1
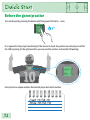
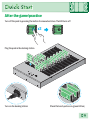
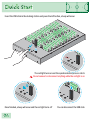
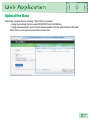
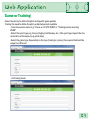
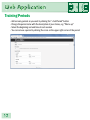
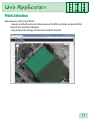
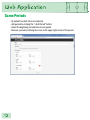
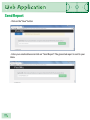
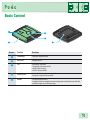
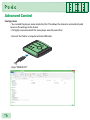
Version A0 August 2015
IIndex
Index
Quick Start...................................................................02
Before the game/ practice..........................................................................................................02
After the game/practice..............................................................................................................03
Clear the data...............................................................................................................................05
Web Application..........................................................06
Create a New Game.....................................................................................................................06
Upload the Data...........................................................................................................................07
Game or Training..........................................................................................................................09
Training Periods............................................................................................................................10
Pitch Selection...............................................................................................................................11
Game Periods................................................................................................................................12
Players Name................................................................................................................................13
Send Report...................................................................................................................................14
Pods.............................................................................15
Basic Control.................................................................................................................................15
Advanced Control.........................................................................................................................16
Docking Station............................................................18
Control...................................................................................................................................18
Basic Command List....................................................................................................................20
Advanced Command list.............................................................................................................22
01
01
Quickk Start
Start
Quick
Before the game/practice
Turn on the pod by pressing the button until the green LED starts (~ 1 sec.)
01
1”
It is required for the proper functioning of the device to check the position on each player and that
the LED is pulsing (In the right possition you can read the number and see the LED pulsing)
01
Each pod has a unique number. Note which player has which number
Lionel #10 Pod #01
Julien #05 Pod #02
02
02
Quickk Start
Start
Quick
After the game/practice
Turn-off the pods by pressing the button 3 consecutive times. The LED turns off
01
x3
01
Plug the pods in the docking station
Turn-on the docking station
Check that each pod are on (green LED on)
03
03
Quickk Start
Start
Quick
Insert the USB stick in the docking station and press the left button, a beep will occur
The red light turns on and the synchronization process starts
Do not connect or disconnect anything while the red light is on
Once finished, a beep will occur and the red light turns off
00444
004
You can disconnect the USB stick
Quickk Start
Start
Quick
Clear the data
It is recommended to clear the data once the information is recovered
Power up the docking station
2”
Once the blue LED is on, press the two buttons simultaneously for 2 sec
30”
The operation takes ~30 sec. Once finished, it emits a “bip” and the blue LED turns on
00055
05
Web Application
Application
Web
pp i tion
Create a New Game
Go to URL : http://upload.fieldwiz.com (or the URL dedicated to your team, ex:
http://myteam.fieldwiz.com)
- Enter your team’s name
- Enter the date and the start time of the data you want to analyze
06
06
Web Application
Application
Web
pp i tion
Upload the Data
Select the recoded data by clicking “Select file(s) to upload”
- Using the docking station: select DATA.FWT from the USB Key
- Using individual pods: select the data downloaded from the pod with the USB cable
Note that you can upload several files at one time
07
07
Web Application
Application
Web
pp i tion
- Click on Send
- Once uploaded, click on Next
0888
08
Web Application
Application
Web
pp i tion
Game or Training
Game: Necessary to define the pitch and specific game periods
Training: No need to define the pitch, unlimited periods available
- Enter the session name. E.g. “Game vs. FC XYZ 20.06” or “Training session morning
20.06”
-Select the sport type (e.g. Soccer, Rugby, Field Hockey, etc.). The sport type impact the characteristics of the output (e.g. pitch draw)
-Select the game type. Depending on the type (training or game), the required field and the
output are different
- On Training mode.
09
09
Web Application
Application
Web
pp i tion
Training Periods
- Add as many periods as you want by clicking the “+ Add Period” button
- Change the period name with the description of your choice, e.g. “Warm-up”
- Select the beginning and end time of each session
- You can remove a period by clicking the cross on the upper right corner of the period
10
10
Web Application
Application
Web
pp i tion
Pitch Selection
Step necessary only for type “Game”
- A square is defined by default on the area where the GPS coordinates are located at the
selected time and date of the game
- Drag and drop the red flags on the corners to define the pitch
11
11
Web Application
Application
Web
pp i tion
Game Periods
- By default: two half-times are selected
- Add periods by clicking the “+ Add Period” button
- Select the beginning and end time of each period
- Remove a period by clicking the cross on the upper right corner of the period
12
12
Web Application
Application
Web
pp i tion
Players Name
- Recognized devices on the uploaded file are automatically selected
- For each device, add the player’s first and/or last name
- Define the player’s role (not mandatory), e.g. “Midfielder”
- Define the played period by dragging the time cursor
- Select if the player played by ticking the check box. By default the player is marked as
“Played”
- Add a player by clicking the “+ Add Player” button
- Remove a player by clicking the cross on the upper right corner of the period
- Sort the player by the device number using the “Sort” button
Note: It is possible to define the Player’s name and role directly on the device. Once defi
ned, the related fields are automatically filled. Please refer to the pod configuration section
13
13
Web Application
Application
Web
pp i tion
Send Report
- Click on the “Save” button
- Enter your email address and click on “Send Report”. The generated report is sent to your
Inbox
114
14
144
Podss
Basic Control
1
3
4
2
5
Function
Description
1
Pod Number
· Help you to recognize each pod
2
Micro USB
· Multipurpose jack
3
LED
· Slow pulsing = Search GPS
· Fast pulsing = Connected to the GPS
· LED ON = Device in charge
· LED OFF = Device turned OFF
4
Switch ON-OFF
· Press and hold for about 1” to turn the device ON
· Short press 3 times to turn the device OFF
5
Battery
· The battery last up to 10 hours
· Charging is done by connecting the pods to the docking station or individually using a USB cable
· When the charge is over, the LED start pulsing
Number
11115555
15
Podss
Advanced Control
Configuration
- You can add the players name inside the Pod. This allows the device to automatically add
name on the web app in the future
- It’s highly recommended if the same player uses the same Pod
- Connect the Pod to a computer with an USB cable
- Open “CONFIG.TXT”
16
16
Podss
- Add your name and your position (no special character (&, ç, é, etc…), Limited to 40 character)
- Save and exit
Divers Information
- You may encounter the following error message
- Click scan and fix if this append
17
17
Docking Stationn
Control
7
4
5
2
3
1
18
18
188
6
8
Docking Stationn
Function
Description
1
Power Switch
· Docking ON/OFF
2
Left Button
· Start Synchronize
· Simultaneously with the Right Button to Clean or Update the Pods or Update Docking Station
3
Right Button
· Start Data Recuperation
· Simultaneously with the Left Button to Clean or Update the Pods or Update Docking Station
4
Red LED
· ON: Docking busy / operation in progress
- Don’t connect or disconnect anything
- Don’t shutdown the docking
· OFF: Docking in idle state
· Simultaneously with other LEDs
- ON : Firmware update in progress
- Blinking : System error
5
Green LED
· ON: Pod synchronization in progress
· Blinking : Copy to USB drive
· Simultaneously with other LEDs
- ON : Firmware update in progress
- Blinking : System error
6
Blue LED
· ON : Docking powered
- Waiting order
- You can connect or disconnect the Pods
- You can shut down the Docking
· OFF : Docking unpowered
· Simultaneously with other LEDs
- ON : Firmware update in progress
- Blinking : System error
7
Pod Slot
· Connects the Pods to the Docking Station
8
USB
· To connect to an USB Stick
Number
11 9
19
Docking Stationn
Basic Command List
Synchronization
- Read every FieldWiz connected
- Automatically start to copy the data. If a USB stick is present, the data is copied to the USB
stick. If no USB stick is present, the data is copied to the docking internal storage
Connect all Pods
Connect an USB stick
Click on the left button
Wait until the red light turns off
Data Recuperation (optional)
- Copy the data from the Docking internal storage to the USB stick if the USB stick was not
inserted at the time of synchronization
- The synchronization must be completed before loading the data
Connect an USB stick
200
20
Click on the right button
Wait until the red light turns off
(up to 5 minutes)
Docking Stationn
Clear Pods
- Clear all data on the Pod, it’s recommended to do this operation after the report creation
- Warning, the operation is irreversible
Connect all Pods
Press on the two buttons
simultaneously
Wait until the red light turns off
21
21
Docking Stationn
Advanced command list
Update the Pod
- Update the Pod
- Check the version of your pod in the file “CONFIG.TXT”
Connect all Pods
Turn off the Docking
Copy the “update.hex” file
on the USB stick
Hold the two buttons
simultaneously
22
22
Wait until all pod are shutdown
( ~10sec)
Connect the USB stick
Turn on the Docking
Release the button when
the red light is on
Docking Stationn
Wait until the red light turns off
Turn off the Docking
Turn on the Docking
Wait until all pod are shutdown
( ~10sec)
The Pods take ~5 – 10 sec to start
Update the Docking
- Update the docking with the last version
Turn off the Docking
Copy the “firmware.hex”
file on the USB stick
Connect the USB stick
23
23
Docking Stationn
Hold the two buttons
simultaneously
Turn on the Docking
Wait until the red light turns off
24
24
224
Release the button when
the red light is on
www.fieldwiz.com