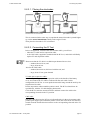
1
R.Test Evolution
R.Test Evolution II
R.Test Evolution 3
User Manual
English
NOVACOR S.A.
4 passage Saint-Antoine
92508 Rueil-Malmaison Cedex - France
R.Test Evolution Manual ©2001-2004 NOVACOR SA. – All rights reserved.
RT User Manual 6 GB – 14 May 2004
page 1
RT User Manual 6 GB – 14 May 2004
page 2
R.TEST EVOLUTION
Contents
R.Test Evolution
R.Test Evolution II
R.Test Evolution 3
1.
INTRODUCTION...................................................................................................... 9
2.
GUARANTEE .......................................................................................................... 11
3.
OPERATION ........................................................................................................... 13
4.
DESCRIPTION OF THE EQUIPMENT .............................................................. 25
5.
CONNECTING THE PATIENT............................................................................ 31
6.
HOW THE UNIT WORKS..................................................................................... 39
7.
PATIENT INSTRUCTION..................................................................................... 43
8.
DOWNLOADING THE RESULTS ....................................................................... 47
9.
TELEPHONIC TRANSMISSION ......................................................................... 53
10.
MODEM TRANSMISSION ............................................................................... 57
11.
E-MAIL TRANSMISSION ................................................................................ 67
12.
MAINTENANCE................................................................................................. 71
RT User Manual 6 GB – 14 May 2004
page 3
R.TEST EVOLUTION
Contents
Summary
1.
INTRODUCTION...................................................................................................... 9
1.1.
ABOUT THIS MANUAL ......................................................................................... 10
1.1.1.
Generalities .............................................................................................. 10
1.2.
REMOTE USERS................................................................................................... 10
1.2.1.1.
1.2.1.2.
2.
GUARANTEE .......................................................................................................... 11
2.1.
2.2.
2.3.
2.4.
2.5.
2.6.
3.
Results sent by modem .................................................................................... 10
Results sent by e-mail ...................................................................................... 10
SPECIFIC GUARANTEES CONCERNING UNITS ....................................................... 12
SPECIFIC GUARANTEES CONCERNING ACCESSORIES ........................................... 12
RESTRICTIONS OF THE GUARANTEE .................................................................... 12
RESPONSIBILITIES .............................................................................................. 12
UPGRADES ......................................................................................................... 12
COPYRIGHTS ...................................................................................................... 12
OPERATION ........................................................................................................... 13
3.1.
COLLECTING THE ECG SIGNAL .......................................................................... 14
3.2.
RECORDING MODES ............................................................................................ 15
3.2.1.
Manual recording..................................................................................... 15
3.2.2.
Automatic recording................................................................................. 15
3.2.3.
Real Time Transmission ........................................................................... 15
3.3.
MANUAL RECORDING ........................................................................................ 16
3.4.
AUTOMATIC RECORDING ................................................................................... 16
3.4.1.
Filtering external noise ............................................................................ 16
3.5.
AUTOMATIC ANALYSIS OF THE ECG .................................................................. 17
3.5.1.
Basal heart rate ........................................................................................ 17
3.5.2.
Memorisation of the heart rate................................................................. 17
3.5.3.
Detection of arrhythmias .......................................................................... 18
3.5.3.1.
3.5.3.2.
3.5.3.3.
3.5.3.4.
Rapid arrhythmias (premature QRS complexes and runs) ............................... 18
Absolute pauses ............................................................................................... 18
Relative pauses................................................................................................. 18
Bradycardias .................................................................................................... 18
3.5.4.
Definitions: ............................................................................................... 19
3.6.
ST SEGMENT ANALYSIS ...................................................................................... 19
3.6.1.
Base line ................................................................................................... 20
3.6.2.
The beginning of the ST segment.............................................................. 20
3.6.3.
The ST segment......................................................................................... 20
3.6.4.
Measurement of the ST shift ..................................................................... 20
3.6.5.
Detection criteria...................................................................................... 20
3.7.
CONSECUTIVE EVENTS ....................................................................................... 21
3.7.1.
Single events:............................................................................................ 21
3.7.2.
Chained events: ........................................................................................ 21
3.7.3.
Multiple events: ........................................................................................ 22
3.8.
MEMORISATION OF EVENTS ................................................................................ 22
3.9.
USING THE R.TEST EVOLUTION WITHOUT A COMPUTER ..................................... 23
4.
DESCRIPTION OF THE EQUIPMENT .............................................................. 25
4.1.
THE R.TEST EVOLUTION RECORDER .................................................................. 26
4.2.
CONNECTION...................................................................................................... 27
4.2.1.
The Decotest ............................................................................................. 27
4.2.2.
Description of the Decotest ...................................................................... 28
4.2.3.
Changing the Decotest batteries............................................................... 28
4.2.4.
The R.Test – PC cable .............................................................................. 29
4.3.
R.TEST EVOLUTION ACCESSORIES...................................................................... 30
RT User Manual 6 GB – 14 May 2004
page 4
R.TEST EVOLUTION
5.
Contents
CONNECTING THE PATIENT............................................................................ 31
5.1.
ORDER OF CONNECTION ..................................................................................... 32
5.2.
CHOICE OF LEAD ................................................................................................ 32
5.2.1.
“Neck-Sternum” configuration ................................................................ 32
5.2.2.
CM5 configuration ................................................................................... 32
5.3.
INSERTING NEW BATTERIES ................................................................................ 32
5.4.
INITIALISING THE UNIT ....................................................................................... 33
5.4.1.
With a computer: ...................................................................................... 33
5.4.2.
Manually: ................................................................................................. 33
5.5.
CONNECTING THE PATIENT CABLE TO THE R.TEST ............................................ 34
5.6.
PLACING THE ELECTRODES AND CONNECTING THE R.TEST ................................ 34
5.6.1.
Preparation .............................................................................................. 34
5.6.2.
“Neck-Sternum” configuration with solid gel electrodes .................... 35
5.6.2.1.
5.6.2.2.
5.6.3.
Connecting the sternal electrode ...................................................................... 35
Connecting the cervical electrode .................................................................... 36
CM5 configuration with solid gel electrodes............................................ 36
5.6.3.1.
5.6.3.2.
5.6.4.
6.
Placing the electrodes....................................................................................... 37
Connecting the R.Test...................................................................................... 37
Configuration with metal electrodes ........................................................ 38
HOW THE UNIT WORKS..................................................................................... 39
6.1.
START UP AND START UP TEST IN THE CONTINUOUS MODE ................................. 40
6.1.1.
Start up in the continuous mode ............................................................... 40
6.1.2.
Visualisation of the test signal.................................................................. 40
6.1.2.1.
6.1.3.
6.2.
7.
Visualisation on an electrocardiograph ............................................................ 41
Disconnection test .................................................................................... 41
START UP AND START UP TEST IN THE DISCONTINUOUS MODE ........................ 42
PATIENT INSTRUCTION..................................................................................... 43
7.1.
GENERAL COMMENTS......................................................................................... 44
7.2.
ACTIVATING A MANUAL RECORDING.................................................................. 44
7.2.1.
R.Test Evolution with solid gel electrodes................................................ 44
7.2.2.
R.Test Evolution with metal electrodes .................................................... 44
7.3.
REMOVING THE R.TEST EVOLUTION .................................................................. 45
7.4.
FAULTY ELECTRODE CONNECTION ..................................................................... 45
8.
DOWNLOADING THE RESULTS ....................................................................... 47
8.1.
REMOVING THE R.TEST ...................................................................................... 48
8.1.1.
End of recording....................................................................................... 48
8.1.2.
Temporary interruption of recording ....................................................... 48
8.1.2.1.
Disconnecting the electrodes............................................................................ 48
8.1.3.
Unplugging cable from R.Test.................................................................. 48
8.2.
CONNECTION TO A COMPUTER ........................................................................... 49
8.2.1.
Using the direct cable (RS232 only)......................................................... 49
8.2.1.1.
8.2.1.2.
Connecting the R.Test PC cable....................................................................... 49
Disconnecting the R.Test PC cable .................................................................. 49
8.2.2.
Using the Decotest.................................................................................... 50
8.2.3.
Transfer of data to a computer................................................................. 50
8.3.
TRANSFER TO AN ELECTROCARDIOGRAPH .......................................................... 51
8.3.1.
Connection: .............................................................................................. 51
8.3.2.
Acoustic transfer: ..................................................................................... 51
8.3.3.
Order of transfer....................................................................................... 52
9.
TELEPHONIC TRANSMISSION ......................................................................... 53
9.1.
9.2.
9.3.
HOW THE TELEPHONIC TRANSMISSION WORKS ................................................... 54
PATIENT ACTION ................................................................................................ 54
PHYSICIAN’S ACTION.......................................................................................... 55
RT User Manual 6 GB – 14 May 2004
page 5
R.TEST EVOLUTION
10.
Contents
MODEM TRANSMISSION ............................................................................... 57
10.1. OPERATION ........................................................................................................ 58
10.2. EQUIPMENT ........................................................................................................ 59
10.2.1.
The recorder ............................................................................................. 59
10.2.2.
The modems.............................................................................................. 60
10.2.2.1.
10.2.2.2.
“Receiver” Modem...................................................................................... 60
“Remote user” Modem................................................................................ 60
10.2.3.
The software ............................................................................................. 60
10.2.4.
The R.Test Modem cable .......................................................................... 60
10.3. REMOTE USER PARTICIPATION............................................................................ 61
10.3.1.
What the remote user has to do ................................................................ 61
10.3.2.
Modem connection.................................................................................... 61
10.3.2.1.
10.3.2.2.
10.3.3.
Telephone connection ................................................................................. 61
Mains connection ........................................................................................ 62
Removing the R.Test ................................................................................. 62
10.3.3.1.
10.3.3.2.
10.3.3.3.
10.3.4.
10.3.5.
End of recording.......................................................................................... 62
Temporary interruption of recording........................................................... 62
Disconnecting the R.Test cable ................................................................... 63
Connecting the R.Test to the modem cable............................................... 63
Transfer of recordings.............................................................................. 64
10.3.5.1.
10.3.5.2.
10.3.5.3.
10.3.5.4.
11.
Disconnecting the R.Test Modem cable...................................................... 64
Turning off the modem ............................................................................... 65
Continuation of monitoring ......................................................................... 65
Replacing the R.Test on the patient............................................................. 65
E-MAIL TRANSMISSION ................................................................................ 67
11.1. OPERATION ........................................................................................................ 68
11.2. THE NOVADRIVE AND NOVAMAIL SOFTWARE .................................................. 68
11.3. THE R.TEST – PC CONNECTION CABLE .............................................................. 68
11.4. REMOVING THE R.TEST ...................................................................................... 69
11.4.1.
End of recording....................................................................................... 69
11.4.2.
Temporary interruption of recording ....................................................... 69
11.4.2.1.
Disconnecting the electrodes....................................................................... 69
11.4.3.
Unplugging cable from R.Test.................................................................. 69
11.5. CONNECTING THE R.TEST TO THE R.TEST-PC CABLE ........................................ 70
11.6. DISCONNECTING THE R.TEST-PC CABLE ........................................................... 70
12.
MAINTENANCE................................................................................................. 71
12.1.
12.2.
12.3.
12.4.
12.5.
12.6.
12.7.
12.8.
12.9.
12.10.
12.11.
HANDLING THE EQUIPMENT ............................................................................... 71
CLEANING THE EQUIPMENT ................................................................................ 71
REPLACING THE BACK-UP BATTERY. .................................................................. 71
STORAGE AND DISPATCHING .............................................................................. 71
USER PRECAUTIONS ........................................................................................... 72
MAINTENANCE ................................................................................................... 72
PREVENTIVE MAINTENANCE ............................................................................... 72
NORMS AND SAFETY STANDARDS ....................................................................... 74
TECHNICAL DATA ............................................................................................... 75
SPECIFICATIONS ............................................................................................. 75
ACCESSORIES AND CONSUMABLES................................................................. 76
RT User Manual 6 GB – 14 May 2004
page 6
R.TEST EVOLUTION
RT User Manual 6 GB – 14 May 2004
Contents
page 7
R.TEST EVOLUTION
RT User Manual 6 GB – 14 May 2004
Contents
page 8
R.TEST EVOLUTION
Introduction
1. Introduction
The R.Test Evolution and the R.Test Evolution II and 3
are miniature ECG event recorders, quick and easy to
place on the patient. They store the most important
pathologic events (symptomatic or silent) as well as the
patient’s continuous heart rate, and is capable of up to
eight days ambulatory recording.
The system consists of a unit weighing about 40 grams
and a lightweight neck cable which can be worn by the
patient unobtrusively and without any discomfort. The
R.Test Evolution is connected to the patient by a
system of electrodes and a neck cable.
Events stored by the R.Test Evolution are then
transferred for interpretation :
- either by a decoder, the Decotest, to an
electrocardiograph (or an ECG monitor) or to a
computer,
- or by cable directly to a computer.
This transfer is generally done at the physician’s
surgery at the following visit.
It can also be
teletransferred by phone or e-mail (or by modem for
the R.Test Evolution II or 3), either from the patient’s
home, or from the office of a physician working in
connection with an interpretation centre.
The R.Test Evolution can also transmit real time ECG
recordings by telephone; and after reading or
transmission the R.Test Evolution can continue
recording any further pathological events which may
occur on the same patient.
Using a computer enables you to:
- define the conditions and criteria of the
recordings to be made by the R.Test Evolution,
- to select, organise and store the results of a
procedure, and to print them in customized
reports.
RT User Manual 6 GB – 14 May 2004
page 9
R.TEST EVOLUTION
Introduction
1.1. About this manual
1.1.1. Generalities
This manual concerns R.Test Evolution all models, inclusive R.Test Evolution 3. It
describes the way they work and the way to use them. It also contains technical
data and indicates when particular attention is required.
Especially, all specific precautions and safety norms are indicated in chapter 12.
Although it has been redacted very carefully, NOVACOR accepts no responsibility
for any errors or inaccuracies which may be found in this manual.
NOVACOR may change the functions of the devices or their accessories without
prior notice.
1.2. Remote users
This manual is obviously made for the use of the main R.Test user, who is
generally unique.
In some cases, units are managed by users who, in collaboration with another
centre, deal with fitting and removing the R.Test but do not interpret the recordings
carried out. These ‘remote users’ transfer then patients’ data to the interpretation
centre either by modem or by e-mail.
The practical details of such operations are given in specific chapters which can be
printed separately and given to these remote users.
1.2.1.1. Results sent by modem
Chapter 10.3, pages 61 to 65, can be printed and given to a remote user (physician
or patient) who will have to send results by modem.
1.2.1.2. Results sent by e-mail
Chapter 11, pages 67 to 70, can be printed and given to a remote physician who
will have to send results by e-mail.
RT User Manual 6 GB – 14 May 2004
page 10
R.TEST EVOLUTION
Guarantee
2. Guarantee
NOVACOR undertakes to deliver merchandise
conforming to the technical specifications
mentioned and to replace any merchandise
recognised as being defective during the period of
garantee.
RT User Manual 6 GB – 14 May 2004
page 11
R.TEST EVOLUTION
Guarantee
2.1. Specific guarantees concerning units
NOVACOR guarantees the unit (recorders and Decotest) for the period of one year
from the date of delivery against any defect resulting in an abnormal function of
the unit.
2.2. Specific guarantees concerning accessories
Equipment which is not categorised as a unit, in particular the accessories and
cables, is not covered by the guarantee.
2.3. Restrictions of the guarantee
The guarantee does not apply:
- to units repaired or opened outside our workshop.
- to units damaged by negligence, by accident, or because the instructions in the
user manual have not been correctly followed.
If necessary, contact your distributor or our maintenance service. We do not accept
units which have been returned without prior agreement.
2.4. Responsibilities
NOVACOR will not, under any circumstances, be held responsible for physical or
material damage of whatever nature, resulting either directly or indirectly from
improper use of the unit or from failure to follow the instructions in the user
manual.
Although NOVACOR manufactures products to the highest standards, justifying
customer confidence, it cannot guarantee or be responsible for the validity or
accuracy of the measurements made with its units.
Therefore, connection of the unit to the patient, interpretation of the ensuing
clinical results and the diagnosis established from them are the entire responsibility
of the physician. No damage, either direct or indirect, resulting from the use of one
of its units can be attributed to NOVACOR, excluding the repair of the unit within
the limits of the guarantee.
2.5. Upgrades
All customers duly registered with NOVACOR or, where applicable, with one of
its distributors, will be kept informed, to the best of NOVACOR’s ability, of any
upgrades to the R.Test Evolution system as they become available.
2.6. Copyrights
Manuel R.Test Evolution 3 ©2004 Novacor S.A. - All rights reserved.
R.Test, Decotest, RTSoft and their respective logos are registered trademarks of
NOVACOR SA.
Windows is a registered trademark of Microsoft Corporation.
RT User Manual 6 GB – 14 May 2004
page 12
R.TEST EVOLUTION
Operation
3. Operation
Le R.Test Evolution is an
- ambulatory,
- automatic or manual,
- single channel,
ECG event recorder, for asymptomatic or
symptomatic patients.
RT User Manual 6 GB – 14 May 2004
page 13
R.TEST EVOLUTION
Operation
3.1. Collecting the ECG signal
The surface ECG signal is recorded with a bipolar lead between two ECG
electrodes specially adapted for the R.Test. The unit is connected directly to one of
the electrodes on the patient’s sternum. The second electrode, which is placed
behind the patient’s neck, is connected to the R.Test by a polyurethane neck-cable
which automatically adapts itself to the patient’s size and shape.
The neck-sternum lead enables an ECG signal to be recorded with:
- a QRS morphology and amplitude comparable to V2,
- significantly different right and left ventricular activations,
- generally optimal P wave amplitude.
However, the physician may prefer to use a different lead to the “neck-sternum”,
such as the CM5 lead, for which there is a specially designed cable.
The CM5 lead may be chosen in the following cases:
- when the amplitude of the “neck-sternum” lead is insufficient,
- when the anatomy of the patient’s sternum makes it impossible to connect the
R.Test properly,
- when the main aim is to record ST changes.
The R.Test stores significant ECG events in its memory.
The physician can pre-program the duration of these events and the mode in which
they will be recorded:
- automatically (for asymptomatic problems), according to recognition criteria
specific to each pathology,
- or by patient activation (pressing the recording key) (for symptomatic or silent
events, whether they be cardiac or not).
RT User Manual 6 GB – 14 May 2004
page 14
R.TEST EVOLUTION
Operation
3.2. Recording modes
The physician can select one, two or all three of the following recording modes,
depending on which software options he has installed:
3.2.1. Manual recording
The ECG is recorded by the R.Test for a pre-determined duration each time the
patient presses the unit’s recording key, but is not analysed or processed.
Each recording includes the ECG immediately preceding and following the event,
the durations of which are programmed by the physician.
3.2.2. Automatic recording
The ECG signal is continuously processed and analysed and the most significant
pathological events are saved in the unit’s memory.
Each recording includes the ECG immediately preceding and following the event,
the durations of which are programmed by the physician.
3.2.3. Real Time Transmission
The ECG only is transmitted in real time in the form of a modulated acoustic signal
to the physician’s surgery or a reception centre.
The reception equipment is, in general, a Decotest linked to an ECG monitor or to
an electrocardiograph.
Real time transmission can be programmed by the physician when he is connecting
the patient, who can then activate it as many times as necessary. After transmission
the R.Test automatically goes back to its pre-programmed mode.
RT User Manual 6 GB – 14 May 2004
page 15
R.TEST EVOLUTION
Operation
3.3. Manual Recording
This mode is designed for symptomatic patients for whom a per-critical ECG
recording is required, even if this symptom only occurs occasionally.
The patient simply has to press the R.Test recording key and the ECG recording
will then be saved in the unit’s memory. This recording is stored, without being
analysed or interpreted, so that the physician can examine it later on.
3.4. Automatic Recording
The R.Test monitors the ECG signal continuously and stores it in a loop memory,
which therefore contains, at any given moment, the previous few minutes of the
ECG recording; this means that a given duration of the ECG preceding a detected
event can be included in the recording. This duration, called the pre-event, can vary
from 5 seconds to four minutes.
3.4.1. Filtering external noise
The difficulty in making an accurate automatic analysis of an ECG recording is
often due to interference caused by different factors which may distort the signal
significantly.
The R.Test and its patient cable possess specialised sensors capable of identifying
most of these noises as they appear and rejecting the invalid part of the signal.
Interference is thus removed, making analysis of the ECG signal much more
efficient.
RT User Manual 6 GB – 14 May 2004
page 16
R.TEST EVOLUTION
Operation
3.5. Automatic analysis of the ECG
The ECG recording is analysed in real time by the R.Test: as the ECG signal is
stored in the loop memory, the R.Test’s microprocessor uses specific software and
algorithms, to automatically carry out the following operations:
- QRS identification and elimination of noise,
- QRS morphology and width measurement,
- R-R interval and basal heart rate calculation,
- continuous memorisation of the heart rate,
- recognition and hourly counting of arrhythmic events,
- memorisation of selected episodes with date and time shown.
3.5.1. Basal heart rate
The reference R-R interval, which corresponds to the basal heart rate, is obtained
by continuous calculation of the average of the last R-R intervals recognised by the
R.Test as being “normal”. The R-R intervals recognised as being “abnormal”, i.e.
periods containing noise, pauses and intervals preceding and following premature
QRS complexes (in order to also eliminate compensatory pauses), are therefore
excluded from the calculation of the mean interval.
By default, this calculation is made from the last 8 R-R intervals recognised as
being “normal”.
Special case of runs: when a run, which is defined as 6 successive premature QRS
complexes, has been identified, its rate becomes the reference rate. This facilitates
identification of the termination of a run by the relative lengthening of the first
“normal” R-R interval which follows.
3.5.2. Memorisation of the heart rate
At regular intervals, the R.Test stores 3 values, enabling assessment of the patient’s
heart rate trend to be made: mean rate, maximum rate* and minimum rate.
The duration of this interval is chosen according to the length of time that the
patient will be connected to the unit.
In addition to recording pathological events, the R.Test therefore also provides the
physician with continuous monitoring of the mean, maximum and minimum heart
rates for a period of up to eight days.
* maximum basal heart rate defined above.
RT User Manual 6 GB – 14 May 2004
page 17
R.TEST EVOLUTION
Operation
3.5.3. Detection of arrhythmias
Arrhythmias detected by the R.Test are classified in the following categories.
3.5.3.1. Rapid arrhythmias (premature QRS complexes and
runs)
A QRS complex is considered to be premature if the R-R interval preceding it is
shorter by a given proportion (standard program 25 %) than the reference interval
(mean rate).
The R.Test classifies QRS complexes according to:
- their width:
“Narrow” premature QRS complexes (QRS less than 120 ms)
“Wide” premature QRS complexes (QRS 120 ms or more)
- their organisation:
Isolated QRS complexes
Multiples (2 to 5 consecutive premature QRS complexes)
Runs (6 or more consecutive premature QRS complexes).
This form of identification enables the R.Test to distinguish six sub-groups of rapid
events:
- Isolated premature “narrow” QRS complexes
- “Narrow” multiples
- “Narrow” runs
- Isolated premature “wide” QRS complexes
- “Wide” multiples
- “Wide” runs
3.5.3.2. Absolute pauses
These are characterised by an R-R interval exceeding a certain duration (standard
program 2.0 seconds), irrespective of the QRS morphology, whether or not this RR interval is consecutive to a premature QRS complex.
3.5.3.3. Relative pauses
These are characterised by an R-R interval exceeding a given percentage of the
mean reference R-R interval (standard program 175%), providing that it does not
follow a premature QRS complex, and that its duration is shorter than the absolute
pause threshold.
3.5.3.4. Bradycardias
These are characterised by a reference heart rate lower than the pre-defined
threshold (standard program 50 bpm).
RT User Manual 6 GB – 14 May 2004
page 18
R.TEST EVOLUTION
Operation
3.5.4. Definitions:
Type of event
Premature QRS
complexes and runs
(narrow or wide)
Narrow QRS
Wide QRS
Relative Pause
Absolute Pause
Bradycardia
Manual recording
Definition
detection threshold
(standard program)
- 25 %
RR < mean RR
Normal QRS complexes; supraventricular;
ventricular in some cases.
Ventricular or pathological QRS
QRS < 120 ms
R-R interval exceeding a given percentage
of the mean reference R-R interval.
R-R interval exceeding a given duration
RR > 175% x mean RR
Reference heart rate lower than predefined threshold
The R.Test record button is pressed
QRS = or > 120 ms
RR > 2.0 sec
Mean FC < 50 min-1
3.6. ST segment analysis
The ST segment is characterised by:
- its slope: with reference to the beginning of the segment (J point), this may be
ascending (+), zero (0), or descending (-).This is expressed as millivolts per
second (mV/s).
- its shift in relation to the base line: this can be positive (elevation), or negative
(depression). It is measured in millimetres (mm), the ordinate scale being
1 mV/cm.
location of measurement points
RT User Manual 6 GB – 14 May 2004
page 19
R.TEST EVOLUTION
Operation
3.6.1. Base line
The base line, or the iso-electric line, represents the electric level of the ECG signal
after a diastole and before the next systole. The R.Test uses a point on the base line
20 ms before each QRS complex as the reference level for the ST shift.
3.6.2. The beginning of the ST segment
The beginning of the ST segment (J point) is identified by the R.Test on the ECG
signal 10 ms after the end of the QRS complex being analysed.
3.6.3. The ST segment
The ST segment used for measuring the slope, connects the J point to an ST point
situated 60 ms later on the ECG signal.
3.6.4. Measurement of the ST shift
The ST shift is measured at the M point situated 30 ms after the J point of the ECG
signal.
Example of ST shift
3.6.5. Detection criteria
An ST change can be recorded by the R.Test if the shift is greater than the preprogrammed threshold value and slope is less than the pre-programmed threshold
value for 30 seconds.
To construct histograms, the R.Test calculates the mean ST shift and slope for each
group of 30 QRS complexes, and retains the highest shift observed every 16
minutes.
RT User Manual 6 GB – 14 May 2004
page 20
R.TEST EVOLUTION
Operation
3.7. Consecutive events
3.7.1. Single events:
Single events
In general, two consecutive events detected by the R.Test are sufficiently far apart
from one another for their recordings to be separate. These two events are therefore
two single events.
3.7.2. Chained events:
Chained events
Two consecutive events will be “chained” if the interval separating them is less
than the duration of the “post-event of the first + pre-event of the second”, and the
second event occurs after the post-event of the first. They will be classified
normally in their specific categories and in addition identified as “links” n° 1 and
n° 2 of chain n° x.
The recording of the second event will have the pre-defined “pre-event + postevent” duration of its category, but it will start after the end of the post-event
duration of the first.
Note that the following event may also be added to the chain if it fulfils the above
criteria, as there is no restriction to the length of a chain. It will then be recorded in its
own category and identified as “link” n° 3 of chain n° x.
RT User Manual 6 GB – 14 May 2004
page 21
R.TEST EVOLUTION
Operation
3.7.3. Multiple events:
Multiple events
When two consecutive events are such that the second occurs within the post-event
of the first, the second will not be recorded separately.
However, when the second event is an absolute pause, or a run (i.e. at least 6
consecutive premature QRS complexes), worse than the previously memorised
worst absolute pause (or run), the recording of this double event will be attributed
to the special “multiple event” register.
3.8. Memorisation of events
When the R.Test is programmed, the total duration of its memory is divided up
between the different types of pathologies.
The number of events of each type which can be memorised by the R.Test depends
on:
- the size of the memory allocated to that type of event and
- the duration of the recording period chosen for each episode (pre-event + postevent).
In addition to this, each time an event corresponding to one of the pre-defined
pathologies is identified:
- the event counter for this type of pathology in the hour interval is incremented by
1 in the corresponding hour segment, and
- the severity of the event is measured for pauses, according to their duration for
premature complexes, according to their number and for bradycardias and runs,
according to their rate.
The R.Test only stores the most severe events detected in its memory:
When the memory allocated to a pathology is saturated, the R.Test will only
memorise a new event of the same type if it is more pronounced than the least
severe event already memorised. The new event will then replace the previous least
severe event in the memory.
RT User Manual 6 GB – 14 May 2004
page 22
R.TEST EVOLUTION
Operation
This rule does not apply to multiple events, which, once memorised, cannot be
replaced.
It should also be noted that manually recorded events cannot be replaced when the
memory allocated to them is saturated: once this memory is full the manual
recording key is inoperative.
During the whole time it is connected to the patient, the R.Test also memorises,
hour by hour, the total number of events detected for each pathology, whether they
are memorised or not. This enables tables or event histograms by pathology to be
established for the whole monitoring period.
3.9. Using the R.Test Evolution without a computer
In such basic version, the automatic mode is not available, and so only manual
recordings can be made.
The R.Test memory is restricted to 5 minutes, enabling 10 manual recordings of 30
seconds each to be made.
During its test phase (explained in § 6), the R.Test automatically identifies the
electrode configuration used by measuring the impedance between them. If it
identifies solid gel electrodes, i.e. a permanent electric connection, the recordings
will have a pre-event duration of 20 seconds and a post-event duration of 10
seconds; otherwise the 30 second recording will be attributed to the post-event
duration, i.e. from the moment the patient sets off the recording.
Once the physician has transferred the recordings to his electrocardiograph, he can
then delete the contents of the memory by pressing the initialisation push-button.
RT User Manual 6 GB – 14 May 2004
page 23
R.TEST EVOLUTION
RT User Manual 6 GB – 14 May 2004
Operation
page 24
R.TEST EVOLUTION
Equipment
4. Description of the equipment
For optimum use under all circumstances, the
R.Test Evolution uses various different
accessories:
- connection to a computer only, or to a computer
and/or an electrocardiograph,
- programming and reading in the same place, or,
for example, programming in one practice and
reading in another,
- teletransmission of data or not,
- for teletransmission of data, choice of :
- telephone,
- e-mail,
- or modem for the R.Test Evolution II and 3.
RT User Manual 6 GB – 14 May 2004
page 25
R.TEST EVOLUTION
Equipment
4.1. The R.Test Evolution recorder
Before R.Test Evolution 3:
Connector
Memory transmission
key
Real time
transmission key
Start / manual recording
key
Manual initialization
push-button
Battery cover lock
(substituted with a clip on R.Test 3)
R.Test 3 :
battery cover locking
clip
RT User Manual 6 GB – 14 May 2004
page 26
R.TEST EVOLUTION
Equipment
4.2. Connection
4.2.1. The Decotest
!
"
#
$
RS232 Connector (output to computer)
ECG Connectors (output to electrocardiograph)
Rubber cradle
Off/On light
(connection to a electrocardiograph), or
Communication light
(connection to a computer)
% Socket for connection to R.Test
& Microphone for acoustic reception and start up test
RT User Manual 6 GB – 14 May 2004
page 27
R.TEST EVOLUTION
Equipment
4.2.2. Description of the Decotest
The Decotest enables the recorder to communicate with a computer, an
electrocardiograph, or an ECG monitor. On the front plate there are hatches for
connecting the R.Test, a luminous button, and a rubber cradle for acoustic
transmissions.
The following connectors are located on the back plate:
- Four standard connectors for the patient cable of an electrocardiograph. Each
connector is identified by a colour, and the same colour banana plug of the
patient cable is inserted into it.
- A computer connector DB9 type for using the R.Test with RTSoft software, with
the cable provided.
- A lateral connector allowing the Decotest to be plugged into an external power
supply (6 V DC), such as a mains supply charger, instead of using batteries.
The luminous button is used for starting and stopping the Decotest only when it is
used with an electrocardiograph or an ECG monitor.
When the Decotest is connected to a computer this button is inactive, as the
software starts up the Decotest automatically. It therefore only lights up during
transfers.
4.2.3. Changing the Decotest batteries
When the batteries start running down,
the luminous button will start to blink.
The batteries should be changed
immediately.
To do this, open the battery cover under
the Decotest, and insert four R6 (AA)
batteries, taking care not to invert the
polarities.
RT User Manual 6 GB – 14 May 2004
page 28
R.TEST EVOLUTION
Equipment
4.2.4. The R.Test – PC cable
R.Test – PC cable
The Decotest is not always necessary for connecting the R.Test to a computer: the
direct connection cable (ref ACC-0158-01) can be used with most computers.
The Decotest is necessary however for:
- a start up test on the screen,
- connecting the R.Test to an electrocardiograph,
- computers that are not compatible with the cable.
RT User Manual 6 GB – 14 May 2004
page 29
R.TEST EVOLUTION
Equipment
4.3. R.Test Evolution accessories
1- Neck cable
(tous modèles).
2- V5 cable
(30 ou 60 cm)
(RTE et RT II).
3- Suspension cable
(RTE et RT II).
Nota :
[2] et [3] are
progressively
replaced by [7].
4- Solid gel
electrodes
5- Adhesive patches
for electrodes
6- Metal electrodes
[7]
RT User Manual 6 GB – 14 May 2004
7- CM5 cable for
R.Test 3
(standard 40 cm
or long 57 cm)
usable with all
models in place
of n° [2] and [3].
page 30
R.TEST EVOLUTION
Connecting the patient
5. Connecting the patient
The R.Test Evolution is usually connected to the
patient, using solid gel electrodes, with the “NeckSternum” lead, although another lead (such as
CM5) can be preferred.
If the physician only wants to obtain manual
recordings with no pre-event duration, the unit
can be worn “loose” around the patient’s neck. In
this case, the patient holds the R.Test Evolution,
through his clothes, against his skin during the
recording.
The patient is connected as described below for
standard cases (solid gel electrodes). For manual
recordings with no pre-event duration, the metal
electrodes supplied with the unit are used instead
of solid gel electrodes, and generally the NeckSternum lead is used, although occasionally the
Neck-V5 lead will be preferred. Other differences
are specified where applicable.
RT User Manual 6 GB – 14 May 2004
page 31
R.TEST EVOLUTION
Connecting the patient
5.1. Order of connection
- Choice of lead
- Inserting new batteries
- Initialising the unit
- Connecting the patient cable to the R.Test
- Placing the solid gel electrodes on the patient and connecting the R.Test
- Start up and start up test
5.2. Choice of lead
5.2.1. “Neck-Sternum” configuration
This lead, which gives very good quality ECG signal, especially generally with
clear P waves, requires the use of the “Neck-Sternum” patient cable (ref ACC0105-00).
It must be chosen to perform manual only recordings (discontinuous mode), with
metal electrodes, on symptomatic patients (see § 5.6.4 p 38).
5.2.2. CM5 configuration
In some cases the “Neck-Sternum” lead will not be chosen, particularly if the QRS
amplitude is inadequate.
A preliminary decision can be made by examining the surface ECG:
If the peak-to-peak amplitude of the QRS in V2 is less than 1 mV, it is best not to
use the “Neck-Sternum” lead, and to choose, for example, the CM5 lead instead.
The CM5 lead may also be used for analysis of ST segment changes, or if there are
problems with the patient’s sternum.
CM5 is the standard lead with R.Test 3 unit.
5.3. Inserting new batteries
If the batteries are flat, they should be replaced just before the R.Test is initialised
for a new patient so that it can function for the longest possible time.
The special R.Test batteries enable the unit to function for more than a week in the
automatic detection mode, with all its options activated.
Make sure that the new batteries have been inserted before initialising the unit.
Taking the batteries out afterwards:
- before start up of the R.Test will freeze the clock as long as the batteries remain
removed,
- after start up of the R.Test switches the unit into the Safeguard mode and blocks
it from functioning until it has been reinitialised.
RT User Manual 6 GB – 14 May 2004
page 32
R.TEST EVOLUTION
Connecting the patient
- Lift the handle and turn it a ¼ of the way round in either direction (RTE and RT
II), or unlock battery cover (R.Test 3).
- Take the old batteries out by turning the unit over.
- Take the adhesive strip off the new batteries.
- Put them in taking care not to invert the polarities. The + side (back of the
batteries) should be pointing upwards.
- Put the battery cover back in place.
- Turn the handle ¼ of the way round to lock the cover back in place, or check that
battery cover is properly locked (R.Test 3).
The R.Test will then go through a 6 second battery check, at the end of which you
will hear a two tone signal.
5.4. Initialising the unit
5.4.1. With a computer:
This consists of programming the R.Test for a new patient (see the Programming
section in the RTSoft software manual).
5.4.2. Manually:
Press the R.Test initialisation push-button with, for example, the tip of a biro, until
the unit emits a series of beeps. This will delete any recordings left in the R.Test
memory.
RT User Manual 6 GB – 14 May 2004
page 33
R.TEST EVOLUTION
Connecting the patient
5.5. Connecting the Patient Cable to the R.Test
When the “Neck-Sternum” lead has been chosen, the neck cable should be
connected to the R.Test before it is placed on the patient, so that the solid gel
electrodes can be correctly placed.
R.Test/cable connection
Make sure that the connector is lined up with the R.Test so that the logos of the
connector and the front plate are visible at the same time.
Guide the connector into the unit until it is locked into position.
5.6. Placing the electrodes and connecting the R.Test
5.6.1. Preparation
Novacor recommends the exclusive use of the specially selected electrodes for
R.Test monitoring, which are supplied in sealed pouches.
These electrodes are hypoallergenic (Ag-AgCl) and can normally be worn for
several days without any side effects. However, people with sensitive skin may
have an allergic reaction (rashes, spots, etc.). These reactions will usually disappear
spontaneously after a few days when removing the electrodes.
If the patient’s skin is particularly sensitive, wait until the rash has completely
disappeared before placing electrodes on him again, and take any other precautions
that you consider necessary.
The patient’s skin must be carefully prepared before fitting R.Test electrodes:
shave the area if too much hair, wipe with ether (briefly) if excessive sweating. A
light scrub or shave helps a good contact between the electrode and the skin.
RT User Manual 6 GB – 14 May 2004
page 34
R.TEST EVOLUTION
Connecting the patient
5.6.2. “Neck-Sternum” configuration with solid gel electrodes
Neck-sternum configuration
5.6.2.1. Connecting the sternal electrode
Sternal electrode
Sternal electrode plus adhesive patch
Place the sternal electrode first, on the lower third of the sternum, if possible, or, in
any case, as low as possible (if the patient’s chest is particularly large).
Adhesive patches must be used to make sure that the solid gel electrodes
adhere properly, especially for patients who perspire heavily or who will be
connected to the R.Test for more than 24 hours.
These adhesive patches have been developed so that they can be used both with the
sternal electrode (use centre hole) and with the cervical electrode (use off-centre
hole).
RT User Manual 6 GB – 14 May 2004
page 35
R.TEST EVOLUTION
Connecting the patient
5.6.2.2. Connecting the cervical electrode
Cervical electrode
Cervical electrode plus adhesive patch
Put the R.Test and cable around the patient’s neck, without attaching the unit to the
sternum, and let them hang naturally against the cervico-thoracic spine.
Locate the place where the neck electrode will be applied (round electrode), put it
in place, then stick the adhesive patch over it (popper through the off-centre hole).
Click on the neck electrode and click the R.Test onto the sternal electrode.
5.6.3. CM5 configuration with solid gel electrodes
Avec Neck cable et V5 cable
With new CM5 cable
CM5 configuration
RT User Manual 6 GB – 14 May 2004
page 36
R.TEST EVOLUTION
Connecting the patient
5.6.3.1. Placing the electrodes
Sternal and V5 electrodes
plus adhesive patch
This is connected in the same way except that the sternal electrode is placed higher
up, on the sternal manubrium, ideally at the angle of Louis.
Then place the electrode in V5 as indicated.
5.6.3.2. Connecting the R.Test
In this configuration, instead of the neck-sternum cable, you will use:
- either the V5 cable and its suspension cable,
- or the CM5 cable, supplied in standard with the R.Test 3, and which will finally
replace V5 and suspension cables.
Please note that the V5 cable is available upon demand in two sizes:
- standard, about 30 cm, and
- large, about 60 cm.
Also for the CM5 cable:
- standard, about 40 cm, delivered with the unit, and
- large, about 55 cm, upon demand.
V5 cable plus suspension cable :
Attach the spiral support cable (suspension cable) to the handle of the battery
cover, and connect the V5 cable as indicated for the neck cable. In this
configuration, the R.Test is worn upside down and is hung around the neck by the
suspension neck-cable.
Put the suspension cable around the patient’s neck. The R.Test should now be
upside down, with the V5 cable hanging downwards.
Click the R.Test onto the sternal electrode, and then connect the cable to the
corresponding electrode in the V5 position.
CM5 cable:
Plug the CM5 cable into the R.Test as indicated before for the neck-sternum cable,
put the spiral support part around the patient’s nack, then click the R.Test onto the
sternal electrode and the distant connector to the corresponding electrode in the V5
position.
RT User Manual 6 GB – 14 May 2004
page 37
R.TEST EVOLUTION
Connecting the patient
5.6.4. Configuration with metal electrodes
Connect the neck cable to the R.Test, then click one metal electrode into the neck
cable connector and the other one into the back of the R.Test.
Put the system around the patient’s neck, making sure that the cervical electrode is
correctly applied to the skin.
To make a recording the patient should, either directly or through his clothes:
- hold the R.Test on each side between his thumb and middle finger,
- pull it gently downwards whilst pressing the unit to the skin at the level of the
sternum or, where applicable, at V5 level, so that there is a good electrode-skin
contact,
- set off the recording by pressing the centre key for about 1 second with his index
finger, making sure that the R.Test is held in this position for the whole
recording, which ends with a beep.
RT User Manual 6 GB – 14 May 2004
page 38
R.TEST EVOLUTION
How the unit works
6. How the unit works
When the R.Test ready to start has been connected
to the patient, follow the instructions for the mode
you have chosen (continuous or discontinuous).
RT User Manual 6 GB – 14 May 2004
page 39
R.TEST EVOLUTION
How the unit works
6.1. Start up and start up test in the continuous mode
(solid gel electrodes only)
Continuous mode
(about 8 days – solid gel electrodes only)
The R.Test continuously analyses all QRS. It will record automatically or
manually and recordings contain a pre-event and a post-event duration.
The R.Test goes into the continuous mode automatically when solid gel electrodes
are used. It can, however, if required, be forced into the discontinuous mode even if
solid gel electrodes are used.
6.1.1. Start up in the continuous mode
- Press the centre key of the unit to start.
- The R.Test will emit a continuous audible signal for 6 seconds,
- then emit a signal modulated by the patient’s ECG for 20 seconds enabling any
problems in the ECG detection to be picked up immediately. If necessary use the
Decotest to carry out a more detailed test (described below), with measurements
and visualization of the signal.
- After this period of 20 seconds, the recording begins and the R.Test will emit a
beep synchronized with each QRS complex detected. If the ECG signal is not
visualized (see next §) perfect synchronization of the beeps with the pulse rate
for at least 30 seconds is the best guarantee that the voltage of the lead
configuration chosen is sufficient (>1mV).
In the automatic mode this check is absolutely necessary to ensure accurate
detection. If it is negative, check the connections and/or change to the CM5 lead
configuration.
- Recording has begun, so press the centre key again to stop the beeps and allow
manual recordings
6.1.2. Visualisation of the test signal
The signal collected during the acoustic phase of the start up test can be visualised
using the Decotest.
The direct connection cable allows only audible verification, and checking the
beep-pulse synchronisation, as described above, is thus essential.
RT User Manual 6 GB – 14 May 2004
page 40
R.TEST EVOLUTION
How the unit works
The modulated audible signal emitted by the R.Test is picked up by the Decotest
when the patient moves near it; this is transformed into an electric signal which can
be examined:
- either on a computer screen (explained in the RTSoft software manual),
- or on an electrocardiograph (paper recording) or an ECG monitor, depending on
the options chosen by the physician.
6.1.2.1. Visualisation on an electrocardiograph
- First connect the Decotest to the electrocardiograph, by putting the peripheral
banana plugs of the patient cable of the electrocardiograph into the Decotest
connectors of the same colour.
- Press the Decotest button, which will light up, then turn on the
electrocardiograph. A single channel model is preferable. This should be used in
the continuous recording mode (manual mode, generally in D1 lead for models
with a selector ; active filter). If, however, a multi-channel model is used, only
the D1 lead will be taken into consideration.
As soon as the R.Test Evolution starts up, a 20 second ECG recording is obtained,
which should be as clear as normal with a peak-to-peak amplitude of the QRS
complexes of at least 1 millivolt.
6.1.3. Disconnection test
If the disconnection alarm has been programmed (recommended), disconnect the
unit or the neck electrode for a few seconds to activate it and explain what it means
to the patient. The warning signal will be emitted every 15 minutes by the R.Test
until the problem has been resolved, for example by replacing an electrode which
has come unstuck or has dried up (the patient should be provided with an extra set
of 2 electrodes in case he needs them).
RT User Manual 6 GB – 14 May 2004
page 41
R.TEST EVOLUTION
How the unit works
6.2. Start up and start up test in the discontinuous mode
(with solid gel or metal electrodes)
Discontinuous mode
(about 2 months – solid gel or metal electrodes)
In this mode, recordings are activated manually by the patient and only contain a
post-event duration.
To put the R.Test into the discontinuous mode if you do not use a software
program, the following instructions should be carefully followed:
- Press the centre key and remove the unit from the patient’s chest (essential for
forcing the unit into discontinuous mode). The R.Test will emit a continuous
audible signal for 6 seconds, during which the unit must be kept held away from
the patient’s chest for at least 3 seconds.
- Place the unit against the sternum gently pulling it downwards, if metal
electrodes are being used, or connect it, if solid gel electrodes are being used.
Listen for the audible signal modulated by the ECG (about 20 seconds), or this
can be visualised using the Decotest (see § 6.1.2).
- The unit is ready to start recording as soon as this signal stops.
RT User Manual 6 GB – 14 May 2004
page 42
R.TEST EVOLUTION
Patient instruction
7. Patient instruction
The success of a procedure depends partly on the
patient’s co-operation and understanding of its
aims. It is important, therefore, to give him the
necessary instruction when the R.Test is
connected.
The following paragraphs summarise the most
important points that the patient should be aware
of at the beginning of the procedure. We suggest
that you, first of all, try out the operations on
yourself so that you are familiar with them before
explaining them to a patient.
RT User Manual 6 GB – 14 May 2004
page 43
R.TEST EVOLUTION
Patient instruction
7.1. General comments
The R.Test can be worn all day and all night without any special precautions. The
patient can carry on with his normal activities, including sports, if he is fit.
The R.Test is dust-proof, perspiration-proof and water-resistant, but showers and
baths must not be taken by a patient equipped with an R.Test. If he wants to have a
bath or shower, he can remove the R.Test unit but should leave the electrodes in
place. If, however, they become too wet, they may have to be changed.
7.2. Activating a manual recording
The patient can set off a recording whenever he feels a symptom as long as this
was authorised when the unit was programmed.
Manual recording can be explained to the patient at the end of the start-up test:
twenty seconds later he can activate a recording himself, which can be used as a
reference during final analysis of the procedure.
7.2.1. R.Test Evolution with solid gel electrodes
Press the centre key briefly, and the unit will emit an audible signal indicating that
the recording has been set off. Another shorter audible signal will indicate the end
of the recording; this is just for the patient’s information (he is not required to do
anything else).
7.2.2. R.Test Evolution with metal electrodes
Hold the R.Test on each side, between the thumb and the middle finger, through
the clothes, or directly if the clothes are too thick to hold the unit. There is a ridge
around the recording key so that it can easily be used, even through a shirt.
Place the unit against the chest pulling it downwards so that the metal electrode is
in contact with the skin at the level of the sternum. This operation also ensures that
the neck electrode is properly connected and in the right position.
Keep holding the unit in this way, and press its centre key briefly. The unit will
then emit an audible signal indicating that the recording has been set off.
The R.Test must be kept pressed against the chest for the whole duration of
the recording without being jerked as this could produce noise on the
recording. The R.Test indicates the end of the recording by another audible
signal. Inform the patient of the pre-programmed recording duration.
RT User Manual 6 GB – 14 May 2004
page 44
R.TEST EVOLUTION
Patient instruction
7.3. Removing the R.Test Evolution
The patient may need to take the unit off in order to wash, or to change faulty
electrodes.
To remove the unit:
Disconnect the sternal electrode and the neck (or V5) electrode keeping them held
against the skin with one hand, and pull the R.Test or the cable connector with
the other (be careful not to damage the electrode or pull it off).
Take the R.Test system off as if it were a necklace: the unit should not be separated
from the neck cable.
7.4. Faulty electrode connection
If there is a faulty electrode connection (electrode unstuck, faulty contact, R.Test
disconnected), and the electrode alarm is activated, the unit will emit an alarm
signal every 15 minutes until the problem has been corrected.
If the patient is of a nervous disposition, let him listen to the alarm when you are
connecting the unit, and reassure him that this is a completely harmless incident!
To correct the electrode fault, the patient can press the electrodes back into place.
If the problem is repetitive, the electrodes should be changed as follows:
- Take the R.Test off as explained above.
- Take the electrodes off having very carefully taken note of their positions.
- Clean the skin to eliminate any perspiration or gel, and make it dry.
- Place the new electrodes on the skin in exactly the same positions as before.
RT User Manual 6 GB – 14 May 2004
page 45
R.TEST EVOLUTION
RT User Manual 6 GB – 14 May 2004
Patient instruction
page 46
R.TEST EVOLUTION
Downloading the results
8. Downloading the results
When the patient brings the R.Test Evolution
back, the physician has immediate access to the
recordings in its memory.
As with the tests when the unit is connected, the
recordings can be transferred either to an
electrocardiograph or to a computer on which the
RTSoft software has been installed (version
1.11.0 minimum for the R.Test Evolution II or 3).
In both cases transmission can be made via the
Decotest.
For transmission to a computer with Windows
(the most common), a direct cable connected to
the PC serial port can be used.
Recordings can also be transmitted from a
distance, either by the patient himself, or by a
collaborating physician, either to a medical centre
or to an analysis centre.
Teletransmission of recordings, by telephone,
modem or by E-mail, is described in the following
chapters (9 to 11).
RT User Manual 6 GB – 14 May 2004
page 47
R.TEST EVOLUTION
Downloading the results
8.1. Removing the R.Test
8.1.1. End of recording
If the R.Test monitoring is not to continue after data transfer, removal of the unit is
not difficult. Patient’s skin can then be dried or cleaned with soap and a clean
cloth, following any instructions given by the physician.
8.1.2. Temporary interruption of recording
It is possible then:
- either to proceed as above, and after the transfer the electrodes are replaced with
new ones,
- or let the electrodes in place on the skin: disconnect the patient cable (neck cable
or V5 cable) from its electrode, then disconnect the R.Test from the sternum
electrode, then unplug the cable from the R.Test.
(with the V5 cable, the suspension cable will not be disconnected form the
R.Test).
8.1.2.1. Disconnecting the electrodes
Cable electrode: with a finger on each side of the press-stud, press firmly on the
neck cable electrode, and with the other hand, lift up one side of the connector to
remove it from the press-stud of the electrode.
R.Test electrode: place a finger on each side of the press-stud of the sternum
electrode, and lift up one side of the unit until it clicks out of the electrode.
This way the R.Test and the cable can be reconnected to the same electrodes (as
they have not been removed).
8.1.3. Unplugging cable from R.Test
This operation must be carried out very carefully, so as not to damage the unit nor
the cable. Training beforehand is essential:
To disconnect the cable
from the unit, the connector
must first be unlocked: do
not pull using brute force,
the unit could be damaged!
! Press the two faces of the connector (marked PRESS), and
" pull straight until clear, as indicated in the picture above
RT User Manual 6 GB – 14 May 2004
page 48
R.TEST EVOLUTION
Downloading the results
8.2. Connection to a computer
8.2.1. Using the direct cable (RS232 only)
8.2.1.1. Connecting the R.Test PC cable
The connector must fit into the R.Test according to the symbol shown on the
interior of the connector,
until the two red positioning triangles are exactly facing each other:
R.Test and connector
connected correctly
8.2.1.2. Disconnecting the R.Test PC cable
To disconnect R.Test from cable :
After having turned over the R.Testconnector, it is necessary to:
! press firmly on the serrated part of
the connector, using the thumb
and forefinger, before
" releasing the R.Test from the
connector.
RT User Manual 6 GB – 14 May 2004
page 49
R.TEST EVOLUTION
Downloading the results
8.2.2. Using the Decotest
The unit should be held upside down with the front plate (key side) turned towards
the operator. Insert the R.Test vertically into the Decotest hatches, which open
automatically. Guide the unit manually into the connectors and continue pushing it
vertically until it is fully engaged.
8.2.3. Transfer of data to a computer
This is fully explained in the RTSoft software manual.
RT User Manual 6 GB – 14 May 2004
page 50
R.TEST EVOLUTION
Downloading the results
8.3. Transfer to an electrocardiograph
8.3.1. Connection:
Introduce the banana plugs into the same colour connectors of the Decotest. Turn
on the electrocardiograph in the “continuous recording” mode.
Turn on the electrocardiograph in the “continuous recording” mode.
8.3.2. Acoustic transfer:
If a computer is not being used, the contents of the R.Test memory are transferred
acoustically to the electrocardiograph.
- Put the R.Test unit in the rubber cradle of the Decotest, with the front plate
visible.
- Press the Decotest key; its luminous button will light up.
- Start running the ECG paper, and simultaneously press the M key of the R.Test
to start up the transfer.
The electrocardiograph prints the events recorded during the monitoring period on
ECG paper: the dates and times of these events should be supplied by the patient.
When the transfer is finished, stop the ECG recorder, and do not forget to switch
off the Decotest by pressing its key again.
RT User Manual 6 GB – 14 May 2004
page 51
R.TEST EVOLUTION
Downloading the results
8.3.3. Order of transfer
Recordings are transferred either chronologically to the electrocardiograph or, if
the Arrhythmia and/or ST options have been installed, classified by type of event,
in the following order:
- Narrow premature isolated complexes
- 2 to 5 narrow premature complexes
- Narrow runs
- Wide premature isolated complexes
- 2 to 5 wide premature complexes
- Wide runs
- Relative pauses
- Absolute pauses
- Bradycardias
- Manual recordings
- ST shifts
Recordings are separated by an easily recognised square signal.
Separator
Event
Separator
Events separator
Recordings may have a supplementary marker (symptomatic event marker) in the
shape of a short line of triangular waves indicating the moment when the patient
pressed the centre key of the unit, whilst a recording was already in process.
Event
Symptomatic event marker
RT User Manual 6 GB – 14 May 2004
page 52
R.TEST EVOLUTION
Telephonic transmission
9. Telephonic transmission
R.Test Evolution patients can transmit recordings
by telephone; either the contents of the unit’s
memory, or the patient’s real time ECG, to the
physician or an analysis centre.
This function, available as standard on all R.Tests,
must be programmed to be activated.
RT User Manual 6 GB – 14 May 2004
page 53
R.TEST EVOLUTION
Telephonic transmission
9.1. How the telephonic transmission works
R.Test Evolution patients can transmit recordings by telephone as many times as
necessary. These may be:
- either the contents of the unit’s memory
(ECG recordings identified and classified by pathology in the R.Test memory),
- or the patient’s real time ECG,
the ECG signal can be received by an electrocardiograph.
As telephonic transmission is the modulation of an acoustic signal, only the ECG
can be transferred (analogical signal).
The Decotest receives the signals transmitted by telephone, transcribes them and
transfers them to the electrocardiograph.
9.2. Patient action
The patient telephones the physician or analysis centre normally. Once the
reception equipment is set up the transfer can take place.
The patient presses the M button to transfer the contents of the R.Test’s memory,
or
Presses the ♥ button for real time transfer of the ECG.
Pressing the button again will stop the transfer.
The handset should be held very near the R.Test, but not touching (risk of noise).
The real time ECG transmission will stop after 5 minutes, but can be repeated as
often as necessary.
RT User Manual 6 GB – 14 May 2004
page 54
R.TEST EVOLUTION
Telephonic transmission
9.3. Physician’s action
If not already done, upon receiving the call from the patient :
- Connect the electrocardiograph to the Decotest by connecting the peripheral
banana plugs of the patient cable to the Decotest connectors with the same
colours,
- Put the electrocardiograph into the manual “continuous recording” mode ,
- Start up the Decotest by pressing its key, which will light up,
- Let the patient know that he will have, within about 10 seconds, to do the
following:
- Press the ❤ key (real time ECG transmission),
or the M key (transmission of the memory),
until he hears the modulated signal,
- Bring his telephone (microphone) close to the R.Test ,
- Stop the audible signal by pressing the same key as soon as the
transmission of the recording is finished.
- Put the telephone earphone on the Decotest rubber cradle
- Run the ECG paper.
The transfer will stop automatically after 5 minutes if the patient has not stopped it
himself, and the R.Test will switch back to its initial recording mode.
RT User Manual 6 GB – 14 May 2004
page 55
R.TEST EVOLUTION
RT User Manual 6 GB – 14 May 2004
Telephonic transmission
page 56
R.TEST EVOLUTION
Modem transmission
10. Modem transmission
The information recorded by the R.Test Evolution
II or 3 can be transmitted via modem from any
standard network telephone socket to a remote
computer, also connected into the telephone
network by modem.
This mode of transmission differs to the standard
R.Test
transmission
system
(telephonic
transmission by acoustic coupling) in that it
allows the transmission of all the information
(graphs, heart rate curve, dates and times, tables),
rather than just the graphs, and is ten times faster.
The Modem transmission was designed to be
carried out by the patient himself, however it
could also be done by a doctor, in connection with
an analysis centre, who fits and removes the
R.Test but does not analyse the recordings.
RT User Manual 6 GB – 14 May 2004
page 57
R.TEST EVOLUTION
Modem transmission
10.1. Operation
Modem transmission of R.Test recordings can be done:
- either by the patient him-self from his home,
- or by a physician who, in collaboration with a cardiology centre, fits and removes
the R.Test but does not interpret the recordings.
This person (physician, patient or whoever) will be referred to as the “remote
user” during this chapter “Modem teletransmission”.
The addressee of the modem transmission will be referred to as the “receiver”.
Modem transmission can only be carried out using R.Test units whose serial
number begins with RTM.
The remote user receives, in addition to the R.Test unit and its standard
accessories, a modem which must be connected to:
- the telephone network (analogic network): if there is no free line, the remote user
must disconnect his telephone, connect the modem and reconnect the telephone
in the back of the modem jack,
- the mains electricity via the transformer delivered with the modem.
The remote user will also receive a cable (permanently connected to the modem) to
connect the R.Test to when transmitting the memorised information.
Also, the receiving computer (PC under Windows) must be equipped with:
- a modem connected to the telephone network:
preferably an external modem connected to the computer’s serial ports.
However, an internal modem, or a PCMCIA modem drive for laptops, would be
suitable *,
- a receiving software unit (NovaModem) supplied by Novacor,
- an RTSoft software (version 1.11.0 or above) with the Modem Communication
option installed.
RT User Manual 6 GB – 14 May 2004
page 58
R.TEST EVOLUTION
Modem transmission
To transmit via modem:
- the receiver’s computer must be on, with the NovaModem software in “Standby” mode,
- remote user connects the R.Test to the modem then presses the M button on the
R.Test.
Once the transmission is finished, the remote user can continue the recording by
reconnecting the R.Test, as it was before the transmission.
* Whilst the physician’s modem is awaiting reception of an R.Test procedure, no
other information should be sent to him. An attempt to connect will suspend the
Novacor stand-by, and no other information can be received anyway.
It is strongly advised to use this modem exclusively for reception of R.Test
procedures.
10.2. Equipment
Equipment given to the remote user
10.2.1. The recorder
R.Tests with the modem transmission feature have serial numbers beginning with
RTM. In these units, the High and Low Alarms, in the Frequency 30 option, have
been removed.
They can be used as normal without taking into account the modem transmission
function.
RT User Manual 6 GB – 14 May 2004
page 59
R.TEST EVOLUTION
Modem transmission
10.2.2. The modems
10.2.2.1. “Receiver” Modem
Any modem found commercially would be suitable as the receiving modem.
10.2.2.2. “Remote user” Modem
The transmitting modem must be able to use the R.Test communication system.
Novacor holds a list of compatible modems, selected from those most commonly
found, available for users.
The modem must have the EC mark.
10.2.3. The software
R.Tests are driven (programming, reading, etc.) by the RTSoft software.
To receive recordings by modem, version 1.11.0 (or above) with Modem option is
required. Also, a specific Novacor software for modem reception, “NovaModem”,
must be installed on the receiving computer.
Obviously, versions 1.11.0 and above of RTSoft can be used with the whole R.Test
Evolution range.
10.2.4. The R.Test Modem cable
The R.Test Modem cable has two connectors.
The modem end can be connected to the
modem before being given to the remote
user. In order to avoid any risk of damage to
the equipment, make sure this one knows
how to properly connect and disconnect the
other R.Test end (cf § 10.3.4 and 10.3.5.1).
The R.Test Modem cable
RT User Manual 6 GB – 14 May 2004
page 60
R.TEST EVOLUTION
Modem transmission
10.3. Remote user participation
10.3.1. What the remote user has to do
The remote user must carry out the transfer of the contents of the R.Test modem
himself. He must learn the following manipulations beforehand:
- check the modem is correctly connected and turned on,
- remove the R.Test,
- connect it to the modem,
- transfer the recordings,
- disconnect the R.Test and the modem,
- turn off the modem,
- if necessary, put the R.Test back on.
It goes without saying that the physician must be sure that the remote user knows
how to carry out these manipulations correctly, so as to avoid any risk of damage
to his equipment, and ensure correct transmission of procedures.
10.3.2. Modem connection
To avoid additional handling, the modem can be given to the remote user with the
R.Test cable already plugged in.
10.3.2.1. Telephone connection
If the remote user has a telephone socket available, the modem “telephone
network” cable can be plugged in directly.
As a general rule, the patient should unplug his telephone from the wall socket,
connect the modem “telephone network” cable in it’s place, and then reconnect the
telephone into the back of the modem telephone jack in the wall.
This connection enables the use of either the telephone or the modem but never
both at the same time.
RT User Manual 6 GB – 14 May 2004
page 61
R.TEST EVOLUTION
Modem transmission
10.3.2.2. Mains connection
The remote user must plug the modem electric cable (usually with a transformer)
into a mains electricity socket.
Before using the modem, the remote user must make sure that it has been correctly
set up: modems usually have an “on-off” switch which must be pressed. These
vary from one modem to another.
It is advisable to switch the modem off when not in use.
10.3.3. Removing the R.Test
10.3.3.1. End of recording
If the R.Test monitoring is not to continue after data transfer, removal of the unit is
not difficult. The patient’ skin can then be dried or cleaned with soap and a clean
cloth, or following any instructions given by the physician.
10.3.3.2. Temporary interruption of recording
It is possible then:
- either to proceed as above, and after the transfer replace the electrodes with new
ones,
- or let the electrodes in place on the skin: disconnect the patient cable (neck cable
or V5 cable) from its electrode, then disconnect the R.Test from the sternum
electrode, then unplug the cable from the R.Test.
(with the V5 cable, the suspension cable will not be disconnected form the
R.Test).
10.3.3.2.1. Disconnecting the electrodes
Cable electrode: with a finger on each side of the press-stud, press firmly on the
neck cable electrode, and with the other hand, lift up one side of the connector to
remove it from the press-stud of the electrode.
R.Test electrode: place a finger on each side of the press-stud of the sternum
electrode, and lift up one side of the unit until it clicks out of the electrode.
This way the R.Test and the cable can be reconnected to the same electrodes (as
they have not been removed).
RT User Manual 6 GB – 14 May 2004
page 62
R.TEST EVOLUTION
Modem transmission
10.3.3.3. Disconnecting the R.Test cable
This operation must be carried out very carefully, so as not to damage the unit nor
the cable. Training beforehand is essential:
To disconnect the cable
from the unit, the connector
must first be unlocked: do
not pull using brute force,
the unit could be damaged!
! Press the two faces of the connector (marked PRESS), and
" pull straight until clear, as indicated in the picture above.
10.3.4. Connecting the R.Test to the modem cable
The connector must fit into the R.Test according to the symbol shown on the
interior of the connector,
until the two red positioning triangles are exactly facing each other:
R.Test and connector
connected correctly
RT User Manual 6 GB – 14 May 2004
page 63
R.TEST EVOLUTION
Modem transmission
10.3.5. Transfer of recordings
Once the connections for transfer are finished (the receiver may have asked the
remote user to notify him by telephone), the remote user has only to press the M
button (black/green) on the R.Test, and the data transmission will go ahead
automatically as follows:
M button
- the R.Test gives a one-second beep,
- the modem initialises communication, making various noises, indicator lights
may flash during several seconds, then a telephone call noise is audible,
- the transfer begins, during which the modem gives a weak crackling noise; the
transfer can last anything from fifteen seconds to around two minutes,
depending on the amount of data to be transmitted,
- finally three beeps followed by one long beep are given out, indicating that the
transfer is finished and that the data has been successfully received by the
remote computer.
The remote user can then disconnect the R.Test from the modem cable and turn
the modem off.
10.3.5.1. Disconnecting the R.Test Modem cable
To disconnect R.Test from cable :
After having turned over the R.Testconnector, it is necessary to:
! press firmly on the serrated part of
the connector, using the thumb
and forefinger, before
" releasing the R.Test from the
connector.
RT User Manual 6 GB – 14 May 2004
page 64
R.TEST EVOLUTION
Modem transmission
10.3.5.2. Turning off the modem
If, as is normally the case, the remote user does not have another modem transfer to
carry out in the near future, it is advised to turn the modem off (switch found on
the modem).
In the event that the remote user is not going to re-use the modem at all, he can
unplug it completely, including the electricity, and plug in his telephone as before.
10.3.5.3. Continuation of monitoring
10.3.5.3.1. Reconnecting the cable
If the remote user is to continue with the R.Test monitoring, he must first of all
reconnect his cable (neck or V5):
! place the cable connector opposite
that of the R.Test, so that the two red
positioning triangles are facing each
other,
" gently push the cable connector into
the R.Test, until their locking into
place can be felt.
This operation, similar to that described above § 10.3.4 for connecting the R.Test
to the modem cable, must be shown to the remote user beforehand.
10.3.5.4. Replacing the R.Test on the patient
- If the previously used electrodes had been removed, they must be replaced with
new ones (and new patches if necessary).
- Then, and this applies also when having taken off the R.Test without removing
the electrodes, simply click the R.Test onto the sternum electrode (after having
slipped the suspension cable, or the R.Test and cable, around the neck), then the
opposing connector onto the other electrode.
The continuation of the monitoring is immediate and automatic.
RT User Manual 6 GB – 14 May 2004
page 65
R.TEST EVOLUTION
RT User Manual 6 GB – 14 May 2004
Modem transmission
page 66
R.TEST EVOLUTION
E-mail transmission
11. E-mail transmission
Transmission by electronic mail, (or ‘E-mail’) is
principally aimed at physicians who, in
collaboration with another centre, deal with fitting
and removing the R.Test but do not interpret the
recordings carried out.
It is a useful alternative to modem transmission as
it passes via the Internet and requires no specific
material or connections.
Of course, both the sending and the receiving
physician must have a computer equipped with a
messaging software.
Another advantage is that the receiving computer
does not have to be switched on at the time of
transmission; and more, results from all R.Test
Evolution models are compatible.
RT User Manual 6 GB – 14 May 2004
page 67
R.TEST EVOLUTION
E-mail transmission
11.1. Operation
The R.Test is connected to the remote physician’s computer via a cable connected
to a serial port.
The NovaDrive software, whose main function is to program Novacor ambulatory
recorders without the full corresponding software, is installed with its E-com option
on the remote physician’s computer.
The remote physician simply downloads and saves the recordings using the
NovaDrive software.
He can thus re-use the R.Test immediately:
- either on the same patient (continuation of current procedure),
- or on a new patient, after changing the batteries and, if necessary, the programme
(patient name included), still using NovaDrive.
The receiving computer (in an analysis centre for example) must have:
RTSoft software (version 1.12 or above) with the E-mail option and
NovaMail, specific software for Email reception.
11.2. The NovaDrive and NovaMail software
Use of NovaMail is described in the RTSoft manual, and NovaDrive in the
NovaDrive Manual.
11.3. The R.Test – PC connection cable
The R.Test-PC cable has two
connectors. The PC serial port end
can be identified by the PC sign.
Make sure the instructions given in
the following chapters § 11.5 and
11.6 are followed when connecting
and disconnecting the other end to
the R.Test so as to not damage the
equipment.
R.Test-PC cable
RT User Manual 6 GB – 14 May 2004
page 68
R.TEST EVOLUTION
E-mail transmission
11.4. Removing the R.Test
11.4.1. End of recording
If the R.Test monitoring is not to continue after data transfer, removal of the unit is
not difficult. Patient’s skin can then be dried or cleaned with soap and a clean
cloth, following any instructions given by the physician.
11.4.2. Temporary interruption of recording
It is possible then:
- either to proceed as above, and after the transfer the electrodes are replaced with
new ones,
- or let the electrodes in place on the skin: disconnect the patient cable (neck cable
or V5 cable) from its electrode, then disconnect the R.Test from the sternum
electrode, then unplug the cable from the R.Test.
(with the V5 cable, the suspension cable will not be disconnected form the
R.Test).
11.4.2.1. Disconnecting the electrodes
Cable electrode: with a finger on each side of the press-stud, press firmly on the
neck cable electrode, and with the other hand, lift up one side of the connector to
remove it from the press-stud of the electrode.
R.Test electrode: place a finger on each side of the press-stud of the sternum
electrode, and lift up one side of the unit until it clicks out of the electrode.
This way the R.Test and the cable can be reconnected to the same electrodes (as
they have not been removed).
11.4.3. Unplugging cable from R.Test
This operation must be carried out very carefully, so as not to damage the unit nor
the cable. Training beforehand is essential:
To disconnect the cable
from the unit, the connector
must first be unlocked: do
not pull using brute force,
the unit could be damaged!
! Press the two faces of the connector (marked PRESS), and
" pull straight until clear, as indicated in the picture above
RT User Manual 6 GB – 14 May 2004
page 69
R.TEST EVOLUTION
E-mail transmission
11.5. Connecting the R.Test to the R.Test-PC cable
The connector must fit into the R.Test according to the symbol shown on the
interior of the connector,
until the two red positioning triangles are exactly facing each other:
R.Test and connector
connected correctly
11.6. Disconnecting the R.Test-PC cable
To disconnect R.Test from cable :
After having turned over the R.Testconnector, it is necessary to:
! press firmly on the serrated part of
the connector, using the thumb
and forefinger, before
" releasing the R.Test from the
connector.
RT User Manual 6 GB – 14 May 2004
page 70
R.TEST EVOLUTION
Maintenance
12. Maintenance
12.1. Handling the equipment
Always press the centre of the keys; never use finger nails or a pointed object.
The R.Test recorder is dust-proof and water-resistant (complies to norm 60-601-1,
protection level IPX4). It should never be immersed in water. Nevertheless, it is
recommended not to keep it to take the shower.
If the unit is sprinkled with water: wipe it and let it dry.
If the unit is immersed in water: wipe it and send back to Novacor for verification.
12.2. Cleaning the equipment
As the R.Test may be in direct contact with patients’ skin it will need to be cleaned
regularly.
To proceed to device cleaning, it is necessary to keep a patient cable connected to
the R.Test, in order to avoid any inside contamination with cleaning product.
This should be done with a soft cloth lightly moistened with alcohol or a product
which does not contain solvents or detergents, preferably with the cable connected.
Avoid direct contact with liquids.
The Decotest and the cables can be cleaned in the same way.
12.3. Replacing the back-up battery.
The lithium back up battery is necessary for the R.Test to work at it’s best. When
this is run down, the recorder’s serial number is no longer displayed and there will
be a risk of losing data.
It can only be replaced in a NOVACOR approved workshop.
If this should happen, contact your distributor who will explain what to do.
12.4. Storage and dispatching
If the R.Test is going to be stored for more than a few days, make sure that the
batteries have been removed.
When the R.Test and Decotest are dispatched they are protected by their
packaging, which should be kept in case it is needed.
RT User Manual 6 GB – 14 May 2004
page 71
R.TEST EVOLUTION
Maintenance
12.5. User precautions
- The equipment must only be used by qualified, R.Test trained medical personnel,
to guarantee its proper use.
- It should only be fitted to patients aware of the unit and capable of understanding
recommendations given to them, and able to take action if necessary to stop the
recording.
- The R.Test is an ambulatory recorder, and has no monitoring functions (no alarm
system in particular). It should not then be used for monitoring.
12.6. Maintenance
If the unit is not working properly, first consult the table on next page.
This should be able to help in most cases.
Maintenance is carried out in our workshop, as rapidly as possible. We are unable,
however, to provide a unit on loan during the repair period (except under special
agreement), or to provide compensation of any sort.
In all cases, including units under guarantee, transport costs are the customer’s
responsibility. If the unit is examined outside the guarantee period, there will be, at
the minimum, a charge for administrative and testing costs.
On receipt of the unit, diagnostic tests will be carried out and an estimate will be
sent by post or by fax, if appropriate. No repair work can be carried out unless a
written order has been received from the customer.
12.7. Preventive maintenance
A check up of the recorder is recommended every two years. This is to reduce the
number of problems and to prolong its useable life. The unit will be checked that it
functions correctly, especially the ECG amplification circuits and the back up
battery.
This check up must be carried out in the Novacor, or a Novacor recommended,
workshop.
The invoicing covers the tests only, no repair work can be carried out unless a
written order has been received from the customer.
RT User Manual 6 GB – 14 May 2004
page 72
R.TEST EVOLUTION
Maintenance
Problem
Possible Cause
Solution
When the unit is started up, The unit is in the
pressing the centre key does safeguard mode
not work
Change the batteries
and reinitialise the
R.Test
Impossible to read the
R.Test
Change the batteries
without reinitialising
the R.Test
The unit is in the
safeguard mode
The memory is empty
following a reinitialisation
of the unit
The memory is empty
because no recordings
have been made
For a new patient,
reinitialise the unit
The Decotest luminous
button does not light
Batteries are flat
Change the batteries
The Decotest luminous
button is blinking
Batteries are starting to
run down
Change the batteries
The electrocardiographic
recordings contain a lot of
noise
Electrode/skin contact is
poor
Change the
electrodes
The R.Test alarm rings
every quarter of an hour
Telephonic transmission
is poor
The electrocardiographic
rejector filter has been
deactivated
Activate the filter
The electrode alarm has
been activated
Change the
electrodes
If the unit is
disconnected, the
alarm will stop when it
is reinitialised
The start-up test does not
work
RT User Manual 6 GB – 14 May 2004
Le R.Test is too far away
from the Decotest
Bring the R.Test 10
cm away from the
Decotest
page 73
R.TEST EVOLUTION
Maintenance
12.8. Norms and safety standards
R.Test Evolution, R.Test Evolution II and R.Test Evolution 3 work exclusively
with an internal power source and comply with class BF device protection
standards.
This sign on a unit indicates that extra information is available in the user
manuals, which should be consulted.
The use of special batteries (1.4v zinc-air) enables the R.Test to run for more than
a week in the automatic detection mode with all its options activated.
Using the R.Test with other types of batteries may result in loss of performance or
reduce the length of time it will function for, and may even damage the unit.
Consequently, our guarantee does not apply if batteries other the recommended
ones have been used.
Equipment connected to the Decotest or to the R.Test Evolution must comply to
the EN-60-950 standard, and the EN-60-601 standard for external supply to the
Decotest.
When using external supply to the Decotest, batteries must be removed.
CEM
The R.Test Evolution and the R.Test Evolution II and 3 comply to the
EN 60 601-1-2 electromagnetic compatibility standard.
However, use under certain specific conditions may be effected by disturbances.
CE mark conform to the 93/42/CEE European Directive applied to medical
devices.
Dispose out of date or unusable products and accessories following regulations
and laws for the disposal of waste.
Never use an R.Test if the casing is damaged (cracked or broken), to avoid any
risk of electric shock.
NOVACOR has electronic plans of the devices, available on demand.
RT User Manual 6 GB – 14 May 2004
page 74
R.TEST EVOLUTION
Maintenance
12.9. Technical data
Overall length
Overall width
Overall height
Weight with batteries
Storage temperature
Functioning temperature
R.TEST
DECOTEST
60 mm
150 mm
48 mm
133 mm
28 mm
46 mm
45 g
320 g
- 20 °C to + 50 °C
+ 10°C to + 45 °C
12.10. Specifications
Type of recorder
Type of events
(automatic mode)
Length of events
- automatic mode
- manual only mode
Total length of recording
- ECG events
- Heart rate trend
Maximum length of monitoring
- automatic mode
- manual only mode
Electrical supply
Number of channels
Data storage
Sampling
Precision of ECG in length
Precision of ECG in voltage:
standard, initial signal < 3 mV
3 mV <= initial signal < 6 mV
RT User Manual 6 GB – 14 May 2004
Automatic ECG event and Heart Rate trend
recorder.
Manual ECG event recorder
Premature fine and large QRS,
(isolated, multiplets and runs).
Absolute and relative pauses.
Bradycardias.
ST shifts.
Programmable from 10 s to 20 min, with
pre-event mini 5 s, maxi 4 min,
and post-event mini 5 s, maxi 19 min 55 s
(loop memory).
pre-event 0 + post-event 30 s, or
pre-event 20 + post-event 10 s
20 min
8 days
8 days
2 months
zinc-air batteries 1.4 V - 600 mAh
1
RAM solid memory
100 Hz
± 5 ms
± 6 µV
± 12 µV
page 75
R.TEST EVOLUTION
Maintenance
12.11. Accessories and consumables
The following accessories and consumables are available from your supplier:
For the R.Test:
Accessory
Reference
Packaging
Special batteries (Zinc-Air 1.4 V)
ACC-0706-00
Box of 60 batteries
Solid gel electrodes Ag-AgCl
ACC-203-00
Box of 50 units
Adhesive patches for electrodes
ACC-0601-00
Box of 100 patches
Neck cable (neck-sternum lead)
ACC-0105-00
1 item
“ V 5 ” patient cable (standard 30 cm)
ACC-0106-00
1 item
“ V 5 ” patient cable (special 60 cm)
ACC-0107-00
1 item
Suspension cable
ACC-0108-00
1 item
CM5 cable (replaces ACC-106+108-00) standard 40 cm
ACC-0105-01
1 item
CM5 cable (replaces ACC-107+108-00) long 57 cm
ACC-0105-02
1 item
Metal electrodes
ACC-0602-00
2 items
Complete battery cover, with handle (RTE and RT II)
ACC-0603-00
1 item
Complete battery cover (RT3)
ACC-0603-01
1 item
R.Test - Modem cable
ACC-0157-00
1 item
R.Test - PC cable
ACC-0158-01
1 item
RTSoft software for PC
LOG-0001-00
1 pack
NovaDrive software
LOG-0500-00
‘Applications’ CD
NovaMail software
LOG-0500-00
‘Applications’ CD
NovaModem software
LOG-0500-00
‘Applications’ CD
R.Test / Decotest user manual (this manual)
LOG-0500-00
‘Applications’ CD
R.Test / Decotest quick reference guide
ACM-0201-0x*
1 item
RTSoft manual
LOG-0500-00
‘Applications’ CD
NovaDrive manual
LOG-0500-00
‘Applications’ CD
*x: language 1=French; 2=English; 3=German; 4=Spanish; 5=Portuguese; 6=Italian
For the Decotest:
Accessory
Decotest
Decotest – PC cable link
Decotest – Mac cable link
Power unit 6 Volts DC
Battery cover
RT User Manual 6 GB – 14 May 2004
Reference
DTE-0001-00
ACC-0155-00
ACC-0156-00
ACC-0950-00
602-0003-00
Packaging
1 unit
1 unit
1 unit
1 unit
1 unit
page 76
R.TEST EVOLUTION
RT User Manual 6 GB – 14 May 2004
Maintenance
page 77
R.TEST EVOLUTION
RT User Manual 6 GB – 14 May 2004
page 78