1
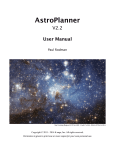
Uncle Rod Mollise’s
Down Home Gumbo Astronomy
From Chaos Manor South !
Skywatch
Fall 2006
Volume 15, Issue 3
“A Newsletter for the
Truly Outbound!”
Number 82 (New Series)
<[email protected]>
In this Issue:
1
Second Look at AstroPlanner
2
A Chiefland Virgin
3
Building an Eagle’s Nest
4
MTF and Chocolate
5
Indoor Collimation
6
Review: Pocket Sky Atlas
7
ETX-125 Focus Aid
8
Astro Video Supplement!
9
My Back Pages!
:
Sometimes It
Pays to Take a
Second Look
Uncle Rod
Skywatch
1207 Selma Street
Mobile, AL 36604
U.S.A.
H
ave y’all seen my laptop
lately? If you’ve had a
peek over my shoulder
from the seat next to me on an
airplane (I saw you, you li’l
dickens),
you’re
probably
thinkin’, “Gull-dernit, that silly old
Uncle Rod has more astronomy
software than humans should be
allowed to have.” Which is
mostly true, I guess. In my role
as astronomy pundit, I get asked
to take a look at a lot of stuff;
everything from the latest
TheSky to little utilities designed
to help you polar align that bad,
ol’ GEM. I don’t mind saying that
I’ve got all the biggies living on
my sorely laden hard drive.
What you’re probably wondering,
though, is, “How much of that
stuff does he actually use?” Not
much, I’ll admit. Excluding
imaging software, I find myself
really using, day-to-day using,
two packages. One of these is a
planetarium, something that will
give me immediate visual
feedback about the way the sky
looks right now or will look
tonight or next week. Click an
icon, the sky appears on my
screen, and I can decide if
Orion’s up yet without puttin’ my
thinkin’ cap on.
I said “two packages.” Yep. The
other type of program I use is a
“planner.” You know, one of
those mega-database jobs that
help
you
plan
observing
sessions, draw finder charts,
send a scope on gotos, check
the weather, and make your
lunch. I’m kidding about the
lunch, but planners have come a
long way since the days when
they were thinly disguised
Access databases and nothing
more. I’ve found these programs
really enhance my observing
productivity. Let’s face it, without
lists of objects to look at you’re
going to be lost among the stars,
real or virtual. Just because a
program draws a pretty sky on
your screen doesn’t mean you’ll
know which objects in that pretty
sky you’ll want to observe.
Planners help you decide which
objects you want to see, and
furnish you with sorted lists of
these objects visible at the time
of your viewing session. I’d
been using two planners almost
interchangeably
for
several
years, Steve Tuma’s Deepsky
and Greg Crinklaw’s Skytools 2,
both
fine
programs
I’d
recommend to anybody. These
apps are good enough, in fact,
that I didn’t think there was room
for a third entry, and was
surprised when I got an email
from a nice gentleman named
Paul Rodman, asking if I’d take a
. . . . . . . . . . . . . . . . . . . . . . .
look
at
AstroPlanner.
his
planner,
In due course, I received an
AstroPlanner (AP) CD from Paul
(Ilanga Software) and had it
installed on my then current
566mhz Win98 machine. What
did I think? Well, to be kind,
AstroPlanner seemed a work in
progress. The program was, for
example, without an installation
routine of any kind, so I had to
do most of the work myself when
it came to getting the thing set
up on a hard drive, copying files
and making directories. Copying
files may seem like a simple task
to y’all, but, believe me, it’s
something that can be a
challenge for the resolutely
computer illiterate—like your Silly
Old Uncle.
Once installed AP was, well,
interesting. The user interface
was
nicely
designed—the
various
program
modules
resided on well thought-out tabs,
and there were some nice
touches, especially for Meade
owners, like an update of Jim
Burrows'
famous
BestPair
program to help Autostar users
select good alignment stars.
Alas, the bad tended to outweigh
the good. Paul’s initial reason for
doing AstroPlanner was to
provide Apple Macintosh users
with a planning program of their
own, and the Apple version was
nice, but the Windows version
seemed an afterthought, being
affected by a serious limitation.
Due to a “resources” issue, AP
would not run very well at all
under Windows 98, which
dampened my enthusiasm. Hell,
just trying to print would often
bring a crash. It became obvious
the program needed Windows
2
2000 or NT, and it was at that
point that I lost interest. Me
upgrade to another Windows yet
again? Uh-uh!
-
And yet…and yet…
One thing I noticed right off the
bat
was
that
Paul
had
accumulated a Yahoogroup full
of enthusiastic users in a short
period of time. They saw plenty
of potential in the program, and,
actually, I guess I did too. It had
a certain something, some
ineffable look and feel that I
found attractive. If only it had
worked a little better on my
computer. I soldiered on with
Deepsky and Skytools. Mr.
Rodman’s little program stuck in
my mind, though, and when I
next heard from him a couple of
years down the line, I had not
forgotten AstroPlanner.
-
-
-
What was new with AP?
Apparently it had come a long
way. Paul rattled off a long, long
list of features, and promised me
the program would work very
well on my new XP laptop. He
wondered if I might take a
second look. Heck, what’s one
more astro-app, bursting hard
drive or no? I said “yes,” both out
of curiosity to see if this
promising program had really
gotten off the ground, and
because I was attracted by a list
of features than included online
download and caching of DSS
images, telescope control for just
about anything, and impressively
large catalog resources (over
100 catalogs; everything from
the good, old NGC to stuff like
the Galactic Dust Cloud catalog).
A
very
partial
list
of
AstroPlanner’s features includes:
-
Cross-platform operation.
AstroPlanner is available
for both Windows PCs
and the Apple Macintosh
“classic”
and
OSX
machines.
Reads
geographic
coordinates from a GPS
unit, a Meade Telescope,
or from Google Earth.
Choose your equipment
lineup from an extensive
list of telescopes and
binoculars or setup your
particular
equipment
manually.
Create
Observing
plans/lists to suit you,
your site, and your
equipment.
Field of view charting with
many
options
and
capabilities.
Extensive support for
goto telescopes.
Incorporates Best Pair II
to
assist
in
goto
telescope alignment star
selection.
All-sky charts available
with a mouse click.
User-defined data fields
can be added to plans.
Extensive catalog search
facilities.
Over
100
catalogs
containing
over
1,000,000 objects.
UCAC and USNO A2.0
catalogs (optional).
USNO
B1.0
on-line
access.
Flexible
search
capabilities.
An extensive library of
user-contributed plans is
available online through
the program interface.
This
includes
lists
containing all the objects
in Burnham’s Celestial
. . . . . . . . . . . . . . . . . . . . . . . .
Skywatch
in two places. The first place is
“Resources,” found under the
Edit menu (folks, I’m talking only
about the Windows version in
this review). Here’s where you
tell the program where you’re
located, what kind of telescope
you use, and which eyepieces
and accessories you own. It’s
remarkably easy to get all this
data entered—as long as you
remember
the
central
AstroPlanner interface paradigm:
click a “+” button onscreen to
add
something;
click
an
found that for a site’s time to
show up correctly in the
program, I had to set the “time
offset” to the value by which the
site’s time would be different
from the computer’s time. Since
my computer is “on” Central
Time, I had to set the offset
selection to “1” for a site on
Eastern Time. I’d a-thought
setting the site’s time zone (in
the “offset from GMT” field)
would have done that, but no-sir
buddy.
To say the least, I was
convinced the program deserved
another look, and, when I
received the new CD, I set about
getting it up and running on my
PC. The Good Thing here is that
the installation process for the
program has long-since been
automated. Put the CD in the
drive, and away you go. I didn’t
try a Mac installation, but I’m told
the process is just as easy there.
Something to think about before
you go installing this program on
your PC, though, is that while
much has been updated, one
thing that has not changed is the
way AP works (or doesn’t) under
Windows 98. Yes, most folks
have
probably
long-since
upgraded to XP, but some of us
still tend to use older machines
as observatory computers. If you
want to use AP, you need
Win2000/NT or XP (or a Mac).
Period.
onscreen “-“ to delete something.
Remember that and, you’ll do
OK. Don’t go typing and clicking
randomly and aimlessly as your
Old Uncle is wont to do. Without
first telling the program to add a
new site with “+,” you won’t get
anywhere
other
than
Frustrationsville.
With the installation complete, as
with any astronomy program,
you are only halfway there.
Before using AstroPlanner, you
must input your equipment and
information
about
your
geographic location. You do this
Most
of
the
site
setup
“questions” are self-explanatory,
and include the usual items like
latitude and longitude, DST
status, and other site peculiar
information and choices. One
slight hang-up I had was that I
Maybe now is a good time to talk
about the AP help system. It
doesn’t have one per se. You do
have an online (and on hard
drive) manual that’s pretty good,
but it’s still not as detailed, even
at over 300 .pdf pages, as it
could be for such a complex and
capable application. I read the
information in this manual
concerning clock offset, for
example, and still came away
scratching my head. I just played
around until the time on the
program display was correct for
the site.
-
-
-
Handbook and the Night
Sky Observer’s Guide.
AAVSO
finder
and
constellation
charts,
observation data, and
observation planner.
Solar system objects
including minor planets &
asteroids can be plotted
on charts and added to
plans.
Import facilities for data
on comets and minor
planets.
PDA
support
for
Astromist,
Planetarium
for Palm, and PalmDSC.
. . . . . . . . . . . . . . . . . . . . . . . .
3
Once you’ve got your location or
locations registered, it’s time to
tell AP the specific scopes and
eyepieces you’ve got in your
equipment inventory. It will use
this data for computing field
sizes in its charting module, in
assisting you in filling-in your log
entries, and in determining
object visibility for a particular
scope/eyepiece combo.
I found it significantly easier to
set up eyepieces and scopes
with AP than with TheSky 6. In
part, this was because of the
long and constantly updated lists
of scopes and oculars in
AstroPlanner. The program has
the most extensive list of
eyepieces I’ve seen. I was
amazed, for example, to find my
beloved WO Uwans—not yet a
household
word—there.
In
addition
to
scopes
and
eyepieces, you’ll also be allowed
to tell AP about your inventory of
filters—OIIIs, UHCs, etc. – and
what AP calls “visual aids,”
barlows and focal reducers.
4
When you’re done in Resources,
“Preferences” is next on your
agenda. This item is the last
entry under the Edit menu. One
thing Preferences does is allow
you to set, well, your preferences
as far as program appearance
and function go. At this early
stage of the game, you may
want to just leave these settings
at their defaults. You’ll need to
use AP for a while before you
start monkeying around with
fine-tuning. Anyhoo, I think you’ll
find the program looks and acts
pretty “right” as shipped.
One other thing you’ll find under
a
Preferences
tab
(AP’s
Windows version is BIG on
tabbed menus, which, in my
opinion is a good thing), is a
place to tell the identify your goto
telescope. These days, most
programs use the ASCOM
application for goto scope
interfacing, AP, however, has its
own built-in drivers, so there are
no additional “external” programs
to load or mess with. The trade
off, of course, is that when new
scopes or features come out,
you have to rely on Ilanga to
update the drivers. ASCOM
releases tend to come very
quickly on the heels of new
scope and new scope firmware
introductions.
While you won’t use an external
program for scope interfacing,
that doesn’t mean AP can’t
interact with external programs.
Via the “External” tab, you can,
for example, tell AstroPlanner to
work with Cartes du Ciel, the
famous shareware planetarium
program. With CdC enabled,
clicking on AP’s Field of View tab
will automatically bring up Cartes
with its display centered on the
same spot as AP’s Field of View.
Using CdC with AP gives the
program more robust charting
capabilities than those contained
in its own charting module
(which we’ll discuss shortly).
After you’ve finished with all this
configuratin’, you can actually
start using the program. You’ll do
that by developing observing
plans which are displayed on the
program’s main screen, the one
found under the “Observing” tab.
How do you develop a plan? You
may not have to. Plans, lists of
objects, can be downloaded from
the AP website via “UserContributed Plans” under the File
menu (assuming you have an
Internet connection). Once a
downloaded plan is saved on
your hard drive, it is opened with,
surprise, “Open,” which is also
found under the file menu.
Let’s say none of the User Plans
in the AP library suit your fancy,
though. Maybe your idea of the
“best” spring DSOs differs from
that of Robert Burnham or Scotty
Houston. If so, it’s very easy to
put your own list together using
. . . . . . . . . . . . . . . . . . . . . . . .
Skywatch
the search and selection tools
found under AP’s “Planning” tab,
the spot where you find and
choose objects for inclusion in
your list. Or, if, like me, you’re
lazy, you can quickly develop a
list by using the program’s Plan
Creation Wizard.
Choose this option from under
the File menu and you’ll be
presented with a dialog box that
will allow you to set the criteria
the program will use for plucking
candidate objects from its
enormous array of databases.
You’re
allowed
to
select
constellations, catalogs, object
difficulty (based on the aperture
of the scope you have selected),
object types, and numbers of
objects per object type. Once the
program has a list displayed, you
can go through and select only
the objects you like, or you can
choose ‘em all. Selected objects
will appear as a list in the
Observing tab and will comprise
an Observing Plan you’ll name
and save.
Don’t like wizards? Know exactly
which objects you want in your
plan? It’s easy to retrieve these
objects yourself starting from the
main Planning tab. When you
want to add an object, click “+,”
just like you did when you were
adding
eyepieces
and
telescopes.
Next,
enter
something in the field above the
“Lookup ID” button in the lower
left-hand area of the screen.
Something? Yeah. You can
enter NGC 7293. Or you can
enter NGC7293. Or you can
enter “Helix.” You can even just
enter “7293” if you want (but be
aware that if you’ve got more
than the NGC catalog selected,
you’ll probably get a LOT of
“hits” that way). AP is the most
forgiving astronomy program I’ve
seen when it comes to entering
search parameters. Many similar
programs will return zero results
if you, for example, enter
NGC7293 instead of the NGC
7293 the software expects.
When you hit the “Lookup”
button, another window will pop
up, and you’ll be asked to
choose the catalogs you’d like to
search. The fewer catalogs, the
quicker the search, natch. When
the searching is done, you’ll next
see a window that lists your
“hits.” Select the object you had
in mind from this list, click the
“Add Selected” button, and your
choice will appear on the list on
the main Planning tab. When
you’re all done, you can click the
Observing tab and see your
objects in a neat list ready for
formatting or whatever else you
want to do with them.
On the observing tab, the first
thing you want to do is save your
new Plan (via “Save” in the File
menu). The next thing you’ll
probably want to do is impose
some kind of order on this list by
sorting the objects. That’s easily
done
by
clicking
column
headers. Want to sort the objects
by constellation? Click the
“Constellation” header at the top
of that column. Want to reverse
the sort order? Click again.
Chances are, you won’t like the
horizontal
arrangement
of
columns. If you’re like me, you
think “Size” is more important
than “RA” and “Dec,” for
example, and want that column
to come right after “Object ID.”
With AP you can straighten
things out. Just go to the edit
menu, to Edit/List columns.
Then, drag and drop “Size” into
the place in the order of columns
where you think it should go.
This
column-arrangement
capability, one of the nicest
features of the program, one
that’s sorely lacking in competing
packages, is saved with your
plan.
. . . . . . . . . . . . . . . . . . . . . . . .
5
eyepiece. Yes, unlike most star
parties, Chiefland has wireless
Internet on the field, but you can
have the program download
batches of pictures and cache
them ahead of time before you
leave for the star party.
What else do you do in the
Observing Tab? Just about
everything. This is your home
base, and displays information
about current conditions, object
status, and telescope position.
The controls here allow you to
send your goto telescope to
objects and display a chart of the
field it lands on. You can
download object images here.
You can even check sky
conditions.
Toward the bottom of the screen
you’ll find some helpful graphics
that show the selected object’s
elevation plotted against time for
the current evening in one pane
and for the months of the year in
the other. The Moon and Sun
are also shown in these
diagrams, making it easy to see
when your target will be high in a
dark sky. To the right of these
two pictures there’s a pair of
compass-like indicator needles
that show “which direction” and
“how high” for the current object.
There’s a lot of functionality
packed into this attractively
6
designed screen, but some of its
most interesting capabilities
involve the Internet. Worried
about the weather? Click Clear
Sky Clocks in the “Observations”
menu and, assuming you have a
live Internet feed, you’ll be
rewarded with a CSC for the
currently selected site (pull
downs at the top of the program
screen allow you to select site,
scope,
and
observer).
Wondering whether the object in
the field of your eyepiece is
really the one you’re after?
Right-click on the object in
question and you’ll be given the
opportunity to download a
Digitized Sky Survey image. Not
only that, these retrieved images
are cached on your hard drive
for future use, and can be
displayed for a selected object
any time you choose.
I found this image retrieval
feature just a godsend last fall at
the Chiefland Star Party. I was
doing dimmish little galaxies in
the Fornax cluster, and being
able to look at their pictures
really helped me see them in the
What else do you do in
Observing? As above, you can
send your goto scope to list
objects, which works incredibly
well with my Meade and
Celestron CATs. Select an
object in your plan. Click the
“Slew to Object” button on the
main screen. Telescope goes
there. That’s all there is to it. You
can also push a button and
display a chart of the scope’s
current field of view. If your
telescope supports it, you can
even sync on the object without
fussing with your hand controller.
You’ve selected an object, sent
the scope there, verified its
identity with the help of the DSS,
and done a lengthy observation.
Don’t you want to record what
you’ve seen for posterity? Yeah,
I can hear you grumbling about
that. Look, when you’re ready to
make a log entry, you don’t even
have to leave the Observing tab.
Just hit the “+” found in the lower
part of the screen, just below the
little “Observations” window. You
can
then
type
in
the
“Observation Notes” space to
your right, select the equipment
used in the observation via pulldowns, and give your object a
“rating.” AstroPlanner’s logging
system is something I don’t hear
too many people talking about,
but in my opinion it’s one of the
best features of the program.
Like most of you, I find logging a
pain, and wouldn’t do it if I had to
go to any trouble at all to do so.
Logging is so easy with AP,
. . . . . . . . . . . . . . . . . . . . . . . .
Skywatch
is “Field of View.” And that is just
that. While AstroPlanner’s chart
drawing system is capable of
showing swatches of sky up to
60 degrees in size, drawing
constellation lines, and doing
most of the things other charting
engines do, it’s really most
suited to doing eyepiece-sized
“finder charts.”
however, that I actually like
making entries.
One thing to keep in mind as
you’re working in the Observing
tab is that you’re normally
working in real time. If you want
the program to use a specific
date and time—for an evening at
next week’s star party, for
example--you must go to “fixed
date” operation via a button at
the top right of the screen. Poke
it, and you’ll be confronted with a
window that lets you choose the
date and time of interest. Having
date/time correct is important,
since it affects not just the Moon
phase
and
rise/set
times
displayed on the Observing tab’s
screen (nice), and the object
elevation/time graphics, but also
a rather important and valuable
facility.
You can instruct the program to
highlight list objects that are
currently visible. This is a real
time-saver in the field. You don’t
have to look at rise-set times or
squint up at the sky. One glance
at your list shows you, via
highlighted entries (you can
select the highlighting style in
Preferences), WHAT’S UP. You
can set the highlighting to show
other things, too, including “not
visible,”
“observed,”
“not
observed,” etc., but I find
“visible” most valuable.
There are lots of catalogs and
options available in this tab,
including the ability to plot the
stars from the Hubble GSC,
Tycho II, and even the USNO B
cat (if you’ve got the data disks),
but AP’s somewhat simplistic
charting system makes these
resources less than useful
unless you stick to eyepiecesized or slightly larger areas. For
example, if you select a 10
degree field and have the
Hubble GSC stars turned on,
you’ll get 10 degrees of sky, but
in the form of a completely
whited-out
screen.
Two tabs down; two to go. The
next one over from “Observing”
AstroPlanner’s chart engine, you
see, won’t automatically adjust
stellar magnitudes when you
. . . . . . . . . . . . . . . . . . . . . . . .
7
zoom out. It will warn you that
you’re about to display LOTS of
stars, however, giving you the
chance to change your mind or
turn off the GSC (or whatever).
Charting is also a trifle slow.
Change anything, and you’ll get
a five second countdown before
your chart/changes appear. If
you’ve got a large star catalog
like the GSC enabled, there’ll be
a further short delay as its stars
are plotted. I was never annoyed
by this time lag, but I was often
aware of it.
While the basic Field of View
system is a little minimalist, it
does do a lot of cool “extra”
things. Like, for example,
superimposing an astrometric
reticle; one similar in layout to
the
complex
reticle
on
Celestron’s
and
Meade’s
astrometric
eyepieces.
Numerous other reticles are
also available, including the
Telrad and Rigel Quickfinder.
There are some interactive
features too. You can add
charted objects to your plan
with a click, center objects in
the Field of View with a click,
and send your goto telescope to
these objects with a click.
Yes, AstroPlanner’s charts are
somewhat rudimentary, but are
just fine if, again, you’re content
to limit yourself to eyepiecesized fields. How easy is it to
tailor these fields for your
specific eyepieces and scope?
Very easy. Based on the
information you entered into
Resources, you’ll have pull
downs that contain the data from
your
equipment
inventory.
Setting the field size to reflect
your current scope/eyepiece
8
takes no more than a couple of
seconds.
No, charting is probably not
AstroPlanner’s strong point. But
there are a couple of things to
keep in mind in this regard. If
you’re mainly a goto user (and
many of AP’s fans seem, like
me, to be heavily into goto),
you’ll rarely need detailed largescale charts. Something four or
five degrees wide at max,
showing
you
what
else
interesting
is
in
the
neighborhood, is usually all you
need, and AP’s charts are more
than able to do that. Need morebetter-gooder? Remember, you
can set up Cartes du Ciel to
work with AP. The charts CdC
generates are easily as detailed
and useful as those from any
other astronomy program.
What’s left? One tab: Sky. This
one is easy enough to figger out.
Clicking on it brings up a round
all-sky chart tailored for the
selected location and current
program date and time. It will
show some of the things you’d
expect of a good planisphere—
bright stars with names and
constellation figures. It won’t
show some of the things you
would expect of a planisphere—
like the bright Messiers. In return
it will show some things your
planisphere can’t or doesn’t—the
planets and meteor shower
radiants.
“Sky” can also be set to display
goto scope alignment stars.
These are mostly of the Meade
variety, since this part of the
program is where Best Pair II
resides, but, frankly, Meade and
Celestron use (mostly) the same
stars anyway. If you’ve got a
Meade
(or
maybe
even
Celestron) scope and are using
an alignment mode that requires
you to pick stars, you can use
Best Pair. Push the “Find Best
Pair,” button and the program
will list the most effective pairs of
alignment in order of decreasing
goodness.
. . . . . . . . . . . . . . . . . . . . . . . .
Skywatch
I was a Virgin
at the
Chiefland
Star Party
Joe Kuhn
So is that it? Is that all AP does?
Not hardly. How about scripting?
Wut’s they-at? The ability to
write small computer programlike sets of instructions that
AstroPlanner will execute. What
good is that? It makes the
program potentially able to do
just about anything. I, for
example, mentioned to Paul that
I wished there were a way to
have the program find pairs of
deep sky objects located close to
each other. “No problem,” he
said, and soon sent me a little
script that did just that, and
which also allowed me to select
numerous parameters for my
close-pairs searches.
Yeah, AP does one heck of a lot.
This may, in fact, be the most
feature heavy program we’ve
seen yet, at least in the
planning/logging genre. In every
area, I’ve just skimmed the
surface—remember that 300
page user’s manual. I have hit
the high points, and I think I’ve
given you enough info to get you
started using this fine program
productively. Oh, I’m not just
being nice when I say “fine,”
either. As I hinted earlier, I find
AP is now 50% of the astronomy
software I use day in and day out
(the other 50% being TheSky 6
Professional). It’s that good.
Skeptical? This is one you can
afford to try. Actually, you can try
it before you pay anything. Just
go to
http://www.ilangainc.com/AstroPl
anner/index.html
and proceed to the download
area. You’ll find a fully
operational version you can use
FOREVER without paying one
red cent. It’s limited in the
catalog area (Messier, NGC, and
Yale Bright Star only), and there
are a few fancy features you
won’t be able to use, but the free
version will definitely allow you to
try AP on for size. Frankly, most
people don’t even bother with
“free AP.” The full version on CD
is only 40 bucks, and the
downloadable
AP
is
an
astonishing 25 (it’s identical to
the CD version, but you have to
do all the downloading, including
all those big catalogs).
How can you lose? You can’t,
good buddy, you can’t.
A little bit about myself first; I am
a retired Navy Chief Petty Officer
with 13 years Sea Duty. During
those years, yes, I lived a very
Spartan lifestyle. Since I retired
in 2001, though, I’ve come to the
conclusion that I am not pioneer
stock and that I like the
amenities.
I attended the Spring Chiefland
Star Party (aka, “Spring Picnic,”
Ed) this past April as a newbie to
any regional/out-of-town Star
Party. I am a member of our
local Astronomy club here in
Mobile, Alabama, and planned to
meet some of my fellow
members in Chiefland, Fl for a
couple of days of stargazing.
As someone who had never
gone to one of these events, and
who didn’t know quite what to
expect, I believed I should have
all my bases covered.
My
minivan seemed like it would
explode at the seams. How did
the pioneers do it?
I had
snacks, sleeping bag with the allimportant mat, drinks, books,
star maps, tools, stargazing
goals, extra clothes, bug spray
and, oh yeah, my Nexstar 8i Se.
I didn’t plan on staying at the site
as I had a reservation at a local
motel (some pioneer stock!).
When I arrived, after missing my
turn, ending up somewhere in
. . . . . . . . . . . . . . . . . . . . . . . .
9
Florida, and getting directions
inch dobsonians. Wow!! Again.
Eagle’s Nest
Observatory
Walter Dutchak
Anyone with a fairly large SCT to
carry around has probably
dreamed of the day when they
could have a permanent dwelling
place for their scope, an
observatory.
from two locals hanging out at
the local gas station, I met up
with George who is the President
of our club. He was all set; tent,
van
with
large
sunshade
attached, and many other items
too numerous too list. Obviously
he was not a virgin at this.
We set up our scopes and
compared notes for the coming
evening. I was amazed at the
telescopes and living quarters
(huge RVs and giant tents) of the
other visitors. Obviously they
were not virgins at this either. I
am detecting a trend here. My
plan was to stay all night and
leave at sun-up.
When the stars came out I was
amazed. I had forgotten what
dark skies were. I haven’t seen
a sky like this since I was last at
sea.
The views through my
scope were amazing!! Omega
Centauri. Wow!!
The Ring
Nebula. Wow!! I’ll let it go at
that.
I then went over and
looked through 18-inch and a 25-
10
The 18-inch dob offered the
most spectacular views of Saturn
and Jupiter I have ever seen. I
had to check to make sure he
hadn’t taped a picture over the
eyepiece!
The 25-inch dob
owners were looking at galaxies.
Galaxies I have never even
heard of. Quite amazing.
Lastly, while trying to defrost my
car windows, I did the newbie
thing and white-lighted the field.
Everybody was so generous with
the blessings said in my
direction! I tried to sleep in my
van but found that’s not for me.
Either the van has gained lumps
or I have.
All in all, I had a wonderful time.
The people were great and the
views spectacular.
I think,
somehow, I will have to have a
rental RV to sleep in onsite. I
need my ESPN and such! I can’t
wait for my next star party and
more great times.
Although my SCT is only an 8inch, for me it was time to build it
a permanent home. I entered
this astronomical hobby a bit late
in life, about 3 years ago at 57.
Although I initially got interested
at 16 when I belonged to my
high school Astronomy club and
was grinding my first 6” mirror, I
got sidetracked into other
hobbies such as classical guitar
and flying model airplanes.
About three years ago I got a
yearning to purchase a 6-inch f/4
Newtonian, and then, a year
later, an 8-inch SCT. Now I was
into the hobby full swing.
The problem was, it was difficult
getting the SCT outside to view.
The 6-inch was fairly easy, but
the 8-inch not so, and that is the
one on which I had invested the
most money.
While an 8-inch may not seem
like
a
huge
scope,
my
circumstances may be a bit
different from yours. About 4
years ago I had brain surgery
and it left me with a bit of a
balance problem and ruined my
binocular vision. This makes it
difficult for me to carry anything
over 10 pounds, since I use a
cane to maintain my balance
while walking. Therefore, a
permanent dwelling place for my
SCT was a must.
. . . . . . . . . . . . . . . . . . . . . . . .
Skywatch
Although I have no expertise in
building structures (my only
previous building project was a
dog house, which I built for my
dog, Rex, when I was 16 years
old), I took on this project as a
challenge as well as the
summer’s “fitness program.” I
had been reviewing pictures of
observatory sheds of all sorts in
the magazines over the past two
years, so I had an idea what to
build. Naturally, I drew up
several plans, which were
endlessly modified.
As a former school teacher and
electronics
engineering
technologist, I thought I had a
chance at success, so I finally
said to myself “Well, Walt, let’s
get to work or it will never get
built.” Because I am not an
experienced builder, I probably
spent too much on material that
was not required, and maybe
made some poor choices, but
still I completed the job and now
have a functional observatory
shed.
The
total cost was
about $1300
Canadian,
which would
be
about
$1100 U.S.
Perhaps you
could
do
better
on
yours.
The project
started
by
digging
a
hole for the 6ft. x 6ft. cement
slab foundation (picture 1,
below). I bought 35 bags (30 kg
– 66 lbs) of Quikrete concrete
mix for the slab, the surrounding
rain run-off skirt, and the inverse
bucket-shaped foundations for
the post jacks. The outside roof
support rails
and
posts
are made of
pressure
treated
lumber. The
roof is built
using 2x4s,
2x3s and ½”
plywood and
then
covered with
white
corrugated
PVC roofing
panels. The vinyl siding is also
white
to
reduce
inside
temperatures during hot summer
days.
Picture 2 shows the finished 6’ x
6’ cement slab with anchor bolts
for the wall frames and the
fulture telescope mounting pier.
It took one yard of ¼ chipped
stone to fill the hole on which the
cement slab sits. The slab is 4
inches thick.
Pictures 3 and 4 show the shed
progressing from walls to the
completed structure. Solid white
stain was used to seal the wood.
The telescope dew prevention
system that I built runs off of a
12-Volt power pack, but I usually
power my Meade 8-inch SCT
from 110V. Therefore, to avoid
pulling out a long extension cord
for every observing session, an
underground cable was laid and
a ground fault protection outlet
was installed inside the shed
(picture 5). The underground
cable goes from my garage to
the shed, and at the garage I put
in a junction box where I spliced
in a section of heavy-duty
extension cable that gets
plugged into the garage power
outlet whenever I need power
inside the observatory. I chose
this
method
instead
of
connecting to the live wiring
because it was simpler, and
ensured
that
power
was
provided to the shed only when I
. . . . . . . . . . . . . . . . . . . . . . . .
11
12
. . . . . . . . . . . . . . . . . . . . . . . .
Skywatch
wanted it there.
Vinyl siding was an extra cost,
but it does improve the
appearance and covers up many
of
my
construction
inadequacies.
The door and a window on the
far side of the shed still have to
be built. The window will be of
solid plywood (currently covered
with a scrap piece of corrugated
PVC roofing – see picture 8
below).
The window was required so the
permanently mounted telescope
would have access to view an
artificial star (PicoStar – brand
name) placed at a minimum of
15m (50 feet) from the telescope
for collimation of the optics.
There will be a painted version of
a window on the wood window.
In picture 8, below, the roof has
been rolled off the shed onto the
support rails. The top panel of
vinyl siding is removed from
each of the four sides before the
roof can be rolled off. These top
panels of siding are not
permanently
fastened
and
merely slip into the grooves of
the vinyl corners and under sill
trim. Also, the bottom of each
panel snaps into a slot on the
panel below it. This was the
simplest method I could think of
to cover the spaces left between
the roof and the tops of the walls
when the roof is mounted on
caster wheels. Of course, if I
had planned it properly, I could
have had the walls 8” higher to
cover the caster wheels and
meet the roofline very closely.
The picture shows the roof
construction and caster wheel
mounting. Each caster wheel
can handle a 180-pound load. I
don’t think that the entire roof is
any more than 200 pounds.
With caster wheels it is better to
have a heavy roof rather than a
light one. The weight provides
better rolling traction and less
likelihood of the roof being blown
off by a light wind. A lighter roof
is desirable when a track system
(such as garage door or barn
door tracks) is used. In those
cases the track contains the
wheels and thus the roof is held
down by virtue of being attached
to the wheels that ride inside the
track. Also, a lighter roof puts
less stress and strain on the
wheels in a track system. At any
rate, this design uses caster
wheels and therefore it has a
heavier roof.
Inside the shack, when the
observatory is closed, the roof is
anchored to the walls via
turnbuckles that are tightened by
hand.
These work very well,
and prevent the roof from being
lifted by a strong wind. Also
inside the shack, in the larger
corner next to the door, there is
a built-in triangular table surface.
Well that was this summer’s
project. Boy, am I exhausted! I
wish to thank my spouse RoseMarie, who was a faithful
assistant in holding boards for
me and various other tasks.
Thank you dear!
Image Quality,
Modulation
Transfer
Functions and
Chocolate
Drew Sullivan
What is the purpose of a
telescope? To gather light? To
make far things appear nearer?
To give you something to tinker
with on Saturday afternoons?
One way to think of a telescope
is as a device that transfers
information from “there” (the
Whirlpool Galaxy) to “here”
(where you’re standing in your
driveway tonight).
A telescope isn’t a device that
transfers information in one
single step. It is better thought of
as a chain of linked devices that
transfer information from one
subunit to the next until finally
you get the the information. That
information might be, in part, the
location of a star, or the
wavelength of light or a number
of other things, but what the
telescope is doing is getting
information to you through a
chain of intermediate steps.
There is a way to describe that
information
transfer
mathematically,
called
a
Modulation Transfer Function
(MTF). All you need to know
about
modulation
transfer
functions is:
a) The value of any MTF is a
number between 1.00 (all the
information
was
transferred
without loss, without blurring and
without error) and 0.00 (you got
only random noise).
. . . . . . . . . . . . . . . . . . . . . . . .
13
b) When there are several steps
involved, the MTFs of each step
is multiplied with those of all the
other steps to determine the
MTF of the system as a whole,
that is to determine the final
amount of information that got to
you. If you divide the process
into 4 substages with MTFs
respectively of 0.99, 0.97, 0.98
and 0.91 you will have an MFT
for the system as a whole of
.856.
Typical MTFs are in the 0.800.99 range.
No MTF can ever be greater
than 1.00. That is really
important.
That
means
information is lost in any step in
that bucket brigade is lost
forever. If you lose some of the
spatial resolution or color at the
level of your diagonal, no
eyepiece, no matter how nearly
perfect, can recover that lost
data. All a near-perfect eyepiece
can do is to pass on the
(degraded)
information
it
received without further loss of
data.
There are a many stages in that
passing of information. The
information has to pass through
your corrector plate (you do have
a dew shield to keep your
corrector plate dew-free, right?),
then the primary mirror (the
mirror is focused and locked
properly, isn’t it), then the
secondary mirror (you, being
careful, did check collimation
early in the evening), the
broadband filter, the diagonal,
and the eyepiece. And that isn’t
even mentioning the quality of
the secondary mirror, the place
in the sky you are choosing to
look (near zenith or at 20
14
degrees, through a lot more
atmosphere), the tracking error
in your mount or the jiggle in the
ground that occurs when you ask
your friend to come over and see
how well your mount is tracking.
If
you
are
doing
astrophotography there are more
steps still - limits in information
recorded due to pixel size, loss
of data due to the format in
which you store your data etc. In
each of those steps you likely
lose at least a little information.
I don’t know the MFT of your
pretty-good eyepiece. (Now he
tells us). Nor the MFT of that
other guy’s better-but-muchmore expensive eyepiece. But I
can make a few observations.
In general you are going to get
“pretty good” (lets say an MFT of
0.80) fairly easily. An MFT of
0.90 is going to be harder (twice
the effort at aligning the mount,
twice the expense for an
eyepiece that much better).
Getting from 0.90 to 0.95 is
going to probably be twice as
expensive again, and getting
from 0.95 to 0.975 yet another
doubling of time, sweat and cost.
You can get any single stage to
“adequate” easily but you will
encounter a logarithmically rising
barrier to each successive,
smaller improvement.
And you will never get to 1.0000.
So if you have all these MTFs of
each
substage
multiplying
together, what is your shrewdest
approach to improving your
image quality?
1) The worst MTF is going to
have the greatest effect on the
MTF of the whole system. If you
have a good OTA, a good
eyepiece, a good diagonal and a
really cheap broadband filter, the
broadband filter is going to
cause most of the data loss.
Also,
since
approaching
perfection has a logarithmically
greater cost, attending to “The
Weakest
Link”
in
your
Information Transfer System is
the easiest, fastest, cheapest
improvement you can make and
the one which will give the
greatest improvement in the
overall system.
2) As a sort of a corollary to #1,
you are going to have a whole
series of values, 0.98, 0.975,
0.967 , , , All of us, no matter
how much time, energy and
money we have to throw at the
problem, have a finite amount
we can commit. So you want to
have the values of all those
substeps to be about the same
in value.
You may want a “pretty good”
OTA with a pretty good diagonal,
a pretty good mount, aligned
fairly well and a reasonable
quality eyepiece. That guy over
there has put more time and
money into each of those
subunits and he is getting better
data. But it doesn’t make a lot of
sense for you to put enormous
effort or expense into just one
part of the system. If you want to
improve your image quality,
improve several things a bit,
keeping the entire system at
about “harmonious” as to quality.
Don’t get a Paramount and then
put a cheap refractor on it. You
won’t get any real benefit from
that superb mount because
having one step in a long chain
be at an MFT of 0.99999 when
all the rest are at 0.8 won’t give
you much benefit, won’t bring the
. . . . . . . . . . . . . . . . . . . . . . . .
Skywatch
final product of all those
individual MTFs appreciably
closer to 1.0. Not enough data is
getting to that one step, and the
data it is sending on is not being
preserved well enough, to make
any appreciable difference.
3) Try to eliminate entire substeps in the information transfer
if you can. You can get the MFT
of your diagonal to 1.000000000.
Do you want to know how? Don’t
use a diagonal. Attach your CCD
directly to the focuser or optical
back. No loss of spatial
resolution due to reflectivity of
the diagonal that way! Any step
you can eliminate entirely isn’t
going to lose any spatial or
spectral information either. For
the mathematically inclined,
(0.98)^6 is larger than (0.98)^7.
4) How do you decide what
“components” are? How do you
break your information transfer
system into discrete steps? Use
the Theory of Limited Choice.
Only break things down as far as
you have an ability to effect a
change in them. You can
consider “eyepiece” a unit with
an MTF. You can also consider
“first lens element of eyepiece” a
unit with an MTF and “second
lens element” another unit. Or
you can consider “coating on first
surface of third lens element”
one unit . Each of those does
have an MFT. But that approach,
dealing with lens elements or
lens surfaces, makes sense only
if you are an eyepiece designer,
and can change the coating on
the surface of one lens element.
If you are “a mere buyer of
eyepieces made by others” all
you need to consider is “this
eyepiece” vs. “that eyepiece”.
That is the only decision you can
make and the only effect you can
have on the system.
5) If you want really high quality
imaging, if you want almost all
the information that is there, the
Whirlpool Galaxy here, your
driveway, you need to pay a lot
of attention not to some, but to
all of the substeps in the
information transfer.
This is where the Chocolate
comes in. You were waiting for
the Chocolate, weren’t you?
Edwin Mars was, at one point in
his life, the third richest person in
the world. He made his fortune in
Chocolate. He owned Mars, the
company that made Mars Bars,
M&Ms (“Mars and Mars”), Ethel
M Chocolates (His mother was
Ethel Mars) Three Musketeers
and just about any other quality
chocolate you can think of that
has “M” in the name. He made
his
fortune
because
the
chocolates were really good.
People in his company were
constantly telling him he could
do better for himself (be the
second richest person in the
world, I guess) by using a slightly
less finicky source for his butter,
or use a source of sugar that
was “almost as good and a lot
cheaper.”
you will find that the final product
deteriorates quickly even though
you think you are only making a
small degradation in one step in
a large chain.
So:
Try to work to improve the
weakest link in your system,
rather than perfecting the
strongest link.
Try to eliminate any step you do
not need.
And when you get to the point
where your quality is getting very
good, don’t let yourself be
incremented.
Indoor
Collimation:
Rainy Day Fun
for SCT Owners
Ron Niklasson & Eric Smith
During a meeting of our regional
astronomy
club,
Northwest
Georgia Astronomy Association,
some
discussion
centered
around collimation.
As the
collimation on a member’s scope
was checked, we realized that
But Edwin always answered with “I we needed to adjust the
collimation of our LX200 10-inch
will not be incremented.”
scopes.
We’ve never been
really
happy
with the visual detail
I don’t know if Edwin Mars knew
about MTFs, but he did know while observing and immediately
that as soon as you start giving looked forward to making this
ground in any one small area of adjustment. Unfortunately, good
an
important,
sophisticated skies are rare in Georgia during
process (I am talking about the summer. We needed to find
serious things here. Snickers another way.
Bars, not Paramount GEMs),
. . . . . . . . . . . . . . . . . . . . . . . .
15
First on our agenda was the
installation of Bob’s Knobs. This
is an easy and inexpensive
upgrade
for
a
SchmidtCassegrain.
This less than
$20.00 kit includes three metal
threaded knobs designed to
replace the allen-wrench screws
used to adjust the collimation.
Installation is simple. Point the
scope downward, remove and
replace each screw one at time,
and then perform a rough
adjustment.
The
rough
adjustment is achieved by
standing 10’-15’ at the front of
the scope and looking at the
reflection of the mirrors –
adjustments with the knobs are
made until the view is concentric.
At this point we needed a star.
Yeah, right!
A star and
reasonable seeing during a
Georgia summer is rare. So, we
made a star! We’ve read online
that others have collimated their
telescopes indoors. We did the
same. Upon taking our scopes
to a local middle school (Eric is a
16
teacher), we set up at one end of
a very long hall (200’+). At the
other end of the hall, we created
an artificial star. This artificial
star consisted of a light that was
masked with aluminum foil. We
used a small needle to make a
very small hole in the foil. From
the 200’ distance, the light
through the tiny hole in the foil
appeared just like a bright star!
Unfortunately the foil also
resulted in some odd reflections
when viewed through our
telescopes. To remedy this, we
placed thick black paper over the
foil and made another very small
pin-prick hole. We now have a
star!
See Tom Whicker’s
MAPUG post for further reading
regarding building an artificial
star
at
http://www.mapugastronomy.net/AstroDesigns/MA
PUG/StarTest.htm .
It was now time to get down to
business. We followed Thiery
Legault’s procedures for fine
tuning the collimation. First, with
the artificial star centered in a
26mm eyepiece, we slightly
defocused just until the resulting
view presented rings and a
bright central point. Here is the
first
indication
of
poor
collimation1. The rings must be
complete and concentric, and
the central point must be
centered. If not, the collimation
screws, Bob’s Knobs in our
case, must be adjusted until the
desired view is achieved. This
process is repeated at ever
increasing magnification.
We
started at 96x, then moved to
166x, 208x, 277x, and finished at
657x. Outdoor seeing would
have never allowed the higher
magnifications. At the highest
magnification, the completely
focused view should result in the
highly coveted airy disc. See
Thiery Legault’s site for more
detail
and
illustrations
at
http://www.astrosurf.com/legault/
collim.html .
We worked together.
As I
manned the eyepiece, Ron
turned the collimation screws.
As
we
approached
final
collimation, we both examined
the view.
After doing this
together, neither of us would do
it alone again. However, the
next time we collimate indoors,
we’ll make a few changes to our
setup: 1) build a frame for the
foil and black paper to avoid any
odd reflection of light through the
pin-prick hole, 2) fine tune our
finder scopes, so that we can
more quickly acquire the artificial
star, 3) probably start at a lower
magnification, 63x or so.
Oh, results you ask? Well, Ron
took his scope out a week later
and in not-so-good seeing
viewed the double-double in Lyra
at 277x. Splitting this pair of
duos was a piece of cake!!! And,
planetary detail on Jupiter was
remarkably better than ever
observed before.
So, on some rainy or cloudy day
when you’re moaning about not
being able to observe, set up an
artificial star and fine-tune your
. . . . . . . . . . . . . . . . . . . . . . . .
Skywatch
Schmidt-Cassegrain.
Then,
when you can get out under
clear skies, the view might just
be the best you’ve ever
experienced.
Eric is a middle school teacher in
Dalton, GA, and Ron is a Ford
electronics
technician
in
Calhoun, GA .
1. Previously, we had been
defocusing too much.
Too much defocus results
in the inability to detect
the lack of concentric
quality within the rings
Review: Pocket
Sky Atlas by
Roger W.
Sinnott
Sky Publishing, 2006, 122
pages, page size 6” x 9”, spiral
bound, full color charts printed
on dull-white heavy stock.
transparency copy of this page
using an 8 ½” x 11”sheet of
overhead projector film by
running it through a copy
machine. I cut out the angular
scale and then I cut the Telrad
bull’s eye in a long rectangle
about 1” x 3“ leaving the bull’s
eye at one end and using the
other end as a handle to move
the finder around the map. I put
these in a small envelope and
tucked it inside the atlas.
The contents page lists the best
months to view the objects by
R.A. range during evening,
midnight and mourning and on
which chart to find them.
Towards the end of the atlas,
there are four close-up charts of
some of the most observed
regions of the sky. The index is
broken down by star name,
galaxies, open and globular
clusters, bright, dark, and
planetary nebulae. The Caldwell
and Messier catalogs are listed
separately. The back cover has
the chart key for both north and
south hemispheres. There are
80 main charts containing
30,796 stars to magnitude 7.6.
Jack Fox
This atlas is thoughtfully laid out
for use at the telescope in the
field. The paper is a heavy dullwhite stock that does not show
reflection under a red light.
Because the book is spiral
bound, the pages lay flat freeing
up your hands. No more trying to
find a heavy object to keep the
pages from turning.
Inside the front cover you will
find printed a sample double
page chart layout with a legend.
Also printed is an angular
distance scale and a Telrad
bull’s eye.
I made a clear
The introduction explains in easy
to understand language how the
charts are labeled and arranged.
The same chart legend appears
on the first page of each chart as
well as the R.A. range and best
time and month for viewing. All
the charts are printed in color on
a white background for easy
reading under a red light. A
location guide to constellations
and what the Greek star letters
mean is also included.
Each page has the same basic
layout as any good star atlas.
The lines for the R.A and
Declination are clearly marked.
You will notice that a small blue
triangle with a number inside is
located on three sides of each
page. These triangles point to
the adjoining charts that make
up more of that part of the sky.
The number in the triangle
indicate which chart.
There are two printing errors in
the atlas on page 55 and on the
close-up Chart C.
You can
download the printable corrected
color pages from the Sky and
Telescope website. You then cut
and paste the corrected pages
directly over the page in the
book. I used spray adhesive.
Bottom line? This is the most
compac t and easy-to-use atlas
you’ll come across. It is very user
friendly and a must have to “grab
and go” with your favorite
telescope or binoculars.
Focus Aid
for the
ETX-125
Jack Fox
Need a spare lens cap or a
Hartman-mask type focus aid for
your ETX? I found that a Cool
Whip lid fits an ETX-125 OTA
perfectly. You can use it as a
travel lens cover and not have to
fool
with
screwing
and
unscrewing the heavy metal lens
cover. You also won’t have to
worry about dropping it or
stripping the threads. However, I
would still use the metal lens
cover for long term storage.
. . . . . . . . . . . . . . . . . . . . . . . .
17
First, draw a large circle 5 7/8” in
diameter (figure 1). Next draw
the 120 degree triangle in the
center of the circle using the
lid and press to mark the center
of the lid. Now without moving
the template, mark the centers of
the 3 small circles the same way
as the large by using the sharp
plastic lid. Be patient, the may
take a few minutes to cut
through. Cut out the other 2
circles the same way. Use fine
sand paper to smooth the inside
edges of the holes. Wipe both
sides of the lid with a damp
sponge or cloth to remove all
plastic dust.
Finally, if you want, you can
spray paint the top of the lid
only with black or ETX blue
paint that is made for plastics
(available at Lowes or Home
Depot).
This paint is not
suppose to flake off. Do not
paint the inside of the lid. You
don’t want to take a chance on
getting any paint on the lens
surface.
It may not be
necessary to paint it at all, just a
personal preference. The only
problem you may have is people
asking if you have any
strawberries to dip in the Cool
Whip!
measurements on the drawing
(13/16” up from center, 1 5/16”
down from center and 1 ¼” right
& left of center). The 3 small
circles are each 1” in diameter.
All measurements are from the
centerline of the large circle.
Next, cut out the drawing and
use it as a template over the
inside of the Cool Whip lid to
mark the centers of each of the
circles (large & small). The Cool
Whip lid as a small dimple in the
exact center of the lid to help
center the template.
I use the point of my compass to
gently
push
through
the
template’s large circle center line
and with the tip of the compass
still through the template, line it
over the dimple of the Cool Whip
18
point of the compass to press
through the templates center line
of each small circle. You now
have a pin hole marking where
you will be cutting out the 3 small
circles.
I use a quality drafting compass
that has a changeable cutting
blade to replace the graphite
drawing point. Set the lid with the
inside facing up on a piece if
thick cardboard or block of wood.
This way you won’t cut your
table and you have something
for the blade to cut into through
the lid. Set the compass to cut a
1” circle and place the sharp
point of the compass into one of
the small pin holes on the inside
of Cool Whip lid. Now begin
rotating the compass with an
even pressure to cut into the
. . . . . . . . . . . . . . . . . . . . . . . .
Skywatch
.
SPECIAL
SUPPLEMENT
The Latest in the World of Video Astronomy
Jack Huerkamp
For the Winter 2005 issue of Skywatch, I
prepared an article entitled “MallinCamTM
Video CCD Observational System” which
discussed my first steps into the field of video
astronomy.
Rather than repeat the
information here, I would ask the reader to
download a copy of that issue and review the
above article. In this article, I will describe
what has transpired in the field of video
astronomy over the last two years since I
received my first two MallinCamTM cameras.
The initial cameras I purchased from Rock
Mallin were the PRO B&W and the II Color.
They were limited to a total exposure time of
2.1 seconds and had no CCD sensor cooling
mechanism. In an attempt to control ambient
temperature effects on the CCD sensor, Rock
devised a fairly inexpensive, passive heat
radiator he called the Radiant Cooler. It
consisted of a pure copper strip attached to
the rear of the CCD sensor with thermal
paste. The copper strip also contacted the
camera’s metal case, and as long as it was
cooler than the CCD sensor, heat was
dissipated to the air. It was successful at
minimizing warm pixel formation; and when
the ambient temperature was cooler, it
worked very well. I had a chance to use my
Radiant Cooled cameras at New Mexico
Skies in June of 2005. Temperatures were in
the 40’s at the 7300’ elevation of this
astronomy facility; and the cameras –
especially the PRO B&W - performed
exceptionally well. The limiting magnitude of
the skies (7+) and the extremely low humidity
(10-15%) also assisted in my being able to
see objects visually with my 17.5” that are
normally attainable only with substantially
larger telescopes. My challenge object was
Hickson 50, a circle of 5 galaxies ranging
from magnitude 18.2 to magnitude 20. This
galaxy cluster is within 1/3 rd of a degree of
M97. All 5 components were seen live on the
screen of my 10.2” DVD player. Below is an
image from the original DVD recording made
while I was observing. The galaxies are faint;
but they are all there.
MallinCam ULTRA
In an attempt to help astronomers who
observe from hotter climates, Rock Mallin
accelerated his work on a Peltier cooler for
the cameras; and near the end of 2005, he
introduced the ULTRA. A custom made
thermoelectric cooler (TEC) was sandwiched
between the copper strip previously used for
the Radiant Cooler and the camera case.
The cameras were still limited to a 2.1 second
exposure, but the number of warm pixels was
greatly diminished. The cooler also resulted
in a slight increase in CCD detector
sensitivity.
Below are two images created
from the DVD recording done at the 2006
. . . . . . . . . . . . . . . . . . . . . . . .
19
Kisatchie Star Party.
The first is M100
showing the supernova discovered shortly
before the event.
At that event, I had the opportunity to test one
of Rock’s latest prototype cameras. This
camera had the Peltier cooler along with a
special circuit that he designed to extend the
exposure time from 2.1 seconds to 6
seconds. By increasing the exposure time,
not only did detail in objects increase, but the
live images actually had a smoother
appearance. There was less noise visible on
the monitor. I recorded images of M81 with a
stock 2.1 second ULTRA and with the
prototype 6-second camera and created the
comparison below.
The second is of the Running Man Nebula
near M42.
20
. . . . . . . . . . . . . . . . . . . . . . . .
Skywatch
The following stack of several 6-second
frames of the Horsehead Nebula starts
looking like a photo done with a dedicated
CCD imager.
Shortly after the 2006 Kisatchie Starparty,
Rock Mallin finished tweaking the long
exposure circuitry for his cameras.
He
introduced his latest cameras called the
HYPER. They incorporated all of the prior
improvements – Peltier cooler and variable
exposure times of 2.1 seconds and 6 seconds
– as well as an additional exposure time of 12
seconds. The processor went from 10bits to
12 bits, increasing the overall quality of the
camera’s output. My HYPERs arrived one
day before the 2006 Mid-South Stargaze held
at Rainwater Observatory near French Camp,
Mississippi, and I brought them with me in
anticipation of fully trying them out. Mother
Nature had other ideas and except for one
night, it was cloudy. However, using the
B&W HYPER on my 17.5” Dob revealed that
the camera was indeed a winner. Below are
several digital camera photographs of the 12”
monitor showing the camera’s output.
B&W HYPER
Centaurus A
MallinCamTM B&W HYPER
. . . . . . . . . . . . . . . . . . . . . . . .
21
The only adjustments made to the four
monitor photographs were to brightness and
contrast, the same adjustments that can be
made during live viewing. In addition, the
digital camera used to take them created the
“bluish” cast seen on the monitor shots. The
live monitor views were similar to the next set
of images.
Below are a few images made by stacking
frames from the DVD recording made at the
stargaze.
Crescent Nebula
Comet 73P
Eagle Nebula – Pillars of Creation
M51 – Whirlpool galaxy
Trifid Nebula
22
. . . . . . . . . . . . . . . . . . . . . . . .
Skywatch
screen. By changing to the Sony 418 AKL
CCD sensor, amplifier glow was virtually
eliminated while sensitivity was increased.
Finally, one could observe in full color while
achieving the gains in sensitivity previously
only available with monochrome video CCD
cameras.
M65
Brad Hewitt of Kalamazoo, Michigan provided
the above image.
He used his 18”
Obsession, MallinCam Color HYPER, and
MallinCamTM MFR-3 focal reducer with
M63 – Sunflower Galaxy
Color HYPER
Major advances in live image quality were
achieved with the B&W HYPER, as seen by
the previous monitor shots and images
created by frame stacking. Ho wever, the
greatest improvement occurred with the Color
HYPER. Not only did Rock Mallin add the
Peltier cooler, long exposure HYPER
circuitry, and 12 bit processing, he also
changed the CCD sensor.
All previous
MallinCam color cameras used the Sony 248
AKL chip, which suffered from amplifier glow
that affected about 30% of the left side of the
MallinCamTM MFR-3 Focal Reducer
extension ring along with a wireless
transmitter/receiver set to send the video
signal of M20 to his 52” Sony HDTV located
. . . . . . . . . . . . . . . . . . . . . . . .
23
inside his home. He froze the image on the
television’s screen and snapped a digital
camera image of it. He then moved the
scope slightly to view another portion of the
nebula. He did this three times and then
created the full color mosaic of three screen
shots.
Due to the bad weather at the April stargaze
and some medical issues that finally got
taken care of in June, I was unable to try out
my Color HYPER. I finally got a chance to do
so in mid-July. Below are three single frames
of M27, the Dumbbell Nebula, grabbed using
an AverTV Cardbus PC Card device. The
first was obtained with an Orion ED80 with an
f/6.3 focal reducer installed. The scope was
functioning at f/4.75.
The next was obtained using a Meade LX200
with f/6.3 focal reducer.
24
Bob Schilling of Tallahassee, Florida took the
last with his 20” Starmaster, MallinCam MFR3 focal reducer and 10mm extension ring.
Below are a few additional single frame
images showing what can be seen during live
MallinCam Color HYPER observing.
. . . . . . . . . . . . . . . . . . . . . . . .
Skywatch
gain is set to maximum. The two cameras
have very similar sensitivities.
For this
reason, interest in the Color HYPER is high.
Live Video Starparties on the Internet
Meade 8 at f/4
With the advent of high quality video using
MallinCam B&W and Color HYPER cameras,
it is possible to have live video starparties on
the Internet.
Jason Davis of Zeropoint
Technologies
is
Beta
testing
his
“AstroChannels ”
website
(www.astrocha nnels.com). Jason is currently
using a 14” Celestron CGE telescope with
f/3.3 focal reducer, and MallinCam B&W and
Color HYPER video CCD cameras. He has
on order a custom designed 28” f/2.6
ServoCAT/Argo Navis equipped telescope.
This scope will provide 4 times the light
gathering power of his 14” Celestron while
providing a similar field of view. The live
views using this scope should be spectacular.
Jason utilizes a 26” Sony Trinitron TV at his
observing site in the desert west of Salt Lake
City, to assist with focusing the telescope.
Once focused, the television is used for
observing the target that the telescope is
aimed at.
Meade 8 at f/4
As seen by the above un-doctored, single
frame images obtained with a variety of
telescopes, the MallinCam Color HYPER
provides an excellent live viewing experience
with only a slight loss in sensitivity as
compared to the B&W HYPER. Rock Mallin
has estimated this loss at 15%, making it
more difficult for potential purchasers to
decide which one to buy. In the past the
decision was easy: go with the B&W due to
the increased sensitivity and lack of amplifier
glow. The amp glow is now essentially gone
only a slight amount is present in the
upper/left corner of the monitor when the
camera is set to the 12 second mode and
14” Telescope, TV Monitor and Satellite
Antenna
. . . . . . . . . . . . . . . . . . . . . . . .
25
The camera’s video signal is then transmitted
via satellite link to the AstroChannels server.
There is a delay of a few seconds between
the time the target object is seen on the
monitor in the desert and the time it appears
on the participant’s monitors at home. When
I was in attendance on Wednesday,
September 27th, there were individuals from
all over the world logged in. I remember
Greece, Belgium, Australia and the US being
represented. Many of those logged in were
not amateur astronomers and had never seen
a Deep Sky Object through a telescope. This
was their first exposure to observing, and
they were impressed.
webcam. The scrolling typed chat questions
and answers are also on the right screen. I
had neither a mic nor webcam, so I had to
type-in my comments and listen to the audio
commentary by Jason and others in the chat
portion of the AstroChannels site. The next
time I log in I will make sure I have all the
items necessary to fully participate in these
Internet star parties.
Live from Utah!
For more information on the MallinCam Video
CCD cameras, check the following websites:
Live Video Starparty – Wednesday,
September 27, 2006
Above is a digital camera picture of my twomonitor computer setup. On the left monitor
was the live image provided by Jason’s setup
in the Utah desert. On the right monitor was
a list of those in attendance indicating
whether or not they had a microphone or a
26
http://mallincam.tripod.com/index.html
http://www.waningmoonii.com/index.htm
For information on the live video starparties,
visit:
http://www.astrochannels.com/
. . . . . . . . . . . . . . . . . . . . . . . .
Skywatch
My Back Pages
“Crimson flames tied through my ears
Rollin' high and mighty traps
Pounced with fire on flaming roads
Using ideas as my maps
"We'll meet on edges, soon," said I
Proud 'neath heated brow.
Ah, but I was so much older then,
I'm younger than that now.”
Huh-huh, huh-huh…you want Rumours DILLWEED Give it
to ‘em BEAVIS…huh-huh…right between the eyes. No, buttmunch…not our Metallica CDs, the mayo jar…the one with
those, uhhhhh…
Rumours
What’s up with Meade’s “Sky Assurance” (extended
warranty) program? Rumour hath it that there is a bit of
uncertainty in the renewal department. That is, folks who
bought a two year Sky Assurance plan are now nearing the
end of it and are wondering whether they will be able to
renew it. We have been told an insurance company servicing
the SA plan (Vac Service; they seem to be a sort of
insurance company, anyway) is unsure about continuing
with Meade’s program. Some folks are saying this has to do
with the number of scope returns Meade is experiencing;
others are saying this is merely reflective of the fact that Vac
was recently bought-out and that its new management may
want to take the company in a different direction. Anyway,
people are wondering if this puts the ability to renew Sky
Assurance in jeopardy. My guess? Sky Assurance is
popular; Meade will find a way to keep it rollin’.
Also concerning Sky Assurance, The Anonymous One has
been told that if your telescope is replaced under the Sky
Assurance warranty, the new telescope is not covered by
anything other than its initial Meade warranty. Hmm. Your
scope turns out to be a lemon, Meade replaces it under Sky
Assurance, and your “assurance” is then over. Better hope
that replacement will be long-lived, I guess. Or you can shell
out for more “Sky Assurance.”
No more Vixen? That’s what some people feared when they
saw the notice on Vixen North America’s page
(http://www.vixenamerica.com/StartPage/) that TeleVue is
closing its “Vixen North America” division and ending its
role as sole distributor for Vixen in the States. Not to worry.
Vixen gear will still be available after Vixen North America
folds; the company will now be selling directly to retailers.
Which, in the end may turn out to be a Good Thing for us.
Why did TV drop Vixen? Don’t ask me. I hear the Vixen
sales were not quite what TeleVue hoped for. How come?
Well, if you ain’t noticed, Vixen just ain’t that hot anymore.
Their Big Deal, the Sphinx mount, turned out to be fairly
problem-ridden and poorly marketed despite that cool
Starbook controller. The rest of the Vixen stuff, the scopes,
the refractors especially? Not too many people are anxious
to pay mid -level prices for Vixen when you can go cheaper
(and get “as good or better”) with William Optics and other
Chinese outfits. These guys will, for example, sell you one
of those hot 66mm refractors cheaply, it will have great
optics, and you can even have the tube in any color of the
rainbow. Vixen? To my knowledge, they have yet to realize
that 66 APOs are HOT, HOT, HOT!
A tip of the hat to Mike Fowler, who’s now joined the
Blue Crew at Meade.
--The Anonymous Astronomer
. . . . . . . . . . . . . . . . . . . . . . . .
27
The Wrap Up
What? Late again? Yep. A little
bit, anyway, and right after I
promised “no more late Skywatch
issues.” Sigh.
What can I say? Fall’s a busy
time ‘round good ol’ Chaos Manor
South. Lotsa star parties. The
new semester is underway for
Rod’s astronomy classes, too.
And, as always, Uncle Rod is just
naturally lazy.
I’ll try to get the next one out
the door quicker, but I think the
wait was worth it for this one:
the biggest issue ever.
For some pix of Rod’s trip:
http://skywatch.brainiac.com/star
party/starparty.htm
Did y’all notice that our monthly
JPL column was a-missin’? Alas,
due to my desire to keep file
sizes “reasonable” for those with
dialup, something just had to go.
SpacePlace will be back next
time.
Till that next time, then. And I
ain’t promisin’ “next time” might
not be a wee bit late, neither.
Sayonara!
--Rod Mollise
Special thanks to Herb, Ray, and
Paula at Anacortes Telescope and
Wild Bird, who had Rod out to the
beautiful Pacific Northwest to
speak at their annual Optics and
Imaging Expo. They sure treated
your ol’ Uncle right, and,
judging by the huge number of
amateurs who swarmed into the
AT&WB premises, this year’s Expo
was a huge success.
28
. . . . . . . . . . . . . . . . . . . . . . . .