1
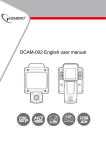
DCAM-002 English user manual
1. TF Card Slot
2. Reset Button
3. Mic
4. Power Button
5. Mic Indicator (red)
6. Mic Button
7. Camera/Playback Button
8. Rack Pad (close) Right
9. LCD Display
10. Rec Indicator (red)
11. Rec Button
12. Switch Button
13. Rack Pad (open) Left
14. Sensor-Aligning Steering
15. AV In Interface(Optional)
16. AV Out Interface
17. USB Interface
18. 3M Adhesive Tape
19. Rack Pad
20. Screw Hole
21. CMOS Sensor
22. Night Vision LED Light
23. Night Vision Sensor
Device Installation
1. Insert the TF card into the card slot with right direction.
2. Install the device on the wind shield or on the driving instrument board
with rack pad.
&Use clean and soft cloth to rub away the dirt and moisture on the wind shield or
instrument board.
3. Connect the USB port and Car Cigarette thru car charger.
4. Adjust the position for video-shooting.
&Press Mic Button or Rec button to make sure the position is right
6.Start the car, and the device will automatically power on and recording
Device Operation
*Automatic Video-Recording
1. Start the car engine
2. The device will be turned on and automatically recording;
The default recording is 2 minutes video file per section
3. To switch the normal/reverse phase of recording, Long Press "Mic" Button for 3
seconds to switch sensor positive shooting.
Long Press "Rec" Button for 3 seconds to switch sensor inverted shooting.
(The system will save the setting of normal/reverse phase switching)
4. Turn off the car engine;
5. The device will save the file and will be automatically power-off.
*Manual Video-Recording
1. After the device is powered on, press the Rec button for taking videos;
2. To switch the normal/reverse phase of recording, Long Press "Mic" Button for 3
seconds to switch sensor positive shooting.
Long Press "Rec" Button for 3 seconds to switch sensor inverted shooting.
(The system will save the setting of normal/reverse phase switching)
3. Press the Rec button again, and the device will automatically stop taking the
videos.
*Taking picture
1. Start the car engine
2. the device will automatically turn on and automatically record
3. In the video mode, short press camera/playback button to enter camera mode
4. short press camera/playback button again to take picture
5. press Rec button or switch button to return video recording mode
*Use motion detection recording function
1. When device is powered on, long press switch button to enable motion detection
function and there is “ ” icon show on screen
2. when motion detection function is enable, if the device senses moving objects4
around the scope, con on the LCD and REC indicator will
flash twice slowly, then the REC indicator goes off and device will in recording
mode
If the device doesn’t sense objects moving around the scope, the device will
automatically stop recording
3. Long press switch button, will disable motion detection function, and “ ” logo
will disappear on the LCD
*Use the Night Vision Mode
1. When the device is powered on, short press the “Turn on/off” Key to enable the
Night Vision function, the “ ” icon will be shown on screen
2. Short press the “Turn on/off” Key again to disable the Night Vision function.
*Switching the normal/reverse phase of video camera
To switch the normal/reverse phase of recording, Long Press "Mic" Button for 3
seconds to switch sensor positive shooting.
Long Press "Rec" Button for 3 seconds to switch sensor inverted shooting.
(The system will save the setting of normal/reverse phase switching)
*G-sensor Function
When device is in recording, if there is serious collision to device, “ ” icon will
be shown on LCD screen immediately, and the device will store current video
which wouldn’t be deleted in the cycle recording.
(The collision video file will be saved as name”SPECxxx” )
*Playback Function
1. When device is powered on, long press camera/playback button, the device will
enter playback mode.
2. use Mic button or Rec button to choose video file or picture file
3. short press camera/playback button to play or pause the video file.
4. Long press camera/playback button to quit playback function
*Update date and time
1. Before operating this device, it is required to update the date and time.
2. Create one txt file named “time”, and input current time in “year-month-day
hour:minutes:second”, for example, current time is 2012-2-5 16:2:9, then input
“2012-02-05 16:02:09” in the “time” txt, and saved it in the TF card root directory.
Note: in the time txt, please make sure the year is 4digit, and others are 2digit,
for example, current time is 2012-3-7 9:2:7, please input“2012-03-07 09:02:07”,
not “2012-3-7 9:2:7”
3. Insert TF card into device and power on the device, device time will be updated
as “time” txt setting.
Motion Detection
*U-disk Mode
1. Turn off the device and connect device thru USB to computer.
2. U disk icon will be shown on LCD display, there will be on removable disk shown
on computer.
3. Enter the removable disk, you could replay video file in the removable disk.
*PC Camera Function
1. Please install the PC camera driver stored on disk.
2. When device is in power off mode, hold Rec button, then connect computer thru
USB, still hold Rec button until the PC Cam icon shown on the LCD screen.
Then device is in PC camera mode.
Button Function overview
Button Function under Video Recording
Button Function in Playback Mode
Technical specifications:
Accessories included
Notes:
1) Please insert the TF card before recording.
2)The device default storage time is 2min. When the storage medium is full, it will
record from the beginning again and erase over the previously recorded material
automatically. It will have 3 seconds pause time, and namely the contents in the
3 seconds will not recorded.
3)Because the DVR is DC5V input, please use the attached car charger.