1
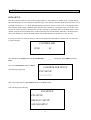
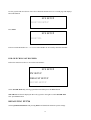
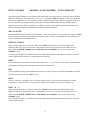
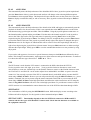
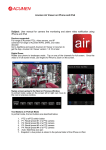
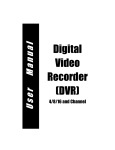
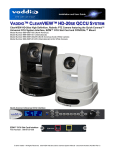
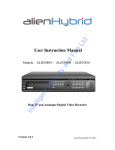
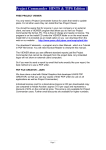
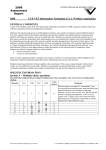
DVR Keyboard Controller
Installation and Operation Manual
MODEL PTZ790
Controls DVRs and PTZs
Version 1.0
CONTENTS
Page
CONTENTS
2
1. Summary
3
2. Keyboard Overview
3
3. The PTZ790 Keyboard
Description of Buttons
DVR Operation
Numeric Keys
PTZ Operation
Joystick Controls
4
4
5
5
6
6
4. Rear Panel Interface
7
5. Rear Panel Connections to DVR and PTZ
Connecting two PTZ790 to two DVRs
Connecting two PTZ790 to four PTZs
8
8
9
6. PTZ Operation
PTZ Setup
Selecting a camera
Introduction to PTZ functionality
Presets and other functions
Presets –How to setup presets
Calling a preset
Deleting a preset
Patrols (Tours) –How to set them up and use them
An example four preset mini-tour
Setting presets using the keypad
Setting up a Tour/Patrol/Track
Running a Tour/Patrol/Track
Stop a Tour/Patrol/Track
Clear a Tour/Patrol/Track
Setting up an Auto Pan/Scan on High Speed Dome
Running an Auto Pan/Scan
Setting up a Record Pattern (certain High Speed domes)
Running a Recorded Pattern (certain High Speed domes)
10
10
10
10
11
11
11
12
12
12
12
12
13
13
13
13
13
14
14
7. DVR Operation
DVR Setup
DVR switching off bleeper
DVR Control –operational controls
15
15
16
17
8. Technical Specifications
19
2
1.
Summary
The PTZ790 is a DVR keyboard controller that can control both the Alien and DVR9K range of DVRs and the
excelPTZ range of intelligent Speed Domes and other standard PTZ domes. The DVR controller completely
replaces the functions available on the front panel of the Alien and DVR9K DVRs and can control a maximum of
31 x DVRs or 128 x PTZ domes with a maximum communication distance of up to 1.2 km. The PTZ790 is very
easy to operate and control the Speed Dome Camera including functions to control pan, tilt, lens etc.
Control
u
u
u
u
u
u
u
2.
Completely replaces all the functions of the DVR front panel.
All operations are displayed in the LCD display.
One PTZ790 can manage a total of 31 x DVRs maximum.
One PTZ790 can control up to 255 x PTZs.
The address range for PTZ domes is 0 ~ 254.
Up to 15 x auxiliary keyboards can be connected in range 0 ~ 15.
Up to 9 different protocols and different baud rates can be selected as configuration is set by the LCD
display.
Keyboard Overview
The PTZ790 controls up to 31 DVRs and 255 PTZ cameras. Each DVR has to be given a unique ID between 01
and 31. Generally Alien DVRs are given a default ID of 255, so to access it, this has to be changed. Instructions
for changing the ID are detailed in the relevant DVR instruction manual. By pressing the Shift button you switch
control between PTZ control or DVR control. The LCD display will show the commands or options selected.
When you have set the DVR ID number/s you can connect the DVR/s to the PTZ790 controller. You can use a
pair of CAT5 twisted cable for connecting the controller to the DVR. Check the rear of the PTZ790 and you will
see a diagram of the connections. The right hand connections are for the DVR/s and the left hand connections for
the PTZ/s. Refer to the diagram which shows two PTZ790s connected to two DVRs. You will see the main or
Host PTZ790 connected from the transmit connections Ta+ and TB- to the DVR input connections D+ and D-.
The second PTZ790 (the auxiliary) connects from the Ta+ and Tb- to the Host PTZ790 Ra+ and Rb- connections.
The PTZ cameras can connect either to the DVR or to the back of the PTZ790. It is recommended that you
connect to the PTZ790 as more functionality and control is available. The PTZs are connected to the PTZ
connections on the left side of the controller, to the transmit connections Ta+ and Tb-. If you are using two
PTZ790s then connect the second or auxiliary unit to the Host controller’s Ra+ and Rb- connections. You can use
the star method of connectivity if you prefer.
The next step is to set all the PTZ cameras with unique IDs as set in each PTZ and Protocol and baud rate. Please
follow the instructions in section 6 to setup the PTZ cameras. This operation is passworded and it will be
necessary to hold down the Setup button to enter the Setup menus. To access the PTZ if connected to the
controller, select the camera ID by pressing the Addr button, entering the ID number and then pressing the Enter
button. As a general guide the DVR commands are mainly accessed using the left block of buttons on the PTZ790,
the PTZ using the far right block of buttons with the centre numeric/alpha keys used for either.
3
3.
The PTZ790 Keyboard
Description of Buttons (Figure 1)
The keyboard has a speed joystick, press buttons and an illuminated display on the front panel. The display is used
to show the active functions in use at that time. The joystick controls the upward, downward, and sideways
movement of the speed dome. The description of buttons is as follows:
1
2
3
A
4
5
6
C
B
1.
2.
3.
4.
5.
6.
ESC
Return to Main Menu
Setup Hold for 3 seconds to enter keyboard configuration. Default Password = 8888
Search Hold for 1 second to check keyboard configuration: PTZ Control
Shift Switch the control mode from DVR to PTZ or vice versa.
Display Display LCD screen.
Joystick Controls Up, Down, Left, Right, Wide, Tele.
A
B
C
DVR Operation
Numeric Keys
PTZ Operation
4
A. DVR Operation
MENU Show main menu
PREV Switch preview displays 1, 4, 9, 12 or 16
F1
Quick setup speed dome –refer LCD display
F2
Quick setup speed dome –refer LCD display
REC
Enter DVR Menu
MON
Control 4 x Auxiliary display output ports
EDIT
Enter DVR edit mode
F3
Set presets in a tour number
PLAY DVR Playback menu
MAIN/AUX Switch between Min/Aux (hold 2 secs)
A
Switch input ways
F4
Quick setup speed dome –refer LCD display
PTZ
Select PTZ options in DVR
AUX
In DVR mode this button is reserved
SHUTDOWN Powers down DVR
ADDR Changes PTZ camera number in PTZ mode
Or DVR number in DVR mode. Note that this
is either the PTZ ID number or the DVR ID
number.
B. Numeric Keys
NUMERIC KEYPAD Enter alpha
characters
CLEAR Clear current input
ENTER Enter current input
5
or
numeric
C. PTZ Operation
PRESET
FOCUS+
FOCUSDEL
ZOOM+
ZOOMSHOT
IRIS+
IRISAUTO
WIPER
LIGHT
Joystick Controls
6
Set preset position
Set Lens focus near
Set Lens focus far
Delete preset position
Zoom in
Zoom out
Call preset position
Open Lens Iris
Close Lens Iris
Set dome to rotate –depends on PTZ
Switch wiper on/off –depends on PTZ
Switch light on/off –depends on PTZ
4.
Rear Panel Interface
7
5.
Rear Panel Connections to DVR and PTZ
Connecting two PTZ790 to two DVRs
8
Connecting two PTZ790 to four PTZs
9
6.
PTZ Operation
PTZ SETUP
In order to control the PTZ dome you will need to uniquely address it. The dome will usually have dip switches to
set the address. When the address is set you will need to use this address to access the specific dome. Press the
Shift button to access PTZ operation rather than DVR control. Now press the Setup button holding it down until
the ENTER PW: message is displayed. Enter the password 8888 and press Enter. Now select PTZ SETUP and
press Enter.
PTZ SETUP
The following is displayed
CAM
:
001
PROTOCOL :
BAUD RATE :
Using the joystick move it to the right to select the required PTZ number (001 ~ 254). Now press Enter.
The protocol and baud rate can now be set for this camera number. This means you can select different protocols
and baud rates for every PTZ camera connected. Press Enter to save.
Protocols provided:
Pelco-D, HIK, SAMSUN, RULE, ALEC, YAAN, B01, NCS850, CS850, Pelco-P.
Baud Rates provided: 1200, 2400, 4800, 9600, 19200.
Note that the screen display cancels after 30 seconds.
SELECTING A CAMERA
To select a camera move the joystick to the right. If display shows DVR controller press the Shift key.
Now press Addr (Address) nn = camera number e.g 02 and press Enter.
INTRODUCTION TO PTZ CAMERA FUNCTIONALITY
The dome stores preset positions, preset tours and other functionality associated with the dome equipment.
The keypad merely instructs the dome to carry out those functions. Think of the keypad as a switch that
activates a particular function in the dome that you require. Not all domes have the same functionality so if
your dome does not have presets built into it you obviously cannot use presets, regardless of the keypad you
use. The PTZ790 controller can be operated in two modes. Speed Dome or DVR. The Shift function button
switches between these modes. The LCD screen will provide guidance on the mode you are in.
10
PRESETS AND OTHER FUNCTIONS
What is a preset? A preset is a particular area or object that the dome camera was looking at and has been
stored into its memory so when the preset is “called-up”from the keypad, the dome will select the area again
without the operator using the joystick to do this. Even the zoom at the time can be stored with the preset.
This means that you could for example store a PRESET of a car-park entrance. When the operator calls up
this preset from the keypad, the camera automatically zooms in on this area. This keypad can select up to 140
different presets. Of course this is dependent on the total number that can be programmed into the dome.
Once programmed they will stay in the dome’
s non-volatile memory so they will be retained even after a
power cut. By storing more than one preset you can add even more functionality to the dome. By having two
locations set, you can then get the dome to “SCAN”between the two locations. You can even vary the speed
of this scan. Having 3 or more presets you can get the dome to go on a TOUR (PATROL) of the presets.
When you run the patrol, the dome goes to one preset, then waits a short period then on to the next preset and
so on. The dome continues to cycle around this patrol until you cancel it.
Please note that the ability to use presets, auto scans, tours, record patterns, the length of time the
camera stays at one location and the speed of travel between each preset, are dependent on the
functionality available in the dome. Always refer to the relevant dome instruction manual.
PRESETS –HOW TO SETUP A PRESET
To select a camera move the joystick to the right. If display shows DVR controller press the Shift key.
Now press Addr (Address) nn = camera number e.g 02 and press Enter.
Aim the dome where you want it to look, zoom in or out to get the correct scene and let the camera auto
focus. Now press the following keys on the keypad : PRESET + xx +Enter (where xx is the preset number
you wish to store). For example PRESET + 01 + Enter would set preset 1 and the camera would always go
to this location when preset 01 is “CALLED”.
To test if the preset is stored correctly in the dome, use the joystick to move the camera to point in a new
location. Now press SHOT + xx + Enter (where xx is the preset you wish the camera to go to). In this
example if you press CALL + 01 + Enter the dome should go straight to the PRESET 01 location.
TIP -You may wish to write down a list of presets that you have stored next to the keypad for the operator.
CALLING A PRESET
This may be as follows;
PRESET 01 = MAIN GATE (a long zoom shot)
PRESET 02 = ENTRANCE DOOR
PRESET 03 = FIRE ESCAPE
PRESET 04 = EMERGENCY EXIT
PRESET 05 = CAR PARK (zoomed-out wide angle)
PRESET 06 = CAR PARK (zoomed-in narrow angle)
When the operator wishes to quickly zoom in on the MAIN GATE all he has to do is press
SHOT + 01 + Enter.
11
To go to the EMERGENCY EXIT he would press SHOT + 04 + Enter and so on.
To call up any previously stored preset camera location, simply press SHOT + xx + Enter, where xx is the
preset number.
DELETING A PRESET
You may wish to delete a preset.
To do this press DEL + xx + Enter
(xx = preset number).
For example to delete preset 1, press DEL + 01 + Enter. Obviously if you wish to overwrite a preset with a
new location, simply aim the camera at the new location and store the same preset again.
PATROLS (TOURS) –HOW TO SET THEM UP AND USE THEM
A patrol (tour) is simply a collection of at least three preset camera locations that are run in sequence with
the dome stopping at each location for a brief period of time and then moving on to the next preset.
For example, you could use a patrol so that an outside dome camera points at a gate, then at a side doorway,
then zooms out to get an overall shot of a car park and finally zooming in on a delivery bay, before repeating
the whole cycle again. Patrols can be useful for both outside and internal PTZ’
s. For a shop they could be
used to cover key areas like clothes rails, tills and changing rooms in a sequence.
To set up a patrol you need to set up the individual stop points where the camera will pause. These are called
presets.
AN EXAMPLE 4 PRESET MINI TOUR
SETTING THE PRESETS USING THE CONTROLLER
STEP 1- Using the keypad joystick, move to the first position and then press PRESET + 01 + Enter
STEP 2- Now move to the next location and press PRESET + 02 + Enter
STEP 3- Now move to the third location and press PRESET + 03 + Enter
STEP 4- Finally move to where you wish to end the tour and press PRESET + 04 + Enter
SETTING UP A TOUR/PATROL/TRACK
Refer to your instructions on the dome. This will detail how the tour/patrol/track (all synonymous) is set up
and initiated via the dome menu. In order to access the dome menu press SHOT + 95 + Enter for the high
speed dome. You can select items in the menu by using the joystick up and down movements to select menu
and the joystick right movement to enter it. Use the IRIS- button to exit. The standard speed dome has no
PTZ menu.
12
RUNNING A TOUR/PATROL/TRACK
Refer to your dome instructions. This will detail how to initiate the Tour/Patrol/Track via the dome menu. In order
to access the dome menu in a high speed dome press SHOT + 95 + Enter. Select the RUN PATROL option
by moving the joystick down to select the option and move joystick to right to start tour.
Alternatively you may be able to start the Tour/Patrol/Track directly from the controller by pressing the
SHOT button followed by 91 and then press the Enter button for the high speed dome.
If you are using the standard speed PTZ dome you may be able to initiate the tour by pressing PRESET 51
Enter or PRESET 64 Enter.
STOP A TOUR/PATROL/TRACK
A Tour/Patrol/Track may be stopped by pressing CLEAR then Enter or by moving joystick.
CLEAR A TOUR/PATROL/TRACK
A Tour/Patrol/Track can only be cleared by entering a new tour.
SETTING UP AN AUTO PAN/SCAN ON HIGH SPEED DOME
Refer to your instructions on the dome. This will detail how the Auto Pan/Scan is set up and initiated via the
dome menu. This is providing you have a PTZ menu to access. In order to access the dome menu press
SHOT + 95 + Enter. You can select items in the menu by using the joystick up and down movement and
then entering the menu using the joystick right movement. You will need to move the camera to the starting
position and by pressing the IRIS- key this will save the start position and return to the menu. Now move the
camera using the joystick to the end position and select the option to set this and press the IRIS- key again to
save this position. To run press SHOT + 97 + Enter.
SETTING UP AN AUTO PAN/SCAN ON STANDARD SPEED DOME
Move the PTZ to the start point of the Autoscan and press PRESET 52 Enter. Now move PTZ to end point and
press PRESET 53 Enter.
RUNNING AN AUTO PAN/SCAN
Refer to your dome instructions. This will detail how to initiate the Auto Pan/Scan via the dome menu. In order to
access the dome menu press SHOT + 95 + Enter. You can select RUN AUTOSCAN in the menu by using
the joystick up and down movement and then entering the menu using the joystick right movement. If you
are using a standard speed dome then try SHOT 51 Enter (slow speed), SHOT 52 Enter (middle speed) or
SHOT 53 Enter (high speed).
NOTE: When initiating an Auto Pan/Scan the PTZ dome will normally take the shortest route. If this is not
the required route then set a tour with at least four presets setting the last preset near the first preset position.
On some PTZs it may be possible to set a route less than 180 or greater than 180 degrees via the dome menu.
13
SETTING UP A RECORD PATTERN (only certain High Speed domes)
Refer to your instructions on the dome. This will detail how the Record Pattern is set up and initiated via the dome
menu. In order to access the dome menu press SHOT + 95 + Enter. You can select items in the menu by using
the joystick up and down movement and then entering the menu using the joystick right movement. Move to
RECORD PATTERN and press joystick right movement. Now using the joystick move to start recording.
When complete press the IRIS- button.
RUNNING A RECORDED PATTERN (only certain High Speed domes)
Refer to your dome instructions. This will detail how to initiate the Record Pattern via the dome menu. In order to
access the dome menu press SHOT + 95 + Enter. You can select items in the menu by using the joystick up
and down movement and then entering the menu using the joystick right movement. Now using the joystick
move to RUN PATTERN. The pattern will run until the joystick is moved.
14
7. DVR Operation
DVR SETUP
In order to control a DVR you will need to uniquely address it. The PTZ790 can address up to 31 DVRs and the
ID in the DVR must be set to a number within this range. Check the ID in the Alien DVR menu and ensure it is set
to a number between 01 ~ 31. As the PTZ790 defaults to DVR 01, it may be easier to use 01. Remember that if
more than one DVR is being controlled by the PTZ790, then it must have a unique ID setting. As the ID is also
used by the remote controller, check that the new ID is working by aiming the remote at the DVR within 1 metre
distance and press the DEV button on the remote followed by the new ID number followed by the Enter button.
The remote should now operate the DVR and this will confirm that the new ID has been setup correctly.
If you do not want to use DVR 01 then you will need to change the PTZ790 Host Controller ID. First move the
joystick to display
CONTROLLER
DVR
:
01
Now hold down the Setup button until the ENTER PW :
Enter.
Now select PTZ SETUP and press Enter.
The following is displayed
____
is displayed. Enter 8888 followed by
CONTROLLER SETUP
PTZ SETUP
SYS SETUP
Move the joystick down to SYS SETUP and press the Enter button.
This will display the following:
SYS SETUP
PW SETUP
DEFAULT SETUP
SOUND SETUP
15
Use the joystick and move down. You will see that SYS SETUP moves to a second page and displays
HOST ID SETUP
SYS SETUP
HOST ID SETUP
Press Enter
SYS SETUP
HOST ID :
Enter new DVR ID number 01 ~ 31 as set in Alien DVR to be accessed by PTZ790 controller.
DVR SWITCHING OFF BLEEPER
Follow the instructions above to access the SYS SETUP :
SYS SETUP
PW SETUP
DEFAULT SETUP
SOUND SETUP
Select SOUND SETUP by moving joystick down and then press the Enter button.
SOUND ON will then be displayed. Move the joystick to the right to switch SOUND OFF.
Now press Enter button.
DEFAULTING PTZ790
Selecting DEFAULT SETUP and pressing Enter will default the PTZ790 system settings.
16
DVR CONTROL
MODELS: ALIEN HYBRID
ALIEN PROLITE
The following DVR buttons can be used to control the DVR. First ensure that you select the correct DVR ID
held in the DVR menu. The default is 01. If it is 02 ~ 31 then press Addr and change to the correct DVR ID
number. Press Enter to save. Use the Esc to escape a routine and start again. When accessing the DVR you
may need specific functionality and by pressing for example the PTZ button will allow further control
options to be accessed. Always check the LCD display screen to ensure that the required function has been
selected, particularly following the Esc button that clears the last function.
MENU OF DVR
Press the MENU button to display the DVR menu. Move the joystick to the selected menu and press Enter.
Use the joystick up and down movements to position on entry to change. Press Enter then use joystick up or
down to change value. Press Enter to save.
EDITING A FIELD
After selecting menu move to field for editing. Press EDIT button and the text will be displayed in a
different colour. Now press the A button. At the bottom of the screen it will tell you the mode you are in.
Select from NUMBER, UPPERCASE, LOWERCASE and SYMBOL. If you want a space select
SYMBOL and 1.
Note that when in alpha you will need to press the number keypad the relevant number of times to select the
correct alpha character similar to a mobile phone text message.
PREV
Press this button to automatically switch screen modes from 1, 4, 9, 12 and 16 screen modes. Note that these
modes apply according to the available streams on the DVR accessed.
REC
This automatically brings up the Manual Record menu. Use the joystick to select the channel and press Enter
to switch record on or off. Press ESC to exit.
MON
This is a control for switching to up to 4 auxiliary display ports. If you press this with only one monitor
connected you will not be able to access monitor unless pressed again to select correct monitor port.
EDIT
&
A
After selecting menu move to field for editing. Press EDIT button and the text will be displayed in a
different colour. Now press the A button. At the bottom of the screen it will tell you the mode you are in.
Select from NUMBER, UPPERCASE, LOWERCASE and SYMBOL. If you want a space select
SYMBOL and 1.
Note that when in alpha you will need to press the number keypad the relevant number of times to select the
correct alpha character.
17
PLAY
ALIEN PRO
This automatically enters the Playback menu of the Alien PRO DVR. Move joystick to option required and
press the Enter button. Move joystick downwards and box will change colour selecting different options.
Press Enter to select required change. The Playback will open with the cursor on the search box. Just press
Enter to display recorded files today or edit as necessary. Move joystick to selected file and press Enter to
play.
PLAY
ALIEN PROLITE
This automatically enters the Playback menu of the Alien ProLite DVR and begins to automatically start the
playback of channel 1 for the current day. If this is not required then select MENU and move to the Video
Search menu using joystick right movement. Then click Enter. Using the joystick right movement move to
the channel number required and the press Enter. This then ticks the channel required. Use the joystick to
move to the Video Type and or File Type and select if required by pressing Enter. Move to the option
required using the joystick and press Enter. For editing a field, for example the date, press the Enter button
to select the numeric field, move the joystick to position directly right of the digit to be changed, then press
Edit button twice for first digit to be edited and this will be removed. Press the required digit and move to
right of next digit using the joystick left or right movement. Now press Edit button once to delete next digit
and enter the required digit. Finally press Edit to save the amended date and move to next position by using
the joystick.
If you need to edit uppercase, lowercase or special characters then press the Edit button followed by the A
button. This changes between numerics, alpha uppercase, alpha lowercase and special characters. A small red
icon shows the character type selected. See EDIT & A above.
PTZ
The PTZ button is used when the PTZ camera is connected to the DVR rather than the PTZ790.
Use the joystick to move left, right, up or down. Twist joystick in clockwise direction to zoom in and
anti-clockwise to zoom out. Alternatively use the ZOOM+ button to zoom in or the ZOOM- button to zoom
out. The FOCUS+ and FOCUS- can be used to adjust focus and the IRIS+ and IRIS- to open or close the
camera iris. You can only set presets if the PTZ is connected directly to the DVR unless you enter the PTZ
menu using a SHOT 95 Enter. However you can call presets directly using the SHOT xx Enter (xx = preset
number) command. You can set presets using the mouse connected to the DVR or you can enter the PTZ
menu using a SHOT 95 Enter on the high speed dome and follow the earlier instructions on PTZ using the
menus. Using SHOT 91 Enter will start a tour on the high speed dome. To provide more extensive control
of PTZ cameras it is recommended to connect them to the rear of the PTZ790 rather than through a DVR.
SHUTDOWN
You can shutdown a DVR by using the SHUTDOWN button. Different display screens according to the
DVR model will be displayed. Use the joystick to select command and press Enter.
SPECIAL NOTE: Functionality depends on how the PTZ790 is connected to DVRs and PTZ
cameras and also the types of DVR and PTZ cameras used. Check that the functions are available on
the equipment connected.
18
8.
Technical Specifications
Keyboard Model
Total DVRs Supported
Total PTZs Supported
Control Mode
Communications Interface
LCD Screen
Joystick
Maximum cable length
Power Supply
Working Temperature
Working Humidity
Size
Weight
PTZ790
31
255
RS485 half duplex mode
Baud Rate: 1200 ~ 19200bps
RS485 port
128mm X 64mm
3D
1200 metres
12vDC 2Amp PSU
-10°C ~ +55°C
10% ~ 90%
360mm x 200mm x 108mm
3.3Kg
All specifications are approximate. Kovert.com reserves the right to change any
product specification or features without notice. Whilst every effort is made to
ensure that these instructions are complete and accurate, kovert.com cannot be held
responsible in any way for any losses, no matter how they arise, from errors or
omissions in these instructions, or the performance or non-performance of the
camera or other equipment that these instructions refer.
19