1
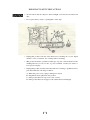
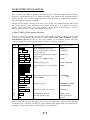
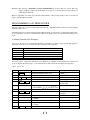
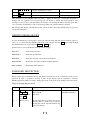
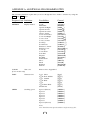
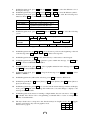
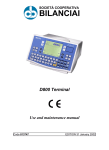
English/ European
Moving Message
Led Sign
Remote
Infrared
Keypad
Operation
Manual
TABLE OF CONTENTS
Introduction .............................................................................................3
Remote Control Programming.................................................................3
Quickstart Programming..........................................................................4
Running A Saved Message ......................................................................5
Recalling A Saved Message For Edit ......................................................5
More Intricate Examples..........................................................................6
Programming A Schedule File.................................................................7
Delete Message File.................................................................................8
Password Protection.................................................................................8
Using The International Character Set.....................................................9
Getting A Graphic For Display................................................................9
Edit The User Defined Graphics..............................................................9
Appendix A: Additional Programming Tips..........................................11
Appendix B: Timer Options...................................................................13
Appendix C: Listing of Colors...............................................................14
Appendix D: Listing of Symbols ...........................................................15
Appendix E: International Characters....................................................16
Appendix F: File Log.............................................................................17
Appendix G: Advanced Setup ...............................................................18
Appendix H: Wireless Infrared Keypad Descriptions ...........................19
Terms And Conditions...........................................................................21
Trouble Shooting ...................................................................................22
1
IMPORTANT SAFETY PRECAUTIONS
λ
Avoid locations that are subject to direct sunlight, excessive heat, moisture and
dust.
λ
Do not place heavy objects or spill liquids on the sign.
λ
Unplug this product from the wall outlet before cleaning. Do not use liquid
cleaners or aerosol cleaners. Use a damp cloth for cleaning.
λ
This product should be operated from the type of power source indicated on the
marking label. If you are not sure of power available, consult your dealer or
local power company.
λ
Unplug this product from the wall outlet and refer servicing to qualified service
personnel under the following conditions.
A.
B.
C.
D.
When the power cord or plug is damaged or frayed.
If liquid has been spilled into the product.
If the product has been exposed to rain or water.
If the product has been dropped or the cabinet has been damaged.
2
INTRODUCTION
Thank you very much for purchasing the English/European led sign. It is designed for indoor use and
is a cost effective visual communication device. Easy to operate, the led sign features 16 character
colors [color models only], 24 eye catching display effects with built in graphic animations and the
ability to store up to 100 message files that you create. Other major features include:
- 30 graphic symbols such as phone, car, sunglasses, etc. for use in place of spelling out a word
- 8 display speeds
- 3 different audible beep sounds that you can add anywhere within a message
- The ability to pause a message up to 60 seconds
- The ability to power on or turn off the display automatically
- The ability to display scheduled multiple message files
- The ability to display both the current date and time within a message
The led sign is designed for indoor use. Models with super bright led are good for viewing in day
times. Standard accessories include a wireless infrared keypad, an external power adaptor, mounting
device and PC software with a serial cable. Before you plug into the power outlet, make sure the
voltage marking on the power adaptor matches that of the power outlet. The mounting device is used
to fix the unit on ceiling, on a wall or as legs for the device to remain freestanding on a table. The PC
software is used to create and manage message files and load message files instantly to led signs.
The car lighter adaptor cable is available as an option.
You should mount the led sign within close proximity to an outlet and preferably where sunlight will
not directly fall on the display.
REMOTE CONTROL PROGRAMMING
A wireless infrared keypad for programming the led sign is included in the package. The device
operates using infrared technology, which frees you from unnecessary wires and having to stand by
the led sign.
When a key on the wireless infrared keypad is pressed, a program code is sent to the led sign to
change or add display effect, character font, display speed, etc. The program code is not shown in its
exact wordings due to the limited space on the screen. The following list shows the program codes
that will appear on the screen when the keys are pressed.
METHOD:
[CYCLIC]
[OPEN><]
[SCROLL ]
[COVER ]
[SHOOT]
[IMMED]
[COVER<>]
[SCROLL ]
[SCANLN]
[FLASH]
[OPEN ]
[COVER ]
[INTER><]
[EXPLODE]
[RANDOM]
[OPEN ]
[COVER ]
[INCOVER><]
[PACMAN]
[SLIDE IN]
[OPEN<>]
[COVET><]
[COVER ]
[FALL]
*Please note if the message takes longer than the screen can hold in length, whatever the display
method used, the display method will be reset to [OPEN ].
FONT:
[5
6] [5
11] [7
6] [7
11] [7
9] [7
3
17] [Small]
SPEED:
[SPEED 1] [SPEED 2] [SPEED 3] [SPEED 4] [SPEED 5] [SPEED 6] [SPEED 7]
[SPEED 8]
GRAPHICS: The graphics will be displayed instantly as the way it appears.
PHRASE: [ANIM 1] [ANIM 2] [ANIM 3] [ANIM 4] [ANIM 5] [ANIM 6] [ANIM 7] [ANIM 8]
COLOR:
[RED] [ORA] [YEL] [GRE] [MIX] – color models only
SYMBOL: Refer to Appendix E for a list of graphic symbols
BEEP:
[BEEP 1] [BEEP 2] [BEEP 3]
You can press the keys on the wireless infrared keypad to embed the program codes into a message.
This is the way for a message to change or add color, speed, display method, symbol, sound, and
character font. Using these program codes in combinations will create amazing and eye-catching
effects to the message.
QUICKSTART PROGRAMMING
The led sign stores up to 100 messages in numbered data files. Each message is stored in the led sign
as a file with a two-digit number. These message files are numbered from 00 to 99. File 00 is factory
built and i s r ead onl y.
A Simple Programming Example Note: Underline denotes words or numbers to type, xxxx denotes key names. To correct a mistake,
press the DEL key to remove it.
User can toggle the capital letter and small letter by pressing the key CAP, and use the ALT
key to display symbol on keypad.
Step
Keys to press
Explanation
Message on screen
1.
2.
PROG
01 ENTER
OPEN: ??
[CYCLIC]
3.
WELCOME
VISITORS
RUN
Y
Begin the Edit/Program mode
A two-digit number (01-99) is allowed for
naming a message file.
[CYCLIC] is the default display method. It
means to cycle through various display methods
at random.
Type the text you wish to display in your
message.
End the Edit/Program mode
Save the message as data file number 01
4.
5.
WELCOME
VISITORS
SAVE? (Y/N)
Your message begins
to display.
Congratulations! You have just created your first message file! Here are some important things that
you have learned from this first exercise:
λ
An audible beep sound is heard when the led sign accepts the program code from the wireless
infrared keypad. Other than looking at the led sign, this is another way to assure that the key you
pressed has been received and understood.
λ
Programming a message can be as simple or as complex as you desire. You decide what you want
your message to say and how you want to display it. In the above example, the message had only
two words, but you could have typed a complex message.
λ
If you make mistakes while typing, you correct them by pressing the DEL key until you have
removed the mistake(s). Then, you can re-enter the message correctly.
You have the option at the end of your programming to save your message. If you only need to
λ
4
λ
display a message for a single instance, simply select N not to save your message as numbered
data file. Your message will still be displayed, but the next time you open up the numbered data
file (in this case, file number 01), the message would not exist.
The led sign always begins the editing of a new message with the default display method as
[CYCLIC]. It works to cycle through all colors and display methods at random.
You can follow the above procedures to enter more messages, as long as the total number of files
does not exceed 99 or the total length of characters does not exceed 7000 characters.
RUNNING A SAVED MESSAGE
The led sign will display the message of the latest edited file. There is an option that user can choose
any message file to display. The following example illustrates this option.
Run Any Message File Example
Step
Key to press
Explanation
Message on screen
1.
2.
RUN
02 ENTER
Run a saved message
Select file 02
RUN : ??
Message begins to display
For saved message files numbered 01 to 10, user can simply press single key to display the message,
like [1] for message file 01, [2] for message file 02 and so on up to [0] for message file 10.
Message file numbered 00 is factory built in ready only file to display the led sign features when no
other file is found.
RECALLING A SAVED MESSAGE FOR EDIT
To recall a previously saved message, you again begin by pressing the PROG key. When the led sign
prompts you for a file number, input the two-digit number and press the ENTER key. If there is a
previously stored message under that file number, the display will show [OLDFIL] [CYCLIC], or it
may not show [CYCLIC] depending on its actual content.
A Simple Message File Recall Example
Step
Key to press
Explanation
Message on screen
1.
2.
PROG
01 ENTER
OPEN : ??
OLDFIL [CYCLIC]
3.
4.
RUN
N
Begin the Edit/Program mode
This is the file number for the
previously stored message.
End the Edit/Program mode
Choose not to re-save the data
file
SAVE ? (Y/N)
Message begins to display
Every time you want to recall and edit a previously saved message, follow the 4 steps listed above,
substituting in the field with the appropriate file number.
5
MORE INTRICATE EXAMPLES
Once you have successfully programmed your first message, you find that using the wireless infrared
keypad to program the led sign is easy. Adding spectacular color, animation and varying the shape of
the letters is also easy to perform. Although it takes a little more time to tackle intricate messages,
they add sparkle and increase readability.
The led sign can display a message in 16 colors (color models only) with 24 different methods and
has various options to select the character size, display speed and so on by which your message
appears on the screen. There is no single method or pattern that you should follow to create a
message. Be creative in your approach to display a message.
A More Complex Programming Example Let’s say you want to program the led sign with a message that is appealing to shoppers about a new
sporting goods department. The message is simple: VISIT OUR NEW SPORTING GOODS
DEPARTMENT TODAY. You’ll use colors [Not available for monochrome models] and other
varieties to bring life to the message and attract some new sporting goods buyers.
Step
Keys to press
Explanation
Message on screen
1.
PROG
Begin the Edit/Program mode
OPEN : ??
2.
02 ENTER
[CYCLIC]
3.
Enter the message text
Assign rainbow color to subsequent
text
VISIT OUR NEW
[MIX]
Change display method to cover old
text from Right
[COVER ]
Enter message text
SPORTING GOODS
DEPARTMENT
9.
NEXT NEXT
NEXT NEXT
COLOR NEXT
NEXT NEXT
VISIT OUR NEW
COLOR NEXT
NEXT NEXT
NEXT NEXT
NEXT NEXT
NEXT
METHOD NEXT
NEXT NEXT
NEXT NEXT
NEXT NEXT
SPORTING
GOODS
DEPARTMENT
PAUSE NEXT
This is the file number assigned to
this new message
Assign the display method to Open
From Center
Assign color to Bright Orange
Pause the message for 2 seconds
[PAUSE 2]
10.
11.
RUN
Y
Exit Edit/Program mode
Save the data file as 02
SAVE ? (Y/N)
Message begins to
display
4.
5.
6.
7.
8.
[OPEN <>]
[ORA]
That’s a pretty fancy message and again, it is easy to program! The beauty of the led sign is that there
is numerous ways to display your messages, just by changing the display method, the character size
and shape. You must decide what works best with your environment.
6
Remarks: The message “SPORTING GOODS DEPARTMENT” is more than one screen. The only
display method is slide in from the right. User may try to shorten this message and try for
other display methods.
Refer to Appendix A to learn more about the functionality of the led sign and how best to use the led
sign to gain maximum benefits!
PROGRAMMING A SCHEDULE FILE
The led sign has the option of displaying many files in a scheduled manner. The following example
illustrates this power.
Schedule files have special names that begin with the letter ‘S’ followed by a single digit number 0 to
9. As such, there are only ten schedule files (S0 to S9), which can be stored and retrieved by the led
sign.
A Simple Schedule File Example Let’s say as the ow ner of a restaurant named Box Car Express, you have daily specials that appeal to
the lunch crowd at noon. You have already created the following files:
File Number
10
11
12
13
14
Message
Welcome to the Box Car Express
Today’s special is
2-Pc. Chicken Meal with Mashed Potatoes and Gravy.
Our drink Special is
Diet Coke.
You may want to display the messages from 10:00 am to 1:00 pm and from Monday to Friday. In
order to display all the messages, your schedule file would contain the following message files:
10, 11, 12, 13, 14
Step
Keys to press
Explanation
Message on screen
1.
2.
3.
4.
5.
PROG
S
1 ENTER
NEXT / PREV
Begin the Edit/Program mode
Activate schedule file
Enter schedule file number
Move right
Toggle for ON/OFF
OPEN : ??
[S0]
DAY 0 1 2 3 4 5 6
1 is highlighted
1 is in green with red
background
S
NEXT / PREV
Repeat steps 4 & 5 for DAY2 3 4 5
until all DAY1 2 3 4 5 in green color
Set start time
Change the time
6.
7.
8.
9.
10 .
11.
12.
S
13.
ENTER
Use the arrow key to set time
Repeat steps 8 & 9 until display shown
is 10:00
Set stop time
Repeat steps 8 & 9 until display shown
is 13:00
Confirm the time setting
7
START 00:00
The digit in green will be
changed
END 23:59
S1
14.
10 11 12 13 14
15.
RUN
Y
16
Enter the sequence of message files to
display, separated by a space.
End the Edit/Program mode
SAVE ? (Y/N)
Save the sequence of files as S1
Message begins to display
Other than that you can schedule when you prefer to display the messages, you have the advantage to
change only one segment of a long message! If you decide to change the meal special in your
message, you need only to edit file number 12 instead of re-entering the whole message again. This
saves your time from having to edit a long message when only a minor change is needed.
The led sign will display schedule files in the order from S0 to S9, if the schedule files are properly
set up with valid times.
DELETE A MESSAGE FILE
In some circumstances, you may like to erase part of the message. The led sign has such an option for
user to do so. After enter the Edit/Program mode, user can press the key CLR and cycling through
the different functions by pressing the PREV or NEXT key.
Listed below is a list of the Delete functions and its usages:
DEL ALL
Clear all message files
DEL FILE ??
Delete the specified file
DEL MSG
Delete the message of the current opening file
DEL ON/OFF
Disable the Auto Turn on /Turn off timer function
DEL ALARM
Disable the Alarm function
PASSWORD PROTECTION
Password protection is built into the led sign. In Password Protect mode, you must key in the correct
password in order to program a message or turn off the display. You are required to enter the
Edit/Program mode when you want to change password, reset password or disable password security.
Steps to change the password
Step
Key to press
Explanation
Message on screen
1.
2.
3.
PROG
00 ENTER
Press
while
the ALT is
being hold
Repeat step 3
Enter Edit/Program mode
Enter file 00
Fast shift
OPEN : ??
OLDFIL [CYCLIC]
4.
A few times until you reach to the end of
the file. This is to make sure you will not
modify the content of the file while doing
password change.
8
5.
6.
7.
8.
9.
10.
CPW
NEXT
NEXT
NEXT
AAA ENTER
AAA ENTER
Enter password mode
Change password
Change the password to AAA
Confirm the password
UNUSE PASS
USE PASS
RES PASS
CHANGE: ***
AGAIN: ***
Content of the data
file
Then you have changed the password to AAA.
Meaning of Display
UNUSE PASS
USE PASS
RES PASS
CHANGE PASS
Turn off password security
Turn on password security
Reset to factory default password ‘000’
Change to new password
If for any reason the password is lost or forgotten, you must access the DIP switch on the CPU board
inside the led sign (not the remote control) and turn switch 8 to ON and then follow the steps to
change the password listed in the above table from step 1 to step 7. In step 7, press Enter. Thus, the
factory default password will be in effect ‘000’. You may disable the feature of password protection
by leaving Switch 8 in the ON position.
USING THE INTERNATIONAL CHARACTER SET
Using international characters in your message is easy. As you program your message, key in the
corresponding English equivalent character and use the NEXT and PREV buttons to scro11 through
the special characters that correspond to the English character (e.g.. key in ‘$’ and use the NEXT
button until the ‘£’ character appears if you want to display a number in British Pound currency) . If
there is no corresponding English character, key in a SPACE and then use the NEXT and PREV keys
to scroll through the list of available characters.
APPENDIX G shows all the international characters with their corresponding English characters.
GETTING A GRAPHIC FOR DISPLAY
To get a graphic for display, you should enter the Edit/Program mode. Get to the desired location and
then press GRA. When the screen shows [GET GRAPH], press ENTER. User can cycle through the
graphics with the key PREV or NEXT pressed. Press ENTER for the desired graphic.
EDIT THE USER DEFINED GRAPHIC
In the Edit/Program mode, enter the number of the message file to edit. Press the key GRA . Use
NEXT and PREV keys to select [MAKE GRAPH]. Press ENTER.
Use NEXT and PREV keys to select the memory location [NUMBER A] to [NUMBER H] for
[GRA] to [GRH]. Press ENTER. The led sign will show a cursor in the form of a dot on the display.
9
Now,
(1) You can move the cursor around by using the direction keys corresponding to F, G, H, I, L, N, O
and P on the wireless infrared keypad.
(2) To turn on drawing, press the key “K” and then use the direction keys to draw the line.
(3) To change the color of the dot, press PREV and NEXT key.
(4) To turn off drawing, simply press the key “K” again.
You can make a new graphic or edit a user-defined graphic in this manner. To recall the user-defined
graphic, select [GET GRAPH] at the desired position in the message file.
10
APPENDIX A: ADDITIONAL PROGRAMMING TIPS
The following functions require that you move through the list to make a selection by using the
PREV and NEXT keys.
Program Code Definition
Possibilities
Control
METHOD
Cyclic
Immediate
Open from Right
Open from Left
Open from center
Open to Center
Cover from Center
Cover from Right
Cover to Left
Cover to Center
Scroll Up
Scroll Down
Interlace to Center
Interlace Cover
Cover Up
Cover Down
Scan Line
Explode
Pac Man
Fall & Stack
Shoot
Flash
Random
Slide in
[CYCLIC]
[IMMED]
[OPEN ]
[OPEN ]
[OPEN<>]
[OPEN><]
[COVER<>]
[COVER ]
[COVER ]
[COVER><]
[SCROLL ]
[SCROLL ]
[INTER><]
[INCOVER><]
[COVER ]
[COVER ]
[SCANLN]
[EXPLODE]
[PACMAN]
[FALL]
[SHOOT]
[FLASH]
[RANDOM]
[SLIDE IN]
Display method
COLOR
Text color
[Color models only]
Please refer to Appendix C
FONT
Character size
5 6 Short
5 11 Short & Wide
7 6 Default
7 11 Wide
7 9
7 17 Extra Wide
Small Fonts
[5 6]
[5 11]
[7 6]
[7 11]
[7 9]
[7 17]
[Small]
SPEED
Scrolling speed
Speed 1 (Fastest)
Speed 2
Speed 3
Speed 4
Speed 5
Speed 6
Speed 7
Speed 8 (Slowest)
[SPEED 1]
[SPEED 2]
[SPEED 3]
[SPEED 4]
[SPEED 5]
[SPEED 6]
[SPEED 7]
[SPEED 8]
Note:
User should not mix speeds within a single message file.
11
Program Code Definition
Cont’d
Possibilities
Control
GRAPHICS
User-programmable graphic file
GRAPHICS
Built-in graphic
City
Car
Vessel
Tel
Nature
Ship
Swim
Cat
[GHA]
[GHB]
[GHC]
[GHD]
[GHE]
[GHF]
[GHG]
[GHH]
[GHI]
[GHJ]
[GHK]
[GHL]
[GHM]
[GHN]
[GHO]
[GHP]
PHRASE
Built-in
Animation
MERRY X`MAS
HAPPY NEW YEAR
4TH JULY
HAPPY EASTER
HAPPY HALLOWEEN
DON`T DRINK&DRIVE
NO SMOKING
WELCOME
[ANIM 1]
[ANIM 2]
[ANIM 3]
[ANIM 4]
[ANIM 5]
[ANIM 6]
[ANIM 7]
[ANIM 8]
PAUSE
Pause
Delay 02 seconds
Delay 03 seconds
Delay 04 seconds
Delay 06 seconds
Delay 10 seconds
Delay 20 seconds
Delay 30 seconds
Delay 60 seconds
[PAUSE 1]
[PAUSE 2]
[PAUSE 3]
[PAUSE 4]
[PAUSE 5]
[PAUSE 6]
[PAUSE 7]
[PAUSE 8]
12
APPENDIX B: TIMER OPTIONS
Timer Options
You have the programming option to turn on or off the display at certain time during a day. Note that
you can only set the timer functions in Edit/Program mode.
In Edit/Program mode, press the TIME key to select the timer functions. Press the NEXT and PREV
keys to cycle through the timer functions and press the ENTER key to make your selection.
To input times, press the [⇓ ] and [◊ ] arrow keys to move through the digits and use the NEXT or
PREV keys to increment or decrement the values for the digits.
Function
SET TIME
SET DATE
ALARM
HOUR ALARM
12H MODE
24H MODE
ADD TIME
ADD DATE
OFF TIME
ON TIME
ADD TEMP
ADJ CLOCK
Function
Set current time (HH:MM:SS)
Set date (DAY of Week MM:DD:YY)
Set alarms and time interval between alarms
Set hourly alarm On/Off
If selected, the time will be displayed in 12-hour format.
Note: While in programming, always enter time in 24-hour format.
If selected, time will be displayed in 24-hour format
Show current time on the screen
Show current date on the screen
Turn off the display at the specified time.
Turn on the display at the specified time.
Not applicable
Compensate time deviation due to crystal aging
Additional Tips On Alarm SettingWhen you select the Alarm option, the led sign will indicate C: xxx M: xxx, where xxx is a number
from 000 to 255.
ExampleC: 123 M: 001
This means that there will be 123 times of alarm signal and the time interval between two alarm
signals is 1 minute.
13
APPENDIX C: LISTING OF COLORS
Listing of Colors: [Color models only]
Color Name
Red............................................................................................... ...
Bright Red................... ................... ................... ................... ........
Orange................... ................... ................... ................... ..............
Bright Orange................... ................... .................. ....................…
Yellow................... ................... ................... ................... ...............
Bright Yellow................... ....................................... .......................
Green................... ................... ................... ................... ................
Bright Green................... ................... ................... ................…….
Layer Mix (Rainbow) ................... ................... ................... ..........
Bright Layer Mix (Rainbow) ................... ................... ..................
Vertical Mix................... ................... ................... ................... ......
Saw Tooth Mix................... ................... ................... ................... .
Green on Red................... ................... ................... ................... ...
Red on Green................... ................... ................... ................... ...
Orange on Red................... ................... ................... ................... .
Yellow on Green................... ................... ................... ..................
* The color brightness is increased.
14
Program Code
[RED]
[RED] *
[ORA]
[ORA] *
[YEL]
[YEL] *
[GRE]
[GRE] *
[MIX]
[MIX] *
[MIX]
[MIX]
[MIX]
[MIX]
[MIX]
[MIX]
APPENDIX D: LISTING OF SYMBOLS
Note: The actual symbol in brackets (“[
Sunny
Phone
Alien
Car
Trees
Crown
Lower Left Arrow
Shoe
Cloudy
Glasses
Key
Tank
Duck
Hearts
Upper Left Arrow
Martini Glass
]”) will appear on the display in the programming mode.
Rainy
Faucet
Sweater
House
Motorcycle
Right Arrow
Mug
15
Clock
Rocket
Helicopter
Teapot
Bike
Left Arrow
Chair
APPENDIX E: INTERNATIONAL CHARACTERS
English Character
International Characters
A
ÄÅÆ
ÇÆ
É
Ñ
ÖÓ
Œ
Ü
¯•
âäàåæá
Ç
éêëè
ïîìí
ññ
ôöòó
C
E
N
O
S
U
Z
a
c
e
i
n
o
t
u
y
Space
?
$
üûùú
Ÿ
áâÃðÓ
óì ôÖ
èÙ äö
¿
¢ £ ¥ Pts ƒ •
16
APPENDIX F: FILE LOG
File No
Message / Description
17
APPENDIX G: ADVANCED SETUP
When the led sign is taken apart, user can find a red 8 bit DIP switch on the CPU board.
ON
È Õ È Õ È Õ È Õ È Õ È Õ È Õ
1
2
3
4
5
6
7
The initial setup is [ ON ON ON ON
is zero and the password is disabled.
ON
ON
ON
È Õ
8 MSB
ON ] meaning the serial port address
Bit 1~ Bit 7: Representing the led sign serial port address
When the corresponding DIP switch bit is ON, the switch bit value is zero. OFF is 1.
ON => ‘0’
OFF=> ‘1’
Example:
If DIP switch position is [ OFF ON ON
then
[1] serial port address is 01[HEX] and
[2] led sign is password disabled.
ON
ON
ON
ON
ON ],
Bit 8: Password
ON: Password disabled
OFF: Password enabled
A PC to led sign serial cable is included in the package. The PC software is also included in the
package to manage message files and to control the led signs on line. User can inter-connect led signs
together in serial, using standard RJ11 phone wires.
18
APPENDIX H: WIRELESS INFRARED KEYPAD DESCRIPTIONS
1.
Press O to turn on or turn off the led sign. If there is no file in 01 to 99, it will run file 00 (the
demo file). If there is file in 01 to 99, it will display the last saved file or the most recently
edited file.
2.
Press PROG to enter the Edit /Program mode. Type a file number from 01 to 99 and then
enter message. File 00 is for power up demonstration. It is read only and cannot be edited.
3.
In Edit/ Program mode, press CPW to edit or reset password. Use PREV and NEXT and ENT
to select the functions:
UNUSE PASS
USE PASS
RES PASS
CHANGE PASS
Turn off password security
Turn on password security
Reset to factory default password “000”
Change to new password
4.
In Edit/ Program mode, press [MET] and use PREV and NEXT to scroll through the 24
display methods. ENT to select the desired display method.
5.
In Edit/ Program mode, press CAP to toggle between capital and small characters.
6.
In Edit/Program mode, press TIME to enter the timer options. Use PREV and NEXT and ENT
to confirm the selection:
SET TIME
SET DATE
ALARM
HOUR
ALARM
12H MODE
24H MODE
ADD TIME
ADD
DATE
OFF TIME
ON TIME
ADD
TEMP
ADJ
CLOCK
Set current time (hh:mm:ss)
Set date (mm:dd:yy)
Set alarms and time interval between alarms.
Format: C: xxx M: xxx where xxx is a number from 000 to 255
Example: C: 123 M: 001
This means that there will be 123 alarm signals and the time interval
between two alarm signals is 1 minute.
Set the hourly alarm On/Off
If selected, the time will be displayed in 12-hour format.
Note: while in programming, always enter the time in 24-hour format.
If selected, the time will be displayed in 24-hour format
Show the current time on the led display
Show the current date on the led display
Turn off the led sign at the specified time.
Turn on the led sign at the specified time.
Not applicable
Compensate time deviation due to crystal aging
7.
In Edit/ Program mode, press SPE to enter display speed options. Use PREV and NEXT to
select the desired speed. Avoid mixing different speeds within a message. Default speed is 3.
The fastest speed is 1 and the slowest speed is 8. Speeds 4,5 and 6 will flash the message while
moving.
8.
In Edit/ Program mode, press FONT and use PREV and NEXT to select the different character
fonts.
19
9.
10.
11.
In Edit/ Program mode, press COL and use PREV and NEXT to select the different color of
the display message.
In Edit/ Program mode, press SYM. and use PREV and NEXT to select 30 different symbols.
In Edit/ Program mode, press CLR and use PREV and NEXT to select the following erase
functions. Press ENT: to confirm the selection.
DEL ALL
DEL MSG
DEL FILES??
DEL ON/OFF
12.
:
Delete all message files
Delete the current message file
Delete the specified file 01 to 09 or
specified sequence file S0 to S9
Delete the Auto On/ Off timer function
In Edit/ Program mode, press GRAPHICS and use PREV and NEXT to select the following
options
GET GRAPH
Use PREV and NEXT to select the graphics
GRAPH A to GRAPH H
Create a new graphics in locations GRAPH A to GRAPH H
MAKE
GRAPH
EDIT GRAPH
Edit and store GRAPH A to GRAPH H
Note: Please refer to 22 page 22 for cursor direction keys to make and edit graphics.
13.
In Edit/ Program mode, use <= and => to move the cursor position to the beginning or the end
of the message. Press INS to edit or press DEL to delete a message file.
14.
In Edit/ Program mode, use ALT for the alternative keys on the remote control keypad.
15.
In Edit/ Program mode, press PAU to generate a pause within the message. Use PREV and
NEXT to select from PAUSE 1 to PAUSE 8.
16.
In Edit/ Program mode, press PHR to select a graphic animation in the message. Use PREV
and NEXT to select ANIM 1 to ANIM 8.
17.
In Edit/ Program mode, press BEEP to beep in the message. Use PREV and NEXT to select
BEEP 1 to BEEP 3.
18.
In Edit/ Program mode (without file selection), press ESC can return to RUN mode.
19.
In Edit/ Program Mode, INS means [Insert], DEL means [Delete] and SPA means [Insert a
Space] in the message.
20.
In Edit/ Program mode, press RUN is to save and run the current message; whereas in Display
mode, press RUN and enter a message file number 01 to 99, will change to display to the
message of the selected file.
21.
In Edit/ Program mode, instead of entering a 2-digit number, the user can enter to select S0 to
S9 schedule files. Please refer to Programming a Schedule File to learn of examples and
benefits of scheduled files.
22.
The keys listed below correspond to the directional keys in Graphics mode. The K toggles
drawing on/off and is only active in graphics mode.
F
G
H
Please refer to page 9.
J
K
L
N
O
P
20
TERMS AND CONDITIONS
Warranty:
The products are warranted against defects in materials and workmanship. If we receive notice of
such defects during the warranty period , we shall either repair or replace the products, which proved
to be defective.
Limitation of Warranty:
Warranty shall not apply to defects resulting from:
a. Improper or inadequate maintenance by buyers;
b. Unauthorized modification or misuse;
c. Operation outside of the environmental specifications for the products, or
d. Improper site preparation and maintenance.
21
TROUBLE SHOOTING
No Display:
1.
2.
3.
4.
Check if power is connected to the led sign.
Check if power is firmly plugged into the wall outlet.
Check if the main AC power supply is normal.
Check if the Auto On / Off timer setting is correct
No response to wireless infrared keypad:
1.
2.
3.
4.
Check if the batteries in the remote control keypad are run out. If user is uncertain, please
replace all the batteries and try again.
Check if the batteries are placed at right polarities. Please, follow the markings carefully in the
battery compartment.
Check switch 8 on the Dip Switch on the PCB board inside the led sign is set to OFF’ position.
Check if there is anything blocking in between the remote keypad and the led sign
No display but with response to the remote control:
1.
2.
3.
Check if the Auto On/ Auto Off Timer setting is correct.
Check if the data in the files are valid.
If you are uncertain, you can enter the Edit Mode and press ‘CLR’ on the keypad and then
select ‘DEL ALL’ to erase all message files. This will reset the led sign to display the default
demo messages.
If all above procedures are observed, please contact your dealer.
22