1
OmniOutliner 4 for Mac
User Manual
Copyright © 2001-2014 The Omni Group. All rights reserved.
OmniOutliner, the OmniOutliner icon/logo, OmniGraffle, Graffle, the OmniGraffle icon/
logo, OmniFocus, OmniPlan, and the Omni logo are trademarks of The Omni Group.
Apple, the Apple logo, AppleScript, Finder, Mac, the Mac logo, OS X, and Spotlight are
trademarks of Apple Inc.
2
Contents
What’s New in OmniOutliner 4
What’s Available in OmniOutliner 4 Pro
How Do I Know If I Have Pro?
Getting to Know OmniOutliner 4
Using and Setting Keyboard Shortcuts
Using the Resource Browser
Managing and Working with Templates
Using the Resource Browser’s Action Menu
Using the Toolbar
Customizing the Toolbar
Using the Toolbar’s Action Menu
Attaching Files
Recording Audio
Using the Sidebar
The Contents Pane
Searching Within Your Outline
The Styles Pane
Using the Inspectors
Inspector Behaviors
Style Inspector
Column Inspector
Outline Inspector
Using Grid Lines and Columns for Creative Templates
Document Inspector
Style Attributes Inspector
Printing from OmniOutliner
OmniOutliner Preferences
General Preferences
Keyboard Preferences
Rearrange the Named Styles for Different Keyboard Shortcuts
3
5
7
9
10
12
17
18
19
21
22
23
24
28
31
32
33
35
39
39
40
46
58
60
61
68
70
75
75
77
80
Text Import & Export Preferences
RTF Export Preferences
Audio Recording Preferences
Automatic Software Update Preferences
Sharing OmniOutliner Files with Other Apps
Exporting from OmniOutliner
Importing to OmniOutliner
Sharing OmniOutliner Files with OmniGraffle
Every Single Menu Item and Keyboard Shortcut
The OmniOutliner Menu
The File Menu
The Edit Menu
A Note About the Clipboard, Styles, and Cut-Copy-Paste
The Format Menu
The View Menu
The Organize Menu
The Window Menu
The Help Menu
Reference
LinkBack
Licensing
Getting Help
The OmniOutliner Website
Forums
Email Support
Release Notes
4
81
81
82
83
85
85
87
88
90
90
93
95
97
102
108
114
117
118
119
119
119
124
124
124
124
124
What’s New in
OmniOutliner 4
Welcome to the new OmniOutliner 4!
Supporting the latest technologies in and optimized for OS X Mavericks,
OmniOutliner 4 packs in more of the features long-time Outliner fans
have been asking for, including:
• A brand-spanking new UI — Yes, that’s right folks, we’ve totally
redesigned the UI in OmniOutliner 4. Out with the old paradigms
and in with the new.
• Resource Browser — Use the new Resource Browser to browse
recently edited files, choose templates, apply themes to existing
documents, and import your templates from OmniOutliner 3.
• Sidebar — We’ve done away with the old style drawer from
OmniOutliner 3 and have created a new Sidebar that lists the
Contents of your outline, Styles, and more!
• Inspector redesign — OmniOutliner’s redesigned Inspector window
is cleaner and fresher.
• Styles — To be more in line with OmniOutliner 2 for iPad, we’ve
retooled the way styles work to create a great cross-platform
experience. We’ve added style theming, too, so you can apply
template styles to an existing document.
• Theming — You can now apply the styles from a template
(its theme) to your outlines.
5
• Column visibility — Have a document with a lot of columns that you
only need to access every now and then? We’ve added the ability to
hide columns when you don’t need them, and then make reappear
when you want them back.
• Smart Match Technology — Pop-up List-styled columns benefit from
the Smart Match technology we’ve used in OmniFocus. As you type
characters in a Pop-up List cell, OmniOutliner tries to guess which
item you mean—and the characters you enter don’t have to be at the
beginning or contiguous. If you type a new value that you’d like to
add to the Pop-up List, just enter Command-Return to add the value
to that list.
• Hyperlinks — URLs are converted into real links so you can click and
open them in your default browser. What’s more, if you don’t want
or like this behavior, you can toggle this off in OmniOutliner’s
preferences.
• Attachments — You can attach pretty much anything to an
OmniOutliner document: images, video, audio, even other
OmniOutliner files. Attached images autoscale to the column width,
and you can attach audio clips which play right within the Outline.
What’s more, we’ve added a new attachment popover to replace
OmniOutliner 3’s tagging, so you can change the visibility of
attached images, use alternative text rather than a filename, and
direct how OmniOutliner 4 opens attachments.
• Date parsing logic — OmniOutliner’s new date parsing logic lets you
type stuff like now, yesterday, 2d, september, thu, or –5w in a date
column and have it know what you mean.
• Printing — All OmniOutliner-specific print options are now located
in the print panel. You can customize page headers and footers,
adjust scaling and margins, choose whether to include Notes, and
more.
6
• Zooming — Text can now be magnified on screen without changing
your print layout.
• Compatibility with existing files — OmniOutliner 4 is fully
compatible with OmniOutliner 3 for Mac, and OmniOutliner 1 and 2
for iPad. As long as you have a .oo3 file, OmniOutliner 4 can open it.
What’s Available in OmniOutliner 4 Pro
Whether you’ve purchased OmniOutliner 4 Pro, or are considering
upgrading from the Standard edition, here are some features you’ll only
find in OmniOutliner Pro:
• AppleScript support — Automate your workflows with AppleScript.
• Export support for Microsoft Word — Export to Microsoft Word in
either .docx or .dochtml format.
• Manual page breaks — Choose whether a row or a particular row
style forces a manual page break when printing the document.
• Note customization — Adjust line height and padding for Notes.
• Display Notes inline or in a pane — Inline notes can sometimes get
in the way. Rather than forcing you to hide and show them, we’ve
added an option to view Notes in a separate pane at the bottom of
the outline area.
• Row handle visibility — Use the Style inspector to change the
visibility of row handles. You can even set row handles independent
from one another so that some rows always have the handles visible
while others only appear when you mouse over the row or not at all.
• Child indentation — Choose whether child rows will be indented, or
if they are aligned with their parent rows.
7
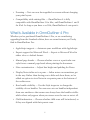
• Adjust line heights and row padding — Use the Style inspector to
tweak the line height and add spacing around rows
• Improved sorting options — sorting opt-out
• Hide columns — Show and hide columns to your hearts’ delight.
• Document-specific toolbars — Create custom toolbars that contain
only the buttons you need for that special document you’ve been
working on.
• Folded editing — No, we don’t mean that you can edit while in a
pike position. We’re talking about the ability to have the text within
a row hide when you’re not editing its content, and to reveal
everything when you have the row selected.
All this in a snappier, faster UI built for OS X Mavericks and the latest Mac
hardware, OmniOutliner 4 is where the future begins!
8
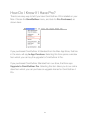
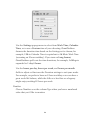
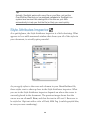
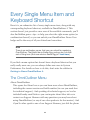
How Do I Know If I Have Pro?
There’s one easy way to tell if you have OmniOutliner 4 Pro installed on your
Mac. Choose the OmniOutliner menu, and look for Pro Purchased, as
shown here:
If you purchased OmniOutliner 4 Standard from the Mac App Store, that line
in the menu will say In-App Purchase. Selecting this item opens a window
from which you can buy the upgrade to OmniOutliner 4 Pro.
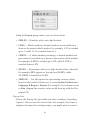
If you purchased OmniOutliner Standard from our store, that item says
Upgrade to OmniOutliner Pro. Selecting this item takes you to our online
store from which you can purchase an upgrade license for OmniOutliner 4
Pro.
9
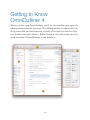
Getting to Know
OmniOutliner 4
When you first open OmniOutliner, you’ll see two windows pop open: the
editing window and the Inspector. The editing window is where you’ll do
all of your work, and the Inspector provides all of tools you need to style
text, format rows and columns. Before diving in, let’s take some time for a
quick overview of OmniOutliner’s user interface:
10
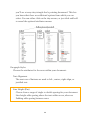
1. The Toolbar — Along the top of OmniOutliner’s window you’ll find
a row of useful buttons in the Toolbar. Fully customizable—including
document-specific toolbars—the toolbar makes it easy for you to add
columns and attachments, record and embed audio clips, and a
whole lot more. See Using the Toolbar for more details.
2. The Sidebar — Along the left side of OmniOutliner’s window is the
Sidebar. Fully collapsible, the Sidebar provides an outline view of
everything in the Editor and keeps tracks of the styles you’ve used in
your document. To learn more about the Sidebar, see Using the
Sidebar.
3. The Outline — This is where you enter text in rows and columns,
add notes, tick things off using the status checkboxes, attach images,
embed audio clips, and a whole lot more.
4. The Inspector — Floating off in its own window are the Inspectors.
Consisting of the Style, Column, Outline, Document, and Style
Attributes inspectors, the floating window makes it easy for you to
design your OmniOutliner documents with style, and when you
don’t need it, you can just hit Shift-Command-I to make it go away
until you need the Inspectors again. For more details about the
Inspectors and what each of them do, see Using the Inspectors.
11
Using and Setting Keyboard Shortcuts
From time to time, we’ll mention keyboard shortcuts that you can use in
OmniOutliner. If you’re new to the Mac or aren’t accustomed to using
keyboard shortcuts, they can really help speed you along while working in
OmniOutliner. Rather than having to grab a mouse or take your fingers off the
keys while you’re typing to use your Mac’s Trackpad, you can just hit a
keyboard shortcut to invoke certain menu commands.
Not every menu option has its very own keyboard shortcut, though. If you find
that you’re using a menu option often enough that it warrants its own special
keyboard shortcut—or if you want to change an existing keyboard shortcut to
something else—you can do this with the System Preferences app on your
Mac. To show you how easy this is to do, let’s create your first custom
keyboard shortcut for OmniOutliner—for the Zoom to Actual Size menu
option.
1. Before you get started, the first thing you need to know is where the
Zoom to Actual Size menu item resides amongst OmniOutliner’s
menu options. After some poking around, you find it in the View menu:
12
It’s not that you need to know which menu the option is in (although,
that is helpful in other ways), what you really need to know is exactly
how that menu option is spelled out. When you go to create this
keyboard shortcut, you’ll need to know that. Of course, you can
always switch back and forth between OmniOutliner and the
Keyboard system preferences pane if you need to, but it’s good to
have this piece of information before you get too far along.
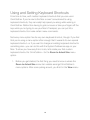
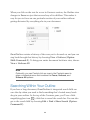
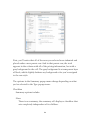
2. In the Dock, click System Preferences.
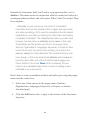
3. Open the Keyboard preferences panel, and then click on the
Shortcuts tab.
4. In the sidebar on the left, click App Shortcuts; the area to the right lists
any custom keyboard shortcuts you’ve created for other apps on your
Mac.
13
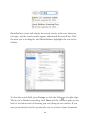
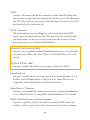
5. Beneath the listing of custom shortcuts, click the Add button; it’s the
one that looks like a plus sign (+). This opens a sheet in which you can
create the custom keyboard shortcut.
6. In the sheet, do the following:
•
In the Application menu, choose OmniOutliner.app.
•
In the Menu Title field, enter Zoom to Actual Size. Be sure to
enter the text exactly as it appears in the menu, otherwise this
won’t work.
•
In the Keyboard Shortcut field, enter the keyboard shortcut you
would like to use. Since many popular design apps use ⌘–1 for
zoom to actual size, that’s what we’ve used here for this example;
you can use whatever you would like, though.
14
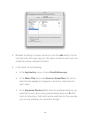
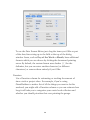
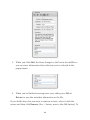
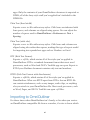
7. When finished, the sheet should look similar to the following:
8. Click Add to create the new keyboard shortcut for OmniOutliner.
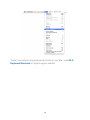
If you switch back to OmniOutliner and look in the View menu, you’ll see your
newly-created keyboard shortcut for Zoom to Actual Size.
15
To learn more about using keyboard shortcuts on your Mac, read OS X
Keyboard Shortcuts on Apple’s support website.
16
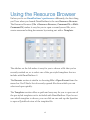
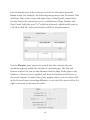
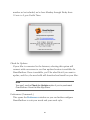
Using the Resource Browser
Unless you’ve set OmniOutliner’s preferences differently, the first thing
you’ll see when you launch OmniOutliner is the new Resource Browser.
The Resource Browser (File ▸ Resource Browser; Command-N or ShiftCommand-N) makes it easy for you to open a recently-saved file, or to
create awesome looking documents by starting out with a Template.
The sidebar on the left makes it easy for you to choose a file that you’ve
recently worked on, or to select one of the pre-styled templates that we
include with OmniOutliner 4.
The Recents section is similar to choosing File ▸ Open Recent from the
menu bar. You’ll find a list of recently-opened files from which you can
select and open quickly.
The Templates section offers a quick and easy way for you to open one of
the pre-styled templates we’ve included with OmniOutliner. If you’re not
sure which template to choose, you can click on one and tap the Spacebar
to open a QuickLook view of the template file.
17
To close the QuickLook view, just tap the Spacebar again and the preview
window goes away.
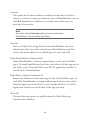
Managing and Working with Templates
Any file that you save as a template (File ▸ Save As Template) is available
from the Resource Browser in the Templates section.
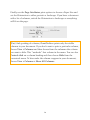
To manage your templates, use the Action menu at the bottom of the
Resource Browser; it’s the one that looks like a small gear (
). First,
select one of the templates, and then click the Action menu and choose
Show in Finder. A new Finder window pops open and places you inside
the Templates folder. Once here, there’s no limit to what you can do with
the templates. You can change their names, move the ones you don’t want
to the trash, or add subfolders so you can categorize template files for
certain tasks.
18
Note
For the scripters or power users who need to know exactly where
the Templates folder is, you can find it on your Mac’s hard drive in
the following location:
~/Library/Containers/com.omnigroup.OmniOutliner/Data/
Library/Application\ Support/The\ Omni\ Group/
OmniOutliner/Templates
If you’ve purchased OmniOutliner 4 from the Mac App Store, swap
out com.omnigroup.OmniOutliner with
com.omnigroup.OmniOutliner.MacAppStore, or
com.omnigroup.OmniOutlinerPro.MacAppStore if you have
OmniOutliner 4 Pro.
Using the Resource Browser’s Action Menu
Use the Action menu (
) to open or create new templates, reveal where
a particular resource lives on your Mac in the Finder, move an object to
Trash, or set a particular template that you’re fond of as the default.
If you would like to import your OmniOutliner 3 templates, you can
choose Add Resources to Library to select a file or template you’d like to
add to OmniOutliner’s library.
You can use the Restore option in the Action menu to restore any of the
default templates that you might have trashed earlier. Even if you delete
these files from the Templates folder, copies of the templates files reside
within the app.
Let’s say that one sleepless night you decided that you didn’t need any of
the templates we’ve included with OmniOutliner. Blurry-eyed, you open
the Resource Browser, and then one by one, choose Action ▸ Move to
Trash. After all that work, you empty the trash, close your laptop and drift
off to sleep. Then, around 5:38 a.m. you awake with a start and have this
incredible idea for what you know will be a best-selling novel. Great.
19
You’ve trashed the Book Draft template. What are you going to do?
Fortunately, we thought about this for you. If you choose Action ▸
Restore ▸ Templates you can choose from any (or all) of the templates
we’ve included with OmniOutliner and put them back on your Mac.
20
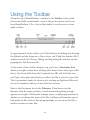
Using the Toolbar
Along the top of OmniOutliner’s window is the Toolbar. Packed with
buttons and fully customizable—even at the per-document level if you
have OmniOutliner 4 Pro—the toolbar makes it easy for you to create
spiffy outlines.
At opposing ends of the toolbar, you’ll find buttons for hiding and showing
the Sidebar and the Inspectors. Above those, you’ll find the standard OS X
window controls for Closing, Hiding, and Expanding the window, and for
popping into Full Screen mode.
At the center of the toolbar along the top, you’ll see a Document Icon
which you might assume does nothing other than tell you what type of file
this is. But if you hold down the Command key (⌘) and click that icon,
you’ll get a tiny menu that shows you where the file is stored on your Mac.
This is sometimes handy for when you’re working on duplicated files and
you can’t remember where you saved the last revision.
Next to the Document Icon is the Filename. If you hover over the
filename with the mouse pointer, a small downward-pointing triangle
appears to its right. Clicking this triangle opens a small popup window, in
which you can change the name of the file, add keyword/metadata tags to
help make the file easier to find using Spotlight, or even move the file to
another location on your Mac.
21
Customizing the Toolbar
As noted earlier, the Toolbar is packed with a variety of tools. However,
you can customize the toolbar by adding additional buttons or rearranging
their order, to suit your needs.
To customize the toolbar, choose View ▸ Customize Toolbar or Controlclick on the toolbar and select Customize Toolbar. When you do, a sheet
slides down from under the toolbar, revealing a slew of function-related
buttons that you can drag up to the toolbar. For example, you could add
the Group and Ungroup buttons to the toolbar. When you’ve finished
making changes to the toolbar, click Done.
22
If you don’t like the changes you’ve made, or if you ever want to reset the
toolbar to its default set, all you need to do is drag the bottom row up to
the toolbar and then click Done to save the changes. The changes you’ve
made to the toolbar are saved along with OmniOutliner’s preferences, so
that you’ll see the same toolbar options with every document you create.
(Pro) If you have OmniOutliner 4 Pro, you can create document-specific
toolbars by choosing View ▸ Create Document-Specific Toolbar.
You’ll start out with a bare-bones toolbar—containing only the Sidebar
and Inspect buttons along with a long Flexible Space “button”—to which
you can add whatever buttons you’d like. If you decide later that you no
longer want that custom toolbar, choose View ▸ Remove DocumentSpecific Toolbar and the toolbar reverts back to the default button set.
Using the Toolbar’s Action Menu
If you've customized the toolbar to include the Action menu, you'll notice
that it behaves slightly different from the Action menu you find in the
Resource Browser.
23
The toolbar’s Action menu includes many of the commonly used options
that you’ll find in the Edit, Format, View, and Organize menus. Rather
than spreading these out over four different menus, we’ve placed the ones
we feel you’ll use most in this compact Action menu for every doc you’re
working on.
Attaching Files
Outlines aren’t just about text. Sure, they mostly are, but every now and
then you’re going to want to attach something—an image, a movie clip
you’ve shot on your iPhone, a PDF file, another OmniOutliner file—to the
document you’re working on. Fortunately, OmniOutliner can
accommodate all your document-attaching needs.
To attach a file, you can do one of the following:
• Drag anything in from anywhere, including files from a Finder
window or text and images from a webpage.
• Click the paperclip icon in the Toolbar.
• Choose Edit ▸ Attach File.
• Click the toolbar’s Action menu and choose Attach File.
When attaching files by any method other than dragging and dropping
things into OmniOutliner, you are presented with a file chooser, that looks
very much like a Finder window. Use the file chooser to navigate through
your Mac’s hard drive until you locate the file you’d like to attach.
24
In the chooser, you’ll notice two options that affect how the file is attached
to your OmniOutliner document:
• Embed the file in the document — The default, this is fairly
obvious what happens: A copy of the file you’ve attached is
embedded within the OmniOutliner file you’re presently working on.
• Create a link to the file — Rather than embedding an exact
duplicate of the file, as with the previous option, this copies the file’s
location on your Mac’s hard drive into the OmniOutliner document.
You may not notice the difference between those two options when you’re
working on your system. Attach a file using either option and the files
appear within your Outline. The big difference, comes into play when you
send your OmniOutliner document to someone else. For that, you’ll want
to go with the default option (Embed the file in the document) so the
25
person you’re sending the file to will also receive the attachment. If you
choose the other option, all they’ll see is an icon and the filename of the
file you’ve attached from your Mac. The problem is, because that file is on
your Mac, they won’t be able to view or open that file.
Note
If you’re the only person who will ever use your OmniOutliner files,
you might consider using the second option (Create a link to the
file) instead of embedding attachments. The linking option makes
your OmniOutliner files smaller (since the attached file isn’t
included), and you can still view and access these attachments
since the files reside on your Mac.
The disadvantage, however, comes when you delete a file that
you’ve attached as a link. All you’ll see is the file’s icon and its
filename. Do that, and even you won’t be able to view the
attachment, no matter how hard you try.
When you attach an image or PDF file, a preview automatically scales to
the width of the column in which it appears. Other types of files appear as
an icon with their filename.
If you click an image or PDF file you’ve attached, the following popover
menu appears:
26
You can choose to have the attachment Show as Image or Show as Icon,
and you can change the Display name for the attached file from its
filename (the default) to something more descriptive. Non-image files
won’t have the Show as Image and Show as Icon buttons along the top.
To open the file, click the Open with button, which recommends an app
to use based on the kind of file you’ve attached.
27
Recording Audio
One of the many cool features in OmniOutliner 4 are the improvements
we’ve made to its audio recording capabilities. To record something, click
the Start Recording button in the toolbar; it’s the one that looks like an
old-timey microphone. OmniOutliner starts recording the instant you click
that button. When you press that button, you’ll also notice a couple
changes in the user interface.
First, the text for the microphone button in the toolbar changes from Start
Recording to End Recording. The button also has a small Stop button
applied to it. The other change you’ll notice is a red Recording bar
appears just beneath the toolbar. If you’ve used OmniOutliner 2 for iPad,
this looks very familiar.
In the center of the Recording bar, you’ll see a button to Pause recording,
which changes the Recording bar’s color to gray, and a checkmark button
(Save) to stop recording. In the gray bar, you’ll notice that Recording has
changed to Paused, and the Pause button has been replaced with a
Resume button.
Click the Resume button to continue recording where you left off, or click
the checkmark (Save) button to stop recording. When you stop recording,
an audio player clip shows up in your Outline.
28
Note
Clicking the checkmark or the End Recording button in the toolbar
has the same effect: your audio recording will cease and an audio
file is saved into your Outline.
Much like attachments, if you click an audio clip’s Info button (the little i
icon at its right edge), a display options popover appears. Here you can opt
to have the audio clip show up as a player (the default) or as an icon. More
importantly, you can change the audio clip’s Display name from a random
number string, to something more descriptive. This is particularly
important if you choose Show as Icon at the top of the popover.
Tip
If you’re using OmniOutliner to take notes while in a meeting, why
not just record the meeting as it happens? That way, you can have a
full audio recording of the meeting within the same document you’re
using for your notes. OmniOutliner can record up to six hours of
audio in one stream.
29
Be sure to read the Audio Recording Preferences section later in this
guide for more information about audio recording options in
OmniOutliner.
30
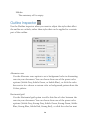
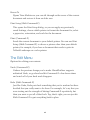
Using the Sidebar
Along the left edge of OmniOutliner’s window is the Sidebar. The Sidebar
lists the Contents of your outline along with the Styles you’ve used. At
the top of the Sidebar, you’ll also find a Search field that makes it easy for
you to sift through your outlines and find the information you’re looking
for.
The Sidebar is open by default, but you can hide and show it again by
choosing View ▸ Hide/Show Sidebar (Option-Command–1), or by
clicking the Sidebar button in the toolbar. The Contents and Styles
sections are independently scrollable within the Sidebar, so they can
handle all of the content and styles you throw at them.
31
If you mouse over the right edge of the Sidebar, or the split line between
the Contents and Styles sections, you’ll notice that the mouse pointer
changes to a resizing handle. Click and drag the resizing handles to resize
the sections of the Sidebar, or the Sidebar itself.
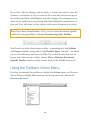
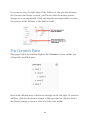
The Contents Pane
The upper half of the Sidebar displays the Contents of your outline in a
collapsable, scrollable pane.
Rows with children have a disclosure triangle on the left edge. To view the
children, click the disclosure triangle to flip open the list. Option-click a
disclosure triangle to open or close all of the rows within.
32
When you click on the text for a row in Contents section, the Outline view
changes to Focus on just that row and any of its children. This makes it
easy for you to focus on one particular section of your outline without
getting distracted by everything else in your document.
OmniOutliner retains a history of the rows you’ve focused on, and you can
step back through that history by choosing View ▸ Unfocus (OptionShift-Command-F). To bring your entire document back into view, choose
View ▸ Unfocus All.
Note
Optionally, you can Control-click on rows in the Contents pane to
open a contextual menu that contains the Focus, Unfocus, and
Unfocus All options.
Searching Within Your Outline
If you have a long document, OmniOutliner’s integrated search field can
save the day when you need to find something that’s buried many levels
deep in your outline. At the top of the Contents pane, you’ll see a little
magnifying glass icon ( ); click that to reveal the search bar. You can also
get to the search field by choosing Edit ▸ Find ▸ Show Search (OptionCommand-F).
33
OmniOutliner starts and adjusts the search criteria with every character
you type, and the search results appear underneath the search bar. Click
the item you’re looking for, and OmniOutliner highlights the row in the
outline.
To clear the search field, press Escape or click the little at its right edge.
When you’ve finished searching, click Done and the Contents pane reverts
back to its former state of showing you everything in your outline. If you
were previously focused on a particular row or section of your document,
34
OmniOutliner restores the Contents pane and the Outline view to where
you were when you cancelled the search. Optionally, you can choose Edit ▸
Find ▸ Hide Search (Option-Command-F) to make the search field go
away.
The Styles Pane
The lower half of the sidebar is the Styles pane. Just like the Contents
pane, the Styles pane is independently scrollable within the sidebar. It also
has a special flippy button (known as the Hide/Show Styles button)
which, when clicked, hides and reveals the Styles pane.
When you click the Hide/Show Styles button, everything in the Styles
pane goes into hiding, and the flippy button escorts itself to the bottomright corner of the sidebar. Click the flippy button again and the Styles
pane reappears. This is particularly useful for when all you’re doing is
working on your outline and you just want to focus on that in the
Contents pane.
35
The area above the split shows the styled ( ) or unstyled ( ) elements
in your document, including a Whole Document item. The area below the
split provides you with some Named styles, such as headings, highlights,
and a rainbow of eight text colors you can apply to the contents of your
document.
36
The Styles themselves are separated into two distinct categories—
Document Styles and Named Styles:
• Document Styles, located at the top of the Styles pane, list all of the
stylable elements in your OmniOutliner document. This includes a
Whole Document item, Column Titles, Notes, a Topic column, and
styles for the various rows in your document. Row styles are
numbered according to their indentation level, and only appear in
the list as they are created in the outline.
• Named Styles, located beneath the style separator line, mainly
consist of the predefined styles included with the template you
started from. Named Styles can be edited by first selecting the style
name in the Styles pane and using the Style inspector to adjust the
style attributes. To create a new Named Style, click the Add button
(+) at the lower-left corner of the Styles pane. You can delete Named
Styles by first selecting the style in the Styles pane, and then
choosing Delete Style from the Action menu at the bottom of the
sidebar.
To familiarize yourself with the Styles pane:
• Click the flippy Hide/Show Styles button a few times so you get the
hang of how this works.
• Click the Add (+) button to create a new Named style.
• Click the Action button to open a mini-menu for creating new
Named styles, duplicating or deleting a style, copying and pasting
style properties, and for clearing styles from a selection.
By now you’ve probably been wondering what all of those little colored
squares are that appear next to the styles in the Styles pane. We call these
little squares Style Chits, and very soon, you’ll see how powerful Style
Chits can be.
37
Style Chits provide you with a visual representation of the style:
Style chits with a two-toned blue checkerboard pattern means that
there are a multitude of style properties for that element.
An empty style chit with a dashed border means there are no styles for
that particular row or column. These elements automatically adopt the
Whole Document style for the template you’ve chosen.
A style chit that’s split diagonally with a darker shade on the upper half
means that the style applies a transparent background color to the
selection.
and
Solid squares with a letter A inside are text-specific styles, such as the
font and its color.
38
Using the Inspectors
The Inspectors reside in a floating window which you can open by clicking
the Inspect icon
at the right edge of the toolbar. Other ways you can
open the Inspector are by choosing Window ▸ Show/Hide Inspectors, or
by using the Shift-Command-I keyboard shortcut.
To switch between the Inspectors, just click on one of the icons in the
Inspector’s toolbar along the top. If you’re not sure which button opens
which inspector, hover over the button with your mouse, and the name of
that inspector appears in italics at the top of the Inspector.
Inspector Behaviors
Before diving in to explore what’s possible with each inspector, it’s worth
taking a quick look at a couple (possibly unknown) features that we’ve
built in.
If you have the Inspector window open while you’re working in a
multicolumn Outline, you’ll notice that the inspector automatically
switches over to the Column inspector whenever you select a column
heading. This makes it easy for you to set or change the column Type and
its Summary behavior.
As you’re working in OmniOutliner, you’ll notice that whenever you are
entering text in a row or column cell that the Style inspector is always
available in the inspector window. However, if you want a particular
inspector to show up as you’re moving along, you can double-click on the
inspector icon in the Inspector window’s toolbar. This places a tiny green
lock on the inspector so that it’s always available. To unlock the inspector,
just double-click it again.
39
This comes in particularly handy when you want to examine the styles in
your outline. Just place the lock on the Style Attributes inspector, and click
around in your document to examine and tweak the styles as needed.
Style Inspector
Use the Style inspector when you want to change the appearance of the
rows in your document.
40
Type Styles
This section of the Styles inspector provides you with a variety of
controls for changing the appearance of the text in your document:
Typeface, Size, and Color
Choose the font, size, and color for the selected text or row.
Bold, Italic, Strikethrough, and Underline
Click to apply the default Bold, Italic, Strikethrough, or Underline
styles to the selected text or row. At the lower right of these buttons
41
you’ll see a teeny-tiny triangle that’s pointing downward. This lets
you know that there are additional options from which you can
select. You can either click on the tiny arrows, or just click and hold
to reveal the optional attributes menus:
Paragraph Styles
Choose the attributes for the rows within your document:
Text Alignment
The next row of buttons are used to left-, center-, right-align, or
justified text.
Line Height (Pro)
Choose from a range of single to double spacing for your document.
Line height adds spacing above the text within a row, where as
Padding adds spacing between rows.
42
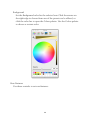
Background
Set the Background color for the selected row. Click the arrows on
the right edge to choose from one of the presets we’ve offered, or
click the color bar to open the Colors palette. Use the Colors palette
to choose a custom color.
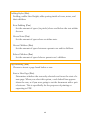
Row Features
Use these controls to set row features:
43
Handle (Pro)
Determines whether the row handle is always visible, only visible
when you hover over the row, or never visible. Hiding the row
handles makes it a little harder to drag and reorder your content;
however, you can use the options in Organize ▸ Move to move rows
up, down, left, or right.
Numbering
Choose a numbering style to use for the rows in your document. See
Row Numbering for more information about numbering styles.
Gutter
Set a color to use for the gutter (the area where the row handle and
status checkbox appear). Click the arrows on the right edge to
choose from one of the presets we’ve offered, or choose Other to
open the Colors palette.
The main purpose of a Gutter color is to help you see which level a
row is on. As you can see in the previous image, the Gutter expands
inward as child rows are added. If you set a Background color but do
not set a Gutter color, the Gutter adopts the Background color
automatically.
44
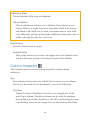
Padding Styles (Pro)
Padding, unlike Line Height, adds spacing inside of rows, notes, and
their children:
Row Padding (Pro)
Set the amount of space (in pixels) above and below the text within
the row.
Above Note (Pro)
Set the amount of space above an inline note.
Above Children (Pro)
Set the amount of space between a parent row and its children.
Below Children (Pro)
Set the amount of space below a parent row’s children.
Page Breaking (Pro)
Choose to insert a page break before a row:
Start a New Page (Pro)
Determines whether the currently selected row forces the start of a
new page. When you select this option, a red dashed line appears
above the row, as if you were going to cut the document with a pair
of scissors. This is specifically for the purposes of printing or
exporting to PDF.
45
Indentation (Pro)
Choose whether child rows are indented:
Indent Children
Choose whether to indent a row’s children. If you choose to not
indent children, it might be hard to determine which is the parent
and which is the child row. As such, you might want to style child
rows differently, perhaps giving them a different background color or
shade, reducing the font size, and so on.
Named Styles
Choose a Named style to apply:
Included Styles
This popup menu lets you select and apply one of the Named styles,
listed in the lower portion of the Styles section of the Sidebar.
Column Inspector
The Column inspector has two popup menus for setting column
attributes:
Type
New columns always start out as Rich Text; however, you can change
this to suit the needs of your document to one of the following:
Checkbox
Unlike the Status Checkboxes that live as an integral part of the
main Topic column, Checkbox columns can be used for anything
from giving you another checkbox to tick off, to monitoring the state
of something, and even for ratings. You can add as many Checkbox
46
columns as you’d like, and you can show or hide them as needed
with the options in View ▸ Columns.
When used in combination with OmniOutliner’s sorting features
(Organize ▸ Keep Sorted or Organize ▸ Sort Outline), checkboxes
can be used to denote a Yes or No (binary) state for almost anything
—feature comparisons, things that need to be reviewed, and so on.
Date
Choose a date and optional time format to use in the column. The
default date string is based on your locale, which is configured in
System Preferences ▸ Language & Region. One of the many
additions to OmniOutliner 4 is a new and improved date parsing
logic that lets you type stuff like now, yesterday, 2d, september, thu, or
–5w in a date column and have it know what you mean.
Use the Format menu to choose how dates and times are displayed
in a date column. You can choose from a Short, Medium, or Long
time string, or opt for something a bit more technical such as ISO
8601 (UTC) so you can show your friends just how nerdy you are.
47
Not satisfied with the options and formats we’ve provided? Choose
Custom Format to create your own special date and time string to
use for a Date-formatted column.
48
To use the Date Format Editor, just drag the items you’d like as part
of the date/time string up to the field at the top of the dialog
window. Items, such as Day of the Week or Month, have additional
formats which you can choose by clicking the downward-pointing
arrow. By default, the custom format uses slashes ( / ) for the
delimiter, but you can enter another character (or different
characters) or remove them entirely, if you’d like.
Duration
Use a Duration column for estimating or tracking the amount of
time a task or project takes. For example, if you’re using
OmniOutliner to make a list of all the things you want to do this
weekend, you might add a Duration column so you can estimate how
long it will take you to categorize your comic book collection and
whether you should prioritize that over painting the garage.
49
Use the Settings popup menu to select from Work Time, Calendar
Time, or to use a Custom time of your choosing. OmniOutliner
formats the duration time based on the Setting you’ve chosen; for
example, 12h in Calendar Time is equivalent to 1d 4h in Work Time
(assuming an 8 hour workday). If you turn on Long format,
OmniOutliner spells out the time durations; for example, 1d 4h gets
expanded to 1 day 4 hours.
Use the hours per day, hours per week, and hours per month
fields to adjust or fine-tune the Duration settings to suit your needs.
For example, we prefer to have an 8-hour workday so we can have a
great work-life balance, while the folks at a law firm or ad agency
might enjoy working 80 hours per week.
Number
Choose Number as as the column Type when you have a numbered
value that you’d like to monitor.
50
Using the Format popup menu, you can choose from:
• 9999.99 — Numbers with a two-digit decimal.
• 10000 — Whole numbers; decimal numbers are rounded up or
down to the nearest whole number. For example, 2.67 is rounded
up to 3, while 3.14 is rounded down to 3.
• 10000% — A whole number percentage; a decimal number that
gets entered is rounded up or down to the nearest whole number.
For example, 2.67% is rounded up to 3%, while 3.14% is
rounded down to 3%.
• 99.99% — Percentages with a two-digit decimal value, if needed.
For example, 99% appears as that and not 99.00%, while
3.14159% is rounded to 3.14%.
• $9999.99 — Use this option for representing currency values
based on the localized values you’ve set in System Preferences ▸
Language & Region ▸ Region. For example, if your Region is set
to Asia ▸ Japan, the currency value would show up with the Yen
symbol (¥).
Pop-up List
Choose the Pop-up List type when you have a column of repeating
“options” that you need to choose from. For example, if you have a
template document for creating recipes, you might want to create a
51
Measurements column with options such as ounce, ounces, gram,
and grams (to name just a few). Now when you go to enter an
amount, all you have to do is select the applicable option from the
Pop-up List rather than having to enter the text over and over again.
Pop-up cells now use OmniFocus’s Smart Match technology. As you
type characters, OmniOutliner tries to guess the item you want—and
those characters don’t have to be at the beginning or contiguous
either.
What’s more, if you enter a new term that isn’t already defined as
part of the Pop-up List, you can enter Command-Return to add it to
the list.
52
Rich Text
Choose Rich Text for regular text; this is the default column style for
new columns.
Summary
The first and most important thing to know about Column Summaries
is that they only appear on the parent row for a group. For example, if
you have a two column document that lists pricing information for a
bunch of parts that you need, and you choose Summary ▸ Total, you’ll
probably wonder “Where’s the total at?”. But if you group those rows
together by selecting the rows and choosing Reorganize ▸ Group
(Option-Command-L), you’ll see all kinds of magic happen.
53
First, you’ll notice that all of the rows you selected were indented and
placed under a new parent row. And in that parent row, the total
appears in the column with all of the pricing information, but with a
gray background to the cell. The gray background is a transparent layer
of black, which slightly darkens any background color you’ve assigned
to the row style.
The options in the Summary popup menu change depending on what
you’ve selected in the Type popup menu:
Checkbox
Summary options include:
None
There is no summary; the summary cell displays a checkbox that
acts completely independent of its children.
54
State
Displays an empty checkbox if no items have been checked off, a
checkbox with a dash inside if some items have been checked, or a
filled checkbox if all of the items have been checked.
Hidden
The summary cell is empty, regardless of the state of the other
checkboxes in the column.
Date
Summary options include:
None
There is no summary.
Minimum
The summary cell displays the earliest date (or time) in the
column from among the child rows.
Maximum
The summary cell displays the latest date (or time) in the column
from among the child rows.
Hidden
The summary cell is empty.
Duration
Summary options include:
None
There is no summary.
55
Total
The summary cell displays the total of all cells in the column.
Minimum
The summary cell displays the lowest duration in the column.
Maximum
The summary cell displays the highest duration in the column.
Average Leaves
The summary cell displays the average duration for the child
items under the parent row in that column.
Hidden
The summary cell is empty.
Number
Summary options include:
None
There is no summary.
Total
The summary cell displays the total of all cells in the column.
Minimum
The summary cell displays the lowest number in the column.
Maximum
The summary cell displays the highest number in the column.
56
Average Leaves
The summary cell displays the average number for the child items
under the parent row in that column. This only averages
descendant leaves, which means that all contained rows with no
children—no matter how many levels away they are—are
averaged.
Hidden
The summary cell is empty.
Pop-up List
Summary options include:
Minimum
If the Pop-up List contains numbers, the summary cell displays
the lowest number used in that column. If the Pop-up List
contains text, the summary cell displays uses the first entry in the
Column inspector.
Maximum
If the Pop-up List contains numbers, the summary cell displays
the highest number used in that column. If the Pop-up List
contains text, the summary cell displays the last entry in the
Column inspector.
Hidden
The summary cell is empty.
Rich Text
Summary options include:
None
There is no summary.
57
Hidden
The summary cell is empty.
Outline Inspector
Use the Outline inspector when you want to adjust the styles that affect
the outline as a whole, rather than styles that can be applied to a certain
part of the outline.
Alternate rows
Use the Alternate rows option to set a background color to alternating
rows in your document. You can choose from one of the preset color
options (Subtle Gray, Subtle Green, or Subtle Blue), or click the color
bar next to it to choose a custom color or background pattern from the
Colors palette.
Horizontal grid
Use the Horizontal grid option to add a thin line of color between the
rows in your document. You can choose from one of the preset color
options (Subtle Gray, Strong Gray, Subtle Green, Strong Green, Subtle
Blue, Strong Blue, Subtle Red, Strong Red), or click the color bar next
58
to it to choose a custom color or background pattern from the Colors
palette.
Vertical grid
Use the Vertical grid option to add a thin line of color between the
columns in your document. You can choose from one of the preset color
options (Subtle Gray, Strong Gray, Subtle Green, Strong Green, Subtle
Blue, Strong Blue, Subtle Red, Strong Red), or click the color bar next
to it to choose a custom color or background pattern from the Colors
palette.
Column headers
Choose whether to Show or Hide column headers. The Automatic
option shows any text you’ve entered for a header, but hides the generic
Topic header if you have only one column in your document. You can
also do this by choosing View ▸ Column Headers ▸ Show/
Automatic/Hide.
59
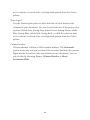
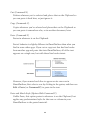
Using Grid Lines and Columns for
Creative Templates
You can combine the Horizontal and Vertical grid to create documents that
resemble a ruled sheet of paper. Just add another column and then change
the font size for column headers, and you’ll get something like this:
Of course, that required a bit more tweaking (and not much, honestly), but
you get the general idea, right? OmniOutliner makes it easy for you to
customize documents and create templates that suit your every note-taking
need.
60
Show row status
Choose this option if you want to display the Status Checkboxes along
the left side of every row. These are different from the Checkbox option
you can set on a column, in that Status Checkboxes are always located
on the left edge of and follow the indentation level of your rows.
Inline notes
These buttons let you decide whether Inline Notes will wrap based on
the first column of the document, or if they’ll span the width of all
columns. Inline notes, which are styled using the Notes style, appear
beneath the text you’ve entered in a row.
(Pro) If you have OmniOutliner Pro, you can opt to have Inline notes
appear in a separate pane at the bottom of the Outline (View ▸ Notes ▸
Display in Pane).
Indent child rows (Pro)
This pop-up menu lets you choose how far child rows will be indented.
You can choose from one of the options we’ve provided (either 0, 8, 16,
or 24 pixels), or enter a value of your liking and press Return.
Document Inspector
Use Document inspector to provide additional information (metadata)
about the document you’re working on. The information you provide here
stays with the document and makes it easier to find on your Mac using
Spotlight.
61
The first option in the Document inspector, Compress on disk,
determines how your Outliner document is saved. This option is
document-specific, which means that you can turn this on or off
depending on your own needs.
If you check this box, OmniOutliner uses a simple Zip compression to
squish your files down to the smallest size possible. Compressed files
don’t just take up less space on your hard drive; they’re also easier to send
to your friends and colleagues via email.
Leaving the Compress on disk option unchecked means your files won’t
be compressed, and they’ll show up in the Finder as taking up a bit more
space. You should consider leaving this unchecked if you are saving your
OmniOutliner files in a version control or document management system,
62
or so you can more easily run scripts (Python, Ruby, and so on) on the
XML inside your document.
The metadata fields in the Document inspector include:
Copyright
Copyright statements typically declare who owns the legal rights to
something. Since this is your thing, or your company’s thing, enter your
name or your company’s name into this field.
Version
Version numbers are used to indicate a certain “state” of a project. For
example, 0.1 might be a beta release while 1.0 might be an initial
release. You can even go as far as adding a sub-version number, so you’ll
end up with something along the lines of 4.0.1 when you correct a typo
or something. The choice is yours, really.
Subject
Enter something similar to what you would enter as the subject line for
an email; for example, Staff project assignments for OmniOutliner 5, or Fried
Chicken Recipe.
Description
Describe the contents of your OmniOutliner file. For example, A list of
bike parts, or Actors who’ve portrayed Batman.
Comments
Use the Comments field to enter more information about the file you’re
working on. For example, you could provide additional detail about a
project this file is associated with, or notes to yourself about other
things that you’d like to add to the file.
63
Beneath the Comments field, you’ll notice a popup menu that’s set to
Authors. This menu works in conjunction with the combo box below for
creating metadata attribute and value pairs. What’s that? Too nerdy? Okay,
let us explain…
…Metadata, as you may know, is tiny bits of “embedded”
information that can be included in files, images, and even audio
and video recordings. OS X uses this metadata to fuel the search
capabilities on your Mac by indexing this information and making
it available to Spotlight. The metadata information you enter here,
however, has two parts: an attribute and its value. In this case,
the attributes are the options you’ll find in the popup menu:
Authors, Organizations, Languages, Keywords, or Projects. Now
here’s the fun part: You get to enter anything you’d like as the
value (or values) for those attributes! The important thing to note
here, though, is that once entered the attribute and its value are
bound to each other, sort of like Arnold Schwarzenegger and
Danny DeVito in the movie Twins. When combined, the two
make for an unbeatable team when it comes to adding unique
metadata to your documents.
Here’s how to create a metadata attribute and value pair using the popup
menu and the combo box:
1. Select one of the options in the popup menu (Authors,
Organizations, Languages, Keywords, or Projects, as further
described next).
2. Click the Add button (the + sign) at the bottom of the Document
inspector.
64
3. When you click Add, the focus changes to the box in the middle so
you can enter information about the item you’ve selected in the
popup menu.
4. When you’ve finished entering some text, either press Tab or
Return to save the metadata information to the file.
If you decide later that you want to remove an item, select it with the
mouse and then click Remove (the − button, next to the Add button). To
65
edit an existing item, double-click to highlight the text, and then enter
your changes and press Tab or Return to save the changes.
Options in the popup menu include; all of these options can have multiple
entries:
Authors
Enter the name of the person who created the document. This would be
you, or perhaps you and a colleague, or you and the cat that won’t get
off your lap while you’re working at 2 a.m. Of course, your friends at
work might question why Sir Snugglepuss III is contributing to a secret
project, but that’s for the lawyers to sort out.
Organizations
Enter the name of your company or the organization the document has
been created for.
Languages
Enter the language, such as English or Japanese, or use one of the ISO
639 language codes, such as en or jp, to name a few.
Keywords
Ah, this is where you can have the most fun! Keywords increase the
find-ability of your files more than anything else. This is because you
can add tons of keywords to your file, and they can be as descriptive or
outrageous as you’d like. The key (no pun indented) here is that the
keywords are what help make each document unique when it comes to
finding files with Spotlight.
Projects
If you’ve created an Outliner file for a specific project, enter the project
name here.
66
Tip
If you are using other Omni apps, such as OmniGraffle or OmniPlan,
you can enter similar metadata in the Document inspectors for
those apps. So, let’s say that you’re tracking a project in OmniPlan,
creating charts and diagrams in OmniGraffle, and managing your todo list in OmniFocus, you could enter similar information for each
project. That way, if you do a Spotlight search for a particular
project, you could just enter that project name in the Spotlight
search field and see all of your related documents in one place
(even if they aren’t saved in the same place).
As noted earlier, the information you enter in these fields, and through the
popup menu, are registered on your Mac as additional metadata for that
particular OmniOutliner file. When you do a Spotlight search, by clicking
the Spotlight menu in the menu bar (or with Command-Space), all of the
information you’ve entered into the Document inspector helps to make
your files easier to find.
Now, rather than opening a Finder window and trying to remember where
you hid that super secret file, you can press Command-Space, enter one
of the keywords or something else that helps you identify the file, and
Spotlight brings it up in the list of possibilities.
To open the file, highlight it with your mouse and press Return.
67
Tip
Actually, Spotlight works with every file on your Mac, not just the
OmniOutliner files that you’ve assigned metadata to. Spotlight is a
system-level service that catalogs all of the files on your Mac
automatically to help you find the file (or files) you need quickly.
Style Attributes Inspector
At a quick glance, the Style Attributes inspector is a little deceiving. What
appears to be a mild-mannered window that shows you all of the styles in
your document, is actually quite powerful.
As you apply styles to the rows and columns in your OmniOutliner file,
those styles start to show up here in the Style Attributes inspector. What
you see in the Style Attributes inspector depends on where the cursor is
currently placed in the document. The previous image shows that the
cursor was on a Level 1 Row, and that the text in all Level 1 Rows are to
be styled as 18pt text with a color of Dark, Mild Fog (a subtle grayish-blue,
in case you were wondering).
68
But let’s say that you want the text in the Level 2 Rows to have that same
grayish blue color. The easy way to apply that style is to click on the
colored square in the middle of the inspector and then drag and drop that
onto the Level 2 Row style in the Styles pane of the sidebar, and voila! The
text for all Level 2 Rows now have that same grayish-blue color. This
makes it easy for you to try out different styles. And remember, if you
don’t like a change you’ve made, you can always press Command-Z to
undo your last change and revert everything to normal.
What makes the Style Attributes inspector particularly useful, however, is
that the order of the styles shown matches the priority of how the styles
are applied to the selection. This allows you to see how the selected item’s
style is calculated, so you can figure out why it looks the way it does.
Additionally, you can click the little button at right to clear any styles
that are causing you trouble without having to find the control you used to
set them.
69
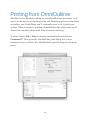
Printing from OmniOutliner
Whether you’ve finished working on your OmniOutliner document, or if
you’re in the process of checking styles and formatting prior to submitting
an outline, one of the things you’ll eventually want to do is print your
outline. When it comes to printing, OmniOutliner has a few tricks up its
sleeve that can make the printed form even more amazing.
To print, choose File ▸ Print or use the standard keyboard shortcut,
Command-P. This opens the standard Mac print dialog box, but as
mentioned, we’ve added a few OmniOutliner-specific things to the print
panel.
70
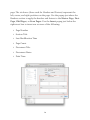
On the left side of the printing panel, you’ll see an exact replica of your
OmniOutliner document, showing you how it will look when printed. You
can use the arrow buttons beneath the preview to page through your
document so you can verify that everything is in order. By default, the
Scale document to fit page width and Include Notes options are
checked.
(Pro) Another thing you might want to check, if you have OmniOutliner
Pro, is that pages are breaking according to any manual page breaks you’ve
added using the Styles inspector.
Just above those two options, you’ll see a popup menu that says
OmniOutliner on it. If you click that, you’ll see a whole bunch of other
printing options, but the ones we want to focus on are Headers &
Footers, Margins, and Page Attributes.
The Headers & Footers print settings gives you the ability to add details
about your OmniOutliner document to the top and bottom of the printed
71
page. The six boxes (three each for Headers and Footers) represent the
left, center, and right positions on the page. Use the popup just above the
Headers section to apply the headers and footers to the Master Page, First
Page, Odd Pages, or Even Pages. Use the Insert popup just below the
right-most box to insert one or more of the following:
• Page Number
• Section Title
• Last Modification Time
• Page Count
• Document Title
• Document Name
• Print Time
72
Just click inside one of the six boxes and choose the option from the
Insert menu. For example, the following image inserts the Document Title
and Print Time in the center and right boxes of the Header, respectively.
For the Footer, the center box uses a combination of Page Number and
Page Count (with the word “of ” added in between), which would print as
1 of 10 or 2 of 10, and is particularly useful for long documents.
Use the Margins print options to control how the contents of your
document appears within the bounds of a printed page. The Top and
Bottom controls let you set the distance from the edge of the page to any
Headers or Footers you’ve applied, and from the Headers and Footers to
the actual content. To adjust any of the margin values, you can either click
in the box and enter something different, or use the little arrows off to the
right to increase or decrease the value.
73
Finally, use the Page Attributes print options to choose a Paper Size and
set the Orientation to either portrait or landscape. If you have a document
with a lot of columns, switch the Orientation to landscape so everything
will fit on the page.
(Pro) And speaking of columns, OmniOutliner prints only the visible
columns in your document. If you don’t want to print a particular column,
choose View ▸ Columns and then choose from the submenu the column
you want to hide. This “unchecks” that column in the menu. You can also
Control-click on a column heading and then choose Hide from the
contextual menu. To later make the column reappear in your document,
choose View ▸ Columns ▸ Show All Columns.
74
OmniOutliner Preferences
Now that you’ve had a chance to get cozy with OmniOutliner 4’s interface,
let’s take some time to examine the app’s preferences. To open
OmniOutliner’s preference pane, choose OmniOutliner ▸ Preferences, or
use the ultra-handy keyboard shortcut, Command-Comma (⌘-,). There
are six preference panes that you can use to further customize
OmniOutliner 4 to suit your needs, and your work style.
Each preference pane includes a Reset (
) and Help ( ) button so
you can revert back to the default settings, or get to this Help page quickly
from within the app.
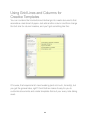
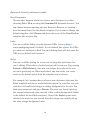
General Preferences
Use the General preferences pane to make changes that apply across the
board for everything you do in OmniOutliner.
75
Options in General preferences include:
New Documents
Choose what happens when you create a new document, by either
choosing File ▸ New or using the Command-N keyboard shortcut. You
can choose between opening the new Resource Browser, or creating a
new document based on the default template. If you want to change the
default template, click Choose and then select one of the OmniOutliner
template files on your Mac.
Links
Turn on or off the ability to make Internet URLs (such as http://
www.omnigroup.com) clickable. If you uncheck this option, the URLs
you enter are rendered as Rich Text and clicking them will not open the
URL in your default web browser.
Styles
Turn on or off the setting for a new row to adopt the style from that
row’s sibling. When this is checked and you add a new row (by pressing
Return or Shift-Return), that new row adopts the styles of the row
you were previously in. When unchecked, any new styles you create
revert to the default styles from the template you’ve chosen.
For example, let’s assume that you have a new document that uses the
Blank template and you’ve unchecked this option. In your first row, you
click the row handle and assign an orange background to the row. You
then enter some text and press Return. The next row doesn’t pick up
the orange background color; instead, it has a white background (which
is the default for the Blank template). Now, if the Styles option were
checked, the next row you created from the orange row would pick up
the same orange background color.
76
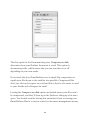
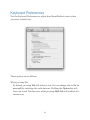
Keyboard Preferences
Use the Keyboard Preferences to adjust how OmniOutliner reacts when
you press certain keys.
These options are as follows:
When pressing Tab
By default, pressing Tab will indent a row. You can change this to Go to
next cell by switching the radio buttons. Holding the Option key will
insert an actual Tab character, while pressing Shift-Tab will outdent the
current row.
77
When pressing Return
By default, pressing Return creates a new empty row. You can change
this to Insert a new line in the current row by switching the radio
buttons; however, pressing Option-Return always inserts a new line in
the current row.
Similarly, with Split the current row at the insertion point set, you
can split the current row into two rows at the cursors position by
pressing Return. Even when this option is turned off, you can press
Control-Return to split a row in two.
New rows are created
By default, new rows are Indented if there are children when you
press Return. If you switch the radio button to Always at the same
level, new rows are created at the same level as the line your cursor is
on when you press Return.
When pressing Escape
There are two options for what happens when you press the Escape key.
By default, pressing the Escape key opens the system-wide completion
menu. This comes in particularly handy when you aren’t quite sure how
to spell something. You can just type in the first few characters of the
word, press Escape, and a popup menu appears with a list of possible
options. To accept one of the options, you can click it with your mouse,
or use the Down Arrow key to move the highlight to the word you
need and then either press Tab or Return to accept that option.
78
Use the other option, Begin or end text editing, for times when you’re
doing quick entry and need to move around in your Outline, editing
rows and column cells more efficiently. Pressing Escape after entering
some text in a row will highlight that row. Press Escape again places
the cursor at the end of the line so you can continue typing.
Apply named styles with
By default, you can use one of the Function keys to apply one of the
Named styles to the current row. (Named styles are found in the lower
portion of the Styles section of the Sidebar.) To use the function keys
(F1 through F9), you’ll need to press and hold the fn key and then press
a numbered function key to apply the style. For example, to apply the
Heading 1 named style, use fn-F1.
You can change this to Control + number by switching the radio
buttons in the preference pane. This can make it easier for you to apply
named styles since using the fn key along with the various function keys
can be a little awkward.
79
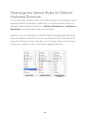
Rearrange the Named Styles for Different
Keyboard Shortcuts
As you may have noticed, not all of the Named styles in the Sidebar have a
keyboard shortcut equivalent. Additionally, you cannot directly assign (or
reassign) these keyboard shortcuts in System Preferences ▸ Keyboard ▸
Shortcuts since these aren’t tied to a menu item.
However, you can rearrange the Named styles by dragging and dropping
them into different positions in the list. For example, if you find that you’re
using the Orange text style very often, you can drag that up in the list and
drop it into a position where it will have a keyboard shortcut.
80
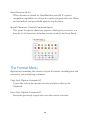
Text Import & Export Preferences
OmniOutliner also offers the ability to import or export raw text files. To
assist with this, the Text Import and Export Preferences lets you view (or
change) the characters used to represent elements in an OmniOutliner
document.
The document elements you have control over include Bullets,
Checkboxes, and Spacing, and there’s also a popup menu that lets you
select the text encoding type for importing and exporting operations.
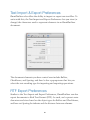
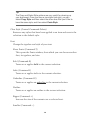
RTF Export Preferences
Similar to the Text Import and Export Preferences, OmniOutliner can also
export documents to Rich Text Format (RTF). As such, we’ve preset some
characters and sizes based on the object types for Bullets and Checkboxes,
and have set Spacing for indents and the distance between columns.
81
You can use the defaults, or change these up however you see fit, and
based on your own document needs.
Audio Recording Preferences
Use the Audio Recording preferences to see which microphone you’re
using for recording, change the compression level, or to access the
temporary recording folder.
82
As you record audio, OmniOutliner creates a temporary file in which to
dump the audio bits you’re recording. When you’ve finished recording,
that temporary file goes away and moves into your OmniOutliner
document. However, if OmniOutliner quits unexpectedly while you are
recording, all hope is not lost. The temporary recording is still there, and
the easiest way to get to it is from this Audio Recording preference panel.
Just click the Open Folder button, and you’ll be whisked away to a new
Finder window that’s open to the where the temporary file is stored. You
can then drag that into OmniOutliner, or dump it in the trash if you want
to start over from scratch.
Automatic Software Update Preferences
There’s nothing worse than out-of-date software, and one way to ensure
that you’re always using the latest and greatest version of OmniOutliner is
with the Automatic Software Update Preferences.
You can choose to check for updates either Daily (the default), Weekly, or
Monthly, or if you’re really impatient you can click Check for Updates
Now.
83
There is also a checkbox to Send anonymous system information to
The Omni Group when you check for an update. This is totally optional,
so feel free to uncheck that box to turn this off. However, if you do choose
to send information about your system (no personal information is ever
sent), we promise to never ever share that information with anyone. The
Omni Group only uses this information so we know which hardware and
operating system types we need to target for future software updates.
Note
If you’ve purchased your copy of OmniOutliner through the Mac
App Store, you can disregard this preference pane as you will be
notified in the App Store app when a new update is available.
However, we still offer Mac App Store customers the option to send
us anonymous system information when updating.
84
Sharing OmniOutliner Files
with Other Apps
As we’ve mentioned, OmniOutliner is the bees knees when it comes to
working with text. And for all of your text-hungry needs, we’ve made it
easy for you to import text files and export in a variety of formats.
Exporting from OmniOutliner
You’ve finished working on your masterpiece, and now it’s time to share
your OmniOutliner file with everyone else around you. For those times
when you need to send an OmniOutliner file to someone who doesn’t
have OmniOutliner (you have told them how awesome OmniOutliner is,
right?), we’ve included a bunch of export file formats that you can choose
from. To export an open file, choose File ▸ Export (Option-CommandE), and then choose one of the following options from the File Format
pop-up menu:
Apple Keynote
Creates a .key file that you can open in Keynote. This file can be opened
on Keynote for Mac.
Note
OmniOutliner 4 exports Keynote files that are only compatible with
iWork ’09 and earlier. These files are not compatible with Keynote
version 6.0 or higher on the Mac, and Keynote for iOS.
85
HTML
Creates a like-named folder that contains an index.html file along with
the necessary images and attachments that make up your OmniOutliner
file. All of the styles you’ve used in OmniOutliner are converted to CSS
and included in the index.html file.
HTML (Dynamic)
This option gives you everything that comes with the basic HTML
export, plus an added outliner.js file. This JavaScript file is what makes
the file dynamic, in that you can open and close the sections of your
document just as you would in OmniOutliner.
Microsoft Word document (Pro)
Exports your beautifully-crafted OmniOutliner file into a .docx file that
you can open in Microsoft Word. This is an OmniOutliner 4 Pro-only
option.
MS Word (HTML) (Pro)
Exports a .dochtml file which you can open in Microsoft Word.
OmniOutliner 3
Exports a .oo3 file which can be opened in either OmniOutliner 3 or 4
for Mac, and in OmniOutliner 1 and 2 for iPad. These files are not
compatible with OmniOutliner 2 for Mac and earlier.
OmniOutliner 3 Template
Exports a .oo3template file which can be opened in either OmniOutliner
3 or 4. These files are not compatible with OmniOutliner 2 or earlier.
OPML (Outline Processor Markup Language)
Exports a .opml file, which is the industry standard XML format for
outlines, and is a great way to share documents with other outlining
86
apps. Only the contents of your OmniOutliner document is exported as
OPML; all of the fancy style stuff you’ve applied isn’t included in the
OPML file.
Plain Text (fixed width)
Exports a raw .txt file without any styles. Child rows are indented with
four spaces, and columns are aligned using spaces. You can adjust the
number of spaces used in OmniOutliner ▸ Preferences ▸ Text ▸
Spacing.
Plain Text (with tabs)
Exports a raw .txt file without any styles. Child rows and columns are
aligned using tabs rather than spaces, making this type of export useful
for importing into spreadsheet apps such as Numbers or Excel.
RTF (Rich Text Format)
Exports a .rtf file, which retains all of the styles you’ve applied in
OmniOutliner. RTF is a standard document format that most word
processors, such as Word and OS X’s TextEdit app can open. Export to
RTF if your Outliner document contains only text and numbers.
RTFD (Rich Text Format with Attachments)
Exports a .rtfd file, which retains all of the styles you’ve applied in
OmniOutliner. What sets RTFD apart from RTF is that an RTFD file
can contain attachments, such as any images, audio clips, or anything
else you attach to your OmniOutliner file. Most word processors, such
as Word, Pages, and OS X’s TextEdit can open .rtfd files.
Importing to OmniOutliner
For those times when OmniOutliner isn’t handy, or for when you receive
an OmniOutliner-compatible file from a coworker, it’s nice to know which
87
filetypes you can open in OmniOutliner. To import a file, just use File ▸
Open and then select one of the following file types in the Open dialog:
• .opml — A valid OPML file.
• .oo3 — Files created with OmniOutliner 3 or 4.
• .oo3template — Template files created with OmniOutliner 3 or 4.
• .txt — Plain text and tab-delimited files.
• .rtf — All text styles and colors are preserved when importing an
RTF file.
• .rtfd — As with RTF files, all text styles and colors are preserved, and
any images are also brought along for the ride. Images are
automatically scaled to the column width.
Tip
OmniOutliner cannot open files created or exported as .csv
(Comma-Separated Values). Instead, use a tab-delimited file and
save it with a .txt file extension.
Sharing OmniOutliner Files with OmniGraffle
Additionally, you can share OmniOutliner files with OmniGraffle and
create awesomely beautiful things from what on the outset might just look
like finely-styled text. Now you can take those texty things and make them
look even more awesome in OmniGraffle.
1. Open OmniGraffle and choose File ▸ Open.
2. In the Open dialog, choose any file whose extension is .oo3.
3. Click Open.
88
4. OmniGraffle presents you with the Import Outline dialog. At the
top, be sure to select one of the themed templates, such as Circles or
Lines, and then in the Outline Columns combo box, choose how
you want column data to be styled (if your OmniOutliner has
column data).
You can use OmniGraffle’s powerful Outline Editor (in OmniGraffle,
choose View ▸ Show Contents ▸ Outline Editor) to add depth to the
diagram you’ve created. When you’re finished, go ahead and export the
OmniGraffle file as an OmniOutliner file and then open that up in
OmniOutliner 4. The styles you’ve used in OmniGraffle should carry over
to OmniOutliner. If you want to change those back to something else,
choose Format ▸ Apply Template Theme and then select a template
whose styles you’d like applied to the OmniOutliner file.
89
Every Single Menu Item and
Keyboard Shortcut
Here it is, an exhaustive list of every single menu item, along with any
corresponding keyboard shortcut, available in OmniOutliner 4. This
section doesn’t just provide a once-over of the available commands, you’ll
also find hidden gems—tips—to help you select the right menu option (or
combination thereof) so you can unlock your OmniOutliner Power User
badge and be the envy of all your friends and coworkers.
Note
There is no real badge, per se, that you can unlock for mastering
OmniOutliner. That would be an Easter Egg, and we don’t do that
sort of thing here. (Not sure what an Easter Egg is? Look here.)
If you find a menu option that doesn't have a keyboard shortcut but you
really-really want one, you can always define new ones in System
Preferences. For details on how to do this, don't miss the sidebar in
Getting to Know OmniOutliner 4.
The OmniOutliner Menu
About OmniOutliner
This opens the About box so you can learn more about OmniOutliner,
including the current version and build number (in case you need that
for technical support). And speaking of technical support, we’ve also
included handy email links so you can inquire about Sales info or to
contact our Support Humans with any questions you may have about
using OmniOutliner (or any of our other products for that matter). And
if you’d rather speak to one of our Support Humans, just dial the phone
90
number we’ve included; we’re here Monday through Friday from
10 a.m. to 5 p.m. Pacific Time.
Check for Updates
If your Mac is connected to the Internet, selecting this option will
connect with our servers to see if an updated version is available for
OmniOutliner. If one is available, you’ll be asked first if you want to
update, and if so, the new build will download and install on your Mac.
Note
You won’t see the Check for Updates option if you’ve purchased
OmniOutliner 4 from the Mac App Store.
Preferences (Command-,)
This opens the Preferences window so you can further configure
OmniOutliner to suit your needs and your work style.
91
Licenses
This opens the Licenses window, in which you can enter or delete a
license, or if you are using an evaluation copy of OmniOutliner, you can
click Buy Licenses to be taken to our online store where you can
purchase a license key.
Note
You won’t see the Licenses option if you’ve purchased
OmniOutliner 4 from the Mac App Store.
Services
Here you’ll find a list of applications that OmniOutliner can share
information with. Just select something in OmniOutliner, and then
choose this menu option to see which apps you can send stuff.
Hide OmniOutliner (Command-H)
Hides OmniOutliner’s window, suppressing it to the land of hidden
apps. To bring OmniOutliner back into view, either click the app icon in
the Dock, or use Command-Tab to use OS X’s application switcher to
switch back to OmniOutliner.
Hide Others (Option-Command-H)
Banish the windows of other open apps to the land of hidden apps. As
with Hide OmniOutliner, to bring a hidden app back into view, either
click that app’s icon in the Dock, or use Command-Tab to use OS X’s
application switcher to switch back to the app you need.
Show All
Choose this menu option to quickly bring all of the hidden app
windows out of hiding.
92
Quit OmniOutliner (Command-Q)
This does what it says; it quits OmniOutliner. If you haven’t saved the
file before, you’ll be prompted to save the file (giving it a name and
specifying a location to save the file to). If you are working in a file that
you’ve previously saved, you don’t have to worry about saving before
you quit, thanks to OS X’s Auto Save feature. But, if you’re really
paranoid, you can use Command-S to save the file before using
Command-Q.
The File Menu
Options for creating, opening, renaming, exporting, and printing
documents and templates:
New (Command-N)
Create a new document using the default template.
Resource Browser (Shift-Command-N)
Opens the Resource Browser.
Open (Command-O)
Open an existing file.
Open Recent
OmniOutliner keeps track of recently opened files and includes the
filenames in this menu so you can reopen a file and continue your work.
Close (Command-W)
Close the current window; use Option-Command-W to close all open
OmniOutliner windows. You will be prompted to name and new,
Untitled, document files before the window is closed.
93
Save (Command-S)
Save the contents of the current document.
Duplicate (Shift-Command-S)
Create a duplicate copy of the current document. The exact contents of
the current window are copied into a new document window, which has
the filename in the titlebar highlighted so you can enter a different
name for the file. The file will be saved in the same location as its
parent.
Rename
Choose this option to highlight the filename in the document’s titlebar
so you can enter a new name for the file.
Move To
Choose this option to open a sheet and select another location on your
Mac’s hard drive to store the file.
Export (Option-Command-E)
Export your OmniOutliner document to one of the following formats
mentioned in Exporting From OmniOutliner.
Save As Template
Saves the current file as an OmniOutliner template file. Template files
are stored on your Mac in ~/Library/Containers/com.omnigroup.
OmniOutliner/Data/Library/Application Support/The Omni Group/
OmniOutliner/Templates.
Note
If you’ve purchased OmniOutliner 4 from the Mac App Store, swap
out com.omnigroup.OmniOutliner with
com.omnigroup.OmniOutliner.MacAppStore, or
com.omnigroup.OmniOutlinerPro.MacAppStore if you have
OmniOutliner 4 Pro.
94
Revert To
Opens Time Machine so you can sift through earlier saves of the current
document and restore it from an older save.
Print Setup (Shift-Command-P)
This opens the Print Setup dialog, so you can apply any previously
saved Settings, choose which printer to format the document for, select
a paper size, orientation, and scale for the document.
Print (Command-P)
Sends the current document to your default printer. You can use Print
Setup (Shift-Command-P) to choose a printer other than your default
printer; for example, if you have a document that needs to print in
Tabloid-Landscape on a color printer.
The Edit Menu
Options for editing your content:
Undo (Command-Z)
Undoes the previous change you’ve made. OmniOutliner supports
unlimited Undo, so go ahead and hit Command-Z a few dozen times
and watch all of your hard work disappear.
Redo (Shift-Command-Z)
Just like Undo, Redo puts back something that you’ve undone but have
decided that you really want to be there. For example, let’s say that you
were testing out the strength of hitting Command-Z repetitively, but
then you want to put all of that back. Yep, that’s right; you can just hit
Shift-Command-Z to put everything back in place.
95
Cut (Command-X)
Deletes whatever you’ve selected and places that on the Clipboard so
you can paste it back later, or just ignore it.
Copy (Command-C)
Copies whatever you’ve selected and places that on the Clipboard so
you can paste it somewhere else, or in another document, later.
Paste (Command-V)
Pastes in whatever is on the Clipboard.
Paste's behavior is slightly different in OmniOutliner than what you
find in some other apps. If you cut or copy text that has line breaks
from another app and paste that into OmniOutliner, all of the text
appears on a single row, but with those line breaks intact.
However, if you wanted each line to appear on its own row in
OmniOutliner, first select a row by clicking in the gutter, and then use
Edit ▸ Paste (or Command-P) to paste in the text.
Paste and Match Style (Option-Shift-Command-V)
Unlike Paste, this option pastes in whatever is on the Clipboard, but
applies any predetermined style for that row or column in your
OmniOutliner to the pasted material.
96
A Note About the Clipboard, Styles, and
Cut-Copy-Paste
Whenever you use Cut or Copy, whether within OmniOutliner or in some other
app, all of the attributes of that thing you cut or copied are placed in OS X’s
Clipboard. The Clipboard is a systemwide feature that only holds one thing at
a time; presumably because once you’ve cut or copied something, chances
are you’re going to want to paste that in somewhere else real soon.
Additionally, OS X also examines the thing you’ve cut or copied and carries
with it any styles that are applied, such as the font, typeface or size, and
color. That’s where Paste and Match Style (Option-Shift-Command-V)
comes in handy. Let’s say that you’ve copied something from a website, and
that some of that text is blue, some green, and some of it is bolded. When
you copy that text in Safari, OS X copies it exactly as it is on that webpage.
But really, all you want is that text, right? You don’t need the colors or styling;
you just want to insert the text into your OmniOutliner file and have it match
the style of the document you’re working on. So, rather than using the default
Command-V to paste in the content, you should use Shift-OptionCommand-V instead. This clears out any styles that were copied along with
the text, and applies the style for the selected row or cell automatically.
This will save you a lot of time from having to reapply your own document
styles to the things you’ve pasted in, whether that info came from a webpage,
a Word or Pages document, or from another OmniOutliner file.
97
Duplicate Selection (Command-D)
Copy and paste the current selection into the current document
automatically.
Delete
Deletes the current selection. Unlike Cut, however, Delete just wipes
out whatever you’ve selected without placing it on the Clipboard.
Select All (Command-A)
Select every single thing in your OmniOutliner document.
Deselect All (Shift-Command-A)
Unselect every single thing in your OmniOutliner document. This is
sometimes handy for when you’re not sure if something is selected and
you’re about to paste something in.
Set Status
Use one of the following to set the status of a row’s checkbox:
• Checked
• Unchecked
• Calculated
• None
Edit Note (Command-’)
Edit the Note for the currently selected row or column cell.
Attach File
Attach a file to the document.
Start/Stop Audio Recording
Add an audio clip to your document.
98
Insert Time Stamp
Inserts one of the following time stamps on the current row:
Short Date (Command-/)
Inserts a localized numerical date string; for example: 10/05/2013.
Long Date (Option-Command-/)
Inserts a localized numerical date string; for example: October 5,
2013.
Time (Command-@)
Inserts a localized numerical time string; for example: 12:34:56 PM.
Short Date and Time (Command-|)
Inserts a localized numerical date and time string; for example:
10/05/2013 12:34 PM.
Long Date and Time (Option-Command-|)
Inserts a localized numerical date and time string; for example:
October 5, 2013 12:34:56 PM PDT.
Find
Use one of the following search options:
Show/Hide Search (Option-Command-F)
Displays the search field in the Sidebar. When the search field is
displayed, a Hide button appears to its left. Click the Hide button, or
use the Hide Search menu option (or the same keyboard shortcut) to
make the search field go away.
Find (Command-F)
This opens the Find dialog, in which you can enter something to
search for. You can search for a text string, such as The Omni
99
Group, or you can use a regular expression, such as Omni\s, to
search for the word Omni followed by a space (\s).
Find Next (Command-G)
Find the next instance.
Find Previous (Shift-Command-G)
Find the previous instance.
Use Selection for Find (Command-E)
Uses the current selection as the search criteria when using Find.
You can use this option before or after opening the Find dialog
(Command-F).
Spelling
Choose one of the following options for checking the spelling and
grammar in your document:
Spelling (Command-:)
Checks the spelling and grammar in the current document.
Check Spelling (Command-;)
Just checks the spelling in the current document. Who cares about
grammar, anyway?
Check Spelling as You Type
Turned on by default, this option checks your spelling as you type. If
you misspell something, the word will get a red squiggle underneath
and OS X offers up similar words from which you can select the
correct spelling.
100
Speech
You can have OS X read aloud the text in the current row or note using
the system voice you’ve set up in the Dictation & Speech preferences
(System Preferences ▸ Dictation & Speech ▸ Text to Speech).
Start Speaking
Start speaking the text in the current row.
Stop Speaking
Stop speaking.
LinkBack
LinkBack is a way of embedding content between applications in such a
way that you can always go back and edit the content with the software
used to create it originally.
Edit LinkBack Item
If you have pasted LinkBack content from another app, select the
object and use this command to open the content in the original app.
Remove LinkBack for Item
Selecting this option removes the LinkBack feature from the selected
content so that this content can only be edited within OmniOutliner.
See the LinkBack section of the Reference for more details.
101
Start Dictation (fn fn)
When dictation is turned on, OmniOutliner uses OS X’s speech
recognition capabilities to convert the words you speak into text. When
you’ve finished, just press fn fn again to stop dictation.
Special Characters (Control-Command-Space)
This opens the special characters popover, which gives you access to a
broader set of characters, including arrows, symbols, and even Emoji.
The Format Menu
Options for formatting the contents of your document, including font and
text styles, row numbering, and more:
Copy Style (Option-Command-C)
Copies the style of the current selection and places that on the
Clipboard.
Paste Style (Option-Command-V)
Pastes the previously copied style onto the current selection.
102
Tip
The Copy and Paste Style options are very useful for cleaning up
your document. Once you have a row styled just right, you can
select Copy Style and then select the other rows that you’d like to
have the same style, and then select Paste Style.
Clear Style (Control-Command-Delete)
Removes any styles that have been applied to an item and reverts the
selection to the default style.
Font
Change the typeface and style of your text:
Show Fonts (Command-T)
This opens the Fonts window, from which you can choose another
font, its typeface, and size.
Bold (Command-B)
Turns on or applies bold to the current selection.
Italic (Command-I)
Turns on or applies italics to the current selection.
Underline (Command-U)
Turns on or applies an underline to the current selection.
Outline
Turns on or applies an outline to the current selection.
Bigger (Command-+)
Increase the size of the current row or selected text.
Smaller (Command-−)
103
Decreases the size of the current row or selected text.
Kern
Use these options to change the spacing between characters:
• Use Default
• Use None
• Tighten
• Loosen
Ligature
Use these options to control ligatures in your document:
• Use Default
• Use None
• Use All
Baseline
Use these options to adjust the baseline of the current row or
selection:
• Use Default
• Superscript
• Subscript
• Raise
• Lower
Show Colors (Shift-Command-C)
Opens the color palette so you can make all of your text chartreuse
(if you’d like).
104
Text
Alignment options for text, images, and attachments:
Align Left
Aligns text and objects to the left margin of the current row or
column.
Center
Aligns text and objects based on the midpoint of the current row or
column.
Justify
Evenly space the words in a row or column so that multiline text
uses the full width of the column.
Align Right
Aligns text and objects to the right margin of the current row or
column.
Writing Direction
Change the writing direction:
Right to Left
Change the writing direction from Left to Right to Right to Left.
Row Numbering
Assign a row-numbering scheme to your document. Row numbers are
based on their indentation level. Assuming that a row with no indent is
the Parent, the first indented row would be a Child, and subsequent
indented rows are Grand Children and Great Grand Children,
unnumbered rows would have the following hierarchy:
105
The Row Numbers menu is split into two parts. The upper section of
the menu lets you determine a numbered style to use as the prefix for
the rows in your document. If you have set a numbered style other than
None, the styles in the lower section—x., x), and (x)—can also be
applied to the row number; for example 1.1.1., 1.1.1), or (1.1.1),
respectively.
Set the formatting for row numbers:
None
When selected, the rows in your document will not be numbered.
1, 2, 3, 4
When selected, the rows in your document are numbered
sequentially, starting with 1.
106
A, B, C, D
When selected, the rows in your document are lettered sequentially
using uppercase letters, starting with A.
a, b, c, d
When selected, the rows in your document are lettered sequentially
using lowercase letters, starting with a.
I, II, III, IV
When selected, the rows in your document are numbered
sequentially using uppercase Roman numerals, starting with I.
i, ii, iii, iv
When selected, the rows in your document are numbered
sequentially using lowercase Roman numerals, starting with i.
1, 1.1, 1.1.1
When selected, the rows in your document are numbered
sequentially using section numbering, starting with 1 for the parent
row, 1.1 for the next level of indented rows, and so on.
No Prefix or Suffix
Selected by default, this option implies that no characters will appear
before or after a row number.
x.
This places a period after the chosen row number style; for example,
1.1.2..
x)
This places a closing parenthesis ) after the chosen row number
style; for example, 1.1.2).
107
(x)
This places row numbers in parenthesis; for example, (1.1.2).
Apply Template Theme
Opens a sheet that looks similar to the Resource Browser so you can
choose and apply a template theme to the current document.
The View Menu
Options for working within your OmniOutliner document:
Expand All (Control-Command–9)
Expand all of the rows in your document.
Collapse All (Control-Command–0)
Collapse all of the rows in your document.
Expand Row (Command–9)
Expand the current row.
Expand Row Completely (Option-Command–9)
Expands the row and all child rows as well.
Collapse Row (Command–0)
Collapses the current row.
Collapse Row Completely (Option-Command–0)
Collapses the row and all child rows as well.
Focus (Shift-Command-F)
Brings the current row (and its children) into focus by hiding
everything else in your OmniOutliner document. This is particularly
helpful, for example, when you want to focus on the outline for a
108
chapter of a book or a parts list for an engineering project. You can also
assign multiple levels of Focus based on the structure of your
document. For example, if you have a row with a few nested children,
you could assign focus to the one of the child rows, and again to one of
its rows if any were nested.
Unfocus (Option-Shift-Command-F)
Removes the previously assigned Focus.
Unfocus All
Removes the Focus as applied to every object in your OmniOutliner
document.
Zoom In (Command->)
Magnify the view of your document. You can scale your document up to
400 percent.
Zoom Out (Command-<)
Demagnify the view of your document. You can scale your document
down to 50 percent.
Zoom to Actual Size
Automatically scales your document back to 100 percent (normal size).
This is particularly helpful when you’ve zoomed in to 400 percent and
want to quickly return to a normal view.
Tip
If you find that you’re zooming in and then back to actual size a lot,
consider adding a keyboard shortcut for Zoom to Actual Size. Many
great Mac apps, such as Acorn, use Command–1 to zoom to actual
size.
109
Column Headers
Choose whether column headers are displayed using one of these
options:
Show
Displays all column headings.
Automatic
Turns on column headings if there are two or more columns in your
document (the Note column does not count).
Hide
Hides all column headings.
Show/Hide Status Checkboxes
Choose to display or hide the clickable status checkboxes. These are
helpful for when you an outline that pertains to a project (such as the
outline for writing OmniOutliner’s documentation) and you want to
tick things off as you go.
Tip
Use the status checkboxes in concert with the Reorganize ▸ Keep
Sorted or Reorganize ▸ Sort Outline options for sorting a
document’s status by checked or unchecked status boxes.
Hide Column (Pro)
Hides the column that presently has the focus.
110
Columns (Pro)
Choose which columns to display:
Show All Columns (Pro)
Displays all of the columns in your OmniOutliner document.
Note (Pro)
Hide or show the Notes column.
Topic (Pro)
The Topic column cannot be hidden; it is always viewable.
Note
Since you can change the default name of the column heading from
Topic to anything else, the options you see in the Columns
submenu will reflect the titles you’ve assigned to the column
headings, including text or any Emoji characters you may have
used.
Row Text (Pro)
Use these options for displaying text within a row:
Always Show Full Text
The text in a row will always be visible, even when the cursor is in
another row.
Collapse When Not Editing
The text in the row will be truncated at the end of the first line
(rather than wrapping and continuing) when the row is not being
edited. This is particularly helpful when you’ve imported text from
another document (such as a Word document), and you only want to
see the text for the row you’re working on.
111
You can still see the text in rows that are collapsed; just move the
mouse pointer over another row, and a popup appears with that rows
text.
Notes (Pro)
While Notes in general are a standard feature of OmniOutliner 4, the
ability to control how they are displayed is only available in
OmniOutliner 4 Pro. Choose how you want the Notes in your
OmniOutliner file to appear; either inline or in a separate pane:
Display Inline
Have your Notes appear inline with the rest of of your content.
Display in Pane
An OmniOutliner Pro feature, you can opt to have the Notes in your
OmniOutliner file appear in a separate pane at the bottom of the
window.
Show/Hide Note (Option-Command-‘)
Show/Hide Note Pane (Pro) (Option-Command-’)
Shows or Hides inline notes or the Note Pane. (Show/Hide Note Pane
is an OmniOutliner Pro feature.)
Show/Hide All Notes (Control-Command-’)
Toggle the visibility of the Notes in your document.
112
Hide/Show Sidebar (Option-Command-1)
Choose whether to display the left sidebar that contains Search,
Document info, and Styles.
Enter/Exit Full Screen (Control-Command-F)
Make it so OmniOutliner takes over the entire screen. The advantage of
going to Full Screen is so you can focus on your work without other
distractions. The Inspector sidebar will float on top of your window, and
you can still access the buttons in OmniOutliner’s toolbar by moving
your mouse pointer toward the top of the screen. To exit from Full
Screen mode, use either Control-Command-F again, or press the Esc
key.
Show/Hide Toolbar (Option-Command-T)
Choose whether to display the toolbar at the top of the document
window.
Create/Remove Document-Specific Toolbar (Pro)
This option lets you create a toolbar that’s specific to the document
you’re working on. For example, the tools you need for writing a script
might be totally different from the tools you use to create invoices.
After creating a document-specific toolbar, you might consider saving
that file as an OmniOutliner Template (File ▸ Save as Template) so
you don’t have to recreate that toolbar ever again.
Customize Toolbar
Choose this option if you want to customize the toolbar for every
OmniOutliner document, except for any templates for which you’ve
created a document-specific toolbar (see the previous menu option). See the
earlier section, Customizing the Toolbar for details on how to
customize and create document-specific toolbars (an OmniOutliner Pro
feature).
113
The Organize Menu
Options for adding, removing, and sorting the contents of your document:
Add Row
Insert a row beneath the current row.
Add Inside (Command-})
Inserts and indents a new row beneath the current row.
Add Outside (Command-{)
Inserts and outdents a new row beneath the current row.
Add Column
Inserts a new column after the currently selected column.
Remove Column
Removes the selected column.
Keep Sorted
Choose one of these options to either reset or maintain the type of
sorting you’d like for your document:
Clear Sorting
Removes any previously selected sorting choice. This is useful for
when you want to resort a document using another method.
Notes, A-Z
Sorts the contents of the document in alphabetical (A-Z) order based
on the Notes for each row.
Notes, Z-A
Sorts the contents of the document in reverse alphabetical (Z-A)
order based on the Notes for each row.
114
Status, Unchecked to Checked
Sorts the contents of the document based the state of the Status
Checkboxes, from unchecked to checked.
Status, Checked to Unchecked
Sorts the contents of the document based the state of the Status
Checkboxes, from checked to unchecked.
Topic, A-Z
Sorts the contents of the document in alphabetical (A-Z) order based
on the Topics used in the document.
Topic, Z-A
Sorts the contents of the document in reverse alphabetical (Z-A)
order based on the Topics used in the document.
Sort Outline
Sort the items in your document, once, based on the following options:
Notes, A-Z
Sorts the contents of the document in alphabetical (A-Z) order based
on the Notes for each row.
Notes, Z-A
Sorts the contents of the document in reverse alphabetical (Z-A)
order based on the Notes for each row.
Status, Unchecked to Checked
Sorts the contents of the document based the state of the Status
Checkboxes, from unchecked to checked.
115
Status, Checked to Unchecked
Sorts the contents of the document based the state of the Status
Checkboxes, from checked to unchecked.
Topic, A-Z
Sorts the contents of the document in alphabetical (A-Z) order based
on the Topics used in the document.
Topic, Z-A
Sorts the contents of the document in reverse alphabetical (Z-A)
order based on the Topics used in the document.
Move
Use the following commands to move, indent, or outdent rows in your
document:
Move Down (Control-Command-↓)
Moves the selected row down one row.
Move Right (Control-Command-→)
Outdents the selected row.
Move Up (Control-Command-↑)
Moves the selected row up one row.
Move Left (Control-Command-←)
Indents the selected row.
Indent (Command-])
Indents the current row.
Outdent (Command-[)
Outdents the current row.
116
Group (Option-Command-G)
Indents the selected rows and groups them together under a new parent
row.
Ungroup (Option-Command-U)
Ungroups the rows of a selected group. Ungrouping does not remove a
parent row; you’ll need to delete that separately, if you so choose.
The Window Menu
Options for working with OmniOutliner’s windows:
Minimize (Command-M)
Relegates the current window to the right side of the Dock so it’s out of
your way. To bring the window back into focus, you can either choose
Window ▸ [filename] (look at the bottom of the Window menu for a
list of open documents), or just click on the document’s icon in the
Dock to make it zoom back into view.
Zoom
This resizes the OmniOutliner document window to make it smaller
(and sometimes really small), or to snap it back to normal-sized. This
performs the same function as clicking the green Zoom button ( ) in
the upper-left corner of the document window.
Show/Hide Inspector (Shift-Command-I)
Open the Inspectors.
Inspectors
Choose to go directly to one of the following Inspectors:
• Style
• Column
117
• Outline
• Document
• Style Attributes
Bring All to Front
Brings all open OmniOutliner windows to the front of any other
application windows that are currently open on your Mac.
The Help Menu
Can’t figure something out in OmniOutliner? We’re here to Help:
OmniOutliner Help
Opens the in-app help document that you’re currently reading.
Welcome
A little greeting from us to you. (Aw!)
Release Notes
Discover what’s new in the latest release of OmniOutliner. Details
you’ll find here include bug fixes, additions, and changes.
Contact Omni
This queues up an email to [email protected] so you can
send us feedback about, or ask for help with, OmniOutliner. We’ve prefilled the Subject line of the message with your specific build number
and the license key for your version of OmniOutliner so we can better
help you.
118
Reference
LinkBack
LinkBack lets you embed content between applications in such a way that
you can always go back and edit the content with the software used to
create it originally.
For example, let's say that you've used LinkBack to include some
information from OmniGraffle in one of your OmniOutliner documents.
To edit the OmniGraffle content that's linked to from your OmniOutliner
document:
• Double-click the OmniGraffle content in your OmniOutliner
document. This opens an OmniGraffle window containing that
content.
• Edit the content in the OmniGraffle window, just as you normally
would.
• In OmniGraffle, choose File ▸ Save; the content in the
OmniOutliner window updates automatically.
This makes it easy for you to roundtrip content shared by LinkBack apps
without having to update the content in two different places. For more
information about LinkBack, and a list of participating applications, check
the LinkBack Project’s website.
Licensing
From the menu bar, choose OmniOutliner ▸ Licenses to see the Licenses
dialog. From here you can review and edit your OmniOutliner licenses,
which verify that you’ve actually paid for the software. (Thanks!)
119
To purchase a license:
• Click Buy Licenses and you will find yourself magically transported
to the Omni Store, where you can purchase a license for the Mac
versions of our software. (Naturally, this only works if you have an
Internet connection.)
To add a new license:
1. From the menu bar, choose OmniOutliner ▸ Licenses to see the
Licenses dialog.
2. Click Add License.
3. If you have a license key in an email message, copy and paste both
the Owner name and the License Key into the appropriate fields. If
you can’t copy and paste the information, you’ll have to type it in;
make sure you enter everything exactly as it appears in your license
message, including the dashes. Also, double-check that the license
you’re entering really is a license for OmniOutliner 4, and that it is
for the correct edition (Pro or Standard); licenses for other Omni
products or earlier versions of OmniOutliner won’t work.
4. The Type drop-down menu is grayed out by default, which limits the
license type to Personal for the current user account on your Mac.
OmniOutliner has two different types of licenses:
• Personal: This license is for your personal use, and will only be
available on this computer when you are logged in as the user
who installed the license. You can install this license on more
than one computer, but only for your personal use. You should
not use the software on two different computers at the same time
with this kind of license. If a personal license is available, the
application will always use it.
120
• Computer: You can use this license on this computer, and so can
any other user of this computer. However, you should not install
this license on more computers than it has license seats for.
5. If there is more than one user account on your Mac, and you’d like
everyone on your Mac to discover the awesomeness that is
OmniOutliner, you'll need to jump through a couple of hoops
(thanks to Apple’s mandated app sandboxing for OS X 10.7 and
above). To set up a Computer license, follow these steps:
1. Quit OmniOutliner 4.
2. Open a new Finder window.
3. Switch the Finder’s view settings to Column, by choosing View ▸
as Columns (or use Command-3). This will make it easier for
you to traverse the folder hierarchy on your Mac.
4. Choose Go ▸ Computer.
5. Choose your Mac’s hard drive (if you haven't renamed it, it should
be named Macintosh HD), and then traverse through the
following folders:
• Library
• Application Support
6. In the Application Support folder, create a new folder (choose File
▸ New Folder, or use Shift-Command-N) and name it Omni
Group. You will need to enter your admin password to create a
new folder at this level.
7. In the Omni Group folder, create a new folder and name it
Software Licenses.
121
8. Open OmniOutliner 4 again, and then choose OmniOutliner ▸
Licenses.
9. Click Add License.
6. When you click Add License, you’ll notice that the Type drop-down
menu is no longer grayed out, and the Computer option is available
for selection. Now just enter the Owner and License Key
information you received from us, click Save, and you should be set.
To remove a license:
1. Select the license you want to remove.
2. Click Delete License.
To move a license from one Mac to another:
1. First, find the license file on the old computer. OmniOutliner license
files are located in the folder Library/Application Support/Omni Group/
Software Licenses, where Library is either at the top level of your
system disk (for computer licenses), or in your Home folder (for
personal licenses). The file you are looking for has a name such as
omnioutliner–123456.omnilicense. Move this file to the new computer.
2. On the new computer, choose OmniOutliner ▸ Licenses from the
menu bar and then click Add License.
3. On the sheet that appears, click Import License File.
4. Locate and select the license file that you want to import.
5. Click Open. If the license file is compatible—meaning, it is for the
same version of OmniOutliner—the license will be added to
OmniOutliner on your other system.
122
Again, the thing to remember here is that license keys are version-specific;
the license key you have for OmniOutliner 3 is not compatible with
OmniOutliner 4 (and vice versa).
123
Getting Help
When you’re in need of help—whether you’re trying to figure out how
layers work, or if you’re having some other issue with OmniOutliner—it’s
good to know that the Support Humans at The Omni Group are always
available to lend you a hand.
The OmniOutliner Website
The OmniOutliner website is always a good place to find the latest
information about OmniOutliner.
Forums
The Omni Group maintains online forums for all of our products, and
you’re invited! Come share your questions and ideas with other users and
Omni staff.
Email Support
If you’re stuck, if you have a good idea for the next version of
OmniOutliner, or if you just want to let us know how we’re doing, go
ahead and send us an email. Choose Help ▸ Contact Omni from the
menu bar to conjure up a message addressed to us, or just send us an
email with your thoughts. We take support pretty seriously, so you can
expect a prompt response actually typed by human hands.
Release Notes
For really meticulously detailed information about what has changed in
each minor version of OmniOutliner, check out Help ▸ Release Notes
from the menu bar.
124