1
CIVICRM
Published : 2011-03-10
License : None
1
INTRODUCTION
1. What is CiviCRM?
2. Real World Examples
3. Who is CiviCRM?
4. About this book
2
1. WHAT IS CIVICRM?
CiviCRM is a powerful, web-based contact relationship management (CRM) system. It allows an
organisation to record and manage information about the various people and other organizations
it deals with. CiviCRM is more than just an address book, it also allows you to track your
interactions with people and organizations and to get them to engage with, and potentially give
money to, your organization through your website. The information you gather is all stored in
one place but you can access it from almost anywhere.
CiviCRM focuses on the needs of non-profits. Most business CRMs are focused on managing
commerce; CiviCRM emphasizes communicating with individuals, community engagement,
managing contributions, and administering memberships.
CiviCRM is open source, which means there are no license costs or user fees associated with
downloading, installing or using the software. You may incur costs if you use a consultant to
implement CiviCRM to meet your specific needs and you may incur website hosting charges.
CiviCRM is web-based, which means it can be accessed by many users at the same time from
different locations. It has been developed with the international community in mind, and
translations and multi-language options are supported.
A MODEL FOR UNDERSTANDING CRMS
One way to understand what a CRM does is to think of your personal address book with
enhanced capabilities. Imagine that every time you make a phone call to a given person, your
address book automatically makes a note of it, together with brief description of the
conversation. It can also decide whether to ask this person for a particular favor, based on
whether she did this favor for you a week ago, and schedule a follow-up meeting following the
call. After using this address book for a while, you could ask "What were my interactions with Ji
Lao?" or "How many people helped me this month?" and it would give you the whole history.
Now let's say you're organizing a dinner party and you want to invite all the people you've met
during the previous year. Just write the invitation and tell your address book to send the email.
You don't have to worry about anything else after this point (apart from preparing the dinner!).
Your address book handles the RSVPs from all invited guests, together with information about
who is vegetarian and who is not. It even lets you know two nights before the event how many
people you can expect.
It would be great to have such an "assistant", right? Organizations need one even more. It's hard
to remember all of your meetings, phone calls and other forms of contact (especially over the
long term), but the more you know about the people and organisations you interact with, the
more successful your work will be. You'll be able to target your message to specific groups,
because you know who will be interested in specific topics, and you'll be able to observe their
reactions and adjust your next interaction, and continue to improve how you talk to different
groups.
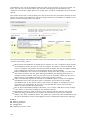
CIVICRM AND CONTENT MANAGEMENT SYSTEMS
CiviCRM works together with another common piece of software: a content management system
(CMS). A CMS is a tool for creating and managing websites, and most websites these days are
based on a CMS.
3
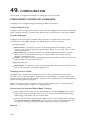
Integration with a CMS offers a number of advantages for CiviCRM, most notably:
visitors to your website can carry out many activities on their own, such as renewing their
membership, signing up for events, requesting email updates, and donating money
you can share parts of your data, for example event information, with visitors to your
website
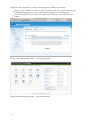
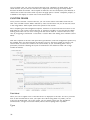
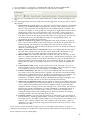
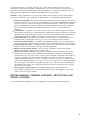
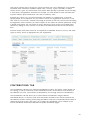
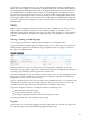
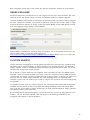
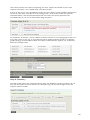
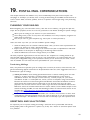
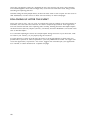
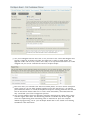
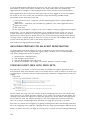
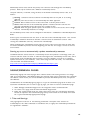
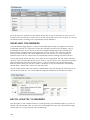
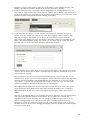
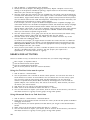
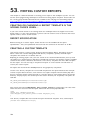
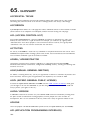
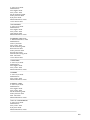
Drupal Content Management System - Content Types Screen
Joomla! Content Management System - Control Panel screen
4
2. REAL WORLD EXAMPLES
CiviCRM is used by all shapes and sizes of organisations that are located all over the world. Some
have no paid employees, while others might have several hundred. Their needs range from very
simple to fairly complex. In this chapter, we will have a look at real world examples of how
organizations are using CiviCRM.
Throughout this chapter you will see references to CiviCRM features such as CiviEmail,
CiviMember, CiviPledge, CiviCRM Profiles and others. These are all components of CiviCRM and we
have included references to them so you can become familiar with the language of CiviCRM;
however, it's not important to understand the finer detail of these features at this point.
A SPECTACULAR PERFORMANCE
This example shows how clubs can use CiviCRM for summer camps, regular classes and other
events.
Wellington Circus Trust in Wellington, New Zealand is run entirely by volunteers. They have a
mailing list of 500-600 people and run blocks of classes in circus skills such as trapeze and hula
hoop. They also host events. For safety reasons, the Trust needs to gather information about
who to contact in the case of a student being injured. The Trust processes about 200
enrolments a year.
Prior to using CiviCRM, the Trust maintained a Microsoft Access database, but data entry was
time-consuming, keeping information up-to-date was difficult and emailing the resulting contact
information to the tutors on a regular basis was challenging. The treasurer wanted members to
be able to maintain their own details and wanted the tutors and volunteers to be able to access
member's contact details from anywhere.
What They Did
After some research, the Trust decided that CiviCRM could enable them do the things they
needed to do, and as soon as the system was up and running they began to make the most of
it.
They up online enrolment for circus skills classes with the CiviEvent component, and
decided to pay a commission to a payment processing company so that credit cards could
be used for online class payments. They also used CiviEvent to set limits on the number of
students that could enroll in a given class.
To track emergency contact information, custom data fields were created and added to a
profile that was used as a form for event registration. This information was then stored in
CiviCRM.
They integrated CiviCRM with Drupal and set up user accounts for every contact in their
database. The system's users were then instructed on how to use the Drupal 'reset my
password' link to gain access to the system for the first time so that they could then
update their own information.
CiviMail was implemented to contact tutors, volunteers and students.
Since the Trust applies for grants from funding bodies, they enabled the CiviGrant
component.
5
The Results
Simply by implementing CiviCRM, tutors and volunteers can now access and manage information
from anywhere in the world where they have internet connectivity.
By implementing CiviEvent with a payment processor and custom data fields, people are able to
enroll in and pay for classes online and provide the important emergency contact information at
the same time. Allowing people to sign-up online has greatly reduced the amount of time spent
on data entry.
By integrating CiviCRM with Drupal and setting up user accounts, contacts are able to maintain
and update their own information, greatly reducing administration time and improving the
accuracy of the data.
Implementing CiviMail has made it easy to email tutors, volunteers and students, and removed
the administrative burden of manually updating the mailing list and contact information because
contacts can do their own updates. The treasurer also found that it saved her from having
hundreds of sent items in her email client, which used to be the result of using Microsoft Office
mail merges to send out email newsletters.
Prior to implementing CiviGrant, the Wellington Circus Trust had not been effective at tracking
the status of grant applications. By using CiviGrant, they are now able to see at a glance what
grant applications had been sent and the status of each application.
All up, the Trust estimates that installing CiviCRM has saved hundreds of volunteer hours over
the course of a year.
After moving to CiviCRM, the Trust found that both contact management and class registration
were easier. One issue they encountered was that some people were confused about having to
reset their Drupal passwords. The Trust thinks that putting more effort into the way they
explained this on their website would have helped. Another issue was the standard PayPal
interface which was initially implemented as a payment processor; people found this difficult to
use, and after six months the Trust invested in developing a payment processor more
appropriate to New Zealand.
They also learned that a cheap hosting provider is not always the best option: quite a bit of time
was wasted before they switched from a free provider to one that costs them approximately
$NZD20 per month and provides significantly better service.
SUFFERING RELIEVED!
The American Friends Service Committee (AFSC) is a large, Quaker-based, peace and social
justice organisation with over 400 employees. Worldwide, they run programmes that work to
relieve and prevent suffering through both immediate aid and long-term development, and they
seek to serve the needs of people on all sides of violent strife.
Their main headquarters are located in Philadelphia, Pennsylvania. They have nine regional
headquarters located throughout the United States, some 50 area offices also located in the
USA, and numerous international field offices located in Africa, Asia, Europe, Latin America, the
Caribbean and the Middle East.
Lists of constituents are maintained by each office. The specific CRM system needs of each
office vary but the general needs are: searching for constituents that meet certain criteria;
sending emails, newsletters, postal mail and announcements; and collecting the contact
information of people who sign online petitions and register for events online.
6
Through a survey conducted by the AFSC Information Technology Department, it was revealed
that AFSC staff were using a variety of systems to keep track of their constituents. It also
became obvious that these systems were not working effectively: repositories of data were
everywhere, contact information was duplicated, staff were having a hard time managing their
contacts and the IT Department was unable to provide adequate support.
The survey also found that staff members were frustrated with the systems they were using
because they lacked the necessary functionality for them to effectively communicate and do
outreach. Specifically: search capability was limited; there was no ability to send high-volume
emails which meant that it was not possible to send newsletters or announcements; and there
was no ability to collect information online.
After investigating several database systems, the IT Department finally decided that, all things
considered, CiviCRM might be the best fit for the AFSC.
What They Did
Initially, CiviCRM sites with CiviMail, managed by an external vendor, were established for offices
in Los Angeles, Rhode Island, San Francisco and Seattle. Los Angeles also chose to use the
CiviEvent component to track event registrations and the CiviMember component to track
contact information of committee members.
After implementation, an LA staff person discovered that certain functionality was missing from
the CiviMember export component and this was preventing them from being able to compile a
membership directory. AFSC talked to the CiviCRM Core development team and contracted them
to add the missing functionality. This was a win-win situation: AFSC got the functionality they
needed and because it was integrated back into the CiviCRM product, the entire CiviCRM
community was able to benefit from the addition. An extra advantage for AFSC is that because
the functionality became a standard part of CiviCRM they don't have to worry about
compatibility with future upgrades.
The Results
The decision to have their sites hosted and managed by an external vendor turned out not to be
a good one when the vendor ran into difficulties and was not responsive to issues or in providing
the services that had been promised, such as timely updates for CiviCRM. Once the hosting issue
was resolved, staff were able to take full advantage of the capabilities of CiviCRM and do all of
the things that they had previously been unable to do.
The Los Angeles office is in full swing, using CiviCRM as the main repository to track their
constituents, board, committee members and volunteers. Their constituents are able to sign up
for events and petitions online, and staff can send volume emails for newsletters and
announcements.
Getting rid of their old system and being able to send out a monthly newsletter was the main
goal for the Colorado office, who came on board with CiviCRM a little later in the process. They
are now able to identify newsletter subscribers and send the newsletter to them via CiviCRM.
They couldn't be happier!
The AFSC currently has nine CiviCRM sites and the IT Department is now recommending CiviCRM
as the "database of choice" for all of its offices. Support from the CiviCRM community is
excellent and CiviCRM itself is improving every day, as more and more functionality being added.
AFSC staff are now able to access their data from any place that has internet access, run
complex searches, manage online event registrations and send online newsletters and postal
mailings. CiviCRM has enabled them to better manage their constituents. This makes their life
easier and in turn, is of great benefit to AFSC.
ACTIVATING THE COMMUNITY
7
The Healthy Environment Alliance of Utah (HEAL) is a grassroots environmental organisation
working to protect Utahns from nuclear and toxic waste. Before moving to CiviCRM, they were
stuck with a Microsoft Access database. They may have called it a database, but in fact it was a
glorified spreadsheet that did little to facilitate their day-to-day operations. The goal for the
CiviCRM project was to move to a system that would centralise all of their information across
their organisation including email lists, volunteer tracking, donor history and more. As an
advocacy and community action organisation, effective engagement with their supporters and
tracking the relationships they build with their constituency over time is critical to their mission.
They needed a tool to support that mission.
What They Did
HEAL has been using CiviCRM since the early days of the software and CiviCRM is now the
central place to track all donors, volunteers, legislators, foundations and contacts. They use
CiviCRM for donor management, email communications, event management, volunteer tracking,
and advocacy.
For advocacy purposes, constituents' legislative districts are monitored so that when issues
arise that need action, HEAL can mobilise its members on a district-by-district basis.
The system tracks volunteers, the activities they participate in, and their interests.
HEAL holds large fundraising events with free admission where donations are solicited.
CiviEvent handles all of the online registrations and collects data, such as guest names and
interests. Invitations, reminders, and follow-up messages are sent via postal mail and the
CiviMail component.
CiviContribute allows HEAL to run donor reports as well as accept online donations.
The Results
There is no question that CiviCRM streamlined and consolidated HEAL Utah's data management
and saved the organisation valuable resources. It is interesting to note that over the last several
years their advocacy campaigns have been more successful and their impact in their community
more noticeable - perhaps in part because they have been able to redirect limited resources
away from administration and into the real work.
The biggest lesson that CiviCRM has brought to HEAL is to force them to always think about
what role technology will play in their outreach and organising work.
A CRM EDUCATION
Schoolhouse Supplies (SHS) is a Portland, Oregon, USA-based non-profit organisation which
gathers and distributes school supplies to students and teachers.
Prior to implementing CiviCRM, SHS used a combination of software programmes including
Exceed, EROI, Constant Contact, Salesforce, Auction Pay (for online contributions) and, of course,
hundreds of spreadsheets. In addition, SHS had a custom web application for managing its online
store inventory and processing in-kind donations.
8
What They Did
By moving to CiviCRCM, SHS has centralised their operations and the management all their
constituent data, and been able to unify and coordinate several of their core business processes.
All data from each source has been migrated to CiviCRM Standalone (an installation that is not
integrated with either Drupal or Joomla! CMS). CiviContact and CiviContribute have replaced
Exceed and Auction Pay. CiviMail has replaced EROI and Constant Contact. Salesforce data was
moved into CiviCRM and the custom e-commerce application it supported was integrated with
CiviCRM. Lastly, the inventory and in-kind management system was integrated with CiviCRM.
Spreadsheets have been imported.
The Results
Each business process at SHS can now take advantage of their full constituent database and
business activities are easily coordinated. More importantly, SHS is now in the process of taking
manual business processes (such as volunteer coordination) and moving them to CiviCRM. New
campaigns are now being planned and executed which would previously have been impossible or
prohibitively expensive.
GROWING SATISFACTION
The New York State Nursery Landscape Association (NYSNLA) is a member-based association
providing resources and advocacy support for nursery and landscape professionals throughout
New York State. The organisation seeks to advance the interests of New York State's nursery
and landscape businesses and professionals by promoting sound business practices, expanding
state and local markets, and exercising leadership in the development of sustainable
communities.
Prior to migrating to CiviCRM the Association went through several iterations of membermanagement solutions, beginning with a series of spreadsheet documents and later moving to a
Microsoft Access database. The move to CiviCRM was prompted by the desire to consolidate
data, provide members real-time access to contact details, and to create a searchable member
directory to website visitors who may be looking for a nursery or landscape professional.
What They Did
Working with a CiviCRM consultant, NYSNLA began the process of analysing the structure and
content of their existing database and mapping the various functions to CiviCRM structures. They
determined that they would use CiviMember, CiviEvent, CiviContribute, and CiviMail to address
their core database needs, and would consider using CiviPledge at some point in the future for
soliciting contributions to their associated non-profit, the Nurserymen's Foundation.
One data area that required particular attention was their Certified Nursery Landscape
Professional program (CNLP). CNLP is an intensive, on-going educational programme designed to
increase the skills of garden and landscape employees. The programme was designed by
members of the nursery and landscape industry with assistance from Cornell University.
Interested individuals must apply to the programme and successfully pass a test. Certification
lasts two years, after which time the individual must recertify.
9
NYSNLA used CiviCRM's membership functionality to track the status of CNLPs. The ability to
define a rolling-period membership and to gauge when they are nearing expiration perfectly met
their management needs. The initial application process, which also must be carefully tracked,
was handled through CiviEvent, as an application to the programme is essentially a registration
to attend one of the bi-annual test events.
The Association also took advantage of CiviCRM's open source platform to make some interface
customisations that improved the way they view contact records. Because of the importance of
the CNLP programme, they wanted to be able to look at all employees for a certain
nursery/landscape company and quickly know if any of them are CNLPs or Lifetime CNLPs. They
also needed to easily find out which employees are authorised to manage the company's
records.
The Results
The Association has worked hard to communicate to the public the importance of using a
qualified landscape professional. Essential to this effort was the inclusion of a searchable member
directory on their website. Using CiviCRM, they were able to create a search page that included
geographic segmentation (the Association divides members into 8 regions state-wide) and a list
of services provided by members (using CiviCRM's tags feature). The resulting search tool,
because it is directly connected with their contact data, ensures website visitors are always
looking at current information. The Association is also able to provide members direct access to
their own contact details so they can update and maintain their list of services provided and
other information.
CAMPAIGNING FOR EFFICIENCY
The Green Party has been the third largest party in New Zealand politics for most of the last
decade, with strong roots in the Values Party (the world's first national Green party) of the early
1970s. They achieved parliamentary representation in 1996 and after the 2008 election had 9
Members of Parliament, 5,000 financial members and some 50,000 contacts. The Party has
more than 50 branches around the country and contest elections across all 67 electorates in the
last election.
Prior to adopting CiviCRM, the Party and its parliamentary units employed a range of systems for
managing members, donations, contacts, campaigning, media and advocacy.
The Green Party policy states:
Development of IT must be socially responsible and sustainable.
The use of free and open source software should be encouraged.
What They Did
CiviCRM was adopted by the Party in 2007 (version 1.7), with a switch to Drupal as a parallel
project. This was inspired in part by work done by the Canadian Greens on developing a voter
canvassing module for Drupal. A Party database was set up using CiviCRM and online donations,
memberships and event registrations were instigated.
The Greens have over 100 different issues that they generate media releases about. These were
reconstructed as a check-box custom data field, and Smart Groups were built for each of these,
for use when sending out media releases via CiviMail.
10
The highly complex access control requirements of the party necessitated the development of
an alternative approach to the use of ACLs (Access Control Lists) in order to provide a more
easily managed, highly granular system. This approach has now been incorporated as a hook
(something that can be utilised by developers to extend CiviCRM) into the core code.
For the 2008 election campaign, a look-up function was developed so that when new contacts
were added to the database, addresses were checked against a table containing the Electoral
Roll, and links were created where matches were made. "Soft" matches were also recorded.
The Results
In the 2008 election campaign, the Party made extensive use of online fundraising and greatly
exceeded previous online income. Membership renewal has been streamlined with more online
renewals occurring.
As of May 2009, the Party was still using CiviCRM v2.0 on Drupal 5 and therefore had not yet
benefited from the many features that became available through the 2.1 and 2.2 releases. An
upgrade was in progress at the time.
In a complex organisation such as the Green Party, training can be a limiting factor, as well as
the need to nurture more in-house super-users. New features in CiviCRM have led to some
rethinking about the Party's usage of custom data fields, particularly with regard to the use of
CiviMail for media releases. New options for both nested groups and Drupal Organic Groups
suggest that a more time effective approach may soon be possible.
QUEST FOR SUCCESS
QuestBridge is dedicated to helping bright, motivated low-income high school students get
accepted to and able to pay for college. QuestBridge recruits high school juniors throughout the
USA and invites them to fill out the QuestBridge application online. QuestBridge also partners
with the USA's most selective colleges and universities with the aim to increase the socioeconomic diversity of their student bodies. QuestBridge's college partners accept the
QuestBridge application in lieu of their own admissions application.
What They Did
QuestBridge has built most of its business processes around CiviCRM. They wrote their online
admission application using CiviCRM and extended it using the PHP scripting language. CiviCRM is
used to store biographical and application information and communication histories about the
students.
The Results
11
In the 2008-9 school year, QuestBridge helped more than 1200 students get accepted and pay
for college at its 25 partner schools. They accomplished their goals in a very efficient manner, in
part thanks to their effective implementation of CiviCRM. QuestBridge is currently planning to
upgrade to the latest version of CiviCRM in order to take full advantage of the new email
features.
If Questbridge were to start over they would have invested more in training on CiviCRM up-front.
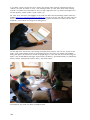
CHANGING WITH THE TIMES
The San Francisco School (SFS), is a Preschool through 8th grade coeducational school with a
diverse student body of about 270 students. Like all schools, communication between the school
and families is very important. Whether it's updating a home phone number, email address or
allergy, it is essential in meeting the needs of the students. The head of school was a strong
supporter of the project from the beginning which led the staff and parents to be able to make a
strong commitment to help the project move forward.
What They Did
They used CiviCRM to create a Parent Portal to:
required parents to log in to view their contact information and their child's school
information
had an automated system to schedule parent teacher conferences
used a computer to record after school class sign in and sign out
managed after school class registration (example: music, cooking, sports) and view their
child's after school fees
To ease the transition of the school community, each of the above features were shown
gradually rather than all at the same time.
The Results
12
Enabling parents/guardians to view their contact information meant that they could confirm what
the school sees and hence notify the school of any changes. Also, they could view their child's
after school fees and view a record of what classes their child is signed up for. Online sign ups
allow parents the flexibility to schedule parent/teacher conferences and after school classes on
their own time. Changing the existing school systems to an online system allowed both parents
and staff to work together, view the Parent Portal so that contact information is current, parent
teacher conferences are scheduled in a timely manner, and that access to the information is
widely accessible.
13
3. WHO IS CIVICRM?
CiviCRM has a unique and diverse community centered around developing, using, and
documenting the software. Our community includes the CiviCRM core team, people at the nonprofits that use CiviCRM; consultants working with a number of non-profit organizations;
programmers and developers, power users, volunteers and community organizers! We are also
closely related to many other open source projects.
Each member of the community interacts with CiviCRM in their own way, working to improve the
software and how we organize ourselves. The strength of community comes from this diversity
and the ease with which someone can join us, and means that we are constantly changing and
improving, often in unexpected ways.
Like all communities your membership is characterised by your interactions. If you treat others
well, have some fun, and help others, then you can expect to enjoy being a member of the
CiviCRM community. But if you are prone to complaining or don't use a respectful tone in
communications, or if you see the community just as a resource and not as a collection of very
kind, generous and clever people, then you are probably not going to get much of a response.
Treat people well and you can find the CiviCRM community fun and rewarding.
HISTORY
CiviCRM started in 2004 by Dave Greenberg, Donald Lobo and Michal Mach. The founders had a
lot of previous experience working with non-profit organizations and tools. The group was
influenced very early by Zack Rosen and Neil Drumm, who convinced them to use Drupal as a
fundamental cornerstone for CiviCRM. This decision has meant that the developers have been
able to leverage a lot of the functionality that Drupal provides, freeing the team up to focus on
building the features necessary to make a great CRM.
In 2005 the first version of CiviCRM was released with two of the core modules in place: CiviMail
and CiviContribute (you can read more about these later).
Since those early days CiviCRM has built a large community of users and contributors (there are
now over 8000 installed sites), the software has gone from strength to strength (there are now
8 core modules and additional third party components), and the core team has expanded to 8
members. There is also a large ecology of free software contributors around the project and
high-profile non-profit organisations such as Wikipedia, Creative Commons, Mozilla, and Amnesty
International use CiviCRM.
IT'S GOOD TO TALK
CiviCRM is an open and learning community, and people are ready to hear your ideas. If you have
a good idea, there's nothing to stop you carrying it out - but the best way to start, is to start
talking about it.
If you're not sure where to start, the best place is probably the community forum
(http://forum.civicrm.org/). Ask people what they think about your idea. There's a wealth of
experience on the forum, and with a bit of luck, someone will have tried something similar
before. CiviCRM people are a friendly bunch and their guiding philosophy is collaboration.
Depending on your idea, you'll be directed to the next best place - maybe an article on the blog
(http://civicrm.org/blog/), a page on the wiki (http://wiki.civicrm.org/), a teleconference or a
meeting up with another community member in real life, yes that's right, REAL LIFE!
BE THE CHANGE
14
So you have a great idea. Now you need an equally great action plan to accompany this idea and
then you'll need to implement it. Although the CiviCRM community is friendly and supportive and
will like to be involved and updated about your project, you'll need to be the driver. How will you
get the resources together for your project? How can you fit it in with your day job? Finding a
way to simultaneously achieve your own objectives and benefiting the CiviCRM community is the
best way of getting things done.
AND FINALLY...
If you're a CiviCRM user who has an ongoing relationship with a consultant, there's nothing to
stop you from also being an active member of the community. The community really benefits
from direct feedback from end users - your consultant is only one person or organization - by
asking on the forums you're opening yourself up to help and input from the entire community.
15
4. ABOUT THIS BOOK
Understanding CiviCRM - A Comprehensive Guide is written for CiviCRM version 3.3. The majority
of the content is applicable for both older and current versions of CiviCRM.
Cover Art (faces) by Kapor Creative: Jake Mix & Trevor Parham (Jake created the illustrations,
and Trevor developed the concept of the civi logos as eyes). Cover Art is CC-BY-SA
CONTENT AND STRUCTURE
This book aims to be a comprehensive guide to using CiviCRM for a wide range of audiences. It
covers core CiviCRM functionality and CiviCRM's components. Both the book, and the componentspecific sections of the book, have the following structure:
Introduction - suitable for all readers
Planning - should be read before configuring and using functionality
Configuration - covers how to set up functionality for everyday use
Everyday tasks - instructions on how to carry out every day tasks with CiviCRM
CONTRIBUTING
Like all other aspects of CiviCRM, this book is a collaborative and community-led project which
you can contribute to and participate in. Instructions on how to contribute are at the end of this
book.
PLANNING
5. Is CiviCRM for You?
6. Identifying Your Needs?
7. Project management
16
5. IS CIVICRM FOR YOU?
This chapter will help you to decide whether CiviCRM is the right tool for your organisation.
CiviCRM is powerful software and has the potential to help your organisation reach its goals but it won't be the right choice for every organisation. Here are some ways that you can find out
whether CiviCRM is right for your organisation:
read the book Understanding CiviCRM (you might be doing that right now)
play with a demonstration site
install a test database
talk to others who use CiviCRM
talk to a CiviCRM consultant.
DEMONSTRATION SITES
CiviCRM hosts two demo sites - one for each of the two supported Content Management
Systems (CMS) - Drupal and Joomla!. The demo sites present a working copy of the latest stable
version of CiviCRM with sample data. You can use them to play around with CiviCRM but be
aware that they are publicly viewable so you shouldn't enter personal data.
The demos are available at:
Joomla! Demo: http://joomla.demo.civicrm.org/
Drupal Demo: http://drupal.demo.civicrm.org/
Other people are likely playing on the demo sites at the same time as you, so they may be
configured strangely, missing functionality or appear in different languages.
The demos have some limitations - you can't send emails from them, you can't set permissions
for Drupal users or do a full exploration of online payment options.
If you are having trouble working on a demo site, contact the CiviCRM core team via the forum
or IRC. If you want a more controlled evironment for exploring CiviCRM, install your own test
site.
TEST INSTALLATIONS
If you have technical skills or are feeling adventurous, you can download and set up a local
version of CiviCRM, that is a version that is stored on your local computer rather than on a
server on the internet. You'll still access it through a browser, but it will only be visible on your
computer. The advantage of a test installation is that you can configure CiviCRM in the way that
you want to use it, and experiment with your data.
Up-to-date information for installations (including troubleshooting tips) is maintained at
http://wiki.civicrm.org/confluence/display/CRMDOC/Installation+and+Upgrades.
TALKING TO OTHERS WHO USE CIVICRM
If you know of another organisation that uses CiviCRM, talk to them about their experience.
Obviously the more similar they are to your organisation, the better. If you don't know anyone
that is using CiviCRM, have a look on the CiviCRM forums, at case studies on the wiki, or try your
local non-profit technology mailing list.
17
The CiviCRM forums (http://forum.civicrm.org) have a few boards for people who are new to
CiviCRM, such as "Pre-installation Questions" (http://forum.civicrm.org/index.php/board,5.0.html).
Remember that the forums are staffed mainly by volunteers so you will get a better response if
you spend some time formulating an easily answerable question. You can also search the forums
and browse for questions that others have asked. If you wish to ask questions or contribute to
the discussions you must register first.
TALKING TO CIVICRM CONSULTANTS
Another option to help you understand CiviCRM is to make use of a professional. The CiviCRM
website lists professional vendors and consultants that can walk you through CiviCRM
(http://civicrm.org/professional), and there are many others; you may find a local website
company who has experience with CiviCRM. Consider hiring a consultant for a day to discuss with
you how CiviCRM could help your organisation.
18
6. IDENTIFYING YOUR NEEDS?
This chapter covers some basic strategies for identifying your organisational needs, and how
they could be met by CiviCRM. It doesn't go into detail about CiviCRM functionality or how
CiviCRM stores data (you will find that in other chapters). Instead, we encourage you to first take
a step back and think about your organisation.
YOUR ORGANISATIONAL GOALS AND PRACTICES
For now, forget about technology and focus on your organisational goals and processes. Here's a
list of questions to start you off:
What are the high level goals of your organisation?
What tasks are staff involved with on a day to day basis?
What activities do staff carry out with your contacts (members, constituents, clients)?
What different teams and roles exist within your organisation?
What services do you provide to your contacts?
How do you communicate with your contacts? (include information flows into and out of
your organisation)
What happens when you receive someone's contact information?
In what ways does money flow in and out of your organisation?
Does your organisation have a membership structure?
UNDERSTAND YOUR "CONTACT RELATIONS"
The CRM in CiviCRM stands for Contact Relationship Management. By contact, we mean an
individual, household or organisation that your organisation has contact with (you may call them
members, constituents, clients or some other term).
Many organisations make the mistake of not thinking about who their contacts actually are.
Spend some time identifying all the people involved with your organisation. What different types
of people do you interact with, and how do they differ from each other? The better you
understand them and their interactions with your organisation, the better you can model them in
CiviCRM. Anecdotal or systematic feedback from your contacts may be useful here.
TAKE ADVANTAGE OF INSTITUTIONAL KNOWLEDGE
In thinking about your contacts and their interactions with your organisation, talk to your coworkers, including those who have been around the longest and those who have just joined. Talk
to as many people as possible to get a complete picture of their interactions with all kinds of
contacts.
As well as talking to people, look at your organisation's data repositories: your databases,
spreadsheets, file servers, address books, and any existing stored information you may have
that can help you understand who your contacts are and how they interact with your
organisation.
MAP YOUR NEEDS TO CIVICRM
CiviCRM has been designed to be flexible and adaptable, based on feedback from many different
non-profits, but it may not map exactly to the ways that your organisation currently works.
Doing things the CiviCRM way could mean adapting your workflow and adopting best practice in
non-profit technology. Be pragmatic and flexible and consider whether your current working
practices need to change.
19
It's worth remembering that CiviCRM offers many opportunities to interact with your contacts in
ways that you have not previously had. Taking advantage of these new possibilities can lead to
positive changes and improvements.
20
7. PROJECT MANAGEMENT
This chapter outlines the parts that typically make up a CiviCRM project and should be read by
people about to embark on a CiviCRM project. Some of this information may be obvious to
experienced project managers. A comprehensive guide to project management is beyond the
scope of one chapter but we have outlined things that are typically encountered in a CiviCRM
project and provided pointers on some things to watch out for.
First, some pop philosophy courtesy of Cynthia Tarasco:
"Life is a series of making decisions. Some decisions are easy because they do not require a
substantial investment of time or money. Deciding which flavor ice cream to buy fits into this
category: if you get vanilla today you can always get chocolate tomorrow. Other decisions are
much more difficult because they require substantial investments of resources, and you will be
living with your choice for the foreseeable future. Adopting a new CRM fits into this category, so
planning and project management are vital".
When you start out on a new CiviCRM project you should spend time thinking about:
the people who will be involved in the project
what the business goals of using CiviCRM are
how you will approach the initial development
what ongoing support you will need
the costs associated with hosting and your IT infrastructure
training and documentation
change management
PEOPLE AND THE PROJECT TEAM
Including a wide range of people that represent the different parts of your organisation will help
with delivery of your project. A mixture of management and day-to-day staff helps the team to
keep an eye on the big picture as well as ensure that the project is ultimately useful to frontline
staff.
You'll be exploring new territory with your CiviCRM installation and this can sometimes be
stressful. It might be helpful to share project management of the project with others who can
give you a different perspective and moral support when you need it!
Managing a CiviCRM project will require a major time investment from people within your
organisation, even if you employ an external consultant. Organisations often under-estimate the
amount of time that will be required from their staff in implementing an IT project - such as
training, modifying existing processes and providing new or updated information to relevant
people. It's not something that can be tacked on to the end of an already busy schedule and this
should be taken into consideration.
BUSINESS GOALS
You should have a good idea of the business goals for implementing CiviCRM. This could be
something like: reduce administrative work in managing events with 25% or manage 25% more
donations with the same staff. The goals should be SMART (specific, measurable, attainable,
relevant, time-boudn)!
These business goals will help you in directing and managing your project. For example, if the
project group for example want some customization that requires budget and effort, your
business goals will help you decide one way or the other. The business goals will help you to
focus on why you are implementing CiviCRM and what you want to achieve in the long run.
DEVELOPMENT
21
It often makes sense to break development up into smaller more manageable sections, which
can be implemented in discrete stages or iterations. A common first phase of development is to
choose something simple to implement in CiviCRM, or specific functionality for a team who can
then act as CiviCRM evangelists within the organisation.
Implementing in stages allows staff to get used to changes gradually without feeling
overwhelmed, and gives the developer or implementer the ability to be responsive to feedback
from users during the development process.
Another reason that people choose to develop iteratively is that it is very hard for users to
correctly or fully articulate their requirements at the start of the project. Giving users hands-on
experience of an early version of the system helps them understand how it works and what is
possible. They can then provide valuable feedback and might articulate requirements that they
haven't thought of previously.
Implementing your CMS (Drupal or Joomla!) either before or after implementing CiviCRM is
another convenient way to split up a CiviCRM project. As well as the normal advantages of
breaking up the development into manageable chunks, this helps staff understand the important
differences between a CMS and a CRM.
Pilot projects
Pilots help to reduce risk during a project implementation. For example, rather than moving your
organisation's entire event management infrastructure to CiviCRM, run one pilot event using
CiviCRM and evaluate it. You can then incorporate the learning back into the development
process.
ONGOING SUPPORT AND DEVELOPMENT
It is a mistake to think about a CiviCRM project as a one-off development that will meet the
needs of your organisation for the foreseeable future. Organisations constantly change and
evolve and your CRM should evolve with you, otherwise it will eventually become out-of-sync
with the organisation.
Once you have been using CiviCRM for a while and staff are comfortable with it, you will likely
want to take advantage of other functionality. Each improvement or new piece of functionality
that you decide to implement in CiviCRM will take resources, so you'll need to plan for these.
Even if your organisational needs don't change, there are ongoing support implications, including:
keeping your site up-to-date with security patches
upgrading to the latest version of CiviCRM (not necessary, but CiviCRM is improving all the
time and your users will thank you for the improved usability and functionality each time
you upgrade)
upgrading the CMS (Drupal or Joomla!)
hosting
TRAINING
Training is a significant aspect of most CiviCRM projects. Your training could take many shapes
and sizes depending on your users, but it often makes sense to spend resources on formal and
reusable training resources (user guides, lesson plans and so on).
CiviCRM's range of functionality can be overwhelming at first (especially to the less technicallyminded). Remember that staff who were not involved in the project's early stages will need to
have concepts explained clearly to them - things that are obvious to you may be quite foreign to
others.
22
Trying to cover everything in one training session probably won't be effective; your staff will
need time to digest the new ideas. Instead, hold smaller training sessions that introduce concepts
and specific functionality, followed by periods of testing, piloting and feedback. Tailor your training
for your audience: not everyone needs to sit through a two-hour training session on how to
manage events if there is a single person responsible for event management and planning. And
where possible, involve staff in training other staff members as this increases the sense of
ownership and helps to embed learning.
Training is also ongoing. New staff will need to be trained, users familiar with the system can
benefit from learning about more advanced topics, and staff will need further training when there
are significant upgrades or new functionality added. If you plan to use CiviCRM for any large or
mission-critical events, allow adequate time for additional staff training and testing.
HOSTING AND INFRASTRUCTURE
Hosting is a key aspect of any CiviCRM project. You will need to provide maintenance of the
server on which CiviCRM is stored, and have someone available to fix problems that inevitably
occur from time to time. If your site needs to be accessible 24 hours a day, you should have a
support agreement with your ISP that covers this. Ensure that your budget is sufficient for
appropriate hosting, and that effective backup procedures and policies are in place.
Keep in mind that in the hosting provider world, you get what you pay for. In many cases, cheap
hosting providers keep their prices down by limiting the services or flexibility they provide.
CiviCRM doesn't work well on cheap hosting, and under-budgeting for hosting may lead to other
problems. Similarly, make sure that the computers your staff are using are powerful enough to
provide a good experience with CiviCRM.
CHANGE MANAGEMENT
Introducing a new (or the first) CRM will cause changes in work flow and processes at your
organisation. These changes may be "political", practical or technical. Either way, a lot of change
at the same time can be difficult and stressful.
To mitigate this, give staff time to accept and support each change so that they share in
ownership of the new system rather than feeling as if something has been forced on them. Focus
on simple tasks at the beginning of deployment and introduce more difficult tasks as staff
understanding of the system grows. Show staff how the new system will make their work easier
and where their feedback has been incorporated.
Good planning can minimise the risks around change, but it is important to be flexible within your
plan; unforeseen things often occur, and a rigid plan could prevent you from reaching the best
solution.
CONFIGURATION
8. How data is organised
9. Extending core data
10. Using CiviCRM Profile
11. Installation
23
8. HOW DATA IS ORGANISED
This chapter covers the main building blocks that CiviCRM uses to store data, and describes their
intended usage. It is recommended reading for working out how you should organise your data in
CiviCRM.
A successful CiviCRM installation depends on having your data stored in the right place. This
chapter goes through all of the places that you can store data and helps you to understand why
you would store data in one place and not another.
Equally important to understanding the different building blocks presented below is understanding
how they can be extended using custom data (described in the next chapter).
CONTACTS
Contacts are the main building block of CiviCRM. There are three types of core contacts in a
standard installation:
Individuals
Organisations
Households.
Contacts hold contact information, including:
name, nickname, greeting, title
website, email addresses, phone numbers, IM account name
addresses
communication preferences (which methods do they prefer being contacted by, and which
methods do they not want to be contacted by).
All of the other building blocks of CiviCRM such as relationships, contributions and groups are
connected to contacts in some way, so you can see events that a contact has attended, or what
contributions they have made.
You can define further contact types to suit your needs, for example "students", "farms" or
"churches". Each contact type you define is based on one of the three core contact types. For
example, students would based on individuals, and farms could be based on organisations, or
perhaps on households, depending on your situation.
A contact can be only one contact type. For example, they can't be a student and a teacher (but
contact types are not the only way to differentiate your contacts).
All users of your content management system are also stored in CiviCRM as individuals. Their
contact record in CiviCRM is linked to their user record in the CMS (Drupal or Joomla!). Note that
only individuals can be linked to user records in your CMS. Organisation and household records in
CiviCRM cannot be directly linked to user records in your CMS.
RELATIONSHIPS
Relationships are a way to connect two contacts to each other. Two out-of-the-box relationship
types in CiviCRM are the "employer - employee" and the "parent - child" relationship types.
There are always two ways to describe a relationship in CiviCRM: one describes the relationship
of A to B, and the other of B to A. For example, Adam is Bernard's son and Bernard is Adam's
father. Sometimes both descriptions will be the same: Charlie is Diane's friend and Diane is
Charlie's friend.
24
CiviCRM comes with a number of relationship types in the standard installation. You can define
further relationship types to meet your needs, for example you might define a relationship type
of "vicar - church".
It may be helpful to compare relationships to groups: relationships connect two contacts, while
groups contain two or more contacts who have something in common.
GROUPS
Groups are useful to identify two or more contacts with something in common. For example, the
advisory board of your organisation could be modelled as a group.
Groups are often used as mailing lists. For example, you could create a group containing all your
newsletter subscribers, then use the group to send an email newsletter.
A group can be the "child" of a "parent" group. When a group is a parent, selecting the contacts
in that group will also select contacts that are in the child group.
For some groups, such as your advisory board, you might want to capture other types of
relationships than a simple "belong to" (eg. president, vice-president, member, substitute).
Instead of creating a group, you might want to create a new type, "board", and a contact,
"advisory board", then add the members of the group as relationships to that contact. For
mailing purposes, you might want to create a smart group with all the related individuals (no
matter the type of relationship) of that board.
Groups are also used in many other situations. For example, a search can be saved as a group
(or a smart group) and groups can be used to provide permissioning. To find out more about
groups and how they are used, read the chapter on groups and tags.
TAGS
Tags are in many ways similar to groups, but as well as being used to identify contacts they can
also be applied to activities and cases that have something in common. To find out more about
tags, and how they are different from groups, read the chapter on groups and tags.
ACTIVITIES
Activities are a key concept in CiviCRM. Activities track interactions between the organisation
and its clients or contacts at a specific point in time. All of CiviCRM's components make
extensive use of activities, such as to record contributions, event attendances, membership
subscriptions, and emails.
You can create additional activity types to define specific activities that your organisation carries
out, for example, "completed annual survey".
Activities have the following characteristics (most of these should be filled in for each activity
and those in bold on the form are required):
time: activities always happen at a certain point in time
status: is the activity scheduled, completed, cancelled, etc.
added by: the person who added this activity, or the contact if they carried out the
activity themselves via the website
assigned to: the person (usually within your organisation) that carried out (or will carry
out) the activity (this is often the same as the person who added the activity)
with contact(s): the contacts in your database that are the subject of the activity.
25
Compare activities to groups. Would you choose activities or groups to record a membership
pack that was sent to a contact? You could add all contacts that have received a membership
pack to a group "received membership pack", but it would probably be better to record this as
an activity. That way, you can record when the membership pack was sent, who sent it, any
notes about what the person requested, and so on. You could also use the activity to schedule
sending membership packs by setting the status to scheduled.
CONTRIBUTIONS
Contributions are a type of activity, and a fundamental concept of CiviCRM. Contributions are
used whenever there is a financial element to an interaction. A contribution will be created for
each donation or campaign contribution, for paid events and for membership fees.
CiviCRM comes with several predefined contribution types (including donations, campaign
contributions, membership fees and event fees). You can define additional types to meet your
needs.
Contributions have different statuses which reflect the process of receiving a contribution. Some
of these statuses are are set automatically by payment processors.
For more information, see the section on CiviContribute.
MEMBERSHIPS AND MEMBERSHIP TYPES
Memberships are another type of activity. As well as the usual activity fields, they contain extra
fields used for tracking memberships, such as start and end dates.
CiviCRM allows you to define different membership types with fees, start and end dates, and
other settings. You can define the types that meet your organisation's needs.
Memberships can be renewed. When this is done, the start and end date will move on by the
specific time period but the join date will remain the same (i.e. the same as the first membership
start date).
If the membership has a fee associated with it, this will be recorded as a contribution and linked
to the membership.
For more information see the section on CiviMember.
EVENTS AND EVENT ATTENDANCES
CiviCRM has a building block for events which contains fields to add events and give these
events, times, locations, fees and other information.
When a contact registers for an event, a participant record is created linking the contact to the
event. A participant record is a type of activity.
For more information see the section on CiviEvent.
CASES
Cases are a way to logically connect a series of activities. You can define different case types
and associate a predefined series of activities with them. When you create a new case, you
typically create a series of scheduled activities that need to be completed as part of that case.
As the case progresses, you can record new activities, or series of activities, as part of the case.
For more information see the section on CiviCase.
26
9. EXTENDING CORE DATA
This chapter explains how you can extend the core building blocks (or objects) in CiviCRM by
adding custom fields that represent the data that you want to collect. For example, you can
extend organisations with a set of check-boxes about the clients that they serve. You can also
restrict custom fields to certain types of that object. For example, you might have a custom field
for one type of contact, students, listing the subjects they study.
Custom data fields are always stored in CiviCRM in custom field sets. Therefore, adding custom
data is a two-stage process:
1. Create a custom field set for an object.
2. Add custom fields to this set. (You may find it helpful to read the information about
custom fields first, but you will need to create the field set before you create the fields in
it).
To clarify, a field is a unit of information entered into the database, such as someone's primary
spoken language, or high school graduation date. A field set is a group of fields containing data
about a common object or area.
CUSTOM FIELD SETS
Custom fields are always part of custom field sets, and each set has a scope as wide or as
narrow as you choose. For instance, you might associate a custom field set called "nationality"
with all contact types, another set such as "immigration status" with a specific contact type (e.g.
Individuals), and yet another set with a specific component (CiviMember, CiviEvent), or with other
elements such as Relationships and Groups. The scope of a custom field set is one of the few
decisions that is irreversible (you will not be able to change it after creating it) so it is important
to consider carefully what you want to associate your custom field set with when you start.
When creating custom field sets, you should ask:
How will the fields in this set be used?
What types of contacts or records will these fields be appropriate for?
Will the fields have broad applicability, or are they relevant to a specific contact type,
event, contribution type, etc.?
Taking the time to think through these questions helps keep your application screens as relevant
and clear of superfluous fields as possible. For example, if your custom field set contains contact
characteristics such as a field for the "color of eyes", you should associate them with the
Individual contact type rather than the generic Contacts option, as this field would be irrelevant
to Organization and Household contact types. Another example would be if custom data is
specific to a particular event registration page. You should create this custom data for an Event
type Participant for the specific Event.
Depending on how many custom fields you are creating, you should also consider grouping the
fields topically. For example, you may associate 20 custom fields with Individual contacts, 12 of
which fields relate to an online membership directory. Rather than group all 20 fields in a single
custom field set, you may want to split them into two sets - one for the directory-related fields,
and a second for more general Individual details.
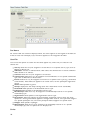
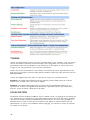
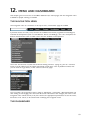
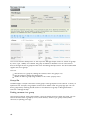
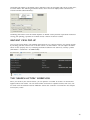
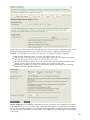
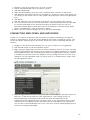
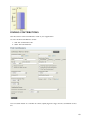
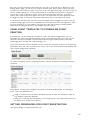
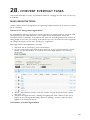
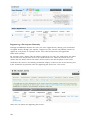
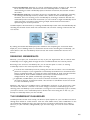
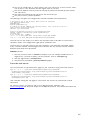
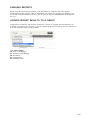
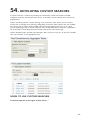
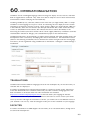
To create a custom field set and custom fields, go to: Administer CiviCRM > Custom Data > New
Set of Custom Fields. This form lets you assign a title to the field set, specify what type of
records it will be used for, select the display characteristics, and enter help text. The form
appears in the following image, and we'll describe each field.
27
Set Name
For custom field sets which are displayed inline, this name appears as the legend of the field set.
If this set uses the tab display style, the name appears as the navigation tab label.
Used For
You can use this option to ensure that the fields appear only where they are relevant. The
choices are:
Activity: fields that may be assigned to all activities or to a specific activity type, such as
Meeting or Phone Call.
Addresses: creates an address block, which allows the administrator to create additional
fields related to an address.
Contacts: fields that may be assigned to all contacts.
Contributions: fields that may be assigned to all contributions or to a specific contribution
type, such as Donations or Event Fees.
Events: fields that may be assigned to all events or a specific event type (e.g., Conference
or Fundraiser). These fields are applied to an actual event, not the participant registration
record.
Grants: fields specific to grants.
Groups: displayed in the Group settings (note that these fields are not searchable).
Household: fields specific to the Household contact type.
Individual: fields specific to the Individual contact type.
Memberships: fields that may be assigned to all membership records or to a specific
membership type.
Organization: fields specific to the Organization contact type.
Participants: fields that appear on the participant registration record. There are three
options for these: general fields applied to all registration records, role-type fields assigned
to a specific participant role, and event participant fields assigned to a specific event.
Pledges: fields specific to pledges.
Relationships: fields that may be assigned to all relationship records or to a specific
relationship type, such as "Spouse of" or "Employee of".
Order
28
This controls the order in which your custom field sets are presented when you have created
more than one set. Lower numbers (1, 2) are displayed above higher numbers (8, 9).
Multiple records
Each field usually contains a single option. For example, a person has either blue eyes or brown
eyes, not both. However, some fields are more complex and may require multiple entries, such
as a person's educational history. A single person may have multiple educational degrees, so a
custom field set about educational history should allow multiple records.
CiviCRM provides this functionality for custom field sets assigned to contacts (whether to all
contact types or to a specific type). To use this option, select the "Does this Custom Field Set
allow multiple records?" option. This option has several restrictions:
It
It
It
It
It
is applied to the whole field set, not to a particular field.
must use tab display, not inline display.
can be used only for Contacts, not for Activities, Contributions, etc.
cannot be used in profiles, such as those used for Events.
cannot currently be exported.
Display style
Custom field sets for Contact records are displayed either "inline" on the contact summary page
(the Summary tab), or as a new tab at the top of the contact record, along with Summary,
Contribution, Group, Note, etc. We suggest using tab display for infrequently accessed fields and
large sets of fields.
Custom field sets used for components, relationships, or other resources are always displayed
inline. Also note that custom field sets configured to handle multiple records will be displayed in
the Summary tab.
Is this Custom Field Set active?
If a custom field set is active, its fields can be viewed and changed. Otherwise, the fields are in
the CiviCVRM system but hidden from the user interface. This option can be valuable for
managing your data, especially if you are migrating from an existing database system.
For example, your existing database may have fields you would like to transfer to CiviCRM for
historical data keeping purposes, but plan to then deprecate or migrate to a new data structure.
Suppose you are importing membership records from an MS Access database. Each record in
Access has a unique ID (key) field, which has no direct benefit in CiviCRM. Rather than ignoring it
altogether, you could create a custom field to hold the value, import the records, and then
disable (keep the Activate option unchecked) the field, thereby hiding it from view and minimising
the interface clutter.
Though not visible to users, the field value is stored in the system and can be referenced at a
later date. For instance, if you ever need to investigate archived data for a possible discrepancy
or compare the field value with a printed record.
Individual fields can be made inactive in the form defining those fields, once the custom field set
is active.
Pre-form Help and Post-form Help
If you enter text in Pre-form Help, your help text appears above the form field, and if you enter
text in Post-form Help it appears below the form field. Use help at this level to provide
instructions related to the entire set of custom fields.
Other settings
29
You can specify that you want the custom field set to be "collapsed" on initial display. If you
check this box, only the title for this field set is displayed when the page is initially loaded,
because the fields are hidden. This is helpful for field sets that are infrequently used because it
reduces the screen real estate taken up when the page opens. A similar "collapsed" property is
available for the display of custom data in Advanced Search.
CUSTOM FIELDS
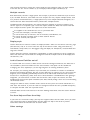
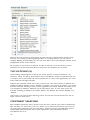
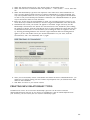
Once you have created a custom field set, you can create custom data fields within the set.
Click "View and Edit Custom Fields" followed by "New Custom Field" and you will see the screen
in the image below. We'll explain each of the options in this section.
After completing the field configuration options, click Save to record the field and return to the
field listing for your current custom field set, or click Save and New to save the field and begin
defining a new field. You can view a listing of all the custom fields in a custom field set at any
time by navigating to Administer > Customize > Custom Data and clicking View and Edit Custom
Fields.
With the exception of the data and input field type selection, all of the configuration options may
be modified after your initial creation of the field. You may also find it useful to preview your
custom fields, as well as the whole set of custom fields, as you are defining them. This is
particularly useful for checking the layout of radio button and check-box fields with a large
number of choices.
Field label
What you want to appear next to the field when it is displayed to the user. The text you enter
here is also the label shown when you export data. When using fields in a profile, you can
overwrite the Field Label. So on this screen you can choose names that are suitable for
administrators, and give more user-friendly names when exposing them in profiles.
Type
30
Custom fields can be of many different types, many of which you've probably encountered when
you have filled out forms on web sites. When you create a custom field, CiviCRM shows you a
dropdown list of types from which you can choose the type that best represents the data you
plan to store. The menu on the left (shown open in the following figure) indicates what kind of
data you want to store, whereas the menu on the right indicates the way you want to interact
with the user.
The types of fields are:
31
Alphanumeric (i.e. text and number fields), which can be of the following types:
Text: a simple area in which users can enter text.
Select: a dropdown box which limits choice to one selection.
Radio: a list of options where you can make one selection. Unlike a Select box, all the
options are visible on the screen at the same time.
Yes and No: a special kind of radio list with two contrasting options.
Check-box: a list of options that allows multiple selections.
Multi-select: a list of options in a single box. You can select multiple selections using
control+click.
Advanced Multi-select: two lists side by side in which items can be moved from one
to the other.
Autocomplete select: an autocomplete widget. The user can start typing, and when
the text entered uniquely identifies a selection, the field automatically fills in the
complete selection.
Note: a longer text box which allows multiple lines. Notes come in two flavours:
plain, and
rich text, which displays a WYSIWYG editor that allows HTML.
Integer, i.e. a whole number. This can be displayed as a:
text box
select box
radio list.
Number: i.e. any number that includes decimals, such as 3.175. This can be displayed as a:
text box
select box
radio list.
Money: similar to a number, but treated according to the local currency as configured in
CiviCRM's administrative pages. This can be displayed as a:
text box
select box
radio list
Date: a way of entering a date (and optionally time) value using a calendar widget. You can
set a range of years which can be selected prior to and after the current date.
State/Province: a list of available geographical locations as configured in CiviCRM's
Localization settings (Administer > Configure > Global Settings >> Localization). Can be
offered as either a select box or a multi-select box.
Country: a list of geographical locations. Can be offered as either a select box or a multiselect box.
File: offered as a browser where the user can select and upload a file.
Link: an active internet hyperlink.
Contact Reference: an autocomplete widget for an existing CiviCRM contact.
We suggest you experiment with creating different field types to get an idea of how they
behave. Different options have implications for use. For example, check-boxes enable you to use
OR as well as AND searches in Advanced Search, whereas multi-select will not.
Database Field Length
The database field length allows you to specify the number of characters that this field will
contain. You should normally leave this at the maximum. In certain cases (for example if you
are dealing with extremely large field sets) it might make sense to shorten this field to improve
performance and decrease storage space, but setting a shorter length won't make any
difference to the vast majority of users.
Order
Controls the order in which the fields appear. You may assign the order in the field edit form, or
use the up/down icons on the main field listing table to adjust the field presentation. By default,
new fields appear at the bottom of the field list within a set.
Default Value
32
Where applicable, you may designate a default value for a field. This value is automatically
displayed or selected when users go to a form containing this field. Note the format required for
date fields (YYYY-MM-DD).
Pre-form Help and Post-form Help
Ideally, your field name is self-explanatory and users will immediately know what to enter. But in
those cases where there is some ambiguity, or where you wish to help regulate how a certain
field is used, you may enter help text here. If you enter it in Pre-form Help, your help text
appears above the form field, and if you enter text in Post-form Help it appears below the form
field.
You help text identified appears in all uses of the field in administration pages and is inserted as
the default help text when fields are assigned to a profile. The person creating the profile can
remove or change the help text there without impact on the original custom field definition.
Required
When selected, this means that a value must be provided for this field before the form can be
submitted. Failure to do so will result in an error message directing the person to complete the
required fields.
If you want a field to be required only when a user fills out a particular profile, you can leave this
box unchecked but check the Required field in the profile.
Is this Field Searchable?
Makes this field appear in a panel of custom fields in CiviCRM's Advanced Search page. While you
may be tempted to mark every field as searchable, doing so may unnecessarily clutter the
Advanced Search custom field panel, when in fact certain fields will probably never be used in
that way. You may toggle this option on or off at any time, so don't be overly concerned about
arriving at a final decision when you first define a custom field.
Active
As with the active check-box in the form defining the custom field set, this box determines
whether the field is disabled or enabled when CiviCRM shows it to the user.
View Only
This allows you to designate a field as visible but uneditable. There are two general uses for this
field:
To store data imported from another system that you want available for reference to the
user, but do not want them to be able to modify.
To store data that is controlled through a custom PHP hook rather than through the user
interface. CiviCRM has a number of hooks defined that allow developers to modify data, as
well as customise forms and screens, without modifying the CiviCRM code base. Read the
chapter on hooks for more specific information.
Multiple choice options
For field types that involve selecting from a set of multiple options (such as Select, Radio, Checkbox, Multi-select and Advanced Multi-select) you are given the choice of either using an existing
set of options that you've already created for another custom field or creating a new set. You
can enter these values while creating the field, and you can enter the values later. The option's
label is displayed on the form, while the option's value is stored in the contact record. The label
and value may be the same or different.
If you choose to use the same set of options for several fields, you will be notified when making
any changes that this will affect an option set used by several fields.
33
When you create a new set, you have the option of initially entering up to ten multiple choice
options in a table. If you need more than ten options, you can create an unlimited number of
additional choices after saving this new field by using the Edit Multiple Choice Options link. Go to:
Administer > Customize > Custom Data > View and Edit Custom Fields > Edit Multiple Choice
Options. You can go to this screen at a later date to modify the label, order and active status
of any multiple choice option, as well as add more choices.
If desired, you can also mark one of the choices as the default option.
Inactive options are hidden when the field is presented.
CHOOSING BETWEEN FIELDS, GROUPS AND TAGS
Data fields, groups and tags are three major ways to associate information with contacts.
Although it can be tempting to just create a custom data field for every attribute of your data,
take time to learn about the alternatives. They offer powerful functionality that you may miss
out on if you rely only on custom data. Furthermore, using data fields for information stored
more appropriately as groups or tags can slow your system. Finally, proper use of groups and
tags makes it much easier for administrative staff to maintain the records.
Some tips that may help you choose are:
Data that can take a wide range of values, such as a person's address or biography, should
be stored in an alphanumeric custom data field.
Custom data fields can be grouped and displayed on their own tab on the contact's record.
As the name implies, Groups are used to group contacts. For instance, you'll probably
assign board members to one group, staff to another, volunteers to a third, and so on. If
you use Drupal, you can assign permissions based on group membership. You can also
define a group that CiviCRM automatically adds contacts to and deletes contacts from,
based on some characteristic. This feature is called a Smart Group.
If you plan to use CiviMail for mass mailings and you want certain contacts to get a
particular mailing, those contacts must be assigned to a Group. For instance, you may
want a press release to go only to certain contacts; those contacts should be assigned to a
particular group. This group could be a Smart Group.
Both Tags and Groups can be structured hierarchically. For instance, a group or tag labeled
Regions can have a subgroup or subtag for each geographic region your organisation covers
(see "Case study in hierarchical tags" later in this section).
Tags support more powerful search options than data fields or groups. For instance,
visitors can search through multiple tags with both AND and OR operators. Data fields
support only lists of words (which is effectively the same as an AND operator), except for
fields represented as check-boxes, which support OR operators.
Tags have a more sophisticated user interface than data fields or groups. The interface
allows the visitor to add and remove tags without reloading the page in edit mode.
Custom data fields can be assigned to a specific record type (e.g., only households),
whereas tags will be assigned to all types once the tags are defined.
34
10. USING CIVICRM PROFILE
A profile is a collection of fields (both predefined and custom) from your database. By creating a
profile you are able to take only those fields relevant for a specific purpose, such as collecting
information about a person registering for an event or displaying a directory of members on your
website. The diagram below provides a visual explanation of how existing fields are assigned for
use in a profile.
SCENARIOS
Profiles provide powerful tools for collecting information from your constituents as well as sharing
that information through your website. These features can save significant staff time by allowing
people to update their own data, and you can display up-to-date information from your database
in a variety of ways.
For example, a membership-based organisation can provide a searchable membership directory
on their website that is updated as soon as a new member joins. Another example is a form
where people can sign up to receive emails from your organisation. Once submitted, they are
automatically added to the correct email list. Profiles can also be embedded in online contribution
or event pages to collect additional information about the constituent.
This section will outline how to use profiles for both collecting and sharing data.
OVERVIEW
Profiles provide an flexible set of options for creating forms, directories, and much more. Think
of a profile as providing a window into your data. Just as you can have many windows in a house
giving different views of the various objects inside, you can have multiple profiles which refer to
the same or different fields.
There are many ways that profiles can be used:
35
Forms: a profile can be used as a form to collect information from your contacts. You can
also add profiles to contribution, membership sign-up, and event registration pages to
collect additional information from donors, members, and event participants. Profile forms
can also be used as simplified data entry forms.
View/edit user account (Drupal only): it is often useful to allow your constituents to
manage their own data through your website. This use of profiles allows people to edit
their information when they are managing their Drupal account; this information is then
automatically updated in CiviCRM.
Website user registration: you can include a set of fields in the new account registration
form (Drupal) or create a profile that includes website user registration fields (Joomla!).
Directory: a profile can be used to create a searchable directory for visitors to your site.
Search results: using profiles allows you to display selected fields in the results of an
advanced search.
Batch data updates (mass updates): there is often a need to update a large number of
records all at once; this process can be streamlined using profiles.
Another important point about profiles is that the same profile can be reused in multiple ways.
COLLECTING DATA FROM CONSTITUENTS
This section reviews the different methods by which you can use profiles to collect information
from your constituents. A later section will discuss how to share information from CiviCRM with
your constituents.
Volunteer sign-up form
Let's walk through an example of a profile used as a volunteer sign-up form. This simple form
includes fields for First Name, Last Name, and Mailing Address. It also includes a reCAPTCHA
widget to protect your site from automated abuse (described further below).
To build a a form similar to this one:
36
1. Go to: Administer > Customize > CiviCRM Profile and click on Add CiviCRM Profile.
2. Give the profile a meaningful name, and mark it to be used for a Profile:
3. The next two text fields allow you to include help text to assist the person filling out the
form.
4. The remaining options are listed under Advanced Settings (click on the gray bar to expand
this section):
1. Limit listing to a group: this is very important. If the profile is used for a searchable
directory, by default CiviCRM will expose every record in your database; this is not
ideal in many cases. Use this setting to limit the available records to contacts who
are part of a regular or smart group. For example, if an organisation needs to limit a
profile listing to show only active members, they can create a smart group of all
members that have a status of New and Current. They then limit the directory to
only show contacts in that smart group. Remember, smart groups are dynamic lists
of records; when new memberships are added, the corresponding contact will
automatically be included in the directory.
2. Add new contacts to a group: this is applicable when using a profile as a sign-up
form. You are able to directly add all the contacts who fill out the profile form to a
particular group. For example, if your profile form asks contacts to offer their
services as a volunteer, then all those who fill out the form can be automatically be
added to a volunteer group.
3. Notify when profile form is submitted?: who in your organisation should receive
an email when someone fills out the form? Enter their email address here. If you
want to send email to multiple addresses, separate them with a comma.
4. Redirect URL: when someone clicks Save to submit the form, do you want to take
them to a specific URL? Normally you would create a special thank-you page on your
website to redirect people to. If this field is left blank, the user will be directed to a
page which displays the information they've just entered (a profile view page). This
setting does not apply if you embed your form in an event sign-up or contribution
form.
5. Cancel Redirect URL: similar to the previous item, what is the URL you want to
redirect people to if they click Cancel on the form? Again, this setting does not apply
if you embed your form in an event sign-up or contribution form.
6. Include reCAPTCHA: CAPTCHA is a type of spam blocking software that requires
the visitor to fill in text generated from a graphic. This prevents automated spiders
(robots) from completing the form. It is highly recommended that you include it. You
must have configured a free reCAPTCHA account before enabling this. Go to
Administer > Configure > Global Settings > Miscellaneous Settings to configure your
account (click the help icon for on that form for detailed instructions).
7. What to do on duplicate match: use this option to control what happens when the
contact data submitted from this profile matches an existing contact record. Options
are to update the matching record, create a duplicate record, or give the user a
"duplicate record" warning (in which case their input will not be saved). This setting is
ignored if the profile is embedded in an online contribution, membership sign-up or
event registration form. In these cases, a contact match always results in the
transaction being linked to the matching contact. Note that if there are multiple
matching contacts, the first matching record is used.
8. Proximity search: if you are using this profile as a search form, you can choose to
include proximity searching. When enabled, a proximity search block will be added to
the search criteria. This block contains fields to set the proximity start address, and
a field to set a "radius" (distance from that address). Set the proximity search as
required if you want all searches using this profile to force the user to enter a start
address and a radius.
Once you have saved the profile settings, it's time to add fields to the profile. If you plan to
reference custom fields in a profile form, make sure that those fields have already been created.
Some important notes on adding fields:
37
You can change the name of a field label for the profile. For example, the Postal Code field
can be renamed Zip Code if your audience is more familiar with that term.
Certain fields can be required (must be filled out). In this scenario, we would want to make
at least First Name and Last Name required, and probably some sort of contact
information such as email address and/or phone number.
You can make a field View Only, which means it will be displayed on the profile form but
not editable (this setting is not relevant for the volunteer sign-up scenario).
If the profile is being used as a searchable directory, set the Visibility of any fields you
want to include on the search form to Public Pages or Public Pages and Listings. For our
volunteer sign-up scenario, we are only using the profile as a sign-up form, so we can set
Visibility to User and User Admin only. This ensures that other visitors can not view any
form data.
Linking to your Form
Once your profile sign-up form is built, it is ready to be used! There are several ways to do this.
Drupal: if you intend to give your volunteers access to some back-office CiviCRM functions,
you can add an item to the CiviCRM navigation menu which links to this form (from
Administer > Customize > Navigation Menu). These users will need be given the "access
CiviCRM" permission.
38
Drupal: create link(s) to the form using the following path:
http://www.myorganization.org/civicrm/profile/create?reset=1&gid=N where N is the
ID of the profile (each profile has a unique numeric ID which you can find by going to
Administer > CiviCRM Profile and checking the third column of the table).
Drupal: create a link or a menu item for logged-in users to edit their own information. If
they are logged in and go to the profile URL, the fields of the profile will be prepopulated
and they will be able edit any fields needing updating. The URL path here is:
http://www.myorganization.org/civicrm/profile/edit?reset=1&gid=N where N is the ID
of the profile.
Joomla!: use the Menu Manager to create a front-end menu item. After creating a new
menu item, select CiviCRM and choose the type of profile display you would like to use. In
the parameters pane, choose the specific profile to use.
A great feature is to provide non-logged-in users with the ability to view and edit their
contact information via a profile using CiviMail. To do this, insert the following link with
appropriate tokens as shown into a CiviMail message:
http://www.organisation.org/civicrm/profile/edit?reset=1&gid=N&
id={contact.contact_id}&{contact.checksum}
where N is the ID of the profile form you want them to use for editing. The token
{contact.checksum} generates a special link that prepopulates the fields of the profile with
any information that already exists for them in that profile. The special link lasts for 7
days from the day you send the mailing. This feature can be used for either Drupal or
Joomla! sites.
The last option is to not link directly to the profile at all, but simply embed the profile form
into any page on your website - or ANY website, for that matter. On the Profiles
Administration page, click more. There is an option called HTML Form Snippet. Clicking it
takes you to a screen where you can copy the raw HTML code and paste it into any page
on your site or any website where you want to collect information. Make sure the
reCAPTCHA feature is NOT enabled for this profile; reCAPTCHA requires dynamic page
generation so submitting a standalone form with reCAPTCHA enabled will always result in
an error.
DATA ENTRY TOOL
If you have volunteers or interns who perform manual data entry for your organisation, you can
make their task easier by creating a profile form which shows only the fields they need to input.
This greatly simplifies data entry and reduces the chance of data being incorrectly entered.
INCLUDING PROFILES ON EVENT REGISTRATION AND
CONTRIBUTION PAGES
Often you will want to define certain fields for inclusion in event registration and contribution
pages. This process is similar to the volunteer sign-up example above. The only significant
difference is that you can include fields in your profile that are specific to participant records (for
event registration forms) and contributions (for contribution pages). Read the sections covering
creating contribution pages and event registration pages for more information.
INCLUDING PROFILES IN DRUPAL'S USER REGISTRATION
SCREEN
For websites that have logged-in users, you may want to allow people to provide additional
information as they register for an account on your website. Similarly, when people fill out a
profile form you may want to encourage (or force) them to sign up for a user account.
To include a profile form during the user registration process:
39
1. Create a profile that is used for User Registration:
2. Add the fields you want people to fill out as they register, using the same process
described above. Make sure the field visibility is set to Public User Pages.
INCLUDING PROFILES IN DRUPAL'S MY ACCOUNT SCREEN
You can embed one or more CiviCRM profiles directly into Drupal's My Account screen. This
makes it easy for logged-in users to review and update their information whenever they visit
their My Account page.
To create a profile for this purpose:
1.
2.
3.
4.
Create a new profile, or navigate to an existing profile and click Settings.
Select View/Edit User Account in Used For.
Click Save.
Add the fields you want people to be able to edit from their Drupal My Account page.
NEW ACCOUNT CREATION DURING PROFILE SIGN-UP
If you want your constituents to create a Drupal or Joomla! account when filling out a profile, you
can enable this with the "User account registration option" under Profile Settings > Advanced
Settings. Anonymous (not-logged-in) users will then be invited (or required) to create an account
when they visit the profile. Logged-in users will just see the profile fields.
You must include a Primary Email Address field in the profile for this feature to function properly.
This feature also works when the profile is embedded in an online contribution page or event
registration page. Hence you can invite or force anonymous visitors to sign-up for an account
when they register for an event.
SHARING INFORMATION
Profiles and directories
Many organisations have data they would like to display on their website. Historically this has
been difficult because it required updating the same data in two places - a website and a
database. Using CiviCRM profiles solves this problem because it allows you to expose data from
your database on your website while only needing to manage and update the data in CiviCRM.
For example, an organisation called Native Americans in Philanthropy (NAP) wanted to create a
membership directory that their members could use to search and connect with other fellow
members. Before CiviCRM, they would create a very expensive annual print directory and mail it
to every member. This process was time-consuming and expensive, and some data would be
out-of-date before the members received their directory. Switching to CiviCRM meant significant
resource savings and, because their website became a portal for their members to connect, it
helped to advance their mission.
To build your directory:
40
1. Go to: Administer > Customize > CiviCRM Profile.
2. Click Add CiviCRM Profile.
3. Set Used For to Profile:
4. Advanced Settings: there are a few options under advanced settings that are helpful when
using profiles for directories.
1. Enable mapping: a really cool feature available in CiviCRM is to allow visitors to map
contacts in your directory using Google or Yahoo! maps. They can then obtain
directions to a record's address dynamically. To use this feature, you must have
already enabled mapping under Administer > Configure > Global Settings > Mapping
and Geocoding.
2. Include profile edit links: check this box if you want to include a link in the
directory listings to allow people to edit the profile's fields. Only users with
permission to edit the contact will see this link. More often than not you will not
need to enable this setting as it is not commonly used in the membership directory
scenario.
3. Include Drupal user information (Drupal only): check this box if you want to include
a link in the directory listings to view a contacts' Drupal user account information
(e.g. their My Account page). This link will only be included for contacts who have a
user account on your website.
Now it's time to include the fields that will make up the directory. For profiles used as directories
you have total control over which fields:
are searchable in the directory
appear in the results columns of your search
appear in the record detail View page.
The important options you must configure in the fields for directory purposes are shown below:
41
Visibility for all fields in your directory must be set to Public Pages or Public Pages and
Listings. The difference between these two options is that those configured as Public
Pages and Listings will have the field in detail view hot-linked, enabling the user to generate
a follow-up search for other records which also have that same field value. For example,
you might set City to Public Pages and Listings. After the user conducts a search and views
the details for a record they can click on the city value and run an immediate search. The
search will run as if they had selected that city in the profile search screen.
The Searchable option determines if visitors to your directory can search the directory by
this field. In common directory uses, almost every field is set to searchable. The more
fields you set to searchable, the more power you provide to your visitors to find the
information they need.
The Results Column check-box determines if the the field is displayed as a column in the
list of results. For example, your directory may have a field for website, and if you set the
website field to appear in the results column, it will appear in the results table. If you do
not check the results column the field will still appear in the view mode for a record. In
other words, checking Results Column? will allow the field to appear in the results column
AND in detail view mode.
The image below shows the search mode for our membership directory.
Once you hit search you get this result set. Profile fields that have Results Column checked are
shown in the listing.
Clicking the view link gives you more details about the constituent, showing all profile fields.
As we've seen, building a directory for your website can provide a valuable tool for your
constituents.
Linking to Your Directory
You have several options to link to your directory:
42
Drupal: link to the directory search page using this path:
http://www.myorganization.org/civicrm/profile?reset=1&gid=N where N is the ID of the
profile directory.
If you add &force=1 to the above URL it will directly show a result set.
If you add &force=1&search=0 it will hide the search criteria and directly show the
result set.
Joomla!: use the Menu Manager to create a front-end menu item. After creating a new
menu item, select CiviCRM and choose the profile search option. In the parameters pane,
choose the specific profile to use.
You can also prepopulate any search criteria in the URL. These options are described here:
http://wiki.civicrm.org/confluence/display/CRMDOC/Linking+Profiles
OTHER PROFILE USES
Search results
Searching is outside the scope of this section but, assuming you are familiar with searches, you
may wish to change the columns used to display the results of an advanced search. To do this:
1. Create or open a profile and mark it as used for Search Results:
2. When adding fields to this profile, you will need to set Visibility for the fields to Public Pages
and check the Results Column box.
When conducting your advanced search, use the Search Views dropdown menu in the top right of
the page to select your profile.
Batch updates
The final way that profiles can be used is to perform batch updates of data. For example, you
have a custom field called "volunteer interests" and you want to update the volunteers group
with a certain interest. You can easily update the entire group using a profile.
1. Create or open a profile and mark it as used for Profile:
No other profile settings are relevant for this type of usage.
2. Add your fields to the profile. Only add the fields you want to batch update. In the above
example, the only field you would need is your custom "volunteer interests" field (contact
name is always displayed when doing batch update). Remember, fields added to the profile
must all be of the same contact type. You cannot add fields that are specific to both
organisations AND individuals.
Once your profile is created, and you have conducted your search, select Batch Update via
Profile from the actions dropdown menu and click Go. Then select the profile you want to use.
43
You will see a grid with the fields in your profile. You can update each field and row individually. If
there is a field where you want to enter the same value for ALL records, you can enter that
value in the first row and then click on the "copy values" icon to the left of the column header.
This will copy the field value to all the rows in your grid.
Don't forget to click the Update Contacts button at the bottom of the page to save your
changes.
Batch update limitations
You cannot perform batch updates for different types of contacts (individuals and
organisations, for example) at the same time.
If you wish to update participant fields, you must do the update from a Find Participants
search (and only include participant fields in your profile).
You may only perform a batch update for 100 records at a time.
COMBINING RECORD TYPES IN A PROFILE
A profile usually contains fields of one record type. For example: First Name and Last Name
(Individual fields). But in some cases, such as online event registration and online contribution
pages, you can combine fields from two different record types (e.g. Individual + Participant fields
or Individual + Contribution fields). You can also combine Individual fields with general Contact
fields (e.g. Last Name + Email Address).
If you try to combine fields with an unsupported combination of record types, you'll get an error
when you try to save the field.
44
11. INSTALLATION
Before reading further, please be aware that much of the information contained here is intended
for technicians and may be difficult to understand if you have little or no experience in setting up
web applications. If you don't understand this topic, you may wish to either seek help, or point
your organisation's technical staff to this material.
PREREQUISITES
CiviCRM must be installed on a computer that has been configured with a web-server, PHP, and
MySQL. Some people prefer to try out CiviCRM on their own local computer before installing it
on a dedicated web-server. If you are doing this and don't have the pre-requisites just
mentioned, you can download packages from the Internet such as WAMP, XAMPP, MAMPP and
LAMP, which will quickly install an Apache web server, PHP, and MySQL. (The first two packages
are for Windows and the second two are for the Macintosh and Linux respectively).
Before you can begin installation, you need to decide whether you are going to use CiviCRM
integrated with Drupal or Joomla!. Refer to the appropriate section in the online CiviCRM
Installation Guide for the latest system requirements and specific installation steps:
http://wiki.civicrm.org/confluence/display/CRMDOC/Installation+and+Upgrades
NETWORK ACCESS
Once you are ready to start using CiviCRM in your organization, you'll probably want CiviCRM to
be available on the Internet. However, some organizations only want internal staff to have
access. In this case they may choose to install CiviCRM on an intranet or local area network.
UPGRADES
New versions of CiviCRM are released two or three times a year, and you will need to apply
upgrades to your CiviCRM site periodically in order to take advantage of new features and
improvements. It's important that you plan for the resources (people and time) required to apply
upgrades to your site. You need to plan on testing upgrades on a copy of your live site to make
sure the process runs smoothly. It's also critical to make backups of your site and database prior
to running an upgrade.
Refer to the appropriate section of the online CiviCRM Installation Guide for specific upgrade
procedures. Be sure to select the procedure that is targeted for the environment you are
running (Drupal or Joomla!), and the version you are upgrading to.
CONFIGURATION
Now that you have CiviCRM installed and running on your web-server, it's time to review the
initial configuration tasks which allow you to customize CiviCRM for your organization.
You can easily access each of the configuration screens described in the following screen from
the Configuration Checklist. Log in to your CiviCRM site and navigate to Administer CiviCRM ->
Configure -> Configuration Checklist. This section will cover the general tasks, while componentspecific configuration will be covered in each component section.
45
TOKENS
Tokens are special blocks of text that refer to specific fields in your database. They are used to
control what fields are included in address display and mailing labels, and can also be used to
personalize emails. This is described in more detail later in this chapter. If you've used "mail
merge" in your word processor, you've already used tokens.
Tokens are always surrounded by curly brackets, and include the record type followed by the
field name. An example is {contact.street_address}. Address values are taken from the contact's
primary location.
Tokens are skipped when they refer to a field that is empty for a particular contact.
EXAMPLE: The default Individual Name Format includes {contact.middle_name}. If a contact
doesn't have a middle name, that token is skipped.
EXAMPLE: The default Mailing Label format includes {contact.supplemental_address_1} on a
separate line. If there is no supplemental address for a particular contact, that entire line is
omitted - there will not be a blank line in the label.
LOCALIZATION
Localization involves adapting CiviCRM for use in a specific country or language by translating the
text displayed on the screen and setting region specific formats for dates and money (including
currency). By default, CiviCRM is localized for the United States. If you are using CiviCRM in a
different country, need to store contact addresses that appear in countries other than the
United States, or want to use CiviCRM in another language, you will need to review and update
the values on this screen.
46
CiviCRM has been translated into a number of different languages. These translations are
contributed by community members. So your first step is to determine if a complete translation
exists for the current version by visiting the Translation Server home page at
http://translations.civicrm.org/. If you find a completed translation, you can download it and
select it on this screen. Otherwise you will need to consider whether you have resources for
contributing a translation.
It is also possible to configure your site to support multiple languages. In this mode, your users
will be able to choose from a list of available languages after logging in. You can also create and
store multi-language versions of text. Examples include custom field labels, an online contribution
page, campaign information, and event descriptions.
Further reading:
Localization overview - http://wiki.civicrm.org/confluence/display/CRMDOC/CiviCRM+Localisation
DOMAIN INFORMATION
Use this screen to enter identifying information for the organization or entity which "owns" this
CiviCRM installation. The organization name and address are used to identify your organization in
CiviMail mailings when you include the domain.name and domain.address tokens.
You should also enter a valid email address belonging to your organization, which will be used as
the From fieldin system-generated (automated) emails.
SITE PREFERENCES
This screen allows you to modify the screen and form elements for the following tasks:
Viewing Contacts - Controls the tabs displayed when viewing a contact record. EXAMPLE:
If your organization does not keep track of Relationships, uncheck this option to simplify
the screen display. Tabs for Contributions, Pledges, Memberships, Events, Grants and
Cases are also hidden if the corresponding component is not enabled.
Editing Contacts - Controls the sections included when adding or editing a contact record.
EXAMPLE: If your organization does not record Gender and Birth Date for individuals, then
simplify the form by unchecking Demographics.
Contact Search - Controls the sections included in the Advanced Search form. EXAMPLE:
If you don't track Relationships, you will not search for that section. Simplify the form by
unchecking this option.
Contact Dashboard - Allows your constituents to view the groups they are subscribed to,
their contribution history, event registration information and more. You can control the
sections that should be included in the dashboard here. EXAMPLE: If you don't want
constituents to view their own contribution history, uncheck that option.
WYSIWYG Editor - The editor provided to users to enter text in fields that allow HTML
formatting (such as the introductory section for your online contribution pages). You can
choose either CKEditor or TinyMCE. It's a good idea to try out both and see which is more
comfortable for you and your users.
Individual Display Name - Display name format for individual contact display names.
Individual Sort Name - Sort Name format for individual contact sort names.
ADDRESS SETTINGS
CiviCRM allows you to modify the default fields for adding and editing contact and event address
data. You can also change the address field layout used for screen display and mailing labels.
Review the out-of-the-box defaults by adding a new contact record and noting the address fields
provided on the form. Save the record and note the order in which the fields are displayed on
the Contact Summary screen. If you plan on generating mailing labels for contacts, review the
label layout (select Mailing Labels from the -actions- drop-down after doing a search using the
Find Contacts menu option).
47
After reviewing the default fields and layouts, review the Address Settings screen and make
changes as needed.
Mailing Labels - Controls formatting of mailing labels here. The default format is:
{contact.addressee}
{contact.street_address}
{contact.supplemental_address_1}
{contact.supplemental_address_2}
{contact.city}{, }{contact.state_province}{ }{contact.postal_code}{contact.country}
You must include the {contact.addressee} token here in order to include the name of the
addressee in your labels. Users will be able to select from a variety of label types
corresponding to the label manufacturer code when they generate the labels from a list of
contacts. It's a good idea to test your format with the type of label and printer you plan on
using to verify spacing.
Address Display - Controls the layout of contact and event location addresses displayed
on CiviCRM screens. The default format is:
{contact.address_name}
{contact.street_address}
{contact.supplemental_address_1}
{contact.supplemental_address_2}
{contact.city}{, }{contact.state_province}{ }{contact.postal_code}{contact.country}
TIP: This format applies to event locations, despite the use of the contact record type in
the layout. The {contact.address_name} token is particularly useful for events where you
need to include a location name (e.g. "Smithson Hall").
Address Editing Fields - Modify the available address editing fields here. You can hide
fields that you don't plan on using in order to simplify the forms. EXAMPLE: If you don't
plan on recording OpenIDs for contacts, you can uncheck that field.
Street Address Parsing - CiviCRM uses the US Postal Service's (USPS) Postal
Addressing Standards to parse an address into fields to hold the address elements:
Street Number, Street Name, and Apt/Unit/Suite. It's best \to enter address
information that conforms to the Postal Addressing Standards, not only for
consistency in your data, but also to best take advantage of the the Street Address
Parsing function. You can edit and or view the parsed address by clicking on Edit
Address Elements next to the Street Address field of the Address Area of the
Summary tab when viewing a contact record. You can learn more about USPS'
Postal Addressing Standards at http://pe.usps.com/text/pub28/welcome.htm.
Address Standardization - CiviCRM includes an optional feature for interfacing to the
United States Postal Services (USPS) Address Standardization web service. You must
register to use the USPS service at http://www.usps.com/webtools/address.htm. If you are
approved, they will provide you with a User ID and the URL for the service. The URL
provided by USPS will not be prefixed with "http://". When entering this URL into the
CiviCRM settings field, you must prefix it with "http://".
MAPPING AND GEOCODING
CiviCRM includes support for both the Google and Yahoo mapping services. These services allow
your users to display contact addresses and event locations on a map. To enable this feature,
select your mapping provider and obtain a key for your site from that provider.
Once a mapping provider is enabled, your contact and event records will be automatically
geocoded (the latitude and longitude for that address is inserted) as you add or edit address
data.
SEARCH SETTINGS
These let you adjust search behaviors such as the use of wildcards and which data to include in
quick search results. Adjusting search settings can improve performance for large datasets.
48
A wildcard character is a special character that can be used to substitute for any other
character or characters in searches. CiviCRM allows you to use the percent (%) character to
substitute for zero or more characters, and the underscore (_) character to substitute for any
single character. Wildcards are useful for broadening your search results.
EXAMPLE: Typing 'Volunteer%' as your Activity Subject will match any record whose subject
starts with "Volunteer" (e.g. "Volunteer for Open House" or "Volunteering Opportunities").
Automatic Wildcards - By default, when users search for contacts by Name, the Search
interface treats the text as if it was surrounded by percent signes. EXAMPLE: Searching for
'ada' will return any contact whose name includes those letters - 'Adams, Janet', 'Nadal,
Jorge', etc. Disabling this feature will speed up searches significantly for large databases,
but will make users explicitly use wildcard characters ("%" or "_") for partial name
searches.
Include Email - By default, when users search contacts by Name, the Search interface
also searches for the text in email addresses. Disabling this feature will speed up searches
significantly for large databases, but users will need to use the Email search fields (from
Advanced Search, Search Builder, or Profiles) to find contacts by email address.
Include Nickname - By default, nicknames are automatically not included when users
search by Name. Change this value to Yes if you want nicknames to be included.
Include Alphabetical Pager - If disabled, the alphabetical pager will not be displayed on
the search screens. This will improve response time for search results on large datasets.
Include Order By Clause- If disabled, search results will not be ordered. This will improve
response time for search results on large datasets significantly.
Default Contact Search Profile - You can select a Profile to override the columns
displayed by default in Find Contacts search results.
Smart group cache timeout - Smart groups are basically saved searches. The list of
contacts for each smart group is cached in the database in order to avoid running the
saved search every time you access a smart group. This field determines the number of
minutes to maintain the cache before refreshing it. The default value of 0 means the
cache is emptied immediately when any contact is edited or a new one is added. If your
contact data changes frequently, you may want to try setting this to a value of 5 minutes
(or even longer) to reduce processing load on your server. The drawback of delaying the
refreshing of the cache is that old data will still be served up to users for a few minutes
after new data is added.
Autocomplete Contact Search - If enabled, selected fields will be displayed in
autocomplete dropdown lists and the "Quick Search" box on the navigation menu. The
contact name is always included.
MISCELLANEOUS: VERSION CHECKING, RECAPTCHA, USE
TRASH, LOGGING
Use the Miscellaneous Settings screen to configure and control the following behaviours:
49
Dashboard Cache Timeout - The number of minutes to cache dashlet content on the
dashboard.
Contact Trash and Undelete - If enabled, deleted contacts will be moved to the trash
(instead of being destroyed). Users with the proper permission are able to search for the
deleted contacts and restore them (or delete them permanently).
Logging - If enabled, all actions performed on non-cache tables will be logged (in the
respective log_* tables). By default, these tables will be created in the same database.
However you can configure CiviCRM to write logging tables to a different database by
editing your site's civicrm.settings.php file. Specify the separate logging database in the
CIVICRM_LOGGING_DSN setting. After enabling this feature you can review changes to
contact records using the Contact Logging Report. Go to Reports > Reports Listing >
Contact Logging Report (Summary).
Version Checking and Statistics Reporting - This feature automatically checks the
availability of a newer stable version of CiviCRM. New version alerts are displayed on the
main CiviCRM Administration page. Statistics about your CiviCRM installation are also
reported anonymously to the CiviCRM team to assist in prioritizing ongoing development
efforts. The following information is gathered: CiviCRM version, versions of PHP, MySQL and
framework (Drupal/Joomla!/standalone), and default language. Record counts (but no actual
data) are also reported. You can set this field to No if you are not comfortable with having
this information reported for your site.
Attachments - You can increase or decrease the maximum number of files (documents,
images, etc.) that can be attached to emails, activities, and grant records. The default
value is 3.
File Size - Maximum size of a file (documents, images, etc.) which can attached to emails
or activities. Note that your PHP configuration files, php.ini, should support at least as big a
file size as the value specified here.
reCAPTCHA - reCAPTCHA is a free service that helps prevent automated abuse of your
site by requiring users to read a random pair of words and type them into the form. To
use reCAPTCHA on public-facing CiviCRM forms, sign up at recaptcha.net, enter the
provided public and private reCAPTCHA keys here, then enable reCAPTCHA under the
Advanced Settings section in a Profile where you want it used.
If you want to use reCAPTCHA protection for online contribution, membership signup or event
registration forms, you'll need to configure a Profile with reCAPTCHA enabled, and then include it
in those forms.
CONTACT TYPES
Here you can modify the names of the built-in contact types (Individual, Household,
Organizations), and create or modify "contact subtypes" for more specific uses (e.g. Student,
Parent, Team, etc.).
SENDING EMAILS
CiviCRM will use the default From address defined here when sending automated emails. If you've
already entered an email address in the Domain Information screen, that address will be listed
here (as illustrated on the leftmost field of the following screenshot).
When users send an email using CiviCRM, their primary email address is used as the From
address by default. However, they can also select one of the general email addresses defined
here as an alternative.
Outbound email
50
If you are sending emails to contacts using CiviCRM, you need to enter settings which allow
CiviCRM to connect to your mail server. Such emails include sending receipts to contributors,
sending confirmations to people registering for events, and using CiviMail to send bulk mailings.
CiviCRM supports three different methods of connecting to a mail server: mail (the built-in PHP
mail function); SMTP (Simple Mail Transport Protocol); and Sendmail. Each method requires that
you enter specific settings. If you're unfamiliar with these terms, or unsure of the correct values
for these settings, check with your system administrator, ISP or hosting provider.
You should always send a test email after you enter or modify the settings. Simply click "Save
and Send Test Email"(shown in the following screenshot). An email will be sent to the email
address associated with your user login account. The From email address will be the default
From address you've configured in the previous section.
If CiviCRM is unable to send the test email, you will see a message on your screen with the
specific error and some suggestions for trouble-shooting the problem.
Disabling outbound email
If you do not want users to send outbound emails from CiviCRM at all, select "Disable Outbound
Email". However, if you disable outbound email, and you are using Online Contribution pages or
online Event Registration, you will need to turn off the automated receipting and registration
confirmation features (these are enabled by default). Otherwise your constituents will see error
messages after they've completed a contribution or registration.
PAYMENT PROCESSORS
Payment processors are companies that handle credit card transactions for merchants and nonprofit organizations and that transfer funds to the organization's bank account. If you plan on
using CiviCRM to accept online contributions, online membership signup and renewal or online
event registration, you will need to select and configure a payment processor for your site.
CiviCRM includes support for several different processors, and provides a way for third-party
developers to add support for additional processors based on their clients' needs. Each processor
has their own pricing structure and features, and you will want to investigate each available
option to determine the best fit for your organization. Refer to the "Contributions" section for a
list of factors to consider in selecting a processor.
The actual steps involved in configuring and testing your payment processor connection are
different for each processor. For more information, visit:
http://wiki.civicrm.org/confluence/display/CRMDOC/CiviContribute+Payment+Processor+Configuration
PERMISSIONS FOR ANONYMOUS USERS
Note: This section applies to Drupal sites only.
If you are using CiviCRM with Drupal, you will need to review Drupal's user permissions to ensure
that people can get to your signup forms, contribution pages, membership pages and event
registration pages.
You must be an administrator for your Drupal site to review and modify user permissions. Log in
to your Drupal site, and navigate to Administer > User Management > Permissions.The following
screen is displayed.
51
Review each of the permissions listed. You should enable them for the anonymous user role if
you want these features to be accessible to people who visit your site without logging in-outsiders registering for membership or events, for instance:
Make online contributions:
If you plan to use CiviContribute and want to allow online contributions, enable this
permission by checking the box.
View event info and Register for events:
If you plan to use CiviEvent and want to allow online event registration, enable both of
these permissions.
Profile listings and forms:
If you want to collect contact information from constituents or expose a searchable
directory using a profile, you must enable this permission.
Access all custom data:
You must enable this permission for any role which you want to view or for which you
want to edit custom data fields. This permission sounds like one that should be given out
with care, but in reality most sites give this permission to anonymous users because it is
required for simple tasks like filling in information about themselves in the data fields you
include in the event registration process. If your site uses Profiles that include custom
fields, make sure the roles that need to access these Profiles have this permission.
Now that you have reviewed all the basic configuration tasks, you're ready to begin exploring the
ways in which you can record and use contact data.
SYSTEM WORKFLOW TEMPLATES
Review and modify the templates used for system-generated emails, including contribution
receipts and event registration confirmations.
GETTING AROUND
12. Menu and dashboard
13. Contacts
14. Groups and tags
15. Searches and actions
16. Importing Data into CiviCRM
17. Deduping and Merging
18. Exporting Your Contacts
19. Postal Mail Communications
20. Everyday Tasks
52
12. MENU AND DASHBOARD
This chapter gives an overview of CiviCRM's dashboard (it's 'home page') and the navigation menu
available for people working in CiviCRM.
THE NAVIGATION MENU
The navigation menu is a small bar at the top of every "back office" page of CiviCRM.
...
It provides access to nearly every function of CiviCRM and is broadly organised into headings by
individual CiviComponents (such as Contributions, Events and Mailings), with a few exceptions for
Search and Administer, both of which cover all of the enabled CiviComponents.
The menu also features a Quick search field for finding contacts. Typing any part of a contact's
name or email address into the Quick search field will pull down a list of possible matches that
you can click on to go directly to the contact's summary page:
You can modify the navigation menu by going to: Administer > Customize > Navigation Menu and
then adding or rearranging menu items on the screen. Remember that changes you make to the
navigation menu will be seen by everyone who has the appropriate permissions to see the menu,
for better or for worse, so be careful when modifying the navigation menu.
THE DASHBOARD
53
When you first log into CiviCRM, the first page that you will see is the dashboard (CiviCRM Home).
The dashboard allows you to see important information about your site and CiviCRM by
displaying a series of "dashlets". A dashlet is a snippet of information about a part of CiviCRM:
many dashlets come with CiviCRM by default, and you or your administrator can create
additional dashlets that are specific to your organisation's needs. Some examples of dashlets
that come with CiviCRM are:
Donor Report: a bar graph of the amount of total contributions per month for the last five
months.
Activities: a list of recent activities that have been recorded by CiviCRM (this could include
emails sent to constituents, donations that have been made, or meetings that have been
scheduled in CiviCRM).
Membership Report: a table summarising information about Members tracked by CiviCRM
and broken out by month. This includes the number of Members of each type total
amounts of payments made and the number of contributions made, among other things.
You can add these dashlets to your CiviCRM dashboard by clicking the Configure Your Dashboard
button. You will see a list of dashlets that can be dragged into the right or left column of your
dashboard.
54
Clicking the Done button will allow you to save the dashlets to your dashboard. From now on,
you will see updates to the status of your dashlets every time you log in (if you'd like to check
and see any changes that have occurred more recently, you can always click Refresh Dashboard
Data - this will reload each dashlet and pull in any new information).
Almost any CiviCRM report can be made available as a dashlet. Select a report from Reports >
Create Reports from Templates. Update the report criteria as needed. For example, you may
want the dashboard version of the report to always show data for "This Quarter" or "This Year".
You can also choose to display the report as a table or as a bar or pie chart. Preview the report
display. Then check the "Available for Dashboard" checkbox under Report Settings. (Refer to the
Reporting section for more details on working with reports.)
55
13. CONTACTS
CiviCRM uses contact records as central hubs for data about your organisation's contacts. There
are three distinct contact types defined in CiviCRM, each suited to a common type of contact
your organisation may want to track:
Individual: any person your organisation wants to keep a record of.
Organization: this could be another non-profit, a company, a chapter of your organisation,
or a committee. You will generally want to create at least one contact of the Organization
type to represent your organisation. This is particularly useful when you are configuring
memberships.
Household: a family or group of people who share a physical location.
CiviCRM provides different fields for each contact type, according to the different kinds of data
you will probably want to track. For example, gender only applies to individuals, not organisations
or households, so the gender field is only available for Individual contact types and subtypes. You
can also define additional data that you want to collect and apply it to only one type. You could
choose to create a custom data field to record the Chairperson or CEO's name and only apply
this field to organisations.
ADDING A CONTACT
The simplest way to add a single contact to CiviCRM is to use the navigation menu at the top of
any non-public page. To create a new Individual, go to: Contacts > New Individual:
Note that the Contacts menu item allows you to create every kind of contact and contact subtype.
Clicking on New Individual will bring you to the New Individual form. All of the contact creation
forms are similarly arranged, with basic information (name, email etc.) at the top of the form
and more specific fields below grouped by type or subject in accordions (such as address fields,
communications preferences and any custom fields that you have added for the contact type).
You can fill out as many of these fields as you like, however it's recommended that you have at
least a name and email address (it is only required that you have first and last name OR email
address). Remember that there is no difference between the contact add and edit screens, so
you can always go back and make changes as needed.
Once you have filled out the form, you have the choice of three buttons to click:
Save will save the contact record and take you to the contact screen.
Save and New will save the contact and clear the form so that you can add another.
Cancel will discard the entered information and return you to your CiviCRM dashboard.
56
THE CONTACT SCREEN
The best way to understand contact management is to have a look at the different screens that
are used to store and display information about contacts.
You can find a contact from your CiviCRM dashboard (or any other CiviCRM page) by entering
part of their name or e-mail address into the Quick search box in the navigation menu. If you
leave the search box blank and click the Search button, it will find all the contacts in your
database.
Below is a search for "sa" that has returned Sam Jones, as well as other contacts with the letter
combination "sa":
CONTACT ACTIONS RIBBON
Across the top of all contact records is an Actions Ribbon with a variety of buttons that allow
you to perform actions related to the current contact. Clicking the Actions button will produce a
dropdown menu with a number of actions that can be performed on this contact. For example,
you could add a note to this contact, or record a new contribution, meeting or other activity.
Some of the activities you can perform here are:
To change any information about this contact, go to the editing screen by clicking the Edit
button. There is also a button to Delete the contact.
Click Print Summary to go to a print-friendly view of this contact's information, ready for
printing.
The vCard link will import the contact's details into your email client (don't do this if you
want your emails to this person to be recorded in CiviCRM).
Click Contact Dashboard to access the the screen that allows users to view and modify
their own group subscriptions, and see the history of their own contributions, memberships
and event registrations.
If you're using CiviCRM in conjunction with Drupal or Joomla, you may also see a link to View User
Record. This link is shown when the contact is a registered user of your site. It links to a CMSspecific User Account screen.
57
CONTACT TABS
A list of tabs underneath the Actions Ribbon break up the contact's information into related
chunks. We will cover the contact summary tab here in some depth, and then look at other tabs
that may be available to you depending on your configuration.
If you think that some of the tabs are not useful and will not be used in your deployment, you
can disable or enable specific tabs from Administer > Global Settings > Site Preferences. If you
don't see some of the tabs described below, you may need to enable them. The visibility of
some tabs is dependent on which components are enabled in your installation. For example, the
Contributions tab will be hidden if the CiviContribute component is disabled.
SUMMARY TAB
The summary tab gives you an overview of information about your contact. Here you will find
names, addresses and contact details. The information on this page appears fairly
straightforward, but take a closer look and you will find some pretty clever stuff is going on.
CiviCRM includes a complete set of fields "out-of-the-box" to store basic contact information.
These are usually referred to as built-in fields and include:
Name fields
Job title and employer
Phone numbers, email address(es) and instant messenger screen names
One or more mailing addresses. If Map this Address appears above an address, you can
bring up a map (either using Google Maps or Yahoo Maps, depending on your system's
configuration) showing where this person lives. If it doesn't show on your screen, this
feature hasn't yet been configured for your site. You can add map support from
Administer CiviCRM > Global Settings > Mapping and Geocoding.
Basic demographics (gender and birth date).
58
Note one small but important feature of the summary screen: if you have a number of long sets
of fields, it may become useful to collapse some of them. In the example below, Communication
Details has been collapsed, while Constituent Info - Individuals is expanded. Some field sets can
be set to be expanded or collapsed by default. This happens for example when a contact has
more than one location entered. The first one is shown by default, the rest of them will be
collapsed. Clicking on the header will toggle the status of the field set.
Name Fields
Each contact's name can include the following fields: Prefix, First, Middle and Last Names, Suffix
and Nickname. You don't have to use all of them, but they are available in case you want to
store all of this information.
If you wish to record a prefix such as Mr., Ms. or Dr. for your contact you can do so using the
dropdown menu on the edit screen. If you require other prefixes such as Sir or Father, you can
add these to the dropdown menu from Administer CiviCRM > Option Lists > Individual Prefixes
(Ms., Mr...). The same applies to name suffixes.
Locations
A location is a group of address-related fields consisting of phone, email and postal address field
groups.
CiviCRM can hold more than one location for a contact. For example, if a person has a home
address, a billing address and a work address, these can be recorded as separate locations. One
of these locations will be marked as Primary. It will be used for any postal mailings that you do.
You can explicitly choose which location will be primary for a particular person, or let it default to
the first one entered. If a person pays you by credit card, the details used for Billing Address in
credit card payments will be stored in the Billing location for the contact.
You can share addresses between contacts. For example, you may need to keep information
about individual contacts and the organizations where they work. When creating or editing the
"work" address for an individual, check the "Share Address With" box. If their employer already
exists in your database, you can select them from the quick search box that appears.
Otherwise, you can create the employer's organization record on the fly by selecting "New
Organization" from the "create new contact" dropdown..
You can also store multiple phone numbers and email addresses for each location. One of these
email addresses can be explicitly marked as the address which receives all bulk mailings (e.g.
emails your organisation sends using the CiviMail component).
RELATIONSHIPS TAB
Relationships are connections between contact records in your database. Each connection can be
named to describe the nature of the connection, and a contact may have many relationships to
other contacts in the database. In the example below you can see a list of Current Relationships
as well as a list of Inactive relationships. Contacts can have relationships with set start and end
dates. For example, a contact could have a relationship "Committee Chair" to an organisation for
a one year period. In order to track past Committee Chairs, you can keep a record of the
contact having an inactive Committee Chair relationship.
59
Another example of a relationship that might be tracked in CiviCRM is the Employee-Employer
relationship. Richard is an employee of the organisation Acme Org, and to store this information
in the database you can set Richard to be an "Employee of" Acme Org. You do this by creating a
relationship between Richard and his employer. Once you do this, you will be able to see this
connection from both Richard's and Acme Org's records.
The Employee/Employer relationship is a special one. If you look at the Summary tab again you
can see that the Current Employer field shows the name of the employer. This name is a link to
the ABC Org contact record. Entering in an Employer in this field is a shortcut way to define an
employment relationship. Whenever you fill in the Current Employer field, a record with a
matching name will be looked up and the appropriate relationship will be created. If no record for
this organisation exists, one will be automatically created before creating the relationship.
The Household Member relationship is used for connecting individuals with households. When
editing a contact, you can opt to "Share Address With" a household. You can either select an
existing household, or create a new one by selecting "New Household" from the "create new
contact" dropdown. When you have opted to use a household address for a contact, a link to the
Household's contact record will be displayed along with the usual address information in the
contact Summary tab. Using a household address for a contact also automatically creates the
Household Member relationship between the contact and household.
Apart from the two special relationship types, you can create and register any other type of
relationship. The Relationships tab shows all of a contact's existing relationships with other
contacts (individuals, households or organisations in the database).
To create a new type of relationship, go to Administer CiviCRM > Option Lists > Relationship
Types. Relationships can be also extended with custom fields if you need to store additional
information for them.
Additional powerful characteristics of relationships include the ability to set a start and end date,
or disable them manually if they are not valid anymore. This means that you can store the
history of relationships in your contact records.
ACTIVITIES TAB
The Activities tab does two things. First, it displays all your interactions with the contact over
time; this includes all CiviCRM's built-in activities like event attendance, contributions,
membership sign-up and renewal, phone calls, emails and user-defined activities. Second, it
allows you to record activities with contacts. Clicking on the icons at the top of the screen (Send
an Email, Meeting, Phone call) will bring up a screen where you can enter those details.
60
This tab can also be used to record any custom activities that you've defined for your CiviCRM
installation (from Administer CiviCRM > Option Lists > Activity Types). The ability to define
custom activity types, and extend them with custom fields provides a powerful tool for tracking
a wide variety of organisation activities. For example, you could choose to track activities such
as press releases, press conferences, site visits or voluntary work.
Activities are a great way to store interactions that happen at a specific time, or that link
specific people. If it is important for you to know who at your organisation carried out a task,
then record it as an activity. Another advantage of activities is that they record when something
has happened, which is useful if you need to report on the volume of activities performed during
a specific time period. You can record an activity between a given contact and multiple other
contacts by adding as many contacts as you like in the With Contact field on the Add Activity
form.
Activities usually have their status set to Completed or Scheduled, however you may add other
types of activity status as appropriate for your organisation.
CONTRIBUTIONS TAB
The Contributions tab shows any financial contributions made by the contact whose details you
are viewing, as well as a summary of the contribution activity of the contact (total amount of
contributions over time, total number of contributions, and average amount of contributions).
The Contributions tab also allows you to record off-line contributions using the Record
Contribution button, or record a credit card transaction on behalf of the contact (useful if the
contribution has been made by phone) using the Submit Credit Card Contribution button. Both of
these buttons lead to forms that allow you to select the contribution type in addition to the
normal contribution information collected from public contribution pages.
61
MEMBERSHIPS TAB
This tab displays the memberships a contact has signed up for. From this tab you are able to
add memberships and submit credit card payments for memberships that require a fee. You can
also renew or delete memberships from the "more" link on each membership in the contact's
existing memberships.
EVENTS TAB
The Events tab displays events related to this contact, whether they are events the contact has
registered for, attended, volunteered at or is any other of the user-configurable event statuses.
From this page you can register the contact for an event, and use the Submit Credit Card Event
Registration button if the event requires payment. The related payment will then appear up on
the contact's Contributions tab in the first row.
You can also modify the event information as it relates to the contact by clicking the Edit link.
For example, you can change the contact's event status from "registered" to "attended".
62
GROUPS TAB
The Groups tab shows the groups that the contact is a member of. Groups can be used in a
variety of ways including mailing lists and permissioning (ACLs).
You can add and remove the contact from groups, and see a history of groups the contact has
unsubscribed or been removed from.
The Status column displays who has added the contact to the group. Whether users can add
themselves to a group is one of the settings you can configure when creating a group. When you
set a group's visibility to "Public Listings" users can join via Profile forms. You may want to
familiarise yourself with the discussion on using Profiles for mailing list sign-ups covered in a later
section.
NOTES TAB
The Notes tab is a place where you can record random bits of information about a contact.
Generally you would use custom fields for information you plan to collect about your contacts,
but in some cases it may be useful to record additional, ad-hoc notes about a contact. Since this
information is unstructured, you should be careful about using the Notes tab, unless you know
that you or other people using your CiviCRM implementation will remember to look at that tab.
When creating a Note both the subject and the content are free-text fields (i.e. the subject field
does not have to be chosen from predefined options).
63
You can specify "Author Only" privacy for a note. This means that only the person who wrote
the note, or someone with "view all notes" permission (Drupal only) can view or edit it.
TAGS TAB
Tags are one way of categorising contacts in your database (other methods are Custom Data
and Groups). You can configure which tags you wish to use for your organisation. You can search
on tags and create Smart Groups based on them.
The tags next to Keywords are part of the Keywords Tagset. A Tagset is a specific grouping of
tags that you can create. Tagsets are non-hierarchical, and you can create a new tag in a tagset
simply by typing a new tag into the field. Existing tags that match what you type will also show
up as a list from which you can select.
CHANGE LOG TAB
This tab gives limited information about changes made to a contact record. It shows the change
date and who made the change, but not what was changed.
NOTE: Administrators can use the Contact Logging Report to get detailed information on changes
to contact records (who, what and when).
64
MODIFYING THE CONTACT SCREENS
After working with the contact editing and summary screens for a while, you may realise that
there are sections and/or fields that aren't useful for your organisation. The good news is that
you can easily hide some fields and sections. For example, if your organisation doesn't need to
store demographics information, you can remove it by configuring the Site Preferences:
Log in to CiviCRM using an account with Administer CiviCRM privileges.
Go to: Administer CiviCRM > Global Settings > Site Preferences.
Uncheck the Demographics box under Editing Contacts.
Click Save.
Similarly, if you want to remove (or add) fields in the postal address section:
Go to: Administer CiviCRM > Global Settings > Address Settings.
Check or uncheck fields under Address Editing.
Click Save.
65
14. GROUPS AND TAGS
Groups and tags are two key methods of organising data in CiviCRM. When used properly, both
allow for powerful segmentation and searching of your database.
Since both groups and tags are methods of categorisation, it can be difficult to determine
whether a tag or a group is more appropriate in a given situation. Identifying the differences in
their workflow and functionality will help you to decide which to use.
It can also be good to have a conceptual understanding of the differences between the two.
Though there are different takes on how tags and groups should be used, a common philosophy
is that tags should be used for descriptive categories and groups should be used for grouping
people within a cohesive entity that functions or will be treated as such. From this perspective,
things like volunteer, ally organisation, vegetarian, and musician would be tags with which you
could categorise contacts while Volunteer Committee, Allied Organisations Coalition, Vegetarian
Newsletter, and This Awesome Band With A Bad Name would be groups to which you could add
contacts.
GROUPS
Groups are an incredibly important feature within CiviCRM. In addition to their fundamental use
as collections of contacts that have something in common, they play a critical role in CiviMail and
Profiles, and can be used to set up advanced access rights (on Drupal). Well-defined groups are
one of the most important tools available when segmenting your CiviCRM contact database.
There are two kinds of Groups - Regular Groups and Smart Groups.
Regular Groups allows you to manually place contacts into a group. For example, you can
manually assign your organisation's board members to a Board of Directors regular group.
You can then easily send board-related emails to each person who is a member of the
Board of Directors group without having to search through CiviCRM and select each
member individually for the mailing.
Smart Groups are automatically populated groups that are configured to include contacts
that share a certain set of characteristics or activities. As contacts are added or edited,
CiviCRM automatically checks them and adds them to Smart Groups if they meet the
characteristics that you have configured. For example, you can create a Smart Group for
"2010 Contributors from California" that includes contacts who have made a contribution in
the year 2010 (an activity) and have an address in California (a characteristic). When new
contacts located in California make a contribution in 2010, they are automatically added to
this group. Another example is a Smart Group of all donors who have not yet been sent a
thank-you letter. As you send your letters, the donors receiving them will automatically
leave the smart group, allowing you to always have an accurate list to work from.
Group settings and functionality
Each group should have a clear, easily understandable group name and a description of the group
and its purpose, both of which will allow users to quickly figure out what particular groups are for
when working in different contexts (e.g. CiviMail). This clarity and specificity is especially
important once your organisation has amassed many different groups. If a group is created for a
specific person within your organisation, it is a good idea to mention in the description who the
owner of the group is, so that in the future someone can check if this group is still used or if it
can be deleted.
Groups can be assigned the following types:
66
Mailing List is used if you plan to use this group as a mailing list in CiviMail. This group type
is available for both Regular and Smart Groups.
Access Control (Drupal only) is used to assign CiviCRM access permissions to a set of
contacts. Only Regular Groups can be assigned the Access Control group type.
Visibility determines permissions for joining and removing contacts from groups. Select "User
and User Admin Only" if membership in this group is controlled only by authorised CiviCRM users.
Select "Public Pages" if you want to allow contacts to join and remove themselves from this
group via Registration and Account Profile forms.
Some organisations find it useful to create a hierarchy of groups. In CiviCRM, this is done by
creating one or more parent groups and then assigning other groups to them. When a user sends
a mailing to a parent group or searches for contacts in a parent group, all contacts in the
associated child groups are automatically included.
For example, an organisation that has a national office and 5 regional offices puts constituents in
each region into their own group. Then they create a National group which is assigned as the
parent group for all regional groups. The national office can now send mailings to the National
group, knowing that all contacts in the regional groups that are children of the National group will
be included.
Adding and removing contacts
You can add contacts to groups in multiple ways:
through the Tags and Groups section of the Contact Details edit screen
through a contact's Groups tab
by using the "Add Contacts to Group" batch action after conducting a search
and by clicking a group's Contacts link in Navigation Menu > Contacts > Manage Groups.
The first two methods also allow you to remove individual contacts from a group; the last two
methods allow you to add multiple contacts to groups at once.
Individual contacts can be added to a Group either in the contact edit screen or via the Groups
tab. Multiple contacts can be added to a group at once by conducting a search, and then
selecting Add Contacts to a Group using the More Actions menu. The second way allows you to
add multiple contacts to a group by going to Manage Groups, selecting Members for the relevant
Group and then using the Add Members to this Group option at the top of the screen.
Contacts can also be added to a group as a result of filling out a Profile (see below).
Managing Groups
To view and manage all groups, go to: Navigation Menu > Contacts > Manage Groups.
67
You can use the Find Groups form at the top of the Manage Groups screen to search for groups
by name, type, visibility and whether the group is enabled or disabled. You can also scroll or
browse through the list of groups further down the Manage Groups screen. This list includes both
regular and smart groups.
You can:
add contacts to a group by clicking the Contacts link in the group's row
edit the group by clicking the Settings link
disable or delete a group using the links in the "more" pop-up menu.
Group IDs
CiviCRM assigns a unique numeric ID to each group. These group IDs can be used for a variety of
operations. For example, the group ID can be used to define a URL for group sign-ups. You can
find a group's ID by checking the ID column in the tabled list of groups at Navigation Menu >
Contacts > Manage Groups.
Finding contacts in a group
The Contacts page for each group includes a form for finding contacts within the group. You can
search contacts within a group by name, email address, contact type, group status (added,
removed, or pending) and tags.
68
Creating and managing smart groups
Smart groups are created by conducting a search (either quick or advanced) based on the
criteria you'd like to use to determine who is automatically added to or removed from the smart
group, then using the New Smart Group batch action in the Actions menu on the search results
page. The smart group creation page is similar to the regular group addition page, except that it
displays the smart group criteria at the top.
Though smart groups are automatically maintained by CiviCRM based on the criteria you've set,
contacts can be manually added to or removed from a smart group whether or not they match
that criteria. For example, if someone unsubscribes from a mailing that is based on a smart
group, they will be recorded as removed from the group even if they still meet that smart
group's search criteria. Similarly, you can manually add a specific individual to a smart group. For
example, you can add someone who is moving away from a city to that city's newsletter smart
group so that they continue to receive the newsletter despite their address not matching the
criteria for the smart group.
To manage smart groups, go to: Navigation Menu > Contacts > Manage Groups and click the
Settings link for your chosen group. Smart group management pages include links for manually
adding contacts and editing the smart group's criteria. When you edit a smart group's criteria,
CiviCRM will update the members in the group and future members will be automatically added
according to the new criteria.
Using groups in a search
When using Advanced Search, if you select several groups in the Group list near the top, it will
treat the search as an OR search, and return results for contacts who are in any of the groups
you select. If you want to find contacts who belong to all of the selected groups, you will need to
use Search Builder.
There is also a very useful built-in custom search, "Include/Exclude Contacts in a Group/Tag",
that enables you to find contacts who are in one group but not in another, which you can find by
going to Search > Custom Searches in the navigation menu.
69
Groups and ACL (Drupal only)
Access Control Lists (ACL) provide finer grained permissioning than what is available through
Drupal's Permissions and Roles. Setting up ACLs requires a good understanding of the concept,
which is thoroughly explained in the online CiviCRM documentation here:
http://wiki.civicrm.org/confluence/display/CRMDOC/Access+Control
As with many processes, the key is to make sure you have assembled all the parts before you
try to join them together. In this case, you must set up the required Groups, Custom Data
Groups, Profiles and Roles before you can use them in ACL.
Groups and Organic Groups (Drupal only)
The Organic Groups CiviCRM module (http://drupal.org/project/og_civicrm) integrates Organic
Groups from a Drupal site with CiviCRM groups. This is useful for groups that require Organic
Group functionality on their website but also need to be tracked within CiviCRM. Once an Organic
Group of Drupal users are integrated into CiviCRM, the Drupal group can be used for mailings,
tracking address information, tracking activities or anything else normally done with CiviCRM
contacts.
Once the Organic Groups CiviCRM module is installed and enabled in Drupal it automatically
creates two CiviCRM groups for each existing Drupal Organic Group:
A normal group containing a contact record for each corresponding user who is part of an
Organic Group. This group is assigned the same name as the linked Organic Group.
An access control group containing the contact record of the administrator of the
corresponding Organic Group. This gives the OG group admin the ability to view and edit
members of their group in CiviCRM.
70
The groups are synchronised one way only, from the Drupal Organic Groups to CiviCRM groups.
When a new user is added to or signs up for an Organic Group, they are automatically added to
the corresponding CiviCRM group. If they leave the Organic Group then they are removed from
the CiviCRM group. If an Organic Group is deleted, the CiviCRM group is also deleted. However,
the reverse of each of this situations is not true; a contact added to the CiviCRM group will not
appear in the Drupal Organic Group, a contact removed from the CiviCRM group will still remain
in the Drupal Organic Group, and if you delete the CiviCRM group, the Drupal Organic Group will
still remain. Therefore, this integration is meant to be used when you administer the group from
the Drupal side.
TAGS
Tags are used to categorise contacts, activities and cases in CiviCRM. You can create as many
tags as needed to classify the contacts in your database, though it is advisable to avoid
duplicating existing tags or adding too many tags that aren't really necessary. It can be useful to
create a standard process for creating and using tags within your organisation to avoid these
problems.
Viewing, creating, and editing tags
To view tags, go to: Contacts > Manage Tags (Categories) in the navigation menu.
A tag can be edited or deleted using the respective links in its row. New tags can be created by
clicking the Add Tag button on the Manage Tags (Categories) screen or by going to Contacts >
New Tag in the navigation menu.
Each tag should have a clear and unique name and an explanatory description to help users
understand the tag's purpose. Tags can be structured hierarchically and designated as subtags of
an existing tag by selecting a Parent tag from the dropdown list.
Tags can be designated for use for contacts, activities and/or cases. If a tag is designated for use
for contacts, it will be available for all contact types and subtypes; tags cannot be specifically
designated for use for only one type of contact.
Tags are a flexible tool and every user can create more if needed. However, very important tags
can be locked to prevent them from being modified or deleted by users who do not have the
"administer reserved tags" permission (this permission is available in Drupal only).
Tags can be assigned to contacts, activities and cases in the following ways:
while creating or editing the record
from the Contact Summary Tags tab
by using the Tag Contacts batch action after conducting a search.
You can also use the first two methods to remove tags.
Tag sets
Tag sets allow you to create free tagging taxonomies which users can add their own tags on the
fly, without having to access the Manage Tags page described above.
71
Tag sets are created by going to: Contacts > Manage Tags (Categories) in the navigation menu
and clicking the Add Tag Set button. Tag sets are configured identically to regular tags. However,
they function quite differently. When you create a new tag set, it creates a new field on the edit
pages of the entity's activities or cases as well as in the Tags tab for contacts.
This is a tokenising autocomplete field: as you begin to type, CiviCRM looks for matching tags in
this tag set and displays any matches below the field. You can select an existing tag or create a
new one by typing the entire tag and pressing the Enter key. The tag will then appear within the
field in a box. Clicking on the X will untag the entity (contact, case or activity) that you are
editing.
Tags created within a tag set can be viewed and edited from the normal Contacts > Manage
Tags (Categories) list. However, tags created within a tag set will only be available within that
particular tag set.
TAGS OR GROUPS?
This is a common question on any project, and the philosophy described in the introduction of
this chapter is a guideline, but rules might need to be bent based on how you intend to use your
contact segmentation.
One interesting benefit of having both groups and tags is that you can perform more refined
searches using AND and OR. For instance, if you have journalists, volunteers and members as
groups and use tags to identify topics of interests such as development, art and history, you can
find all the journalists who are interested in art or development, all the volunteers or members
that are interested in history, or any other combination.
Beside that, groups have some features that tags don't:
Groups are integrated into several other CiviCRM functions (most notably CiviMail).
Contacts can be added to smart groups automatically based on characteristics.
Groups can be associated to Drupal Organic Groups.
Think of it this way: tags can be applied to contacts, activities, and cases, whereas groups can
only consist of contacts.
72
15. SEARCHES AND ACTIONS
This chapter covers different ways to find information you've stored in CiviCRM. Two of the
techniques in this chapter - finding contacts and the "search-action" work flow - are core
functions in CiviCRM, so most if not all users will find this chapter helpful.
We will start off with some simple searches and then move on to more advanced techniques.
CiviCRM beginners should be familiar with Quick search, Advanced search and the component
searches. More advanced users should also look at reports, custom searches and search builder.
There are three main reasons to search:
Finding a specific contact: the Quick search box can find contacts by name or email
address, and an Advanced search can find contacts by other characteristics.
Performing an action on a contact that meets certain criteria: a common workflow in
CiviCRM, called a "search-action", is to find contacts that meet certain criteria and then
perform an action on them. For example, you might want to find all contacts in the
advisory group in order to invite them to a meeting, find all those whose memberships
have recently expired to send a renewal reminder, or find all contacts aged under 25 in a
specific location to send them an email about an upcoming event nearby.
As a form of ad-hoc reporting.
For reports, searching is often useful but has limitations. For example, you can't group results by
particular criteria, or summarise or easily produce graphs of the results. For more advanced
reporting, read about CiviReport in the section Reporting.
Note that when you search for character strings, the search is not case-sensitive. For example,
if you search for 'brooklyn', the search will return strings with capitalised letters if the string
exists, e.g. 'Brooklyn' or 'BROOKLYN'.
QUICK SEARCH FOR CONTACTS
The easiest way to find a specific contact, if you know part of their name or email address, is to
use the Quick search box that appears in the navigation menu at the top left of the screen.
Contacts that match the phrase you enter will appear in a dropdown list below the box. For
example, entering "peter" will find
people who's first or last name is Peter
people who have Peter appearing as part of their name, e.g. Mary Peterson
people who have Peter as part of their email address, e.g. [email protected]
organisations with Peter in their name, e.g. Petersfield Community Centre.
You don't need to type the full name of the person - just the first few letters. The following
screenshot shows that two contacts turn up in our database when we search just for "pe".
ADVANCED SEARCH
Advanced search allows you to search across all the information you have about your contacts.
For example, you could find "all contacts in Venezuela" or "all advisory group members". If you
specify two or more categories of information, the search displays every contact that matches
all the categories. For instance, you can combine the two criteria just mentioned to find "all
advisory group members in Venezuela".
73
The Advanced search screen is accessible from the navigation menu Search > Find Contacts >
Advanced Search. On this screen, search criteria are grouped into sections which refer to
different types of data that you can search on, such as address data, notes and information
from components such as Contributions or Events. Each group of criteria is shown as a gray bar.
If you click on a gray bar, it expands to reveal the options within that group. For example, if you
want to search for all people in your database from 16 to 18 years old, click on the Demographics
bar. It expands, as shown in the following figure, and you can specify the birth date range you
are interested in.
Combining search criteria
Different criteria are combined by "ANDing" them. For example, if you select the tag "major
donor" and the country "Mexico", the search will return major donors from Mexico.
Within criteria groups that allow you to check boxes for more than one value, these options are
also combined by "ANDing". For example, if you can search for contacts whose Preferred
Communication Method is both Email AND SMS.
With fields that allow you to select values from a drop down list, options are combined by
"ORing". For example, you could find contacts that live in Mexico OR the United States by
selecting both countries in the country field.
Display Advanced Search results as ...
Advanced Search returns your results as Contact records by default. However, you may want to
get another record type instead. For example, you may want to see all the Contribution records
which match your search criteria (while taking advantage of the rich set of search filters
available in Advanced Search). Simply select the record type you want from the dropdown in the
upper right corner of the Advanced Search form.
Modifying search columns
Advanced searches allow you to use to change the columns displayed in your search results. The
default columns are Name, Street Address, City, State, Postal Code, Country, Email and Phone. If
you want to display a different set of columns (perhaps to include a custom field or remove a
column you don't need), create a Profile with the Search Results option selected. Make sure that
the fields in this Profile are set to "Public User Pages and Listings" visibility, and are marked as
Results Columns. (For more information about creating Profiles, which are described in detail in
the Profiles chapter in the Configuration section.)
74
The Profile will appear in the Search Views dropdown menu in the upper right corner of the form,
as shown below. The following screenshot shows what the menu displays after someone has
created a Profile called "Birthday".
Combining this feature with the "Batch Update via Profile" action provides a powerful method of
viewing and updating a specific set of fields across a batch of contact records.
INSTANT VIEW POP-UP
You can see a pop-up box with detailed information for any contact listed in your search results
by hovering over the contact icon in the left column, as shown below. You can adjust the fields
shown in this "pop-up view" by modifying the fields included in the "Summary Overlay" profile
(Administer > Customize > CiviCRM Profile).
THE "SEARCH-ACTION" WORKFLOW
After you retrieve your search results, you can perform a number of actions. An Actions box
appears above the results. You can select either all records or specific records, then carry out
an action with the selected records. Different actions are covered in more detail in the chapter
on Everyday Tasks.
75
Some of the most commonly used actions are Add Contacts to Group, Export Contacts, Map
Contacts, and creating and printing Mailing Labels. (To use Map Contacts, you will need to
configure Mapping and Geocoding. You can read more about this in the Installation chapter of the
Configuration section of this manual).
For example, to send email to a selected number of contacts, mark the contacts you are
interested in and then select Send Email to Contacts in the dropdown list of actions.
THE WILDCARD (%)
Understanding wildcards greatly expands your search options. A wildcard represents "any
character" (letter, numeral or punctuation mark). In CiviCRM, the wildcard is represented by the
% symbol (you may be familiar with other symbols such as * from other applications). It is most
easily understood through examples.
Suppose that somebody asked you to find a contact with a first name similar to "Michael", but
possible something different such as "Michelle" or "Michał". If you search for "Mich%" you will find
all these variations, including a contact who is supposed to be named "Michael" but whose name
was misspelled as "Micheal". Wildcards can be used before, after, or even within words. For
example, searching on 'Mich%el' will exclude "Michał" and "Micheal" but still find "Michelle" and
"Michael".
This search is not case sensitive. Entering "mi%el" in lowercase will also find contacts with an
upper case 'M' in their name.
COMPONENT SEARCHING
Most CiviCRM components offer a search on the data they maintain, such as Find contributions,
Find members, etc. These forms work in a similar way to Advanced search but return rows of
the main objects associated with the components, instead of contacts. Find Members returns
memberships, Find Participants shows event registrations, Find Contributions returns
contributions and so on.
76
Each component search has its own Action list. See the Component sections for more details.
SEARCH BUILDER
Advanced search lets you choose from a wide range of criteria, but it has limitations. The main
limitation is that the search criteria you enter into different fields are "ANDed" together.
The Search Builder tool provides an alternative for situations when you need to search using OR
for some criteria. For example, you can build a search for contacts who are born within a range
of dates OR who are female. To do this, access the Search Builder tool and Edit Search Criteria
from the navigation menu: Search > Search Builder.
Search Builder is intended for advanced users and requires you to use specific formats for your
search values. Refer to the online documentation at
http://wiki.civicrm.org/confluence/display/CRMDOC/Search+Builder before you try to create your
own searches.
CUSTOM SEARCH
Custom searches are designed to answer specific questions that can't be easily answered using
Advanced search or Search Builder. A good example are the "Exclude Contacts" and "Exclude
Groups" options, which, in combination with a previously run advanced search, allow you to find
contacts that do not meet certain criteria.
Go to: Search > Custom Search in the navigation menu and look at the list of available custom
searches. These customised searches have been written by members of the CiviCRM community
to meet their own needs, and then contributed back to the community to share with others who
need the same or similar custom searches. It's worth spending some time exploring these
searches as some may be useful to you, and they will give you an idea of the sorts of things that
are possible.
It is possible to write your own custom searches, but you'll need to be comfortable with MySQL
and PHP. See the section of this manual called Extending CiviCRM for more information about
how to do this. If you create a custom search that you think could be useful for others, consider
contributing it back to the community.
By combining Include and Exclude options, you can find contacts who are in one group but not in
another. You can find these options, which are shown in the following screenshot, in the
navigation menu Search > Custom Searches.
77
78
16. IMPORTING DATA INTO CIVICRM
Most organisations have data in sources outside CiviCRM, such as previously used database
platforms, spreadsheets created on the fly for specific events or other purposes, and email
address books. Because manually entering large amounts of data can be tedious, CiviCRM
provides a way do import data en masse if the source can export it into some common format
such as a Comma Separated Version (CSV) file.
CONSIDERATIONS BEFORE IMPORTING
It might be useful to think about your pre-existing data in the same way as the contents of a
house or apartment when you need to move. People often use moving as a chance to say, "Do
we really need this? This stuff is too old; let's trash it and get some new stuff once we have
moved in."
To apply this metaphor to your data, look for fields that have no purpose, such as old
organisational divisions that you've abandoned or office locations in a facility you no longer
occupy.
Some old data will have continuing value. For instance, one organisation in a financial pinch
decided to use an old list of founding donors who had not given money for many years. It turned
out that these lapsed donors still had strong emotional ties to the organisation that they had
founded and they came to its financial rescue. In that case, saving old data was crucial.
Moving to a new living space doesn't just provide an opportunity to evaluate what's really
important to keep and what can be left behind; it also gives you a chance to clean up everything
that you do decide to take with you. Just as you wouldn't pack up dusty picture frames and dirty
dishes because that would make your nice new clean place as dirty as your old place, you'll want
to clean up your data before moving it into CiviCRM so that you're starting off with as clean and
useful a database as possible.
In planning for a move to CiviCRM, prepare to spend a good amount of time looking at your old
data; standardising how different elements of contacts' records are stored (e.g. are states
entered as NY or New York?) and deleting obvious duplicates, accidental entries, outdated
information, and corrupted records.
For many US-based organisations, an important element of cleaning your data is standardising
addresses to conform to the conventions defined by the United States Postal Service's
Standards for Addresses. Standardising how addresses are entered into CiviCRM will allow for
more accurate search results when searching by address, as CiviCRM can parse addresses based
on the USPS standards if you choose to do so. (To find out more about how Address Parsing is
handled and used in CiviCRM, refer to the Installation chapter of the Configuration section of this
manual.) When adding or editing contacts, you will enter and edit such address elements as
street number, street name, and Apt/Unit/Suite number according to these standards.
To find out more details about the USPS' Standards for addresses, refer to their Publication 28
at http://pe.usps.com/text/pub28/welcome.htm or
http://pe.usps.com/cpim/ftp/pubs/Pub28/pub28.pdf for the pdf version.
PREPARING TO IMPORT DATA
Importing data requires considerable attention and care, so we'll present some concepts here
that you should know before you start your first import. You can import both core and custom
data for contacts, as well as data for event attendance, activities, memberships and
contributions. This chapter focuses solely on the import process for contacts, though the
processes for other data are similar.
There are two ways to import data:
79
from CSV files. Most database and spreadsheet applications (e.g. OpenOffice.org Calc,
Google Spreadsheets, Microsoft Excel) can create and manipulate files in this format. It is
often easier to view and clean your data when it's in a CSV file than while it's still inside
your old database.
Each column in your CSV file will map to a field in CiviCRM, so make sure you use a
different column for every distinct bit of information.
Depending on your country or region, fields in your CSV files might be separated by
semicolons (;) instead of commas. If so, you'll need to change the Import/Export Field
Separator value in the CiviCRM Localization settings by going to the navigation menu and
choosing Administer > Configure > Global Settings > Localization.
from another SQL or MySQL database stored on the same server, using an SQL query.
If you do not have a clear understanding of your existing data and how it will map to CiviCRM
fields, you will experience frustrations and problems when you try to import the data. Please
read about each type of data in other sections of this CiviCRM Manual and visit the CiviCRM
online documentation for more information:
http://wiki.civicrm.org/confluence/display/CRMDOC/Importing+Data
The following rules and recommendations will help you to import data with minimal problems:
80
Always test your data import with a small subset of your records. After importing the test
set, visit the records within CiviCRM and ensure that the data was imported and functions
as you expected.
It can be helpful to create a test contact that has every attribute you've defined in your
existing data set. Then import the contact and check results to ensure that CiviCRM
correctly represents all the data.
When you map the columns or fields from your source data to CiviCRM fields during the
import, CiviCRM can save this field mapping as an import map for future use. This is helpful
if you will be importing multiple files with the same structure. To save an import map for
future use, click the "Save this field mapping" check-box at the bottom of the Match Fields
screen of the import wizard and enter an appropriate name and description. To reuse a
saved import map, select it from the Load Saved Field Mapping dropdown menu on the
Choose Data Source screen (step 1) of the import wizard.
If your imports are timing out or taking too long, try splitting up the imports into smaller
batches. If you have the appropriate permissions on your web server, you can also
increase the memory_limit and max_execution_time values in the file php.ini.
You can add all of the contacts imported in an import to new or existing groups or tags. All
of the contacts in a single import will be given the same groups and tags. This limitation
has a couple effects on your import:
Make sure that you assign groups and tags that are applicable to every contact in
the imported set. If you need to assign groups or tags on a contact-by-contact basis,
import contacts in small, discrete batches in which all contacts share the same tags
and groups. Alternatively, you can create searchable custom data fields in CiviCRM
that contain the groups and tags that you want to assign to imported contacts.
After the import you can run searches on those fields and use the "Add Contacts to
Group" or "Tag Contacts" batch actions on the search results.
You can use this feature to manage the import. Consider adding contacts to a new
group or tag that indicates what batch of imports the contacts were a part of,
thereby allowing you to easily identify when a contact was imported and undo an
entire import if necessary.
CiviCRM stores first names and last names in separate fields, so these should appear as
separate columns in your CSV file. The same goes for city and postal code/zip code. Most
spreadsheet programs contain tools that automate the process of splitting text across
fields.
Ensure that your country names are expressed in the same way as they are in CiviCRM,
i.e., 'United States', not 'United States of America', and 'United Kingdom', not 'Britain'.
If you are importing multiple locations, the first location will be set as the primary location
address. You may want to move your columns around to ensure that the desired location
becomes the Primary Location. You may also need to split your import so that some
records have one type of record as their Primary Location, while others have a different
one.
81
If you are importing data into multi-choice (e.g. check-box or radio button) custom fields,
your data source can use either the label (what's visible to the user in the CiviCRM front
end) or the value (what's actually stored in the database for that choice). CiviCRM will
recognise it and import it appropriately. When importing into multi-choice core data fields,
you can specify only the value(s) in your data source, not the label.
If you are updating multiple choice options, new values will replace the entire field. For
example, if you update the value of the Colors field to be "orange" for a contact that
currently has Colors set to "blue", the result will be that Colors is set to orange, not
orange and blue.
Make sure your data source uses an accepted date format and that you select the same
date format on the Choose Data Source screen of the import wizard.
Make sure any name prefixes and suffixes you use have been set up in the administration
interface (go to: Administer > Option Lists in the navigation menu).
If you plan to do additional imports of related data that's associated with your contact
data, e.g. contribution data, event participation data, membership data, you can make
things easier by ensuring that your contact records have unique IDs that are also
associated with the related data. When you do the initial import of your contact data,
import these unique IDs and map them to CiviCRM's External ID field, so that you can then
use your original (or legacy data) IDs to match to the contact records records for later
imports of the related data.
SETTING UP A CSV FILE FOR IMPORTING
Example of spreadsheet .csv format
When thinking about setting up your spreadsheet, think about the data that you are collecting
and plan out your column headings. Keep in mind that you may need to create more than one
.csv file and perform multiple imports before you are finished.
If you plan to import related data that pertains to a specific contact, e.g. event participant
information, contribution data, etc., you will need to make sure that each contact record has a
unique identifier or the contact record should have First Name, Last Name and Email, so that
you can link their related data during later imports. If you have unique ID, you would map the ID
to CiviCRM's External Identifier on import.
RUNNING AN IMPORT
The import process has four steps.
Step 1: Setup
Setup lets you specify the basic details of your import, including the source of the data. Data can
come from either a CSV file, or an SQL query of a database on your server. A check-box lets
you indicate whether the first row of your file contains column headers.
82
Imports use the default strict rule to decide whether a contact record is a duplicate (refer to the
Deduping and Merging chapter in this section for information on duplicate matching rules in
CiviCRM). You can specify what action to take when an import encounters a duplicate:
Skip: skip the duplicate contact, i.e. leave the original record as it is.
Update: update the original record with the database fields from the import data. Fields
that are not included in the import data will be left as they are.
Fill: fill in the additional contact data, if it contains fields that are missing or blank in the
original records, and leave fields which currently have values as they are.
No Duplicate Checking: this inserts all valid records without comparing them to existing
contact records for possible duplicates.
Import mappings tell CiviCRM how the fields of data in your import file correspond to the fields
in CiviCRM. The first time you import from a particular data source, it's a good idea to check the
box to "Save this field mapping" at the bottom of the page before continuing. The saved mapping
can then be easily reused the next time similar data is imported, by requesting that it be loaded
at this step.
83
Step 2: Match the fields
If you had column headings in your file, these headings will appear in the first column on the lefthand side of the Field Map, while the next two columns show two rows of data in your file to be
imported, and the fourth column is the Matching CiviCRM Field. If you loaded an import mapping
in Step 1, your choices will be reflected here. You can change them if they are inappropriate for
this import.
The matching CiviCRM fields include standard CiviCRM data such as First Name and Last Name as
well as any custom data fields that have been configured for use with contact records on your
site. Match the fields by clicking the dropdown list and selecting the appropriate data. For
example, if the heading of the second column in your input is Surname, you should choose Last
Name as your Matching CiviCRM Field.
Select "- do not import -" for any columns in the import file that you don't want to import into
CiviCRM.
If you have a saved mapping for a specific set of spreadsheet columns, and your spreadsheet
layout has changed (for instance, you need to import additional fields, so you add the appropriate
columns of data in the spreadsheet), you can modify and save the field mapping. One tip to ease
the mapping process when you need to import additional fields is to place the additional columns
of data in your import spreadsheet to the right of the columns you've previously mapped in
CiviCRM. This allows you to use the existing saved field mapping to map the initial import fields,
and then continue mapping the new data fields.
Note that if you add new data columns in your spreadsheet and do not position the columns
AFTER the columns you previously mapped, you then can't use the saved mapping and will have
to map all your import fields again.
Once you've mapped your fields, you can decide if you want to keep the original saved mapping
unchanged, or check the box to "Update this field mapping" to include the new field mappings.
Step 3: Preview
84
This screen previews the results of importing your data, reports the number of rows to be
imported, and allows you to double check your field matches.
If some of the rows in your spreadsheet contain data that doesn't match CiviCRM's requirements
for one or more fields, you'll see an error message with a count of the invalid rows (see the
screenshot below). Click the Download Errors link and review the errors reported in the
downloaded file, so you can fix them before doing the import.
At the bottom of the form, you can choose to add the contacts to an existing group, import to a
new group, create a new tag, or tag imported records. Adding imported records to a separate
group is strongly recommended in order to be able to quickly find the imports and, if necessary,
delete and reimport them.
Step 4: Summary
The final screen reports the successful imports along with Duplicate Contacts and Errors. If you
have set the import to add all contacts to a Group or Tag, you can click through to see your
imported contact records.
85
At this point it makes sense to check to make sure that your import has worked as expected.
Search for the contacts that you just imported and examine their fields and custom data to
make sure all is as expected.
IMPORTING RELATIONAL DATA
We have just described the process of importing one data file. But what about if you want to
import related data, like parent child relationships, activities, contributions, etc.? For each type
of data you want to import, you will need to import a seperate CSV file.
CiviCRM has specific tools for importing related contact data and a set of specific import tools for
contributions, memberships, event participation etc. (and you should see specific chapters for
details of how to use these tools). To import relationships, you should run multiple contact
imports.
For example if we want to import data for children and then for both parents, we run three
imports, one for the child, one for the father and one for the mother.
We first import the child remembering to include an external identifier that we can use to match
the child to their parents. We then import the father, and then the mother, as related contacts,
linking them to the child using the child's external identifier.
In the example below we have one CSV file which contains father and mother information. We
use this CSV file twice as part of the import. Have a look at the fields below to understand
what is happening.
We are linking the father to the original child using the external identifier and are then importing
the related father name using the 'Child of' relationship type.
86
When the import is done, go back and verify the data by searching for the parent and examining
the relationship tab. They should have a relationship linking them to the child.
You can then repeat this process for the mother, and also for other relationships as necessary.
FULL EXAMPLE OF A MULTIPLE IMPORT
A full example of a relational import based on an example of a school, which includes mothers,
fathers, teachers, advisors etc, can be found on the wiki at:
http://wiki.civicrm.org/confluence/display/CRMDOC/Importing+Student%2C+Staff+and+Parents
The example has step by step instructions and can be useful in better understanding the import
process.
87
17. DEDUPING AND MERGING
Duplicate contacts can turn up in your data for many reasons, such as mistakes by users who
don't realise they're creating a contact for someone who is already in CiviCRM, duplicates that
aren't caught in the import process, and duplicate records created when people fill in forms
about themselves (maybe with their names spelled differently or use a different email address)
on your site without realising they're already in your list of contacts.
CiviCRM is equipped with duplicate matching rules that are applied automatically when new
contacts are created, and can be run manually at any time to search for duplicates. You can
configure these rules to suit your needs.
To view the DeDupe rules:
1. Go to: Administer > Manage in the navigation menu
2. Select Find and Merge Duplicate Contacts.
This displays the following screen:
From the screen, here's an example of a process to dedupe all individuals in your data:
1. Start by looking for dupes using a strict rule: click the Use Rule link for the third row
(Contact Type: Individual, Level: Strict).
2. Select All Contacts or a particular group.
3. Click Continue.
4. If duplicates are found, merge or delete the duplicate contacts.
5. Now look for dupes using a fuzzy rule to find those dupes that were missed with the
stricter rule: Click the Use Rule link for the fourth row (Contact Type: Individual, Level:
Fuzzy).
6. Select All Contacts or a particular group.
7. Click Continue.
8. If duplicates are found, merge or delete the duplicate contacts.
Different rules are configured for each contact type (individuals, organizations, and households.)
A default fuzzy rule and a default strict rule is set for each contact type. The default rules are
used when CiviCRM invokes automatic checking, in ways we'll explain in detail shortly.
STRICT AND FUZZY RULES
88
CiviCRM includes two categories of dedupe rules:
Strict: this type of rule places a priority on avoiding false matches, and therefore applies
relatively rigid criteria. It is therefore possible to sometimes miss real duplicates.
Strict rules are invoked during imports to scan for duplicates without user intervention.
These rules are used here because it is easier to sort out duplicates later than to
disentangle two incorrectly merged contacts.
An example of a strict rule is one that matches individual contacts only if three criteria are
met: identical email addresses, first names, and last names. This rule would allow both
Mike Tael and Michael Tael into the database because only two criteria are met: last name
and email rather than first name, last name, and email.
Default strict rules are also automatically checked when new contacts are created through
online registrations including events, membership, contributions, and profile pages, and
when you create a contact through CiviCRM's programming API.
Fuzzy: this type of rule has a relatively loose definition of matches in the hope of catching
as many possible duplicates as possible.
Fuzzy rules are used in instances where human intelligence can be applied to decide
whether a match is accurate. This means that a wider range of possible match results is
both permissible and useful.
Default fuzzy rules are automatically used to check for possible duplicates when contacts
are added or edited via the CiviCRM user interface (the default strict rules are
automatically used when contacts are added or edited via a Profile, the API, or on import).
You'll probably also want to use a fuzzy rule when scanning your database for possible
duplicates.
CONFIGURING RULES
To determine whether two contacts are duplicates, CiviCRM checks up to five fields that you can
specify. You can also set a length value which determines how many characters in the field
should be compared. For example, if you set a length of 2 on the "First name" field, a first name
of "Mike" would match "Michael" and they would be recognized as duplicates, because the first 2
characters are the same. However, if you set the length to 3 instead, "Mike" would no longer
match "Michael" and they would be accepted as different contacts. If the length value is left
blank, the comparison is done on the entire field value.
Each field is also configured with a numeric weight that determines the relative importance of a
match on that field. When a match is discovered on a field, that field's weight is added to the
total weight for the rule. After each field is checked, if the total weight is equal to or greater
than the numerical threshold set for the rule, the contacts being compared are flagged as
suspected duplicates.
USING RULES AND MERGING DUPLICATE CONTACTS
Go to: Administer > Manage > Find and Merge Duplicate Contacts, and click the Use Rule link to
scan for duplicate contacts using the selected rule. You can then select to search all contacts for
duplicates or to search only a particular group. Contacts of the type to which the rule is assigned
will be scanned and compared. If the match between two contacts exceeds the rule's threshold,
the contacts will be displayed on the following screen of possible duplicates.
Clicking Merge for any pair of contacts brings up a table showing details for each contact.
CiviCRM designates one record as the duplicate record and displays its information in the left
column. The record in the right column is considered the original record into which selected data
from the duplicate record will be merged. If you want to move the information in the opposite
direction, you can swap the duplicate and original contacts by choosing "Flip between original and
duplicate contacts".
89
For each field, you can choose whether to keep the original data shown on the right (don't check
the check-box in the middle column), or use the value from the duplicate contact instead (check
the box). For the email addresses or phone numbers, you can decide to keep both the value of
the duplicate and of the original (check both the checkbox in the middle column and the "add
new" on the right column) to copy the duplicate data. Note that associated tags, groups and
activity data (including event attendance, contributions, etc.) will appear in addition to data
already recorded in the original record, not in place of it. It is safer in general to keep the tags,
groups and activities of both contacts after the merge.
90
18. EXPORTING YOUR CONTACTS
Exporting lets you share data with external applications by providing a copy of data from
CiviCRM in a standard comma separated value (CSV) format. This format can be viewed and
edited in spreadsheet applications, imported into other database applications, or merged with
word processing documents.
You can either export a predefined set of fields or create your own custom export mapping
which can be saved for reuse.
CiviCRM's export functionality is available:
in any of the search tools
when viewing contacts in a group
in component-based search results, where the resulting records reflect the component
specific data rather than simply core contact data. For example, from the Contributions >
Find Contributions search, you could export your donors and their contact information for
use in a thank-you letter in which the total amount donated is included.
Here's how you can export contact information:
Search for contacts. Carry out a search based on your desired criteria using one of the
available search tools, e.g. Quick search, Find Contacts, Advanced search, Search Builder, or a
custom search (you can find out more about performing searches in the Searching chapter
earlier in this section)
Select contacts you wish to export. Select all records, or choose individual records for export
using the check-boxes to the left of each record. From the "- actions -" dropdown menu, choose
Export Contacts as shown in the following figure, and click Go. This takes you to the export
wizard.
Export primary (default) or selected fields. Choose between exporting the primary fields or
selecting your own set of fields for export. The primary fields include all core contact fields with
email, phone, and address data. If this is satisfactory, click Continue >> and skip step 4 of this
list.
If you want to add or remove fields to be exported, choose "Select fields for export" and
continue with step 4. The default export uses primary location data, so if you wish to export
non-primary addresses you need to select fields for export and explicitly specify the address
type
91
Select Fields to Export Choose the fields you want to export. CiviCRM allows you to save
this export mapping, which enables you to reuse the export field mapping at a later time. To
save your selection of fields, click "Save this field mapping" at the bottom of the form and enter
a descriptive name for this type of export.
Click Export to create your CSV file. By default, a comma is used as the field separator for
import and export functions. In some locales, other characters are used (e.g. a semi-colon). You
can change the separator value by going to Administer > Configure > Global Settings >
Localization and modifying the Import/Export Field Separator.
92
19. POSTAL MAIL COMMUNICATIONS
This chapter discusses the different ways that CiviCRM helps with postal mail and post mail
campaigns. It will help if you already have a strong understanding of CiviCRM's search features as
well as custom fields, activities, profiles, and how to perform mail merges using word processing
software.
PLANNING YOUR MAILING
Before beginning any communication activity, take the time to identify your goals and plan the
steps. For our purposes, there are a few key questions to ask before sending out postal mailings.
What types of mailing do you send out to your constituents?
Are mailings always sent to everyone in the database or are they frequently targeted to a
select group of contacts?
How do you want to greet recipients (e.g. "Dear Jane" or "Dear Jane Doe")?
There are three ways that you can use CiviCRM in postal mailings:
1. Generate labels: print out standard address labels when you don't need to personalise the
content, for instance to send a printed brochure.
2. Export contacts and do a mail merge to an external tool (such as OpenOffice or Microsoft
Word). Refer to the chapter on Exporting in the Getting Around section.
3. Generate PDF letters and do the merge directly in CiviCRM.
TIP: Many nonprofit organisations in the USA need to sort recipients of a mailing based on zip
code for bulk mailing purposes. If this is true for your organisation, it is recommended that you
create your mailing labels using a word processor where you can control the sort order, rather
than in CiviCRM. You can reuse the same spreadsheet for your mail merge.
Fundraising Mailings
Many non-profits have specific types of mailings such as thank you letters, renewal letters, and
general fundraising appeals which need to be personalised. Here are some suggestions for how to
handle those types of mailings.
Thank-you letters: when sending personalised letters to donors thanking them for their
support, it is often convenient to include specific acknowledgement of the donor's
contribution amount. For example, a letter could say, "Thank you Judy for your recent
contribution of $35." To accomplish this, create your list of recipients using CiviContribute
because the results of a search using Find Contributions will include contribution amounts.
These results also include contact information so can be easily used for mail merge
purposes. You can also create a custom token to get the latest contribution then use the
PDF letter action. For detailed information on custom tokens, see the Hooks chapter of the
section Extending CiviCRM, and also the Mail Merge Tokens for Contact Data section in the
CiviCRM wiki: http://wiki.civicrm.org/confluence/display/CRMDOC/Mailmerge+Tokens+for+Contact+Data).
Similar to thank-you letters, renewal letters ask members and/or donors to renew their
membership or previous donation level. In the case of renewals, it may be more useful to
use Memberships > Find Members to retrieve their membership type and expiration date.
GREETINGS AND SALUTATIONS
An important part of a postal mailing is including a salutation that is personable and friendly.
Some people prefer to be greeted in a special way if they are a doctor or esteemed person such
as a politician.
93
You can set a specific postal greeting format for each contact. There are several options from
the friendly "Dear John", to more formal "Dear Mr. John Doe". You can also enter a customized
greeting ("Your royal highness"). Postal greetings can be edited in the Communications
Preferences section of the contact edit form. If you need to set or reset postal greetings en
mass, refer to the Command Line Script Configuration documentation:
http://wiki.civicrm.org/confluence/x/LIK9AQ
PRINT PDF LETTER
The workflow is to first select the group you want to target, then choose the action "Print PDF
letter" from the dropdown menu. The letters will then be outputted as a PDF, allowing you to
easily print them.
To create the letter:
1.
2.
3.
4.
5.
Go to Search > Find Contacts or Find Contacts > Advanced Search.
Enter your search criteria and click Search.
Select the contacts who will receive the letter.
From the Actions dropdown menu, choose "Print PDF Letter for Contacts" and click Go.
Create your letter, using the formatting options provided. You can personalise the letter by
using tokens, for example Postal Greeting is a commonly used token in this situation. Click
in the body of the letter where you want to enter the token. Then click on "Insert Tokens"
located above the letter at the top right and select the desired token.
6. Before you move to the next screen, decide whether the format of this letter could be
used again. If so, check the Save New Template box and enter the Template Title.
7. When your letter is finished scroll to the bottom and click Make PDF Letters.
8. A pop-up window will offer the option of opening or saving the PDF. Open and review your
letter and then print it, or save the PDF and review at your leisure.
TIP: You can use this feature for any kind of document, not only letters. For example, you could
use it to print attendance certificates for a workshop.
GENERATE MAILING LABELS
Generating mailing labels is a very easy and useful function.
1.
2.
3.
4.
94
Perform the search to select the contacts you want to target.
Choose Mailing Labels from the Actions dropdown menu and click Go.
Select the mailing label style
Determine if you want to exclude people with "do not mail" checked in their privacy
options (checked by default and recommended), and whether you want to merge any
records with the same mailing address into one label.
This last option is very useful when sending a mailing to a households or organisations where you
don't want them to receive duplicate mailings. When the records are merged, each name at that
address is listed on a separate line on the label.
Your system administrator can configure the fields included in mailing labels. Read the
information on configuring address settings in the Contacts chapter to learn more about the
options.
95
20. EVERYDAY TASKS
The following are step-by-step guides to performing common and useful tasks in CiviCRM.
ADDING CONTACTS TO GROUPS
1. Perform a search and select the contacts that you wish to add to your group from your
search results (you can choose either specific contacts or all contacts).
2. Select Add Contacts to Group from the dropdown " - more actions - " menu, then click Go.
3. On the Add Contacts to A Group screen, select the appropriate radio button to either add
the selected contacts to an existing group or create a new group for the selected contacts.
4. If you are adding contacts to an existing group, select the desired group from the Select
Group dropdown menu, then click Add to Group.
5. If you are creating a new group, enter a Group Name. You can also optionally enter a
Description and/or select a Group Type (refer to the Tags and Groups chapter of this
manual for more information on Groups and Group Types.) When finished, click Add to
Group.
6. You should see a message stating that the number of participants that you selected have
been added to the group.
7. Click Done to return to your search results.
CREATING SMART GROUPS
Smart group are useful in many different situations. They are often used to assist organisational
workflows. For instance, when you find yourself doing the same search over and over on your
contacts, you can save the search as a smart group. Whenever you select that group, CiviCRM
will run the search and display the results. Any new contacts that meet the search criteria will
be added to the group, and contacts that no longer meet the criteria will be removed from the
group.
Smart groups can be created from the search results generated by any of the search forms. For
example, you can create a smart group of all donors who have not yet been sent a thank-you
letter. As you send your letters, the donors receiving them will automatically leave the smart
group, allowing you to always have an accurate list to work from. To create this smart group:
1. Go to: Search > Find Contacts > Advanced Search.
2. Scroll down to the Contributions section and click on Contributions.
3. Check "Thank-you date not set?" and choose Donation from the Contribution Type
dropdown menu.
4. Click Search at the bottom of the page.
5. Click the button that selects all the records
6. From the " - more actions - " dropdown menu select New Smart Group, then click Go.
7. The next screen provides a review of the criteria chosen for the smart group. Give the
smart group a name, a description (optional) and decide if you want to make this smart
group a Mailing List (allowing you to include the smart group in CiviMail). Then click Save
Smart Group.
8. You can view your smart group by going to: Contacts > Manage Groups where you will see
your smart group in the list.
CREATING RELATIONSHIPS BETWEEN CONTACTS
CiviCRM allows you to represent connections between contacts by creating relationships. For
example, if a mother and son are both in your database, it can be useful to be able to look at
either record and see that they are related to each other. To do this:
96
1.
2.
3.
4.
5.
6.
7.
8.
9.
Navigate to one of the records that you want to relate.
Click on the Relationships tab in the Contact's record.
Click New Relationship.
Select the Relationship Type. In this case it would be either "Child of" or "Parent of".
Click inside the Find Target Contact box and begin to type the first name of the person you
are relating to this contact. One or more options will be displayed. Click on the appropriate
entry.
Click Search.
Click the check-box next to the name of the person you are relating to this contact.
You can scroll down and enter further information, which includes Start Date and End Date
(in case the relationship is time limited), Description and Notes. There are also two
permission-related options, which allow users of the database to edit this record. Finally
there is an Enabled? box, which is checked by default.
When you have made the changes you want, click Save Relationship.
CONNECTING EMPLOYEES AND EMPLOYERS
A quick way to connect employees (which are stored in CiviCRM as individuals) to employers
(stored as organisations) is to use the Current Employer field within an individual's record. This
will set the current employer field in the contact record and create a relationship between the
contacts.
1. Navigate to the record of the individual who you want to connect to an organisation.
2. Click the Edit button to edit the individual's record.
3. Begin typing the organisation name into the Current Employer field. As you type, matching
names of organisations that already exist as contacts in CiviCRM will appear in a dropdown
autocomplete list below the Current Employer field. If the organisation is already a contact
in CiviCRM you can select it from the dropdown list by pressing the down arrow key or by
clicking on it. If the organisation does not already exist as a CiviCRM contact, simply enter
the full organisation name.
4. After the organisation's full name is entered in the Current Employer field either press the
Enter key or click the Save button. If the organisation is a pre-existing contact, an
Employee/Employer relationship will be created between the individual and the
organisation. If the organisation does not already exist, a new organisation contact will be
created and the relationship will be created between the individual and the organisation.
You can click on the Relationships tab to view your newly created relationship Employee of
and see any existing relationships.
97
ADDING CONTACTS TO ORGANISATIONS
1. Select the desired contacts from your search results as described above.
2. Select Add Contacts to Organization from the dropdown " - more actions - " menu, then
click Go.
3. On the Add Contacts to Organization screen, select the Relationship Type from the
dropdown menu.
4. Enter part of the desired organisation name in the Find Target Organization field, then
click Search.
5. Organisations that match your search will appear in the "Mark Target Contact(s) for this
Relationship" section below the Search and Cancel buttons. If the organisation you're
looking for appears in this list, click the radio button next to that organisation and then
click the Add to Organization button below. If the organisation you're looking for does not
appear in this list, try entering something different into the Find Target Organization field
and clicking Search again. If you are still unable to find your desired organisation it may not
exist; click Cancel, add a new organisation, and try again.
6. After you've successfully chosen an organisation and clicked the Add to Organization
button, you should see a message stating that the number of participants that you
selected have been added to the organisation.
7. Click Done to return to your search results.
ADDING CONTACTS TO HOUSEHOLDS
98
1. Select the desired contacts from your search results as described above.
2. Select Add Contacts to Household from the dropdown " - more actions - " menu, then click
Go.
3. Select the Relationship Type from the dropdown menu. Note that while CiviCRM will not
stop you from adding multiple contacts as Head of Household for a single household, this
may cause problems later on in any situation where you are expecting Head of Household
to refer to only one individual per household. Therefore, the "Household Member of" option
may be the better choice in most situations.
4. Enter part of the name of the household to which you are adding contacts (such as a last
name shared by household members) in the Find Target Household field, then click Search.
5. Households that match your search will appear in the "Mark Target Contact(s) for this
Relationship" section below the Search and Cancel buttons. If the household you're looking
for appears in this list, click the radio button next to that household and then click the Add
to Household button below. If the household you're looking for does not appear in this list,
try entering something different into the Find Target Household field and clicking Search
again. If you are still unable to find your desired household it may not exist; click the
Cancel button, add a new household, and try again.
6. After you've successfully chosen a household and clicked the Add to Household button, you
should see a message stating that the number of participants that you selected have been
added to the household.
7. Click Done to return to your search results.
CREATING NEW RELATIONSHIP TYPES
CiviCRM comes with a set of common relationship types that can be used to indicate
relationships between contacts. If you need to track different types of relationships between
your contacts, you can create your own custom relationship types.
99
1. In the navigation menu, go to: Administer > Option Lists > Relationship Types.
2. Review the list of existing relationship types to ensure that you are not creating a
duplicate.
3. If the relationship type you need does not already exist, click the New Relationship Type
button.
4. Enter descriptive labels for the relationship type you are creating in the "Relationship
Label-A to B" and "Relationship Label-B to A" fields. The "Relationship Label-A to B" field
describes the relationship between Contact A and Contact B; the "Relationship Label-B to
A" field describes the relationship between Contact B and Contact A. You will designate
which contact types are used for Contact A and Contact B respectively in step 5.
Some relationships can be described by the same label in both directions; in these cases
you can enter the Relationship Label once in the "Relationship Label-A to B" field. For
example, when describing the relationship between two domestic partners named Sylvia
and Audre, you can say that Sylvia is the "Partner of" Audre and Audre is the "Partner of"
Sylvia. Therefore you would enter the "Partner of" label only in "Relationship Label-A to B"
field, leaving the "Relationship Label-B to A" field blank.
5.
6.
7.
8.
In other situations one Relationship Label cannot be applied in both directions; in these
cases you need to enter different Relationship Labels in each of the Relationship Label
fields. For example, you can say that Kiyoshi is the "Grandparent of" Yuki but you cannot
say that Yuki is the "Grandparent of" Kiyoshi. Therefore you would enter the "Grandparent
of" label in the "Relationship Label-A to B" field and either "Grandchild of" or "Grandparent
is" in the "Relationship Label-B to A" field.
Use the Contact Type A and Contact Type B fields to designate which kind of contacts are
being linked by your relationship. Remember to check that the contact types you select for
Contact A and Contact B make sense when corresponded to your Relationship Labels.
Optionally enter a description for this relationship type. This is especially useful if the
intended purpose of this relationship type may not be obvious to other users.
Leave the Enabled box checked unless you intend to create this relationship type but not
allow users to utilise it until a future date.
Click Save. You will see a message telling you that the relationship type has been saved
and you will see your new Relationship Type in the list below.
DISABLING OR DELETING UNNEEDED RELATIONSHIP TYPES
If an existing relationship type is no longer useful or relevant for your organisation you can either
disable or delete it so it is no longer presented as an option for new relationships. Disabling
rather than deleting the relationship type has two significant advantages: you will still be able to
see existing data on relationships of this type, and you can easily enable the relationship type
again should you find you need it later.
1. In the navigation menu, go to: Administer > Option Lists > Relationship Types.
2. Click the "more" link in the row of the relationship type that you'd like to disable or
delete.
3. Select either Disable or Delete from the pop-up menu.
4. If you select Disable, a pop-up confirmation bubble will appear. If you select Delete, you will
be directed to an additional screen that provides a more serious warning and requests
confirmation. Review the information provided in either confirmation message and if you
are sure you'd like to complete this action, click the OK or Delete button.
5. If you have chosen to disable the relationship type it will appear in red in the Relationship
Types list and relationships of this type will still be visible when viewing contacts. If you
have chosen to delete the relationship type it will no longer appear in the Relationship
Types list or in contact relationships data. In either case users will no longer be able to
create new relationships of this type.
To enable a previously disabled relationship type, follow steps 1 and 2 above and select Enable
from the "more" pop-up menu.
MERGING CONTACTS FROM SEARCH RESULTS
100
If you notice duplicate contacts within a set of search results you can quickly merge them
directly from the search results instead of using the separate "Find and Merge Duplicate
Contacts" process. This is a great way to clean up your database during your everyday workflow
with minimal disruption.
1. Select the duplicate contacts from your search results by clicking the check box at the left
side of each record.
2. Select "Merge Contacts" from the " - more actions - " menu, then click Go.
3. Follow the normal steps for merging duplicate contacts; see the Deduping and Merging
chapter for more information.
CONTRIBUTIONS
21. What is CiviContribute?
22. Planning
23. Configuring
24. Everyday Tasks
101
21. WHAT IS CIVICONTRIBUTE?
CiviContribute is a CiviCRM module that supports fund-raising and related money management. It
has two main uses:
To facilitate fundraising campaigns and collection of donations
To support activities by other CiviCRM components that have financial elements, such as
managing fees in the Events and Member modules
CiviContribute has a number of tools for raising money through your website. You can create
contribution pages with fundraising targets. Campaigns support a thermometer style widget that
you can embed on other websites and blogs. Personal campaign pages (PCPs) and tell-a-friend
functionality engage your supporters in raising money for your organisation and give them credit
for any money that raise from other people on your behalf.
102
22. PLANNING
This chapter is aimed at fundraisers, administrators and others who want to use CiviContribute.
You should find the information here useful before configuring and using CiviContribute. Start by
listing the types of contributions you receive as an organization and which of those you want to
track using CiviCRM. Then evaluate the following issues.
DATA NEEDS AND FIELDS
CiviContribute has a set of predefined fields to track contribution information. If you need to
track more information about contributions, you can define and use custom data fields. Custom
data might be useful to further categorize your contributions or track additional information.
Consider all the information you want to track about your contributions, including the reports
described later in this chapter. Then carefully compare your data needs to CiviCRM's predefined
fields. A lot of useful functionality is built in to the core contribution fields and there's no point in
duplicating them with custom fields.
TYPES AND ACCOUNTING CODES
CiviContribute categorises contribution by type. Examples of contribution types include event
fees, member dues, donations, and grants.
To aid integration with your accounting software, you can assign an accounting code to each
contribution type. This accounting code is included when you export contributions for import into
your accounting package.
REPORTING AND EVALUATION
Reports can support targeted fundraising, reveal how you can improve fundraising processes, and
help you gauge the financial health of your organization. Examples of what you can learn include:
Checking contribution totals for tactic A versus tactic B
Comparing amounts earned by a specific campaign over time
Comparing first-time givers with repeat givers
Generating a list of people that gave last year but are yet to give this year.
As part of the planning process, consider the reports that you would like to run with CiviCRM.
The data they require helps determine the data you need to collect in CiviContribute, and
whether you need to create new custom fields to hold the data. This planning also helps you
configure CiviContribute to allow you to run these reports.
CiviReport comes out of the box with a number of reports designed to give you information
about your donors and fundraising campaigns. Spend some time familiarising yourself with these
reports.
103
23. CONFIGURING
This chapter shows how to set up CiviCRM, and particularly its contribution management
component, CiviContribute, to support fundraising. Throughout CiviCRM, the term "contribution"
refers to any financial transaction or payment taking place in the system: a donation, event fee
payment, membership dues payment, or other similar transaction.
This chapter assumes you have a working understanding of custom fields, contact matching rules,
CiviCRM Profiles, and the CiviMember and CiviMail components. The chapter also assumes you
have already set up your payment processor, configured contribution types, and created any
custom fields you want to use when tracking contributions.
GENERAL CONFIGURATIONS
You may need to configure the following fields before you begin setting up various methods for
managing contributions.
Contribution Types and Accounting Codes: Navigate to Administer > CiviContribute >
Contribution Types, where you can edit one of the existing contribution types or create a
new one by clicking Add Contribution Type. Once you edit or add a contribution type, you
can define an accounting code that corresponds to your accounting system (the accounting
code will be exported along with the contribution data if you do an export), and indicate
whether this type of contribution is tax-deductible. Be careful when editing core
contribution types or adding new types, because CiviCRM has useful built-in functionality
that depends on the core contribution types.
Premiums: Navigate to Administer > CiviContribute > "Premiums (Thank-You Gifts)" to
configure premiums, such as T-shirts or subscriptions, that you want to offer on your
Online Contribution Pages. You can edit an existing premium or click Add Premium to add a
new one. Once you edit or add a premium, you can then enter additional information:
Name, Description, SKU (an optional product code), Premium Image (an optional image of
the item), Minimum Contribution Amount to receive the premium, Market Value of the
premium, Actual Cost, and Options (e.g., colors and sizes). If you're offering a subscription
or service, you can also click on the Subscription or Service Settings and define additional
information here, such as Period type (e.g., Fixed or Rolling), the Fixed Period Start Day, the
Duration, and the Frequency.
Accepted Credit Cards: Navigate to Administer > CiviContribute > Accepted Credit Cards
to edit existing acceptable credit cards or define a new option through Add Accept
Creditcard.
Payment Instruments: Navigate to Administer > CiviContribute > Payment Instruments
to edit existing options that can be used for contributions or to add a new option through
Add Payment Instruments . The common options--credit card, cash, check, debit card,
and EFT--are installed by default.
ONLINE FUNDRAISING
One of the most useful aspects of CiviCRM is its integration with your site's content
management system. Once integrated with either Drupal or Joomla!, CiviCRM allows you to build
an unlimited number of contribution pages that can be seamlessly accessed from your website.
Contribution pages can be used to:
Accept donations and other contributions
Process membership signups and renewals
Run a specific fundraising campaign
104
This section will walk through each of those three scenarios and point out some options and
features that may be useful. Once you answer all the necessary questions and consider all the
points mentioned in the chapter, you can build your contribution pages. Step-by-step
documentation for doing that is available at
http://wiki.civicrm.org/confluence/display/CRMDOC/Manage+Contribution+Pages.
General Online Contribution Page
Before you configure a general contribution page, ask:
What contribution type will be used to categorize contributions received via this page?
Do you want to allow people to give in honor or in memory of someone?
What other data do you want to capture from your donors and contributors? These can be
collected in predefined CiviCRM fields or custom fields that you have created previously.
The only field required by CiviCRM to process a contribution is an email address. Typically
you will want to collect additional contact information for the contributor. These should be
added using a Profile.
If possible, build the profile of fields that you will expose on the contribution form before
you build your contribution page. A contribution page can include up to two profiles. If you
do not create your profile before creating your contribution page, you can complete the
process and return at a later time to add a profile.
Can individuals contribute on behalf of an organization? This is most commonly used for
membership sign-up pages (discussed later).
Do you want to allow people to pledge a certain amount as they contribute? A pledge is a
commitment to give a certain amount over a certain period of time--for instance, a fixed
amount deducted from a credit card every month. Pledges are a great way to allow your
supporters to provide long-term support to your organization.
What are the amounts you want people to choose from? Some organizations call these
"donation levels" and they're important because they give a potential donor a range and
suggestions of what to give. You may also allow donors to complete an "other amount"
field and ignore your predefined giving levels.
What text do you want to appear in the following?
The introduction of the contribution page
The footer of the contribution page
The text for the thank-you page
The automatic email receipt sent to the contributor (optional)
Do you want to enable the "tell-a-friend" feature? This allows donors to forward the page
to friends, which can be very powerful in spreading your message throughout their social
networks.
Do you provide premiums such as T-shirts or tote-bags to donors who give a certain
minimum? If you do, be sure to set up your premiums within the CiviCRM administration
pages first, as described earlier.
Once you have answered and resolved all of these questions, you can build your contribution
page. Go to CiviContribute and click on Manage Contribution Pages > New Contribution Page. The
options and settings should map pretty clearly to the choices you made for the questions listed
in this section.
Membership Sign-up Donation Page
CiviContribute is closely integrated with CiviMember, the membership management component of
CiviCRM. This means that your online contribution pages can allow people to join your
organization at predefined membership levels. When people do, they create not only a
membership record for themselves but a corresponding contribution record.
You must create all of your membership types and status settings within CiviMember before you
build your online membership sign-up page.
Before building your membership sign-up page, you need to ask most of the questions listed in
the previous section for the contribution page. A couple of additional questions include:
105
Should this page be used only for membership sign-up purposes, or can people give general
contributions as well? Membership-based organizations usually use their contribution page
only for membership sign-up, which means they do not allow a variety of contribution
amounts and membership sign-up is required.
Which membership types allow sign-ups? Some membership types in your organization may
be for administrative use only.
If your organization allows organizations as well as individuals to become members, you will need
to allow individuals to join on behalf of an organization. Depending on your membership structure,
you may want to require this behavior.
Campaign Fundraising Page
In addition to the questions in the previous sections about how the contribution page will be used
and what information it will capture, CiviCRM includes some exciting features for campaign
fundraising purposes:
The campaign contribution page can have a start and end date along with a goal. You can
then create a widget to embed on your website to show the progress of the campaign
toward the goal (see the following screenshot).
Wouldn't it be great if your constituents could do some of the fundraising for you? CiviCRM
has a feature called Personal Campaign Pages (PCPs) that allows you to let people create
their own fundraising page for your organization. This means that a donor, after donating
to your organization, can elect to create a page with her own photo, text, and personal
information. She can then send a link to the page to her friends, soliciting support for your
organization. This is a powerful way to widely and quickly spread the message about your
campaign.
When someone donates through a personal campaign page, a soft credit is given to the
owner of the page to recognize the role she played in the contribution. CiviContribute has a
section that allows you to administer all of the PCPs for your organization as well as
moderate PCPs you don't approve of. Lastly, you can provide an "Honor Roll" for your
contacts who build PCPs, highlighting the donations made through their pages. (Donors need
to opt in to have their names displayed in the honor roll).
Publicizing your campaign
Now that you've created your contribution page, it's time to bring people to the page so they
can contribute. Naturally, you will display a link to the page prominently on your website through
a donate button or menu item. Here are some additional tips for promoting a contribution page
in different CiviCRM configurations:
Joomla!: The most direct way to expose your contribution page or membership
signup/renewal page to the front of your website is by creating a menu item. Navigate to a
menu and create a new CiviCRM item. From the list of menu options, choose Contributions.
In the basic parameters section, select the contribution page you would like exposed from
the dropdown menu. Save the menu item and view the website to confirm the page's
functionality.
Drupal: From the contribution page listing, select Live Page to view the finished page. You
can then copy the URL and include it in a content page or assign it to a menu item.
Standalone: From the contribution page listing, select Live Page to view the finished page
and link to it.
106
CiviContribute contribution pages have "ugly" URLs. In other words, they are difficult to
remember. An example is :
www.myorganization.org/civicrm/contribute/transact?reset=1&id=1
You may find it useful to create a URL redirect (take people from one URL of your website to
another automatically) on your server to take people to a "pretty" URL like:
www.myorganization.org/donate
Pretty URLs are much easier to remember and use in your organization's outreach. Creating a
redirect requires some technical skill and access to your web server.
Drupal provides a helpful module called Path Redirect (http://drupal.org/project/path_redirect)
that lets you can create URL redirects from the user interface without complicated web server
configuration. Joomla! users also have a work-around if Search Engine Friendly URLs are enabled
in Global Settings. You can then create a menu link to the contribution page and define the
"pretty" URL using the alias field.
Emailing your current membership is the other critical way to publicize the campaign. The CiviMail
component of CiviCRM allows you to send targeted emails to any group of contacts in your
database. Within a CiviMail message you can include links to the contribution form and use
CiviMail's tracking capability to see how many people click on that link.
One time-tested way to increase contributions is to send each targeted constituent a
personalized email with a link to the contribution form that has all of their contact information
already filled in. This saves them the hassle of filling it out and raises the chances that they
donate. Using CiviMail, you can use this feature by creating a special link in the body of your
CiviMail message that includes a checksum token. A checksum is a unique and pseudo-random
number assigned to each recipient of the mailing that points back to their contact information,
securely stored in your database.
When people click on the special link, CiviCRM looks them up in the database and pre-fills fields
on the contribution form (core fields or fields exposed via a profile) with any information in their
contact record. To read more on how to do this and what the link path must be, visit:
http://wiki.civicrm.org/confluence/display/CRMDOC/Mail-merge+Tokens+for+Contact+Data
Automatic Contribution Recording
Regardless of how donors get to your contribution page, CiviCRM automatically records their
donations, freeing your staff from doing manual data entry. If the donors already exist in the
database, CiviCRM adds the contribution to their existing record. If they don't exist, CiviCRM
creates a new record for them.
To record contributions in the appropriate records, CiviCRM must identify the donor correctly by
comparing the information they enter into the contribution page to their contact in the database.
By default, CiviCRM checks just the contributor's email address. In other words, if Judith Monroe
has a contact record in CiviCRM with an email address of [email protected] and she puts in
that email address when she contributes, but with the first name of Judy, the contribution will
correctly go into her record. If she puts in another address, such as a Hotmail or Gmail account,
a new record will be created and you may have to manually clean it up later. Note that this
problem appears only for anonymous visitors (those not currently logged into your website).
Once users log into the website, CiviCRM recognizes them in the system and will attribute any
activity to their records.
107
We recommend that you configure CiviCRM to match contact information very strictly by
changing the default duplicate matching rules. In our opinion, it is better to risk creating a new
(duplicate) record for someone who is already in the database than to incorrectly credit their
donation to someone else. It is not uncommon for multiple people to share an address such as
[email protected] or [email protected], the default rules may find the wrong contact if
such a shared email address is entered. We recommend you change the duplicate matching strict
rule so that the first name, last name, and email must all match. This raises the bar on whether
data is merged with an existing record, increasing the change that a new record will be created.
Using CiviMail's automatic fill-in feature (the checksum token) will help avoid some of these
issues. To configure your duplicate matching rules, navigate to Administer CiviCRM > Find and
Merge Duplicate Contacts.
OFFLINE FUNDRAISING
Organizations have plenty of offline opportunities to raise money. You may pick up donations at
events or solicit donations via postal mailings. For money raised through any of these offline
activities, your staff needs to enter the results manually.
There are three steps in offline fundraising: creating your lists, creating your mailings, and
manually entering contributions.
Creating your lists
This process is fairly straightforward if you are familiar with CiviCRM's search capabilities.
1. Create a list of records to receive your offline postal mail appeal (this can be your entire
database if you like). If you want to later track the success of a mailing or if you are
tracking who receives certain appeals, it is recommended you save the search results as a
group. Later on, you can mark everyone in that group as recipients of that appeal using
the Record Activity for Contacts option under the "- actions-" menu.
2. From a search (whether a search of the groups' members or of other criteria) you will see
an "- actions -" dropdown menu that allows you to, among other things, export the list as
a CSV file. Select all records or a subset using the checkboxes, choose "export", and click
Go.
3. As you export to a CSV spreadsheet, you can determine which fields you want to export
to your spreadsheet and save the list of exported fields as an export mapping for future
use. By default, CiviCRM will export a great deal of data, including contacts' names, contact
information, email addresses, phone numbers, and a list of their groups and tags.
Creating your mailings
Once your spreadsheet is created, you can do a mail merge using any popular word processing
software (such as OpenOffice.org Writer, the Free Software Word Processor) that will insert any
fields you want in the letter.
CiviCRM can also create mailing labels for you. Perform the same search you used in the
previous section to create your list of recipients, but under the More Actions menu, choose
Mailing Labels. Then select the mailing label number, determine whether you want to exclude
people with "do not mail" checked in their privacy options (checked by default and
recommended), and whether you want to merge two records that have the same mailing
address into one label. This last option is very useful when you are mailing a household or
organization and you don't want them to receive duplicate mailings. When the records are
merged, each name at that address appears on its own line on the label. Once you click 'Make
Mailing Labels," a PDF document will be created that you can print.
Its important to note that many nonprofit organizations in the United States have to sort
recipients of a mailing based on zip code for bulk mailing purposes. If this is true for your
organization, it is recommended you do not create your mailing labels within CiviCRM, but instead
create them using word processor merge functions where you have control over the sort order.
You can reuse the same spreadsheet for the mail merge you exported in the previous section.
108
PAYMENT PROCESSORS
A payment processor is a tool that integrates with CiviCRM to process live credit card
transactions. In other words, it accepts the credit card information submitted by your site
visitor, processes it, and transfers money to your organization's bank account. As of this
writing, the payment processors compatible with CiviCRM include:
PayPal (website standard and pro)
Authorize.net
PayJunction
Google Checkout
Moneris eSelect Plus
Elavon / Nova
eWAY
PayJunction
PaymentExpress
ClickAndPledge
Each has their own pricing structure and features, benefits and drawbacks. You should carefully
investigate each available option to determine what's best for you. Important things to consider
include:
Availability in your country and currency
Cost (setup costs, monthly cost, transaction fees and commission percentage)
Security: whether you want to, and are able to set up your own Secure Sockets Layer
(SSL) certificate or whether you would prefer a payment processor that captures credit
card information on its own website. Does the payment provider provide protection against
fraud and liability?
Ability to control branding: does the payment processor take users off your CiviCRM site
and does this matter to you?
Ability to accept recurring payments: Only one or two payment processors are able to do
this at the time of writing.
Ease of use for your customers: does the site visitor need an account with the
transaction provider in order to process payment?
Reputation and reliability: Ask other CiviCRM users about their experiences with payment
providers.
Secure Sockets Layer (SSL/HTTPS)
If you wish to collect credit card information through a CiviCRM form (as opposed a payment
processors own website) you must configure your site for Secure Sockets Layer encryption.
Alternatively, choose a processor such as Paypal Standard, Elavon or PaymentExpress where the
customer is redirected to the payment processor's website to enter their credit card details and
back to your site afterwards.
Visitors to your website can determine that their data is encrypted when they see a symbol
(often a padlock) somewhere in the browser or by noting that the "http:" part of your url has
been replaced by "https:".
To enable SSL, you will need an SSL certificate. An SSL certificate should be purchased through a
reputable third party provider, and may range in price from USD$30 to USD$100 a year
depending on the company and the level of service and protection they provide.
If you are using shared hosting or a virtual private server (VPS), it is likely that your hosting
provider has a list of preferred vendors they work with to provide SSL security. Contact your
hosting provider for more information and to get help installing the SSL certificate.
109
SSL certificates are domain-form specific. If purchased and installed to your root domain
(something that looks like example.org), it does not automatically work for subdomains, such as
http://www.example.org or http://contribute.example.org. Discuss the options available with your
hosting provider and ensure that the certificate and its installation will meet your needs.
Wherever possible, purchase a certificate that will cover both the root domain and www form of
your domain.
Once the certificate is installed and you have tested its functionality by browsing to a page on
your site using https (rather than http), you should enable SSL redirection in CiviCRM. To do this,
navigate to Administer CiviCRM > Global Settings > Resource URLs > Force Secure URLs (SSL) >
Yes. This will force any pages that include contribution-related information (i.e., credit card fields)
to redirect to the secure form of the URL (https).
After you enable the Force Secure URLs setting and save the page, CiviCRM will automatically
check to ensure the SSL certificate is activated and working properly. You should also navigate
to a contribution page on your website to confirm that https redirection works correctly.
PCI DSS Compliance
The prevalence and impact of online fraud has led to increased security measures to counteract
the schemes of fraudsters. The Payment Card Industry Data Security Standard sets out security
standards that all major credit cards require sites to comply with. If your CiviCRM page accepts
card numbers directly rather than sending visitors to your payment processor web page, your
site and its hosting environment may need to comply with those standards. Some payment
processors, notably Moneris, put some of the compliance burden on you by making you complete
a long and technical Self-Assessment Questionnaire.
For more information, visit:
https://www.pcisecuritystandards.org/
110
24. EVERYDAY TASKS
This chapter describes some common CiviContribute tasks.
ADDING CONTRIBUTIONS
When your organisation receives a contribution from a contact, you can add it to their record.
If the donor does not already exist in the database, you need to first create a new contact
record for them. Use the links on the CiviCRM home page to create a New Individual, New
Organization, or New Household, and fill out any information you have for this contact. Once the
record is created, you can then enter the contribution.
To manually enter a contribution for a contact in your database:
1. Find the contact's record using one of the contact search tools.
2. Select the contact's Contributions tab.
3. Click Record Contribution (Check, Cash, EFT...). Alternatively, if you have set up a payment
processor that allows credit card transactions directly on your site, you may select the
Submit Credit Card Contribution option and process the payment immediately.
4. Complete the new contribution form. The following screenshot shows the offline
contribution (i.e. contributions via check, cash, EFT, etc.) form. If you selected to record a
credit card contribution, the credit card form is almost identical except for the paymentrelated fields.
Record the contribution type, amount, received date (the default is the current day), receipt
date (shown on the receipt generated by the system), and status (the default is Completed). Any
custom fields for contributions will also appear on this form.
111
The Soft Credit To field works with personal campaign pages (PCPs) that harness your contacts'
help for campaigns. As described in the previous chapter, when a donor sets up a PCP for their
friends and family to make donations to your organisation, some of the credit goes to the donor
who set up the PCP. The person giving the money receives a "hard" credit while the owner of the
PCP receives a "soft" credit. When you enter a donation manually on the contribution form for
the contributor, you can assign a soft credit to the owner of the PCP. Soft credits can also be
applied to spouses, partners, or employers, to give an indication of how much money is coming
from a relationship or providing a credit to employees if they urged their employers to donate.
(There is more information about PCPs and campaign fundraising pages in the Configuring chapter
of this section on CiviContribute.)
The Additional Details section near the bottom of the screen offers other options including adding
a note about the contribution and entering the date when a thank-you letter was sent.
The last two sections allow you to enter whether the contribution was in honor of someone else
(Honoree Information) and whether there is a premium associated with the contribution
(Premium Information).
VIEWING THE CIVICONTRIBUTE DASHBOARD
The CiviContribute main page or dashmboard summarises the contributions made, including lists
of contributions received in the current month to date, year to date, and cumulatively since the
campaign's inception. For example, the following screenshot lists the most recent contribution to
a campaign using the Table Layout tab:
You can also view bar or pie charts to compare contribution totals across months of a given
year and across years by clicking on the Chart Layout tab.
112
FINDING CONTRIBUTIONS
Use this screen to find contributions made to your organisation.
To View the Find Contributions screen:
1. Click the Contributions Tab.
2. Select Find Contributions.
You can search based on a number of criteria, specifying date range, amount, contribution status
etc.
113
Contributions must match all specified criteria in order to be returned, so the more criteria you
enter, the narrower the search will be. For example, searching for the contribution type
"donation" and the date range "January 1st to May 31st" will return contributions that meet both
criteria.
The results screen from a search displays the the total amount for the results returned for that
search, the number of contributions, and the average amount per contribution in addition to the
subset of records resulting from the search:
You also have options under the "actions" menu once you select all or a subset of records. The
"actions" menu allows you to:
Batch Update Contributions Via Profile: this is useful if you want to update a large number
of contributions' thank-you date at once, for example. You need to create the profile you
want to use before you perform the search and batch update (see the the chapter Profiles
in the Configuration section for more information about creating profiles).
Delete Contributions: this removes contributions entirely from the system, as if they had
never been entered in the first place. Editing contribtions and updating their status to
canceled provides a better audit trail, but there may be situations where you do want to
delete, such as a contribution entered on the wrong contact's record.
Export Contributions: because this search is contribution-centric, it does not recognise if
contributions come from the same contact. Therefore, if one contact has multiple
contributions that fit the search criteria, that contact will appear as multiple rows when
you export your spreadsheet. If you want to do searches that return one result per
contact, use the contact advanced search.
Print or Email Contribution Receipts: this allows you to create a PDF file of all the receipts
in the search, or email the receipts to the associated donors.
Send Email to Contacts: send an email to all or selected contacts found in the search.
Update Pending Contribution Status: update the contribution status of all or selected
contacts who have contributed online. This action only works with online contributions, and
the same contribution status will be applied to all the contributions selected for updating.
EVENTS
25. What is CiviEvent?
26. Planning the Event
27. Configuration
28. CiviEvent Everyday Tasks
114
25. WHAT IS CIVIEVENT?
CiviCRM's CiviEvent module centralizes your registration data process, lets your constituents
register themselves (including such conveniences as paying online with credit cards), and even
gives people live access to your data while onsite at the event.
CiviEvent is integrated with CiviCRM's other modules, so you can send a targeted email to the list
of participants, or to specific subsets such as the ones who have a volunteer role but cancelled
attendance. Moreover, each registration is added to the list of activities for the contact, letting
you see for instance that Mr Doe registered 15 hours after having received your monthly
newsletter.
SCENARIO: RECRUITING FOR AN ANNUAL YOUTH
LEADERSHIP WORKSHOP
Organizations have many ways to take advantage of CiviEvent to lighten the task load when
planning and managing events. Here is a scenario of how an organization is using CiviEvent.
A community organizing group holds leadership workshops for youths 25 and younger as their
major yearly event. They invite youth speakers and volunteers, as well as several other
speakers for the training workshops. The organization also charges nominal fees for meals and
lodging, a flat fee for the registration fee, and additional costs for optional workshops.
Information is collected beforehand about the participants' food and lodging preferences. The
event invitation is usually sent to a targeted audience contact list to ensure that the
organisation's core constituency attends, and the event is also announced more broadly by
posting it on the website to allow for online registrations. At the end of the event, staff want to
evaluate the success of the event and report results such as number of attendees, total event
fees paid, and total amount still due.
To prepare for the event, the organization plans their data needs and the tasks needed to
configure the event as well as to keep tabs on the registration and event management process.
Here are some items that the organization plans to do in preparation for the day of the event:
Organizers will build their targeted list of people they want to invite to the event.
A staff person will set up the website to show the event.
A staff person will decide and configure the pricing for the different event fees: registration
fee; cost for the meals; cost for lodging; costs for optional workshops.
A staff person will configure CiviEvent to collect information about participants' food and
lodging preferences.
A staff person will set up an event template and email message template that can be used
every year in order to ease the process of setting up similar events over time.
During the event registration process, a staff person will manage the process by which
participants register themselves, periodically checking to make sure that payments are
being made, and managing the wait list when they exceed their maximum number of
participants.
During the day of the event, organizers will check in each attendee on-site to keep track
of who's actually attending and who is a no-show. This will also help determine at the end
of the event who has paid and who still owes fees.
After the event, the Director will create reports about the number of attendees, and
event details such as total fees received as part of a report to give the organization's
funders.
115
26. PLANNING THE EVENT
Before you dive in to create an event, we recommend you review the work flow in this chapter
to help you plan for setting up and managing the event. The work flow also includes concepts
you should know about the structure and functions of the event management process.
GLOBAL EVENT CONFIGURATION
There are several global event configurations as well as general CiviCRM configurations you will
need to consider before you create your event. These configurations define the details and
structure of the event, such as the type of event, the cost if it's a paid event, and the payment
processor to handle credit cards. You can also configure information about the type of
participant, e.g. attendee or speaker, and define different status options to help track
participants' progress through the event process, from being Registered to indicating whether
they Attended or were a No-Show. You may also want to capture additional information about
the participant, such as food preference if the event is a Dinner. Additional data often requires
you to create custom data and profiles in the general CiviCRM configuration.
Some of these configurations are a required prior to creating the event, so familiarizing yourself
with these concepts and planning your data needs before you create the event will help
streamline the event configuration process. Although, if you've already begun creating an event
when you decide to expand your configuration needs, you can always complete the event
configuration process, address your additional data needs, and return to reopen and complete
the event configuration.
You may want to review the following concepts before you begin to configure your event. These
concepts will be discussed in more detail later in the following chapters of this Events section.
Event Type
Participant Role
Participant Status
Price Set
Payment Processor
Send Email Settings
Event Templates
Additional Custom Data and Profiles
Email Message Templates
Participant Listing Templates
CREATING THE EVENT
In addition to planning the configuration you will need, you may want to ask some questions to
help you make some decisions about the details of your event:
Will this be a paid event?
Will you charge multiple fees, such as fees for additional sessions or meals?
Are you restricted to a maximum number of participants?
Will there be a wait list if the maximum number of registrations is exceeded?
Will you allow a contact to register multiple people?
Will you allow online registrations to the event through a website?
Will you be emailing participants to confirm their registrations?
Will you be publishing a listing of the participants?
Is there specific information you want to collect about participants, e.g., food and lodging
preferences?
Thinking about the structure of your event and how you want a person to experience the event
registration will help inform whether you need to do additional configuration and how to set up
the event.
116
TEST DRIVING THE EVENT
Once you finish configuring and setting up the details of your event, you are well advised to test
drive the event to make sure all the pieces of the event process are working according to your
expectations. You may want to test the following:
Do the description of the event, dates, cost of the event, etc., make sense and match
your organisation's plans?
Are the messages that confirm the registration clear?
Did you receive the email message that confirms and thanks you for registering?
If it's a paid event, did payment processing work?
Test the event through the eyes of a person who is registering for the event, to make sure the
flow of the registration process guides the person effortlessly each step of the way. After initial
testing, if you send your invitation email to a person in the organisation that hasn't been directly
involved in the the configuration of the event, you can get a fresh point of view that represents
what your contacts will feel during the process.
When using the "Test-drive Registration" option, you see the same registration pages as a
regular user, but the online payment isn't really debited from your card (and you can enter a
fake one).
PROMOTING THE EVENT
Think about all the ways you would like people to learn about your event:
Will you be posting your event on your website and allow people to register that?
Will you be writing an email blast to your constituents about the event?
Is your event "by invitation only"? Who are the people you would need to email the
invitation?
Have you planned a schedule to announce your event from the initial invitation to sending
out event reminders?
Can you create message templates ahead of time to ease the process of getting multiple
messages out about your event?
In addition to configuring and creating your event, you may need to plan how you could use other
CiviCRM functions to promote the event, as well as determine what other tools, such as as your
website, may need to be utilized to promote your event.
MANAGING THE EVENT PROCESS
From the time you announce your event to the time the event is over, there will be ongoing
event management tasks that you may need to carry out to ensure good participation:
Check to see the status of the participants, such as finding out the number registered, the
number confirmed, or who canceled
Find out the total event fees received to-date to check that you're on budget for the
event
Check to see that your volunteers and speakers have confirmed to attend
Decide when and how to announce or market your event further if you see that number of
registrations are low
Manage the waiting list of people once the maximum number of event registrations is
exceeded
Review participant information, such as food or lodging preferences, to organize additional
event logistics
Determine how you will indicate whether a participant attended and enter the information
into CiviCRM
117
The event management tasks vary depending on the type of event and venue you're planning,
and CiviCRM supports these tasks through many event and communication tools, along with its
searching and reporting features.
Consider asking the staff people directly involved in these tasks to add a report for that event in
their dashboards, in order to have a direct overview directly on their homepages.
FOLLOWING UP AFTER THE EVENT
Once your event is over, you may want to evaluate the event by looking at the total number of
attendees, the total event fees received, who hasn't completed payment for their registration,
and who canceled. Several event reporting tools can help, including the Event Participant Report,
the Event Income Summary Report (summary and detail), the Event Dashboard, and search tools
such as Find Participant.
It is worthwhile updating the status of each participant during the event or just afterward, while
it's fresh in your memory, so you properly flag the no-shows.
It is good practice to send an email after the event to all the participants to thank them and
provide links to pictures or slides of speakers if you have published them online. You might want
to use this opportunity to promote a new event, suggest that attendees join your organisation
as a member, or solicit donations for a specific campaign.
118
27. CONFIGURATION
This chapter assumes that you've gone through the event planning chapter and sketched out the
type of events you need to configure, along with the event-related data you want to collect and
track. Now it's time to actually start configuring CiviEvent and creating events.
If you do not see the Events menu item in your navigation menu bar and you don't see CiviEvent
under the Administer menu, you may not have the component enabled. Navigate to Administer
> Configure > Global Settings > Enable Components to manage which components are enabled.
GENERAL CIVIEVENT CONFIGURATION
There are a number of "general" configuration tasks for the CiviEvent component that are best
to work on first. These settings lay the foundation for creating your events. Review each of the
following event-related settings and modify them as needed before you begin creating events.
Event Types
CiviCRM allows you to define different types of events as a categorization mechanism. This is
particularly useful when searching through event participants or generating an event listing feed.
You can also configure custom fields to store and display additional data about an event by its
event type. Take the time to consider what types of events your organization holds and define
them in this interface. You can return at any time to add to the list of types or modify an event
type label. However, you can not delete event types which have been assigned to one or more
events.
Navigate to Administer > CiviEvent > Event Types to review the default list of event types,
shown in the following screenshot. You can modify event type labels by clicking Edit on any row.
Click "Add Event Type" to create a new category for your events.
Participant Roles
When an individual registers for an event, he or she will be assigned a participant role. This field
helps you segment your participants into meaningful categories based on their involvement in the
event, such as attendee, volunteer, speaker, or staff (attendee is the default role). You can also
define custom fields and assign them to a specific role, which can be helpful when you need to
collect certain information relevant only to speakers or another role. When creating a
registration page for inclusion on your website, you will select a default participant role which will
be assigned to all online registrants.
You can search for participants matching particular roles using the Find Participants and
Advanced Search screens.
119
Navigate to Administer > CiviEvent > Participant Roles to review the default list, shown in the
following screenshot. You can modify participant role labels by clicking Edit on any row. Click "Add
Participant Role" if you need participant roles that are not in the default list (e.g., audio-visual
coordinator, food and beverage manager, etc.).
Participant Statuses
The participant status field allows you to track the individual's registration through your system.
This can help you identify pending or canceled registrations, people on a waiting list, no-shows,
confirmed attendance, or any other status you define. Participant status is also searchable in the
Find Participants and Advanced Search screens.
For organizations that need more of an RSVP workflow, you can rename your statuses to
friendly names such as "Yes, I'm Coming", "No, I can't make it", and "Maybe". Then configure, for
each of those statuses, which ones are for administrative use only or for public use. This allows
you to expose the participant status field via a profile on your registration form, displaying only
those with public visibility. For more information on this scenario, visit:
http://wiki.civicrm.org/confluence/display/CRM/RSVP-style+Event+Registration
Navigate to Administer > CiviEvent > Participant Statuses to review the default list, shown in the
following screenshot. Some statuses in the list are marked Reserved (with a green checkmark).
This means that they are required for event workflows and can not be deleted or disabled.
However you can change the Label, which is what users see when they select from a list of
statuses.
120
There are also five statuses that are disabled by default (displayed in red). These statuses are
used for optional event registration features and must be enabled if you want to use those
features.
Waitlists
You can offer a waitlist to users during online registration when an event is full. If a space
becomes available, the first participant from the waitlist will be invited to complete their
registration. The workflow for this feature is described later in this chapter. Enable the "On
waitlist" and "Pending from waitlist" statuses here if you want to use this feature for any of your
events.
Approval required to attend event
For certain types of events, you may need to require administrative approval for all the
participants who self-register, prior to being able to complete the registration process. The
workflow for this feature is described later in this chapter. Enable the "Awaiting approval",
"Pending from approval" and "Rejected" statuses here if you want to use this feature for any of
your events.
Custom data
CiviCRM provides ample flexibility for you to define and integrate custom fields into your event
management process. Custom data are fields that you define and associate with a specific data
type. You can then use them to collect information from your contacts as they register for an
event, as well as in other ways.
Custom data is managed through Administer > Customize > Custom Data. Begin by creating a
new set of custom fields, then designate the objects in which those fields appear. You might
assign some fields to events, some fields to participants, and some fields to participants at
certain events or participants who take on certain roles (such as speakers). The scope of the
custom field set is called its use. Several types of uses are available to CiviEvent tools:
121
Events (Event Type): This use type applies to fields that are connected to the event
itself, or to a specific event type. For example, your organisation may host a series of
training workshops and want to create a custom field to track six common topics covered
by events. You could create a checkbox style field with the list of topic options. When
creating an event using the "Workshops" type, this field will be available. Note that you are
not required to select a specific event type. Leaving the dropdown set to "Any" indicates
the field is available to all events, regardless of the type.
Participants: The Participant use type attaches to the actual registrant record. For
example, you may want to know whether a registrant has any dietary restrictions and
collect that information when they register.
Participants (Event Name): This use type is identical to the Participants type, with the
exception that it allows you to assign a group of custom fields to a specific event.
Returning to the previous example, you may find that the dietary restrictions field is
relevant only to an upcoming full-day workshop where lunch will be served, but not to an
afternoon workshop series you are planning for the coming month. You could create the
field set and assign it to a single event.
Participants (Role): Additionally, you may create a participants type field and assign it to a
single participant role. This is valuable, for example, if you need to collect biographical
profile details from your speakers and wish to record it with their event registration.
Because that field is applicable to only the Speakers role, you would limit it using this
interface.
After creating your set of custom fields, define the actual fields within each set. If you are not
familiar with creating custom data, refer to chapter in this book on extending core data before
creating your actual fields.
Using Profiles for online event registration
Participant custom data groups and fields will be automatically included in their assigned location
when you access the information through the CiviCRM administrative tools. However, they will
not be displayed in your online event registration page unless they are first included in a Profile,
which is then included when you configure online registration for an event.
Participants always provide an email address when they register for an event in CiviEvent, but
most organizations find it useful to collect more personal information during online event
registration. This might include basic information such as first and last name, as well as eventspecific information such as meal preference. You will need to create a profile containing these
additional fields prior to creating your event.
Navigate to Administer > Customize > Profile to set up and edit profiles. The following
screenshot offers a typical example of a Profile used for a conference where there is an option
to provide childcare. Notice that this profile contains fields belonging to Individuals and
Participants.
If you are not already familiar with setting up Profiles, refer to the section on using them.
122
Registration confirmation and receipting
CiviCRM can send automated confirmation and receipt emails to participants who register online,
as well as participants who are registered by your staff or volunteers using back-office screens.
The content and layout of these emails are controlled by message templates. Both HTML and
Text formats are provided. Your organization may want to modify or add text to these emails,
or add branding such as a logo to the HTML versions.
Once you create an event, you can test-drive the online registration process and review the
confirmation email. Navigate to Administer > Configure > Message Templates (shown in the
following screenshot) and click the System Workflow Message tab to see the list of messages you
can modify. Click Edit next to "Events - Registration Confirmation and Receipt" rows to edit the
content and layout.
The templates for these messages include both the text shown and necessary program logic.
Use caution when editing so as not to modify the program logic. Be sure to test the workflow
and review the emails sent after making any changes. If you find that your changes have caused
problems, errors or missing information, you can always "Revert" to the system default for that
workflow.
CORE SETTINGS USED BY EVENTS
Several core CiviCRM settings may play an important role in how you use the event tools:
Administer > Configure > Global Settings > Outbound Email (SMTP/Sendmail): In
order to use the previously mentioned capabilities to send an email receipt, you must
complete and test the Outbound Email settings.
Administer CiviCRM > Configure > Global Settings > Payment Processors: While not
required, the event registration process is significantly enhanced by allowing individuals to
register and pay for the event with a credit card. CiviCRM can be configured to use several
payment processors, all configurable through this interface. Please visit the online
documentation for more details on using payment processing (http://tiny.booki.cc/?
civicrmpaymentprocessorconfig). Once you have created a payment processor you can
select it in the event creation fees page.
CREATING AN EVENT
123
You're ready now to create an event. The following sections guide you through a sequence of
screens which allow you to control each aspect of the event. As we walk through each step, we
will demonstrate the options and their effects on the resulting registration form through
screenshots and examples.
It's a good idea to go through each screen in detail as you learn about available options. Later in
this chapter we'll discuss how you can streamline the event creation process by creating event
templates. These allow you to prefill most options with a single keystroke.
Begin by navigating to Events > New Event.
1. Event Information and Settings
The first page in the event wizard requests basic information about the event:
What is the type of event (e.g., Conference, Workshop, etc.)?
What role will participants be assigned to when they register online for this event? Roles
distinguish different types of event participants, such as attendees, speakers, and staff.
The value placed in this field will be assigned by default when users register online. The
most common value is "Attendee."
Do you want users to see a listing of participants, and how much information about the
participants do you want to reveal in the listing? Participant listings are a great way to
demonstrate support for an event and generate interest within your constituent
community. Note that the options you define in this section only enable participant listings
—to display one, you will still need to create a menu item or link to the listing somewhere
on your website. Once you've created the event, the participant listings link is displayed on
the event configuration page. Refer to the chapter on everyday event tasks for
information on promoting your events.
What is your event title? The title will appear on event information pages, registration
pages, event listings, and in the Manage Events administrative page. Be sure to choose a
descriptive, well-crafted title to represent your event.
124
The next two fields (event summary and complete description) let you describe your
event. Both the summary and complete description will be included on event information
pages. Use the rich-text editor provided for the description field to include photos and
images.
What is the starting date/time and ending date/time for your event? These will be included
on the event information page and event listings.
CiviCRM lets you set a maximum number of participants for each event. This is important,
because online registration lets people sign up without giving your staff a chance to
intervene and shut off registrations. Here you can set the maximum number of
participants and define a message to be displayed when that number is reached.
If you've enabled the Waitlisting feature (by enabling the related participant statuses), you
can check Offer Waitlist and set the message you want displayed on the event information
page when the event is full.
In today's world, people are increasingly using GPS and web-based mapping tools to get
where they are going. CiviCRM integrates this functionality by letting you include Google
Maps or Yahoo! maps throughout your site. You will first need to configure your mapping
solution through Administer > Configure > Global Settings > Mapping. You can then enable a
map link which will generate the location based on the event location.
Once you have created your event and placed the information and registration pages on
your website, you naturally will be looking for ways to promote the event. CiviCRM
provides several ways to do that through RSS feeds, iCal files or feeds, and event listing
pages. Select the Public Event box to nclude the event in these promotional listings.
Techniques for promoting events are described in the everyday tasks section.
Lastly, you have the option of toggling this event active or inactive. If you anticipate that it
will take some time to complete the configuration of your event, consider making it
inactive it until it is complete to ensure it is not inadvertently listed on the event listing
feeds. You can easily activate the event when you are ready to begin publicizing it.
After reviewing the details on this page, click Save to advance to the next step. When you press
Save, your event is created. You can interrupt configuration on any subsequent page by clicking
Cancel and return later to review and modify any of the event settings. Any information you
entered on any page will be preserved so long as you pressed Save on that page. To return to a
saved event, navigate to Events > Manage Events and click Configure to continue working on the
event.
2. Event Location
The next step in event configuration is to complete the location and contact details for the
event. Though optional, it is highly recommended that you take the time to provide these details
to your potential participants. If you have enabled a map link in the previous step, make sure
that you fully complete the address details on this page (see screenshot).
Once you have entered an event location, you can reuse it for subsequent events by clicking
"Use existing location" and selecting from the dropdown list.
125
You can also list phone numbers and email addresses on the event information page if you want
to give registrants a way to contact event organizers directly. If the event is being held off-site
from your organization's primary location, you may also want to provide contact information for
the meeting location.
Click Save to save your entries and advance to the next step.
3. Event Fees
CiviCRM supports both free and paid events. If this event is free, set the Paid Event radio button
to No, then click Save and skip to step 4, Online Registration. If this is a paid event, click Yes.
The screen will show the options available (see the following set of screenshots).
Note that if you plan to accept credit card payments through the online registration form, you
need to configure a payment processor prior to completing the details in this section (you will see
a notice on top of this screen if no payment processors have been configured). Questions you
are asked on this screen are:
What contribution type will be assigned to paid registrations for this event? Although the
most common value for this field is simply "Event Fee", CiviCRM provides the flexibility to
define multiple contribution types and assign them to different events as needed.
Do you want to allow registrants to "pay later" by mailing in a check, paying on-site with
cash or credit card, or arranging some other payment method? If so, you can enable the
Pay Later option and define a label and payment instructions. If you keep this unchecked,
registrants will be required to pay by credit card.
126
Can you use Regular Fees for this event, or do you need to use a Price Set? Regular fees
provide a single set of options and allow the registrant to select a single option. This
approach works well for many events and is easy to set up. Each fee amount has a label
assigned and you can set a default fee. Here's a simple example:
Price sets allow you to break event fees into smaller pieces, and set a fee for each piece.
Using a price set you can offer optional programs and event features (e.g., an optional
post-conference dinner or a book). Examples and steps for creating price sets are covered
later in this section. Please take time to review their functionality and understand how
they can benefit your event management process.
You can also configure early bird discounts (discounts determined by signup date). These
override regular event fees. This discounting method is available only for the regular fee
structure. Implementing other discounting rules or discounts for price sets requires
additional programming. You or your developer should refer to the section on extending
CiviCRM for more information.
127
Discounts are structured in parallel with the base event fees. After creating your list of fee
options and enabling the discounts feature, you must create the discount set and add it to
the fee table. To help you create a discount set, a new fee table will appear toward the
bottom of your page, duplicating the original fee table shown in the previous screenshot.
You can now edit the labels and fees to correspond to the discounts offered for each of
the original fee options.
You can even create multiple date-based discount sets for an event. This may be useful if
you have a series of early bird dates that progressively increase the cost of registration as
the date of the event gets closer.
Click Save to save your entries and advance to the next step.
4. Online Registration
Your organisation may want its staff to register participants manually. However, allowing people
to register online (self-service) through your website offers many benefits. Online registration is
convenient for your constituents and can save staff time and resources.
If you want to offer online registration for this event, check Allow Online Registration and use the
options on this form to configure this feature.
Define the text to be used as the link to the registration form, and set the starting and
ending dates for registration. The link text is used in the event information page, and is
most commonly "Register Now" or something similar. The starting and ending dates define
when website visitors may register for the event. The registration ending date is likely
different from the starting date of the event, as you may want to close registration in
advance of the event in order to prepare name tags or perform other administrative
functions.
128
Very often an organisation may choose to send multiple people to a conference or an
individual will bring her partner and wish to register and pay for the registrations in a single
process. Enabling "Register multiple participants" lets individuals register as many people as
they choose for the event and pay the fees with a single transaction. By default, this
option requires a different name and email address for each person registered. Checking
"Allow multiple registrations from the same email address" provides the same capabilities,
but without requiring distinct email addresses for each registrant. In either case, CiviCRM
uses a separate contact record (either an existing one if it's already in the system, or
create a new one) for each individual registered.
The Registration Screen configuration block defines introductory and footer text for your
registration page, and the profiles included in the top and bottom regions of the form. If
you come to this stage in the wizard and have not created your profile form, you may
continue with the event setup process and return to the event configuration page later to
select your desired profiles.
What other data do you want to capture from your participants as they register? By
default, the CiviEvent registration page requires only an email address. Organizations
typically want to collect additional contact information from the registrant, as well as
define fields unique to this particular event (such as meal choice). The custom data fields
and profiles used here (see screenshot) must be created before you reach this form, as
described earlier in this chapter. Here, you can include up to two profile form snippets in
your registration page. It's a good idea to put contact data (name, address, etc.) in one
profile snippet, and event related information (e.g. meal choice, childcare requirements,
etc.) in the second profile.
The remaining fields on this page control the text to be displayed on the Confirmation
page, Thank-you page, and emailed confirmations / receipts (if enabled). The standard page
flow is shown in the following screenshot.
For free events, the Confirmation step is skipped. When completing the Confirmation,
Thank-you, and Confirmation Email sections on this page, take care to think about the
user experience at each stage in the process. Ensure that the text is appropriate to the
point where the registrant will be in the registration process.
For most events you'll want to enable the Send Confirmation Email feature (see following
screenshot). For paid events, the confirmation email also acts as a receipt. Make sure that
the Confirm From Email address entered is a valid email account on your mail server. Add
one or more staff emails (separating multiple email addresses with commas) to the CC
Confirmation To field if you want real-time updates on who is registering for your event.
129
Click Save to save your entries and continue with the next step.
5. Tell-A-Friend
CiviEvent makes it easy to leverage the social networking power of your committed constituents
by empowering them to quickly and easily share details about your organization and event with
their friends and colleagues. The final step in the event creation is a page where you can enable
"Tell-A-Friend" capabilities. You can define the text and links to be included on that page and in
the email sent from the tool (see the following screenshot).
A "Tell a friend" activity record will be added to a participant's Activities tab each time he sends
mail to his friends. This allows you to track your most active supporters and engage them
further. The people who are emailed using this feature are also automatically added to CiviCRM
as contacts.
This is the last step in creating an event. Click Save and Done.
130
Now that you have completed the creation of your event, you should test it. Returning to the
Manage Events page, you will see your recently created event listed with any others you have
created. From the action list, select Test-drive to test the registration page. Test-drive mode will
use the sandbox options for your payment processor, if available, and will create a registrant
record with a "test" indication so that it can be reviewed and easily removed. If you have
events where anonymous users register for events, you should also test the registration when
not logged in. Refer to the Event Permissions information later in this chapter for details.
If you discover elements that you need to edit and adjust, select Configure to return to the list
of event setting pages. Once you are satisfied with the event information and registration form,
it's time to display it on your website. The everyday event tasks chapter includes detailed
information on adding the event to your website and promoting it.
USING EVENT TEMPLATES TO STREAMLINE EVENT
CREATION
If you find that you are setting up a number of events with similar configurations, you can
streamline the process using Event templates. Enter all the characteristics your events have in
common in the event template. Common characteristics might include location, event fees,
online registration settings, tell a friend settings, etc.
Once you've created an event template, you can select that template (as shown in the following
screenshot) when you start to create a new event. Your event will be automatically prefilled with
all the saved configuration properties.
To create a template, start by navigating to Events > Event Templates and clicking Add Event
Template.
The steps for creating event templates are similar to those described earlier for creating an
event. The main differences are:
Assign a Template Title that clearly identifies the type of event this template is used for
(e.g., Monthly Community Meetup).
There are no starting and ending dates in the template form. That information will always
be specific to an actual event instance.
SETTING PERMISSIONS FOR EVENT REGISTRATION
This section applies to Drupal installations only.
131
If you've enabled online registration for events on your site you need to review the Drupal user
permissions to ensure that visitors are able to view event information and complete the
registration forms. Navigate to the Drupal Administer menu and select Users > Permissions.
Most organizations allow anonymous users (users who have not logged in) to view and register
for events. If you want to allow this convenience, assign the following CiviCRM module
permissions for the anonymous user role:
access all custom data - required if you are collecting information in custom fields from
registrants
profile create - required if you've included any profiles in your online registration forms
register for events
view event info
view event participants - required if you want to display a listing of registered participants
Alternatively, you can assign these permissions to an authenticated user role if you want to
exclude anonymous visitors from viewing or registering online for events. Finally, if you need
special access control rules for specific events, you can use the Manage Access Control feature
to assign access to specific groups of contacts. If you're not familiar with CiviCRM's built-in ACL
(access control list) features, refer to this online documentation:
http://wiki.civicrm.org/confluence/x/Y4C9AQ
INCLUDING PROFILES FOR AN EVENT REGISTRATION
To collect information about registrants, such as additional contact information or food and
lodging preferences, when the registrants register online, the best way is to include profiles in
your event configuration. Do this as follows:
1.
2.
3.
4.
Choose Events > Manage Events.
Click Configure for this event.
Click the Online Registration tab or link.
Choose one profile for "top of page" and another profile for "bottom of page"
COMPLEX EVENT FEES WITH PRICE SETS
Price sets play a role similar to custom data fields and profiles, but support options for event
fees instead of basic data collection. Here's an example of how a price set looks to a person who
is registering for a Conference that includes optional pre-conference training sessions, meals and
lodging:
We saw earlier that step 3 in event creation involves configuring event fees. The standard fees
layout form is a very simple structure, allowing you to create a list of fees and their labels. The
resulting layout allows the registrant to select one option from the list. Often, this single-option
format does not meet the complex demands of your event registration structure. Price sets
allow you to create multiple registration fee fields and assign the entire set to an event.
Price sets are created and managed by navigating to Manage Price Sets and choosing the Events
link or by navigating to the CiviEvent > Manage Price Sets menu and choosing the Administer link.
Similar to custom data sets, you begin by creating a new price set and then adding specific fields.
132
Creating a New Price Set
To create a new price set, click "Add Set of Price Fields". In the Price Set form, enter the name
of your price set, whether it's used for events or contributions, and a description. Press Save. A
form appears for you to create the first field in your price set.
Creating a New Price Field
Begin by entering a name for the event item in the Field Label.
The Input Field Type has a structure similar to custom data fields, with some unique qualities and
usage relevant to fee structures.
Text/Numeric Quantity: Allows you to set a unit price. When the form is presented to
the registrant to fill it, it displays a text box where the registrant enters a quantity. The
quantity entered is multiplied by the unit value to calculate the fee.
Select: Displays a drop-down box where the registrant selects one option from the list.
Radio: Displays multiple options in a list, allowing the registrant to select one fee choice.
Checkbox: Displays fields in a list where the registrant can select or unselect any number
of options.
You can combine these field types to create virtually any fee structure.
Enter a number in the Participant Count field if you want to increment the number of registered
participants per unit against the maximum number of participants allowed for this event. For
example, if this price field is for a table at a fundraiser which seats eight people, you would set
Participant Count to 8.
For Text/Numeric Quantity fields, enter an amount in the Price field. For Select, Radio and
Checkbox types you will enter a price for each option in the table of options (shown in the
screenshot above).
If you want to display the price next to the event item, check the "Display Amount?" box.
As when creating other custom data, you can enter a description for the Field Help, decide
whether the event item is Required, select whether the event item is visible to the public or only
to the administrator in the Visibility field, and indicate wheter the event item is Active. These
fields are described in the chapter on extending core data.
133
Next, you can either press Save to finish configuring this event item, or Save and New to create
another price field for this price set.
Once you finish configuring your price set, you can add it to your event in step 3 where you
configure the event fees. Select the name of your price set in the Price Set field as shown in the
following screenshot.
As with custom data fields, it is to your advantage to give thought to the structure of your
registration fees and build the price set before creating the event. However, if you begin the
event creation process and determine that you needed to construct a price set, you can
complete the process, create the price set, and then return to the event configuration page to
assign the price set.
Price sets can be reused in multiple events. This is particularly helpful for organizations that run
multiple events in a series, such as a regional training seminar program.
134
28. CIVIEVENT EVERYDAY TASKS
This chapter describes a variety of procedures related to managing an event after you set it up
in CiviEvent.
MASS REGISTRATIONS
CiviEvent offers the time-saving feature of registering multiple contacts for an event at one time
(or as a "batch").
Scenario for doing mass registration
An organization is planning a large event and has invited many people, based on who they think
will be interested. The staff then does a mass registration of those people, setting the
participate status to "pending". They then use the event list of pending contacts as a means of
calling people to see if they are coming. If the person says they will attend, the event organizer
can change the person's status from "pending" to "registered".
Mass registration is accomplished by the steps:
1. Search for the set of contacts you are interested in.
2. On the search results page, either choose "select all" or put a check mark next to each
contact you are interested in. A sample search results page appears in the following
screen-shot.
3. Choose "Add Contacts to Event" from the "actions" list just above the search results,
then click "Go".
4. Complete the registration form, choosing the appropriate action choices for this set of
people, such as setting the Participant Status to "pending". Choices made here will be
applied to all contacts in this set.
Limitations of mass registrations
135
You can not make different action choices for a single set of contacts. The action choices are
applied uniformly to the entire set of contacts. To work around this limitation, do a mass
registration several times, each time choosing the desired action choices for that set of contacts.
For example, you might mark one set of contacts you plan to call and invite with a Participant
Status of "pending", then add another set of contacts to the event, such as event leaders you
know will attend, with a Participant Status of "registered".
You cannot apply contribution information, such as a pay later contribution or a credit card
transaction, in a batch action. Therefore, mass registration is best for free events or for
contacts who are not required to pay a fee at this point. You could always add payment details
for an individual later on.
IMPORTING REGISTRATIONS
Importing registration information is a quick way to add a bunch of registrations to the event.
The information to be imported must be available in a comma-separated values (CSV) file. If the
majority of the contacts are already in CiviCRM, it may be faster to do a mass registration
action as mentioned earlier in this chapter.
Scenarios for importing registrations
Your organization may be collaborating with another organization for a specific event. The other
organization may be handling event registration and sending you a spreadsheet after the event.
Another scenario is that a volunteer event coordinator, who did not know that you had CiviCRM,
recorded event registrations using Excel or another spreadsheet program.
In these cases, it is still important to record the event registration inside CiviCRM to help you
consolidate your information and allow better interactions and reporting for the event
participants in the future.
Steps for importing registrations
1. Prepare the data in the CSV file. Make sure date fields (if used) are valid dates. If some of
the contacts are already present as contacts in CiviCRM, make sure the first name, last
name and email address match what is already in CiviCRM.
2. Differences between an imported contact's and an existing contact's information can cause
a duplicate record to be created. While duplicate contacts can be merged later, its
preferable to avoid the situation. The rules for determining duplicate contacts can be
defined by navigating to Administer > Manage > Find and Merge.
3. On the navigation menu, choose Events > Import Participants.
FINDING AND REPORTING ON PARTICIPANTS
This section helps you do some common information searches.
To see an overview of participants for all upcoming events
1. NAvigate to Events > Dashboard
2. Click the "Counted:" link to see all the contacts for that event.
If any count is zero, the associated text will not be a hyperlink. Some participant roles may not
count for the event total, such as someone who is on the cleanup duty.
To see the participants for any event with a variety of criteria
1. Navigate to Events > Find Participants.
2. In the event name field, start typing to see a list of events. Click on the event you want.
Set additional search choices for the fields you want to see.
3. Click Search.
136
When the search returns results, you have the opportunity to select all of the resulting
participants or a subset, and perform an "action" on them. Available actions include:
Batch update participants via profile: This feature is useful if you wish to edit multiple
fields for multiple participants in a table grid layout. Note that you must create the profile
set you wish to use before implementing this action. If you are not familiar with how
Profiles work, please read the chapter on that topic before using this feature.
Cancel Event Registrations for the selected participants.
Change Participant Status for the selected participants.
Delete Participants: Deleting participants does not delete the contact record but will
delete all transactions and activities associated with the participant. Note that this action
cannot be undone.
Export Participants: The export function allows you to export a predefined set of fields or
create your own custom set of fields (which can be saved for reuse). The software exports
to CSV format, which can be easily opened in standard spreadsheet software or directly
used for mail merges.
New Smart Group: Smart groups are saved search results based on defined criteria,
similar to a query. The advantage of a smart group is that the system will rerun the query
using the criteria you have defined each time you open the smart group. This is particularly
helpful for complex search criteria that you need to view on a regular basis.
Send an Email to Selected Participants: CiviCRM also lets you generate an email on the
fly to your search result list. For example, you may want to let recipients know details
about the event in advance, such as parking options or local area restaurants.
To see a participant list listing individual fees
1. Navigate to Search > Custom Searches.
2. Click the Event Aggregate link.
3. Choose your search criteria, and click Search.
To use a report template to create an event report
137
1.
2.
3.
4.
5.
6.
7.
Click Reports > "Create reports from templates".
Scroll to see the templates in the Event Report Templates section.
Click the name of the report template to create a new report.
Choose the desired report criteria, then click Preview Report.
Expand the area labeled Create Report.
Choose a report title, and other choices as desired.
Click Create Report. Typical results appear in the following screenshot.
TESTING YOUR EVENT
Before unleashing your event on the public, you should always test the event registration
process. This can be done as follows:
1. Navigate to Events > Manage Events.
2. Locate your event in the list of all upcoming events and click the Test-drive link.
3. Fill out the registration form and complete the registration process. If this is a paid event,
the test settings for the payment processor will be used, you can enter dummy
information.
4. In order to find the new test participant record, navigate to Events > Find Participants.
5. In the search criteria, check the box Find Test Participants.
6. If you need to adjust the event settings, navigate to Events > Manage Events and click the
Configure link for this event.
PROMOTING YOUR EVENTS
Getting the word out and building excitement about your event can take many forms. The most
important is making sure the event is prominently listed on your organization's website and your
public calendar, and letting many people and organizations know about it.
Some organizations may want to publicise their guest list as part of the event description as a
means of encouraging others to register. Participants should also be encouraged to help
promote the event.
If you are publicising your events on another website or organization's calendar, make it clear
how people are expected to register. For example, some social networks have a built-in event
registration system, such as Facebook events. Other organizations that are helping to publicise
your event may have their own event registration systems. Make sure that no matter where
you publicise the event, it is obvious how the person is expected to register.
There is also additional information about how to list your event on a Drupal-based website and
a Google calendar on CiviCRM's Wiki:
http://wiki.civicrm.org/confluence/display/CRMDOC/Event+Listings
138
To add the participant list to the event information page
1. Navigate to Events > Manage Events, then click the Configure link for this event.
2. Expand the section labeled Public Participant Listing and copy the URL in the description
area.
3. Click the link Event Information and Settings.
4. Paste the URL from step 2 into the event summary or event description, then click Save
and Done.
5. Optionally, you can share the URL via other communication vehicles such as within an
email message and other places you are promoting the event.
You may also choose to share the URL through email and other places where you are promoting
the event.
To display an event description or registration on the website (Drupal
steps)
1. Navigate to Events > Manage Events and then click "more" > Live Page for this event.
2. Copy the URL for this event page.
3. Create a Drupal menu item for this URL or paste the URL into any Drupal page.
Additionally, you may enable a Drupal block that lists all upcoming public events. To learn more,
go to the CiviCRM wiki:
http://wiki.civicrm.org/confluence/display/CRMDOC/Event+Listings
To display an event description or registration on the website (Joomla!
steps)
1.
2.
3.
4.
5.
6.
Go into the Joomla! control panel.
Choose Menu Manager > Your menu name.
Click New.
Expand CiviCRM > CiviCRM Events and click the Event Info item.
Choose the event from the "Select an Event" list on the right side of the page.
Click Save.
GETTING THE URL OF A LISTING OF UPCOMING EVENTS
This lets you give an external organization or external website a URL that they can place
anywhere on their website. The only drawback is that the page will appear like the rest of your
own website.
1. Navigate to Events > Manage Events.
2. Click on the "globe" icon on the top right of the page.
3. Copy the URL.
GETTING AN RSS FEED FOR ALL UPCOMING EVENTS
This lets visitors subscribe to all your events in the RSS feed reader of their choice. Also, many
website management systems allow a website to subscribe to any RSS feed and present the
information within their layout.
1. Navigate to Events > Manage Events.
2. Click on the orange and white square icon on the top right of the page.
3. Copy the URL to share or embed into your website.
ALLOWING PEOPLE TO TELL A FRIEND ABOUT AN EVENT
139
This offers people the chance, when they register for the event, to email their friends and
colleagues about it. CiviCRM will also capture the "friend's" email and create a "Tell A Friend"
activity for the email. At the same time, CiviCRM will create a similar activity in the participant's
record.
1.
2.
3.
4.
Navigate to Events > Manage Events and click the Configure link for this event.
Click on the "Tell a Friend" link.
Click the checkbox to enable "Tell a Friend" for this event.
Provide the appropriate message to include for this event.
GETTING YOUR EVENTS ON A CALENDAR
Most websites include a graphically laid out calendar that can be shown by he month, week, or
day. It is very useful to get your events on relevant calendar pages. Many individuals also
maintain personal calendars to track events along with their personal meetings and
appointments; you can make it easy for them to copy your event to their calendars.
The standard format for sharing information between calendar systems is called iCal. CiviCRM
can export a static iCal file as well as a dynamic iCal feed.
Getting a static list of events into another calendar system
1.
2.
3.
4.
5.
Navigate to Events > Manage Events.
Click on the square icon displaying "31" on the top right of the page.
Save the iCal file on your local computer.
Go into the other calendar system and find the import iCal file tool.
Within the import wizard of the other calendar system, browse to and upload the iCal file
from your local computer.
New CiviEvents created later on will not appear in the other calendar system. These steps will
need to be repeated to show new events. Dynamic updates are described in the following
procedure.
Getting a dynamic list of events into another calendar system
1.
2.
3.
4.
5.
Navigate to Events > Manage Events.
Click on the square green icon displaying the letters "ICAL" on the top right of the page.
Copy the URL of the page that opens.
Go into the other calendar system and find the import iCal feed tool.
Within the import wizard of the other calendar system, paste the URL from step 3.
From this point forward any new public events created in CiviEvent will automatically appear
within the external calendar system.
Displaying an event report on CiviCRM 's home dashboard
1. From the navigation menu, click on Reports > "Create reports from templates".
2. In the Event Report Templates area, select one of the reports you would like to display on
the home dashboard.
3. Enter the criteria you want to build the report, then click Preview Report.
4. Click Create Report and enter the additional information you want in the report.
5. In the Other Settiongs area, check the "Available for Dashboard?" box.
6. Click Create Report.
7. From the navigation menu, click Home to view the dashboard.
8. To add the report to the dashboard, click Configure Your Dashboard.
9. Drag your report from the Available Dashlets area into either the Left Column or Right
Column of the dashboard area, and click Done.
10. On the home dashboard, you should now see your report. To view the latest updated
information for your report as well as any other items you've included on your dashboard,
click Refresh Dashboard Data.
140
WAITLISTS
Your organization may have limits on attendance, such as a 25-person limit for a training
workshop or a 200-person limit for a fund-raising dinner. CiviEvent lets you set the maximum
number of people allowed to register for your event. When registrations reach that number,
CiviEvent will not allow other people to register, but will instead send an automatic message
saying, "The event is currently full." This message can be customized by the organization when
creating a new event, and you can let people add themselves on a first-come-first-served basis
to a waitlist.
To create an event with a waitlist:
1. Navigate to Events > Manage Events.
2. Click the Configure link next to your event.
3. Click the "Event Information and Settings" link, and on the Info and Settings form, check
the "Offer a Waitlist?" box.
APPROVING REGISTRANTS
Many events are open to everyone, but there may be times when your organization invites only
specific people to the event. For example, you could have an event where only volunteers that
have donated 100 or more volunteer hours are invited to an appreciation dinner. But it is
possible that the people invited will talk about the event to their friends, and possibly forward
the information. Hence, other people not invited may try to register for the event. CiviEvent
allows you to create an event that allows you to check the people who have registered and
approve only the people invited.
When a person registers for the event, they will get a reply that says, "Your registration has
been submitted. Once your registration has been reviewed, you will receive an email with a link
to a web page where you can complete the registration process." This reply can be customized
to your organisation's needs.
To create an event that requires approval:
1. Navigate to Events > Manage Events.
2. Click the Configure link for your event.
3. Click the Online Registration link. On the Online Registration form, check the Requires
Participant Approval box.
4. You can then customize the text for the Approval Message. You can also limit the amount
of time participants have to complete their registration after approval by entering the time
in hours in the "Pending participant expiration" field. For example, if you want to give
participants 3 days to complete their registration, enter "72" in that field.
5. Click Save or Save and Done.
MANAGING PARTICIPANTS
After you create your event and provide the registration form to website visitors, you need to
begin managing your participants through the CiviEvent administrative tools. CiviEvent lets you
register participants manually, search through participants based on a variety of criteria, export
participant lists, and perform a number of other functions on your event records. CiviEvent not
only gives participants a smooth journey from registration to payment to attendance at the
event, but also lightens the burden of administrative duties on your organisation's staff. An
Events dashboard brings all your events and participant information together in one place (see
screenshot). In this section we will discuss how these administrative tools are used.
141
Registering a Participant Manually
Although CiviCRM helps alleviate data entry for event registration by allowing your constituents
to register directly through your website, a segment of your contacts will probably continue to
register by mail, phone, or in person on-site. Your staff will then enter the registration
information manually.
For example, when a person calls the office to register for an event, the staff person who takes
the call can enter the person's name in the "Quick search" box, select the contact from the
results, click the Events tab on the caller's contact record, and add the person to the event.
The Events tab, shown in the following screenshot, displays a summary list of the contact's past
event attendance and provides a link for registering the contact for a new event.
There are two options for registering the contact:
142
Add Event Registration: For people who pay later, such as by sending a check or paying
when they arrive at the event.
Submit Credit Card Event Registration: For people paying immediately with a credit
card. This option is available only if you've configured a payment processor that allows
direct payments through your website. You can ask them for their information and enter it
manually.
The interface for both options is very similar, with the exception of those fields that record
payment details.
143
As you work through this form, certain sections of the page change to reflect selections you
have made. For example, when you choose the event you want to register the contact for and
select the participant role, the form will automatically load predefined custom data fields that
pertain to those selections.
If the event selected is a paid event, you will see an event fees section which has been defined in
the event configuration details, and an option to record the financial transaction details (Record
Payment) will be visible. This leads us to an important concept central to CiviEvent (as well as
other modules). Event registration records in CiviCRM are independent of, but can be related to,
a financial transaction. While this may seem confusing to organizations accustomed to viewing
event registrations as essentially a financial transaction, it offers an important and valuable
distinction.
An event registration communicates the contact's participation in the organization's event. A
corresponding financial transaction indicates the monetary value associated with that
participation. While related, the two are distinct.
The distinction is best understood by considering the all common scenario of an organization
waiving fees for a V.I.P., a speaker, or someone who participating in the event in a limited way.
In such cases, you want to register the individuals but may not want to create an associated
financial transaction.
CiviCRM respects this distinction by recording the event registration record under the Events tab,
recording the financial record under the Contributions tab, and then creating a link between the
two records.
144
If the event is a paid event, click the Record Payment checkbox and enter information in the
transaction fields that are displayed. This process essentially "links" together the event
registration and the contribution record for this contact. After recording the registration, you will
be able to view the event registration record and see the related contribution record at the
bottom (see screenshot). If you do not select the Record Payment check box, only a registration
record will be created.
MEMBERSHIP
29. What is CiviMember?
30. Planning
31. Configuration
32. Everyday tasks
145
29. WHAT IS CIVIMEMBER?
CiviMember allows you to track and manage membership for one or more organisations. You can
define different membership types for each organisation. CiviCRM provides tools to track
contacts through the membership cycle, and handles membership renewals. A central aim of
CiviMember (much like other CiviCRM components) is to automate membership administration as
much as possible.
REAL WORLD SCENARIOS
The Atlantis State Public Transit Association (ASPTA) is a useful case study to learn from when
deciding how to manage membership. They have four membership categories:
Regular Members: Public transit systems. There are three tiered dues levels within this
category, based on the size of the system. Membership is organization-based, and all
employees receive access to member benefits, such as discounted rates at Association
events.
Affiliate Members: Businesses providing goods and services to the transit industry, such
as bus and rail car manufacturers, engineers and consultants, parts and component
manufacturers, etc. Membership dues are a flat rate for all Affiliate Members. Membership
is organization-based, and all employees receive access to member benefits, such as
discounted rates at Association events.
Associate Members: Students, government representatives, public interest groups,
research institutions, and other interested parties. Membership dues are a flat rate for all
Associate Members. Membership is individual-based.
Honorary Members: Retired transit system executives and others who have made a
notable contribution to the industry and Association. No membership dues; lifetime period.
Membership is individual-based.
As the ASPTA CiviCRM administrator configures the membership types, she creates three
separate types for the Regular Member category to account for the three dues levels. The
duration is one year, beginning on January 1, with a rollover date of October 1. In this way she
accounts for new members who join very late in the year and are not able to fully benefit from
their membership during that calendar year: their memberships extend through December 31 the
following year.
It is now time to see how CiviMember responds to the particular needs of a membership drive.
ASPTA's membership committee begins a focused outreach to non-member public transit
systems (Regular Member category) and non-member businesses working in the public transit
industry (Affiliate Member category). They want their members to renew online and pay through
a credit card.
To accomplish this, they create a membership signup/renewal page. CiviMember can maintain the
information about how to join in one place and generate a signup page or renewal page from it as
appropriate. The signup page will be available to all website visitors, whereas the renewal page
will be visible only to contacts who are already members, after they login to the members-only
section.
After completing configuration of the signup/renewal page, ASPTA creates a menu link to expose
the form (shown in the following screenshot) and begin their online membership recruitment
effort.
146
30. PLANNING
This chapter covers the major areas you should think about before configuring CiviMember. It
should be useful for system administrators setting up CiviMember.
Before you begin using CiviCRM's membership tools with your contacts, spend some time thinking
about your organisation's membership structure. Work out the membership types you'll offer
and how you'll model them in CiviCRM.
Key questions include:
Membership lengths.
Start and end times, and if your membership terms are rolling or fixed-date. In other
words, does membership always start at the same date, such as January 1, or can a
person start an annual membership that runs exactly one year till the day rolls around
when they signed up?
Whether a membership is based on the individual, family, or organisation. For instance, a
social service agency may sign up an entire family as a member, while a policy-making
organisation may sign up other organisations as members.
It's tempting to over-engineer your membership structure and create more membership
categories than you actually need. Try and keep things as simple as possible.
Map your membership structure to the way CiviMember handles membership. If you are having
trouble modelling your membership structure in CiviCRM, ask in the forums about the problems
you are having. There might be other ways to model your data, or simple changes you can make
to CiviCRM's behavior to better fit your needs.
Also ask why your membership structure is the way it is. Perhaps the workflow was set up
based on a previous technological or organisational limitation that doesn't apply now that you are
using CiviCRM.
The renewal process is as important as the initial sign-up. You'll need to plan time to get renewal
reminder templates working and tested.
Do you want to provide a special members area of your website, or offer them extra online
content as a result of their membership? If so, you should explore CMS integration modules such
as Drupal's CiviMember roles integration module.
147
31. CONFIGURATION
This chapter takes you through the necessary configuration steps for CiviMember. As with other
modules, CiviMember takes advantage of CiviCRM's integration with the Drupal and Joomla! CRMs,
allowing your members to manage their own memberships through your web site. So the second
half of this chapter takes you through setup of online renewal pages.
CONFIGURING MEMBERSHIP TYPES
The first configuration step is to configure the membership types and status rules. These are
handled in: Administer > CiviMember > Membership Types.
Membership types are the various membership categories that your organization offers. You can
configure an unlimited number of membership types and set various options for each of them.
Options include how they are used, the membership term period, and the dues amount.
Begin by defining the name of the membership type and a brief description. The name will be
used throughout the system, so choose it carefully.
CiviCRM requires the membership type to be associated with an organization record.This gives
CiviCRM the flexibility to handle multiple membership types with multiple organizations (or suborganizations) within a single interface. For example, if your national organization consists of six
regional chapters, each of which maintains membership records separate from the national
membership, you can create membership types for each chapter membership and associate
them directly with the chapter organization.
Continue with the membership type configuration by entering the minimum membership fee
(zero if the membership is free), and select the contribution type. In most cases you will select
Membership Fee from the dropdown menu. You can create and modify Contribution types
through the Administer CiviCRM tools. When a user or administrator enters a membership record
that includes payment of dues or a fee, CiviCRM will log a corresponding contribution record and
assign the selected contribution type.
Each membership type must have a duration value and period type. The duration value is the
length of time for which the membership is valid (e.g., an annual membership has a duration of 1
year). The period type determines when that duration is measured from. A rolling membership is
measured from the date it is entered in the system, whereas a fixed membership begins on a
defined date. For fixed period memberships you must also identify the rollover date: the point
after which new memberships are entered as belonging to the next dues period.
Membership can be inherited from one contact to another, which is useful in situations such as
one finds in professional trade organisations, where they sign up another organisation as the
member, but employees of the organisation receive the benefits of membership. Use the
relationships dropdown menu to specify which related records should receive membership
through the parent record.
You can use the visibility option to make sure certain membership types are handled by an
administrator manually (e.g., honorary and lifetime memberships). When you restrict their
visibility, they do not appear on membership signup or renewal pages on your website.
At the bottom of the membership types page lies a block of information for managing renewal
reminders. CiviCRM can be configured to send out a reminder email to members as the
expiration date for their membership nears. This is particularly helpful for rolling membership
types, where contacts may join at any time during the year. To configure the renewal reminder
you must first have set up a renewal email template through Administer > CiviMail > Message
Templates.
MEMBERSHIP STATUS RULES
148
Membership status rules control the journey that contacts take through the membership
process. Each step is marked with a different membership status.
The path taken by a member, along the lines of the default membership status rules, is as
follows:
Pending. Someone who has asked for membership but has not paid, or is awaiting
approval.
New. Payment has arrived, or the membership has been approved.
Current. New members move to this status after a certain period of time.
Grace. When the end of the membership period is reached, someone who has not
renewed membership enters this status for a period of time.
Expired. When the grace period expires, the member moves to this status and no longer
receives membership discounts or mailings.
All membership status rules can be configured in Administer > CiviMember > Membership Status
Rules.
Status types are measured from the start or end date of the membership record. The "current
membership" checkbox determines whether a certain status is considered "current" when
viewing the CiviMember summary statistics for memberships.
When configuring the membership status rules, be sure to take note of the order in which they
are listed. CiviCRM will process the rules beginning with the first and assign a status as soon as
one matches.
Setting up cron to automatically update membership statuses
CiviCRM checks the status rules for a membership record and updates it accordingly when you
create or edit the record. In order to take full advantage of the membership status rules, and to
automatically send membership renewal emails, you must configure your server to regularly
update the status of your members. This is done using the Unix cron utility. For more details,
visit the online wiki documentation:
http://wiki.civicrm.org/confluence/display/CRMDOC/Membership+Types.
SIGNUP/RENEWAL PAGES
Membership signup and renewal pages allow website visitors and existing contacts to manage
their own memberships. Membership signup and renewal pages can be connected with a financial
contribution, which means you can use CiviCRM to process membership dues, fees, and special
contributions.
CiviCRM thinks of membership sign up pages as a type of Contribution page (even if there is no
associated contribution). So to create a sign up page, you need to create a Contribution page:
1. Select Manage Contribution Pages from the navigation menu's Contribution link.
2. To create a new page, click the Add Contribution Page button.
3. Follow the screens displayed by the setup wizard that starts up. The following discussion
focuses on options in the contribution page setup wizard which are most likely to be used
for a typical membership signup/renewal page.
1. Title and Settings
This page appears as shown in the following screenshot. The option must relevant to
memberships is the "Allow individuals to contribute and / or signup for membership on behalf of
an organization" checkbox.
149
People (not organizations) visit websites, so CiviCRM assumes by default that any interaction is
done through an individual's contact record. This becomes a problem if your membership
categories are organization-based. To address this, CiviCRM allows you to select this option and
permit an individual to act on behalf of the organization she represents. The membership record
will then be attached to the organization's record, not the individual's. After checking this box,
you can add descriptive text and select whether signing up on behalf of an organization is
optional or required.
2. Contribution Amounts
The second step of the wizard allows you to configure details related to the financial transactions
performed through the Contribution page. If you have configured a credit card transaction
payment processor in CiviCRM, you will be able to set up real-time transactions here.
If you are building a contribution page for membership signup and renewal only, uncheck the
"Contribution Amounts section enabled" checkbox. This hides the section which allows you to
solicit extra financial contributions over and above the membership fee.
In addition to executing real-time transactions, you can allow constituents to make make offline
payments through the "Pay later" option. The "Pay later" feature leaves the responsibility on the
member to pay by check or cash at a later date.
3. Memberships
The next step in the contribution page setup wizard is specifically related to memberships. Check
the Membership Section Enabled checkbox to show two sets of title and introductory message
fields, one for new memberships (signups) and the other for membership renewals.
CiviCRM will display the title and introductory message for new memberships if the website
visitor is not logged in. If the user is logged in and has an existing membership record, CiviCRM
will display the title and introductory message for renewals. Joining the organization creates a
new membership record, while renewing membership updates the member's existing record and
extends the membership end date.
Administrators should be aware of potential confusion and duplicate records if an existing
member uses a membership join page without having first logged in. CiviCRM will make an
attempt to match the user with an existing contact record, but any variations in the name or
email address could cause a new contact record with corresponding membership record to be
created.
You may want to provide guidance in the introductory text on your membership join page to
encourage members to log in before completing the form. By logging in first, existing members
can ensure that the transaction properly interacts with their contact and membership records.
150
Some addition options appear at the bottom of this page:
You can select which membership types are available in this signup/renewal page.
If you are using this online contribution page for both membership signup and general
fundraising, you can make membership signup optional for constituents who just want to
donate without becoming a member.
If you enabled the option in step 2 to solicit additional contributions, you can decide
whether such payments are recorded separately from membership fee payments.
You can decide whether to display membership fees on the signup/renewal page.
4. Thank-you and Receipting
After the site visitor completes the membership signup or renewal form, he will be redirected to
a thank-you page and can have an email receipt generated and sent to him. This fourth step in
the wizard allows you to configure those options.
5. Tell-A-Friend
Organizational growth and development is increasingly built through viral social networking
mechanisms. CiviCRM allows you to add a tell-a-friend feature to the thank-you page. The page
lets your members share details about your organization with their friends by emailing them a
link and information.
6. Include Profiles
Profiles are central to CiviCRM's interfaces with website visitors. A profile is a collection of data
fields that CiviCRM displays to obtain information from visitors or display data to them. If you
are not familiar with the creation and function of profile sets you should read more about it in
the Profiles chapter of the Configuration section in this book.
Profiles are critical to the functioning of membership signup and renewal pages. By default,
contribution pages will include only an email field (which the member is required to fill in), in
addition to the membership and contribution amount fields. Organizations almost always want to
collect additional contact information as part of the membership signup process. Profiles provide
these extra fields. On this step of the contribution page wizard, you may select one ore more
existing profiles for inclusion on the form.
if you haven't yet defined a profile with the fields whose information you want to collect, simply
procede to the next step of the wizard. Save your work on the Contribution page, define the
Profile you want, and come back to the Contribution page to assign the profile.
7. Premiums
Premiums are thank you gifts and incentives offered to organization contributors. They are most
commonly associated with tiered donation levels, though they could be created for use with
memberships. Before including premiums on a contribution page, you must configure them
through Administer > Contributions > Premiums (Thank-you Gifts). Step 7 (Premiums) of the
contribution page wizard controls the introductory text, contact information, and other premiumrelated details.
8-9. Campaign Widgets and Personal Campaign Pages
Contribution Widget (Step 8) is used for displaying fundraising goals, while Personal Campaign
Pages (Step 9) is geared toward obtaining help from visitors toward fundraising efforts. These
steps are usually not used for membership pages.
Publishing your membership signup/renewal page
151
After completing the contribution page wizard, return to the listing of Contribution pages, where
you will find the page you've just created. You can now view the page, test the functionality, or
return to the configuration options and make adjustments.
At this point you've completed the Contribution page but have not made it visible or available to
website visitors. Depending on the environment in which CiviCRM is operating, this will be
accomplished in different ways.
Drupal: From the Configure Contribution Page screen, select Live Page to view the finished
page. You can then copy the URL and include it in a content page or assign it to a menu
item.
Joomla!: The most direct way to expose your membership signup/renewal page to the
front of your website is by creating a menu item. Navigate to a menu and create a new
CiviCRM item. From the list of menu options, choose Contributions. In the basic parameters
section, select the contribution page you would like exposed from the dropdown menu.
Save the menu item and view the website to confirm the page's functionality.
152
32. EVERYDAY TASKS
This chapter describes some of the CiviMember tools of use to administrators. It will show how
to expose membership signup/renewal pages and membership directories to your members and
other website visitors.
ADMINISTERING MEMBERSHIPS
Organization administrators will primarily work with membership records by viewing contacts.
After finding the contact you wish to manage, click the Membership tab to view a summary of
the contact's membership records (illustrated in the following screenshot).
Membership records appear in a list with active memberships (those with a current status) first
and expired or cancelled memberships below.
From this interface, you can edit existing membership records, renew a membership, or create a
new membership record. If you have configured an online credit card payment processor for use
in CiviCRM, you will see two options for creating or renewing a membership: one for handling an
offline record (no real-time transaction taking place), and one for handling an online record (using
a real-time credit card transaction). The interface for each process is very similar, except that
the credit card option includes payment processing and recording options .
After creating a new membership, you are taken to a form where you complete details regarding
the record.
153
Many of the fields on this page will be auto-completed if left blank. Fields include:
Source: The system will complete details regarding the record, including whether it was an
offline or online transaction and who completed the record.
Join Date: The date the record was created will be auto-filled.
Start Date: If the membership type is a rolling membership, the current date will be autofilled. If the membership type is a fixed period, CiviCRM will determine the appropriate
start date based on the membership type configuration.
End Date: This is automatically calculated from the start date and filled in based on the
membership type configuration settings.
You can use the Status Override field to manually define a status for the record. As indicated by
the title, it overrides the status automatically provided. You should use caution with this field as
setting it will disable the automated status function for the record.
RECORDING MEMBERSHIP PAYMENTS
The Record Membership Payment checkbox expands the membership payment and receipt block
and lets you record payments associated with the membership record. This feature touches an
important concept central to CiviCRM's membership function: membership records in CiviCRM are
independent of, but can be related to, a financial transaction. While this may seem confusing to
organizations accustomed to viewing membership records as essentially a financial transaction, it
offers an important and valuable distinction.
A membership record communicates the contact's relationship with the organisation. A
corresponding financial transaction indicates the monetary value associated with that
relationship. While related, the two are distinct. The distinction is best understood by considering
two scenarios:
154
Free memberships: Obviously if a certain membership category charges no fee, there will
be no financial transaction associated with the membership. But in a traditional
understanding (in which membership equals a financial transaction) this scenario "breaks"
the model.
Membership renewal: If a member renews her membership, she is essentially extending
her existing membership record by another term, defined as the membership period.
Therefore, she is not creating a new membership. By retaining a distinction between the
membership record and financial transaction you can maintain a single membership record
whose end date is extended, while creating multiple related financial transactions
representing each renewal purchase.
CiviCRM respects this distinction by recording the Membership record under the Membership tab,
recording the financial record under the Contributions tab, and then creating a link between the
two records.
By clicking the Record Membership Payment checkbox and completing the transaction fields
displayed, you are building these two associated records. After recording the membership, you
will be able to view the membership record and see the related contribution record at the
bottom.
RENEWING MEMBERSHIPS
Naturally, you expect your constituents not only to join your organization, but to maintain their
membership on an ongoing basis through renewals. CiviCRM facilitates the renewal process.
Returning to the contact's membership tab, you will see the option to renew an existing
membership record. The renewal process does two things:
It extends the membership record by altering the end date to reflect a new membership
period. For example, if your organisation's membership is handled on an annual basis from
January through December, an existing end date of December 31, 2010 would be extended
to December 31, 2011. CiviCRM calculates the end date extension based on the
configuration for the specific membership type being renewed.
If applicable, CiviCRM allows you to record a financial transaction (contribution) as part of
the renewal process. As discussed earlier, this will insert a contribution record and attach
it to the membership record.
Members' "join date" is not modified when a membership is renewed, so you always know when
the contact first became a member. You cannot change a member's membership type when
renewing their membership. If your constituent is moving from one membership type to another,
you need to create a new membership record, distinct from the existing one. In this way you
develop a membership history for the member.
THE MEMBERSHIP DASHBOARD
CiviCRM provides several tools to help you obtain a quick snapshot of your members and search
through them based on various criteria. From the main sidebar menu, select CiviMember to view
the membership dashboard page. This page contains two blocks of information that display a
summary or your members, categorised by type and date range, and a list of recent member
activity.
155
All of the summary numbers are hot-linked. Simply click on one to drill down and view a list of
members who have joined or renewed over the last two months or the year-to-date, or who are
considered current according to the membership status definitions.
SEARCHING FOR MEMBERS
The Find Members page displays a series of searchable fields to help you segment and locate
membership records. It is important to note that searching with this tool will display a list of
membership records. So if a certain contact has multiple membership records meeting your
search criteria, multiple records will be displayed for that contact. This contrasts with the
advanced contact search tool, which displays one row per contact (i.e., there would be no
duplicate listed, even if a contact had two membership records meeting the search criteria).
Toward the bottom half of the form are a series of date range fields. The left column indicates
the From value and the right column the To value so you can narrow down searches to activities
that take place between two particular dates. If you are interested in membership records
before a certain date, use only the To field. Conversely, if you are interested in membership
records after a certain date, select only the From field.
The top of the search result set includes a shaded block with tools letting you take action on all
records in the result set, or on those selected using the checkboxes in the leftmost column.
BATCH UPDATES TO MEMBERS
Use this option to edit multiple records in a table grid using a pre-defined profile. If you are not
familiar with how Profiles work, you will want to investigate how they are created before using
this function. As you use this tool, note the following:
156
You must have a Profile created before using this option. To find out more about Profiles,
please read the Profiles chapter in the Configuration section of this book.
Your selection of contacts must be of a single contact type. You cannot edit Individual and
Organization type contacts simultaneously.
You may edit only a maximum of 100 records at a time. If your search result set exceeds
100, use the record selection checkboxes to edit a single page of records at a time.
DELETING MEMBERS
This action deletes all the selected membership records from the database. The contacts are
not deleted, only their membership records. This action cannot be undone.
EXPORTING MEMBERS
After selecting this action, you have the option of exporting a default set of primary fields or
choosing which fields to export. When selecting which fields to export, you may save the mapping
for future use. The data is exported in CSV format, which can be easily modified further in
spreadsheet software or used for document mail merges.
SENDING EMAIL TO MEMBERS
After searching your records, you may send an email to selected contacts and include data field
tokens. Tokens are placeholders that are filled with the contact's data when the email is sent.
This can save a lot of effort and possible errors, because you are able to send a bulk email to
contacts while customizing it to each contact (e.g., beginning the email with a personalized
salutation containing the contact's name).
EMAIL
33. What is CiviMail
34. Planning
35. System Configuration
36. Configuring Email in CiviCRM
37. Everyday Tasks
157
33. WHAT IS CIVIMAIL
This chapter introduces the ways CiviCRM can help you maintain relationships with contacts
through email, using either CiviMail or other features. There are two main ways to send email in
CiviCRM:
The "send mail to contacts" action
CiviMail (CiviCRM's 'mass mailer')
There are advantages and disadvantages to either method. The first is quicker and easier. The
second is more sophisticated and offers better options for reporting.
Whichever option you use, integrating email to contacts with CiviCRM offers several benefits:
CiviCRM lets you share a single address book across all the staff in your organisation, which
is less work to maintain than leaving the responsibility up to individual staff, and increases
the chance of having the correct email for each of your contacts.
Every email sent is stored in the activity history of each of the recipients. So you can see,
for instance, that John Doe made a donation three days after he received your April
newsletter. Both outgoing and incoming email messages are recorded.
Everyone at your organisation can see what email was sent and received, even if the staff
person who sent or received it has left the organisation.
You can use templates to ensure that your organisation's visual identity and branding are
consistently applied to all your email communications.
You can use "canned emails" for your most common emails (welcome emails, invitations to
events, directions to your office, membership information, call for actions, etc).
You can send personalised mass emails using tokens. Personalised emails have been found
to get better response rates.
Advantages specific to CiviMail include:
Bounced emails are handled automatically.
Recipients can manage their own subscriptions to email.
Statistics are available on who is reading your emails and what links they are clicking on.
CiviMail can be configured to automatically track replies by creating an autofile mailbox. Email
sent to this mailbox is automatically converted into an activity and added to the right contact.
CiviCRM's mail features, including CiviMail, interact with your mail server software. Configuring
the mail server and CiviMail are system administrator tasks, which may also require professional
assistance. You will also need to verify with your web hosting provider whether they meet the
configuration requirements, and verify that they don't put limits you might exceed on the
number of emails you can send per day.
158
34. PLANNING
This chapter explains some key ideas that are useful for planning the use of CiviCRM's email
capabilities. The chapter should be read by system administrators before they start configuring
CiviCRM for sending email, and by regular users before they start sending emails to contacts.
You have three options for sending email:
Your regular mail client (simplest option)
CiviCRM's "send mail to contacts" functionality
CiviMail (most powerful option)
Simple or insignificant emails that don't need to be viewed by others in your organisation
shouldn't be sent through CiviCRM. Emails that you want to share with other members of your
team should be sent through CiviCRM. If you are also interested in capturing statistics about the
success of your email, including bounce statistics and click-throughs, use CiviMail.
CiviMail requires more work initially to configure and there are more steps involved in sending
each email.
Working out which method to use for each email might not be immediately apparent. Over time,
the best practices for using the right tool for each situation will become more obvious and can be
shared among your users.
PERSONALISATION OF EMAILS
You can email from a personal address, from a more general email address associated with your
organisation, or from another person's address. For instance, an assistant can send official email
messages under the name of his manager.
You can use tokens to insert personalised text, such as a persons name, into a mailing sent with
CiviCRM. Tokens are placeholders that CiviCRM recognizes and replaces with an appropriate
value when sending each message.
Display name and email greeting tokens are very useful. With a bit of customisation, you can
also add more sophisticated information, such as details about the recipient's most recent
donation or when her membership expires.
You can also provide a link to the person's contact dashboard so that they can review their
registration details for themselves after logging in. Or you can use the checksum token to direct
them to this page without logging in.
TEMPLATES
An email template allows you to create a generic structure that can be reused when sending
emails.
You might want to have specific headers and footers for mass mailings (newsletter, internal
bulletin, Press Release), and a few templates for regular emails.
Part of the planning involves to talk to those using CiviCRM for email to see what they need to
send on a regular basis. Use this information to create a template for them.
LIES, DAMN LIES, AND REPORTING
CiviMail can track links that have been clicked, providing useful information to help you
understand the areas your recipients are interested in.
159
You can also track how many of your recipients opened the email and which links in the email
were popular.
A word of warning about email opening statistics. The vast majority of the mail clients protect
(by default) the privacy of the recipient. That's why, when you receive an email containing
external data (such as images that are online), you get a warning message saying something such
as "Images are not displayed". If a recipient doesn't override the privacy features, she won't be
counted among the contacts that read the email.
Therefore, it's likely you will have more readers than the number reported by CiviCRM.
In our experience, having around a 30% reported opening rate can be considered good. This is
obviously different for each organisation and each group you send emails to.
Don't focus too much on the absolute numbers, but rather use them as a way of comparing
different mailings you send. You might want to use them to experiment with different layouts,
writing styles, and lengths and see what works best for your constituents.
You might also want to consider the privacy issues (and we encourage you to do so). There are
good reasons to turn off CiviCRM's tracking of recipients in order to honor your constituents'
privacy. For instance, you may wish to avoid tracking who has clicked on the "how to deal with
drug issues" link on a specific mailing.
AUTOFILING OUTBOUND EMAIL
CiviCRM lets you keep a history of email sent via your email client as follows. Use the BCC field
(which no one who receives the email will see) to enter an email address that will be read by the
database and converted into an activity. This activity gets filed in the record of the contact that
matches the email address. If that email address does not exist in your database a new contact
record will be created.
160
35. SYSTEM CONFIGURATION
This chapter covers CiviMail system configuration. This is a complex task which requires system
administrator level skills. Correct configuration is crucial to keep your server off spam lists and
black lists.
You will need to be able to change the configuration of your DNS, create email accounts,
configure a cron job, read the headers of email messages, and possibly change the configuration
of your SMTP server.
In this chapter, we assume you are running CiviCRM on a Linux server and that you are
comfortable working with the shell and running some simple commands. Most of these steps will
be similar on other operating systems, but you will need to adapt them to your system and
tools.
The configuration described works fine for mailings to up to about 10,000 people. If you plan on
sending email to hundreds of thousands of contacts, you should benchmark several options and
consider a dedicated SMTP server. This more complex configuration is outside the scope of this
book.
In this chapter we'll use an external Gmail mailbox address to test configuration. So the first step
is to create a Gmail account if you don't have one already; alternatively, you can use another
address for testing the procedures in this chapter, but you will need to be able to view the
source of the mails you receive.
Once your system is properly configured, you are going to run periodically (for instance every 10
minutes) two different programs:
EmailProcessor.php to check if you have received new bounces, and flag the invalid
contacts
civimail.cronjob.php to send all the emails that might be queued for sending.
CONFIGURING OUTBOUND EMAIL
Outbound email setting are configured at: Administer > Configure > Global settings > Outbound
Email. The choices here are:
mail(). This is the default option and if it works for you, you should use it.
SMTP. If you have a dedicated external mail server, specify its details here. Bounce
messages generated with SMTP are slightly more complete than the ones from mail(), but
there is no practical benefit to using SMTP if you can use mail().
Sendmail. This option is kept for compatibility with older CiviCRM versions.
Disable Outbound Email. Works as expected.
After making a choice, send a test email to your account on Gmail and verify that you receive it.
If you receive the following error message, you'll need to configure a default FROM email address
(covered in the chapter on CiviMail configuration).
Sorry. A non-recoverable error has occurred.
The site administrator needs to enter a valid 'FROM Email Address' in Administer ->
Configure -> Domain Information. The email address used may need to be a valid
mail account with your email service provider.
Once you have received the email, you will need to view the source. This is done in Gmail by
clicking on "Show original" in the email you receive.
The email should contain headers that resemble the following.
Received: from yourmailserver.example.org (xxx.example.org [12.45.120.30])
by mx.google.com with ESMTP id e31si4519230wej.3.2010.04.26.00.38.16;
161
Mon, 26 Apr 2010 00:38:17 -0700 (PDT)
Received-SPF: pass (google.com: best guess record for domain of
[email protected] designates 12.45.120.30
as permitted sender) client-ip=12.45.120.30
In particular:
The "Received: from" header should correspond to your mail server and be properly
configured. It might contain information about your hosting provider instead of your domain
name. This is not a problem as long as the mail server is properly configured. If you have a
dedicated IP address for your server, you should try to configure a reverse DNS that represents
your organisation instead of the default name.
The "Received-SPF" header should list "pass" or "neutral". Sender Policy Framework is
described later in more detail.
Sending mass mailing is resource intensive. We don't recommend sending email messages from
budget hosting providers. The time you will spend troubleshooting will often cost more than
upgrading to a more professional host. Check with your hosting provider to find out whether
they limit the number of email messages you can send and whether they run PHP in safe mode.
Some of your recipients' mail servers use DNS based blacklisting services (DNSBL) which keep a
blacklist of IP addresses likley to send spam. Mail from these servers will be flagged as spam
and not reach its intended destination. If your server is blacklisted (for instance, because enough
of your recipients flagged your email as spam, or because another website on your server has
been flagged as spam), you will need to contact the organisations that have blacklisted you and
convince them to unlist you.
They are several websites that help you testing whether you are in a DNSBL. A web search for
"blacklisting email" will turn some up. Test regularly to find whether you are on a blacklist.
CONFIGURING SENDER POLICY FRAMEWORK (SPF)
By default, the Internet allows any mail server to send any email claiming to be from anyone.
This makes it easy for spammers to forge addresses and send spam using your email address
(or any other). SPF allows you to create a special DNS record listing the IP addresses of the mail
servers that can legitimately send email from @yourdomain.org.
If your domain name already has an SPF record, make sure that it includes the IP address of
your CiviCRM mail server (which might be a different from the host used for the web server or
from your mail servers), and if it doesn't, add this IP address.
If you don't have an SPF record, consider adding one. You will need to add at least your mail
server and CiviCRM server (if they are different) to the SPF record.
You can read more about SPF at http://www.openspf.org.
CONFIGURING THE RETURN CHANNEL TO MANAGE
BOUNCES
You will have contacts that have invalid emails, and CiviCRM can automatically receive the
bounced email notifications and flag your contacts accordingly. Based on the type of errors (mail
server is unreachable, mailbox full, mailbox doesn't exist, dns error...), CiviCRM will either directly
set the contact as on hold or wait until several mailings are bounced with the same error for the
same contact.
You need to set up two things: a mailbox to receive bounced email messages, and a cronjob that
will read periodically this mailbox, and update your contacts and your mailing reports in civicrm.
The bounce email address is an "invisible" email address visible only in the email message's
envelope (hidden fields that precede the headers and message added by the user). Choose any
name you like that is meaningful to you. In this example we have chosen return, so the email
address we need to set up on a mail server for example.org is [email protected].
162
Verify that your account is properly set up by sending a test email from Gmail to the return
account.
CiviCRM handles bounces as follow: for each email sent, a new unique "invisible" sender address
is created using the variable envelope return path (VERP). When CiviCRM receives a bounce, it
looks at the invisible sender address to decide which email bounced. Contacts will be marked as
on hold when their email bounces. Further messages to those addresses won't be sent.
Setting up an email account to receive bounces
There are several ways of configuring your bounce mailbox:
Sub-addressing: Your mail service might allow you to append a +tag or -tag qualifier to
your e-mail address (e.g., [email protected]). Several mail servers, including Gmail,
Yahoo! and Postfix provide this sub-addressing by default.
Try to send yourself an email, adding a +tag or -tag. If you received received the mail you
sent with a tag, it means that you can directly use the mailbox you created
([email protected] in our example) as the VERP.
Catch-all address: If sub-addressing doesn't work on your mail server, you need to define
the mail account you created ([email protected]) as the "catch-all" account. Every mail
sent to an address that isn't a real mail account will end up there, including all the bounced
email messages.
External address: If neither of the preceding methods works, consider creating a new
account on a service such as Gmail and use it to receive the bounced emails. You will have
to set filters in this account so it doesn't discard as spam all the bounced email it will
receive.
Adding the account on CiviMail
Once you have created your email account to receive the bounces, you need to set up CiviMail
so it knows how to read it: Administer > CiviMail > Mail accounts as the default email address.
Specify the mail server, username, and password you used when creating the account.
If your mail server supports it, specify IMAP and SLL, otherwise POP.
You can leave the return path empty.
The email domain is the one for your email address (example.org).
The local part is the account you created with '+' appended , e.g., "return+".
Check the default checkbox. (If not, in Civicrm 3.2.5, CIvimail will ignore this information,
construct a Return-Path lacking a domain, generating a 501 error: "recipient is not
recognized" from SMTP.
Once this mailbox is configured, you will need to configure CiviMail to empty it, read all these
bounced messages and identify the related bounced contacts. This is performed by the
bin/EmailProcessor.php program. We recommend testing the bounce process by running this
program directly before setting up CiviCRM to process the bounced email messages
automatically. For instance, try entering the following URL into a browser to test the program,
substituting the details for your invisible email account:
http://example.org/sites/all/modules/civicrm/bin/EmailProcessor.php?name=username&pass=
password&key=your_site_install_key
Read the chapter on cron for the details of these parameters.
If CiviCRM can't properly connect to the mailbox, it displays an error message:
ezcMailTransportException: An error occured while sending or receiving mail.
followed by some extra information about the precise problem, such as:
Failed to connect to the server
163
The POP3 server did not accept the password: -ERR [AUTH] Username and password not
accepted
The IMAP server did not accept the password: -ERR [AUTH] Username and password not
accepted
Once you have verified that CiviCRM can properly handle the bounce, you can set it up to
automatically process the replies and bounces on a regular basis.
The different options to set up this periodical task are described on the Scheduling the job
section below.
SENDING MASS MAILINGS
Mass mailings are generated via the web interface and queued to be sent by a background cron
job, a process that periodically checks whether there are any mailings waiting to be processed.
The program that cron runs is bin/civimail.cronjob.php. This section explains how to schedule it to
run on a regular basis
If you need to send some email from CiviCRM right away, without waiting for the cron job, you
can trigger the sending process by visiting the http://example.org/civicrm/mailing/queue&reset=1
URL. Use this capability sparingly. It could utilize a lot of server resources and cause CiviCRM to
slow down noticeably. The administrative settings for sending email are usually configured to
minimize the load on the server, and the cron job is a more efficient way to send mass email.
Scheduling the job
To handle both outgoing email and bounced email, you should run a process several times an
hour. On Linux and other Unix or Unix-like systems, this is done by configuring a cron job.
The cron job needs to run using an account recognized by your Drupal or Joomla! server. Create
an account dedicated to this task (e.g.,
mailprocess), give it a long, secure password (e.g.,seol-lzprm42amv-psyc) and grant it access on
CiviCRM and CiviMail. Do not change the account password without changing the password in the
configuration files of this cron job.
To set up your cron job, you need to understand how cron works specifically on your CiviCRM
server. But as example of setting up cron, you can log in as your dedicated cron user and type
the following in the shell:
crontab -e
and then enter the following line:
*/5 * * * * php absolute_path_to_civimail.cronjob.php
Press CTRL-D to save the job and exit crontab. This example runs the PHP file every five
minutes.
The civimail.cronjob.php program has two modes: one for running the file directly from the shell
and one for loading the program from the web server. Use the direct shell method whenever you
can. But if for technical reasons (not enough access rights, non-working php-cli, etc.) you can't
run the programs from the shell, use the web server method.
From the shell
First, find out whether php-cli is installed. From the shell, type php -v. If you see (cli) in the
result, as in:
PHP 5.2.3-1ubuntu6.5 (cli) (built: Feb 11 2009 19:55:53)
Copyright (c) 1997-2007 The PHP Group
Zend Engine v2.2.0, Copyright (c) 1998-2007 Zend Technologies
with eAccelerator v0.9.5.3, Copyright (c) 2004-2006 eAccelerator, by eAccelerator
This means you have php-cli installed and you should use it, because it has several advantages:
164
You can run a PHP script at a lower priority than your web server, so that even if it takes
a lot of CPU, it won't interfere with the regular users of your site.
You can set different memory limits for the php-cli process and the PHP process used by
your web server.
You avoid the overhead of the web server and the HTTP layer.
You won't have any timeout problems.
The following is complete cron configuration to handle CiviCRM's mail requirements:
# This must be set to the directory where civicrm is installed.
CIVI_ROOT=/var/www/civicrm
USER=www-data
MAILTO="[email protected]"
# Location of the PHP Command Line Interface binary. nice -19 forces to run at a
lower priority than the web server
PHP=nice -n19 /usr/bin/php
#line to be modified according to the informations below
PARAMS= -sdefault -umailprocess -pseol-lzprm42amv-psyc
#cronjob send
# m h dom mon dow
command
*/5 * * * * cd $CIVI_ROOT;$PHP bin/civimail.cronjob.php $PARAMS
*/15 * * * * cd $CIVI_ROOT;$PHP bin/EmailProcessor.php $PARAMS
The user that run the scripts (www-data in this example) needs to be able to write into the
temporary folder. Your configuration might specify a different user.
You don't have to run both scripts at the same frequency. The preceding crontab file verifies
every 5 minutes whether mail messages need to be sent, but only every 15 minutes whether
bounced email needs to be processed.
PARAMS contains:
1. The site you used, which is -sdefault on Drupal. If you run multiple CiviCRM sites on a
single server, you need to specify your site's domain, such as -sexample.org.
2. The user login account (-umailprocess).
3. The password you defined (-pseol-lzprm42amv-psyc).
From the web server
You can access the two processes from pages on your web server using commands such as:
wget -O - -q -t 1 --post-data='name=mailprocess&pass=seol-lzprm42amvpsyc&key=yoursiteinstallkey' http://www.example.org/sites/all/modules/civicrm
/bin/civimail.cronjob.php
wget -O - -q -t 1 --post-data='name=mailprocess&pass=seol-lzprm42amvpsyc&key=yoursiteinstallkey' http://www.example.org/sites/all/modules/civicrm
/bin/EmailProcessor.php
This works like visiting the web pages in your brower, but can be run automatically as shell
commands.
For security reasons, you need to add an extra key parameter, defined in your
civicrm.settings.php file. Read the chapter on the REST interface for more information about this
parameter.
165
36. CONFIGURING EMAIL IN CIVICRM
The preceding chapter set up your mail server to support CiviCRM's mail functions. This chapter
covers configuration of CiviCRM itself. The configuration steps in this chapter are essential if you
want to delegate the creation and sending of mailings to someone in your organization using
CiviCRM.
CONFIGURING THE DOMAIN INFORMATION
Your domain information is basic information about your organization: its name, a short
description, your email address and your physical postal address. CiviMail requires that you
include the sender's physical address along with unsubscribe/optout links in any email you send,
in order to comply with privacy laws in many countries. This information is made available via
tokens and must be included in any mail sent with CiviMail.
To configure the domain information, go to: Administer > Configure > Domain Information.
CONFIGURE GROUPS
CiviMail uses Groups to manage subscriptions to mailing lists. To create a group, go to: Contacts
> New Group. When you create and configure a Group for this purpose, make sure to check
Mailing List so that it is available as a Mailing List in CiviMail.
You can also create Smart Groups using the search forms. For example, using the Advanced
Search you can create a Smart Group of contacts who have active memberships, or a Smart
Group of contacts in a given city. You can then use the Smart Group to send mailings without
having to first update the contacts in that group.
To create a Smart Group:
1. Go to any of the search forms and run a search query based on the criteria for your
group.
2. On the search results page, click the radio button that selects all the records.
3. Click on " - more actions - ", select New Smart Group and then click Go.
4. The next screen provides a review of the criteria chosen for the Smart Group. Give the
Smart Group a name and (optionally) a description, and make the Smart Group a Mailing
List.
5. Click Save Smart Group.
CONFIGURE MAILING LIST SUBSCRIPTION PAGES
CiviCRM provides a page that allows users to sign up for email directly from your website. This
page is available at www.yourdomain.org/civicrm/mailing/subscribe.
This page contains all the groups that have publicly viewable mailing lists and allows visitors to
subscribe directly to these groups. After people fill in this form, they will be sent an email asking
them to confirm their subscription and their details will appear in CiviCRM with their group
subscription set to Pending. When they click the confirmation link in the email, their group
subscription will be set to Added.
Another way to add contacts to a group is to create a profile, make this profile public and set
the profile so that when it is completed, the contact is added to a group. The advantage of
using a profile is that you can collect extra fields. The disadvantage is that there is no email
verification.
166
When you use a profile to enable emall subscriptions, decide what information you want to ask
contacts on the registration form. Avoid asking for information just because you might need it
laterr. Focus on what is immediately useful and strive to keep the form as short as possible. It is
probably wise to add a Recaptcha to avoid getting a lot of spam contact.
CREATING TEMPLATES
Message templates can be used for an email message's subject and body. Messages templates
can be used for routine mailings such as canned responses, daily tasks, and reminder messages,
or just to create a standard format for the body of messages.
Manage message templates from Administer > CiviMail > Message Templates.
1. Click on New Message Template.
2. Enter a Message Title and a Message Subject. You can choose to use tokens to personalize
your subject line.
3. Scroll down to the HTML Message section and create your template. There are online
resources that offer instructions on creating an HTML Email Template. One suggestion is to
find and copy an Email Template from a website that offers samples.
4. One of the toolbar buttons at the top of this section lets you view the source code of your
template. When you click on it, the template changes the view to show the HTML code
that is being used. If you want to use HTML from a template you found externally, you
need to switch to this view in order to paste in HTML code from the template. Make
structural changes in your template in this mode as well.
Tips for creating templates
HTML email is not regular HTML. It has significant restrictions, including the need to use tables
and inline CSS and not to include a background image. Here are some tips for creating a
template that will look good in all mail clients:
Table border: The HTML <table> element includes an optional border attribute. Since the
default value is 0, it doesn't appear unless you choose to use it. Adding it (or editing it if it
is available) and setting it to 1 (e.g., <table border="1">) allows you to see the edges of
your table and helps identify potential places to fix problems. Please note that HTML email
templates usually have multiple tables and nested tables (tables inside tables). Make
changes one at a time and switch to the HTML view to see the results. A table usually has
more than one parameter, so make sure to place spaces between parameters.
Table cellpadding and cellspacing: these table parameters are very useful when trying
to improve the readability of your email. Play with these settings in different tables and
see what works for you.
Width: Do not send an email that is wider than 600 pixels, to ensure maximum
compatibility across email clients. Make sure your outermost table does not exceed 600
pixels. Do the same for any other tables inside your main table. Also make sure that the
total width of each image does not exceed 600 pixels. Images have a width parameter, but
they can also have a horizontal padding parameter that, if set, can increase the width of
the image.
Images: these need to be online and accessible in order for you to use them. First edit
your image so that its width and height is appropriate for your email template. Next save
it so that its file size is as small as possible. If you do not have image editing software, or
do not know how to use it, there are free online resources that can help you resize your
image.
CREATING HEADERS AND FOOTERS
The mail header is the area at the top of the email, which should include elements that you want
to be always displayed before the main content body, such as the logo of your organization and
the title of the newsletter.
167
The default footer, which is always the last thing in the email, often includes the tokens required
by law in some countries (unsubscription links and domain information).
You can manage headers and footers in Administer > CiviMail > "Headers, Footers, and
Automated Messages". Style them to present a coherent visual identity across all your
messages. Both should be configured for maximum flexibility. For example, one or more headers
can be created with different images and titles that can be used for different campaigns or
programs.
After headers and footers are configured, staff who prepare a new mailing will be able to select
them from available headers and footers. This helps staff create more standardized mailings
with elements that help your readers identify the contents of the mailing or find information.
TESTING TEMPLATES
Once your templates are ready, we strongly recommend that you test them in various email
clients, such as Mozilla Thunderbird, MS Outlook, Mac Mail and web-based e-mail such as Gmail,
Yahoo and Hotmail. You can create a group that includes a test contact for each of those
destinations and use it each time you create a new mailing.
Because email clients can display the HTML in emall very differently, we recommended that you
keep the HTML as simple as possible and use only inline CSS or tables for formatting. Include as
much of the layout as possible in the templates so that each new mailing will not require too
much reviewing, the template having already been tested.
USING TOKENS
In many mailings is useful to insert dynamically chosen information that is different for every
recipient. This is accomplished by using mail merge tokens in your message. A list of available
tokens appears in the top right corner of the message editing area.
You might need to insert information that isn't available as a token, for instance to create a joint
family greeting. Creating custom tokens is a task for a developer. To find out more about
working with custom tokens, refer to the discussion about custom mail merge tokens in the
Hooks chapter of the Extending CiviCRM section of this book and look at the wiki:
http://wiki.civicrm.org/confluence/display/CRMDOC/Mail-merge+Tokens+for+Contact+Data.
168
37. EVERYDAY TASKS
This chapter contains some step-by-step instructions for performing important everyday tasks
with email.
SEND AN EMAIL TO ONE PERSON
You can use CiviCRM to send an email to individuals. Using CiviCRM for this purpose is useful if
you want other people at your organisation to see the email or if you want to send an email
based on a pre-defined template.
1. Find the person you wish to email. There are two common ways to do this:
Use the Quick Search box on the top left. Click inside the box and begin typing a part
of the person's name or email address. Choose the person from the choices that are
presented.
Navigate to Search > Find Contact. Enter part of the person's name or email
address. Click Search and click on the person's name when it shows up on the search
results screen.
2. From the contact summary page, click Actions > New Activity > "Send an email".
3. If you have templates defined, you can choose one to use for this email. Selecting a
template populates the text content and HTML content fields with the message content
from the particular template you have chosen. You can then edit that content. You can
also update the template, either changing the original template or saving it as a new
template.
4. Enter a subject line for your email, or modify the subject from the selected template as
necessary.
5. If you just wish to send a text version of your email, ignore the HTML section and click on
the Text section. Enter your message in the box.
6. Click Send to send your message.
To see the activity that was just recorded of the email sent, click the Activities tab of the
contact.
SENDING A QUICK EMAIL TO LESS THAN 50 CONTACTS
In the results from a search, CiviCRM makes "Send an email" available from the actions
dropdown menu. This allows you to send an email to more than one contact at a time. Sending
an email this way is relatively quick but provides no options for tracking email and doesn't give
contacts the option to opt out. It is bad practice to use this method for mass mailings, which is
why it is limited to 50 contacts. For mass mailings, use CiviMail.
169
1. Click Search > Find Contacts > Advanced Search > "Choose your search criteria" and click
Search (or use any other search to find the contacts that you wish to email).
2. From the search results screen, choose some or all of the contacts and click Actions >
"Send an email".
3. Enter a subject line for your email.
4. If you have templates defined, you can choose one to use for this email. Selecting a
template populates the text content and HTML content fields with the message content
from the particular template you have chosen. You can then edit that content. You can
also update the template, either changing the original template or saving it as a new
template.
5. As you write your content, remember that every email will be sent individually. CiviCRM
offers the ability to personalize each email using tokens. See "Using tokens in emails" later
in this chapter.
6. If you just wish to send a text version of your email, ignore the HTML section and click on
the Text section. Enter your message in the box. You can also use tokens in the text
version of the message. There is also a token link at the top right of the Text box.
7. Click Send to send your message.
8. You can, if you wish, look at the different contacts' activities to see that each one has an
activity recorded for the sending of this email.
To see the activity that was just recorded of the email sent, click the Activities tab of the
different contacts.
Because the recipients don't see who else received the email, you might want to mention whom
you are sending it to in the text of your mail (for instance: "TO: Members of the board, staff")
SENDING A MASS EMAIL THROUGH CIVIMAIL
Using CiviMail offers many benefits over the "Send an email" action, allowing you to track
respondents to your mailing, process bounces and allow people to unsubscribe to your mailings.
There are two ways to select the recipients for your mailing.
If you are sending mail to an existing group, go to Mailings > New Mailing. From this screen
you can choose the groups you want to send the mailing to. You can also choose to
exclude contacts who are members of another group or who have received previous
mailings.
Carry out a search (for example, using the advanced search) and then choose
"schedule/send a mass mailing" from the actions drop down. You will be redirected to the
New Mailing screen (step 1), where you can choose a "base group" for your mailing. You
need to choose a base group for your mailing because you need to give people the option
of unsubscribing from your mailing.
The process for sending the email then proceeds as follows:
170
1. Enter a title for this mailing. Select a title that will allow you and others in your
organization to clearly identify the purpose of this mailing (e.g. "August 2010 monthly
newsletter"). This title is for internal use only and will not be shown to recipients. Then
click next.
2. This step of the process offers options for Tracking and Responding. Tracking collects
information about what your contacts do with this email. CiviCRM can store whether a
contact opens this email (open rates) and/or what links in the email are clicked.
Responding offers options concerning what to do when a contact replies to the message
you are sending. By default, the reply is sent to the sender, but you might want to redirect
the replies to a special address (the same one used to collect the bounce). This is a very
specific and advanced usage and you probably don't want to use it unless you have specific
tracking requirement in your organisations. Make your selections and click next.
3. Enter the content for your mailing. If you have templates defined, you can choose one to
use for this email. Selecting a template populates the text content and HTML content
fields with the message content from the particular template you have chosen. You can
then edit that content. You can also update the template, either changing the original
template or saving it as a new template.
4. As you write your content, remember that every email will be sent individually. CiviCRM
offers the ability to personalize each email using tokens. See "Using tokens in emails" later
in this chapter.
5. If you just wish to send a text version of your email, ignore the HTML section and click on
the Text section. Enter your message in the box. You can also use tokens in the text
version of the message. There is also a token link at the top right of the Text box.
6. Choose a Mailing Header and Mailing Footer. Click Next to continue.
7. Test your email by sending it your yourself and viewing it in your email client to make sure
it looks as you expect. If you are sending a mail with a complex layout, send it to your test
group and verify it from various mail clients. It is preferable to have more than one person
receive your test email and give you feedback. Once you are satisfied with your email,
click the Preview button for one last look. If you are ready to send the message, click
Next.
8. Either send the email immediately or schedule a day and time for it to be sent. By default,
CiviMail checks every 15 minutes whether an email is ready to be sent, so there can be a
delay of up to 15 minutes after you request the email to be sent.
To see the activity that was just recorded of the email sent, click the Activities tab of the
different contacts. As people receive your email, information about open rates and clickthroughs
becomes available on the report page. To see these statistics, click on Mailings > Scheduled and
Sent Mailings, find your mailing, and click on Report.
USING TOKENS IN EMAILS
You can use tokens to insert personalised text, such as a person's name, into a mailing sent with
CiviCRM. Tokens are replaced by the appropriate value at the time the email is sent out.
For instance, if you want each email to address the person after "Dear " you would type the
space and then click on the Token link at the top left of the HTML box. The popup that appears
enables you to find the appropriate token. Start typing "First name" in the box and choose the
token that corresponds. Click Close and you will see that your message now reads "Dear
{firstname}". When the email is sent the appropriate first name will be inserted into each
message.
To view the list of available contact tokens, click on the Token link. Tokens for the display name
and email greeting are particularly useful.
Only contact fields and actions can be inserted in your email as tokens. Related records, such as
the name of the event for which the contacts have pending enrollments, cannot be included.
However, you could provide a link to the person's contact dashboard so that they can review
their registration details for themselves (once logged in). You can also use a checksum token that
generates a unique URL for each contact so they can modify their information without having to
login.
171
VIEW A MAILING REPORT
As people receive your email, information about the number who opened the email (open rates)
can be available, as well as information about the links they are clicking on.
1. Choose Mailings > Scheduled and Sent Mailings and find the row your mailing is in.
2. Click on Report and examine the results (illustrated in the following screenshot):
Intended Recipients: counts how many email messages were sent by this mailing.
Successful Deliveries: shows how many messages reached their intended
recipients
Tracked Opens: shows how many messagess were verified as opened. Since many
email clients do not show images by default, this number is not particularly accurate.
The number is more useful to compare mailings.
Click throughs: tracks how many times a link on any message was clicked. This is
useful to gauge what items your recipients were most interested in.
3. You can also see statistics for Forwards, Replies, Bounces and Unsubscribed Requests.
MANAGING BOUNCES AND CONTACTS WITH INVALID
EMAILS
If your server is set up to process bounces, contacts will be marked as on hold when their email
bounces. Further messages to those addresses will be suppressed. You can search for emails
that are on hold either from the Bounces report or with an advanced search, and then
investigate why the emails are bouncing.
CASE MANAGEMENT
38. What is CiviCase?
39. Planning
40. Configuration
41. Everyday Tasks
172
38. WHAT IS CIVICASE?
CiviCase is a way to track and manage a sequence of interactions between people in your
organisation and contacts in CiviCRM. In addition to tracking and managing your organisation's
interactions with clients or constituents, CiviCase can also manage internal organisational
interactions.
CiviCase tracks interactions in two ways: as cases and as activities.
Activities are single interactions. For example, if a constituent calls to request information and
the staff person directs them to a website, it would be recorded as an activity, with a brief
description of how the staff person followed-up. CiviCRM will auto-generate some activities in
conjunction with other actions, such as logging an email receipt for event registrations.
Cases are used to track more complex interactions or communication processes. Multiple
activities can be grouped together into one case, and these activities can be optionally
structured in a timeline. A case can be used to track a specific workflow that must be followed,
for example: a client fills out an intake form, then has an initial meeting with a staff person, and
finally receives a certificate from the organisation for meeting certain goals.
As well as linking activities around a common case, CiviCase identifies the people involved and
their role(s) in the case. For example, a website project would be a case, with tasks such as
design, develop and write content being activities within that case, and the people involved
would have roles as designer, developer, tester, writer, etc.
ACTUAL SCENARIOS
Organisations have employed CiviCase in a wide variety of situations. Here are a few examples
of different types of organisations and how they might employ CiviCase.
Managing Legislator-Constituent Interactions
A Legislator's staff may manage hundreds of interactions with constituents and communities
daily. CiviCase provides a flexible and predictable way of allowing Legislative staff to manage and
track these interactions while avoiding duplication (for example, if a constituent calls in about a
topic that a staffer is already working on). CiviCase also automates the task of remembering and
scheduling follow up activities by presenting staffers with a list of upcoming case activities that
require their attention.
Below are some scenarios in which CiviCase can be used to effectively record interactions
between Legislative staff and constituents:
The Legislator's office receives a phone call from a constituent requesting agency support.
A staffer logs the call as a CiviCase activity and then sets up a follow up call in the next
week to make sure that action has been taken on the agency's behalf.
A Legislative staffer records where and when a Legislator staff heard from a constituent
about a government service problem.
The Legislator's staff records event invitations that a Legislator's scheduler must respond
to.
A Legislative staffer receives a phone call about illegal dumping near the caller's home. The
staffer creates a case recording the location of the reported issue and assigns the task of
following up with the Health Department to another member of the Legislator's staff.
When the staff member logs in to CiviCRM they see that a new case activity has been
assigned to them. The Staffer then contacts the Health Department on behalf of the
constituent and mails the constituent to confirm that the Health Department has been
informed of the situation.
Helping clients with emotional health or substance abuse problems
173
Social services agencies have specific workflows for processing clients through the variety of
services that they provide. CiviCase can be used to outline and record the path that clients
travel on their way to recovery.
When a client phones a social services agency, they will speak to an intake counsellor. The intake
counsellor can set up a case to quickly record and determine what the clients' needs are, who
are the people that need to be involved, and then set up a follow up meeting with a social
worker.
174
39. PLANNING
The CiviCase component allows for a high degree of customisation to meet the needs of a wide
variety of organisations and workflows. It is important to understand CiviCase's underlying
principles and assumptions, as well as the elements that can be customised, before you begin to
plan and configure the component based on your requirements.
ASSUMPTIONS
Although CiviCase is quite flexible, there are a number of assumptions about managing cases
built-in to the component. These assumptions have been arrived at through an extensive trial
and error process and although some of them may seem new or foreign at first, we encourage
you to approach them with an open mind.
Activities are single tasks or interactions between your organisation and a client or
constituent, or between people within your organisation.
Cases involve a sequence of interactions (activities). The record of these activities forms
the case story and almost all information about a case should be stored as an activity.
Classifying cases by case type allows you to define work-flows and evaluate results.
Cases often have a predictable sequence of activities (a standard timeline). Creating a
schedule with the expected timeline helps people working on the case to manage their
work, and is a useful way to measure progress.
Cases often involve a predictable set of people involved (staff, professionals, etc.). These
are case roles. Knowing who is playing what role in a case is helpful, and provides an easy
way to communicate case activities to other people who are also working on that case.
Organisations may have additional people and/or outside organisations (case resources) who
are frequently contacted or involved with most or all cases.
CASE TYPES
The first step in planning your CiviCase configuration is to think about the types of cases your
organisation needs to manage. Complex processes which include several activities, span several
days or weeks, and involve multiple people are potentially good candidates for case
management. Start by listing these processes and defining a case type for each one.
For example, the Physician Health Program provides support for physicians who are experiencing
problems related to emotional health issues, the inappropriate use of alcohol and/or drugs or
coping with physical illness. Some of the case types they use are:
Inpatient Treatment
Referral to Counsellor
Relapse Prevention.
For a community services organisation, examples of case types might include:
Housing Assistance
Job Training
Prenatal Counseling.
Think about the complex tasks that staff in your organisation do on a regular basis and make a
list of potential case types.
CASE ACTIVITIES
175
Activities track specific interactions and tasks within a case. Activities may be scheduled or ad
hoc, and may involve the case client or constituent, or a third party such as a family member or
a professional who is assisting with the case. Each organisation needs to determine the level of
detail to be recorded, but many organisations find it helpful to include every phone call, meeting
or internal discussion in the case story by recording it as an activity.
Activity Types
CiviCRM is preconfigured with a number of predefined activity types such as Phone Calls,
Meetings, Emails Sent, Interviews and Follow ups. These may be sufficient for your needs.
However most organisations will want to track other specific tasks, and activity types can be
added for these.
During the life of each case, some activities will be automatically created, such as:
Open Case: created at the same time the case is created.
Follow up: you can use this type when it isn't necessary to define a more specific one (see
"activity data" below).
Change Case Type: created every time the type is modified.
Change Case Status: created every time the status is updated.
For a community services organisation, additional activity types might include:
Client Intake
Physician Referral
Skills Evaluation.
For each of the case types you identified, create a list of the specific activities involved. Creating
new types instead of relying only on "Follow up" will make the list of activities easier to read.
Activity Data
A standard set of information can be entered whenever a case activity is recorded in CiviCase:
who recorded the activity and who reported the activity
when and where the activity will (or did) occur
free-form subject and detailed description
time spent on the activity.
This is sufficient for some types of activities, however it is often useful to collect additional
structured data. The "Open Case" (intake) activity is a common example where you may want
to include a set of specific questions about the client and their situation.
Create a list of additional requirements (custom data) for each activity type, including the type of
data being recorded (free text, multiple choice, date, etc.). For more information about custom
data please refer to sections on custom data in the the CiviCRM flossmanual, or to the CiviCRM
wiki.
TIMELINES
CiviCase allows you to define a workplan or an expected sequence of tasks and activities for
each type of case. These are called standard timelines, and one is created automatically when a
new case is opened.
For simple cases, the timeline might include only two items:
Open Case
Follow up.
Even in this example, the timeline is useful as it allows you to predefine when the persons
assigned to the case should follow up with the client or constituent.
176
For more complex processes, the timeline provides a case plan that can help the people involved
to stay on track. The timeline lists all the activities which are expected to occur and should be
accomplished within a certain timeframe. You can define the expected number of days between
the beginning of the case and each of the subsequent activities in the timeline.
If necessary, an activity can also define an offset from another activity. For example: for a
"Referral to Specialist" case, the "facilitate first appointment" activity might be expected to
occur within 2 days after the case is opened. "Survey client satisfaction" might be scheduled for
30 days after "facilitate first appointment".
You might also want to define a timeline based on the end date. If a case has to be completed
by a specific date, each activity can be defined as needing to happen a number of days before
this end date. You then set a negative offset on the timeline.
CASE ROLES AND RELATIONSHIPS
CiviCase provides three mechanisms for relating people to cases and clients:
Case Roles: people directly involved in this case. Examples include Intake Specialist, Case
Coordinator, Addiction Counselor, Employment Counselor, etc. You can identify one of
these roles as the case manager for a particular case type.
Other Relationships: people related to the client, with relationships that exist beyond the
context of a particular case. Examples include Spouse, Sibling, Family Doctor, etc.
Generally, use relationships when you want someone to appear on ALL cases for the same
client, otherwise use a case role.
Case Resources: people and organisations that have involvement with many or all cases in
your case management setting. Examples include: regulatory agency contact(s), service
provider, frequent referral contacts, etc.
CiviCRM provides relationship type definitions for most of the standard relationships you might
track (e.g. Spouse, Child). However you will probably need to define additional relationship types
for your case roles, such as:
Case Coordinator
Addiction Specialist
Job Counsellor.
Make a list of the expected case roles for each type of case you've listed, then determine which
role will normally be considered the "case manager" for that case type.
CONTROLLING ACCESS TO CASE DATA
This section applies to Drupal installations only.
You can assign permissions to users in order to control whether or not they have access to the
CiviCase component, as well as what case data they can see (Administer -> Users ->
Permissions). Here is a list of the CiviCase-related permissions.
Access my cases and activities
Allows a user to create new cases, add activities to the cases they've created and edit those
activities. Users with this permission can NOT see cases or activities created by others.
If you need to restrict certain users to ONLY seeing case data (i.e. hide all other contact
information from them), assign access my cases and activities permission WITHOUT edit and view
contacts permissions. This permissioning model is useful for users who work in external agencies
and who should not be allowed to see contact details.
Access all cases and activities
177
Allows a user to create new cases, as well as view and add activities to any case (regardless of
who initially created the case).
Delete in CiviCase
Allows a user to mark cases or case activities as deleted. Cases and activities are never
physically deleted from your database, but only "hidden" when you mark them as deleted.
Users with this permission can also find and undelete these cases and activities by checking the
Deleted Cases option in Find Cases and the Deleted Activities option in the Case Activities Search
Filter.
Administer CiviCase
Gives access to Administer -> CiviCase options including:
create and edit case types and case statuses
set rules for redacting case data. These rules are used to disguise data which could be
used to identify the case client in case reports which are shared with external reviewers.
178
40. CONFIGURATION
Now that you've gone through the planning process and determined the types of cases, activities
and case roles that you need, you're ready to configure your CiviCase installation. The
configuration process requires some technical skills. Review these prerequisites before getting
started, and recruit assistance if needed.
PREREQUISITES
Many of the configuration steps require that you create and edit files outside of the CiviCRM user
interface. You will need to:
use a text editor
edit XML files and upload them to the server directory where CiviCRM is installed
(optional) write or modify a simple program using the API to automate the creation of
activity types or relationships.
CONFIGURATION TASKS
Follow these steps to configure CiviCase for your organisation.
1. Case Type Configuration Files
You will create a separate XML-formatted text file for each of the case types you identified
during the planning process. These files specify the characteristics of the case type using XML
elements. Case configuration files should be saved to the following directory in your CiviCRM
installation:
<civicrm_root>/CRM/Case/xml/configuration
You will need to create this directory when you save your first configuration. Ensure that the
directory is readable by your web server process.
If you are not familiar with XML markup, refer to the Wikipedia page on XML at:
http://en.wikipedia.org/wiki/Xml
A set of sample configuration files are included when you download CiviCRM. If you can access
the CiviCRM codebase at http://svn.civicrm.org/civicrm/, load the sample case type configuration
file for Housing Support in your text editor before continuing, and refer to it as you review each
of the sections below.
<civicrm_root>/CRM/Case/xml/configuration.sample/HousingSupport.xml
Activity Types: this is a list of all activity types that are valid for this type of case. Several
activity types will be needed for any type of case. Be sure to include them in this listing: Open
Case, Change Case Status, Change Case Type, Follow up. You will use Change Case Status to close
a case. Follow up is a useful general activity type for most case settings.
You can optionally specify the maximum occurrences of this activity type in a case using the
max_instances element. Generally you'll want to set max_instances to 1 for the Open Case
activity type, but you can also use this to limit recurrence of other types of interactions or
processes.
179
Activity Sets: groups of activity types which define a sequence of interactions. You must include
at least one activity set in the configuration file which defines the standard timeline (plan). The
activities in the standard timeline set are automatically created when you open a case of this
type. You can control the scheduling of each activity relative to the date the case is opened OR
relative to another activity using the reference activity and reference offset elements. Offsets are
expressed in days.
Here's a simple timeline example for a Housing Support case:
In this example, the Open Case activity is marked as Completed when the case is opened. Three
additional activities are automatically scheduled when the case is opened. A Medical evaluation is
scheduled for the following day (reference offset is 1); then Secure temporary housing (reference
offset 2); and finally a Follow up three days later.
Case Roles: this section lists the types of people who are involved in the case in some way.
Roles listed here will be automatically created when the case is opened. One role is marked as
creator. This role is automatically assigned to the person who created the case. After the case is
opened, users with access to the case can assign the remaining roles to contacts as appropriate.
You may also mark one of the roles as the case manager. The case manager's name will be
displayed prominently in case listings and reports.
Here's a simple example of case roles for a Housing Support case:
180
In this example there are three case roles. The Homeless Service Coordinator is both the creator
and manager of these cases. In addition, a Health Services Coordinator and a Benefits Specialist
role are created when the case is opened.
Refer to the detailed configuration documentation on the wiki for more detailed explanations of
each element in the XML file:
http://wiki.civicrm.org/confluence/x/UIC9AQ
Create a separate XML file for each of your case types. Your file names should match the case
type name with spaces removed and the first letter of each word upper-cased.
For example, if the Case type is "Housing Support", the filename would be "HousingSupport.xml".
A good approach is to use a copy of one of the sample configuration files that are included in the
distribution as a starting point, and edit it to meet your requirements.
2. Enable the CiviCase component
Once you have created your configuration files and uploaded them to the configuration directory
in your CiviCRM installation, you must enable the CiviCase component. The CiviCase component
is included in CiviCRM downloads, but it is NOT enabled by default. To enable the component:
go to Administer -> Configure -> Global Settings -> Enable Components
select CiviCase in the left-hand box and click Enable (this should move it to the right side)
click Save.
You will now see an Other option in the navigation menu. Click that option to see the Cases
menu. People in your organisation who work with cases will probably want to modify their
navigation menu to move Cases to the top-level. Navigate to Administer -> Customise ->
Navigation Menu to make this change.
3. Review CiviCase permissions
This section applies to Drupal installations only.
In order for users to add and manage cases, you will need to configure CiviCase-related
permissions (Administer -> Users -> Permissions). You may want to create case management
specific Drupal user roles for staff, based on their responsibilities within your organisation.
Permission options are described in the Planning chapter of this section.
4. Populate Case Types, Activity Types, and Case Roles
You will need to add database records for each case type, activity type, and case role that you've
included in your case type configuration files. You can use the CiviCRM Administrative screens to
do this:
Case types
Administer CiviCRM -> CiviCase -> Case Types
Click New Case Type.
Complete the form using the exact same text for the Label as you entered for the
CaseType <name> element in your case configuration files.
Click Save.
Activity types
181
Generic activity types (Open Case, Change Case Status, etc.) are included in all CiviCRM
installations. Meeting, Phone Call, Email (inbound and sent) activity types are also included "out of
the box". However you will need to manually add any other activity types that you've defined in
your case configuration files.
Administer CiviCRM -> Option Lists -> Activity Types
Click New Activity Type.
Complete the form using the exact same text for the Label as you entered for the
ActivityType <name> element in your case configuration files.
Select CiviCase in the Component drop-down.
Click Save.
Repeat for each unique activity type defined in your case configuration files.
Alternatively, if you have a lot of entries, you may prefer to use the API to write a simple
programme to automatically create all the activity types:
<?
require_once 'civicrm.config.php';
require_once 'CRM/Core/Config.php';
require_once('api/v2/ActivityType.php');
//read the API chapter to get more explanation
$componentCase = 7;
$types = array ("Medical evaluation","Secure temporary housing");
foreach ($types as $type) {
$param = array("label"=>$type,"description"=> "Example of Type","component_id" =>
$componentCase, is_reserved=>false,is_active=>1,weight=>1);
$result = civicrm_activity_type_create ($param);
if (civicrm_error( $result )) {
echo "\n ERROR creating $type: ". $result['error_message'];
} else {
echo "\n Type $type created";
}
}
?>
Case roles
You will need to define relationship types for any case roles you've defined in your case
configuration files. Examples might include Intake Coordinator, Employment Counsellor, Housing
Advocate, etc.
Administer CiviCRM -> Option Lists -> Relationship Types
Click New Relationship Type.
When completing the form fields, define the relationship using the client as Contact A and
the service provider as Contact B. The Relationship Label-B to A value should match the
text entered for the RelationshipType <name> element in your case configuration files.
Click Save.
Repeat for each unique case role.
For example, to define a Case Coordinator relationship type:
Relationship Label-A to B : "Case Coordinator is"
Relationship Label-B to A : "Case Coordinator"
Contact Type A: "Individual"
Contact Type B: "Individual"
Again, if you have a lot of entries, the process of defining relationship types can be automated
using the API:
<?
require_once 'civicrm.config.php';
require_once 'CRM/Core/Config.php';
require_once('api/v2/RelationshipType.php');
//read the API chapter to get more explanation
$types = json_decode ('[
{"label_a_b": "Case Coordinator is","label_b_a":"Case
Coordinator","contact_types_a":"Individual","contact_types_b":"Individual"}
,{"label_a_b": "Benefit Specialist of","label_b_a":"Benefits
specialist","contact_types_a":"Individual","contact_types_b":"Individual"}
182
]');
foreach ($types as $type) {
$result = civicrm_relationship_type_add (get_object_vars($type));
if (civicrm_error( $result )) {
echo "\n ERROR creating $type: ". $result['error_message'];
} else {
echo "\n Type $type created";
}
}
?>
Custom fields
It is likely that you will want to collect structured data for some of the activity types you've
defined. Custom fields are most often connected to a specific activity type. For example, in
Employment Counselling cases, you may want to define an activity type used to record client job
skills. This activity type will require one or more custom fields - perhaps a set of checkboxes. If
you are transitioning from a paper-based system, it is helpful to refer to existing forms and then
determine what information from the forms is relevant to include. Remember that CiviCase is
designed to store case information within activity records, and does not support custom fields at
the case level.
Please review the section on configuring custom data fields prior to beginning these steps.
Administer -> Customize -> Custom Data
Click New Group of Custom Fields.
Under Used For, select Activities.
Select one or more specific activity type(s) for which this set of fields will be used.
Enter any help information you want to be displayed to your users.
Click Save.
Enter one or more custom fields for this set.
Repeat these steps for each activity type which requires custom data to be recorded.
If you need to define a large number of fields for a given activity type, consider breaking them up
into sets of related fields. Group the fields into logically related sets that will make sense to the
users, and avoid the form looking like an endless tunnel of fields.
You can assign more than one custom data field group to a single activity type. For example, if
you are collecting a lot of data during client intake, you may want to create several sets of
custom fields for the Open Case activity type.
If you have sets that are only relevant to some contacts, for example a different set of fields for
male or female contacts, you can modify the form's template and add client-side logic using
jQuery to hide/show the relevant sets based on the values selected on previous fields.
Filing Inbound Emails to Cases
Some organizations find it useful to record incoming case-related emails in CiviCase. For example,
the case coordinator for a work disability case might send an inquiry to a state agency
representative - and would like the reply to become part of the case story.
You can enable this functionality by configuring the provided Email Processor script as described
here:
http://tiny.booki.cc/?vfW0
5. Add staff members
You will need to create a contact record for each staff member or service provider who will be
using CiviCase to enter or view case information. These individuals will also need to have a
Drupal or Joomla! user account.
For Joomla! installations, staff members must have back-end (administrator) access. All CiviCase
functions are done within the Joomla! Administrator interface.
183
You should also add contact records for service providers who will be assigned case roles but will
not be accessing the CiviCase system. This will allow your staff to easily send emails with
pertinent case and client information to these providers via CiviCase, as well as record caserelated interactions reported by providers.
184
41. EVERYDAY TASKS
This chapter describes a list of everyday tasks that you might perform using CiviCase, and how
to go about them.
VIEWING THE CASE DASHBOARD
The Case Dashboard gives you an easy way to keep track of case-related tasks. It provides:
A summary of cases in the system ("Summary of Case Involvement")
A list of your cases with upcoming activities (scheduled in the next 14 days)
A list of your cases with recently performed activities (completed in the last 14 days)
If you have permission to view cases other than ones that you are working on, you also have the
option to see:
A list of all cases with upcoming activities
A list of all cases with recently performed activities
You can switch between viewing Your Cases and All Cases by clicking on the link at the top right
of the content area.
Click the "edit" icon next to the Next Sched. activity name to work on that task. In the case
shown in the following screenshot, the Next Sched. activity is "Medical evalution". You can view
this activity in a pop-up window by clicking directly on the title. If you're ready to work on that
activity, click the edit "pencil" to the right of the activity title.
input
field
Click on the triangular expand icon (►) to the left of the client name to see the complete list of
activities for that case. From this list you can view or edit any activity in that case. Click Manage
Case when you want to work on a number of tasks within a case or to change the status of the
case, print a case report, or view case roles.
To add a new case from the Case Dashboard, click the Add Case button at the top left of the
content area.
FINDING CASES
You can search for cases by clicking on Find Cases under Search or under Cases in the menu bar
at the top of the CiviCRM screen. The Cases search form gives you a number of options. You can
search by each option individually, or combine them for further filtering.
You can search by:
Client's name or email address: Type characters from the name or email address into
the "Client name or email" input field.
Type or types of cases: Checking the case types that you would like to filter by.
Case status: Selecting a status from the dropdown menu.
All cases or your cases (if unselected, the default is to filter by your cases).
Deleted cases: Click the "Deleted cases" checkbox.
185
If you make selections in multiple criteria (e.g. adding a client name, checking off a case type, and
selecting "all cases") the search criteria will be combined so that the results must fulfill at least
one requirement in each set of criteria (in other words, the criteria sets are ANDed). In contrast,
making multiple selections within one set of criteria (e.g., checking two case types) will ensure
that the returned results fulfill at least one of the selections in the criteria set (in this example,
cases must match at least one of the case types).
OPENING A NEW CASE
You can open a new case with either an existing contact or a new contact not yet in your
system.
Creating a case from an existing contact's summary screen or actions menu automatically links
the case to that contact. To open a case on an existing contact, follow these steps:
1.
2.
3.
4.
Go to the contact's summary screen.
Select Add Case from the Actions dropdown menu, or alternatively click on the Cases tab.
Fill in the required fields in the Add Case form.
Click Save.
If you open a new case for a new contact, the contact's record in CiviCRM is created at the
same time as you create the case. Follow these steps:
186
1. Navigate to Cases > New Case or select the Create New > Case dropdown button. This
button is provided as a block in Drupal or on the left hand side in Joomla!.
2. If you've opted to create a new case without navigating to an existing contact first, you
may want to check whether the contact already exists in the database. Type the name or
email of the contact you are looking for in the Select Contact field, and you will see a list of
potential matches (as illustrated by the following screenshot).
3. If you don't find the contact, you can create it immediately by selecting the type of
contact from the "create new contact" list. This opens a popup window (shown in the
following screenshot) that allows you to fill out the new contact's name and other
information while opening the case. The fields in this popup window are controlled by the
fields in the "Add Individual" profile. This means you can easily add or modify the fields
provided. You can read more about profiles in the Profiles chapter.
Use the Medium and Location fields to record information about where and how this case
came to your attention. For example, you might select "In Person" for Medium and "At the
Annual Gala" for Location.
Use the Details text area to add information pertaining to the overall case, but not to a
specific activity of the case. An example might be "Jane is concerned about some illegal land
use that she has witnessed in her neighbourhood, and would like us to see what can be
done about it. I told her that the best person to look into this was Tom, and she asked
whether her husband could be included on any correspondence."
The Subject field is displayed in search results and in other listings of cases, next to the
name of the case client. Keep this in mind when entering the subject text: a brief and
unique description of the case will be more helpful than using the client's name as the
subject.
The Case Type selector allows you to choose the type of case that you are creating. Many
case types have specific activities and timelines, so it is important to choose the
appropriate case type at this point. You can change to a different case type at a later
point by clicking Manage Case next to the case when it's displayed in the CiviCase
Dashboard, or from the contact's record Case tab. Then select Change Case Type from
the New Activity drop down list, Changing an ongoing case may require you to then update
or re-enter some data.
187
The Case Status selector allows you to indicate the current status of the case. Generally
you will use a status such as Ongoing or Urgent, but if you are adding a case that has
already been completed (for tracking purposes) select "Resolved".
The Case Start Date field defaults to the current day. If you are creating a case that has
already been completed or entering data for upcoming cases (not yet started), adjust the
case start date accordingly.
The Duration field records the time spent collecting the data needed to fill out the create
case form, not the amount of time it took to fill the form out. Fill out the number in
minutes. For example, you might use this field to record the number of minutes spent on
the phone with a constituent as they described the case.
4. After you finish the popup window, clicking the Save button saves the case and loads the
Manage Case page, where you can then modify activities, add attachments and assign case
roles. Alternatively, clicking "Save and New" save the case and resets the form so that
you can add further new cases uninterrupted (this is particularly useful if you are doing
data entry). Clicking Cancel discards the case data you have entered and sends you back
to the CiviCRM dashboard.
ASSIGNING CASE ROLES
You can assign case roles to contacts who are working on the case or need to stay informed
about case activities. Users who have access to CiviCase and are assigned a role in the case will
then see that case in their My Cases view. The phone number and email address of each person
with a case role will be displayed on the case, making it easy to communicate with them (see
screenshot).
To assign a case role to a contact:
1. Click the Case Roles area to open it.
2. Case roles that have not been assigned display "(not assigned)" in the Name column. Click
the edit icon to assign someone to that role.
3. The Assign Case Role popup window will appear. Begin typing the last name of the contact
until you see the name in the dropdown list.
4. Select the contact you want to assign to the role and click OK.
Generally, anyone who might be assigned to a case should already be in the database, but if you
can't find the person you're looking, for you must add her as a contact first (navigate to
Contacts > New Individual).
Each assigned case role has mail, edit and delete icons under the Email and Actions columns. You
can email contacts with roles in the case, or modify their relationships to the case. Change the
case role by clicking the edit icon, or delete a case role by clicking the delete icon. Emails that
you send from here are automatically added to the list of case activities in the proper sequence.
This provides an audit trail of case-related communications, and ensures that the "case story" is
complete.
FINDING ACTIVITIES WITHIN A CASE
188
You may need to find a specific activity within a case, for reference or modification. To view the
activities in the case, scroll down to the Case Activities section and click it to open it if it's
closed. In the default view, scheduled activities are listed first, sorted by date, followed by
completed activities. Click on the column headers to sort by a specific column (for example, by
activity type).
You can filter the activities if there is a large number of activities, or if you'd like to restrict the
view to activities of a certain type (for example, to see all of the "Follow up" activities that have
been performed for this case). Click the Search Filters accordion button, which opens a form (see
screenshot) that allows you to filter by:
Reporter/Role
Activity Status
Activity Dates (enter a range by filling in both date fields, or search for activities
performed on a specific date by filling out the first date only)
Activity Type (for instance, to find all "Follow up" activities, select "Follow up" from the list)
Deleted Activities (available to people with permission to view deleted activities)
Once you have selected your search criteria, click the Search button to the right and the table
will automatically filter out all of the activities not matching your criteria.
ADDING AND MANAGING ACTIVITIES
Several tasks are commonly performed on activities. After performing the necessary work, click
the Save button to save the activity and be sent back to the case page, or Cancel to discard
your work.
To add a new activity to a case
1.
2.
3.
4.
Navigate to the case (either using Find Cases or via the Cases Dashboard).
Choose an activity type from the select list labeled New Activity.
Click Go.
Fill out the activity form. The Client" field will be pre-populated with the case's client data.
To send a copy of the activity to anyone with a case role for the case
1. Open the "Send a Copy" area.
2. Check the contacts or case roles whom you would like to be alerted about this activity.
To schedule a follow up activity
1. Open the "Schedule Follow-up" accordion.
2. Select the follow-up activity type, the number of days until the follow-up should occur, and
subject of the follow-up (e.g. "confirm that Jane's problem is fixed").
To add an attachment to the activity
189
1. Open the Attachments area.
2. Click a "Choose file" button.
3. Up to five files can be attached to an activity. Select an attachment from your file
browser.
4. Click Choose. The name of the attachment will appear to the right of the "Choose file"
button.
The attachment will not be saved into CiviCRM until you have saved the activity.
EDITING AN ACTIVITY IN A CASE
To edit an activity in a case:
1. Navigate to the case from the Case Dashboard, the Find Cases search form, or the
contact's Cases tab.
2. Click the "edit" link at the far right side of the activities table at the bottom of the case
form.
3. This brings you to the activity form, which you can edit in the same way as when creating
an activity for a case. The only difference is that many of the fields will already be filled in.
To assign a "scheduled task" to a staff member while adding or editing a case:
1. Start typing the staff member's name into the "Assigned to" field; a list of possible
contacts will appear.
2. Select from the list of suggestions and make sure the staff member's full name shows up
in the "Assigned to" field.
You can assign multiple contacts to an activity. If you accidentally select the wrong contact, click
the X by the contact's name to remove him from the list.
CHANGING THE STATUS OF A CASE
The case status lets you quickly determine how a case is progressing. Sample status values
include Ongoing, Resolved, Not Assigned, and Urgent. To change the status of a case:
1. Navigate to the case from the Case Dashboard, the Find Cases search form, or the
contact's Cases tab.
2. Click Manage Case.
3. Click the "edit" icon next to the current status column in the Case Summary table.
4. This will open the Change Case Status form (an activity with an additional field called Case
Status).
5. Set the case status to the new status.
6. Modify the other the fields as you would when editing an activity in a case. Make sure to
set the Status field. It is required, but not set by default.
7. Click Save to return to the case page, with a message stating that the Change Case Status
Activity has been created.
PRINTING CASE REPORTS
To print a report that lists all case and case activity data:
1. Navigate to the case from the Case Dashboard, the Find Cases search form, or the
contact's Cases tab.
2. Click Print Case Report in the Case Summary section.
Your installation may define additional reports for audit or quality assurance purposes. If so, you
will see them listed in the "Run QA Audit/Redact" dropdown menu.
REPORTING
42. What is CiviReport?
43. Planning with CiviReport
190
44. Configuration
45. Every day tasks with reports
191
42. WHAT IS CIVIREPORT?
CiviReport allows you to create, run and schedule reports based on the data CiviCRM has about
your contacts and their interactions with your organisation. Many report templates are designed
to work with a specific CiviCRM component, such as CiviContribute or CiviCase.
CiviCRM comes with a number of predefined report templates that are used to create reports.
For example, the Membership Report template can be used to create a report that shows all
student members that have joined your organisation within the past year.
CiviCRM's predefined report templates are built to satisfy the basic needs of non-profits and
organisations. Each new version of CiviCRM will include further report templates, but if you can't
find the right template for your requirement, you can extend CiviCRM by writing a new template
yourself - and contribute it back to the CiviCRM community to share the benefit of your work.
Writing a new report template requires some PHP and SQL skills. A well-written template will be
flexible enough to meet your specific needs as well as the needs of others. Techniques for
developing report templates are explained in the section of this book which covers methods of
extending and customising CiviCRM.
REAL WORLD SCENARIOS
Reports help your organisation to evaluating its impact and achieve its mission. Here are some
reports examples:
Evaluating turnout for an event
An organisation wants to attract young people to their annual 'Community Organising and Youth
Leadership workshop' They decide to announce the event three months in advance to ensure a
good turnout. Lead staff or organisers will use the Event Participant Report throughout the
registration process to determine if they need to do more outreach to attract m.
Here is a work flow describing how the organisation's staff will use this report.
1. A lead staff person uses pecific criteria, such as youths under the age of 25 based in the
target area, to identify contacts to invite to the event.
2. Lead staff then email and phone the identified contacts to invite them to register and
attend the event.
3. During the three months before the event, a lead organiser views the Event Participant
Report at the end of each week to see how many have registered and to determine what
other strategies could be used to increase the turnout. The lead organiser may also want
to know the roles of the participants, such as who and how many will be speakers or
volunteers.
4. At the end of the event, the lead organiser will view the Event Participant Report again to
see how many actually attended the event, as well as how many registered but didn't
attend. Organisers may then want to follow up those contacts who registered but didn't
attend, to determine whether there were any barriers to attending such as the cost of the
event, lack of transportation or lack of interest in the topics scheduled for the workshop.
Determining total contributions for all people in a household
A non profit keeps records of individuals organised by households. A common situation will be
that the husband in the household has attended a numbe of paid events, and their wife has also
registered for other events, and made seperate donations.
192
Staff at the organisation want to see the total contributions received from everyone in the
household so that when someone calls the office to inquire about a donation or event payment
made by someone else in the family, all the relevant information is at hand. Staff run the
Donation Summary Report (Household) and fill in the name of the household to find all
contributions and find all relevant information and answer the caller's questions.
Targeting a mailing for fundraising
Your organisation has launched a capital campaign to raise money for a new shelter. The
development director wants to reach out to donors who made a large donation last year but
haven't given money this year.
1. She creates an instance of the LYBUNT report ("Last year but not this year") which filters
data to show people who gave more than 500 EUR last year.
2. She runs the report and uses the "Add to Group" button to put these donors in a new
group.
3. Then she sends an email to everyone in the group with information about the capital
campaign.
4. She adds the report to her CiviCRM Dashboard so she can review progress getting this
group of prior donors to contribute to the campaign.
193
43. PLANNING WITH CIVIREPORT
This chapter explains some key ideas that are useful when planning your use of CiviReport. It
should be read by system administrators before they start to configure CiviReport for daily use.
It will also be useful for anyone who wants to better understand the thinking behind CiviReport.
Skip this chapter if you just want to look at specific reports that have already been configured
by your administrator!
WHEN TO USE CIVIREPORT
CiviReport grew out of the need for users to be able to easily display complex information about
their data, and to display answers to questions about this information in accessible ways. It is
useful when you need to repeatedly ask the same question, or a set of similar questions, about
your data.
CiviReport can be used as a management tool in organisational planning and as an analysis tool
for membership or donor development. Tabular or graphical output can be produced and set up
to email reports to specific people according to a schedule.
CiviReport might be overkill if you want to quickly find a set of contacts that match a certain
criteria. In this case you might consider using one of CiviCRM's search tools.
WHAT REPORTS ARE AVAILABLE?
When you think about it, the number of questions a non-profit might want to ask about their
data is pretty much infinite. The CiviCRM approach to solving this problem (which is a familiar
CiviCRM approach) is to aim to cater for 90% of the scenarios and allow the system to be easily
extendable by administrators and developers to cover the last 10%.
Reports often come in pairs: one showing a summary and the other showing the detail. These
reports can be linked, allowing users to see information at a glance with the option to drill down
in a certain report for more detail.
We haven't included all the reports available in CiviCRM here because the list is constantly
growing. For a complete list of reports available in your version, along with an explanation how
the reports can be used, look at the page 'Create reports from templates' (in the Reports
dropdown menu).
REPORT TEMPLATES AND REPORT INSTANCES
Two key concepts in CiviReport are report templates and report instances. A report template
is the base for creating a report instance. In other words, you can generate any number of
report instances from one report template. For example, the Top Donors Report template is
used to show those people who have given most to your organisation. An instance of this report
might show the top 10 donors that have given to your organisation this year-to-date.
REPORT VS. SEARCH
CiviCRM has inbuilt search functionality that covers most scenarios, so it's important to know
when to use a report and when to search. The current report interface does not support most
common batch actions such as "Update via Batch Profile," "Smart Group" creation, etc. This
means that if you want to perform any action against a result set, it is better to use search
rather than report.
Reports are more flexible than searches, and each has its own set of features. Reports allow you
to change display columns in selector, support column grouping, email the report and also save it
as dashlet. Because you can create multiple report instances from a single report template, you
194
can use the same report to show different iterations of the report, such as monthly donations or
quarterly donations.
195
44. CONFIGURATION
This section explains how to configure CiviReports. It assumes a basic knowledge of why you
would want to use CiviReport, and describes the workflow from creating a report from a
template to making these reports available for users.
REPORT TEMPLATES
Report templates are general reports that can be further customised to create specific report
instances. These report instances can then be made available to users.
The "Create report from templates" page lists all available report templates and is found in the
Reports menu. The templates are grouped by component, and each has a brief description of its
intended scenario. If there are already report instances for a given template, you'll see a link to
view "Existing Reports".
Clicking on the report template name will bring up a screen where the report can be configured.
There are two steps to configuring a report:
Select your report criteria - decide what information will be displayed in the report.
Define the report settings - choose a title, set permissions and add it to a menu.
SELECT REPORT CRITERIA
There are three types of report criteria:
Display Columns
Group by Columns
Filters
The options available for these criteria change from report to report. General principles for the
different types of report criteria are outlined below.
Display Columns
These check boxes allow you to select the data to be displayed for each record in your report. In
most reports, at least one display column is required and cannot be unselected. For example, in
the Top Donors report, showing the total amount donated is required. In the Constituent Detail
report, showing the contact name is required.
Group by Columns
This is not available in all reports, but it is useful when creating a report which summarises data,
rather than displaying each individual row, and for reports that compare different types of data.
The report below compares donations per quarter in 2009.
196
You can specify more than one grouping criteria. When you do this, groupings will be nested
based on both groupings. Not all groupings or combinations of groupings will make sense for your
data. You may need to spend time experimenting with Group By Columns to become familiar
with this functionality.
Note that some Groups By Columns interact with Display Columns and can't be selected at the
same time. The system will warn you if you try to make an invalid selection.
Set Filters
Filters are the main way to specify the records that you want to include in the report. For
example, running the Membership Detail report without choosing any filters will show you all
membership records. You could then filter the report to show all members of a specific
membership type who joined last year.
197
The Date Range Filter
Most reports will have a date range filter. This can be configured in two ways:
by using an absolute date range, e.g. "1st Jan 2010" to "31 July 2010"
by using a relative date range, e.g. "Previous Year".
Relative date ranges are very useful for reports that you want to run on an ongoing basis.
This year gives all records from the start of the current year.
Previous year gives all records from the previous year.
Earlier year gives all records excluding this year.
Ending year gives all records between one year from today's date, and today (really
useful!).
The Ending date ranges are particularly useful when used in combination with Group By
Columns. Combining "Ending Year" with "Group By Month" gives a report that summarises data
by month for the previous 12 months.
The report below shows the total amount of contributions received in the past 12 months, as
well as each month's total.
Once you have selected your report criteria, click Preview Report. If the report displayed isn't
exactly what you wanted, open the Report Criteria section at the top of the screen to modify
your criteria. You may need to make several modifications before you achieve the report you
want.
198
REPORT SETTINGS
Once you are happy with the report criteria you have entered into the template, save it as a
report instance so that it is available to use again. It will appear in the drop down list of reports
under the Reports navigation menu.
Title, description and formatting options
Click Create Report to open the report settings section. Give your report a title and description
that will help other people understand its usage, for example, "Student members joined so far
this year".
You can optionally create a report header and footer in HTML. The header and footer will be
displayed at the beginning and end of any PDF or downloaded versions of the report. This can be
used to personalise your reports with your organisation's logo and to other useful information.
Email settings
CiviReport allows you to email reports to specific people on a regular basis. To do this, fill in the
Subject, To and CC fields in the Email Delivery Settings. You can enter one or more email
addresses in the To and CC fields; multiple email addresses should be separated by commas.
You will need to configure a cron job for each report that you want to send. The cron job runs a
script in the civicrm/bin directory (CiviReportMail.php) which takes several parameters, including
the ID of the report instance that you wish to send. For example, if you want to send a Donor
Report to your board members, you can configure a cron job with the ID of the particular report
instance to email the report in HTML or PDF format. Refer to the "Command-line Script
Configuration" documentation for more information:
http://wiki.civicrm.org/confluence/x/LIK9AQ
Adding reports to navigation menu
The most straight-forward way to share reports with other users is to add them to the
navigation menu. Do this by specifying the parent menu item under which the report should be
listed, in Other Settings. For example, if you would like it to appear in the Reports menu, select
Reports as the "Parent Menu". Alternatively, you might want to add an event report to the
event menu.
199
Permissions to view reports
You can set up permissions to view reports on a report-by-report basis. This allows you to
simplify the user interface for junior users and set sensitive reports to be accessible only to
certain users.
Permission to edit report criteria
Drupal installations only
The ability to edit report criteria is a separate permission that can be configured globally in
Drupal. Users with this permission will be able to edit report criteria, while users without this
permission will be able to view reports but not edit the criteria.
Adding reports to the Dashboard
Finally, you can set a report to be available on users' dashboards by checking the box, Available
for Dashboard? in Other Settings. Users with appropriate permissions will be able to add this
report to their dashboard by clicking the Configure Your Dashboard button.
200
45. EVERY DAY TASKS WITH REPORTS
This chapter assumes that CiviReport is already configured and you are a user wanting to access
reports that have been configured for you. If you want to learn more about how to set up and
configure reports, read the section on configuring CiviReport.
VIEWING REPORTS
To view a report:
1. Click on the navigation menu "Reports -> Report listing".
2. All reports are listed on this page, grouped by the component they report on.
3. To view a report, click on the report name.
Reports can also be configured to be directly accessible from navigation menus. They would
normally appear in the Reports menu, but can be configured to appear in any menu. For
example, an event report might appear in the Events menu.
When you open a report it will appear on screen as a table. Some reports can also be viewed as
a bar or pie chart. When this is the case, a dropdown menu will allow you to select the format
you want.
The appropriate report should then be displayed.
As well as viewing reports on screen you can create a PDF version of either tables or graphs,
suitable for printing or emailing.
201
If you want to perform further calculations on your report data, you can output the data as
comma separated variable (CSV) for import into a spreadsheet by clicking Export to CSV.
If you have the appropriate permissions, you will be able to adjust the report criteria and
settings when you view the report. Read the section configuring reports for detailed information
about how to do this.
REPORTS ON YOUR DASHBOARD
Reports can be configured to appear on your dashboard (the first page you see when you log in
to CiviCRM). You can configure this yourself, although not all reports may be available to put on
your dashboard.
To display specific reports on your dashboard:
1. Click on Configure Your Dashboard (from your dashboard, i.e. CiviCRM home).
2. Select a report from the list of available reports.
3. Drag the report onto your dashboard.
202
EMAILING REPORTS
Reports can be automatically emailed to certain people on a regular basis. This requires
modifying the report settings, which is explained in the section on configuring CiviReport. If you
do not have the permissions to do this, you will need to ask your administrator to configure it
for you.
ADDING REPORT RESULTS TO A GROUP
Sometimes it is useful to add contacts returned in a report to a group. This functionality isn't
available in all reports but where it is, you can choose the group you want to add the contacts to
from the dropdown menu as shown below.
CIVIC ENGAGEMENT
46. What is CiviEngage?
47. Planning with CiviEngage
48. Installation
49. Configuration
50. Essential Tasks
203
46. WHAT IS CIVIENGAGE?
CiviEngage is a drupal module that enhances CiviCRM's core functions for non-profits focused on
community organizing and civic engagement work.
PURPOSE
CiviEngage was built to aid community organizing, base-building and civic engagement, specifically
with regards to managing walk lists for door-to-door campaigns and caller lists for phone banks.
CiviEngage provides:
A package of custom fields, reports and features to track the history of engagement,
involvement, and activities of constituents over time
A model of how to conceptualize and best organize information about individual
constituents, organizations and methods of tracking their history of interaction.
SCENARIOS
Community organizing groups that do base-building and civic engagement work have taken
advantage of the features in CiviEngage in various ways. The following are scenarios in which
CiviEngage can help organizations further their ongoing community organizing.
Mobilizing Constituents for a Direct Action
An organization needs to mobilize several hundred people for a direct action at the state capitol
in less than two weeks. The organizers know that the best way to contact their particular
constituency is by phone. Organizers want to know who is coming to the direct action, so they
can track that individual's involvement with the organization over time.
1. Organizers will identify who they want to mobilize for direct action based on specific
criteria and information they know about their constituency, such as geographic location,
issue interests, volunteer interests, leadership level, etc.
2. A staff member will create a Direct Action event in CiviCRM and add groups of individuals
to the event.
3. Organizers will call the list of possible participants from a Phonebank List report or through
a participant listing and enter each call's results; such as whether they will attend, or if it's
a wrong number, or if the organizer left a message.
4. An organizer may contact the participants several times to ensure that they will attend
the direct action, so the organizer will record the responses each time they attempt to
contact the participant. Most organizers attempt to contact up to 3 times to ensure that
the participant commits to attending.
5. After the Direct Action event, staff can analyze how many people attended or didn't who
said they would attend, as well as if their method of outreach was effective.
Door Knock Canvassing
An organization wants to engage constituents based on what they learn from individual
responses during a door knock canvass around a particular issue, such as workers' rights. To
find out more about how their constituencies feel about the issue and to see if they would like to
help, the organization decides to do a door knock canvass in several neighborhoods.
204
1. Staff will define the target audience based on specific districts in a city and use CiviCRM's
Smart Groups to build the list of people to canvass.
2. Staff will set up a Campaign Event to record the questions that will be asked during the
door knock canvass.
3. Staff will identify the volunteers who will do the door knocking and then add them as
participants to the event. This way they can track who is door knocking and what group or
list of individuals they will be visiting.
4. Staff will print the Walk List Report based on the Smart Group, and will also export the
walk list information to a spreadsheet to collect the responses and identify the volunteer
canvasser.
5. Each volunteer canvasser will door knock the locations on the Walk List and gather
responses on their report. At the end of the night, other volunteers will gather the Walk
List reports, and enter the responses on the spreadsheet. Staff can then import the
spreadsheet information back into CiviCRM.
6. After the canvass campaign, staff can use the Activity Report to analyze campaign
responses to determine their next step to engage their constituency in the issue.
205
47. PLANNING WITH CIVIENGAGE
CiviEngage packages a set of custom data groups and fields, reports, and other features for use
in civic engagement and community organizing work. This chapter will describe the general
concepts and planning needed to use CiviEngage effectively.
WHAT YOU NEED TO KNOW
The following are concepts, custom fields and values to keep in mind when preparing to use
CiviEngage.
Campaign Source Code
Campaign Source Codes are descriptive values used to identify related activities, events,
contributions, and memberships and map how these activities and transactions are linked
together. Campaign Source Codes are also useful for identifying these sets of activities or
transactions as part of a larger campaign, project, or program.
For example, an organization is conducting a door knock canvass around a particular issue during
a specific range of dates. The organization may want to use campaign source codes to link
together the activities (where responses to door knock canvass questions are captured), the
event (the door knock canvass campaign itself), and any contributions made during the canvass
to be able to analyze the effectiveness of the campaign.
Activity, Event, Contribution, Participant, and Membership records each contain a custom field to
store a Campaign Source Code, that all share a common option list where Campaign Source Code
values can be added and edited.
Your organization can establish a standard method for creating new Campaign Source Codes so
that the codes are consistent and easy to sort and understand at a glance. For example, you
can specify that annual campaigns always include the year at the either the beginning or the end
of the Campaign Source Code, not both, so that you don't wind up with "2009 Annual Campaign"
and "Annual Campaign 2010."
Issue Interests
Issue Interests are issues that your organization works on or tracks. They are included in
CiviEngage as a single option list shared across multiple contexts:
Grassroots Info: Issue Interests for individuals
Media Issue Interests for media contacts
Funder Issue Interests for funders
Grant Info: Funding Areas for organizations
It is important to remember that despite appearing with different labels in these different
contexts, you are still dealing with just one shared list of options.
In planning to use CiviEngage you should come up with a list of distinct issues that are important
to your organization and that you will want to utilize when tracking individuals' interest in your
organization's work, the issues that your media contacts may be interested in covering, funders'
general interests and the specific areas of work included in particular grants.
Volunteer Interest
206
Volunteer interests are activities that your organization's volunteers can take on and participate
in; you can indicate each individual's interest in participating in these ways. They are included in
CiviEngage as an option list. In planning to use CiviEngage you should establish a list of your
organization's current volunteer activities as well as any activities that you are planning to launch
in the future. Some examples of volunteer interests are canvassing, phone banking, and tabling.
Cleaning your Address Data
Cleaning your address data means standardizing addresses to conform to the conventions
defined by the United States Postal Service's Standards for Addresses. Standardizing how
addresses are entered into CiviCRM will allow for more accurate search results when searching
by address and is essential to generate accurate Walk List reports. CiviCRM will parse addresses
based on the USPS standards. To find out more about how Address Parsing is handled and used
in CiviCRM, refer to the Address Parsing chapter of this book. When adding or editing contacts
you will be entering or editing address elements including street number, street name, and
Apt/Unit/Suite number according to these standards.
When planning to import pre-existing data into CiviCRM for use in CiviEngage it is essential that
you plan to clean up address data before importing.
To find out more details about the USPS' Standards for addresses, refer to their Publication 28
at http://pe.usps.com/text/pub28/welcome.htm.
TRACKING CIVIC ENGAGEMENT AND CAMPAIGNS
CiviEngage is designed to manage interactions with constituents around an organization's civic
engagement and base-building work, such as door knock canvassing and phone banking. There
are several concepts and details to consider when preparing for these types of campaigns.
Working with Your Universe of Contacts
In preparing for your campaign, you will need to identify the audiences you will be targeting for
your door knock canvass or phone bank in CiviCRM. CiviCRM uses Smart Groups and regular
Groups as the mechanisms to target specific groups of contacts. Here are a couple of examples
of how you can use Smart Groups and regular Groups for targeting during your campaign:
You can use Smart Groups to identify contacts you want to target based on specific
criteria, such as voter demographics, issue interests, primary language spoken, etc.
You can track voter demographics about your contacts using the custom data group called
Voter Info
You can use Groups to identify contacts who subscribe to a particular newsletter or issue
to do an email blast about your campaign.
You can then use these Smart Groups and regular Groups to generate your walk list or
phone bank list.
Learn more about working with Smart Groups and regular Groups in the "Tags and Groups"
chapter of this book.
Preparing a Campaign Event
To prepare a campaign event in CiviCRM, there are several setup items you may want to
consider:
207
Define a specific Campaign Source Code for your event. This Campaign Source Code will be
used for the event and the activity which holds the individual responses gathered during
the door knock canvass or phone bank campaign.
When you set up your event with the Event Type set to "Campaign" you can record the
questions being asked during the campaign in the Event Campaign Details area.
Decide how you want to identify participants in the campaign event. Maybe you only want
to identify the staff and volunteers who will be involved in conducting the door knock
canvass or phone bank. Maybe you'll want to add the targeted contacts as participants.
Activities will be used to record the responses of each individual contacted during the
campaign as well as the campaign source code related to the campaign, so it may not be
necessary to add these contacts to the event. In either case, it is recommended to also
record the Campaign Source Code in the participant's record in the Participant Info area.
When capturing responses from each individual during the campaign, consider how you plan
on getting the data back into CiviCRM. If the plan is to enter data one contact at a time,
which may make sense for phone banking, you will need to record the response in the
individual's activity record, with the Activity Type of "Door Knock" or "Phone" in the
Walk List Responses or Call List Responses area. But if you plan on entering batches of
data at a time, then you will need to plan to import the responses using the Import
Activities function.
Working with Voter History
When using CiviEngage, plan how you will manage voter history and other voter information
collected during a voter engagement or electoral cycle. Many organizations have access to a
voter file from which they manage all their voter engagement work outside of CiviCRM. Once
the voter engagement or electoral campaign is over and voter information is updated with who
voted and other demographics, organizations most often will only want to keep information on
the actual contacts they made during the campaign. In this case, only those selected records
from the voter file and additional voter information, such as responses to specific electoral
campaign questions, will be imported and maintained in CiviCRM. These voter records then
become contacts that organizers will continue to engage and target with base-building efforts.
If you wish to collect voter contacts with their demographics, history, and additional information,
first import voter contacts (with their contact information and demographics) into the Voter Info
custom group. Then import additional information as Activities, such as responses to electoral
campaign canvass questions.
MOBILIZING INDIVIDUALS TO ATTEND AN EVENT
The Participant Info custom data group that comes with CiviEngage contains fields that hold
information about prospective event participants, including a history of interactions between
your organization and prospective participants. Use this information (such as needs for childcare
or rides) to bring these individuals to your events. Tracking the history of your organization's
contact with individuals around events such as an annual membership meeting, a direct action,
or leadership training can help you to understand the effectiveness of your outreach methods
and determine how committed or engaged an individual is based on if the individual actually
attends events after multiple contacts.
This feature is mostly useful for organizers or staff who have a list of individuals they are
recruiting to attend an event through multiple phone calls or face-to-face meetings. The
following CiviCRM tasks could be used to mobilize individuals:
208
1. Conduct a basic or advanced search or use Groups and Smart Groups to create a list of
the contacts you want to mobilize or invite to the event.
2. From the search results or Group Contacts screen, you can add the list of contacts to the
event by selecting Add Contacts to Events from the Actions list. To find out more about
how to add contacts to events, refer to the Managing Participants chapter in the Events
section in this book.
3. Once you add the contacts to the event, you can enter participant information or
responses from multiple interactions in the Participant Info area in a contact's participant
record. You can either enter information for one participant by editing the participant
record itself, or you can add information for a list of participants at one time. For example,
if you plan to call through your list by viewing the participant list from the event listing, you
could use Batch Update Participants Via Profile and select one of the following custom
profiles provided by CiviEngage:
Update Event Invite Responses - to record responses from multiple contacts with the
participant.
Update Participant Info - to record general information about participants, such as if they
need childcare or rides to the event.
TRACKING FUNDERS AND FOUNDATIONS
You can track information about and due dates for grant proposals, letters of inquiries, and
reports for funders by adding an activity related to the funder's contact record and choosing
from the Proposal, Letter of Inquiry, or Report activity types.
You can also tailor information about an individual funder, such as their funding areas and issue
interests, using the Funder Info custom group. In order to view the Funder Info tab, you will
need to use the Individual sub-contact type, Funder, when you create a new contact that is
identified as a funder.
You can tailor information about a foundation (organization record), such as their program areas
for funding, using the Grant Info custom group.
TRACKING MEDIA CONTACTS
As part of civic engagement and community organizing work, it can be useful to track
information about your media contacts in CiviCRM, especially if you want to know which media
contacts or outlets are interested in your organization's issues, or have written articles about
your work, or for identifying who to contact when you want to publicize the work the
organization is undertaking.
You can tailor information about an individual media contact, such as their media type (e.g., TV,
Newspaper, Photographer, etc.), issue interests and beat using the Media Info - Ind custom
group. Use the Individual sub-contact type, Media Contact, when you create a new contact for a
media contact. You can then view and edit the Media Info - Ind tab.
You can also tailor information about a media outlet (organization) such as their media type (e.g.,
TV, Newspaper, Magazine, etc.) using the Media Info - Org custom group. As with the individual
media person, use the Organization sub-contact type, Media Outlet, when you create a new
contact for a media outlet. You can then view and edit the Media Info - Org tab.
TRACKING ELECTED OFFICIALS
Identifying and collecting information about your elected officials could be useful for your
community organizing and civic engagement work. You may want to know who is an elected
official in a specific district, or who to contact on their staff, such as the scheduler, or
spokesperson.
209
You can tailor information about an individual elected official, such as their elected position (e.g.,
city council, Senate, etc.) and their role using the Elected Info custom group. Use the Individual
sub-contact type, Elected Official, when you create a new contact for an elected official. You
can then view and edit the Elected Info tab. Remember that staffers, schedulers, or
spokespeople for an elected official can be entered as the Elected Official subtype.
REPORTING AND ANALYSIS
There are two reports packaged with CiviEngage: Walk List and Phonebank List. In addition,
the Activity Report is enhanced to filter custom activity fields such as those associated with the
custom group Call List Responses and Walk List Responses.
The Walk List report allows you to view, print, or export an individual's contact information and
demographics such as Member Type, Sex, Age, Party Registration, Voter history, along with
response codes and notes where a volunteer can collect responses during a door knock canvass.
The Phonebank List report is similar to the Walk List report except that this report is used
exclusively during a phonebank and contain response codes pertaining to phone responses.
The Walk List and Phonebank List reports are used to collect information during a campaign to
later be imported or batch entered back into CiviCRM.
The Activity Report is enhanced to allow you to search, view, print, or export for specific
responses from a door knock canvass or phonebank campaign. Use this report not only to
analyze the effectiveness of your campaign (e.g., how many people you contacted and collected
responses from) but also to analyze responses from your constituency around an issue, or to
determine whether individuals may become more involved with your organization.
Disabling vs. Deleting Custom Data
If you decide you don't need to use or view particular custom groups, fields, or values, we
strongly recommend that you disable the group, field, or value rather than delete them. The
Walk List and
Phonebank List reports rely on these fields, so deleting certain custom data could potentially
"break" the reports.
210
48. INSTALLATION
Several tasks are required to install CiviEngage. Given the level of detail involved, we refer you
to the wiki for the procedure:
http://wiki.civicrm.org/confluence/display/CRMDOC/CiviEngage+Installation
A few aspects of CiviEngage lead to special requirements:
Because CiviEngage is implemented as a Drupal module, the site's Drupal administrator will
have to install and enable it.
A site key is also needed because CiviEngage runs a script that adds information to the
database.
And finally, new Individual and Organization contact subtypes need to be created.
211
49. CONFIGURATION
You will need to configure both Drupal and CiviEngage to use the module.
CONFIGURING CIVICRM FOR CIVIENGAGE
CiviEngage can be configured using the following CiviCRM core features:
Custom Data Groups
Configure custom data groups and fields to track voter demographics, issue interests, leadership
levels, volunteer interests, and information about funders, media contacts, and elected officials.
Contact Subtypes
CiviEngage takes advantage of CiviCRM contact subtypes to expose custom data groups
associated only with specific subtypes. The following are new contact subtypes:
Individual subtypes:
Media Contact - will expose a contact tab containing information specific to media
contacts, such as their media type (e.g. Newspaper, Radio, TV, etc.), their "Beat," and the
media issue interests
Elected Official - will expose a contact tab containing information specific to elected
officials, such as their elected level (e.g. City Council, Senate, etc.) and the role (e.g.
scheduler, spokesperson, etc.)
Funder - will expose a contact tab containing information specific to funders, such as their
program areas and their issue interests.
Organization subtypes:
Media Outlet - will expose a contact tab containing information about their type of media,
such as TV, Radio, Wire, Newspaper, Magazine, etc.
Campaign Source Codes
CiviEngage uses Campaign Source Codes that you can tailor to describe and track related
activities, events, event participants, contributions, or memberships. Campaign Source Codes
can be used to describe a group of related activities, events, contributions, or memberships for a
specific campaign, project, or program.
Note: A "Campaign" does not necessarily mean a formal campaign, but can also generally be
defined as a specific project, program, or organizing activity.
Door Knock Canvass and Phone Bank Tracking
Events used for Door Knock Canvass or Phone Bank - Use the Campaign Event Type to
expose Event custom fields that allows you to store up to four specific questions being
asked during a door knock canvass or phone bank.
Activities used to Collect Responses from Door Knock Canvass or Phone Bank Campaigns Use the Door Knock and Phone Call Activity Types to expose custom fields where you
can collect an individual's responses during a door knock canvass or phone bank.
Reports
212
Walk List Report - view, print or export certain demographic and other constituent
information in a specific geographic area to collect responses to be used during a door
knock canvass. The Walk List Report takes advantage of the optional address parsing
feature to build the report.
Call List Report - view, print or export certain demographic and other constituent
information along with an area to collect responses to be used during a phone bank.
Activity Report - includes filters for activity custom fields so that you can build a report of
specific activities based on criteria about your constituency, such as creating a report to
analyze particular responses from a door knock canvass or phone bank.
Grant Proposal and Report Tracking
CiviEngage uses the Proposal, Letter of Inquiry and Report Activity Types to expose custom
fields to track information and schedules for proposals, letters of inquiries and reports related to
an individual funder or foundation.
Custom Profiles
CiviEngage configures several custom profiles for easier batch updating of individual or
organization information, such as voter demographics, issue interests, volunteer interests, or
event participant information. To learn more about profiles, please refer to the "Profiles" section
of the book.
CONFIGURING CIVIENGAGE
When you install CiviEngage a number of custom fields are automatically created. These fields
are designed to support your community organizing work. Most of these fields are multiple choice
fields which have been pre-populated with sample options. Before you start using CiviEngage, you
need to review and modify the supplied options to meet your needs.
Begin by going to Administer -> Customize -> Custom Data in the navigation menu. In the
following list bolded items are Group Header entries in the Custom Data screen. The bulleted
items are custom fields under those Group Headers that have been added by CiviEngage; the
other fields under these group headers are standard to CiviCRM. The choices for these custom
fields should be edited before you use CiviEngage. You should add, delete, or edit the available
options for each custom field to make them better fit your organization's needs.
Communications Details
Best Time to Contact
Voter Info
All of the fields in this custom data group are added by CiviEngage, so you should review and edit
them all to suit your needs. You may also want to add specific local voter fields that apply to
you.
Constituent Info - Individuals
Constituent Type
Staff Responsible - note that the values for this field are also used for Event Contact
Person. Replace the sample names in the list with your staff, member or volunteer
coordinators, and other folks that have individuals assigned to them.
How Started - edit this list to fit the ways in which members are brought into your
organization.
Grassroots Info
213
Member Status - three status choices included by default. Think about other member
statuses that might work for your organization and add or remove as needed.
Leadership Level - The default options for tracking an individual's leadership level within
your organization are 1-5. Change this to match however your organization tracks this
information.
Issue Interest - this custom field uses the same set of options as the Funding Areas and
Funder Issue Interest fields. It is a list of issues that your organization works on or tracks.
Volunteer Interests - a list of volunteer activities that your members can take on.
Constituent Info - Organizations
Constituent Type - Org
Grant Info
Funding Areas - this custom field uses the same set of options for Issue Interest and
Funder Issue Interest.
Participant Info
Participant Campaign Code - this custom field uses the same set of options as the
Contribution Campaign Code, Event Campaign Code, Activity Campaign Code and
Membership Source Code fields. Delete the example campaigns and add your own. This is
the mechanism CiviEngage uses to connect a contact's participation across all these
different actions. For example, a Campaign called "House Party 10-1-2010" could have an
Event tied to it, a participant of that Event tied to it, an activity when an organizer calls a
contact inviting them to attend an Event, a membership entry when they become
members at the Event and a contribution when they pay their dues.
Contribution Source
Contribution Campaign Code - see Participant Campaign Code.
Contribution Campaign Method - this custom field uses the same set of options as
Membership Source Campaign. Add different types of interactions or locations where you
would be engaging potential members and donors.
Event Details
Event Contact Person - also used for Staff Responsible. Add all appropriate people to this
list.
Event Campaign Code - see Participant Campaign Code.
Activity Source Details
Activity Campaign Code - see Participant Campaign Code.
Organizational Details
This custom group is used to store information that is specific to organizations. There is only one
example currently.
Rating - if you need to evaluate organizations in some way, change the options to reflect
that.
Demographics
Ethnicity
Primary Language - this custom field uses the same set of options as Secondary Language.
Only one entry can be selected for each contact for this field.
Secondary Language - also used for Primary Language, but as many choices as needed can
be checked.
Media Info - Org
214
This custom group is only applicable to the New Media Outlet contact subtype.
Media Type - Org - this custom field uses the same set of options as Media Type - Ind: TV,
Radio, Wire, Newspaper, Magazine
Media Info - Ind
This custom group is only applicable to the New Media Contact contact subtype.
Media Type - Ind - this custom field uses the same set of options as Media Type - Org
Beat - this refers to the general category of topics that a media contact covers, such as
local government, education, neighborhoods, religion, labor, etc.
Media Issue Interest - uses the same option list as Issue Interest. As you come to know a
reporter, you will learn the issues they are particularly interested in, even if it differs from
their assigned beat.
Elected Info
This custom group is only applicable to the New Elected Official contact subtype.
Elected Level - the governmental body the individual is part of (City Council, state
legislature, mayor, etc.)
Role - Whether the contact is the elected official, or the official's staff, spokesperson, etc.
Funder Info
This custom group is only applicable to the New Funder contact subtype.
Funder Issue Interest - this custom field uses the same set of options as Issue Interest and
Funding Areas.
Membership Source Details
Membership Source Code - Uses the same codes as the Participant Campaign Code and
Contribution Campaign Code.
Membership Source Campaign - also used for contributions. Add different types of
interactions or locations where you would be engaging potential members and donors.
215
50. ESSENTIAL TASKS
This chapter provides instructions on how to do some of the common tasks associated with the
CiviEngage module.
PRINTING A WALK LIST
CiviEngage offers a report that allows you to easily print walk lists for folks who are doing
canvassing, Get Out the Vote (GOTV) or other door knocking activities.
1. If you want to use Groups or Smart Groups to develop your walk list, be sure to create
the groups you want.
2. Click on Reports -> Create Reports from Templates in the navigation menu.
3. Click on the walk list report. Choose whether you want the Country or Email field to
display.
4. Scroll down to the "Set Filters" section. You must select a filter to obtain results. All your
Groups and Smart Groups appear in the Group filter.
5. Once you have set your filter(s), scroll down and click on "Preview Report." You are now
seeing the report results, but if you click on "Print Preview" you will see your walk list. You
can use your browser's Print Preview feature to see the walk list on a per-page basis.
PRINTING A PHONE LIST
CiviEngage offers a report that allows you to easily print phone lists for folks who are doing
phone banks or other mass phoning activities.
1. If you want to use Groups or Smart Groups to develop your phone list, be sure to create
the groups you want.
2. Click on Reports -> Create Reports from Templates in the navigation menu.
3. Click on the phone list report. Choose the columns you want to display from the template
screen.
4. Scroll down to the "Set Filters" section. You must select a filter in order to obtain results.
All your Groups and Smart Groups appear in the Group filter.
5. Once you have set your filter(s), scroll down and click on "Preview Report." You are now
seeing the results but if you click on "Print Preview" you will see your phone list. You can
now use your browser's Print Preview feature to see the phone list on a per-page basis.
CREATE A CAMPAIGN SOURCE CODE
In order to use CiviEngage effectively, you need to create "campaigns" that you connect all your
activities to.
1. Click on Administer -> Customize -> Custom Data.
2. Find Participant Info in the list and click the corresponding "View and Edit Custom Fields"
link. This gives you a list of Custom Fields.
3. Find Participant Campaign Code and click the "Edit Multiple Choice Options" link. Now you
are seeing a list of the interests.
4. Scroll down and click on "New Option" and add your new campaign.
Please note that this new campaign code will now be available for Event, Membership and
Contribution Campaign Codes as well as in the Participant Campaign Code that it was just
created in.
ADD AN ISSUE INTEREST
216
To better understand and track the areas that your members and constituencies are interested
in working on, CiviEngage provides a field that collects this information. Customize this list to
meet the needs of your particular organization.
1. Click on Administer -> Customize -> Custom Data.
2. Find Grassroots Info in the list and click on the corresponding "View and Edit Custom Fields"
link. This gives you a list of Custom Fields.
3. Find Issue Interest and click the "Edit Multiple Choice Options" link. Now you are seeing a
list of the interests.
4. Scroll down and click "New Option" and add your new interest.
Please note that this new issue will also appear in Funding Areas and Funder Issue Interest as
well as in the Issue Interest that it was just created in.
TRACK WALK LIST/CALL LIST RESPONSES
Responses to the questions your canvassers or phone bankers ask are tracked in an individual's
activity record. The text of the questions are tracked in the event record. In order to properly
configure this, start with creating the event.
1. Click on Events -> New Event.
2. Choose Campaign for your Event Type, which will let you see the Event Campaign Details
section.
3. Scroll down to the Event Campaign Details section and add the text to the questions for
this particular campaign.
4. You will also want to add an Event Campaign Code, which is in the Event Details section.
Next you would go to a contact record to create a "Door Knock" or "Phone Call" activity and
finish configuring this functionality.
1.
2.
3.
4.
5.
Go to a contact's record and click on "new activity."
Choose "Phone Call" or "Door Knock" and you will get the Activities screen.
Scroll down and click on the Call List Responses section.
Now you can record the responses.
You then add the Activity Campaign Code in the Activity Source Details section. Make sure
you choose the same campaign as you did for the Event.
PRINT AN ACTIVITY REPORT
One of the features of CiviEngage is the ability to track the different activities that your
members are engaged in. Use the activity report to better understand what your members are
doing.
217
1. Click on Reports -> Create Reports from Template.
2. Choose the Activity Report. This brings up the Activity Report Template. You are now
looking at all the options available for printing a report based on the activities CiviEngage
offers that your contacts are engaged in.
3. The first section lists the columns that are available for your report. Use the check boxes
to decide what information you want your report to show. The default values are Assignee
Contact Name, Target Contact Name, Activity Type, Subject, Activity Date and Activity Status.
You can choose columns from Walk List Responses, Leadership Level (from Activities), Call
List Responses, Proposal Info or Activity Source Details.
If, for example, you want a report of Walk List Responses from a specific campaign, you
would check boxes from the Walk List Responses section and choose the Activity Campaign
Code from the Activity Source Details section. Please note that the default value for
Activity Date is "this month." If you want a different range of dates you have many options.
Click on "this month" and you will see all the options available. Included is Date Range,
where you can choose a specific range of dates.
4. The next section allows you to group your data by the Source Contact (the default value),
Activity Date or Activity Type. Check the appropriate box for your report.
5. The final section is for filtering your data. Here you can choose data from any of the
activity fields that CiviEngage offers.
To continue our example, you might choose to include data where the first two Walk List
questions were answered yes. Choose Y in the appropriate boxes and scroll down to the
Activity Source Detail section and choose the appropriate Activity Campaign Code. Click
Preview Report and view your results.
6. Once you have your results, you have a number of options. You can "Preview" the report,
"Preview" the PDF of the report, "Preview" the CSV (export your report into a
spreadsheet), or "Add the contacts to a group."
SEARCH FOR ACTIVITIES
The are a number of ways to search for the activities that you create using CiviEngage:
Run a report, as explained above
Use the Find Activities search option
Use the CiviCRM Advanced Search
Run an Activity Search, which is in Custom Searches.
Using the Find Activities search option
1. Click on Search -> Find Activities.
2. You are presented with a number of search criteria options. You can enter the name or
email address of a contact in the database. You can choose one or more activity types.
You can add a range of dates during which activities happened. You can search for
contacts in specific Activity Roles: With, Created By and Assigned to. You can look for
specific subjects, test activities or by the status of the activity. Each criterion you select
will narrow your search results.
3. Click Search and you will get to the Search Results screen.
4. Select some or all of the search results and click on "- actions."
5. You can then choose to export your results, send an email to all the contacts you found or
add these contacts to a group or smart group, among other options.
Using Advanced Search to find Activities
1. Click on Search -> Find Contacts - Advanced Search.
2. Scroll down to the Activities section and click on it. Here you find all the options available in
CiviEngage for activities.
3. Once you choose your search options and click Search you will get to the Search Results
screen.
4. Select some or all of the search results and click on "- actions."
5. You can then choose to export your results, send an email to all the contacts you found or
add these contacts to a group or smart group, among other options.
218
Using the Custom Search: Activity Search
1. Click on Search -> Custom Searches... -> Activity Search.
2. You are presented with different criteria by which you can search for information. Enter
your search terms and click Search.
3. The Search Results provides the Name of the person, the Status, Type and Subject of the
Activity and who assigned the activity. You also have a button for viewing and editing each
activity record.
4. Select some or all of the search results and click on "- actions."
5. You can then choose to export your results, send an email to all the contacts you found or
add these contacts to a group or smart group, among other options.
EXTENDING CIVICRM
51. Extending CiviCRM
52. Developing Page Templates
53. Writing custom reports
54. Developing Custom Searches
55. Working with the API
56. Hooks
57. Importing data
58. Tips and Tricks
219
51. EXTENDING CIVICRM
This section contains developer documentation for CiviCRM. It should be useful for developers
wishing to extend CiviCRM and also for organizations who want to ensure that their developers
are using best practices to extend CiviCRM.
There are many different ways you can extend and customize CiviCRM, and this section takes
you through them in order of simplest to most difficult. If you find that you cannot do something
you're trying to do using the tools and techniques outlined in this section, please get in touch
with the CiviCRM developers in the forums (http://forum.civicrm.org/) or on the IRC channel
(#civicrm on irc.freenode.net) and let them know. Hacking on the core code should always be a
last resort and done in consultation with the core team who will always be happy to help you
find the best way to cover your use case.
WHEN DO YOU NEED TO CODE?
There are a lot of different options to customize CiviCRM to fit your specific needs. They are
listed roughly in order of complexity:
1. Change the configuration: (ok, this isn't coding but it is worth repeating) you can use
custom fields, profiles, components and many existing Drupal modules and Joomla!
extensions to customize CiviCRM without writing a line of code. This book covers many of
these options in other sections, so make sure you've exhausted all of those possibilities
before you dive into extending the code.
2. Edit CSS: You can create a new Cascading Style Sheet (CSS) file and use it, for example, to
adapt the style to your site or hide elements that don't make sense in your environment.
Administer -> Configuration -> Global settings -> Resource URLs field "Custom CiviCRM CSS
URL".
3. Edit the templates: Useful to change the layout of forms, and to add more data or
features via AJAX. Read about templating and APIs to know more.
4. Implement hooks: Hooks are called at specific points in the code as users interact with
CiviCRM and are useful, for example, when you want to change the default behavior when
you create, update or delete an entity, create a new custom mail merge token, or to
populate a custom field automatically based on your own business logic.
5. Add custom searches or reports: Use these to fetch information and display it in a
unique way.
6. Extend your CMS: Create a Drupal module or Joomla! extension that integrates with
CiviCRM.
7. Override PHP files: In the same way that you can override templates, you can override
any file in CiviCRM. If you have to modify core, it's much better to override files than to
edit them.
8. Write a new CiviCRM component or patch CiviCRM: Regardless of which path you take
to extending and customizing CiviCRM, chances are that someone else would be interested
in what you did. Share it with the community! If others start using your contribution, you're
likely to get bug fixes, improvements, and documentation as a bonus. Let us know what
you did in the forums or IRC channel (see above).
Where possible use the documented APIs in your extensions, this will make them less likely to
break when you upgrade CiviCRM.
Before venturing into any development, we strongly suggest that you discuss what you want to
do, and how you want to do it, with the community. We will help you find the simplest way to
reach your goal and may be able to point you to others doing similar work.
Please consider using the Academic Free License to open more opportunities to share your work.
This also makes contributing your work back to the CiviCRM project very simple.
220
52. DEVELOPING PAGE TEMPLATES
CiviCRM uses page template files to display all the pages. This makes it possible for a person to
customize any CiviCRM screen to suit a special requirement or preference. The HTML for
CiviCRM pages is not embedded in PHP code, instead a template engine (Smarty) sends the
correct page to the web browser.
A person should be familiar with HTML and CSS syntax to be comfortable editing page
templates. Some page templates additionally make use of JavaScript and an Ajax utility, JQuery.
CHANGING PAGE TEMPLATES IS THE WRONG CHOICE
WHEN ...
If it is possible to make the needed changes by updating the CSS styles. For example, if a
requirement is to hide o⁞r move some information or form fields on a screen, a CSS style for
that HTML element can be changed to display: none, or position: absolute within the CSS file.
If there is a CiviCRM hook available that can control the page. For example, there is a hook
that can modify the information on the Contact Summary screen.
If there is no process in place to update the page templates after an upgrade to a new
version of CiviCRM. Page templates are stored in a separate folder and are not touched during
an upgrade, However new versions of CiviCRM often change which placeholder elements are
available in various templates. Proper source control procedures are needed to simplify upgrades
to new versions.
SMARTY TEMPLATES INTRODUCTION
CiviCRM uses a page template engine called Smarty. This documentation is focused on how
Smarty is used within the CiviCRM environment. Every Smarty element is enclosed between
braces like these: "{}". All the other text is going to be displayed directly as HTML in the
rendered page.
Each page template is stored in a file with the extension .tpl. The PHP code assigns variables for
content that needs to be displayed, and then lets the template engine take care of presenting it.
The Smarty template engine always does this process :
1.
2.
3.
4.
Load the contents of a .tpl file.
Scan the .tpl file for placeholder elements.
Replace each placeholder element with the corresponding variable value.
Send the resulting HTML to the web browser.
These are the most commonly used Smarty template elements:
{$Name}: To display the value of a variable named "Name"
{$row.Name}: To display the value of the attribute Name in the object Row
{foreach from=$rows item=row}...{/foreach}: To loop though all the items of the Rows
array
{literal} JavaScript code{/literal}: To indicate to Smarty the "{}" aren't smarty elements but
JavaScript code, enclose JavaScript between {literal}
{ldelim}... {rdelim}: is generating "{}". Useful if you have a simple JavaScript code that
needs a lot of values from Smarty variables
{include file="CRM/path/to/template.tpl" param1=xxx}: includes the result of the
template.tpl. Some included files expect to have extra param (e.g., param1).
Please read the Smarty documentation for more information.
221
Tip: To see what variables have been assigned to the template, enable debug (Administer ->
Configure -> Global Settings -> Debugging) and on any URL, add &smartyDebug=1. It opens a
new browser window listing all the variables and values.
CiviCRM introduces some extra features to Smarty:
{ts}Any text{/ts}: It will display the translated text (if you don't use US English)
{crmURL p='civicrm/contact/view' q="reset=1&cid=`$row.source_contact_id`"}. Generates
the proper CiviCRM URL that works both on Joomla! and Drupal.
{crmAPI} Allows retrieval and display of extra data that is not assigned to the template
already. Read about the CiviCRM API for more information.
HOW TO FIND AND MODIFY THE TEMPLATES ?
All the templates are under the folder templates/CRM in your CiviCRM installation. Finding which
template is used on a given page can be difficult, but the easiest way to find out the answer is
to view the source of the page from a web browser and search for ".tpl". For example, for the
Contact Summary page, use the web browser to open the Contact Summary page, then click
"View Source" in the browser. You should find an HTML comment such as:
<!-- .tpl file invoked: CRM/Contact/Page/View/Summary.tpl.
Call via form.tpl if we have a form in the page. -->
You can then view the file at templates/CRM/Contact/Page/View/Summary.tpl to see how the
HTML is generated. If you want to modify the layout; for instance to reorder the content, do not
modify directly these files, as all the modifications will be lost on the next upgrade of CiviCRM.
The proper way is to create a new folder outside of your CiviCRM folder, then navigate to
"Administer -> Configure -> Global settings -> Directories" in the navigation menu, and set the
complete path of the folder that is going to contain your custom templates in the field Custom
Templates.
SCENARIO: THE CONTACT SUMMARY SCREEN NEEDS TO
BE CHANGED
If you want to alter the Contact Summary page template for Acme organization, perform these
steps:
1. Create the folder /var/www/civi.custom/acme/templates/CRM/Contact/Page/View
2. Update the Custom Template field in the Global Settings directories to
/var/www/civi.custom/acme/templates. You can use any directory. We found it easier to put
the custom templates under /var/www/civi.custom/yourorganisation.
3. copy templates/Contact/Page/View/Summary.tpl from your CiviCRM install to
/var/www/civi.custom/acme
Tip: Say you want to modify the template for a specific profile form, or a specific event. Instead
of copying the Form template to its default place (templates/CRM/Profile/Form/Edit.tpl), you can
create a subfolder with the ID of the profile and put the template file you want to change in the
subfolder (templates/CRM/Profile/Form/42/Edit.tpl to modify only the form for ProfileID 42).
You might be willing to modify a template that isn't directly the page you load, but added later
via Ajax. For instance, perhaps you want to change all the tabs beside the Content Summary
(Activities, Groups, etc.). The easiest way to do this is to install a development oriented plug-in
to your web browser. If using Mozilla Firefox, the Firebug plug-in is indispensable. Open the
Firebug console (or equivalent in your browser) and click the tab. You will see what URL has
been loaded for the tab (e.g., for the notes tab: http://example.org/civicrm/contact/view/note?
reset=1&snippet=1&cid=1). Open it in a new window or new tab of the web browser, and view the
source. It also contains a comment identifying the template used
(CRM/Contact/Page/View/Note.tpl).
222
Keep in mind that when you modify a template, you might have a template that doesn't work
properly anymore after an upgrade of CiviCRM, because the layout has changed or the name of
variables assigned to the template was modified. In our experience, the easiest is to use a
source code management system (SCM) to keep track of the changes you have made. Before
doing any modification of the template you copied, add it to your SCM, and obviously also
commit the template after having modified it. That way, you can easily generate a patch of your
changes, and see how to apply them to the latest version of the template.
SEMANTICALLY MEANINGFUL HTML ATTRIBUTES
To make it as easy as possible for you to style any element in the page (e.g. put a yellow
background on all the contacts of the subtype "members"), or add Ajax (clicking on the status of
the activity changes it to complete), we strive to have a consistent and coherent schema for
class names and ids for the generated HTML. This makes it easier to isolate the elements you
want to alter from a custom style or from JavaScript:
There is a class crm-entityName defining the type of the entity bubbled up as high as
possible in the DOM. For instance, each line on a list of activity has <tr class="crm-activity
...">
There is an id crm-entityName_entityID allowing to find the id of the entity bubbled up.
e.g., on a list of contacts, the contact number 42 has a <tr id="crm-contact_42" ...>
Each field or column contains a class identifying it, e.g., "crm-activity-subject"
Each field or column that contains a value with a fixed set of possible values (e.g., a Status,
a Role, a Contact Type) contains a class identifying it. It doesn't contain the human
readable version (that can be changed), but the id or a name that can't be modified by the
end-user; such as class="crm-activity-status-id_42". This is on the top of the class
identifying the field name, so the complete HTML is <td class="crm-activity-status crmactivity-status-id_42">Hitchhiked</td>.
At the time of the writing, some of the templates don't follow these conventions. Please update
them and submit a bug tracking issue with a patch if you need to use a template that isn't yet
complying. For more information about submitting a bug or issue, read About the CiviCRM
community.
DISPLAYING MORE CONTENT AND ADDING AJAX FEATURES
If your modifications go further than "simple" modifications of the layout, but need to display
more content than the one assigned to the template by default, or to add Ajax functionality, use
the CiviCRM API. Please read more information about using the CiviCRM API from Ajax to pursue
this approach.
In most cases, using the CiviCRM APIs should be simple and only takes a few extra lines of
modifications.
SOME USEFUL VARIABLES AND EXAMPLES
On each page template, you have extra Smarty variables populated by CiviCRM.
{$config} Contains a lot of useful information about your environment (including the URL, if it's
Drupal or Joomla!, etc.)
{$session} Contains information about the user.
If you want to modify the template only for a logged-in user but leave it identical for anonymous
users, do the following:
{if $session->get('userID') > 0}
Insert your modifications here
{/if}
223
53. WRITING CUSTOM REPORTS
This chapter is a brief introduction to creating a new report in the CiviReport system. You can
use the same programming techniques to extend an existing report template. These tasks call
for a strong grasp of PHP. More details are available in the wiki page on customizing reports:
http://wiki.civicrm.org/confluence/display/CRMDOC/CiviReport+structure+and+customization.
CREATING OR CHANGING A REPORT TEMPLATE IS THE
WRONG CHOICE WHEN ...
If you want a batch action on an existing result set. CiviReport does not support most of the
batch actions. If your main purpose is to print or send an email to a list of contacts that meet
specific criteria, write a custom search.
REPORT SPECIFICATION
Before starting on a custom report, fill out the form on the CiviCRM wiki for report
specifications. Add your specification there and ask for comments in the forum or on IRC.
CREATING A CUSTOM TEMPLATE
This section creates a custom report listing all contacts' Display Name, First Name and Last
Name. Note that we'll be talking about both Smarty templates (.tpl files) and PHP report
templates--be careful not to confuse the two.
Replacing an existing report with your own version is not recommended because you may need
the original too, and because an upgrade of CiviCRM will overwrite your changes with the CiviCRM
version. In this section, therefore, we'll create a new Smarty template and a new PHP template
for the report. You can also copy a template and report to a new location and edit them to
create your custom report.
All reports are located under CRM/Report/Form/ and grouped by component.
Create a new Smarty template and a new PHP template for the report. Because this example
creates a report about contacts, we'll create a new report template named Contact.php and a
Smarty template named Contact.tpl, both in a custom directory (the Contact.php in the custom
directory for php scripts, the Contact.tpl in the custom directory for templates). The paths will
look like:
PHP_CUSTOM_PATH/CRM/Report/Form/Contact/Contact.php
TPL_CUSTOM_PATH/CRM/Report/Form/Contact/Contact.tpl
Add a base class named CRM_Report_Form_Contact_Contact in Contact.php, Your class must
inherit the form class used for the report framework. So Contact.php looks like:
<?php
require_once 'CRM/Report/Form.php';
class CRM_Report_Form_Contact_Contact extends CRM_Report_Form {
}
Your Smarty template file must include the report framework template. Thus, Contact.tpl is:
{include file="CRM/Report/Form.tpl"}
224
Register your report template in CiviCRM. Go to: Administer ->⁞ CiviReport -> Register Report.
Enter the details shown in the following screenshot.
In a constructor, create an array to hold a contact, which in turn hold an array specifying two
fields you want to display.
function __construct( ) {
$this->_columns = array( 'civicrm_contact' =>
array(
'dao' => 'CRM_Contact_DAO_Contact',
'fields' => array( 'first_name' => array( 'title' => ts( 'First Name' ) ),
'last_name' => array( 'title' => ts( 'Last Name' ) ),
) ) );
parent::__construct( );
}
Build the display by issuing a SELECT against the database. You can create column headers and
fill in each field in the display with the results returned by the SELECT.
function preProcess( ) {
parent::preProcess( );
}
// build select query based on display columns selected
function select( ) {
$select = $this->_columnHeaders = array( );
foreach ( $this->_columns as $tableName => $table ) {
if ( array_key_exists('fields', $table) ) {
foreach ( $table['fields'] as $fieldName => $field ) {
if ( CRM_Utils_Array::value( 'required', $field ) ||
CRM_Utils_Array::value( $fieldName, $this->_params['fields'] )) {
$select[] = "{$field['dbAlias']} as {$tableName}_{$fieldName}";
// initializing
columns as well
$this->_columnHeaders["{$tableName}_{$fieldName}"]['type'] =
CRM_Utils_Array::value( 'type', $field );
$this->_columnHeaders["{$tableName}_{$fieldName}"]['title'] = $field['title'];
}
}
}
}
$this->_select = "SELECT " . implode( ', ', $select ) . " ";
}
function from( ) {
$this->_from = "FROM civicrm_contact {$this->_aliases['civicrm_contact']}";
}
Your custom report template is ready. Press the Preview button to see the results.
225
After you've installed and tested your report, add it to the CiviCRM wiki as a patch to the
project so that it can be used by others in the community.
226
54. DEVELOPING CUSTOM SEARCHES
A custom search is a method of providing new functionality within the standard CiviCRM
navigation structure. This chapter looks at how to develop a Custom Search and is written for
programmers.
Custom searches produce a screen showing a set of contacts, from where you can execute
actions such as sending email, printing mailing labels, and all the other actions that are available
for contact search results within CiviCRM. The results page displays the same as any other
search results page, such as results delivered from an Advanced Search, however, a predefined
set of functions is controlling which information is delivered to the result page.
Custom Searches follow the Hollywood principle, "Don't call me, I'll call you." In this case CiviCRM
calls your functions at the appropriate time.
WHEN TO USE CUSTOM SEARCHES
A custom search is the right choice when ...
227
you need to access the Actions list after running your search, to send email, add the
contacts to a group or other actions (since the list of actions and list of tokens can be
extended with developer-created hooks, the combination of a custom search + custom
action + custom token is a powerful tool for implementing a special requirement. If you are
interested in creating new actions or tokens, read the section on CiviCRM hooks in the
chapter Extending CiviCRM.)
you want to create a Smart Group based on the parameters of the custom search
you want to use the search results to drive a mass mailing in CiviMail
you want results that can be sorted by clicking any column heading in the results page.
A custom search is the wrong choice when ...
you can use the Advanced Search or the Search Builder to create the same results
the information you need is not primarily accessible from the CiviCRM database tables (for
example, the information needs to be retrieved from a third-party system or a different
database)
the information you need does not include the CiviCRM contact ID (for example,
information related to summarised event income).
CiviReport is a better choice if ...
you need to schedule and send the entire result as an email to one or more people
you need a summary/detail drill-down style of results page where the detail is not just the
contact summary screen
you want to use the results as a dashlet on your CiviCRM dashboard
you need multiple report break areas within the results page, such as subtotals after
every 5 records as well as grand totals
you need to include information not related to contacts.
GETTING STARTED CREATING A NEW CUSTOM SEARCH
In this section we will create a new custom search called "BirthdaySearch" that will find all
contacts whose birthdays fall in June.
Custom searches are written using PHP and SQL. Very little knowledge of PHP is needed, as you
start with a template file and only make minor changes. In many cases the only changes are the
SQL Select statement and which columns to display in the results.
Plan and test
Before writing the code, it is important to plan and test the SQL query and verify the results. It
is valuable at this stage to review the database tables and test the SQL select statements
within the database using an SQL tool such as PHPMyAdmin.
It may be helpful for you to review the information at:
Useful CiviCRM SQL Queries:
http://wiki.civicrm.org/confluence/display/CRMDOC/Useful+SQL+queries
CiviCRM Data Architecture: http://wiki.civicrm.org/confluence/x/GQDEAQ
CiviCRM wiki: http://wiki.civicrm.org/confluence/x/MYOUAQ
Setting the filepath
Your custom search files can be stored almost anywhere, but you must tell CiviCRM where these
files are.
228
1. Within CiviCRM, go to: Administer > Configure > Global Settings > Directories
2. Fill in the Custom PHP Path Directory. This needs to be an absolute path to your PHP
directory, such as /home2/jsmith/public_html/civicrm_custom_code/
3. Create a copy of an existing custom search file, such as the EventAggregate.php file. You
will find this file at:
<joomla
root>/administrator/components/com_civicrm/civicrm/CRM/Contact/Form/Search/Custom
or
<drupal root>/sites/all/modules/civicrm/CRM/Contact/Form/Search/Custom
4. Place the EventAggregate.php file in the directory:
/home2/jsmith/public_html/civicrm_custom_code/CRM/Contact/Form/Search/Custom
5. Rename the copied EventAggregate.php file to BirthdaySearch.php
UNDERSTANDING AND UPDATING THE SEARCH CODE
Start by opening the file BirthdaySearch.php in a text editor. The first change needed is to
change the class declaration to:
class CRM_Contact_Form_Search_Custom_U p c o m i n g B i r t h d a y s
implements CRM_Contact_Form_Search_Interface {
Functions you will probably need to modify:
function_construct: this controls the columns that are part of the results page.
function all: this function is responsible for returning the SQL select statement to execute
that gets the entire set of information. The select statement MUST include a field named
"contact_id". Normally it also contains fields named "name" and "sort_name". For example:
if ( $onlyIDs ) {
$select = "DISTINCT civicrm_contact.id as contact_id,
civicrm_contact.display_name as name";
} else {
$select = "DISTINCT civicrm_contact.id as contact_id, CONCAT(
monthname(civicrm_contact.birth_date) , ' ', day(civicrm_contact.birth_date))
as sort_name , civicrm_contact.display_name as name, 'birthday' as oc_type" ;
}
$from = $this->from( );
$where = $this->where( $includeContactIDs ) ;
$sql = "SELECT $select FROM $from WHERE $where ";
⁞
function from: this function is responsible for returning the from clause of the SQL select
statement. It is normally called from the "all" function as well as by CiviCRM.
function where: this function is responsible for returning the where clause of the SQL
select statement.
function buildForm: this controls the results title as well as the parameters that are
available to the person running the search. For this birthday search, you may want the
user to be able to choose the month.
Functions you may need to modify:
function summary: this function is needed if some or all columns have summary
information, such as total number of birthdays in June.
function alterRow: this function allows you to alter the contents of a piece of information
before the results are displayed.
templateFile: this function returns the name of the Smarty template that CiviCRM will use
to present the results. For most purposes, the template
CRM/Contact/Form/Search/Custom/Sample.tpl will suffice.
229
PREPARE TO RUN THE CUSTOM SEARCH
Before you can run the custom search, CiviCRM needs to be informed that it exists. This is
accomplished by the following steps:
1.
2.
3.
4.
Go to: Administer > Customize > Manage Custom Searches.
Scroll to the bottom of the page and click the button New Custom Search.
Provide the class path as: CRM_Contact_Form_Search_Custom_BirthdaySearch
Provide the title as: Birthday Search
The new Birthday Search should now appear in (and can be run from) the list of custom searches
in the navigation menu. It will also appear on the page reached by going to Search > Custom
Searches.
The new custom search will not appear in the black navigation menu unless the navigation menu
is edited. This can be done by going to Administer > Customize > Navigation Menu.
TESTING THE CUSTOM SEARCH
Always test the following behaviors of the new search:
Test for a variety of form values, especially for invalid data. Errors in validation can lead to
serious security breaches. Just because there is a drop-down list of valid months, do not
assume that only valid months are passed to your custom search. Also test for values
with apostrophes and other special characters.
Test the previous and next page links for a variety of different size results.
Test the first/last page links for a variety of different size results.
Make a Smart Group from it and send a CiviMailing to that group.
Test other actions in the Action menu such as Send an Email, or create PDF letters with
mail merge tokens.
230
55. WORKING WITH THE API
CiviCRM provides an Application Programming Interface (API). This is a stable, coherent and
standardised set of functions and it is the recommended way for any external programme to
interact with CiviCRM.
CiviCRM is open source software, which means you can modify the source code or call methods
and objects directly. But if you did, you would probably encounter difficulties when upgrading to a
new version of CiviCRM because those methods and objects may have changed in the new
version.
On the other hand, the API is designed to remain the same so it should behave identically across
versions, or at the very least warn developers well in advance of a change. An API change
between minor versions will be considered a regression bug and you should report it to the
CiviCRM development team so they can fix it.
Most of the API functions are low level methods that allow you to interact with one of the
entities in CiviCRM (contact, tag, group, activity, etc.). For each entity type, there are at least 3
actions: add (handles add and update), get (one specific entity), and delete. Some entities work
slightly differently. Read the API docs in the wiki for the most up-to-date information:
http://wiki.civicrm.org/confluence/display/CRMDOC/CiviCRM+Public+APIs
Additionally, the API test directory http://svn.civicrm.org/civicrm/trunk/tests/phpunit/api/v2/
contains examples of most of the APIs, along with what parameters to use as input and what
return parameters to expect.
There is an ongoing effort to better standardise the APIs, and help is certainly appreciated. If
you're interested in lending a hand, post to the API section of the developer forum here:
http://forum.civicrm.org/
HOW TO USE THE API
The naming convention for API functions is civicrm_entityname_action. For instance, the
function to create a contact is civicrm_contact_add, and the method to delete a group is
civicrm_group_delete.
Every API function takes one single array of parameters as input. If the function needs a single
parameter (e.g. the identifier of the group you want to delete), this will be an array containing a
single item like so: array( 'id' => XX );
Every API function returns a single array. All the delete and add/modify functions contain an item
"is_error". If the function couldn't delete or modify the entity as you requested, is_error = 1 and
a second item error_message returns details about the error (eg. "DB Error: already exists"). If
you have turned on debugging (see the Developer Tips & Tricks section), you have an extra item
"debug_info" that contains a more detailed explanation (e.g. "INSERT INTO civicrm_tag (name)
VALUES ('existing tag name') [nativecode=1062...").
They are at least 5 different ways of using an API function:
1.
2.
3.
4.
5.
as a php function, to run your own code on the same server as CiviCRM
via the AJAX interface, to be called from JavaScript code
via the REST* interface, can be called from another server via http calls
as a Smarty function to add data to templates
from drush on the command line for Drupal installations.
Tip: When using the API, be sure to verify the proper name of each parameter, which
parameters are mandatory, and the structure of the resulting array. The easiest way to test
the API is to make AJAX calls from a test web page. See the AJAX section below for more
information.
231
*It's not really REST, but it's not SOAP either. It doesn't work for many API functions because it
assumes a certain level of standardisation that just isn't in place yet (as of version 3.2). Test,
test, test if you use the REST (REST, REST) interface, and don't hesitate to file bugs when things
don't work the way they should.
CALLING THE API AS A PHP FUNCTION
If you write custom code that is going to run within the same environment as CiviCRM, calling the
API as a PHP function is the recommended way of modifying or fetching data. You will see
examples of API calls throughout the developer documentation.
For example, you could create several tags from a script rather than doing it manually from the
CiviCRM admin page. The code below shows you how to do it using the API.
Following the API convention described above, the function to call is civicrm_tag_create. The
input parameters are: name, description, parent_id.
<?php
require_once 'civicrm.config.php';
require_once 'CRM/Core/Config.php';
require_once 'api/v2/Tag.php';
$param = array("name"=>"Topic of interest");
$result = civicrm_tag_create( $param );
if (civicrm_error( $result ))
die ("Topic of interest already exists");
$parentid = $result['tag_id'];
$tags = array("Animal Protection", "...200 other tags", "Zen");
foreach ($tags as $tag) {
$params = array("name"=>$tag, "description"=> "Example of Topic of interest",
"parent_id" => $parentid);
$result = civicrm_tag_create ($param);
if (civicrm_error( $result )) {
echo "\n ERROR creating $tag: ". $result['error_message'];
} else {
echo "\n Tag $name created with id:".$result['tag_id'];
}
}
Some explanations:
civicrm_error is a helper function to test if the api returned an error (or not)
all the functions are in api/v2; the name of the file is the name of the entity (in
CamelCase).
Tip: It is very easy to create a custom API class to add new methods to the API. Simply create a
new file in api/v2/ with any name you want (and a .php extension) and put the functions in it.
They should follow the naming convention explained above. Your new API functions will
automatically be available.
CALLING THE API AS AJAX BACK-END
With Ajax, you can retrieve data from the CiviCRM server asynchronously in the background
without interfering with the display and behavior of the existing page.
This section assumes you are familiar with over-riding templates and using jQuery. There is a
chapter in this section on over-riding templates, and you can find more information on jQuery
using any web search engine.
232
All the API functions are directly usable from an Ajax call and available to all logged-in users with
CiviCRM access privileges. This is very useful to update a value in the database without having to
reload the whole page (which might contain a long list of records, for example). You could use it
on the activities list page to set the status as "completed", on a list of participants to set the
status as "attended", or to tag a contact in a search result, each time without having to reload
the page.
Using the jQuery plug-in
The file js/rest.js contains a jQuery plug-in to make it simpler to call any CiviCRM API function.
The general syntax is $().crmAPI (entity,action,params)
For example, to dynamically create a tag, using JavaScript, in any page:
$().crmAPI ("civicrm_tag", "create", {"name": "Wonky", "description": "Broken, please
fix."});
Upon completion of the Ajax call, the default behaviour is to display a "Saved" message in a div
with id "restmsg" (you will need to be sure this div exists in your page if you want to see the
message). However, you might want to alter this default behaviour, for instance to change the
colour of a row, the name in a field or to hide a button the user has clicked. This is done via a
special parameter, "success", that is a function called when the Ajax API has returned the result.
The next example shows how this is used.
Large organisations often have many contact records in CiviCRM and staff don't have time to
update every detail of every record, even if they notice that the phone number doesn't work or
the address isn't correct anymore. One solution is to allow them to flag the record for later
follow-up if they suspect it may be inaccurate.
To make this as simple as possible, create a button that tags the contact "To be checked". We
can modify the contact summary screen (CRM/Contact/Page/View/Summary.tpl) and add a button
"To be checked", that adds the tag via an Ajax call to the API.
Here's what we added to the contact summary template to make this work (don't forget to
create the "To be checked" tag):
{literal}
<script>
jQuery(document).ready(function($){
$("#actions").append(''<li><a href="#" id="tobechecked" class="button"
title="If the contact details need to be updated"><span>
To be checked</span></a></li>');
$("#tobechecked").click(function(){
$().crmAPI ('entity_tag','add',{
tag_id
: 6
,entity_table : 'civicrm_contact'
,entity_id
: {/literal}{$contactId}{literal}
},{
success:function (){
$("#tobecheked").fadeOut('slow');
}
});
return false;
});
});
</script> {/literal}
A few points of explanation:
233
The initial {literal} is to tell Smarty (CiviCRM's templating engine) that it should ignore
everything that comes next until it sees {/literal}. This is needed because JavaScript uses
the curly brace character and Smarty will become very confused if we don't tell it to relax
beforehand.
In this specific example, the tag "to be checked" had 6 as its id, so adjust appropriately if
you're following along at home.
entity_id: {/literal}{$contactId}{literal} means that {$contactId} is a smarty tag (and is
replaced by a number, the id of the contact
When the contact has been tagged, the function success is called, and it removes the "To
be checked" button from the toolbar.
It might be even better to have the button create a new activity "To be checked" that is
assigned to the person responsible for checking contacts. The API to call would be
civicrm_activity_create. The details of the parameters for the actual implementation is an
exercise left to the reader.
Ajax behind the scenes
It is useful to know what happens when you use the Ajax interface to help you debug problems
with it.
The $().crmAPI call accesses a URL like this (for Drupal with clean URLs enabled):
http://eg.org/civicrm/ajax/rest?
fnName=civicrm/<entity>/<action>&json=1¶m1=xxx¶m2=yyy...
To create a tag, for example, the following URL gets accessed:
http://eg.org/civicrm/ajax/rest?fnName=civicrm/tag/create&json=1&name=
example&description=direct
Tip: In order to test an API function that you want to use in your PHP code, a template, or via
the REST interface, you can use the Ajax interface to figure out the right parameters. For
instance, if you want to fetch all the tags of a contact (method civicrm_entity_tag_get), log in to
CiviCRM and then paste this URL into your browser:
http://example.org/civicrm/ajax/rest?fnName=civicrm/entity_tag/get&json=1
It should return {"is_error":1,"error_message":"entity_id is a required field."}. So you add the
entity_id (which should be the contact id in this case). Now try this one:
http://example.org/civicrm/ajax/rest?fnName=civicrm/entity_tag/get&json=
1&entity_id=1
... which returns:
[{"tag_id":"4"},{"tag_id":"3"},{"tag_id":"1"},{"tag_id":"14"}]
You can also now see the format of the returned data. This should give you a good idea of how
to use this API function in other contexts.
Autocomplete and search contacts
If you create a profile for individual contacts that contains the current employer, you might want
to add an autocomplete on that field, such as you have on the normal contact edit form. When a
user starts to type the name of the current employer, the system will attempt to autocomplete
the name from your database of organisation contacts.
For security reasons, the Ajax interface is restricted to users who have access to CiviCRM otherwise, it would be fairly easy for anyone to download all the contacts you have in your
database. So that's the first thing we check for here:
{if $session->get('userID') > 0}
<script type="text/javascript" src="../{$config->resourceBase}js/rest.js"></script>{literal}
<script>
jQuery(document).ready(function($){
$('#current_employer').crmAutocomplete({params:{contact_type:'Organization'}});
});
234
</script>
{/literal}
{/if}
You might want to add additional filters. For instance in a profile "new volunteer from a
member", you want to populate the list only with the organisations that belong to the group
"members" (group id 42).
$('#current_employer').crmAutocomplete({params:{contact_type:'Organization',group:42}});
CALLING THE API FROM A TEMPLATE
This section assumes you know how to find the template used to render a page and you know
how to over-ride a template. Read the section on templating in the developer documentation if
you're not sure.
On some templates, you might want to display more information than what is available by
default, for example, displaying the list of groups a contact belongs to next to his or her tags.
You can use the API to fetch that information from within the template and assign it to a
Smarty variable that you can then display just like any other variable.
The general syntax is {crmAPI var="new variable name" entity="entity name"
action="action name" param1="xxx" param2="yyy"}
For example to fetch all groups the user id 42 belongs to and assign them to the variable groups:
{crmAPI entity="group_contact" action="get" var="groups" contact_id=42}
The following code adds the list of groups below the list of tags on the contact summary page
(CRM/Contact/Page/View/Summary.tpl)
<tr>
<td class="label">Groups</td>
<td id="groups">
{crmAPI entity="group_contact" action="get" var="groups" contact_id=$contactId}
{foreach from=$groups item=group}
{$group.title},
{/foreach}
</td>
</tr>
CALLING THE API FROM AN EXTERNAL SERVER VIA THE
REST API
The syntax and principle are identical to the other methods, but with one major difference: the
external server needs to authenticate itself before being able to use any API functions.
To call the API with a browser, use:
http://www.example.org/path/to/civi/codebase/civicrm/extern/rest.php?q=civicrm/<function>
The first call is to authenticate the caller on the CiviCRM server:
https://eg.org/path/to/civi/codebase/civicrm/extern/rest.php?q=civicrm
/login&name=user&pass=password&key=yoursitekey&json=1
The key is in the CIVICRM_SITE_KEY variable defined in your civicrm.settings.php file.
Note: On the first call, you might get an error message like "This user does not have a valid API
key in the database, and therefore cannot authenticate through this interface". This means that
you need to generate a key for the user, and add it to the api_key field in the civicrm_contact
table in the database.
{"is_error":0,"api_key":"as-in-your-setting.civicrm.php",
"PHPSESSID":"4984783cb5ca0d51a622ff35fb32b590",
"key": "2e554f49c9fc5c47548da4b24da64681b77dca08"}
235
It returns a session id. You can then use any API adding the extra param PHPSESSID = the value
returned by the log-in call.
For example:
http://www.example.org/civicrm/ajax/rest?fnName=civicrm/contact/search&json=1&key=
yoursitekey&PHPSESSID=4984783cb5ca0d51a622ff35fb32b590
Note: An action that modifies the database (such as creating a contact or group) should have the
parameters passed as POST, not GET. The REST interface accepts both a GET and a POST, but
you should follow the web standard and use POST for things that alter the database. You'll win
the respect of your peers and the admiration of your friends and family.
Access the REST API from other languages
The REST interface is language neutral (any language can use it as soon as it operates over HTTP
requests), and 3 external libraries have been written by others in the CiviCRM community (and
are in various states of completion):
1. perl: http://search.cpan.org/~wmorgan/
2. ruby: http://github.com/cap10morgan/civicrm-client-rest-ruby
3. python: http://dev.plone.org/collective/browser/collective.civicrm.pycivicrm/trunk
Please refer to the documentation provided with each library to see how to use them (or
complain to their authors if it is lacking).
236
56. HOOKS
Hooks are a common way to extend systems. The way they work in CiviCRM is that, at key
points in processing--such as saving a change or displaying a page--CiviCRM checks to see
whether you've "hooked in" some custom code, and runs any valid code it finds.
For example, let's say you want to send an email message to someone in your organization
every time a contact in a particular group is edited. Hooks allow you to do this by defining a
function with a specific name and adding it to your organisation's CiviCRM installation. The name
of the function indicates the point at which CiviCRM should call it. CiviCRM looks for appropriate
function names and calls the functions whenever it performs the indicated operations.
Hooks are a powerful way to extend CiviCRM's functionality, incorporate additional business logic,
and even integrate CiviCRM with external systems. Many CiviCRM developers find themselves
using them in nearly every customization project.
USING A HOOK IS THE WRONG CHOICE WHEN ...
If you just want to invoke an activity from CiviCRM in a program, it's more appropriate to use
the API (covered in another chapter). For example, if you want CiviCRM to output everyone in a
particular group so that you can feed them into an external database, you probably should use
the API instead of a hook.
A good test for whether or not to use a hook is to ask yourself whether what you're trying to do
can be expressed with a sentence like this: "I want X to happen every time someone does Y."
HOW TO USE HOOKS
How you use hooks depends on whether you're using CiviCRM with Drupal or Joomla!.
Using hooks with Drupal
Check the CiviCRM wiki page for the most up-to-date information on setting up hooks with
Drupal: http://tiny.booki.cc/?hooks-in-drupal
In order to start using hooks with a Drupal-based CiviCRM installation, you or your administrator
needs to do the following:
1. Create a file with the extension .info (for instance, myhooks.info) containing the following
lines. Replace the example text in the first 2 lines with something appropriate for your
organization:
name = My Organization's Hooks
description = Module containing the CiviCRM hooks for my organization
dependencies[] = civicrm
package = CiviCRM
core = 6.x
version = 1.0
2. Create a new file with the extension .module (for instance, myhooks.module) to hold your
PHP functions.
3. Upload both the .info and .module files to the server running CiviCRM, creating a new
directory for them under /sites/all/modules (for instance, /sites/all/modules/myhooks/) inside
your Drupal installation. The directory name you create should be short and contain only
lowercase letters, digits, and underlines without spaces.
4. Access the Drupal Administration page to enable your new hooks module.
Using hooks with Joomla!
237
Check the CiviCRM wiki for the most up-to-date information on setting up hooks with Joomla!:
http://tiny.booki.cc/?hooks-in-joomla
In order to use hooks with Joomla!, you or your administrator needs to do the following:
1. Create a file named civicrmHooks.php to contain your functions.
2. Create a new directory anywhere on your server outside of your Joomla! / CiviCRM
installation (so that upgrades will leave your hooks alone). /var/www/civicrm_hooks might
be a good choice.
3. Upload the civicrmHooks.php file to the directory you just created.
4. Go to: CiviCRM Administer > Global Settings > Directories. Change the value of Custom
PHP Path Directory to the absolute path to the new directory (e.g.,
"/var/www/civicrm_hooks" if you used that suggestion in the earlier step).
Refine what you want to act upon
When you create a hook, it will be called for all the types of entities. For instance, a civicrm_post
is called after the creation or modification of any object of any type (contact, tag, group, activity,
etc.). But usually, you want to launch an action only for a specific type of entity.
So a hook generally starts with a test on the type of entity or type of action. For instance, if you
want to act only when a new individual contact is created or modified, start your civicrm_post
hook with:
if ($objectName != "Individual" || $op != "edit") {
return;
}
On the other hand, if you want to run multiple hooks within the same function, you don't want
to return from any single hook. Instead, you can nest the entire code for each hook within your
test:
if ($objectName == "Individual" && $op == "edit") {
// Your hook
}
Pitfalls of hooks
Because you have little control over what CiviCRM passes to your hook function, it is very helpful
to look inside those objects (especially $objectRef) to make sure you're getting what you expect.
A good debugger is indispensable here. See the Developer Tips & Tricks chapter at the end of
this section for more information on setting up a debugger for your development environment.
EXAMPLES OF USING HOOKS
Some example hooks follow. Consult the hooks reference documentation on the CiviCRM wiki to
see the full extent of what you can do:
http://wiki.civicrm.org/confluence/display/CRMDOC/CiviCRM+hook+specification
In all of these examples, you'll put the code we provide into your myhooks.module file if using
Drupal, or the civicrmHooks.php file if using Joomla!. Be sure to upload the file after each change
to the appropriate location on your server to see the new code take effect.
Additionally, if you are using Drupal and add a new hook to an existing module, you will need to
clear the cache for the hook to start operating. One way of doing this is by visiting the page
Admin > Build > Modules.
Sending an email message when a contact in a particular group is edited
In order to have CiviCRM tell you when a contact is edited, define the civicrm_pre hook. This lets
you see the incoming edits as well as the values of the existing record, because you may want
to include that information in the email.
238
If you are using Drupal, create a function named myhooks_civicrm_pre. If using Joomla!, create a
function named joomla_civicrm_pre. We'll assume you're using Drupal for the rest of the
example, so please adjust the code accordingly if you're using Joomla! instead.
<?php
function myhooks_civicrm_pre( $op, $objectName, $objectId, &$objectRef ) {
# configuration stuff
$theGroupId = 1; # group id we want the contacts to be in
$emailRecipient = '[email protected]'; # person to e-mail
# Make sure we just saved an Individual contact and that it was edited
if ($objectName == "Individual" && $op == "edit") {
# Now see if it's in the particular group we're interested in
require_once 'api/v2/GroupContact.php';
$params = array('contact_id' => $objectId);
$groups = civicrm_group_contact_get( $params );
$found = false;
foreach ($groups as $group) {
if ($group['group_id'] == $theGroupId) {
$found = true;
}
}
# Exit now if contact wasn't in the group we wanted
if (! $found) {
return;
}
# We found the contact in the group we wanted, send the e-mail
$emailSubject = "Contact was edited";
$emailBody = "Someone edited contactId $objectId\n";
# Here's where you may want to iterate over the fields
# and compare them so you can report on what has changed.
mail( $emailRecipient, $emailSubject, $emailBody );
}
}
Validating a new contribution against custom business rules
If you have experience with other hook-based systems, you might think that the civicrm_pre
hook is the one to use for validations. But this is not the case in CiviCRM because, even though
the civicrm_pre hook is called before the record is saved to the database, you cannot abort the
action from this hook.
This is where validation hooks come in. When you return true from a validation hook, CiviCRM
saves the new or updated record. When you return an error object instead, CiviCRM aborts the
operation and reports your error to the user.
An example follows of using a validation hook to validate new contributions against a business
rule that says campaign contributions must have a source associated with them. In this example,
we'll assume you are using Joomla!, so if you are using Drupal instead, be sure to change the
function name accordingly.
<?php
function joomla_civicrm_validate( $formName, &$fields, &$files, &$form ) {
# configuration stuff
$campaignContributionTypeId = 3; # adjust for your site if different
$errors = array();
# $formName will be set to the class name of the form that was posted
if ($formName == 'CRM_Contribute_Form_Contribution') {
require_once 'CRM/Utils/Array.php';
$contributionTypeId = CRM_Utils_Array::value( 'contribution_type_id',
$fields );
if ($contributionTypeId == $campaignContributionTypeId) {
# see if the source field is blank or not
$source = CRM_Utils_Array::value( 'source', $fields );
if (strlen( $source ) > 0) {
# tell CiviCRM to proceed with saving the contribution
return true;
} else {
# source is blank, bzzzzzzzzzzzt!
# assign the error to a key corresponding to the field name
$errors['source'] =
"Source must contain the campaign identifier for campaign contributions";
return $errors;
239
}
} else {
# not a campaign contribution, let it through
return true;
}
}
}
Automatically filling custom field values based on custom business logic
This example uses a hook to write some data back to CiviCRM. You can make a custom field
read-only and then set its value from a hook. This is very handy for storing and displaying data
that are derived from other attributes of a record based on custom business logic.
For example, let's say you are storing employee records and you want to auto-generate their
network login account when new employees are added. By doing it in your code, you can enforce
a policy for login account names. For this example, let's say the policy is first initial + last name.
So if your name is Jack Frost, your network login name would be jfrost.
Add a new read-only custom field to CiviCRM called "Network Login" and then find its ID. You can
find it either by:
Checking the civicrm_custom_field table in your CiviCRM database.
Editing a contact and check the name of the Network Login field.
The code must refer to the ID as custom_id. So if you find that the id of the new field is 74,
refer to is as custom_74 in your code.
Now that we have our Network Login field, let's see how to populate it automatically with a
hook. We'll switch back to the Drupal naming convention for this example.
Note that we use the civicrm_post hook here because we need the new contact record's ID in
order to save a value to one of its custom fields. New records don't have an ID until they have
been saved in the database, so if we ran this code in the civicrm_pre hook, it would fail.
<?php
function myhooks_civicrm_post( $op, $objectName, $objectId, &$objectRef ) {
# configuration stuff
$customId = 74;
if ($objectName == 'Individual' && $op == 'create') {
# generate the login
$firstName = $objectRef->first_name;
$lastName = $objectRef->last_name;
$firstInitial = substr( $firstName, 0, 1 );
$networkLogin = strtolower( $firstInitial . $lastName );
# assign to the custom field
$customParams = array("entityID" => $objectId,
"custom_$customId" => $networkLogin);
require_once 'CRM/Core/BAO/CustomValueTable.php';
CRM_Core_BAO_CustomValueTable::setValues( $customParams );
}
}
Custom mail merge token
The CiviMail component lets you customise a bulk email message using mail merge tokens. For
instance, you can begin your message with, "Hi, {recipient.first_name}!" and when John Doe
receives it, he'll see, "Hi, John!" whereas when Suzy Queue receives it, she'll see, "Hi, Suzy!" You
can find out more details about working with custom tokens on the CiviCRM wiki:
http://wiki.civicrm.org/confluence/display/CRMDOC/Mail-merge+Tokens+for+Contact+Data.
Besides the built-in tokens, you can use a hook to create new custom tokens. Let's make a new
one that will show the largest contribution each recipient has given in the past. We'll use Drupal
syntax again for this one.
<?php
# implement the tokens hook so we can add our new token to the list of tokens
# displayed to CiviMail users
240
function myhooks_civicrm_tokens( &$tokens ) {
$tokens['contribution'] =
array('contribution.largest' => 'Largest Contribution');
/* just array('contribution.largest'); in 3.1 or earlier */
}
# now we'll set the value of our custom token;
# it's better in general to use the API rather than SQL queries to retrieve data,
# but in this case the MAX() function makes it very efficient to get the largest
# contribution, so let's make an exception
function myhooks_civicrm_tokenValues( &$details, &$contactIDs ) {
# prepare the contact ID(s) for use in a database query
if ( is_array( $contactIDs ) ) {
$contactIDString = implode( ',', array_values( $contactIDs ) );
$single = false;
} else {
$contactIDString = "( $contactIDs )";
$single = true;
}
# build the database query
$query = "
SELECT contact_id,
max( total_amount ) as total_amount
FROM
civicrm_contribution
WHERE contact_id IN ( $contactIDString )
AND
is_test = 0
GROUP BY contact_id
";
# run the query
$dao = CRM_Core_DAO::executeQuery( $query );
while ( $dao->fetch( ) ) {
if ( $single ) {
$value =& $details;
} else {
if ( ! array_key_exists( $dao->contact_id, $details ) ) {
$details[$dao->contact_id] = array( );
}
$value =& $details[$dao->contact_id];
}
# set the token's value
$value['contribution.largest'] = $dao->total_amount;
}
}
241
57. IMPORTING DATA
The CiviCRM import system can be used to import contacts, activities, contributions, event
participants, and memberships. You can extend the import system to allow it to parse different
data sources, such as XML, JSON, Excel, or OpenDocument. The import system is especially
useful when you have legacy data in another system (such as a spreadsheet), or have data you
need to migrate from one system to another.
As of version 3.2, the import system has a few important limitations. It is currently not very
good at importing:
Large data sets
Data sets which contain information for more than component (such as contact data that
also contains contributions)
Data sets which should be imported into more than one group or tag (currently, you can
choose only one group or tag for the entire import rather than specifying the value in a
field of the imported data set).
These limitation apply to any extensions you build on the import. To overcome these limitations,
one strategy would be to write a custom script using the CiviCRM API that parses the incoming
data and makes the appropriate API calls to import it.
Note: If you're reading this in a printed copy, you may want to access the online version so you
can copy and paste the code examples more easily. You can find the online version here:
http://en.flossmanuals.net/civicrm
DATA SOURCES
The import system supports two data sources out of the box. CSV and SQL. CSV is exported by
most spreadsheets, many web sites, and a lot of legacy systems. SQL is the language of
relational databases.
Here's your first insider tip on the import system: Every import is an SQL import. The CSV
import data source, for example, starts out by dumping the CSV into a temporary database
table and then running an SQL import on those data. If you write a custom data source, it's
important to remember this because it will save you a lot of mental energy. You don't need to
worry about formatting or validating the import data at all. Just get it into a database table and
let CiviCRM take it from there.
When would you want to write an import data source? It might be useful if, say, a client were
migrating from another CRM to CiviCRM and wanted to import their data themselves. Another
example would be to support a different import file format.
To make things easy on yourself, check for an existing PHP library that can read the format of
the data you want to import. If you fine one, use that library to read the data into a database
table.
DATA SOURCE API
The data source API is essentially a set of functions you should implement in a new PHP class.
Many software developers refer to this as an "interface" or "protocol." The abstract class that
defines this interface is located in CRM/Import/DataSource.php. You should also look at the
CRM/Import/DataSource/CSV.php file, because this implements the interface for the CSV import
feature.
Here are the functions you will implement and what they should do:
getInfo(); # should return an array with the title of your data source plugin
242
preProcess( &$form ); # if you need to set anything up before the form is
displayed, this iss the place to do it
buildQuickForm( &$form ); # here you should build a form snippet that asks the user
for the appropriate information to access the incoming data
postProcess( &$params, &$db ); # this is where you dump the incoming data into the
database table
After defining your import data source, you need a new Smarty template to create your form
snippet. This is pretty specific to the type of import data source you're defining. Let's look at an
example of a real custom data source.
EXAMPLE DATA SOURCE
This example of a custom import data source reads a JSON file and imports its contents as new
contacts. This file should be named JSON.php and be added to the CRM/Import/DataSource/
directory.
<?php
/* My awesome JSON importer of dubious utility and efficiency (but still awesome!)
*
* JSON should look like this:
* {
*
"contacts" : [
*
{
*
"first_name" : "Foo",
*
"last_name" : "Bar",
*
"other_field" : "baz"
*
},
*
{
*
"first_name" : "Other",
*
"last_name" : "Contact",
*
"something_else" : "yep"
*
}
*
]
* }
*/
require_once 'CRM/Import/DataSource.php';
class CRM_Import_DataSource_JSON extends CRM_Import_DataSource
{
function getInfo()
{
return array('title' => ts('JavaScript Object Notation (JSON)'));
}
function preProcess(&$form)
{
# nothing to do here, but we still define the function
}
function buildQuickForm(&$form)
{
### In this function we're calling a lot of QuickForm functions.
### If you're unfamiliar with that library, it might be good
### to look up the documentation for it.
# define a hidden field that tells the system which
# data source class we're using
$form->add( 'hidden', 'hidden_dataSource', 'CRM_Import_DataSource_JSON' );
# grab the config object so we respect some system settings
$config = CRM_Core_Config::singleton();
# get the max upload file size from the config
$uploadFileSize = $config->maxImportFileSize;
$uploadSize = round( ( $uploadFileSize / (1024*1024) ), 2 );
# assign the max upload file size to a template variable
# see the template documentation for more info on this
$form->assign( 'uploadSize', $uploadSize );
# add the file selection field to the form
$form->add( 'file', 'uploadFile', ts('Import Data File'),
'size=30 maxlength=60', true );
# now set the max file size so the form enforces it
$form->setMaxFileSize($uploadFileSize);
$form->addRule( 'uploadFile',
243
ts('File size should be less than %1 MBytes (%2 bytes)',
array(1 => $uploadSize, 2 => $uploadFileSize)),
'maxfilesize', $uploadFileSize );
# not a very smart rule, but it'll do for now
$form->addRule( 'uploadFile', ts('Input file must be in JSON format'),
'utf8File' );
# make sure we end up with a file after the form posts
$form->addRule( 'uploadFile', ts('A valid file must be uploaded.'),
'uploadedfile' );
}
function postProcess(&$params, &$db)
{
# grab the name of the file that was uploaded
$file = $params['uploadFile']['name'];
# call a helper function we'll define below to parse the JSON
$result = self::_JsonToTable( $db, $file,
CRM_Utils_Array::value( 'import_table_name', $params ) );
# grab the import table name (CiviCRM determines this for us)
$table = $result['import_table_name'];
# create a new ImportJob object for our table
require_once 'CRM/Import/ImportJob.php';
$importJob = new CRM_Import_ImportJob( $table );
# the ImportJob modifies the table name a bit, so let's update it
$this->set( 'importTableName', $importJob->getTableName() );
}
/**
* We define this function just to keep things cleaner, the import data source
* interface doesn't look for it; it's a private function. We use an
* underscore at the beginning of the name to indicate this.
*/
private static function _JsonToTable(&$db, $file, $table )
{
# read the JSON into a string variable
$jsonString = file_get_contents($file);
if (!$jsonString) {
# oops, reading the file didn't work, generate an error
CRM_Core_Error::fatal("Could not read $file");
}
# grab the config object again
$config = CRM_Core_Config::singleton();
# this is a bit presumptuous of us, but oh well
$db->query("DROP TABLE IF EXISTS $table");
# create the table where we'll store the incoming data
$create = "CREATE TABLE $table LIKE civicrm_contact";
$db->query($create);
# drop the id column because the import system will add one
$dropId = "ALTER TABLE $table DROP COLUMN id";
$db->query($dropId);
# decode the JSON and INSERT the records one by one;
# it might be more efficient to build one big multi-insert,
# but we'll leave that as an exercise for the reader
###
###
###
###
BE CAREFUL THAT YOU DON'T RUN THIS ON A MASSIVE JSON FILE!!
It creates one big object from the entire JSON file, so you'll quickly
eat up every bit of memory PHP can use if you try to import a large
file.
# this requires that the JSON PECL extension is installed and
# enabled in PHP
$importObj = json_decode( $jsonString, true );
# loop through each record in the JSON object, put it into an SQL query,
# and insert it into the database
foreach ($importObj['contacts'] as $newContact) {
$fields = array_map( '_civicrm_mysql_real_escape_string',
array_keys( $newContact ) );
$sqlFields = "(" . implode( ',', $fields ) . ")";
$values = array_map( '_civicrm_mysql_real_escape_and_quote_string',
$newContact );
$sqlValues = "VALUES (" . implode( ',', $values ) . ")";
# construct the query and run it
$sql = "INSERT IGNORE INTO $table $sqlFields $sqlValues";
$db->query($sql);
}
244
# get the import tmp table name and return it
$result = array( );
$result['import_table_name'] = $table;
return $result;
}
}
# Another couple private helper functions we define
function _civicrm_mysql_real_escape_and_quote_string( $string ) {
return _civicrm_mysql_real_escape_string( $string, true );
}
function _civicrm_mysql_real_escape_string( $string, $quote = false ) {
static $dao = null;
if ( ! $dao ) {
$dao = new CRM_Core_DAO( );
}
$returnString = $quote ? "\"{$dao->escape( $string )}\"" :
$dao->escape( $string );
return $returnString;
}
And here's the Smarty template. It should be saved in templates/CRM/Import/Form/JSON.tpl.
<fieldset><legend>{ts}Upload JSON File{/ts}</legend>
<table class="form-layout">
<tr>
<td class="label">{$form.uploadFile.label}</td>
<td>{$form.uploadFile.html}<br />
<div class="description">{ts}File format must be JavaScript
Object Notation (JSON). File must be UTF8 encoded if it contains
special characters (e.g. accented letters, etc.).{/ts}</div>
{ts 1=$uploadSize}Maximum Upload File Size: %1 MB{/ts}
</td>
</tr>
</table>
</fieldset>
SUMMARY
The CiviCRM Import system has a few limitations, but it is by far the easiest way for end users
to get data from other systems into CiviCRM. When a client has ongoing data import needs and
wants non-technical users to initiate and manage the imports, writing a custom data source may
be a good solution.
If the import system cannot handle the type or amount of data you need to import, your options
are to write a separate import program that calls the CiviCRM API, write your own
improvements to the import system, or sponsor other developers to write improvements. If you
write or sponsor improvements to the import system, make sure you contribute them back to
the core system! The CiviCRM development team would be happy to discuss potential
improvements with you. You can find them in the #civicrm IRC channel on irc.freenode.net.
245
58. TIPS AND TRICKS
There are a few practices that seasoned CiviCRM developers have found very helpful when
working on CiviCRM projects. This chapter contains a few of them, as well as some guidance on
how to make use of them yourself. You don't have to use any of these tips, but they have made
many other developers' lives easier, so give them a try and see if you agree.
RUN A LOCAL DEVELOPMENT INSTANCE OF CIVICRM
When hacking on CiviCRM customizations and extensions, you don't want to interrupt your users'
work or corrupt the data in the CiviCRM database. That's why you should never, ever hack on
the same instance of CiviCRM that other people are using to store and work with live data.
That's a recipe for disaster. Instead, load CiviCRM and its associated programs onto your own
development "sandbox," where you can do whatever you want to CiviCRM without disturbing
anyone else.
If your computer runs Linux or Mac OS X, running CiviCRM on your local machine is pretty easy.
If your computer runs Windows, you have a little more work to do, but it's not impossible. You
should seriously consider running Linux inside a virtual machine (there's a free program called
VirtualBox that makes this pretty easy). We recommend running the latest version of Ubuntu
Linux inside the virtual machine. You can download that here: http://www.ubuntu.com/
Preparing your machine to run CiviCRM
These instructions will tell you how to prepare your system to run CiviCRM. Jump to the section
that matches your operating system.
Debian / Ubuntu Linux
sudo apt-get install apache2 php5 libapache2-mod-php5 mysql-server \
libmysqlclient15-dev php5-mysql php-db
Red Hat / CentOS Linux
sudo yum install php-xml
Mac OS X
Mac OS X does not have a built-in package manager like most Linux distributions do, but there
are some third-party ones you can install. MacPorts is a good choice. The installation instructions
can be found here: http://www.macports.org/install.php
Once MacPorts is installed, open up Terminal (in Applications -> Utilities) and run this command
(quit Terminal first and re-launch it if you already had it running):
sudo port install apache2 mysql5-server php52 +pear +mysql5
Be sure to read the output of that command carefully, because there are often further tasks
you need to perform to enable some of the packages (especially PHP and MySQL).
Next Step for All Operating Systems
Follow the CiviCRM installation instructions already provided in the documentation. You can find
these instructions here:
http://wiki.civicrm.org/confluence/display/CRMDOC/Installation+and+Upgrades
USE XDEBUG
246
This is our main recommendation for developers. Readers familiar with what a debugger is and
how it works should feel free to skip ahead to the "Setting Up XDebug" section.
What is a debugger?
A debugger is a software program that watches your code while it executes and allows you to
inspect, interrupt, and step through the code. That means you can stop the execution right
before a critical juncture (for example, where something is crashing or producing bad data) and
look at the values of all the variables and objects to make sure they are what you expect them
to be. You can then step through the execution one line at a time and see exactly where and
why things break down. It's no exaggeration to say that a debugger is a developer's best friend.
It will save you countless hours of beating your head against your desk while you insert print
statements everywhere to track down an elusive bug.
Debugging in PHP is a bit tricky because your code is actually running inside the PHP interpreter,
which is itself (usually) running inside a web server. This web server may or may not be on the
same machine where you're writing your code. If you're running your CiviCRM development
instance on a separate server, you need a debugger that can communicate with you over the
network. Luckily such a clever creature already exists: XDebug.
Setting Up XDebug
XDebug isn't the only PHP debugger, but it's the one we recommend for CiviCRM debugging.
The instructions for downloading and installing XDebug are here: http://xdebug.org/docs/install
Those instructions are a bit complex, however. There is a far simpler way to install it if you
happen to be running one of the operating systems listed here.
Debian / Ubuntu Linux
sudo apt-get install php5-xdebug
Red Hat / CentOS Linux
sudo yum install php-pecl* php-devel php-pear
sudo pecl install Xdebug
Mac OS X
sudo port install php5-xdebug
Next Step for All Operating Systems
Tell XDebug to start automatically (don't do this on a production server!) by adding the following
two lines to your php.ini file:
xdebug.remote_enable = On
xdebug.remote_autostart = 1
Once XDebug is installed and enabled in your PHP configuration, you'll need to restart your web
server.
Installing an XDebug Front-End
After you have XDebug running on your PHP web server, you need to install a front-end to
actually see what it is telling you about your code. There are a few different options available
depending on what operating system you use:
All Operating Systems
247
NetBeans is a heavyweight Java IDE (Integrated Development Environment). It offers lots of
features, but isn't exactly small or fast. However, it is very good at interactive debugging with
XDebug. And since it's written in Java, it should run on any operating system you want to run it
on. You can find it at http://www.netbeans.org/
After installing NetBeans, open your local CiviCRM installation in NetBeans and click the Debug
button on the toolbar. It will fire up your web browser and start the debugger on CiviCRM. You
may went to set a breakpoint in CRM/Core/Invoke.php to make the debugger pause there. For
more information, see the NetBeans debugging documentation.
Mac OS X
A much lighter-weight option for Mac users is a program called MacGDBp. You can download it
here: http://www.bluestatic.org/software/macgdbp/
After installing MacGDBp, launch it and make sure it says "Connecting" at the bottom in the
status bar. If it doesn't, click the green "On" button in the upper-right corner to enable it. The
next time you access CiviCRM, the web browser will appear to hang. If you click on MacGDBp,
you'll see that it has stopped on the first line of code in CiviCRM. From there you can step
through the code to the part you're interested in. But it's probably a better idea to set a
breakpoint in the part of the code you're interested in stopping at. See the MacGDBp
documentation for more information.
DEBUGGING TIPS
Note that to use these tips this you need to enable your Debugging in CiviCRM.
Smarty Debug Window
Loads all variables available to the current page template into a pop-up window. To create
this window, add &smartyDebug=1 to any CiviCRM URL query string. Make sure you disable
pop-up blocking in your browser for the CiviCRM site URL.
Session Reset
Resets all values in your client session. To trigger this, add &sessionReset=2
Directory Cleanup
Empties the template cache and/or the temporary upload file folders.
To empty template cache (the civicrm/templates_c folder), add &directoryCleanup=1
To remove temporary upload files (the civicrm/upload folder), add
&directoryCleanup=2
To clean up both, add &directoryCleanup=3
Stack Trace
To display a stack trace listing at the top of a page, add &backtrace=1
LOG EMAILS TO A FILE
For this you need to modify your CiviCRM settings (http://civicrm.settings.php) and add following
line:
define('CIVICRM_MAIL_LOG', '<path to of the file >/mail.log');
CHECK THE QUERIES FIRED BY DATAOBJECT
define( 'CIVICRM_DAO_DEBUG', 1 );
FOREIGN CONSTRAINT ERRORS
If you are getting foreign key constraint errors, try logging out from CiviCRM and logging in again.
HOW TO FIND THE TEMPLATE FILE
248
Finding which template is used on a given page can be difficult. The easiest way is to view the
source of the page from a web browser and search for ".tpl". For instance, for the contact
summary page, use the web browser to access the contact summary page, then click "View
Source" in the browser. You should find an HTML comment such as:
<!-- .tpl file invoked: CRM/Contact/Page/View/Summary.tpl. Call via form.tpl
if we have a form in the page. -->
USE A SOURCE CODE MANAGEMENT SYSTEM
The source code of CiviCRM is accessible via Subversion. Although installing Subversion on your
own computer is a bit complex, it is worthwhile using source control for your development
website.
You should also use a local source code manager (git or mercurial are good solutions) to keep
track of your modified files. The workflow that has been proven most efficient is to copy the
original file, add it to your repository and then modify it.
CIVICRM COMMUNITY
59. The CiviCRM Community
60. Internationalisation
61. Bug Reporting
249
59. THE CIVICRM COMMUNITY
Like many open source projects, CiviCRM is shaped, guided, and driven by its community, a farflung ecosystem of users, developers, and implementers who utilize CiviCRM in many different
ways and bring to it a wide array of skills, experiences, and perspectives. These varied and
diverse offerings are crucial to the continued success of CiviCRM, but they can move the project
forward only if they find their way back into the public stream of discussion and collaboration.
This chapter is a guide to finding and engaging in the community of people who are working
together to make CiviCRM what it is and what it will become.
FINDING THE COMMUNITY ONLINE
As might be expected of a web-based software project, much of the CiviCRM community's
activity occurs online. This means that if you have access to the Internet you also have access
to and can participate in the CiviCRM community regardless of where you live or work. English is
the predominant language for discussion and contributions.
The CiviCRM website itself (http://civicrm.org) is a good starting point for exploring and
participating in the community. In addition to general information about getting and using
CiviCRM, you'll find blog posts from community members, announcements about upcoming
events, and a Participate section (http://civicrm.org/participate) that lists and links to many of
the resources described below.
The CiviCRM Forums (http://forum.civicrm.org) are a central location for CiviCRM discussion and
support. The forums are divided into topical boards for:
Asking general questions
Getting technical support for installing, upgrading, configuring, using, and customizing
CiviCRM
Discussing and providing feedback on documentation
Feature requests and suggestions
Projects in internationalisation and localisation
Showcasing success stories and case studies
Conversations around modifying and extending CiviCRM
Coordination of testing
Obtaining or providing professional services
Registration for the forums is completely free and most of the boards are very active with
frequent new posts and responses.
Another great source of support and discussion is Internet Relay Chat (IRC). The #civicrm IRC
channel is hosted by Freenode at irc.freenode.net. You can access the channel using an IRC
client (a program that you run on your computer) or through the web interface at
http://webchat.freenode.net. Enter #civicrm in the Channels field and a nickname of your
choosing in the Nickname field. For more information on using IRC, check out the IRC section of
the Drupal website (http://drupal.org/irc). Although the information is targeted to the Drupal
community it can also be useful for CiviCRM users, especially because the Drupal IRC channels
are also hosted on Freenode.
You'll hopefully find that both the forums and the IRC channel are great sources for help,
support, and good ideas. That's all attributable to the good will and generous efforts of people
like you! Everyone who visits the forums and the channel is encouraged to give back to the
community by responding to questions and requests for help and contributing their own ideas
and feedback to the conversations. And simply asking your own questions is also a significant
contribution to the community. It's likely that someone else is having the same problems or
wondering the same thing, and the responses you solicit help build the community's knowledge
base.
250
The CiviCRM blog (http://civicrm.org/blog) is another good source of information and discussion.
Blog posts are written by both the CiviCRM core team and other community members and cover
a wide range of topics, including general news and announcements, upcoming events and
accounts of events that have occurred, case studies, use cases and ways to get things done with
CiviCRM, and new features and development. Comments are encouraged and can create lively
discussions that can in turn direct future CiviCRM development. If you've got something that
you'd like to post on the blog, we encourage you to write to [email protected] with your ideas
and your request to post.
Much discussion of CiviCRM also occurs outside of these official channels. Using your favorite
engine to search for CiviCRM will turn up many articles and posts from other folks' websites and
blogs. The CiviCRM team is good at keeping an eye out for these posts and often publicize them
through Twitter. To keep abreast of the stream of comments, follow @civicrm and find CiviCRM
tweets and tag your own tweets with the #civicrm hashtag.
HOOKING IN OFFLINE
Though the online community is both accessible and active, participating in the CiviCRM
community offline can be even more rewarding and can help you connect with others in your
area who are developing, implementing, and using CiviCRM.
Many cities and regions hold CiviCRM meetups where people gather to learn about CiviCRM, share
new ideas, developments, and use cases, and meet other folks involved with the community.
You can find out more about meetups at http://civicrm.org. Some meetup and local user groups
(or LUGs) also maintain discussion boards at http://civicrm.org/groups. Contact the CiviCRM crew
if you'd like a discussion board for your own group on the site.
CiviCRM recently held the first CiviCon conference in April 2010 in San Francisco. More are being
planned, including one in Chicago in 2011. CiviCRM core developers and community members also
make appearances at other conferences, including DrupalCon, the NonProfit Technology
Conference, Joomla! events, and Aspiration Tech events.
CiviCRM also conducts user and developer training in cities around the globe. Check out
http://civicrm.org for info about upcoming trainings and contact CiviCRM if you'd like to host
trainings in your own area.
OPEN SOURCE = COMMUNITY SOURCED
Here are some additional ways that you can participate in and contribute to the CiviCRM
community.
251
Contribute to CiviCRM documentation. This book was written by community members;
you can contribute to it by going to http://en.flossmanuals.net/civicrm, registering, and
clicking "Edit this page" on the page you want to edit. You can also find and contribute to
the CiviCRM documentation wiki at
http://wiki.civicrm.org/confluence/display/CRMDOC/CiviCRM+Documentation.
Share use cases and case studies that describe how your organization uses CiviCRM and
the solutions and processes you've developed around the software. You can post your
case studies to the CiviCRM Showcase on the Forums, post them on the Wiki at
http://wiki.civicrm.org/confluence/display/CRMDOC/Case+Studies, or pitch them as posts for
the CiviCRM blog.
Share your training resources and materials with the rest of the community through
the wiki, the forums, or blog posts on the CiviCRM blog or your own sites.
Contribute code you've written to extend CiviCRM, because it's likely that someone else
out there needs the same functionality. Check out the recommended steps for developing
and contributing to the CiviCRM core codebase
at http://wiki.civicrm.org/confluence/x/kADNAQ. If you've developed a Drupal module, you
should contribute it to Drupal.org; see http://drupal.org/node/7765 for more information on
contributing modules. Joomla! extensions can be posted on http://forge.joomla.org/.Finally,
you can post your code on the CiviCRM Forums or wiki as attachments.
Sponsor development of new features. If your organization needs certain features or
functionality that doesn't yet exist for CiviCRM and can't develop those features in-house,
you can sponsor their development by outside coders and developers. This can be a solo
effort on the part of one organization or a coordinated effort sponsored by multiple
organizations in need of the same set of functionality. Refer to the wiki at
http://wiki.civicrm.org/confluence/display/CRM/Developing+with+the+CiviCRM+team or
write to [email protected] for more information on sponsoring development.
Report any bugs that you find in CiviCRM. See the Bug Reporting chapter of this book
for more information.
252
60. INTERNATIONALISATION
CiviCRM is written with English-language code and strings for display. It has, however, also been
built for organisations worldwide. They need to be able to adapt the tool to local circumstances
and demands without modifying the tool technically.
Localising CiviCRM (or any software) affects much more than you might initially think. To adapt
CiviCRM to a local language is not just a matter of translating the text displayed on the screen.
Consider for example the currency used in a given country (USD or $ in United States, GBP or £
in Great Britain), date and time formats (for example: November 16th, 2009 will be commonly
written as 11/16/2009 in United States, but in Russia the format will be 16.11.2009) or the
formatting of numbers (the same number will be written slightly differently in different countries:
1 234 567,89 in Slovakia or Hungary, but 1,234,567.89 in Japan or the United States).
CiviCRM provides plenty of functionality to support these language and region specific needs. The
development team is constantly developing new tools in this area too. The Localization screen
(shown in the following screenshot) lets an administrator select the right locale for the language
and country of the organization using CiviCRM. Go to: Administer > Configure > Global Settings >
Localization.
TRANSLATIONS
CiviCRM accommodates different languages, however the developers rely on the community to
translate the text displayed.
A number of languages have already been provided to a greater or lesser extent. Some have
more than 90% of the text translated, others only 5%, and a number of languages have not
been translated at all. Please check the online translation tool Transifex
(http://www.transifex.net/projects/p/civicrm/) to find out about your language of interest.
Download and install it on your CiviCRM installation to find out how well it will suit your needs.
You may find that although the translation is correct, you would want to use different terms in
your situation. You are very much encouraged to take part in the translation of your language.
FACILITIES
A number of facilities in CiviCRM support the community in its translation efforts, though some
are still under development.
253
1. Transifex is an online tool that enables groups of translators to translate strings of text
and keep an overview on its progress. Register there, look for your language, join the team
or, if your language is not available, start translating.
2. A glossary (http://wiki.civicrm.org/confluence/display/CRM/Glossary+for+translations) on
CiviCRM's wiki will help you maintain consistency in your translations. It will also help you
get some insight on how much work it will be to translate those strings of text that your
users will most often see and that would therefore be the first to translate.
3. A tips and tricks wiki page
(http://wiki.civicrm.org/confluence/display/CRM/Localisation+community+building+howto)
explains how to set up your localization community.
4. A FAQ
(http://wiki.civicrm.org/confluence/display/CRM/Getting+started+with+CiviCRM+Localisation+FAQ)
on the CiviCRM wiki covers localisation.
GETTING STARTED
Feel like helping translating CiviCRM to a new language or improving the current translation?
Here's how to do it (provided you have a bit of a technical background):
1. Go to transifex.net and create an account.
2. Look for your language on http://www.transifex.net/projects/p/civicrm/teams/ and either
join a team, or request the creation of a new one if needed.
3. Start translating!
Team work
The CiviCRM translation work flow is still a work-in-progress and until the process becomes more
mature, you should probably refer to
http://wiki.civicrm.org/confluence/display/CRM/Localisation+community+building+howto for the
most current instructions.
The work flow is heavily based on teamwork. Hopefully, there is already a team of translators
for your language that you can join. This team will have built a glossary, will have started a
translation set and will be able to review your translations and give constructive criticism. If
such a team does not yet exist, the opportunity is all yours to create one.
COMPONENTS AND FILES
There are quite a lot of strings (phrases) to translate in CiviCRM. To make it easier to translate
the part that you are interested in (hopefully the one you know best), the strings that need
translation have been divided into components, which are CiviCRM plugins (e.g., CiviCRM core,
CiviMail, CiviContribute, etc.). A separate component should be available for each version of
CiviCRM, starting with version 3.2 (or 3.1, for language teams that have chosen to do so).
Each component itself contains a number of files, which themselves contain the strings to
translate. The main component "CiviCRM" (the core) has close to 20 files (for countries, provinces,
menu, etc.).
TOOLS AND TECHNICAL DETAILS
The process you use to do translation depends on whether you prefer to do translation online or
offline. Online translation does not require installation of any software. Offline translation is done
with files downloaded from the translation website, using software that offers more features
than the online system.
Online translation
254
Transifex is the tool to use for online translation. It does not have as many features as an offline
tool such as PoEdit, but it's the easiest way to contribute translations and do the occasional
quick correction. Every translator should have an account on the Transifex site, because
translation teams can use the forums and messaging system to coordinate their work.
The basic steps in online translation are:
1. Select a component on http://www.transifex.net/projects/p/civicrm/. This will display the list
of language teams for this component.
2. Click on the icon in the Options column next to the language you are interested in. This
brings you to the list of files for this component.
3. Click on the "pencil and paper" icon. This brings you to the online translation screen,
which lists all the translatable strings in this file.
4. For each string, you can then enter a translation.
5. When you are finished, you can click on the "Send for review" button at the end of the
page.
Offline translation
Most translation is usually done with an offline translation tool. One of the most common is
PoEdit (see http://www.poedit.net), which is free software and has a big community of users. The
exact steps in translation using an offline tool depend on your tool of choice, but should follow
the following steps:
1. Download the files from transifex.net you want to translate,
2. Load the files up in your translation tool and do your translations.
3. Send them back to the site when you are done.
Building a translation memory
PoEdit and other translation software will help you build a translation memory for your language.
This translation memory can either be restricted to translations done in CiviCRM, or include
translations from other projects. If you include other projects, automatic translation might be
able to translate more strings, but you will lose consistency and most strings will be marked as
fuzzy. This could be a way to bootstrap a new translation, though.
Building a translation memory based on words from the glossary could go a long way in insuring
the consistency of your team's work.
Using version control (mostly for programmers)
Transifex keeps files in a version control system, http://github.com/civicrm/l10n. This is useful to
some users who find interacting with the Github site easier than downloading each file separately
from Transifex.
Consistency & consensus
To insure a good consistency in the translation, every team is encouraged to build and use a
glossary and employ peer review. You can find a glossary of common terms on
http://wiki.civicrm.org/confluence/display/CRM/Glossary+for+translations. You definitely should
translate these terms to your language, and make sure your team reaches a consensus on all
terms.
Building and sharing a common translation memory, which is like a specialized glossary that can
be used automatically by translation tools, also helps to insure consistency. The PoEdit help
system explains how to build this database (and most other translation software should do the
same).
TEAM BUILDING AND SPRINTS
255
A good way to make progress in translation is to organize translation sprints. This means getting
as many people as possible together in the same room to translate as many documents as they
can. Here are a few things to keep in mind when organizing a translation sprint:
Choose a good location, where people will be able to get online (enough computers for
everybody, or desks to set up laptops and with a decent Internet connection).
Provide instructions in advance on how to install an offline translation tool such as PoEdit,
and have people ready to help others install and use it.
Create the glossary in advance. Present the glossary, discuss terms which do not have
consensus, make sure everybody has access to a copy of the glossary, and print a
sufficient amount of copies beforehand.
Determine goals for the sprint: which component will be translated, and what percentage
your team is trying to achieve.
Make sub-teams with clear objectives: per component or file or a part of it.
If your translators are not familiar with CiviCRM, do a demo of the features your team is
about to translate.
Clearly designate someone who can be interrupted in order to answer questions.
Make sure you've got enough coffee, tea, chocolate, etc. in reserve to keep everybody
going through the night.
At the end of the sprint, present the result of the translation in a demo CiviCRM
installation.
Discuss whether the team has reached its goal and how to improve further.
256
61. BUG REPORTING
There will be times when you use CiviCRM - as there are when you use any software - when
things don't work the way you expect them to.
When this happens, a good first step is to search the forums for similar problems and follow
advice given there. If your problem hasn't been addressed, posting to the forum is probably the
right thing to do.
Have a look on the forum for good posting guidelines and spend a bit of time writing your post.
Make sure you are detailed and specific about what software you are using, what you are trying
to do and how you are trying to do it. For example letting people know the url you are using
(with any confidential details removed) may cause them to realise that you are configuring the
wrong page. Unclear posts are less likely to get good replies.
WHAT CAUSES PROBLEMS WITH CIVICRM?
Check the following possible sources of problems before you report something on a forum. You
can save yourself and a lot of people trouble by isolating the problem. CiviCRM forums try to be
friendly and don't criticise you for misjudging a problem, but you'll certainly get more help and
resolve problems faster by doing some checking of your own first.
Misunderstanding the software. We don't claim our documentation is perfect. But please
go back and check it very carefully when you hit a barrier. Frustration makes it hard to
concentrate, so be sure to read slowly and thoroughly. Also remember that different parts
of CiviCRM depend on each other, so check for problems in related modules, besides the
one you think the problem is in.
Your server set up. Servers can be configured in many different ways, and these settings
can change the way CiviCRM operates. Depending on your issue your server configuration
may be causing you issues.
Customisations made to the source code of your installation of CiviCRM. Any changes made
to the source code of CiviCRM may have unintended consequences. The community forums
may be able to help you, but you will have to be patient, share source code, and try out
suggestions.
Bugs in the version of CiviCRM you are using. After you have eliminated all the previous
options, you can report your problem as a bug. In fact, we appreciate you doing this,
because you are making CiviCRM better for everyone.
RECREATING YOUR PROBLEM ON THE DEMO SITE
Recreating your bug on one of the demo sites helps determine whether your problem is a result
of a bug in the source code, or as a result of changes on your site, such as your server setup or
any customisations you've made to the code. If you can show us that the code on the demo site
turns up your bug, it's very likely that the CiviCRM source code is the problem, and your
demonstration will help us find and fix it.
Still, no demo site can cover all possibilities. So even if you can't reproduce your bug there, it
might still be a bug in CiviCRM. It is, however, probably triggered by your server setup or other
customisations.
Write to the forum and explain the problem you are experiencing. If the bug was reproduced on
the demo site, describe exactly what you did there. If not, include as much information about
your server setup as you feasibly can. Configuration files from the web server, CMS, and
CiviCRM will be valuable.
If the forum suggests you discovered a bug in CiviCRM, you can report it to the CiviCRM bug
tracker (http://issues.civicrm.org/jira/browse/CRM).
257
USING OLDER VERSIONS OF CIVICRM
If you are using an older version and the problem you are experiencing is a bug that has been
fixed in the lastest release, be prepared for the answer that it is time to upgrade to the latest
version. Although the CiviCRM community tries to be as helpful as possible, and we recognize
that upgrading puts a burden on your organisation, it is difficult to support multiple versions
simultaneously.
FIXING BUGS
The amount of time taken for the bug to be fixed depends on the severity and complexity of the
bug. It could be as quick as the same day, but it could take much longer.
To get bug fixes, the easiest way is just to download and install the latest revision of CiviCRM.
Downloading bug fixes between releases and fixing ('patching') your existing software is possible,
but it's a more involved process and depends on your technical ability and server setup.
APPENDICES
62. Contributing to this manual
63. History of this book
64. Free Software?
65. Glossary
66. CREDITS
258
62. CONTRIBUTING TO THIS MANUAL
If you would like to contribute to this book, please follow these steps:
1. REGISTER
Register at FLOSS Manuals:
http://en.flossmanuals.net/register
2. WRITE
Select the manual http://en.flossmanuals.net/bin/view/CiviCRM/WebHome and a chapter to work
on.
Make sure you are logged in, choose the WRITE version of the web site (the default is only READ)
and click the "edit" link next to the chapter you want to work on. You can also create new
chapters and put chapters in a different order.
If you need to ask us questions about how to contribute, join the chat room listed in the next
step and ask us! We look forward to your contribution.
For more information on using FLOSS Manuals you may also wish to read our manual:
http://en.flossmanuals.net/FLOSSManuals
To help give our manual some continuity, we've come up with some agreed-upon writing
conventions. You should probably read this before contributing, but don't worry so much about
the conventions that it hampers your writing.
3. CHAT
It's a good idea to talk with us so we can help co-ordinate all contributions. We have a chat room
embedded in the FLOSS Manuals website so you can use it in the browser.
If you know how to use IRC you can connect to the following:
server: irc.freenode.net
channel: #booksprint
4. MAILING LIST
For discussing all things about FLOSS Manuals, join our mailing list:
http://lists.flossmanuals.net/listinfo.cgi/discuss-flossmanuals.net
259
63. HISTORY OF THIS BOOK
This book is the result of the collaborative effort of many people. A lot of the content was
written during two book sprints held in 2009 and 2010 in Tahoe, USA. Many contributions have
also been made by individuals in the times between these sprints.
THIRD EDITION
This edition includes minor updates to reflect changes in CiviCRM 3.3 which was released in
December 2010. It is being published on the eve of the second annual CiviCon conference. Thanks
to the generous contributions of our CiviCon Sponsors (listed in the front of the book) - a copy
has been provided to each conference participant.
SECOND EDITION
The second edition of the CiviCRM manual was published after a four-day Book Sprint organised
by CiviCRM and led by FLOSS Manuals. The sprint was sponsored by the Information Program
initiative of the Open Society Institute (http://www.soros.org/initiatives/information). We are
especially grateful to Janet Haven for pushing this forward.
The second edition includes new sections on CiviReports, CiviCase, CiviEngage and Extending
CiviCRM. This edition also included an extensive rewrite of nearly every section of the text,
including a reorganization of all sections to break up information into Introduction, Planning,
Configuration and Everday Tasks sections, the latter to serve as an easy-to-follow user manual
for individuals working with CiviCRM on a daily basis.
We also added an entire new section to assist developers get into the code. Finally, we updated
the book to match CiviCRM 3.2 (which is a few weeks away from release at the time of writing).
We think that the reorganisation adds a lot to the book and increases it's readability because it
helps people who with CiviCRM in a specific capacity get directly to the chapter relevant to them.
The following photo shows the people who worked on this second edition of the book.
260
In the back row, starting from the left, you are looking at Dave Greenberg (San Francisco, USA),
Kyle Jaster (NY, USA), Xavier Dutoit (Geneva, Switzerland and Brussels, Belgium), Kurund Jalmi
(Mumbai, India), Michael McAndrew (London, UK), Wes Morgan (Washington DC, USA) , Josue
Guillen (DC, USA). The front row from the left is Jack Aponte (NY, USA), Mari Tilos (San Francisco,
USA), Sarah Gladstone (Chicago, USA), and Alice Aguilar (NY, USA).
FIRST EDITION
The first edition of manual was written during a five-day book sprint also organised by CiviCRM
and led by FLOSS Manuals. The sprint was also sponsored by the Information Program initiative
of the Open Society Institute (http://www.soros.org/initiatives/information), and again, we are
especially grateful to Janet Haven for pushing this forward.
Having secured sponsorship, the CiviCRM Core team invited a group of people from around the
globe to gather for a week at Lake Tahoe in California. The modest goal was to transform our
diverse experience of CiviCRM into a manual that we hope will help people to use this great piece
of software. This turned out to be an interesting, and at times difficult, challenge.
The following photo shows the people who wrote this book.
In the back row you are looking at Michael McAndrew (London, UK), Tony Guzman (Salt Lake City,
USA), Brian Shaughnessy (Albany, NY, USA), Dave Greenberg (San Francisco, USA), Yashodha
Chaku (Mumbai, India) and Adam Hyde (Berlin, Germany). In the front row are Mari Tilos (San
Francisco, USA), Cynthia Tarascio (Philadelphia, USA), Michal Mach (Warsaw, Poland) and Peter
Davis (Wellington, New Zealand). In the very front is Eileen McNaughton (Wellington, New
Zealand).
We came from different backgrounds, had used CiviCRM in different ways, and had worked with
very different organisations. It was often a challenge to meld these perspectives into a cohesive
whole, but we hammered away at it and we think this made for a better book. We had some
lively discussions about important issues, such as whether there is a "z" or an "s" in
organis/zation or a "q" in check/que, and finally agreed to use both spellings in the spirit of
internationalism. We also struggled with the word "constituent", which is core to the non-profit
sector in America but was unfamiliar to those of us from outside America.
261
It was been a pretty intense five days. Adam (our friendly Floss manuals taskmaster) kept us
realistic, on track, and hard at work - even hauling us back to work after dinner each evening.
Overall it was both fun and productive and we really appreciate the way Adam has helped us to
actually produce a book within a week. Thank you.
For most of us, however, the highlight of the week has been the breathtaking cuisine cooked by
Jill Klein (http://www.partiesthatcook.com/about-us/). We love you, Jill, and wish we could take you
home with us. We are also grateful to Dave Greenberg, Bob Concannon and Mari Tilos for their
hospitality, and to Scout the dog just for being there.
We had help from around the world during the preparation process, and over the course of the
Sprint. Andy Oram helped us both in the planning process and then with editing and feedback
during the Sprint. We also had a number of people log in to write and edit the manual during the
Sprint. They include Robert Santiago, Xavier Dutoit, Joe Murray, Sarmeesha Reddy, Jay Maechtlen,
Dream Gomez, Leila Johnson, Duncan Hutty, and Kurund Jalmi.
Our office for the week was Dave and Bob's house.
262
We mitigated the hardship of late-night work with some tasty beverages.
And occasionally they let us out for a bit....
263
64. FREE SOFTWARE?
CiviCRM is Free Software - this means it is developed by a community and licensed in a
generous way so you can use it for free for whatever you want.
Free Software (sometimes also referred to as Free and Open Source Software, FLOSS,
FOSS, Software Libre, or Open Source) is software that anyone can download, share, and -significantly -- change in any way they want. Practically speaking, you might never want to
change the software, or even have a staff person who can read the source code (the
instructions written by programmers). But the ability to change the software protects you in
many ways:
CiviCRM will not go away, unlike non-free software from some companies that gets
abandoned if the company goes bankrupt or decides to discontinue specific product.
The software can be used and customised free of charge.
Nobody can suddenly take away features or change the terms under which you're allowed
to use features.
If an organisation wants a feature that CiviCRM doesn't provide, the organisation can just
hire someone to create it. Of course, the organisation can also submit a feature request to
the CiviCRM team as with any software product.
Similarly, anyone can fix a bug (error in the software) if he or she has the skills to do so.
Because the source code is available, clients can also find bugs more easily.
Members of the community have much more input into how CiviCRM develops, because
they can understand the product by reading the code and can make changes. Furthermore,
many people can try different implementations of features and the community can decide
by vote or consensus which one to make official.
That may be enough for you, but for the sake of completeness we'll offer some widely used
definitions:
"Free software or software libre is software that can be used, studied, and modified without
restriction, and which can be copied and redistributed in modified or unmodified form either
without restriction, or with minimal restrictions only to ensure that further recipients can also do
these things and that manufacturers of consumer-facing hardware allow user modifications to
their hardware. Free software is available gratis (free of charge) in most cases."
(from: http://en.wikipedia.org/wiki/Free_software)
"Open source software (OSS) is defined as computer software for which the source code and
certain other rights normally reserved for copyright holders are provided under a software
license that meets the Open Source Definition or that is in the public domain. This permits users
to use, change, and improve the software, and to redistribute it in modified or unmodified forms.
It is very often developed in a public, collaborative manner."
(from: http://en.wikipedia.org/wiki/Open_source_software)
Nearly any software that qualifies as free also qualifies as Open Source, and vice versa. The
main reason that two different terms exist is that "free software" emphasizes the freedom
aspect (that you aren't under the control of the original programmers) whereas "open source
software" emphasizes the convenience and potential for innovation provided by having the
source code available.
When you install and use CiviCRM, you'll notice there's no annoying click-through software
license imposing a thousand things that you can or cannot do with it. That's because free
software doesn't limit your right to do with the software whatever you want. Free and open
source software have licenses, but they're simpler than and quite different from proprietary
software ('closed software') licenses. CiviCRM itself is available under Affero General Public
License version 3.0, one of the popular free software licenses used by many other projects.
FREE SOFTWARE AND NON-PROFITS
264
Explaining all of the possible considerations on using FOSS in non-profit and advocacy work might
take a really long time, so let's focus on the most important highlights:
One of the priorities of FOSS projects, including CiviCRM, is to involve the community of
users in the process of designing and building the software. In the long run, this not only
assures that the software is doing exactly what it should do to sustain the needs of its
users, but it also allows indirect exchange of knowledge and experience between
organisations. By using CiviCRM, you're basically taking advantage of other non-profit and
advocacy practitioners' experience.
Having access to the source code gives you and your organisation certain independence.
With proprietary software it's usually impossible to customise the tools to meet your
specific needs. With FOSS, you can hire a developer or consultant and work with them on
providing specific functionality needed in your work. Additionally, if you contribute your
improvements to the project community other organisations will most probably start using
them. It means you can receive testing and further improvements of your functionality.
When a company which provided you with a closed software goes out of business, the
usual procedure for an organisation reliant on that software is to abandon the software
and start investing in a new one (which is resource intensive and costly). It's less likely to
happen with Free and Open Source Software - there is always a community of users and
developers around it and there is no single "point of failure". With FOSS projects, if the
main organisation behind a specific piece of software shuts down or changes their focus,
the community takes over, a new organisation is formed and the software development
and support continues.
Apart from the quite practical advantages listed above, there is also a more philosophical
approach to answering the question of importance of FOSS for non-profits and advocacy
organisations. Without getting too deep into philosophical discussions, there is a great overlap
between values shared by non-profit organisations and these shared by Free and Open Source
Software communities. By working with the community of users, providing your feedback,
contributing your changes back into the project, you're actually strengthening the non-profit
sector.
FURTHER READING
Free Software Foundation
http://www.fsf.org/
The Free Software Definition
http://www.gnu.org/philosophy/free-sw.html
Open Source Initiative
http://www.opensource.org/
The Open Source Definition
http://www.opensource.org/docs/osd
GNU Affero General Public License v3
http://www.opensource.org/licenses/agpl-v3.html
Choosing and Using Free and Open Source Software: A primer for nonprofits
http://www.nosi.net/projects/primer
265
65. GLOSSARY
ACCIDENTAL TECHIE
Someone who has inherited the role of IT technical support but whose primary role maybe
something else; often has little or no formal IT training (which is not always a bad thing!).
ACCORDION
A javascript-based effect on a web page that allows additional content to be revealed or hidden
(often referred to as collapsed or uncollapsed) without the user leaving the web page.
ACL (ACCESS CONTROL LIST)
ACLs define permissions for a group of contacts to perform an operation (e.g. edit, view,
delete) on a set of data or a type of record. For example, you could set up a group called
"Administrators" that allows people to view and edit all contact records, and a group called
"Volunteers" that can view contact records but not edit them.
ACTIVITIES
An activity in CiviCRM is a record of any scheduled or completed interaction with one or more
contacts. Examples include meetings, phone calls, emails, event attendances and contributions.
You can define additional types of activities as needed.
ADMIN / ADMINISTRATOR
The person or persons that maintain a server or a web-based software like CiviCRM.
Administration includes maintenance, configuration, backup, security, creating and deleting user
accounts and so on.
AGM (ANNUAL GENERAL MEETING)
An AGM is a meeting held every year by an organisation to inform its members of previous and
future activities. Certain types of organisations are required by law to hold an AGM.
AGPL (AFFERO GENERAL PUBLIC LICENSE)
A license for open source software. CiviCRM uses the AGPL version 3.0 license, which gives
you the right to do with the software as you like and guarantees that the source code will
always protect your rights in this way.
ALPHA VERSION
A software version that contains very new source code with new functionality and bug fixes.
An alpha version is released for testing purposes, and for people who want to follow its
development, but it is not considered to be any where near ready for general release or use.
APACHE
The most popular web server software. Apache is free and open source (see also FLOSS).
API (APPLICATION PROGRAMMING INTERFACE)
266
An interface employed by a software application to enable interaction between itself and other
software.
BACKUP
Protecting your data by regularly making copies and storing them independently of the original
files so they can be restored if necessary.
BANDWIDTH
The speed at which you can transfer information through a network or internet connection. If a
connection can transfer a lot of information it is said to be "high bandwidth".
BETA VERSION
A software version that is in good condition but still needs testing to make sure it functions as
intended before general release. Testing beta versions is a helpful way to participate in the
CiviCRM community.
BLOG
Short for web-log. A website which is regularly updated with news and views from one or more
individuals.
BUG
An error that prevents software from behaving as the user would expect.
BUG REPORTING / BUG FIXING
The process of reporting bugs to the software developer(s), and then fixing the bugs so the
software operates as intended.
BUG TRACKER
An official repository for recording bugs. The CiviCRM bug tracker can be found here:
http://issues.civicrm.org/ (click on Issue Tracker).
CACHE
A recent copy of frequently used data that can be quickly and easily accessed. This is especially
useful if the data is complicated or takes a large effort to generate. The disadvantage of caching
is that data can become out of date, but this normally isn't a problem. Even caching data for 5
minutes might be useful in certain circumstances. If a page is accessed 1,000 times in 5 minutes,
having a cached version means the data will only need to be generated once.
A web cache holds copies of recently visited web page files. Sometimes a user may need to clear
their web cache in order to see updated information on a web page.
CAPTCHA
A spam prevention tool. See reCaptcha.
CIVICASE
The case management component of CiviCRM. CiviCase provides service organisations with
tools for structuring, scheduling and recording case activities.
267
CIVICONTRIBUTE
CiviContribute is an online fundraising and donor management component which enables you to
track and manage contributions to your organisation.
CIVICRM
What this whole manual is about! CiviCRM is web-based, open source software that allows you
to record and manage information about your various constituents including volunteers,
activists, donors, employees, clients, vendors, etc.
CIVIDOG
See Scout.
CIVIEVENT
CiviEvent provides integrated online event registration and management for paid and free
events.
CIVIMAIL
CiviMail is a mass-mailing component which allows you to engage constituents with
personalised email blasts and newsletters.
CLIENT
A term used sometimes instead of constituent or contact, more often in a context involving a
financial transaction.
Client is also a term for a system (computer) or application that accesses a remote computer
such as a web server to receive information; examples include a personal computer that is
connected to the internet, or an email application that downloads email from a server.
CLOSED SOFTWARE
Software that does not allow users to access its source code, as opposed to open source
software. See also proprietary software.
CMS (CONTENT MANAGEMENT SYSTEM)
An application used to create, edit, manage, search and publish various kinds of digital content
(text and other media such as images and videos). Web-based CMS allow organisations to add
and manage content on their website without requiring advanced technical skills. CiviCRM is
often integrated with a CMS (commonly Drupal or Joomla!) which helps to facilitate client
interaction.
COMPONENT
A part of a CMS or other application that can be enabled or disabled, according to the needs of
the user. Examples include CiviEvent or CiviCase. See also module.
COMMUNITY ADVISORY GROUP
A representative group of people from the CiviCRM community who work with the CiviCRM
team on project development.
268
COOKIE
A file stored on your computer and used by a website to identify you on return visits. Some
websites cannot be accessed unless you allow your computer to accept and store cookies.
CONSTITUENT
A constituency is usually defined as a group of people bound by shared identity, goals, or loyalty.
In CiviCRM, "constituents" is used to a describe all supporters, current or potential, of a given
organisation. See also contact and client.
CONTACT
In CiviCRM a contact is either an individual, an organisation or a household about whom
information is stored in the database. See also constituent and client.
CONTACT SUMMARY SCREEN
A page that displays at a glance all the data about an individual, organisation or household that is
stored in the CiviCRM database.
CORE CODE
The source code that constitutes the official code of CiviCRM. Also called core.
CORE DATA FIELD
A field that is included in a record structure "out-of-the-box". For example, the CiviCRM contact
record includes First Name as a core field.
CORE TEAM
The people most closely involved with CiviCRM development.
CRM
Acronym for Contact (or Constituent, Customer or Client) Relationship Management. CRM (or
eCRM) software was originally developed from a sales perspective, to help companies track and
organise their interactions with current and potential customers. CiviCRM is oriented specifically
toward the needs of non-profits, advocacy and non-governmental organisations, so the term
"customer" is replaced with "constituent". Outside the USA it is often referred to as Contact
Relationship Management.
CRON JOB
A cron job is a way of automatically scheduling a programme to run at certain intervals. Crons
are often used in CiviCRM to handle daily or monthly events such as sending membership
renewal reminders or processing ongoing payments.
CRUD
Create, Read, Update and Delete: the basic functions performed on databases.
CSS (CASCADING STYLE SHEETS)
269
A way to control the style of a website by defining design and layout elements in a single file
which is linked to all files in a website and applies the style across the site. An element, such as
the formatting of a heading or a background colour, can be changed once in the CSS file to effect
a change on all pages of the site.
CSV (COMMA SEPARATED VALUES)
A simple format for a spreadsheet. CSV files are text files where each cell is separated by a
comma, and each row is separated with a return. This very simple format is understandable by
many different programmes.
CUSTOM DATA FIELD
A field that is added to the data structure of a CiviCRM record by your organisation. Custom
data fields extend the information that can be stored in that type of record. For example, your
organisation might need a custom field to record each contacts' professional qualifications, or
the food preferences of event participants.
DASHBOARD
A user's homepage, which displays when the user logs in to CiviCRM and which can be
personalised with dashlets.
DASHLET
A report on some data in the CiviCRM database, configured to appear on a user's dashboard.
For example, monthly figures in graph and/or numerical form, appointments for the day, or a list
of new memberships.
DATA CENTRALISATION
Storing all your data in one place.
DATABASE
DEMO SITE
A website that allows you to test and explore the functionality of a piece of software. CiviCRM
maintains three demos sites: one integrated with Drupal, one integrated with Joomla! and one in
standalone mode.
DEDUPE
Refers to the task of finding and merging multiple entries for one contact.
DEVELOPER
Someone who develops software.
DOMAIN
See DNS.
DONOR
Someone who makes a donation, i.e. voluntarily gives money to an organisation.
270
DNS (DOMAIN NAME SYSTEM)
The Domain Name System (DNS) converts domain names, which are made up of easy-toremember combinations of letters (example.com), to IP addresses (123.456.123.234) which are
hard-to-remember strings of numbers. Every computer on the internet has an unique address (a
little bit like an area code + telephone number).
DRUPAL
An open source CMS that integrates with CiviCRM to provide a user-interface and additional
website functionality (http://drupal.org).
ENCRYPTION
A way of disguising data when it is being transferred from one computer to another so that it is
unreadable by any other computer that it may pass through on the way.
ENVIRONMENT
The specific hardware and operating system on which you are running your software.
EVENT LISTING FEED
A RSS feed containing the list of events defined in CiviEvent.
FIREFOX
A popular free and open source web browser, developed by the Mozilla Foundation
(http://www.mozilla.com)
FLOSS (FREE/LIBRE OPEN SOURCE SOFTWARE)
Software that is licensed so as to guarantee the essential freedoms of users to its source code
and reuse. A combination of "free software" and "open source software", with "libre" added in
to emphasise that software freedom is essentially a matter of rights, not price.
FOSS
Free and Open Source Software - see FLOSS.
FORUM
A web-based online discussion tool (see http://forum.civicrm.org/).
FREE SOFTWARE
Software that is licensed so that you can use and distribute it without restriction. CiviCRM is
free software. See also FLOSS.
FTP (FILE TRANSFER PROTOCOL)
The FTP protocol is used for file transfers from one computer to another over the internet.
Many people use it for downloads, and it can also be used to upload files to web servers. A
popular free and open source FTP client for Windows is FileZilla. There are also web-based FTP
clients that you can use with a normal web browser like Firefox.
271
FUNCTIONALITY
The set of tasks that a piece of software can perform.
GEOCODING
The process of finding associated geographic coordinates (often expressed as latitude and
longitude) from other geographic data, such as street addresses, or zip codes (postal codes).
GUI (GRAPHICAL USER INTERFACE)
User interface offering windows, icons, mouse control, multiple fonts, and so on - the normal way
for non-programmers to communicate with their computers. The alternative to a GUI is a
command line interface with text only.
HOOK
[needs definition]
HOSTING SERVICE
A service (usually commercial) that provides server space for your website. Hosting services also
can provide physical space to put your own server in so that it is connected to the internet.
ICT
Acronym for Information and Communication Technology.
INTERNATIONALISATION: I8N
The process of making software ready for adoption in different countries and different cultures,
without the need to modify it technically. This is done by the developer (software engineer)
when writing the software. See also Localisation.
INTERNET SERVICE PROVIDER (ISP)
A business that provides services such as internet access, email, and website hosting.
INTRANET
A network of computers that are connected within a home or office but not accessible from
outside the local network.
IT
Acronym for Information Technology.
JAVASACRIPT
A scripting language primarily used in web pages to display dynamic content.
JOOMLA!
A CMS that can integrate with CiviCRM to provide a user interface and additional website
functionality (http://www.joomla.org).
272
LAMP
LINUX
A type of operating system (other common operating systems are Windows and Mac OS). Linux
has been popular as a web server for a long time and is now gaining popularity on personal
laptops and desktop computers. Linux is free software and open source.
LOCAL COMPUTER
A computer that runs CiviCRM but is not publicly available via the internet. This could be your
personal or home computer, or it can be in your office. It can also be called a client computer in
the context of receiving information from a server
LOCALISATION: L10N
The process of translating a product into different languages or adapting a language for a specific
country or region. This is done by translators with no need for technical wizardry.
MAIL SERVER
A computer that transfers email from one computer to another.
MAPPING PROVIDER
A service provider that allows displaying contact locations on maps - Google Maps or Yahoo Maps
in CiviCRM.
MODULE
A part of a system, also called a component. CiviCRM includes a number of modules, each of
which adds functionality to the basic contact management features. For example, the CiviEvent
module provides event management functionality. Organisations using CiviCRM can turn modules
on or off, according to their needs.
MYSQL
A popular database engine. CiviCRM uses MySQL to hold its data. MySQL is free software.
(http://mysql.com)
NGO (NON-GOVERNMENTAL ORGANISATION)
A legally constituted non-business organisation with no participation or representation from
government. In the United States, this type of organisation is more often referred to as a Nonprofit. They may be also called civil society organisations or not-for-profits.
NON-PROFIT
see NGO.
ONLINE CONTRIBUTION PAGE
A function of CiviCRM which allows the creation of a page on the website where visitors can
make online donations using credit cards.
OPEN ID
273
A convenient free system to use a single digital identity across the internet.
OPEN SOURCE SOFTWARE
Software with source code that is publicly available, as opposed to proprietary software; see
also FLOSS. Open source software is based on the philosophy that sharing and collaborating on
code leads to better software and greater benefit for everyone.
PAYMENT INSTRUMENT
Medium or method that is used for online payments.
PAYMENT PROCESSOR
A company (usually a third party) appointed by a merchant to handle credit card transactions for
merchant banks. A payment processor is required to handle online transactions through a
system such as CiviCRM.
PERMISSIONS
Allow you to limit access for different users to different parts of the system.
PERSONAL CAMPAIGN PAGES
A feature of CiviCRM that can be enable to allow constituents to create their own fundraising
pages.
PHP
The programming language in which the majority of CiviCRM is written.
PING
Sending and receiving small amounts of data to and from a server; often used to measure the
response time across the network.
POINT PERSON
Someone given the responsibility to keep their eye on a certain issue.
PREMIUM
A gift that can be offered to contributor in exchange for donation. CiviCRM allows offering
premiums as a part of the donation gathering process.
PRICE SETS
A way of storing and re-using complicated price structures for events. For example, you can
charge for different elements of an event.
PRIMARY LOCATION
The information that a constinutent wants to be used as their main point of contact for
mailings etc.
274
PROFILES
A central concept in CiviCRM. In essence a subset of fields. See the chapter on Collecting and
Sharing Data for a full explanation.
PROPRIETARY SOFTWARE
Also called closed software or closed source software. Software licensed so that you cannot
access the source code and modify it without first coming to an agreement with the authors.
See also open source software.
PROTOCOL
An agreed-upon method of doing something. HTTP and SMTP are two examples, one being an
agreement on how to transfer website data across the web, the other an agreement on how
email will be transferred across the web.
RADIO BUTTON
An element of a web-based application user interface that allows the user to choose only one of
a predefined set of options. Usually indicated by a white circle that can be filled with a click.
RECAPTCHA
A common tool for testing whether a user is a human or a computer, used to prevent spam.
REQUIREMENTS
The things that you require a particular software application to do.
RICH TEXT EDITOR
A text editor that allows you to add formatting, such as bold, italic and underline, to text (as
opposed to just plain text).
ROOT DOMAIN
The 'raw' URL of a website without 'www' or any other subdomain. For example,
http://civicrm.org/ is the root domain while http://www.civicrm.org/ is not.
RSS (REALLY SIMPLE SYNDICATION) FEED
RSS feeds are a way to publish frequently updated information, either for inclusion on a website
or to be read by an RSS reader.
RSVP
"Répondez s'il vous plaît", a French phrase that translates to "please respond". Commonly used
to request confirmation (or declining) of attendance at an event.
SCRIPT
A script is a short programme that does one specific task. Many web pages include scripts to
manage user interaction, so that the server does not have to send a new page for each change.
SCOUT
275
The CiviCRM Book Sprint official dog. Scout likes dog biscuits, rolling on the ground, eating snow
and proof-reading.
SENDMAIL
Sendmail is one of the most popular mail transfer agents (MTA) used for handling email on a
server. Sendmail is free and open source software.
SERVER
1. Software that "serves" content to a client. See Apache, or Mail Server for two examples.
2. A computer that is used primarily to serve content. Any computer can be set up this way, but
the term traditionally refers to those that deliver web content. See also client computer.
SHARED HOSTING
A website hosting service, where multiple websites reside on single server.
SMART GROUP
A group in CiviCRM to which contacts are automatically assigned. Smart groups are created by
running and then saving a search. They are useful for groups that might change frequently, for
example "donations over $1000 in the last month".
SMTP
Simple Mail Transfer Protocol. A standard or protocol used by email software to transfer (send)
email.
SOFT CREDIT
Allows you to credit a contact for a donation made by someone, for example the person who
inspired the actual donor to make a donation. See
Personal Campaign Pages.
SOFTWARE
Applications (also called programs or programmes) that enable specific functionality on your
computer. There are many broad categories of software such as web browsers, word processors
and email clients. Within each category there are many available softwares that perform the
functions you require. For example, Firefox and Internet Explorer are two commonly-used web
browsers.
SOFTWARE LICENSE
The terms you must accept before using a piece of software.
SOURCE CODE
Software is created by writing instructions that a computer understands. These lines of
instructions are known as code or source code.
SSL (SECURE SOCKETS LAYER)
276
One way of making internet communication secure. You can easily see if you are using SSL by
looking at the URL in your browser: if it starts with https instead of http, your connection is
using SSL.
SSL CERTIFICATE
Provided by the server to prove its identity, in the same way that a person carries a passport or
driving license. See also SSL (Secure Sockets Layer).
STABLE VERSION
A version of software that has been tested and is considered to be ready for general use.
STANDALONE
An installation of CiviCRM which is not integrated with a CMS such as Drupal or Joomla!.
STRING
A string is a sequence of characters for example "Hello, World", the URL
"http://www.flossmanuals.net/" or the text message "No such file or directory". Different
character sets allow different strings. Unicode strings can include any combination of languages,
such as "Japan (日本) and Korea (대한민국)".
SUBDOMAIN
A domain that is a part of larger larger domain. For example: en.flossmanuals.net and
fa.flossmanuals.net are subdomains of the domain flossmanuals.net.
TOKEN
Tokens are used in CiviCRM to insert elements such as a contact's name or a standard greeting
into emails being sent from the system. In an email sent to a group of people, the token
{first.name} will be replaced with actual name of each message recipient, in the email that each
individual receives.
UPGRADE
The process of replacing software with a newer version of the same software. An upgrade may
fix bugs, improve security, enable the software to continue to work with upgraded operating
systems, or provide new features and other enhancements.
URL
Acronym for Unique Resource Locator, sometimes referred to as a Universal Resource Indicator,
or URI. The technical convention that identifies the location of a resource on a network. The
resource might be a web page, in which case the URL refers to the location of that web page on
the internet, for example www.civicrm.org is the URL for CiviCRM.
USE CASE
Use case is a central concept in software development. A use case is a story or scenario that
documents the experience of performing a specific task with the application. Generally, a use
case should avoid technical or database-specific language, such as 'fields' or 'record', and
concentrate on real world objects and scenarios in order to communicate the idea clearly to
people who may not be familiar with technical terms.
277
VERSION
Updates to software are released periodically, and these releases are referred to as a version
of the software. There are different types of version, for example the most recent release of a
software which has been tested and is intended for general use is referred to as the stable
version, while a very new untested version is the alpha version.
VPN (VIRTUAL PRIVATE NETWORK)
A method of sharing information between members of an organisation over encrypted
connections.
WEB APPLICATION
A software application that provides a website with additional functionality. CiviCRM is a web
application.
WEBMAIL
Webmail is email service through a website. The service sends and receives email messages for
users in the usual way, but provides a web interface for reading and managing messages, as an
alternative to running a mail client like Outlook Express or Thunderbird on the user's computer.
For example a popular and free webmail service is https://mail.google.com/
WEB-SERVER
WIKI
A web-based software that enables anyone to edit content via a web browser. Wikipedia is the
best known example of a wiki.
WILDCARD
A character that can match an any number and collection of characters, normally represented
by . For example, when used in searches, ab finds ab, abba and abracadabra but not
fabulous; ab finds fabulous.
WORK STATION
A computer used for working; often in a situation such as an office where there are other
computers that may include servers.
WYSIWYG (WHAT YOU SEE IS WHAT YOU GET)
An application that provides a visual tool for editing web content, so that the user can see how
the page will look in the browser as they are editing, instead of working in the HTML code. See
also rich text editor.
278
66. CREDITS
Cover Art (faces) by Kapor Creative: Jake Mix & Trevor Parham (Jake created the illustrations,
and Trevor developed the concept of the civi logos as eyes). Cover Art is CC-BY-SA
All chapters copyright of the authors (see below). Unless otherwise stated all chapters in this
manual licensed with GNU General Public License version 2
This documentation is free documentation; you can redistribute it and/or modify it under the
terms of the GNU General Public License as published by the Free Software Foundation; either
version 2 of the License, or (at your option) any later version.
This documentation is distributed in the hope that it will be useful, but WITHOUT ANY
WARRANTY; without even the implied warranty of MERCHANTABILITY or FITNESS FOR A
PARTICULAR PURPOSE. See the GNU General Public License for more details.
You should have received a copy of the GNU General Public License along with this
documentation; if not, write to the Free Software Foundation, Inc., 51 Franklin Street, Fifth Floor,
Boston, MA 02110-1301, USA.
AUTHORS
ABOUT THIS BOOK
© Michael McAndrew 2010
Modifications:
adam hyde 2010
David Greenberg 2010
helen jamieson 2010
HOW TO CONTRIBUTE?
© adam hyde 2009, 2010
Modifications:
Alice Aguilar 2010
Andy Oram 2010
Brian Shaughnessy 2009
Cynthia Tarascio 2009
David Greenberg 2009
Eileen McNaughton 2009
Kyle Jaster 2010
Michael McAndrew 2009, 2010
Yashodha Chaku 2009
LOCALISATION
© adam hyde 2009, 2010
Modifications:
Alice Aguilar 2010
Andy Oram 2009, 2010
Cynthia Tarascio 2009
David Greenberg 2010
Dream Gomez 2009
Eileen McNaughton 2009
Erik Brouwer 2010
Jack Aponte 2010
Mathieu Petit-Clair 2010
Michael Lenahan 2009
Michael McAndrew 2009, 2010
Michal Mach 2009
Peter Davis 2009
279
BUG REPORTING
© adam hyde 2009
Modifications:
Andy Oram 2009
Cynthia Tarascio 2009
Eileen McNaughton 2009
Michael McAndrew 2009, 2010
Michal Mach 2009
INSTALLATION
© David Greenberg 2009
Modifications:
adam hyde 2009, 2010
Alice Aguilar 2010
Andy Oram 2009, 2010
Cynthia Tarascio 2009
Eileen McNaughton 2009
Kurund Jalmi 2010
Michael Gross 2009
Michael Lenahan 2009
Michael McAndrew 2009, 2010
Tony Guzman 2009
PROFILES
© adam hyde 2009, 2010
Modifications:
Alice Aguilar 2010
Andy Oram 2009
Brian Shaughnessy 2009
David Greenberg 2009, 2010
Eileen McNaughton 2009
helen jamieson 2010
jay maechtlen 2009
Kurund Jalmi 2010
Kyle Jaster 2010
Mari Tilos 2009, 2010
Michael McAndrew 2009, 2010
Michal Mach 2009
Peter Davis 2009
Tony Guzman 2009
Yashodha Chaku 2009
CONFIGURING
© adam hyde 2010
Modifications:
David Greenberg 2010
helen jamieson 2010
Kyle Jaster 2010
Lachlan Musicman 2010
xavier dutoit 2010
PLANNING
© adam hyde 2010
Modifications:
David Greenberg 2010
helen jamieson 2010
Kyle Jaster 2010
Lachlan Musicman 2010
xavier dutoit 2010
EVERYDAY TASKS
280
© adam hyde 2010
Modifications:
Alice Aguilar 2010
Andy Oram 2010
David Greenberg 2010
helen jamieson 2010
Kyle Jaster 2010
Michael McAndrew 2010
xavier dutoit 2010
CIVICOMMUNITY
© adam hyde 2010
Modifications:
Alice Aguilar 2010
Andy Oram 2010
Jack Aponte 2010
Michael McAndrew 2010
EXTENDING CORE DATA
© Michael McAndrew 2010
Modifications:
adam hyde 2010
Andy Oram 2010
David Greenberg 2010
Erik Hommel 2010
helen jamieson 2010
Kurund Jalmi 2010
Manuel Schmalstieg 2010
Mari Tilos 2010
xavier dutoit 2010
CONFIGURING
© adam hyde 2010
Modifications:
Alice Aguilar 2010
Andy Oram 2010
Michael McAndrew 2010
PLANNING
© adam hyde 2010
Modifications:
Andy Oram 2010
Michael McAndrew 2010
EVERYDAY TASKS
© adam hyde 2010
Modifications:
Alice Aguilar 2010
Andy Oram 2010
David Greenberg 2010
helen jamieson 2010
Mari Tilos 2010
Michael McAndrew 2010
WHAT IS CIVICONTRIBUTE?
© adam hyde 2010
Modifications:
Andy Oram 2010
Kyle Jaster 2010
Michael McAndrew 2010
281
MENU AND DASHBOARD
© Michael McAndrew 2010
Modifications:
adam hyde 2010
helen jamieson 2010
Kurund Jalmi 2010
Kyle Jaster 2010
Mari Tilos 2010
CONFIGURING
© Alice Aguilar 2010
Modifications:
adam hyde 2010
David Greenberg 2010
Jack Aponte 2010
Josue Guillen 2010
Kyle Jaster 2010
Michael McAndrew 2010
Michael McCallister 2010
Tim Homewood 2010
EVERYDAY TASKS
© Alice Aguilar 2010
Modifications:
adam hyde 2010
Jack Aponte 2010
Josue Guillen 2010
Kyle Jaster 2010
Michael McAndrew 2010
Michael McCallister 2010
INSTALLING
© Alice Aguilar 2010
Modifications:
adam hyde 2010
Andy Oram 2010
Josue Guillen 2010
Kurund Jalmi 2010
Kyle Jaster 2010
Michael McAndrew 2010
Michael McCallister 2010
PLANNING
© Alice Aguilar 2010
Modifications:
adam hyde 2010
Jack Aponte 2010
Michael McAndrew 2010
Michael McCallister 2010
CONFIGURING
© adam hyde 2010
Modifications:
Andy Oram 2010
David Greenberg 2010
EVERYDAY TASKS
© adam hyde 2010
Modifications:
Alice Aguilar 2010
Andy Oram 2010
282
David Greenberg 2010
Mari Tilos 2010
Michael McAndrew 2010
Sarah Gladstone 2010
PLANNING
© adam hyde 2010
Modifications:
Alice Aguilar 2010
Andy Oram 2010
Michael McAndrew 2010
xavier dutoit 2010
WHAT IS CIVIEVENT?
© adam hyde 2010
Modifications:
Alice Aguilar 2010
Andy Oram 2010
Christopher Gervais 2010
Jack Aponte 2010
xavier dutoit 2010
CONFIGURING
© Kurund Jalmi 2010
Modifications:
adam hyde 2010
Alice Aguilar 2010
David Greenberg 2010
helen jamieson 2010
Michael McAndrew 2010
TWikiGuest 2010
EVERYDAY TASKS
© Michael McAndrew 2010
Modifications:
adam hyde 2010
helen jamieson 2010
Josue Guillen 2010
Kyle Jaster 2010
TWikiGuest 2010
PLANNING
© Michael McAndrew 2010
Modifications:
adam hyde 2010
Alice Aguilar 2010
helen jamieson 2010
Kurund Jalmi 2010
Kyle Jaster 2010
WHAT IS CIVIREPORT?
© Michael McAndrew 2010
Modifications:
adam hyde 2010
Alice Aguilar 2010
David Greenberg 2010
helen jamieson 2010
Kurund Jalmi 2010
Kyle Jaster 2010
Sarah Gladstone 2010
283
CONFIGURING
© xavier dutoit 2010
Modifications:
adam hyde 2010
Alice Aguilar 2010
Andy Oram 2010
Graham Mitchell 2010
Mathieu Lutfy 2010
Michael McAndrew 2010
Sarah Gladstone 2010
Tim Homewood 2010
IMPORTING
© Peter Davis 2009
Modifications:
adam hyde 2009, 2010
Alice Aguilar 2010
Andy Oram 2010
Cynthia Tarascio 2009
David Greenberg 2009, 2010
Eileen McNaughton 2009
helen jamieson 2010
Jack Aponte 2010
Mari Tilos 2009, 2010
Michael McAndrew 2009, 2010
Michal Mach 2009
Tony Guzman 2009
CREDITS
© adam hyde 2006, 2007, 2009, 2010
Modifications:
Cynthia Tarascio 2009
Michael McAndrew 2009, 2010
HOW DATA IS ORGANISED?
© adam hyde 2009, 2010
Modifications:
Alice Aguilar 2010
Andy Oram 2009, 2010
Brian Shaughnessy 2009
Brylie Oxley 2010
Cynthia Tarascio 2009
David Greenberg 2009
Eileen McNaughton 2009
helen jamieson 2010
Jack Aponte 2010
jay maechtlen 2009
Janet Swisher 2009
Kurund Jalmi 2010
Mari Tilos 2009, 2010
Michael Lenahan 2009
Michael McAndrew 2009, 2010
Peter Davis 2009
TWikiGuest 2009
Tony Guzman 2009
xavier dutoit 2010
DEDUPING AND MERGING
© Jack Aponte 2010
Modifications:
adam hyde 2010
284
Alice Aguilar 2010
Andy Oram 2010
David Greenberg 2010
helen jamieson 2010
Jeff Sherk 2010
Kyle Jaster 2010
Mari Tilos 2010
xavier dutoit 2010
API
© Wes Morgan 2010
Modifications:
adam hyde 2010
Brylie Oxley 2010
helen jamieson 2010
Josue Guillen 2010
Kyle Jaster 2010
Michael McAndrew 2010
xavier dutoit 2010
CUSTOM SEARCHES
© Wes Morgan 2010
Modifications:
adam hyde 2010
helen jamieson 2010
Josue Guillen 2010
Kyle Jaster 2010
Michael McAndrew 2010
Sarah Gladstone 2010
HOOKS
© Wes Morgan 2010
Modifications:
adam hyde 2010
Alice Aguilar 2010
Andy Oram 2010
Kyle Jaster 2010
Mathieu Lutfy 2010
Michael McAndrew 2010
xavier dutoit 2010
IMPORTS
© Wes Morgan 2010
Modifications:
adam hyde 2010
Andy Oram 2010
Josue Guillen 2010
Kyle Jaster 2010
Michael McAndrew 2010
INTRODUCTION
© Wes Morgan 2010
Modifications:
adam hyde 2010
Andy Oram 2010
Kyle Jaster 2010
Michael McAndrew 2010
Michael McCallister 2010
xavier dutoit 2010
REPORTS
285
© Wes Morgan 2010
Modifications:
adam hyde 2010
Andy Oram 2010
Erik Hommel 2010
Kurund Jalmi 2010
Kyle Jaster 2010
Michael McAndrew 2010
xavier dutoit 2010
TEMPLATES
© Wes Morgan 2010
Modifications:
adam hyde 2010
Andy Oram 2010
Josue Guillen 2010
Kyle Jaster 2010
Michael McAndrew 2010
Michael McCallister 2010
Sarah Gladstone 2010
xavier dutoit 2010
DEVELOPER TIPS
© Wes Morgan 2010
Modifications:
adam hyde 2010
Andy Oram 2010
Kurund Jalmi 2010
Kyle Jaster 2010
Michael McAndrew 2010
xavier dutoit 2010
EXPORTING
© Kurund Jalmi 2010
Modifications:
adam hyde 2010
Alice Aguilar 2010
Andy Oram 2010
David Greenberg 2010
helen jamieson 2010
Michael McAndrew 2010
EVERYDAY TASKS
© xavier dutoit 2010
Modifications:
adam hyde 2010
Andy Oram 2010
David Greenberg 2010
Josue Guillen 2010
Michael McAndrew 2010
REAL WORLD EXAMPLES
© adam hyde 2009, 2010
Modifications:
Andy Oram 2009
Brian Shaughnessy 2009
Cynthia Tarascio 2009
David Greenberg 2009
Eileen McNaughton 2009
helen jamieson 2010
jay maechtlen 2009
286
Mari Tilos 2009, 2010
Michael Lenahan 2009
Michael McAndrew 2009, 2010
Michael McCallister 2010
Peter Davis 2009
Roberto Santiago 2009
Tony Guzman 2009
ABOUT FREE SOFTWARE
© Michal Mach 2009
Modifications:
adam hyde 2009, 2010
Cynthia Tarascio 2009
Mari Tilos 2009
Michael McAndrew 2009, 2010
EVERYDAY TASKS
© Jack Aponte 2010
Modifications:
adam hyde 2010
helen jamieson 2010
Michael McAndrew 2010
Tim Homewood 2010
GLOSSARY
© adam hyde 2009, 2010
Modifications:
Cynthia Tarascio 2009
David Greenberg 2009
Eileen McNaughton 2009
helen jamieson 2010
Kurund Jalmi 2009, 2010
Lachlan Musicman 2010
Mari Tilos 2009
Michael McAndrew 2009, 2010
Michal Mach 2009
Tony Guzman 2009
TAGS AND GROUPS
© adam hyde 2009, 2010
Modifications:
Andy Oram 2009, 2010
Cynthia Tarascio 2009
Eileen McNaughton 2009
helen jamieson 2010
Jack Aponte 2010
Kurund Jalmi 2010
Kyle Jaster 2010
Mari Tilos 2010
Michael McAndrew 2009, 2010
Michal Mach 2009
Peter Davis 2009
Tony Guzman 2009
xavier dutoit 2010
Yashodha Chaku 2009
CONTACTS
© adam hyde 2009, 2010
Modifications:
alan zucker 2009
Andy Oram 2009
287
David Greenberg 2009
Eileen McNaughton 2009
helen jamieson 2010
Kurund Jalmi 2010
Kyle Jaster 2010
Mari Tilos 2009, 2010
Michael McAndrew 2009
Michal Mach 2009
Peter Davis 2009
TWikiGuest 2009
Yashodha Chaku 2009
HISTORY OF THIS BOOK
© Michael McAndrew 2010
Modifications:
Alice Aguilar 2010
Andy Oram 2010
Sarah Gladstone 2010
WHAT IS CIVICRM?
© Michal Mach 2009
Modifications:
adam hyde 2009, 2010
Andy Oram 2010
Cynthia Tarascio 2009
David Greenberg 2009
Eileen McNaughton 2009
Michael Lenahan 2009
Michael McAndrew 2009, 2010
Michael McCallister 2010
Peter Davis 2009
IS CIVICRM FOR YOU?
© adam hyde 2009, 2010
Modifications:
Alan Schacter 2009
Andy Oram 2009
Benjamin Melançon 2010
Cynthia Tarascio 2009
Duncan Hutty 2009
Eileen McNaughton 2009
helen jamieson 2010
Jack Aponte 2010
Janet Swisher 2009
Mari Tilos 2010
Michael McAndrew 2009, 2010
Michal Mach 2009
Peter Davis 2009
Tony Guzman 2009
POSTAL MAIL
© adam hyde 2009, 2010
Modifications:
Brian Shaughnessy 2009
Cynthia Tarascio 2009
David Greenberg 2010
helen jamieson 2010
Michael McAndrew 2009, 2010
Michal Mach 2009
Tony Guzman 2009
xavier dutoit 2010
288
WHAT IS CIVIMEMBER?
© adam hyde 2009, 2010
Modifications:
Andy Oram 2009, 2010
Brian Shaughnessy 2009
Cynthia Tarascio 2009
Eileen McNaughton 2009
Kurund Jalmi 2010
Kyle Jaster 2010
Mari Tilos 2009
Michael McAndrew 2009, 2010
TWikiGuest 2009
Tony Guzman 2009
Tracy Smith 2009
EVERYDAY TASKS
© adam hyde 2009, 2010
Modifications:
Alice Aguilar 2010
Andy Oram 2010
Brian Shaughnessy 2009
David Greenberg 2010
Eileen McNaughton 2009
Kurund Jalmi 2010
Kyle Jaster 2010
Michael McAndrew 2009, 2010
Michal Mach 2009
TWikiGuest 2009
Tony Guzman 2009
CONFIGURING
© adam hyde 2009, 2010
Modifications:
Alice Aguilar 2010
Andy Oram 2010
Brian Shaughnessy 2009
Cynthia Tarascio 2009
David Greenberg 2010
Eileen McNaughton 2009
Kurund Jalmi 2010
Kyle Jaster 2010
Mari Tilos 2009
Michael Lenahan 2009
Michael McAndrew 2009, 2010
Michal Mach 2009
Tony Guzman 2009
PLANNING
© adam hyde 2009, 2010
Modifications:
Andy Oram 2010
Brian Shaughnessy 2009
Eileen McNaughton 2009
Joe Murray 2010
Kurund Jalmi 2010
Kyle Jaster 2010
Mari Tilos 2009
Michael McAndrew 2009, 2010
TWikiGuest 2009
Tony Guzman 2009
289
ORGANISATIONAL ANALYSIS
© adam hyde 2009, 2010
Modifications:
Alan Schacter 2009
Andy Oram 2009, 2010
Cynthia Tarascio 2009
Eileen McNaughton 2009
helen jamieson 2010
Janet Swisher 2009
Mari Tilos 2010
Michael Lenahan 2009
Michael McAndrew 2009, 2010
Michal Mach 2009
Peter Davis 2009
Phil Mocek 2010
Tony Guzman 2009
PLANNING
© xavier dutoit 2010
Modifications:
adam hyde 2010
Andy Oram 2010
Josue Guillen 2010
Michael McAndrew 2010
TWikiGuest 2010
PROJECT MANAGEMENT
© adam hyde 2009, 2010
Modifications:
Alan Schacter 2009
Andy Oram 2009, 2010
Cynthia Tarascio 2009
David Greenberg 2009
Eileen McNaughton 2009
Erik Hommel 2010
helen jamieson 2010
Jack Aponte 2010
Janet Swisher 2009
Joe Murray 2010
Mari Tilos 2009, 2010
Michael Lenahan 2009
Michael McAndrew 2009, 2010
Michal Mach 2009
Peter Davis 2009
Tony Guzman 2009
SEARCHING
© adam hyde 2009, 2010
Modifications:
Alice Aguilar 2010
Andy Oram 2010
David Greenberg 2009, 2010
Eileen McNaughton 2009
helen jamieson 2010
Kurund Jalmi 2009, 2010
Kyle Jaster 2010
Mari Tilos 2010
Michael McAndrew 2009, 2010
Michal Mach 2009
Peter Davis 2009
Tony Guzman 2009
290
Yashodha Chaku 2009
SYSTEM CONFIGURATION
© xavier dutoit 2010
Modifications:
adam hyde 2010
Andy Oram 2010
Christoph Berendes 2010
Joe Murray 2010
Kurund Jalmi 2010
Michael McAndrew 2010
WHAT IS CIVIENGAGE?
© Alice Aguilar 2010
Modifications:
adam hyde 2010
Josue Guillen 2010
Kurund Jalmi 2010
Kyle Jaster 2010
Michael McAndrew 2010
Michael McCallister 2010
Tim Homewood 2010
WHAT IS CIVIMAIL?
© xavier dutoit 2010
Modifications:
adam hyde 2010
Andy Oram 2010
Graham Mitchell 2010
Lachlan Musicman 2010
Michael McAndrew 2010
TWikiGuest 2010
WHAT IS CIVICASE?
© adam hyde 2010
Modifications:
Andy Oram 2010
helen jamieson 2010
Josue Guillen 2010
Kyle Jaster 2010
Lachlan Musicman 2010
xavier dutoit 2010
WHO IS CIVICRM?
© adam hyde 2009, 2010
Modifications:
David Greenberg 2009
Eileen McNaughton 2009
Jack Aponte 2010
Mari Tilos 2010
Michael Lenahan 2009
Michael McAndrew 2009, 2010
Michael McCallister 2010
Michal Mach 2009
Peter Davis 2009
291
Free manuals for free software
GENERAL PUBLIC LICENSE
Version 2, June 1991
Copyright (C) 1989, 1991 Free Software Foundation, Inc.
51 Franklin Street, Fifth Floor, Boston, MA 02110-1301, USA
Everyone is permitted to copy and distribute verbatim copies
of this license document, but changing it is not allowed.
Preamble
The licenses for most software are designed to take away your freedom to share and change it.
By contrast, the GNU General Public License is intended to guarantee your freedom to share and
change free software--to make sure the software is free for all its users. This General Public
License applies to most of the Free Software Foundation's software and to any other program
whose authors commit to using it. (Some other Free Software Foundation software is covered by
the GNU Lesser General Public License instead.) You can apply it to your programs, too.
When we speak of free software, we are referring to freedom, not price. Our General Public
Licenses are designed to make sure that you have the freedom to distribute copies of free
software (and charge for this service if you wish), that you receive source code or can get it if
you want it, that you can change the software or use pieces of it in new free programs; and that
you know you can do these things.
To protect your rights, we need to make restrictions that forbid anyone to deny you these rights
or to ask you to surrender the rights. These restrictions translate to certain responsibilities for
you if you distribute copies of the software, or if you modify it.
For example, if you distribute copies of such a program, whether gratis or for a fee, you must
give the recipients all the rights that you have. You must make sure that they, too, receive or
can get the source code. And you must show them these terms so they know their rights.
We protect your rights with two steps: (1) copyright the software, and (2) offer you this license
which gives you legal permission to copy, distribute and/or modify the software.
Also, for each author's protection and ours, we want to make certain that everyone understands
that there is no warranty for this free software. If the software is modified by someone else and
passed on, we want its recipients to know that what they have is not the original, so that any
problems introduced by others will not reflect on the original authors' reputations.
Finally, any free program is threatened constantly by software patents. We wish to avoid the
danger that redistributors of a free program will individually obtain patent licenses, in effect
making the program proprietary. To prevent this, we have made it clear that any patent must
be licensed for everyone's free use or not licensed at all.
The precise terms and conditions for copying, distribution and modification follow.
TERMS AND CONDITIONS FOR COPYING, DISTRIBUTION AND MODIFICATION
0. This License applies to any program or other work which contains a notice placed by the
copyright holder saying it may be distributed under the terms of this General Public License. The
"Program", below, refers to any such program or work, and a "work based on the Program"
means either the Program or any derivative work under copyright law: that is to say, a work
containing the Program or a portion of it, either verbatim or with modifications and/or translated
into another language. (Hereinafter, translation is included without limitation in the term
"modification".) Each licensee is addressed as "you".
292
Activities other than copying, distribution and modification are not covered by this License; they
are outside its scope. The act of running the Program is not restricted, and the output from the
Program is covered only if its contents constitute a work based on the Program (independent of
having been made by running the Program). Whether that is true depends on what the Program
does.
1. You may copy and distribute verbatim copies of the Program's source code as you receive it,
in any medium, provided that you conspicuously and appropriately publish on each copy an
appropriate copyright notice and disclaimer of warranty; keep intact all the notices that refer to
this License and to the absence of any warranty; and give any other recipients of the Program a
copy of this License along with the Program.
You may charge a fee for the physical act of transferring a copy, and you may at your option
offer warranty protection in exchange for a fee.
2. You may modify your copy or copies of the Program or any portion of it, thus forming a work
based on the Program, and copy and distribute such modifications or work under the terms of
Section 1 above, provided that you also meet all of these conditions:
a) You must cause the modified files to carry prominent notices stating that you changed
the files and the date of any change.
b) You must cause any work that you distribute or publish, that in whole or in part
contains or is derived from the Program or any part thereof, to be licensed as a whole at
no charge to all third parties under the terms of this License.
c) If the modified program normally reads commands interactively when run, you must
cause it, when started running for such interactive use in the most ordinary way, to print
or display an announcement including an appropriate copyright notice and a notice that
there is no warranty (or else, saying that you provide a warranty) and that users may
redistribute the program under these conditions, and telling the user how to view a copy of
this License. (Exception: if the Program itself is interactive but does not normally print such
an announcement, your work based on the Program is not required to print an
announcement.)
These requirements apply to the modified work as a whole. If identifiable sections of that work
are not derived from the Program, and can be reasonably considered independent and separate
works in themselves, then this License, and its terms, do not apply to those sections when you
distribute them as separate works. But when you distribute the same sections as part of a
whole which is a work based on the Program, the distribution of the whole must be on the terms
of this License, whose permissions for other licensees extend to the entire whole, and thus to
each and every part regardless of who wrote it.
Thus, it is not the intent of this section to claim rights or contest your rights to work written
entirely by you; rather, the intent is to exercise the right to control the distribution of derivative
or collective works based on the Program.
In addition, mere aggregation of another work not based on the Program with the Program (or
with a work based on the Program) on a volume of a storage or distribution medium does not
bring the other work under the scope of this License.
3. You may copy and distribute the Program (or a work based on it, under Section 2) in object
code or executable form under the terms of Sections 1 and 2 above provided that you also do
one of the following:
a) Accompany it with the complete corresponding machine-readable source code, which
must be distributed under the terms of Sections 1 and 2 above on a medium customarily
used for software interchange; or,
b) Accompany it with a written offer, valid for at least three years, to give any third party,
293
for a charge no more than your cost of physically performing source distribution, a
complete machine-readable copy of the corresponding source code, to be distributed under
the terms of Sections 1 and 2 above on a medium customarily used for software
interchange; or,
c) Accompany it with the information you received as to the offer to distribute
corresponding source code. (This alternative is allowed only for noncommercial distribution
and only if you received the program in object code or executable form with such an offer,
in accord with Subsection b above.)
The source code for a work means the preferred form of the work for making modifications to
it. For an executable work, complete source code means all the source code for all modules it
contains, plus any associated interface definition files, plus the scripts used to control compilation
and installation of the executable. However, as a special exception, the source code distributed
need not include anything that is normally distributed (in either source or binary form) with the
major components (compiler, kernel, and so on) of the operating system on which the executable
runs, unless that component itself accompanies the executable.
If distribution of executable or object code is made by offering access to copy from a designated
place, then offering equivalent access to copy the source code from the same place counts as
distribution of the source code, even though third parties are not compelled to copy the source
along with the object code.
4. You may not copy, modify, sublicense, or distribute the Program except as expressly provided
under this License. Any attempt otherwise to copy, modify, sublicense or distribute the Program
is void, and will automatically terminate your rights under this License. However, parties who
have received copies, or rights, from you under this License will not have their licenses
terminated so long as such parties remain in full compliance.
5. You are not required to accept this License, since you have not signed it. However, nothing
else grants you permission to modify or distribute the Program or its derivative works. These
actions are prohibited by law if you do not accept this License. Therefore, by modifying or
distributing the Program (or any work based on the Program), you indicate your acceptance of
this License to do so, and all its terms and conditions for copying, distributing or modifying the
Program or works based on it.
6. Each time you redistribute the Program (or any work based on the Program), the recipient
automatically receives a license from the original licensor to copy, distribute or modify the
Program subject to these terms and conditions. You may not impose any further restrictions on
the recipients' exercise of the rights granted herein. You are not responsible for enforcing
compliance by third parties to this License.
7. If, as a consequence of a court judgment or allegation of patent infringement or for any other
reason (not limited to patent issues), conditions are imposed on you (whether by court order,
agreement or otherwise) that contradict the conditions of this License, they do not excuse you
from the conditions of this License. If you cannot distribute so as to satisfy simultaneously your
obligations under this License and any other pertinent obligations, then as a consequence you
may not distribute the Program at all. For example, if a patent license would not permit royaltyfree redistribution of the Program by all those who receive copies directly or indirectly through
you, then the only way you could satisfy both it and this License would be to refrain entirely
from distribution of the Program.
If any portion of this section is held invalid or unenforceable under any particular circumstance,
the balance of the section is intended to apply and the section as a whole is intended to apply in
other circumstances.
294
It is not the purpose of this section to induce you to infringe any patents or other property right
claims or to contest validity of any such claims; this section has the sole purpose of protecting
the integrity of the free software distribution system, which is implemented by public license
practices. Many people have made generous contributions to the wide range of software
distributed through that system in reliance on consistent application of that system; it is up to
the author/donor to decide if he or she is willing to distribute software through any other system
and a licensee cannot impose that choice.
This section is intended to make thoroughly clear what is believed to be a consequence of the
rest of this License.
8. If the distribution and/or use of the Program is restricted in certain countries either by
patents or by copyrighted interfaces, the original copyright holder who places the Program under
this License may add an explicit geographical distribution limitation excluding those countries, so
that distribution is permitted only in or among countries not thus excluded. In such case, this
License incorporates the limitation as if written in the body of this License.
9. The Free Software Foundation may publish revised and/or new versions of the General Public
License from time to time. Such new versions will be similar in spirit to the present version, but
may differ in detail to address new problems or concerns.
Each version is given a distinguishing version number. If the Program specifies a version number
of this License which applies to it and "any later version", you have the option of following the
terms and conditions either of that version or of any later version published by the Free
Software Foundation. If the Program does not specify a version number of this License, you may
choose any version ever published by the Free Software Foundation.
10. If you wish to incorporate parts of the Program into other free programs whose distribution
conditions are different, write to the author to ask for permission. For software which is
copyrighted by the Free Software Foundation, write to the Free Software Foundation; we
sometimes make exceptions for this. Our decision will be guided by the two goals of preserving
the free status of all derivatives of our free software and of promoting the sharing and reuse of
software generally.
NO WARRANTY
11. BECAUSE THE PROGRAM IS LICENSED FREE OF CHARGE, THERE IS NO WARRANTY FOR THE
PROGRAM, TO THE EXTENT PERMITTED BY APPLICABLE LAW. EXCEPT WHEN OTHERWISE
STATED IN WRITING THE COPYRIGHT HOLDERS AND/OR OTHER PARTIES PROVIDE THE
PROGRAM "AS IS" WITHOUT WARRANTY OF ANY KIND, EITHER EXPRESSED OR IMPLIED,
INCLUDING, BUT NOT LIMITED TO, THE IMPLIED WARRANTIES OF MERCHANTABILITY AND
FITNESS FOR A PARTICULAR PURPOSE. THE ENTIRE RISK AS TO THE QUALITY AND
PERFORMANCE OF THE PROGRAM IS WITH YOU. SHOULD THE PROGRAM PROVE DEFECTIVE,
YOU ASSUME THE COST OF ALL NECESSARY SERVICING, REPAIR OR CORRECTION.
12. IN NO EVENT UNLESS REQUIRED BY APPLICABLE LAW OR AGREED TO IN WRITING WILL ANY
COPYRIGHT HOLDER, OR ANY OTHER PARTY WHO MAY MODIFY AND/OR REDISTRIBUTE THE
PROGRAM AS PERMITTED ABOVE, BE LIABLE TO YOU FOR DAMAGES, INCLUDING ANY
GENERAL, SPECIAL, INCIDENTAL OR CONSEQUENTIAL DAMAGES ARISING OUT OF THE USE OR
INABILITY TO USE THE PROGRAM (INCLUDING BUT NOT LIMITED TO LOSS OF DATA OR DATA
BEING RENDERED INACCURATE OR LOSSES SUSTAINED BY YOU OR THIRD PARTIES OR A
FAILURE OF THE PROGRAM TO OPERATE WITH ANY OTHER PROGRAMS), EVEN IF SUCH HOLDER
OR OTHER PARTY HAS BEEN ADVISED OF THE POSSIBILITY OF SUCH DAMAGES.
END OF TERMS AND CONDITIONS
295