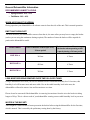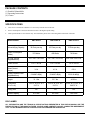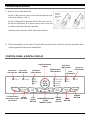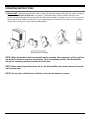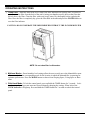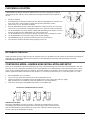
1
HMT-D30-A Model Numbers: HMT-D30-A HMT-D45E-A HMT-D70E-A Portable Dehumidifier Operating Instructions HMT-D45E-A HMT-D70E-A 3119233 V.141217 General Dehumidifier Information RECOMMENDED HUMIDITY LEVELS Spring/Summer: 30% - 50% Fall/Winter: 30% - 40% WARM AIR EXHAUST IS NORMAL During operation your dehumidifier will exhaust warm air from the side of the unit. This is normal operation. EMPTYING THE BUCKET The more moisture your dehumidifier removes from the air, the more often you may have to empty the bucket (unless you are using the continuous drainage option). The number of times the bucket will be emptied depends on the dehumidifier model. Model Number Pints of moisture removed per every 24 hour period Maximum number of times to empty the bucket when operating at full capacity during a 24 hour period 30 Pints 4 Times 45 Pints 6 Times 70 Pints 5 Times HMT-D30-A HMT-D45E-A HMT-D70E-A LESS MOISTURE BEING REMOVED OVER TIME IS A GOOD THING! Using a dehumidifier will cause your area to maintain a more comfortable humidity level. Over time, this humidity level will become more and more stable. Due to the stable humidity level in the area, the dehumidifier will need to remove less and less moisture over time. Please do not be concerned if the dehumidifier is removing less moisture from the air or the bucket is taking longer to fill up. This is a direct result of your dehumidifier creating a more stable humidity level in your area. WATER IN THE BUCKET! There might be a small amount of water present in the bucket before using the dehumidifier for the first time, which is normal. This is caused by the preliminary testing done by the factory. 2 FEATURES Removes up to 30/45/70 pints (depending on model) of moisture from the air every 24 hours depending on the unit you have. This is not the bucket size. Adjustable humidistat for precise humidity control. Digital humidistat displays set humidity level and current room humidity level. Operates at temperatures down to 41°F. Perfect for basement use in the winter. Automatic defrost function melts away ice from frozen coils for continuous, worry-free operation. 3-Speed fan allows you to choose between maximum dehumidifying power or quiet operation. Bucket full indicator and audible alarm signals as soon as the bucket is full and ready to be emptied. Ultra quiet operation allows for use almost anywhere. Perfect for heavy traffic areas like a family room or bedroom. Loss of power protection remembers all settings even when power is interrupted. Auto-restart automatically continues operation when power is restored. No need to manually restart the dehumidifier. 24-Hour Timer automatically turns on and off the unit after the preset time of 0.5 up to 24 hours. MyHome modes allow you to choose the location in which you are using your dehumidifier (Sleeping Space, Living Space or Basement) for preset comfort and balanced operation. 3 Thank you for choosing a Soleus Air Fueled by TCL Portable Dehumidifier. This owner’s manual will provide you with valuable information necessary for the proper care and maintenance of your new product. Please take a few moments to thoroughly read the instructions and familiarize yourself with all the operational aspects of your new Dehumidifier. For your own records, please attach a copy of your sales receipt to this manual. Also, write the store name/location, date purchased, and serial number below: Store Name: ____________________________________________________ Location: ______________________________________________________ Date Purchased: _________________________________________________ Serial Number (located on back of unit): ______________________________ IMPORTANT INSTRUCTIONS Before installing and using your dehumidifier, please read this owner’s manual carefully. Store this manual in a safe place for future reference. 1) Always place the unit on a level surface. 2) Never use or store gasoline or other flammable vapor or liquid near this unit unless instructed by this manual. 3) Maintain at least 12-18 inches clearance space around this unit. Do not block or cover air inlet or outlet grilles. 4) The unit must be connected to a correctly grounded power supply. 5) Do not start or stop the unit by inserting or pulling out the power plug. 6) Do not use an adapter plug or extension cord. 7) Do not use the unit in the immediate surroundings of a bath, a shower or a swimming pool. 8) Do not insert anything into the air outlet. Do not obstruct air inlet or outlet grills unless instructed by this manual. 9) Do not let children play near this unit. 10) Always inspect the cord for signs of damage before use. If the power cord is damaged, it must be replaced by the manufacturer or a qualified service technician. 11) When cleaning the unit, always turn the unit off and unplug the power cord. 4 PACKAGE CONTENTS (1) Portable Dehumidifier (1) Operating Instructions (4) Casters SPECIFICATIONS Noise level is measured at a distance of 3.28 ft away from the front of the unit. Power consumption is measured when the fan runs at the highest speed setting. These specifications are for reference only. For actual data, please refer to the rating label on the back of the unit. Model Number HMT-D30-A HMT-D45E-A HMT-D70E-A 30 Pints per day 45 Pints per day 70 Pints per day 370 Watts 450 Watts 730 Watts 215 / 180 / 155 CFM 215 / 180 / 155 CFM 320 / 290 / 250 CFM Power Source 115 V / 60 Hz 115 V / 60 Hz 115 V / 60 Hz Rated Current (Amps) 3.2 A 4.5 A 6.5 A 51/49/47 dB(A) 51/49/47 dB(A) 53/51/49 dB(A) 31.1 lbs 33.7 lbs 46.9 lbs Dimensions (W x D x H) 13.375” W x 10” D x 19.5” H 13.375” W x 10” D x 19.5” H 15.25” W x 11.25” D x 24.875” H Energy Star No Yes Yes 8.5 Pints 8.5 Pints 16.9 Pints Dehumidifying Capacity Power Consumption (Watts) Air Flow Volume (High/Med/Low) Sound Pressure Level (High/Med/Low) Weight Bucket Capacity DISCLAIMER ALL INFORMATION AND THE TECHNICAL SPECIFICATIONS PRESENTED IN THIS USER’S MANUAL ARE THE PRESENTATION OF THE MANUFACTURER. SOLEUS HOME COMFORT HAS NOT CONDUCTED INDEPENDENT TEST TO THE INFORMATION AND THE SPECIFICATIONS PRESENTED HEREWITHIN. 5 CASTER INSTALLATION 1) Remove casters from the bucket. For the 70 Pint, the four casters can be taken out from the side of the bucket directly. (Fig. 1) 4 casters in plastic bag packed inside bucket For the 30 Pint and 45 Pint, please check if the casters are under the lid of the bucket. If so, please remove lid to access casters, then re-placed the lid before operation. Fig. 1 Attention: please don't take off the float in this situation. 2) Tilt the dehumidifier no more than 45⁰ and forcibly insert the casters. Make sure the ring around the caster is flush against the bottom of the dehumidifier. CONTROL PANEL & DIGITAL DISPLAY Digital Humidistat Display Bucket Full Clean Filter LED Indicator LED Indicator This button does FILTER not operate or offer BUTTON any function Child-Lock LED Indicator MyHome Mode LED Indicators Fan Speed LED Indicators FAN INCREASE/DECREASE SPEED ROOM BUTTON HUMIDITY LEVEL 6 PRESET MODE BUTTON Power On LED Indicator Timer LED Indicator TIMER BUTTON POWER BUTTON OPERATING INSTRUCTIONS OPERATING INSTRUCTIONS 1) When first operating the dehumidifier, run it in Continuous mode for 24 hours. 2) Power On and Off - Press the POWER button once to manually turn the unit on. Press the POWER button once more to turn the unit off. 3) Humidity Selection - Press the or buttons to choose the desired relative humidity in the room. Each press of the button will change the desired room humidity by 5%. The room humidity is selectable from 35%-80% or continuous. The unit will cycle on and off to maintain the humidity level chosen on the digital display. If you want the dehumidifier to operate continuously regardless of the room humidity, press the MODE button until you see “CO” on the digital display. This will enable continuous operation and the “Continuous” indicator will light up on the control panel. 4) Fan Speed Control - Press the FAN SPEED Button to cycle through the different fan speeds: High, Medium, and Low. The fan speed can be visually distinguished by the fan speed indicators on the control panel. 5) Timer Auto On- To program the unit to automatically turn on, press the TIMER button when the unit is off. Press or to increase or decrease the timer in 30 min increments (.5 hours) up to 10 hours. After 10 hours, each press of the button will increase the timer in 1 hour increments up to 24 hours. Once the desired time is reached, the unit will automatically turn on. Timer Auto Shut-Off- To program the unit to automatically turn off, press the TIMER button when the unit is on. Each press of the or buttons will change the timer setting in 30 min increments ( .5 hours) up to 10 hours. After 10 hours, each press of the or buttons will increase or decrease the timer in 1 hour increments up to 24 hours. Once the desired time is over, the unit will automatically power off. NOTE: Fan will continue to run even when the compressor is off. This is normal and allows the unit to circulate air and operate more efficiently 7 OPERATING INSTRUCTIONS 6) Bucket Full - When the water bucket is full of water, the unit will automatically shut off , make a beeping noise, and the Bucket Full Indicator will light up. The dehumidifier will not function until the water bucket is emptied and placed back inside the unit. The bucket should be cleaned every few weeks to prevent the growth of mold, mildew and bacteria. Use a mild detergent to clean the bucket. Once clean, completely dry the bucket and place it back inside the dehumidifier. NOTE: When the bucket is full or removed from the machine, the compressor will turn off, but the fan will continue to run for a few minutes. This is completely normal. The dehumidifier will not be removing moisture from the air at this time. NOTE: When removing moisture from the air, the dehumidifier will exhaust warm air from the side exhaust vent. NOTE: Do not place a full bucket on the floor, because the bottom is uneven. 8 OPERATING INSTRUCTIONS 7) Clean Filter - When the filter needs to be cleaned, the filter indicator will light up (after 250 hours of use). Remove the filter from the back of the unit by using your thumbs to press down on the filter tabs directly above the filter. Clean the filter with warm, soapy water. Dry thoroughly before replacing the filter. Once the filter is completely dry, place the filter back in the unit and press the FILTER button to reset the filter indicator. CAUTION: DO NOT OPERATE THE DEHUMIDIFIER WITHOUT THE INCLUDED FILTER NOTE: Do not clean filter in dishwasher 8) MyHome Modes - Preset humidity level settings allow the user to easily move the dehumidifier roomto- room and select the corresponding mode for the location in which the dehumidifier is operating for optimum performance. Press the MODE button to choose from Sleeping Space, Living Space or Basement. 9) Child-Lock Mode- To lock the control panel, press and hold the TIMER button for 3 seconds. Locking the control panel prevents someone from accidentally changing the settings. When locked, the LOCK Indicator will light up. Press and hold the TIMER button for 3 seconds to unlock the control panel. 9 CHOOSING A LOCATION A Dehumidifier operating in a basement will have little or no effect in drying out an adjacent enclosed storage area, such as a closet, unless there is adequate circulation of air in and out of the area. Do not use outdoors. This dehumidifier is intended for indoor use only. Place the dehumidifier on a smooth, level floor surface that is strong enough to support the unit with a full bucket of water. Allow at least 12”-18” of air flow on all sides. Place the dehumidifier in an area where the temperature will not fall below 41°F. The coils can become covered with frost at temperatures below 41°F, which may reduce performance. Use the dehumidifier in cooking, laundry, bathing and dishwashing areas that have excessive moisture. NOTE: Place the dehumidifier away from a clothes dryer. Use the dehumidifier to prevent moisture damage anywhere books or valuables are stored. Use the dehumidifier in a basement to help prevent moisture damage. The dehumidifier must be operated in an enclosed area to be most effective. Close all doors, windows and other outside openings to the room. AUTOMATIC DEFROST When frost builds up on the evaporator coils, the compressor will cycle off and the fan will continue to run until the frost disappears. When the coils are completely defrosted, the compressor or fan (depending on the model) will automatically restart and dehumidification will resume. CONTINUOUS MODE—GARDEN HOSE INSTALLATION AND SETUP Water can be automatically emptied by attaching a hose to the continuous drainage port on the back of the dehumidifier. This will allow the unit to run continuously (depending on the selected humidity level) without having to empty the water bucket. To drain, simply attach a standard garden hose (not included). The thread standard for garden hoses in the US and its territories is known as GHT or "garden hose thread" which has an outer diameter of 1 1/16 inches (1.0625 inches or 27.0 mm) and a pitch of 11.5 TPI. Place dehumidifier on a level surface. Unscrew the cap on the back of the unit to access the garden hose nozzle Thread a garden hose (not supplied) onto the accessible nozzle, lead to a floor drain and cut to length. Make sure that there are no kinks or knots in the garden hose. (See Picture Below) Turn on the unit and press the MODE button until set to CONTINUOUS. Garden Hose Installation Reference Guide IMPORTANT NOTES: Placing the dehumidifier on an uneven surface or improper hose installation may result in water filling up the bucket and causing the unit to shut off. Empty bucket if shut-off occurs, then check dehumidifier location and hose for proper setup. The bucket must be in place and securely seated for the dehumidifier to operate. 10 MAINTENANCE Note: Make sure power is off and the power cord is not plugged into an electrical outlet prior to performing any maintenance on the unit. Clean or Replace Filter - Refer to Page 9 Operating Instructions Clean Filter section. Clean the Unit Housing 1) Keep the unit from being exposed directly to the sun to prevent color fading. 2) Clean the surface with a damp cloth and dry it with a soft towel. Storing the Unit for an Extended Period of Time or Transporting the Unit 1) Clean or replace filter - Refer to Page 9 Operating Instructions Clean Filter section. 2) Unplug the unit. 3) Empty any excess water 4) The unit should be stored in a cool dry place. 11 TROUBLESHOOTING Problem Possible Causes Solutions Dehumidifier does not start The dehumidifier is unplugged. Make sure the dehumidifier’s plug is pushed completely into the outlet. The fuse is blown / circuit breaker is tripped. Check the house fuse / circuit breaker box and replace fuse or reset breaker. Dehumidifier has reached its The dehumidifier automatically turns off when either condipresent level or the bucket is full. tion occurs. Change to a lower setting or empty the water bucket and replace properly. Dehumidifier does not dry the air as it should Bucket is not in the proper position. The bucket must be in place and securely seated for the dehumidifier to operate. Power Failure. There is a protective time delay (up to 3 min.) to prevent tripping of the compressor overload. For this reason, the unit may not start normal dehumidification for 3 min. after it is powered back on. Not enough time allowed for unit When first installed, allow at least 24 hours to maintain the to remove moisture. desired dryness. Airflow is restricted. Make sure there are no curtains, blinds, or furniture blocking the front or back of the dehumidifier. See the CHOOSING A LOCATION section on Page 10. Dirty filter. See the CLEAN FILTER section on Page 9. The Humidity Control may not be set low enough. For drier air, press the button to lower the percent humidity desired in the room, or set the dehumidifier to CO for maximum dehumidification. Doors and windows may not be closed tightly. Check that all doors, windows, and other openings are securely closed. Clothes dryer may be blowing moist air into the room. Install the dehumidifier away from the dryer. The dryer should be vented outside. Room temperature is too low. Moisture removal is best at higher room temperatures. Lower room temperatures will reduce the moisture removal rate. This model is designed to operate at temperatures above 41°F. The area to be dehumidified is too large. The capacity of your dehumidifier may not be adequate for the room size. Doors and windows are open. Close all doors and windows to the outside. Frost appears on the coils The dehumidifier has recently been turned on or the room temperature is below 41°F. This is normal. Frost will usually disappear within 60 minutes. Controls cannot be set The compressor will turn off and This is normal. Wait approximately 3 minutes and set the fan the fan will automatically speed at the desired level. continue to run for approximately 3 minutes at a fixed setting. Fan Noise Air is moving through the unit. This is normal. Water on the floor Hose connection may be loose. Check the hose connection. See the CONTINUOUS MODEGARDEN HOSE INSTALLATION AND SET UP Section on Page 10. Dehumidifier runs too much Hose is attached but not draining Disconnect the hose if using the bucket or place the hose near into a drain a drain. 12 ERROR CODE Error Code EH E1 E2 Description Humidity Sensor Fault Temperature Sensor Fault For any questions or Technical Support, Please Call customer service (888) 876-5387 13 WARRANTY One Year Limited Warranty Soleus Home Comfort warrants the accompanying Soleus Air Fueled by TCL Dehumidifier to be free of defects in material and workmanship for the applications specified in its operation instruction for a period of ONE (1) year from the date of original retail purchase in the United States. If the unit exhibits a defect in normal use, Soleus Home Comfort will, at its option, either repair or replace it, free of charge within a reasonable time after the unit is returned during the warranty period. As a condition to any warranty service obligation, the consumer must present this Warranty Certificate along with a copy of the original purchase invoice. THIS WARRANTY DOES NOT COVER: Damage, accidental or otherwise, to the unit while in the possession of a consumer not caused by a defect in material or workmanship. Damage caused by consumer misuse, tampering, or failure to follow the care and special handling provisions in the instructions. Damage to the finish of the case, or other appearance parts caused by wear. Damage caused by repairs or alterations of the unit by anyone other than those authorized by Soleus Home Comfort. Freight and Insurance cost for the warranty service. Filter and Accessories ALL WARRANTIES, INCLUDING ANY IMPLIED WARRANTY OF MERCHANT ABILITY ARE LIMITED TO ONE-YEAR DURATION OF THIS EXPRESS LIMITED WARRANTY. SOLEUS HOME COMFORT DISCLAIMS ANY LIABILITY FOR CONSEQUENTIAL OR INCIDENTAL DAMAGES AND IN NO EVENT SHALL SOLEUS HOME COMFORT’S LIABILITY EXCEED THE RETAIL VALUE OF THE UNIT FOR BREACH OF ANY WRITTEN OR IMPLIED WARRANTY WITH RESPECT TO THIS UNIT. This warranty covers only new products purchased from our authorized dealers or retailers. It does not cover used, salvaged, or refurbished products. As some states do not allow the limitation or exclusion of incidental or consequential damages, or do not allow limitation on implied warranties, the above limitations and exclusions may not apply to you. This warranty gives you specific legal rights, and you may also have other rights that vary from state to state. For Technical Support and Warranty Service Please Call (888) 876-5387 Or Write To: Soleus Home Comfort 17911 East Ajax Circle City of Industry, CA 91748 www.soleushomecomfort.com 14