1
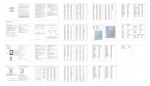
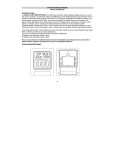
-10 degree C to + 60 degree C
+/- 1 degree C (within -10 degree C to
+ 40 degree C)
AA batteries x 2 pcs.
AAA batteries x 2 pcs.
DV207NL
Electromagnetic compatibility and Radio spectrum Matters
ETSI EN 300 220-2 V2.3.1 (2010-02)
ETSI EN 300 330-2 V1.5.1 (2010-02)
Electromagnetic compatibility
ETSI EN 301 489-1 V1.9.2 (2011-09)
ETSI EN 301 489-3 V1.4.1 (2002-08)
Low voltage directive
EN 60950-1:2006+A11:2009+A1:2010+A12:2011
2006/95/EC
30
Date & Alarm.
(DV207NL)
USER MANUAL
41
42
49
50
57
KSPO:
NIL DV207NL & TS51 MANUAL 2(ENG)
SIZE: W105 X H148(mm)
BY Lai H Z 23/05/13
DAY/NIGHT
DAY/NIGHT
with 3 channels
Flashing
Flashing
Key Features:
- Weather Status for today and coming three days for 470 cities
- Rain/Snow/Hail Probability for today
- Wind Speed and Wind Direction for today
- 3 channel outdoor 433MHz wireless Thermometer (channel 1 sensor is included, additional
sensors are required for channels 2 and 3)
- Indoor Thermometer
- Maximum and minimum memories of temperature readings
- Temperature trends (UP/ FLAT/ DOWN), Temperature in degree C only.
- Regional Day-time temperature and Night-time Temperature information
- 7-languages abbreviation (English/ Espanol/ Francais/ Italiano/Dutch /Swedish/ Deutsch)
- Critical Weather Alert
- Maximum of 5 cities’ weather information can be selected and displayed.
- Radio-controlled Clock and Calendar (24 hours format only)
- Time-zone setting
- Powered by 2 x AA batteries for main unit, and 2 x AAA batteries for the outdoor sensor
- Dual alarm (weekday alarm/single alarm, Alarm sound for 2 minutes)
- Pre- alarm (Programmable) for outdoor sensor – Channel 1 only.
- Battery Low Indicator for Main Unit and Wireless Sensor
WEATHER
ER
H
AT
SINGLE ALARM
43
WE
AT
H
ER
WE
DAY/NIGHT
44
51
PRE-ALARM
WEEKDAY ALARM
TIME & DATE.
DAY/NIGHT
52
WEATHER STATUS
There are total 15 weather status for Day and 15 weather status for Night.
There are total 7 buttons on the Main Unit, namely:
SET
- Selected Date &Time
City
Week Alarm “OFF W-ALM”
Single alarm“OFF
S-ALM”
Pre-Alarm“OFF P-ALM”
- Press and HOLD [SET] for 3 seconds to select your <1> Country, <2> Time Zone, <3>
Language, <4>Exit to city display mode
Alarm time
DAY/NIGHT
- Critical Weather Information
Day/Night Weather Status Change
- Read the critical weather information one by one.
Tomorrow, One-Day-After,
and Two-Day-After Weather
Information including Day &
Night Temperature, Day &
Night Weather Status.
In/Outdoor Temperature
▲
- increasing the value during setting
- Turn ON alarm
- Press and Hold for 3 seconds to force RC Clock receiving
▼
- decreasing the value during setting
- Chose one of the pre-selected cities
- Turn OFF alarm
- Press and Hold for 3 seconds to force to search for outdoor sensor
MEM
- display the maximum and minimum measured Temperature in record
- Press and Hold for 3 seconds to clear all the Max. and Min. record
- Edit your home town
Main Unit
TEST √
- Find the place for the device which has a good reception
- Add the city into the list of your desired cities
OR
Remove the city out of the list of desired Cities
- Edit your home town
CHANNEL
- Switch to read Outdoor Thermometer channel 1, 2, 3.
- Press and Hold key for 3 seconds to enter into“
” display mode
Remote Thermometer
45
46
Insert 2 pcs AAA batteries for remote sensor, and then insert 2 pcs AA batteries for the
53
54
OUTDOOR TEMPEATURE READING
The wave display indicates the reception of the remote unit is in good order.
If no readings are received from the remote unit for more than two minutes, blanks
will be
displayed until further readings are successfully searched. Checked the remote unit is sound and
secure. You can wait for a little while or Hold DOWN (▼) button for 2 seconds to enforce an
immediate search.
MAXIMUM AND MINIMUM TEMPERATURES
- The maximum and minimum recorded indoor and outdoor temperatures will be automatically
stored in the memory of the main unit. To display them, press [MEM] button and the
respective indicators, [MAX] or [MIN] will be displayed.
- To clear the memory, hold [MEM] button for 3 seconds. The maximum and minimum
temperature records will be erased.
The kinetic wave display shows the signal receiving status of the main unit. There are three
possible forms:
ALARM FEATURE
Icon
Status
Searching for the signals from the remote sensor
Corresponding remote sensor signal received successfully
No signals received for over 1 hour
TEMPERATURE TREND
The trend indicator shows the trend of temperatures collected at that particular remote sight.
Three trends: rising steady and falling will be shown.
Arrow indicator
Temperature Trend
• SCAN A: the signal strength will be represented from 0 (very bad) to 9 (very good).
SWITCH CITY
ALARM TIME
TIME & DATE
• After inserting the batteries, the weather station searches for the Radio controlled Time signal
as well as the MeteoTime signal. After it has successfully received the MeteoTime signal, the
information windows the default city “
”.
• You are able to press [SET] to switch from the display of the City of date, weekday alarm,
single alarm and pre-alarm.
Rising
Steady
Falling
VIEWING REMOTE (CHANNEL) TEMPERATURE
Static Display:
- Press [ CHANNEL ] button to select measurements from different remote sensors, each is
mode to a unique channel 1,2, or 3
Channel Auto-Scan Display:
- Press To enable an automatic scan of all channels, press and hold CHANNEL button, until the
icon is displayed. The measurements from each remote channel will be alternately
displayed with a 5 seconds viewing.
Weekday Alarm:
- This is a repeat alarm that will activate daily from Monday to Friday at a set time.
Single Alarm:
- This is a single alarm that will activate once at a set time
HOW TO SET ALARM
- Press [SET] to toggle between weekday, single alarm time or pre-alarm.
If the alarm is disarmed, the time will be displayed as “OFF W-ALM”
- Hold [SET] for 3 seconds, the hour digits will blink.
- Enter the hour by using UP [▲] or DOWN [▼] button.
- Press [SET] to confirm, the minute digits will blink.
- Enter the hour by using UP [▲] or DOWN [▼] button.
- Press [SET] to exit and the respective alarm icons [
],[
] and [
activated.
HOW TO STOP ALARM
- When alarm is on, the respective alarm icons [
] and [
] will be flashing. Press UP [▲]
or DOWN [▼] button to stop the alarm immediately.
- To turn off the alarm, press UP [▲] or DOWN [▼] button to change the alarm time display
as “OFF W-ALM”
- If no button is pressed, the alarm will be sounded for 2 minutes and then deactivated
automatically.
SETTING THE ICE WARNING ALARM (PRE-ALM)
- If Weekday (W) or Single day (S) alarm is set, the Ice Warning Alarm (Pre-ALM) can be
programmed.
- Press and hold [SET] button for 3 seconds once to enter into the Ice Warning Alarm setting
mode on “PRE-ALM” display mode.
- The number 15 will flash, meaning that if selected, the alarm will sound 15 minutes earlier
than the Weekday or Single alarm.
- Select the desired Ice Warning Alarm interval in 15 minutes increments between 15 and 90
minutes, using UP (▲) or DOWN (▼)buttons
- Press [SET] button to confirm and exit from the alarm setting mode.
NOTE: the channel auto-scan feature can be active only if there are more than one remote
sensors operating and are set to different channels.
47
48
55
]will be
56
City and Text List
METEO TIME 470 CITY
10
11
20
KSPO:
NIL METEO TIME 470 CITY IM SUPPLEMENTARY
SIZE:W105xH148mm
BY Lai H Z 23/05/13
22
2
3
12
13
4
5
14
15
6
7
16
17
8
9
18
19
21