1
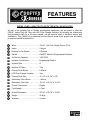
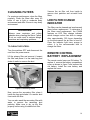
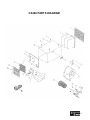
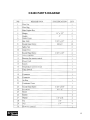
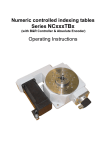
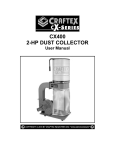
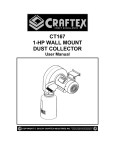
CX408 HEAVY DUTY AIR FILTER WITH LED FILTER CHANGE INDICATOR User Manual Version: 1.0 TABLE OF CONTENTS General Safety Instructions for Machines ............................................................... 3 CX408 Specific Safety Instructions ......................................................................... 4 Features.................................................................................................................. 5 Physical Features ................................................................................................... 6 Un-packing.............................................................................................................. 7 Inventory ................................................................................................................. 7 Proper Grounding ................................................................................................... 7 Test Run ................................................................................................................. 8 Attaching Eye Bolts................................................................................................. 8 Installing Air Filter ................................................................................................... 8 Adjusting Fan Speed............................................................................................... 9 Setting Fan Timer ................................................................................................... 9 Cleaning Filters ....................................................................................................... 10 LED Filter Change Indicator.................................................................................... 10 Remote Control Battery Replacement .................................................................... 10 Parts List................................................................................................................. 11 Parts Diagram ......................................................................................................... 12 Warranty ................................................................................................................. 13 2 GENERAL SAFETY INSTRUCTIONS FOR MACHINES Extreme caution should be used when operating all power tools. Know your power tool, be familiar with its operation, read through the owner’s manual and practice safe usage procedures at all times. ALWAYS read and understand the user manual before operating the machine. CONNECT your machine ONLY to the matched and specific power source. DISCONNECT the power source when changing drill bits, hollow chisels, router bits, shaper heads, blades, knives or making other adjustments or repairs. NEVER leave a tool unattended while it is in operation. ALWAYS wear safety glasses respirators, hearing protection and safety shoes, when operating your machine. ALWAYS make sure that any tools used for adjustments are removed before operating the machine. A SAFE ENVIRONMENT is important. Keep the area free of dust, dirt and other debris in the immediate vicinity of your machine. Regularly inspect the machine for loose or damaged parts or any other unsafe condition that may effect safe operation. Repair the machine before operating it. BE ALERT! DO NOT use prescription or other drugs that may affect your ability or judgment to safely use your machine. ALWAYS keep the bystanders safely away while the machine is in operation. DO NOT force machine. It will do the job safer and better at the rate for which it is designed. ALWAYS wear hearing protection when operating or observing loud machinery. Extended exposure to this noise without hearing protection can cause permanent hearing loss. 3 CX408 HEAVY DUTY AIR FILTER SPECIFIC SAFETY INSTRUCTIONS Read and understand the instructions given in this manual before operation. This air filter is designed to capture dust from ambient air in a woodworking shop for a short time after cutting or sanding operations. Do not use this filter to collect metal particles, liquids, smoking materials or toxic fumes. Fine dust is too small to be caught in the filter. Always wear a respirator during sanding or cutting operation because to protect yourself from the risk of permanent respiratory damage. Always turn OFF the switch and disconnect the cord from the power, allow the impeller to come to a complete stop before servicing, cleaning or performing any adjustments. Clean the air filter and the surrounding areas regularly to prevent fine dust from built-up. Do not operate the air filter in areas where the explosion risks are high; areas near pilot lights or open flames. Do not use or store the air filter in a rainy or wet location. Only operate the air filter in locations that contain a fire suppression system or have a fire extinguisher nearby. Always keep your hands and tools away from the open inlet during operation. Your hands or tools could come in contact easily with the impeller which can cause serious damage to your hands and the machine. Always keep small animals and children away from the open dust collection inlets while operation. Never leave the air filter unattended until the switch is turned OFF, the cord is disconnected from the power source and the impeller has come to a complete stop. When hanging the air filter from ceiling, make sure the eye bolts are tightened properly and the hanging straps are strong enough to support the weight of the air filter. Make sure you have read and understood all the safety instructions in the manual and you are familiar with your table saw, before operating it. If you fail to do so, serious injury could occur. WARNING! The safety instructions given above can not be complete because the environment in every shop is different. Always consider safety first as it applies to your individual working conditions. 4 FEATURES MODEL CX408 – HEAVY DUTY AIR FILTER WITH LED INDICATOR As part of the growing line of Craftex woodworking equipment, we are proud to offer the CX408, Heavy Duty Air Filter with LED Filter Change Indicator. By following the instructions and procedures laid out in this user manual, you will receive years of excellent service and satisfaction. The CX408 is a professional tool and like all power tools, proper care and safety procedures should be adhered to. Motor .............................................. 1/3 HP, 120 Volts, Single Phase, 60 Hz Amps ..............................................3 Amps Number of Fan Speed .................... 3 Speeds Switch ............................................. ON/OFF Switch & Programmable Remote Air Suction Capacity .......................1400 CFM Impeller Construction...................... Engineering Plastics Impeller Size................................... 9" Number of Filters ............................ Two Primary Filter Micron ...................... 5 Micron LED Filter Change Indicator ........... Yes Primary Filter Size .......................... 15-1/4" x 19-1/4" x 7/8" Secondary Filter Micron.................. 1 Micron Secondary Filter Size ..................... 15-1/4" x 19-1/4" x 17-7/8" Frame Construction ........................ Plastic Cord Length.................................... 6 Feet Overall Dimension .......................... 30-1/8" x 19-7/8" x 16-3/8" Weight ............................................ 32 Kgs Warranty ......................................... 3 Years 5 CX408 - HEAVY DUTY AIR FILTER PHYSICAL FEATURES Eye Bolts with Hex Nuts Air Outlet Hanging Wire Main Switch Hanging Wire Remote Control Power Cord Pull Chain Switch Thermal Breaker LED Filter Change Indicator 6 UNPACKING PROPER GROUNDING The machine is properly packaged for safe transportation. When unpacking, carefully remove the packing materials from around the machine and ensure that nothing has been damaged during transit. Grounding provides a path of least resistance for electric current to reduce the risk of electric shock. CX408 is for use on a normal 120 volt circuit. Make sure that the machine is connected to an outlet having the same configuration as the plug. If an adaptor plug is used, it must be attached to the metal screw of the receptacle. To prevent electrical hazards, have a qualified electrician ensure that the line is properly wired. The air filter should be wired with a plug having 3 prongs to fit a 3 prong grounded receptacle as shown in figure-1. Do not remove the grounding prong to fit it into a 2 pronged outlet. Figure-1 Inventory LIST OF CONTENTS QTY A. Air Filter Unit ................................... 1 B. Remote Control ............................... 1 C. Eye Bolts ......................................... 4 D. Hex Nuts ......................................... 4 E. Hanging Cables............................... 4 NOTE: While doing inventory, if you can not find any part, check if the part is already installed on the machine. Some of the parts come preassembled with the machine for shipping purposes. Figure-2 120-Volts outlet for CX408 WARNING! Improper connection of the equipmentgrounding conductor can result in a risk of electric shock. Check with a qualified electrician if you are in doubt as to whether the outlet is properly grounded. 7 TEST RUN Before installing the CX408 you will need to test run the air filter to make sure it runs properly. TO TEST RUN THE MACHINE: Place the air filter on the floor or a workbench. ATTACHING EYE BOLTS The CX408 comes with 4 eye bolts which allow hanging the air filter. Thread the four hex nuts one on each eye bolt. Thread the eye bolts into the four holes on the top of the air filter as much of the available thread as possible. See figure-3. Connect the cord to the power source. Push the switch to "No Remote Control" on the air filter unit. Pull the switch chain to turn the fan ON. The machine should run smoothly without rubbing noises and with little vibration. It is normal for the air filters to produce a small amount of vibration during operation. The vibration is more noticeable when running on hard surfaces like concrete or a workbench compared to the suspended position. Figure-3 Installing eye bolt Now, tighten the hex nut on each eyebolt and make sure no to over tighten. Pull the switch chain and turn OFF the fan. Now, set the main switch on the air filter unit to "Remote Control". Push the ON/HR button on the remote control to turn the machine ON and then push OFF to turn it OFF. WARNING! During the test run if there is any unusual noise coming from the machine or the machine vibrates excessively, stop the machine immediately and disconnect from the power source and investigate to find out the problem with your machine. INSTALLING AIR FILTER Locate the load bearing studs or joists and mark the centers. Drill 1/4" holes into the marks on the joists and thread the lag eye bolts into the holes at least 1-1/2". Attach the four hanging cables that come with the machine, one to each eye bolt on the air filter. Get the help of a person, lifting the air filter up and connect the hanging cables to the lag eye bolts. 8 ADJUSTING FAN SPEED SETTING FAN TIMER The ON/HR button on the remote control allows you to toggle between the fan speed and timer control function. After setting the fan speed, press the ON/HR button to change from fan speed to fan timer. The three lights on the remote control show the three fan speeds as shown in the table below. If some or all of the lights in the upper row illuminate, press ON/HR button once more. Press the increase button to increase the amount of time the fan runs before automatically shutting off. TO ADJUST THE FAN SPEED: Each time you press the increase button, the amount of time is increased by two hours up to a maximum of 8 hour cycle and the light for the selected time illuminates on the remote control. See figure-5. Press the ON/HR button to start the fan. If one or more of the lights turn on, press ON/HR button again. Figure-5 Setting fan timer Decrease the amount of time the fan runs, by pressing the decrease button. Figure-4 Setting fan speed Increase the fan speed by pressing the increase button on the remote control. See figure-4. Each you press this button, the fan speed increases and the light for the selected fan speed illuminates on the remote control. Decrease the fan speed by pressing the decrease button on the remote control. 9 CLEANING FILTERS For maximum performance, clean the filters regularly. Clean the filters after every 40 hours of use in light or moderate dusty environment and after 8 hours in very dusty environment. WARNING! Always wear respirator and safety glasses when cleaning the filters. Failure to do so could result in serious allergic reactions and respiratory problems. TO CLEAN THE FILTERS: Turn the machine OFF and disconnect the cord from the power source. Lift the primary filter and remove it. Inspect the filter and place it in the trash bag and shake it gently to remove the dust. Vacuum the air filter unit from inside to remove dust particles and re-install both filters. LED FILTER CHANGE INDICATOR The filters can be cleaned and used several times before replacement. To determine if the filters need replacement, the CX408 features an LED filter change indicator which changes colour from blue to orange after approximately 320 hours depending on the environment the air filter is used in. Once the indicator light turns orange in colour, it is the recommended time to change the filters. REMOTE CONTROL BATTERY REPLACEMENT The remote control uses one 9V battery. To replace it, remove the battery compartment cover as shown in figure-7 and remove the old battery. Install the new battery and replace the cover. Figure-6 Removing filters Now, remove the secondary filter, place it inside the bag and shake it to remove dust from inside the filter. Figure-7 Replacing remote control battery You can also wash the secondary filter with water to remove the remaining dust particles. Make sure to dry up the filter properly before using it inside the air filter. 10 CX408 PARTS DIAGRAM 11 CX408 PARTS DIAGRAM 12 WARRANTY CRAFTEX 3 YEARS LIMITED WARRANTY Craftex warrants every product to be free from defects in materials and agrees to correct such defects where applicable. This warranty covers three years for parts and 90 days for labour (unless specified otherwise), to the original purchaser from the date of purchase but does not apply to malfunctions arising directly or indirectly from misuse, abuse, improper installation or assembly, negligence, accidents, repairs or alterations or lack of maintenance. Proof of purchase is necessary. All warranty claims are subject to inspection of such products or part thereof and Craftex reserves the right to inspect any returned item before a refund or replacement may be issued. This warranty shall not apply to consumable products such as blades, bits, belts, cutters, chisels, punches etceteras. Craftex shall in no event be liable for injuries, accidental or otherwise, death to persons or damage to property or for incidental contingent, special or consequential damages arising from the use of our products. RETURNS, REPAIRS AND REPLACEMENTS To return, repair, or replace a Craftex product, you must visit the appropriate Busy Bee Tools showroom or call 1800-461-BUSY. Craftex is a brand of equipment that is exclusive to Busy Bee Tools. For replacement parts directly from Busy Bee Tools, for this machine, please call 1-800-461-BUSY (2879), and have your credit card and part number handy. All returned merchandise will be subject to a minimum charge of 15% for re-stocking and handling with the following qualifications. Returns must be pre-authorized by us in writing. We do not accept collect shipments. Items returned for warranty purposes must be insured and shipped pre-paid to the nearest warehouse Returns must be accompanied with a copy of your original invoice as proof of purchase. Returns must be in an un-used condition and shipped in their original packaging a letter explaining your reason for the return. Incurred shipping and handling charges are not refundable. Busy Bee will repair or replace the item at our discretion and subject to our inspection. Repaired or replaced items will be returned to you pre-paid by our choice of carriers. Busy Bee reserves the right to refuse reimbursement or repairs or replacement if a third party without our prior authorization has carried out repairs to the item. Repairs made by Busy Bee are warranted for 30 days on parts and labour. Any unforeseen repair charges will be reported to you for acceptance prior to making the repairs. The Busy Bee Parts & Service Departments are fully equipped to do repairs on all products purchased from us with the exception of some products that require the return to their authorized repair depots. A Busy Bee representative will provide you with the necessary information to have this done. For faster service it is advisable to contact the nearest Busy Bee location for parts availability prior to bringing your product in for repairs. 13