1
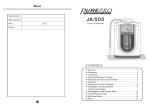
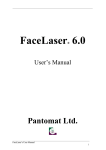
Easy Dine
Administrator
Module
- User Manual -
Easy Dine – Admin Module
TABLE OF CONTENTS
EASY DINE – ADMINISTRATOR MODULE ............................................................ 4
INTRODUCTION ...................................................................................................................................4
Administrator Login ..................................................................................................................... 4
Menu .................................................................................................................................................. 7
Filters ............................................................................................................................................. 15
Feedback ....................................................................................................................................... 22
Reports........................................................................................................................................... 26
Logout ............................................................................................................................................ 29
2
Easy Dine – Admin Module
COPYRIGHT © 2012
All rights reserved. No part of this publication may be reproduced, stored in a
retrieval system or transmitted, in any form or by any means electronic,
mechanical, photocopying, recording or otherwise, without prior written
permission of IDS Next Business Solutions Pvt. Ltd.
IDS believes that the information contained in the documentation is correct and
reserves the right to revise the same, make changes in it and the software without
having to notify any person about the changes.
Copyright © 2010 IDS Next Business Solutions Pvt. Ltd. All Rights Reserved.
Registration No. SW-2495/2005
Trademarks
All company, brand and product names are referenced for identification purposes
only and may be trademarks or registered trademarks that are the sole property of
their respective owners.
DISCLAIMER
IDS Next Business Solutions Pvt. Ltd., having its registered office at 490, R T Nagar
Main Road, R T Nagar, Bangalore – 560 032, Karnataka, India, reserves the right to
make changes to this software product manual described herein without notice.
IDS Next Business Solutions Pvt. Ltd. has made all reasonable efforts to ensure that
the information in this manual is accurate and complete. However, IDS Next
Business Solutions Pvt. Ltd. shall not be liable for any technical or editorial errors
or omissions made herein or for incidental, special or consequential damage of
whatsoever nature resulting from the furnishing of this manual or operation and
performance of the product in connection with this manual.
REVISION HISTORY
Version
Application As On
Approver Name
Version 1
3rd February 2015
DivyaSharad
3
Easy Dine – Admin Module
Easy Dine – Administrator Module
Introduction
The User Manual contains all essential information for the supervisor to make full
use of the Easy Dine Administrator Module. This manual provides a systematic
procedure on how to make changes in displaying the data in the existing app.
The display changes in the app are based either on its content (data) or in
beautifying its appearance. The client requirement is the basis for all these changes.
Administrator Login
Please note that the Supervisor does the Login operation.
Provide the specified path in the address bar to enter the Administrator Login
screen.
This displays the following screen.
4
Easy Dine – Admin Module
5
Easy Dine – Admin Module
Enter the login credentials (User Name and Password) and click the Login button
to view the Home screen.
The menu bar in the Home screen consists of four menu items. They are:
Menu
Filters
Feedback
Reports
6
Easy Dine – Admin Module
Menu
The Menu screen opens by default once you click the
button.
The Menu screen has two divisions – Fine Dining (App) and PMS.
The Fine Dining part consists of Outlets, Groups (based on the outlets), and Items
(based on the groups).
Hence, an Outlet is the parent of a Group, Group is the parent of an Item or vice
versa.
Click the
Click the
button beside the Outlet name to view the Group list.
button beside the Group name to view the Item list.
Note:
The Outlets, Groups, and Items are provided with color legends in order to
differentiate them.
7
Easy Dine – Admin Module
To add a Child group (node), click the
button found next to the Outlet.
A pop up screen appears as shown below.
8
Easy Dine – Admin Module
Enter the desired group name and click OK.
You can see the confirmation message that a new group is added to the group list.
Scroll down to view the added group.
Note:
Click the
button to add a Parent node for a group / item.
9
Easy Dine – Admin Module
You can add menu items from the PMS item list to the Fine dining (App) item list.
To do this, drag an item from the PMS item list and drop it to the Fine dining item
list as shown in the figure below.
A line indication represents the place to drop the selected item.
Note:
You are allowed to drag and drop an outlet from the PMS to the App.
10
Easy Dine – Admin Module
You can change the item order in a group by dragging and dropping an item from
one place to another in the same group.
The same is shown in the figure below.
Note:
While sorting the contents in the App, you should not drag the outlets from one
place to another as it is prohibited.
11
Easy Dine – Admin Module
To publish the newly added group, select the check box of the new group and click
the Save & Publish button.
A pop up window appears asking for confirmation to publish the selected group.
Click OK to publish the selected group.
12
Easy Dine – Admin Module
To unpublish a group, select the group check box and click the Unpublish button.
A pop up window appears asking for confirmation to unpublish the selected group.
Click OK to unpublish the selected group.
Note:
The unpublished group can be saved as a draft using Save Draft option. Here, the
group shall remain unpublished but it will be saved in the database.
13
Easy Dine – Admin Module
To delete a group, select the check box of a group and click the Delete button.
A pop up window appears asking for confirmation to delete the selected group.
Click OK to delete the selected group.
Note:
The delete option can also be used for Outlet, Group, and Item options.
14
Easy Dine – Admin Module
Filters
Click the Filters option in the menu bar to view the following screen.
15
Easy Dine – Admin Module
To create a filter, click the New Filter button.
A pop up window appears as shown below.
Enter the desired filter name.
Click the OK button.
You can see the confirmation message that a new filter is added in the Choose
Filter(s) screen.
16
Easy Dine – Admin Module
To save the new filter, select the check box and click the Save button as shown in the
figure below.
Note:
The filter will be saved as an unpublished filter.
17
Easy Dine – Admin Module
To publish the new filter, select the check box of the unpublished filter and click the
Save & Publish button to view the following screen.
18
Easy Dine – Admin Module
To unpublish the new filter, select the check box of the published filter and click the
Unpublish button.
A pop up window appears asking for confirmation to unpublish the selected filter.
Click OK to unpublish the selected filter.
19
Easy Dine – Admin Module
To delete a filter, select the check box of a filter and click the Delete button.
A pop up window appears asking for confirmation to delete the selected filter.
Click OK to delete the selected filter.
20
Easy Dine – Admin Module
You can drag and drop a single item or a complete menu group under one filter. The
same is shown in the figure below.
Note:
You can drag menu groups from different outlets under one filter.
If the menu group has a filter, then an icon (
21
) is displayed in the app screen.
Easy Dine – Admin Module
Feedback
Click the Feedback option in the menu bar to view the following screen.
Note:
You can add feedback questions either to individual outlets or to all the outlets.
22
Easy Dine – Admin Module
Select the required check box from the Select Outlet drop down. (Click the ALL
check box to select all the outlets or select any one outlet from the drop down list).
Click the Add New button to enter a new feedback question.
The same is shown in the figure below.
23
Easy Dine – Admin Module
Enter the new feedback question for the outlet(s).
Select the check box of the new question and click Save & Publish to update it.
24
Easy Dine – Admin Module
To delete the feedback question, select the check box of the question and click the
Delete button.
A pop up window appears asking for confirmation to delete the selected question.
Click OK to delete the same.
25
Easy Dine – Admin Module
Reports
The suggestions provided in the Feedback option can be found in the Reports page.
Click the Reports option in the menu bar to view the following screen.
Enter the Start date and the End date (Do not enter a future date in the End date
option).
Select the required outlet from the Select outlet drop down.
Click Apply to view the feedback report.
26
Easy Dine – Admin Module
To create a report based on group filter (Restaurant Code, Table Number, and so
on), drag a column header and drop it above the existing column header as shown in
the figure below.
27
Easy Dine – Admin Module
Click the
button next to the group name to view the pop up window as shown
below.
Enter the required details and click the Filter button to update the same.
28
Easy Dine – Admin Module
Logout
Click the
option on the home screen to exit from the Easy Dine
Admin module as shown below.
Note:
To Login again, click the Re-Login button and you will be directed to the
Administrator Login screen.
29