1
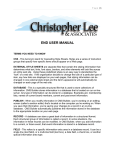
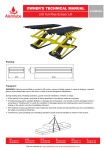
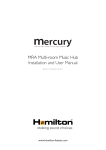
ALARM CLOCK RADIO FOR iPod AND iPhone
User manual
Model number:GSIPDS1001
Please read these instructions carefully and keep them for future reference
CONTENT
safety and warning...............................................................................................1-2
quick start............................................................................................................2-3
controls and indications...........................................................................................4
operating instructions............................................................................................5-7
trouble shooting......................................................................................................8
SAFETY AND WARNING
CAUTION: TO REDUCE THE RISK OF ELECTRIC SHOCK,
DO NOT REMOVE COVER (OR BACK).
NO USER-SERVICABLE PARTS INSIDE.
REFER SERVICING TO QUALIFIED PERSONNEL.
The lightning flash with arrowhead symbol, within an equilateral triangle, alerts
the user to the presence of un-insulated dangerous voltage within the system
enclosure that may be of sufficient magnitude to constitute a risk of electric shock.
The exclamation point with in an equilateral triangle alerts the user to the
presence of important operating and maintenance instructions in this owner's guide.
◆ Do not allow children to play with electrical devices when not under supervision.
Children may not be aware of the presence of potential risks!
◆ Install the cables in a safety way! Avoid tripping over them!
◆ Do not expose the device to direct sunlight or place it near sources of heat!
◆ Protect the cables and devices from dust, dirt and abrasive liquids!
SAFETY AND WARNING
◆ The equipment and cables must not be splashed by water. Do not place any recipients
containing (such as vases or beverages) onto or next to the devices!
◆ No fire sources (such as candles) should be placed onto or next to the device!
◆ The wall outlet must be within easy reach and next to the place of use. Only use the supplied
power adapter. Do not place heavy objects on the cable or power supply. Position the
cable so that it cannot obstruct or catch anyone. Always make sure there is sufficient
ventilation of the power adapter.
◆ Before stormy weather when there is the danger of lighting, disconnect the device from the
power supply.
◆ Never open the casing of the device, of the power adapter or other accessories: there are no
serviceable parts! If the casing is opened, your life is in danger due to electric shock. Do not
use the device if the casing is damaged. If this happens, it must first be examined by a
technical expert. If you notice any smoke, unusual noise or strange smells, switch off the
device immediately and pull the plug from the power supply. Contact customer service. It is
very dangerous to continue using this device under these conditions. Disconnect the power
supply immediately if liquid gets into the device and seek the help of customer service or a
technical expert.
1
Warning: Do not expose batteries to heat of fire. Do not short-circuit the batteries,
disassemble them or try to recharge them. They may explode and cause
serious injury. Store batteries out of children's reach. If batteries are swallowed,
there is the danger of choking or poisoning.
SAFETY AND WARNING
CONFORMITY, DISPOSAL
Conformity
This device has been tested for compliance with the basic and other relevant
requirements of the EMC Directive 2004/108/EC and the Low Voltage Directive 2006/95/EC.
This symbol on the product or in the instructions means that your electrical and electronic
equipment should be disposed at the end of its life separately from your household waste.
There are separate collection systems for recycling in the EU. For more information,
please contact the local authority or your retailer where you purchased the product.
iPod is a trademark of Apple Computer, Inc., registered in the U.S. and other countries.
QUICK START
Box Content
3.5mm Audio Cable
AL AR M CLOC K RA DI O FO R iPod A ND i Ph on e
Us er m an ua l
Mo de l nu mb er :G SI PD S 10 01
Pl ea se r ea d th es e in st ru ct io ns c ar ef ul ly a nd kee p th em f or f ut ur e re fe re nc e
GSIPDS1001
Alarm clock radio
for iPod and iPhone
AC Adapter
User Manual
3.5mm Audio Cable
Connections and Initial Set Up
3.Extend the FM Wire
2.Install the Backup Battery
1.Connect the Power Supply
Plug the AC adapter into GSIPDS1001 and a
wall socket.
Pull the batter y holder at the back of the unit,
and insert the cell batter y CR2032(not included)
Extend the FM wire as much as you can to increase
reception sensitivity.
Use this insert
for this iPhone/iPod
insert 15
insert 16
insert 17
iPhone 3G/3GS
iPod touch 2G
nano 4G
4.Prepare the Docking
12:35
Help
Weather
Tue, 02 Feb 2010
Guangzhou
Mostly Cloudy
High/Low Temperatre:
17/23 C
UV Index:
5
Wind:
23 C
From SSE at 17.7km/h
Humidity:
73%
17/23C
16/28C
15/17C
Tue
Wed
The
Time
Weather
15/18C
Fri
Radio
16/21C
Sat
Setting
PUSH OPEN the docking tray and pull it all the way out,dock the iPhone/iPod into the unit with
the correct insert.
2
Note:When inserting an iPhone/iPod
Touch into GSIPDS1001, make sure to
use the correct dock insert supplied
with your device or commercially
available from Apple Inc. If you do not
have an insert for your iPhone/iPod T
ouch, check thewebsite of Apple Inc.
and purchase one.
5.Install the App
To setup,dock your iPhone/iPod Touch to the
GSIPDS 1001, Application not installed dialogue
box appears. Select yes. The iTunes App store will
open automatically to the iDock Speaker
Application. Follow the on-screen instruction to
install the application. Once installed, you can
start to use the GSIPDS1001 with the App
FM
AUX
Tips:Please ensure you are WIFI connect when
downloading the App
6.Preset Time/Alarm/Weather/FM Radio in the App
Alarm
setting
Help
12:35
Help
Weather
Tue, 02 Feb 2010
Guangzhou
Mostly Cloudy
High/Low Temperatre:
17/23 C
UV Index:
5
Wind:
Time
23 C
Weather
Humidity:
73%
17/23C
16/28C
15/17C
15/18C
Tue
Wed
The
Fri
Time
Weather
Setting
From SSE at 17.7km/h
Radio
16/21C
Sat
Radio
Setting
Set up your personal settings in the App.For
details, please follow the SETUP instructions in
App by pressing HELP
Tips:Please ensure you connect to the network
all the times when using the App to get the latest
Time and Weather update.
Note:Please leave the App open in working with
GSIPDS1001. When App is turned off, the
Time/Weather sync to the GSIPDS1001 will be
stopped.
7.Sync App to the Unit
12:35
Help
Weather
12:35
Help
Tue, 02 Feb 2010
Weather
After the App setting completed, the current
Time/Weather/Alarm will be synced to the
GSIPDS1001.
Go to operate the unit now.
Tue, 02 Feb 2010
Guangzhou
Guangzhou
Mostly Cloudy
High/Low Temperatre:
17/23 C
UV Index:
5
Wind:
High/Low Temperatre:
17/23 C
UV Index:
5
Wind:
23 C
23 C
Humidity:
73%
17/23C
16/28C
15/17C
Tue
Wed
The
Time
16/28C
15/17C
15/18C
16/21C
Tue
Wed
The
Fri
Sat
Weather
From SSE at 17.7km/h
From SSE at 17.7km/h
Humidity:
73%
17/23C
Time
Mostly Cloudy
Radio
Setting
Weather
15/18C
Fri
Radio
16/21C
Sat
Setting
FM
AUX
3
CONTROLS AND INDICATIONS
SET+/PLAY/PAUSE
Set the clock Program
radio stations
ENTER,
Confirm time,alarm1,
alarm2 setting
Play the iPhone/iPod music
POWER
ALARM RESET
RADIO PRESET
Select a preset radio
station
MODE
MEMORY/DISPLAY
Memorize preset stations
during the FM radio mode.
Display preset date,alarm
1 and alarm 2 setting in
lower display
+
-
VOLUME+/Adjust volume
SET TIME
Set time setting
SET ALARM
Set the alarm timer Turn
ON/OFF the alarm tone
View alarm1 and 2
settings
SLEEP
Set sleep timer and
show status
12/24HR
Set clock setting
in 12/24hr
DC IN 5V
Connect AC
adapter
AUDIO IN
Audio source input
SNOOZE/DIMMER
Snooze alarm mode Dim display
PM Indicator
iPhone/FM/Aux
Input Indicator
Alarm Status
Indicator
FM
AUX
FM MH Z
Indicator
Alarm Setting/
Current Temperature*
/Date/Sleep Wake To
Status Indicator
Sleep Status indicator
FM Stereo
Mode Indicator
4
OPERATING INSTRUCTIONS
Setting the clock and date manually
1.Press 12/24hr at the rear of the unit to choose 12/24 hr setting.
2.When 12 hr setting is chosen, AM/PM appears in the display along with the time.
3.Press TIM, the“hour”starts to flash in the display.
4.Press SET +/- to adjust the“hour.
5.Press ENTER to confirm the“hour”setting,“minute”starts to flash.
6.Press repeatedly SET+/- and ENTER to set the minute.
7.Press and hold TIME, the“yyyy”starts to flash in the display. Press SET+/- to set the year and ENTER
to exist.
8.Set the“mm”,“dd”like Step 7 to set the month and day respectively. Press ENTER to exist.
Note: When iPhone is docked with App activated, the time and date settings in App will override the
original settings in the unit.
Setting the Clock and Date by APP
1.Initiate the iDockSpeaker App in the iPhone/iPod Touch
2.PRESS Locate Me to update the time/ date information automatically
3.Once set, dock the iPhone into the unit with the App on.
4.Current time, date is synchronized and displayed into the unit automatically.
Tips:Go to the setting page in the App to select 12/24 hour made,and turn on/off of the time flash colon.
Setting the Alarm manually
1 .Press and Hold ALARM, Alarm 1 “hour' flashes in the unit.
2 .Press SET +/- to adjust and “hour”.
3 .Press ENTER to confirm the “hour” setting, “minute” starts to flash.
4 .Press repeatedly SET + /- and ENTER to set the minute. Wake-to source “BUZ/ IP/FM”starts to flash
5 .Wake-to source: BUZ/IP/FM (Buzzer/iPod/FM) flashes in the unit by pressing SET+/- to adjust.
Press ENTER to confirm setting.
6 .When Alarm 1 is set, press ALARM again to set Alarm 2 .
Or press 2 times ALARM to enter the Alarm 2 setting.
7 .Repeat the step 2-5 to set the Alarm 2.
Note: When iPhone is docked with App activated, the Alarm Settings in App will be synchronized to the
unit at the same time.
Note: When the unit is on, the default wake- to source is Buzzer. Other wake-to sources are
activated only in standby mode.
Setting the Alarm by APP
1.Initiate the iDockSpeaker App in the iPhone.
2.Go to the alarm setting in the iDockSpeaker App to select alarm 1 and alarm 2 setting.
3.The iDockSpeaker App allow you to set the wake up song from iPhone playlist. If no wake up
song is selected in the alarm setting, the App will shuffle a song from the playlist.
4.Once set, dock the iPhone into the unit with the App on.
5.Alarm setting is set and displayed into the unit automatically.
Note: When App is activated and the unit is in standby mode, App wake up song is the only wake-to
source.
5
Listening to iPhone/iPod
1 .Before docking the iPhone/iPod on, please choose the correct cradle to match your model
of iPod/iPhone if the wrong cradle is chosen this might affect playback and charging.
2 .PUSH OPEN the docking tray and pull it all the way out, dock the iPhone/iPod into the
unit with the correct cradle.
3 .iPhone/iPod is docked, iPhone/iPod input source will be set as priority source.
iPhone appears in the display.
4 .If iPhone/iPod is in standby mode, press POWER to turn on the iPhone/iPod
5 .Choose the songs from the iPhone/iPod to play; or press PLAY/PAUSE to play the music.
6 .Adjust the volume by pressing VOLUME +/- on top of the unit.
7 .Press >> and < < in the front panel to skip track.
Using the Alarm
1.When alarm is sounding, press SNOOZE/DIMMER to turn off the sound. Alarm sounds
again after 10 minutes
2.When alarm is sounding, press ALARM RESET to reset the alarm for the next day.
3.Press ALARM to turn on/off the alarm setting. Alarm icon disappears when alarm is turned
off.
Listening to Radio
Tuning by the unit
1 .Press INPUT to select the FM input mode, “FM” appears in the display.
2 .Press and hold SET +/- to scan the FM stations.
3 .Press SET +/- to adjust the steps of the stations.
4 .Once station is selected, press and hold DISPLAY/ MEMORY until P01 appears
in the display.
5 .Press SET +/- again to select the preset number, then press DISPLAY/MEMORY
to store.
6 .To listen to the radio, press PRESET to select a preset station.
Note: To increase the reception sensitivity, please extend the FM wire fully.
Note: The FM frequency display is raised or lowered by a step of 0.1MHz. For example,
frequency between 88.00 to 88.05MHz will be displayed as"88.0MHz”.
Tuning by APP
1 .Dock the iPhone/iPod into the dock, and launch the iDockSpeaker APP on your iPhone/ iPod
Touch.
2 .Choose the FM ticker in the APP, FM input appears on GSIPDS 1001 display.
3 .Press AUTO to scan the FM stations automatically, auto scanned stations will be preset in
the 20 memor y stations.
4 .Or turn the Station Scroll to select your desired station. Press SAVE to store the FM station
in your desired memor y location.
5 .Press preset stations by M1-M20, and the unit will be tuned and display the relevant
station.
Tips: Other than auto scanning in App, you may also fine tune the FM steps manually
through the unit or App. Both the unit and App display will show the tuning status at the
same time.
6
Using the Audio-in jack
You can play the MP3 player or portable audio device through the GSIPDS1001 via the Audio-in
jack.
1.Connect the AUDIO IN jack at the back of the unit to the line out jack or headphone
jack of the external audio device using the audio cable( included)
2.Press INPUT to select “AUX” mode. Display will show “AUX”
3.Play the music from the external audio device.
4.Adjust the volume by pressing VOLUME +/Using the Sleep mode
Sleep mode lets you to sleep to your iPhone/iPod or radio, gradually lowering the volume until
the unit shuts off at the selected time.
1.Press and hold SLEEP to set the sleep timer. Press SET+/- to adjust the sleep time.
Press ENTER to confirm the setting
2.When Sleep time is set, “ZZZ” appears in the display.
3.Press SLEEP to view the preset sleep time in the lower display.
4.To stop listening at any time, press the POWER to turn unit off.
Viewing the DATE/Alarm 1/Alarm 2 setting
1.When iPhone/iPod touch is docked into the unit with APP open, weather information appears
in the lower display.
2.Press DISPLAY/MEMORY each to view the preset DATE, Alarm 1, Alarm 2 in sequence.
Press again to back to the weather display.
3.When APPS is not in use, preset DATE will appear in the lower display by default. Press
DISPLAY/MEMORY each to view Alarm 1 , and Alarm 2 in sequence. Press again to
back to the DATE display.
Using the DIMMER
During normal operation, press the SNOOZE/DIMMER to control the brightness of the
LCD display. Press once to dim the display, press a second time have no display
and the press again to bring up the full display.
7
TROUBLESHOOTING
In case of malfunction, please turn off the system immediately and check the unit according
to following table. If the problem still pesists, please contact the retailer or the manufacturer.
Symptom
Possible Causes
GSIPDS1001
Alarm clock radio
for iPod and iPhone
iPod does not
fit the dock
Solution
The AC adaptor may not
be connected properly
- Check the connection of the AC jack of the unit and
the wall socket
The play socket may not
function
- Try another working play socket
iPod didn't properly
dock because of
obstruction on the dock
- Remove the iPod, check and remove any obstructions
on the connector or on the dock.Place the iPod again
iPod is not installed
properly
- Make sure your iPod is correctly docked in the
GSIPDS1001 system
Volume level too low
- Press "Volume" button on the panel and check the
volume on the iPod/iPhone that is dock
- Make sure your iPod video or audio device is on, and
a track is selected for playback
iPod is not playing
No Sound
iPod software compatibility
problem
- Make sure your iPod is running with the most updated
Apple software. For details visit.
Http://www.apple.com/ipod/download
iPod is quickly undocked
or docked on the system
- Remove the iPod from the dock, wait for 5 seconds,
and return it to the dock.Unplug the power cable for
1 minute, then plug it back to reset the system
SPECIFICATIONS
Audio Power THD:
1Wx2
Speaker Units:
1.5”x2
Signial-noise ratio:
75dB
Frequency range:
76-108MHz
Rated Load Impedence:
40hm
AC Adaptor Input:
100-240V 50-60Hz 0.2A
AC Adaptor Output:
5V 1.2A
Product Dimension (HWD):
12x17x8(cm)
Net Weight:
515g
Notes:
1. The specification listed above are for reference only.
2. The technical specification of this device are subject to change without prior notice.
8
For Customer Services
please call
0161 235 5005
Monday-Friday
9am until 5pm
Revision 1
This symbol is known as the “Crossed-out wheelie bin Symbol”. When this symbol is marked on
a product/batteries, it means that the product/batteries should not be disposed of with your
general household waste. Only discard electrical/electronic/batter y items in separate collection
schemes, which cater for the recover y and recycling of materials contained within. Your cooperation is vital to make sure the success of these schemes and for the protection of the
environment. For your nearest disposal facility, visit www.recycle-more.co.uk or ask in store for
details.
We reserve the right due to possible changes to desibn to alter the instruction manual without
prior notice.