1
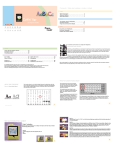
GYPSY
™
Quick Start Guide
GYPSY
™
Guide Rapide
GET STARTED:
Be sure to download the latest updates
and claim your Cricut rewards points!
Visit www.provocraft.com/gypsy
STYLUS PEN
ZOOM
(IN AND OUT)
MENU BUTTON
ON BUTTON
PAN
(IN ANY DIRECTION)
TOUCH SCREEN
GET STARTED
GYPSY OVERVIEW
1. If battery is charged, push
and hold power button
until blue light turns on.
ON BUTTON: Push and hold until
blue light turns on.
ZOOM: Push and hold this button
and tap anywhere on the mat to
zoom in. The window will center
the zoom to wherever you select.
To zoom out, push and hold the
Zoom button without touching
the screen.
2. If battery is not charged,
plug the small end of the
Charger Cable into the
top of the Gypsy. Plug the
power supply into a wall outlet.
Push and hold button until blue
light turns on.
AN: While zoomed in, push and
P
hold this button while dragging the
stylus across the screen
to move the main view in
any direction.
3. The End User License
Agreement will display if this
is the first time the machine
has been turned on. Read
document and click the I Agree
button to continue.
1
New: Click this button to
start creating a design.
Update your Cricut®:
Click this button to update
your Cricut®.
Open: Click this button
to open a previously
saved file.
Delete File: Click this
button to select a file
to delete.
Open as Template:
Click this button to open
a previously saved file as a
template, which will make
images in the saved file
un-editable while allowing
you to add new images to
the design.
Link Cartridge: Click
this button to link a
cartridge to your Gypsy.
This allows you to cut
the cartridge’s content
on a Cricut® without the
cartridge being present.
2
LINK CARTRIDGES
COMPUTER
CONNECTOR
CABLE
REGISTER AND
UPDATE YOUR GYPSY
4. Connect the Gypsy to your
computer using the Computer
Connector Cable.
1. Prior to syncing your Gypsy,
ensure that you have the latest
updates for your operating
system. If your computer requires
any updates, please install them.
5. Run the sync software. Follow
website instructions.
Remember to sync your Gypsy
regularly for firmware and
cartridge library updates.
2. Go to www.provocraft.com/
Gypsy and sign in using your
Cricut.com account. If you don’t
have an account, sign up for one.
LINK CARTRIDGES
1. Connect desired cartridge to
Gypsy using the Cartridge
Link Cable.
3. Download and install either the
PC or Mac Gypsy Sync Software.
3
Inches/mm
X/Y
Width/Height
Group
Delete
Relative/True Size
Cut
Undo
Ungroup
Adjust Size
Move Arrows
Keypad Button
these two fields to display all
values in inches or in millimeters.
2. Turn on the Gypsy.
3. Click the Cricut® App button
or the Menu button.
4. Click the Link Cartridge
button. When linking is
complete, a message will
display informing you that the
link was successful. Click Ok.
X/Y: Click on one of these two
fields to change where the image
or cursor is located on the mat.
INTERFACE
Aspect Ratio Link: Click this
button to toggle it on (yellow)
or off (white). When highlighted
Inches/mm: Click on one of
4
yellow, this feature ensures that
your image doesn’t get stretched
disproportionately.
the images or groups of images
you would like to join. Images will
turn blue as you add them to the
group. You can unselect images
by selecting them a second
time. If you select a group to
be added and then decide you
want to unselect it, you will need
to remove the images from that
group one image at a time.
Width/Height: Click on one of
these two fields to change the width
or height of the image(s) selected or
the height of the cursor.
Relative/True Size: Click this
button to toggle on Relative
Size mode (white) or True Size
mode (yellow). When highlighted
white, this feature allows you to
control the size of the images
selected in relation to the size of
the key height character. Every
cartridge contains a key height
character, and the size of every
other character in that cartridge
is based on the size of this key
character. This is done so that
when images are selected to
be cut they are the correct size
relative to one another. For
Delete: Click this button to delete
an image or group of images. You
will need to first select the image(s)
you want to delete and then click
the Delete button.
Group: Click this button to
toggle it on (yellow) or off (white).
When highlighted yellow, this
feature allows you to take images
or groups of images and join
them into a single group. Turn
this feature on and then select all
5
example, if you enter the images
C-a-t to be 1 inch tall, where “C”
is the key height character and
“a” should be half the height
of “C,” then the “a” will really
only be half an inch tall. You can
control the exact size of all images
selected without regard to the key
character by toggling the button to
True Size mode (yellow).
Cut: Click this button when you
are ready to cut. The display will
zoom out to show the entire mat
and the Cut Screen will appear.
While the Cut Screen is displayed
you will not be able to zoom,
pan, or edit your image(s).
Ungroup: Click this button to
separate all images in a group
into single images. To ungroup,
first select the group you would
like to change and then click the
Ungroup button.
Move Arrows: Click on any
one of these arrows to move a
highlighted image(s) on the screen
in small increments. If nothing is
highlighted, the cursor will move.
Undo: Click this button to undo
your last command. If you click
this button a second time, it
will redo what was just undone.
If you exit the Mat Screen, you
will lose your ability to undo
any commands.
Size Buttons: Click either of
these two circles to change the
size of any highlighted image(s)
on the screen in small increments.
If nothing is highlighted, the
cursor will change size.
6
will be placed in the Image
Queue on the Keypad Screen.
Navigation Arrows: Click
on these arrows to move
alphabetically through the entire
list of cartridges.
Mat Button: Click this button
to move the images in your
Image Queue to the Mat Screen.
Keypad Button: Click this
button to view the keypad. You
will not lose any of your design
when you leave the Mat Screen,
and you can return to the Mat
Screen at any time. If an image(s)
is highlighted when you click this
button, the highlighted image(s)
© 2009 Provo Craft and Novelty, Inc.
All rights reserved
Spanish Fork, UT 84660
Made in USA
www.provocraft.com • 09/09-7838
Search Button: Click this
button to search all images in the
Cricut® cartridge library by keyword.
FAQ
Where can I get a full
version of the user manual?
You can find the user manual at
www.provocraft.com/gypsy
What happens if my Gypsy
stops responding (freezes)?
Hold down the Zoom, Menu, and
Power buttons at the same time.
A set of colored bars will appear
on your screen. The Gypsy will
restart and display the initial set
up screen. Follow instructions to
recalibrate your Gypsy and reset
the date and time.
Customer Service:
1-866-716-2260
Monday–Friday
7:00 a.m.–6:00 p.m. (MST)
[email protected]