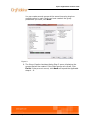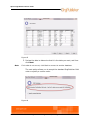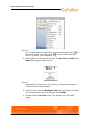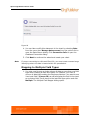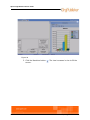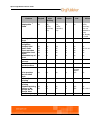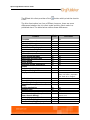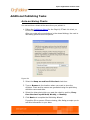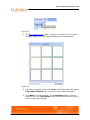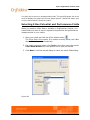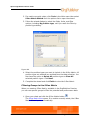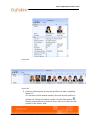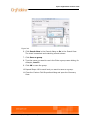
1
OrgPublisher 10
User Guide
Aquire OrgPublisher 10 User Guide
COPYRIGHTS
Copyright © 2001 - 2011 Aquire. All Rights Reserved. Information in this document is
subject to change without notice. The software described is furnished under a license
agreement or nondisclosure agreement and may be used or copied only in accordance with
the terms of those agreements. No part of this publication may be reproduced, stored in a
retrieval system, or transmitted in any form or any means electronic or mechanical for any
purpose other than the purchaser’s personal use without the written permission of Aquire.
Aquire
400 E. Las Colinas Blvd., Suite 500
Irving, Texas 75039
USA
1+ 214.574.5020
[email protected]
http://www.aquire.com
TRADEMARKS
All trademarks are properties of their respective owners.
OrgPublisher™, Unifi Platform™, OrgHistory™, OrgSuccession™, and OrgPlan™ are
trademarks of Aquire in the United States and other countries.
Microsoft®, Windows®, Windows XP, Windows VISTA™, WIndows 7, Windows 2003,
Windows 2008, Windows NT, and Internet Explorer, are either registered trademarks or
trademarks of Microsoft Corporation in the United States and other countries.
Oracle®, JD Edwards, PeopleSoft, and Siebel are registered trademarks of Oracle
Corporation and/or its affiliates.
HTML, DHTML, XML, XHTML are trademarks or registered trademarks of W3C®, World Wide
Web Consortium, Massachusetts Institute of Technology.
Revised 01/07/2011
Aquire OrgPublisher 10 User Guide
C
NEW
WITH
ONTENTS
THIS VERSION .................................................................... 1
FORMATTING ................................................................................... 3
Resizing Photos in the Chart ............................................................................ 3
Showing or Hiding the List Bar in the Search View .............................................. 4
GROUPS ........................................................................................ 6
Creating New Groups Using the Group Creation Assistant .................................... 6
Adding a Group Category .............................................................................. 12
Attaching or Removing Group Icons in Styles ................................................... 15
MENUS
AND
TOOLBARS .....................................................................17
Viewing a Chain of Command ........................................................................ 17
Enabling Send to PDF in a Published EChart ..................................................... 19
Using Toolbar Search with Quick Search Results ............................................... 22
PRINT
AND
PREVIEW ENHANCEMENTS .....................................................24
Print Enhancements Using Print Preview .......................................................... 24
Printing the Published EChart as PDF .............................................................. 27
SECURITY ENHANCEMENT ...................................................................30
Using Secure FTP ......................................................................................... 30
SEARCH ENHANCEMENTS ....................................................................31
Using the Smart Search Option ...................................................................... 31
Creating and Using a Semantic Dictionary for Intelligent Searches ...................... 34
Setting Search Properties for Custom Fields ..................................................... 37
Table of Contents
i
Aquire OrgPublisher 10 User Guide
VIEWS .........................................................................................43
Viewing the Matrix Reporting Hover Display ..................................................... 43
THE BASICS ...................................................................................45
Primary Roles in OrgPublisher ........................................................................ 45
Key Elements .............................................................................................. 46
OrgPublisher Directory Structure .................................................................... 47
File Types ................................................................................................... 48
Online Knowledge Base ................................................................................. 48
GETTING STARTED
WITH
ORGPUBLISHER .................................................50
To create a new chart or open an existing chart: .............................................. 50
WHAT YOU NEED
TO
KNOW .................................................................51
When creating a chart .................................................................................. 51
When building from data ....................................................................................... 52
RUNNING
CREATING
THE
NAME
CHART FROM
A
SPECIFYING
AND
NEW CHART WIZARD ......................................................53
A
AN
ODBC DATABASE ........................................55
CUSTOM FIELD ORDER ......................................................59
ASSIGN YOUR CUSTOM FIELDS ...............................................64
Custom Fields in OrgPlan ...................................................................................... 64
LINKING
TO YOUR
DATA SOURCE ..........................................................66
Identify a Broken Hierarchy ........................................................................... 66
Updating Your Chart ..................................................................................... 67
Refreshing Chart Data .......................................................................................... 68
CREATING
ii
A
BLANK ORG CHART ...........................................................69
Table of Contents
Aquire OrgPublisher 10 User Guide
Inserting the First Box and Person in a Chart ................................................... 69
Inserting Boxes In a Chart ............................................................................ 72
Box Style Button Descriptions and Purposes .................................................... 72
Boxes and Position Types .............................................................................. 74
Identifying and Using Pointers ....................................................................... 75
Opening an Existing Chart ............................................................................. 76
Entering a New License Key .......................................................................... 77
WHAT YOU CAN DO
BUILD
AND
WITH
ORGPUBLISHER ...............................................79
MODIFY CHARTS
FROM A
DATA SOURCE ....................................81
INPUT FILE LAYOUT ...........................................................................81
RECORD TYPES ...............................................................................90
EXTRACTING YOUR DATA ...................................................................94
Identifying Invalid Comma-separated File Format ............................................. 95
SELECTING
A
DATA SOURCE ................................................................95
Creating an Org Chart from ODBC .................................................................. 96
Creating an Org Chart from an XML File .......................................................... 97
Creating a Custom XSLT File .................................................................................. 98
Creating an Org Chart from a Text File ............................................................ 99
Extracting Data into a Text File ............................................................................ 100
Creating an Org Chart from Multiple Data Sources ...........................................100
Choosing Standard or Custom Field Order ......................................................102
Selecting a Database Table, View, or Query ....................................................102
Mapping to Multiple Field Types ....................................................................104
Table of Contents
iii
Aquire OrgPublisher 10 User Guide
Resolving Reporting Relationship Problems .....................................................107
Addressing Warnings and Error Messages .......................................................108
File Types ......................................................................................................... 110
Sorting Boxes .............................................................................................111
Using Auto Build .........................................................................................112
Auto Build Options ............................................................................................. 113
Selecting an Auto Build Option ............................................................................. 113
Managing Data Sources ...............................................................................113
Using the Select a Chart to Open dialog .........................................................115
MANUALLY EDIT CHARTS .................................................................. 117
ADDING BOXES UNDER
AN
ASSISTANT BOX ............................................ 117
CHANGING
A
CHART TITLE ................................................................ 117
CHANGING
A
JOB
CHANGING
A
NAME ......................................................................... 118
OR
BOX TITLE ......................................................... 118
CHANGING DIRECT REPORTS
TO INDIRECT
REPORTS .................................. 118
COPYING JOB TITLES ....................................................................... 119
DELETING CHART COMPONENTS .......................................................... 120
Delete a box from a chart: ...........................................................................120
Delete a Job title from a box: .......................................................................120
Delete a person from a box: .........................................................................120
Delete an Open position from a box: .............................................................120
DRILLING THROUGH CHART LEVELS ...................................................... 121
EDITING
iv
AN EMBEDDED ORG CHART
...................................................... 122
Table of Contents
Aquire OrgPublisher 10 User Guide
EDITING
THE
EMBEDDING
GOING
STYLE BAR LABEL .......................................................... 122
AN
TO THE
ORG CHART
TOP
OF THE
IN A
DOCUMENT .......................................... 122
DISPLAYED CHART ........................................ 123
INSERTING
A
CHART TITLE ................................................................ 123
INSERTING
A
PERSON/JOB BOX .......................................................... 124
Inserting Additional Person/Job Boxes ...........................................................124
Inserting Multiple Person/Job Boxes ..............................................................124
INSERTING
A
STAFF FUNCTION BOX ..................................................... 125
INSERTING ASSISTANT BOXES ............................................................ 125
Inserting and labeling an Assistant box ..........................................................125
Inserting multiple Assistant boxes .................................................................126
INSERTING JOBS ............................................................................ 126
Inserting and labeling a job ..........................................................................127
Inserting multiple jobs .................................................................................127
INSERTING LOGOS .......................................................................... 127
INSERTING NORMAL BOXES ............................................................... 128
Inserting a single box ..................................................................................128
Inserting multiple boxes ..............................................................................129
INSERTING OPEN POSITIONS .............................................................. 129
Inserting an Open position ...........................................................................129
Inserting multiple Open positions ..................................................................129
INSERTING PARTNER BOXES ............................................................... 130
Table of Contents
v
Aquire OrgPublisher 10 User Guide
Inserting and labeling a Partner ....................................................................130
Inserting multiple Partner boxes ...................................................................130
INSERTING PEOPLE ......................................................................... 130
Inserting and naming a person .....................................................................131
Inserting multiple people .............................................................................131
INSERTING PHOTOS ........................................................................ 131
Insert a photo ............................................................................................132
MOVING BOXES
OR
SPAN
OF
CONTROL .................................................. 132
MOVING INDIRECT REPORTS .............................................................. 133
MOVING JOBS ............................................................................... 134
MOVING PEOPLE ............................................................................ 134
SELECTING DRILLING OPTIONS ........................................................... 135
SETTING
THE
TOP
OF THE
CHART ........................................................ 135
UNDOING CHANGES ........................................................................ 135
Undo a Content Change ...............................................................................136
USING CLICK
CREATE
ADDING
AND
A
AND
DRAG SCROLLING .................................................... 136
USE CUSTOM FIELDS ...................................................... 137
CUSTOM FIELD ................................................................. 137
CHANGING
THE
CONTENTS
CHANGING
THE
CUSTOM FIELD LABEL ................................................... 140
OF A
DESIGNATING CUSTOM FIELDS
DISPLAYING
vi
A
CUSTOM FIELD ....................................... 140
AS
NOT SEARCHABLE ................................. 140
CUSTOM FIELD ............................................................. 141
Table of Contents
Aquire OrgPublisher 10 User Guide
DISPLAYING
DRAGGING
PROPERTIES
THE
AND
OF A
CUSTOM FIELD .................................... 142
DROPPING CUSTOM FIELDS ............................................ 143
Inserting a Custom Field to a single Position type ............................................143
Inserting a Custom Field to all Position types ..................................................144
HIDING
CUSTOM FIELD LABEL .......................................................... 144
A
INSERTING
A
CUSTOM FIELD
FOR A
SINGLE POSITION TYPE ......................... 144
INSERTING
A
CUSTOM FIELD
FOR ALL
POSITION TYPES ............................... 145
REVIEWING CUSTOM FIELD SECURITY SUMMARY ....................................... 146
CREATE
AND
APPLY HOTSPOTS ........................................................... 147
INSERTING HOTSPOTS ...................................................................... 147
ASSIGNING HOTSPOTS
ATTACHING
A
COPYING
LINK
USING
A
HOTSPOT
TO A
DEFINE
THE
TO
POSITION TYPES ............................................ 148
TO A
FIELD ...................................................... 148
PERSON
IN THE
DIALOG TO SET A
CHART .......................................... 149
HOTSPOT URL ................................. 150
ACCESSING SMART LINKS ................................................................. 150
Access Smart Links from the published chart ..................................................150
DEFINE
AND
ASSIGN POSITION TYPES .................................................. 152
CREATING
AND
ADDING
CUSTOM POSITION TYPE ...................................................... 155
A
ASSIGNING
CHANGING
A
A
Table of Contents
DEFINING POSITION TYPES ............................................. 152
POSITION ID TYPE ......................................................... 156
PERSON'S POSITION TYPE ................................................. 157
vii
Aquire OrgPublisher 10 User Guide
CHANGING
FROM AN
CHANGING
THE
CREATING
OPEN POSITION .................................................... 157
OPEN POSITION LABEL .................................................. 158
STAFF FUNCTION POSITION TYPE ......................................... 158
A
INCLUDING/EXCLUDING POSITION TYPES
IN
SUMMARY VIEW ........................ 159
Exclude Managers from their own Totals ........................................................159
Exclude/include Position Types in Totals .........................................................160
LISTING ALL
OR
CURRENT POSITIONS ................................................... 160
MAKING SEVERAL INSERTIONS
MODIFYING
A
FOR THE
SAME POSITION TYPE ...................... 161
POSITION TYPE ............................................................. 161
MOVING OPEN POSITIONS ................................................................. 162
RENAMING
A
POSITION TYPE .............................................................. 163
SELECTING
A
POSITION TYPE
SHOWING
OPEN
OR
AND
FOR INSERT
.............................................. 163
HIDING ALL OPTIONS ASSOCIATED
WITH A
POSITION TYPE ........ 163
USE VIEWS .................................................................... 165
9 BOX MATRIX VIEW ....................................................................... 165
CHART VIEW ................................................................................. 166
GROUPS VIEW ............................................................................... 166
LIST VIEW ................................................................................... 166
PROFILE VIEW ............................................................................... 167
SEARCH VIEW ............................................................................... 169
STYLE VIEW ................................................................................. 172
viii
Table of Contents
Aquire OrgPublisher 10 User Guide
SUMMARY VIEW ............................................................................. 172
TREE VIEW ................................................................................... 174
WIZARD VIEW ............................................................................... 174
USING
THE
HOVER PROFILE ............................................................... 175
Adding Subheadings to the Hover Profile ........................................................175
Editing Subheadings in the Hover Profile ............................................................... 176
Adding Subheadings to the Profile View .........................................................177
Editing Subheadings in the Profile View ................................................................. 178
Deleting Subheadings in the Profile View ............................................................... 178
Adjusting Column Widths in List View ............................................................179
Copying the List View ..................................................................................179
Copying the Summary View .........................................................................179
Displaying Profile Fields ...............................................................................180
Enable the Hover Profile ..............................................................................180
Expanding or Collapsing Levels in Tree View ...................................................181
Hiding or Showing Icons in Tree View ............................................................181
Locating Information in the Chart with Tree View ............................................181
Locating Information with the List View ..........................................................181
Locate information in the chart: ........................................................................... 181
Locate information in the List View: ...................................................................... 182
Maximizing Docked Views ............................................................................182
Maximizing a View ............................................................................................. 183
Opening Multiple Views ....................................................................................... 185
Resetting Maximized or Docked Views ................................................................... 186
Troubleshooting Maximized/Docked Views ............................................................. 187
Resizing Dialogs ................................................................................................. 187
Moving and Docking Views ...........................................................................188
Table of Contents
ix
Aquire OrgPublisher 10 User Guide
Docking a View .................................................................................................. 188
Sizing a View ..................................................................................................... 188
Removing a View ............................................................................................... 188
Pinning the Style View .................................................................................188
Reordering Field Sequence in Profile View ......................................................189
Resizing Rows and Columns in Summary View ................................................189
Resizing the Hover Profile ............................................................................190
Setting Default Profile View Fields .................................................................190
Showing or Hiding Fields in Profile View .........................................................191
Showing or Hiding Fields in the Hover Profile ..................................................191
Sorting the List View ...................................................................................191
Expanding or Collapsing Levels in Tree View ...................................................192
Hiding or Showing Icons in Tree View ............................................................192
Using the Symbol Indicators in Tree View .......................................................192
Viewing the Hover Profile .............................................................................193
Viewing the Tabbed Profile ...........................................................................193
Viewing the Tabbed Hover Profile ..................................................................195
Using the Tabbed Style Selector ....................................................................197
OPEN
AND
OPENING
A
RUN WIZARDS ................................................................ 198
WIZARD ........................................................................ 198
9 BOX MATRIX WIZARD ................................................................... 199
AUTOMATIC TASK SCHEDULING WIZARD ................................................ 200
CUSTOM FIELD WIZARD ................................................................... 200
Create or modify a Custom Field using the Custom Field Wizard: .......................201
HEAD COUNT WIZARD ..................................................................... 202
x
Table of Contents
Aquire OrgPublisher 10 User Guide
Show or hide head counts: ...........................................................................202
HOTSPOT WIZARD .......................................................................... 203
Create a Hotspot Link ..................................................................................203
Manually Edit a Hotspot Label:...................................................................... 203
Manually Edit a Hotspot File Information: .......................................................204
LOGO WIZARD .............................................................................. 204
Insert a Logo .............................................................................................204
NEW CHART WIZARD ....................................................................... 205
ORGHISTORY ARCHIVE WIZARD .......................................................... 206
PHOTO WIZARD ............................................................................. 206
Insert a Photo: ...........................................................................................207
POSITION TYPE WIZARD ................................................................... 208
PRINT WIZARD .............................................................................. 208
Print a Chart Using the Print Wizard ..............................................................209
Print the 9 Box Matrix ..................................................................................209
Print Graphs ...............................................................................................209
PUBLISHING WIZARD ....................................................................... 210
STYLE WIZARD .............................................................................. 211
SUMMARY WIZARD .......................................................................... 211
Add a Summary Field ..................................................................................213
Creating a Group Summary with the Summary Wizard .....................................213
Inserting a Head Count Roll-up .....................................................................214
Table of Contents
xi
Aquire OrgPublisher 10 User Guide
Inserting a Head Count Roll-up with the Custom Field Properties Dialog .............215
Resizing Wizard Icons ..................................................................................215
Showing or Hiding Planned Head Count ..........................................................216
Showing or Hiding the Head Count Label ........................................................216
APPLY STANDARD FORMATTING ........................................................... 216
Adding a Chart Background ..........................................................................216
Adding a Style ............................................................................................217
Adding Multi-relationship Icons .....................................................................218
Applying a Chart Design Template .................................................................219
Chart Design Templates versus Style Wizard ..................................................220
Choosing a Background Image and Style .......................................................221
Creating a Backup Style ...............................................................................221
Creating a Color Gradient and Style ...............................................................222
Using Additional Gradient Options .................................................................223
Customizing Drill Buttons .............................................................................224
Defining and Using Custom Colors .................................................................225
Deleting a Style ..........................................................................................225
Displaying Chart Styles ................................................................................226
Enabling or Disabling Styles Tabs ..................................................................226
Formatting a Custom Field ...........................................................................226
Format a numeric field: ...................................................................................... 227
Selecting a custom field date format: .................................................................... 227
Formatting Chart Boxes ...............................................................................228
Formatting Chart Text .................................................................................229
Formatting Fonts ........................................................................................231
xii
Table of Contents
Aquire OrgPublisher 10 User Guide
Formatting Numeric Custom Fields ................................................................231
Formatting a Custom Field .................................................................................. 232
Formatting Reporting Lines ..........................................................................233
Formatting the Chart ...................................................................................234
Formatting the Chart Legend ........................................................................237
Formatting the Chart Title ............................................................................238
Formatting the Search Dialog .......................................................................239
Group and Multi-reporting Relationships Icons ................................................240
Hiding Lowest Boxes ...................................................................................241
Inserting a Background Image ......................................................................241
Modifying an Existing Style ...........................................................................241
Opening a Chart for Formatting Only .............................................................242
Selecting Color Schemes for Charts ...............................................................242
Setting Chart Layout Options ........................................................................243
Setting the Default Template ........................................................................244
Showing or Hiding Chart Components ............................................................245
Showing or Hiding Chart Levels ....................................................................246
Showing or Hiding the Style Bar ....................................................................247
Showing the Entire Chart .............................................................................248
Showing a Portion of the Chart .....................................................................248
Using Dynamic Chart Layouts .......................................................................248
Using the Chart Legend Properties Dialog .......................................................250
Aligning the Chart Legend Dialog ......................................................................... 250
Using the Define Dialog ...............................................................................251
Define a new position type: ................................................................................. 252
Table of Contents
xiii
Aquire OrgPublisher 10 User Guide
Modify an existing position type: .......................................................................... 253
Using the Multi-level Peer Display .................................................................253
Manually move a box up or down a level: .............................................................. 253
Viewing Available Styles ..............................................................................254
ADD
AND
FORMAT
A
CHART LEGEND .................................................... 255
Adding a Custom Item to the Chart Legend ....................................................255
Modifying Icon Properties .................................................................................... 256
Formatting the Chart Legend ........................................................................256
Selecting the Contents of the Chart Legend ....................................................257
ADVANCED BOX LAYOUT EDITOR ........................................................ 259
Use the Advanced Box Layout Editor .............................................................260
Succession Candidates and Advanced Box Layout Editor .......................................... 260
Adding a Background Color to a Box Area ......................................................262
Adding Items to a Box Layout .......................................................................263
Arranging Sections in the Box Layout ............................................................263
Copying the Box Layout to Another Position Type ............................................264
Displaying Information Outside the Chart Box .................................................264
Resetting the Box Layout .............................................................................266
Reviewing List Items in the Box Layout ..........................................................266
Using Auto Build with Advance Box Layout Editor ............................................267
Using Advanced Box Layout with Organizational Model Planning ........................267
USE CONDITIONAL FORMATTING .......................................................... 268
Assigning Conditional Formatting to a Group ..................................................268
SEARCHING ALL FIELDS .................................................................... 272
xiv
Table of Contents
Aquire OrgPublisher 10 User Guide
Searching by Box Title .................................................................................276
Searching by Job Title .................................................................................278
Searching by Name .....................................................................................280
Using the Sounds Like Feature ......................................................................283
Using the Group Filter in Searches ................................................................284
Adding to a Search Result List ......................................................................284
Combining Searches ....................................................................................285
Conducting a Boolean Search .......................................................................286
Searching within the Group Results List .........................................................289
Spotlighting Search Results in the Chart View .................................................290
Viewing Search Results in Microsoft Excel .......................................................291
View Search View Results in Microsoft Excel ........................................................... 291
View Search Dialog Results in Microsoft Excel ........................................................ 291
Using the Groups tab in the Search dialog ......................................................292
Using the My groups tab in the Search View ...................................................293
Using Enhanced Toolbar Search and Find Features ..........................................294
DEFINING GROUPS ......................................................................... 297
SAVING
AND
CHARTING SEARCH RESULTS
AS A
GROUP .............................. 298
Saving a Group ..........................................................................................298
Adding a New Group ...................................................................................299
Adding a Group by Searching ............................................................................... 299
Adding a Group using right-click menu .................................................................. 300
Adding a Group Icon ...................................................................................300
Adding a Person to a Group ..........................................................................301
Copying a Group List ...................................................................................301
Table of Contents
xv
Aquire OrgPublisher 10 User Guide
Creating a Group Head Count .......................................................................302
Deleting a Group ........................................................................................302
Editing a Group Definition ............................................................................303
Exporting and Importing Groups ...................................................................304
Export groups: .................................................................................................. 304
Import groups: .................................................................................................. 305
Hiding Groups in Published Charts .................................................................305
Opening a Selected Group in the Chart View ...................................................306
Removing a Person from a Group ..................................................................306
Securing Styles to a Group ...........................................................................306
Sending Email to a Group ............................................................................307
Setting Field Security Based on Group Membership .........................................308
Spotlighting Groups in the Chart View ............................................................311
Using the Group Editor Dialog .......................................................................311
SELECTING SUMMARY TYPES .............................................................. 314
Selecting Summary Types in Custom Field Properties Dialog .............................315
Selecting Summary Types in the Summary Wizard ..........................................315
Adding a Summary Field ..............................................................................316
Adding Summary Fields Manually in an ODBC Chart .........................................316
Copying Workforce Analysis Graphs ...............................................................317
Displaying Summary Fields ..........................................................................317
Inserting a Summary Field ...........................................................................318
Showing Head Count for a Selected Portion of Your Chart .................................319
Showing Head Count for a Single Job Title ......................................................320
Showing Head Count for Each Box .................................................................320
xvi
Table of Contents
Aquire OrgPublisher 10 User Guide
Showing or Hiding Actual Head Count ............................................................320
PREVIEWING
A
BOOK STYLE CHART ...................................................... 322
Changing the Chart Layout in the Book Style Print Preview ...............................324
Choosing Book Style Print Settings ................................................................325
Creating a Book Style Top of Page List ...........................................................327
Modifying Book Style Print Settings ...............................................................328
Saving the Book Style Page Modifications .......................................................331
Selecting Pages to Print in Book Style Preview ................................................331
PREVIEWING
A
WALL STYLE CHART ...................................................... 332
Changing the Chart Layout in Wall Style Print Preview .....................................335
Copying the Print Preview Chart ....................................................................336
Moving Boxes in Print Preview ......................................................................337
Moving the Chart in Print Preview ..................................................................338
Opening Print Header/Footer Options in Print Preview ......................................338
Sending the Chart to Microsoft PowerPoint .....................................................339
Showing/Hiding Headers and Footers in Print Preview ......................................340
PRINT VIEWS
AND
CHARTS ............................................................... 342
Running Print Setup ....................................................................................342
Selecting Print Header/Footer Options ...........................................................342
Customizing the Header and Footer Print Options ............................................344
Printing Your Chart as a Book .......................................................................344
Printing in Wall Chart Style ..........................................................................348
Printing a View ...........................................................................................349
Printing the List View .......................................................................................... 350
Table of Contents
xvii
Aquire OrgPublisher 10 User Guide
Printing the Profile View ...................................................................................... 351
Printing the Summary View ................................................................................. 351
Printing a Chart Legend ...................................................................................... 352
Printing a Chart without the Print Wizard ........................................................353
STANDARD CHART PUBLISHING ........................................................... 354
Publishing in Express Mode ..........................................................................354
Choosing a Publishing Format .......................................................................357
PUBLISH YOUR CHARTS
WITH
ADVANCED FEATURES ................................. 360
Choosing Between Express and Advanced Mode Publishing ...............................361
Publishing in PluginX Format ........................................................................361
Publishing in EChart Rich Client Format ..........................................................365
PUBLISH ECHART THIN CLIENT ........................................................... 372
Publishing in EChart Thin Client Format ..........................................................374
Publishing in Graphic Format ........................................................................380
Publishing in HTML Format ...........................................................................382
Publishing in PDF Format .............................................................................385
Publishing a Directory Version of the Chart .....................................................388
Publishing a Portion of a Chart ......................................................................389
Publishing Real-Time Charts .........................................................................390
Redirecting a Published EChart .....................................................................397
REPUBLISHING CHARTS .................................................................... 397
Republishing EChart Rich/Thin Client Charts ...................................................398
CHANGING
A
PUBLISHING DEFINITION ................................................... 399
Deleting a Publishing Definition .....................................................................399
xviii
Table of Contents
Aquire OrgPublisher 10 User Guide
USING
THE
PUBLISH CHARTS DIALOG ................................................... 400
Publishing Definitions tab .............................................................................401
Schedules tab ............................................................................................401
Schedule Status tab ....................................................................................402
SECURING PUBLISHED CHARTS .......................................................... 403
Securing a PluginX Chart .............................................................................403
Securing an EChart .....................................................................................404
Setting EChart Security ....................................................................................... 405
Securing an EChart Custom Field ..................................................................406
Selecting Role-based Toolbars ......................................................................407
ADDITIONAL PUBLISHING TASKS ......................................................... 410
Auto-archiving Charts ..................................................................................410
Choosing EChart Thin Client Settings .............................................................411
Choosing PDF Font and Image Settings ..........................................................412
Choosing PDF Paper Settings ........................................................................413
Configuring EChart Multiple User Selections ....................................................414
Enabling and Disabling Functions in a Published Chart ......................................415
Enabling Action Buttons ...............................................................................416
Selecting Chart Action Button Options ................................................................... 416
Using Chart Action Buttons .................................................................................. 419
Enabling End User Personalization .................................................................420
Enabling PluginX Screen Capture in Secured Published Charts ...........................422
Enabling Publish Notification Email ................................................................423
Moving Boxes in the Published Chart .............................................................424
Table of Contents
xix
Aquire OrgPublisher 10 User Guide
Moving Published Charts ..............................................................................425
Opening a Password Protected PluginX Chart ..................................................425
Overwriting the Existing HTML and JS Files .....................................................425
Providing Access to End User Help Pages ........................................................426
Resetting the Number of Levels Published ......................................................426
Resetting the Starting Box ...........................................................................427
Selecting a User ID Instance ........................................................................427
Selecting Additional Publishing Features .........................................................428
Selecting Chart Action Button Options ...........................................................428
Selecting Color Schemes for Published Charts .................................................431
Selecting Publishing Options for the Tree View and List View .............................432
Setting a Base URL (Path) ............................................................................432
Using a Target Frame ..................................................................................434
Using the FTP Option ...................................................................................434
CREATE
OR
MODIFY
A
PUBLISHING SCHEDULE ........................................ 436
Creating a Publishing Schedule .....................................................................436
Scheduling
Scheduling
Scheduling
Scheduling
a
a
a
a
Daily Job ........................................................................................ 438
Monthly Job .................................................................................... 438
One Time Only Job .......................................................................... 439
Weekly Job ..................................................................................... 439
Scheduling an EChart ..................................................................................440
Updating or Deleting a Publishing Schedule ....................................................441
Deleting a Schedule in Microsoft Explorer .......................................................442
CREATING
USING
xx
A
THE
NEW ARCHIVE CHART ....................................................... 444
ORGHISTORY ARCHIVES DIALOG ........................................... 446
Table of Contents
Aquire OrgPublisher 10 User Guide
Scheduling a Chart for Archive ......................................................................446
Updating an Archive Definition ......................................................................447
Updating an Archive Schedule ......................................................................448
Deleting an Archive Chart ............................................................................448
Deleting an Archive Schedule .......................................................................448
Resetting Starting Box in OrgHistory Archive Charts ........................................449
COMPARING TWO CHARTS ................................................................. 449
USING
THE
ORGHISTORY ARCHIVE BROWSER .......................................... 450
ORGANIZATIONAL PLANNING
FOR
ADMINISTRATORS .................................. 453
Working with Organizational Planning Charts ..................................................453
Organizational Planning or Succession Planning ...............................................456
Preparing to Publish a Chart with the Org Modeling Feature ..............................458
Organizational Planning Chart Provisions ........................................................460
PUBLISHING
A
CHART
FOR
ORG MODEL PLANNING .................................... 461
MANAGING PLANNING CHARTS ........................................................... 463
Creating a New Planning Chart .....................................................................464
Opening a Planning Chart .............................................................................465
Deleting a Planning Chart .............................................................................465
Move a Planning Chart .................................................................................465
Storing Planning Charts ...............................................................................467
ADDITIONAL ORGANIZATIONAL MODEL PLANNING TASKS ............................ 469
Selecting Planning Chart Options ..................................................................469
Enabling a Visual Change Indicator in the Planning Chart .................................469
Table of Contents
xxi
Aquire OrgPublisher 10 User Guide
Assigning Group Access to Planning Charts .....................................................471
Using Advanced Box Layout with Organizational Model Planning ........................472
ORGPLAN
FOR
PLANNERS ................................................................. 474
How to Get Started with Organizational Planning Charts ...................................474
Changing a Planning Chart Job Title and Position Type .....................................478
Changing a Person's Position Type in Planning Charts ......................................478
Drag and Drop from 9 Box Matrix in Planning Charts .......................................479
Drag and Drop from Search View in Planning Charts ........................................479
Exporting Change Data ................................................................................480
Generating a Change Report ........................................................................481
Generating a Revision History .......................................................................482
Selecting a Planning Chart Style ...................................................................483
Sending the Planning Chart to Another User ...................................................483
Setting Change Report Default Options ..........................................................484
Updating an Open Position in Planning Charts .................................................485
SUCCESSION PLANNING
FOR
ADMINISTRATORS ........................................ 488
Working with Succession Planning .................................................................489
Succession Planning Chart Provisions .............................................................492
Preparing to Publish Chart with Succession Planning ........................................493
Enabling the Succession Planning Features .....................................................493
Creating a Succession Planning Chart in the New Chart Wizard .........................494
Mapping Succession Planning Fields ...............................................................495
Publishing a Chart for Succession Planning .....................................................496
ADDITIONAL SUCCESSION PLANNING TASKS ........................................... 498
xxii
Table of Contents
Aquire OrgPublisher 10 User Guide
Creating a New Succession Planning Chart .....................................................498
Enabling the Change Icon Display .................................................................499
Searching Succession Candidates ..................................................................499
Searching for successors in a box ......................................................................... 500
Searching for person succession counts ................................................................ 501
Spotlighting Succession Groups ....................................................................502
Using Succession Candidates in Groups ..........................................................503
Search Results for Succession Candidates ............................................................. 503
Using a Group Icon for Succession Groups ............................................................. 504
Using a Multi-Report Icon for Succession Groups .................................................... 504
SUCCESSION PLANNING
FOR
PLANNERS ................................................ 506
How to Get Started with Succession Planning ..................................................506
Adding a Succession Candidate to a Box ........................................................510
Adding a Second Successor Position ..............................................................510
Add a Successor with Drag and Drop .................................................................... 510
Add a Successor with Copy and Paste ................................................................... 510
Creating a Successor in a Succession Planning Chart .......................................511
Deleting a Successor ...................................................................................514
Drag and Drop from 9 Box Matrix in Planning Charts .......................................515
Drag and Drop from Search View in Planning Charts ........................................515
Modifying Successor Fields ...........................................................................515
Moving a Successor .....................................................................................516
Cut and Paste Successors .................................................................................... 516
Rearranging Successors in a Box ...................................................................517
Searching Succession Candidates ..................................................................518
Searching for successors in a box ......................................................................... 519
Searching for person succession counts ................................................................ 519
Table of Contents
xxiii
Aquire OrgPublisher 10 User Guide
Spotlighting Succession Groups ....................................................................521
Using Search View to Create a Successor .......................................................522
Using Succession Candidates in Groups ..........................................................522
Search Results for Succession Candidates ............................................................. 522
Using a Group Icon for Succession Groups ............................................................. 524
Using a Multi-Report Icon for Succession Groups .................................................... 524
9 BOX MATRIX WIZARD .................................................................. 525
Creating a 9 Box Matrix ...............................................................................525
Creating a 9 Box Matrix from Pinned Profiles in a Published Chart ............................. 535
Selecting 9 Box Potential and Performance Fields ............................................536
Defining 9 Box Potential Field Range Values ....................................................537
Defining 9 Box Performance Field Range Values ..............................................537
Sorting the 9 Box Matrix ..............................................................................538
Selecting 9 Box Filters .................................................................................539
Filtering Position Types in the 9 Box Matrix ............................................................ 540
Filtering Groups in the 9 Box Matrix ...................................................................... 541
Printing a 9 Box Matrix ................................................................................542
Modifying 9 Box Matrix Results .....................................................................543
CREATING
A
SIDE-BY-SIDE PROFILE VIEW ............................................. 545
Creating a 9 Box Matrix from Pinned Profiles .......................................................... 549
Creating a Group from Side-by-Side Profiles ...................................................549
Displaying a 9 Box Matrix in Side-by-Side Profile View .....................................550
Auto Pinning Group or Search Results as Side-by-Side Profiles ..........................551
FORMULAS ................................................................................... 552
Inserting Formulas ......................................................................................552
xxiv
Table of Contents
Aquire OrgPublisher 10 User Guide
USING LEVELS
AND
SPAN
OF
CONTROL ................................................. 556
Counts and Position Type Definitions .............................................................556
Adding Summary Fields for Levels and Span of Control ....................................559
Using Level or Hierarchy Options with Groups ........................................................ 562
Creating a Group for Each Level in the Chart ..................................................563
Displaying a Direct Report Count ...................................................................565
Displaying the Level Number in Each Box .......................................................567
Displaying the Number of Levels Below a Selected Box ....................................568
WORKFORCE ANALYSIS GRAPHS ......................................................... 570
Creating Workforce Analysis Graphs ..............................................................570
Resizing Workforce Analysis Graphs ..............................................................572
Resizing Graphs using the Graph Properties Dialog ................................................. 572
Resizing Graphs Using Alignment Buttons .............................................................. 573
Selecting Graph Categories ..........................................................................573
Using the Graphs Tab Toolbar .......................................................................574
Printing a Workforce Analysis Graph ..............................................................575
USING WEB ADMINISTRATION ............................................................ 578
Accessing OrgPublisher Web Administration ....................................................579
Importing a Chart .......................................................................................580
Opening an Existing Chart ............................................................................580
Creating a New Chart ..................................................................................581
Publishing a Chart Using Web Administration ..................................................581
ABOUT CONDITIONAL FORMATTING ...................................................... 584
Conditional Formatting Provisions .................................................................585
Table of Contents
xxv
Aquire OrgPublisher 10 User Guide
ABOUT INTERACTIVE CHARTS ............................................................. 585
ABOUT ORG CHART DOCUMENTS ......................................................... 586
BUILD
AND
VIEW MODES .................................................................. 587
CHART WINDOW ............................................................................ 588
END USER ACCESSIBILITY ................................................................. 590
INPUT FILE LAYOUT RULES ................................................................ 591
INSERTING CHART COMPONENTS ......................................................... 594
MENUS
AND
TOOLBARS .................................................................... 595
Format Toolbar ...........................................................................................596
Insert Toolbar ............................................................................................597
Main Toolbar ..............................................................................................598
Navigation Toolbar ......................................................................................600
Status Bar .................................................................................................601
Style Bar ...................................................................................................602
Text Toolbar ...............................................................................................602
Title Bar ....................................................................................................603
Views Toolbar .............................................................................................603
Scroll Bars .................................................................................................604
Menu Bar ...................................................................................................605
File menu .......................................................................................................... 605
Edit menu ......................................................................................................... 606
View menu ........................................................................................................ 606
Insert menu ...................................................................................................... 607
Format menu .................................................................................................... 608
Tools menu ....................................................................................................... 609
Data menu ........................................................................................................ 610
Options menu .................................................................................................... 610
Help menu ........................................................................................................ 611
xxvi
Table of Contents
Aquire OrgPublisher 10 User Guide
PUBLISH ECHARTS ......................................................................... 612
PUBLISHING DEFINITIONS ................................................................. 613
Entering Connection String for a Unifi Style Chart ............................................614
UNDERSTAND SUMMARY FIELD VALUES .................................................. 615
USE
A
VIRTUAL DIRECTORY ............................................................... 616
USE CONDITIONAL FORMATTING
WORK
WITH
SIGNED
AND
SYSTEM REQUIREMENTS
WITH
OTHER FEATURES ............................. 617
READ-ONLY ARCHIVE CHARTS ............................ 618
AND
CHART PARAMETERS .................................... 619
Chart Parameters ........................................................................................619
Browser Requirements .................................................................................620
Minimum System Requirements ....................................................................620
EChart Thin Chart Publishing Requirements ....................................................620
Chart viewing for typical end user requirements: .................................................... 621
EChart Rich Client Publishing Requirements ....................................................621
If publishing real-time: ....................................................................................... 621
Real-time Chart Publishing Requirements .......................................................621
Web Administration Requirements .................................................................622
Planning Chart User Requirements ................................................................622
TROUBLESHOOTING AUTOMATIC PUBLISHING ........................................... 624
Tips for Automatic Publishing ............................................................................... 625
Troubleshooting Automatic Publishing procedure .............................................625
Troubleshooting Tips for Published ECharts .....................................................626
Sending Feedback to Aquire .........................................................................628
Table of Contents
xxvii
Aquire OrgPublisher 10 User Guide
xxviii
Table of Contents
Aquire OrgPublisher 10 User Guide
C
HAPTER
1
WHAT’S NEW
New with This Version
New Features
OrgPublisher
Premier
OrgPublisher 10
Published Chart
Formatting
Resizing Photos in the Chart
Showing or Hiding the List Bar in
the Search View
X
X
X
X
Creating New Groups Using the
Group Creation Assistant
Adding a Group Category
Attaching or Removing Group
Icons in Styles
Menus and Toolbars
New buttons in Menus and
Toolbars
Viewing a Chain of Command
X
X
X
X
X
X
X
X
X
X
X
Not in planning
charts
Enabling Send to PDF in a
Published EChart
Using Toolbar Search with Quick
Search Results
Print Preview enhancements
Print Enhancements Using Print
Preview
Printing the Published EChart as
PDF
Security enhancements
Using Secure FTP
Search enhancements
Using the Smart Search Option
Creating and Using a Semantic
Dictionary for Intelligent
Searches
Setting Search Properties for
Custom Fields
X
X
X
X
X
X
Groups
What’s New/New with This Version
Modeling and
Succession only
X
X
ECharts only
X
X
X
X
X
X
X
X
X
1
Aquire OrgPublisher 10 User Guide
New Features
Views
Viewing the Matrix Reporting
Hover Display
Wizard enhancements
Head Count Wizard- count on
direct reports, hierarchy, or level
Logo Wizard - shrink preview to
fit, show logo option
Photo Wizard - resize photo,
shrink preview to fit
Position Type Wizard - ability to
retain base position box type
Publishing Wizard - enabling Send
to PDF in EChart
Summary Wizard - sum on
hierarchy or level
2
OrgPublisher
Premier
OrgPublisher 10
X
X
X
X
X
X
X
X
X
X
X
X
X
X
Published Chart
What’s New/New with This Version
Aquire OrgPublisher 10 User Guide
Formatting
Resizing Photos in the Chart
Using the Photo Wizard, you can resize the photos in your chart at any
time.
1. Double-click on a photo in your chart.
The Photo Wizard opens to display the file name and path. Click
Next.
2. Type the new size or use the up and down arrows to adjust the
Width or Height. As you adjust one dimension, the other
automatically changes to maintain the aspect ratio.
Figure 1
3. If you are not satisfied with the new size, click Reset to actual size
and begin again.
4. If you are using very large photos, you can select the Shrink
preview to fit check box. This will not change the actual size of the
large photos in the chart.
5. Click Finish.
What’s New/Formatting
3
Aquire OrgPublisher 10 User Guide
Figure 2
A message displays asking if you want to make the size of the selected
photos the default size for all photos in the chart. Click Yes for best
results.
All the photos in the chart are redisplayed in the new size.
Showing or Hiding the List Bar in the Search
View
The List View and Search View share the same pane in the OrgPublisher
window. The default setting is now to hide the List View option.
Figure 3
You can show the List View bar again by following the steps below.
1. Select Options from the Menu Bar.
2. Highlight List View options from the pull-down menu.
4
What’s New/Formatting
Aquire OrgPublisher 10 User Guide
3. Select Show List View bar in Search View.
The List View opens, and the Search View bar displays at the bottom
of the pane.
Figure 4
What’s New/Formatting
5
Aquire OrgPublisher 10 User Guide
Groups
Creating New Groups Using the Group Creation
Assistant
The Group Creation Assistant provides a series of dialogs which ask the
questions needed to create multiple groups at the same time, although
you can use the assistant to create a single group.
1. Click Search
opens.
in the Navigation bar. The Search dialog
2. Select the Groups tab.
3. In the Groups tab, click the Group Creation Assistant button
.
4. Click the drop-down arrow in the Select the field that contains
the values you want field, and select the field you want to search
on.
Figure 5
6
What’s New/Groups
Aquire OrgPublisher 10 User Guide
5. Type a prefix or name for the group in the Enter a prefix for the
names of the groups field. Click Next.
The Group Creation Assistant Step 2 dialog opens.
The left pane contains the values available for grouping the data in
the field you selected. These values are sorted first by "hit" count
(the highest number of records to match the criteria), then
alphabetically.
Figure 6
6. Drag and drop the correct value to the right pane.
Note:
You can create more than one group by selecting multiple fields.
7. If you want to use multiple values from which to create the group,
drag another value from the left pane and drop it on the first value.
What’s New/Groups
7
Aquire OrgPublisher 10 User Guide
Figure 7
8. If you want to create multiple groups, drag a value from the left pane
and drop it in the white space of the right pane.
Figure 8
8
What’s New/Groups
Aquire OrgPublisher 10 User Guide
You can create several groups at the same time using single or
multiple values in each. when you have created the group
parameters you want, click Next.
Figure 9
9. The Group Creation Assistant dialog Step 3 opens, displaying the
groups that will be created. If the listed groups are correct, click
Finish. if they are not correct, click Back and repeat the applicable
steps 4 - 9.
What’s New/Groups
9
Aquire OrgPublisher 10 User Guide
Figure 10
The Groups tab of the Search dialog displays the groups that were
created using the Groups Creation Assistant.
10.Click Close to return to the Chart View.
Figure 11
10
What’s New/Groups
Aquire OrgPublisher 10 User Guide
11.On the Style Bar, click the Groups View button to display the Filter
View, formerly titled the Groups View.
Figure 12
12.Click on group to display it in the Chart View. the following example
shows the Human Resource Specialist in the Spotlight mode.
What’s New/Groups
11
Aquire OrgPublisher 10 User Guide
Figure 13
Adding a Group Category
You can now add group categories to your chart in order to classify groups
with a common theme, such as, for a global company, groups by country
or HR items like retirements or ethnicity.
1. Open the Groups tab of the Search dialog by click the Groups button
in the toolbar, or by clicking the Advanced Search button
and selecting the Groups tab.
2. Double-click on a group name for which you want to create a
category. The Group Editor dialog opens.
3. In the optional Category field, type the name of the category you
want to add. The category name appears in the Search Field of the
record displaying the selected group criteria.
12
What’s New/Groups
Aquire OrgPublisher 10 User Guide
Note:
The category name is not a searchable field. The Value, or group name, is
the searchable field.
Figure 14
4. Click Save. The Groups tab redisplays with the new category name,
and the group name indented below it.
When selected, the Category name is highlighted in green.
Figure 15
What’s New/Groups
13
Aquire OrgPublisher 10 User Guide
When selected, the Group name is highlighted in blue.
Figure 16
5. Repeat steps 2 - 4 to add additional categories.
If you want to use an existing category, click the drop-down arrow in
the Category field and select the name you want to use.
Figure 17
The Groups View displays the groups indented below the associated
category name. The Groups View list first displays the category
names in alphabetical order, then the associated group with the
category name in alphabetical order, then the groups without
categories in alphabetical order.
14
What’s New/Groups
Aquire OrgPublisher 10 User Guide
Figure 18
Attaching or Removing Group Icons in Styles
You can choose not to display a group icon in selected styles in your chart
by using the Attach Groups to Styles dialog.
1. Select Options in the OrgPublisher Main menu, then Group display
options.
Figure 19
What’s New/Groups
15
Aquire OrgPublisher 10 User Guide
2. Click Manage Group Attachment.
The Attach Groups to Styles dialog opens.
Figure 20
The default is to attach all group icons to all styles in the chart.
3. Find the style you want to modify, then clear the check box for each
named group you do not want to visually display in the chart.
4. When you have finished modifying the styles to not display a group
icon, click OK.
When you return to the chart and select a modified style, icons do
not display in chart boxes for the groups you modified.
16
What’s New/Groups
Aquire OrgPublisher 10 User Guide
Menus and Toolbars
Viewing a Chain of Command
The Chain of Command mode is available in the View Mode in the
OrgPublisher application and the published chart using PluginX or EChart,
including the published planning-enabled chart. It is not available in the
modeling or succession planning published charts, as these charts are
about reassigning responsibilities and positions.
If you are working in the application, verify that you are in the View
Mode
published chart.
of the application if you are not working with a
1. Select the chart box containing the person whose chain of command
you want to see.
Figure 21
2. The Display Chain of Command button
is enabled in the Main
toolbar. Click it to view the person's chain of command, the reporting
hierarchy upward from this person in the chart.
Note:
This view is affected by the number of levels shown. If the chain of command
spans 3 levels, but the chart is set to display only two, just the first two levels
in the chain of command are shown.
What’s New/Menus and Toolbars
17
Aquire OrgPublisher 10 User Guide
Figure 22
3. Click the button
again to redisplay the whole chart.
If the List View is open, the list changes to reflect the people in the
boxes now displayed.
Figure 23
If the Profile View is open, it displays the person at top of the chart.
18
What’s New/Menus and Toolbars
Aquire OrgPublisher 10 User Guide
Enabling Send to PDF in a Published EChart
You can now enable end users to send an EChart rich client chart to PDF
by allowing that toolbar button during the publishing process.
1. Follow the Publishing in EChart Rich Client Format procedure.
2. When you reach the dialog to enable or disable toolbars and buttons,
retain the default with the Send To PDF check box selected.
Figure 24
Clear the check box if you do not want to allow this feature.
3. Click Next and complete the publishing process.
When the published EChart is opened, the Send to PDF button
displays in the toolbar.
Figure 25
What’s New/Menus and Toolbars
19
Aquire OrgPublisher 10 User Guide
4. Click the button
to create a PDF of the chart.
A dialog opens that allows you to select the Number of OrgChart
levels to print.
Figure 26
In addition, you can choose whether or not to Include index, a
version of the List View.
5. Click OK when you have made your selections. A File Download
dialog opens. You can Open the PDF immediately or Save the
document to a folder of your choice.
Figure 27
When you open the PDF, the index is at the beginning of the
document, if you elected to include an index.
20
What’s New/Menus and Toolbars
Aquire OrgPublisher 10 User Guide
Figure 28
The printed chart follows, displays as many levels as you selected.
What’s New/Menus and Toolbars
21
Aquire OrgPublisher 10 User Guide
Figure 29
Using Toolbar Search with Quick Search Results
The simple toolbar search feature in the OrgPublisher application and
published chart has been modified.
1. Type a single or multiple words or initials in the Look For toolbar
field.
Figure 30
2. Click the Go button
to begin the search navigate around the
chart; this feature searches on a box-to-box basis for the next
instance of a matching record.
A list of matching results displays in the Quick Search Results dialog
below the toolbar, the characters entered for the search are in bold
font.
22
What’s New/Menus and Toolbars
Aquire OrgPublisher 10 User Guide
Figure 31
3. You can select a record right away, or click the Details button
to
display more information for the shown results. Click the List button
to return the display to just the found records.
4. To reuse previous searches, click on the down-arrow and select the
search item you want. To clear the search list, right-click on the
button and select Clear List.
What’s New/Menus and Toolbars
23
Aquire OrgPublisher 10 User Guide
Print and Preview Enhancements
Print Enhancements Using Print Preview
The OrgPublisher Print Preview features have been enhanced to provide
more chart printing options. You can see detail of all the enhancements in
the Previewing a Book Style Chart and Previewing a Wall Style Chart
topics.
When working with a published Thin Client chart, OrgPublisher also
provides a popup option to select the number of levels to print.
Book Style preview
• Both the Wall style and Book style previews now contain a Print Setup
button
for easier access to your print client.
• The Book Style preview now provides the ability to print all levels of
the chart using the Levels button
.
• The Book Style Print Settings dialog includes the Header/Footer button
to open the Print Header/Footer Options dialog in
order to configure the header and footer display.
Wall Style preview
The Wall Style Preview has been configured to provide the preview and
print controls at the top of the window. The controls also provide a section
with thumbnails that give you an idea of what your chart will look like
when you select a specific layout.
Figure 32
24
What’s New/Print and Preview Enhancements
Aquire OrgPublisher 10 User Guide
The thumbnails display a tooltip showing the percent zoom necessary for
the chart to fit a the page. The first thumbnail shows the current default
setting for the preview. The thumbnails are sorted by the largest percent
(least shrinkage) first. However, if a thumbnail is within 5% of the
thumbnail preceding it, then OrgPublisher checks to see which thumbnail
is squarer; that one will be the first in the list.
Click the thumbnail you want to use, and it layout is displayed in the
preview pane.
Figure 33
The default chart layout in Wall Style preview is based on the number of
levels displayed in the Chart View.
What’s New/Print and Preview Enhancements
25
Aquire OrgPublisher 10 User Guide
• If 2 levels are displayed:
– If there are 8 or fewer direct reports, chart layout 1 is used.
– If there are more than 8 reports, chart layout 4 is used.
• If 3 or more levels are displayed, chart layout 2 is used.
If you accept the default Wall Style preview settings, then no check is
performed on the size of the chart when the preview is opened.
If you select one of the suggested Wall Style thumbnails, then
OrgPublisher checks to see if the chart must be shrunk by 50% to fit on a
single page when the preview. If so, then the zoom is set to 80%. In all
other cases, zoom-to-fit is the default.
In addition, the Wall Style preview includes new buttons:
- opens you system Print Setup dialog to select printer,
paper size, orientation, and source.
- removes all modifications made to the preview layout and
returns to the OrgPublisher default layout.
- presents options, depending on the layout
selected, to optimize the chart layout on the page.
• Compact boxes - reduces the box size, field size, and drill arrow
lines; shrinks box shadow.
• Use narrow font - changes font to Arial Narrow 8pt.
• Put employees in box with manager - Turns on Auto Build;
available only when at least 1 leaf node box is visible.
• Hide secondary fields - Turns on Compact Build mode.
• Customize - Enabled if Hide secondary fields is selected; opens the
Select fields to print dialog, displaying box fields to show or hide; the
default is to print only box title and name.
Note:
26
If the Advanced Box Layout Editor was used in the chart, Hide secondary
fields and Customize are not available.
What’s New/Print and Preview Enhancements
Aquire OrgPublisher 10 User Guide
Figure 34
- Opens the Wall Style Preview Format toolbar in
order to set top of chart, choose layout, move boxes, and more.
Printing the Published EChart as PDF
When the published EChart is opened and the Send to PDF button
displays in the toolbar, you can print the chart as PDF.
1. Open the published chart. Verify that the Send to PDF button is
enabled, as highlighted in the sample below.
Figure 35
2. Click the button
to create a PDF of the chart.
A dialog opens that allows you to select the Number of OrgChart
levels to print.
What’s New/Print and Preview Enhancements
27
Aquire OrgPublisher 10 User Guide
Figure 36
In addition, you can choose whether or not to Include index, a
version of the List View.
3. Click OK when you have made your selections. A File Download
dialog opens. You can Open the PDF immediately or Save the
document to a folder of your choice.
Figure 37
When you open the PDF, the index is at the beginning of the
document, if you elected to include an index.
28
What’s New/Print and Preview Enhancements
Aquire OrgPublisher 10 User Guide
Figure 38
The printed chart follows, displays as many levels as you selected.
Figure 39
What’s New/Print and Preview Enhancements
29
Aquire OrgPublisher 10 User Guide
Security Enhancement
Using Secure FTP
If you are publishing using File Transfer Protocol (FTP), you must have
authority to write to the target server directory.
Note:
To use FTPS you must access a server that accepts FTP connections using
SSL.
The FTP server authority must be set to recursive to allow you to put the
file in a directory you create. Otherwise, it will place your files in the
server’s root directory. Sometimes the user ID must also contain the
domain name, for example mydomainname/myuserid. Verify this process
with your IT administrator.
1. Follow the Publishing Wizard to publish a chart in Advanced Mode.
2. Choose the publishing type you want to use and select the Send to
web server (FTP) check box when you get to that dialog.
3. In the FTP Server dialog of the wizard, complete the fields required
by your IT department.
• Enter the user name - Type your system user name.
• Enter the password - Type your password, if any to transfer files to
your web server.
• Confirm password - Retype the password.
• Address (FTP URL or server name) - You must type the correct IP
address or server name before you can click Browse Site.
4. Once you enter the server name, the dialog displays a directory tree.
Navigate to the directory you want and click on it. The Parent Dir
button enables you to move up to the parent directory, if necessary.
The complete URL address displays in the Path field.
5. Select the Establish the network Connection using SSL check
box if you want to use FTPS.
6. Continue following the Publishing Wizard.
30
What’s New/Security Enhancement
Aquire OrgPublisher 10 User Guide
Search Enhancements
Using the Smart Search Option
The toolbar Quick Search Results dialog in the OrgPublisher application
can be used in a Smart Search option when you pin the search results
into the Search View.
1. Type a single or multiple words or initials in the Look For toolbar
field
.
2. Click the Go button
to begin the search navigate around the
chart; this feature searches on a box-to-box basis for the next
instance of a matching record.
A list of matching results displays in the Quick Search Results dialog
below the toolbar, the characters entered for the search are in bold
font.
Figure 40
3. Click the Pin button
in the dialog. The Search View opens,
displaying the Quick Search Results list.
What’s New/Search Enhancements
31
Aquire OrgPublisher 10 User Guide
Figure 41
Once you pin the Quick Search Results into the Search View,
OrgPublisher identifies this as the Smart Search mode by the
"pushed in" appearance of the chevron button. Hover the cursor over
the button to see a tooltip indicating how to switch to the Advanced
Search mode.
Figure 42
4. You can select a record right away, or click the Details button
to
display more information for the shown results. Click the List button
to return the display to just the found records.
If you select the Detail button, the Smart Search View displays
additional columns of data.
32
What’s New/Search Enhancements
Aquire OrgPublisher 10 User Guide
Figure 43
5. You can search further by typing additional letters to the original
search and click Go
.
6. Once you have selected the records you want, you can also select
the Groups tab to save
results to Microsoft Excel,
the search results as a group, send the
send the results to the clipboard to
copy and paste into another application,
Profile View, and more.
place the results in the
7. When you have completed your Smart Search tasks, click the Search
Mode
button to return the Search View to its original display, or
Advanced Search, as identified by the label when you hover over
the button.
What’s New/Search Enhancements
33
Aquire OrgPublisher 10 User Guide
Figure 44
You can click the button again to return to the Smart Search mode.
Figure 45
Creating and Using a Semantic Dictionary for
Intelligent Searches
You can add values associated with specific fields in order to expedite
searching on box and job titles. The Semantic Dictionary Editor enables
you to create associations between the titles and any value you enter for
it.
1. Select Options from the Main menu, Search options, then
Semantic Dictionary.
Figure 46
34
What’s New/Search Enhancements
Aquire OrgPublisher 10 User Guide
The Semantic Dictionary Editor dialog opens.
Figure 47
2. Select the title you want to add values to. Two buttons appear to the
right, a plus
, to add a value, and a minus
, to delete a value.
3. Click the Plus button to add a value. The Map node appears with a
Value record. The Plus
right of Value.
and Minus
buttons now appear to the
4. Select Value and type the word, phrase, or partial word you want to
associate with the select title. Press ENTER to accept the new value.
5. If additional search criteria exist, highlight one of those records and
click the Plus button
. The Value record displays below it.
Type the word, partial word, or phrase you want to associate with the
selected job title. Press ENTER.
What’s New/Search Enhancements
35
Aquire OrgPublisher 10 User Guide
Figure 48
6. Click the Plus button
title.
again to add another value to the selected
7. Repeat steps 2-5 to add values to other titles.
8. To delete a value, select it and click the Minus button
.
9. Click OK to accept your entries and close the dialog.
When using the Search View to search on box or job titles, end users
type any of the entries associated with a job title, the search results
pane displays all possible matches.
36
What’s New/Search Enhancements
Aquire OrgPublisher 10 User Guide
Figure 49
Setting Search Properties for Custom Fields
You can now specify suggested values on which users can search custom
fields. Using this option also enables a preview of the available values.
1. Click the Custom fields button
Field Properties dialog.
in the toolbar to open the Custom
2. Select the custom field for which you want to set search properties,
for instance Birthdate.
3. Click the Search Properties button to open the Search Properties
for dialog.
4. Accept the default of Allow this field to be searchable if you want
end users to be able to find this field while searching. Clear the check
box if you do not want the field found during a search.
What’s New/Search Enhancements
37
Aquire OrgPublisher 10 User Guide
Figure 50
5. You can accept the default to Allow entry of custom search
values if you want end users to type whatever characters they want
to search on.
6. When choosing to allow customer search values, you can also select
the Show potential matches as users type check box. This option
displays a preview pane with potential matching records as the user
types the search criteria.
7. If a field has a limited number of possible values, you do not have to
accept the default. You can specify values to search on by clicking
Create selection from field values.
38
What’s New/Search Enhancements
Aquire OrgPublisher 10 User Guide
Figure 51
Values that have been entered for that custom field display in the
pane in the center of the dialog.
8. Select the Limit searches to these items radio button. Click OK to
accept your selections and close the dialog.
When the selected field is searched on, using the Search View or
Search dialog, the first value displays automatically in the blank field.
Figure 52
End users can click the down-arrow to display all the available
values.
What’s New/Search Enhancements
39
Aquire OrgPublisher 10 User Guide
Figure 53
In the Search View, end users can select the field they want, and
then click
. The record with the searched for value displays in
the results pane.
40
What’s New/Search Enhancements
Aquire OrgPublisher 10 User Guide
Figure 54
In the Search dialog, end users can select the All Fields tab, then
the field they want. The first value displays automatically in the For
field.
Figure 55
What’s New/Search Enhancements
41
Aquire OrgPublisher 10 User Guide
In the case of the Birthdate field in this example, end users can
then highlight the month, date, or year and change the value by
typing over it or using the up or down arrow in the field.
Figure 56
In the case of the Birthdate field in this example, end users
highlight the month, date, or year and change the value by typing
over it or using the up or down arrow in the field, then click Search
Now.
42
What’s New/Search Enhancements
Aquire OrgPublisher 10 User Guide
Views
Viewing the Matrix Reporting Hover Display
If you enable the Hover Profile, you can also enable the Matrix Reporting
hover display.
1. Open a chart that contains multiple relationships/matrix reporting
icons.
2. Move the cursor over the matrix reporting icon in a box.
The Matrix reporting hover display appears, listing that person and
all report to instances.
3. You can move the cursor to close the hover display, or you can pin
the matrix reporting hover display to the Search View by clicking the
Pin button
What’s New/Views
.
43
Aquire OrgPublisher 10 User Guide
44
What’s New/Views
Aquire OrgPublisher 10 User Guide
C
HAPTER
2
GETTING STARTED WITH
ORGPUBLISHER
The Basics
By reviewing the topics listed below, you will learn the key concepts to
help you get the most out of your initial OrgPublisher experience.
You can follow the topics chronologically, or you can link to a specific topic
listed below.
Primary Roles in OrgPublisher
Key Elements
OrgPublisher Directory Structure
File Types
Menus and Toolbars
Getting Started with OrgPublisher by creating your first chart
Publishing in Express Mode
Online Knowledge Base
Primary Roles in OrgPublisher
There are three different types of OrgPublisher users and how they
typically work with the software.
• Administrators create, format, secure, and publish various types of
charts, reports, and directories. The OrgPublisher application is
typically installed on the chart administrator’s PC for this purpose. A
Web Administration console, a secured server install that can be
accessed, the same as any web page, from any PC, is also available for
distributed administration.
• End Users access the published charts, reports, and directories using
web-based viewing solutions (such as your company intranet) or
offline options (such as Adobe PDF, Microsoft PowerPoint, or Microsoft
Excel).
• Planning Users (users with special privileges) perform org modeling
or succession planning scenarios using our web-based viewing
solution.
Getting Started with OrgPublisher/The Basics
45
Aquire OrgPublisher 10 User Guide
Key Elements
Before we install the software, let's review the various modes and views in
OrgPublisher.
Build Mode vs View Mode - If you are an administrator, you'll need to
be aware of this. OrgPublisher operates in either Build Mode
or View Mode
. You use Build Mode to create, edit, and
reorganize data. You use View Mode to format and view charts as they will
be seen by your users when published.
When building charts from data, remember that any editing of data or
hierarchical structure made using Build Mode will be lost when your chart
is refreshed.
Views - The user interface within OrgPublisher displays smaller windows
called views.
• The Chart View is the main window and contains the chart components
arranged in boxes.
• The 9 Box Matrix Wizard
allows you to compile the top performers
and high potential employees in preparation for succession planning; if
the wizard has already been used, this button opens the 9 Box Matrix
View.
• Using the Hover Profile allows users to quickly view key custom fields
just by letting the cursor hover over a box component.
• The Tree View
arranges data hierarchy in an outline format.
• The List View
can be used as a telephone listing, and includes a
Search View that enables end users to search for and save their own
groups.
can provide employee job or box profiles
• The Profile View
containing information you may not want to display in the chart box.
• Creating a Side-by-Side Profile View can be used to build groups in
conjunction with the 9 Box Matrix or search results.
• The Groups View lists all groups in the current style.
46
Getting Started with OrgPublisher/The Basics
Aquire OrgPublisher 10 User Guide
• The Summary View
provides totals and calculated summary totals
by position type and group.
• Creating Workforce Analysis Graphs, part of the Summary View, allows
you to view your summary data as bar graphs or pie charts.
• The Style View
chart.
displays a list of available styles within the current
• Tabbed Views are available; see Viewing the Tabbed Profile, Using the
Tabbed Style Selector, and Viewing the Tabbed Hover Profile.
OrgPublisher Directory Structure
OrgPublisher is installed to the Program Files folder on your local drive.
C:\Program Files\OrgPubX - the OrgPublisher folder containing all
application files and sub-folders.
C:\Program Files\OrgPubX\assets - the sub-folder containing files and
graphics used with succession planning.
C:\Program Files\OrgPubX\ChartImages - the sub-folder containing
images used when publishing to EChart thin client.
C:\Program Files\OrgPubX\css - the sub-folder containing cascading style
sheets for thin client publishing.
C:\Program Files\OrgPubX\docs - the sub-folder containing files and
documents used in the sample charts.
C:\Program Files\OrgPubX\images - the sub-folder containing photos
used in the sample charts.
C:\Program Files\OrgPubX\samples - the sub-folder containing the
sample charts.
C:\Program Files\OrgPubX\SearchDictionary - the sub-folder containing
any additional search criteria when using the Semantic Dictionary.
C:\Program Files\OrgPubX\SAP - the sub-folder containing
documentation and files associated with OrgPublisher for SAP® solutions.
This folder may not be included with your installation if you did not specify
SAP as your data source.
Getting Started with OrgPublisher/The Basics
47
Aquire OrgPublisher 10 User Guide
C:\Program Files\OrgPubX\Web - the sub-folder containing files required
to publish charts.
C:\Program Files\OrgPubX\XML - the sub-folder containing associated
files to create a chart using XML.
File Types
OrgPublisher potentially creates several types of files that contain
different information for your chart.
File
Extensions
OCP
OTM
HTM
OCB
ODB
DLL
OCS
BAT
OPW
ODBX
File Contents
OrgPublisher published chart; if you are working with an
EChart, contains information to contact the EChart server.
PluginX - Binary chart/template file combined.
Template formatting; OTM file is matched to the ODB or
OCB file to make the chart file.
Determines the browser type and invokes the PluginX. Also
applicable to EChart, both thin and rich client.
Chart data ASCII file; comma-delimited text file.
Database connection file.
EChart file for both thin client and rich client; contains
ISAPI DLL; must be in the same web directory as EChart
OCP file.
EChart file for both thin and rich client security; contains
EChart data; must be in the same web directory as the
EChart OCP file.
EChart file for both thin and rich client; batch file that can
be used for automated EChart publishing.
Web Administration file.
Multiple sources chart file.
Online Knowledge Base
The Aquire web site (www.aquire.com) contains a vast collection of
tutorials and FAQs, as well as general information, concerning
OrgPublisher and other products.
Click Support in the main menu and select Support Portal. From this
page, you can access support documents, how tos, and product FAQs, as
well as Automation, which gives you access to APIs and sample code if
48
Getting Started with OrgPublisher/The Basics
Aquire OrgPublisher 10 User Guide
you need to customize OrgPublisher. Connector tools which help you
connect directly to your data source, such as PeopleSoft, Oracle HR, etc.
You can also find published versions of the OrgPublisher sample charts
that include a directory and planning chart. These charts are web-enabled
so you can navigate, search, change views, print, and more.
Getting Started with OrgPublisher/The Basics
49
Aquire OrgPublisher 10 User Guide
Getting Started with OrgPublisher
By the time you reach this point the following activities should have
occurred:
• OrgPublisher has been installed on your computer.
• Your company’s human resource data is in a location that you can
access.
-or• You have access to data from which you will manually create a chart.
If you are familiar enough with OrgPublisher to create a chart now,
proceed with this topic. If you'd like more background information about
OrgPublisher, please review The Basics.
To create a new chart or open an existing chart:
1. Open OrgPublisher.
OrgPublisher displays a blank chart and the OrgPublisher dialog.
Figure 57
50
Getting Started with OrgPublisher/Getting Started with OrgPublisher
Aquire OrgPublisher 10 User Guide
The Create a blank org chart option provides a blank org chart to
which you can add boxes, enter the employee information into the
boxes, and apply formatting.
The Run the New Chart Wizard option provides interactive screens
to walk you through the process of creating a new chart, either
manually or automatically.
The Open an existing org chart option is preselected by
OrgPublisher, and a list of existing charts is provided from which you
can choose.
Choosing the Open chart for formatting only option opens an
existing chart for formatting changes only. No data changes can be
made to a chart opened with this option.
2. Select the option you want then click OK.
3. Refer to the appropriate procedure to continue:
What You Need to Know
Running the New Chart Wizard
Creating a Blank Org Chart
Opening an Existing Chart
Opening a Chart for Formatting Only
Identify a Broken Hierarchy
What You Need to Know
When creating a chart
There are two ways you can build organizational charts in OrgPublisher:
Automatically
By connecting directly to a data source. You will need to know the path to
that data. OrgPublisher provides the ability to access data from multiple
locations. Your IT department should be able to provide you with this
information.
Getting Started with OrgPublisher/What You Need to Know
51
Aquire OrgPublisher 10 User Guide
Manually
By placing boxes on a chart and entering employee information into the
boxes.
When building from data
You should have an understanding of how your company's reporting
relationships work, the layout of your company’s reporting relationships,
and other HR data so that you can properly map the data for
OrgPublisher. It is also useful if you have experience in:
• Querying a database.
• Writing VBA scripts (for automating charting processes).
• Adding and extracting data from a database.
• Operating a Microsoft Windows spreadsheet application.
You should also familiarize yourself with the system requirements and
parameters.
Chart Parameters
Browser Requirements to interactively view charts residing on a web
server or platform
Minimum System Requirements
EChart Thin Chart Publishing Requirements
EChart Rich Client Publishing Requirements
Real-time Chart Publishing Requirements
Web Administration Requirements which is a custom installation and may
involve additional work on the part of your web administrator
Planning Chart User Requirements to enable users to modify and share
web-based org model (what-if) planning charts
52
Getting Started with OrgPublisher/What You Need to Know
Aquire OrgPublisher 10 User Guide
Running the New Chart Wizard
1. Open OrgPublisher and select Run the New Chart Wizard.
Figure 58
2. If the Succession Planning Module is included with your license, the
first dialog provides two options. Select Organizational chart then
click Next.
Getting Started with OrgPublisher/Running the New Chart Wizard
53
Aquire OrgPublisher 10 User Guide
Figure 59
3. In the Select a data source dialog, select a source for your data then
click Next.
Figure 60
Note:
If you do not know what your data source type is, see your OrgPublisher
Administrator.
Succession planning and multiple data sources are considered advanced
org chart options and are not part of this section.
54
Getting Started with OrgPublisher/Running the New Chart Wizard
Aquire OrgPublisher 10 User Guide
If you selected:
ODBC database, go to the Creating a Chart From an ODBC Database
procedure.
XML file, go to the Creating an Org Chart from an XML File procedure.
Empty chart, go to the Creating a Blank Org Chart procedure.
Creating a Chart From an ODBC Database
1. In the New Chart Wizard Select a data source dialog, select ODBC
database then click Next.
Figure 61
The next dialog box allows you to specify the ODBC Data Source
Name (DSN).
Figure 62
Getting Started with OrgPublisher/Creating a Chart From an ODBC Database
55
Aquire OrgPublisher 10 User Guide
2. In the ODBC Database dialog, click the down arrow and select the
type of database containing your chart data. Click Next.
-orIf your data source is not listed, click New data source and follow
the instructions in the Select Data Source dialog.
The Select Database dialog opens.
Figure 63
3. Indicate the path and filename of the database containing your data
then click OK.
The next dialog allows you to select the database table, view, or
query that contains the data for your chart.
56
Getting Started with OrgPublisher/Creating a Chart From an ODBC Database
Aquire OrgPublisher 10 User Guide
Figure 64
4. Click the Select a database table, view or query that contains
the data for your chart option. Click the down arrow and, from the
options list, select the table containing the data from which you want
to build your chart. Click Next.
Note:
The Custom SQL option is addressed in advanced procedures.
The Data preview dialog opens, and the first 100 records are shown.
Getting Started with OrgPublisher/Creating a Chart From an ODBC Database
57
Aquire OrgPublisher 10 User Guide
Figure 65
5. Review the data to determine that it is the data you want, and then
click Next.
Note:
If the data is not correct, click Back to connect to another database.
The next option allows you to accept the standard OrgPublisher field
order or specify a custom order.
Figure 66
58
Getting Started with OrgPublisher/Creating a Chart From an ODBC Database
Aquire OrgPublisher 10 User Guide
6. Select the appropriate option for your field order. The default
selection is Use standard OrgPublisher field order. If the table,
view, or query selected is not laid out in the field noted in the Input
File Layout, see the Specifying a Custom Field Order procedure. This
provides the mapping option. Click Next.
When you select the default field order, OrgPublisher displays the
following dialog box.
Figure 67
7. If you do not want to Launch the style wizard, clear that check
box. Click Finish.
OrgPublisher displays your org chart.
Specifying a Custom Field Order
This procedure assumes the following:
• You are building an org chart from an ODBC database.
• You have become familiar with the OrgPublisher Input File Layout
requirements.
• You have reviewed the Data Preview in the New Chart Wizard.
• You have clicked Next in the Data Preview dialog to accept the data.
When building a chart from an ODBC database, OrgPublisher provides two
options for sequencing the data fields in the database:
Getting Started with OrgPublisher/Specifying a Custom Field Order
59
Aquire OrgPublisher 10 User Guide
1. After accepting the data preview, the next option allows you to
accept the standard OrgPublisher field order, or you can Specify
custom field order as illustrated below.
Figure 68
2. Select Specify custom field order then click Next.
The Data Preview dialog enables you to map the displayed field
names to the OrgPublisher input layout.
Figure 69
3. Above each column of data, a drop-down arrow appears with the
default selection of Do not import. Click the drop-down arrow to
60
Getting Started with OrgPublisher/Specifying a Custom Field Order
Aquire OrgPublisher 10 User Guide
display other field options. Select the appropriate option for that
field/column of data.
As you select the field options (other than Custom Field) in the
drop-down list and move to another column the previously selected
mapping options "fade." This indicates that you have already
identified a field/column for this type.
If a field type (other than Custom Field) is used more than once,
the field type switches to red text. Duplicate usage of a field type
must be limited to Custom Fields.
Other mapping options in the list include Parent Box ID, Box ID,
Person ID, Position Sequence, Level Number, etc.
When you finish mapping, click Next.
4. You may need to map a single column of data as more than one field
type. For instance, you have a column of data that contains the
Employee Number. You want to use it as input field 5 (Person ID)
as well as display the field in the chart as a custom field. Scroll down
to the last field type option and click Multiple. The Multiple Field
Mapper dialog opens.
Figure 70
Getting Started with OrgPublisher/Specifying a Custom Field Order
61
Aquire OrgPublisher 10 User Guide
5. Click Add. The Multiple Field Mapper inserts Custom Field as the
first mapping type.
6. In the Name column, click Custom Field to display all the available
options.
Figure 71
7. Select the field type you want to apply.
8. Click Add to insert the second instance of the field.
9. Repeat Steps 6-8 if applicable.
62
Getting Started with OrgPublisher/Specifying a Custom Field Order
Aquire OrgPublisher 10 User Guide
Figure 72
10.Click OK when you have finished mapping the field. The mapped
column is now labeled as Multiple in the New Chart Wizard.
11.Complete mapping your fields then click Next.
12.If you do not want to Launch the style wizard, clear that check
box. Click Finish.
13.OrgPublisher displays the chart. Any custom fields or custom position
types brought into the chart must be defined in OrgPublisher.
14.Save the chart file. It will have an .odbx extension.
Getting Started with OrgPublisher/Specifying a Custom Field Order
63
Aquire OrgPublisher 10 User Guide
Name and Assign Your Custom Fields
In addition to the predefined, required data fields of the Input File Layout,
OrgPublisher provides the capability for an unlimited number of fields that
can be imported and customized to include data that is unique to your
environment.
You can keep the names of these fields as they exist in your HR data
source or you can rename them. Custom fields can be used for
information like telephone numbers, office numbers, sales figures, and so
forth. An E-mail custom field type enables you to send email messages to
a group. Custom fields can contain either text or numeric data, such as
head count, sales, and expenses. OrgPublisher can perform simple
calculations on numeric fields and the results of the calculations are stored
in summary fields. The Summary Wizard topic explains how to insert
summary fields and head counts.
Some custom fields, like phone numbers and office locations, might be
assigned to all position types. Other custom fields might need to be
limited to a specific position type, for example fax numbers for all
administrators.
Custom fields added below box titles contain information pertinent to the
whole department or team that the box represents. Custom fields added
below a job title contain information about that job. Custom fields added
below a person contain specific information about that person or the
position they hold.
Custom Fields in OrgPlan
The administrator maintains control over the custom fields to use in the
planning chart. Planners cannot add or delete custom fields.
To learn about how custom fields fit in the input data layout, see:
Input File Layout
Input File Layout Rules
To create a custom field, see:
Custom Field Wizard
Adding a Custom Field
Formatting a Custom Field
64
Getting Started with OrgPublisher/Name and Assign Your Custom Fields
Aquire OrgPublisher 10 User Guide
Formatting Numeric Custom Fields
Dragging and Dropping Custom Fields
Inserting a Custom Field for a Single Position Type
Inserting a Custom Field for all Position Types
Reviewing Custom Field Security Summary
Securing an EChart Custom Field
Designating Custom Fields as Not Searchable
To manage your custom fields, see:
Changing the Contents of a Custom Field
Displaying a Custom Field
Changing the Custom Field Label
Hiding a Custom Field Label
Getting Started with OrgPublisher/Name and Assign Your Custom Fields
65
Aquire OrgPublisher 10 User Guide
Linking to your Data Source
You must know how to link to your data source to create your chart,
manage your data, and resolve reporting relationship problems.
Your system administrator may need to provide some of the information
required to connect to your database. To share a database connection file
with another user, you must use a file DSN on a shared network path
when you save the ODB file.
In order to create a chart from data, you can connect to an ODBCcompliant database and extract data for your organizational chart. You
can also connect to, or create, a text file to use as input for creating your
chart.
Use the New Chart Wizard to connect to your HR database. A series of
dialogs helps you select the data source, tables, etc. These selections
form an SQL statement that is used to extract data from your database.
This statement is formed from options you select in the wizard dialogs,
starting with the database to use as your source. You can also write your
own SQL statement. For query samples, refer to the Downloads section of
the Aquire web site at www.aquire.com.
Once you have saved the file with your connection, you can reconnect to
the same database by opening the chart’s ODB file.
To review the error messages OrgPublisher may generate see:
Addressing Warnings and Error Messages
Identify a Broken Hierarchy
One of OrgPublisher’s most valuable features is the ability to track
reporting relationships. When you create your input file layout for your
first chart and define your relationship hierarchy, OrgPublisher remembers
that hierarchy.
OrgPublisher determines if any of the established relationships are broken
when you open your chart built from data. For instance, if a manager
should leave your company, and is deleted from your database, and if the
records for the employees who reported to that manager are not changed
to reflect a new reporting relationship, OrgPublisher generates an error
report listing those broken hierarchies.
The following is an example of the error message:
66
Getting Started with OrgPublisher/Linking to your Data Source
Aquire OrgPublisher 10 User Guide
Figure 73
You can copy the list and use it to correct your HR database and then
update your chart.
For more information see:
Resolving Reporting Relationship Problems
Addressing Warnings and Error Messages
Updating Your Chart
You can update chart data after you have created your organizational
chart by refreshing the chart data with changes made to the database. If
your chart was created from multiple data sources, you can also manage
data sources through the Tools menu.
Note:
You can also update a published real-time chart by clicking the Refresh
button in the browser or by drilling through the chart.
You may want to change chart data in the OCB file to reflect personnel
changes that have not yet been applied to your HR database. When you
overwrite or manually update a chart that was created with a database
connection, an OCB file is created.
Getting Started with OrgPublisher/Linking to your Data Source
67
Aquire OrgPublisher 10 User Guide
Refreshing Chart Data
OrgPublisher updates your chart built from data every time you open that
chart. You can also keep the data in your org chart up-to-date while you
are working in your chart. The following steps explain how to do this
manually. Detailed information about automating this process can be
found in the OrgPublisher System Development Kit (OPSDK).
1. Open the ODB file for the chart you want to update. Your database
connections are reestablished and your org chart is displayed.
2. Select Data from the Main menu then Refresh from the pull-down
menu. Any changes made to data in your HR database are applied to
the chart data.
68
Getting Started with OrgPublisher/Linking to your Data Source
Aquire OrgPublisher 10 User Guide
Creating a Blank Org Chart
Creating a blank org chart is the first step to building a chart manually.
You insert each box then populate each box with the employee
information. You can also design the box and chart format, or you can
apply a preformatted chart design provided by OrgPublisher.
The first step is to insert a box. This box must contain a person and a job.
To insert these two components at the same time, select the Person/Job
box button from the Insert Toolbar. (See Box Style Button Descriptions
and Purposes for the purpose and behavior of each button.)
Once you have inserted the first box into your chart, you can begin
building your chart levels by inserting additional boxes.
Refer to the following topics:
Inserting Boxes In a Chart
Inserting Chart Components
Box Style Button Descriptions and Purposes
Identifying and Using Pointers
Inserting the First Box and Person in a Chart
When you manually create an org chart, you start with a blank chart, and
then insert each box, enter all of the relevant information into each box,
and then format the chart.
1. From the Main menu, select Insert then Person in box from the
options list.
Getting Started with OrgPublisher/Creating a Blank Org Chart
69
Aquire OrgPublisher 10 User Guide
Figure 74
You can also select the Insert Box containing a person button
the Insert toolbar. Click and release the mouse. Notice that the
cursor, or pointer, has changed to
.
in
2. Click inside the chart to place the box. The Box title, Job title, and
Name fields appear inside the box.
Figure 75
Because this is a new chart, the first box is placed at the top and
middle of the new chart window.
3. Inside the box, click the Employee name text and replace the field
name with the name of the employee. Press ENTER.
4. Double-click the Job Title 1 text. The Rename Job Title dialog
opens.
70
Getting Started with OrgPublisher/Creating a Blank Org Chart
Aquire OrgPublisher 10 User Guide
Figure 76
5. Type the Job title and select the Position type. Click OK. The
Rename Box Title dialog opens.
Figure 77
6. Type the Box title then click OK. The new name appears inside the
box and at the top of the chart. When you rename Box 1 (inside the
box), that name becomes the chart title. This is typically the name of
your organization or a department name, but may be whatever
works best for your chart. See the Formatting the Chart Title
procedure for more information.
Add additional boxes to your chart, using the Inserting Boxes In a Chart
procedure. See the Box Style Button Descriptions and Purposes topic to
help identify appropriate buttons.
Getting Started with OrgPublisher/Creating a Blank Org Chart
71
Aquire OrgPublisher 10 User Guide
Inserting Boxes In a Chart
Boxes can be manually inserted into charts by either of the following two
methods.
1. From the Main menu bar select Insert.
The Insert menu displays the options available.
Figure 78
-orThe Insert toolbar also displays the box style buttons.
Figure 79
2. Select a box style, click the button, and then click inside the chart to
place the box.
See the Box Style Button Descriptions and Purposes and Inserting Chart
Components topics for additional information.
Box Style Button Descriptions and Purposes
The following table describes each box style and its purpose.
72
Getting Started with OrgPublisher/Creating a Blank Org Chart
Aquire OrgPublisher 10 User Guide
Button
Name
Insert Box containing a
person and job
Insert box
Description
Inserts a box containing a person. Includes fields
for:
• Box Title
• Job Title
• (Manager, Employee, etc,) name
If it is the first box in a chart its placement
determines the top of the chart. If it is not the first
box in the chart it is added directly below the box
it reports to.
Inserts a normal box containing only the Box Title
field.
If it is the first box in a chart its placement
determines the top of the chart.
Insert Job
Insert Person
If it is not the first box in the chart it is added
directly below the box it reports to.
Inserts Job Title and Employee name fields into
an existing box.
If it is the first job added to the box, the label is
Manager name. Any additional jobs added to the
same box will be specified Employee name.
Inserts Job Title and appropriate (Employee,
Assistant, etc.) name fields into an existing box.
If it is the first job added to the box, the name
field reflects a Manager position type.
Insert Open Position
Any additional persons added have the name field
labeled Employee.
Inserts an Open position field into an existing
box.
Getting Started with OrgPublisher/Creating a Blank Org Chart
73
Aquire OrgPublisher 10 User Guide
Button
Name
Insert Assistant Box
Description
Inserts an assistant box into the chart and
designates an employee as the assistant to the
position to which it is attached.
It is inserted below and to the right of a selected
box. If you insert more than one assistant box,
these boxes alternate from the right and then to
the left of the reporting box.
Insert Partner Box
When you insert an assistant, the text Assistant
Box followed by the number of the box in the
chart, is placed into the box as the box title.
Inserts a partner box into the chart.
Represents the equal yet independent relationship
of a business partner by inserting and connecting
a partner box on the same level and to the right of
the box on which it is dropped. Multiple jobs and
people can be placed in a partner box.
When you insert a partner, the text Partner Box
followed by the number of the box in the chart, is
placed into the box as the box title.
Boxes and Position Types
Each box type has a designated position within the chart in relation to
other box types. By placing position types in specific box types it ensures
that the position type appears in its correct hierarchial position in the org
chart.
Normal Box
Employee
Manager
Contractor
Indirect Report
Succession
Candidate
Assistant Box
Assistant
Partner Box
Partner
Staff Box
Staff Function
An open position type will occupy the same box type as the original
position.
74
Getting Started with OrgPublisher/Creating a Blank Org Chart
Aquire OrgPublisher 10 User Guide
Identifying and Using Pointers
The appearance of the mouse pointer changes in OrgPublisher when you
add or move chart components such as boxes, jobs, or people. These
special pointers indicate the type of object dragged in your chart.
When you drag an existing box, the pointer also shows the box’s
relationship to other boxes. When you drag a new object, a plus (+) sign
appears with the special pointer indicating a new component.
Special pointers and their functions are:
Pointer
Function
Inserts a person/job box.
Inserts an assistant box below and to the right of a
selected box. If there is more than one assistant,
alternate between the right and left side of the selected
box.
Inserts a normal box.
Inserts a box to the left of a selected box.
Inserts a box to the right of a selected box.
Inserts a box between two selected boxes.
Inserts a box below a selected box.
Inserts a job.
Inserts a person.
Getting Started with OrgPublisher/Creating a Blank Org Chart
75
Aquire OrgPublisher 10 User Guide
Pointer
Function
Inserts an open position.
Inserts a partner box.
Inserts a photo.
Inserts a custom field. Custom fields are always
inserted from the Insert Custom Field button, never
from one box to another.
Inserts a hotspot. Hotspots are always inserted from
the Insert Hotspot button, never from one box to
another.
Selects an area to display as the center of the chart
after you use the Zoom to point option. Zoom
automatically sets magnification to 100%.
Opening an Existing Chart
To open an existing org chart:
1. Open OrgPublisher.
OrgPublisher displays a blank chart and the OrgPublisher dialog.
76
Getting Started with OrgPublisher/Creating a Blank Org Chart
Aquire OrgPublisher 10 User Guide
Figure 80
2. Select the Open an existing org chart radio button.
3. Select the file name of the chart you want to open then click OK.
The selected chart file opens.
Entering a New License Key
If you, as an administrator, request a licence upgrade or a trial extension
of OrgPublisher, a new license key is provided by your Aquire sales
associate. Only the OrgPublisher administrator can successfully
enter a license key on the computer where OrgPublisher resides.
1. When you receive the new key, open OrgPublisher and select Help in
the Main menu.
2. Select License Information from the options list. The Licensing
Information dialog opens, showing your license number and all
features currently enabled, as well as your Position Count and
expiration date, if applicable.
Getting Started with OrgPublisher/Creating a Blank Org Chart
77
Aquire OrgPublisher 10 User Guide
3. Click Enter new key. The License Key Entry dialog opens.
4. Copy the provided key from your email message and click Paste
Key. The license key displays in the Please enter a license field.
5. Type your company name in the Registered Company field. Click
OK to accept the new key.
If an error message displays stating you have entered invalid
information, click the Back button and verify that the license key and
company name are correct and retry.
Note:
78
In the Web Administration server, the new license information is read when
the remote administration server starts, after IIS is refreshed.
Getting Started with OrgPublisher/Creating a Blank Org Chart
Aquire OrgPublisher 10 User Guide
What You Can Do with OrgPublisher
Creating a Chart From an ODBC Database
Creating an Org Chart from Multiple Data Sources
Publishing in Express Mode
Creating a New Planning Chart or Creating a New Succession Planning
Chart
Printing in Wall Chart Style or Printing Your Chart as a Book
Creating a New Archive Chart
Displaying Summary Fields
Drag and drop people and positions into the chart by Inserting Boxes In a
Chart
Applying a Chart Design Template to quickly format charts
Refer to the Table of Contents for more.
Getting Started with OrgPublisher/What You Can Do with OrgPublisher
79
Aquire OrgPublisher 10 User Guide
80
Getting Started with OrgPublisher/What You Can Do with OrgPublisher
Aquire OrgPublisher 10 User Guide
C
HAPTER
3
CREATE YOUR CHARTS
Build and Modify Charts from a Data Source
Note:
If you plan to use the Compare Two Charts feature, it is strongly
recommended that you create a custom field called Position ID and assign a
unique ID to each instance of a person in the chart. In addition, each open
position should be assigned a unique ID.
An Input File record represents an open position when the Last Name, First
Name, and Middle Name fields are empty.
Example: “1","2","ABC Department","M","9-
99999999",,,,"JOB001","Supervisor"
Input File Layout
The Input File Layout defines the order of columns in the commaseparated text file that OrgPublisher opens to generate your org chart. It
also specifies the order of fields to send to OrgPublisher when you choose
to generate org charts automatically using the Component Object Model
(COM ) interface.
Each record in an OrgPublisher input file typically represents a manager,
an employee, an open position, an assistant, a partner, or a contractor in
the organizational chart. In addition, an input record can represent a
normal box, an assistant box, or a partner box within the hierarchy of
boxes in the chart.
The first two fields are required to build a reporting structure. These fields
can include information from your HR database such as a supervisor ID
and an employee ID, or a supervisory department and reporting
department. Each person or position in an org chart is represented by only
one record in the Input File. However, a person may occupy more than
one position in the chart and may appear in multiple input records. The
Input File Layout Rules will help you to accurately map your data.
Note:
Field 5 is displayed and searchable by end users. Do not store sensitive
information in this field.
If you are creating a succession planning chart, see the Mapping Succession
Planning Fields topic.
Create Your Charts/Build and Modify Charts from a Data Source
81
Aquire OrgPublisher 10 User Guide
Column
number
1
Field name
Parent Box
ID
Description
A required field, the parent box ID can be any string of
numbers and/or characters that represent the report to
box of this record. The data type for fields 1 and 2
should match, for instance, if field 1 is numeric, then
field 2 should be numeric. If field 1 is alpha, then field
2 should be alpha, etc.
The parent box ID is not displayed in the chart.
2
Box ID
Only the top person in a chart will have an empty
parent box ID.
A required field, the box ID can be any string of
numbers and/or characters that uniquely represent a
box within the chart. This ID can be duplicated for
several records when multiple people are located in the
same box. The box ID is not displayed in the chart. The
data type for fields 1 and 2 should match, for instance,
if field 1 is numeric, then field 2 should be numeric. If
field 1 is alpha, then field 2 should be alpha, etc.
You can add a unique box ID, typically an employee ID
from your database. You can also use a position code if
you use position management. Where the employee is
placed in the chart depends on the Auto Build option,
the position type priority, and the Sort option.
Note:
3
Box title
If you use the matrix reporting, or multi-relationship
feature in OrgPublisher, the box ID for the person
reporting to more than one person must be unique for
each instance in the chart in order ensure correct
drilling up through hierarchy.
A required field, the box title can be any string of
numbers and/or characters and is shown as the top
text entry in the org chart box that it describes. This
can be a cost center or full department name.
The box title should be unique to the box ID that is also
contained in this record. The same box title is displayed
in every record that contains this box ID.
82
Create Your Charts/Input File Layout
Aquire OrgPublisher 10 User Guide
Column
number
4
Field name
Description
Record Type A required field, record type defines the position type
of each person in your organization. OrgPublisher
provides several predefined record types. You can also
create custom record types to define other positions in
your organization. Record types for custom position
types should use brackets, for example <T>.
M = Manager
E = Employee
A = Assistant
C = Contractor
I = Indirect report
PR = Partner
<SF> = Staff Function
<SC> = Succession Candidate
B = Box
5
Person ID
If left blank, it defaults to an employee record type.
You cannot insert a person in a B record type. It is
typically used to display org units or departments only.
The person ID field is optional. It can contain any string
of numbers and/or characters to represent the ID or
unique identifier for a person, such as employee ID.
With OrgPublisher version 5 and later this field is used
to add a person to a group and to identify a person in
order to add a multi-relationship icon. Therefore, the
field is displayed and searchable by end users. Do not
store sensitive information, such as a social
security number, in this field.
Example:
"1","2",”ABC Department”,"M","9999999",”Smith”,”Rose”,,"JOB001",”Supervisor"
Create Your Charts/Input File Layout
83
Aquire OrgPublisher 10 User Guide
Column
number
6
Field name
Last Name
Description
An optional field, the last name field represents the
last, or family, name of the person a record represents.
Example:
"1","2",”ABC Department”,"M","999999999",”Smith”,”Rose”,,"JOB00"1,”Supervisor”
Note:
An Input File record represents an Open position when
the Last Name, First Name, and Middle Name fields are
empty.
Example:
7
First Name
"1","2",”ABC Department”,"M","999999999",,,,"JOB001",”Supervisor”
An optional field, the first name field represents the
first name of the person that a record represents.
Example:
"1","2",”ABC Department”,"M","999999999",”Smith”,”Rose”,,"JOB001",”Supervisor”
Note:
An Input File record represents an Open position when
the Last Name, First Name, and Middle Name fields are
empty.
Example:
8
Middle
Name
"1","2",”ABC Department”,"M","999999999",,,,"JOB001",”Supervisor”
An optional field, the middle name field represents the
middle name of the person that a record represents.
Example:
"1","2",”ABC Department”,"M","999999999",”Smith”,”Rose”,”L”,JOB001,”Supervisor”
Note:
An Input File record represents an Open position when
the Last Name, First Name, and Middle Name fields are
empty.
Example:
"1","2",”ABC Department”,"M","999999999",,,,"JOB001",”Supervisor”
84
Create Your Charts/Input File Layout
Aquire OrgPublisher 10 User Guide
Column
number
9
10
Field name
Job ID
Job Title
Description
The job ID can be any string of numbers and/or
characters that uniquely represent a job title or
position title within the chart. If records are combined
into one box, job titles are defaulted to list in ascending
sequence by job ID and are sorted within each position
type.
The job ID is not displayed in the chart. This field is
used in Auto Build.
The Job Title field is optional. The job title can be any
string of numbers and/or characters and is shown
above the individual name within a box.
A job title is associated with the first position type
beneath the job title. The priority of the position type
determines the order of job titles of different position
types appearing within a box. You can override the
priority by assigning the sequence number in field 13 of
the comma-delimited text file.
In the following example, each record that contains job
ID "JOB001" also contains the job title "Supervisor."
Example:
"1","2",”ABC
Department”,"M",,"Smith",'A",,"JOB001",”Supervisor”
"1","3",”ABC
Department”,"M",,”Turner”,”B”,,"JOB001",”Supervisor”
11
Reserved
12
Box
Sequence
Number
"1","4",”ABC
Department”,"M",,”Brown”,”K”,,"JOB001",”Supervisor”
Field 11 is reserved for use by OrgPublisher. To avoid
problems when you are creating an org chart
automatically from data, and to ensure compatibility
with future versions of OrgPublisher, leave this field
blank.
Field 12 is the box sequence number and accepts only
numeric (integer only) characters. It can be used, but
is not required, to override the default positioning of
the boxes.
By default, boxes are positioned from left to right (level
by level) in your chart alphabetically by box ID. This
field is used when you select the Sort by box ID
option of the OrgPublisher Sort feature.
Create Your Charts/Input File Layout
85
Aquire OrgPublisher 10 User Guide
Column
number
Field name
13
Job
Sequence
number
14
Position
Sequence
Number
15
Photo
16
Reserved
17
Position ID
Description
The job sequence number accepts only numeric
(integer only) characters. It can be used, but is not
required, to override the default positioning of the job
title. By default, job IDs are used for sorting multiple
jobs within a single box, such as people in the same
box as their manager.
The position sequence number can be used, but is not
required, to override the default positioning of the
employee name, and must be numeric (integer only)
characters. By default, multiple employee names are
sorted alphabetically within a single box.
The file names of the photos in your chart are stored in
the photo field. Add photos with the Photo Wizard so
that you can specify a common path for all of your
photo files. If photos are stored in different areas you
must put the full path name in this field.
Fields 16 is reserved for use by OrgPublisher. To avoid
problems when you are creating an org chart
automatically from data and to ensure compatibility
with future versions of OrgPublisher, leave this field
blank.
OrgPublisher looks for Position ID in field 17. Position
IDs are used for:
- Tracking position movement in OrgHistory.
- Tracking what positions have been pinned in the sideby-side Profile View.
- Importing a chart to Unifi. Unique position IDs are
very important for continued synchronization.
18
Level
Number
It’s preferable to have position IDs in the source data if
you want to tie changes back to the source system.
Level number is used to pass in your levels for use in
the multi-level peer display . This is a numeric absolute
value level, for instance, if the manager grade level is
10 and the report-to is 1, OrgPublisher charts the
report-to box as 9 levels below the manager box.
The level number is a differential from the parent level
number, either in ascending or descending order. The
sequence cannot change in the middle of the ”r;chain.”
There are 10 levels to work with at each parent box
level; any differential greater than 10 displays at the
same level as 10. If there is no value in the parent box,
it is assumed to be 0 (zero).
86
Create Your Charts/Input File Layout
Aquire OrgPublisher 10 User Guide
Column
number
Field name
19
Reserved
20-25
Custom
Fields
Description
Field 19 is reserved for use by OrgPublisher. To avoid
problems when you are creating an org chart
automatically from data and to ensure compatibility
with future versions of OrgPublisher, leave these fields
blank.
Input in fields 20 and up are for your custom fields,
such as phone numbers, room numbers and hotspot
URLs. After populating these fields in the Input File with
your custom data, open the Custom Field Properties
dialog and select where these fields should be
displayed in your chart.
A default label is supplied that you should type over.
This example shows custom fields of hire date and
phone number in Positions 20 and 21.
If you plan to use the EChart security option, custom
fields must be created to hold the unique identifiers for
both the Password and User ID.
Example:
"1","2",”ABC
Department”,"M",,”Smith”,”A”,,"JOB001",”Supervisor”,,,
,,,,,,”1995/12/02”,”2495”
Note:
When importing numeric fields, make sure that you do
not use any leading symbols, such as dollar signs. Also,
verify that decimal places are set the way you want
them prior to importing those fields into OrgPublisher.
You can add leading and trailing symbols to numeric
fields with the Field Format dialog, but the decimal
places cannot be adjusted after they are imported.
OrgPublisher does not change the value of numeric
fields you bring in. For instance, if you import 341.00,
that's what the number is in OrgPublisher. If you
import 341, that's what OrgPublisher uses. Formatting
cannot change the value of the data you import.
Create Your Charts/Input File Layout
87
Aquire OrgPublisher 10 User Guide
Column
number
26-49
Field name
Custom
Fields and
Summary
Fields
Description
Fields 26 - 49 and 65+ can be used for custom fields,
as well as summaries. In OrgPublisher Premier, you can
perform basic calculations on numeric custom fields in
your chart and display this data in a summary field in
your org chart.
Note:
The Summary Wizard inserts placeholders, if
necessary, which display in the Custom Field Properties
dialog. These fields within OrgPublisher, occupy
sequences 20 -25, and are designated as field types
other than summaries, such as Text, Hotspot, or
Email. As you create summary fields, OrgPublisher
starts placing them in sequence 26.
When importing numeric fields, make sure that you do
not use any leading symbols, such as dollar signs. Also,
verify that decimal places are set the way you want
them prior to importing those fields into OrgPublisher.
For example, you can calculate the total sales for a
department and display that information in a summary
field. The Summary Wizard and Head count Wizard
automatically place summary fields in the Input File
starting at field 26.
Note:
When importing numeric fields, make sure that you do
not use any leading symbols, such as dollar signs. Also,
verify that decimal places are set the way you want
them prior to importing those fields into OrgPublisher.
You can add leading and trailing symbols to numeric
fields with the Field Format dialog, but the decimal
places cannot be adjusted after they are imported.
OrgPublisher does not change the value of numeric
fields you bring in. For instance, if you import 341.00,
that's what the number is in OrgPublisher. If you
import 341, that's what OrgPublisher uses. Formatting
cannot change the value of the data you import.
88
Create Your Charts/Input File Layout
Aquire OrgPublisher 10 User Guide
Column
number
50-64
Field name
Succession
Candidate
Fields
Description
Input fields 50 through 64 are standard fields provided
for your succession candidates. After populating these
fields in the Input File with your custom data, open the
Custom Field Properties dialog and select where these
fields should be displayed in your chart. Can be used to
help define a successor group. special formatting for a
successor position comes automatically with
OrgPublisher.
Note:
Initial formatting of the successor position type is
handled in the default templates shipped with
OrgPublisher.
50 - Key Person
51 - Location
52 - Age
53 - Salary
54 - Performance Rating
55 - Education Level
56 - Skills
57 - Certifications
58 - Competency Rating
59 - Successor Rank
60 - Designated Successor
61 - High Potential Rating
62 - Readiness
63 - Retention Risk
65 and up
Custom
Fields and
Summary
Fields
64 - Impact of Loss
Positions 26 - 49 and 65+ can be used for custom
fields, as well as summaries. In OrgPublisher Premier,
you can perform basic calculations on numeric custom
fields in your chart and display this data in a summary
field in your org chart.
See Notes in column 26-49.
Create Your Charts/Input File Layout
89
Aquire OrgPublisher 10 User Guide
Record Types
The record type is the position type of a person who works in your
organization. A position type can be used to categorize employees.
Position types assist in the formatting of boxes and text, and the
calculations of various head counts within your organization. The position
type/record type determines the order of positions within a single box .
Each person or position in an org chart is represented by only one record
in the input file, but a person can occupy multiple positions and have
multiple records. You can also create your own record type to define a
position within your organization using the Position Type Wizard or the
Define dialog.
If you leave the Record Type blank, OrgPublisher sets the position type
to "Employee."
Do not use these characters when creating your own custom record type
in field 4.
Record
Type
M
E
Name
Manager
Employee
Description
A manager record type represents a person who is
the manager or supervisor of the people in the
reporting boxes or within an org box. Manager
record types have a Priority of 0. They are placed
in their own box unless the Auto Build option, in
the Format dialog Chart tab, is set so that
managers and employees are placed in the same
box.
When there is more than one manager under a job
title within a box, the names are defaulted to sort
alphabetically by last name.
This is the default record type. An employee record
type represents a person who is an employee within
an org box. You can format employee names and
boxes separately from manager names and boxes.
When there is more than one employee name under
a job title within a box, the names are defaulted to
sort alphabetically by last name.
90
Create Your Charts/Record Types
Aquire OrgPublisher 10 User Guide
Record
Type
A
I
Name
Assistant
Indirect
report
Description
An assistant record type represents a person who is
displayed within an assistant box type. Assistant
boxes alternate right and left of the reporting line.
You can define custom assistant position types with
data using the Define dialog, accessed from the Edit
menu option, by creating a new position type and
selecting the assistant box type.
An OrgPublisher org chart can include indirect
reporting relationships as well as direct reporting
relationships. Indirect reporting relationships are
also known as dotted-line relationships.
An input record can indicate a person is an indirect
report by using an I in the Record Type field in
front of the assigned position record type. Indirect is
a modifier of the assigned position type. For
example, an IE is an employee who reports
indirectly to another position. If you use only I as
your record type, OrgPublisher defaults the record to
IM.
When an indirect report appears as the top position
in a box, the box is formatted with a dotted-line box
unless you change this default in the current chart
style. In addition, an indirect box has a dotted
connecting line to the supervisor box above it.
Indicating that one person reports to more than one
manager is accomplished with multiple records and
use of position types.
One box must be designated position type "E" for
Employee. Other boxes must be designated position
type "I" for Indirect Report. (Indirect Reports are not
counted for head count purposes. Indirect Report
boxes are displayed with dotted lines around the
box, as well as the lines to the box.) When building
from data, you need multiple employee records —
one for each manager (see sample of data below).
If you are building from data the records should look
like the following:
ParentBoxID
Create Your Charts/Record Types
BoxID
Box Title Record Type ID Last Name First Name
Manager 1
1234
xxx
E
Smith
Carol
Manager 2
1234a
xxx
I
Smith
Carol
Manager 3
1234b
xxx
I
Smith
Carol
91
Aquire OrgPublisher 10 User Guide
Record
Type
C
Name
Description
Contractor
A contractor record type represents a person who is
a contractor within an org box. Contractor record
types are different from other position type records
because:
Contractors are always displayed after managers
and employees within an org box.
Contractor names are formatted separately from
other position types.
Contractors are not counted in the head count with
the default settings. You can override the default.
92
PR
Partner
B
Box
BA
Assistant
box
When there is more than one contractor under a job
title within a box, the names are defaulted to sort
alphabetically by last name.
A partner record type represents a person in a
partner box type and denotes a side-by-side
relationship. A partner box is located on the same
level and to the right of the box to which the partner
is aligned.
A box record type reports to another record and may
have records reporting to it. A box record type can
be used to create a report-to box that does not
contain a person or job title, for instance a
department or division name. You cannot add
persons to a box with B record type.
An assistant box record type can be used to indicate
there are assistants for the report-to box, but names
and job titles are not stored in the box, for instance
a department or division name that has an assistant.
You cannot add persons to a box with BA record
type.
Create Your Charts/Record Types
Aquire OrgPublisher 10 User Guide
Record
Type
Name
SF
Staff
function
SC
Succession
candidate
Create Your Charts/Record Types
Description
A staff function record type represents a person very
much like an assistant, or a cost center displayed in
a staff function box. The staff function normally has
boxes reporting to it in the chart and is positioned
opposite an assistant box on the reporting line. Staff
function record types have a Priority of 0, and are
placed in their own box.
A succession candidate record type represents a
person who is a candidate for a specific position
currently being held by someone else. Succession
candidate record types have a Priority of 1, and are
typically placed in a normal box type with other
candidates, as well as the current person holding the
position they may inherit.
93
Aquire OrgPublisher 10 User Guide
Extracting Your Data
Once you have established person-to-person, position-to-position, or
department-to-department relationships, you can begin building your
charts automatically from data by mapping data in your HR system to
OrgPublisher's input fields.
1. Map the fields in your database that link managers to their direct
reports or reporting departments to managing departments to the
following OrgPublisher input fields.
Input Field 1 - PARENT_BOX_ID
Input Field 2 - BOX_ID
You can map an Employee ID field from your database to BOX_ID
and a Reports To (or Supervisor ID) field to PARENT_BOX_ID. This
creates an org chart where each person appears in their own box.
2. Define each input record with a default or custom position type in
Input Field 4 - RECORD_TYPE.
If you leave the record type blank, all positions in the chart default to
Employee position types.
3. Map the employee name from your HR system to the Last Name,
First Name, and Middle Name fields in the OrgPublisher Input File
Layout.
Note:
If your database has only one field for the entire employee name, then
map this field to the Last Name field.
If you are creating a succession planning chart, see the Mapping
Succession Planning Fields topic.
Each record can contain information about a person’s position or job
title. If your database does not store a key or code to identify each
job title, you can map the job title field in your employee database to
both the Job ID field and the Job title field in the Input File, or you
can leave the Job ID field blank.
4. If you want to use multi-level peer display, you must define the level
number in Field 18.
5. Map the rest of the fields according to the Input File Layout.
6. Save your comma-separated ASCII text file as an OCB, TXT, or CSV
file.
7. Open your text file (example, MYCHART.OCB) in OrgPublisher.
Your org chart is displayed and ready for you to format. When you
save the chart, your formatting is stored in a separate template file
94
Create Your Charts/Extracting Your Data
Aquire OrgPublisher 10 User Guide
with an OTM extension. When you re-import your data and open the
chart, the styles and formatting remain unchanged.
Identifying Invalid Comma-separated File
Format
When building from data or using API function definitions, found in the
OrgPublisher Software Development Kit (OPSDK):
• Ensure that fields that contain a comma, such as last name, are
enclosed in quotes.
Example:
Incorrect: ,Smith, Jr.,
Correct: ,"Smith, Jr.",
• Ensure that fields do not contain any quote characters.
Example:
Incorrect: ,"Mc"Donald",
Correct: ,"Mc'Donald",
• Ensure that there are no blank records at the end of the file. Word
processors and spreadsheets may inadvertently leave blank lines at
the end of the file. The last record in the file should be followed by the
end of file marker.
• Ensure that no single field is over 2000 characters in length.
• Ensure that there are no less than 10 comma-separated fields in each
input record.
Selecting a Data Source
The New Chart Wizard helps you select the data source from which to
create your org chart.
Note:
If you are creating a succession planning chart, see the Mapping Succession
Planning Fields topic.
ODBC database - OrgPublisher establishes a direct connection to any
ODBC - compliant database, retains all connection and field mapping
information.
XML - OrgPublisher matches data in the XML format to the OrgPublisher
input fields. If your XML data file contains an x-schema reference to the
Aquire schema, this reference must point to the downloaded Aquire
Create Your Charts/Selecting a Data Source
95
Aquire OrgPublisher 10 User Guide
schema or the Aquire schema must be copied to the directory containing
your XML data file.
Text - OrgPublisher uses existing data in a comma-delimited text file for
building an organization chart.
Multiple data sources - OrgPublisher allows you to build a single chart
from more than one data source, choices include ODBC, XML, and Text.
Blank chart - This option allows you to open a blank chart to build your
hierarchy manually.
Creating an Org Chart from ODBC
The New Chart Wizard also enables you to create a chart from a single
source, such as text, XML, or ODBC. You can also create a succession
planning chart.
1. Open OrgPublisher and select Run the New Chart Wizard radio
button from the OrgPublisher dialog. You can also click File from the
Main menu then New, or click the New button
New Chart Wizard opens.
in the toolbar. The
2. Accept the default selection of Organizational chart and click Next.
The Select a data source dialog opens.
3. Select the ODBC database button and click Next.
4. Select the ODBC Data Source Name (DSN) for your database from
the pull-down list, or click New data source to navigate to the
source file. Click Next.
Note:
If you elect to return to this dialog for any reason, you must reenter the DSN
information.
5. Depending on your data source selection, you can select a database
table, view, or query that contains the data for your chart. Or, you
can select the Custom SQL radio button and type your own query. if
the data is not correct, click Back to connect to the another
database. Click Next.
6. The Data preview dialog lets you verify that you have the right
source and that your records contain the appropriate data. Click
Next.
7. In the next dialog, select the Use standard OrgPublisher field
order radio button if your database was built for OrgPublisher. Or,
96
Create Your Charts/Selecting a Data Source
Aquire OrgPublisher 10 User Guide
select the Specify custom field order radio button if you want to
sequence your custom fields in a specific order. Click Next.
8. If you chose to Use standard OrgPublisher field order in the
previous step, proceed to Step 11.
9. If you chose to Specify custom field order, the Data preview
dialog enables you to map your field names to the OrgPublisher input
layout.
10.Click the pull-down arrow above the field you want to map, and
select the appropriate OrgPublisher record name from the pull-down
list. The default option is Do not import for those fields you don't
have to map. For instance, if your database contains fields identified
as ParentID or BoxID, these fields will automatically map to the
standard OrgPublisher record input field.
Other mapping options in the list include Custom Field, Parent Box
ID, Box ID, Person ID, Position Sequence, Level Number, etc.
You can also click Apply Standard Mapping if you choose not to
map fields manually.
You will most often use this dialog to identify your custom fields.
Duplicate usage of a field type is limited to custom fields.
If you are creating a succession planning chart, see Mapping
Succession Planning Fields for additional information.
When you finish mapping, click Next.
11.You can accept the default in the last dialog to Launch the style
wizard to format your chart, or you can clear the check box and
click Finish to open your chart.
Creating an Org Chart from an XML File
The New Chart Wizard enables you to create a chart from a single source,
such as text, XML, or ODBC. You can also create a succession planning
chart, see Mapping Succession Planning Fields for additional information.
1. Open OrgPublisher and select Run the New Chart Wizard radio
button from the OrgPublisher dialog. You can also select File from
the Main menu then New from the pull-down menu, or click the New
button
in the toolbar. The New Chart Wizard opens.
2. Select the XML file button and click Next.
3. Type or Browse to the Chart XML file. Click Next.
4. The Data Preview dialog lets you verify that you have the right
source and that your records contain the appropriate data. See the
Create Your Charts/Selecting a Data Source
97
Aquire OrgPublisher 10 User Guide
Specifying a Custom Field Order procedure for additional
information. Click Next.
5. You can accept the default in the last dialog to Launch the style
wizard to format your chart, or you can clear the check box and
click Finish to open your chart.
Creating a Custom XSLT File
As an alternative to downloading a valid XSLT file from the Aquire web
site, you may want to create a custom XSLT file that is valid for your data.
To implement your own schema for translating XML data to OrgPublisher’s
input format, you will need to add the tag name and file name of your
XSLT file to the XSLTFileList.xml file. This file is usually located in your
C:\Program Files\OrgPub8\TVXMLCon\XML directory.
The following code samples are truncated to conform to this document’s
margin settings. When modifying this code make sure that there are no
spaces inserted or this code may not perform properly. If you have any
questions about this process, please contact Aquire Support at
[email protected].
Sample of original XSLTFileList.xml file
<?xml version = “1.0”?>
<OP40FileList>
<urn_schemas_biztalk_org_lawson_com_0q3yhkct_xml>LawsonToOP40
V1.xsl</urn_schemas_biztalk_org_lawson_com_0q3yhkct_xml>
</OP40FileList>
Sample of modified XSLTFileList.xml file
<?xml version = “1.0”?>
<OP40FileList>
<urn_schemas_biztalk_org_lawson_com_0q3yhkct_xml>LawsonToOP40
V1.xsl</urn_schemas_biztalk_org_Lawson_com_0q3yhct_xml>
<x_schema_myschema_xml>mytoOP40V1.xsl</
x_schema_myschema_xml>
</OP40FileList>
98
Create Your Charts/Selecting a Data Source
Aquire OrgPublisher 10 User Guide
Note:
The underscore (_) character must be substituted for period (.) and comma
(,) characters.
Creating an Org Chart from a Text File
The New Chart Wizard also enables you to create a chart from a single
source, such as text, XML, or ODBC. You can also create a Succession
Planning chart.
1. Open OrgPublisher and select Run the New Chart Wizard radio
button from the OrgPublisher dialog. You can also select File from
the Main menu then New, or click the New button
The New Chart Wizard opens.
in the toolbar.
2. Select the Text file button and click Next.
3. Type or Browse to the Chart Text File. Click Next.
4. The Data preview dialog lets you verify that you have the right
source and that your records contain the appropriate data. If your
data file includes field names, select the First row contains
column names check box. OrgPublisher then removes the Field
number column headings. Click Next.
5. In the next dialog, select the Use standard OrgPublisher field
order radio button if your database was built for OrgPublisher. Or,
select the Specify custom field order radio button if you want to
sequence your custom fields in a specific order. Click Next.
6. If you chose to Use standard OrgPublisher field order in the
previous step, proceed to Step 9.
7. If you chose to Specify custom field order, the Data preview
dialog enables you to map your field names to the OrgPublisher input
layout.
8. Click the pull-down arrow above the field you want to map, and
select the appropriate OrgPublisher record name from the pull-down
list. The default option is Do not import for those fields you don't
have to map. For instance, if your database contains fields identified
as ParentID or BoxID, these fields will automatically map to the
standard OrgPublisher record input field.
Other mapping options in the list include Custom Field, Parent Box
ID, Box ID, Person ID, Position Sequence, Level Number, etc.
Duplicate usage of a field type is limited to custom fields. You can
also click Apply Standard Mapping if you choose not to map fields
manually.
Create Your Charts/Selecting a Data Source
99
Aquire OrgPublisher 10 User Guide
If you are creating a succession planning chart, see Mapping
Succession Planning Fields for additional information.
You will most often use this dialog to identify your custom fields.
When you finish mapping, click Next.
9. You can accept the default in the last dialog to Launch the style
wizard to format your chart, or you can clear the check box and
click Finish to open your chart.
Extracting Data into a Text File
Extract data into a comma-separated text file in the order required by
OrgPublisher’s Input File.
For example, if your database is on a mainframe, you can extract or query
the data and then download it as an ASCII text file to your PC. If the data
is not laid out correctly, you must reorder it before you create your org
chart.
You can save the comma-separated text file in an ODBC -compliant
database, and then establish a database connection with OrgPublisher to
reorder the data by selecting the appropriate columns in the New Chart
Wizard.
Note:
If you are creating a succession planning chart, see the Mapping Succession
Planning Fields topic.
Creating an Org Chart from Multiple Data
Sources
The New Chart Wizard also enables you to create a chart from a single
source, such as text, XML, or ODBC. You can also create a Succession
planning chart.
Note:
Real-time publishing is not available when creating a chart from multiple data
sources .
1. Select File from the Main menu then New from the pull-down menu.
You can also click the New button
Wizard opens.
in the toolbar. The New Chart
2. Select the Organizational chart radio button, and click Next. The
Select a data source dialog opens.
3. Select the Multiple Data Sources button, and click Next. The
Multiple data sources dialog opens.
100
Create Your Charts/Selecting a Data Source
Aquire OrgPublisher 10 User Guide
4. Click the appropriate button to Select a Primary Data Source.
Click Next.
5. Follow the prompts for the data source you select, ODBC database,
XML file, or Text file.
Note:
Web Administration supports opening multiple data base charts (OCB, CSV )
as long as those files exist in the SourceCharts folder. Web Administration ,
however, does not support creating multiple data source charts from these file
types, neither does it support editing the text file charts using the Data
sources dialog.
6. The next dialog asks you to either accept the default name, Primary
data source, or type a "nickname" for this data source. Click Next.
7. The next dialog verifies that you want to use another data source.
Select the Yes radio button and click Next.
8. The Multiple data sources dialog allows you to identify what the
additional data source contains.
If you select Additional boxes, positions, and persons, you can
also select the All new positions have the following position
type check box and select the corresponding position type.
If you select Additional fields for existing records, choose the
corresponding data element from the Link to pull-down list.
If you select Succession planning information, choose the
corresponding data element from the Link to pull-down list. See
Mapping Succession Planning Fields for more information.
Click Next.
9. In the next dialog, click Select an additional data source then
click Next.
10.Follow the wizard prompts to add the additional data source, ODBC
database, XML file, or Text file. Click Next.
11.Either accept the default name, Secondary data source 1, or type
a "nickname" for the additional data source. Click Next.
12.You can again access another data source by selecting Yes, and
repeating Steps 4 - 11. Select No to complete the wizard.
13.You can accept the default in the last dialog to Launch the style
wizard to format your chart, or you can clear the check box and
click Finish to open your chart.
Note:
By design, only the last data source in the list can be deleted.
Create Your Charts/Selecting a Data Source
101
Aquire OrgPublisher 10 User Guide
Custom fields and associated data are NOT deleted from the chart when you
delete a data source. These custom fields, or just the custom field data, must
be deleted manually using the Custom Field Properties dialog.
Choosing Standard or Custom Field Order
When creating a new chart from data, you must choose between a
standard field or map to a custom field order.
1. Follow the New Chart Wizard dialogs, selecting the data source and
database table or query. Click Next in the Data preview dialog.
Figure 81
2. The next dialog defaults to the Use standard Org Publisher field
order radio button. As noted in this option, you should accept the
default only if your database was created with the OrgPublisher Input
File Layout in mind. This layout provides information in a specific
order, and relies on a person-to-person, position-to-position, or
department-to-department relationship. Unique IDs are used for the
parent box, individual employees, boxes, jobs, and more. If you
accept this default selection click Next to finish the wizard.
3. If your database was not designed to follow the OrgPublisher input
file layout, select the Specify custom field order radio button.
Click Next to map your field order to work with the OrgPublisher
layout.
4. Follow the link in Step 3 to map your field order then complete the
New Chart Wizard.
Selecting a Database Table, View, or Query
When creating a chart from ODBC, you must select the table, view or
query to extract data from the database.
102
Create Your Charts/Selecting a Data Source
Aquire OrgPublisher 10 User Guide
1. Follow the New Chart Wizard dialogs, selecting the ODBC option and
navigating to your ODBC database.
2. The dialog that opens next depends on the type of database you
select. For example, if you select an SQL database the next dialog
may be a login screen for SQL. Click the drop-down arrow and select
from a list of tables, views, or queries.
Figure 82
If your database does not already contain tables, views or queries
you may have to write your own SQL statement.
3. If you want to write your own SQL statement select the Custom SQL
radio button and type your query string.
Create Your Charts/Selecting a Data Source
103
Aquire OrgPublisher 10 User Guide
Figure 83
4. You can later modify this statement in the chart by selecting Data
from the menu then Manage data sources from the options list to
open the Data Source dialog. Click Connection Info to open the
Database Connection dialog.
5. Click Next to continue the wizard and create your chart.
Note:
If you are connecting to a Microsoft Excel file, you must create a named range
identifying where the data is located within the spreadsheet.
Mapping to Multiple Field Types
1. You may need to map a single column of data as more than one field
type when creating a chart from data. For instance, you have a
column of data that contains the Employee Number. You want to use
it as input field 5 (Person ID) as well as display the field in the chart
as a custom field. Scroll down to the last field type option and click
Multiple. The Multiple Field Mapper dialog opens.
104
Create Your Charts/Selecting a Data Source
Aquire OrgPublisher 10 User Guide
Figure 84
2. Click Add. The Multiple Field Mapper inserts Custom Field as the
first mapping type.
3. In the Name column, click Custom Field to display all the available
options.
Create Your Charts/Selecting a Data Source
105
Aquire OrgPublisher 10 User Guide
Figure 85
4. Select the field type you want to apply.
5. Click Add to insert the second instance of the field.
6. Repeat Steps 3-5 if applicable.
106
Create Your Charts/Selecting a Data Source
Aquire OrgPublisher 10 User Guide
Figure 86
7. Click OK when you have finished mapping the field. The mapped
column is now labeled as Multiple.
8. When you have finished mapping your fields, click Next to continue
with the New Chart Wizard.
Resolving Reporting Relationship Problems
If you open a chart that contains incomplete or invalid reporting
relationships, the Errors Found in Data dialog opens when you open your
chart. This dialog displays the incomplete hierarchy, or orphan records.
The Errors Found in Data dialog finds information in the data for Parent
Box ID, Box ID, Box title, Record type, ID, Last name, First name,
and more for each error record.
Note:
The records listed from your input file, and any boxes reporting to these
records, will not display in your org chart. Review the records listed to
determine the problem.
1. If you want to quickly open the chart without resolving the
relationship problems, you can select the "top of chart " record, for
instance the CEO or president box, to display your chart with only
the valid records. This represents an incomplete organization.
The only valid record in the Errors Found in Data dialog that can
display a blank Parent Box ID field is the "top of chart" box, usually
Create Your Charts/Selecting a Data Source
107
Aquire OrgPublisher 10 User Guide
the CEO or President of the company, because that box does not
report to another box.
Select a record of, for instance, a manager to display all the boxes
that report to that box. However, this closes the Errors Found in
Data dialog and does not resolve the reporting relationship problem.
You may see records listed in this dialog that display a Parent Box
ID. This suggests that the actual record for that box is not in your
database, or the box ID is invalid.
You may see records listed in the dialog that display a blank Parent
Box ID field. This suggests that these records in your database are
incomplete, with no parent box ID recorded.
2. To assist you in resolving errors in your source data, select the
records in the list and click Copy list to clipboard.
3. Open a Windows application, such as Microsoft Word or Excel.
in the toolbar to paste
4. Press CTRL+V or click the Paste button
the records. Either save this document or print it so that you can
research the invalid data and correct your HR database.
5. Close your chart and correct your database. Once your HR database
is corrected, reopen your org chart. The missing records now display
and the Errors Found in Data dialog does not open if all records have
been corrected.
Note:
If the Messages option is cleared in OrgPublisher Options menu list, the
Errors Found in Data dialog does not open even though you may have
reporting relationship problems.
Once you have corrected your data, you can turn off messages in order to
increase your processing time.
Addressing Warnings and Error Messages
Message 1
Too few fields in record #, Abort file read?
The Messages option under the Options menu must be checked for this
message to appear. The message is caused by having less than 10 fields
in any record within the Input File. The number of the records in error is
displayed in the message.
108
Create Your Charts/Selecting a Data Source
Aquire OrgPublisher 10 User Guide
Message 2
# records read. Do you wish to continue?
The Messages option under the Options menu must be checked for this
message to appear. This message allows you to stop OrgPublisher reading
the Input File at a certain record limit. The following setting determines
the number of records read each time before this warning is displayed:
[Settings]
warn after=1000
This setting can only be changed by manually editing the OrgPublisher
registry settings. The default setting is to warn after every 200,000
records are read.
Message 3
Warning!
Chart is too wide to be displayed correctly. Please alter the chart
style and/or reduce the width and spacing of boxes.
This message occurs if the width of the chart to be displayed is larger than
30,000 characters across.
To resolve this problem, try changing the chart style by selecting Format
from the menu bar, then Chart from the pull-down menu, and then
choose a more compact chart layout in the Format dialog.
In addition, try reducing the character width of boxes and the horizontal
spacing between boxes. Setting the overall chart font to a smaller font
such as Arial 6 point, using the Font tab of the Format dialog will also
reduce the chart width. Using the Drill-up/Drill-down features in
OrgPublisher can also solve this problem because it limits the number of
organizations levels displayed at any one time. As a last resort, break up
your org chart into smaller, more manageable charts.
Message 4
OLE 2.0 initialization failed. Make sure that the OLE libraries are
the correct version.
This message is displayed when OrgPublisher is unable to locate a
required OLE2 file on your PC.
Create Your Charts/Selecting a Data Source
109
Aquire OrgPublisher 10 User Guide
During the OrgPublisher setup process OLE2 files are copied to the
Windows System directory. Check that these files have been installed. Try
rebooting your PC and then reinstalling OrgPublisher.
If your PC is connected to a network, ensure that you are able to write to
the Windows System directory. If you do not have the necessary network
access, request that your networking group install the product for you.
Message 5
Failed to allocate space for objectName.
OrgPublisher has run out of available memory. Close OrgPublisher and all
other programs. Restart OrgPublisher and open the org chart again. Also,
try restarting Windows before running OrgPublisher. If the situation
persists, try adding more memory to your PC or reduce the size of your
org chart.
Message 6
Warning! The maximum number of organization levels has been
exceeded.
The org chart has exceeded 499 levels. This may be caused by an invalid
reporting hierarchy.
Please email Aquire Customer Support at [email protected] if you
suspect your data is correct.
File Types
OrgPublisher potentially creates several types of files that contain
different information for your chart.
110
Create Your Charts/Selecting a Data Source
Aquire OrgPublisher 10 User Guide
File Extensions
OCP
File Contents
OrgPublisher published chart file: contains the OCB,
ODB, ODBX, CSV, and OTM files combined; if you are
working with an EChart, contains information to
contact the EChart server.
OTM
PluginX - Binary chart/template file combined.
Template formatting file: OTM file matches the ODB,
ODBX, or OCB chart file.
HTM
Contains all formatting, custom field labels, publishing
definitions, styles, and groups.
HTML code page: main chart page that determines the
browser type and invokes the JS file for downloading
the ActiveX Plugin.
OCB
ODB
OCS
ODBX
OPW
DLL
BAT
Also applicable to EChart, both thin and rich client.
HTML code page: contains chart data ASCII file;
comma-delimited text file (in OrgPublisher format).
Contains "static snapshot" of the data (not dynamic
data).
Database connection file: contains ODBC connection
and DSN information only, no chart data.
EChart file for both thin and rich client types; contains
EChart data; must be in the same web directory as the
EChart OCP file.
Multiple sources chart file: also pertains to single text
data-source that is custom mapped or contains a
header row. Maps information to text file only, contains
no chart data.
Web Administration file.
EChart chart file: contains DLL for both thin client and
rich client. DLL file is named the same as the published
chart file and must be in the same directory as the
EChart OCP file.
Needs to be configured in ISAPI Filter setup (IIS6) or
Handler Mapping (IIS7).
EChart batch file for both thin and rich client; used for
automating EChart publishing via the scheduling
option.
Sorting Boxes
In OrgPublisher you can sort by boxes in the Chart View across rows
manually, by box ID, or by a selected field. After remodeling a chart using
Create Your Charts/Selecting a Data Source
111
Aquire OrgPublisher 10 User Guide
drag and drop editing, you can select the Sort by this field option to sort
the chart on box ID left to right.
Note:
Charts saved in previous versions of OrgPublisher open with the original
sequencing unaffected. If you choose to sequence by field, this sequencing
overrides any previous sequencing and priority choices.
Charts built from data are always sorted left to right by box ID. The Sort
manually option is enabled by default.
1. Select Options from the Main menu and Sort options from the pulldown list. The Sorting Options dialog opens.
2. Select the radio button that describes the sort option you want to
use, Sort manually, Sort by Box ID, or Sort by this field.
Selecting the Sort manually option enables you to place boxes
where you want them in a row, or place position types, etc. where
you want them in a box. Selecting Sort by Box ID enables
OrgPublisher to automatically sort boxes by the ID in field 2.
Selecting Sort by this field enables you to select a custom field by
which to sort the boxes.
3. If you select Sort by this field, click the down-arrow and select the
field by which you want to sort, such as Last name or Box title.
4. Click OK to close the Sorting Options dialog and apply your sort
option.
Note:
Although this section provides information on manually editing a chart,
remember that if you want the changes to remain permanent, you must apply
the changes to your HR database. When your HR data is refreshed and you
open your chart, your manual changes are overwritten.
Using Auto Build
The Auto Build feature automatically controls how positions are placed in
boxes attached to the report-to box. OrgPublisher's former Auto sort
option (sorting job titles within a box based on the priority for the position
type and a person’s last name ) is managed with Auto Build. This option:
• Sorts job titles on job ID top to bottom.
• Sorts people on last name within a job title.
• Using Auto Build with Advance Box Layout Editor for formatting follows
separate rules.
112
Create Your Charts/Selecting a Data Source
Aquire OrgPublisher 10 User Guide
Auto Build Options
Use Auto Build to place positions within an org chart. These options are
effective only in View Mode. You can choose from:
Auto Build
Options
Normal
Reports in one
box
Reports in box
below
Description
The default setting. Each person is in a box because the
box IDs are based on the employee ID.
Managers and direct reports are contained in a single
box.
Managers are in their own boxes above their direct
reports, which are contained in a single box.
The options other than Normal are useful for org charts using employee
ID and supervisor ID as the box ID and parent box ID, respectively.
Note:
Planning charts are always in Build Mode, and do not reflect special
formatting, such as multi-level peer display, reports in the same box as their
manager, or the advanced box layout settings.
Selecting an Auto Build Option
1. Select Format from the Main menu then Chart from the pull-down
menu. The Format dialog opens to the Chart tab.
2. In the Auto Build Value field, select the Auto Build option for the
chart.
3. Click OK. OrgPublisher places the positions in the chart as specified.
Managing Data Sources
After you have created a chart from a multiple sources, text, XML, or
ODBC, you can manage those sources through the Data menu.
Note:
Web Administration supports opening multiple data base charts (OCB, CSV )
as long as those files exist in the SourceCharts folder. Web Administration,
however, does not support creating multiple data source charts from these file
types, neither does it support editing the text file charts using the Data
sources dialog.
1. Click Data from the Main menu then Manage data sources from
the options list. The Data sources dialog opens. This dialog displays a
list of all databases used to create your chart. You can delete a data
Create Your Charts/Selecting a Data Source
113
Aquire OrgPublisher 10 User Guide
source, add a new data source, or modify the properties of a data
source.
To Delete a Data Source
2. Select the last data source displayed in the Data Sources dialog.
Click the Delete button
chart.
Note:
to remove the data source from your
By design, only the last data source in the list can be deleted.
A message asks you to verify that you want to delete the selected
data source.
3. Click Yes to delete the source and return to the Data sources dialog.
4. Click Close.
Note:
Custom fields and associated data are NOT deleted from the chart when you
delete a data source. These custom fields, or just the custom field data, must
be deleted manually using the Custom Field Properties dialog.
To Add a Data Source
1. Click the New button
to add another data source to your
chart. The New Chart Wizard opens at the Additional data source
dialog.
2. Follow the wizard prompts to add the data source.
3. Click Finish to close the New Chart Wizard and return to the Data
sources dialog.
4. Click Close.
Your chart reflects the new data.
To Modify a Data Source
1. Click the Properties button
to modify the data fields. The
New Chart Wizard opens at the Data preview dialog.
2. Follow the wizard prompts to modify the data properties.
3. Click Finish to close the New Chart Wizard and return to the Data
sources dialog.
4. Click Close when you are finished modifying the data sources.
114
Create Your Charts/Selecting a Data Source
Aquire OrgPublisher 10 User Guide
Your chart reflects the updates.
To Review or Configure Connection Information
1. Click the Connection Info button
to review or configure
your connection information. The Database Connection dialog opens.
2. To configure the connection information, click Configure. The dialog
fields are now enabled for editing.
3. Modify the connection information as needed and click Verify.
4. Click OK when you have finished configuring the database
connection to close the dialog.
Using the Select a Chart to Open dialog
You can choose to add or delete charts, open an existing chart, or modify
a chart in Web Administration using the Select a Chart to Open dialog.
• Open OrgPublisher Web Administration in your browser. The Select a
Chart to Open dialog opens.
• The Select a Chart to Open dialog defaults to the detailed list of files.
You can change that to view large icons or small icons.
Field
Chart name
Type
Modified by
Modification
date
Lock Status
Locked by
Locked on
Description
The name of the chart in Web Administration.
The file type for the chart in Web Administration, such
as text file, or database connection.
The login name of the person who last modified the
chart in Web Administration.
The date and time the chart was last modified in Web
Administration.
Indicates whether the chart is Locked or Not locked
in Web Administration.
The login name of the person who has locked the chart
in Web Administration.
The date and time the chart was locked in Web
Administration.
• If you want to open a new chart, click New Chart. The New Chart
Wizard opens. Follow the dialog prompts to create your chart.
Create Your Charts/Selecting a Data Source
115
Aquire OrgPublisher 10 User Guide
• If you want to delete a chart, select the chart from the records list and
click Delete Chart. A message verifies that you want to delete the
record, as you cannot "undo" that action. Click Yes to delete or No to
cancel the action.
• If you want to import an OrgPublisher chart from a disk drive, click
Import. The Import OrgPublisher Chart dialog opens. Type or Browse
to the location of the chart you want to add to OrgPublisher with Web
Administration. Click Import.
116
Create Your Charts/Selecting a Data Source
Aquire OrgPublisher 10 User Guide
Manually Edit Charts
Note:
Although this section provides information on manually editing a chart,
remember that if you want the changes to remain permanent, you must apply
the changes to your HR database. When your HR data is refreshed and you
open your chart, your manual changes are overwritten.
Adding Boxes Under an Assistant Box
You can add reports to an assistant box type just as you can to other
boxes in the chart. OrgPublisher displays these boxes vertically
immediately below the assistant. Assistant boxes dropped on an assistant
box display like normal boxes and will not contain the special assistant
box formatting.
1. Click and release the Insert person/job button
the Normal box button
. (You can also use
.)
2. Move the mouse pointer over the assistant box title or job. Click the
mouse. The new box displays directly below the assistant box.
Note:
You cannot add a Partner box to an Assistant box. If you have an Assistant
box that has several reporting boxes, you should consider identifying that box
as a Staff function box, rather than as an assistant. You can add several
reporting boxes to an Assistant box, but since they are all displayed directly
below the assistant, more than one or two boxes can make viewing your org
chart difficult.
Only Staff Function position types can reside in a Staff Function box.
Changing a Chart Title
You can change the title of your organizational chart at any time. You can
also use the Chart tab of the Format dialog or select Format from the
Main menu and Title from the options list.
1. Click the chart title text to select it in the Chart View. A red box
outlines the title.
2. Click the title again to highlight the text.
3. Type the new chart title and click somewhere in the chart or press
ENTER. The new chart title displays in the chart.
Create Your Charts/Manually Edit Charts
117
Aquire OrgPublisher 10 User Guide
Changing a Job or Box Title
You can change job and box titles in your chart at any time.
1. Double-click on the box title or job title in the Chart View. The
Rename Box/Job Title dialog opens.
2. Type the new title over the old one. If you are changing the box title
and there are multiple titles existing in the chart, you can also select
a title from a drop-down list.
3. Click OK. The new title displays in the chart box.
Changing a Name
In OrgPublisher, you can change a person's name by using the Update
Person dialog.
1. Double-click the person’s name in the Chart View, or if a name hasn't
been entered, the default text, such as "Manager name.” The Update
Person dialog opens.
2. Type the new name in the First name, Second, or Last name
fields.
3. You can also update the ID field in this dialog, if required.
4. Click OK. The name displays in the chart box.
In addition, the ID field contains the unique ID information
necessary to enable the use of multi-relationship icons and EChart
security.
Changing Direct Reports to Indirect Reports
Organizations often have people who may report to more than one
manager in terms of a project, but who belong to just one manager’s
department. By default, OrgPublisher displays this type of indirect
relationship, or matrix reporting, as a dotted line box and connecting line
in the Chart View.
Indicating that one person reports to more than one manager is
accomplished with multiple records and use of position types.
One box must be designated position type "E" for Employee. Other boxes
must be designated position type "I" for indirect report. (Indirect reports
are not counted for head count purposes. Indirect report boxes are
118
Create Your Charts/Changing a Job or Box Title
Aquire OrgPublisher 10 User Guide
displayed with dotted lines around the box, as well as the lines to the
report-to box.) When building from data, you need multiple employee
records — one for each manager (see sample of data below).
If you are building from data the records should look like the following:
ParentBoxID
BoxID
Box Title Record Type ID Last Name First Name
Manager 1
1234
xxx
E
Smith
Carol
Manager 2
1234a
xxx
I
Smith
Carol
Manager 3
1234b
xxx
I
Smith
Carol
You can modify the display for indirect boxes and connecting lines using
the Format menu option. In addition, you can add multi-relationship icons
to boxes with indirect reports.
1. Verify that you are in Build Mode then double-click on the name in
the chart that you want to change from a direct report to an indirect
report. The Update Person dialog opens.
2. Click Indirect Report in the Position type column.
3. Click OK. The box and connecting line now display in the chart with a
dotted line, indicating an indirect reporting relationship.
If you change an assistant from a direct to an indirect report, the
internal record type also changes, from A (Assistant) to IA (Indirect
assistant).
Copying Job Titles
You can copy job titles and paste them to other boxes in the chart.
1. Press and hold the CTRL key. Press and hold the left mouse button
over the job to copy.
2. Drag the pointer to the new box or job title. Release the mouse
button and then the CTRL key. The job title is inserted below the
selected location.
OrgPublisher automatically inserts an open position below the job
title.
Create Your Charts/Copying Job Titles
119
Aquire OrgPublisher 10 User Guide
Deleting Chart Components
You can manually delete chart components in OrgPublisher, such as
people, job titles, or boxes while you are in Build Mode.
Delete a box from a chart:
1. Select the box title text.
2. Press DELETE on your keyboard or right-click and select Delete from
the options list. You can also select Edit from the Main menu then
Delete from the pull-down menu. The selected box and subsidiary
boxes are removed from the chart.
Delete a Job title from a box:
1. Select each person under the job title in the chart box.
2. Press DELETE on your keyboard or right-click and select Delete from
the options list. You can also select Edit from the Main menu then
Delete from the pull-down menu. OrgPublisher automatically inserts
an open position.
3. Select the open position. Press DELETE on your keyboard or rightclick and select Delete from the options list. You can also select Edit
from the Main menu then Delete from the pull-down menu. The job
title is automatically removed. If the deleted job title is the only one
in the box, the box is also removed.
Delete a person from a box:
1. Select the person’s name in the chart box.
2. Press DELETE on your keyboard or right-click and select Delete from
the options list. You can also select Edit from the Main menu then
Delete from the pull-down menu. The person and any custom fields
for that person are removed from the chart.
If a deleted person is the only one under a job title, OrgPublisher
replaces the person’s name with an open position.
Delete an Open position from a box:
1. Select the open position in the chart box.
2. Press DELETE on your keyboard or right-click and select Delete from
the options list. You can also select Edit from the Main menu then
120
Create Your Charts/Deleting Chart Components
Aquire OrgPublisher 10 User Guide
Delete from the pull-down menu. The open position and any custom
fields for the position are removed from the chart. If no other person
exists for a job title, deleting the last open position also deletes the
job title.
Drilling Through Chart Levels
If you want to display only a few levels within your chart, you can use
OrgPublisher’s Drill-up/Drill-down
feature. You can set the number of
levels that are displayed from the Custom levels dialog on the toolbar or
from the Style Wizard while creating a style for your chart. This feature is
available in both the OrgPublisher application and in a published chart in a
browser.
Drill-up
and drill-down
buttons are arrows that are placed above or
beneath boxes to indicate there are chart levels above or below them.
Click the arrows to move to other levels. Unless you change it, you move
up or down through the chart the number of levels shown in the Custom
levels dialog on the toolbar. Changing the number of levels to drill up is
useful when used with the Set Top of Chart
feature.
You can customize drill buttons to make your charts more cosmetically
appealing or to better match your corporate document style.
Note:
Drilling through a real-time chart automatically updates the chart.
To move up and down through the chart, set the top of chart and then set
the number of chart levels to display. You must show a minimum of two
custom levels.
Drilling tasks include:
Selecting Drilling Options
Showing a Portion of the Chart
Setting the Top of the Chart
Going to the Top of the Displayed Chart
Showing the Entire Chart
Create Your Charts/Drilling Through Chart Levels
121
Aquire OrgPublisher 10 User Guide
Editing an embedded org chart
You can edit linked or embedded charts from within the target application.
1. Double-click in the object to edit. The OrgPublisher toolbar and
editing area appear.
2. Make changes to the object using OrgPublisher’s editing tools.
3. If the chart is embedded, click outside the chart. The application’s
toolbar refreshes. Save the changes.
4. If the chart is linked, select File from the OrgPublisher Main menu
then Save from the pull-down menu. Exit to return to the original
application.
Editing the Style Bar Label
You can edit the label displayed in the Style Bar by right-clicking on the
bar or using the View menu option. The new text pre-pends the existing
text.
Note:
This option is not available if the Show styles in tabs option is enabled.
1. Right-click on the Style Bar and select Style Selector button then
Edit label from the options list. The Style button label text box
opens.
2. Type the label name and click OK. Or, click Cancel to close the text
box without modifying the label.
You can also select View from the main menu then Toolbars,
Styles Toolbar, Style selector button and Edit Label from the
options list. The Style button label dialog opens. Type the label name
and click OK or click Cancel to close the text box without modifying
the label.
Note:
The Edit Label option in both the Style and group selectors adds text in front
of the existing label name. It does not overwrite it.
Embedding an Org Chart in a Document
You can embed a chart in another COM automation-compliant document.
You can also use Previewing a Wall Style Chart to copy a modified chart.
You can also copy the print preview into Microsoft PowerPoint, and open
the search results in Microsoft Excel.
122
Create Your Charts/Editing an embedded org chart
Aquire OrgPublisher 10 User Guide
1. In OrgPublisher, save the chart to be embedded.
2. To select a box and all its reports, for instance the top box in the
chart hierarchy, click on the Box title.
3. Select Edit from the Main menu then Copy from the pull-down
menu.
4. Open the target application and document, such as Microsoft® Word
for Windows.
5. In the target document, select the point to insert the OrgPublisher
chart.
6. In the target application, select Edit from the menu bar then, in the
target application, select Paste from the pull-down menu. A copy of
the chart displays in the document.
Going to the Top of the Displayed Chart
You can return to the top of the current chart level in the Chart View after
you have scrolled to a specific box or after you have performed a search.
• Select View from the Main menu then Go to top of displayed chart
from the pull-down menu.
• You can also use the Go to top of displayed chart button
the toolbar.
from in
OrgPublisher displays the box at the top of the current drilling level and its
reporting boxes.
Inserting a Chart Title
When you insert the first box in a new chart, the text "Box 1" is
automatically inserted and selected for you to add the box name and
becomes the chart title. The text you type displays for both the box and
the chart. When you insert or type a title, the chart title remains the same
regardless of which portion of the chart is displayed.
A planning chart ordinarily displays an existing chart title, which you can
modify.
1. Right-click the chart title. Click again to clear Auto Title. The text
"Chart Title" appears.
Create Your Charts/Going to the Top of the Displayed Chart
123
Aquire OrgPublisher 10 User Guide
2. Double-click the text and type the title of the chart. Press ENTER.
3. Save the chart.
Or
Double-click on an existing chart title and type a new title.
Inserting a Person/Job Box
When you create a chart, you must insert a box before you add any other
components. This box must contain a person and a job. To insert these
two components at the same time, select the Person/Job box button
from the Insert toolbar. You can also add the person and job chart
components individually.
You can also see the Inserting the First Box and Person in a Chart
procedure in the Getting Started with OrgPublisher section of this book.
Inserting Additional Person/Job Boxes
Once you have inserted the first box into your chart, you can begin
building your chart levels by adding additional boxes.
1. Click and release the Insert Person/Job Box button
Toolbar.
in the Insert
2. Move the pointer over the box to which the new person/job box will
be reporting and click to insert a person/job box beneath the box you
selected.
3. Type over the Box title, Job title, and Name text with the
appropriate for the person for the new box.
Inserting Multiple Person/Job Boxes
Once you have inserted your first box into your chart, you can add several
boxes at once.
1. Press and hold the CTRL key. Click and release the Insert Person/Job
Box button
124
in the Insert toolbar.
Create Your Charts/Inserting a Person/Job Box
Aquire OrgPublisher 10 User Guide
2. Still pressing the CTRL key, move the pointer over each box under
which you want to place a new box. Click the mouse once for each
box you want to insert.
3. To insert the last box, release the CTRL key and click the mouse over
the last box under which the new box will be inserted.
Inserting a Staff Function Box
Note:
Only Staff Function position types can reside in a Staff Function box.
Unlike the process of inserting other chart components from the
OrgPublisher toolbar, inserting a staff function box to an existing chart
requires that you first create a staff function position type.
If you are working with an empty chart, the position type is already
available in the Position Type Wizard. The actual box type does not
contain special formatting by default, but you can format the box to your
specifications.
1. Once the position type is created, you add a box with a person and
job into the chart where you want to place the staff function.
2. Double-click on the name field to open the Update Person dialog and
select the Staff Function position type.
3. The staff function box title displays and the box may be repositioned.
Double-click on Staff Function to change the box title. If you add
reports to this box, a drill-down button displays and you must drill to
view those reporting boxes.
Inserting Assistant Boxes
An assistant is a special type of box that is inserted below and to the right
of a selected box. If you insert more than one assistant box, these boxes
alternate from the right and then to the left of the reporting box. The text
"Assistant Box" followed by the number of the box in the chart, is placed
into the box as the box title.
Note:
You can add reports to assistants in OrgPublisher, enabling you to show one
level of reporting boxes.
Inserting and labeling an Assistant box
You can add one or more assistant boxes in your org chart. Multiple jobs
and people can be placed in an assistant box.
Create Your Charts/Inserting a Staff Function Box
125
Aquire OrgPublisher 10 User Guide
1. Click and release the Insert Assistant button
Toolbar.
on the Insert
2. Move the mouse pointer over the box title or job under which the
assistant box will be inserted. Click the mouse.
3. The assistant box is inserted below and to the right.
4. Type a title for the assistant box.
Inserting multiple Assistant boxes
Multiple assistant boxes can be placed under a box, and multiple jobs and
people can be placed in an assistant box. Multiple assistant boxes inserted
under the same box alternate from right to left.
1. Press and hold the CTRL key. Click and release the Insert Assistant
button
in the Insert toolbar.
2. Still pressing the CTRL key, move the pointer over each box title or
job under which the assistant boxes will be inserted.
3. Click the mouse for each assistant you want to insert.
4. To insert the last assistant box, release the CTRL key and click the
mouse over the last box title or job.
Inserting Jobs
A job is a descriptive title for an employment position. You can insert as
many jobs as you want into one or more boxes. You can do this by either
inserting the box and job separately, or adding them at the same time by
using the Person/Job box button
. The text "Job Title" followed by the
number of the box in the chart displays. OrgPublisher places text for the
employee, manager, or other jobholder below the job title.
When you manually select the position type for a job, each job you insert
afterwards is for that position type until you change it or select the
automatic assignment of position types. For example, if you insert a job
and select an open position type, the jobs you insert afterwards are all for
open positions.
126
Create Your Charts/Inserting Jobs
Aquire OrgPublisher 10 User Guide
Inserting and labeling a job
1. Click and release the Insert Job button
on the Insert Toolbar.
2. Move the mouse pointer over the box title or job under which the
new job will be inserted. Click the mouse. The text Job Title and
Employee name are inserted in the box.
3. Type the name of the job and employee.
4. Use one of the following methods to assign a position type.
– Select Insert from the Main menu then Select position type from
the pull-down menu. The Select Position Type for Insert dialog
opens.
– Make sure the Automatically assign this Position Type check box
is marked. When you drop a job on a box title, a manager will be
created. When you drop a job on a manager title, an employee will
be created.
Or
– Select Insert from the Main menu then Select position type from
the pull-down menu. The Select Position Type for Insert dialog
displays.
– Select the Insert using this Position Type check box and click on
the position type you want to insert, for example Contractor. All of
the jobs that you insert are for contractors until you change the
position type.
5. Click OK.
Inserting multiple jobs
1. Press and hold the CTRL key. Click and release the Insert Job button
in the Insert toolbar.
2. Still pressing the CTRL key, move the job pointer over the box title
or job under which the new job will be inserted. Click the mouse.
3. To insert the last job, release the CTRL key and click the mouse over
the last box or job title under which the new job will be inserted.
Inserting Logos
OrgPublisher enables you to insert your company logo into your org chart.
The logo displays at the top of the chart in the Chart View, either to the
left or right, and appears on every page or window of your chart. You can
Create Your Charts/Inserting Logos
127
Aquire OrgPublisher 10 User Guide
also insert a logo as a watermark or background in your chart, or insert
special graphics or instructions instead of a logo. Valid file types are GIF,
JPG, TGA, PCX, and DIB.
Note:
The Logo Wizard inserts one logo per chart, across all styles .
1. Click the Logo Wizard button
in the Wizard View or select
Insert from the Main menu then Logo from the pull-down menu.
You can also select Tools from the Main menu then Logo Wizard
from the pull-down menu. If you are modifying an existing logo,
right-click on the logo. The Logo Wizard opens.
2. Type or Browse to the Logo file name. Click Next.
3. If you are deleting a logo, just delete the file name from this field.
Click Next, then Finish.
4. To add a logo to your chart, select the alignment you want for your
logo from the drop-down Alignment list.
5. Select the Show Logo check box if you want the logo displayed.
(You may create styles that will not display the logo.) A preview of
the logo is displayed. If the logo is correct, click Finish.
Click Back at any time if you need to change the logo or graphic,
then repeat these steps and click Finish.
Inserting Normal Boxes
A normal box is one of three types of boxes that you can insert into your
chart. It contains only the box title field and is always added directly
below the box it reports to.
You can also see the Inserting the First Box and Person in a Chart
procedure in the Getting Started with OrgPublisher section of this book.
Inserting a single box
1. Click and release the Insert Box button
on the Insert Toolbar.
2. Move the mouse pointer over the box title under which the new box
will be inserted. Click the mouse.
3. Type a title for the box.
128
Create Your Charts/Inserting Normal Boxes
Aquire OrgPublisher 10 User Guide
Inserting multiple boxes
1. Press and hold the CTRL key. Click and release the Insert Box button
in the Insert toolbar.
2. Still pressing the CTRL key, move the pointer over each box title or
job under which the new boxes will be inserted.
3. Click the mouse for each box you want to insert.
4. To insert the last box, release the CTRL key and click the mouse over
the last box title or job.
5. Type the box titles for each box.
Inserting Open Positions
Open positions are positions in your organization that are not presently
filled. Open positions retain the position type already assigned to the box ,
whether that is a manager, employee, etc. You can format and track open
positions separately from the filled positions in your chart, as well as drop
them on box titles, jobs, or other people. When you drop an open position
on a box title, a new job title is automatically created for the open
position.
Inserting an Open position
1. Click and release the Insert Open Position button
Toolbar.
on the Insert
2. Move the pointer over the box title, job, or person under which the
open position will be inserted.
3. Click the mouse. The text "Open position" displays in the box.
Inserting multiple Open positions
1. Press and hold the CTRL key. Click and release the Insert Open
Position button
on the toolbar.
2. Still holding the CTRL key, move the pointer over each box title, job,
or person under which the new person will be inserted. Click the
mouse.
Create Your Charts/Inserting Open Positions
129
Aquire OrgPublisher 10 User Guide
3. To insert the last person, release the CTRL key and click the mouse
over the last box title, job title or person.
Inserting Partner Boxes
OrgPublisher depicts the equal yet independent relationship of a business
partner by inserting and connecting a partner box on the same level and
to the right of the box on which it is dropped. Multiple jobs and people can
be placed in a partner box. When you insert a partner, the box number is
shown as the box title.
Inserting and labeling a Partner
1. Click and release the Insert Partner button
on the Insert toolbar.
2. Move the mouse pointer over the box title or job by which the
partner box will be inserted.
3. Click the mouse. The partner box is inserted to the right.
4. Type a title for the partner box.
Inserting multiple Partner boxes
Multiple partner boxes can be placed to the right of a box.
1. Press and hold the CTRL key. Click and release the Insert Partner
button
in the Insert Toolbar.
2. Still pressing the CTRL key, move the pointer over each box title or
job by which the Partner boxes will be inserted. Click the mouse for
each partner box you want to insert.
3. To insert the last partner box, release the CTRL key and click the
mouse over the last box title or job.
Inserting People
People are the employees, managers, and other personnel in your chart.
One person is automatically inserted whenever you place a job in a chart.
Additional people can be dropped on box titles, jobs and other people.
When you drop a person on a box title, a manager is created. If you
already have an employee position type in that box, OrgPublisher displays
130
Create Your Charts/Inserting Partner Boxes
Aquire OrgPublisher 10 User Guide
both positions. When you drop a person on a job title, the person inherits
the characteristics of the job.
When you drop a person on another person, the new person inherits the
existing person’s job title, and the new person’s name is placed directly
below the name of the existing person.
Inserting and naming a person
1. Click and release the Insert Person button
on the Insert Toolbar.
2. Move the mouse pointer over the box title, job, or person under
which the new person will be inserted. Click the mouse.
3. Type the name of the person.
Inserting multiple people
1. Press and hold the CTRL key. Click and release the Insert Person
button
in the Insert toolbar.
2. Still pressing the CTRL key, move the pointer over each box title,
job, or other person under which the new person will be inserted.
3. Click the mouse for each person you want to insert.
4. To insert the last person, release the CTRL key and click the mouse
over the last box title, job title or person.
Inserting Photos
In OrgPublisher you can insert photos in your chart boxes in the Chart
View. You can also insert graphics into your chart the same way as
photos. The accepted file formats are GIF, JPG, TGA, PCX, and DIB. In
addition, you can display photos in the Profile View.
Before you insert any photos or graphics, you should:
• Move all of your picture files into one directory to prevent selecting a
different path or URL for each photograph you insert. By keeping all of
your photos in one directory, you can type the base URL or path for
photos in the field, Base photo file path or URL in the Photo Wizard,
and it is saved for future photo insertions.
Create Your Charts/Inserting Photos
131
Aquire OrgPublisher 10 User Guide
• Set a default size for your photos. If you insert a photo that is larger
than the chart box, the box automatically widens to fit the photo. The
width of a chart box is the same for all boxes in the chart, which
means that all of the boxes in the chart change to the same width as
the box with the photo.
Once you have moved all of your photos and graphics to the same
directory and have modified them to be the same size, run the Photo
Wizard.
Insert a photo
1. Right-click on a name in the chart if you are working in a planning
chart. Select Photo Wizard. You can also click and release the
Insert Photo button
on the Insert Toolbar. Move the mouse
pointer over the box in which the photo will be inserted. Click the
mouse. The Photo Wizard opens.
2. Type or Browse to the Photo file name.
3. Type or Browse to the Base photo file path or URL. If you
browsed to the photo file name, the base path automatically displays
in this field. The base file path or URL is the path to the directory
where the photos or graphics are saved, the lowest level of the path
to the directory where the linked document is saved, such as file://
servername/profiles/.
Note:
If a full path is passed in with a photo file in field 15, the base URL is
overridden and the full path name is used. You must include the trailing
forward slash (/) in the base URL.
4. A preview of the photo is displayed. If the photo is correct, click
Finish. OrgPublisher inserts the photo or graphic into your org chart.
Click Back if you need to change the photo or graphic, then repeat
these steps and click Finish. The photo displays in the selected box.
Moving Boxes or Span of Control
You can move boxes or span of control from one location to another in
your chart. See the Moving Boxes in Print Preview section of this
document if you want to temporarily move boxes in order to print your
chart.
132
Create Your Charts/Moving Boxes or Span of Control
Aquire OrgPublisher 10 User Guide
1. Press and hold down the left mouse button
The box and all reporting boxes are selected.
over the box title.
2. Drag the box pointer to the new top box and drop it on the top box.
3. You can also drag and drop to rearrange boxes on a horizontal line
without changing the top box. Select a box and then drag it to
another location at the same level.
Moving Boxes with Cut and Paste
In previous versions of OrgPublisher, if the user right-clicked and cut a
box or span of control, the box disappeared from the chart. The box/span
of control now remains in the chart with lines drawn through. It will stay in
its current position until the user selects a box to paste (move) the cut
box or span of control. If the user changes their mind, they can right-click
on the selected box or press the ESC key and it will no longer be in a “cut”
status.
Figure 87
Moving Indirect Reports
Indicating that one person reports to more than one manager is
accomplished with multiple records and use of position types. Indirect
reports, also referred to as matrix reporting, are not counted for head
count purposes. Persons, jobs, and boxes defined as indirect can be
moved like other chart components.
If an indirect report is dropped on a job title or another name, the indirect
report inherits the new reporting relationship. If an indirect report is
Create Your Charts/Moving Indirect Reports
133
Aquire OrgPublisher 10 User Guide
dropped on a box title, the indirect report is moved to that box and
remains an indirect report. One box must be designated position type "E"
for Employee. Other boxes must be designated position type "I" for
Indirect Report.
1. Press and hold down the left mouse button over the indirect report
you want to move.
2. Drag the cursor to the new box or person and release the mouse
button. The indirect report and associated fields, including the multirelationship icon, if used, are inserted below the selected location.
Indirect report boxes are displayed with dotted lines around the box,
as well as the lines to the box.
When building from data, you need multiple employee records — one for
each manager (see sample of data below). The records should look like
the following:
ParentBoxID
BoxID
Box Title Record Type ID Last Name First Name
Manager 1
1234
xxx
E
Smith
Carol
Manager 2
1234a
xxx
I
Smith
Carol
Manager 3
1234b
xxx
I
Smith
Carol
Moving Jobs
You can move jobs from one location to another in your chart.
1. Press and hold down the left mouse button over the job you want to
move.
2. Drag the cursor to the new box title or job title, and release the
mouse button. The job title and associated people and custom fields
are inserted below the selected location.
Moving People
You can move people from one location to another in your chart.
1. Press and hold down the left mouse button over the person’s name.
2. Drag the cursor to the new box title, job title, or name, and release
the mouse button. The person and any custom fields associated with
the person are inserted below the selected location.
134
Create Your Charts/Moving Jobs
Aquire OrgPublisher 10 User Guide
When you drop a person on a job title or another person, the moved
person inherits the new job title.
When the last person is moved from a job title, OrgPublisher creates
an open position under that title.
Selecting Drilling Options
1. Select View from the Main menu then Drill-up/Drill-down from
the pull-down menu. An arrow displays next to the option to indicate
that drilling is enabled.
You can also click on the Drill-up/Drill-down button
in the toolbar,
or right-click in the chart area and choose Drill-Up/Drill-Down
from the options list.
2. To turn off the drilling option, select View from the Main menu then
click on the arrow next to the Drill up/Drill down option to clear it.
You can also customize the look of the drill buttons.
Setting the Top of the Chart
When you set the top of chart for the current style, the selected box and
reporting boxes are shown in the Chart View. To set the top box in the
chart style:
1. Click on the Box title you want to display as the top of your chart.
2. Select View from the Main menu then Set Top of chart from the
pull-down menu.
You can also use the Set top of chart
button in the toolbar.
OrgPublisher displays only the selected box and reporting boxes in both
the Chart View and Tree View for the current style.
Head counts in the Status Bar are adjusted to reflect only the portions of
the chart that are shown.
Undoing Changes
If you make a change in your chart, then decide that you do not want to
keep the change, you may be able to reverse, or undo that change. You
can undo most content-related changes, such as adding, deleting,moving,
and copying information.
Create Your Charts/Selecting Drilling Options
135
Aquire OrgPublisher 10 User Guide
Formatting changes, such as changes to box style, text size, or the color
of chart components cannot be reversed.
Undo a Content Change
• Click the Undo button
in the Main Toolbar.
Or
• Select Edit from the menu bar, then Undo from the pull-down menu.
Using Click and Drag Scrolling
When the mouse cursor sits over a blank area in the Chart View, the
cursor changes to a hand icon
. Using the click and drag scrolling
feature is another way to navigate through a large chart. This option is
always enabled and cannot be turned off.
• Click and hold down the mouse button. The hand closes
and allows
you to scroll through the chart levels by dragging or moving the mouse
wheel in the direction you want the Chart View to move.
For instance, if you want to see the bottom of a chart level, you want
the Chart View to move up. Click the hand in the background of the
view and drag upwards.
OrgPublisher Scrolling Enhancement
Chart scrolling is now updated with more of an iPod® scrolling feel. As you
drag to move a chart, it will appear more as a “toss.” As you release the
mouse, the chart continues to move with a gradual slow down to it’s new
position.
136
Create Your Charts/Using Click and Drag Scrolling
Aquire OrgPublisher 10 User Guide
Create and Use Custom Fields
Note:
Although this section provides information on manually editing a chart,
remember that if you want the changes to remain permanent, you must apply
the changes to your HR database. When your HR data is refreshed and you
open your chart, your manual changes are overwritten.
Fields 50 - 64 are standard succession planning custom fields provided by
OrgPublisher. These labels cannot be modified.
Adding a Custom Field
You can place custom fields directly below box titles, job titles or peoples’
names. Custom fields added below box titles contain information pertinent
to the whole department or team that the box represents. Custom fields
added below a job title contain information about that job. Custom fields
added below a person contain specific information about that person or
the position they hold.
You can also add custom fields with the Custom Field Wizard.
Note:
If the charts you are comparing do not contain a custom Position ID type,
OrgPublisher uses the ID in field 5 from the Input File Layout. If neither exist,
an error message appears and the comparison does not occur. In addition
new or renamed custom fields will not match when comparing harts and will
not be included in the change report.
Planners cannot add new custom fields when working in OrgPlan.
1. Select Data from the menu bar, then Custom Field Properties
from the pull-down menu. You can also use the Custom fields button
in the toolbar. The Custom Field Properties dialog opens.
2. Position the cursor where you want to add the new custom field,
either somewhere within existing fields, or at the end. Click Insert.
If you are inserting a field within the list of existing fields, a message
dialog verifies that this is what you want to do.
3. Enter the field name in the Field label column.
4. Press the TAB key to move to the Type column and select the type
of custom field you are adding, for instance Text.
Create Your Charts/Create and Use Custom Fields
137
Aquire OrgPublisher 10 User Guide
Custom Field
Type
Text
Hotspot
Numeric
Currency
Count
Summary
Descriptipn
Alpha/numeric field that displays company information like
phone numbers, email addresses, etc.
Displays whatever label or text you enter and links to a
destination URL or path you have assigned in the Hotspot
Wizard.
Any field containing numbers only for calculating data;
displays information such as hours of training and years of
employment. See also Inserting Formulas.
Displays monetary values, such as a department’s budget,
that can be summarized.
Includes a position type in the head count total or a head
count by position type that can be totaled.
Calculates summaries for a numeric custom field, such as:
Sum - Total T & E expenses.
Average - Years of employment.
Minimum - Training hours.
Maximum - Sales per salesperson.
Average
Minimum
Maximum
Percentage
Date
Email
Position ID
Percentage - Managers to employees.
Numeric summary field used to display the average derived
from a calculation of two or more numeric fields.
Numeric summary field used to display a minimum number
derived from a calculation of two or more numeric fields, for
example, a minimum salary range for a specific job.
Numeric summary field used to display a maximum number
derived from a calculation of two or more numeric fields for
example, a maximum salary range for a specific job.
Numeric summary field used to display a percent derived
from a calculation of two or more numeric fields.
Displays a date field in a specific format.
Displays an active link to an email address message.
(See Field 17 in the Input File Layout topic.) Tracking
position movement in OrgHistory. This field is used for:
- Tracking position movement in OrgHistory.
- Tracking what positions have been pinned in the side-byside Profile View.
- Importing a chart to Unifi. Unique position IDs are very
important for continued synchronization.
138
Create Your Charts/Adding a Custom Field
Aquire OrgPublisher 10 User Guide
Custom Field
Type
Descriptipn
Direct Count
In OrgPublisher Premier levels and span of control feature,
shows the direct report count for each manager, director,
vice president, and president by creating a custom field and
assigning the Direct Count custom field type.
Level Number In OrgPublisher Premier levels and span of control feature,
show the level number where the box is located in each box
by creating a custom field and assigning the Level
Number custom field type.
Levels Below In OrgPublisher Premier levels and span of control feature,
show the number of levels below a manager's box by
creating a custom field and assigning the Levels Below
custom field type.
Note:
OrgPublisher looks for the first custom field of Email type when sending email
to a group. If you decide to use more than one email address in your chart,
the primary email must be first in the custom field sequence order.
OrgPublisher does not change the value of numeric fields you import. For
instance, if you import 341.00, that's what the number is in OrgPublisher. If
you import 341, that's what OrgPublisher uses. Formatting cannot change the
value of the data you import.
5. If you selected a numeric, currency or count field type, press the
TAB key to move to the Calc Field and select the numeric field on
which to do the calculation. See the Formulas and Using Levels and
Span of Control topics for additional information.
6. Press the TAB key to move to the Population column and select the
position types, total head count, or planned head count to be
included in your calculation.
7. Press the TAB key to move to the Assigned To column. The Update
Assigned Custom Fields dialog opens. Select the position types you
want to assign the custom field to, such as Manager, Employee, or
All Position Types.
8. Choose where you want the field to display, Box title, Job title, or
Name. Click OK to accept your changes and close the text box.
The Sample field displays the contents of the first custom field for
this Type.
The Seq field displays the OrgPublisher Input File record sequence
for that custom field.
9. Click Apply or Close.
Create Your Charts/Adding a Custom Field
139
Aquire OrgPublisher 10 User Guide
Note:
In OrgPublisher Premier, the Summary Wizard inserts placeholders, if
necessary, which display in the Custom Field Properties dialog. These fields
within OrgPublisher, occupy sequences 20 -25, and are designated as field
types other than summaries, such as Text, Hotspot, or Email. As you create
summary fields, OrgPublisher starts placing them in sequence 26.
When importing numeric fields, make sure that you do not use any leading
symbols, such as dollar signs. Also, verify that decimal places are set the way
you want them prior to importing those fields into OrgPublisher.
Changing the Contents of a Custom Field
You can modify the contents of a custom field at any time.
1. Double-click on the contents of the field in the chart box to select it
for editing.
2. Type new field information and either press ENTER or click elsewhere
in the Chart View. The new information displays in the box.
Changing the Custom Field Label
You can change the custom field label, or name, within the body of the
chart, or by using the Custom Field Properties dialog. Custom field labels
change in all the views.
1. Double-click on the custom field label in the Chart View.
2. Type the new name and press ENTER. The label is changed
throughout the chart.
Or
1. Select Data from the menu bar, then Custom Field Properties
from the pull-down menu. You can also click the Custom fields button
in the toolbar. The Custom Field Properties dialog opens.
2. Double-click in the Field label to highlight the current field name.
3. Type the new name and click Close or Apply.
Designating Custom Fields as Not Searchable
With OrgPublisher you can designate custom fields as not searchable in
the published chart. End users will still be able to see these fields in the
chart, but will not be able to conduct a search using that data.
140
Create Your Charts/Changing the Contents of a Custom Field
Aquire OrgPublisher 10 User Guide
Note:
Published real-time charts use IIS security only. Custom field, group, and
styles security do not apply.
Working in OrgPlan, planners cannot add or delete custom fields. The
Administrator maintains control over the custom fields to use in the planning
chart.
1. Select Data from the Main menu then Custom field properties
from the options list. You can also click the Custom fields
in the toolbar. The Custom Field Properties dialog opens.
button
2. Select the custom field you do not want end users to find when
conducting a search in the published chart by clicking on the gray cell
next to the custom field name.
3. Click Security. The Custom Field Security dialog opens.
4. The check box at the top of the dialog determines if the field is
searchable in the Search View and Search dialog. Select the check
box if you want to allow end users to search on this field name. Clear
the check box if you do not want to allow end users to search on this
field name.
If you are publishing your chart as a secured EChart, you can also
secure customs fields. See the Securing an EChart Custom Field
procedure for details.
5. Click OK to accept the change and return to the Custom Field
Properties dialog.
6. Click Apply to accept the change in the current chart and continue to
work in the dialog. Click Close to exit the Custom Field Properties
dialog.
Note:
Keep in mind when you choose to show or hide fields that all information you
can view in the OrgPublisher chart or search results list is also displayed when
you copy the chart to Microsoft PowerPoint or the search results to Microsoft
Excel.
Making a field not searchable does not hide it in the chart or other views.
Displaying a Custom Field
The Assigned To field in the Custom Field Properties dialog determines
where the custom field is displayed in the chart. EChart field security,
such as securing a field hierarchically or by group, also affects whether or
not end users can view custom fields .
Create Your Charts/Displaying a Custom Field
141
Aquire OrgPublisher 10 User Guide
Note:
Planners can modify any data fields displayed in the Chart View. Data fields
you, the administrator, want to keep in the chart, but do not want modified
can be displayed in the Profile View. And since planners cannot add or delete
custom fields, you still maintain control over the custom fields you decide to
use in the chart.
1. Select Data from the Main menu then Custom Field Properties
from the pull-down menu. The Custom Field Properties dialog opens.
You can also use the Custom fields button
in the toolbar.
2. Position the cursor on the custom field, and press the TAB key to
move to the Assigned To column.
3. Select the position types for this custom field and click Apply.
Displaying the Properties of a Custom Field
1. Right-click on the data content of a custom field. Select Custom
Field Properties from the drop-down menu. The Custom Field
Properties dialog displays with a list of the custom fields for your
chart. You can also click the Custom fields button
in the toolbar.
2. If you want to add or delete a field, click on an existing field in this
dialog and then click Insert to add a custom field above the one you
selected, or click Delete to erase a custom field.
Note:
In OrgPlan, planners can modify any data fields displayed in the Chart View.
Data fields you, the administrator, want to keep in the chart, but do not want
modified can be displayed in the Profile View. And since planners cannot add
or delete custom fields, you still maintain control over the custom fields you
decide to use in the chart.
If you want to modify properties, click on the existing property data
and either type over or select a new value from the drop-down list.
3. Click Apply.
4. If you are just reviewing the property values, click Close when you
are finished.
The properties in this dialog include:
142
Create Your Charts/Displaying the Properties of a Custom Field
Aquire OrgPublisher 10 User Guide
Properties
Field label
Type
Calc Field
Population
Assigned To
Sample
Seq.
The name of the custom field.
The type of custom field, for example a text field or a
currency field.
The numeric custom field that is used when a summary
field is calculated.
The position types or groups included for the custom field.
The position types that will display the custom field. A
custom field must be assigned to a position type to be
displayed in the chart.
A sample of the custom field information.
The position where the custom field data resides in
OrgPublisher from the text input file used to create an org
chart automatically. OrgPublisher automatically assigns
sequence numbers to custom fields, beginning with field
20.
Dragging and Dropping Custom Fields
You can insert a custom field into your chart by dragging the custom field
from the Custom Field Properties dialog into the Chart View. You can add
a custom field to one position type or to all position types.
Inserting a Custom Field to a single Position
type
1. Select Data from the Main menu then Custom Field Properties
from the pull-down menu. You can also click the Custom fields button
in the toolbar. The Custom Field Properties dialog opens.
2. Verify that the Drag and Drop for All Position Types check box is
not selected. If it is, click to clear it.
3. Select the custom field you want to drop into the chart. Click and
hold down the mouse button.
4. Drag the mouse cursor into a box in the chart that contains the
position type you want.
5. Release the mouse button. The custom field is inserted in every
instance of that specific position type in the chart.
6. Repeat steps 3 - 5 for each custom field you want to add.
Create Your Charts/Dragging and Dropping Custom Fields
143
Aquire OrgPublisher 10 User Guide
Inserting a Custom Field to all Position types
1. Select Data from the Main menu then Custom Field Properties
from the pull-down menu. You can also click the Custom fields
button in the toolbar. The Custom Field Properties dialog opens.
2. Verify that the Drag and Drop for All Position Types check box is
selected.
3. Select the custom field you want to drop into the chart. Click and
hold down the mouse button.
4. Drag the mouse cursor into a box in the chart and release the mouse
button. The custom field is inserted in every position type in the
chart.
5. Repeat steps 3 - 4 for each custom field you want to add to all
position types.
Hiding a Custom Field Label
You can choose to hide a custom field label in your org chart.
1. Right-click the custom field label in your chart.
2. Select Hide label from the drop-down menu. The label is no longer
displayed in your chart.
3. To show a hidden label, right-click on the custom field data and click
Show label from the drop-down menu.
You can also select the Hide label option in the Custom Field Wizard
when you create or modify a custom field.
Note:
Keep in mind when you choose to show or hide fields that all information you
can view in the OrgPublisher chart or search results list is also displayed when
you copy the chart to Microsoft PowerPoint or the search results to Microsoft
Excel.
Inserting a Custom Field for a Single Position Type
You can insert a custom field for a single position type by dragging it from
the Custom Field Properties dialog.
Note:
144
The use of conditional formatting can affect position type summary totals.
Create Your Charts/Hiding a Custom Field Label
Aquire OrgPublisher 10 User Guide
1. Select Data from the Main menu then Custom Field Properties
from the pull-down menu. You can also click the Custom fields button
. The Custom Field Properties dialog opens.
2. You can also use the Custom fields button
in the toolbar and
move the mouse pointer to the place within an existing box where
you want to insert the custom field. Click the mouse to add it.
3. Make sure the field Drag and Drop for All Position Types is not
selected. Click Close.
4. If the check box is selected, click on it to clear it then click Apply.
5. Position the cursor in the column to the left of the Field label of the
custom field to be added. Click in the column and hold the mouse
button down as you drag that custom field into the chart and place it
within an existing box. Release the mouse button to add the custom
field.
6. Double-click on the label for this custom field and type the new
name, if applicable. Press ENTER.
7. The new field displays in the dialog and the chart.
8. If you are adding the field data manually, double-click on the righthand side of this field and type your data, for example a phone
number. Press ENTER.
9. If you want to format the new custom field, right-click on the field
and select Format from the drop-down menu.
Inserting a Custom Field for all Position Types
You can insert a custom field for all position types by dragging it from the
Custom Field Properties dialog.
Note:
The use of conditional formatting can affect position type summary totals.
1. Select Data from the Main menu then Custom Field Properties
from the pull-down menu. You can also click the Custom fields button
in the Format Toolbar. The Custom Field Properties dialog opens.
In addition, you can use the Insert Custom Field button
in the
toolbar and move the mouse pointer to the place within an existing
box where you want to insert the custom field. Click the mouse to
add it.
Create Your Charts/Inserting a Custom Field for all Position Types
145
Aquire OrgPublisher 10 User Guide
2. Make sure the field Drag and Drop for All Position Types is
selected. Click Close.
Note:
You can also use this check box in conjunction with the Insert Hotspot button
in the Insert toolbar.
3. If the check box is not selected, select it and click on Apply.
4. Position the cursor in the column to the left of the Field label of the
custom field to be added to a position type. Click in the column and
hold the mouse button down as you drag that custom field into the
chart and place it within an existing box. Release the mouse button
to add the custom field.
5. Double-click on the label for this custom field and type the new
name, if applicable. Press ENTER. The new field displays in the dialog
and with every position type displayed in the chart.
6. Double-click on the right-hand side of each occurrence of this field
and type your data, for example a phone number. Press ENTER.
7. If you want to format the new custom field, right-click on the field
and select Format from the drop-down menu.
Reviewing Custom Field Security Summary
You can designate field security and then quickly review a summary of the
security for each custom field in your EChart.
1. Select Data from the Main menu then Custom Field Properties
from the pull-down menu. You can also use the Custom fields button
in the toolbar. The Custom Field Properties dialog opens.
2. Click View security summary. The Field Security Summary dialog
opens, displaying the custom fields in your chart and the type of
security assigned to each.
3. Click Copy to Clipboard if you want to copy the summary to
another application for printing or to view later, or click Close to
return to the Custom Field Properties dialog.
146
Create Your Charts/Reviewing Custom Field Security Summary
Aquire OrgPublisher 10 User Guide
Create and Apply Hotspots
Note:
You can use hotspots to link to any file type that your web browser can
recognize and display.
Profile View hotspots do not work in the published PluginX or Planning charts
when the hotspot data points to a data file from the local drive. Web pages,
even those served from the local file system, are not allowed to access, open,
or otherwise "touch" the local file system. This is a security measure as web
pages shouldn't be allowed to do anything with your local files.
Inserting Hotspots
Hotspots provide a way to create links in an org chart that is published
and viewed with a web browser, such as Internet Explorer. Any string that
can be typed in an address line of a browser can be used as a hotspot,
such as mailto:, http://, file://, etc. Hotspots are a type of custom
field assigned to a specific position type, or all position types, and they
appear in listings with other custom fields.
As with other custom fields, you can add hotspots for all position types or
to a single position type. Each hotspot contains two components : a label
for the field, and the name of the file to display when the hotspot is
clicked. You can attach a hotspot to a specific custom field using the
Custom Field Properties dialog.
You can set up a hotspot on a box title, job title, person’s name or custom
field to view another web page pertaining to the selected text. Hotspots
can be clicked in the Chart View, Profile View, and the Hover Profile to
open an email message (with the format mailto:), or to link to a page on
your intranet or a Web page.
The Smart Links feature enables you to attach more than one hotspot to a
field. When the end user clicks on a custom field, a list displays the names
of all the hotspots attached to that particular field. This feature enables
end users to access multiple applications or web pages from within a
chart, and provides the administrator with more choices for drilling down
to people, jobs, or department information.
You can insert a hotspot in your chart with:
Hotspot Wizard
Inserting Hotspots
Custom Field Wizard
Create Your Charts/Create and Apply Hotspots
147
Aquire OrgPublisher 10 User Guide
Assigning Hotspots to Position Types
When you create hotspots, a type of custom field, using the Hotspot
Wizard, you assign the hotspot to either a specific position type or to all
position types. Assigning a hotspot to a single position type, such as open
position, can allow links to the appropriate job descriptions. Assigning a
hotspot to all position types in your chart allows you to make the physical
locations, telephone extensions, or email addresses of all employees
accessible to all employees.
1. Click the Insert Hotspot button
in the Insert Toolbar. Drag the
cursor to the location in the chart where you want to add the hotspot
and click the right mouse button. You can also select Tools from the
Main menu then Hotspot Wizard from the options list. The Hotspot
Wizard opens.
2. Follow the Hotspot Wizard prompts asking for the base path or target
name, until you reach the dialog asking you to select the position
types for which the hotspot will be active.
3. Click on the position type to expand it. You can also click All
Position Types.
4. Click on the field you want as the hotspot link, Box Title, Job Title,
or Name. A green arrow displays next to the selected field and the
position type label. Click Next.
5. Follow the prompts to complete the wizard and open the Custom
Field Properties dialog to attach the hotspot to a field and, if
applicable assign security.
Note:
Profile View hotspots do not work in the published PluginX or Planning charts
when the hotspot data points to a data file from the local drive. Web pages,
even those served from the local file system, are not allowed to access, open,
or otherwise "touch" the local file system. This is a security measure as web
pages shouldn't be allowed to do anything with your local files.
Attaching a Hotspot to a Field
You can attach a hotspot to a custom field by using the Custom Field
Properties dialog. In addition you can attach multiple hotspots, known as
Smart Links, to a field. When the end users click on the field, a list of the
Smart Links appears and the user selects the appropriate hotspot. Smart
Links also provide the administrator with more choices in how to display
or access detailed information regarding people, jobs, and departments.
148
Create Your Charts/Assigning Hotspots to Position Types
Aquire OrgPublisher 10 User Guide
1. While in Build Mode, verify that you have correct URLs in your
hotspot fields.
2. Select Data from the Main menu and Custom Field Properties
from the pull-down menu or click the Custom fields button
toolbar. The Custom Field Properties dialog opens.
in the
3. Select the hotspot you want to attach to a field. Only fields with a
designated Type of Hotspot can be attached to another field.
For instance, if one of your custom fields is an email address hotspot,
instead of displaying the email address in the published chart, you
can attach the hotspot to the Name field. When users click on a
name in the published chart, the email client opens.
4. Click Hotspot Attachment. The Attach Hotspot dialog displays.
5. Click the down-arrow in the Select field to attach hotspot field.
6. From the pull-down list, select the field you want to be the "clickable"
link in your published chart, for instance the Box Title or Name.
7. Click OK. The text box closes.
8. In the Custom Field Properties dialog, click Apply. Continue working
in the dialog or click OK to close the dialog.
9. Test your hotspot by switching to View Mode and click on the field to
which you attached the hotspot. If you attached multiple hotspots to
a field, the list of Smart Links displays when you click on a field.
Select the link you want to access.
Note:
Smart Links attached to a hidden field do not appear in the chart.
Copying a Link to a Person in the Chart
With OrgPublisher you can copy the link to a person in the published chart
if you publish to and access the published chart from a server. You
can copy the link from the person's Name, Job title, or Box title.
1. Open the published chart and right-click on a person's name, the job,
or the box title. A list of menu options appears.
2. Select the Copy hyperlink to person or Copy hyperlink to box
option.
3. Open an application that can recognize and use hyperlinks, such as
an email client, and paste the link into the application. The hyperlink
text appears.
Create Your Charts/Copying a Link to a Person in the Chart
149
Aquire OrgPublisher 10 User Guide
For instance, you can copy a link to a person in a chart, paste the link
into an email message, and send the email to a supervisor who
should review information in this person's chart box. The supervisor
clicks on the link and the chart opens at that person's location in the
chart.
Note:
If there are multiple people listed in a box, OrgPublisher will open the box and
select the first person listed.
Using the Define dialog to set a Hotspot URL
When you use hotspots in your org chart, you must set a base URL or a
target frame. The Define dialog contains two tabs, one for Positions and
one for Hotspots.
1. Select Edit from the Main menu then Define from the pull-down
menu. The Define dialog opens.
2. Click the Hotspots tab.
3. Type the Base Hotspot URL or path name. The base URL is the
lowest level of the path to the directory where the linked document is
saved. Setting the base URL helps you avoid passing in extra or
repetitive data.
4. Or, you may want to type the Web browser Target frame name, if
applicable. If you use HTML frames to display the results of all your
hotspots, specify the target HTML frame name. If you are not using
HTML frames, then accept the default _parent.
5. Click OK. The Define dialog closes and the file is saved.
Accessing Smart Links
With OrgPublisher end users can select from multiple hotspots attached to
a single field. When the end user clicks on a custom field, a list displays
the names of all the hotspots attached to that particular field. This feature
enables end users to access multiple applications or web pages from
within a chart.
Access Smart Links from the published chart
1. In the PluginX, or the published chart, place the cursor over a field,
such as a name, job, or department. If there is a link, or hotspot
attached to the field, the cursor changes.
150
Create Your Charts/Using the Define dialog to set a Hotspot URL
Aquire OrgPublisher 10 User Guide
2. Click on the field. A list of the hotspots, or Smart Links, attached to
that field appears.
3. Click on the link you want. OrgPublisher opens the appropriate web
page, document, or email client.
Note:
Profile View hotspots do not work in the published PluginX or Planning charts
when the hotspot data points to a data file from the local drive. Web pages,
even those served from the local file system, are not allowed to access, open,
or otherwise "touch" the local file system. This is a security measure as web
pages shouldn't be allowed to do anything with your local files.
Create Your Charts/Accessing Smart Links
151
Aquire OrgPublisher 10 User Guide
Define and Assign Position Types
Note:
Record Types for custom position types should use brackets, for example
<T>.
The use of conditional formatting can affect position type summary totals.
Only Staff Function position types can reside in a Staff Function box.
You can also assign position type using the Update Person dialog or define the
priority of a position type.
Creating and Defining Position Types
OrgPublisher uses position types to structure your company’s information
and organizational chart. A position type is a classification or assignment
within your organization to which a person is associated. You can format
boxes and summarize data, such as head counts, by position type.
You must define certain values when you create a position type in
OrgPublisher:
• Priority - Determines where your custom position types will be placed
within a box in relationship to other position types. The lower the
priority number, the higher it is placed in the box. OrgPublisher
automatically assigns this number, but you can change it through the
Define dialog.
• Count - Includes a position type in the head count total or a head
count by position type that can be totaled.
• Box type - Determines the type of box that is inserted for this position
type. Each box type has a different position within the chart. For
example, the first assistant box is placed below and to the right of the
box to which it reports. If there is more than one assistant, the boxes
alternate from right to left below the box to which it reports.
Values include: Normal Box, Assistant Box, Partner Box, and Staff
Function Box.
OrgPublisher’s default, or standard position types are:
• Manager - A manager position type represents a person who is the
manager or supervisor of the people within a chart box.
– Count - Yes
– Priority - 0
152
Create Your Charts/Define and Assign Position Types
Aquire OrgPublisher 10 User Guide
– Box Type - Normal
• Employee - An employee position type represents a person who
reports to a manager or supervisor within a chart box.
– Count - Yes
– Priority - 1
– Box Type - Normal
• Assistant - An assistant position type represents a person who is
displayed in an assistant box in the org chart.
– Count - Yes
– Priority - 0
– Box Type - Assistant
• Contractor - A contractor position type represents a person who is
contracted from an outside source and who is not counted in head
count roll-ups.
– Count - No
– Priority - 2
– Box Type - Normal
• Indirect report - An Indirect report position type represents a person
who reports indirectly to a manager or supervisor. "Indirect" is a
modifier or condition of the assigned position type, so you should use a
record type of "IM" for an indirect reporting relationship of a manager
or an "IE" for an indirect relationship of an employee.
An input record uses an “I” in the Record Type field in front of the
assigned position record type. For example, an IE is an employee
who reports indirectly to another position. If you use only "I" as
your record type, OrgPublisher defaults the record to IM.
– Count - No
– Priority - N/A
– Box Type - Normal
Indicating that one person reports to more than one manager is
accomplished with multiple records and use of position types.
One box must be designated position type "E" for Employee. Other
boxes must be designated position type "I" for Indirect Report.
(Indirect Reports are not included for head count purposes. Indirect
Report boxes are displayed with dotted lines around the box, as well
as the lines to the box.) When building from data, you need multiple
employee records — one for each manager (see sample of data
below).
If you are building from data the records should look like the
following:
Create Your Charts/Creating and Defining Position Types
153
Aquire OrgPublisher 10 User Guide
ParentBoxID
BoxID
Box Title Record Type ID Last Name First Name
Manager 1
1234
xxx
E
Smith
Carol
Manager 2
1234a
xxx
I
Smith
Carol
Manager 3
1234b
xxx
I
Smith
Carol
• Open position - An open position type represents any position/
employee that is not currently filled. You can create open positions
when building a chart by double-clicking on the employee name and
selecting Open position. You can create open positions when building
from data by passing null records into Input File positions 6, 7, and 8.
– Count - Yes
– Priority - N/A
– Box Type - N/A
• Partner - A partner position type represents a person who is at the
same level as the box you link it to, normally the top of chart .
– Count - No
– Priority - N/A
– Box Type - Partner
• Staff function - A staff function position type represents a person or
cost center displayed in a Staff Function box in the org chart. The
default values are listed, although you can customize the settings to
match your org chart requirements.
– Count - Yes
– Priority - 0
– Box Type - Staff Function
• Succession candidate - A Succession Candidate record type
represents a person who is a candidate for a specific position currently
being held by someone else. Succession candidate record types are
typically placed in a normal box type with other candidates, as well as
the current person holding the position they may inherit.
– Count - Yes
– Priority - 1
– Box Type - Normal
Note:
Only Staff Function position types can reside in a Staff Function box.
Another way to identify positions within your organization is through the
multi-level peer display option. You can indicate that several positions report
to one manager, but that some of those positions are at different levels within
your organization.
154
Create Your Charts/Creating and Defining Position Types
Aquire OrgPublisher 10 User Guide
You can also define a conditional position type to which you assign a
group for formatting purposes. Conditional formatting is meant to
increase the visibility of distinct groups in your chart based on a single
attribute, such as "High Performers."
Note:
It is recommended that you do not select a group that references secure fields
if you plan to publish a secure thin client EChart because you will receive
undesirable results.
The rich client EChart summary counts using conditional formatting show
numbers calculated as if all fields are visible to the end user. This is because
EChart summaries are calculated at publishing time and cannot be
recalculated.
Adding a Custom Position Type
OrgPublisher provides standard position types in order to create your
organizational hierarchy. These position types are Manager, Employee,
Assistant, Contractor, Indirect Report, Open position, Partner,
Staff function, and Succession Candidate.
You can also create your own position types either to better match a
position within your company, such as Director or Vice President, or to
assign conditional formatting to a single-attribute group for display
purposes.
1. Select Tools from the menu bar then Position type Wizard from
the drop-down list. The Position Type Wizard opens. Click Next.
2. Select the New Position Type radio button. Click Next.
3. Type the Position Type name.
4. If you are creating a position type in order to assign conditional
formatting to a group, click the down-arrow and select a Group
name. Click Next.
Note:
It is recommended that you do not select a group that references secure fields
if you plan to publish a secure thin client EChart because you will receive
undesirable results.
The rich client EChart summary counts using conditional formatting show
numbers calculated as if all fields are visible to the end user. This is because
EChart summaries are calculated at publishing time and cannot be
recalculated.
If there is more than one group-based position type for which a person
qualifies, the first match is used in Search and Summary tasks.
Create Your Charts/Adding a Custom Position Type
155
Aquire OrgPublisher 10 User Guide
5. Indicate whether the new position type is to be displayed in a
Normal Box, Assistant Box, Partner Box, or Staff Function
Box. Click Next.
Note:
This box type dialog does not display if you have assigned the new position
type to a group. Conditional formatting does not change the original position
type, from which the box type is decided.
You must create a custom position type before you can add a Staff Function
Box to your blank chart. Only Staff Function position types can reside in a
Staff Function box.
6. Indicate if the position type is to be included in the total Head count
by selecting the Yes or No radio button. Click Next.
7. Type or select a Record Type code for this position. Click Next.
8. Click Box Style and Color to open the Format dialog to the Box tab.
Choose the style of the chart box and the box color. Click OK.
9. Click Text Style and Color to open the Format dialog to the Text
tab. Choose the text color, alignment, etc. Click OK then Next.
10.Click Finish. The new position type is saved within your chart file,
even if you do not actually save the chart after creating the position
type.
Assigning a Position ID Type
You can compare two charts that have identical custom field definitions,
and generate a change report. If you do not automatically import a
position ID (see Field 17 in the Input File Layout topic), in order to
achieve consistent results, it is recommended that you assign a custom
field type of Position ID to a unique record number across all charts.
Note:
If the charts you are comparing do not contain a Position ID type in field 17 or
a custom field position type, OrgPublisher uses the ID in field 5 from the Input
File Layout. If neither exist, an error message displays and the comparison
does not occur.
In addition new or renamed custom fields will not match when comparing
charts and will not be included in the change report.
1. Select Data from the Main menu then Custom Field Properties
from the pull-down menu. You can also click the Custom Field
Properties button
dialog opens.
156
in the toolbar. The Custom Field Properties
Create Your Charts/Assigning a Position ID Type
Aquire OrgPublisher 10 User Guide
2. Select the custom field you want to use for Position ID and Tab to
the Type column.
3. Click the down-arrow to view a list of custom field types.
4. Scroll to the end of the list and select Position ID.
5. Click Apply or Close.
Changing a Person's Position Type
Note:
If you want to use conditional formatting for a single attribute in a group, see
the About Conditional Formatting section in this document. If you build your
chart with data, the conditional position type does not override the position
type pulled from your data source.
1. Double-click on the person’s name in the Chart View. The Update
Person dialog opens.
2. Double-click the new Position type you want to use. The Update
Person dialog closes and the new position type is accepted. You can
also select the new position type from the list, then click OK.
The person in the box inherits the formatting of the new position
type. In addition, the ID field contains the unique ID information
necessary to enable the use of multi-relationship icons and EChart
security.
Changing from an Open Position
You can change an open position to the appropriate position type at any
time.
1. Verify you are in Build Mode then double-click the open position in
the Chart View. The Update Person dialog opens.
2. Type the name of the person who filled this position in the First
name, Second, or Last name fields.
3. You can also update the ID field in this dialog, if required.
4. Select the Position type from the list if the chart box does not
designate one already.
5. Click OK. The open position text in the chart box is replaced by the
person’s name. If the chart box is an assistant or partner box, the
position type will change automatically when you enter a person’s
name.
Create Your Charts/Changing a Person's Position Type
157
Aquire OrgPublisher 10 User Guide
Changing the Open Position Label
You can modify the label for open positions in the Chart View at any time.
1. Select Edit from the Main menu then Define from the pull-down
menu. The Define dialog opens to the Positions tab.
2. Select the record line for Open position and, in the Position type
field, type the label name you want to use.
3. Click OK. All open positions in your chart will display the new text.
Creating a Staff Function Position Type
Use the Position Type Wizard to create a position type to add a Staff
Function to an existing chart. Once this position type is established, you
can insert a Staff Function box type to your chart. If you open an empty
chart, the Staff Function is already available in the wizard.
Note:
Only Staff Function position types can reside in a Staff Function box.
1. Open the Position Type Wizard by clicking the
button in the
Wizard View and then click Next. You can also select Tools from the
Main menu then Position type Wizard from the pull-down list. The
Position Type Wizard opens.
2. Click Next and select the New Position Type radio button. Click
Next.
3. Type the Position Type name for which you are creating the Staff
Function box or type "Staff Function." Click Next.
4. Select the Staff Function Box radio button. The actual box type
does not contain special formatting by default, but you can format
the box to your specifications, as noted in Steps 7-8. Click Next.
5. Indicate whether or not this new position type is included in the total
head count. Click Next.
6. Type the Record Type code for this position, <SF>. The code must
be include brackets. Click Next.
7. Click Box Style and Color to open the Format dialog to the Boxes
tab. Choose the style of the chart box and the box color you want for
the Staff Function position type. Click Apply to add your changes
158
Create Your Charts/Changing the Open Position Label
Aquire OrgPublisher 10 User Guide
and continue working in the Format dialog. Click OK to add your
changes and close the dialog.
8. Click Text Style and Color to open the Format dialog to the Text
tab. Choose the text color, alignment, etc. Click Apply to add your
changes and continue working in the Format dialog. Click OK to add
your changes and close the dialog. Click Next.
9. Click Finish.
10.In the Chart View, add a box with a person and job where you want
to place the Staff function.
11.Double-click on the name field to open the Update Person dialog and
select the Staff Function position type.
12.The staff function box title displays and the box may be repositioned.
Double-click on Staff Function to change the box title. If you add
reports to this box, a drill-down button displays and you must drill to
view those reporting boxes.
Including/Excluding Position Types in Summary
View
When you exclude, or do not count, a position type in the Summary View
the summary amounts for these types are not displayed in the view, and
are subtracted from any totals, except for group totals.
When you include a counted position type, the amounts display in the
Summary View and are added to any totals. You can exclude managers
from the total in summary fields assigned to their boxes.
Exclude Managers from their own Totals
1. Select Options from the Main menu then Summary options from
the pull-down menu.
2. Select Exclude managers from their own totals. The totals in the
manager boxes no longer include the manager.
3. You can also exclude managers from their own totals when using the
Summary Wizard.
Create Your Charts/Including/Excluding Position Types in Summary View
159
Aquire OrgPublisher 10 User Guide
Exclude/include Position Types in Totals
1. Select Edit from the Main menu then Define from the pull-down
menu. The Define dialog opens.
2. Click on the record line of the position type you want to exclude from
your Summary View totals. By default, indirect reports and
contractors are already excluded from Summary View totals.
3. Click in the Count field. A drop-down arrow appears.
4. Click No. If you want to include a position type, for example indirect
reports, click Yes.
5. Click OK to accept the change and close the Define dialog.
Note:
The use of conditional formatting can affect position type summary totals.
If there is more than one group-based position type for which a person
qualifies, the first match is used in search and summary tasks.
Listing All or Current Positions
The List View displays all of the positions in your chart, or only those
positions which are currently shown in the Chart View. The current
OrgPublisher default is to display only the positions currently displayed in
the Chart View.
Note:
Older versions of OrgPublisher use the default option of displaying all
positions.
If you want to list only those positions displayed in the Chart View (such
as a set number of levels), leave the default as is. If you want to list all
positions in your chart file, you can:
1. Select Options from the Main menu then List View options from the
pull-down menu.
2. Clear Positions in chart. The Search View pane in the List View is
now active.
Or
Open the List View and select the Search View pane. All positions
are now listed.
160
Create Your Charts/Listing All or Current Positions
Aquire OrgPublisher 10 User Guide
Making Several Insertions for the Same Position
Type
You can apply the format for the same position type to several boxes or
jobs if you select a position type before you begin inserting boxes.
1. Select Insert from the Main menu then Select position type from
the pull-down menu. The Select Position Type for Insert dialog
opens.
2. Click on the position type you want to insert and clear the
Automatically assign Position Type check box.
3. If you are inserting multiple boxes with this position type, or you
want to make it the default position type when you insert a box, click
the Insert using this Position Type check box.
4. To automatically assign a manager position type to the first inserted
box and an employee position type on the box dropped on that
position, click the Automatically assign Position Type check box.
5. If you do not select either check box, OrgPublisher prompts you for
the position type when you insert a job or person into an empty box.
6. Click OK. The dialog closes.
7. Select the appropriate button from the toolbar and insert the box
where you want it.
Modifying a Position Type
You can modify an existing position type using the Position Type Wizard.
Note:
The use of conditional formatting can affect position type summary totals.
1. Click the Position Type Wizard button
in the Wizard View or
select Tools from the Main menu then Position type Wizard from
the options list. The Position Type Wizard opens. Click Next.
2. Select the Existing Position Type radio button.
3. In the position type list, click on the position type you want to
modify. Click Next.
4. Accept the Position type name shown, or rename the position type.
Create Your Charts/Making Several Insertions for the Same Position Type
161
Aquire OrgPublisher 10 User Guide
5. Accept the Group shown for conditional formatting or select a
different group. Click Next.
Note:
It is recommended that you do not select a group that references secure fields
if you plan to publish a secure thin client EChart because you will receive
undesirable results.
The rich client EChart summary counts using conditional formatting show
numbers calculated as if all fields are visible to the end user. This is because
EChart summaries are calculated at publishing time and cannot be
recalculated.
6. Accept the box type shown or select a different radio button, Normal
Box, Assistant Box, Partner Box, or Staff Function Box. Click
Next.
Note:
You must create a custom position type before you can add a Staff Function
Box to your blank chart.
7. Accept the Yes or No indication for the total Head count or select a
different radio button. Click Next.
8. Accept the displayed Record Type code for or type or select a new
record type. Click Next.
9. If applicable, click Box Style and Color to open the Format dialog to
the Box tab. Choose the style of the chart box and the box color.
Click OK.
10.If applicable, click Text Style and Color to open the Format dialog
to the Text tab. Choose the text color, alignment, etc. Click OK then
Next.
11.Click Finish.
Moving Open Positions
You can move positions from one location to another in your chart.
1. Press and hold down the left mouse button over the open position.
2. Drag the cursor to the new box title, job title, or name, and release
the mouse button. The open position and any custom fields
associated with the position are inserted below the selected location.
When you drop an open position onto a box title, a job title is
automatically created for the open position.
162
Create Your Charts/Moving Open Positions
Aquire OrgPublisher 10 User Guide
When the last open position is moved from a job title, a copy of the
open position remains at the original location. The last open position
must be deleted manually, because deleting the last open position
also deletes the job title.
Renaming a Position Type
1. Select Edit from the Main menu then Define from the pull-down
menu. The Define dialog opens at the Positions tab.
2. Select the record line for the position you want and, in the Position
type field, type the label name you want to use.
3. Click OK. All instances of that position in your chart display the new
text.
Selecting a Position Type for Insert
The first time you open OrgPublisher, an employee position type is
automatically assigned to the first inserted box. After that, the default is
the last position type assigned.
1. Select Insert from the Main menu then Select position type from
the pull-down menu. The Select Position Type for Insert dialog
opens.
2. Choose a position type by clicking on it. A green check mark
indicates the current selected position type.
3. If you want to choose a position type to insert for each person you
add to your chart, select the Insert using this Position Type check
box. OrgPublisher assigns each subsequent person that position
type.
4. If you want OrgPublisher to use the default position type, the last
one inserted, select the Automatically assign Position Type check
box. This is the default when you first open OrgPublisher and the
Employee position type is selected.
5. Click OK to accept the changes and close the text box.
Showing or Hiding All Options Associated with a
Position Type
Note:
Keep in mind when you choose to show or hide fields that all information you
can view in the OrgPublisher chart or search results list is also displayed when
Create Your Charts/Renaming a Position Type
163
Aquire OrgPublisher 10 User Guide
you copy the chart to Microsoft PowerPoint or the search results to Microsoft
Excel.
1. Select View from the Main menu then Show/Hide chart
components from the pull-down menu. The Show/Hide Chart
Components dialog opens. You can also click the Show/Hide Chart
Components
button in the toolbar.
2. Select a Style to modify from the drop-down list.
3. Select a Group displayed to modify in the chart, if applicable.
4. Select the Components tab. Each position type in your chart is
listed. Click on the plus sign to display each component within the
position type. A green check mark to the left indicates a shown
component, and a red X indicates a hidden component.
5. Select a position type, or All Position Types, to change the status.
All components for the position type are affected unless you place an
X next to the individual component.
6. Click Apply to update the chart and keep the dialog open for further
changes, or click OK to update the chart and close the dialog.
164
Create Your Charts/Showing or Hiding All Options Associated with a Position Type
Aquire OrgPublisher 10 User Guide
Open and Use Views
Note:
Although this section provides information on manually editing a chart,
remember that if you want the changes to remain permanent, you must apply
the changes to your HR database. When your HR data is refreshed and you
open your chart, your manual changes are overwritten.
9 Box Matrix View
Available in OrgPublisher Premier, the 9 Box Matrix enables you to
evaluate your organization’s talent pool using comparative sets of data.
This feature has also been referred to as "personal score cards,"
"tombstones," or "baseball cards." 9 Box matrices are available in the
OrgPublisher application as well as charts published as PluginX, EChart
rich client, and planning charts. The 9 Box Matrix requires 2 numeric
(integer) fields of data. Typically, these are a field indicating performance
level and a field indicating potential.
The 9 Box Matrix View displays the results from the 9 Box Matrix Wizard.
A combination of Y and X axis determines the box within the grid where
the employee is placed. The top right-most box displays High
Performance/High Potential employees, while the bottom left-most
box contains Low Performance/Low Potential. The title of each axis is
the same as the field you selected for that criteria.
As the chart administrator, you define the fields used for the 9 Box Matrix
within a published chart. Chart planners can determine the fields used in a
planning chart.
Click the 9 Box Matrix button
in the toolbar to view the matrix.
With the 9 Box Matrix View you can:
Creating a 9 Box Matrix (when opening for the first time)
Filtering Groups in the 9 Box Matrix
Modifying 9 Box Matrix Results
Selecting 9 Box Filters
Sorting the 9 Box Matrix
Create Your Charts/Open and Use Views
165
Aquire OrgPublisher 10 User Guide
Chart View
The Chart View is stationary and is the default display in the OrgPublisher
window. It shows the chart boxes as you are editing or building in your
organizational chart. You can format the chart background and title, as
well as the individual components, to give your chart more impact. You
can use the multi-level peer display and print the Chart View as a book or
wall chart.
In the Chart View, you can drill-up or down through different chart levels
and hide or show different chart components. If you are working with a
published EChart, the allowable levels are already set through the
Publishing Wizard and cannot be overridden.
With the Chart View, using menus, toolbars, and right-click menus you
can also:
Spotlighting Groups in the Chart View or Spotlighting Search Results in
the Chart View
Adding a Person to a Group
Add and Format a Chart Legend
Groups View
The Groups View is style specific, displaying a list of groups created for
the current chart style.
The Groups View is anchored to the right side of the OrgPublisher window
and closes as soon as you have selected a group to view. End users can
save ad hoc groups to the My groups tab in the Search View in a
published PluginX chart. These groups display in the PluginX only.
With the Groups View you can:
Opening a Selected Group in the Chart View
List View
The List View displays a listing of your organization’s employees shown in
the Chart View, along with any available custom fields you wish to display.
The List View is style specific. Fields that may be hidden in your
organizational chart are included in a List View unless you choose to hide
them using the List View right-click menu.
166
Create Your Charts/Chart View
Aquire OrgPublisher 10 User Guide
The List View contains two panes, List View and Search View. Columns
shown in the List View determine the columns shown in the Search View.
Click the List View button
in the Views Toolbar to display a list of your
employees and their custom fields, such as telephone extensions, or
select View from the menu bar, then List View from the pull-down
menu. The list pane opens.
If you are working with a published EChart , an additional pane displays
with the records list. The List View contains a List of currently
displayed pane and another, List View of all in chart pane, with all the
EChart records.
Note:
The List View is available as an index in the PDF format. In addition the Name
field is the automatic default. If you want to display the first, middle and last
names you must right-click and select the Show/hide columns options to
make your choices.
If EChart security is enabled, the published chart reflects only the information
accessible to the user, based on the level of security.
The List View defaults to the bottom of the window, but you can drag it to
another location. When you print a chart as a book, the List View
automatically prints as an index and contains page numbers so that you
can locate different chart information in the book.
With the List View, using menus, toolbars, and right-click menus you can:
Adjusting Column Widths in List View
Copying the List View
Listing All or Current Positions
Locating Information with the List View
Printing the List View
Sorting the List View
Profile View
The Profile View focuses on a selected employee, box title, or job title in
your chart and can contain additional information that may not fit in the
chart boxes. This information can also be organized under subheadings .
Create Your Charts/Profile View
167
Aquire OrgPublisher 10 User Guide
Using the Profile View to display information such as telephone numbers,
job titles, office locations, salaries, job descriptions, departments, mission
statements, and photos can eliminate the need for hotspots to HTML
documents that display this information.
If you still want to access a hotspot, it's available in this view. Simply
insert the hotspot in the Chart View and publish your chart with the open
Profile View and end users can click on the hotspot to link to another
document or page on your intranet.
Note:
Profile View hotspots do not work in the published PluginX or Planning charts
when the hotspot data points to a data file from the local drive. Web pages,
even those served from the local file system, are not allowed to access, open,
or otherwise "touch" the local file system. This is a security measure as web
pages shouldn't be allowed to do anything with your local files.
In OrgPublisher Premier, Side-by-Side Profiles are also available.
Click the Profile View button
in the Views Toolbar to display this view
or select View from the menu bar, then Profile View from the pull-down
menu. The Profile View defaults to the right side of the window, but you
can drag it to another location. The default is to show the top box in the
chart when you open the view. You can also print the Profile View.
Note:
The Profile View is not available in PDF format.
The Profile View is not the same as the Hover Profile. Modifications made in
one place are not reflected in the other.
If EChart security is enabled, the published chart reflects only the information
accessible to the user, based on the level of security.
With the Profile View, using menus, toolbars, and right-click menus you
can:
Adding Subheadings to the Profile View
Setting Default Profile View Fields
Reordering Field Sequence in Profile View
Displaying Profile Fields
Printing the Profile View
168
Create Your Charts/Profile View
Aquire OrgPublisher 10 User Guide
Search View
The Search View offers several elements of the Search dialog, including
selecting variables for the search. With this view, you can conduct
searches and create groups, as well as send e-mail to groups. In addition,
the Search View enables end users to search chart information and create
their own groups in the My groups tab, available only in the PluginX
chart.
This feature enables org chart administrators to publish a chart with the
Search View displayed in the browser and enables end users to conduct
queries in the published chart. The Search View is style specific, and
opens within the List View and displays the same columns shown in the
List View.
You can use a group filter
in your searches if you want OrgPublisher
searches only the selected group and displays the matching records. If no
group filter was selected, the entire chart is searched and matching
records shown. You can also place the search result ins Microsoft Excel;
see the Viewing Search Results in Microsoft Excel procedure for details.
Note:
Published real-time charts provide single field searching capabilities; complex
or group searching and saving My groups are not available.
The Search View displays everyone in the chart or a selected section of
the chart or group, and contains two tabs, Search and Groups.
The Search View enables you to perform additional tasks, such as copy
the list, save a new group, or send e-mail to the entire group. The Groups
tab contains buttons to delete a group or open the Group Editor dialog in
order to edit a group definition or add a new group definition.
The custom field type Email must be used within your chart in order to
enable the "email to group" feature in the Search View. If the custom field
type Email is not used, the email to group button does not appear in the
dialog. Additional buttons in the Search View include the "start search" or
Go button
. The Reset button
clears the previous search
results and resets the view to display everybody. The Copy the list to
clipboard
, which copies your search results to the clipboard, enables
you to paste them in another application.
The Save as button
opens the Enter a group name dialog in order save
the search results as a new group. The Open search results in Microsoft
Create Your Charts/Search View
169
Aquire OrgPublisher 10 User Guide
Excel button
automatically opens Excel and places the search results
within the worksheet. The Spotlight search results in chart button
dims boxes that are not part of the selected group or search results. You
can also choose to include the Include the search results
View.
in the Profile
The Search tab contains the variable fields found in the Search dialog.
You can choose the field to search, specify what you want to find in that
field, and save the results as a group. You also have the option to search
the chart under a specified person. For instance to search on a manager's
reporting group, you must first select the manager box in the Chart View
and then select the Search under check box in the Search View.
Note:
This feature begins the search at this level in the chart but does not confine
the search to that single hierarchical tree.
The Groups tab of the Search View displays the existing groups in the org
chart. It enables you to create a new group description, delete a group, or
edit an existing group description. When you select a group name, the list
pane displays that group’s members. The Email to group feature is also
available in this tab if the chart contains custom fields assigned to the
Email type.
The Groups tab contains several buttons. The New Group Definition
button
opens the Group Editor dialog to add a new group
definition. The Delete Group Definition button
group, and the Edit Group Definition button
dialog to edit an existing group definition.
deletes a selected
opens the Group Editor
The Export groups button
opens the Select Groups to Export dialog.
The Import groups button
opens the Select Groups to Import dialog.
The custom field type Email must be used within your chart in order to
enable the email to group feature in the Search View. If the custom field
type Email is not used, the email to group button does not appear in the
dialog.
170
Create Your Charts/Search View
Aquire OrgPublisher 10 User Guide
The Copy the list to clipboard button
, which copies your search results
to the clipboard, enables you to paste them in another application.
The Open search results in Microsoft Excel
automatically opens Excel
and places the search results within the worksheet.
The Spotlight search results in chart button
part of the selected group or search results.
dims boxes that are not
You can also navigate through the chart by clicking on a group record.
OrgPublisher moves to that box in the group chart. The group list can be
sorted by clicking on a column.
The Search View also provides a My groups tab when the chart is
published. This tab is viewable only in the published chart. Once your org
chart is published with the Search View, end users can search for and
save their own groups, which are displayed in the My groups tab in the
published chart.
Note:
If end users open the Search View in a large published chart, for instance
larger than 2,000 records, that was not published as an EChart , no records
will display in the pane until a search is performed.
If EChart security is enabled, the published chart reflects only the information
accessible to the user, based on the level of security.
With the Search View, using menus, toolbars, and right-click menus you
can:
Searching by Name
Searching by Job Title
Searching by Box Title
Searching All Fields
Conducting a Boolean Search
Copying a Group List
Adding a Group by Searching
Deleting a Group
Create Your Charts/Search View
171
Aquire OrgPublisher 10 User Guide
Editing a Group Definition
Exporting and Importing Groups
Spotlighting Groups in the Chart View
Sending Email to a Group
Style View
The Style View displays a list of the different styles you have created for
the open chart. Chart styles display in alphabetical order. The published
chart opens in the style you selected in the Publishing Wizard.
Click the Style View button
in the toolbar to display this view or select
View from the menu bar, then Style View from the pull-down menu. The
Style View defaults to the left side of the window, but you can drag it to
another location.
Your chart may use tab view buttons instead of the Style View.
Note:
You can also format your chart by using the Chart Design Templates.
With the Style View you can:
Viewing Available Styles
Displaying Chart Styles
Pinning the Style View for active use
Summary View
The Summary View is a report of summary fields from your organizational
chart, which is easily viewed and printed, either in a summary report or a
graph. The summary amounts shown in the view pertain to the top box
displayed, regardless of how many levels are in view. Any numeric custom
fields can be summarized and displayed in this view. OrgPublisher
provides head count totals by position type and group automatically.
Summary View data may not initially display in a published chart when the
following set of conditions exist:
172
Create Your Charts/Style View
Aquire OrgPublisher 10 User Guide
• The current style is different from the publishing definition's starting
style.
• The current style has a different top of chart than the actual top of
chart.
• Summaries or group icons are showing.
You can prevent these issues by publishing the chart using the current
style as the publishing definition's style.
You can also open the Group Editor dialog from the Summary View by
clicking on the group name.
Click on the Summary View button
in the toolbar to display this view,
or select View from the menu bar, then Summary View from the pulldown menu. Summary View opens at the Summaries tab. You can also
select the Graphs tab. The summary numbers in the view may change,
based on the box selected in the chart. In addition, the Everyone count
includes all records, whether or not they are displayed in the chart.
The Summary View defaults to the bottom of the window, but you can
drag it to another location. You can also print or copy the Summary View.
Note:
Orphan records and broken hierarchies can adversely affect summary and
security functions. Unexpected results can occur that may cause head count
or other totals to be incorrect.
The Summary View is not available in the PDF format or in published real-time
charts.
Successor candidate position types are not included in head counts or
summaries.
Summary fields are added with the Summary Wizard or from the Custom
Field Properties dialog.
With the Summary View, using menus, toolbars, and right-click menus
you can:
Displaying Summary Fields
Exclude/include Position Types in Totals
Printing the Summary View
Resizing Rows and Columns in Summary View
Create Your Charts/Summary View
173
Aquire OrgPublisher 10 User Guide
Copying the Summary View
Tree View
The Tree View displays chart components in outline format and can be
used to navigate through large charts. Simply click a chart component in
the tree and the box containing that component is placed in the center of
the Chart View.
Click the Tree View button
in the toolbar to display this view or select
View from the toolbar, then Tree View from the pull-down menu.
The Tree View defaults to the right of the window, but you can drag it to
another location. To set the Tree View display options, click Options,
Tree View options, then Outline or Full. The Outline mode displays
only the job or box titles, and you cannot expand any records. The Full
mode displays all the fields shown in the chart.
Note:
The Tree View is not available when publishing as an EChart thin client or PDF.
With the Tree View you can:
Printing a View
Expanding or Collapsing Levels in Tree View
Hiding or Showing Icons in Tree View
Locating Information in the Chart with Tree View
Using the Symbol Indicators in Tree View
Wizard View
The Wizard View displays buttons that open a wizard to perform
OrgPublisher tasks, although some wizards do not display in this view.
Details on opening a wizard can be found in the Opening a Wizard
procedure.
Click the Wizard View button
from the toolbar to open this view, or
select View from the Main menu, then Wizard View from the options
list.
174
Create Your Charts/Tree View
Aquire OrgPublisher 10 User Guide
The Wizard View defaults to the left side of the window, but you can drag
it to another location.
With Wizard View, using menus, toolbars, and right-click menus you can:
Opening a Wizard
Resizing Wizard Icons
Using the Hover Profile
The Hover Profile is a quick way to view the most important employee
information without opening the Profile View. The pop-up profile is
anchored to the upper right or, depending on the location in the Chart
View, the upper left, of the data element (box title, job title, or name) that
the mouse is over.
The Hover Profile is style-specific and is available in View Mode or
published chart only. The Hover Profile defaults to off. End users can
access it if you publish a chart with the Hover Profile enabled.
The Hover Profile is not the same as the Profile View. Modifications made
in one place are not reflected in the other.
You can:
Enable the Hover Profile
Viewing the Hover Profile
Adding Subheadings to the Hover Profile
You can add subheadings to the Hover Profile using the Configure Profile
View dialog. Subheadings can help you organize data fields for better
viewing. Subheadings are affected by security attached to fields beneath
the headings.
Note:
When all fields under a heading are secured so that a particular end user can
not view them, the subheading above the fields is also hidden for that end
user.
The Profile View is not the same as the Hover Profile. Modifications made in
one place are not reflected in the other.
Create Your Charts/Using the Hover Profile
175
Aquire OrgPublisher 10 User Guide
1. Right-click on a field name in the Hover Profile, and select the
Configure Profile View option. The Configure Profile View dialog
opens.
The dialog contains Person, Job, and Box tabs, as well as Add
heading, Edit heading, and Delete heading buttons. You can also
resize the Hover Profile in the Popup View Size section.
2. Choose the box component for which you want to assign a
subheading. If your fields are in the order you want to display them,
you can highlight the first field you want to display below the
subheading then click Add heading. The Heading Caption dialog
opens.
3. Type the name of the heading you want to use and click OK. The
subheading appears at the point you highlight in the list or, if you
don't highlight a field, it appears at the bottom of the list in the
Configure Profile View dialog. The corresponding check box is
automatically selected for display in the Hover Profile.
4. Use the Move Up or Move Down buttons to arrange the subheading
and the fields to display under it.
5. Click OK to accept changes and close the dialog.
Figure 88
Editing Subheadings in the Hover Profile
1. Right-click on a field name in the Hover Profile, and select the
Configure Profile View option. The Configure Hover Profile dialog
opens
2. Select the subheading you want to modify.
176
Create Your Charts/Using the Hover Profile
Aquire OrgPublisher 10 User Guide
3. Click Edit heading. The Heading Caption dialog opens.
4. Modify the subheading name as necessary and click OK. The change
is saved and the dialog closes. The Hover Profile reflects the name
change.
Deleting Subheadings in the Hover Profile
Note:
There is no warning prior to deleting the subheading.
1. Right-click on a field name in the Hover Profile, and select the
Configure Profile View option. The Configure Hover Profile dialog
opens.
2. Select the subheading you want to delete.
3. Click Delete heading. The subheading is immediately deleted. It no
longer displays in the dialog or the Hover Profile. All check boxes for
the associated components are cleared, and the components do not
display in the Hover Profile.
Adding Subheadings to the Profile View
You can add subheadings to the Profile View using the Configure Profile
View dialog. Subheadings can help you organize data fields for better
viewing. Subheadings are affected by security settings attached to fields
beneath the headings.
Note:
When all fields under a heading are secured so that a particular end user can
not view them, the subheading above the fields is also hidden for that end
user.
The Profile View is not the same as the Hover Profile. Modifications made in
one place are not reflected in the other.
1. Right-click on a field name in the Profile View, and select the
Configure Profile View option. The Configure Profile View dialog
opens.
The dialog contains Person, Job, and Box tabs, as well as Add
heading, Edit heading, and Delete heading buttons.
2. You can modify each tab to work as a Person Profile View, Job Profile
View, and Box Profile View. Select the tab in which you want to add
subheadings.
3. Choose the component for which you want to assign a subheading. If
your fields are in the order you want to display them, you can
Create Your Charts/Using the Hover Profile
177
Aquire OrgPublisher 10 User Guide
highlight the first field you want to display below the subheading
then click Add heading. The Heading Caption dialog opens.
4. Type the name of the heading you want to use and click OK. The
subheading appears at the point you highlighted in the list or, if you
didn't highlight a field, at the bottom of the list in the Configure
Profile View dialog. The corresponding check box is automatically
selected for display in the Profile View.
5. Use the Move Up or Move Down buttons to arrange the subheading
and the fields to display under it.
6. Click OK to accept changes and close the dialog.
The Profile View displays the new subheading, indented one space,
with corresponding fields indented two spaces, and listed beneath
the subheading.
Editing Subheadings in the Profile View
1. Right-click on a field name in the Profile View, and select the
Configure Profile View option. The Configure Profile View dialog
opens.
2. Select the profile tab you want to modify, Person, Job, or Box, and
select the subheading you want to modify.
3. Click Edit heading. The Heading Caption dialog opens.
4. Modify the subheading name as necessary and click OK. The change
is saved and the dialog closes. The Profile View reflects the name
change.
Deleting Subheadings in the Profile View
Note:
There is no warning prior to deleting the subheading.
1. Right-click on a field name in the Profile View, and select the
Configure Profile View option. The Configure Profile View dialog
opens.
2. Select the profile tab you want to modify, Person, Job, or Box, and
select the subheading you want to delete.
3. Click Delete heading. The subheading is immediately deleted from
the Configure Profile View dialog and the Profile View. The associated
field check boxes are cleared, and no longer display in the Profile
View.
178
Create Your Charts/Using the Hover Profile
Aquire OrgPublisher 10 User Guide
Adjusting Column Widths in List View
1. To resize a column width in the List View, place the cursor in the
column heading on the line separating one column from the next.
Click and hold down the left mouse button. The cursor changes
appearance.
2. Drag the column line to the width you want and release the mouse
button. The column is resized.
Copying the List View
You can copy information from the List View and paste it into other
Microsoft® Windows® applications.
Note:
If you are working with a published EChart, because of its size, the Copy
whole list option is not available. You can, however, use the Search feature
and select the Everyone group, then copy the list to the clipboard.
1. To copy a record, highlight the record in the List View and right-click.
2. Select Copy selection from the options list.
3. Click the Copy button
in the toolbar.
4. Open the Windows application and click the Paste button
selection appears in the new application.
. The
5. To copy the entire list, right-click in the List View.
6. Select Copy whole list from the options list.
7. Open the Windows application and click the Paste button
selection displays in the new application.
. The
Copying the Summary View
You can copy information from the Summary View to other Microsoft®
Windows® applications.
Note:
The Summary View is not available in a published real-time chart.
1. Right-click in the Summary View.
2. Select Copy Summary from the options list.
Create Your Charts/Using the Hover Profile
179
Aquire OrgPublisher 10 User Guide
3. Click the Copy
button in the toolbar.
4. Open the Windows application and click the Paste
button. The
summary information displays in the new application.
Displaying Profile Fields
You can display different information in the Profile View by clicking on
different components within a chart box. The information shown depends
on the custom fields in that box, and whether you have selected to hide
any of these fields within the profile. You can also change the order of
fields in this view.
Note:
In OrgPlan, planners can modify any data fields displayed in the Chart View.
Data fields displayed in the Profile View cannot be modified.
1. Open the Profile View
and click on an employee name in your
chart. The Profile View displays the employee Name, Job title, and
any Custom Field information you have added beneath the
employee name.
2. Click on a Box title in your chart. The Profile View displays the box
title and any custom field information you have added beneath the
box title.
3. Click on a job title in your chart. The Profile View displays the job title
and any custom field information you have added beneath the job
title.
4. You can also choose to show or hide fields in the Profile View.
Note:
Profile View hotspots do not work in the published PluginX or Planning charts
when the hotspot data points to a data file from the local drive. Web pages,
even those served from the local file system, are not allowed to access, open,
or otherwise "touch" the local file system. This is a security measure as web
pages shouldn't be allowed to do anything with your local files.
Enable the Hover Profile
1. Select Format from the menu and Chart from the options list. The
Format dialog opens at the Chart tab.
2. Scroll down to the Show Hover Profile field and select the
corresponding check box.
180
Create Your Charts/Using the Hover Profile
Aquire OrgPublisher 10 User Guide
3. Type the time in milliseconds in the Hover Profile Delay (ms) field
that the mouse cursor must remain in the field before the Hover
Profile opens. The range is 1000 milliseconds (1 second) to
20,000 milliseconds (20 seconds).
4. Click OK to save the change and close the Format dialog.
Expanding or Collapsing Levels in Tree View
1. Select Options from the Main menu then Tree View options.
2. Select Expand or Collapse from the options list. Expand shows
each level of information. Collapse shows only the top level, with
plus (+) signs to indicate where additional levels are available. The
Tree View immediately reflects your change.
Hiding or Showing Icons in Tree View
1. Select Options from the Main menu then Tree View options.
2. Select Show icons from the options list. If Show icons is selected,
the Tree View displays the appropriate icon at each level. If the
option is not selected, the Tree View displays text only and the
connecting lines.
Locating Information in the Chart with Tree View
1. In the Tree View, select the person, job, or custom field that you
want to find in the chart.
2. Click on that person, job, or custom field.
3. OrgPublisher locates and displays the selected information in the
center of the Chart View and outline the selected field in red.
Locating Information with the List View
You can locate a person, custom field, or position in the chart using the
List View. You can also find information in the List View by clicking on it in
the Chart View.
Locate information in the chart:
Click on the name, position or custom field in the List View that you want
to find. The matching record is highlighted in the chart.
Create Your Charts/Using the Hover Profile
181
Aquire OrgPublisher 10 User Guide
Locate information in the List View:
Click on the name, position, or custom field in the chart. The matching
record is highlighted in the List View.
Maximizing Docked Views
The views that are normally docked by default, Summary View, Tree View,
List View, Profile View, and 9 Box Matrix Wizard (available in OrgPublisher
Premier) – can now be maximized to fill the OrgPublisher window. You no
longer have to display the Chart View.
This feature provides a method to create a “dashboard” style with
workforce analytics available for your management team, and is available
in the application as well as charts published as PluginX and EChart rich
client.
Note:
You can drag and drop a docked view to another side of the OrgPublisher
window, right, left, top, or bottom.
When views are maximized, toolbar buttons not usable with the view are
disabled (grayed out). Views can be maximized if they are docked on the
right or left side of the OrgPublisher window.
In the example below, the Profile View, Summary View, and Search View
are shown. The Summary View is maximized while the Profile View and
Search View are not. If a view is not maximized, it can be sized by
dragging the left or right border of the view.
182
Create Your Charts/Using the Hover Profile
Aquire OrgPublisher 10 User Guide
Figure 89
Maximizing a View
Note:
A maximized view cannot be published as an Org Chart Document (PDF,
Graphic, HTML or Express Mode PDF) chart. A maximized view can be
published as PluginX, EChart rich client, planning, or Express Mode chart or
chart with directory. The published chart opens with the view maximized. A
maximized view published as EChart thin client will open only in standard view
size and location.
1. Open the view you want to maximize.
Create Your Charts/Using the Hover Profile
183
Aquire OrgPublisher 10 User Guide
Figure 90
2. Click the Maximize button
screen.
184
. The view increases in size to fill the
Create Your Charts/Using the Hover Profile
Aquire OrgPublisher 10 User Guide
Figure 91
3. Click the Restore button
to set the view to its previous size. You
can also lose the view and re-open it to reset the size.
Opening Multiple Views
1. Open all views you want to display in OrgPublisher. If you want to
create a dashboard, first create a new style then begin opening the
desired views.
2. Dock the views and size them as needed.
3. Maximize the primary view.
Note:
Only one docked view can be maximized at a time. If a second view is
maximized the first view returns to its original size.
4. If the Graph View is active and you click on an individual’s name in
the List View or Tree View, the graph may change based on the
number of levels displayed in the underlying chart. In this example,
2 levels are shown. When Gregory O’Malley is selected, Gregory is on
the 2nd level of the displayed chart. The graph now reflects the
current top of chart, Greg’s Manager.
Create Your Charts/Using the Hover Profile
185
Aquire OrgPublisher 10 User Guide
Figure 92
Resetting Maximized or Docked Views
The views normally docked by default are Summary View, Tree View, List
View, Profile View, and 9 Box Matrix View. These view can also be
maximized to fill the OrgPublisher window. If you no longer need the
maximized view or if, over time, you see inconsistencies in the docked
views, you can reset the chart to the original state.
There are three methods to reset maximized views.
• Click the Restore docked window (Contract docked window if the views
are docked at the top or bottom of the Chart View) button
top of the view.
at the
• Select View from the Main menu then Reset Docking Window
Layout from the pull-down list.
• When the Chart View is open, you can right-click in an open space to
see a list of menu options. Click Reset Docking Window Layout.
186
Create Your Charts/Using the Hover Profile
Aquire OrgPublisher 10 User Guide
• In the published PluginX chart, click the Reset style to published value
button
in the Views toolbar.
Troubleshooting Maximized/Docked Views
When working with several views, docking them, maximizing, and
moving, you may experience problems. Close all docked views and the
reopen each view you want to use. Follow the instruction above to Reset
Docking Window Layout. This sets the views back to a place where you
can restart the docking or maximizing of views you want.
Resizing Dialogs
Dialogs that require a scroll bar to view all available options can be resized
to increase height and width. You cannot resize a maximized view.
1. Open a dialog that requires a vertical or horizontal scroll bar to view
all fields, such as the Format dialog, Chart tab.
2. Place the mouse pointer on the corner or border of the dialog that
contains
; in this example, the bottom-left border. Hold the left
mouse button down and drag to increase the height.
Figure 93
Create Your Charts/Using the Hover Profile
187
Aquire OrgPublisher 10 User Guide
Moving and Docking Views
Views can be docked in one place or you can float them in the chart. You
can also remove or size views. When creating styles in OrgPublisher, you
can select which views should become part of that style. The location and
size of the view at publishing time determines what the end user sees in
the published chart.
Docking a View
1. Place the mouse pointer on the docking bar portion of the view.
2. Holding the mouse button down, drag the view to the new location.
3. Release the mouse button when you have the view where you want
it.
4. You can float the view or dock it on the top, bottom, left, or right of
the screen. An outline of the view displays as you are dragging it.
Sizing a View
1. Place the mouse pointer on the edge of the view.
2. Drag to change the size of the view.
Removing a View
• To remove a view from the OrgPublisher window or from a style, you
can either:
– Click on the close button (X).
– Click on the view button in the Views Toolbar.
Pinning the Style View
You can display the list of available styles by clicking the Style View button
in the toolbar. The Style bar, which indicates the name of the open chart
style, displays just below the menu and toolbars.
Note:
This option is not available if the Show styles in tabs option is enabled.
1. Click the Style View button
chart.
188
to display the list of styles for the
Create Your Charts/Using the Hover Profile
Aquire OrgPublisher 10 User Guide
2. Highlight a style from the list and click on the "pin"
in the upper
right corner of the view. This makes the Style View easily accessible
while you work.
3. When you close the Style View, an arrow displays to the right of the
style name in the Style bar.
You can right-click on the Style bar to view the options menu. The
Edit Label option in both the style and group selectors adds
additional text to the existing label name. The original name is never
overwritten in the Style bar. The Style bar also displays the Group
name in the right-hand corner.
Reordering Field Sequence in Profile View
You can reorder the field sequence in Profile View.
Note:
The Profile View is not the same as the Hover Profile. Modifications made in
one place are not reflected in the other.
If the Profile View contains subheadings, you must also move the
subheading and items beneath it.
1. Right-click on a profile field.
2. Select Configure Profile View from the drop-down list. The
Configure Profile View dialog opens.
3. Highlight the field you want to move and click Move Up or Move
Down until the field is where you want it.
Resizing Rows and Columns in Summary View
You can resize the columns and rows in the Summary View to fit your
chart.
1. In the Summary View, place the cursor in the column or row heading
on the line separating one column or row from the next. Click and
hold down the left mouse button. The cursor changes appearance.
2. Drag the column or row line to the width you want and release the
mouse button.
Note:
The Summary View is not available in published real-time charts.
Create Your Charts/Using the Hover Profile
189
Aquire OrgPublisher 10 User Guide
Resizing the Hover Profile
The Hover Profile is a quick way to view the most important employee
information without opening the Profile View. The pop-up profile is
anchored to the upper right or, depending on the location in the Chart
View, the upper left, of the chart component that the mouse pointer is
over.
The Hover Profile is style-specific, and end users can access it if you
publish a chart with the Hover Profile enabled. The Profile View is not the
same as the Hover Profile. Modifications made in one place are not
reflected in the other.
1. Hover the mouse cursor over the chart component, person, job, or
box , for which you want to resize the Hover Profile. When the profile
appears, right-click on a field and select Configure Profile View
from the options list. The Configure Profile View dialog opens.
2. In the Popup View Size portion of the dialog, use the up or downarrows to select the pixel size you want for the Width and Height.
You can also type a size between 80 and 600 pixels.
3. Click OK to close the dialog and accept the changes. Hover over the
data element, box title, job title, or name, again and the Hover
Profile opens to the new size. All profiles for the same component
(person, job, or box) throughout the chart reflect this change.
Setting Default Profile View Fields
Note:
The Profile View is not the same as the Hover Profile. Modifications made in
one place are not reflected in the other.
1. Select Options from the Main menu then Profile View options
from the pull-down menu.
2. Select Auto display.
3. Select Box title if you want to see just the box title and any
assigned custom fields when the Profile View is opened.
4. Select Job Title if you want to see just the job title and any assigned
custom fields when the Profile View is opened.
5. Select Position if you want to see all the information associated with
the position when the Profile View is opened.
190
Create Your Charts/Using the Hover Profile
Aquire OrgPublisher 10 User Guide
Showing or Hiding Fields in Profile View
1. Right-click on a field in the Profile View.
2. Select Configure Profile View from the drop-down list. The
Configure Profile View dialog opens.
3. Select the check box for the field or subheading you want to show or
hide. A check indicates the field is displayed. A blank box indicates
that the field is hidden.
4. You can also rearrange the position of each field, or arrange fields to
display beneath a subheading, by clicking the Move Up and Move
Down buttons.
5. Click OK to close the dialog. The Profile View reflects the changes.
Note:
Keep in mind when you choose to show or hide fields that all information you
can view in the OrgPublisher chart or search results list is also displayed when
you copy the chart to Microsoft PowerPoint or the search results to Microsoft
Excel.
Showing or Hiding Fields in the Hover Profile
1. Right-click on a field in the Hover Profile.
2. Select Configure Profile View from the drop-down list. The
Configure Profile View dialog opens at the Person tab.
3. Select the tab where you want to modify the fields, Person, Job, or
Box then select the check box for the field or subheading you want
to show or hide. A check indicates the field is displayed. A blank box
indicates that the field is hidden.
4. You can also rearrange the position of each field, or arrange fields to
display beneath a subheading, by clicking the Move Up and Move
Down buttons.
5. Click OK to close the dialog. The Hover Profile reflects the changes.
Sorting the List View
You can sort the data in the List View columns alphabetically, numerically,
or in date order.
Create Your Charts/Using the Hover Profile
191
Aquire OrgPublisher 10 User Guide
1. Open the List View by selecting View from the Main menu then List
View from the options list. You can also click the List View
in the toolbar.
button
2. Click on the column heading that you want to sort by. The sort order
is retained when you publish the chart. For instance, click on the full
name to sort the list alphabetically by last name.
3. Click on the heading for a numeric field, such as telephone number,
to sort the list numerically, or on a date column to sort the list by
date. The date format must be YYYY/MM/DD.
Expanding or Collapsing Levels in Tree View
1. Select Options from the Main menu then Tree View options.
2. Select Expand or Collapse from the options list. Expand shows
each level of information. Collapse shows only the top level, with
plus (+) signs to indicate where additional levels are available. The
Tree View immediately reflects your change.
Hiding or Showing Icons in Tree View
1. Select Options from the Main menu then Tree View options.
2. Select Show icons from the options list. If Show icons is selected,
the Tree View displays the appropriate icon at each level. If the
option is not selected, the Tree View displays text only and the
connecting lines.
Using the Symbol Indicators in Tree View
Symbols in the Tree View indicate whether additional chart components
are available for viewing, or that a branch is collapsed into summary
format.
Symbols used in the Tree View, their function and locations are:
192
Create Your Charts/Using the Hover Profile
Aquire OrgPublisher 10 User Guide
Symbol
+
>
Function
A component is collapsed and can be
expanded to show more components
by clicking on the plus sign.
A component is expanded and can
be collapsed by clicking on the
minus sign.
More boxes are available for display
by double-clicking the box
containing the greater-than sign.
Location on the tree
Corner of the branch
connected to the chart
component
Corner of the branch
connected to the chart
component
Chart box
Viewing the Hover Profile
1. Move the mouse cursor over a box title, job title, or name in a chart
box, and let it hover there for a few seconds. The Hover Profile
opens.
2. A vertical scroll bar is available if the number of displayed fields
requires it. The Hover Profile displays the selected chart color
scheme.
3. When you have finished reviewing the information in the Hover
Profile, click somewhere else in the chart to close it.
You can also select fields to show or hide in the Hover Profile, add
subheadings, and change the size of the profile.
Viewing the Tabbed Profile
If you have created subheadings in the Profile View you, as well as the
end user of a published chart, have the option to display the information
with tabs representing each subheading. The chart administrator sets the
default display for the published chart.
1. Open the Profile View and add subheadings if they do not currently
exist.
Create Your Charts/Using the Hover Profile
193
Aquire OrgPublisher 10 User Guide
Figure 94
2. Right-click inside the view and select Configure Profile View. The
Configure Profile View dialog opens.
Figure 95
3. Select the Show headings as tabs radio button.
194
Create Your Charts/Using the Hover Profile
Aquire OrgPublisher 10 User Guide
4. Click OK. The dialog closes and the Profile View displays the
subheadings as tab options.
Figure 96
5. Select a tab to view the subheading and associated data.
6. Click the Enable/disable tabbed category view
tabs and view the grid.
button to remove
The Hover Profile can also be configured to display tabs.
Viewing the Tabbed Hover Profile
If you have created subheadings in the Hover Profile View you, as well as
the end user of a published chart, have the option to display the
information with tabs representing each subheading. The chart
administrator sets the default display for the published chart.
1. Open the Hover Profile and add subheadings if they do not currently
exist.
2. Right-click inside the view and select Configure Profile View. The
Configure Profile View dialog opens.
Create Your Charts/Using the Hover Profile
195
Aquire OrgPublisher 10 User Guide
Figure 97
3. Select the Show headings as tabs radio button.
4. Click OK. The dialog closes and the Hover Profile displays the
subheadings as tab options.
Figure 98
5. Select a tab to view the subheading and associated data.
196
Create Your Charts/Using the Hover Profile
Aquire OrgPublisher 10 User Guide
6. Click the Enable/disable tabbed category view
tabs and view the grid.
button to remove
The Profile View can also be configured to display tabs.
Using the Tabbed Style Selector
In addition to selecting a style from the Style View, OrgPublisher now
displays available styles with tabs across the Style bar. The last tab in the
application contains a New Style
button which launches the Style
Wizard when selected. The tabs display in alphabetical order.
Click on a tab to look at the selected style.
The application tabs look like this:
Figure 99
The published chart tabs look like this:
Figure 100
Note:
The edit style bar label option is not available if the Show styles in tabs option
is enabled.
Create Your Charts/Using the Hover Profile
197
Aquire OrgPublisher 10 User Guide
Open and Run Wizards
Note:
Although this section provides information on manually editing a chart,
remember that if you want the changes to remain permanent, you must apply
the changes to your HR database. When your HR data is refreshed and you
open your chart, your manual changes are overwritten.
Opening a Wizard
Each OrgPublisher wizard consists of a series of dialogs that guide you
through a specific process one step at a time. Some wizards are available
from the Tools menu or through the Wizard View. Some wizards open
another wizard. For example when you create a new chart, the New Chart
Wizard opens the Style Wizard so that you can format your chart.
You can access a wizard by following the instructions below.
• 9 Box Matrix Wizard - opens from the Tools menu or when you click
the 9 Box Matrix button
Box Matrix).
in the toolbar (the first time you access 9
• Automatic Task Scheduling Wizard - opens from the Publishing Wizard
or OrgHistory Archive Wizard when you select the Schedule now
option; also available from the Publish charts and OrgHistory Archives
dialogs.
• Custom Field Wizard - opens from the Tools menu or the Wizard View.
• Head Count Wizard- opens from the Tools menu or the Wizard View.
• Hotspot Wizard - opens from the Tools menu, the Wizard View, or by
clicking on the Insert Hotspot
button and clicking in a chart box.
• Logo Wizard - opens from the Tools or Insert menu.
• New Chart Wizard - opens when you select the New
button in the
menu or toolbar, or when you select that radio button when you open
OrgPublisher.
• OrgHistory Archive Wizard - opens from the OrgHistory Archives
dialog, which opens by clicking the Manage OrgHistory Archives button
in the Main toolbar, or opens from the Tools menu.
• Position Type Wizard - opens from the Tools menu or the Wizard View.
198
Create Your Charts/Open and Run Wizards
Aquire OrgPublisher 10 User Guide
• Photo Wizard - opens from the Insert menu, or by clicking the Insert
Photo
button and clicking in a chart box.
• Print Wizard - opens the first time you print a chart (using either the
File, Print menu or the Print
button) or every time you print a
chart if you choose it in Print Options from the File menu.
• Publishing Wizard - opens from the Tools or File menu or from the
Wizard View.
• Style Wizard - opens from the Tools menu or the Wizard View. Also
opens from the New Chart Wizard.
• Summary Wizard - opens from the Tools menu or the Wizard View.
9 Box Matrix Wizard
Available in OrgPublisher Premier, the 9 Box Matrix Wizard walks you
through selecting fields for the X-axis (horizontal line) of 3 boxes
assessing performance and the Y-axis of 3 boxes (vertical line) assessing
potential. A combination of the Y and X axis determines the box within the
grid where the employee is placed. The top right-most box displays High
Performance/High Potential employees, while the bottom left-most
box contains Low Performance/Low Potential.
In addition to the fields you want to use for analysis, you can also select
group and position type filters, range limits, and sort order.
Note:
Records displayed in the 9 Box Matrix are associated with the level displayed
in the Chart View.
With the 9 Box Matrix Wizard, you can:
Creating a 9 Box Matrix
Defining 9 Box Potential Field Range Values
Defining 9 Box Performance Field Range Values
Selecting 9 Box Filters
Filtering Groups in the 9 Box Matrix
Filtering Position Types in the 9 Box Matrix
Create Your Charts/9 Box Matrix Wizard
199
Aquire OrgPublisher 10 User Guide
Modifying 9 Box Matrix Results
Sorting the 9 Box Matrix
Automatic Task Scheduling Wizard
OrgPublisher provides an Automatic Task Scheduling Wizard which
enables you to schedule a chart to automatically publish or archive at the
selected frequency. You can create a new schedule definition or select
from a list of existing definitions.
Task scheduling is accessed when you choose the Schedule now option in
either the Publishing Wizard or the OrgHistory Archive Wizard.
With the OrgPublisher Automatic Task Scheduling Wizard you can:
Scheduling a One Time Only Job
Scheduling a Daily Job
Scheduling a Weekly Job
Scheduling a Monthly Job
Note:
The OrgPublisher Web Administration Server allows you to publish charts
manually. You can, however, open the desktop OrgPublisher version and
schedule the publishing definition in the Publish charts dialog using the Web
Administration SourceCharts folder.
Custom Field Wizard
OrgPublisher’s Custom Field Wizard walks you through the process of
manually creating or modifying custom fields in your chart for your
organization’s data, such as telephone numbers, hire date, salary, etc.
You can also attach a hotspot to a specific field using the Custom Field
Properties dialog.
OrgPublisher can display custom field data extracted from your database.
The required layout for org chart information is defined in OrgPublisher’s
Input File Layout. Custom fields automatically begin in column 20 of this
file, and summary custom fields begin in column 26.
The first time a chart is created from data, open the Custom Field
Properties dialog and assign your custom fields to the appropriate position
types.
200
Create Your Charts/Automatic Task Scheduling Wizard
Aquire OrgPublisher 10 User Guide
Note:
Working in OrgPlan, planners can modify any data fields displayed in the
Chart View. Data fields you, the administrator, want to keep in the chart, but
do not want modified can be displayed in the Profile View. And since planners
cannot add or delete custom fields, you still maintain control over the custom
fields you decide to use in the chart.
In OrgPublisher Premier, make sure when importing numeric fields that you
do not use any leading symbols, such as dollar signs. Also, verify that decimal
places are set the way you want them prior to importing those fields into
OrgPublisher. You can add leading and trailing symbols to numeric fields with
the Field Format dialog, but the decimal places cannot be adjusted after they
are imported.
Create or modify a Custom Field using the
Custom Field Wizard:
Note:
If you manually create a custom field and you do not update you HR
database, the next time your chart is refreshed, your data will overwrite your
manual changes.
1. Click the Custom Field Wizard
button in Wizard View and click
Next. You can also select Tools from the Main menu then Custom
field Wizard from the pull-down menu.
2. The first time you create a custom field for your chart, the dialog
prompts you to select the Type of custom field you want. For
instance, select Email if you are setting up a group email list. Click
Next.
3. If custom fields already exist in your chart, select either the New
Custom field or Existing Custom field radio button. Click Next.
4. Type the Label, or name, for the custom field. Select the Hide label
check box if you do not want the label to display in the chart. Click
Next.
5. Click on the Position Type to display the custom field in your chart,
such as All Positions or Manager. Select where you want to assign
the field, box, job, or name. Click Next.
6. Click Finish. The custom field displays in your chart.
Note:
Fields 50 - 64 are standard succession planning custom fields provided by
OrgPublisher. These labels cannot be changed.
Create Your Charts/Custom Field Wizard
201
Aquire OrgPublisher 10 User Guide
If the charts you are comparing do not contain a custom Position ID type,
OrgPublisher uses the ID in field 5 from the Input File Layout. If neither exist,
an error message displays and the comparison does not occur.
In addition new or renamed custom fields will not match when comparing
charts and will not be included in the change report.
Head Count Wizard
OrgPublisher provides a wizard to help you create head count populations
and summaries in your chart. The Head Count Wizard displays a series of
dialogs that prompt you for information on who to count, what to name
the head count roll-up and which position types will display the roll-up. A
head count roll-up is a count of employees per manager, department, etc.
You can show or hide the head count label, the actual head count, or the
planned head count.
Note:
The use of conditional formatting can affect position type summary totals. See
About Conditional Formatting for additional information.
Show or hide head counts:
1. Click the Head Count Wizard
button in Wizard View and click
Next. You can also select Tools in the menu bar, then Head Count
Wizard from the pull-down menu.
2. Select the Population to include in the roll up. You can select
individual position types, Total Head Count, or a group, if
applicable. Click Next.
3. Type the Label, or name, for the head count field. Select the Hide
label check box if you do not want the label to display in the chart.
Click Next.
4. Click on the Position Type to display the head count, such as All
Positions or Manager. Select where in the position type you want
the field displayed. Repeat for each position type. Click Next.
5. Click Finish. The head count displays in your chart boxes, unless you
choose to hide that field, and in the Status bar.
Note:
Orphan records and broken hierarchies can adversely affect summary and
security functions. Unexpected results can occur that may cause head count
or other totals to be incorrect.
Succession candidates are not included in head counts or summaries.
202
Create Your Charts/Head Count Wizard
Aquire OrgPublisher 10 User Guide
Hotspot Wizard
OrgPublisher provides a Hotspot Wizard to help you create or modify
hotspot links in the Chart View, Profile View, and the Hover Profile. These
links can point to locations on the Internet, your intranet, or your server.
You can also specify a base path for each hotspot rather than a global
base path.
Note:
If you want to set up a hotspot e-mail link, do not use this wizard. Use the
Custom Field Properties dialog to assign the Email custom field type.
Create a Hotspot Link
1. Click the Hotspot Wizard
button and click Next. You can also
click the Insert a Hotspot button
in toolbar and click on a field in
a chart box to open the Hotspot Wizard.
2. Accept the default Use the chart's global hotspot base path
option or select the Specify a base path that is unique to this
field radio button. If you select the latter option, type the lowest
level of the path to the directory where the linked document is
saved, such as file://servername/profiles. Setting the base URL
helps you avoid passing in extra or repetitive data. Click Next.
Note:
You can also specify a base path for each hotspot when using the Publishing
Wizard.
3. Type the Target frame name, if applicable. If you use HTML frames
to display the results of a hotspot, specify the target HTML frame
name. If you are not using HTML frames, then accept the default,
_parent. Click Next.
4. Select the Position type to display the hotspot, such as All
Positions or Manager.
5. Select the position type and field where you want the hotspot shown,
such as Job Title. Click Next.
6. Review the information you have selected, the label, base URL and
target frame. If the fields are correct, click Finish. Click Back if you
need to modify data, then repeat these steps and click Finish.
Manually Edit a Hotspot Label:
1. Double-click the hotspot label to select it for editing.
Create Your Charts/Hotspot Wizard
203
Aquire OrgPublisher 10 User Guide
2. Type a new hotspot label. Every occurrence of this label is changed.
Manually Edit a Hotspot File Information:
1. Verify that you are in Build Mode.
2. Double-click the file information area to select it for editing.
3. Type a new file name.
You can also review additional information on how to:
Access Smart Links from the published chart
Setting a Base URL (Path)
Using a Target Frame
Logo Wizard
OrgPublisher’s Logo Wizard walks you through adding or modifying the
URL for a logo in your org chart. You can also insert a graphic as a
watermark or background using the Format dialog.
Note:
The Logo Wizard inserts one logo per chart, across all styles.
Insert a Logo
1. Click the Logo Wizard
button in the Wizard View or select
Insert from the main menu, then Logo from the options list. You
can also select Tools, then Logo Wizard. If you are modifying an
existing logo, right-click on the logo. The Logo Wizard opens.
2. Type or Browse to the Logo file name. Click Next.
3. If you are deleting a logo, just delete the file name from this field.
Click Next and proceed to Step 6.
4. To add a logo to your chart, select the alignment you want for your
logo from the drop-down Alignment list.
5. Select the Show Logo check box if you want the logo displayed.
(You may create styles that do not display the logo.) A preview of the
logo is shown.
204
Create Your Charts/Logo Wizard
Aquire OrgPublisher 10 User Guide
6. If the logo is correct, click Finish. Click Back if you need to change
the logo or graphic, then repeat these steps and click Finish.
Note:
You can also add special chart backgrounds or color gradients to your chart.
Logos cannot be hidden in charts, and they are not supported when publishing
as an EChart thin client.
New Chart Wizard
OrgPublisher provides a wizard to help you begin creating a new chart.
The New Chart Wizard can also launch the Style Wizard to help you create
your first style.
Note:
Use the ODBC, or Database, option to publish a chart in real-time. If you are
creating an ODBC connection for Unifi Thin Client, refer to the Unifi
Installation and Configuration Guide provided by the Aquire Professional
Services Group.
Real-time publishing is not available when building a chart from multiple data
sources.
1. Open OrgPublisher and select Run the New Chart Wizard radio
button from the OrgPublisher dialog. You can also select File from
the OrgPublisher menu then New, or click the New button
toolbar. The New Chart Wizard opens.
in the
2. Select either the Organizational chart or Succession planning
chart radio button then click Next. The New Chart Wizard displays a
dialog for you to select the source of your data.
3. If you select Succession planning chart, see the Creating a
Succession Planning Chart in the New Chart Wizard topic for detailed
information.
4. Select the button that indicates where you want to get data and click
Next.
5. Click on a data source option below to access the procedure you
need to create an org chart.
Creating
Creating
Creating
Creating
Creating
an Org Chart from
an Org Chart from
an Org Chart from
an Org Chart from
a Blank Org Chart
Create Your Charts/New Chart Wizard
ODBC
an XML File
a Text File
Multiple Data Sources
205
Aquire OrgPublisher 10 User Guide
6. Follow the wizard prompts for the data source you selected.
Note:
If you are connecting to a Microsoft Excel file, you must create a named range
identifying where the data is located within the spreadsheet.
Detailed information about the input fields can be found in the Input File
Layout and Input File Layout Rules sections of this document.
7. Select the Launch the Style Wizard check box if you want to
format a style. Click Finish. The Style Wizard opens.
OrgHistory Archive Wizard
With OrgPublisher you can use the OrgHistory Archive Wizard to take a
"snapshot" of your organizational chart and archive it for reference at a
later time. The wizard walks you through selecting a directory and name
for your archive, as well as helps you assign a password or add a
signature to the archive.
Note:
You can create a "read-only" archived chart just once a day (using the "One
time only" scheduling option). If you want to archive an updated version of
your "read-only" chart, you can schedule it to run the next day.
A "read-only" archived chart can be overwritten with an updated version of
the same chart. A message verifies that the end user wants to overwrite the
"read-only" archive.
With the OrgHistory Archive Wizard you can:
Creating a New Archive Chart
Updating an Archive Definition
Using the OrgHistory Archives Dialog
Note:
If you are working with the OrgPublisher Web Administration server, all
archived charts will be created in the server ArchivedCharts folder. In
addition, if end users must access archived charts, they must be stored in the
SourceCharts folder.
Photo Wizard
OrgPublisher’s Photo Wizard walks you through the process of inserting or
modifying the URL for photos or graphics in your chart.
206
Create Your Charts/OrgHistory Archive Wizard
Aquire OrgPublisher 10 User Guide
Insert a Photo:
1. Right-click on a name if you are working with a planning chart and
select Photo Wizard from the options list. Select Insert from the
menu bar, then Photo from the pull-down menu. The Photo Wizard
opens. If you are working with a chart from data, place the photo file
name, for example, jasmith.jpg, in field 15 of the input file.
OrgPublisher opens the Photo Wizard when it detects the file name in
field 15 of the input file.
You can also click the Insert Photo button
on the Insert toolbar
and click in the box where you want to add the photo. The Photo
Wizard opens.
2. Type or Browse to the Photo file name.
3. Type or Browse to the Base photo file path or URL. If you
browsed to the photo file name, the base path automatically displays
in this field. The base file path or URL is the path to the directory
where the photos or graphics are saved, the lowest level of the path
to the directory where the linked document is saved, such as file://
servername/profiles/.
OR, if applicable, you can select the Photos located in the same
folder as chart check box.
4. Click Next.
Note:
If a full path is passed in with a photo file in field 15, the base URL is
overridden and the full path name is used. You must include the trailing
forward slash (/) in the base URL.
5. A preview of the photo is shown in the last dialog. If the photo is
correct, click Finish. OrgPublisher inserts the photo or graphic into
your org chart. Click Back if you need to change the photo or
graphic, then repeat these steps and click Finish. The photo displays
in the selected box.
6. If necessary, resize the photo. By default, this will be the size for all
of the chart photos.
7. To update photo properties, select Build Mode and then double-click
on the photo to open the Photo Wizard.
Create Your Charts/Photo Wizard
207
Aquire OrgPublisher 10 User Guide
Position Type Wizard
OrgPublisher contains a set of standard position types, such as Manager
and Employee. It also provides a Position Type Wizard
to help you
create your own position types for your chart. For instance, if you want to
place a staff function box in an existing chart, you use this wizard to
create the new position type. If you are opening a blank chart or a chart
that already contains a staff function, that position type is available to
select in the wizard. A new position type is saved within your chart file,
even if you do not actually save the chart after creating the position type.
You can also use the Succession Candidate position type in order to
create succession planning charts that do not contain a hierarchy.
You can assign a group, based on a single attribute to create a conditional
position type. You can then use conditional formatting to increase visibility
of that group in your chart.
Note:
Only Staff Function position types can reside in a Staff Function box.
The Position Type Wizard steps you through changes to an existing
position type or through creating a new position type. You can also use
the Define dialog from the Edit menu option.
With the Position Type Wizard you can:
Adding a Custom Position Type
Modifying a Position Type
Assigning Conditional Formatting to a Group
Print Wizard
OrgPublisher provides a Print Wizard to help you with the page setup for
your printed chart. You can print a chart in either a book or wall chart
format.
The Wall Chart option is ideal for smaller charts that fit on one page, or
when printing to a plotter. The Book Style option can be modified to print
a select number of levels per page, specific chart layouts and more, and
includes an index.
208
Create Your Charts/Position Type Wizard
Aquire OrgPublisher 10 User Guide
You can also refer to the Printing in Wall Chart Style, Printing Your Chart
as a Book, or Printing a View procedures for more details.
Print a Chart Using the Print Wizard
1. Select File from the Menu then Print options from the options list
then Use Print Wizard. You can also click the Print
toolbar. The Print Wizard opens.
button in the
2. Select the View to print, in this case Org Chart. Click Next.
3. Select either the Wall Chart or Book Style radio button. Click
Next.
4. If you want to add or modify a header or footer for your chart, click
Header/Footer to open the Print Header/Footer Options dialog.
Make your selections, as detailed in the Selecting Print Header/
Footer Options procedure in this document. Click OK.
5. If your chart contains group icons or custom items, you can select
the Include Legend check box to print a chart legend listing all the
icons and colors used in the chart. Click Finish to print your chart.
Print the 9 Box Matrix
You can print the 9 Box Matrix if the Print Wizard has been activated. The
user will be prompted to print the chart or the 9 Box Matrix View. If the 9
Box Matrix is maximized, the matrix prints automatically.
Print Graphs
You can print graphs when the Print Wizard is enabled. To print a graph,
open the Summary View and select the Graphs tab. Each graph prints
one to a page.
Note:
If you print an EChart, you may see a warning message that too many
records exist to print the chart. You can print the chart in smaller sections.
If you attempt to print more than 5000 records in an EChart, a message
displays noting that you are exceeding the print limit and the print job is
canceled. Select smaller portions of the chart to print. This provides you with
more control and prevents you from getting caught in an unwieldy print
operation at the end user’s browser.
Create Your Charts/Print Wizard
209
Aquire OrgPublisher 10 User Guide
Publishing Wizard
OrgPublisher provides a Publishing Wizard
to help you create
publishing definitions for your chart. You can choose Express Mode for a
basic PluginX published chart or Advanced Mode to select specific
options for your published org chart. The published chart will start either
at the top box in the chart, or at a box that you select.
You can also publish a chart for org model (what-if) planning, as well as
receive data troubleshooting e-mail messages when publishing to PluginX.
For instance, if you publish a chart with a broken hierarchy, this message
can notify you of the problem.
If you are publishing a chart for the first time using the Advanced Mode,
the Publishing Wizard presents more dialog choices. You can select
several publishing options, each requiring specific steps. You can even
choose to enable Section 508 accessibility in your published chart.
Review the Choosing a Publishing Format topic before you are ready to
publish. In addition, you should understand whether or not you want to
overwrite your existing HTM or JS file, and if you can use file transfer
protocol (FTP ). If you publish ECharts, you should also verify whether or
not your web server structure uses a virtual directory. Using the EChart
publishing option you can also publish in thin client as well as rich client
format.
Select a publishing format to review the appropriate Publishing Wizard
procedure.
Publishing in Express Mode
Advanced Mode
Publishing in PluginX Format
Publishing in Graphic Format
Publishing in HTML Format
Publishing in EChart Rich Client Format or Publishing in EChart Thin
Client Format
Publishing Real-Time Charts
Publishing in PDF Format
210
Create Your Charts/Publishing Wizard
Aquire OrgPublisher 10 User Guide
Style Wizard
You can create multiple styles in OrgPublisher for each chart to vary the
display of your chart data and to help format your chart. If you publish
your charts with OrgPublisher PluginX, your users can switch styles while
viewing your chart. With the Style Wizard, you can create a new or
change an existing style. You can set styles from within the New Chart
Wizard, or create styles later in the chart process.
By clicking the Style Wizard
create unique styles by:
button in the Wizards View, you can
Formatting Chart Boxes
Applying a Chart Design Template
Note:
Applying a chart design template overwrites any Advanced Box Layout
settings you may already have in your chart.
Saving and Charting Search Results as a Group
Inserting Photos
Showing or Hiding All Options Associated with a Position Type
Securing Styles to a Group
Selecting Drilling Options
Setting Chart Layout Options
Inserting Hotspots
Showing or Hiding Chart Levels or Displaying Chart Styles
Setting the Top of the Chart
Summary Wizard
The Summary Wizard walks you through the process of creating summary
fields in your chart for numeric data. You can use summary information
for reports or what-if planning. You can select how much of this
information displays in the Summary View.
Create Your Charts/Style Wizard
211
Aquire OrgPublisher 10 User Guide
Summary fields can include:
• Head counts
• Summaries of numeric data, such as totals, averages, minimum,
maximum, or percentages
• Projections that you create in a separate planning session
• Group counts
The Summary Wizard provides dialogs to help you insert a summary field.
It prompts you for the custom field to summarize, the type of summary,
the population for the summary, the name or label you want to assign to
the summary, and which position types should display the summary.
Note:
The Summary View is not available in published real-time charts.
Succession candidates are not included in head counts or summaries.
To add a field or change an existing text field to a numeric field, open the
Custom Field Properties dialog.
Note:
The Summary Wizard informs you if your chart does not contain numeric
custom fields and, subsequently, closes. In addition, the wizard inserts
placeholders, if necessary, which display in the Custom Field Properties
dialog. These fields within OrgPublisher, occupy sequences 20 -25, as you will
note in the Seq. column in the dialog, and are designated as field types other
than summaries, such as Text, Hotspot, or Email. As you create summary
fields, OrgPublisher starts placing them in sequence 26.
When importing numeric fields, make sure that you do not use any leading
symbols, such as dollar signs. Also, verify that decimal places are set the way
you want them prior to importing those fields into OrgPublisher.
In conditional formatting, the search feature and all calculations follow the
conditional position type. Formatting follows the group. If you display the
Summary View in a chart with conditional formatting, you should hide either
the group or position type of the conditional format. If you don't, head counts
display in both areas.
Orphan records and broken hierarchies can adversely affect summary and
security functions. Unexpected results can occur that may cause head count
or other totals to be incorrect.
You can add leading or trailing symbols to numeric fields with the Field
Format dialog, but the decimal places cannot be adjusted after they are
imported.
212
Create Your Charts/Summary Wizard
Aquire OrgPublisher 10 User Guide
Add a Summary Field
1. Click the Summary Wizard
button in Wizard View. You can also
select Tools from the Main menu, then Summary Wizard from the
pull-down menu. The Summary Wizard opens to the first dialog. Click
Next.
Note:
The “There are no numeric fields in your input file” dialog appears in the
Summary Wizard if you have built your chart with a data source that contains
no numeric fields. You may have added numeric fields manually and can use
the Custom Field Properties dialog to create your summary field.
2. Select the existing Numeric Field to Summarize. Select the Type
of Summary. Click Next.
3. Select the Population to include the summary total. You can choose
a specific position type, custom field, total head count, or group.
Click Next.
4. Type the Label, or name, for the summary field. Select the Hide
label check box if you do not want the label to display in the chart.
Click Next.
5. Click on the position type to display the summary. Select where in
the position type you want the field displayed. Repeat for each
position type. You can also select All Positions. Click Next.
6. Click Finish. The summary field displays in your chart.
Creating a Group Summary with the Summary
Wizard
Note:
The Summary View is not available in published real-time charts.
In OrgPublisher, you can use the summary feature to generate a group
head count.
1. Open the Summary Wizard by selecting Tools from the Main menu
then Summary Wizard from the options list. You can also click the
Summary Wizard
button in the Wizard View. Click Next.
2. Select the Numeric Field to Summarize and the Type of
Summary. Click Next.
Create Your Charts/Summary Wizard
213
Aquire OrgPublisher 10 User Guide
3. Click the drop-down arrow in the Population field and select the
group name for which you want to create the summary. Click Next.
4. Type the summary Label. Click Next.
5. Select the Position type to display the summary field. Click Next.
Note:
If you create a group based on a standard position type, such as Manager,
then associate a custom position type to the group for conditional formatting,
such as Top Performing Manager, the original position type is no longer a part
of the group criteria. For instance, if you then searched for all "managers" the
"top performing managers" will not be part of your search results because
they are now a different position type. Your Boolean search should use both
the original position type, Manager, and the new position type, Top
Performing Manager, as a criteria using And/Or.
6. Click Finish. The new group summary field displays in the Summary
View.
Note:
If there is more than one group-based position type for which a person
qualifies, the first match is used in Search and Summary tasks.
Inserting a Head Count Roll-up
Before you insert the head count roll-up or while you are creating your
position types, you must indicate if the position types are to be counted or
not. By default, indirect reports and contractors are excluded from the
total head count. You can change this default to include or exclude other
position types in the head count.
1. Select Edit from the Main menu then Define from the pull-down list.
The Define dialog displays.
2. Find the Position type you want to include in the roll-up and click
inside the Count field.
3. Select Yes from the options list to include the position type in the
roll-up or No to exclude it. Excluded position types do not affect
groups.
You can insert a head count roll-up with the:
Head Count Wizard
Inserting a Head Count Roll-up with the Custom Field Properties Dialog
Note:
214
Succession candidates are not included in head counts or summaries.
Create Your Charts/Summary Wizard
Aquire OrgPublisher 10 User Guide
Inserting a Head Count Roll-up with the Custom
Field Properties Dialog
1. Select Data from the Main menu then Custom Field Properties
from the pull-down menu. You can also click the Custom fields
button
in the toolbar. The Custom Field Properties dialog opens.
2. Position the cursor where you want to add the new custom field,
either somewhere within existing fields, or at the end. Click Insert.
If you are inserting a field within the list of existing fields, a message
verifies that this is what you want to do.
3. Enter the field name in the Field label column.
4. Press the TAB key to move to the Type column and select Count.
5. Press the TAB key to move to the Population column and select the
position type or group you want to count. You can select one or more
position types or groups, or the Total Head Count, or the Total
Planned Head Count.
6. Press the TAB key to move to the Assigned To column. The Update
Displayed Custom Fields dialog opens. Select the position types or
groups for this custom field. If you want all position types to have
this field, select All Positions.
7. Click Close to insert the new head count in your org chart and to
close the Custom Field Properties dialog.
Note:
Succession candidates are not included in head counts or summaries.
Resizing Wizard Icons
You can resize the icons used in the Wizard View.
1. Click the Wizard View
button or select View from the Main menu
then Wizard View from the pull-down list. The Wizard View opens.
2. Right-click within the view.
3. Select Large icon or Small icon. The Wizard View immediately
displays the resized icons.
Create Your Charts/Summary Wizard
215
Aquire OrgPublisher 10 User Guide
Showing or Hiding Planned Head Count
1. Select View from the Main menu then Status Bar from the pulldown menu. A drop-down list displays the Status Bar options. Each
option selected for display is checked.
Note:
Keep in mind when you choose to show or hide fields that all information you
can view in the OrgPublisher chart or search results list is also displayed when
you copy the chart to Microsoft PowerPoint or the search results to Microsoft
Excel.
2. Select Planned to show the planned head count for the displayed
portion of the chart. This option adds in the number of open positions
displayed in your chart. You can click on the option again to clear it.
3. You can display both the actual and the planned head count at the
same time by selecting both options in the option list. Planned head
count displays to the right of Shown Head count.
Showing or Hiding the Head Count Label
You can show or hide the label, or name, of a head count field in two
ways.
• When you create or modify a style, you can select the Hide label
check box in the Head Count Wizard to hide the label in the chart. To
show the label, leave the check box blank.
• Right-click on the label in the Chart View and select the Hide label for
option. To show the label, right-click on the head count field and select
Show label.
216
Create Your Charts/Summary Wizard
Aquire OrgPublisher 10 User Guide
C
HAPTER
4
FORMAT YOUR CHARTS
Apply Standard Formatting
Note:
Although this section provides information on manually editing a chart,
remember that if you want the changes to remain permanent, you must apply
the changes to your HR database. When your HR data is refreshed and you
open your chart, your manual changes are overwritten.
Adding a Chart Background
You can add a background or watermark to your OrgPublisher chart.
1. Click Format in the menu then Chart from the pull-down list. The
Chart tab of the Format dialog opens.
2. In the right-hand pane, the Property column displays both a
Background color and Background Image field. Click in the
Background color Value field to select a color for your chart
background. You can also select Other to customize a background
color.
3. In the Color dialog, you can select one of the Basic colors, then
modify it by moving your cursor within the color matrix to adjust the
Hue, Saturation, and Luminosity. When you have the color you
want, as shown in the Color/Solid box, click Add to Custom
Colors. Click OK to return to the Format dialog.
4. Click Apply to accept the change and continue working in the Format
dialog or click OK to accept the change and close the dialog.
You can also create a gradient for your chart background color.
Note:
You can either embed an image background or select a background color or
gradient for a specific chart. You cannot apply both to the same chart at the
same time.
5. You can add a Background Image by clicking on Embed Image in
the Value field. This displays the Open dialog which you can use to
browse to an image file. Click Apply to accept the change and
continue working in the Format dialog or click OK to accept the
change and close the dialog.
6. Select a File name and click Open. The Open dialog closes and the
Format dialog displays again.
Format Your Charts/Apply Standard Formatting
216
Aquire OrgPublisher 10 User Guide
7. If you want to choose a Background Style, click the Value field and
select Center, Tile, or Stretch. Center places your background
image in the middle of the chart. Tile displays your image
(depending on the size) several times, covering the entire
background of the chart. Stretch modifies your file so that a single
image stretches across the entire background of the chart.
8. Click Apply to accept the change and continue working in the Format
dialog or click OK to accept the change and close the dialog.
9. If you want the background or background image to print when you
print your chart, select the Print Gradient/Background check box.
10.Click Apply to accept the change and continue working in the Format
dialog or click OK to accept the change and close the dialog.
11.You can delete the background image by clicking Remove Image.
Click Apply to accept the change and continue working in the Format
dialog or click OK to accept the change and close the dialog.
Adding a Style
Note:
You can also select a style from the Chart Design Template using the Style
Wizard or by clicking the Chart Design Templates button in the toolbar.
1. Select Tools from the main menu and Style Wizard from the pulldown list. If the Wizard View is open, you can also click on the Style
Wizard
button. The Style Wizard opens. Click Next.
2. Select the radio button to either edit an Existing Style or create a
New Style. Click Next.
3. Type a Style name or accept the displayed default.
4. Select the radio button to choose the method of creating the style,
Use this wizard to create a new style or Make a copy of an
existing style. Click Next.
If you selected to make a copy of an existing style, proceed to Step
7.
5. If you selected to create a new style, select a method to format your
chart, Selecting a chart design template or Using the wizard.
Click Next. If you select the chart design template option, proceed to
Step 13.
6. Choose a radio button for the chart layout you want to use. Click
Next.
217
Format Your Charts/Apply Standard Formatting
Aquire OrgPublisher 10 User Guide
7. Select the radio button for how you want reports displayed in each
box, Report each person on his/her own box, Report each
person in box with manager, or Report each person in the
same box below manager. Click Next.
8. Select the position types you want to show or hide in the style. A
green check mark indicates a shown position type. A red X indicates
a hidden position type. Click Next.
9. Select a radio button to use the Automatic chart title or to create a
Custom Title. If you choose to use a custom title, type the name in
that field. Click Next.
10.Select the Levels to Display in the chart. OrgPublisher defaults to
"2 levels." Click the down-arrow to modify the default.
11.Select the check box to Enable Drill-up/Drill-down buttons, or
clear it to hide the drill buttons. Click Next.
12.Select the check box next to each view you want to display in the
chart. Click Next and proceed to Step 15.
13.If you selected the chart design template option in Step 5, the next
dialog displays thumbnails of preformatted window layout templates
available. Select the format you want then click Next.
14.Select the thumbnail that resembles the Chart View you want to see
in your chart. Click Next.
15.You can click Back in order to modify any of your choices, or click
Finish to close the wizard and open your chart in this style.
Adding Multi-relationship Icons
You can use this feature for matrix reporting to indicate employees who
report to more than one supervisor. In order to do this, each employee
must have a unique ID in the ID field of the Update Person dialog. This
file is "searchable" and, therefore, can be viewed by end users. Do
not use sensitive data in this field. If you build charts from data, the
Input File must contain a unique ID in Field 5. If you build charts
manually, you can add the ID using the Update Person dialog.
Note:
In the printed version of a book, matrix reporting is indicated by persons
appearing multiple times in the index with a page number for each
appearance. We recommend that you format indirect relationships differently,
such as with a dotted line.
Format Your Charts/Apply Standard Formatting
218
Aquire OrgPublisher 10 User Guide
Using group and multi-reporting relationship icons in conjunction with
Conditional Formatting is not recommended. These two features distinguish
different aspects of group information and are not meant to work together.
1. Verify that unique IDs exist for each employee. To open the Update
Person dialog, double-click on a person's name in the chart. If the ID
field is empty, add the employee ID.
If you build charts from data, you can choose to enter this
information manually, as stated above, but when your chart is
refreshed, this information will be lost. If you want the unique ID to
be permanent, you must make the changes in your database.
2. Click Format in the Main menu and Chart from the pull-down list.
The Format dialog opens at the Chart tab.
3. Click in the Multiple report icon field to display the list of existing
icons. Click on the image you want or click Other to navigate to an
icon from another icon resource file.
4. Click OK. The dialog closes and the Chart View displays the multiple
report icon in the lower-left corner of the boxes.
You can click on the icon to display the Search View which lists each
instance of the person in the chart.
Multiple reports display separately in the List View for each time they
occur in the chart. You can click on an instance of the name to locate
the person in the chart.
Applying a Chart Design Template
Note:
Applying a formatting template overwrites any Advanced Box Layout settings
you may already have in your chart.
1. Select Tools from the Main menu then Style Wizard from the
options list. You can also click the Chart Design Templates
in the Format toolbar. The Style Wizard opens.
button
2. Follow the wizard prompts until you reach the dialog asking you how
you want to create the style.
3. Select the radio button to choose the method of creating the style,
Use this wizard to create a new style. Click Next.
4. Select the Selecting a chart design template radio button. Click
Next.
219
Format Your Charts/Apply Standard Formatting
Aquire OrgPublisher 10 User Guide
5. The next dialog displays thumbnails of preformatted window layout
templates available. Use the scroll bar to view the available window
styles. Select the format you want then click Next.
6. The preformatted chart view template thumbnails display in the next
dialog. Use the scroll bar to view the available style templates. Select
the template you want to use and click Next.
7. Follow the remaining dialog prompts and click Finish. Your chart
displays the selected chart design template.
Note:
The Chart Design tries to match position types in the source chart. If it can’t
find a position type match then the manager formatting is applied.
The Web Administration Server chart design templates work if the web
administration server (remotserver.dll) and the OrgPub32.exe installed on the
server are both the current version. If one of these pieces has not been
updated, OrgPublisher cannot pull the data it needs and a blank list of quick
formats appears in the dialog.
Chart Design Templates versus Style Wizard
When creating a style for your chart, you can use a Chart Design Template
or the Style Wizard.
With the Chart Design Templates you:
• get a chart that contains predefined
– reports displayed in boxes
– position types that may require formatting
– automatic chart title
– number of levels displayed in the chart
– drilling feature
– views displayed in the chart
– color schemes and gradients
– box shapes
Note:
Applying a formatting template overwrites any Advanced Box Layout settings
you may already have in your chart.
The Chart Design tries to match position types in the source chart. If it can’t
find a position type match then the manager formatting is applied.
With the Style Wizard you:
• design your style using dialogs in which you select
Format Your Charts/Apply Standard Formatting
220
Aquire OrgPublisher 10 User Guide
– which chart layout you want
– how you want the window to look
– how reports are displayed in the chart
– which position types are shown or hidden
– chart title
– how many levels are displayed in the chart
– whether or not to enable drilling
– which views are displayed in the chart
Choosing a Background Image and Style
You can select a background image, or watermark, either from the
OrgPublisher folder or from your own library, and then choose a
background style.
1. Select Format from the Main menu then Chart from the pull-down
menu. The Format dialog opens at the Chart tab.
2. Select the style you want to modify from the drop-down list in the
left pane of the dialog.
3. Click inside the Background Image field in the Value column in the
right pane, and select an image from the OrgPublisher
Samples>Images folder. You can also navigate to your company
folder to choose a background image. Embed Image displays in the
field.
4. Click inside the Background Style field in the Value column, and
select from the drop-down list. Choices are Center, Tile, or Stretch.
5. Click OK to accept the background choices and view the chart.
To remove a background image, click Remove Image in the Value
column then OK.
Creating a Backup Style
If you have taken the effort to format the chart and create a style you
want to use as a standard, it is recommended that you create a backup of
that style.
1. Select File from the Main menu then Styles from the pull-down
menu. The Styles dialog opens.
2. Select the existing style you want to backup then click New.
OrgPublisher copies the existing style features into the new style and
a new record line displays at the bottom of the list.
221
Format Your Charts/Apply Standard Formatting
Aquire OrgPublisher 10 User Guide
3. Select the text Copy of X style, and type the name you want to use
for the backup style.
4. Add any notes, if appropriate, in the Notes area of the dialog.
5. If you are working with a secure EChart, you can secure a style to a
group by selecting the group name from the drop-down list.
6. Click Close.
7. Select File from the Main menu then Save from the pull-down menu.
You can also click the Save button
Note:
in the toolbar.
Keep in mind when you choose to show or hide fields that all information you
can view in the OrgPublisher chart or search results list is also displayed when
you copy the chart to Microsoft PowerPoint or the search results to Microsoft
Excel.
EChart security works only with an unbroken hierarchy. Orphans within a
secured chart will disrupt all security controls.
Creating a Color Gradient and Style
OrgPublisher enables you to create a gradient color and style for your
chart background. A gradient is a gradual difference in lightness or
darkness of a color. A good example is the color matrix slide in the Color
dialog.
1. Click Format in the Main menu then Chart from the pull-down list.
The Chart tab of the Format dialog opens.
2. In the right-hand pane, the Property column displays both a
Gradient Color and Gradient Style field. Click in the Gradient
Color Value field to select a color for the chart background gradient.
You can also select Other to customize a background color.
3. In the Color dialog, you can select one of the Basic colors, then
modify it by moving your cursor within the color matrix and the color
slide to adjust the Hue, Saturation, and Luminosity. When you
have the color you want, as shown in the Color/Solid box, click Add
to Custom Colors. Click OK to return to the Format dialog.
4. Click Apply to accept the change and continue working in the Format
dialog or click OK to accept the change and close the dialog.
5. Click in the Gradient Style Value field to select how you want the
gradient to display in the chart background. The black and gray tone
Format Your Charts/Apply Standard Formatting
222
Aquire OrgPublisher 10 User Guide
images in the pull-down list enables you to display the gradient
darker colors on the top, left, horizontal middle, or center of the
chart. Click on the image that best illustrates what you want to
display.
6. Click Apply to accept the change and continue working in the Format
dialog or click OK to accept the change and close the dialog.
7. If you want the color gradient to print when you print your chart,
select the Print Gradient/Background check box.
8. Click Apply to accept the change and continue working in the Format
dialog or click OK to accept the change and close the dialog.
9. You can also add an image to your chart background.
Using Additional Gradient Options
Additional gradient options are available for boxes, background, and
legend items.
In the gradient drop down, the black is the background color
representation and white is the gradient representation.
1. Select Format from the Main menu then Boxes from the pull-down
menu. The Format dialog opens at the Boxes tab. You can also use
the Format Box button
in the toolbar.
2. Select the specific style you want to modify or, if you want to modify
all styles for the chart, select All Styles.
3. Click the position type, or All Position Types, you want to modify.
Only the chart boxes for the selected position types are modified.
4. Click the arrow in the Gradient Style field to select one of the new
options.
223
Format Your Charts/Apply Standard Formatting
Aquire OrgPublisher 10 User Guide
Figure 101
You can also select the Chart tab and assign a new gradient style to the
chart background, or select the Gradient style under the Formatting
tab of the Chart Legend Properties dialog.
Customizing Drill Buttons
You can modify the shape and color of the drill button to better match
your corporate style, making your chart more cosmetically appealing. The
customize drill button feature is part of the style format.
1. Select Format from the Main menu, then Chart from the drop-down
list. The Format dialog opens at the Chart tab.
2. Click on the down-arrow to the right of the dialog next to the Value
column and scroll down until the Drill button type option displays in
the Property column.
3. Select the Click to modify button. The Customize Drill Buttons
dialog opens.
4. Select the Use custom drill buttons check box. The drill button
options are enabled.
5. In the Button Shape section, click on the down-arrow in the
Outline field and select the outline shape.
Format Your Charts/Apply Standard Formatting
224
Aquire OrgPublisher 10 User Guide
6. Click on the down-arrow in the Arrow field and select the arrow
shape.
7. In the Button Color section, click the down-arrow in the
Foreground field and select the color of the arrow.
8. Click the down-arrow in the Background field and select the outline
background color.
As you make each selection, the Preview section in the lower-left
hand corner displays a sample of what the drill button will look like.
9. Click OK to save and apply your changes to the chart. Click Cancel
to discard and not use the changes.
Defining and Using Custom Colors
In OrgPublisher you can define custom colors for boxes, backgrounds, and
the chart color scheme. You can also define custom colors for a published
chart when using the Publishing Wizard.
1. Select Format in the Main menu, then Boxes, Lines, or Chart from
the pull-down menu. The Format dialog displays at the tab that you
selected. You can also use the Format Box button
in the toolbar to
modify chart boxes, or select Options then Color scheme options.
2. Select the chart component color option. For box options, you can
choose background, shadow, or outline colors. For the entire chart,
you can choose a background color.
3. Click to open the color grid and select Other to define your custom
color. Select the color by clicking in the color areas and using the
intensity slide. Click Add to Custom Colors. Click OK.
4. Click Apply or OK to display the chart using the new color.
Note:
Custom colors cannot be used with text.
Deleting a Style
1. Select File from the Main menu then Styles from the pull-down
menu. The Styles dialog displays.
2. Select the style you want to delete by clicking to the left of the name.
3. Click Delete. The style no longer exists.
4. Click Close to return to the chart.
225
Format Your Charts/Apply Standard Formatting
Aquire OrgPublisher 10 User Guide
Displaying Chart Styles
If you have created more than one style for your chart, you can quickly
view the style list and open a specific style with the Style View.
With OrgPublisher, styles may be secured to groups in published ECharts,
which can enhance a secure rich client EChart. In securing styles to
groups, you must remember that each chart viewer must have access to
at least one style.
Note:
This option is not available if the Show styles in tabs option is enabled.
1. Click the Style View button
in the toolbar or, if you have "pinned"
the Style View, click the drop-down arrow next to the style name in
the Style Bar. The Style View displays a list of styles available for
your chart.
2. Click on the name of the style you want to display. For example, if a
style were created to show indirect reports in your organization, you
click that style name to display information for indirect reports.
Note:
Keep in mind when you choose to show or hide fields that all information you
can view in the OrgPublisher chart or search results list is also displayed when
you copy the chart to Microsoft PowerPoint or the search results to Microsoft
Excel.
Deleting a group associated with a style security makes that style available to
every EChart user.
Enabling or Disabling Styles Tabs
The tabbed styles option is the default selection in OrgPublisher. You can
turn this option off or back on.
1. Right-click on the Styles bar in OrgPublisher. An options list appears.
2. Select the Show styles in tabs option to disable the tabbed styles.
To enable the tabbed option again, repeat Steps 1-2.
Formatting a Custom Field
When you manually create a numeric custom field, you can format that
field by selecting the appropriate values. You can also format a date field.
Format Your Charts/Apply Standard Formatting
226
Aquire OrgPublisher 10 User Guide
Note:
When importing numeric fields, make sure that you do not use any leading
symbols, such as dollar signs. Also, verify that decimal places are set the way
you want them prior to importing those fields into OrgPublisher.
You can add leading and trailing symbols to numeric fields with the Field
Format dialog, but the decimal places cannot be adjusted after they are
imported. OrgPublisher does not change the value of numeric fields you bring
in. For instance, if you import 341.00, that's what the number is in
OrgPublisher. If you import 341, that's what OrgPublisher uses. Formatting
cannot change the value of the data you import.
Format a numeric field:
1. Select Data from the Main menu, then Custom Field Properties
from the pull-down menu. The Custom Field Properties dialog opens.
You can also use the Custom fields button
in the toolbar.
2. Select a numeric custom field then click Format. The Field Format
dialog opens.
3. Type values for the properties that pertain to this field. For example,
if the field is a percentage, you can select % in the Trailing Symbol
field.
4. Click OK to apply the properties.
Selecting a custom field date format:
1. Select Data from the menu bar, then Custom Field Properties
from the pull-down menu. The Custom Field Properties dialog opens.
You can also use the Custom fields button
in the toolbar.
2. Select a date custom field then click Format. The Select a date
format dialog opens.
3. Click the down arrow in the Date Format field and select the format
you want. The options are:
– MM/DD/YYYY
– DD/MM/YYYY
– DD.MM.YYYY
Note:
227
If you want to use the data formatting (or the search criteria of <>) in
Custom Field Properties dialog when building a chart with data, OrgPublisher
must receive the data with a 4-digit year then the month and the day; for
example, "YYYYMMDD" if you want to change the format to display as
"DDMMYY."
Format Your Charts/Apply Standard Formatting
Aquire OrgPublisher 10 User Guide
4. Click OK to apply the format.
Formatting Chart Boxes
You can define box characteristics individually for each position type to
modify a box outline, background color, and style. These modifications are
style specific. You can also use the Advanced box layout tab if you want
to format in greater detail.
Note:
If there is more than one position type within a box, the top position type
determines the formatting for the box.
1. Select Format from the Main menu then Boxes from the pull-down
menu. The Format dialog opens at the Boxes tab. You can also use
the Format boxes
button in the toolbar.
2. Select the specific style you want to modify or, if you want to modify
all styles for the chart, select All Styles.
3. Click the position type, or All Position Types, you want to modify.
Only the chart boxes for the selected position types are modified.
4. Change the appropriate values:
Value
Style
Show only text
Width
Description
Choose a box style for the selected position in the
current style. All box styles have background color and
several have shadows. Both can be configured using
the box options.
Select to show text for the position in the current style.
This hides the box outline, shadow, and background
color.
Type the box width for the selected position type in the
current style. If the text is wider than the box width, it
wraps automatically. This setting applies to all boxes in
the chart. The maximum range is between 5 and 100.
This field must be changed from OrgPublisher's default
setting in order to place text outside the boxes using
the Advanced Box Layout Editor. Change the width to
a number wide enough to accommodate the text.
Format Your Charts/Apply Standard Formatting
228
Aquire OrgPublisher 10 User Guide
Value
Description
Height
Type the minimum box height for the selected position
type in the current style. If the wrapped text is taller
than this setting, the box height automatically
increases to fit the text. This setting applies to all boxes
in the chart for this position type. The maximum range
is between 0 and 500.
Show outline
Select to show the box outline for the selected position
type in the current style; or clear the selection to hide
the box outline. If you hide the outline, other box
components such as background color and shadow still
appear.
Outline width
Type the width of the line surrounding the box for the
selected position type in the current style.
Background color Select a predefined or custom color for the box
background for the selected position type in the current
style.
Shadow color
Select a predefined or custom color for the box shadow
for the selected position type in the current style.
Outline color
Select a predefined or custom color for the box outline
for the selected position type in the current style.
Gradient color
Select a predefined or custom color for the box
gradient for the selected position type in the current
style.
Gradient style
Select a box gradient for the current style from the
drop-down list.
Show head count Select to show the number of filled or open positions in
the current style with Count set to Yes inside the box.
To be shown in the count, a person’s position type must
be defined to show count.
Show group
Indicate where you want the group icons to display in
icons
the current style, if applicable, in respect to the
person's name in the box. Click in the field to display
the drop-down list and select Left, Center, or Right.
5. Click OK or Apply.
Formatting Chart Text
You can format the job title, box title, or name text within a position type
for the current style. If you have custom fields for a position type, you can
also format that text.
1. Select Format from the Main menu then Text from the pull-down
menu. The Format dialog opens at the Text tab. You can also use the
Format Text button
229
in the toolbar.
Format Your Charts/Apply Standard Formatting
Aquire OrgPublisher 10 User Guide
2. Select the specific style that you want to change or, if the change is
to be applied to all the styles for a chart, select All Styles.
3. Select the position type, for example Manager, or All Position
Types. Select the category you want to format, such as Box Title. If
applicable, choose the custom field you want to modify.
4. Change the appropriate values. These options may vary, depending
on the component you select.
Value
Position Type
Show
Bold
Italic
Underline
Text color
Align
Name format
All caps
Leading caps
Leading spaces
Trailing spaces
Label
Show label
Description
This field displays the position type to be formatted in
the current style. The position type can also be
renamed if a component under the position type is
selected.
Shows the selected position type in the current style
when the chart is published or in View Mode.
Bolds text in the current style for the selected
component of the position type.
Italicizes text in the current style for the selected
component of the position type.
Underlines the text in the current style for the selected
component of the position type.
Choose predefined or custom color text in the current
style for the selected component of the position type.
Aligns (Left, Center, or Right) text in the current style
for the selected component of the position type.
Choose a format to display employee names in the
current style for the selected position type; for example
F. Last indicates first initial, last name.
Displays text for the selected component of the position
type in all capital letters in the current style.
Capitalizes the first letter of each word in the selected
component of the position type in the current style.
Type the number of blank lines to appear above the
selected component of the position type in the current
style.
Type the number of blank lines to appear below the
selected component of the position type in the current
style.
Type the label for the selected component of the
position type in the current style.
Shows the label for the selected component of the
position type in the current style.
Format Your Charts/Apply Standard Formatting
230
Aquire OrgPublisher 10 User Guide
Value
Label position
Show Photo
Description
Choose the location of the selected component label,
either above or next to the component it describes in
the current style.
Shows the photo (if applicable) for the selected position
type in the current style.
5. Click OK or Apply.
Formatting Fonts
The format text option changes the default character attributes of the
chart’s text. Attributes include font name and point size. A preview sample
box displays an example of the text before you assign the attribute.
1. Select Format from the Main menu then Font from the pull-down
menu. The Font dialog opens.
2. Choose the font type you want to use.
3. Choose the size.
4. Confirm your selections in the Sample area of the dialog.
5. Click OK. The new font format displays in your chart.
Formatting Numeric Custom Fields
You can insert a new summary field after you create a numeric custom
field. You can format numeric custom fields while or after you add them to
your chart.
Note:
If you renewed maintenance from a previous OrgPublisher Advantage version
your OrgPublisher version now includes the ability to:
• create charts from multiple data source
• work with Web Administration
• use chart security
• add summaries to your chart
• create email distribution list
With OrgPublisher you can choose to suppress zero values in numeric
fields. When building from data, OrgPublisher writes (and rewrites as data
refreshes) to these fields based on calculations. When selecting a
231
Format Your Charts/Apply Standard Formatting
Aquire OrgPublisher 10 User Guide
summary field you are prompted to select a field type, for instance
Average or Percentage, and what population you want to include in the
calculation. When your chart is republished or refreshed, these data fields
may change, depending on your source data.
Custom field types that must be formatted for summary fields include:
• Numeric
• Count
• Currency
Formatting a Custom Field
1. Select Data from the menu bar, then Custom Field Properties
from the pull-down menu. The Custom Field Properties dialog opens.
You can also click the Custom fields button
in the toolbar.
2. Select the custom field you want to format. If the Type field does not
indicate a numeric selection, click on the field and select the option
you want from the drop-down list.
3. Click Format. The Field Format dialog displays.
4. Click within the Value field for each Property, then click the dropdown arrow to make your choice.
Note:
When importing numeric fields, make sure that you do not use any leading
symbols, such as dollar signs. Also, verify that decimal places are set the way
you want them prior to importing those fields into OrgPublisher.
You can add leading and trailing symbols to numeric fields with the Field
Format dialog, but the decimal places cannot be adjusted after they are
imported. OrgPublisher does not change the value of numeric fields you bring
in. For instance, if you import 341.00, that's what the number is in
OrgPublisher. If you import 341, that's what OrgPublisher uses. Formatting
cannot change the value of the data you import.
Property
Leading symbol
Trailing symbol
Decimal places
Value
Select a symbol that precedes the numeric custom
field, for example £ or #.
Select a symbol to follow the numeric custom field, for
example a percentage sign (%).
When using the summary feature in OrgPublisher, you
can type the number of digits shown after the decimal.
Format Your Charts/Apply Standard Formatting
232
Aquire OrgPublisher 10 User Guide
Property
1000 separator
Negative values
Show negative
values
Suppress zero
values
Value
Select a character to separate thousands within a
numeric custom field, for example a comma (,).
Select a symbol to represent a negative value, for
example a minus sign (-).
Select this option to display all negative numeric
custom fields in red.
Select this check box if you do not want to display zero
values in your chart.
5. Click OK to accept the field properties.
Formatting Reporting Lines
You can not only format reporting lines by relationship, direct or indirect,
you can also select line attributes for each position type in the current
style. A list of existing position types now displays beneath the Direct
Report node. An option for All Position Types has also been added. The
reporting line format is style specific. You can define lines by changing the
color or line type, change the thickness of a solid line, and use any
standard color for a reporting line.
You can also use the Advanced box layout tab if you want to format in
greater detail.
1. Select Format from the Main menu then click Lines from the pulldown menu. The Format dialog opens at the Lines tab.
2. Click the relationship type to modify. If you want to format by a
specific position type, you must expand Direct Report then select
the position type, or All Position Types.
3. Select the position type and change the appropriate values:
Value
Type
Line Style
233
Description
Select the reporting relationship for the line you want
to format in the current style.
Choose a line type for the selected relationship in the
current style. If you plan to change the line width, you
must select a solid line style. (Microsoft Windows limits
dashed lines to one point.)
Format Your Charts/Apply Standard Formatting
Aquire OrgPublisher 10 User Guide
Value
Width
Color
Description
Type or select a width of the solid connecting line for
the selected reporting relationship in the current style.
(Microsoft Windows limits dashed lines to one point.)
Choose a predefined or custom color of the connecting
line for the selected reporting relationship in the
current style.
4. Click OK or Apply.
Note:
When using conditional formatting , the reporting line format is based on the
conditional position type.
If the first and last report-to box line styles are identical, that style will be
used for shared areas. If you do not select a particular line style for the
middle boxes, they will always take the default line style (as selected for
Direct Reports).
If first and last report-to box line styles are different the default line style (as
selected for Direct Reports) will be used for shared areas.
Direct report default line style doesn't refer to All Position Types. It is used
only if you don't expand the node.
Formatting the Chart
You can update a chart’s box arrangement, background, and default text
information at any time. You can do this across all styles or for just one
style. In addition you can modify the shape and color of the drill button to
better match your corporate style, making your chart more cosmetically
appealing. The Chart tab in the Format dialog displays an easy reference
graphic of what each chart layout looks like.
With OrgPublisher you can also open a chart for formatting only, which is
very helpful when you are working with a very large chart and you just
want to format it. The Advanced box layout tab enables you to format in
greater detail.
1. Select Format from the Main menu then Chart from the pull-down
menu. The Format dialog opens at the Chart tab.
2. Select the style you want to modify from the drop-down list.
3. Change the chart layout in the left-hand pane of the dialog, or the
property values such as background color, gradient, background/
watermark or font size from the right-hand pane.
Format Your Charts/Apply Standard Formatting
234
Aquire OrgPublisher 10 User Guide
Value
Description
Style
Layout 1
Select the style of your chart you want to format.
Horizontal - Lowest level of each branch in the chart is
arranged in a horizontal line. This creates shorter,
wider charts.
Layout 2
Vertical - Lowest level of each branch in the chart is
arranged in a vertical row. This creates narrower, taller
charts.
Layout 3
Side by side - Lowest level of each branch in the chart
is arranged with the boxes side by side. This creates
more compact charts.
Layout 4
Stacked - Lowest level of the chart (displays only two
levels) is arranged in a horizontal line across the width
of a page for as many lines as it takes to display the
lowest level. The number of boxes across is determined
automatically or set to a specific number.
Background color Select or define a color for the chart background.
Gradient color
Select a predefined or custom color for the chart
gradient.
Gradient style
Select a chart gradient style from the drop-down list.
Background
Select an image to use as a chart background, or
image
watermark, by clicking Imbed Image. You can also
delete an existing background image by clicking
Remove Image.
Background style Select the style for the background image from the
drop-down list, Center, Tile, or Stretch.
Print Gradient/
Select this check box if you want to print your chart
Background
gradient or background.
Multiple report
Select an icon to use in the chart to indicate a person
icon
reports to more than one supervisor by clicking on the
down-arrow and choosing an image. You can also
select Other to open the Select an icon dialog and
browse to a different icon source file.
235
Format Your Charts/Apply Standard Formatting
Aquire OrgPublisher 10 User Guide
Value
Auto Build
Description
Select an Auto Build option to change how reporting
employees are shown. Select one of the following
options:
Normal - Each employee in the chart has his or her
own box, with its own reporting line.
Reports in one box - All reporting employees are
included in the box of the person they report to.
Position types with a zero (0) priority remain in their
own box.
Horizontal
spacing
Vertical spacing
Drill button type
Chart font
Chart font size
Automatic row
size
Boxes per row
Show Hover
Profile
Hover Profile
Display (ms)
Reports in box below - All reporting employees are
included in the same box, with a single line indicating
to whom they report.
Type the horizontal space between boxes.
Type the vertical space between boxes.
Click on the Click to modify button in this field to
open the Customize Drill Buttons dialog.
Select the default font type for the chart text in the
current style.
Select the default font size for chart text in the current
style.
Select this check box when using chart layout 4,
typically for use in a smaller window, if you want
OrgPublisher to automatically set the number of boxes
across in a row.
Type the maximum number of boxes to print in a row.
The minimum number of boxes across is 4. (The chart
style is automatically stacked, which means there are
two levels of the organization per page and the lowest
level is arranged in a horizontal line across the width of
a page for as many lines as it takes to display the
lowest level.)
Select this check box to enable the display of the Hover
Profile. The default is set to off.
Type the number of milliseconds to hover over the field
before displaying the Hover Profile. Limits are between
1000 - 20,000.
4. When you have completed your changes, click Apply to add your
changes and continue working in the Format dialog. Click OK to add
your changes and close the dialog.
Format Your Charts/Apply Standard Formatting
236
Aquire OrgPublisher 10 User Guide
Formatting the Chart Legend
You can format the chart legend to better fit your chart scheme. The
legend default uses a 1 column list, a width of 200 pixels, and a height
that is automatically calculated to fit the number of items in the legend.
1. Open the chart legend by clicking the Legend Properties button
in
the toolbar or by selecting Insert from the Main menu then Legend
from the options list. If the legend is already displayed in the chart,
you can also click on the legend to open it. The Chart Legend dialog
opens at the Placement tab.
2. Select the Formatting tab. This tab provides options for outline
style, color, gradient, and dimensions, as well as a preview section.
3. In the Format section, select the Outline style you want to use by
scrolling through the available options and clicking on the one you
want.
4. Accept the default to Show outline for the legend, or clear the
check box if you do not want to display the outline.
Note:
If your legend style contains a shadow, the shadow remains despite deleting
the outline.
5. Select the Outline width using the up or down-arrow. The allowed
range is between 1 - 5 pixels.
6. In the Use Custom Dimensions section, select the check box if you
want to the legend to be a different size. Using the up and downarrows for each field, select the Box width (range 40 - 999), Box
height (range 40 - 999), Number of columns (1 - 20), and
Column wrap style.
Note:
Depending on where you place the legend, some boxes in the chart may be
covered. You may want to modify the legend settings to better fit the legend
within a blank area of the Chart View.
7. In the Color section, use the pull-down options in each field to select
the Background color, Gradient color, Gradient style, Shadow
color, and Outline color.
8. The Preview section to the right of the dialog provides a sample of
what the legend looks like as you make each change. When you get
the format you want, click OK to accept the changes and close the
dialog.
237
Format Your Charts/Apply Standard Formatting
Aquire OrgPublisher 10 User Guide
Formatting the Chart Title
You can format the chart title for the current style separately from the rest
of the chart text.
1. Select Format from the Main menu then Title from the pull-down
menu. The Format dialog opens at the Title tab.
2. Modify or select the appropriate values.
Value
Description
Show chart title
Shows the title at the top of the chart in the current
style.
Title width
Type the number of characters across that are allowed
for the chart title in the current style. If the title text is
wider than the available width, it is automatically
wrapped, or divided, into more than one line.
Auto Title
Select to make the chart title of the current style the
same as the title of the top box.
Custom Title
Type a title for the chart in the current style. To do this,
clear Auto Title.
Title font
Select the default font for the chart title in the current
style.
Title font size
Select the default font size for the chart title in the
current style.
Title color
Select a predefined or custom color for the chart title in
the current style.
Title bold
Select to show the chart title in bold text for the current
style.
Title italic
Select to show the chart title in italic text for the
current style.
Title underlined
Select to underline the chart title in the current style.
Title with AsOf
Select to add the current date to the chart title in the
Date
current style.
AsOf Date Format Select to format the date, for example, MM/DD/
YYYY.
Title Separator
Type the character to use as the chart title and date
separator in the current style.
3. When you have completed your changes, click OK.
Format Your Charts/Apply Standard Formatting
238
Aquire OrgPublisher 10 User Guide
Formatting the Search Dialog
You can format OrgPublisher’s Search dialog to match the field types in
your org chart by:
• altering the tabs or field labels.
• changing the operation between modal and non-modal; either keeping
the focus on the Search dialog while it is open or letting the focus
switch between the dialog and the chart window.
• hiding or reordering search tabs.
• select focus or succession planning options.
1. Select Options from the menu bar, then Search Options from the
pull-down menu and Customize Search dialog from the options
list. The Customize Search Dialog opens.
There are four columns in the Search dialog.
Column Name
Search Page
Tab Caption
Field label
Hide
Description
Lists the type of information contained in each tab of
the Search dialog.
Lists the current name of the selected tab in the Search
dialog.
Lists the names of the fields within each tab of the
Search dialog.
Indicates whether the tab is shown or hidden in the
Search dialog.
2. Click the tab name in the Tab Caption column that you want to
change.
3. Type the name that you want over the old name and press ENTER.
4. Repeat the process for each Tab Caption or Field label you want to
change.
5. To change the sequence of the tabs, highlight the tab record line that
you want to move and click Move Up or Move Down.
6. If you want the Search dialog to always be active while it is open,
verify that the Keep focus on Search dialog (Modal) check box is
selected. In other words, you have to close the Search dialog before
you can perform a task in OrgPublisher or the published chart.
239
Format Your Charts/Apply Standard Formatting
Aquire OrgPublisher 10 User Guide
7. If you want to create a succession planning chart and search for
succession candidates, select the Enable succession planning
features check box. Clear the check box to disable this feature.
8. Click OK to accept your change.
9. If you want to use the original tab and field names, click Restore
Default and click OK. This option immediately restores all default
headings.
Group and Multi-reporting Relationships Icons
OrgPublisher enables you to select a unique icon to associate with a
specific group. The icon displays in the chart box next to the name of each
person who is a member of that group. If a person is a member of
multiple groups, multiple icons display in the box. When you click on a
group icon, the Search View opens with a list of all the people in that
group.
When choosing an icon for a group, you can add your own icon by opening
the Group Editor dialog, clicking the down-arrow in the Image to show
in chart for people in this group field, and then selecting Other to
browse to an icon file.
Note:
Using group and multi-reporting relationship icons in conjunction with
Conditional Formatting is not recommended. These two features distinguish
different aspects of group information and are not meant to work together.
See the Using the Chart Legend Properties dialog for details on viewing and
displaying a list of group icons used in the chart. See the Printing a Chart
Legend for details on printing a legend.
You can also add a multiple relationship icon that displays next to the
names of people in the chart who report to more than one person.
If a person reports to only 2 people, you can click on the icon in the Chart
View to open the Search View which displays the list of supervisors that
person reports to. You can select a name within the list and the Chart
View shifts to that particular instance of the person in the chart.
When choosing an icon for multi-relationships, you can add your own icon
by selecting Format then Chart, clicking in the Multiple report icon
field and browsing to an icon file (.ico).
Note:
You can use 16 bit or 32 bit icons for both the group and multi-relationship
icons.
Format Your Charts/Apply Standard Formatting
240
Aquire OrgPublisher 10 User Guide
Hiding Lowest Boxes
You can choose to show text only, not the chart boxes, for the employees
in the lowest displayed level of the chart. This hides the lowest level
currently displayed, whether it is the actual bottom level of the chart or a
level specified using the Show Custom Levels option.
1. Select Format from the Main menu then Chart from the pull-down
menu. The Format dialog displays at the Chart tab.
2. Select the Hide lowest boxes check box.
3. Click Apply to update the chart and keep the dialog open for further
changes, or click OK to update the chart and close the dialog.
Inserting a Background Image
In OrgPublisher, you can further enhance your org chart by adding a
background image, or watermark. This can be done while you are
formatting the chart.
1. In OrgPublisher, select Format from the Main menu then Chart from
the pull-down list. The Format dialog opens at the Chart tab.
2. In the Background Image field, click Embed Image. The Open
dialog appears, enabling you to navigate to your JPG image file. Click
Open.
3. OrgPublisher returns to the Chart tab. Click OK to accept the image
and exit the dialog, or click Apply and proceed to step 4 if you want
to continue working in the dialog.
4. If applicable, select a style for the background image in the
Background Style field. Click the down-arrow and select Center,
Tile, or Stretch.
5. Click OK to accept the image and exit the dialog, or click Apply if
you want to continue working in the dialog.
Modifying an Existing Style
1. To modify an existing style, open the style in your chart, make your
changes, then select File from the Main menu then Save. You can
also click the Save button
241
in the Main toolbar.
Format Your Charts/Apply Standard Formatting
Aquire OrgPublisher 10 User Guide
2. To rename an existing style, open the Styles dialog and select the
style you want to rename by clicking to the left of the name and then
typing over the text.
Opening a Chart for Formatting Only
You can open a chart from the OrgPublisher dialog for formatting only.
Note:
Only file types of OCB and ODB can be opened for formatting only.
1. Open OrgPublisher. The OrgPublisher dialog opens to Create a
blank chart, Run the New Chart Wizard, or the default selection,
Open an existing org chart. Select the chart you want to format
and select the Open chart for formatting only check box. Click
OK. You can also select File from the OrgPublisher menu, then Open
for formatting only from the options list.
2. A message states that formatting changes will be saved but data
edits will not. Click OK.
3. OrgPublisher opens a chart containing a "dummy" hierarchy of 100
boxes and "place holder" text, such as Manager Box Title or Field
#16. No specific data is called, and the Insert, publishing, and Save
As features are disabled. There will be a box representing each
position type in your chart.
4. You can modify your formatting and even put fake data in the fields.
When you save the chart, only the template is saved and the fake
data is discarded.
Selecting Color Schemes for Charts
You can choose a color scheme for your chart, or customize a color
scheme, by using the Options menu. You can keep this color scheme in
your published chart, or select another scheme using the Publishing
Wizard.
Note:
This option is disabled if you are not running in at least 16-bit color.
1. Click Options in the Main menu and then Color scheme options
from the options list. The Select Color Scheme dialog opens.
2. Select the radio button for the predetermined color you want, such
as Windows system, Office, or ERP blue. Proceed to Step 9.
Or, you can select Custom color scheme.
Format Your Charts/Apply Standard Formatting
242
Aquire OrgPublisher 10 User Guide
3. If you selected to use a custom scheme, click Define custom color
scheme. The Select Color Scheme dialog opens.
4. Select the color for each gradient by clicking the down-arrow to open
the color grid. Fields in the OrgPublisher Select Color Scheme dialog
include, background and gradient intensity, as well as a Style bar
color option.
5. Select Other to define your custom color using the Microsoft®
Windows Color dialog. Select the color by clicking in the color areas
and using the intensity slide. Click Add to Custom Colors. Click OK.
6. You can also Copy scheme to the clipboard if you want to
propagate the same color scheme to another chart. The code for the
color scheme is copied to the clipboard which can be pasted into
OrgPublisher.
7. Click Paste scheme to the clipboard if you want to paste the code
previously copied to the clipboard into another OrgPublisher chart.
Click OK to close the dialog.
8. If you want to use this color scheme for all charts, select the Set as
default color scheme for new charts check box in the Select
Color Scheme dialog.
9. Click OK to close the text box and return to the chart.
Note:
Once a color scheme is selected as a default, the check box is disabled when
you return to this text box. You only have to select it again if you want to
change the default color scheme.
Setting Chart Layout Options
In OrgPublisher, you can update a chart’s box arrangement, background,
and default text information at any time. You can do this across all styles
or for just one style.
Note:
You can further define your chart layout by using the Advanced Box
Layout Editor. If you want to change the way the boxes display for
printing purposes, use the Print Preview to make those modifications.
1. Select Format from the Main menu then Chart from the pull-down
menu. The Format dialog opens at the Chart tab.
2. Select the style you want to modify from the drop-down list.
243
Format Your Charts/Apply Standard Formatting
Aquire OrgPublisher 10 User Guide
3. Change the chart layout from the left-hand pane of the dialog. A brief
description of how layout works displays at the top of the pane, just
above the Style field.
Field
Description
Style
Layout 1
Select the style of your chart you want to format.
Horizontal - Lowest level of each branch in the chart is
arranged in a horizontal line. This creates shorter,
wider charts.
Layout 2
Vertical - Lowest level of each branch in the chart is
arranged in a vertical row. This creates narrower, taller
charts.
Layout 3
Side by side - Lowest level of each branch in the chart
is arranged with the boxes side by side. This creates
more compact charts.
Layout 4
Stacked - Lowest level of the chart (displays only two
levels) is arranged in a horizontal line across the width
of a page for as many lines as it takes to display the
lowest level. The number of boxes across is determined
automatically or set to a specific number.
4. When you have completed your layout changes, click OK.
Setting the Default Template
Note:
Initial formatting of the successor position type is handled in the default
templates shipped with OrgPublisher.
A default template contains one or more styles and all of the formatting
options within those styles.
1. Open the chart that contains the styles you want to use regularly, or
create a style that includes colors, views, and data layouts that you
want.
Format Your Charts/Apply Standard Formatting
244
Aquire OrgPublisher 10 User Guide
2. Select File from the Main menu then Set Template as Default from
the pull-down menu. These styles will be active the next time you
open a new chart.
3. To remove a default template, you can either rename or delete the
file Default.OTM in the OrgPublisher directory.
Note:
There is no option to Set a Default Template when using Web Administration
(thin client publishing format ) because setting the template on the server
would set the same default template for all chart administrators' charts.
Showing or Hiding Chart Components
You can show or hide specific components in your chart such as an open
position, assistants, partners, custom fields, hotspots, or your logo. You
can show or hide fields using the Show/Hide Chart Components dialog,
selecting options in wizards, or by using the right-click menu in views.
Note:
The Show/Hide Chart Components dialog does not apply to position types
formatted using the Advanced Box Layout Editor.
All information you can view in the OrgPublisher chart or search results list
is also displayed when you copy the chart to Microsoft PowerPoint or the
search results to Microsoft Excel.
1. Select View from the Main menu then Show/Hide chart
components from the pull-down menu. The Show/Hide Chart
Components dialog opens at the Components tab. To modify levels
displayed, see the Showing or Hiding Chart Levels procedure below.
You can also click on the Show/Hide Chart Components button
the toolbar.
in
2. Select the Style from the drop-down list for which you want to show
or hide components. A check mark next to a position type means it is
displayed. An X means the position type is hidden.
Note:
Keep in mind when you choose to show or hide fields that all information you
can view in the OrgPublisher chart or search results list is also displayed when
you copy the chart to Microsoft PowerPoint or the search results to Microsoft
Excel.
3. Click the plus sign (+) to expand and view the components of a
position type.
4. Click on a component to display (green check mark) or hide (red X)
it.
245
Format Your Charts/Apply Standard Formatting
Aquire OrgPublisher 10 User Guide
5. Select the Group displayed in the style from the drop-down list, if
applicable. The default group is Everyone.
6. Click Apply to update the chart and keep the dialog open for further
changes, or click OK to update the chart and close the dialog box.
Note:
In conditional formatting, the search feature and all calculations follow the
conditional position type. Formatting follows the group. If you display the
Summary View in a chart with conditional formatting, you should hide either
the group or position type of the conditional format. If you don't, head counts
display in both areas.
In addition to hiding components, you can:
Showing or Hiding All Options Associated with a Position Type
Showing or Hiding Fields in Profile View
Showing or Hiding Chart Levels
You can choose to show just a specified number of chart levels, or you can
show all levels. You can also hide the lowest level of boxes. When you
select a specified number of displayed levels in your chart, you create a
custom level. The Show Custom Levels menu option displays chart
levels using the currently selected top of chart, whether it is the actual top
of the chart or an alternate specified with the Set top of chart command.
If you are working with a large chart, you may choose to display only a
certain number of levels. You can also hide the lowest boxes in a chart.
1. Select View from the Main menu then Show/Hide chart
components from the pull-down menu. The Show/Hide Chart
Components dialog opens.
You can also click on the Show/Hide Chart Components button
the toolbar.
in
2. Click the Levels tab.
3. Select the Style you want to modify from the drop-down list.
4. The Show All Levels check box is the default selection. In the
Custom Levels field, select the number of chart levels you want to
show in your chart. The default is automatically cleared.
Note:
If you are publishing an EChart , you select the maximum number of levels to
display while you are in the Publishing Wizard. All levels is not an option.
Format Your Charts/Apply Standard Formatting
246
Aquire OrgPublisher 10 User Guide
These levels cannot be changed in the published EChart. The drop-down
levels toolbar option in the browser contains only the allowable levels.
All information you can view in the OrgPublisher chart or search results list is
also displayed when you copy the chart to Microsoft PowerPoint or the search
results to Microsoft Excel.
5. Select whether or not you want to display the Drill-up/Drill-down
buttons.
6. Select whether or not you want to Drill up custom levels.
7. Select the number of Drill up levels.
8. Select the Group displayed in the style from the drop-down list, if
applicable.
9. Click Apply to update the chart and keep the dialog box open for
further changes, or click OK to update the chart and close the dialog
box.
Once your chart levels have been set and you are looking at your
chart, you can later choose to display all chart levels. Select View
from the Main menu then Show All Levels from the pull-down
menu.
Showing or Hiding the Style Bar
You can elect to hide the Style Bar in OrgPublisher by right-clicking on the
bar or using the View menu option. The default is to display the Style Bar.
Note:
Keep in mind when you choose to show or hide fields that all information you
can view in the OrgPublisher chart or search results list is also displayed when
you copy the chart to Microsoft PowerPoint or the search results to Microsoft
Excel.
• Right-click on the Style Bar and select Style Selector button then
Enable button from the options list. A check mark indicates that the
Style Bar is shown in OrgPublisher. Clear the option to hide the bar.
• You can also select View from the Main menu then Toolbars, Styles
Toolbar, and Show Styles toolbar from the options menu. A check
mark indicates that the Style Bar is shown in OrgPublisher. Clear the
option to hide the bar.
247
Format Your Charts/Apply Standard Formatting
Aquire OrgPublisher 10 User Guide
Showing the Entire Chart
You can display the entire chart in the Chart View from any location or
level within your chart. The Display whole chart option is available only
after you have invoked Set top of chart.
• Select View from the Main menu then Display whole chart from the
pull-down menu.
• You can also click the Display whole chart button
in the toolbar.
OrgPublisher displays as much of the entire chart as the window and the
size of your chart allow.
Showing a Portion of the Chart
When you set the top of chart, the selected box and reporting boxes are
shown in the Chart View. This option is useful for working with company
divisions or other areas of an organization, or for printing a portion of a
chart.
You can also create styles using the set top of chart feature.
1. Click on the Box title where you want the portion of the chart to
begin.
2. Select View from the Main menu then Set Top of chart from the
pull-down menu. You can also click the Set top of chart button
.
3. Save the style, or create a new style, using the selecting portion of
the chart.
Using Dynamic Chart Layouts
OrgPublisher now allows you to dynamically select a chart layout. This
feature is available in the application as well as charts published as
PluginX and EChart rich client.
1. Open a chart and click the Select the layout style for this chart
button
.
Format Your Charts/Apply Standard Formatting
248
Aquire OrgPublisher 10 User Guide
Figure 102
2. The drop-down list displays layout options. The current layout is
selected. Click the layout you want to use.
Layouts are defined, in order of the buttons listed top to bottom:
– Horizontal - Lowest level of each branch in the chart is arranged in
a horizontal line. This creates shorter wider charts.
– Vertical - Lowest level of each branch in the chart is arranged in a
vertical row. This creates narrower, taller charts.
– Side by side - Lowest level of each branch in the chart is arranged
with the boxes side-by-side. This creates more compact charts.
– Stacked - Lowest level of the chart (displays only two levels) is
arranged in a horizontal line across the width of a page for as many
lines as it takes to display the lowest level. The number of boxes
across is determined automatically or set to a specific number. The
stacking always takes place on the lowest levels of the chart shown.
In other words, if you display 3 levels, level 3 is "stacked" according
to the layout.
Figure 103
The chart immediately changes the displayed layout.
249
Format Your Charts/Apply Standard Formatting
Aquire OrgPublisher 10 User Guide
Figure 104
Using the Chart Legend Properties Dialog
The chart legend allows the chart administrator and OrgPlan planners to
not only display a list of group icons, but to also create and describe
custom colors used in the chart. The legend helps end users understand
what the icons and colors mean, and takes the place of OrgPublisher's
previous group legend.
When you first enable the legend, all group icons are automatically placed
within the legend, which is displayed in a specified corner of the Chart
View. You can quickly turn the legend on or off by using the toolbar
Legend Properties button
Properties dialog.
, or you can open the Chart Legend
With this dialog, you can set the content, location, and format of the
legend. These settings are applied to the current style.
Aligning the Chart Legend Dialog
When you open the Chart Legend Properties dialog for the first time, the
legend is disabled.
Format Your Charts/Apply Standard Formatting
250
Aquire OrgPublisher 10 User Guide
1. Open the chart legend by clicking the Chart Legend Properties button
in the toolbar or by selecting Insert from the menu then Legend
from the options list. If the legend is already displayed in the chart,
you can also click on the legend to open it.
2. Select the Show legend check box in the Placement tab. The Chart
Legend Properties dialog is now enabled, and the Contents and
Formatting tabs are available.
3. Select the radio button to place the legend in one of the four corners
of your chart, Upper Left, Lower Left, Upper Right, or Lower
Right.
4. If you want to accept the default to display all current icons in the
legend, as well as the default legend format, click OK to close the
dialog. The legend displays in the Chart View in the selected corner.
5. You can also select or add the contents of the chart legend or format
the chart legend to fit better with your chart properties.
Note:
Depending on where you place the legend, some boxes may be covered. You
may want to modify the legend settings to better fit it within a blank area of
the Chart View.
Using the Define Dialog
The Define dialog contains two tabs, one for Positions and the other for
Hotspots.
When building from data, this information is fed into field 4 in the
OrgPublisher Input File. You must define certain values when you create a
position type.
Value
Priority
251
Definition
Determines where your custom position types will be placed
within a box in relationship to other position types. The
lower the priority number, the higher it is placed in the box.
OrgPublisher automatically assigns this number, but you
can change it from the Define dialog.
Format Your Charts/Apply Standard Formatting
Aquire OrgPublisher 10 User Guide
Value
Count
Box type
Definition
Determines if the position type is counted in head counts.
The default is Yes.
Determines the type of box that is inserted for this position
type. Each box type has a different position within the
chart. For example, the first assistant box is placed below
and to the right of the box to which it reports. If there is
more than one assistant, the boxes alternate from right to
left below the box to which it reports.
Values include:
Normal Box, Assistant Box, Partner Box, and Staff
Function Box
Define a new position type:
1. Select Edit from the menu bar, then Define from the pull-down
menu. The Define dialog opens.
2. To create a new position type, click New. The last row in the table
displays a new position with default information.
3. Highlight the text in the field Position type and type the new name.
This name is not displayed in the chart, but should be something
meaningful to you.
4. You can accept the default or press the TAB key to move to the
Count column and choose whether or not this position will be
counted in the head count roll-up.
5. You can accept the default or press the TAB key to move to the
Priority column and select the position priority number.
6. You can accept the default or press the TAB key to move to the
Record type column and select the record type for the position.
7. Press the TAB key to move to the Group column. Click in the field
and select a group from the drop-down list.
8. You can accept the default or press the TAB key to move to the Box
type column and select the chart box type.
Note:
Box type selection cannot be modified when using conditional formatting. The
Box type column is disabled once you assign the position type to a group.
9. Click Move Up or Move Down to reposition the position type in the
dialog. (This does not affect the order of position types in the chart
boxes.)
Format Your Charts/Apply Standard Formatting
252
Aquire OrgPublisher 10 User Guide
10.Click OK. The Define dialog closes and the file is saved. If this is a
new file, you will be prompted to save the file before you can
continue.
Modify an existing position type:
Select the Position type name, and follow Steps 3 - 10 above.
Note:
When using conditional formatting, it is best to assign a single attribute group
to an appropriately named position type, such as "High Performing
Managers."
Using the Multi-level Peer Display
OrgPublisher provides the option to display all reports at the same chart
level or display multiple levels. This option is a formatting function,
displays in View Mode only, and can be useful if you have, for instance, a
Vice President and a manager reporting to the same box and you want to
show the hierarchy level of the two positions.
Note:
The multi-level peer display does not work when your chart contains multiple
people in a box.
When building a chart with data, map your levels to the OrgPublisher
Input File field 18. Boxes reporting to an assistant will not have this
functionality. You can also save the multi-level peer display as a separate
style or use the menu or toolbar options to manually adjust box levels.
Note:
If you are working with a large chart that takes a little longer to open, you
may want to turn off the multi-level viewing. This will speed up the process.
Select View from the menu bar and clear Show multi-level peers option in the
pull-down list.
Planning charts are always in Build Mode, and do not reflect special
formatting, such as multi-level peer display, reports in the same box as their
manager, or the advanced box layout settings.
Manually move a box up or down a level:
Note:
Although this section provides information on manually editing a chart,
remember that if you want the changes to remain permanent, you must apply
the changes to your HR database. When your HR data is refreshed and you
open your chart, your manual changes are overwritten.
1. Select View from the Main menu and verify that Show multi-level
peers in the pull-down list is selected.
253
Format Your Charts/Apply Standard Formatting
Aquire OrgPublisher 10 User Guide
2. Click View Mode
in the tool bar.
3. Highlight the name or job title of the box you want to move.
4. Click the Move up
the new level.
or Move down
button. The box displays at
5. You can also select Edit from the Main menu then Move up a level
or Move down a level from the pull-down menu.
6. Save your chart.
Some things to note about the Multi-level Peer display feature:
• Works in View Mode.
• The top box cannot be moved.
• The first level below the parent box does not move up because it is
already at the highest level in relation to the parent box.
• If you move a parent box, all reporting boxes move with it.
• Partners move with their attached boxes.
• You can move (up or down) 10 levels in relation to a parent box.
Viewing Available Styles
If you have created more than one style for your chart, you can quickly
view the style list with the Style View.
Note:
This option is not available if the Show styles in tabs option is enabled.
1. Click on the Style View button
in the toolbar or, if you have
pinned the Style View, click the drop-down arrow next to the style
name in the Style bar.
2. The Style View opens on the left side of the OrgPublisher window.
3. Select the style from the list by selecting the tab in the Style bar (if
available) or by clicking on the style name.
Format Your Charts/Apply Standard Formatting
254
Aquire OrgPublisher 10 User Guide
Add and Format a Chart Legend
Adding a Custom Item to the Chart Legend
When you enable the chart legend in your chart, you can select the
placement of the legend, format the legend, and select the contents of the
legend. You can also add custom item color and gradient icons to include
in the legend.
Note:
Depending on where you place the legend, some boxes may be covered.
Using click and drag scrolling can help, but modifying the legend settings to fit
it within a blank area of the Chart View may be a better solution.
1. Click on the legend in the Chart View. You can also click the Legend
Properties button
in the toolbar. If the legend is already displayed
in the chart, you can also click on the legend to open it. The Chart
Legend Properties dialog opens.
2. Click the Contents tab.
When opening the Chart Legend Properties for the first time, all icons
in the chart are displayed in the legend. These icons are listed in the
Legend contents section of the dialog. As you create new groups with
icons or custom items, they display in the Available groups section
of the dialog. The Preview section shows you what the legend
currently looks like.
Note:
The Chart Legend Properties dialog does not display groups that do not have
an icon assigned to them.
In addition, it's best not to give custom items the same names as groups.
Custom legend items and groups that have the same name do not synch.
3. Click Add Custom Item to Legend. The Add New Custom Item
dialog opens.
4. Type the Label for the new icon, limited to 64 characters.
5. Select a Color using the down-arrow to open the color grid.
6. If applicable, select the Gradient style using the down-arrow to
select a gradient style thumbnail.
7. If applicable, select the Gradient color using the down-arrow to
open the color grid.
8. Click Add. The new icon is automatically added to the Legend
contents section of the dialog.
255
Format Your Charts/Add and Format a Chart Legend
Aquire OrgPublisher 10 User Guide
Modifying Icon Properties
1. Select the custom item icon in the Legend contents tab to enable
the Properties button
. you can modify custom legend icon
properties only. Properties for a group icon can be modified only in
the Group Editor dialog.
2. Click the Properties button
dialog.
to open the Modify Icon Properties
3. Modify the custom icon settings as needed, Label, Color, Gradient
style, Gradient color.
4. Click OK to accept the changes and close the dialog. The modified
icon displays in the Legend contents and Preview sections of the
dialog.
Formatting the Chart Legend
You can format the chart legend to better fit your chart scheme. The
legend default uses a 1 column list, a width of 200 pixels, and a height
that is automatically calculated to fit the number of items in the legend.
1. Open the chart legend by clicking the Legend Properties button
in
the toolbar or by selecting Insert from the Main menu then Legend
from the options list. If the legend is already displayed in the chart,
you can also click on the legend to open it. The Chart Legend dialog
opens at the Placement tab.
2. Select the Formatting tab. This tab provides options for outline
style, color, gradient, and dimensions, as well as a preview section.
3. In the Format section, select the Outline style you want to use by
scrolling through the available options and clicking on the one you
want.
4. Accept the default to Show outline for the legend, or clear the
check box if you do not want to display the outline.
Note:
If your legend style contains a shadow, the shadow remains despite deleting
the outline.
5. Select the Outline width using the up or down-arrow. The allowed
range is between 1 - 5 pixels.
Format Your Charts/Add and Format a Chart Legend
256
Aquire OrgPublisher 10 User Guide
6. In the Use Custom Dimensions section, select the check box if you
want to the legend to be a different size. Using the up and downarrows for each field, select the Box width (range 40 - 999), Box
height (range 40 - 999), Number of columns (1 - 20), and
Column wrap style.
Note:
Depending on where you place the legend, some boxes in the chart may be
covered. You may want to modify the legend settings to better fit the legend
within a blank area of the Chart View.
7. In the Color section, use the pull-down options in each field to select
the Background color, Gradient color, Gradient style, Shadow
color, and Outline color.
8. The Preview section to the right of the dialog provides a sample of
what the legend looks like as you make each change. When you get
the format you want, click OK to accept the changes and close the
dialog.
Selecting the Contents of the Chart Legend
When you enable the chart legend in your chart, you can select the
placement of the legend, format the legend, and select the contents of the
legend. You can also add or modify custom items in the chart legend.
Note:
Depending on where you place the legend, some boxes may be covered. You
may want to modify the legend settings to better fit it within a blank area of
the Chart View.
1. Click on the legend in the Chart View. You can also click the Legend
Properties button
dialog opens.
in the toolbar. The Chart Legend Properties
2. Select the Contents tab.
When opening the Chart Legend Properties for the first time, all icons
in the chart are displayed in the legend. These icons are listed in the
Legend contents section of the dialog. As you create new groups
with icons or custom items, they display in the Available groups
section of the dialog. The Preview section shows you what the
legend currently looks like.
3. Select a group or custom item from the Available groups section
and click Add selected group to legend. The selected icon moves
to the Legend contents section, and you can see it in the Preview
section.
257
Format Your Charts/Add and Format a Chart Legend
Aquire OrgPublisher 10 User Guide
4. Click Move up or Move down to change the sequence of the list in
the Legend contents section.
5. Click Remove an icon
button to remove a group icon from the
contents area and move it to the Available groups section.
6. Click Add Custom Item to Legend to add an additional custom
color to the legend. When you add the new icon to the contents
section, double-click on the item to enable the Set icon properties
button
. Click the button to Modify Icon Properties. You can
also delete a custom color icon with the Remove an icon
Note:
button.
When you delete a custom icon, it is immediately discarded. The icon and
color information is not saved.
7. Click OK to accept the changes and close the dialog.
Format Your Charts/Add and Format a Chart Legend
258
Aquire OrgPublisher 10 User Guide
Advanced Box Layout Editor
With OrgPublisher you can use the Advanced Box Layout Editor to display
more information more concisely. The advanced box layout provides more
flexibility in displaying information in the chart box, such as the use of
columns, and helps you conform to your existing documentation
standards.
Here are some tips to remember when using the Advanced Box Layout
Editor.
• If your chart already contains Advanced Box Layout Editor settings,
and you select a chart design template, the Advanced Box Layout
Editor settings are overwritten and lost.
• The Advanced Box Layout Editor is designed to change the chart box
layout. Any other formatting done, such as changing the font color, is
not affected when you choose to Copy or Reset the layout.
• You can use the Advanced Box Layout Editor in both the Build Mode
and View Mode, however the changes can be seen only in the View
Mode.
• If you want to place data outside the box in the chart, you must first
adjust the width of the box using the Boxes tab of the Format dialog.
• When centering a field within a box, drag the field width to match the
box width in the layout editor.
• The layout editor box perimeters hold three zones, one each for Box
Title, Job Title, and Name. Custom fields, which are associated with
one of these components, can be moved only within the assigned
component's zone.
• If there are multiple people in a box, the Advanced Box Layout Editor
sorts by the position type priority as noted in the Define dialog.
• When setting the box layout to display custom fields side-by-side, you
cannot arrange the Box Title, Job Title, and Name to display sideby-side.
• You can move a custom field only within the associated component
area of the Advanced Box Layout Editor. For instance, if a field is
associated with the name, you can move the field only within the area
designated for the name.
• Fields will wrap only if the field is tall enough to hold the wrapped text.
259
Format Your Charts/Advanced Box Layout Editor
Aquire OrgPublisher 10 User Guide
• When changing the layout or editing custom fields, remember that
they have both a Label and a Data component. You must select the
component of the custom field you want to modify.
Note:
At this time, the Advanced Box Layout Editor does not display people under
individual job titles when you rearrange the box, name, or job fields and there
are multiple people in a box.
The Show/Hide Chart Components dialog does not apply to position types
formatted using the Advanced Box Layout Editor.
Planning charts are always in Build Mode, and do not reflect special
formatting, such as multi-level peer display, reports in the same box as their
manager, or the Advanced Box Layout settings.
Use the Advanced Box Layout Editor
1. Select Format from the Main menu then Advanced box layout
from the options list. The Advanced box layout tab opens
displaying a single check box. You can also right-click in the chart,
select Format from the menu list then Advanced box layout.
2. Select the Use advanced box layout for this position type check
box. The layout options display in the dialog.
3. Choose a style you want to format from the pane on the left then
choose a position type within the style.
4. Select one of the fields to edit: Box Title, Job Title, or Name. In
the above example, the job title is selected. The type of field you
select, data, or label, displays in the bar at the bottom of the dialog.
5. If you add many fields to the chart box, the box layout editor may
display a message at the bottom of the list box, for example, The box
is taller than this window. Please expand the window height. You can
increase the size of the Advanced box layout by clicking on the tab
borders and dragging the dialog borders to the length and width you
need.
Succession Candidates and Advanced Box Layout Editor
The first example uses a group created to show succession candidates
who are designated to succeed more than one position.
Format Your Charts/Advanced Box Layout Editor
260
Aquire OrgPublisher 10 User Guide
Figure 105
The second example uses a succession group created to find managers
with no successors.
Figure 106
Tasks you can perform with the Advanced box layout:
• Adding Items to a Box Layout, including vertical and horizontal lines.
• Adding a Background Color to a Box Area or field within a box.
• Arranging Sections in the Box Layout.
• Copying the Box Layout to Another Position Type.
• Displaying Information Outside the Chart Box.
• Reviewing List Items in the Box Layout.
• Resetting the Box Layout tab to the default settings.
261
Format Your Charts/Advanced Box Layout Editor
Aquire OrgPublisher 10 User Guide
Adding a Background Color to a Box Area
Within the Advanced Box Layout Editor, you can add a background color
to a box area. You can also make the area color conditional, based on a
selected group.
1. Select Format from the Main menu then Advanced box layout
from the options list. The Format dialog opens to the Advanced box
layout tab displaying a single check box.
2. Select the style, if applicable, and the position type you want to
modify.
3. Select the Use advanced box layout for this position type check
box. The advanced box layout options appear.
4. Click Add. The Add Item to Layout dialog opens.
5. Three types of fields are available, Box field, Job field, and Name
field.
The Box field and Job field contain options to select the box or job
title, the box or job label, a horizontal line, or a vertical line. The
Name field contains all the custom fields as well as the label,
horizontal or vertical line, and group or multiple report icons.
The Background area option is available in each field type.
6. Select Background area in the field type you want, such as Name
field.
7. Click Add item. The item is added to the box layout editor.
8. Click the background borders, or perimeters, and drag them to
modify the area size for the color or gradient you want to add.
9. Double-click on the background area to open the Background Area
Properties dialog.
10.You can select a Default color for the area, as well as a gradient
style and color. You can also select a custom color by selecting
Other in the color palette dialog.
11.Select the Apply conditional color check box to fields within
groups. In the case of a member of more than one group, the order
of the group selected in the dialog is the order in which the color is
applied in the chart.
12.Click the down-arrow to select the Group, Color, Gradient style,
and Gradient color.
Format Your Charts/Advanced Box Layout Editor
262
Aquire OrgPublisher 10 User Guide
13.Click OK to close the dialog.
14.Continue with the Advanced box layout editor or click OK to close the
editor.
Adding Items to a Box Layout
Within the Advanced Box Layout Editor, you can add items to the box
layout in the current style by field, as well as align and format the text of
those items.
1. Select Format from the Main menu then Advanced box layout
from the options list. The Format dialog opens to the Advanced box
layout tab displaying a single check box.
2. Select the style, if applicable, and the position type you want to
modify.
3. Select the Use advanced box layout for this position type check
box. The Advanced box layout options appear.
4. Click Add. The Add Item to Layout dialog opens. Three types of fields
are available, Box field, Job field, and Name field.
The Box field and Job field contain options to select the box or job
title, the box or job label, a horizontal line, or a vertical line. The
Name field contains all the custom fields as well as the label,
horizontal, or vertical line, and group or multiple report icons.
See the Adding a Background Color to a Box Area procedure for
detailed information on applying conditional colors.
5. Select the field or line you want to add, such as a photo, email
address, or a horizontal line. If you want the field label, as well as
the field data, to display in the box, select the Automatically add
label item check box at the bottom of the list box.
6. Click Add item. The item is added to the box layout editor.
Arranging Sections in the Box Layout
Within the Advanced Box Layout Editor, you can arrange the order of
fields within the chart boxes in the current style.
1. Select Format from the Main menu then Advanced box layout
from the options list. The Format dialog opens to the Advanced box
layout tab displaying a single check box. If you have already used
the Advanced box layout tab for this chart, the layout options
already display.
263
Format Your Charts/Advanced Box Layout Editor
Aquire OrgPublisher 10 User Guide
2. Select the style, if applicable, and the position type you want to
modify.
3. Select the Use advanced box layout for this position type check
box. The advanced box layout options display in the right-side of the
tab.
4. Click Arrange. The Arrange Sections dialog opens.
5. Select the radio button that describes the order in which you want
the field sections to display in the chart box.
6. Click OK. The list box closes.
7. Click OK in the Advanced box layout tab. The Format dialog closes
and the field sections are rearranged for the position type you
selected.
Copying the Box Layout to Another Position Type
Within the Advanced Box Layout Editor, you can copy the advanced box
layout of one position type to another position type in the current style.
1. Select Format from the Main menu then Advanced box layout
from the options list. The Format dialog opens to the Advanced box
layout tab. Since you have modified a layout previously, the Use
advanced box layout for this position type check box is already
selected and the advanced box layout options are displayed.
2. Click on the style, if applicable, and the position type layout you want
to copy.
3. Click Copy layout. The Copy Box Layout dialog opens.
4. Select the style, if applicable, and the position type to which you
want to copy the layout.
5. Click Copy. A message notifies you that the layout has been copied
successfully.
6. Repeat steps 2 - 5 if you want to copy the layout to multiple position
types, or click Close to exit the list box.
Displaying Information Outside the Chart Box
Within the Advanced Box Layout Editor, you can modify your org chart to
display information outside of the chart box.
Format Your Charts/Advanced Box Layout Editor
264
Aquire OrgPublisher 10 User Guide
While the actual width of the chart boxes is controlled in the Boxes tab of
the Format dialog, you can use the layout editor to manipulate the box
and place the text outside.
1. Select Format from the Main menu then Boxes from the options
list. You can also select the Format Boxes button
The Format dialog opens to the Boxes tab.
in the toolbar.
2. Modify the Width field to accommodate the length of the field you
want to place outside the chart box. Click Apply.
3. Select the Advanced box layout tab. If you have not yet used this
feature, the tab opens to display a single check box. If you have
already used the Advanced box layout tab for this chart, the layout
options already display in the right-hand pane.
4. In the left-hand pane, select the style, if applicable, and the position
type you want to modify.
5. If not already checked, select the Use advanced box layout for
this position type check box. The advanced box layout options
display in the right-hand pane.
6. The box area displays with either the default fields, or the fields you
have previously selected, within the box outline. OrgPublisher's
default fields are Box Title, Job Title, and Name.
Add or Arrange items in the layout. Do so before you place the field
outside the box.
7. Select the field you want to place outside the box and drag it to the
right-side of the box outline. Verify that field labels and information
do not overlap. Adjust the box width in the Boxes tab again, if
required.
8. Click and drag the box borders, or perimeters, to resize the chart box
until the field you want to display outside the box now sits outside
the box perimeter.
The area of the box that will display in the chart is outlined with a
darker border. The area you can work with to display your text
outside the box shows in gray-scale. Connecting lines also display as
dark lines within the gray-scale area so that you can verify their
positions in relation to your field. If the layout is what you want, click
OK.
9. The Format dialog closes and the text field displays outside the box
for the selected position type.
265
Format Your Charts/Advanced Box Layout Editor
Aquire OrgPublisher 10 User Guide
10.Repeat steps 2-8 if needed to properly adjust the location of the
field, box perimeters, and connecting lines.
Resetting the Box Layout
Within the Advanced Box Layout Editor, you can choose to reset the box
layout to the default settings.
Note:
This Reset feature deletes ALL formatting done in the Advanced box layout
tab, not just in the current instance. Do not use this feature as an "undo"
button.
1. Select Format from the Main menu then Advanced box layout
from the options list. The Format dialog opens to the Advanced box
layout tab displaying the current advanced settings.
2. Click Reset. A message displays verifying that you want to lose all
the current settings and revert back to the default settings in the
chart.
3. Click Yes if you do or No if you want to leave the settings as they are
or adjust them individually.
Reviewing List Items in the Box Layout
Within the Advanced Box Layout Editor, you can review a list of items in
the box layout in the current style. Selecting an item is the same as
selecting it within the layout tab.
1. Select Format from the Main menu then Advanced box layout
from the options list. The Format dialog opens to the Advanced
box layout tab displaying a single check box. If you have already
used the Advanced box layout tab for this chart, the layout options
are enabled.
2. Select the Use advanced box layout for this position type check
box. The advanced box layout options appear.
3. Click List items. The Box Layout Items dialog opens. The three
sections of the layout editor appear, Box field section, Job field
section, and Name field section. Data and information fields
added using the Add Item to Layout dialog display within each
section.
4. Click Done to close the list box and return to the Advanced box
layout tab
Format Your Charts/Advanced Box Layout Editor
266
Aquire OrgPublisher 10 User Guide
Using Auto Build with Advance Box Layout Editor
When using Auto Build with the Advanced Box Layout Editor:
1. Select Format from the Main menu then Chart from the pull-down
menu. The Format dialog opens to the Chart tab.
2. In the Auto Build Value field, select Reports in one box.
3. Click OK. OrgPublisher places the positions in the chart as specified.
If custom position types vary within the direct reports, they must all
be formatted the same using Advanced Box Layout Editor. This
feature can be used to display information in a spreadsheet format.
Custom field data is associated with the name field. No job title or
box title is displayed for the Employee position type in this example.
If it is displayed, the job title or box title would appear on the line
above or below each name, never horizontally.
Note:
When building a chart automatically, Auto Build assumes that each record has
a unique box ID.
Using Advanced Box Layout with Organizational
Model Planning
You, the chart administrator, can now use the Advanced Box Layout Editor
to format charts for planning (OrgPublisher Premier) purposes.
When editing within a planning chart, you may need to select a box which,
in turn, selects the span of control beneath that box. Because Advanced
Box Layout formats allow the placement of the name or job title at the top
of the box, a selection button has been added.
Note:
The administrator must change the Open position label position type in the
source chart if you want to allow planners to modify the field. You can change
the name to read Open position instead.
When the user places the mouse pointer over the top right corner of the
box, the selector is available
box and its span of control.
267
. When this is visible, click to select the
Format Your Charts/Advanced Box Layout Editor
Aquire OrgPublisher 10 User Guide
Figure 107
Figure 108
Use Conditional Formatting
Assigning Conditional Formatting to a Group
Conditional formatting answers your need to graphically represent a
particular search criteria by box and text formatting, and, if applicable,
show more data in the boxes of the group with that single attribute. You
do this by creating a conditional position type and assigning it to your
single attribute group.
Note:
Published real-time charts provide single field searching capabilities; complex
or group searching and saving My groups are not available.
Format Your Charts/Use Conditional Formatting
268
Aquire OrgPublisher 10 User Guide
Conditional formatting is not designed to display summaries or counts, nor
will it replace the original position type assigned when you created the chart.
Conditional position types apply across all styles.
1. Click the Position Type Wizard button
in the Wizard View, or
select Tools from the Main menu then Position type Wizard from
the drop-down list. The Position Type Wizard opens. Click Next.
2. Select the New Position Type radio button. Click Next.
3. Type the conditional Position Type name. It is recommended that
you do not name the position type the same name as the group.
Note:
Conditional formatting does not "erase" the original position type assigned,
such as Manager or Assistant. The box type remains associated with that
original position type. For instance, if an Assistant falls into the conditional
group and you change the position type (a formatting feature only), the box
type remains as an Assistant box. This will be apparent while working in the
OrgPublisher application but not in the published, or PluginX chart. In the
application, open the Update Person dialog to view the original position type.
You can address this by naming the conditional position type to reflect the
original position type name, such as "Top Performing Manager" or "Highest
Ranked Assistant."
4. Assign a Group to the position type by clicking on the drop-down
arrow and selecting the single attribute group you want to
highlight in your chart. Click Next.
Note:
It is recommended that you do not select a group that references secure fields
if you plan to publish a secure thin client EChart because you will receive
undesirable results.
The rich client EChart summary counts using conditional formatting show
numbers calculated as if all fields are visible to the end user. This is because
EChart summaries are calculated at publishing time and cannot be
recalculated.
If there is more than one group-based position type for which a person
qualifies, the first match is used in Search and Summary tasks.
5. Indicate if it is included in the total Head count by selecting the Yes
or No radio button. Click Next.
Note:
Summary counts are based on the position type, as is the Search feature.
Formatting will follow the group assigned to the conditional position type.
6. Type or select a Record Type code for this position. Click Next.
269
Format Your Charts/Use Conditional Formatting
Aquire OrgPublisher 10 User Guide
Note:
Record types for custom position types should use brackets, for example
<T>.
7. Click Box Style and Color to open the Format dialog to the Box tab.
Choose the style of the chart box and the box color. Click OK.
8. Click Text Style and Color to open the Format dialog to the Text
tab. Choose the text color, alignment, etc. Click OK. Click Next.
9. Click Finish. The new position type is saved within your chart file,
even if you do not actually save the chart after creating the position
type.
10.Open the Custom Field Properties dialog. The original formatting and
custom fields are removed from the boxes included in the new
conditional position type. You must now reassign custom fields to the
conditional position type.
11.Select the custom field you want to assign to the conditional position
type and click in the corresponding Assigned To field. The Update
Assigned Custom Fields dialog opens.
12.Select the conditional Position type from the list. A green check
mark displays next to the name.
13.If you want the custom field assigned to a particular component,
select Box title, Job title, or Name.
14.Click OK. The Update Assigned Custom Fields dialog closes.
15.Click Apply in the Custom Field Properties dialog. Click Close to exit
the Custom Field Properties dialog.
Note:
When using conditional formatting to create a position type group for
Employees (record type E), the search results include both direct (E) and
indirect employees (IE). If you need to separate the direct from indirect
employees you can add additional logic to the Group Editor description of the
group, such as:
OR PositionType = Employee
AND PositionType <> Indirect Report
Format Your Charts/Use Conditional Formatting
270
Aquire OrgPublisher 10 User Guide
271
Format Your Charts/Use Conditional Formatting
Aquire OrgPublisher 10 User Guide
C
HAPTER
5
SEARCH YOUR CHARTS
Note:
Published real-time charts provide single field searching capabilities; complex
or group searching and saving My groups are not available.
By default, OrgPublisher is set to display the top of chart box if no results are
found for a search. If you conduct a search that results in a blank Chart View,
verify that the group option default is set. Select Options from the Main menu,
Group display options, and then Auto adjust display to show group.
When working with a published EChart, you can add new groups, but the
existing groups cannot be modified or deleted. The new group cannot be
displayed in the published EChart Chart View.
If EChart security is enabled in OrgPublisher Enterprise, the published EChart
reflects only the information accessible to the user, although field labels
display in the dialog.
When using conditional formatting to create a position type group for
Employees (record type E), the search results include both direct (E) and
indirect employees (IE). If you need to separate the direct from indirect
employees you can add additional logic to the Group Editor description of the
group, such as:
OR PositionType = Employee
AND PositionType <> Indirect Report
If you create a group based on a standard position type, such as Manager,
then associate a custom position type to the group for conditional formatting,
such as Top Performing Manager, the original position type is no longer a part
of the group criteria. For instance, if you then searched for all "managers" the
"top performing managers" will not be part of your search results because
they are now a different position type. Your Boolean search should use both
the original position type, Manager, and the new position type, Top
Performing Manager, as a criteria using And/Or.
Searching All Fields
You can conduct a search in this tab by using the Search, For, and Match
field options. You can search any field including position type, custom
field, or group, as well as any of the hidden or displayed fields in your
chart, including hidden or displayed custom fields. You can also search the
All Fields option using the Search View.
Search Your Charts/Searching All Fields
272
Aquire OrgPublisher 10 User Guide
1. Open the Search dialog by selecting Edit from the Main menu then
Search from the pull-down options, or open the Search View pane
in the List View. You can also click on the Advanced Search button
in the toolbar.
2. Select the All Fields tab in the Search dialog. If you are using the
Search View, click the drop-down arrow in the first field and select
All Fields.
3. If you have selected a specific box in the Chart View, the Search
dialog selects the Search under selected box check box. This
begins the search at that point in the chart. If you want to search the
entire chart, click the Search under selected box check box to
clear it.
If you are using the Search View and want to start your search from
a specific box in a chart, you must first select a box in the Chart View
and then select the Search under check box. This begins the search
at that point in the chart.
Note:
This feature begins the search at this level in the chart but does not confine
the search to that single hierarchical tree.
4. In the Search field, click the drop-down arrow to select what field
you want to search. For instance, if you want to find a specific
telephone number in order to identify an employee or department,
you will scroll through the list until you reach the custom fields and
the name for telephone number.
You can also press the key of the first letter of the field you want to
navigate through the list.
Other examples include:
– Search for open positions by selecting Status type.
– Search for indirect reports by selecting Relationship.
5. In the For field, type the telephone number, or a portion of the
number, you want to find.
If, for instance, you chose Status type or Relationship, click the
drop-down arrow and select a field option.
6. In the Match field, indicate with the drop-down arrow what you want
to match.
273
Search Your Charts/Searching All Fields
Aquire OrgPublisher 10 User Guide
Field
= Any Part of
Field
= Match Whole
Field
= Start of Field
<> Any Part of
Field
<> Match Whole
Field
<> Start of Field
= Equal to
> Greater than
< Less than
< > Not equal to
> = Greater than
or equal to
< = Less than or
equal to
In group
Search Your Charts/Searching All Fields
Description
Select this option if you want OrgPublisher to find the
records that contain fields with matching criteria in any
part of the searched field.
Select this option if you want OrgPublisher to find the
records that contain fields exactly matching the criteria
in the searched field.
Select this option if you want OrgPublisher to find the
records that contain fields with matching criteria at the
beginning of the searched field.
Select this option if you want OrgPublisher to find the
records that do not contain fields with matching criteria
in any part of the searched field.
Select this option if you want OrgPublisher to find the
records that do not contain fields with exactly matching
criteria in the searched field.
Select this option if you want OrgPublisher to find the
records that do not contain fields with matching criteria
at the beginning of the searched field.
Select this option for date and numeric fields if you
want OrgPublisher to find the records that contain
exactly matching criteria in the searched field.
Select this option for date and numeric fields if you
want OrgPublisher to find the records that contain
dates or numbers that are greater than the criteria
indicated in the searched field.
Select this option for date and numeric fields if you
want OrgPublisher to find the records that contain
dates or numbers that are less than the criteria
indicated in the searched field.
Select this option for date and numeric fields if you
want OrgPublisher to find all the records that contain
dates or numbers that do not match the criteria
indicated in the searched field.
Select this option for date and numeric fields if you
want OrgPublisher to find the records that contain
dates or numbers greater than or equal to the criteria
indicated in the searched field.
Select this option for date and numeric fields if you
want OrgPublisher to find the records that contain
dates or numbers that are less than or equal to the
criteria indicated in the searched field.
Select this option if you want OrgPublisher to find only
the records that are contained in the specified group.
274
Aquire OrgPublisher 10 User Guide
Field
Not in group
Sounds Like
Description
Select this option if you want OrgPublisher to find only
the records that are not contained in the specified
group.
Select this option if you want OrgPublisher to find the
records that closely match the typed name or word.
7. If you are using the Search dialog, select the Match Case check box
if you want the search to match upper or lower case formats in your
text.
8. If applicable, you can select a group to filter your search. Click the
Search Base Group Filter button
dialog opens.
. The Search Base Group Filter
9. Select the Use a base group filter check box.
10.Click the down-arrow to select the group you want to use as a filter.
11.Click OK. The dialog closes and the filter button appears to be
"pressed in." This indicates that a base filter is set for your search.
12.Click Search Now in the Search dialog or Go in the Search View. If
you chose a group filter, OrgPublisher searches only the selected
group and displays the matching records. If no group filter was
selected, the entire chart is searched and matching records shown.
13.If you are looking for a certain record, click on it. OrgPublisher moves
to that section of the chart and highlights the record you have
selected. If you are creating a new group, click Save as group.
14.Type the name you want to use in the Enter a group name dialog.
15.Click OK to save the group.
You can also include search results in the side by side profile by
clicking the Include the search results in Profile View button
. Side
by side profiles are limited to 6 at a time if you auto-pin the profiles
in the Search View.
275
Note:
All records in the Profile View, pinned or not, are included when you save
profiles as a group.
Note:
You can click on “auto-pin” as many times as you’d like to append the next six
people into the Profile View along to existing profiles, or you can pin an
unlimited number individually.
Search Your Charts/Searching All Fields
Aquire OrgPublisher 10 User Guide
Searching by Box Title
You can conduct a simple search in this tab by using the Match field
options in the Search dialog or by using the Search View.
1. Open the Search dialog by selecting Edit from the Main menu then
Search from the pull-down options, or open the Search View pane
in the List View. You can also click on the Advanced Search button
in the toolbar.
2. Select the Box Title tab in the Search dialog. If you are using the
Search View, click the drop-down arrow and select the Box Title
option.
3. If you have selected a specific box in the Chart View, the Search
dialog selects the Search under selected box check box. This
begins the search at that point in the chart. If you want to search the
entire chart, click the Search under selected box check box to clear
it.
If you are using the Search View and want to start your search from
a specific box in a chart, you must first select a box in the Chart View
and then select the Search under check box. This begins the search
at that point in the chart.
Note:
This feature begins the search at this level in the chart but does not confine
the search to that single hierarchical tree.
4. Type all or a portion of the box title in the Box title field.
5. In the Match field, indicate with the drop-down arrow what you want
to match or do not want to match.
Field
= Any Part of
Field
= Match Whole
Field
= Start of Field
<> Any Part of
Field
Search Your Charts/Searching All Fields
Description
Select this option if you want OrgPublisher to find the
records that contain fields with matching criteria in any
part of the searched field.
Select this option if you want OrgPublisher to find the
records that contain fields exactly matching the criteria
in the searched field.
Select this option if you want OrgPublisher to find the
records that contain fields with matching criteria at the
beginning of the searched field.
Select this option if you want OrgPublisher to find the
records that do not contain fields with matching criteria
in any part of the searched field.
276
Aquire OrgPublisher 10 User Guide
Field
Description
<> Match Whole
Field
Select this option if you want OrgPublisher to find the
records that do not contain fields with exactly matching
criteria in the searched field.
Select this option if you want OrgPublisher to find the
records that do not contain fields with matching criteria
at the beginning of the searched field.
Select this option if you want OrgPublisher to find only
the records that are contained in the specified group.
Select this option if you want OrgPublisher to find only
the records that are not contained in the specified
group.
Select this option if you want OrgPublisher to find the
records that closely match the typed name or word.
<> Start of Field
In group
Not in group
Sounds Like
6. If you are using the Search dialog, select the Match Case check box
if you want the search to match upper or lower case formats in your
text.
7. If applicable, you can select a group to filter your search. Click the
Set or remove a base filter button
dialog opens.
. The Search Base Group Filter
8. Select the Use a base group filter check box.
9. Click the down-arrow to select the group you want to use as a filter.
10.Click OK. The dialog closes and the filter button appears to be
"pressed in." This indicates that a base filter is set for your search.
11.Click Search Now in the Search dialog or Go in the Search View. If
you chose a group filter, OrgPublisher searches only the selected
group and displays the matching records. If no group filter was
selected, the entire chart is searched and matching records shown.
12.If you are looking for a certain record, click on it. OrgPublisher moves
to that section of the chart and highlights the record you have
selected. If you are creating a new group, click Save as group.
13.Type the name you want to use in the Enter a group name dialog.
14.Click OK to save the group.
You can also include search results in the side by side profile by
clicking the Include the search results in Profile View button
. Side
by side profiles are limited to 6 at a time if you auto-pin the profiles
in the Search View.
277
Search Your Charts/Searching All Fields
Aquire OrgPublisher 10 User Guide
Note:
All records in the Profile View, pinned or not, are included when you save
profiles as a group.
See Figure .
Note:
You can click on “auto-pin” as many times as you’d like to append the next six
people into the Profile View along to existing profiles, or you can pin an
unlimited number individually.
Searching by Job Title
You can conduct a simple search in this tab by using the Match field
options in the Search dialog or by using the Search View.
If you want to search for a specific job title in your chart:
1. Open the Search dialog by selecting Edit from the Main menu then
Search from the pull-down options, or open the Search View pane
in the List View. You can also click on the Advanced Search button
in the toolbar.
2. Select the Job Title tab in the Search dialog. If you are using the
Search View, click the drop-down arrow and select the Job Title
option.
3. If you have selected a specific box in the Chart View, the Search
dialog selects the Search under selected box check box. This
begins the search at that point in the chart. If you want to search the
entire chart, click the Search under selected box check box to
clear it.
If you are using the Search View and want to start your search from
a specific box in the chart, you must first select the box in the Chart
View and then select the Search under check box. This begins the
search at that point in the chart.
Note:
This feature begins the search at this level in the chart but does not confine
the search to that single hierarchical tree.
4. Type all or a portion of the job title in the Job Title field.
5. In the Match field, indicate with the drop-down arrow what you want
to match or do not want to match.
Search Your Charts/Searching All Fields
278
Aquire OrgPublisher 10 User Guide
Field
= Any Part of
Field
= Match Whole
Field
= Start of Field
<> Any Part of
Field
<> Match Whole
Field
<> Start of Field
In group
Not in group
Sounds Like
Description
Select this option if you want OrgPublisher to find the
records that contain fields with matching criteria in any
part of the searched field.
Select this option if you want OrgPublisher to find the
records that contain fields exactly matching the criteria
in the searched field.
Select this option if you want OrgPublisher to find the
records that contain fields with matching criteria at the
beginning of the searched field.
Select this option if you want OrgPublisher to find the
records that do not contain fields with matching criteria
in any part of the searched field.
Select this option if you want OrgPublisher to find the
records that do not contain fields with exactly matching
criteria in the searched field.
Select this option if you want OrgPublisher to find the
records that do not contain fields with matching criteria
at the beginning of the searched field.
Select this option if you want OrgPublisher to find only
the records that are contained in the specified group.
Select this option if you want OrgPublisher to find only
the records that are not contained in the specified
group.
Select this option if you want OrgPublisher to find the
records that closely match the typed name or word.
6. If you are using the Search dialog, select the Match Case check box
if you want the search to match upper or lower case formats in your
text.
7. If applicable, you can select a group to filter your search. Click the
Set or remove a base filter button
dialog opens.
. The Search Base Group Filter
8. Select the Use a base group filter check box.
9. Click the down-arrow to select the group you want to use as a filter.
10.Click OK. The dialog closes and the filter button appears to be
"pressed in." This indicates that a base filter is set for your search.
11.Click Search Now in the Search dialog or Go in the Search View. If
you chose a group filter, OrgPublisher searches only the selected
279
Search Your Charts/Searching All Fields
Aquire OrgPublisher 10 User Guide
group and displays the matching records. If no group filter was
selected, the entire chart is searched and matching records shown.
12.If you are looking for a certain record, click on it. OrgPublisher moves
to that section of the chart and highlights the record you have
selected. If you are creating a new group, click Save as group.
13.Type the name you want to use in the Enter a group name dialog.
14.Click OK to save the group.
You can also include search results in the side by side profile by
clicking the Include the search results in Profile View button
. Side
by side profiles are limited to 6 at a time if you auto-pin the profiles
in the Search View.
Note:
All records in the Profile View, pinned or not, are included when you save
profiles as a group.
Note:
You can click on “auto-pin” as many times as you’d like to append the next six
people into the Profile View along to existing profiles, or you can pin an
unlimited number individually.
Searching by Name
You can conduct a simple search in this tab by using the Match field
options in the Search dialog or by using the Search View.
If you want to search for an employee name in your chart:
1. Open the Search dialog by selecting Edit from the menu bar, then
Search from the pull-down options or open the Search View pane
in the List View. You can also click on the Advanced Search button
in the toolbar.
2. Select the Name tab in the Search dialog. If you are using the
Search View, click the drop-down arrow and select the Name option.
3. If you have selected a specific box in the Chart View, the Search
dialog selects the Search under selected box check box. This
begins the search at that point in the chart. If you want to search the
entire chart, click the Search under selected box check box to
clear it.
If you are using the Search View and want to start your search from
a specific box in the chart, you must first select the box in the Chart
View and then select the Search under check box. This begins the
search at that point in the chart.
Search Your Charts/Searching All Fields
280
Aquire OrgPublisher 10 User Guide
Note:
This feature begins the search at this level in the chart but does not confine
the search to that single hierarchical tree.
4. Type all or a portion of the employee’s last name in the Last name
field.
5. Type all or a portion of the employee’s first name in the First name
field, if you have that information.
6. If you are using the Search dialog, type all or a portion of the
employee’s middle name in the Middle name field, if you have that
information.
7. In the Match field, indicate with the drop-down arrow what you want
to match.
Note:
If you type a last name and a first name, OrgPublisher searches for both
names, and will not show a match if only one of the names is found.
You can look for records that match (=) what you type, or do not
match (<>) what you type.
Field
= Any Part of
Field
= Match Whole
Field
= Start of Field
<> Any Part of
Field
<> Match Whole
Field
<> Start of Field
In group
281
Description
Select this option if you want OrgPublisher to find the
records that contain fields with matching criteria in any
part of the searched field.
Select this option if you want OrgPublisher to find the
records that contain fields exactly matching the criteria
in the searched field.
Select this option if you want OrgPublisher to find the
records that contain fields with matching criteria at the
beginning of the searched field.
Select this option if you want OrgPublisher to find the
records that do not contain fields with matching criteria
in any part of the searched field.
Select this option if you want OrgPublisher to find the
records that do not contain fields with exactly matching
criteria in the searched field.
Select this option if you want OrgPublisher to find the
records that do not contain fields with matching criteria
at the beginning of the searched field.
Select this option if you want OrgPublisher to find only
the records that are contained in the specified group.
Search Your Charts/Searching All Fields
Aquire OrgPublisher 10 User Guide
Field
Not in group
Sounds Like
Description
Select this option if you want OrgPublisher to find only
the records that are not contained in the specified
group.
Select this option if you want OrgPublisher to find the
records that closely match the typed name or word.
8. If you are using the Search dialog, select the Match Case check box
if you want the search to match upper or lower case formats in your
text.
9. If applicable, you can select a group to filter your search. Click the
Set or remove a base filter button
dialog opens.
. The Search Base Group Filter
10.Select the Use a base group filter check box.
11.Click the down-arrow to select the group you want to use as a filter.
12.Click OK. The dialog closes and the filter button appears to be
"pressed in." This indicates that a base filter is set for your search.
13.Click Search Now in the Search dialog or Go in the Search View. If
you chose a group filter, OrgPublisher searches only the selected
group and displays the matching records. If no group filter was
selected, the entire chart is searched and matching records shown.
14.If you are looking for a certain record, click on it. OrgPublisher moves
to that section of the chart and highlights the record you have
selected. If you are creating a new group, click Save as group.
15.Type the name you want to use in the Enter a group name dialog.
16.Click OK to save the group.
17.You can also include search results in the side by side profile by
clicking the Include the search results in Profile View button
. Side
by side profiles are limited to 6 at a time if you auto-pin the profiles
in the Search View.
Note:
All records in the Profile View, pinned or not, are included when you save
profiles as a group.
See Figure .
Search Your Charts/Searching All Fields
282
Aquire OrgPublisher 10 User Guide
Note:
You can click on “auto-pin” as many times as you’d like to append the next six
people into the Profile View along to existing profiles, or you can pin an
unlimited number individually.
Using the Sounds Like Feature
The OrgPublisher search option has been enhanced to allow you to search
any text type fields based on a “sounds like” feature. This feature provides
you with an increased chance of a successful search for people and
information.
The view and dialogs affected by the new match field option Sounds Like
are:
• Group Editor: Access this feature by right-clicking in a group icon in
the Groups tab, then the Compare column.
• Search View: Access this feature by clicking on the down-arrow in the
Match field.
• Search dialog: Access this feature by clicking on the down-arrow in
the Match field in the Name, Job Title, Box Title, and All Fields
tabs.
Search for information in the Search View or Search dialog
using the Sounds Like feature:
1. Open the Search View or Search dialog.
2. Select the Name field (or other text field) in the Search View, or the
Name tab (or one of the other tabs) in the Search dialog.
3. Type the name as accurately as possible in the Last field.
4. Click on the down-arrow in the Match field and select Sounds Like.
5. Click Go. The search results pane displays all names that come close
to the spelling you used.
This feature works with all text fields, such as Job Title or Box Title,
and any text type in the All Fields tab.
Search for information in the Group Editor dialog using the
Sounds Like feature:
1. Open the Group Editor dialog.
2. Click Add to set a new group criteria. A duplicate of the last criteria
record is created.
283
Search Your Charts/Searching All Fields
Aquire OrgPublisher 10 User Guide
3. Click on the Compare field and select Sounds Like.
4. Click in the Value field and type the name or word as accurately as
possible.
5. Click Search Now. The search results pane displays all names or
words that come close to the spelling you used.
Using the Group Filter in Searches
With OrgPublisher you can choose to filter your searches through a
specific group. The filter button is included in the Search View and the
Search dialog.
Note:
When you select a base group filter, you also limit the records displayed in the
published directory view of the chart.
1. Open the Search View or Search dialog and select the search criteria
you want to use. Detailed instructions on how to conduct searches is
available in the Searching All Fields, Searching by Box Title,
Searching by Job Title, and Searching by Name procedures in this
document.
2. Click the Set or remove a base filter for searching button
Search Base Group Filter dialog opens.
. The
3. Select the Use a base group filter check box.
4. Click the down-arrow to select the group you want to use as a filter.
5. Click OK. The dialog closes and the filter button appears to be
"pressed in." This indicates that a base filter is set for your search.
6. Continue selecting your search criteria and click Search Now.
OrgPublisher searches only the selected group and displays the
matching records.
7. Click the filter button again to remove the filter, or click it twice to
reopen the Search Base Group Filter dialog to select a new group
filter.
Adding to a Search Result List
You can combine two or more search results in order to create the unique
group that you want.
Search Your Charts/Searching All Fields
284
Aquire OrgPublisher 10 User Guide
1. In the Search dialog, select a tab to begin your search, such as
Name or Job Title. Or, if you have an existing group that you want
to search, click the Groups button
Group Editor dialog.
in the toolbar to open the
2. If you have selected a specific box in the Chart View, the Search
dialog selects the Search under selected box radio button. This
begins the search at that point in the chart. If you want to search the
entire chart, click the Search under selected box radio button to
clear it.
Note:
This feature begins the search at this level in the chart but does not confine
the search to that single hierarchical tree.
3. Enter your search criteria and indicate if you want to Match part or
all of the field, or Match Case. If you are searching the All Fields
tab, select the Search field and enter or select the For field data, as
well.
4. Click Search Now. The results display in the list in the lower section
of the dialog.
5. If the results are what you want, click the Add to list below radio
button to begin the second search.
6. Repeat Steps 2-5 until you have the Group you want. Then click
Save as Group.
Combining Searches
You can combine two or more searches in order to create the unique
group that you want.
1. Select a tab in the Search dialog or a field in the drop-down list of the
Search View to begin your search. Or, if you have an existing group
that you want to search, click the Groups button
open the Group Editor dialog.
in the toolbar to
2. If you have selected a specific box in the Chart View, the Search
dialog selects the Search under selected box radio button. This
begins the search at that point in the chart. If you want to search the
entire chart, click the Search under selected box radio button to
clear it.
3. Enter your search criteria and indicate if you want to Match part or
all of the field, or Match Case. If you are searching the All Fields
285
Search Your Charts/Searching All Fields
Aquire OrgPublisher 10 User Guide
tab, select the Search field and enter or select the For field data, as
well.
4. Click Search Now. The results display in the list in the lower section
of the dialog.
5. If the results are what you want, click the Add to list below radio
button.
6. Repeat Steps 2-4 until you have the group you want. Then click
Save as Group.
Conducting a Boolean Search
OrgPublisher’s advanced search function enhances the Search dialog and
Search View capabilities. You can take one of two approaches to a boolean
search. You can search within a group list using boolean criteria or add
additional records to your original list. Advanced users can go directly to
the Group Editor dialog and add Boolean logic, that is, true/false logic to
the group search criteria.
For example, you can search your chart for all employees hired before
January 1, 2001 by first selecting Position type in the Search field,
choosing Employee in the For field and selecting =Equal to in the Match
field. Click Search Now.
The matching records for the first part of your search display. Then click
the Search within list below radio button and enter the second part of
your search criteria. Select Hire Date in the Search field, 01/01/2001 in
the For field, and < Less than in the Match field. Click Search Now.
Only the records matching both criteria are displayed in the results list.
Now you can click Save as Group and you have your employees hired
before 01/01/2001.
Your search criteria are saved as part of the group information so that you
can use the same criteria later.
The components of a Boolean search include:
Search Your Charts/Searching All Fields
286
Aquire OrgPublisher 10 User Guide
All Fields tab
Component
Search
For
Match
Match Case
Search Now
Close
Search under
selected box
New Search
Add to list below
Search within list
below
Number of
people found
287
Description
This field displays all standard and custom fields within
your chart in a drop-down list. Select the field you want
to search.
Sample value: Position type or Status type
This field varies based on the selection made in the
Search field. Type what you want to search for or
select from the options list.
Sample value: Type text or select either Contractor or
Filled Position.
Information in the drop-down list in this field varies
based on the selection made in the For field. Select the
value you want to use for your search.
Sample value: Select = Equal to, > Greater than, or
< Less than
This check box is available based on the selection made
in the For field. Displays Yes or No, depending on your
search criteria. When adding new search criteria, select
the check box to match upper and lower case text.
Click this button to perform the search and display all
the matching records in the lower pane of the dialog.
When adding new search criteria, click this button to
begin your search.
Click this button at any time to close the dialog.
Check box is selected if you have clicked on a specific
box in your chart that is not the “top of chart.” When
adding new search criteria, select this radio button if
you want to begin your search at a selected point in the
chart. You must select a box in the Chart View to
enable this feature.
Select this radio button if you want to discard current
records displayed and begin a new search.
Click this radio button if you want to keep the existing
displayed records and you want to add the results of
your new search to the current list. This is an “OR”
condition.
Click this radio button if you want to search only the
records already displayed in a search. This is an “AND”
condition.
Display in the lower left-hand corner indicates the
number of matching records found in your search.
Search Your Charts/Searching All Fields
Aquire OrgPublisher 10 User Guide
Component
Copy List to
Clipboard
Save as group
Description
Click this button if you want to copy the list of matching
records in order to paste them into another Microsoft®
Windows® application.
Click this button if you want to save the search criteria
group.
Group Editor dialog
Component
Group Name
Add
Remove
Move Up
Move Down
And/Or
Search Field
Compare
Description
Field displays the name of the group you have selected.
You can type a new name.
Click this button to add a new Boolean search criterion
for the group definition and to copy the previous or
selected criterion, if available.
Click this button to delete the selected Boolean search
criterion.
Click this button to move the selected criteria up one
record in the dialog, modifying the search priority.
Click this button to move the selected criteria down one
record in the dialog, modifying the search priority.
Select AND if you want your search results to meet
both (or all) lines of criteria.
Select OR if you want your search results to meet
either (or some) line of criteria.
Displays the field or fields in the chart your search is
based on. When adding new search criteria, select a
field you want to find from the drop-down options list.
Sample value: Head count or Planned Head count.
This field varies based on the selection in the Search
Field column. Displays the value or action performed in
your search. When adding new search criteria, select a
value or action from the options list.
Sample value: Select =Equal to, > Greater than, <
Less than, <> Not equal to, >= Greater than or
equal to, <= Less than or equal to, or Sounds
Like.
Search Your Charts/Searching All Fields
288
Aquire OrgPublisher 10 User Guide
Component
Value
Match Case
Image to show in
chart for people
in this group
Just selection
Search Now
Save
Save As
Cancel
Matching reocrds
display
People found
Description
This field varies based on the selection in the Search
Field column. Displays the information you looked for
in your search. When adding new search criteria, type
what you want to find or select a value from the dropdown options list.
Sample value: date (99/06/03) or number (12)
This check box is available based on the selection made
in the For field. Displays Yes or No, depending on your
search criteria. When adding new search criteria, select
the check box to match upper and lower case text.
This field displays the icon shown in the chart for the
selected group. Select an icon from the drop-down
options list if you want to display a group icon in the
chart.
Check box is selected if you have clicked on a specific
box in your chart that is not the “top of chart .” When
adding new search criteria, select this radio button if
you want to begin your search at a selected point in the
chart. You must select a box in the Chart View to
enable this feature.
Click this button to perform the search and display all
the matching records in the lower pane of the dialog.
When adding new search criteria, click this button to
begin your search.
Click this button to save the displayed records and
group search criteria.
Click this button to save the displayed results under a
new group name.
Click this button to cancel your search.
The lower pane in this dialog displays the existing
group records or the matching records of your new
search.
Display in the lower left-hand corner indicates the
number of matching records found in your search.
Searching within the Group Results List
After you have done a search and a list displays in the Search dialog or
Search View pane in the List View, you can also search within that list.
This enables you to eliminate records and narrow your search criteria.
1. Click the Search within list below radio button.
2. If you have selected a specific box in the Chart View, the Search
dialog selects the Search under selected box check box. This
289
Search Your Charts/Searching All Fields
Aquire OrgPublisher 10 User Guide
begins the search at that point in the chart. If you want to search the
entire chart, click the Search under selected box check box to
clear it.
Note:
This feature begins the search at this level in the chart but does not confine
the search to that single hierarchical tree.
3. Choose the search tab and enter your search criteria and indicate if
you want to Match part or all of the field, or Match Case. If you
are using the All Fields tab, select the Search field and enter or
select the For field data, as well.
4. Click Search Now. The new results display in the list in the lower
section of the dialog.
You can also include search results in the side by side profile by
clicking the Include the search results in Profile View button
.
Side by side profiles are limited to 6 at a time if you auto-pin the
profiles in the Search View.
Note:
All records in the Profile View, pinned or not, are included when you save
profiles as a group.
You can click on “auto-pin” as many times as you’d like to append the next six
people into the Profile View along to existing profiles, or you can pin an
unlimited number individually.
Spotlighting Search Results in the Chart View
You can use the chart spotlighting feature to highlight search results in
the Chart View, or dim boxes that are not part of the search result, you
can use the Spotlight search results in chart button
in the Search
View. You can use this feature alone, or in conjunction with the spotlight
group boxes feature.
Note:
The Spotlighting feature works only in View Mode.
1. Open the Search View.
2. Select the search criteria and click Go to begin the search.
3. When the search results display in the Search View, click the
Spotlight search results in chart button
. The boxes in the Chart
View that are not part of the search results are dimmed.
4. Click the button again to disable the spotlight search results feature.
Search Your Charts/Searching All Fields
290
Aquire OrgPublisher 10 User Guide
Note:
When printing a chart with the spotlighting feature enabled, if your printer
does not support AlphaBlend, your printed chart will show all boxes as in the
past. See your IT administrator if you have any questions.
Viewing Search Results in Microsoft Excel
You can open and view your search results list directly in Microsoft®
Excel. All information you can see in the results list in OrgPublisher is
copied into Microsoft Excel.
View Search View Results in Microsoft Excel
1. Open the List View
in the chart.
2. Select the Search View pane.
3. Conduct the search you want, or sort the records as required. Click
the Open in Microsoft Excel button
at the bottom of the view.
Microsoft Excel opens with your chart records list.
4. You can also open the Groups tab in the Search View, select a
group, and click the Excel button
Microsoft Excel.
to open the group list in
View Search Dialog Results in Microsoft Excel
You can also open your search results in the Search dialog in Microsoft
Excel.
1. Open the Search dialog by clicking the Advanced Search button
in the toolbar or by selecting Edit from the Main menu and
Search from the options list. The Search dialog opens at the Name
tab.
2. Conduct the search you want then click the Open search results in
Microsoft Excel button
your search results list.
. Microsoft Excel opens with
3. You can also open the Groups tab in the Search dialog, select a
group, and click the Open search results in Microsoft Excel button
to open the group list in Microsoft Excel.
291
Search Your Charts/Searching All Fields
Aquire OrgPublisher 10 User Guide
Using the Groups tab in the Search dialog
You can search existing groups, add or delete a group, edit an existing
group, or change the group display window from large to small icons or to
a group name list. You can do all this in the Groups tab.
When working with a published EChart, you can search existing groups
and create new groups. You cannot edit an existing group. The new group,
however, cannot be displayed in the published EChart Chart View.
1. Open the Search dialog by selecting Edit from the Main menu then
Search from the pull-down menu. You can also click on the
Advanced button
in the toolbar.
2. Select the Groups tab. To create a new group, click on the New
button
. The Group Editor dialog opens. See the Using the
Group Editor Dialog procedure for detailed information.
3. Click the Export Groups button
if you want to export a group to
be used by other users or on a different PC.
4. Click the Import Groups button
if you want to import a group.
5. To search or modify an existing group in the Group Editor dialog,
click on the group icon or name and click Search Now. The group
list displays in the lower frame of the dialog.
Note:
You can also use the base group filter option to narrow your search.
6. Select the tab you want to use for your search, Name, Job Title,
Box Title, All Fields.
7. To delete an existing group, click the Delete Group Definition button
. The group is immediately deleted from the existing groups.
8. To modify the existing group, click the Edit Group Definition button
to open the Group Editor dialog.
9. You can change how you display your group names by clicking on
one of the display buttons, such as, View large icons
Icons
, or View Details
Search Your Charts/Searching All Fields
, View Small
.
292
Aquire OrgPublisher 10 User Guide
10.You can copy the existing group list by clicking Copy List to
Clipboard, then opening the other application and pasting the list
into the document.
11.You can modify a group name by clicking Save as Group and typing
the new name in the Enter a group name dialog.
Note:
If you choose not to secure ECharts, they can be accessed by any chart user,
as well as any user who can access the server where the EChart resides.
If you plan to use EChart security, verify that your custom fields are set for
Security before you open the Publishing Wizard.
Using the My groups tab in the Search View
Not only can you search for information in a published chart, end users
can also save the search results as a group. Groups saved by end users
are displayed in the My groups tab of the Search View in the published
chart. The My groups tab is enabled only in the published chart.
When working with a published EChart, you can add new groups, but the
existing groups cannot be modified or deleted. The new group cannot be
displayed in the published EChart Chart View.
1. Open a published chart in your browser. The Everyone group, the
OrgPublisher default, automatically opens at the My groups tab.
2. Open the List View and select the Search View pane. Three tabs are
shown, Search, Groups, and My groups. The Search tab enables
you to search for specific information in the chart. You can copy the
results list or save the list as a group. The Groups tab displays the
groups created by the OrgPublisher administrator before publishing
the chart. The My groups tab displays all groups saved by the end
user plus the default Everyone group.
3. If you haven't already done so, conduct your search using the
Search View pane.
Note:
You can use the base group filter option to narrow your search.
4. When your search result is the way you want it, click Save as
Group. The Enter a group name dialog opens.
5. Type the name of the group and click OK. The My groups tab opens
and displays the new group name. Also available are three buttons.
The New Group Definition button
opens the Group Editor
dialog to add a new group definition. The Delete Group Definition
293
Search Your Charts/Searching All Fields
Aquire OrgPublisher 10 User Guide
button
deletes a selected group, and the Edit Group Definition
button
opens the Group Editor dialog to edit an existing group
definition.
Note:
If the end user must change PCs, the export and import buttons enable the
transfer of end user groups from one machine to another. See the Exporting
and Importing Groups procedure in this document.
6. To display a specific group in the published chart, open the Groups
View by clicking on the groups label in the OrgPublisher Style bar.
Using Enhanced Toolbar Search and Find
Features
The Using Toolbar Search with Quick Search Results feature in the
OrgPublisher application and published chart has been modified.
1. The Find Next toolbar field is now labeled Look For. You can type in
a single or multiple words.
Figure 109
2. Click Go
to begin the search navigate around the chart: searches
on a box-to-box basis for the next instance of a matching record.
3. To reuse previous searches, click on the down-arrow and select the
search item you want. To clear the search list, right-click on the
button and select Clear List.
See the Using the Smart Search Option procedure for more details.
Search Your Charts/Searching All Fields
294
Aquire OrgPublisher 10 User Guide
295
Search Your Charts/Searching All Fields
Aquire OrgPublisher 10 User Guide
C
HAPTER
6
CREATE AND WORK WITH GROUPS
Note:
Although this section provides information on manually editing a chart,
remember that if you want the changes to remain permanent, you must apply
the changes to your HR database. When your HR data is refreshed and you
open your chart, your manual changes are overwritten.
Published real-time charts provide single field searching capabilities; complex
or group searching and saving My groups are not available.
If you plan to create a large number of groups, for instance 60 - 70, it is
recommended that you use more than one chart.
By default, OrgPublisher is set to display the top of chart box if no results are
found for a search. If you conduct a search that results in a blank Chart View,
verify that the group option default is set. Select Options from the Main menu,
Group display options, and then Auto adjust display to show group.
If you create a group based on a standard position type, such as Manager,
then associate a custom position type to the group for conditional formatting,
such as Top Performing Manager, the original position type is no longer a part
of the group criteria. For instance, if you then searched for all "managers" the
"top performing managers" will not be part of your search results because
they are now a different position type. Your Boolean search should use both
the original position type, Manager, and the new position type, Top
Performing Manager, as a criteria using And/Or.
If there is more than one group-based position type for which a person
qualifies, the first match is used in Search and Summary tasks.
When using conditional formatting to create a position type group for
Employees (record type E), the search results include both direct (E) and
indirect employees (IE). If you need to separate the direct from indirect
employees you can add additional logic to the Group Editor description of the
group, such as:
OR PositionType = Employee
AND PositionType <> Indirect Report
Create and Work with Groups/
296
Aquire OrgPublisher 10 User Guide
Defining Groups
You can search your org chart for position types or custom field
information and then create special groups within your chart. In addition,
you can create unique styles using the group charts or copy the group
data and paste it into a spreadsheet for further analysis. You can even
create summaries with just the group information.
Groups can be used to manage role-based security, summarize numeric
data for group members, or quickly send an e-mail message to group
members from the published chart.
You can also create groups in OrgPublisher Premier by Creating a Side-bySide Profile View.
With the Search feature, you can create and chart groups by:
Position Type - for instance, director, manager, staff position (Searching
All Fields )
Name - for instance, a complete name, John Smith, by first name , John,
or by last name , Smith (Searching by Name)
Job Title - for instance, Sales Rep, Technical Support (Searching by Job
Title)
Box title - for instance, department (Searching by Box Title)
Custom Field - for instance, hire date, salary, office location, male or
female (Searching All Fields)
Any combination of fields or text - for instance, female managers
hired after a certain date (Conducting a Boolean Search)
Any word or number in a field - for instance, marketing (Searching All
Fields)
Conduct searches for records that exclude specific data (Conducting a
Boolean Search)
You can further define your group in your org chart by selecting a group
icon to display next to the name of each person in the chart belonging to
that group.
Note:
297
You can also define a conditional position type to which you assign a group for
formatting purposes. Conditional formatting is meant to increase the visibility
Create and Work with Groups/Defining Groups
Aquire OrgPublisher 10 User Guide
of distinct groups in your chart based on a single attribute, such as "High
Performers."
Saving and Charting Search Results as a Group
When you create a group, it can be used in any style at any time. A style
can be saved to open with a particular group displayed. OrgPublisher
automatically creates the Everyone group, which is the default group
displayed when you open your chart. You can modify a group from any
style and all styles reflect those changes. Search criteria can be reused as
chart data is refreshed.
Show/Hide functions affect charting groups, thus only the position types
allowed by the style will display in the group chart. Group charts are
always displayed in the View Mode.
The Style Bar displays the name of the group currently shown in your
chart on the right side of the bar, and you can click on the down-arrow to
open the Groups View.
The chart is a visual representation of the group members within the
original hierarchy, showing the matching records and the boxes they
report to.
Saving a Group
1. Conduct your search using one of the Search dialog tabs or by using
the Search View pane in the List View.
2. When your search result is the way you want it, click Save as
Group. The Enter a group name dialog opens.
3. Type the name of the group.
4. Click OK. The Search dialog or Search View displays the Group tab
with the new group shown. If an end user has conducted a search in
the published chart, the saved group displays in the My groups tab
of the Search View.
5. If you are using the Search dialog, close it. Click on the down-arrow
in the Styles bar. A Groups View displays your group names.
6. Click on the name of the group you want to chart. The Chart View
displays the group members within the original hierarchy.
Create and Work with Groups/Saving and Charting Search Results as a Group
298
Aquire OrgPublisher 10 User Guide
For instance, if you searched your chart to find all open positions and
saved the group, the charted group shows the boxes containing open
positions and the parent boxes those open positions report to.
Side by side profiles are limited to 6 at a time if you auto-pin the
profiles in the Search View.
Note:
All records in the Profile View, pinned or not, are included when you save
profiles as a group.
Adding a New Group
You can add a person to a group directly from the Chart View. In addition,
you can add a new group using the Select a Group text box .
Note:
Adding a new group is not necessarily the same as adding a group to a
conditional position type. Use conditional formatting only to distinguish a
single attribute group in your chart.
Adding a Group by Searching
1. Conduct your search using one of the Search dialog tabs or by using
the Search View pane in the List View.
2. When your search result is the way you want it, click Save as
Group. The Enter a group name text box opens.
3. Type the name of the group.
4. Click OK. The Search dialog or Search View displays the Groups tab
with the new group displayed.
Note:
It is best not to give groups the same names as custom items. Custom legend
items and groups that have the same name do not synch.
If an end user has conducted a search in the published chart, the saved group
displays in the My groups tab of the Search View. The new group displays in
the PluginX Group View only.
5. If you are using the Search dialog, close it. Click on the down-arrow
in the Style Bar. The Groups View displays your group names. Click
on the name of the group you want to chart. The Chart View displays
the group members within the original hierarchy.
For instance, if you searched your chart to find all open positions and
saved the group, the charted group shows the boxes containing open
positions and the parent boxes those open positions report to.
299
Create and Work with Groups/Saving and Charting Search Results as a Group
Aquire OrgPublisher 10 User Guide
Adding a Group using right-click menu
1. In the Chart View, select the name of the person you want to add to
a new group.
2. Right-click on the person's name. The Select a Group text box opens.
3. Click New Group. The Enter a group name text box opens.
4. Type the name for the group. Click OK. The text box closes. The new
group is created and the name is added to the Groups View.
Adding a Group Icon
You can add an image to display in your chart next to the names of
individuals belonging to a selected group. You can use standard 16x16
and 32x32 pixel icons (.ico files).
Note:
Conditional formatting does not perform the same function in the org chart as
the display of group icons. In particular, if you want to show that an employee
is a member of more than one group, use the group icon feature.
Using group and multi-reporting relationship icons in conjunction with
Conditional Formatting is not recommended. These two features distinguish
different aspects of group information and are not meant to work together.
1. Click the Search
opens.
button in the toolbar. The Search dialog
2. Click the Groups tab and double-click on the group you want to
modify. The Group Editor dialog opens.
3. Select the radio button to choose from Small icons or Large icons.
4. Click the down-arrow in the Displayed image for people in this
group field and select the icon you want to display from the pulldown list.
You can also scroll to the end of the list and click Other. This opens
the Select an icon file dialog where you can browse to another icon
image resource file. Valid files of type are *.ico, *.dll, *.exe, *.ocx.
5. If applicable, you can select the check box to Hide this group in
published chart. For additional information, see the Hiding Groups
in Published Charts procedure in this document.
6. Click Save. The dialog closes.
7. Click Close to return to the Chart View.
Create and Work with Groups/Saving and Charting Search Results as a Group
300
Aquire OrgPublisher 10 User Guide
8. The selected group icon displays in the lower-left corner of the group
member's box. You can change where you want to display the icon
by selecting Format from the menu and Boxes from the options list.
In the Show group icons field, select Left, Center, or Right.
9. You can click on the group icon to open the Group Editor dialog to
modify or delete (select (None) from the pull-down list) the
displayed icon.
Adding a Person to a Group
You can add a person to a group directly from the Chart View by using the
right-click menu Add person to group.
Note:
This "Search" and addition to a group uses the information in Field 5. This
information becomes part of the group criteria and is displayed and
searchable. Do not store sensitive information in this field.
1. In the Chart View, select the name of the person you want to add to
an existing group.
2. Right-click on the person's name and select the Add person to the
Group option. The Select a Group dialog opens.
3. Click the down-arrow and select a group from the drop-down list and
click OK.
4. The text box closes and the person is now included in the selected
group.
Copying a Group List
Just as you can copy the List View and Summary View into another
Microsoft® Windows® application, you can also copy the group list.
Note:
Because of its size, the Copy whole list feature in the List View for a published
EChart is disabled. You can use this group copy and paste feature to print the
entire records list of an EChart as a substitute for that option. Simply open the
Everyone group and follow this procedure.
1. Conduct your search in the Search dialog or Search View. The list of
matching records displays in the lower pane. Or, if you have an
existing group that you want to search, click the groups button in the
toolbar to open the Group Editor dialog.
You can also click on a group name in the Groups tab (click Search
Now in the Search dialog) to display the group.
301
Create and Work with Groups/Saving and Charting Search Results as a Group
Aquire OrgPublisher 10 User Guide
2. If you are using the Search dialog, click Copy List to Clipboard. In
the Search View click Copy list.
3. Open the application in which you want to place the list and paste it.
The records in the group list are pasted into the new document.
Creating a Group Head Count
You can use the summary feature to generate a group head count.
1. Open the Head Count Wizard by selecting Tools in the Main menu,
then Head count Wizard from the options list. You can also click
the Head count Wizard
button in the Wizard View. Click Next.
2. Click the drop-down arrow in the Population field and select the
group name for which you want to create the head count. Click Next.
Note:
Orphan records and broken hierarchies can adversely affect summary and
security functions. Unexpected results can occur that may cause head count
or other totals to be incorrect.
3. Type the head count Label. If you want to hide the field label in your
chart, select the Hide label check box. Click Next.
4. Select the Position type to display the head count. Click Next.
5. Click Finish. The new group head count displays in the selected
position type.
Note:
In conditional formatting, the search feature and all calculations follow the
conditional position type. Formatting follows the group. If you display the
Summary View in a chart with conditional formatting, you should hide either
the group or position type of the conditional format. If you don't, head counts
display in both areas.
If there is more than one group-based position type for which a person
qualifies, the first match is used in Search and Summary tasks.
Deleting a Group
You can delete a group definition through the Search dialog or Search
View.
1. Open the Search dialog by selecting Edit from the Main menu, then
Search from the pull-down menu. You can also click on the Search
Create and Work with Groups/Saving and Charting Search Results as a Group
302
Aquire OrgPublisher 10 User Guide
button
in the toolbar. In addition, you can open the List
View and select the Search View pane.
2. Select the My groups or Groups tab.
3. Click the group then click the Delete Group Definition button
group is immediately deleted from the existing groups .
. The
Editing a Group Definition
1. Click the Search button
opens.
in the toolbar. The Search dialog
2. Select the Groups tab.
3. To modify an existing group, double-click on that group to open the
Group Editor dialog. Click Search Now to display the group list. You
can also open the Search View pane in the List View and select the
Groups tab. Click the Edit Group Definition
Group Editor dialog.
button to open the
4. To add search criteria, click Add to copy the last criteria line, then
modify it by using the And/Or, Search Field, Compare, Value,
and Match Case fields. Click on the values in those fields and select
the option you want to use from the drop-down list.
5. When you have added all the search criteria, click Search Now to
conduct the search. If you are modifying an existing group, the
results are added to that list. If you are creating a new group the
results display in the lower pane.
6. To delete an existing group criterion, highlight the record and click
the Remove button
.
7. Save the changes to an existing group by clicking Save. Save to a
new group by clicking Save As.
8. You can continue to build criteria for additional groups or click
Cancel to close the Group Editor dialog and return to the Search
dialog or Search View.
Note:
303
If you delete the custom position type, the records will return to the original
position type assigned.
Create and Work with Groups/Saving and Charting Search Results as a Group
Aquire OrgPublisher 10 User Guide
Do not mix groups based on position type with position types based on
groups.
Exporting and Importing Groups
OrgPublisher includes export and import options for both the OrgPublisher
application and the PluginX chart. End users no longer have to lose their
group information when they have to change PCs. You, as the
administrator can now share groups with other administrators.
If duplicate group names are imported, OrgPublisher will append the
name with a number, 1, 2, 3, etcetera. No groups are overwritten by the
import process.
When exporting groups that reference other groups, verify that they
reference the correct group. If a referenced group is not included in the
import, the affected group will not be imported and an error message
displays.
Note:
In order to import a group successfully, the number, type, and order of
custom fields in the chart receiving the import must match exactly the
number, type, and order of custom fields in the chart from which the group
was exported.
The "Everyone" group cannot be exported or imported.
Export groups:
1. Open the Search View or the Search dialog. Click on the My groups
tab if you're in a published chart or the Groups tab if you're in the
application. The group names display in the upper pane.
2. Click the Export groups button
dialog opens.
. The Select Groups to Export
3. Click Select all if you want to export all of the groups. You can clear
groups you do not want to export, or you can click Clear all if there
are many groups and you want to select just a few.
4. Type or Browse to the file into which you want to export your
groups, such as a file in your network drive. Type a name for the
group files and click Open. The file extension is OCG, Group Data
Files.
5. Click Export to send the groups to the selected file. A message
displays to let you know if your groups were successfully exported.
Create and Work with Groups/Saving and Charting Search Results as a Group
304
Aquire OrgPublisher 10 User Guide
Import groups:
1. Open the Search View or Search dialog. Click on the My groups tab
if you're in a published chart or the Groups tab if you're in the
application.
2. Click the Import groups button
dialog opens.
. The Select Groups to Import
3. Type or Browse to the file from which you want to import your
groups. The names of the groups in the selected file display.
4. Click Select all to import all of the displayed groups to your PC. You
can clear the groups you do not want to import or click Clear all if
there are many groups and you want to select just a few.
5. Click Import. A message displays that your groups have been
successfully imported. The selected groups display in the PluginX
(published chart) My groups tab.
Hiding Groups in Published Charts
With OrgPublisher you can hide selected groups in published charts.
Note:
You can select a group to hide in the OrgPlan chart; however, there is no
"undo" for this feature. If you save the chart with the group hidden, you
cannot access the hidden group. You must conduct a new search using the
same criteria if you want to recover the group.
1. Click the Search button
Search dialog opens.
in the Navigation toolbar. The
2. Click the Groups tab to display groups available in the current chart.
3. Double-click on the group you want to hide. The Group Editor dialog
opens.
4. Select the Hide this group in published chart check box.
Note:
Hidden groups are removed from the Groups View and Chart View in both the
application and the published chart. In addition, hidden groups cannot be
seen in the Search View, Search dialog, Groups View, or Chart View in the
published chart. They can be seen in the application in the Groups tab of the
Search View and Search dialog.
5. Click Save then Close the Search dialog.
305
Create and Work with Groups/Saving and Charting Search Results as a Group
Aquire OrgPublisher 10 User Guide
6. Complete the publishing steps. When you open the published chart
the selected group will not display in the chart or the Groups View.
Note:
Keep in mind when you choose to show or hide fields that all information you
can view in the OrgPublisher chart or search results list is also displayed when
you copy the chart to Microsoft PowerPoint or the search results to Microsoft
Excel.
Opening a Selected Group in the Chart View
Your chart may contain several groups. OrgPublisher displays only one
group at a time, but you can quickly select and open another.
1. Click on the group label in the Style Bar. The Groups View opens.
2. Click on the group you want to view. The Groups View closes, and
your selected group hierarchy displays in the Chart View.
You can also use the group spotlighting feature, accessed by right-clicking
on the group name in the Style bar, and selecting Group filter in chart
then Spotlight boxes in group.
Removing a Person from a Group
You can remove, or delete a person from a group by using the right-click
menu in the Search View.
1. Open the List View and select the Search View pane.
2. Click the Groups tab then click on the group you want to modify.
The group members display in the lower pane.
3. Right-click on the name of the person you want to delete from the
group. The right-click menu opens.
4. Select Remove person from group. The name is removed from the
group.
There is no "Undo" option for this process. If you remove a person in
error, you can locate them in the chart and add them back into the group.
Securing Styles to a Group
With OrgPublisher styles may be secured to groups in published ECharts,
which can enhance a secure rich client EChart. In securing styles to
groups, you must remember that each chart viewer must have access to
at least one style.
Create and Work with Groups/Saving and Charting Search Results as a Group
306
Aquire OrgPublisher 10 User Guide
Note:
Deleting a group associated with a style security makes that style available to
every EChart user.
EChart security works only with an unbroken hierarchy. Orphans within a
secured chart will disrupt all security controls.
1. Select File from the Main menu then Styles from the options list.
The Styles dialog opens.
2. Select the style you want to secure by clicking on it in the top pane of
the dialog.
3. In the lower pane, use the down-arrow to select the group to which
you want to secure the style. You may also create a new style to
secure to a group.
4. Click Close. The Chart View displays your group and style.
5. Follow the EChart publishing procedure to publish your chart.
Sending Email to a Group
If enabled by your Administrator, an email button displays in the Search
View, and you can send an email to a group. When a custom field type,
Email, is used within a chart, the email to group feature is enabled in the
Search View.
Note:
When working with published chart in PDF format, end users must use
Adobe® Reader® 9 to effectively open email links. OrgPublisher will install
this free reader if it cannot find it on the end user's operating system.
If the custom field type Email is not used, the Email to group button
does not appear in the Search View.
Note:
OrgPublisher looks for the first custom field of Email type when sending email
to a group. If you decide to use more than one email address in your chart,
the primary email must be first in the custom field sequence order.
1. Open the Search View pane of the List View.
2. Click the Groups tab and select the group you want to send an email
to. You can also select your search criteria to create and save a
group.
3. Click the Send email to everybody in this group button
OrgPublisher opens your email client and displays the email
addresses in the To field.
307
.
Create and Work with Groups/Saving and Charting Search Results as a Group
Aquire OrgPublisher 10 User Guide
Note:
OrgPublisher defaults the maximum number of email addresses to "20." The
Administrator can override this number when using the Publishing Wizard.
4. Type your message and send the email in the normal method.
Setting Field Security Based on Group
Membership
An additional layer of security restricts the display of data unless the
record is a member of a specific group. The chart administrator can now
display data for select employees based on search criteria and group
membership. This allows end users to see results for employees across
the whole chart – not just within the span of control in which they are a
member.
You may want to use this feature to:
• display fields for employees who are at a specific performance level,
specific age, etc.
• restrict specific fields to only display if the logged in individual supports
that employee, and you are using the same data feed to create
individual charts for each member of your HR team.
1. Create a group containing the employee records you want to view.
2. Open the Custom Fields Properties dialog and select the field to
secure.
3. Click the Security button
dialog.
to open the Custom Field Security
4. Setup up the desired security attributes:
– Will the field be searchable?
– Can the end user see the data for the entire chart, their own box and
subordinates, or subordinates only?
– Can everyone see the field or just a select group of individuals?
5. Select the group where the field will display (highlighted area in the
following graphic).
Create and Work with Groups/Saving and Charting Search Results as a Group
308
Aquire OrgPublisher 10 User Guide
Figure 110
If the end user can see all records in the chart, the secured field data
displays for the group identified in Step 5. If the end user can only see
within their designated span of control, they see the secured field data
only within that span of control.
Unpublished Chart
Figure 111
309
Create and Work with Groups/Saving and Charting Search Results as a Group
Aquire OrgPublisher 10 User Guide
Published Chart – HR Specialist logged in and viewing sensitive
data for their area of responsibility
Figure 112
Published Chart – Viewer logged in and viewing sensitive data for
below average performers
Figure 113
Create and Work with Groups/Saving and Charting Search Results as a Group
310
Aquire OrgPublisher 10 User Guide
Spotlighting Groups in the Chart View
When you want to spotlight a group in the Groups View, or dim boxes that
are not part of the group, you can reduce the opacity of the boxes that are
not part of the selected group. This makes finding the group boxes in the
Chart View much easier. You can use this feature alone or you can use it
in conjunction with spotlighting search results.
Note:
The Spotlighting feature works only in View Mode.
1. To enable the spotlight group feature, select a group to display in the
chart from the Groups View.
2. Right-click on the group label in the Style Bar to view the options list.
3. Select Group filter in chart then Spotlight boxes in group. The
Chart View dims all boxes that are not part of the selected group.
You can disable the spotlight group feature by following Step 3 and
clearing the spotlight option by selecting Show only boxes in
group.
Note:
When printing a chart with the spotlighting feature enabled, if your printer
does not support AlphaBlend, your printed chart will show all boxes as in the
past. See your IT administrator if you have any questions.
Using the Group Editor Dialog
The Group Editor dialog displays all the existing groups for your chart, and
enables you to modify those groups or create new groups. An advanced
search allows you to search the existing group list or create another query
and add that search criterion to the group. You can also add a group icon
to display next to names of each person in a selected group.
You can display the existing group list by clicking on the group button
in the toolbar to open the Search dialog, and then clicking on your group
in the Groups tab and Search Now. You can also open the Search View
pane in the List View, click on the Groups tab and then click on your
group.
You can sort the group list by clicking on a column or you can use the
group list to navigate through the chart. Click on a record and
OrgPublisher moves to that box in the group chart. Advanced users can
create extensive searches using the existing groups and adding additional
search criteria.
311
Create and Work with Groups/Saving and Charting Search Results as a Group
Aquire OrgPublisher 10 User Guide
Note:
When working with a published EChart, you can add new groups, but the
existing groups cannot be modified or deleted. The new group cannot be
displayed in the published EChart Chart View.
1. Click the Search button
in the toolbar. The Search dialog
opens. You can also select Edit from the menu and Search from the
drop-down list.
2. Click the Groups tab.
3. To modify an existing group, double-click on that group to open the
Group Editor dialog. Click Search Now to display the group list in
the lower portion of the dialog.
To create a new group, click the New Group Definition
button
in the Search dialog. The Group Editor dialog opens.
You can also open the Search View pane in the List View and click
the Groups tab. Click the Edit Group Definition button
the Group Editor dialog.
to open
4. To add search criteria, click Add
to copy the last criteria line,
then modify it by using the And/Or, Search Field, Compare,
Value, and Match Case fields. Click on the values in those fields and
select the option you want to use from the drop-down list.
Note:
If you delete the custom position type, the records will return to the original
position type assigned.
Do not mix groups based on position type with position types based on
groups.
5. When you have added all the search criteria, click Search Now to
conduct the search. If you are modifying an existing group, the
results are added to that list. If you are creating a new group the
results display.
6. If you want to add a group icon to each person's box within the
group, select the down-arrow in the Displayed image for people
in this group field and select the icon you want to use. You can also
click Other and navigate to an icon of your choice.
7. Select a radio button for the icon size. Small icons inserts 16X16
pixel icons. Large icons inserts 32X32 pixel icons.
Create and Work with Groups/Saving and Charting Search Results as a Group
312
Aquire OrgPublisher 10 User Guide
8. If you have created this group for security purposes, you can hide
the group from end users by selecting the Hide this group in
published chart check box.
Note:
Hidden groups are removed from the Search dialog, Search View, Groups
View, and Chart View in both the published chart and the application. The
group can be accessed in the application using the Groups tab of the Search
View or Search dialog.
9. To delete an existing group criterion, highlight the record and click
Remove
.
10.Save the changes to an existing group by clicking Save. Save to a
new group by clicking Save As.
11.You can continue to build criteria for additional groups or click
Cancel to close the Group Editor dialog and return to the Search
dialog or Search View.
Note:
313
If EChart security is enabled, the published EChart reflects only the
information accessible to the user, although field labels display in the dialog.
Create and Work with Groups/Saving and Charting Search Results as a Group
Aquire OrgPublisher 10 User Guide
C
HAPTER
7
CREATE SUMMARIES
Note:
The Summary View is not available in published real-time charts.
Successor candidate position types are not included in head counts or
summaries.
Orphan records and broken hierarchies can adversely affect summary and
security functions. Unexpected results can occur that may cause head count
or other totals to be incorrect.
In conditional formatting, the search feature and all calculations follow the
conditional position type. Formatting follows the group. If you display the
Summary View in a chart with conditional formatting, you should hide either
the group or position type of the conditional format. If you don't, head counts
display in both areas.
Selecting Summary Types
There are several types of summaries you can insert in your
organizational chart. You can use the Summary Wizard to create the
summary field and select the summary type. You can also assign
summary type in the Custom Field Properties dialog.
When building from data, OrgPublisher writes (and rewrites as data
refreshes) to these fields based on calculations. When selecting a
summary field you are prompted to select a field type, for instance
Average or Percentage, and what population you want to include in the
calculation. When your chart is republished or refreshed, these data fields
may change, depending on your source data.
The summary field types are:
Summary Field
Type
Sum
Average
Minimum
Maximum
Percentage
Example
Total sales per district
Tenure in company
Training hours for all employees
Sales by or for all employees
Department sales to total sales
Create Summaries/Selecting Summary Types
314
Aquire OrgPublisher 10 User Guide
Selecting Summary Types in Custom Field
Properties Dialog
1. Select Data from the Main menu then Custom field properties
from the pull-down list. The Custom Field Properties dialog opens.
2. Select the summary field record by clicking inside the box to the left
of the Field label column.
3. TAB to the Type column and click inside the field.
4. Use the scroll bar to locate the field type you want to assign. Click
the type, such as Sum. See the Formatting Numeric Custom Fields
procedure for additional information.
5. Click Apply.
6. Repeat Steps 2 - 5 to assign summary types to additional custom
fields or click Close to exit the dialog.
Selecting Summary Types in the Summary
Wizard
1. Select Tools from the Main menu then Summary Wizard from the
pull-down list. The Summary Wizard opens.
2. Click Next. Click inside the Numeric Field to Summarize field and
select the summary field from the options list.
3. Click inside the Type of Summary field and select the summary
type you want to assign. Click Next.
4. Click inside the Population field and select the population for the
summary field, for instance position type or group. Click Next.
5. Type the name you want to use for the summary in the Label field.
Click Next.
6. Select the Hide label check box if you do not want to display the
label in the chart.
7. Select the position types or All Position Types you want to display
the summary. Click Next.
8. Click Finish.
315
Create Summaries/Selecting Summary Types
Aquire OrgPublisher 10 User Guide
Adding a Summary Field
1. Select Tools from the Main menu, then Summary Wizard from the
pull-down menu. The Summary Wizard opens to the first dialog. Click
Next.
2. Select the existing Numeric Field to Summarize. Select the Type
of Summary. Click Next.
3. Select the Population to include the summary total. You can choose
a specific position type, custom field, total head count or group. Click
Next.
4. Type the Label, or name, for the summary field. Select the Hide
label check box if you do not want the label to display in the chart.
Click Next.
5. Click on the position type to display the summary. Select where in
the position type you want the field displayed. Repeat for each
position type. You can also select All Positions. Click Next.
6. Click Finish. The summary field displays in your chart.
Adding Summary Fields Manually in an ODBC
Chart
When OrgPublisher imports data to create a chart, it verifies that a field
exists in the position that the data field is mapped to. It will add more field
definitions,if necessary. The properties of the current fields (type name,
etc.) are not taken into consideration.
If this occurs when you create your chart, then you manually add custom
fields using the Custom Field Properties dialog, and consequently walk
through the Manage data source option again to add another custom
field, the code does nothing because there are already more field
definitions than there are actual fields coming from the data. The field
“position” is key, not whether a field with this name already exists.
If you have manually added summary fields and then want to go back and
import more fields from the data source, please do the following.
1. Select Data from the Main menu then Custom Field Properties
from the pull-down menu. You can also use the Custom fields button
in the toolbar. The Custom Field Properties dialog opens.
Create Summaries/Selecting Summary Types
316
Aquire OrgPublisher 10 User Guide
2. Select the top-most summary field and click Insert once for each
new data field you want to import.
3. Type your field label names and attach the new fields to the
appropriate position types.
4. Click Apply then Close. The Custom Field Properties dialog closes.
5. Select Data in the Main menu then Manage data sources. The
Data sources dialog opens.
6. Click Properties to open the New Chart Wizard.
7. Follow the wizard dialogs to map the new fields.
8. Complete the wizard and click Finish. The summary fields are added
correctly to your chart.
Copying Workforce Analysis Graphs
You can copy workforce analysis graphs to the clipboard in order to paste
into other applications.
1. Open your chart then open the Summary View.
2. Select the Graphs tab and verify that the graph is the correct type
and size.
3. Click the Copy button
is copied to the clipboard.
in the Graphs tab toolbar. The graph
4. Paste the graph into another application.
Displaying Summary Fields
In OrgPublisher, summary fields inserted in the top box of the displayed
portion of the chart are also displayed in the Summary View. These fields
can be hidden in the Chart View while still shown in the Summary View.
Summary fields you may want to display include group totals, position
type totals, or sales figures.
Note:
The Summary View is not available in published real-time charts.
1. To show or hide summary fields in the Chart View, right-click on a
blank spot in the chart and select Show/Hide chart components.
317
Create Summaries/Selecting Summary Types
Aquire OrgPublisher 10 User Guide
You can also click the Show/hide chart components button
toolbar. The Show/Hide Chart Components dialog opens.
in the
2. Click on the position type or group you want to modify, or click All
Position Types to select a component for all position types.
Navigate to the summary field you want to show or hide, and click on
the green arrow or red X. The arrow indicates the field is shown in
the Chart View. The X indicates that it is hidden.
3. Select the component in the position type or group you want to show
or hide. Click OK.
4. To show or hide summary fields in the Summary View, right-click on
a column name and select Show/Hide columns. The Show/hide
Fields dialog displays the names of the columns shown in the view.
5. Scroll to the summary column names and select the corresponding
check box. To move a column in the view, click the Move Up or
Move Down button.
6. To show or hide specific fields, such as a group total or head count,
right-click on a row in the Summary View and select Show/Hide
rows. The Show/hide Fields dialog displays the names of the field
totals in the view.
7. Scroll to the summary field names and select the corresponding
check box. To move a field up or down in the Summary View, click
Move Up or Move Down.
8. Click OK to accept the changes and close the text box. The summary
fields display in the Summary View.
Inserting a Summary Field
You can add a summary field at the end of or within the list of custom
fields displayed in the Custom Field Properties dialog.
1. Select Data from the Main menu then Custom Field Properties
from the pull-down menu. The Custom Field Properties dialog opens.
You can also click the Custom fields button
in the toolbar.
2. Position the cursor where you want to add the new custom field,
either somewhere within existing fields, or at the end. Click Insert.
If you are inserting a field within the list of existing fields, a message
dialog verifies that this is what you want to do.
Create Summaries/Selecting Summary Types
318
Aquire OrgPublisher 10 User Guide
3. Enter the field name in the Field label column.
4. Press the TAB key to move to the Type column and select a
Summary type.
5. Click in the Calc Field and select a numeric custom field to
summarize.
6. Press the TAB key to move to the Population column and select the
position types or groups you want to count. You can select one or
more position types or groups, a combination of position types and
groups, or All Position Types.
7. Press the TAB key to move to the Assigned To column. The Update
Displayed Custom Fields dialog opens. Select the position types or
groups for this custom field. If you want all position types to have
this field, select All Positions.
8. The Sample field information displays the contents of the first
custom field for a selected type.
9. The Seq. field displays the OrgPublisher Input File Record sequence
for that custom field.
10.Click Close to insert the new summary field in your org chart and to
close the Custom Field Properties dialog.
Showing Head Count for a Selected Portion of
Your Chart
1. Select View from the Main menu then Status Bar from the options
list. Each Status Bar option displays a check mark when selected.
2. Click Head count to show the actual head count for the displayed
portion of the chart.
3. Select Planned to show the planned head count for the displayed
portion of the chart. This option includes the actual head count plus
the number of open positions displayed in your chart.
4. Click a box title to select the box. People in the selected reporting
boxes are also counted. Total head count on the Status bar changes
to Selected Head Count, and OrgPublisher displays the head count
for the selected boxes.
319
Create Summaries/Selecting Summary Types
Aquire OrgPublisher 10 User Guide
Showing Head Count for a Single Job Title
1. Select View from the Main menu then Status Bar from the pulldown menu. A drop-down list displays the Status bar options. Each
option selected for display is checked.
2. Verify that Head count is selected to show the actual head count for
the displayed portion of the chart.
3. Verify Planned is selected to show the planned head count for the
displayed portion of the chart. This option includes the actual head
count plus the number of open positions displayed in your chart.
4. Click on the job title in the chart. Total Head Count on the Status
bar changes to Job Head Count, and the head count for the
selected title is displayed.
Showing Head Count for Each Box
1. Select Format from the Main menu then Boxes from the pull-down
menu. You can also click the Format boxes button
The Format dialog opens to the Boxes tab.
in the toolbar.
2. Select the position type of the first position shown within a box.
Note:
If the position type you select is not at the top of the box, the head count for
the box is not shown.
3. Select Show Head Count. Each box with the selected position type
at the top displays the planned head count in the bottom right corner
of the box. This option shows the open and filled positions with
Count indicated as Yes.
Showing or Hiding Actual Head Count
1. Select View from the Main menu then Status Bar from the pulldown menu. The Status Bar options display in an options list. Each
option displays a check mark when selected.
Note:
Keep in mind when you choose to show or hide fields that all information you
can view in the OrgPublisher chart or search results list is also displayed when
you copy the chart to Microsoft PowerPoint or the search results to Microsoft
Excel.
2. Click Head count to show the actual head count for the displayed
portion of the chart. Or, clear it to hide the actual head count.
Create Summaries/Selecting Summary Types
320
Aquire OrgPublisher 10 User Guide
Shown Head count displays in the lower right section of the Status
bar.
321
Create Summaries/Selecting Summary Types
Aquire OrgPublisher 10 User Guide
C
HAPTER
8
PREVIEW AND PRINT YOUR CHARTS
Note:
If you choose to print a chart legend in your org chart, it does not display in
the Book Style Print Preview. It does, however, print.
Changing the chart layout can nullify previous modifications made in Print
Preview, so you should select your layout before performing other tasks such
as setting levels or zooming in or out.
You must have Print Wizard selected in File> Print Options in order access the
Book Style Print Preview.
Previewing a Book Style Chart
You can preview charts before printing them to check how the chart fits on
the pages. The Chart View is the only one you can preview. Modifications
made in the Print Preview window now enable you to fine-tune a chart for
printing, for instance, by moving boxes or a selection of boxes or changing
the chart layout.
Using the toolbar, you can move boxes, change box layouts, zoom in or
out and select and move boxes. When in "grab" mode, clicking on a box
selects it. When selecting boxes, the first click on a box selects the box
and all reporting boxes. The second click selects just that box.
If you have Print Wizard selected in the Print Options, and you select
File, Print Preview, the Print Preview Type dialog opens, requiring a
selection of either Book style print preview or Wall chart print
preview. The default selection is the preview type you used last.
1. Select File from the menu bar, then Print Preview from the pulldown menu. The Print Preview dialog opens and the chart displays as
it will print for each page. You can also click on the Print Preview
button
in the toolbar. The Print Preview Type dialog opens.
2. Select the Book style preview radio button and click Show
Preview. The Book Style Print Preview dialog opens and the chart
displays as it will print on each page. The top pane displays
thumbnails of each page. The lower pane displays the selected page.
The Book Style Print Preview enables you to format individual pages.
Each page is displayed in a thumbnail.
Preview and Print Your Charts/Previewing a Book Style Chart
322
Aquire OrgPublisher 10 User Guide
3. The Print Preview Menu bar contains buttons that enable you to print,
modify your Book Style print settings, or cancel the preview. Click on
a button for its definition.
Button
Action Performed
Click this button to print the chart. This button
opens your system Print dialog.
Click this button to open the Book Style Print
Settings dialog. You can also access the Print
Header/Footer Options dialog, the page
customization list, or enable the Print a chart
legend feature.
This button closes the Book Style Print Preview
dialog.
Click this button to print only selected pages.
Click this link to access the OrgPublisher Printing
Tips web page for ideas on successfully printing
your chart.
4. You can use the Print Preview toolbar buttons to change the layout
for the printed page, change the number of levels to print on a page,
and zoom to a selected percent per page.
Button
Action Performed
Click this button to select Layout 1, the layout
with the lowest level of each branch in the chart
arranged in a horizontal line. This creates shorter,
wider charts.
Click this button to select Layout 2, the layout
with the lowest level of each branch in the chart
arranged in a vertical row. This creates narrower,
taller charts.
Click this button to select Layout 3, the layout
with the lowest level of each branch in the chart
arranged with the boxes side by side. This creates
more compact charts.
323
Preview and Print Your Charts/Previewing a Book Style Chart
Aquire OrgPublisher 10 User Guide
Button
Action Performed
Click this button to select Layout 4, the layout
with the lowest level of the chart (displays only
two levels) arranged in a horizontal line across the
width of a page for as many lines as it takes to
display the lowest level. The number of boxes
across is determined automatically or set to a
specific number.
Click this button to select the number of levels
from the drop-down list that you want to display.
Click this button to set the zoom percent for the
chart display. The default is Zoom to fit.
Click this button to use the Compact Build Mode in
the print preview.
Click this button to place employees in individual
boxes below the supervisor box. (Same as Auto
Build option.)
Click this button to place employees in a box
below the supervisor box. (Same as Auto Build
option.)
Click this button to place employees in the same
box as the supervisor. (Same as Auto Build
option.)
Click this button to reset the chart boxes with
employees and supervisors in normal build. (Same
as Auto Build option.)
5. Click Print to print the chart. This button opens your system Print
dialog.
6. Or, you can close the Print Preview without printing the chart by
clicking Cancel.
Changing the Chart Layout in the Book Style
Print Preview
The Book Style Print Preview window enables you to modify your chart by
changing the chart layout on each page to better fit on a printed page.
1. Open Print Preview by selecting File from the menu bar, then Print
Preview from the pull-down menu. You can also click on the Print
Preview button
opens.
in the toolbar. The Print Preview Type dialog
Preview and Print Your Charts/Previewing a Book Style Chart
324
Aquire OrgPublisher 10 User Guide
2. Click the Book style preview radio button then Show Preview.
The Book Style Print Preview window opens and the top pane
displays thumbnails of each page as it will print. The lower pane
displays the selected page.
3. To change the chart layout for a specific printed page, select the
page you want to modify in the thumbnail pane and click one of the
layout buttons in the toolbar.
Chart Layout
button
Chart Layout Description
Layout 1 - Click this button to select the layout with
the lowest level of each branch in the chart arranged in
a horizontal line. This creates shorter, wider charts.
Layout 2 - Click this button to select the layout with
the lowest level of each branch in the chart arranged in
a vertical row. This creates narrower, taller charts.
Layout 3 - Click this button to select the layout with
the lowest level of each branch in the chart arranged
with the boxes side by side. This creates more compact
charts.
Layout 4 - Click this button to select the layout with
the lowest level of the chart (displays only two levels)
arranged in a horizontal line across the width of a page
for as many lines as it takes to display the lowest level.
The number of boxes across is determined
automatically or set to a specific number.
4. Click Print if you want to print the chart or Cancel the print preview
without printing.
Choosing Book Style Print Settings
When publishing or printing your chart in PDF format, you can accept
default settings, or select settings of your own when the Publishing Wizard
reaches the Settings dialog. These include chart settings, paper, font and
image choices. PDF settings not only help you arrange the chart to fit on
pages in the PDF file but will also affect the printed document.
The Settings dialog is similar to the dialog used in the Book Style Print
Preview. You can accept defaults, work with the classic book style print
settings such as chart layout 4, or select custom optimizer settings.
325
Preview and Print Your Charts/Previewing a Book Style Chart
Aquire OrgPublisher 10 User Guide
Settings Option
Description
Select this radio button if you want to print the Book
Style chart which uses chart layout 4, stacked boxes.
There are two levels of the organization per page and
the lowest level is arranged in a horizontal line across
the width of a page for as many lines as it takes to
display the lowest level.
Use the page
Selecting this radio button enables you to make several
optimizer
choices to customize the PDF print settings. Use
standard settings is the default option. You can move
the slider to optimize more or less. If you choose to
optimize more, OrgPublisher will fit as many boxes on a
page as possible. If you choose to optimize less,
OrgPublisher will print fewer boxes on a page.
Use easy settings Select this radio button to use the slider to print your
chart on More pages or Fewer pages. OrgPublisher
automatically arranges the chart to best fit the boxes
on the pages.
Preferred layout
Choose the radio button to print your chart pages in
one of the layout options.
Select this radio button to print your chart as a book
Use custom
optimizer
using custom optimizing settings.
settings
Custom settings
Click this button to open the Advanced Page Optimizer
Settings dialog.
Use classic book
style printing - all
pages are printed
using layout 4
Page
customization
list
Depth
In some cases, the default criteria used by the page
optimizer may not produce the fewest pages possible
for printing your Book Style chart. You can adjust those
settings using the Advanced Page Optimizer Settings
dialog, selecting the maximum number of reporting
boxes and the layout to display per page. When a page
fits none of the criteria selected in the Advanced
Settings dialog, OrgPublisher prints the chart using
layout 4 with two levels displayed.
Select this option to view a list of boxes that you have
either customized within the Print Preview window, or
have chosen to print at the top of each page of your
book style chart. In order to print a box at the top of a
page, you must first select the box for this purpose in
the Chart View, by right-clicking on a box and selecting
Top of Page.
Click the down-arrow and select the number of levels
you want to include.
Preview and Print Your Charts/Previewing a Book Style Chart
326
Aquire OrgPublisher 10 User Guide
Settings Option
Automatically set
row size
Specify
maximum row
size
Print index
Include Legend
Print Header
Hyperlinks
Show page
number circles
Print Footer
Description
Selecting this radio button enables OrgPublisher to
automatically select the number of boxes to print per
row.
Selecting this radio button enables you to specify the
number of boxes per row to be printed on a page.
Select this check box if you want to print an index for
the book style PDF printed chart.
Select this check box to print the chart legend.
Select this check box to print a header in your chart.
Select this check box to include existing hyperlinks in
the PDF.
Select this check box if you want to print the
connecting page numbers in circles on each printed
PDF page.
Select this check box to print a footer in the chart.
Once you've published the chart, a dialog displays the progress of the PDF
conversion. After the conversion is complete a message box displays the
number of chart pages created.
Note:
Options available in the dialog vary, depending on whether you are printing to
PDF or sending to PowerPoint. Publishing to a PDF format is available in
OrgPublisher Enterprise and OrgPublisher Premier.
Creating a Book Style Top of Page List
You can create a list of boxes that you want to print at the top of pages in
your Book Style printed chart or PDF published chart.
1. In the Chart View, right-click on a name or box you want as the top
of a page in your Book Style printed chart. This box must be a
hierarchically logical box, such as a manager's box. An assistant's
box cannot be selected as the top of a page.
2. Select the Top of page (Book style printing) option. When you
open the print preview, the selected box will display at the top of the
page for the selected hierarchy.
3. Select File from the menu and Print preview from the pull-down
list. The Print Preview Type dialog opens.
4. Select the Book style preview radio button and click OK. The Book
Style Print Preview opens.
5. Click Settings. The Book Style Print Settings dialog opens.
327
Preview and Print Your Charts/Previewing a Book Style Chart
Aquire OrgPublisher 10 User Guide
6. Select the Page customization list button. A list box displays a list
of pages with custom settings, including selected names for top of
page.
You can remove a name from the top of page list by clicking on the
corresponding check box and clicking Remove checked items. The
name is removed from the list and, if it is not a hierarchically logical
top of page box, that page no longer displays in the preview pane.
Note:
Because Book Style printing handles hierarchy in a consistent manner, you
may right-click on a box and see that this option is not enabled. Similarly, you
cannot remove a "hierarchically logical" top of page box.
Modifying Book Style Print Settings
You can modify your initial settings made while in the Print Wizard for
Book Style printing in the Book Style Print Preview window.
1. Follow the Print Wizard to the Settings dialog, which provides several
options to choose from when printing your chart as a book.
2. Select the Use classic book style printing radio button if you want
to print all pages using chart layout 4.
Use the page optimizer
3. If you choose to use the optimizer for printing your chart as a book,
you can accept automatic optimizer settings or customize the
settings.
Setting
Description
Use easy settings Select this radio button to use the slider to print your
chart on More pages or Fewer pages. OrgPublisher
automatically arranges the chart to best fit the boxes
on the pages.
Preferred layout
Choose the radio button to print your chart pages in
one of the layout options.
Use custom
Select this radio button to print your chart as a book
optimizer
using custom optimizing settings.
settings
Preview and Print Your Charts/Previewing a Book Style Chart
328
Aquire OrgPublisher 10 User Guide
Setting
Custom settings
Page
customization
Depth
Description
Click this button to open the Advanced Page Optimizer
Settings dialog.
In some cases, the default criteria used by the page
optimizer may not produce the fewest pages possible
for printing your Book Style chart. You can adjust those
settings using the Advanced Page Optimizer Settings
dialog, selecting the maximum number of reporting
boxes and the layout to display per page. When a page
fits none of the criteria selected in the Advanced
Settings dialog, OrgPublisher prints the chart using
layout 4 with two levels displayed.
Select this option to view a list of boxes that you have
either customized within the Print Preview window, or
have chosen to print at the top of each page of your
book style chart. In order to print a box at the top of a
page, you must first select the box for this purpose in
the Chart View, by right-clicking on a box and selecting
Top of Page.
Click the down-arrow and select the number of levels
you want to include.
4. You can select the Use easy settings radio button and use the
slider to enable OrgPublisher to print on more or fewer pages. If you
choose More pages, OrgPublisher will print fewer boxes on a page.
If you choose to Fewer pages, OrgPublisher will fit as many boxes
on a page as possible.
5. Using the standard settings, select a Preferred layout to print your
chart pages.
6. You can select the Use custom optimizer settings radio button
and click Custom settings to open the Advanced Page Optimizer
Settings dialog.
In some cases, the default criteria used by the page optimizer may
not produce the fewest pages possible for printing your Book Style
chart. You can adjust those settings using the Advanced Page
Optimizer Settings dialog, selecting the maximum number of
reporting boxes and the layout to display per page.
When a page fits none of the criteria selected in the Custom Settings,
OrgPublisher prints the chart using layout 4 with two levels
displayed.
7. You can set a maximum number of report boxes and select a layout
and the number of levels to print on a page in order to print your
chart on as few pages as possible. Click OK.
329
Preview and Print Your Charts/Previewing a Book Style Chart
Aquire OrgPublisher 10 User Guide
8. If you have already previewed your chart and selected boxes to print
at the top of each page, you can select Page customization list in
order to delete any as a top of page box. Deleting the box from this
list does not remove the box from the chart. Click OK.
Boxes across on book style pages
9. You can allow OrgPublisher to determine the chart row size or
manually select the number of boxes in a row.
Setting
Description
Automatically set
row size
Select this radio button to let OrgPublisher set the
number of boxes per row and size these boxes to fit
each page.
Select this radio button to manually set the maximum
number of boxes to be printed in a row. The minimum
number of boxes across is 4. (The chart style is
automatically stacked, which means there are two
levels of the organization per page and the lowest level
is arranged in a horizontal line across the width of a
page for as many lines as it takes to display the lowest
level.)
Set maximum
row size
Note:
The Settings dialog displays different settings, depending on whether you are
publishing, and thus printing, to PDF or just printing a book.
10.You can choose to Print index to accompany your book pages.
11.Select Show page number circles if you want each book style page
to print the circled page numbers.
12.Select Show the print preview check box if you want to modify
individual pages in the book style print job.
13.If you want OrgPublisher to adjust the size of the boxes to fit on each
page, select the Zoom each page to fit radio button.
14.Click Next. Click Header/Footer to change either the header or
footer text. The Print Header/Footer Options dialog opens.
15.Follow the prompts to select header and footer options. Click OK to
accept the changes and close the dialog.
16.If you have included groups in your chart, or use custom colors, you
can select the Include Legend check box to help identify the groups
and colors by the icons displayed in the chart legend.
Preview and Print Your Charts/Previewing a Book Style Chart
330
Aquire OrgPublisher 10 User Guide
17.Click Finish to complete the Print Wizard.
Saving the Book Style Page Modifications
With OrgPublisher you can save any modifications you make to individual
pages in the Book Style Print Preview and PDF publishing format.
1. Open the Book style preview to change page layouts or zoom
percent.
2. Click Settings, and use the Book Style Print Settings dialog to
suppress the display of page numbers in circles, or delete a specified
top of printed page box.
3. You can click Page customization list to open the Book style page
customization list box and review the pages which you have
customized or chosen a specific top of page box.
4. You can select a page or all of the pages, and remove them from the
customization list. This deletes the modifications you have made in
the Book Style Print Preview. Click OK or Cancel to return to the
Book style print settings dialog.
5. Continue with the settings modifications or click OK to return to the
Book Style Print Preview.
6. Click Print to print the Book Style chart or Cancel to return to the
Chart View without printing.
7. A message displays asking if you want to save your changes. You do
not have to save the settings in order to print the customized pages.
Click Yes to save the page customizations or No to discard them.
8. The Book Style Print Preview closes and your system printer Settings
dialog may open before the print job completes.
Selecting Pages to Print in Book Style Preview
With OrgPublisher 8.1 and later, you don't have to print the entire book in
the Book Style Print Preview - you can select just the pages you want to
print.
1. Select File from the Main menu then Print Preview from the pulldown menu. The Print Preview Type dialog opens. You can also click
on the Print Preview button
331
in the toolbar.
Preview and Print Your Charts/Previewing a Book Style Chart
Aquire OrgPublisher 10 User Guide
2. Click Show Preview. The Book Style Print Preview window opens,
and the chart displays as it will print for each page. The box with the
yellow border indicates the current view shown in the preview. See
the Previewing a Book Style Chart procedure for additional tasks you
can perform.
3. Click the
button to enable the selection of
specific pages for printing. The Selective printing mode enabled
message notifies you that selective printing is enabled. You can
choose not to display the message again by selecting the Don't
show this dialog again check box. The individual page thumbnails
now include a printer icon
.
4. Select the pages that you do NOT want to print. The print icon
changes
.
5. If you choose not to print only selected pages, click
. You can also right-click on a printer icon to use
the context menu. Options are Select all pages to print and Clear
all pages.
If you choose to print the selected pages only, click
.
Previewing a Wall Style Chart
Note:
Note that the connecting line moves with the box. Because OrgPublisher is not
a drawing tool you do not want to move the box across from or above its
manager box because the reporting line draws through it. If you select the top
box in a hierarchy, all reporting boxes move as well. Remember these basic
rules when moving boxes:
- Vertical lines move with the boxes.
- The boxes at the either end of a row must stay at the end because the
corners of the horizontal and vertical lines which link these boxes are "owned"
by the boxes.
- Unexpected results occur if you move boxes outside of the OrgPublisher
hierarchical drawing standards. These standards assure that an OrgPublisher
chart can be viewed without written explanation and be understood anywhere
in the world.
Preview and Print Your Charts/Previewing a Wall Style Chart
332
Aquire OrgPublisher 10 User Guide
You can preview charts before printing them to check how the chart fits on
the pages. The Chart View is the only one you can preview. Modifications
made in the Print Preview window now enable you to fine-tune a chart for
printing, for instance, by moving boxes or a selection of boxes or changing
the chart layout.
Using the toolbar, you can move boxes, change box layouts, zoom in or
out and select and move boxes.
If you have Print Wizard selected in the Print Options, and you select
File, Print Preview, the Print Preview Type dialog opens, requiring a
selection of either Wall chart preview or Book style preview.
1. Open the Print Preview by selecting File from the menu then Print
preview from the options list. The Print Preview Type dialog opens.
You can also click the Print Preview button
in the toolbar.
2. The default selection is the preview type you used last. If you are not
using the Print Wizard, OrgPublisher assumes you will print as a Wall
style chart. Click OK to accept the default Wall chart preview type.
The Print Preview dialog opens.
The OrgPublisher Print Preview dialog contains a new toolbar, which
offers additional flexibility and control when you print in Wall Chart
style. The toolbar buttons include:
Button
Action Performed
Click this button to reverse the latest action. May be
repeated to undo additional actions.
Click this button to copy the chart displayed in the
preview to another application. Photos in the chart are
also copied using this button.
Clicking this button designates the selected box as the
top of chart for the selected style.
Click this button to display the whole chart from the
highest box in the hierarchy.
Click this button to select Layout 1, the layout with the
lowest level of each branch in the chart arranged in a
horizontal line. This creates shorter, wider charts.
Click this button to select Layout 2, the layout with the
lowest level of each branch in the chart arranged in a
vertical row. This creates narrower, taller charts.
333
Preview and Print Your Charts/Previewing a Wall Style Chart
Aquire OrgPublisher 10 User Guide
Button
Action Performed
Click this button to select Layout 3, the layout with the
lowest level of each branch in the chart arranged with
the boxes side by side. This creates more compact
charts.
Click this button to select Layout 4, the layout with the
lowest level of the chart (displays only two levels)
arranged in a horizontal line across the width of a page
for as many lines as it takes to display the lowest level.
The number of boxes across is determined
automatically or set to a specific number.
Click this button to move the entire Chart View to the
left.
Click this button to move the entire Chart View to the
right.
Click this button to move the entire Chart View up.
Click this button to move the entire Chart View down.
Click this button to set the zoom percent for the chart
display.
Click this button to show or hide the header text.
Click this button to show or hide the footer text.
Click this button to open the Print Header/Footer Options
dialog and select your print options.
Click this button to print a chart legend page.
Click this button to select the number of levels from
the drop-down list that you want to display.
Click to display or hide the drill buttons for printing.
3. You can use the Print Preview toolbar buttons to set top of chart,
display the whole chart, change the layout for the printed chart,
move individual boxes, move the chart left, right, up or down, zoom
in or out, show or hide headers and footers, print a chart legend,
even open the Print Header/Footer Options dialog.
4. For a clearer view of the chart, move the cursor anywhere on the
chart and click. The chart enlarges each time you click on it until it
fills the page. When you click on a full-page display, it reduces to
display the entire chart as it will print. You can also use the Zoom In
and Zoom Out buttons to enlarge and reduce the chart.
Preview and Print Your Charts/Previewing a Wall Style Chart
334
Aquire OrgPublisher 10 User Guide
5. The Menu bar contains buttons that enable you to print, move from
page to page, zoom in or out and change from a one page view to
two page. The Menu bar buttons include:
Button
Action Performed
Click this button to print the chart. If you have Print
Wizardselected in Print Options, this button opens
the Print Wizard. If you do no have Print Wizard
selected, this button opens your system Print dialog.
If your chart will print on multiple pages, click this
button to view the next page.
If your chart will print on multiple pages, click this
button to view the previous page. This button is
enabled only after you've clicked Next Page.
This button indicates your chart can print on multiple
pages. Click Next Page to see a page preview. After
you have clicked this button, it reads Two Page. Click
to return to the single page preview.
If your chart will print on multiple pages, this button
enables you to see two pages at a time in the preview
window. This button is enabled only after you have
clicked Next Page. After you have clicked this button,
it reads One Page to return to the single page
preview.
This button closes the Wall Chart Style Print Preview
dialog.
6. Click Print to print the chart. If you have Print Wizard selected in
Print Options, this button opens the Print Wizard. If you do not
have Print Wizard selected, this button opens your system Print
dialog.
7. Or, you can close the Print Preview without printing the chart by
clicking Close or Esc.
Changing the Chart Layout in Wall Style Print
Preview
The Wall Chart Print Preview window enables you to modify your chart by
changing the chart layout to better fit on a printed page.
Note:
335
Changing the chart layout can nullify previous modifications made in Print
Preview, so you should select your layout before performing other tasks such
as showing/hiding the header.
Preview and Print Your Charts/Previewing a Wall Style Chart
Aquire OrgPublisher 10 User Guide
1. Open Print Preview by selecting File from the Main menu then Print
Preview from the pull-down menu. You can also click the Print
Preview button
opens.
in the toolbar. The Print Preview Type dialog
2. Select the Wall chart preview radio button then Show Preview.
The Wall Chart Print Preview window opens displaying the chart as it
will appear in print form.
3. To change the chart layout for the printed page, click one of the
layout buttons in the toolbar.
Chart Layout
button
Chart Layout Description
Layout 1 - Click this button to select the layout with
the lowest level of each branch in the chart arranged in
a horizontal line. This creates shorter, wider charts.
Layout 2 - Click this button to select the layout with
the lowest level of each branch in the chart arranged in
a vertical row. This creates narrower, taller charts.
Layout 3 - Click this button to select the layout with
the lowest level of each branch in the chart arranged
with the boxes side by side. This creates more compact
charts.
Layout 4 - Click this button to select the layout with
the lowest level of the chart (displays only two levels)
arranged in a horizontal line across the width of a page
for as many lines as it takes to display the lowest level.
The number of boxes across is determined
automatically or set to a specific number.
4. Select Print if you want to open the Print Wizard to print the chart or
Close the print preview without printing.
Copying the Print Preview Chart
You can copy the Wall style chart from the Print Preview window and paste
it into another Microsoft® Windows application. The chart headers and
footers are also copied.
Note:
This preview chart copy function copies with OLE embedding enabled, which
enables you to manipulate the chart if you paste it into an application that can
edit metafiles, such as Microsoft Word or PowerPoint.
Preview and Print Your Charts/Previewing a Wall Style Chart
336
Aquire OrgPublisher 10 User Guide
1. Open the Print Preview by selecting File from the Main menu then
Print preview from the options list. You can also click the Print
Preview button
opens.
in the toolbar. The Print Preview Type dialog
2. Click OK to accept the default type or select the Wall chart preview
radio button. The Print Preview window opens.
3. Modify the chart as needed, such as moving the chart or boxes, or
selecting a new layout.
4. Click the Copy button
in the toolbar.
5. Paste the chart into the desired application. The chart displays in the
new application.
6. Close the Print Preview dialog.
Moving Boxes in Print Preview
In OrgPublisher the Print Preview for Wall Style and Print Preview for Book
Style dialogs enable you to modify your chart for printing by moving
boxes (and the box reporting lines ) to better fit on the page.
1. Open the Print Preview by selecting File from the menu then Print
preview from the options list. The Print Preview Type dialog opens.
You can also click the Print Preview button
in the toolbar.
2. Select the Wall chart preview or Book style preview radio
button. The Print Preview dialog opens.
3. Select a box by clicking on it. The box is highlighted.
4. Holding down the mouse cursor, move the box to where you want it
on the page.
5. Release the box by moving the cursor to a blank space on the page
and click.
6. You can reverse that change by clicking the Undo button
.
7. Select Print if you want to open the Print Wizard to print the chart or
Close Print Preview without printing.
337
Preview and Print Your Charts/Previewing a Wall Style Chart
Aquire OrgPublisher 10 User Guide
Moving the Chart in Print Preview
In OrgPublisher, the Print Preview for Wall Style dialog enables you to
modify your chart for printing by moving the chart left, right, up or down
on the printed page.
1. Open the Print Preview by selecting File from the menu then Print
preview from the options list. You can also click the Print Preview
button
in the toolbar. The Print Preview Type dialog opens.
2. Select the Wall chart preview radio button and click OK. The Print
Preview dialog opens.
3. To move the chart on the page, click one of the Move buttons in the
toolbar. Click the Move button as many times as needed to move the
chart to the location on the page that you want.
Button
Action Performed
Click this button to move the entire Chart View to the
left.
Click this button to move the entire Chart View to the
right.
Click this button to move the entire Chart View up.
Click this button to move the entire Chart View down.
4. You can reverse changes by clicking the Undo button
.
5. Select Print if you want to open the Print Wizardto print the chart or
Close Print Preview without printing.
Opening Print Header/Footer Options in Print
Preview
In OrgPublisher the Print Preview for Wall Style dialog enables you to
modify your chart for printing by opening the Print Header/Footer Options
dialog to modify your header and footer information.
1. Open Print Preview by selecting File from the Main menu then Print
Preview from the pull-down menu. The Print Preview dialog opens
Preview and Print Your Charts/Previewing a Wall Style Chart
338
Aquire OrgPublisher 10 User Guide
and the chart displays as it will print. You can also click on the Print
Preview button
in the toolbar to open the Print Preview.
2. To open the Print Header/Footer Options dialog, click the Header/
Footer button
in the toolbar.
3. Select the header or footer options you want in your printed chart
and click Apply to accept the changes and continue working in the
dialog or click OK to accept the changes and close the dialog.
4. Select Print if you want to open the Print Wizard to print the chart or
Close Print Preview without printing.
Sending the Chart to Microsoft PowerPoint
With OrgPublisher you can copy the chart directly to Microsoft®
PowerPoint. This provides enhanced chart graphic quality and flexibility
within PowerPoint presentations. All the information you can see in the
OrgPublisher chart is sent to PowerPoint.
Note:
This feature disables the header and footer options, as well as the index or
chart legend for Book style. In addition, the page number circle drill buttons
are not available for the copy to PowerPoint option.
1. In the Main toolbar, click the Send to Microsoft PowerPoint button
. The Microsoft PowerPoint Preview dialog opens.
2. Select either the Wall chart preview or Book style preview radio
button. Click OK. The Microsoft PowerPoint Preview window opens.
3. Make your modifications in the Wall style or Book style preview. If
you click Settings in the Book Style preview, the Book Style
PowerPoint Settings dialog opens. Follow the Choosing Book Style
Print Settings procedure to choose the PowerPoint settings.
4. Click Send. The Send to PowerPoint dialog opens.
5. In the Page Range section, select which pages you want to send to
PowerPoint, Current Page, All Pages, or Pages and enter the page
numbers or range.
6. In the Chart Options section, select the optional chart features you
want to send to PowerPoint. These features include Show Drill
Buttons, Chart Title, which allows you to choose Title is part of
image or Title is part of slide, and Chart Background, which
339
Preview and Print Your Charts/Previewing a Wall Style Chart
Aquire OrgPublisher 10 User Guide
allows you to choose Background is part of image or Background
is part of slide.
Note:
When previewing as Wall Chart the Show Drill Buttons option is not available.
7. In the PowerPoint Options section, the default is Use currently
open presentation. Clear this check box if a current presentation
does not exist or you want to choose a different presentation.
8. In the Image Options, select Copy as metafile or Copy as
bitmap.
9. Click OK once you have selected all the options you want to use.
Microsoft PowerPoint opens with the chart embedded in the slides.
Showing/Hiding Headers and Footers in Print
Preview
In OrgPublisher the Print Preview for Wall Style dialog enables you to
modify your chart for printing by showing or hiding the header and footer
information on the printed page. The default is to show and, therefore,
print the header and footer. The Print Preview dialog displays the header
and footer as they will print.
Note:
Keep in mind when you choose to show or hide fields that all information you
can view in the OrgPublisher chart or search results list is also displayed when
you copy the chart to Microsoft PowerPoint or the search results to Microsoft
Excel.
1. Open Print Preview by selecting File from the Main menu then Print
Preview from the pull-down menu. The Print Preview dialog opens
and the chart displays as it will print. You can also click on the Print
Preview button
in the toolbar.
2. To hide the chart header, click the Show/Hide Header button
in
the toolbar. The header text is hidden in the preview window and will
not print. Click the Show/Hide Header button again to display and
print the header text.
3. To hide the chart footer, click the Show/Hide Footer button
in the
toolbar. The footer text is hidden in the preview window and will not
print. Click the Show/Hide Footer button again to display and print
the footer text.
Preview and Print Your Charts/Previewing a Wall Style Chart
340
Aquire OrgPublisher 10 User Guide
4. Select Print if you want to open the Print Wizard to print the chart or
Close Print Preview without printing.
341
Preview and Print Your Charts/Previewing a Wall Style Chart
Aquire OrgPublisher 10 User Guide
Print Views and Charts
Running Print Setup
To select your printer, page size, page orientation, and paper source
before you print a chart:
1. Select File from the Main menu then Print Setup from the options
list. You can also click the Print Setup
button in the toolbar. The
Print Setup dialog opens with the default printer and settings.
2. Verify the selected printer, or select a different printer.
3. Verify the paper size or select a different size.
4. Verify the paper source or select a different source.
5. Select portrait or landscape orientation.
6. Click OK to save these settings as defaults.
Selecting Print Header/Footer Options
1. Select File from the Main menu then Print Options from the pulldown menu. The print options display in an options list.
2. Click one of the views to print. Available views depend on which
views you have open in your chart.
3. Click on the header or footer if you want to modify one or the other.
The Print Header/Footer Options dialog opens.
Header tab
Field
Print Page
Header
Group
Title
Default Chart
Title
Custom Title
Description
Select this check box to print a header in your chart.
Select this check box to print the group name in
OrgPublisher and PluginX.
Select this check box to print a title for the chart.
Select this radio button to use the title shown on the
chart.
Select this radio button in the Print to type new title text
box.
Preview and Print Your Charts/Print Views and Charts
342
Aquire OrgPublisher 10 User Guide
Field
Date and Time
Date Format
Date Prefix
Print Date
Data Modified
Date
Font
Customization
Description
Select this check box to show the date and time the
chart was printed.
Select the format to display the date and time, such as
MM/DD/YYYY HH:mm:ss.
Type text to precede the date or date and time on your
chart, if any.
Select this radio button to print the date that the chart
is printed.
Select this radio button to print the date that the chart
was last modified.
This section of the Print Header/Footer Options dialog
displays a sample of the selected font and a button,
Select Font, that opens the Font dialog to customize
font information for the header or footer.
Footer tab
Field
Description
Print Page Footer Select this check box to print a footer in your chart.
File Name and
Select this check box to print the drive and directory
Location
where the chart file is located, followed by the file
name.
Head count
Select this check box to print the actual head count for
the chart or the displayed portion of the chart.
Open positions
Select this check box to print the head count for
positions that are listed in your chart but are not filled.
Planned Head
Select this check box to print the total of actual and
count
planned positions in your chart.
Page Number
Select this check box to print the page number on each
page of the chart.
Font
This section of the Print Header/Footer Options dialog
Customization
displays a sample of the selected font and a button,
Select Font, that opens the Font dialog to customize
font information for the header or footer.
4. Select the header or footer options you want and choose a date
format. Click OK to accept the changes and close the dialog.
5. Click on Print Wizard if you want to open it each time you print a
chart. The options to print the chart as a book or wall chart are only
available in the Print Wizard.
343
Preview and Print Your Charts/Print Views and Charts
Aquire OrgPublisher 10 User Guide
6. You can also use the Print Preview to temporarily remove a header or
footer in the printed chart.
Customizing the Header and Footer Print Options
The header/footer print option enables you to display a group label,
modify the chart title and date printed in the header, as well as select data
to display in the footer such as head count, number of open positions, and
the file name and location.
Now, you can also customize font information, such as type, size and
color, for both header and footer in a printed OrgPublisher chart.
Customized footers print above any other existing footer information.
1. Access the Print Header/Footer Options dialog by either using the
Print Wizard or by selecting File from the Main menu, Print Options
from the pull-down menu, and Header or Footer from the options
list.
2. Make your selections in both the Header and Footer tabs, such as
Date Format, Group label, or Head count, that you want to print.
3. The Font Customization section, in both tabs of the dialog, displays
a sample of the current font used for the printed chart. You can
change the font for either the header or footer, or both. Click Select
Font. The Font dialog opens.
4. Select the Font, Font style, and Size for your text. Your selection
displays in the Sample pane of the dialog.
5. You can also choose Effects, such as Underline, or Color.
6. When you have made your selections, click OK to accept your
changes and close the Font dialog. If you accessed the Print Header/
Footer Options through the Print Wizard, click Finish. Your system
Print dialog opens.
7. Verify the print settings and print your chart.
Note:
You can also access the Print Header/Footer Options dialog from the Settings
dialog in the Book Style Print Preview.
Printing Your Chart as a Book
The Book Style printing option is available from the Print Wizard or the
Book Style Print Preview. This procedure describes printing your chart
Preview and Print Your Charts/Print Views and Charts
344
Aquire OrgPublisher 10 User Guide
using the Print Wizard. If you want to modify your Book Style chart in
more detail, see the Previewing a Book Style Chart procedure.
Book Style is a method of previewing or printing your chart as a single
print job. You can include an index, print all or just selected pages, change
the layout, or modify box settings. A books style print job is sent to a PDF
file
1. Verify that your Print Options choice is set to Print Wizard.
2. Select File from the menu bar, then Print from the pull-down menu.
You can also click the Print
Wizard opens.
button in the main menu. The Print
3. If additional views are displayed in your chart, you can select the
views you want to print. Click Next.
4. Select the Book Style radio button and click Next.
5. The Settings dialog of the Print Wizard provides several options to
choose from when printing your chart as a book. Select the Use
classic book style printing radio button if you want to print all
pages using chart layout 4.
Use the page optimizer
6. If you choose to use the optimizer for printing your chart as a book,
you can accept automatic optimizer settings or customize the
settings.
Setting
Description
Use easy settings Select this radio button to use the slider to print your
chart on More pages or Fewer pages. OrgPublisher
automatically arranges the chart to best fit the boxes
on the pages.
Preferred layout
Choose the radio button to print your chart pages in
one of the layout options.
Use custom
Select this radio button to print your chart as a book
optimizer
using custom optimizing settings.
settings
345
Preview and Print Your Charts/Print Views and Charts
Aquire OrgPublisher 10 User Guide
Setting
Custom settings
Page
customization
list
Description
Click this button to open the Advanced Page Optimizer
Settings dialog.
In some cases, the default criteria used by the page
optimizer may not produce the fewest pages possible
for printing your Book Style chart. You can adjust those
settings using the Advanced Page Optimizer Settings
dialog, selecting the maximum number of reporting
boxes and the layout to display per page. When a page
fits none of the criteria selected in the Advanced Settings
dialog, OrgPublisher prints the chart using layout 4
with two levels displayed.
Select this option to view a list of boxes that you have
either customized within the Print Preview window, or
have chosen to print at the top of each page of your
book style chart. In order to print a box at the top of a
page, you must first select the box for this purpose in
the Chart View, by right-clicking on a box and selecting
Top of Page.
You can select the Use easy settings radio button and use the
slider to enable OrgPublisher to print on more or fewer pages. If you
choose More pages, OrgPublisher will print fewer boxes on a page.
If you choose to Fewer pages, OrgPublisher will fit as many boxes
on a page as possible.
Using the standard settings, select a Preferred layout to print your
chart pages.
You can select the Use custom optimizer settings radio button
and click Custom settings to open the Advanced Page Optimizer
Settings dialog.
In some cases, the default criteria used by the page optimizer may
not produce the fewest pages possible for printing your Book Style
chart. You can adjust those settings using the Advanced Page
Optimizer Settings dialog, selecting the maximum number of
reporting boxes and the layout to display per page.
When a page fits none of the criteria selected in the Custom
Settings, OrgPublisher prints the chart using layout 4 with two
levels displayed.
7. You can set a maximum number of report boxes and select a layout
and the number of levels to print on a page in order to print your
chart on as few pages as possible. Click OK.
8. If you have already previewed your chart and selected boxes to print
at the top of each page, you can select Page customization list in
order to delete any as a top of page box. Deleting the box from this
list does not remove the box from the chart. Click OK.
Preview and Print Your Charts/Print Views and Charts
346
Aquire OrgPublisher 10 User Guide
Boxes across on book style pages
9. You can allow OrgPublisher to determine the chart row size or
manually select the number of boxes in a row.
Setting
Description
Automatically set
row size
Select this radio button to let OrgPublisher set the
number of boxes per row and size these boxes to fit
each page.
Select this radio button to manually set the maximum
number of boxes to be printed in a row. The minimum
number of boxes across is 4. (The chart style is
automatically stacked, which means there are two
levels of the organization per page and the lowest level
is arranged in a horizontal line across the width of a
page for as many lines as it takes to display the lowest
level.)
Set maximum
row size
10.You can choose Print index to print an index of pages to accompany
your book print.
11.If you are not already using the Book Style Print Preview, you can
select the Show the print preview check box in order to view each
page before you print the chart.
12.If you want the book pages to print page numbers, select the Show
page number circles radio button.
13.If you want OrgPublisher to adjust the size of the boxes to fit on each
page, select the Zoom each page to fit radio button. Click Next.
14.If you are using the Settings dialog from the Book Style Print Preview
window, click Header/Footer to change either the header or footer
text. The Print Header/Footer Options dialog displays. Follow the
prompts to select header and footer options.
15.If you have included groups or custom colors in your chart, you can
choose Print legend to print a chart legend that helps identify the
icons displayed in the chart boxes.
Note:
Although not shown in the Book Style Print Preview window, the chart legend
will print if this option is selected.
16.Click OK to accept the changes and close the dialog.
347
Preview and Print Your Charts/Print Views and Charts
Aquire OrgPublisher 10 User Guide
17.If you are using the Settings dialog while publishing to PDF, you can
choose to print a header and footer on each page, or clear the Print
Header and Print Footer check boxes if you do not want them to
print in the book pages.
18.Click Finish to start the printing process. The Book Style Print
Preview dialog opens. Make any adjustments using the Print Preview.
19.When you are ready, click Print. Your system Print dialog opens.
Verify your printer settings and click OK. Your chart begins to print
as a book.
Your printed Book Style chart contains Next and Previous page
indicators, and prints the List View as an index at the beginning of
the chart. The index contains the page numbers of the chart where
employees are located and the custom fields associated with each
position.
Printing in Wall Chart Style
The Wall Chart Style printing option is available from the Print Wizard or
the Wall Chart Print Preview. This procedure describes printing your chart
using the Print Wizard. If you want to modify your Wall chart in more
detail, see the Previewing a Wall Style Chart procedure.
Buttons on the toolbar enable moving boxes, changing box layouts, and
switching between zoom and grab modes. When in grab mode, clicking on
boxes selects the box rather than zooming in/out.
1. Open the Print Wizard or, if you have turned off the Print Wizard
option, select File from the main menu, then Print from the pulldown list. You can also click the Print button
in the main menu.
2. If you selected File then Print, the system Print dialog opens. Verify
the printer options and click OK. The portion of the chart displayed in
the Chart View prints.
If you are following the Print Wizard, and additional views are
displayed in your chart, you can select the views you want to print.
Click Next.
Note:
You can turn the Print Wizard back on by selecting File from the main menu,
Print Options from the pull-down list, then Use Print Wizard.
3. Following the Print Wizard, select the Wall Chart radio button. Click
Next.
Preview and Print Your Charts/Print Views and Charts
348
Aquire OrgPublisher 10 User Guide
4. Select the Include Legend check box if you are using group or
custom item icons in your chart and need the chart legend to identify
them.
5. Click Header/Footer if you want to include these in your chart. The
Print Header/Footer Options dialog opens.
The Header tab prompts you to indicate if you want to print a page
header, select chart title options and the date and time formats.
If you select the Group label check box, the name of the group
prints in the upper-left corner of the page.
The Footer tab prompts you to indicate if you want to print a page
footer and select the fields you want to see in the footer.
See the Selecting Print Header/Footer Options procedure for detailed
header and footer information. In addition, see the Customizing the
Header and Footer Print Options procedure for information on
formatting fonts.
6. When you have made your header and footer selections, click Apply
to accept the changes and continue using the dialog or click OK to
accept the changes and return to the Print Wizard.
7. Click Finish to print your chart.
Note:
If you want to view your chart before printing, select File from the
OrgPublisher main menu, then Print Preview.
Printing a View
You can print views that display specific information about your chart. For
example, the Summary View displays the summary fields you have set up
by each position type. A print preview is available only for the Chart View.
You can print side-by-side profiles by selecting Profile View.
Note:
If you are working with a published EChart, because of its size, the Print List
feature is available only for the List of currently displayed pane. You can,
however, use the Search feature and select the Everyone group, then copy
the list to the clipboard, paste the list into another application and print it.
1. Open your chart.
2. Select File from the Main menu then Print Options from the pulldown list. The available views are displayed in your chart.
349
Preview and Print Your Charts/Print Views and Charts
Aquire OrgPublisher 10 User Guide
Figure 114
3. Select the view you want to print. If a view is "grayed-out," it is not
available in your current chart style. Click OK.
4. Select File from the Main menu then Print. At this point, depending
on your print options, the Print Wizard may open. Follow the prompts
to print the view.
5. If the system Print dialog opens, select the portrait or landscape
orientation.
6. Click OK to accept these settings as defaults and print the view.
Printing the 9 Box Matrix
You can print the 9 Box Matrix if the Print Wizard has been activated. The
user will be prompted to print the chart or the 9 Box Matrix. If the 9 Box
Matrix is maximized, the matrix prints automatically.
Printing Graphs
You can print graphs when the Print Wizard is enabled. To print a graph,
open the Summary View and select the Graph View. Each graph prints one
to a page.
Printing the List View
You may want to print the List View as your telephone listing or,
depending on the custom field data that you have added, as a convenient
data index. You can print the List View with the Print button, as described
Preview and Print Your Charts/Print Views and Charts
350
Aquire OrgPublisher 10 User Guide
here, or the Print Wizard, depending on the options you have selected.
The List View must be open in your chart in order to print it.
1. Open your chart then open the List View by selecting View in the
Main menu then List View in the options list. You can also click the
List View button
in the Views Toolbar.
2. Select File from the Main menu then Print Options from the pulldown list.
3. Verify that List View is selected in the options list and that Print
Wizard is not selected.
4. Click the Print button
to open the system Print dialog. Verify the
printer location and click OK.
Note:
The Search View can be copied to another Windows application. It is not a
"printable" view.
Printing the Profile View
You may choose to print the Profile View of an individual, for instance, to
place a hard copy of the employee profile information in the employee file.
You can print the Profile View using the Print button, as described here, or
the Print Wizard. The Profile View must be open in your chart in order to
print it.
1. Open your chart then open the Profile View by selecting View in the
Main menu then Profile View in the options list. You can also click
on the Profile View
button in the Views toolbar.
2. Select File from the Main menu then Print Options from the pulldown list.
3. Verify that Profile View is selected in the options list and that Print
Wizard is not selected.
4. Click the Print button
to open the system Print dialog. Verify the
printer location and click OK.
Printing the Summary View
You can choose to print the Summary View separately from your Chart
View. You can print the Summary View using the Print button, as
351
Preview and Print Your Charts/Print Views and Charts
Aquire OrgPublisher 10 User Guide
described here, or the Print Wizard. The Summary View must be open in
your chart in order to print it.
1. Open your chart then open the Summary View by selecting View in
the Main menu then Summary View in the options list. You can also
click on the Summary View
button in the Views toolbar.
2. Select File from the Main menu then Print Options from the pulldown menu.
3. Verify that Summary View is selected in the options list. Clear the
Print Wizard option if you just want to print the summary and not
the Chart View.
4. Click the Print button
to open the system Print dialog. Verify the
printer location and click OK.
Printing a Chart Legend
If you use several group or custom icons in your chart, you can choose to
print a chart legend when you print your chart using the Print Wizard or
the Print Preview.
Note:
The chart legend does not display in the Book Style Print Preview. It does,
however, print.
1. Open the Print Wizard by clicking on the Print button
or, if you
have turned off the Print Wizard option, select File from the Main
menu, then Print Options from the pull-down list and Use Print
Wizard from the options list.
2. Follow the wizard dialogs to print either in Wall chart or Book style.
3. The last dialog enables you to choose header or footer options. If you
select the Include Legend check box, your printed chart includes
the legend on each page of your chart.
4. Click Finish to close the wizard and print your chart.
If you are using the Print Preview option and you have defined and
enabled a legend, you can use the Add or remove legend button
in the
preview and select the Include Legend check box in the Settings dialog
of the Book style preview.
Preview and Print Your Charts/Print Views and Charts
352
Aquire OrgPublisher 10 User Guide
The legend prints on one page in Wall style and on every page in Book
style. You may need to make adjustments in your chart for the size of the
legend so that it does not print over boxes.
Note:
Depending on where you place the legend, some boxes in the chart may be
covered. You may want to modify the legend settings to better fit the legend
within a blank area of the Chart View.
Printing a Chart without the Print Wizard
You can print a chart from the menu options to print the Wall chart style
as long as you have disabled the Print Wizard. Select File, Print Options,
and, if Use Print Wizard is selected, click the option to clear it.
Note:
If you choose to turn off the Print Wizard, the Book Style print option is no
longer available.
1. Open the chart you want to print. If your chart has multiple styles,
select the one you want to print.
2. Open the Print Preview by selecting File from the Main menu then
Print preview from the options list. The Print Preview Type dialog
opens. You can also click the Print Preview button
in the toolbar.
3. Click OK to accept the default Wall chart preview type or select the
Book style preview radio button. The Print Preview dialog opens.
4. To reduce the size of a chart that does not fit on a page, you can
reduce the size of chart text, change the arrangement of chart
boxes, reduce the space between boxes, or select View.
5. Select File from the Main menu then Print from the pull-down
menu. The system Print dialog opens with the default printer and
settings. Your Print dialog options may vary. You can also click the
Print button
in the toolbar.
6. Verify the selected printer, or select a different printer.
7. Specify a range of pages, or select All to print the entire document.
8. Specify the number of copies to print. Click OK to print the chart.
353
Preview and Print Your Charts/Print Views and Charts
Aquire OrgPublisher 10 User Guide
C
HAPTER
9
PUBLISH YOUR CHARTS
Standard Chart Publishing
Publishing in Express Mode
OrgPublisher now provides an Express Mode and Advanced Mode for
publishing. Advanced Mode enables you to choose a publishing format,
such as EChart rich client or thin client, as well as select all options prior
to publishing. Express Mode prompts you with one screen of options
prior to publishing.
Toolbar buttons are limited in charts published through Express Mode.
Only the List View/Search View and the Profile View are available.
1. Click the Publish button
in the toolbar. You can also select
Tools from the Main menu then Publishing Wizard from the
options list. If this is the first time you are publishing a chart, the
Publishing Wizard opens. If a publishing definition already exists, the
Publish charts dialog opens.
Publish Your Charts/Standard Chart Publishing
354
Aquire OrgPublisher 10 User Guide
Figure 115
2. If the Publishing Wizard opens, select the Express Mode radio
button. If the publish chart dialog opens, click New to open the
Publishing Wizard then select Express Mode. Click Next.
355
Publish Your Charts/Standard Chart Publishing
Aquire OrgPublisher 10 User Guide
Figure 116
3. Select the type of express publishing you want. Options include:
Publishing
Option
Chart
Chart with
directory
PDF
Description
Publishes a chart that can be viewed with Internet
Explorer. (PluginX )
Publishes a chart that includes a directory view of the
organization. (telephone list)
Publishes a chart to a PDF document.
4. Accept the default or type the Name of Chart. The name can be the
same as the chart name and does not need to include publishing
information. The name must, however, be unique and cannot contain
any special characters such as slashes (\ or /), colons (:), asterisks
(*), question marks (?), quotation marks ("), and greater than or
less than symbols (< or >). The publishing definition name can be up
to 255 characters.
Publish Your Charts/Standard Chart Publishing
356
Aquire OrgPublisher 10 User Guide
Note:
OrgPublisher checks for invalid characters in this step and when you click
Finish. Invalid characters are replaced with a dash (-). A message displays at
the end of the wizard, and you can change the chart name to avoid the
dashes.
5. Accept the default Location or Browse to the location to save your
chart file.
6. Click Finish. The Publishing Summary message displays the link, or
links if you also chose to publish a Chart with directory, to your
published charts. Click on the link to preview the chart.
Choosing a Publishing Format
You can choose one of several formats to publish your chart in
OrgPublisher. These formats publish charts that fall into one of two
categories, an interactive chart or an org chart document.
An interactive chart provides end users with a more flexible chart in which
they can search, drill through chart levels, save groups, and even send
email messages to a group. An org chart document provides end users
with limited drilling and searching functions.
Interactive choices include PluginX and EChart. Org chart documents
include HTML, graphic, and PDF.
Format
PluginX
EChart
HTML
Graphic
PDF
Browser
Interactive - OrgPublisher PluginX to view with
Microsoft Internet Explorer 6.0 and later.
Interactive - To publish to a Microsoft IIS or ISAPIcompliant Windows® 2000, Windows® XP,
Windows® 2003 web server, or Apache™ HTTP
Server 2.0+ running Windows. Offers both thin
and rich client formats.
Org chart document - For cross-platform
publishing.
TOrg chart document - o publish in graphics
format.
Org chart document - To publish a chart in a
portable document format file.
Platform
Windows
Windows
Cross
Cross
Cross
The differences between the publishing formats are:
357
Publish Your Charts/Standard Chart Publishing
Aquire OrgPublisher 10 User Guide
Feature
Add group
category
Group Creation
Assistant
Send to PDF
New menu and
toolbar buttons
Switch to chain
of command
mode
Toolbar Quick
Search
Smart Search
9 Box Matrix
(Premier)
Side-by-side
Profile (Premier)
Succession/org
model planning
(Premier)
Workforce
analysis graph
(Premier)
Express Mode
publishing
Auto-archive
charts
Chart design
template
Chart legend
Hover Profile
Spotlighting
groups and
search results
Real-time
publishing
Multiple viewing
levels
Thin client
PluginX
HTML
with
drilling
HTML
Graphic
PDF
EChart
Yes
No
No
No
No
Yes
Planning
charts
No
Yes
No
No
No
No
Planning charts
No
Yes
No
Yes
No
Yes
No
Yes
Yes
Yes
Not
planning
No
No
No
No
Not planning
Yes
No
No
No
No
Yes
Yes
Yes
No
No
No
No
No
No
No
No
Yes
Yes
Yes
Yes
Yes
No
No
No
No
Yes
Yes
No
No
No
No
Yes
Yes
No
No
No
Yes
No
Yes
No
No
No
No
Yes
Yes
Yes
Yes
Yes
Yes
Yes
Yes
Yes
Yes
Yes
No
No
Yes
No
No
Yes
No
No
Yes
No
No
Yes
Yes
Yes
No
No
No
No
No
Yes
Yes
No
No
No
No
Yes
No
No
No
No
Yes
Yes
Requires
Adobe
Acrobat
Reader
Publish Your Charts/Standard Chart Publishing
358
Aquire OrgPublisher 10 User Guide
Feature
Self-installing
Displayable
views
Secure published
chart
Drilling
navigation
Hotspot links
Smart links
Chart searches
Selectable chart
styles
Selectable top of
chart
Viewable on
intranet
Viewable by MAC
and Unix users
Zoom view
Print preview
Book or Wall
style
Book style
printing
Wall chart
printing
Disabled printing
Ad hoc or My
groups tab in
Search View
Email to a group
359
PluginX
Yes
Yes
HTML
with
drilling
N/A
List,
Profile,
Summary
only
HTML
N/A
List,
Profile,
Summary
only
Graphic
N/A
No
PDF
Yes
No
EChar
Yes
Profile,
Summary,
Tree not
available in
client
Yes
No
No
No
No
List display
an index
Yes
Yes
Yes
No
No
No
Yes
Yes
Yes
Yes
Yes
Yes
No
No
No
Yes
No
No
No
No
No
No
No
No
No
No
No
Yes
Yes rich clie
Yes
Yes
Yes
No
No
No
No
Yes
Yes
Yes
Yes
Yes
Yes
Yes
No
Yes
Yes
Yes
Yes
No
Yes
No
No
No
Yes
Yes
No
No
No
Within
Acrobat
Reader
N/A
Yes
No
No
No
Yes
Yes
Yes
No
No
No
N/A
Yes
Yes
Yes
No
No
No
No
No
No
N/A
N/A
Yes
Yes, rich cl
Yes
Yes
Yes
No
N/A
Yes, rich cl
Publish Your Charts/Standard Chart Publishing
Yes
Aquire OrgPublisher 10 User Guide
Publish Your Charts with Advanced Features
Note:
OrgPublisher PluginX supports Microsoft Internet Explorer. The HTML file
generated identifies the browser being used and checks for the necessary
components.
Web servers do not allow clients to schedule tasks. The OrgPublisher Web
Administration Server allows you to publish charts manually. You can,
however, open the desktop OrgPublisher version and schedule the publishing
definition in the Publish charts dialog using the Web Administration
SourceCharts folder.
1. Log on the server as an administrator or power user.
2. Open the desktop OrgPublisher application. (If default install is used, it
would be in c:/program files/orgpubx).
3. Open the chart (found in the SourceCharts folder).
4. Schedule the publishing definition in OrgPublisher using the Schedules tab.
Also, when you are publishing to ECharts, you must manually schedule the
BAT file created in the first manual publishing. To do this, open the Task
Scheduler on the server to add the .BAT job.
You can modify the BAT file created through the Publishing Wizard to publish
to a location other than the server. Doing this may increase publishing time if
your chart is extremely large (200,000+ records) or if the server has limited
resources.
The EChart option supports Microsoft Internet Explorer and requires a
Microsoft IIS or ISAPI-compliant server. See the complete EChart publishing
requirements.
When publishing to a network drive while logged off, it is necessary that you
enter a UNC (Universal Naming Convention) path. A UNC is a way to identify a
shared file in a computer without having to specify the storage device it is on.
Do not use a relative path.
Due to security restrictions Web servers cannot access a UNC path. If your
chart contains photos, use either a local path or a URL. The EChart option
supports a Microsoft® IIS (ISAPI enabled) Windows® XP, Windows® 2003
web server, Windows® 2008 web server, or Apache™ HTTP Server 2.0+
running Windows.
Publish Your Charts/Publish Your Charts with Advanced Features
360
Aquire OrgPublisher 10 User Guide
Choosing Between Express and Advanced Mode
Publishing
When publishing a chart in OrgPublisher, the Publishing Wizard lets you
select Express Mode or Advanced Mode. Your choice depends on your
needs for a particular published chart and its audience.
Express Mode enables you to quickly publish a chart in PluginX, directory
view, or PDF. You can type the chart name and choose a publish to
location and immediately publish a chart.
Advanced Mode walks you through each of the wizard dialogs, enabling
extensive choices for publishing format, enabling the publishing
notification email, selecting planning or succession chart options, end
users toolbar and button options, end user context menu commands,
allowing end user personalization, enabling visually impaired support,
chart security, and more.
Publishing in PluginX Format
1. Click the Publish button
in the toolbar. You can also select
Tools from the Main menu then Publishing Wizard from the
options list. If this is the first time you are publishing a chart, the
wizard opens to the first dialog which gives you a brief overview of
the Publishing Wizard. Click Next.
2. If your published chart does not require specific selections, select the
Express Mode radio button and follow the Publishing in Express
Mode procedure.
If your published chart requires selections, such as planning or
available toolbars, select the Advanced Mode radio button. Click
Next and click Next again.
3. Type the Name of the published chart. It can be the same as the
chart name and does not need to include publishing information. The
name must, however, be unique and cannot contain any special
characters such as slashes (\ or /), colons (:), asterisks (*),
question marks (?), quotation marks ("), and greater than or less
than symbols (< or >). The publishing definition name can be up to
255 characters. Click Next.
4. Accept the default Interactive Org Chart selection. Click Next.
5. Accept the default PluginX selection. Click Next.
361
Publish Your Charts/Publish Your Charts with Advanced Features
Aquire OrgPublisher 10 User Guide
6. Type or Browse to the location where you want to publish your org
chart.
7. The Overwrite existing HTML and JS files check box in this dialog
is selected by default. If you do not want to write over your existing
htm information, click this check box to clear it.
8. Select the Send to web server (FTP ) check box if you want to
transfer your chart to your intranet. Click Next.
9. If you selected Send to web server (FTP), the FTP Server dialog
opens. Type the required information to publish the chart to your
intranet.
° Enter the user name - Type your system user name.
° Enter the password - Type your password, if any to transfer files
to your web server.
° Confirm password - Retype the password.
° Address (FTP URL or server name) - You must type the correct
IP address or server name before you can click Browse Site.
Once you enter the server name, the dialog displays a directory
tree. Navigate to the directory you want and click on it. The Parent
Dir button enables you to move up to the parent directory, if
necessary.
Double-click on the correct file. The complete URL address displays in
the Path field. Click Next.
10.Select the Chart Style you want the published chart to display first
by clicking the down-arrow and choosing a style from the options list.
11.If you have highlighted a box in the Chart View other than the
hierarchical top box, you can select Reset starting box to make
that box the top of your published chart. Click Next.
12.When you select the Enable Publish Notification Email check box,
this notification can be sent and the chart will not be published in the
event of a:
° Broken hierarchy
° Recursive reporting relationship
° License violation
13.Type or scroll to select the email address to which the notification
should be sent in the Addresses field.
14.Type the email address from which the notification should be sent in
the From Address field.
15.Type the name of your company's Mail Server.
Publish Your Charts/Publish Your Charts with Advanced Features
362
Aquire OrgPublisher 10 User Guide
16.The Port field defaults but can be overridden only on the rare
occurrence that it is not the standard port.
17.You can click Send Test Email to verify that the email addresses
you entered are correct. Click Next.
Note:
This notification is sent only if the OrgPublisher is not being run interactively.
18.Select a color scheme for the published chart. Select the Use a
predefined color scheme radio button if you want to use a
predefined scheme.
Note:
This option is disabled if you are not running in at least 16 bit color. The
Publishing Wizard color scheme option affects the published chart only.
19.Click the down-arrow and select one of the schemes from the options
list. The color scheme displays in the Preview pane of the dialog. If
the scheme is what you want, click Next. If the scheme is not what
you want, select a different predefined scheme or select a custom
color scheme.
20.Select the Use a custom color scheme radio button if you want to
choose the colors for your published chart.
21.Click Define custom color scheme. The Select Color Scheme
dialog opens. See the Selecting Color Schemes for Published Charts
procedure in this document for details. Click Next.
22.Select the toolbars, buttons, and views you want to display in your
published chart. End users can utilize buttons on these toolbars to
view more of the chart data and to navigate through it.
You can enable the Main and Views toolbars and enable either only
certain buttons or all buttons on each toolbar.
23.If you do not enable the Copy button in the Main toolbar, you can
select the Enable PluginX copy check box if you want to allow your
end users to copy the browser window and chart to other
applications.
24.Select Enable opening the search results in Microsoft Excel if
you want end users to click (open in Excel) in the Search View and
OrgPublisher opens Microsoft Excel with the search results list
displaying. Click Next.
25.With OrgPublisher Premier, you can select the Enable
Organizational Planning and/or Enable Succession Planning
check boxes if you want to enable web-based planning. Click Next.
363
Publish Your Charts/Publish Your Charts with Advanced Features
Aquire OrgPublisher 10 User Guide
26.If you selected the planning option, you can select the Enable
revision history check box if you want the planning charts to
provide a history of revisions, user ID, and, if available, comments.
27.Select the Require that all planning charts be password
protected check box if you want to limit access to the planning
charts.
28.If you want an indicator in the planning chart when changes are
made, select the Show visual indicator for changes check box.
29.Click Set default options for change report if you want to modify
the information provided in the planning chart change report. See
the Setting Change Report Default Options procedure in this
document for detailed information. Click Next.
30.Click on the plus sign to expand the context menu commands (chart
action buttons) for the published chart. Click an item to turn it off or
on. The default to all options are enabled. A green check indicates an
option is enabled, a red X that the option is disabled. Click Next.
31.If you are publishing your chart using a different "top of chart " than
the actual top box in the chart, you can select the Exclude
positions above check box if you do not want your end users to drill
up in the chart.
32.Select the Create directory view for chart check box if you want
to publish an additional HTML file of the chart that contains only the
Search View columns. See the Publishing a Directory Version of the
Chart procedure in this document for detailed information.
33.If you want to allow the PluginX chart to be personalized by the end
user, select the Remember each user's navigation and interface
changes check box is selected.
34.Select either the Open hotspots in the same browser window or
the Open hotspots in a new browser window radio button based
on how you want end users to access the chart's hotspots.
35.You can choose to use your own PluginX help for your published
chart by typing the file name and location in the PluginX Help URL
field which users can access by clicking the question mark in the
OrgPublisher toolbar. Click Next.
36.In the next dialog you can also set the Maximum number of email
recipients in Search View. The default is 20, but you can change
that, depending on your system.
Publish Your Charts/Publish Your Charts with Advanced Features
364
Aquire OrgPublisher 10 User Guide
37.If you want to publish your chart for accessibility by JAWS assistive
software, select the Enable support for the visually impaired
check box. Click Next.
38.You can encrypt the data of a PluginX chart and secure the chart by
selecting the Password protect this chart check box. If you
choose to password protect the chart, continue with the options in
this dialog. If not, click Next and proceed to Step 42.
39.In the Password Protection Options section, type the Password.
40.Select either 40 bit encryption or 128 bit encryption. This choice
requires that the end user PCs have the Microsoft High Encryption
Pack installed.
41.If you want PluginX to remember the password for end users, select
the Allow 'Remember my password' option in the PluginX
check box. Click Next.
42.If you want to set up an archive schedule now, select the Keep an
archive of this chart check box.
43.Type or Browse to the location where you want to store the
archives.
44.Select the interval at which you want the chart to archive, Every
time the chart is published, Weekly, or Monthly. Click Next.
45.Select the radio button for when you want to publish.
° Publish now: The chart is published and saved to the location you
specified. The publishing definition is also saved for future use.
° Publish later: This option opens the Publish charts dialog. The
chart is not published, but the publishing definition is saved. See
Using the Publish Charts Dialog section of this document.
° Schedule now: This option opens the Schedule Name dialog.
Follow the Creating a Publishing Scheduleprocedure.
The Publishing Summary message displays the link, or links if you
also chose to publish a directory view chart, to your published charts.
Click on the link to preview the chart.
Click Finish.
Publishing in EChart Rich Client Format
Rich client is an option of EChart publishing and uses the OrgPublisher
PluginX for a more flexible end user experience. EChart publishing may
affect other processes running on the server. You can also schedule your
published chart to automatically publish at a specified date and time.
365
Publish Your Charts/Publish Your Charts with Advanced Features
Aquire OrgPublisher 10 User Guide
1. Click the Publish button
in the toolbar or the Publishing
Wizard button
in the Wizard View. You can also select Tools
from the Main menu then Publishing Wizard from the options list.
If this is the first time you are publishing a chart, the wizard opens to
the first dialog which gives you a brief overview.
2. Select the Advanced Mode radio button. Click Next. Click Next
again at the brief description dialog.
3. Type the Name of the published chart. It can be the same as the
chart name and does not need to include publishing information. The
name must, however, be unique and cannot contain any special
characters such as slashes (\ or /), colons (:), asterisks (*),
question marks (?), quotation marks ("), and greater than or less
than symbols (< or >). The publishing definition name can be up to
255 characters. Click Next.
4. Accept the default Interactive Org Chart selection. Click Next.
5. Select the EChart radio button. Click Next.
6. The next dialog verifies that your chart will benefit from publishing
an EChart. If the wizard determines that your chart will not benefit
from this option, it is recommended that you click Back and select a
different publishing format. If your chart will benefit using the EChart
option, click Next.
7. In the Publish to location, type or Browse to the location where
you want to publish your org chart.
8. The Overwrite existing HTML and JS files check box in this dialog
is selected by default. If you do not want to write over your existing
information, click this check box to clear it.
9. Select the Send to web server (FTP ) check box if you want to
transfer your chart to your intranet. Click Next.
10.If you selected Send to web server (FTP), the FTP Server dialog
opens. Type the required information to publish the chart to your
intranet.
– Enter the user name - Type your system user name.
– Enter the password - Type your password, if any, to transfer files
to your web server.
– Confirm password - Retype the password.
– Address (FTP URL or server name) - You must type the correct IP
address or server name before you can click Browse Site. Once you
Publish Your Charts/Publish Your Charts with Advanced Features
366
Aquire OrgPublisher 10 User Guide
enter the server name, the dialog displays a directory tree. Navigate
to the directory you want and click on it. The Parent Dir button
enables you to move up to the parent directory, if necessary.
Double-click on the correct file. The complete URL address displays in
the Path field. Click Next.
11.Choose the EChart option, Rich client using PluginX or Both
client options above. Click Next.
12.Type the URL (http://SiteName) of the virtual directory on your
web server. This is necessary to locate the EChart server for this
chart.
Note:
You can modify the BAT file created through the Publishing Wizard to publish
to a location other than the server. Doing this may increase publishing time if
your chart is extremely large (200,000+ records) or if the server has limited
resources.
In Windows operating systems, the UNC name format is:
\\servername\sharename\path\filename
13.Select the Maximum chart levels to display in your published
EChart. Click Next.
14.Select a level of security to assign to your published EChart. If you
have already set security on your selected custom fields, proceed to
make your security selections in this dialog. If you have not secured
your custom fields, close the Publishing Wizardand open the Custom
Field Properties dialog to secure fields.
First, Select a chart security option radio button.
– Unsecured - This radio button is the default selection and allows all
users to view the entire chart and its contents.
Note:
If you choose not to secure ECharts, they can be accessed by any chart user,
as well as any user who can access the server where the EChart resides.
If you plan to use EChart security, verify that your custom fields are set for
Security before you open the Publishing Wizard.
– Windows NT® operating system authentication - Select this
radio button to allow only users who have Windows NT access and
who are actually located in the chart to access the chart.
– System user ID /box linkage - Select this radio button if you want
to give any user ID on the user machine access to the chart. This is
not a secure setting. The chart will open at the user's box.
– Chart- Select this radio button to require users to type an ID and
password to open and view the chart. This option can be used for
single sign-on.
367
Publish Your Charts/Publish Your Charts with Advanced Features
Aquire OrgPublisher 10 User Guide
– Reverse proxy - Select this radio button when you can supply the
user ID in HTTP header.
Note:
This option can be used with portals for single sign-on.
15.If you selected Chart as your security option, select the Password
field from the pull-down list where OrgPublisher can find your
password information. This must be stored in an Input File Layout
custom field record.
16.If you selected Reverse proxy as your security option, accept the
Variable default of USER_ID, or type a new variable.
17.If applicable, select the Passed as a cookie radio button.
18.Select the User ID field using the down-arrow.
19.Choose the Format of User ID field, such as User ID only,
Domain\UserID, or domain.company.com /UserID.
20.In the Starting box in chart section, select the radio button of the
box from which the security check will begin.
– Top of chart - Select this radio button to open the chart at the
original top of chart box, displaying all levels in the chart.
– Supervisor's box - Select this radio button to open the chart at the
user's supervisor's box, displaying all levels from that point
downward.
– User's box - Select this radio button to open the chart at the user's
box, displaying all levels from that point down.
– Box ID in this field - Select this radio button to open the chart at a
top of chart box other than the previous options. This unique ID must
be stored in an Input File custom field record. Use the down-arrow to
make your selection in the adjacent field.
21.The Allow users to drill up from starting box check box is the
default selection, and allows users to navigate to levels above their
box in the chart. Clear the check box if you do not want users to
navigate above their own chart level. Click Next.
22.Select the Chart Style you want the published chart to display first
by clicking on the down-arrow and choosing a style from the options
list.
23.If you have highlighted a box in the Chart View other than the
hierarchical top box, you can select Reset starting box to make
that box the top of your published chart. Click Next.
Publish Your Charts/Publish Your Charts with Advanced Features
368
Aquire OrgPublisher 10 User Guide
24.If you select the Enable Publish Notification Email check box, this
notification can be sent and the chart will not be published in the
event of a:
– Broken hierarchy
– Recursive reporting relationship
– License violation
25.Type or scroll to select the email address to which the notification
should be sent in the Addresses field.
26.Type the email address from which the notification should be sent in
the From Address field.
27.Type the name of your company's Mail Server.
28.The Port field defaults but can be overridden only on the rare
occurrence that it is not the standard port.
29.You can click Send Test Email to verify that the email addresses
you entered are correct. Click Next.
Note:
This notification is sent only if the OrgPublisher is not being run interactively.
30.Select a color scheme for the published chart. Select the Use a
predefined color scheme radio button if you want to use a
predefined scheme.
Note:
This option is disabled if you are not running in at least 16 bit color. The
Publishing Wizard color scheme option affects the published chart only.
31.Click the down-arrow and select one of the schemes from the options
list. The color scheme displays in the Preview pane of the dialog. If
the scheme is what you want, click Next. If the scheme is not what
you want, select a different predefined scheme or select a custom
color scheme.
32.Select the Use a custom color scheme radio button if you want to
choose the colors for your published chart.
33.Click Define custom color scheme. The Select Color Scheme
dialog opens. See the Selecting Color Schemes for Published Charts
procedure in this document for details. Click Next.
34.Select the toolbars and buttons you want to display in your published
chart. You can make these selections "role-based" in a secured
EChart. Open locks appear to the left of each securable button. Click
the lock to display security options.
369
Publish Your Charts/Publish Your Charts with Advanced Features
Aquire OrgPublisher 10 User Guide
Right-click on the lock to display the available groups. Click to select
individual groups or click on (Select all groups) to include all group
results. After you select a group, the lock appears closed and the
button displays a green filled check box indicating that it is available
for the restricted viewing audience. Only users who are in the
selected groups have access to the locked buttons when they access
the published EChart.
35.If you do not enable the Copy button in the Main toolbar, you can
select the Enable PluginX copy check box if you want to allow your
end users to copy the browser window and chart to other
applications. Enable opening the search results in Microsoft
Excel, end users will be able to click the open in Excel button in the
Search View and OrgPublisher opens Microsoft Excel with the search
results list displaying. Click Next.
36.Select one or both of the planning options, Enable Organizational
Planning and/or Enable Succession Planning, if you want to
enable web-based planning in the published chart. Click Next.
37.If you selected one or both of the planning options, select the
Enable revision history check box to provide a history of revisions,
user ID, and, if available, comments.
38.Select the Require that all planning charts be password
protected check box if you want to limit access to the planning
charts.
39.If you want an indicator in the planning chart when changes are
made, select the Show visual indicator for changes check box.
40.Click Set default options for change report if you want to modify
the information provided in the planning chart change report. See
the Setting Change Report Default Options procedure in this
document for detailed information. Click Next.
41.If you are publishing a secured EChart, you can choose where to
store your planning charts. You can Store planning charts on the
user's local hard drive, and these charts can be shared with other
users via email.
Or, you can Store planning charts centrally on the EChart
server. Each user will automatically have access to planning charts
that exist at or below the user's section of the hierarchy.
42.Type the name of the folder on the server that will be used to store
the planning charts. Click Next.
Note:
It is strongly recommended that this folder be secured so that it is accessible
to the EChart server but not HTTP requests.
Publish Your Charts/Publish Your Charts with Advanced Features
370
Aquire OrgPublisher 10 User Guide
43.Select the group name that will be allowed to create, view or modify
planning charts only from a selected point in the chart.
44.Select the group name that will be allowed to create planning charts
for the entire chart hierarchy. Click Next.
45.Click on the plus sign to expand the context menu commands (chart
action buttons) for the published chart. Click an item to turn it off or
on. The default to all options are enabled. A green check indicates an
option is enabled, a red X that the option is disabled. Click Next.
46.If you are publishing your chart using a different "top of chart" than
the actual top box in the chart, you can select the Exclude
positions above check box if you do not want your end users to
drill-up in the chart.
47.Select the Create directory view for chart check box if you want
to publish an additional HTML file of the chart that contains only the
Search View columns. See the Publishing a Directory Version of the
Chart procedure in this document for detailed information.
48.If you want to allow the rich client chart to be personalized by the
end user, select the Remember each user's navigation and
interface changes check box.
49.Select either the Open hotspots in the same browser window or
the Open hotspots in a new browser window radio button based
on how you want end users to access the chart's hotspots.
50.You can choose to use your own PluginX help for your published
chart by typing the file name and location in the PluginX Help URL
field which users can access by clicking the question mark in the
OrgPublisher toolbar. Click Next.
51.In this dialog you can set the Maximum number of email
recipients in Search View. The default is 20, but you can change
that, depending on your system.
52.If you want to publish your chart for accessibility by JAWS assistive
software, select the Enable support for the visually impaired
check box Click Next.
53.If you want to set up an archive schedule now, select the Keep an
archive of this chart check box.
54.Type or Browse to the location where you want to store the
archives.
371
Publish Your Charts/Publish Your Charts with Advanced Features
Aquire OrgPublisher 10 User Guide
55.Select the interval at which you want the chart to archive, Every
time the chart is published, Weekly, or Monthly. Click Next.
56.Select the Publish now radio button to publish your EChart
immediately. The Publishing Summary message displays the link, or
links if you also chose to publish a directory view chart, to your
published charts. Click on the link to preview the chart.
Note:
The EChart htm file must be closed in order to publish successfully. If it is
open when you attempt to publish the EChart, an error message displays
stating that access is denied. Simply close the file and publish again.
57.Select Publish later to open the Publish charts dialog where all
publishing definitions are kept. You can publish your EChart directly
from this dialog or schedule your EChart to publish with Task
Scheduler.
Note:
EChart publishing may affect other processes running on the server.
Publish EChart Thin Client
OrgPublisher includes EChart thin client architecture that enables you to
publish org charts from your server and run the charts remotely. The
EChart thin client requires no install on end user machines and works in
diverse environments. The EChart rich client, on the other hand, installs
components to your end user’s computer as required, but provides for a
richer user interface solution. For example, end users can open a chart
published via thin client that contains 12 levels and the default is to
display 4 levels. OrgPublisher calls only the levels displayed currently in
the browser, the default 4, rather than all 12 levels.
Note:
Thin client charts are platform independent, however browser compatibility
problems between your operating system and your platform version may
occur and, thus, affect thin client chart performance.
OrgPublisher thin client charts are dynamic HTML versions of org charts.
You can customize the HTML pages to more closely match the look and
feel of your web site, as well as what information is displayed, by linking
to your custom style sheet. Because there is no input type for tree control
in HTML, the Tree View is not available in thin client charts. In addition,
the Search feature is not be available in its entirety in thin client charts.
End users can access a modified Search View by clicking the List View
button in the toolbar.
Publish Your Charts/Publish EChart Thin Client
372
Aquire OrgPublisher 10 User Guide
The EChart thin client provides a Print
a PDF.
button which prints the chart to
The thin client option is a form of EChart, however, there are some
differences between the rich client mode and thin client mode in a
published chart. The table below outlines these differences.
Rich
client
Feature
373
Thin client
Formulas
Levels and span of control
9 Box Matrix
Side-by-side profiles
Workforce analysis graphs
Role-based security
Express publishing
Tabbed views
Succession planning
Chart design template
Maximized docked views
Chart legend
Hover Profile
Spotlight groups and search
results
Real-time publishing
Multiple viewing levels
Displayable views
Yes
Yes
Yes
Yes
Yes
Yes
No
Yes
Yes
Yes
Yes
Yes
Yes
Yes
Yes
Yes
Yes
Yes
Yes
Yes
No
Yes
Yes
Yes
Yes
Yes
Yes
Yes
Yes
Yes
Yes
Resizable views
Show/hide views
Moveable (docked) views
Printable views (other than Chart
View)
Drilling navigation
Hotspot links
Smart Links
Chart searches (toolbar, Search
View, Search dialog)
Ad hoc/My groups queries
Group Editor dialog
Saved ah hoc/My groups queries
Yes
Yes
Yes
Yes
Yes
Yes
No Tree View; Search View
does not have a separate
List View as in PluginX
No
Yes
No
No
Yes
Yes
Yes
Yes
Yes
Yes
Yes
Toolbar button opens
Search View
Yes
Yes
Yes
No
No
No
Publish Your Charts/Publish EChart Thin Client
Aquire OrgPublisher 10 User Guide
Feature
Rich
client
Email to a group
Quick search from toolbar
Status bar
Zoom factor/zoom to point
Copy option
Copy query results to clipboard
Yes
Yes
Yes
Yes
Yes
Yes
Photos in chart
Selectable chart styles
Logo/watermark support
Print preview - Book or Wall style
Print as book
Print as wall chart
Sexcurity validation (Active
Diretory® authentication, ID/Box
linkage)
Automatic/single sign-on security
Yes
Yes
Yes
Yes
Yes
Yes
Yes
Browser component required
Section 508 compatibility
Access to a UNC path for photo
linkage
Viewable by Mac® computer and
UNIX® operating system users
Support provided for the Apache
httpd server
Yes
Yes
Yes
Yes
No
Yes
Thin client
No
Yes
Yes
No
Browser image copy
Only the records actually
seen in the window
Yes
Yes
No
In PDF viewer only
PDF document
Browser print
Yes
Yes, using Active Directory
authentication when
running IIS with
anonymous access
disabled
No
No
No
Yes, with JavaScript
turned off
No
Publishing in EChart Thin Client Format
Note:
Logos are not supported when publishing as an EChart thin client.
Due to several possible network issues, it is recommended that you hide all
photos before publishing as thin client. See the Troubleshooting section for
details.
The Levels field in the published Unifi Thin Client chart displays the lowest of
the two options, “maximum number of levels set at publish time” and
“maximum levels” set in the Unifi rich client application.
Publish Your Charts/Publish EChart Thin Client
374
Aquire OrgPublisher 10 User Guide
If your EChart contains secured fields, it is recommended that you either do
not publish your chart in thin client format or that you do not use onditional
formatting on secured fields.
Hierarchical custom field security can significantly slow the length of time to
publish the thin client.
EChart thin client end users will not have the My groups tab available in the
Search View.
The thin client is an option in EChart publishing. EChart publishing may
affect other processes running on the server. Thin client publishing is a
manual process and cannot be scheduled to automatically publish.
1. Click the Publish button
in the toolbar or Publishing Wizard
button
in the Wizard View. You can also select Tools from the
Main menu then Publishing Wizard from the options list. The
Publishing Wizard opens.
2. Select the Advanced Mode radio button. Click Next. Click Next
again at the brief description dialog.
3. Type the Name of the published chart. It can be the same as the
chart name and does not need to include publishing information. The
name must, however, be unique and cannot contain any special
characters such as slashes (\ or /), colons (:), asterisks (*),
question marks (?), quotation marks ("), and greater than or less
than symbols (< or >). The publishing definition name can be up to
255 characters. Click Next.
4. Accept the default Interactive Org Chart selection. Click Next.
5. Select the EChart radio button. Click Next.
6. The next dialog verifies that your chart will benefit from publishing
an EChart. If the wizard determines that your chart will not benefit
from this option, it is recommended that you click Back and select a
different publishing format. If your chart will benefit using the EChart
option, click Next.
7. In the Publish to location, type or Browse to the location where
you want to publish your org chart.
8. The Overwrite existing HTML and JS files check box in this dialog
is selected by default. If you do not want to write over your existing
information, click this check box to clear it.
375
Publish Your Charts/Publish EChart Thin Client
Aquire OrgPublisher 10 User Guide
9. Select the Send to web server (FTP ) check box if you want to
transfer your chart to your intranet. Click Next.
10.If you selected Send to web server (FTP), the FTP Server dialog
opens. Type the required information to publish the chart to your
intranet.
– Enter the user name - Type your system user name.
– Enter the password - Type your password, if any to transfer files to
your web server.
– Confirm password - Retype the password.
– Address (FTP URL or server name) - You must type the correct IP
address or server name before you can click Browse Site. Once you
enter the server name, the dialog displays a directory tree. Navigate
to the directory you want and click on it. The Parent Dir button
enables you to move up to the parent directory, if necessary.
Double-click on the correct file. The complete URL address displays in
the Path field. Click Next.
11.Choose the EChart option Thin client, or Both client options
above. Click Next.
12.Type the URL (http://SiteName) of the virtual directory on your
web server. This is necessary to locate the EChart server for this
chart.
In Windows operating systems, the UNC name format is:
\\servername\sharename\path\filename
13.Select the Maximum chart levels to display in your published
EChart. Click Next.
14.Select a level of security to assign to your published EChart. If you
have already set security on your selected custom fields, proceed to
make your security selections in this dialog. If you have not secured
your custom fields, close the Publishing Wizard and open the Custom
Field Properties dialog to secure fields.
First, Select a chart security option radio button.
– Unsecured - This radio button allows all users to view the entire
chart and its contents. Not available in thin client format.
Note:
If you choose not to secure ECharts, they can be accessed by any chart user,
as well as any user who can access the server where the EChart resides.
If you plan to use EChart security, verify that your custom fields are set for
Security before you open the Publishing Wizard.
– Windows NT® operating system authentication - Select this
radio button to allow only users who have Windows NT access and
who are actually located in the chart to access the chart.
Publish Your Charts/Publish EChart Thin Client
376
Aquire OrgPublisher 10 User Guide
– System user ID /box linkage - This radio button gives any user ID
on the user machine access to the chart. This is not a secure setting
and is not available in thin client format. The chart will open at the
user's box.
– Chart - Select this radio button to require users to type an ID and
password to open and view the chart.
– Reverse proxy - Select this radio button when you can supply the
user ID in HTTP header.
Note:
This option can be used with portals for single sign-on.
15.If you selected Unsecured, click Next and proceed to Step 23.
If you selected Windows NT® operating system authentication,
proceed to Step 19.
If you selected System user ID /box linkage, proceed to Step 19.
16.If you selected Chart as your security option, select the Password
field from the pull-down list where OrgPublisher can find your
password information. This must be stored in an Input File custom
field record. Proceed to Step 20.
17.If you selected Reverse proxy as your security option, accept the
Variable default of USER_ID, or type a new variable.
18.If applicable, select the Passed as a cookie check box.
19.Select the User ID field using the down-arrow.
20.Choose the Format of User ID field, such as User ID only,
Domain\UserID, or domain.company.com /UserID.
21.Select a Starting box in chart from which the security check will
begin.
– Top of chart - Select this radio button to open the chart at the
original top of chart box, displaying all levels in the chart.
– Supervisor's box - Select this radio button to open the chart at the
user's supervisor's box, displaying all levels from that point
downward.
– User's box - Select this radio button to open the chart at the user's
box, displaying all levels from that point down.
– Box ID in this field - Select this radio button to open the chart at a
top of chart box other than the previous options. This unique ID must
be stored in an Input File Layout custom field record. In the adjacent
field, click the down-arrow to select the custom field you want to use.
22.The Allow users to drill up from starting box check box is the
default selection, and allows users to navigate to levels above their
box in the chart. Clear the check box if you do not want users to
navigate above their own chart level. Click Next.
377
Publish Your Charts/Publish EChart Thin Client
Aquire OrgPublisher 10 User Guide
23.Select the Chart Style you want the published chart to display first
by clicking the down-arrow and choosing a style from the options list.
24.If you have highlighted a box in the Chart View other than the
hierarchical top box, you can select Reset starting box to make
that box the top of your published chart. Click Next.
25.If you select the Enable Publish Notification Email check box, this
notification can be sent and the chart will not be published in the
event of a:
– Broken hierarchy
– Recursive reporting relationship
– License violation
26.Type or scroll to select the email address to which the notification
should be sent in the Addresses field.
27.Type the email address from which the notification should be sent in
the From Address field.
28.Type the name of your company's Mail Server.
29.The Port field defaults but can be overridden only on the rare
occurrence that it is not the standard port.
30.You can click Send Test Email to verify that the email addresses
you entered are correct. Click Next.
Note:
This notification is sent only if the OrgPublisher is not being run interactively.
31.Select a color scheme for the published chart. Select the Use a
predefined color scheme radio button if you want to use a
predefined scheme.
Note:
This option is disabled if you are not running in at least 16 bit color. The
Publishing Wizard color scheme option affects the published chart only.
32.Click the down-arrow and select one of the schemes from the options
list. The color scheme displays in the Preview pane of the dialog. If
the scheme is what you want, click Next. If the scheme is not what
you want, select a different predefined scheme or select a custom
color scheme.
33.Select the Use a custom color scheme radio button if you want to
choose the colors for your published chart.
Publish Your Charts/Publish EChart Thin Client
378
Aquire OrgPublisher 10 User Guide
34.Click Define custom color scheme. The Select Color Scheme
dialog opens. See the Selecting Color Schemes for Published Charts
procedure in this document for details. Click Next.
35.Select the toolbars and buttons you want to display in your published
chart. Specific button are not available in thin client charts. They are
disabled and noted with an asterisk. Enable opening the search
results in Microsoft Excel, end users will be able to click the open
in Excel button in the Search View and OrgPublisher opens Microsoft
Excel with the search results list displaying. Click Next.
36.If you are publishing your chart using a different "top of chart" than
the actual top box in the chart, you can select the Exclude
positions above check box if you do not want your end users to drill
up in the chart.
37.Select the Create directory view for chart check box if you want
to publish an additional HTML file of the chart that contains only the
Search View columns. See the Publishing a Directory Version of
the Chart procedure in this document for detailed information.
38.If you want to allow the thin client chart to be personalized by end
user, select the Remember each user's navigation and interface
changes check box.
39.Select either the Open hotspots in the same browser window or
the Open hotspots in a new browser window radio button based
on how you want end users to access the chart's hotspots.
40.You can choose to use your own published chart help by typing the
file name and location in the PluginX Help URL field which end
users can access by clicking the Help button
OrgPublisher toolbar. Click Next.
in the
41.The next dialog contains several default selections, which you may
override by clearing the options.
– Enable JavaScript allows end users to close views and do more
specific searches.
– Enable end users to print charts via PDF files will allow end
users to print the thin client chart.
42.In the Chart Graphic Options section, JPEG is the default
selection. If, however, your chart does not contain photos, gradients
or backgrounds, you may want to select the GIF radio button for
better text quality.
43.Select the Use optimized toolbar and button images check box if
you cache static images.
379
Publish Your Charts/Publish EChart Thin Client
Aquire OrgPublisher 10 User Guide
44.If you want to use a custom style sheet for this chart, type the URL
for the style sheet. Click Next.
45.Select the Publish now radio button to publish your EChart
immediately. Click Finish.
Note:
The EChart htm file must be closed in order to publish successfully. If it is
open when you attempt to publish the EChart, an error message displays
stating that access is denied. Simply close the file and publish again.
46.If you want to set up an archive schedule now, select the Keep an
archive of this chart check box.
47.Type or Browse to the location where you want to store the
archives.
48.Select the interval at which you want the chart to archive, Every
time the chart is published, Weekly, or Monthly. Click Next.
49.Select the Publish now radio button to publish your EChart
immediately. The Publishing Summary message displays the link, or
links if you also chose to publish a directory view chart, to your
published charts. Click on the link to preview the chart.
50.Select Publish later to open the Publish charts dialog where all
publishing definitions are kept. You can publish your EChart directly
from this dialog or schedule your EChart to publish with Task
Scheduler.
The Publishing Summary message displays the link, or links if you
also chose to publish a directory view chart, to your published charts.
Click on the link to preview the chart.
Publishing in Graphic Format
Note:
A chart published as a graphic is in JPG format, which can be read by most
browsers and graphics programs.
You can also schedule your published chart to automatically publish at a
specified date and time.
1. Click the Publish button
in the toolbar. You can also select
Tools from the Main menu then Publishing Wizard from the
options list. The Publishing Wizard opens.
2. Select the Advanced Mode radio button. Click Next. Click Next
again at the brief description dialog.
Publish Your Charts/Publish EChart Thin Client
380
Aquire OrgPublisher 10 User Guide
3. Type the Name of the published chart. It can be the same as the
chart name and does not need to include publishing information. The
name must, however, be unique and cannot contain any special
characters such as slashes (\ or /), colons (:), asterisks (*),
question marks (?), quotation marks ("), and greater than or less
than symbols (< or >). The publishing definition name can be up to
255 characters. Click Next.
4. Select the Org Chart Document radio button. Click Next.
5. Select the Graphic radio button. Click Next.
6. Type or Browse to the location where you want to publish your org
chart.
7. Select the Send to web server (FTP ) check box if you want to
transfer your chart to your intranet. Click Next.
8. If you selected Send to web server (FTP), the FTP Server dialog
displays. Type the required information to publish the chart to your
intranet.
– Enter the user name - Type your system user name.
– Enter the password - Type your password, if any to transfer files to
your web server.
– Confirm password - Retype the password.
– Address (FTP URL or server name) - You must type the correct IP
address or server name before you can click Browse Site. Once you
enter the server name, the dialog displays a directory tree. Navigate
to the directory you want and click on it. The Parent Dir button
enables you to move up to the parent directory, if necessary.
Double-click on the correct file. The complete URL address displays in
the Path field. Click Next.
9. Select the Chart Style you want the published chart to display first
by clicking the down-arrow and choosing a style from the options list.
10.If you have highlighted a box in the Chart View other than the
hierarchical top box, you can select Reset starting box to make
that box the top of your published chart. Click Next.
11.If applicable, select the Enable Publish Notification Email check
box, this notification can be sent and the chart will not be published
in the event of a:
– Broken hierarchy
– Recursive reporting relationship
– License violation
381
Publish Your Charts/Publish EChart Thin Client
Aquire OrgPublisher 10 User Guide
12.Type or scroll to select the email address to which the notification
should be sent in the Addresses field.
13.Type the email address from which the notification should be sent in
the From Address field.
14.Type the name of your company's Mail Server.
15.The Port field defaults but can be overridden only on the rare
occurrence that it is not the standard port.
16.You can click Send Test Email to verify that the email addresses
you entered are correct. Click Next.
Note:
This notification is sent only if the OrgPublisher is not being run interactively.
17.Select the radio button for when you want to publish.
– Publish now: The chart is published and saved to the location you
specified. The publishing definition is also saved for future use. A
copy of the chart as the user will see it is displayed on your browser.
A Publishing Summary message displays a link to the published
chart.
– Publish later: This option opens the Publish charts dialog. The chart
is not published, but the publishing definition is saved. See Using the
Publish Charts Dialog section of this document.
– Schedule now: This option opens the Schedule Name dialog. Follow
the Creating a Publishing Schedule procedure.
Click Finish.
Publishing in HTML Format
You can also schedule your published chart to automatically publish at a
specified date and time.
HTML charts can be published with the List View or Profile View that are
displayed when you publish a chart on your intranet.
Use a chart published with a List View to locate and display different chart
pages for entries you select in the list. For example, publish a chart with a
List View that contains one department’s employees and their phone
numbers. You can then click on each employee name in the list to display
the page where that employee is located within the chart.
Publish a chart with a Profile View to display employee profiles. You can
click on a name within the chart to display that employee’s profile. Or, if
you publish your chart with both a List View and Profile View, click on a
name in the List View to display the page and that employee’s profile.
Publish Your Charts/Publish EChart Thin Client
382
Aquire OrgPublisher 10 User Guide
1. Click the Publish button
in the toolbar. You can also select
Tools from the Main menu then Publishing Wizard from the
options list. If this is the first time you are publishing a chart, the
wizard opens to the first dialog which gives you a brief overview of
the Publishing Wizard. Click Next.
2. Select the Advanced Mode radio button. Click Next. Click Next
again at the brief description dialog.
3. Type the Name of the published chart. It can be the same as the
chart name and does not need to include publishing information. The
name must, however, be unique and cannot contain any special
characters such as slashes (\ or /), colons (:), asterisks (*),
question marks (?), quotation marks ("), and greater than or less
than symbols (< or >). The publishing definition name can be up to
255 characters. Click Next.
4. Select the Org Chart Document radio button. Click Next.
5. Select the HTML radio button. Click Next.
6. Type or Browse to the location where you want to publish your org
chart.
7. Select the Send to web server (FTP ) check box if you want to
transfer your chart to your intranet. Click Next.
8. If you selected Send to web server (FTP), the FTP Server dialog
displays. Type the required information to publish the chart to your
intranet.
– Enter the user name - Type your system user name.
– Enter the password - Type your password, if any to transfer files to
your web server.
– Confirm password - Retype the password.
– Address (FTP URL or server name) - You must type the correct IP
address or server name before you can click Browse Site. Once you
enter the server name, the dialog displays a directory tree. Navigate
to the directory you want and click on it. The Parent Dir button
enables you to move up to the parent directory, if necessary.
Double-click on the correct file. The complete URL address displays in
the Path field. Click Next.
9. Select the Chart Style you want the published chart to display first
by clicking the down-arrow and choosing a style from the options list.
10.If you have highlighted a box in the Chart View other than the
hierarchical top box, you can select Reset starting box to make
that box the top of your published chart. Click Next.
383
Publish Your Charts/Publish EChart Thin Client
Aquire OrgPublisher 10 User Guide
11.When you select the Enable Publish Notification Email check box,
this notification can be sent and the chart will not be published in the
event of a:
– Broken hierarchy
– Recursive reporting relationship
– License violation
12.Type or scroll to select the email address to which the notification
should be sent in the Addresses field.
13.Type the e-mail address from which the notification should be sent in
the From Address field.
14.Type the name of your company's Mail Server.
15.The Port field defaults but can be overridden only on the rare
occurrence that it is not the standard port.
16.You can click Send Test Email to verify that the email addresses
you entered are correct. Click Next.
Note:
This notification is sent only if the OrgPublisher is not being run interactively.
17.The Enable Drill-up/Drill-down check box is automatically
selected and generates multiple HTML pages. If you do not want your
end users to have the ability to navigate any where in the chart,
clear this check box.
18.If you have included photos in your chart, it is recommended that
you select the Use JPEG graphic format check box. Click Next.
19.Select the radio button for when you want to publish.
– Publish now: The chart is published and saved to the location you
specified. The publishing definition is also saved for future use. A
copy of the chart as the user will see it is displayed on your browser.
A Publishing Summary message displays a link to the published
chart.
– Publish later: This option opens the Publish charts dialog. The chart
is not published, but the publishing definition is saved. See Using the
Publish Charts Dialog section of this document.
– Schedule now: This option opens the Schedule Name dialog. Follow
the Creating a Publishing Schedule procedure.
20.Click Finish.
Publish Your Charts/Publish EChart Thin Client
384
Aquire OrgPublisher 10 User Guide
Publishing in PDF Format
You can publish your chart as a PDF (Portable Document Format) in Book
Style. This format produces a legend page listing the records in your chart
as well as your Book Style chart.
Note:
When working with published chart in PDF format, end users must use
Adobe® Reader® 9 to effectively open email links. OrgPublisher will install
this free reader if it cannot find it on the end user's operating system.
1. Click the Publish button
in the toolbar. You can also select
Tools from the Main menu then Publishing Wizard from the
options list. If this is the first time you are publishing a chart, the
wizard opens to the first dialog which gives you a brief overview of
the Publishing Wizard. Click Next.
2. Select the Advanced Mode radio button. Click Next. Click Next
again at the brief description dialog.
3. Type the Name of the published chart. It can be the same as the
chart name and does not need to include publishing information. The
name must, however, be unique and cannot contain any special
characters such as slashes (\ or /), colons (:), asterisks (*),
question marks (?), quotation marks ("), and greater than or less
than symbols (< or >). The publishing definition name can be up to
255 characters. Click Next.
4. Select the Org Chart Document radio button. Click Next.
5. Select the PDF radio button. Click Next.
6. Type or Browse to the location where you want to publish your org
chart.
7. Select the Send to web server (FTP ) check box if you want to
transfer your chart to your intranet. Click Next.
8. If you selected Send to web server (FTP), the FTP Server dialog
displays. Type the required information to publish the chart to your
intranet.
– Type user name - Type your system user name.
– Type password - Type your password, if any to transfer files to
your web server.
– Confirm password - Retype the password.
– Address (FTP URL or server name) - You must type the correct IP
address or server name before you can click Browse Site. Once you
enter the server name, the dialog displays a directory tree. Navigate
385
Publish Your Charts/Publish EChart Thin Client
Aquire OrgPublisher 10 User Guide
to the directory you want and click on it. The Parent Dir button
enables you to move up to the parent directory, if necessary.
Double-click on the correct file. The complete URL address displays in
the Path field. Click Next.
9. Select the Chart Style you want the published chart to display first
by clicking the down-arrow and choosing a style from the options list.
10.If you have highlighted a box in the Chart View other than the
hierarchical top box, you can select Reset starting box to make
that box the top of your published chart. Click Next.
11.When you select the Enable Publish Notification Email check box,
this notification can be sent and the chart will not publish in the
event of a:
– Broken hierarchy
– Recursive reporting relationship
– License violation
12.Type or scroll to select the email address to which the notification
should be sent in the Addresses field.
13.Type the email address from which the notification should be sent in
the From Address field.
14.Type the name of your company's Mail Server.
15.The Port field defaults but can be overridden only on the rare
occurrence that it is not the standard port.
16.You can click Send Test Email to verify that the email addresses
you entered are correct. Click Next.
Note:
This notification is sent only if the OrgPublisher is not being run interactively.
17.In the Settings dialog, click Next if you want to accept the default
settings for printing the PDF (both online display and hard copy), and
proceed to Step 22. If you don't want to accept the defaults, proceed
to Step 17.
18.Select the Use classic book style printing radio button if you want
to print the PDF pages using chart layout 4. Or select the Use the
page optimizer if you want to manually set PDF page options.
19.See the Choosing PDF Settings procedure in this document for
detailed information about your choices of Use easy settings,
Preferred layout, Use custom optimizer settings, Page
customization list, and the Depth options. Additional information
about the Custom settings and using the Advanced Page Optimizer
Publish Your Charts/Publish EChart Thin Client
386
Aquire OrgPublisher 10 User Guide
Settings dialog can be found in the Modifying Book Style Print
Settings or the Printing Your Chart as a Book procedure in this
document.
20.In the Boxes across on book style pages section, select the
Automatically set row size radio button to let OrgPublisher set the
number of boxes per row and size these boxes to fit each page. Or,
you can select the Specify maximum row size radio button to
manually set the maximum number of boxes to print in a row. The
minimum number of boxes across is 4. (The chart style is
automatically stacked, which means there are two levels of the
organization per page and the lowest level is arranged in a horizontal
line across the width of a page for as many lines as it takes to display
the lowest level.)
21.In the Organizational levels to print field, click the down-arrow
and select the number of levels you want to allow end users to print.
22.The check boxes in the lower section of this dialog concern Print
Index, Show page numbers in circles, Include Legend, Print
Header, Print Footer, and Hyperlinks. The Choosing Book Style
Print Settings procedure provides additional information in these
selections.
23.Click Next to leave the Settings dialog.
24.OrgPublisher provides default PDF paper settings for Paper Size,
Paper Orientation, and Margins. You can accept the defaults or
select the settings you want. Click Next.
25.The Choosing Book Style Settings procedure provides additional
information in these selections. OrgPublisher defaults the Font
Embedding check box which will increase the compatibility of the
PDF file. If you have concerns about the size of the file (font
embedding significantly increases the file size) you can clear the
option.
26.The Printer Resolution is set to "600 DPI." You can choose a
different DPI by clicking the down-arrow and selecting a DPI from the
options list.
The Image Options section also includes default selections. If you
accept the defaults, OrgPublisher will Remove Duplicate Images
and Down-sample high resolution images when creating the PDF
file.
If you are not concerned about the sharpness of graphics in your PDF
chart, you can select the JPEG Compression check box which will
387
Publish Your Charts/Publish EChart Thin Client
Aquire OrgPublisher 10 User Guide
help reduce the size of the file but provide a low quality graphic. Click
Next.
27.Select the radio button for when you want to publish.
– Publish now: The chart is published and saved to the location you
specified. The publishing definition is also saved for future use. A
copy of the PDF file is displayed on your browser. A Publishing
Summary message displays a link to the published chart.
– Publish later: This option opens the Publish charts dialog. The chart
is not published, but the publishing definition is saved. See Using the
Publish Charts Dialog section of this document.
– Schedule now: This option opens the Schedule Name dialog. Follow
the Creating a Publishing Schedule procedure.
Once you've published the chart, a dialog displays the progress of
the PDF conversion. After the conversion is complete a message box
displays the number of chart pages created.
The PDF chart file is saved to the WEB folder in the OrgPublisher
directory. End users will be able to view and print the chart as a
"Book style" PDF.
Note:
The PDF book style printing is the only print option for an EChart thin client
chart.
Click Finish.
Publishing a Directory Version of the Chart
With OrgPublisher you can publish a chart for Directory View. This
additional html file opens the Search View as a directory for the published
PluginX or EChart rich client chart.
Note:
When you select a base group filter, you also limit the records displayed in the
published directory view of the chart.
Express Mode
1. Click the Publish button
in the toolbar or the Publishing
Wizard button
in the Wizard View. You can also select Tools
from the Main menu then Publishing Wizard from the options list.
The Publishing Wizard opens.
2. Select the Express Mode radio button. Click Next.
3. Select the Chart with directory view radio button.
Publish Your Charts/Publish EChart Thin Client
388
Aquire OrgPublisher 10 User Guide
4. Type the Name of Chart.
5. Type or Browse to the Location where you want to store the chart.
Click Finish to publish the chart directory.
Advanced Mode
1. If you choose to publish using the Advanced Mode, select
Interactive Org Chart.
2. Make your selection of either PluginX or EChart and follow the
wizard dialogs until you reach the multiple subject dialog that
includes the directory view option.
3. Select the Create directory view for chart check box.
4. Complete the Publishing Wizard and then open the published chart .
5. You can access the directory view by clicking on the file name in the
Publishing Summary message, or add an underscore and "dir" (_dir)
to your chart name in the Address field in your browser and press
ENTER, for example, \Creative Print_Dir.htm. If you are
publishing to EChart thin client, the name is \Creative
Print_TDir.htm. The directory view opens.
End users can click on a name and OrgPublisher displays the Smart
Links options list. The end user selects the required link, such as
Email or Go to person in chart. If there is no link provided,
OrgPublisher automatically opens to the person in the chart.
End users can also use the Search View features, such as the
Groups and My groups tab, as well as the email, save as, and
viewing the list in Microsoft Excel options.
Publishing a Portion of a Chart
1. Open the chart you want to publish.
2. Place the mouse pointer on the box you want to be the top of the
chart and click to select it and all the boxes below it.
3. Select File from the Main menu then Publish from the pull-down
menu. You can also click the Publish button
in the toolbar.
The Publishing Wizard or Publish charts dialog opens.
4. Select Advanced Mode, and step through the wizard dialogs,
selecting the options you want included in this publishing definition.
389
Publish Your Charts/Publish EChart Thin Client
Aquire OrgPublisher 10 User Guide
5. Be sure to select the option to Exclude positions above if you do
not want to publish the higher levels of the org chart.
6. Select a publishing option and click Finish to publish your chart.
Publishing Real-Time Charts
Real-time publishing is an option when publishing an EChart, either rich
client or thin client, that has been created using an ODBC connection. This
option requires Microsoft Data Access Components (MDAC) 2.6 or higher,
ASP.NET support on the web server, and must be published to a virtual
directory. You can also configure real-time connections for a Unifi chart
using the Real-time Connection Configuration dialog.
Note:
The EChart option supports Microsoft Internet Explorer and requires a
Microsoft IIS or ISAPI-compliant server.
EChart publishing may affect other processes running on the server.
Real-time charts must be secured via your IIS, not through the Publishing
Wizard. The security dialog is not available when you publish a real-time
chart.
Real-time publishing is not available when building a chart from multiple data
sources.
1. Click the Publish button
in the toolbar. You can also select
Tools from the Main menu then Publishing Wizard from the
options list. If this is the first time you are publishing a chart, the
wizard opens to the first dialog which gives you a brief overview of
the Publishing Wizard.
2. Select the Advanced Mode radio button. Click Next. Click Next
again at the brief description dialog.
3. Type the Name of the published chart. It can be the same as the
chart name and does not need to include publishing information. The
name must, however, be unique and cannot contain any special
characters such as slashes (\ or /), colons (:), asterisks (*),
question marks (?), quotation marks ("), and greater than or less
than symbols (< or >). The publishing definition name can be up to
255 characters. Click Next.
4. Accept the default Interactive Org Chart selection. Click Next.
5. Select the EChart radio button. Click Next.
Publish Your Charts/Publish EChart Thin Client
390
Aquire OrgPublisher 10 User Guide
6. The next dialog verifies that your chart will benefit from publishing
an EChart. Click Next and click Next again.
7. Type or Browse to the location where you want to publish your org
chart.
8. The Overwrite existing HTML and JS files check box in this dialog
is selected by default. If you do not want to write over your existing
htm information, click this check box to clear it.
9. Select the Send to web server (FTP) check box if you want to
transfer your chart to your intranet. Click Next.
10.If you selected Send to web server (FTP), the FTP Server dialog
opens. Type the required information to publish the chart to your
intranet.
– Type user name - Type your system user name.
– Type password - Type your password, if any, to transfer files to
your web server.
– Confirm password - Retype the password.
– Address (FTP URL or server name) - You must type the correct IP
address or server name before you can click Browse Site. Once you
enter the server name, the dialog displays a directory tree. Navigate
to the directory you want and click on it. The Parent Dir button
enables you to move up to the parent directory, if necessary.
Double-click on the correct file. The complete URL address displays in
the Path field. Click Next.
11.Choose one of the EChart options, Rich client using PluginX, Thin
client, or Both client options above. Click Next. The Publishing
Wizard Real-time Data dialog opens.
12.Select the Use Real-Time Data check box.
13.If you want to improve searching performance you can select the
Use static cached data for searching check box. This performs all
searches using a "snapshot" of the data as of publishing time only. If
you do not select this option, end users will be able to search using
real-time data.
14.Type the OLE DB connect string for the database and click Next.
If you need help building the connect string, click Connect String
Builder. The Data Link Properties dialog opens at the Provider tab.
Follow the Microsoft operating system instructions to select a data
provider, build a connection string, and choose a data source by
clicking the Help button in this dialog.
Note:
391
When publishing to real-time using Oracle, you MUST select the Microsoft OLE
DB Provider for Oracle driver.
Publish Your Charts/Publish EChart Thin Client
Aquire OrgPublisher 10 User Guide
15.After you select a provider, click Next. The Data Link Properties
dialog opens to the Connection tab. Options may vary, depending
on the provider selected. However, you MUST select the Allow
saving password check box. This allows the password to be saved
in the connection string in order to open the chart. Click Next.
16.Type the URL (http://SiteName) of the virtual directory on your
web server. This is necessary to locate the EChart server for this
chart. In Windows operating systems, the UNC name format is:
\\servername\sharename\path\filename
17.Select the Maximum chart levels to display in your published
EChart. Click Next.
18.Select a level of security to assign to your published EChart. If you
have already set security on your selected custom fields, proceed to
make your security selections in this dialog. If you have not secured
your custom fields , close the Publishing Wizard and open the
Custom Field Properties dialog to secure fields.
First, Select a chart security option radio button.
– Unsecured - This radio button is the default selection and allows all
users to view the entire chart and its contents.
– Windows Active Directory® authentication - Select this radio
button to allow only users who have Windows NT access and who are
actually located in the chart to access the chart.
– System user ID /box linkage - Select this radio button if you want
to give any user ID on the user machine access to the chart. This is
not a secure setting. The chart will open at the user's box.
– Chart- Select this radio button to require users to type an ID and
password to open and view the chart. This option can be used for
single sign-on.
– Reverse proxy - Select this radio button when you can supply the
user ID in HTTP header.
19.If you selected Chart as your security option, select the Password
field from the pull-down list where OrgPublisher can find your
password information. This must be stored in an Input File custom
field record.
20.If you selected Reverse proxy as your security option, accept the
Variable default of USER_ID, or type a new variable.
21.If applicable, select the Passed as a cookie radio button.
22.Select the User ID field using the down-arrow.
23.Choose the Format of User ID field, such as User ID only,
Domain\UserID, or domain.company.com /UserID.
Publish Your Charts/Publish EChart Thin Client
392
Aquire OrgPublisher 10 User Guide
24.In the Starting box in chart section, select the radio button of the
box from which the security check will begin.
– Top of chart - Select this radio button to open the chart at the
original top of chart box, displaying all levels in the chart.
– Supervisor's box - Select this radio button to open the chart at the
user's supervisor's box, displaying all levels from that point
downward.
– User's box - Select this radio button to open the chart at the user's
box, displaying all levels from that point down.
– Box ID in this field - Select this radio button to open the chart at a
top of chart box other than the previous options. This unique ID must
be stored in an Input File custom field record. Use the down-arrow to
make your selection in the adjacent field.
25.The Allow users to drill up from starting box check box is the
default selection, and allows users to navigate to levels above their
box in the chart. Clear the check box if you do not want users to
navigate above their own chart level. Click Next.
26.Select the Chart Style you want the published chart to display first
by clicking on the down-arrow and choosing a style from the options
list.
27.If you have highlighted a box in the Chart View other than the
hierarchical top box, you can select Reset starting box to make
that box the top of your published chart. Click Next.
28.When you select the Enable Publish Notification Email check box,
this notification can be sent and the chart will not be published in the
event of a:
– Broken hierarchy
– Recursive reporting relationship
– License violation
Note:
This notification is sent only if the OrgPublisher is not being run interactively.
Click Next.
29.Select a color scheme for the published chart. Select the Use a
predefined color scheme radio button if you want to use a
predefined scheme. Click Next.
Note:
This option is disabled if you are not running in at least 16 bit color. The
Publishing Wizard color scheme option affects the published chart only.
30.Select the toolbars and buttons you want to display in your published
chart. End users can utilize buttons on these toolbars to view more of
the chart data and to navigate through it.
393
Publish Your Charts/Publish EChart Thin Client
Aquire OrgPublisher 10 User Guide
You can enable the Main and Views toolbars and enable either only
certain buttons or all buttons on each toolbar.
Note:
The Summary View is not available in published real-time charts.
31.If you do not enable the Copy button in the Main toolbar, you can
select the Enable PluginX copy check box if you want to allow your
end users to copy the browser window and chart to other
applications.
32.If you select Enable opening the search results in Microsoft
Excel, end users will be able to click the open in Excel button
in
the Search View and OrgPublisher opens Microsoft Excel with the
search results list displaying. Click Next.
33.Select one or both of the planning options, Enable Organizational
Planning and/or Enable Succession Planning, if you want to
enable web-based planning in the published chart. Click Next.
34.Select the Enable revision history check box if you want the
planning charts to provide a history of revisions, user ID, and, if
available, comments.
35.Select the Require that all planning charts be password
protected check box if you want to limit access to the planning
charts.
36.If you want an indicator in the planning chart when changes are
made, select the Show visual indicator for changes check box.
37.Click Set default options for change report if you want to modify
the information provided in the planning chart change report. See
the Setting Change Report Default Options procedure in this
document for detailed information. Click Next.
38.If you are publishing a secured EChart, you can choose where to
store your planning charts. You can Store planning charts on the
user's local hard drive, and these charts can be shared with other
users via email.
Or, you can Store planning charts centrally on the EChart
server. Each user will automatically have access to planning charts
that exist at or below the user's section of the hierarchy.
Note:
You can modify the BAT file created through the Publishing Wizard to publish
to a location other than the server. Doing this may increase publishing time if
your chart is extremely large (200,000+ records) or if the server has limited
resources.
Publish Your Charts/Publish EChart Thin Client
394
Aquire OrgPublisher 10 User Guide
39.Type the name of the folder on the server that will be used to store
the planning charts. Click Next.
Note:
It is strongly recommended that this folder be secured so that it is accessible
to the EChart server but not HTTP requests.
40.Click the down-arrow to select a group that will be allowed to create/
view/modify planning charts only from a selected point in the chart.
41.Click the down-arrow to select a group name will be allowed to
create planning charts for the entire chart hierarchy. Click Next.
42.Click on the plus sign to expand the context menu commands (chart
action buttons) for the published chart. Click an item to turn it off or
on. The default to all options are enabled. A green check indicates an
option is enabled, a red X that the option is disabled. Click Next.
43.If you are publishing your chart using a different "top of chart" than
the actual top box in the chart, you can select the Exclude
positions above check box if you do not want your end users to drill
up in the chart.
44.Select the Create directory view for chart check box if you want
to publish an additional HTML file of the chart that contains only the
Search View columns. See the Publishing a Directory Version of the
Chart procedure in this document for detailed information.
45.If you want to allow the rich client chart to be personalized by the
end user, select the Remember each user's navigation and
interface changes check box.
46.Select either the Open hotspots in the same browser window or
the Open hotspots in a new browser window radio button based
on how you want end users to access the chart's hotspots.
47.You can choose to use your own rich client help for your published
chart by typing the file name and location in the URL for PluginX help
file field which users can access by clicking the question mark
in the OrgPublisher toolbar. Click Next.
48.In this dialog you can set the Maximum number of email
recipients in Search View. The default is 20, but you can change
that, depending on your system.
49.If you are publishing to rich client, and want to publish your chart for
accessibility by JAWS assistive software, select the Enable support
for the visually impaired check box. Click Next.
395
Publish Your Charts/Publish EChart Thin Client
Aquire OrgPublisher 10 User Guide
If you are publishing to thin client, proceed to Step 51, if not,
proceed to Step 54.
50.If you are publishing to thin client, the next dialog contains several
default selections, which you may override by clearing the options.
Enable JavaScript allows end users to close views and do more
specific searches.
Enable end users to print charts via PDF files will allow end
users to print the thin client chart.
In the Chart Graphic Options section, JPEG is the default
selection. If, however, your chart does not contain photos, gradients,
or backgrounds, you may want to select the GIF radio button for
better text quality.
51.Select the Use optimized toolbar and button images check box if
you cache static images.
52.If you want to use a custom style sheet for this chart, type the URL
for the style sheet. Click Next.
53.If you want to set up an archive schedule now, select the Keep an
archive of this chart check box.
54.Type or Browse to the location where you want to store the
archives.
55.Select the interval at which you want the chart to archive, Every
time the chart is published, Weekly, or Monthly. Click Next.
56.If you are publishing to thin client, the next dialog contains several
default selections, which you may override by clearing the options.
Enable JavaScript allows end users to close views and do more
specific searches.
Enable end users to print charts via PDF files will allow end
users to print the thin client chart.
In the Chart Graphic Options section, JPEG is the default
selection. If, however, your chart does not contain photos, gradients,
or backgrounds, you may want to select the GIF radio button for
better text quality.
57.Select the Use optimized toolbar and button images check box if
you cache static images.
58.If you want to use a custom style sheet for this chart, type the URL
for the style sheet. Click Next.
59.Select the Publish now radio button to publish your EChart
immediately.
Publish Your Charts/Publish EChart Thin Client
396
Aquire OrgPublisher 10 User Guide
Select Publish later to open the Publish charts dialog where all
publishing definitions are kept. You can publish your EChart directly
from this dialog or schedule your EChart to publish with Task
Scheduler.
The Publishing Summary message displays the link, or links if you
also chose to publish a directory view chart, to your published charts.
Click on the link to preview the chart.
Redirecting a Published EChart
For security purposes, you can redirect a published EChart to an alternate
data folder.
1. Create an INI file with the same name as the chart and include the
chart path; for example:
[OrgPublisherEChart]
OCS_PATH="C:\secure_directory_path\secure_folder\OCS\File_name.OCS
2. Place the INI file in the default directory created by OrgPublisher.
3. Copy the DLL file, and any associated style sheets if publishing as
thin client, to the secure directory.
Republishing Charts
Note:
If you previously published a chart with a version earlier than OrgPublisher 8,
you may want to modify your publishing definition to take advantage of the
new functions.
If you are republishing an EChart originally published on a previous version of
OrgPublisher, you must delete the EChart DLL file before republishing using
Version 8 and later.
1. Select File from the Main menu, then Publish from the pull-down
menu. You can also click the Publish button
charts dialog opens.
. The Publish
2. All of your publishing definitions are listed. Click the gray box to the
left of the publishing definition you want to select.
3. Click Publish to republish the chart. The chart is published and you
are prompted to preview it. Click Yes to preview the chart as it will
be seen on the web. Otherwise, click No.
397
Publish Your Charts/Republishing Charts
Aquire OrgPublisher 10 User Guide
4. If you need to modify your chart before republishing, click Update to
walk through the Publishing Wizard to republish.
5. Click Publish All to publish all of the publishing definitions for this
chart. You cannot preview the charts if you select this option.
Republishing EChart Rich/Thin Client Charts
1. Select File from the Main menu then Publish from the pull-down
menu. You can also click the Publish button
charts dialog opens.
. The Publish
2. All of your publishing definitions are listed. Click the gray box to the
left of the publishing definition you want to select.
3. Click Publish to republish the chart. The chart is published and you
are prompted to preview it. Click Yes to preview the chart as it will
be seen on the web. Otherwise, click No.
4. If you need to modify your chart before republishing, click Update to
walk through the Publishing Wizard to republish. Follow the dialog
prompts, and click Publish Now on the last dialog.
5. OrgPublisher displays the EChart Link Summary message. Click on
the link to update and republish your chart. (The HTM link is always
created when you publish an EChart. The DLL/Frame link is created
when you publish an EChart thin client .)
Note:
The links in the EChart Link Summary are valid only when publishing to a
server. Clicking on the EChart link does not actually run the BAT file, although
it performs in a similar manner. If you modify the BAT file itself, you must run
it manually to execute the changes.
6. If you click OK instead of on the link, you must run the BAT file
manually.
When you first publish an EChart using the Publishing Wizard,
OrgPublisher puts all the related files onto your server and creates
the BAT (batch) file.
To manually republish an updated EChart, whether rich client or thin
client format, run the EChart BAT file. The BAT file will:
– unload the EChart from the server memory
– publish the EChart files to the server (if not already done)
– reload the EChart onto the server
Publish Your Charts/Republishing Charts
398
Aquire OrgPublisher 10 User Guide
Changing a Publishing Definition
You can modify an existing publishing definition using the Publish charts
dialog.
1. Select File from the Main menu then Publish from the pull-down
menu. You can also click the Publish button
in the toolbar.
The Publish charts dialog displays at the Publishing Definitions
tab.
2. The Name field lists the publishing definitions for this chart. Click the
gray box to the left of the publishing definition to select the one you
want to change.
3. Click Update to walk through the Publishing Wizard for this
publishing definition, modifying the desired elements.
Note:
Publishing formats can not be changed within the Publish charts dialog. All
publishing updates must be done within the Publishing Wizard.
4. Select a publishing time and click Finish. The new options are saved
in the existing publishing definition when you save the file.
Note:
If you installed the Web Administration mode of OrgPublisher, you cannot
change a publishing definition. The publishing definition and name of charts
published with Web Administration must be the same.
Deleting a Publishing Definition
1. Open a previously published chart or a chart for which you have
defined and saved a publishing definition.
2. Select File from the Main menu then Publish from the pull-down
menu. You can also click the Publish button
The Publish charts dialog opens.
in the toolbar.
3. In the Charts to Publish field select the publishing definition to
remove from the list.
4. Click Delete. The definition no longer exists.
5. Save the chart file.
399
Publish Your Charts/Changing a Publishing Definition
Aquire OrgPublisher 10 User Guide
Using the Publish Charts Dialog
Note:
If you installed the Web Administration mode of OrgPublisher, you cannot
change a publishing definition. The publishing definition and name of charts
published with Web Administration must be the same.
Web servers do not allow clients to schedule tasks. The OrgPublisher Web
Administration Server allows you to publish charts manually. You can,
however, open the desktop OrgPublisher version and schedule the publishing
definition in the Publish charts dialog using the Web Administration
SourceCharts folder.
1. Log on the server as an administrator or power user.
2. Open the desktop OrgPublisher application. (If default install is used, it
would be in c:/program files/orgpubx).
3. Open the chart (found in the SourceCharts folder).
4. Schedule the publishing definition in OrgPublisher using the Schedules tab.
Also, when you are publishing to ECharts, you must manually schedule the
BAT file created in the first manual publishing. To do this, open the Task
Scheduler on the server to add the .BAT job.
ECharts are an exception, and are not automatically published using the
Publish charts dialog.
The Publish charts dialog is enabled after you have published a chart or
created a publishing definition.
In the Publish charts dialog, you can review the list of publishing
definitions, the publishing schedules, and the schedule status of your
charts.
You can also create new definitions and schedules, or update or delete
existing definitions and schedules. From the Publish charts dialog, you can
publish one or all of your definitions and preview the chart before you
actually publish it.
The Publish charts dialog contains three tabs.
Publishing Definitions tab
Schedules tab
Schedule Status tab
Publish Your Charts/Using the Publish Charts Dialog
400
Aquire OrgPublisher 10 User Guide
Publishing Definitions tab
The Publishing Definitions tab of the Publish charts dialog provides the
same elements as the Publishing Wizard and is available as soon as you
have created a definition or published a chart.
This tab displays information about your publishing definitions. Buttons
enable you to create New, and Update or Delete existing publishing
definitions. Buttons are also available to Preview your chart, Publish a
chart definition or Publish All definitions and Browse for the publishing
location you want.
Fields in the Publishing Definitions tab are:
Field
Name
Start at
Style
How to publish
FTP to Web
Server
Date published
Definition
The name you set up for the chart publishing definition.
The box title chosen to be the “top of chart ” for this
published chart.
The style selected for the published chart.
The publishing format selected, such as PluginX.
If the check box is selected, indicates that the
published definition is sent to a web server via FTP.
The date the chart was last published with this
definition.
Schedules tab
The Schedules tab of the Publish charts dialog provides a list of your
publishing schedules and the last time the publishing schedule ran. The
Schedules tab displays information about the schedules for your
publishing definitions. Buttons enable you to create New and Delete or
Update existing schedules.
Note:
Always verify that your chart has published as scheduled by checking the Last
run date and time or the Status information on the Schedule Status tab.
Fields in the Schedules tab are:
Field
Name
Publishing
Definition
401
Definition
The name of the publishing schedule.
The name given to describe the publishing definition.
Publish Your Charts/Using the Publish Charts Dialog
Aquire OrgPublisher 10 User Guide
Field
Schedule
Last run
Definition
The date and time the definition is scheduled to run.
The date and time the definition was last published.
Schedule Status tab
The Schedule Status tab of the Publish charts dialog provides a list of
your publishing definitions and the status of each publishing run. The
View log button enables you to open your current scheduling log in
Notepad to review it.
Fields in the Schedule Status tab are:
Field
Publishing
Schedule
Status
Definition
The name describing the publishing schedule.
This field describes the current status of the publishing
schedule. If blank, the chart has not yet been
published. Once a chart is published, the status reads
“Publishing completed.” If a problem occurs during the
publishing process, you may see “Access denied” or
“Login failure.”
Publish Your Charts/Using the Publish Charts Dialog
402
Aquire OrgPublisher 10 User Guide
Securing Published Charts
Note:
If you choose not to secure ECharts, they can be accessed by any chart user,
as well as any user who can access the server where the EChart resides.
EChart security works only with an unbroken hierarchy. Orphans within a
secured chart will disrupt all security controls.
If you plan to use EChart security, verify that your custom fields are set for
Security before you open the Publishing Wizard.
When publishing a real-time chart, you must use IIS security. The Publishing
Wizard security dialog is disabled for this option.
Active Directory authentication for EChart thin client will always require a
manual entry of the user's password.
In order to ensure that your user level security is not circumvented, you must
restrict all users from accessing or transferring the OCS file in the EChart
publishing directory.
Securing a PluginX Chart
OrgPublisher contains a feature for charts published in the PluginX format
by encrypting the chart and setting a password.
Note:
Password encryption provides basic security only. If you want to publish a
chart with NT authentication or field level security, you should publish using
the EChart format.
1. Follow the dialogs in the Publishing Wizard or Publish charts dialog
selecting the PluginX publishing format.
2. When the wizard displays the dialog with the password fields, select
the Password protect this chart check box.
3. Type the password you want to use in the Password field.
4. If you want users to be able to access the chart without typing the
password each time they open it, select the Allow 'Remember my
password' option in the PluginX check box.
5. OrgPublisher uses the 40 bit encryption by default. If your users
have the Microsoft High Encryption Pack installed on their machines,
you can select the 128 bit encryption radio button.
6. Click Next and continue with the Publishing Wizard.
403
Publish Your Charts/Securing Published Charts
Aquire OrgPublisher 10 User Guide
When the encrypted chart is accessed in PluginX, the Enter Password
dialog opens. If the Remember my password option was selected
when the chart was published, that check box also displays in the
text box.
End users type the correct Password and click Unlock to open the
chart.
Securing an EChart
OrgPublisher contains a security feature for ECharts that provides security
at the chart and custom field levels. A unique user ID custom field
record must be kept in the OrgPublisher Input File in order to
secure ECharts. In addition, if the manual entry of a password will be
required, you must also keep the password information in an Input File
custom field record.
OrgPublisher uses the Windows NT® authentication to help secure a
published chart. Authentication provides the knowledge of the location of
each person in the chart, and a person must be charted in order to open a
secured EChart. You can also secure styles to a group, which can enhance
a secure rich client EChart.
The Publishing Wizardprovides the security chart level options and the
Custom Field Properties dialog provides the field level security options.
The List View, Profile View, Search View, and Search dialog all reflect the
same authentication level. Commands, such as go to top of chart, display
whole chart, and drill-up/drill-down buttons, all recognize the "top of
chart" as the end user's supervisor box, and will not display chart
information beyond that point.
There are three types of authentication.
• Full Windows NT authentication - the server automatically
recognizes you by your Windows NT login and password and opens the
OrgPublisher EChart at your box. If a user is dialing in and cannot be
recognized automatically, the user will be prompted for a user ID and
password.
• Manual authentication - the server prompts each user to enter a
user ID and password in order to open the OrgPublisher EChart. This
password is designated in the Input File Record and selected in the
Publishing Wizard when activating this security type.
• Private fields - the server does not pass private field information into
the OrgPublisher EChart for users not specified in the Custom Field
Properties dialog Security option.
Publish Your Charts/Securing Published Charts
404
Aquire OrgPublisher 10 User Guide
Setting EChart Security
1. Verify that you have stored the appropriate custom field records in
your input file.
2. If you want to set field level security, open the Custom Field
Properties dialog from the Data menu option, or by clicking on the
Custom fields
button in the toolbar. If you do not need field level
security, proceed to Step 7.
3. Select a custom field to secure and click Security. The Custom Field
Security dialog opens.
4. Accept the default selection to Allow this field to be searchable,
or clear the check box if you do not want end users to search for the
custom field in the published chart.
5. In the Options for secure ECharts section, select the radio button
that best fits the user audience you want to have access to the field.
– Entire chart - Select this radio button if you want the field displayed
throughout the entire chart. This is the default option.
– User's box and subordinates - Select this radio button if you want
the field displayed only in the user's box and all boxes below it.
– User's subordinates only - Select this radio button if you want the
field displayed only in the boxes below the user's box.
6. Select the group, if applicable, that you want to have access to the
secured field. Everyone is the default option. Fields display in the
chart when both the user audience and group criteria are satisfied.
7. Click OK to return to the Custom Field Properties dialog. Click OK to
accept the security and exit the Custom Field Properties dialog.
8. Open the Publishing Wizard by clicking Tools in the Main menu and
Publishing Wizard from the options list, or click the Publishing
button
in the toolbar.
9. Follow the prompts in the wizard dialogs. When you reach the
security dialog, select a security level option. If you select to secure
your chart using one of the following methods, users must be in the
chart in order to open it.
– Unsecured - This radio button is the default selection and allows all
users to view the entire chart and its contents.
– Windows® NT® operating system authentication - Select this
radio button to allow only users who have Windows NT access and
who are actually located in the chart to access the chart.
405
Publish Your Charts/Securing Published Charts
Aquire OrgPublisher 10 User Guide
– System user ID/box linkage - Select this radio button if you want
to give any user ID on the user machine access to the chart. This is
not a secure setting. The chart will open at the user's box.
– Chart - Select this radio button to require users to manually type an
ID and password to open and view the chart.
– Reverse proxy - Select this radio button to allow OrgPublisher to
retrieve the user ID from the HTTP header variable and use it for
authentication.
10.If you selected the Chart option, click the down-arrow in the
Password field and select the field in the chart containing the
password information. This must be stored in an Input File custom
field record.
11.No matter which security option you choose, click the down-arrow in
the User ID field and select the field in the chart that holds the
unique user ID. Click the down-arrow in the Format of User ID
field to select the user ID format. This information must be stored in
an Input File custom field record.
12.In the Starting box in chart section, select the box where you want
OrgPublisher to display as top of chart.
– Top of chart - Select this radio button to open the chart at the
original top of chart box, displaying all levels in the chart.
– Supervisor's box - Select this radio button to open the chart at the
user's supervisor's box, displaying all levels from that point
downward.
– User's box - Select this radio button to open the chart at the user's
box, displaying all levels from that point down.
– Box ID in this field - Select this radio button to open the chart at a
top of chart box other than the previous options. Click the downarrow in the adjacent field to select the field you want to use. This
unique ID must be stored in an Input File Layout custom field record.
13.The Allow users to drill up from starting box check box is the
default selection, and allows users to navigate to levels above their
box in the chart. Clear the check box if you do not want users to
navigate above their own chart level.
14.Complete the Publishing Wizard. When the published chart is
opened, it reflects the security options you have selected.
Securing an EChart Custom Field
You can set security on EChart custom fields using the Custom Field
Properties dialog. The Publishing Wizard also enables you to select
security settings for ECharts.
Publish Your Charts/Securing Published Charts
406
Aquire OrgPublisher 10 User Guide
Note:
All fields display in archived charts. When using OrgHistory to archive an
EChart with secured custom fields, you may want to consider removing the
data from those fields, as described in Creating a New Archive Chart.
You can designate custom fields as not searchable in published charts.
The fields are still visible in the chart but end users will not be able to
search for them.
1. Select Data from the menu bar, then Custom Field Properties
from the pull-down menu. You can also use the Custom fields
button in the toolbar. The Custom Field Properties dialog opens.
2. Position the cursor at the custom field you want to secure and click
Security. The Custom Field Security dialog opens.
3. The Allow this field to be searchable check box is a default
option. If you do not want end users to searching using this custom
field, clear the check box.
4. Depending on where you want the security to start, based on the end
user's place in the chart, select Entire chart, User's box and
subordinates, or User's subordinates only.
5. If you want to secure fields based on a group, allowing only members
of the selected group to view the field, click the down-arrow and
choose a group. Accept the default of Everyone if you if all users are
allowed to view the field.
6. If you want to secure fields so that they are only visible in the
records of members of a selected group, click the down-arrow and
choose a group. Accept the default of Everyone if you do not need
this feature.
7. Click OK to return to the Custom Field Properties dialog. Click
Cancel if you do not want to apply your changes to security. All
security criteria must be met in order for the selected custom field to
display in the chart.
Selecting Role-based Toolbars
If you publish an EChart rich client, you can secure role-based toolbar
buttons based on groups.
Note:
If your chart contains only one group, the lock icons are disabled.
1. Create any groups needed to secure toolbar buttons.
407
Publish Your Charts/Securing Published Charts
Aquire OrgPublisher 10 User Guide
2. Create a publishing definition for an EChart rich client after selecting
the Advanced Mode option in the Publishing Wizard.
3. When you reach the toolbar button selection dialog, open locks
appear to the left of each securable button.
4. Click on the lock to display security options.
Figure 117
5. Right-click on the lock to display the available groups. Click to select
individual groups or click (Select all groups) to include all group
results.
Figure 118
Publish Your Charts/Securing Published Charts
408
Aquire OrgPublisher 10 User Guide
6. After selection, the lock appears closed and the button displays a
green filled check box indicating that it is available for the restricted
viewing audience.
Figure 119
Only users who are in the selected groups have access to the locked
buttons when they access the published EChart.
409
Publish Your Charts/Securing Published Charts
Aquire OrgPublisher 10 User Guide
Additional Publishing Tasks
Auto-archiving Charts
You can archive a chart at the same time you publish it.
1. Follow the Publishing Wizard for the PluginX, EChart rich client, or
EChart thin client format.
After you make all your selections in the wizard dialogs, the next to
last dialog presents archive options.
Figure 120
2. Select the Keep an archive of this chart check box.
3. Type or Browse to the location where you want to store the
archives. Chart archive names are generated using the publishing
definition name and date.
4. Select the interval at which you want the chart to archive, Every
time the chart is published, Weekly, or Monthly.
5. Click Next and complete the Publishing Wizard.
If position IDs or person IDs are missing, this dialog prompts you to
add this information to your data.
Publish Your Charts/Additional Publishing Tasks
410
Aquire OrgPublisher 10 User Guide
Figure 121
Figure 122
Figure 123
Note:
When archiving from the Publishing Wizard, the OrgHistory definition is not
automatically created. If you create a publishing schedule for the chart, the
archive is also scheduled.
Choosing EChart Thin Client Settings
When publishing your chart in EChart thin client, you can accept default
settings, or select settings of your own when the Publishing Wizard
reaches the next to the last dialog. EChart thin client settings help you
publish a chart that will look good and work within your browser, but can
also enable end users to print the chart.
Choices include enabling JavaScript, choosing JPEG or GIF graphics, using
a cascading style sheet, enabling PDF printing, and optimizing images.
411
Publish Your Charts/Additional Publishing Tasks
Aquire OrgPublisher 10 User Guide
Settings
Enable
JavaScript
Enable end users
to print charts
via PDF files
JPEG
GIF
Use optimized
toolbar and
button images
Cascading Style
Sheet
Descriptions
Accept this default selection to allow end users to close
and reopen views, as well as perform searches on
numeric fields.
Clearing this option prohibits end users from closing
views and forces them to search using the All fields
options.
Accept this default selection to provide end users with a
"book style " print option for the chart.
Clearing this option forces end users to use the browser
Print button in order to get a hard copy of the chart,
which only prints what displays in the browser window.
Accept the default selection of JPEG if your chart
contains photos, background or box color gradients, or
background images.
Selecting the GIF radio button will provide a published
chart with clearer text quality, but will display lower
quality photos and graphics.
You may be able to improve performance by caching
static images. When enabling this option, the
ChartImages subfolder, in the OrgPub9 folder, must
be copied to the destination web folder.
You can type a path to your corporate or custom
cascading style sheet you want to use with this thin
client chart.
Two cascading style sheets are available with the OrgPublisher
installation, and can be found in the css subfolder of the OrgPub9 folder.
Choosing PDF Font and Image Settings
When publishing your chart in PDF format or printing an EChart thin client
chart, OrgPublisher defaults to several settings. These include chart,
paper, font and image choices.
Font embedding and images can affect the size of the PDF file which, in
turn, can affect the response time.
Publish Your Charts/Additional Publishing Tasks
412
Aquire OrgPublisher 10 User Guide
Settings
Font Embedding
Printer
Resolution
Description
OrgPublisher defaults to the Font Embedding check
box. Embedding fonts used in the creation of the chart
into the published PDF ensures that the end user sees
the chart text just as it is in the original chart.
If you have concerns about the size of the file (font
embedding significantly increases the file size) you can
clear the option.
The default Printer Resolution is set to 600 DPI, but
you can select another option from 72 DPI to 1200 DPI.
DPI means dots of ink (or toner) printed per inch of
full-color and gray-scale images. The higher the
resolution, the more detailed the image.
Remove
If you accept the default, OrgPublisher will Remove
Duplicate Images Duplicate Images. If you must keep duplicate images
in the PDF chart, clear this check box.
Downsample
OrgPublisher defaults to Downsample highresolution images when creating the PDF file. If you
high-resolution
want to keep high-resolution images, clear this check
images
box.
JPEG
Compression
High-resolution images provide sharper graphics but
can also increase the file size or take a longer to
display.
If you are concerned about the PDF file size and the
sharpness of graphics in your PDF chart is not a high
priority, you can select the JPEG Compression check
box.
Once you've published the chart, a dialog displays the progress of the PDF
conversion. After the conversion is complete a message displays the
number of chart pages created.
Choosing PDF Paper Settings
When publishing your chart in PDF format or printing an EChart thin client
chart, OrgPublisher defaults to several settings. These include chart,
paper, font and image choices. You can choose several paper settings,
such as paper size, page orientation, and page margins; but you can
select other options.
413
Publish Your Charts/Additional Publishing Tasks
Aquire OrgPublisher 10 User Guide
Settings
Paper Size
Page Orientation
Margins (in
tenths of
millimeters)
Description
You can choose the paper size you want for the PDF
chart. The default is Letter 8 1/2 x 11 in. You can
select Legal 8 1/2 x 14 in, A4 210 x 297 mm
(International/European paper size, roughly 8.27 x
11.69 in) or A3 297 x 420 mm (International/
European paper size, roughly 11.69 x 16.54 in).
You can choose the page orientation that will best
display your PDF chart. The default is Landscape but,
depending on the layout selected, you can choose
Portrait.
You can choose the page margins (in tenths of
millimeters) that will best display your PDF chart. The
default margins are Horizontal 60 and Vertical 60.
Type over the numbers if you want to change them.
Once you've published the chart, a dialog displays the progress of the PDF
conversion. After the conversion is complete a message box displays the
number of chart pages created.
Configuring EChart Multiple User Selections
When publishing a secured EChart, there may be multiple occurrences of
end user ID records; for instance, an employee reports directly to a
manager, but also participates in a project team and, therefore, also has
an indirect reporting relationship to the project leader. When this occurs,
the end user can select which occurrence to use when opening the chart.
You can choose which fields the end user can see when making the user
ID record selection.
1. Click Options in the Main menu then EChart security options from
the options list. The EChart Multiple Instance User Configuration
dialog opens.
2. Select the check box for each field you want the end user to see,
such as Name of user's manager, First name, Last name, Job
Title, and more.
3. When you have finished your selections, click OK. The dialog closes.
When opening an EChart, end users are shown the Select User Instance
dialog to choose which instance to use when accessing the chart. The
dialog states that the user ID is assigned to multiple records in the chart
Publish Your Charts/Additional Publishing Tasks
414
Aquire OrgPublisher 10 User Guide
and one of the displayed instances must be chosen to view the chart. The
information you select to display helps them make the right decision.
Enabling and Disabling Functions in a Published
Chart
If you publish your chart in the PluginX or EChart format, you can select
to enable or disable certain end user functions in the published chart.
These selections are made in the Publishing Wizardand can be updated.
The EChart thin client mode does not contain all toolbar options. For
instance, the toolbar copy and search features are not available.
If you are publishing a secured EChart, you can select role-base toolbar
buttons based on groups.
In addition, in the PluginX or EChart publishing format, you can:
• Allow end users to access different styles and groups by enabling the
Styles bar in the published chart. The default is to enable the Style
bar.
• Display the Status Bar in the Chart View, which explains what the
users are viewing. For instance, the position type of the person in the
selected box and head counts. The default is to enable the Status bar.
• Enable specific functions from the Main toolbar such as searching,
drilling, and print preview, or disable the entire toolbar by clearing that
check box.
Note:
If you disable the Main toolbar, the OrgPlan and Succession Plan options are
not available in the published chart.
• Select specific views your end users can see, such as the 9 Box Matrix
View, Profile View, List View, or Search View, or disable all but the
Chart View by clearing the Views toolbar check box. Some views are
disabled, depending on the publishing format selected. For instance,
thin client publishing does not provide the Tree View, and real-time
chart publishing does not provide the Summary View.
• Allow end users to save a published chart, or a portion of the chart,
under a different name. Select the Save as check box in the
Publishing Wizard.
• The default is to allow saving the published chart. Clear the check box
if you do not want end users to save any part of the published chart.
415
Publish Your Charts/Additional Publishing Tasks
Aquire OrgPublisher 10 User Guide
• Allow end users to preview and copy the chart into Microsoft
PowerPoint. The default is to enable that function.
• Allow end users to print the published chart. Select the Print check
box in the Publishing Wizard.
The default is to enable printing of a published chart. Clear the check
box if you do not want end users to use OrgPublisher to print a
published chart. They will still be able to use the browser print
feature.
If you are working with a published EChart, end users will be limited
to the size of the chart they are able to print.
• Allow end users to copy the published chart. Select the Enable
PluginX Copy check box in the Publishing Wizard. The default is not
to allow any copies in the browser while the PluginX chart is open,
unless a third party copy software is used.
The default is not to enable this function. This makes the published
chart unavailable for copying, although end users can use the
browser copy and paste functions.
• Enable or disable the ability for end users to view search results in
Microsoft Excel. The default is to enable this feature.
Note:
If you are working with a published EChart, end users will be limited to the
size of the chart they are able to save.
Enabling Action Buttons
Chart action buttons are an easy way to view and access what were
previously the right-click menus for each data field in the Chart View. The
chart administrator chooses the Action button options for published charts
and can enable or disable the action button feature in the chart.
1. Click View in the Main menu.
2. If the Show Action Buttons option is not selected, click to enable
the feature.
Click the checked option to disable the feature.
Selecting Chart Action Button Options
As the chart administrator, you can select available Action button options
for each data element within the chart box in a published chart. You can
remove any or all of the items (eliminating the Action buttons) from the
published chart and planning chart.
Publish Your Charts/Additional Publishing Tasks
416
Aquire OrgPublisher 10 User Guide
1. Select File from the Main menu then Publish from the pull-down
menu. You can also click the Publish button
in the toolbar.
The Publishing Wizard or Publish charts dialog opens.
2. Step through the wizard dialogs and select the options you want
included in this publishing definition.
3. When you reach the dialog for the context menu, click an item to
turn it off or on. The default to all options are enabled. A green check
indicates an option is enabled, a red X that the option is disabled.
Figure 124
417
Publish Your Charts/Additional Publishing Tasks
Aquire OrgPublisher 10 User Guide
Figure 125
4. Click Next to complete the wizard to publish your chart.
Planning chart options differ slightly but the procedure is the same.
Figure 126
Publish Your Charts/Additional Publishing Tasks
418
Aquire OrgPublisher 10 User Guide
Using Chart Action Buttons
Chart action buttons are an easy way to view and access what were
previously the right-click menus for each data field in the Chart View. The
chart administrator chooses the Action button options for published
charts.
This feature is available in the OrgPublisher application and in charts
published as PluginX or EChart rich client, as well as OrgPlan charts.
1. Open the chart and select a data field in a chart box, for instance the
job title. The Action button appears to the right of the chart box.
Figure 127
2. Click the button. The available menu options appear.
Figure 128
In this example, the data includes Smart Links associated with the
data field. Smart Links display at the top of the Action menu list.
Note:
419
Microsoft® Internet Explorer will append the OrgPublisher menu list with
Internet Explorer specific options, such as "Right to left Reading order" or
Publish Your Charts/Additional Publishing Tasks
Aquire OrgPublisher 10 User Guide
"Insert Unicode control character." These additional menu options cannot be
disabled in the browser.
3. Select the option you want to use and proceed with your task. If you
choose not to select a menu option, click in a blank area of the chart
to close the menu.
Chart action buttons include more options when used by the chart
administrator within OrgPublisher. The following graphic is of the
same box and job title from the chart administrator’s perspective.
Figure 129
Enabling End User Personalization
When publishing in Advanced Mode, OrgPublisher 9 allows you to
publish a chart as PluginX, EChart rich client, or thin client with an option
to remember the user’s navigation and interface changes. The same
dialog in the Publishing Wizard that provided the Remember user's
place in the chart now includes this option as Remember each user's
navigation and interface changes.
Publish Your Charts/Additional Publishing Tasks
420
Aquire OrgPublisher 10 User Guide
Figure 130
The settings are saved based on the name of the chart. The end user can
save only one group of personalized settings per chart.
End users can reset the settings at any time by clicking the Reset Style
to Published Value button
. You, as the administrator, can suppress
the display of this button when creating the publishing definition using
Advanced Mode.
Settings that can be remembered are listed below. Items marked as
PluginX only are not available in EChart thin client.
• Current style (PluginX only)
• Selected group
• Current top of chart
• Pinned Style View (PluginX only)
• View zoom percentage (PluginX only)
• Levels shown
• Drill Buttons, on or off
421
Publish Your Charts/Additional Publishing Tasks
Aquire OrgPublisher 10 User Guide
• Tree View shown and position (PluginX only)
• List View shown and position
• Summary View shown and position
• Summary View or Graphs tab (PluginX only)
• Profile View shown and position
• List View or Search View pane
End users' settings cannot override the normal behavior of the published
chart. For instance:
• If the end user has set a specific style as the opening style, but that
style is removed by the administrator, when republishing the chart,
the defined default style is displayed.
• If the end user has turned on a Summary View and you no longer
make that view available when you republish the chart, the end user
can no longer see that view.
• If the end user has selected a secured style in the personalized
settings but you remove that user from the group allowed to view that
style, the end user can no longer see the secured style. The defined
default style is displayed.
• If the end user tries to open or doc a view that is disabled the view
does not open.
• If the end user has personalized the published chart but the
administrator subsequently disables personalization, the
personalization is ignored until, or unless, the administrator re-enables
personalization.
Enabling PluginX Screen Capture in Secured
Published Charts
When you publish a PluginX or EChart rich client chart, the browser print
(ALT+PRNT SCRN) and copy features are automatically disabled only if:
• the chart is secured and the PluginX copy option is disabled in the
toolbar.
• the chart is secured and the PluginX copy option is disabled based on
the user's role.
Publish Your Charts/Additional Publishing Tasks
422
Aquire OrgPublisher 10 User Guide
This prevents end users from taking a screen shot or copy of the
published chart. When the user exits the web page containing the
published chart, the print screen and copy functionality are restored. This
does not, however, eliminate screen captures by users who have Snagit®
or other 3rd party screen capture software installed.
The copy option is automatically enabled when you publish an usecured
chart.
If you want to restore the ability to copy the secured chart in the PluginX
browser:
1. Select File from the Main menu then Publish from the pull-down
menu. You can also click the Publish
button in the toolbar.
The Publishing Wizard or Publish charts dialog opens.
2. Step through the wizard dialogs and select the options you want
included in this publishing definition.
3. When you reach the dialog for enabling toolbar options.
4. Select the Enable PluginX Copy check box, located toward the
bottom of the dialog.
Figure 131
5. Complete the wizard to publish your chart.
Note:
Taking screen captures becomes unavailable system wide only after accessing
the published chart. If the you leave Enable PluginX Copy option unchecked in
the Publishing Wizard, you can still take the screen capture system wide until
you actually open the published chart.
Enabling Publish Notification Email
You can enable the publish notification email when using the Publishing
Wizard. This notification is sent and the chart is not published in the event
of a:
• Broken hierarchy (orphans )
423
Publish Your Charts/Additional Publishing Tasks
Aquire OrgPublisher 10 User Guide
• Recursive reporting relationship
• License violation (publishing continues normally)
Note:
This email notification does not cover all possible situations that can affect
publication of a chart. Always check that your chart has published
successfully.
This notification is sent only if OrgPublisher is not being run interactively.
1. Follow the Publishing Wizard until you reach the email notification
dialog. Select the Enable Publish Notification Email check box.
The fields in the dialog are enabled for entry.
2. Type or scroll to select the email address to which the notification
should be sent in the Addresses field
3. Type the email address from which the notification should be sent in
the From Address field.
4. Type the name of your company's Mail Server.
5. The Port field defaults but can be overridden only on the rare
occurrence that it is not the standard port.
6. You can click Send Test Email to verify that the email addresses
you entered are correct.
7. Click Next, and continue with the publishing procedure.
Note:
If you have enabled Messages in the Options menu, publishing will stop when
an error is detected. If you do not want to stop publishing in the event of an
error, a registry setting must be changed. Contact the Aquire Support Team
for assistance.
Moving Boxes in the Published Chart
If given permission to access specific boxes, end users can move the
boxes in the published chart. The mouse move box feature changes only if
the user has the necessary permissions to access the box.
1. Place the mouse cursor over the border of a box. The cursor changes
into a four way arrow
.
2. Click the mouse, and drag the box from that point.
3. Release the mouse when you reach the new location for the box.
Publish Your Charts/Additional Publishing Tasks
424
Aquire OrgPublisher 10 User Guide
Moving Published Charts
When you publish charts, it is safest to publish them to the location on the
network where users will access them, typically a web server.
1. If the publish location changes, modify the publishing definition,
using the Publishing Wizard or the Publish charts dialog, to redirect
updated charts to the new location.
2. The HTML publishing format creates more than one file at
publication, so when you move or copy a published HTML chart,
make certain to transfer all the files for the chart.
Opening a Password Protected PluginX Chart
In order to protect sensitive information, you can publish charts to your
browser as password protected. End users must enter a valid password in
order to view the chart.
1. The Enter Password dialog opens when you access a protected chart
in your browser.
2. If you know the password to open the chart, type the password in
the Password field.
3. If the Remember my password option displays and you want to
open the protected file in the future without entering the password
again, select this check box.
4. Click Unlock to open the chart.
5. If you do not have a password, click Cancel and contact the
publisher of the chart you want to open.
Overwriting the Existing HTML and JS Files
The Overwrite existing HTML and JS files check box in the Publishing
Wizard is selected by default. If you do not want to write over your
existing htm or JS information, click this check box to clear it.
Note:
This option is not available when republishing an EChart.
You do NOT want to overwrite your HTML or JS files if you have modified
them, for example to display special web elements, or you will lose your
modifications.
425
Publish Your Charts/Additional Publishing Tasks
Aquire OrgPublisher 10 User Guide
However, when you first use a new version of OrgPublisher, it is advisable
to create new HTML and JS files and then make your modifications to the
new file.
Providing Access to End User Help Pages
When you publish a chart using PluginX or EChart you can provide the URL
to help pages you create or allow end users access to the Aquire end user
help pages on our web site.
The Publishing Wizard includes a dialog in which you can type or browse to
the location of help pages meant for end users of your published charts.
1. Click the Publish button
in the toolbar. You can also select
Tools in the Main menu then Publishing Wizard from the options
list. If this is the first time you are publishing a chart, the wizard
opens to the first dialog which gives you a brief overview of the
Publishing Wizard.
2. Follow the dialog prompts until you reach the dialog enabling you to
select several different options, such as creating a directory view ,
opening hotspots in the same or a new browser, or entering a URL
for the PluginX help file.
3. If you want end users to access pages on your intranet, type the
location of the end user help files you want to use in the If
applicable, type a URL for a PluginX help file field.
4. Complete the Publishing Wizard and publish your chart.
5. Open the published chart and click on the Help button
in the
toolbar. The custom help files open in the web browser.
If you do not type a custom URL, the Help button opens the default
Aquire end user help page.
Resetting the Number of Levels Published
When publishing large charts you may receive the following message:
OrgPublisher is unable to continue publishing due to your current
settings. Please try publishing only 2 levels with the drill-up/drilldown publishing option.
Publish Your Charts/Additional Publishing Tasks
426
Aquire OrgPublisher 10 User Guide
You can either reset the number of levels or change your display settings
in the Windows Control Panel to resolve this problem. To reset the
number of levels:
1. Select View from the Main menu then Show Custom Levels from
the pull-down menu.
2. Change Custom Levels to 2 to correct the error. (Otherwise, you
can reset the levels to the number you want published.) Levels can
also easily be set from the Set Chart Levels field in the toolbar.
Resetting the Starting Box
You can use the reset starting box option in the Publishing Wizard if you
have a publishing definition assigned to start at a box ID that no longer
exists in the chart.
When republishing or updating a published chart, clicking this button
changes the top of chart (boxid) saved in the publishing definition to the
currently selected box or the top box shown in the Chart View.
1. Select a box in the chart that you want as the top of chart.
2. Follow the Publishing Wizard , using the Advanced Mode option,
until you reach the dialog containing the Reset starting box button.
3. Click Reset starting box. A message verifies you want to the
publishing definition's top of chart box. Click Yes. If you decide not
to change the starting box, click No.
4. Complete the Publishing Wizard.
Selecting a User ID Instance
When opening a secured EChart, there may be multiple occurrences of
end user ID records, for instance if they have more than one report-to in
the chart. When this occurs, end users can select a user ID instance to use
in the chart session. EChart security must be enabled for this feature to
work.
1. Open the published secured EChart. The Select User Instance dialog
opens. Fields displayed include Reports to, First name, Last
name, Job title, Box Title, Position type, and Reporting
relationship (direct or indirect).
2. Review the displayed fields and select your record for the current
chart session.
427
Publish Your Charts/Additional Publishing Tasks
Aquire OrgPublisher 10 User Guide
3. If you are opening a rich client chart, click OK to close the dialog.
The published EChart opens.
If you are opening a thin client chart, the EChart opens when you
click your selection.
Selecting Additional Publishing Features
In the Publishing Wizard, you can enable or disable many features in the
PluginX or EChart published chart. Some of those features are:
• Choose to publish a chart starting from a box other than the top of the
chart. Select the Exclude positions above check box in the
Publishing Wizard. This publishes your chart starting from that
selected box in your organization. The default is not to exclude the
positions above the selected box. This makes the positions above that
box in the chart available to the end users via the Display Whole
Chart feature.
• Create an additional file to publish as a telephone directory by
selecting the Create a directory view for chart check box. The
default is not to select this option.
• OrgPublisher can remember where the user last was in the chart so
that the next time the user opens the chart, it opens in the same
place. In addition, OrgPublisher retains all interfaces changes made by
the end user. You can enable this feature by selecting the Remember
each user's navigation and interface changes check box.
• Hotspots can reuse the current browser window or Open hotspots in
a new browser window. You can select the radio button that serves
your needs best. The default is to Open hotspots in the same
browser window.
• Provide a link to the downloaded OrgPublisher end user help file if you
do not want end users to use the same file from the published chart,
which accesses the Aquire web site. If you want to make this or one of
your own local help files available to end users, type your URL in the
PluginX Help URL field.
Selecting Chart Action Button Options
The chart administrator can select available Action button options for each
data element within the chart box in a published chart. You can remove
any or all of the items (eliminating the Action buttons) from the published
chart and planning chart.
Publish Your Charts/Additional Publishing Tasks
428
Aquire OrgPublisher 10 User Guide
1. Select File from the Main menu then Publish from the pull-down
menu. You can also click the Publish
button in the toolbar.
The Publishing Wizard or Publish charts dialog opens.
2. Step through the wizard dialogs and select the options you want
included in this publishing definition.
3. When you reach the dialog for the context menu, click an item to
turn it off or on. The default to all options are enabled. A green check
indicates an option is enabled, a red X that the option is disabled.
Figure 132
429
Publish Your Charts/Additional Publishing Tasks
Aquire OrgPublisher 10 User Guide
Figure 133
4. Click Next to complete the wizard to publish your chart.
Planning chart options differ slightly but the procedure is the same.
Figure 134
Publish Your Charts/Additional Publishing Tasks
430
Aquire OrgPublisher 10 User Guide
Selecting Color Schemes for Published Charts
You can select a color scheme for the published chart when using the
Publishing Wizard. You can use the Options menu to change the color
scheme for the chart in the OrgPublisher application.
Note:
This option is disabled if you are not running in at least 16-bit color.
The Publishing Wizard color scheme option affects the published chart only.
1. Follow the Publishing Wizard until you reach the color scheme dialog.
Select the Use a predefined color scheme radio button if you
want to use a predefined scheme.
2. Click the down-arrow and select one of the schemes from the options
list. The color scheme displays in the Preview pane of the dialog. If
the scheme is what you want, click Next. If the scheme is not what
you want, repeat steps 1-2 or proceed to step 3.
3. Select the Use a custom color scheme radio button if you want to
choose the colors for your published chart.
4. Click Define custom color scheme. The Select Color Scheme
dialog opens.
5. Select the color for each gradient by clicking the down-arrow to open
the color grid. Fields in the OrgPublisher Select Color Scheme dialog
include, background and gradient intensity, as well as a Style bar
color option.
6. Select Other to define your custom color using the Microsoft®
Windows Color dialog. Select the color by clicking in the color areas
and using the intensity slide. Click Add to Custom Colors. Click OK.
7. You can also Copy scheme to the clipboard if you want to
propagate the same color scheme to another chart. The code for the
color scheme is copied to the clipboard which can be pasted into
OrgPublisher.
8. Click Paste scheme to the clipboard if you want to paste the code
previously copied to the clipboard into another OrgPublisher chart.
9. Click OK to close the dialog and return to the Publishing Wizard.
10.Click Next to go to the next dialog and complete the publishing
process.
431
Publish Your Charts/Additional Publishing Tasks
Aquire OrgPublisher 10 User Guide
Selecting Publishing Options for the Tree View
and List View
You can set display options for both the Tree View and List View from the
Options menu. These options are only available for charts that are
published with a PluginX format.
Note:
The Tree View is not available in a published thin client EChart.
1. Select Options from the Main menu.
2. Click Tree View options then, from the options list, select or clear
display options from a drop-down list:
Field
Outline
Full
Expand
Collapse
Show icons
Description
Select this option to show box titles only.
Select this option to show box titles, custom fields, and
people.
Select this option to list all chart information for all
levels shown.
Select this option to show only box titles of the top two
levels shown.
Select this option to display chart icons.
3. Click List View options then select or clear the Show Displayed
Positions check box. Select this check box to display a list of
positions currently shown in the chart. Leave unchecked to display all
positions,
The Tree View reflects your choices.
Setting a Base URL (Path)
The base URL is the common path or command string for all hotspots or
photos in the chart. To set up a base URL (path), you must store the
hotspots or photos for your chart in the same location.
OrgPublisher appends the base URL to the beginning of each link in your
chart, which means you do not have to type the complete path or string
for each hotspot or photo. (At the same time, you are supporting
browsers that require fully qualified URLs.) For example:
• If all the links in your chart are to email addresses of people within
your organization, set up the base URL as mailto:. However, you must
Publish Your Charts/Additional Publishing Tasks
432
Aquire OrgPublisher 10 User Guide
use the Custom Field Properties dialog to set an Email custom field
type to create your email link.
• If you have links to company documents or photos saved on a network
drive, for example the T drive, set up the base URL as file://
servername/folder name/.
• If these documents or photos are saved on your intranet, you might
set up the base URL as
http://www.companysite.com /CompanyDocuments/.
Note:
You must include the trailing forward slash (/) in the base URL.
You can set a base path that is unique for each custom field. This base
path can be assigned in the Hotspot Wizard or using the Attach Hotspot
dialog accessed in the Custom Field Properties dialog.
1. Open the Hotspot Wizard by clicking on the component where you
want to place the hotspot and select Tools in the Main menu then
Hotspot Wizard from the options list. You can also click on the
Hotspot button
in the toolbar.
2. The Hotspot Wizardopens. Click Next.
3. Select the Specify a base path that is unique to this field radio
button, and type or Browse to the base path you want to use for
this custom field.
4. You can also accept the default selection, Use the chart's global
hotspot base path, and type or Browse to the common path to the
hotspots in your chart. See the samples above for the correct format.
5. Click Next and continue following the wizard dialogs.
Or
1. In the Photo Wizard, type or Browse to the file name of the photo in
the Photo file name field.
2. Type or Browse to the common path to the photos in your chart in
the Base photo file path or URL field. See the URL samples above
for the correct format.
3. Click Next. If the photo preview is correct, click Finish. If the photo
preview does not show the correct photo, click Back and retype or
Browse to the correct path or URL.
433
Publish Your Charts/Additional Publishing Tasks
Aquire OrgPublisher 10 User Guide
Using a Target Frame
Most modern Web browsers support frames which enable you to view
multiple web pages at the same time. Each frame is given an internal
name so it can be the target of links or hotspots from other web pages.
To click on hotspots inside your organizational chart and display the target
web page in one of the frames, you must specify the internal target frame
name to OrgPublisher. Use any name that describes what will be displayed
in the frame. For instance, if a profile will be displayed, call the frame
Profile. This frame name should be used in the HTML document that will
be called from the published chart.
1. Select Edit from the Main menu then Define from the pull-down
menu. The Define dialog opens.
2. Select the Hotspots tab.
3. Type the name of the internal target frame in the Web browser
Target frame field.
4. Click OK.
Using the FTP Option
If you publishing using File Transfer Protocol (FTP ), you must have
authority to write to the target server directory. The FTP server authority
must be set to recursive to allow you to put the file in a directory you
create. Otherwise, it will place your files in the server’s root directory.
Sometimes the user ID must also contain the domain name, for example
mydomainname/myuserid.
1. Follow the Publishing Wizard until you reach the dialog requiring the
Publish to location.
2. Select the Send to web server (FTP) check box in the if you want
to use transfer protocol to publish your chart to your intranet. The
FTP Server dialog opens. Type the required information to publish
the chart to your intranet.
– Enter the user name - Type your system user name.
– Enter the password - Type your password, if any to transfer files to
your web server.
– Confirm password - Retype the password.
– Address (FTP URL or server name) - You must type the correct IP
address or server name before you can click Browse Site. Once you
enter the server name, the dialog displays a directory tree. Navigate
to the directory you want and click on it. The Parent Dir button
Publish Your Charts/Additional Publishing Tasks
434
Aquire OrgPublisher 10 User Guide
enables you to move up to the parent directory, if necessary. The
complete URL address displays in the Path field.
3. Type or browse to the path in the Address field. It should look
something like this, <FTP://1.1.1.1> or <FTP://webservername>.
Do not type the complete directory path, just connect to your
directory in this step.
4. Depending on your server, you may have to type the IP address or
the server name without including FTP://. When the connection is
made, navigate to the correct directory and click to select it. The
complete URL address displays in the Path field.
5. Continue following the Publishing Wizard.
435
Publish Your Charts/Additional Publishing Tasks
Aquire OrgPublisher 10 User Guide
Create or Modify a Publishing Schedule
Note:
If you choose to have more than one schedule, make sure that you set up
enough time for each schedule to complete before the next one begins.
Your machine must be turned on and the chart closed in order to
publish.nough time for each schedule to complete before the next one begins.
Always open the OrgHistory Archives dialog to verify that your scheduled
chart archived at the correct time.
If you are working with the OrgPublisher Web Administration server, all
archived charts will be created in the server ArchivedCharts folder. In
addition, if end users must access archived charts, they must be stored in the
SourceCharts folder.
You can create a "read-only" archived chart just once a day (using the One
time only scheduling option). If you want to archive an updated version of
your "read-only" chart, you can schedule it to run the next day.
A "read-only" archived chart can be overwritten with an updated version of
the same chart. A message displays verifying that the end user wants to
overwrite the "read-only" archive.
Web servers do not allow clients to schedule tasks. The OrgPublisher Web
Administration Server allows you to publish charts manually. You can,
however, open the desktop OrgPublisher version and schedule the publishing
definition in the Publish charts dialog using the Web Administration
SourceCharts folder.
1. Log on the server as an administrator or power user.
2. Open the desktop OrgPublisher application. (If default install is used, it
would be in c:/program files/orgpubx).
3. Open the chart (found in the SourceCharts folder).
4. Schedule the publishing definition in OrgPublisher using the Schedules tab.
Also, when you are publishing to ECharts, you must manually schedule the
BAT file created in the first manual publishing. To do this, open the Task
Scheduler on the server to add the .BAT job.
Creating a Publishing Schedule
When you schedule a chart to publish or archive, you can select how often
and at what time you want the job to run.
Publish Your Charts/Create or Modify a Publishing Schedule
436
Aquire OrgPublisher 10 User Guide
1. Select File from the Main menu then Publish from the pull-down
menu. The Publish charts dialog displays at the Publishing
Definitions tab. You can also click the Publish button
the toolbar.
in
2. Select the Schedules tab.
3. Click New. The Schedule Name dialog of the OrgPublisher Automatic
Task Scheduling Wizard opens.
4. Type the schedule name in the Name field or accept the default
name displayed. The schedule name can be the same name as the
publishing definition, if you want. Click Next.
5. Select the publishing definition you want to publish, or you can
choose All definitions. You should have one publishing schedule per
chart, but you can create multiple schedules. Click Next.
6. Select a radio button for your publishing schedule. Click Next.
7. If you selected One time only, the Schedule Once dialog asks you to
select a time of day and a date to automatically publish your chart.
If you selected Daily, the Daily Schedule dialog asks you to select a
day to automatically publish your chart. For example, if you want
your chart to publish Every weekday, you select that radio button.
If you want your chart to publish every other day, you select 2 in the
Every field. Then you set the time and actual date to begin
automatically publishing your chart.
If you selected Weekly, the Weekly Schedule dialog asks you to
select a weekly frequency in the Every field, such as 1 for every
week, or 2 for every two weeks. Then you must enter the time and
the day of the week to automatically publish your chart, such as
Sunday. Your chart can be published on more than one day of the
week.
If you selected Monthly, the Monthly Schedule dialog asks you to
select a day, such as Day 1, or the First Monday of the month to
automatically publish your chart. Then you select the time and the
specific months that you want your chart published.
Click Next.
8. If you are using Microsoft Windows 2000, the User ID dialog prompts
you to type a valid user name and password in order to automatically
publish your chart. You must be an authorized user of Windows® XP
or Windows® Vista™ to publish your charts on these operating
systems. Click Next.
437
Publish Your Charts/Create or Modify a Publishing Schedule
Aquire OrgPublisher 10 User Guide
9. The Scheduling dialog displays a recap of your publishing selections.
If the information is correct, click Finish. If you need to modify
information, click Back until you reach the appropriate dialog and
repeat steps above to complete your scheduling.
Scheduling a Daily Job
1. Select the Schedule now radio button and click Finish in the
OrgHistory Archive Wizard or the Publishing Wizard. The
OrgPublisher Automatic Task Scheduling Wizard opens. You can also
access the task scheduling in the Archive Schedule tab by selecting
the archive definition and clicking Update or New. Click Next.
2. Follow the wizard prompts until you reach the Schedule Frequency
dialog. Select the Daily radio button. Click Next.
3. You can select the Every x days or the Every weekday radio
button; for instance, the first option runs the job every 2 days, and
the second option runs the job every day Monday through Friday.
4. Use the up or down arrow to Select the time of day to run the
scheduling job, for instance 1:00:00 PM.
5. Use the down-arrow to Select the date you want the job to begin,
for instance 11/16/2005. Click Next.
6. Continue with the Automatic Task Scheduling Wizard. The last dialog
displays if you have successfully completed the scheduling. Click
Finish. You can also click Back and change your scheduling
information.
Scheduling a Monthly Job
1. Select the Schedule now radio button and click Finish in either the
OrgHistory Archive Wizard or the Publishing Wizard. The
OrgPublisher Automatic Task Scheduling Wizard opens. You can also
access the task scheduling in the Archive Schedule tab by selecting
the archive definition and clicking Update or New. Click Next.
2. Follow the wizard prompts until you reach the Schedule Frequency
dialog. Select the Monthly radio button. Click Next.
3. You can choose the appropriate radio button to run the scheduling
job on a specific day or a relative day of the month. Use the up or
down-arrow to select a specific Day of the month, for instance 1 or
15. Use the down arrows to select a relative day, for instance The
First Monday.
Publish Your Charts/Create or Modify a Publishing Schedule
438
Aquire OrgPublisher 10 User Guide
4. To Select the time of day to run the scheduling job, use the up or
down-arrow to choose the time, for instance 1:00:00 PM.
5. To Select the specific months to run the scheduling job, select the
appropriate check boxes; for instance to run the job quarterly you
select January, April, July, and October. Click Next.
6. Continue with the Automatic Task Scheduling Wizard. The last dialog
displays if you have successfully completed the scheduling. Click
Finish. You can also click Back and change your scheduling
information.
Scheduling a One Time Only Job
1. Select the Schedule now radio button and click Finish in either the
OrgHistory Archive Wizard or the Publishing Wizard. The
OrgPublisher Automatic Task Scheduling Wizard opens. You can also
access the task scheduling in the Archive Schedule tab by selecting
the archive definition and clicking Update or New. Click Next.
2. Follow the wizard prompts until you reach the Schedule Frequency
dialog. Select the One time only radio button. Click Next.
3. Use the up or down-arrows to Select the time of day you want the
schedule to run, such as 1:00:00 PM.
4. Use the down-arrow to Select the date you want the schedule to
run, such as 11/16/2005. Click Next.
5. Continue with the Automatic Task Scheduling Wizard. The last dialog
displays if you have successfully completed the scheduling. Click
Finish. You can also click Back and change your scheduling
information.
Scheduling a Weekly Job
1. Select the Schedule now radio button and click Finish in either the
OrgHistory Archive Wizard or the Publishing Wizard. The
OrgPublisher Automatic Task Scheduling Wizard opens. You can also
access the task scheduling in the Archive Schedule tab by selecting
the archive definition and clicking Update or New. Click Next.
2. Follow the wizard prompts until you reach the Schedule Frequency
dialog. Select the Weekly radio button. Click Next.
3. To Select a weekly frequency, use the up or down-arrow to
choose Every x week, for instance, every 2 weeks.
439
Publish Your Charts/Create or Modify a Publishing Schedule
Aquire OrgPublisher 10 User Guide
4. To Select the time of day to run the scheduling job, use the up or
down-arrow to choose the time, for instance 1:00:00 PM.
5. To Select the days of the week you want the job to run, select the
appropriate check box; for instance, if you want the job to run at the
beginning and middle of the week, you might select Monday and
Wednesday. You can also schedule the job to run on weekends by
selecting Saturday or Sunday. Click Next.
6. Continue with the Automatic Task Scheduling Wizard. The last dialog
displays if you have successfully completed the scheduling. Click
Finish. You can also click Back and change your scheduling
information.
Scheduling an EChart
You can schedule an EChart to automatically publish using Microsoft
Windows Task Scheduler, included in Internet Explorer 4.0 and later. Task
Scheduler prompts you to provide a user ID and password, which verify
that you have the necessary access rights to run the scheduled task.
You must be a member of the local Administrators group on the
computer executing the task. You may have to work with your Systems
Administrator to schedule this task. You can reschedule an EChart to
publish using this same procedure.
1. Publish your EChart using the Publishing Wizard. This creates a batch
file.
2. Run the batch (BAT) file. This file assumes that publishing and
server processing occur on the same machine.
You can modify the batch file (BAT) produced by the Publishing
Wizard in order to publish to a location other than the web server.
Doing this may minimize chart "down time” if your chart is extremely
large (200,000+ records) or if resources are limited on the web
server. EChart publishing is very CPU intensive and may affect other
processes running on the server.
The batch file must be modified after you publish, so that the
following steps occur in this order:
a. Move the EChart files to the server (if not publishing directly to
the server).
b. Unload the EChart from the server’s memory.
c. Reload the EChart into the server’s memory.
Note:
The batch file will not be overwritten during publishing, so any modifications
you make will be preserved.
Publish Your Charts/Create or Modify a Publishing Schedule
440
Aquire OrgPublisher 10 User Guide
3. Open the Microsoft Task Scheduler from the Control Panel in
Windows 2000 and Windows XP (or from My Computer in Windows
NT).
4. Double-click Scheduled Tasks. The Scheduled Tasks window opens.
5. Double-click Add Scheduled Task and follow the wizard prompts to
set up the batch file as a scheduled task.
Updating or Deleting a Publishing Schedule
1. Select File from the Main menu then Publish from the pull-down
menu. The Publish charts dialog displays at the Publishing
Definitions tab. You can also click the Publishing button
in the toolbar.
2. Click on the Schedules tab.
3. Click Update to modify a schedule and continue with Step 4. Click
Delete to permanently remove a schedule. A message confirms that
you want to delete the selected schedule. Click Yes and proceed to
step 9.
4. Select or type the schedule name in the Name field or accept the
default name displayed. The schedule name can be the same name
as the publishing definition, if you want. Click Next.
5. Select the publishing definition you want to update, or you can
choose All definitions. You should have one publishing schedule per
chart, but you can create multiple schedules. Click Next.
6. Select a radio button for your publishing schedule. Click Next.
7. If you selected One time only, the Schedule Once dialog asks you to
select a time of day and a date to automatically publish your chart.
If you selected Daily, the Daily Schedule dialog asks you to select a
day to automatically publish your chart. For example, if you want
your chart to publish Every weekday, you select that radio button.
If you want your chart to publish every other day, you select 2 in the
Every field. Then you set the time and actual date to begin
automatically publishing your chart.
If you selected Weekly, the Weekly Schedule dialog asks you to
select a weekly frequency in the Every field, such as 1 for every
week, or 2 for every two weeks. Then you must enter the time and
the day of the week to automatically publish your chart, such as
Sunday. Your chart can be published on more than one day of the
week.
441
Publish Your Charts/Create or Modify a Publishing Schedule
Aquire OrgPublisher 10 User Guide
If you selected Monthly, the Monthly Schedule dialog asks you to
select a day, such as Day 1, or the First Monday of the month to
automatically publish your chart. Then you select the time and the
specific months that you want your chart published.
Click Next.
8. If you are using Microsoft Windows 2000, the User ID dialog prompts
you to type a valid user name and password in order to automatically
publish your chart. You must be an authorized user of Windows®
2000, Windows® XP, or Windows® Vista™ to publish your charts on
these operating systems. Click Next.
9. The Scheduling dialog displays a recap of your publishing selections.
If the information is correct, click Finish. If you need to modify
information, click Back until you reach the appropriate dialog and
repeat steps above to complete your scheduling.
Deleting a Schedule in Microsoft Explorer
You can delete a publishing schedule using the Schedules tab of the
Publish charts dialog or through Microsoft Explorer. To delete a schedule
using Microsoft Explorer:
1. Locate the Scheduled Tasks folder on your PC. In Windows 2000,
this folder is found by clicking Start on the task bar then Settings
and Control Panel.
2. Select the schedule you want to delete and press DELETE. The
schedule no longer exists.
Publish Your Charts/Create or Modify a Publishing Schedule
442
Aquire OrgPublisher 10 User Guide
443
Publish Your Charts/Create or Modify a Publishing Schedule
Aquire OrgPublisher 10 User Guide
C
HAPTER
10
ARCHIVE YOUR CHARTS
Note:
Web servers do not allow clients to schedule tasks. The OrgPublisher Web
Administration Server allows you to publish charts manually. You can,
however, open the desktop OrgPublisher version and schedule the publishing
definition in the Publish charts dialog using the Web Administration
SourceCharts folder.
1. Log on the server as an administrator or power user.
2. Open the desktop OrgPublisher application. (If default install is used, it
would be in c:/program files/orgpubx).
3. Open the chart (found in the SourceCharts folder).
4. Schedule the publishing definition in OrgPublisher using the Schedules tab.
Also, when you are publishing to ECharts, you must manually schedule the
BAT file created in the first manual publishing. To do this, open the Task
Scheduler on the server to add the .BAT job.
Creating a New Archive Chart
Note:
The Position ID type provides a unique record number across all charts. If the
charts you are comparing charts that do not contain a Position ID type in field
17 or a custom field position ID, OrgPublisher uses the person ID in field 5
from the Input File Layout. If neither a position or person ID exist, an error
message displays and the comparison does not occur. For the most consistent
results, it is recommended that you assign a unique identifier field for each
record in charts that you want to compare.
You can create a "read-only" archived chart just once a day (using the "One
time only" scheduling option). If you want to archive an updated version of
your "read-only" chart, you can schedule it to run the next day.
A "read-only" archived chart can be overwritten with an updated version of
the same chart. A message displays verifying that the end user wants to
overwrite the "read-only" archive.
If you are working with the OrgPublisher Web Administration server, all
archived charts will be created in the server ArchivedCharts folder. In
addition, if end users must access archived charts, they must be stored in the
SourceCharts folder.
Archive Your Charts/Creating a New Archive Chart
444
Aquire OrgPublisher 10 User Guide
With OrgPublisher you can save a "snapshot" of an organizational chart
and use OrgHistory to archive it for future reference.
1. Click the Manage OrgHistory Archives button
in the Main toolbar.
The OrgHistory Archives dialog opens. You can also select Tools
from the Main menu then Manage OrgHistory Archives from the
options list.
2. Click New. The OrgHistory Archive Wizard opens.
3. Type or Browse to the folder where you want to store your archived
charts.
4. Accept the default name for the archived chart, which is the chart
name, or type a new name. When the archived chart is saved,
OrgPublisher adds the date to the beginning of the file name, for
instance, "20050815_Martin." Click Next.
5. Select the Password protect this chart check box if you want to
assign a password to the archived chart. Type the password and
select the encryption method radio button, 40 bit encryption or
128 bit encryption.
6. All fields display in archived charts. If your chart contains secure
custom fields you can choose to remove the data from those secured
fields in the archived chart. Select the Remove secure field data
check box. Click Next.
7. OrgPublisher defaults to Sign archived charts. If you do not want
to archive the chart with a signature, clear the check box. See the
Work with Signed and Read-Only Archive Charts procedure for more
information.
8. OrgPublisher also defaults to Mark archived charts as read-only.
You can clear the check box if you do not want to archive the chart
as read-only. See the Working with Signed and Read-Only Archive
Charts procedure for more information. Click Next.
9. If you highlighted a box other than the top of chart in OrgPublisher,
you can select the Exclude positions above check box to archive
the chart only from the selected box down.
10.If you navigated through the chart you want to archive and left the
cursor at a box other that the top box in the chart, you can click
Reset Starting Box. Click Next.
11.You can select to archive your chart immediately or later. Select the
appropriate radio button.
445
Archive Your Charts/Creating a New Archive Chart
Aquire OrgPublisher 10 User Guide
– Execute now archives the chart immediately, placing it in the folder
you designated in the wizard. The Archive Charts dialog opens to
display the names of all your archived charts. A message displays
verifying that the chart has been archived with a link you can click to
preview the archived chart.
– Execute later places the name of your chart in the Archive Charts
dialog but will not create the archived chart until you return to the
dialog and click Archive.
– Schedule now opens the OrgPublisher Automatic Task Scheduler
which walks you through scheduling a date and time to archive your
chart.
Using the OrgHistory Archives Dialog
The OrgHistory Archives dialog opens when you click the Manage
OrgHistory Archives button
in the Main toolbar or when you click
Finish in the OrgHistory Archive Wizard after you have selected the
Schedule Now option. The OrgHistory Archives dialog contains two tabs,
Definitions and Archive Schedule. You can also access the OrgHistory
Archive Browser from this dialog.
You can use this dialog to open the OrgHistory Archive Wizard to create a
new archived chart or update existing archived chart definitions, review a
list of archived charts and schedules. You can also delete archived charts
and set new schedule times to automatically archive charts.
Note:
Always open the OrgHistory Archives dialog to verify that your scheduled
chart archived at the correct time.
Scheduling a Chart for Archive
You can schedule a date and time to archive your charts. You can start the
task scheduler at the end of the OrgHistory Archive Wizard or in the
Archive Schedule tab of the OrgHistory Archives dialog.
1. If you select Schedule Now in the OrgHistory Archive Wizard, the
OrgPublisher Automatic Task Scheduling Wizard opens when you
click Finish. You can also access the task scheduling in the Archive
Schedule tab by selecting the archive definition and clicking Update
or New. Click Next.
2. In the Schedule Name dialog, type the Name you want to assign to
the archived chart. Click Next.
Archive Your Charts/Using the OrgHistory Archives Dialog
446
Aquire OrgPublisher 10 User Guide
3. Select the scheduling definition you want to archive. If this is your
first archive, only this definition displays in the list pane of the dialog.
Click Next.
4. In the Schedule Frequency dialog, select the radio button that fits
your scheduling needs. Options are One time only, Daily, Weekly,
and Monthly. Click Next.
5. If you selected One time only, the next dialog prompts you to
Select the time of day and Select a date using the drop-down
arrows. Click Next.
If you selected Daily, the next dialog prompts you to select a
frequency to archive, such as every 2 days or Every weekday. You
must also Select the time of day and Select the date to begin.
Click Next.
If you selected Weekly, the next dialog prompts you to select a
frequency to archive, such as every 3 weeks. You must also Select
the time of day as wells as Select the days of the week to
archive. Click Next.
If you selected Monthly the next dialog prompts you to select the
Day or specified day, such as the First Monday. You must also
Select the time of day and Select the specific months, such as
January and April.
6. In the User ID dialog, your login ID displays in the Type user name
field. Complete the Type password and Confirm password fields.
Click Next.
If a password is not entered, a message verifies that you want to
continue. If you select Yes, the scheduling proceeds without
requiring a password.
7. The last dialog opens if you have successfully completed the
scheduling. Click Finish. You can also click Back and change your
scheduling information.
Updating an Archive Definition
You can use OrgHistory save a "snapshot" of an organizational chart and
archive it for future reference. You can also update that snapshot if an
archive definition already exists.
1. Click the Manage OrgHistory Archives button
in the Main toolbar.
The Archive Definitions dialog opens. You can also select Tools from
the Main menu then Manage OrgHistory Archives from the
options list.
447
Archive Your Charts/Using the OrgHistory Archives Dialog
Aquire OrgPublisher 10 User Guide
2. Click Update. The OrgHistory Archive Wizard opens.
3. Complete the wizard dialog prompts to update the archive definition
following the steps for Creating a New Archive Chart.
Updating an Archive Schedule
1. Select Tools from the Main menu then Manage OrgHistory
Archives from the options list. You can also click the Manage
OrgHistory Archives button
in the toolbar. The OrgHistory
Archives dialog opens at the Definitions tab.
2. Click on the Archive Schedule tab.
3. Select a schedule from the displayed list and click Update.
4. Complete the wizard dialog prompts to update the archive definition
following the steps for Scheduling a Chart for Archive.
Deleting an Archive Chart
You can delete an archived chart definition using the OrgHistory Archives
dialog.
1. Click the Managing OrgHistory Archives button
in the toolbar to
open the OrgHistory Archives dialog. The Definitions tab displays all
archive chart definitions.
2. Select the definition you want to delete. Click Delete. The archive
chart file is removed.
3. Click OK to close the dialog and return to the chart.
Deleting an Archive Schedule
1. Click the Managing OrgHistory Archives button
open the OrgHistory Archives dialog.
in the toolbar to
2. Select the Archives Schedule tab.
3. Select the schedule you want to delete. Click Delete. The archive
schedule is removed.
4. Click OK to close the dialog and return to the chart.
Archive Your Charts/Using the OrgHistory Archives Dialog
448
Aquire OrgPublisher 10 User Guide
Resetting Starting Box in OrgHistory Archive
Charts
When you use OrgPublisher's OrgHistory feature, you can use the reset
starting box option in the OrgHistory Archive Wizard if you want the
archived chart to start at the currently selected top box shown in the
Chart View. You can use this feature to archive only a specific part of your
hierarchy within the chart.
1. Follow the OrgHistory Archive Wizard, selecting where you want to
store the archived chart, whether or not you want to password
protect the archive or remove secure fields, mark archives as readonly, until you reach the dialog with the Reset Starting Box button.
2. If you select Exclude positions above, the archived chart will only
provide information from the selected box and below in the
hierarchy.
3. If you do not select Exclude positions above, users can navigate
upward in the chart to the additional hierarchical information.
4. Click Rest Starting Box. A message verifies that you want to reset
the top of box. Click Yes. Click No if you decide not to reset the top
of box.
5. Continue with the OrgHistory Archive Wizard.
Comparing Two Charts
You can compare two organizational charts in the OrgPublisher application
that have identical custom field definitions, and generate a change report.
Fields that do not match will not be listed on the change report.
Note:
The Position ID type provides a unique record number across all charts. If the
charts you are comparing charts that do not contain a Position ID type in field
17 or a custom field position ID, OrgPublisher uses the ID in field 5 from the
Input File Layout. If neither a position or person ID exist, an error message
displays and the comparison does not occur. For the most consistent results,
it is recommended that you assign a unique identifier field for each record in
charts that you want to compare.
In addition new or renamed custom fields will not match when comparing
charts and will not be included in the change report.
1. Select Tools from the Main menu then Compare two charts from
the options list. The Compare Charts dialog opens.
449
Archive Your Charts/Comparing Two Charts
Aquire OrgPublisher 10 User Guide
You can also click Compare in the Definitions tab of the OrgHistory
Archives dialog.
2. Type or Browse to the first chart in the Select the first (older)
chart to compare field. This should be the original or older chart.
3. Type or Browse to the second chart in the Select the second
(newer) chart to compare field. This should be the modified or
newer chart.
4. You can also select the default options for your change report by
clicking Customize change report. See the Setting Change Report
Default Options procedure for additional information.
5. Click View Change Report to view the results of the comparison, or
click Cancel.
Depending on which viewing option you selected when you
customized the report, it displays either in a web browser or in
Microsoft® Excel.
The report defaults to the name OrgPubChangeReport.htm and is
placed in a temporary folder. You can rename the report and save it
in a specified folder.
The figures in the Before column represent the first chart you
selected. The figures in the After column represent the second chart
you selected.
Note:
You can also compare two archived charts and generate a change report using
the OrgHistory Archives dialog.
Using the OrgHistory Archive Browser
Once you have created one or more archive definitions, you can access
these definitions through the OrgHistory Archives dialog.
• Click
Browser.
or
to open the OrgHistory Archive
• The left-hand pane lists the OrgHistory Archive Definitions for the
current chart.
• When you double-click on a definition, it displays in the right-hand
pane, OrgHistory Archives. Select the definition then click
to open the archive.
Archive Your Charts/Using the OrgHistory Archive Browser
450
Aquire OrgPublisher 10 User Guide
• If you accessed the OrgHistory Archive Browser by clicking
in the Definitions tab, you can use the CTRL key to select archives
then click Compare to view a change report.
451
Archive Your Charts/Using the OrgHistory Archive Browser
Aquire OrgPublisher 10 User Guide
C
HAPTER
11
WORK WITH ORGANIZATIONAL
PLANNING
Note:
It is recommended that you do not combine the Succession planning and
Organizational planning features as unexpected results may occur. Succession
planning is designed to help you match people to specific positions with no
hierarchical information involved. OrgPlan is designed as an organizational
modeling tool based on a hierarchy.
When you create a planning chart, verify that the box you have selected as
top of chart is correct. Once the planning chart is created, drilling up from the
designated top of chart is not available.
Planning charts do not contain a separate My groups tab in the Search View.
If you already have groups in the My groups tab in the PluginX chart
however, those groups are copied to the planning chart.
If you renewed maintenance from a previous OrgPublisher Enterprise version
that included the organizational planning client, that feature is included in the
OrgPublisher 9 version.
A new custom field type of Position ID is available for use in comparing and
reporting on planning files. This field should contain a unique number for each
record across all charts and including open positions. If the charts you are
comparing do not contain a custom Position ID type, OrgPublisher uses the ID
in field 5. If neither exists, OrgPublisher displays an error message and the
comparison does not occur.
If you save multiple planning charts to the same web folder, you should
specify separate storage folders in order to maintain user name and password
security.
Planners may encounter an error when sending a planning chart created on a
local machine using Microsoft Vista. It is recommended that administrators
use a secured server location.
Work with Organizational Planning/
452
Aquire OrgPublisher 10 User Guide
Organizational Planning for Administrators
Working with Organizational Planning Charts
With OrgPublisher Premier, you can publish a web-based chart for org
model planning as well as succession planning. This topic covers
organizational planning; see the Working with Succession Planning for
details about succession charts.
Planning administrators can create a new planning chart, modify an
existing chart, or delete a planning chart. Selected individuals, or
planners, can create and share organizational models. Planners can
modify any data fields displayed in the Chart View. Data fields
administrators want to keep in the chart, but do not want modified, can be
displayed in the Profile View. And, since planners cannot add or delete
custom fields, administrators still maintain control over the custom fields
you decide to use in the chart.
Note:
If you renewed maintenance from a previous OrgPublisher Enterprise version
that included the organizational planning client, that feature is included in the
OrgPublisher 9 version.
Administrators enable planning charts while using the Publishing Wizard,
and can customize change report options, enable the revision history, or
password protect planning charts. If your chart contains photos, it is best
to hide the photos for your planning chart. The administrator or specified
group member can then create a planning chart using the Planning button
.
Before starting the Publishing Wizard, please review Preparing to Publish a
Chart with the Org Modeling Feature.
The planning enabled published chart toolbar includes the following
buttons.
Button
Action
Click this button to view information about the
version of OrgPublisher you are using.
Saves the chart. If this is a new chart, the Save As
dialog displays so that you can assign a name to
the file.
453
Work with Organizational Planning/Organizational Planning for Administrators
Aquire OrgPublisher 10 User Guide
Button
Action
Button available in planning enabled published
charts if both org model and succession planning
have been selected. Click to select the
Organizational Planning or Succession Planning dialog
to manage planning charts.
Button available when the Organizational planning
option only is selected in the Publishing Wizard.
Click to view the Organizational Planning dialog.
Button available when the Organizational planning
option only is selected in the Publishing Wizard.
Click to view the Succession Planning dialog.
The Cut button sends a copy of the selected text
or object to the clipboard and leaves the text or
object on the screen.
Prints the chart. Prints a specific chart view if it is
selected in Print Options or the Print Wizard
dialog.
Displays the chart as it will look when you print it
and is only available in the Chart View.
Opens the system Print Setup dialog.
Opens the preview dialog and displays the chart as
it will look in Microsoft® PowerPoint, and is only
available in the Chart View.
Click this button to move the Chart View to the top
center of the displayed drilling level.
Click this button to display the Search dialog at the
Name tab.
Use this field to enter your basic toolbar search
text. Searches are based on text you enter in the
toolbar field or select from the drop-down list, if
previous toolbar searches have been performed.
You can type one or two words, such as first name
and last name. Searches all fields one field at a
time.
Click this button to make a selected box the center
of the chart display.
Click this button to set the zoom percent for the
chart display.
Clicking this button designates the selected box as
the top of your chart for the selected style.
Click this button to display the chart from the
highest box in the hierarchy.
Work with Organizational Planning/Organizational Planning for Administrators
454
Aquire OrgPublisher 10 User Guide
Button
Action
Click this button to enable the drill buttons in your
chart which facilitate navigation between shown
and hidden levels.
Click this button to select the number of levels
from the drop-down list that you want to display.
Click this button to open and close the Style View,
which displays the styles available for the open
chart.
Click this button to open and close the Tree View,
which displays the chart in an outline format. Click
on a position or name to locate it in the chart.
Click this button to open and close the List View,
which lists employees in the chart. The view
contains two panes. One pane lists only the
employees in the portion of the org chart that is
shown. The List View pane shows custom
information such as telephone numbers and office
locations and is used as the index for a chart
printed in Book style format. You can click on a
name in this list to locate it in the chart. Columns
can be sorted.
The Search View pane enables you to conduct a
search for specific information, and to create and
save a new group. Click on a name in this list to
locate it in the chart. The Search View can,
typically, also list everyone in the chart. Columns
can be sorted.
Click this button to open and close the Profile
View, which displays information about an
employee or position, including custom fields that
are defined for that position type.
Click this button to open and close the Summary
View, which displays summary fields and totals by
position type and group.
Click this button to open the 9 Box Matrix which
displays a matrix of your talent pool.
Click this button to open the help file.
With planning enabled charts, you can:
Copying a Link to a Person in the Chart
Creating a New Planning Chart
455
Work with Organizational Planning/Organizational Planning for Administrators
Aquire OrgPublisher 10 User Guide
Deleting a Planning Chart
Opening a Planning Chart
Previewing a Book Style Chart or Previewing a Wall Style Chart
Printing Your Chart as a Book or Printing in Wall Chart Style
Sending Email to a Group
Storing Planning Charts
Organizational planning charts can be saved to the end user's local hard
drive or to your web server in a subfolder automatically created by
OrgPublisher. If you elect to use a web server, you can use the EChart
options to add security to the planning charts. End users can see a list of
planning charts created by themselves and their subordinates.
Administrators can password protect the planning chart and, if more than
one user tries to open the same chart, a message notes that someone
else is modifying the chart and a read-only option is available.
Once a planning chart is opened in OrgPlan, a special menu and toolbar
are available. Planning charts are always in Build Mode. Build Mode does
not reflect special formatting, such as multi-level peer display, reports in
the same box as their manager, or the advanced box layout settings. The
menu and toolbar offer several new options to end users which enable
them to modify and save planning charts, as well as generate a change
report or view a revision history.
See the How to Get Started with Organizational Planning Charts topic for
more information. In addition, several planning chart provisions apply.
Note:
Planners may encounter an error when sending a planning chart created on a
local machine using Microsoft Vista. It is recommended that administrators
use a secured server location.
If you save multiple planning charts to the same web folder, you should
specify separate storage folders in order to maintain user name and password
security.
Organizational Planning or Succession Planning
Available in OrgPublisher Premier, you can publish charts for planning
when publishing a PluginX or EChart rich client chart.
Planning administrators can create a new planning chart, modify an
existing chart, or delete a planning chart. Planners can modify any data
Work with Organizational Planning/Organizational Planning for Administrators
456
Aquire OrgPublisher 10 User Guide
fields displayed in the Chart View. Data fields administrators want to keep
in the chart, but do not want modified, can be displayed in the Profile
View. And, since planners cannot add or delete custom fields,
administrators still maintain control over the custom fields you decide to
use in the chart.
Administrators enable planning charts while using the Publishing Wizard,
and can customize change report options, enable the revision history, or
password protect planning charts. If your chart contains photos, it is best
to hide the photos for your planning chart. The administrator or specified
group member can then create a planning chart using the Planning button
.
OrgPublisher's succession planning feature enables you to create a chart
specifically for analyzing potential successors to jobs in your company.
Function
Organizational Planning
Succession Planning
Drag and drop
Chart View
employees
You can move the employee to a
new location within the chart with
drag and drop.
Deleting
successors
When the employee is deleted
from the position, OrgPlan
creates an open position.
Removes the display of all data
except the name from the chart
box for a more compact view of
the structure.
You must copy the employee into
the target box as a successor.
Dragging within a list of
successors in a box allows user to
rank their successor list.
When deleting the last successor
on a box, Succession does NOT
leave (create) an open position.
This option is not available in
succession planning.
Compact Build
Mode button
457
Work with Organizational Planning/Organizational Planning for Administrators
Aquire OrgPublisher 10 User Guide
Function
Toolbar
buttons
Organizational Planning
Succession Planning
All buttons for inserting positions,
jobs and boxes are available.
These buttons are not available in
succession planning:
• Insert a Box containing an open
position
• Insert Box containing a person
• Insert Box
• Insert Job
• Insert Person
• Insert Open Position
• Insert Assistant
• Insert Partner Box
Data Editing
Cut/Copy/
Paste
All fields displayed in the chart
box (except the name) may be
modified by the planner. Doubleclick on the name or job title to
change the position type.
Cut and paste options are
available.
Delete
Delete is available for data fields
within a chart box.
Search View
Standard search features and
results as defined by the chart
administrator are available.
The associated menu items are
also removed.
No displayed fields of data may
be edited.
You can “copy” existing
employees (for subsequent
pasting as a successor).
Successors may be “cut” from the
chart.
Delete is not available for existing
employees, but is allowed for
successors only.
Enhanced to show successors. A
successor icon reflects successor
status.
Preparing to Publish a Chart with the Org
Modeling Feature
The best way to prepare your chart for the Organizational Planning feature
(OrgPublisher Premier) is to create a new chart with a different data
extraction that contains only the custom fields needed for your planning
chart. This ensures that the planning chart does not contain fields you do
not want the planners to see, for instance, salaries. You can display fields
you do not want updated by planners in the Profile View only, as updates
are permitted in the Chart View only.
Work with Organizational Planning/Organizational Planning for Administrators
458
Aquire OrgPublisher 10 User Guide
Before you publish a chart with the planning feature enabled, you should
also answer the following questions.
1. Who needs access to the OrgPlan feature?
– EChart Rich Client publishing gives the most flexibility in controlling
who can use OrgPlan and what portion of the hierarchy they can
access.
– PluginX publishing gives the OrgPlan function to everyone and does
not restrict what portion of the hierarchy the planner can manipulate.
2. Can they plan only for their group or for the whole organization?
– If publishing an EChart rich client, you can create two groups:
° a) Create a group with access to the complete hierarchy (such as
"HR Planning Coordinators").
° b) Create a group with specific span of control planning (such as
"Managers Only").
– EChart rich client publishing prompts you for access levels of the
OrgPlan feature; select the appropriate group for each option.
3. How do I activate OrgPlan?
– Select either PluginX or EChart Rich Client in the Publishing
Wizard and select the Enable what-if planning check box.
4. How do I secure the planning charts?
– In the Publishing Wizard, select Require that all planning charts
be password protected. If you do not require this at publishing
time, the option is still available for the planner when the planning
chart is created.
– If publishing as PluginX, you can select either 40 bit encryption or
128 bit encryption. This is the only security method for PluginX.
– If publishing an EChart Rich Client, user IDs and passwords or
Windows NT authentication are key to identifying a user in a group
and authorizing the use of OrgPlan.
° Windows NT operating system authentication - The server
automatically recognizes you by your Windows NT login and
password.
° Chart - The server prompts each user to enter a user ID and
password.
° System User ID/box Linkage (not secure) - The server
recognizes you by your local user account information.
° Starting box in chart - Provides control for the location of where
the user opens the chart.
° Allow users to drill up from starting box - Leave unchecked to
prevent users from drilling to other areas of the chart.
5. Where do the planners send the results?
459
Work with Organizational Planning/Organizational Planning for Administrators
Aquire OrgPublisher 10 User Guide
– If you select Enable revision history in the Publishing Wizard, the
planner is prompted to log their activity as they save a planning
chart.
– Click the Set default options for change report button to modify
the default change report output. The planner can change the default
settings, when requesting a change report.
– Storage of the planning charts is also determined at publishing time.
ECharts allow storing on a local hard drive or on the EChart server.
PluginX automatically stores on the local hard drive.
Organizational Planning Chart Provisions
The Organizational planning feature, available in OrgPublisher Premier, is
intended to provide organizational modeling opportunities. This page
contains some provisions you should remember when publishing planningenabled charts.
• Do not combine the Succession planning and Organizational planning
features, as unexpected results may occur. Succession planning is
designed to help you match people to specific positions with no
hierarchical information involved. Organizational planning is designed
as an org modeling tool based on a hierarchy.
• Only one person can work on a specific organizational planning chart
at a time.
• Employees cannot be renamed. Names can be cut and pasted, and
unassigned employees in ECharts can be selected to add to the chart.
• New custom fields cannot be added.
• Fields displayed only in the Profile View cannot be modified.
• Formatting options and styles are disabled.
• End users can use the Search View to spotlight search results or a
selected group in the Chart View.
• OrgPlan users cannot enable a chart legend, but, if the planning chart
is published with a chart legend, end users can modify the existing
legend.
• The Hover Profile is not available in Organizational planning charts.
• Employees and boxes cannot be copied, only cut and pasted.
• End users can email a planning chart to another planning user.
Work with Organizational Planning/Organizational Planning for Administrators
460
Aquire OrgPublisher 10 User Guide
• If data modifications are noted when a chart is saved, the end user is
prompted to enter a description for the revision history.
Publishing a Chart for Org Model Planning
You can publish a web-based chart for organizational model (what-if)
planning using OrgPublisher Premier. Once OrgPlan charts are created,
they are always in Build Mode to allow modifications to chart components.
Planning administrators can create a new planning chart, modify an
existing chart, or delete a planning chart. Planners can modify any data
fields displayed in the Chart View. Data fields you want to keep in the
chart, but do not want modified can be displayed in the Profile View. And
since planners cannot add or delete custom fields, you still maintain
control over the custom fields you decide to use in the chart.
Note:
If you save multiple planning charts to the same web folder, you should
specify separate storage folders in order to maintain user name and password
security.
Planning charts do not contain a separate My groups tab in the Search View.
If you already have groups in the My groups tab in the PluginX chart
however, those groups are copied to the planning chart.
1. Click the Publish button
in the toolbar or the Publishing
Wizard button
in the Wizard View. You can also select Tools
from the Main menu then Publishing Wizard from the options list.
The Publishing Wizard opens.
2. Select Advanced Mode and follow the wizard dialogs, selecting the
Interactive Org Chart option then either the PluginX or EChart
Rich client format.
3. In the OrgPlan dialog, select the Enable Organizational Planning
check box. Click Next.
4. If you want the planning chart to record the Windows NT user signon ID and a comment, if supplied, for each change, click the Enable
revision history check box.
5. If you want planning charts password protected, click the Require
that all planning charts be password protected check box.
6. If you want an indicator in the chart where changes have been made,
select the Show visual indicator for changes check box.
461
Work with Organizational Planning/Publishing a Chart for Org Model Planning
Aquire OrgPublisher 10 User Guide
7. If you want to select the defaults for the planning change report,
click Set default options for change report to open the Change
Report Options dialog. See the Setting Change Report Default
Options procedure in this document for detailed information. Click
Next.
8. Select the context menu commands you want to make available in
both the planning-enabled PluginX the planning chart by expanding
each menu and selecting the options you want.
9. Click Next and continue with the publishing procedure.
10.When the chart is published, planning administrators click the
Planning button
in the toolbar. The
Organizational Planning Charts dialog opens.
11.To create a new chart, select New. See the Creating a New Planning
Chart procedure for more detailed information.
When the chart is published, the planning administrator sees one of
the following button options, based on the chart administrator’s
selection.
Organizational Planning only is available Succession Planning only is available Organizational and Succession Planning are available the Planning button options list displays when the button is clicked.
Figure 135
Work with Organizational Planning/Publishing a Chart for Org Model Planning
462
Aquire OrgPublisher 10 User Guide
Managing Planning Charts
When viewing a published planning enabled chart (OrgPublisher Premier),
you can manage the planning charts.
When you click the planning charts button the first time, the standard
create a chart dialog opens. The planning button varies, based on the type
of planning chart.
Org model planning button Succession planning button Both planning options If a planning chart already exists, you see the list of existing charts. You
can select a chart to delete, open to edit, or create a new planning chart.
You can also choose to create a new planning chart.
Figure 136
463
Work with Organizational Planning/Managing Planning Charts
Aquire OrgPublisher 10 User Guide
Creating a New Planning Chart
When a chart is published in OrgPublisher Premier with the org model
planning feature enabled, end users can open the PluginX or EChart rich
client chart and create new or work with existing OrgPlan charts.
Planning administrators can create a new planning chart, modify an
existing chart, or delete a planning chart. Planners can modify any data
fields displayed in the Chart View. Data fields administrators want to keep
in the Profile View only, cannot be modified. So the administrator can
maintain control over the custom fields in the chart, planners cannot add
or delete custom fields.
1. Open the planning-enabled chart in the web browser and click the
Planning button
.
2. Select Create new planning chart. The Create New Planning Chart
dialog opens. The dialog will note where the planning chart begins,
such as "This chart will include boxes from (name) and down." For
instance, your chart administrator may publish the chart for you to
work from your box down.
3. Type a name for the chart if you do not want to accept the default.
The planning chart name defaults "OrgPlan for" and names the top
person in the chart, as well as the name of the original chart.
4. If not already enabled by the chart administrator, you can select the
Password protect this chart check box to require typing a
password whenever the chart is opened.
5. Type the Password then Retype password.
6. You can limit the number of levels available to planners by selecting
the Restrict planning chart size check box.
7. If you want a shortcut to the planning chart to display on your
desktop, select the Create a shortcut to the chart on my
Windows desktop check box.
8. Click Create and edit chart. The browser opens the planning chart
with the Insert toolbar, the Generate a change report
, and email
buttons enabled. See the Generating a Change Report procedure
for detailed information.
The planning chart saves to the folder specified when the original
chart was published. PluginX planning charts can be saved to the
Work with Organizational Planning/Managing Planning Charts
464
Aquire OrgPublisher 10 User Guide
local hard drive or the web server. See the Working with
Organizational Planning Charts topic for additional information.
Opening a Planning Chart
Planning administrators can open a planning chart (OrgPublisher Premier)
from the planning-enabled published chart. Planning charts are always in
Build Mode.
1. Click on the Planning button
in the toolbar.
2. Select Open planning chart from the options list. A list of available
planning charts displays in a pull-down list.
3. Click on the chart name you want. The planning chart opens in the
OrgPlan client.
4. Return to the planning-enabled chart by clicking the Back button
in the browser.
Deleting a Planning Chart
Planning administrators can delete a planning chart from the planningenabled published chart (OrgPublisher Premier).
1. Open the planning-enabled published chart in the web browser. Click
on the Planning button
down menu appears.
in the toolbar. A drop-
2. Select Delete planning chart. A list of all planning charts appears.
3. Select the chart you want to delete. A message displays verifying
that you want to delete the chart.
4. Click Yes. A message verifies that the chart has been deleted.
Move a Planning Chart
A published planning chart can be published to a new location other than
the default location.
1. Publish a planning enabled chart
465
Work with Organizational Planning/Managing Planning Charts
Aquire OrgPublisher 10 User Guide
2. In the toolbar, click the Organizational Planning button
.
The Planning Charts dialog opens.
Figure 137
3. Click Move Chart Location.
The Browse for Folder dialog opens.
Work with Organizational Planning/Managing Planning Charts
466
Aquire OrgPublisher 10 User Guide
Figure 138
4. Navigate to the folder where you want publish the chart, or select
Make New Folder to create a new location for the published chart.
5. Click OK to move the chart to the new location.
Storing Planning Charts
When you publish a secured EChart using OrgPublisher Premier's
organization modeling or succession planning, you can store your planning
charts either on the end user's PC or the EChart web server. Planning
charts can be shared via email when using the end user PC option. With
the server option, each end user automatically has access to planning
chart information that exists at or below the user's box in the hierarchy.
467
Work with Organizational Planning/Managing Planning Charts
Aquire OrgPublisher 10 User Guide
Storing the planning charts on the server makes sharing them very easy,
but, possibly, makes the information in them highly vulnerable. It is
essential that the folder in which they are stored is properly secured.
1. In the planning chart, select File from the Main menu then
Preferences from the options list. The Preferences dialog opens.
Figure 139
The dialog displays the default locations set by the IT administrator.
If you have the appropriate permissions, you can select to store the
planning chart on a local drive or a network location.
2. Type or browse
to the folder on the server to store planning
charts, and verify that the folder is secure - accessible to the EChart
sever but not to HTTP requests. If you are in doubt about the
security, contact your IT administrator.
3. Click OK to save the specified folder and return to the planning chart.
Work with Organizational Planning/Managing Planning Charts
468
Aquire OrgPublisher 10 User Guide
Additional Organizational Model Planning Tasks
Selecting Planning Chart Options
When you choose to publish a chart with organizational planning or
succession planning enabled (OrgPublisher Premier), you can select
additional features specifically for planning charts.
1. Follow the Publishing Wizard dialogs until you reach the enable
planning dialog. Select either or both planning options,
Organizational Planning or Succession Planning.
2. Select the Enable revision history check box if you want to provide
a history of revisions, user ID, and, if supplied, any comments made
by the user.
3. Select the Require that all planning charts be password
protected check box if you want to password protect the planning
chart.
4. Select the Show visual indicator for changes check boxes if you
want to use a visual marker in chart boxes that have been added,
moved, or edited.
5. Select the Set default options for change report check box if you
want to generate a change report or export change data.
6. Continue with the Publishing Wizard.
Enabling a Visual Change Indicator in the
Planning Chart
The Show Change icon
is a visual indicator that change has occurred in
the planning chart (OrgPublisher Premier). The chart administrator
determines if this feature is enabled in a planning chart. The planner
decides whether or not to display the icons.
The change icon appears as a small pencil icon in the upper right-hand
corner when a chart box has been moved, added, or edited.
1. Click the Publish button
in the toolbar. You can also select
Tools in the Main menu then Publishing Wizard from the options
list. If this is the first time you are publishing a chart, the wizard
opens to the first dialog which gives you a brief overview of the
Publishing Wizard.
469
Work with Organizational Planning/Additional Organizational Model Planning Tasks
Aquire OrgPublisher 10 User Guide
2. Follow the dialog prompts, choosing to publish a planning enabled
chart, until you reach the dialog allowing choices for the planning
chart.
Figure 140
3. Select the Show visual indicator for changes check box.
4. Complete the Publishing Wizard and publish your chart.
5. In the planning chart, click View in the menu then Show Change
Icons.
Work with Organizational Planning/Additional Organizational Model Planning Tasks
470
Aquire OrgPublisher 10 User Guide
Figure 141
As changes are made in the chart, the icon appears (with a hover
tool tip) when:
– a box has been moved
– box data has been modified
– a box has been moved and edited
– a box has been added
Figure 142
Assigning Group Access to Planning Charts
When you enable org model planning in OrgPublisher Premier and choose
to require a password to open the charts, you can assign group access at
two different levels.
471
Work with Organizational Planning/Additional Organizational Model Planning Tasks
Aquire OrgPublisher 10 User Guide
During the publishing process, the Publishing Wizard prompts you to
select a group that you want to create, view, and modify charts beginning
or beneath their box in the chart. This means that when the selected
group opens the planning-enabled chart, they can create and
modify planning charts only from that point and below in the
hierarchy.
You can also select a group that you want to create planning charts for the
entire hierarchy. This means that, based on where you have placed the
top of the chart in the planning-enabled chart, the selected group can
start their planning charts anywhere within the hierarchy.
1. Follow the Publishing Wizard until you reach the dialog allowing
you to select groups to access your OrgPlan chart.
2. Use the first down-arrow to select a group that can create a planning
chart beginning at or under the group member's box.
3. Use the second down-arrow to select a group that can create a
planning chart from any area of the hierarchy.
4. Click Next and complete the Publishing Wizard.
Planners will be able to create a new planning chart, modify an existing
chart, or delete a planning chart. Planners can modify any data fields
displayed in the Chart View. Data fields you want to keep in the chart, but
do not want modified can be displayed in the Profile View. And since
planners cannot add or delete custom fields, you still maintain control
over the custom fields you decide to use in the chart.
Using Advanced Box Layout with Organizational
Model Planning
The chart administrator can now use the Advanced Box Layout Editor to
format charts for planning (OrgPublisher Premier) purposes.
When editing within a planning chart, you may need to select a box which,
in turn, selects the span of control beneath that box. Because Advanced
Box Layout formats allow the placement of the name or job title at the top
of the box, a selection button has been added.
Note:
The administrator must change the Open position label position type in
the source chart if you want to allow planners to modify the field. You can
change the name to read Open position instead.
Work with Organizational Planning/Additional Organizational Model Planning Tasks
472
Aquire OrgPublisher 10 User Guide
When the user places the mouse pointer over the top right corner of the
box, the selector is available
box and its span of control.
. When this is visible, click to select the
Figure 143
Figure 144
473
Work with Organizational Planning/Additional Organizational Model Planning Tasks
Aquire OrgPublisher 10 User Guide
OrgPlan for Planners
How to Get Started with Organizational Planning
Charts
Planning charts, available in OrgPublisher Premier, work with a special
menu and toolbar, and are always in Build Mode. Build Mode does not
reflect special formatting, such as multi-level peer display or reports in the
same box as their manager. The menu and toolbar offer several options
which enable planners to modify planning charts, as well as generate a
change report or view a revision history.
Planners can modify any data fields displayed in the Chart View. Data
fields in the Profile View only cannot be modified. So the chart
administrator can maintain control over the custom fields in the chart,
planners cannot add or delete custom fields.
The Organizational planning toolbar includes the following buttons.
Menu option/Button
File
Report
Edit
View
Action
Enables you to Save you planning chart, as well as use
Print, Print preview, and Print setup features. The
Print options feature allows you to choose to print
views (depending on the views available in the chart),
header and footer information and select or clear the
Print Wizard. Preferences allows you to select the
location to store your planning charts, either a local or
network drive.
Enables you to generate and customize a change
report, as well as view a history of revisions in the
planning chart, or send the planning chart to another
user.
Enables you to Cut, Paste, Rename, or Delete
components in the chart. In addition, you can Undo
changes made or open the Search dialog or go directly
to the Groups tab of the Search dialog.
Enables you to perform several functions, including
opening views (if available) in the planning chart, work
in the Compact Build Mode, or enable or disable the
drilling buttons. In addition, you can set the top box in
the planning chart, go to the top of the displayed chart,
display the whole chart, display or hide the Main
Toolbar or Text Buttons, and select the head count
information to display in the Status Bar.
Work with Organizational Planning/OrgPlan for Planners
474
Aquire OrgPublisher 10 User Guide
Menu option/Button
Insert
Help
Action
Enables you to insert the standard components in the
planning chart, such as a Person, Job, Box, and
more.
Enables you to access the Help file for OrgPlan, as well
as view information about the OrgPublisher version and
license.
Click this button to view information about the version
of OrgPublisher you are using.
Saves the chart. If this is a new chart, the Save As
dialog displays so that you can assign a name to the
file.
Click this button to open the Email OrgPlan dialog to
send the planning chart, change report, or both to
another user.
Click this button to generate and open the change
report in HTML format.
The Cut button sends the selected text or object to the
clipboard and deletes the text or object from the
screen.
The paste button copies the contents of the clipboard
to the screen.
Reverses, the latest action. May be repeated to undo
additional actions. You can undo content-related
changes, such as adding, deleting, moving, and
copying information.
Prints the chart. Prints a specific chart view if it is
selected in Print Options or the Print Wizard dialog.
Displays the chart as it will look when you print it and is
only available in the Chart View.
Opens the system Print Setup dialog.
Displays the chart as it will look in Microsoft®
PowerPoint and is only available in the Chart View.
Click this button to move the Chart View to the top
center of the displayed drilling level.
Use this field to enter your basic toolbar search text.
Searches are based on text you enter in the toolbar
field or select from the drop-down list, if previous
toolbar searches have been performed. You can type
one or two words, such as first name and last name.
Searches all fields one field at a time.
Click this button to display the Search dialog at the
Name tab.
475
Work with Organizational Planning/OrgPlan for Planners
Aquire OrgPublisher 10 User Guide
Menu option/Button
Action
The editing mode in which everything except the
employee name is hidden; provides an easy-to-view,
compact chart to facilitate dragging and dropping
boxes.
Click this button to set the zoom percent for the chart
display.
Click this button to display the chart from the highest
box in the hierarchy.
Click this button to select the number of levels from the
drop-down list that you want to display.
Click to open the Select Style dialog to choose a layout
style for the planning chart. Click on a layout for
additional information.
Click this button to insert a box containing an open
position.
Inserts a box containing person and job fields into the
chart.
Inserts a box into the chart.
Inserts an open position field into a box in the chart.
Inserts a person field into a box in the chart.
Inserts a job field into a box in the chart.
Inserts an assistant box into the chart.
Inserts a partner box into the chart.
Click this button to open and close the Style View,
which displays the styles available for the open chart.
Click this button to open and close the Tree View,
which displays the chart in an outline format. Click on a
position or name to locate it in the chart.
Work with Organizational Planning/OrgPlan for Planners
476
Aquire OrgPublisher 10 User Guide
Menu option/Button
Action
Click this button to open and close the List View, which
lists employees in the chart. The view contains two
panes. One pane lists only the employees in the portion
of the org chart that is shown. The List View pane
shows custom information such as telephone numbers
and office locations and is used as the index for a chart
printed in Book style format. You can click on a name in
this list to locate it in the chart. Columns can be sorted.
The Search View pane enables you to conduct a
search for specific information, and to create and save
a new group. Click on a name in this list to locate it in
the chart. The Search View can, typically, also list
everyone in the chart. Columns can be sorted.
Click this button to open and close the Profile View,
which displays information about an employee or
position, including custom fields that are defined for
that position type.
Click this button to open and close the Summary View,
which displays summary fields and totals by position
type and group.
Click this button to open and close the 9 Box Matrix View,
which displays employees on a Y and X axis, based on
performance and potential ratings.
Starts the context-sensitive portion of the help system.
Click the Help button then click a toolbar button or
inside a wizard for additional information.
With planning charts, if enabled by your administrator, you can also:
Use procedures found in New with This Version
Drag and Drop from Search View in Planning Charts or Drag and Drop
from 9 Box Matrix in Planning Charts
Generating a Change Report
Generating a Revision History
Inserting Chart Components
Moving Boxes or Span of Control, Moving People, Moving Boxes with Cut
and Paste
Previewing a Book Style Chart or Previewing a Wall Style Chart
477
Work with Organizational Planning/OrgPlan for Planners
Aquire OrgPublisher 10 User Guide
Printing Your Chart as a Book, Printing in Wall Chart Style
Saving and Charting Search Results as a Group
Displaying Chart Styles
Sending the Planning Chart to Another User
Setting Chart Layout Options
Setting Change Report Default Options
Storing Planning Charts
Work with Views
9 Box Matrix View
List View
Profile View
Search View
Creating a Side-by-Side Profile View
Summary View
Tree View
Changing a Planning Chart Job Title and Position
Type
When working with a planning chart (OrgPublisher Premier), you can
change job titles or position types.
1. Double-click on the job title in the Chart View. The Rename Job Title
dialog opens.
2. Type the new title over the old one.
3. You can also modify the Position type by selecting from the list.
4. Click OK. The new title and position type, if applicable, display in the
chart box.
Changing a Person's Position Type in Planning
Charts
When working with a planning chart (OrgPublisher Premier), you can
change position types.
Work with Organizational Planning/OrgPlan for Planners
478
Aquire OrgPublisher 10 User Guide
1. Double-click on the person’s name in the Chart View. The Update
Person dialog opens.
2. Double-click the new Position type you want to use. The Update
Person dialog closes and the new position type is accepted. You can
also select the new position type from the list, then click OK.
Drag and Drop from 9 Box Matrix in Planning
Charts
You can drag a person's name from the 9 Box Matrix View, available in
OrgPublisher Premier, and drop it into the org model planning chart or
succession planning chart.
1. Once the 9 Box Matrix is created, click the name you want to add to
the chart and hold down the mouse button.
2. Drag the cursor to the target box in the chart.
3. When the cursor is over the field where you want to drop it, release
the mouse button.
If you are working with org model planning, the name replaces the
name in the target box. If you are working with succession planning,
the name is added as a, or replaces the existing, successor.
Drag and Drop from Search View in Planning
Charts
You can drag a person's name from the Search View and drop it into the
org model planning chart or succession planning chart (OrgPublisher
Premier).
1. After you conduct your search, click the name you want to add to the
chart and hold down the mouse button.
2. Drag the cursor to the target box in the chart.
3. When the cursor is over the field where you want to drop it, release
the mouse button.
If you are working with org model planning, the name replaces the
name in the target box. If you are working with succession planning,
the name is added as a successor, or replaces the existing successor.
479
Work with Organizational Planning/OrgPlan for Planners
Aquire OrgPublisher 10 User Guide
Exporting Change Data
When you generate change reports you can choose to export data that
has changed in order to create a comma separated file reflecting changes
to upload into a source HR system. You select the desired fields, and the
resulting Microsoft Excel file contains three tabbed worksheets:
• Added position data records
• Removed position data records
• Edited data records (field data modified or movement in the chart)
1. In the planning chart, select Report from the menu then Generate
change report from the options list. You can also click the Generate
a change report button
in the toolbar.
In the OrgPublisher application chart, select Tools from the menu
then Compare two charts from the options list. Follow the
Comparing Two Charts procedure to generate the report.
The Change Report Options dialog opens.
2. In the Generate Report tab, select the report data you want to see
then click the Export Change Data tab.
Figure 145
Work with Organizational Planning/OrgPlan for Planners
480
Aquire OrgPublisher 10 User Guide
3. Select the fields you want to see in each summary section of the
report, such as position types or groups.
Note:
Parent Box ID must be one of the selected fields in order to see the current
and previous Parent Box ID data for a changed record.
4. Click Generate. If you selected to View report in web browser,
the browser displays a basic HTML report that summarizes the
changes made in the chart using Before and After columns, as well
as the Change percent.
The HTML file is saved to your local drive in the in the Local
Settings/Temporary folder. You can also save the report by using
the browser File>Save As option.
If you selected View report in Microsoft Excel, both the report
sheet and export data sheets open with the 3 tabbed sheets.
Figure 146
See the Setting Change Report Default Options procedure for more
information.
Generating a Change Report
When working with Organizational planning charts, available in
OrgPublisher Premier, you can also create customized change reports .
481
Work with Organizational Planning/OrgPlan for Planners
Aquire OrgPublisher 10 User Guide
Change reports show the differences in a chart from one point in time to
another.
1. In the OrgPlan chart, select Report from the menu then Generate
change report from the options list. You can also click the Generate
a change report button
in the toolbar.
In the OrgPublisher application chart, select Tools from the menu
then Compare two charts from the options list to open the
Compare Charts dialog. Follow the Comparing Two Charts procedure
to generate the report.
2. The browser displays a basic HTML report that summarizes the
changes made in the chart using Before and After columns, as well
as the Change percent.
3. The HTML file is saved to your local drive in the in the Local
Settings/Temporary folder. You can also save the report by using
the browser File>Save As option.
4. You can also export the changed information by selecting the Export
Change Data tab.
If you want to view detailed information in your change reports, see
the Setting Change Report Default Options procedure in this
document.
Generating a Revision History
With OrgPublisher Premier you can create a revision history when
modifying web-based planning charts. After you have modified an OrgPlan
chart, or have been sent a modified planning chart, you can see who
modified the chart on what day the modification occurred.
1. In the planning chart, select Report from the menu then View
revision history from the options list.
2. The browser displays a basic HTML page with the revision
information. The User and Date fields are automatically recorded. A
Comment is entered as an option and may or may not be available.
3. You can use the browser menu to save the revision history, copy and
paste it into another application, or send it to someone via an email
message.
Work with Organizational Planning/OrgPlan for Planners
482
Aquire OrgPublisher 10 User Guide
Selecting a Planning Chart Style
Click the Select Style button in the toolbar to open the Select Style dialog
to choose a layout style for the planning chart (OrgPublisher Premier).
Click on a layout for additional information.
Chart Layout
Description
Layout 1
Horizontal - Lowest level of each branch in the chart is
arranged in a horizontal line. This creates shorter,
wider charts.
Layout 2
Vertical - Lowest level of each branch in the chart is
arranged in a vertical row. This creates narrower, taller
charts.
Layout 3
Side by side - Lowest level of each branch in the chart
is arranged with the boxes side by side. This creates
more compact charts.
Layout 4
Stacked - Lowest level of the chart (displays only two
levels) is arranged in a horizontal line across the width
of a page for as many lines as it takes to display the
lowest level. The number of boxes across is determined
automatically or set to a specific number.
Sending the Planning Chart to Another User
You can send your planning chart (OrgPublisher Premier) and the change
report to another approved user via email.
1. In the planning chart, select Report from the menu then Send
chart to another user from the options list. You can also click the
Send chart to another user button
OrgPlan dialog opens.
in the toolbar. The Email
2. Select the radio button that matches what you want to do, Send
chart and a change report, Send chart only, or Send change
report only.
483
Work with Organizational Planning/OrgPlan for Planners
Aquire OrgPublisher 10 User Guide
3. Click OK. Your email client opens a message with the attachments in
the email. The planning chart file attachments include an OCP and
HTM file.
4. Type the email address or addresses to which you would like to send
the attachments. Click Send.
Setting Change Report Default Options
With OrgPublisher Premier you can choose to Enable Organizational
Planning or Enable Succession Planning in the Publishing Wizard, as
well as select the default options for the planning chart change report.
1. Follow the Publishing Wizard until you reach the dialog concerning
the planning chart revision history. Click Set default options for
change report. You can access the change report from the planning
chart Report/Generate change report menu option. The Change
Report Options dialog opens.
2. In the Generate Report tab, the Generate summary section
enables you to choose the areas to summarize in the report. Check
box options include:
Summary
Description
Create summary section
Show position type
Select this check box to display a summary of
summaries
changes made to each position type in your
planning chart.
Show group summaries Select this check box to display a summary of
changes made to each group in your planning
chart.
Show differences in
Select this check box if you want to display
summary fields
changes made to each summary field in the
OrgPublisher Premier planning chart.
Show differences for
Select this check box if you want to display
every manager
changes made to each summary field for each
manager in the OrgPublisher Premier planning
chart.
Show summary section Select this check box if you want to show the
for each manager
detail for added or removed reporting
relationships for each manager in the planning
chart.
Specify how you want
Click the drown-arrow to select box title, job title,
to show people's names or customize.
in
Work with Organizational Planning/OrgPlan for Planners
484
Aquire OrgPublisher 10 User Guide
3. You can customize the display of names by selecting the Specify
how you want to show people's names in the check box.
– If you select Custom, the Custom Name Format dialog opens and
you can build the desired format.
– By default the Box title and Name are loaded into the Custom name
format: box. To remove these, select the text in the list and press
the Delete key on your keyboard.
– Scroll through the list to locate the first field you want to display.
– Double-click on the field to place it in the Custom name format
field: box. You can also type the field information between the $
character.
– To add a second field, scroll to locate and then double click on the
field. A hyphen (-) will separate be added to separate the fields of
data.
– Sample output displays in the Example of this format section.
Click OK to close the Custom Name Format dialog.
4. In the Where to view the report section, you can select the View
report in web browser or View report in Microsoft Excel radio
button. Click OK to accept your selections.
5. Follow the Exporting Change Data procedure to send the report to a
spreadsheet.
6. Click Next, and continue the publishing procedure.
Updating an Open Position in Planning Charts
You can update a position type in a planning chart (OrgPublisher Premier).
1. Double-click on the open position in the Chart View. The Update
Person dialog opens.
485
Work with Organizational Planning/OrgPlan for Planners
Aquire OrgPublisher 10 User Guide
Figure 147
2. Type the First name and Last name of the person filling the open
position.
3. Select the appropriate Position type from the list.
4. Click OK. The new position type and name display in the chart box .
Work with Organizational Planning/OrgPlan for Planners
486
Aquire OrgPublisher 10 User Guide
487
Work with Organizational Planning/OrgPlan for Planners
Aquire OrgPublisher 10 User Guide
C
HAPTER
12
WORK WITH SUCCESSION PLANNING
Succession Planning for Administrators
Note:
If you renewed maintenance from a previous OrgPublisher Enterprise version
that included the organizational planning client, that feature is included in the
OrgPublisher 9 version.
Verify that you have satisfied the special considerations when building a
succession chart from either a single data field or multiple data feeds.
It is recommended that you do not combine the Succession planning and
Organizational planning features as unexpected results may occur. Succession
planning is designed to help you match people to specific positions with no
hierarchical information involved. OrgPlan is designed as an organizational
modeling tool based on a hierarchy.
When you create a planning chart, verify that the box you have selected as
top of chart is correct. Once the planning chart is created, drilling up from the
designated top of chart is not available.
Planning charts do not contain a separate My groups tab in the Search View.
If you already have groups in the My groups tab in the PluginX chart however,
those groups are copied to the planning chart.
Planners may encounter an error when sending a planning chart created on a
local machine using Microsoft Vista. It is recommended that administrators
use a secured server location.
If you save multiple planning charts to the same web folder, you should
specify separate storage folders in order to maintain user name and password
security.
If you disable the Main toolbar while using the Publishing Wizard, the OrgPlan
and Succession Plan options are not available in the published chart.
When formatting successor fields, be aware that using lighter colors, such as
pale blue or white, may make it difficult to see the text in the chart boxes or
views.
Work with Succession Planning/Succession Planning for Administrators
488
Aquire OrgPublisher 10 User Guide
Working with Succession Planning
Note:
It is recommended that you do not combine the Succession planning and
Organizational planning features as unexpected results may occur. Succession
planning is designed to help you match people to specific positions with no
hierarchical information involved. OrgPlan is designed as an organizational
modeling tool based on a hierarchy.
When you create a planning chart, verify that the box you have selected as
top of chart is correct. Once the planning chart is created, drilling up from the
designated top of chart is not available.
Planning charts do not contain a separate My groups tab in the Search View.
If you already have groups in the My groups tab in the PluginX chart however,
those groups are copied to the planning chart.
With OrgPublisher Premier, you can publish a web-based chart for
succession planning as well as org model planning. This topic covers
succession planning, see the Working with Organizational Planning Charts
for details about organizational planning charts.
Planning administrators can create a new succession planning chart,
modify an existing chart, or delete a planning chart. Selected individuals,
or planners can create and share succession charts. Special formatting is
automatically assigned to successor position types by OrgPublisher.
Planners can modify any data fields displayed in the Chart View. Data
fields administrators want to keep in the chart, but do not want modified,
can be displayed in the Profile View. And, since planners cannot add or
delete custom fields, administrators still maintain control over the custom
fields you decide to use in the chart.
Administrators enable planning charts while using the Publishing Wizard,
and can customize change report options, enable the revision history, or
password protect planning charts. If your chart contains photos, it is best
to hide the photos for your planning chart. The administrator or specified
group member can then create a planning chart using the Planning
button.
Before starting the Publishing Wizard, please review Preparing to Publish
Chart with Succession Planning.
The planning enabled published chart toolbar includes the following
buttons.
489
Work with Succession Planning/Succession Planning for Administrators
Aquire OrgPublisher 10 User Guide
Button
Action
Click this button to view information about the version
of OrgPublisher you are using.
Saves the chart. If this is a new chart, the Save As
dialog displays so that you can assign a name to the
file.
Button available in planning enabled published charts.
Click to view the Planning charts menu. Options
include Create a new planning chart, Open
planning chart, and Delete planning chart.
The Cut button sends the selected text or object to the
clipboard and deletes the text or object from the
screen.
Prints the chart. Prints a specific chart view if it is
selected in Print Options or the Print Wizard dialog.
Displays the chart as it will look when you print it and is
only available in the Chart View.
Opens the system Print Setup dialog.
Displays the chart as it will look in Microsoft®
PowerPoint and is only available in the Chart View.
Click this button to move the Chart View to the top
center of the displayed drilling level.
Click this button to display the Search dialog at the
Name tab.
Use this field to enter your basic toolbar search text.
Searches are based on text you enter in the toolbar
field or select from the drop-down list, if previous
toolbar searches have been performed. You can type
one or two words, such as first name and last name.
Searches all fields one field at a time.
Click this button to make a selected box the center of
the chart display.
Click this button to set the zoom percent for the chart
display.
Clicking this button designates the selected box as the
top of your chart for the selected style.
Click this button to display the chart from the highest
box in the hierarchy.
Click this button to enable the drill buttons in your
chart which facilitate navigation between shown and
hidden levels.
Click this button to select the number of levels from the
drop-down list that you want to display.
Work with Succession Planning/Succession Planning for Administrators
490
Aquire OrgPublisher 10 User Guide
Button
Action
Click this button to open and close the Style View,
which displays the styles available for the open chart.
Click this button to open and close the Tree View,
which displays the chart in an outline format. Click on a
position or name to locate it in the chart.
Click this button to open and close the List View, which
lists employees in the chart. The view contains two
panes. One pane lists only the employees in the portion
of the org chart that is shown. The List View pane
shows custom information such as telephone numbers
and office locations and is used as the index for a chart
printed in Book style format. You can click on a name in
this list to locate it in the chart. Columns can be sorted.
The Search View pane enables you to conduct a
search for specific information, and to create and save
a new group. Click on a name in this list to locate it in
the chart. The Search View can, typically, also list
everyone in the chart. Columns can be sorted.
Click this button to open and close the Profile View,
which displays information about an employee or
position, including custom fields that are defined for
that position type.
Click this button to open and close the Summary View,
which displays summary fields and totals by position
type and group.
Click this button to open and close the 9 Box Matrix
View, which displays employees on a Y and X axis,
based on performance and potential ratings.
Click this button to open the help file.
With planning enabled charts, you can:
Copying a Link to a Person in the Chart
Creating a New Succession Planning Chart
Deleting a Planning Chart
Modifying Successor Fields
Opening a Planning Chart
491
Work with Succession Planning/Succession Planning for Administrators
Aquire OrgPublisher 10 User Guide
Previewing a Book Style Chart or Previewing a Wall Style Chart
Printing Your Chart as a Book or Printing in Wall Chart Style
Sending the Planning Chart to Another User
Storing Planning Charts
Succession planning charts can be saved to the end user's local hard drive
or to your web server in a subfolder automatically created by
OrgPublisher. If you elect to use a web server, you can use the EChart
options to add security to the planning charts. End users can see a list of
planning charts created by themselves and their subordinates.
Administrators can password protect the planning chart and, if more than
one user tries to open the same chart, a message notes that someone
else is modifying the chart and a read-only option is available.
Once a succession planning chart is opened, a special menu and toolbar
are available. Planning charts are always in Build Mode. Build Mode
does not reflect special formatting, such as multi-level peer display or
reports in the same box as their manager. The menu and toolbar offer
several new options to end users which enable them to modify and save
planning charts, as well as generate a change report or view a revision
history.
See the How to Get Started with Succession Planning topic for more
information. In addition, several planning chart provisions apply.
Succession Planning Chart Provisions
The Succession planning feature (OrgPublisher Premier) is intended to
provide opportunities to designate successors to specific positions. This
page contains some provisions you should remember when publishing
planning-enabled charts.
Do not combine the Succession planning and Org Model planning features,
as unexpected results may occur. Succession planning is designed to help
you match people to specific positions with no hierarchical information
involved. Organizational planning is designed as an org modeling tool
based on a hierarchy.
• Employees cannot be renamed. Successor names can be cut and
pasted, and unassigned employees in ECharts can be selected to add
to the chart.
• No other fields can be modified.
Work with Succession Planning/Succession Planning for Administrators
492
Aquire OrgPublisher 10 User Guide
• Formatting options and styles are disabled.
• Planners can use the Search View to spotlight search results or a
selected group in the Chart View.
• Succession planning users cannot enable a chart legend, but, if the
planning chart is published with a chart legend, planners can modify
the existing legend.
• The Hover Profile is not available in Succession planning.
• Employees and boxes cannot be copied, only cut and pasted.
• Planners can e-mail a planning chart to another planning user.
• If data modifications are noted when a chart is saved, the end user is
prompted to enter a description for the revision history .
Preparing to Publish Chart with Succession
Planning
In OrgPublisher Premier, you can use any chart you have created as the
source chart for Succession Planning. When a person is moved in a
succession planning chart, they automatically become a Successor
position type (Successor 1, Successor 2, Successor 3).
You should create formats for the Successor position type in the source
chart. This might include:
• Format the name text differently for the Successor position type.
• If Advanced Box Layout Editor is used, format the Successor position
type to display a different background color.
• Create a group for anyone who is a Successor position type and apply
a group icon to display in the chart.
Enabling the Succession Planning Features
If you have selected this option in OrgPublisher Premier and you are the
chart administrator, you can choose to enable or disable succession
planning features in your chart.
1. Click Options from the OrgPublisher menu then Search options
and Customize Search dialog. The Customize Search Dialog
opens.
493
Work with Succession Planning/Succession Planning for Administrators
Aquire OrgPublisher 10 User Guide
2. To create succession planning charts and search for succession
candidates, select the Enable succession planning features check
box. Clear the check box to disable these features.
3. Click OK to accept the changes and close the dialog.
Creating a Succession Planning Chart in the New
Chart Wizard
Available in OrgPublisher Premier, OrgPublisher's succession planning
feature enables you to create a chart specifically for analyzing potential
successors to jobs in your company that you can publish to your intranet
or the Internet, enabling planners to delegate successors to specific
positions. Special formatting is automatically assigned to successor
position types by OrgPublisher.
1. Open OrgPublisher and select Run the New Chart Wizard radio
button from the OrgPublisher dialog. You can also click File from the
OrgPublisher Main menu then New, or click the New button
toolbar. The New Chart Wizard opens.
in the
2. Select the Succession planning chart radio button then click Next.
3. Select the appropriate data source button then follow the dialog
prompts to extract your data. Click Next.
4. Select the Specify custom field order radio button. Click Next.
5. In the Data preview dialog, map your fields. When you do this,
OrgPublisher provides standard succession candidate fields in the
drop-down list in the column headings.
6. Select the field that matches your data in each column. Duplicate
usage of a field type is limited to custom fields. After you have
mapped the fields, click Next.
7. If you select Multiple data sources, you are prompted to choose
the corresponding data element from the Link to pull-down list
before repeating Steps 3-6. See the Creating an Org Chart from
Multiple Data Sources for more information.
8. Select a style template for the succession planning chart then click
Next.
9. Click Finish to open the succession planning chart.
Work with Succession Planning/Succession Planning for Administrators
494
Aquire OrgPublisher 10 User Guide
Mapping Succession Planning Fields
When you create a succession planning chart, available in OrgPublisher
Premier, and you want to use fields that correspond to the standard
succession candidate fields, you select the Specify custom field order
option to map your fields. Verify that you have satisfied the special
considerations when building a succession chart from either a single data
field or multiple data feeds.
Before you create a succession chart or map your fields, you should:
• Match your data to OrgPublisher’s Input File Layout.
• Review the input file rules.
• Review record types.
• Extract your data.
In the New Chart Wizard Data Preview dialog, you can match your data
fields to the standard succession fields provided in OrgPublisher.
These standard fields include:
Field
Number
495
Field Name
50
Key Person
51
Location
52
Age
53
Salary
54
55
Performance
Rating
Education Level
56
Skills
57
Certifications
58
Competency
Rating
Description
Standard succession candidate custom field; Text
type field assigned at the position level.
Standard succession candidate custom field; Text
type field assigned at the person level.
Standard succession candidate custom field;
Numeric type field assigned at the person level.
Standard succession candidate custom field;
Currency type field assigned at the person level.
Standard succession candidate custom field; Text
type field assigned at the person level.
Standard succession candidate custom field; Text
type field assigned at the person level.
Standard succession candidate custom field; Text
type field assigned at the person level.
Standard succession candidate custom field; Text
type field assigned at the person level.
Standard succession candidate custom field; Text
type field assigned at the person level.
Work with Succession Planning/Succession Planning for Administrators
Aquire OrgPublisher 10 User Guide
Field
Number
Field Name
Description
59
Successor Rank
60
62
Designated
Successor
High Potential
Rating
Readiness
63
Retention Risk
64
Impact of Loss
Standard succession candidate custom field;
Numeric type field assigned at the person level.
Standard succession candidate custom field; Text
type field assigned at the person level.
Standard succession candidate custom field; Text
type field assigned at the person level.
Standard succession candidate custom field; Text
type field assigned at the person level.
Standard succession candidate custom field; Text
type field assigned at the person level.
Standard succession candidate custom field; Text
type field assigned at the person level.
61
These succession custom fields can be used to help create succession
candidate groups using the fields singly or in combinations.
Publishing a Chart for Succession Planning
At chart publishing time, the chart administrator can choose to enable one
or both of the planning options available in OrgPublisher Premier. Once
selected, the chart administrator is taken through the wizard dialogs for
planning charts.
1. Click the Publish button
in the toolbar or the Publishing
Wizard button
in the Wizard View. You can also select Tools
from the Main menu then Publishing Wizard from the options list.
The Publishing Wizard opens.
2. Select Advanced Mode and follow the wizard dialogs, selecting the
Interactive Org Chart option then either the PluginX or EChart
Rich client format.
3. In the OrgPlan dialog, select the Enable Succession Planning
check box. Click Next.
4. If you want the succession planning chart to record the Windows NT
user sign-on ID and a comment, if supplied, for each change, click
the Enable revision history check box.
5. If you want succession planning charts password protected, click the
Require that all planning charts be password protected check
box.
Work with Succession Planning/Succession Planning for Administrators
496
Aquire OrgPublisher 10 User Guide
6. If you want an indicator in the chart where changes have been made,
select the Show visual indicator for changes check box.
7. If you want to select the defaults for the planning change report,
click Set default options for change report to open the Change
Report Options dialog. See the Setting Change Report Default
Options procedure in this document for detailed information. Click
Next.
8. Select the context menu commands you want to make available in
both the planning-enabled PluginX and planning charts by expanding
each menu and selecting the options you want.
9. Click Next and continue with the publishing procedure.
10.When the chart is published, succession planning administrators click
the Succession Planning button
Succession Planning Charts dialog opens.
in the toolbar. The
11.To create a new chart, select New. See the Creating a New
Succession Planning Chart procedure for more detailed information.
When the chart is published, the planning administrator sees one of the
following button options, based on the chart administrator’s selection.
• Organizational Planning only is available • Succession Planning only is available • Organizational and Succession Planning are available - the
Planning button options list displays when the button is clicked.
Figure 148
497
Work with Succession Planning/Succession Planning for Administrators
Aquire OrgPublisher 10 User Guide
Additional Succession Planning Tasks
Creating a New Succession Planning Chart
If published through OrgPublisher Premier, planning administrators can
create a new succession planning chart, modify an existing chart, or
delete a planning chart. When in succession planning chart end users can
add and remove successors from the chart but cannot change the chart
structure.
1. Open the planning-enabled chart in the web browser and click the
Succession Planning button
.
2. Select Create new succession planning chart. The New
Succession Planning Chart dialog opens. If a current succession
planning chart does not exist, the dialog opens as soon as you click
the button.
The dialog notes where the planning chart begins, such as "This chart
will include boxes from (name) and down." For instance, your chart
administrator may publish the chart for you to work from your box
down.
3. Type a name for the chart if you do not want to accept the default.
4. If not already enabled by the chart administrator, you can select the
Password protect this chart check box to require typing a
password whenever the chart is opened.
5. Type the Password then Retype password.
6. If you want a shortcut to the planning chart to display on your
desktop, select the Create a shortcut to the chart on my
Windows desktop check box.
Note:
When running OrgPublisher Succession planning on Microsoft® Vista with
Internet Explorer in Protected mode, this check box option does NOT contain
the text “on my Windows desktop.” Instead, OrgPublisher stores the shortcut
at: %USERPROFILE%\AppData\LocalLow.
7. Click Create and edit chart. The browser opens the succession
planning chart with the Insert toolbar, the Generate a change report
, and email
buttons enabled. See the Generating a Change
Report procedure for detailed information.
The planning chart saves to the folder specified when the original
chart was published. PluginX planning charts can be saved to the
Work with Succession Planning/Additional Succession Planning Tasks
498
Aquire OrgPublisher 10 User Guide
local hard drive or the web server. See the Storing Planning Charts
topic for additional information.
Enabling the Change Icon Display
You can determine if you want to display the change icon
in the
planning chart (OrgPublisher Premier) box as changes are made.
1. Select View in the Main menu.
2. If there is a check mark beside Show Change Icons, then click the
check mark to clear it.
This closes the menu and removes the displayed change icons in the
chart boxes.
3. If there is no check mark and you want to display the change icon,
select Show Change Icons.
Figure 149
Searching Succession Candidates
When working with a succession planning chart (OrgPublisher Premier),
you can search for succession candidates using the Search dialog or
Search View. When succession planning is enabled, the search feature
499
Work with Succession Planning/Additional Succession Planning Tasks
Aquire OrgPublisher 10 User Guide
includes searches for Successor(s) in a box and Person succession
count.
For general searching information, see the Searching All Fields topic.
Searching for successors in a box
This search option provides a list of people in a box containing a selected
number of successors, and helps you locate where you have no successors
or too many successors for a specific position.
1. Open the Search dialog by selecting Edit from the menu bar, then
Search from the pull-down options, or open the Search View pane
in the List View. You can also click on the Search button
the toolbar.
in
2. If you have selected a specific box in the Chart View, the Search
dialog selects the Search under selected box check box. This
begins the search at that point in the chart. If you want to search the
entire chart, click the Search under selected box check box to
clear it.
3. If you are using the Search View and want to start your search from
a specific box in a chart, you must first select a box in the Chart View
and then select the Search under check box. This begins the search
at that point in the chart.
4. Select the All Fields tab.
5. In the Search field, click the drop-down arrow to select
Successor(s) in a box. You can also press the key of the first letter
of the field you want to navigate through the list.
6. In the For field, type the number of successors in a box you want to
find. For instance, if you want to see all boxes that contain more than
one successor, type 1.
7. In the Match field, click the down-arrow to select =Equal to.
8. Click Search Now or Go
. OrgPublisher performs the search
and displays the matching records, successors and managers in the
box in the lower pane.
9. You can save the search results as a group or perform an additional
search.
Work with Succession Planning/Additional Succession Planning Tasks
500
Aquire OrgPublisher 10 User Guide
Searching for person succession counts
The Person succession count uses the employee ID and position type of
<SC> to determine if a person is slated for more than one position. Your
organization may want to see everyone slated for more than one position.
You may also want to create groups showing people slated for 2 positions,
3 positions, etc.
Note:
The results show only the <SC> record, not an entry for the successor's
standard position. In addition, this is a compound search. The Person
succession count search option first goes through the data to find all <SC>
records in the chart. The resulting <SC> records are searched a second time
is to see if any employee IDs appear on the list more than once. Accurate
employee IDs for each record must exist in your data in order to use
this option.
1. Open the Search dialog by selecting Edit from the menu bar, then
Search from the pull-down options, or open the Search View pane
in the List View. You can also click on the Search button
the toolbar.
in
2. If you have selected a specific box in the Chart View, the Search
dialog selects the Search under selected box check box. This
begins the search at that point in the chart. If you want to search the
entire chart, click the Search under selected box check box to
clear it.
3. If you are using the Search View and want to start your search from
a specific box in a chart, you must first select a box in the Chart View
and then select the Search under check box. This begins the search
at that point in the chart.
4. Select the All Fields tab.
5. In the Search field, click the drop-down arrow to select Person
successor count. You can also press the key of the first letter of the
field you want to navigate through the list.
6. In the For field, type the number you want to search on. For
instance, if you want to see how many positions contain more than
one successor, type the number 2.
7. In the Match field, click the down-arrow to select >= Greater than
or equal to.
8. Click Search Now or Go
. OrgPublisher performs the search
and displays the matching records in the lower pane.
501
Work with Succession Planning/Additional Succession Planning Tasks
Aquire OrgPublisher 10 User Guide
9. You can save the search results as a group or perform an additional
search.
Side by side profiles are limited to 6 at a time if you auto-pin the
profiles in the Search View.
Spotlighting Succession Groups
You can use the spotlighting a group feature with succession groups
(OrgPublisher Premier) you have created. You can use this feature alone
or you can use it in conjunction with spotlighting search results.
Note:
The Spotlighting feature works only in View Mode.
1. To enable the spotlight group feature, select a succession group to
display in the chart from the Groups View.
2. Right-click on the group label in the Style Bar to view the options list.
3. Click Group filter in chart then Spotlight boxes in group.
The first example uses a succession group created to show people who are
designated to succeed more than one position.
Figure 150
The second example uses a succession group created to find managers
with no successors.
Work with Succession Planning/Additional Succession Planning Tasks
502
Aquire OrgPublisher 10 User Guide
Figure 151
Note:
When printing a chart with the spotlighting feature enabled, if your printer
does not support AlphaBlend, your printed chart will show all boxes as in the
past. See your IT administrator if you have any questions.
Using Succession Candidates in Groups
After you have created a group or groups with the results you require, you
can use one of several options to indicate persons meeting the succession
group criteria (OrgPublisher Premier). Some examples are:
Search Results for Succession Candidates
The first example uses a group created to show people who are
designated to succeed more than one position.
Figure 152
503
Work with Succession Planning/Additional Succession Planning Tasks
Aquire OrgPublisher 10 User Guide
The second example uses a group created to find managers with no
successors.
Figure 153
Using a Group Icon for Succession Groups
Figure 154
The above example uses a group created to show succession candidates
who are designated to succeed more than one position.
Note:
When formatting successor fields, be aware that using lighter colors, such as
pale blue or white, may make it difficult to see the text in the chart boxes or
views.
Using a Multi-Report Icon for Succession Groups
Uses the employee ID to determine if a succession candidate is in the
chart more than once. When the user clicks the icon, the Search View
opens with a list of all occurrences of the person in the chart. If indirect
Work with Succession Planning/Additional Succession Planning Tasks
504
Aquire OrgPublisher 10 User Guide
reports are in the chart and the person is also a successor, the indirect
role appears in the list.
Figure 155
505
Work with Succession Planning/Additional Succession Planning Tasks
Aquire OrgPublisher 10 User Guide
Succession Planning for Planners
How to Get Started with Succession Planning
Planning charts, available in OrgPublisher Premier, work with a special
menu and toolbar, and are always in Build Mode. Build Mode does not
reflect special formatting, such as multi-level peer display or reports in the
same box as their manager. The menu and toolbar offer several options
which enable planners to modify planning charts, as well as generate a
change report or view a revision history.
Planners can add or move successors using the Chart View. Other data
fields cannot be modified. As the chart administrator, you can maintain
control over other fields in the chart.
Note:
Initial formatting of the successor position type is handled in the default
templates shipped with OrgPublisher.
The Succession planning toolbar includes the following buttons.
Menu Option/Button
File
Report
Edit
Action
Enables you to Save you planning chart, as well as
use Print, Print preview, and Print setup
features. The Print options feature allows you to
choose to print views (depending on the views
available in the chart), header and footer
information and select or clear the Print Wizard.
Preferences allows you to select the location to
store your planning charts, either a local or
network drive.
Enables you to generate and customize a change
report, as well as view a history of revisions in the
planning chart, or send the planning chart to
another user.
Enables you to Cut, Paste, Rename, or Delete
components in the chart. In addition, you can
Undo changes made or open the Search dialog or
go directly to the Groups tab of the Search dialog.
Work with Succession Planning/Succession Planning for Planners
506
Aquire OrgPublisher 10 User Guide
Menu Option/Button
View
Help
Action
Enables you to perform several functions,
including opening views (if available) in the
planning chart, work in the Compact Build Mode, or
enable or disable the drilling buttons. In addition,
you can set the top box in the planning chart, go
to the top of the displayed chart, display the whole
chart, display or hide the Main Toolbar or Text
Buttons, and select the head count information to
display in the Status Bar.
Enables you to access the Help file for OrgPlan, as
well as view information about the OrgPublisher
version and license.
Click this button to view information about the
version of OrgPublisher you are using.
Saves the chart. If this is a new chart, the Save As
dialog displays so that you can assign a name to
the file.
Click this button to open the Email OrgPlan dialog to
send the planning chart, change report, or both to
another user.
Click this button to generate and open the change
report in HTML format.
The Cut button sends the selected text or object to
the clipboard and deletes the text or object from
the screen.
The paste button copies the contents of the
clipboard to the screen.
Reverses, the latest action. May be repeated to
undo additional actions. You can undo contentrelated changes, such as adding, deleting, moving,
and copying information.
Prints the chart. Prints a specific chart view if it is
selected in Print Options or the Print Wizard
dialog.
Displays the chart as it will look when you print it
and is only available in the Chart View.
Opens the system Print Setup dialog.
Displays the chart as it will look in Microsoft®
PowerPoint and is only available in the Chart View.
Click this button to move the Chart View to the top
center of the displayed drilling level.
507
Work with Succession Planning/Succession Planning for Planners
Aquire OrgPublisher 10 User Guide
Menu Option/Button
Action
Use this field to enter your basic toolbar search
text. Searches are based on text you enter in the
toolbar field or select from the drop-down list, if
previous toolbar searches have been performed.
You can type one or two words, such as first name
and last name. Searches all fields one field at a
time.
Click this button to display the Search dialog at the
Name tab.
The editing mode in which everything except the
employee name is hidden; provides an easy-toview, compact chart to facilitate dragging and
dropping boxes.
Click this button to set the zoom percent for the
chart display.
Click this button to display the chart from the highest
box in the hierarchy.
Click this button to select the number of levels
from the drop-down list that you want to display.
Click to open the Select Style dialog to choose a
layout style for the planning chart. Click on a
layout for additional information.
Click this button to open and close the Style View,
which displays the styles available for the open
chart.
Click this button to open and close the Tree View,
which displays the chart in an outline format. Click
on a position or name to locate it in the chart.
Click this button to open and close the List View,
which lists employees in the chart. The view
contains two panes. One pane lists only the
employees in the portion of the org chart that is
shown. The List View pane shows custom
information such as telephone numbers and office
locations and is used as the index for a chart
printed in Book style format. You can click on a
name in this list to locate it in the chart. Columns
can be sorted.
The Search View pane enables you to conduct a
search for specific information, and to create and
save a new group. Click on a name in this list to
locate it in the chart. The Search View can,
typically, also list everyone in the chart. Columns
can be sorted.
Work with Succession Planning/Succession Planning for Planners
508
Aquire OrgPublisher 10 User Guide
Menu Option/Button
Action
Click this button to open and close the Profile
View, which displays information about an
employee or position, including custom fields that
are defined for that position type.
Click this button to open and close the Summary
View, which displays summary fields and totals by
position type and group.
Click this button to open and close the 9 Box
Matrix View, which displays employees on a Y and
X axis, based on performance and potential
ratings.
Starts the context-sensitive portion of the help
system. Click the Help button then click a toolbar
button or inside a wizard for additional
information.
Note:
In addition, several planning chart provisions apply.
Planning charts do not contain a separate My groups tab in the Search
View.
With succession planning charts, if enabled by your administrator, you can
also:
Performing tasks using procedures New with This Version
Exporting Change Data
Generating a Change Report
Generating a Revision History
Modifying Successor Fields
Previewing a Book Style Chart or Previewing a Wall Style Chart
Printing Your Chart as a Book or Printing in Wall Chart Style
Searching Succession Candidates
Setting Chart Layout Options
Sending the Planning Chart to Another User
Setting Change Report Default Options
Work with Views
9 Box Matrix View
List View
Profile View
Search View
Creating a Side-by-Side Profile View
Summary View
Tree View
509
Work with Succession Planning/Succession Planning for Planners
Aquire OrgPublisher 10 User Guide
Storing Planning Charts
Adding a Succession Candidate to a Box
Available in OrgPublisher Premier, when you create a succession planning
chart, the chart opens with no hierarchical information included because
this type of chart is meant to help you plan for successors to specific
positions within your company.
• You can add succession candidates by extracting them from a separate
data source using the record type of SC. The Box ID records must
match the box IDs of the positions for which they are candidates.
• You can also drag and drop individuals from their current box into the
box of the position for which they are candidates. You must then
change the position type manually.
Verify that you have satisfied the special considerations when building a
succession chart from either a single data field or multiple data feeds.
Adding a Second Successor Position
Available in OrgPublisher Premier, a person may be a successor to more
than one position.
Add a Successor with Drag and Drop
1. Place the mouse pointer on the person’s name you want to become a
successor. Hold down the left mouse button to select the name,
which is outlined with a solid red line.
2. Continue to hold down the left mouse button and drag the name to
the position needing a successor. The pointer includes a person icon
while moving to the new box. When the cursor is on top of the
current position holder’s name (a dotted red line outlines the name),
release the mouse button.
The successor’s name appears below the current position holder and
a change icon appears in the top right of the chart box.
You can also copy and paste a successor into the new location within the
succession planning chart. This method is helpful when placing someone
in a box that is outside of the chart viewing area.
Add a Successor with Copy and Paste
1. Place the mouse pointer on the person you want to become a
successor.
Work with Succession Planning/Succession Planning for Planners
510
Aquire OrgPublisher 10 User Guide
2. Right-click and select Copy.
3. Locate the box containing the current position holder by one of the
following methods:
4. Searching for the person’s name and clicking to navigate to the
person
– Drilling to the person
– Scrolling
– Using the context menu option
5. Place the pointer on the position holder's name and right-click.
6. Select Paste. The copied record is now a successor.
Creating a Successor in a Succession Planning
Chart
Available in OrgPublisher Premier, you can work with succession planning
charts. The easiest method for creating a successor in a succession
planning chart is to use drag and drop.
1. Place the mouse pointer on the person’s name you want to become a
successor. Hold down the left mouse button to select the name,
which is outlined with a solid red line.
Figure 156
2. Continue to hold down the left mouse button and drag the name to
the position needing a successor. The pointer includes a person icon
while moving to the new box. When the cursor is on top of the
current position holder’s name (a dotted red line outlines the name),
release the mouse button.
511
Work with Succession Planning/Succession Planning for Planners
Aquire OrgPublisher 10 User Guide
Figure 157
The successor’s name appears below the current position holder and
a change icon appears in the top right of the chart box.
Figure 158
You can also copy and paste a successor into the new location within the
succession planning chart. This method is helpful when placing someone
in a box that is outside of the chart viewing area.
1. Place the mouse pointer on the person you want to become a
successor.
2. Right-click and select Copy.
Work with Succession Planning/Succession Planning for Planners
512
Aquire OrgPublisher 10 User Guide
Figure 159
3. Locate the box containing the current position holder by one of the
following methods:
– Searching for the person’s name and clicking to navigate to the
person
– Drilling to the person
– Scrolling
4. Place the pointer on the position holder's name and right-click.
5. Select Paste.
Figure 160
The copied record is now a successor.
513
Work with Succession Planning/Succession Planning for Planners
Aquire OrgPublisher 10 User Guide
Figure 161
Deleting a Successor
You may need to remove a person from a successor role (OrgPublisher
Premier).
1. Right-click on the person’s successor position in the chart.
2. Select Delete from the options list. This deletes only that successor
occurrence of the person in the chart.
Figure 162
Note:
OrgPublisher does not leave an open position in the box when a successor is
deleted.
Work with Succession Planning/Succession Planning for Planners
514
Aquire OrgPublisher 10 User Guide
Drag and Drop from 9 Box Matrix in Planning
Charts
You can drag a person's name from the 9 Box Matrix View available in
OrgPublisher Premier, and drop it into the org model planning chart or
succession planning chart.
1. Once the 9 Box Matrix is created, click the name you want to add to
the chart and hold down the mouse button.
2. Drag the cursor to the target box in the chart.
3. When the cursor is over the field where you want to drop it, release
the mouse button.
If you are working with org model planning, the name replaces the
name in the target box. If you are working with succession planning,
the name is added as a, or replaces the existing, successor.
Drag and Drop from Search View in Planning
Charts
You can drag a person's name from the Search View and drop it into the
org model planning chart or succession planning chart (OrgPublisher
Premier).
1. After you conduct your search, click the name you want to add to the
chart and hold down the mouse button.
2. Drag the cursor to the target box in the chart.
3. When the cursor is over the field where you want to drop it, release
the mouse button.
If you are working with org model planning, the name replaces the
name in the target box. if you are working with succession planning,
the name is added as a, or replaces the existing, successor.
Modifying Successor Fields
Planners (OrgPublisher Premier) can modify successor fields in the
Succession Planning chart. You can cut, copy, and paste the successor
names and associated ranking fields. You can also drag a name from the
List View or Search View and place in a successor slot.
You cannot, however, modify any other position type or associated field.
515
Work with Succession Planning/Succession Planning for Planners
Aquire OrgPublisher 10 User Guide
If enabled by your administrator, the change icon
succession chart box as changes are made.
displays in the
Moving a Successor
In Succession Planning, available in OrgPublisher Premier, once a
successor is in the chart, you can move them to a new location with drag
and drop .
1. Place the mouse pointer on the successor's name.
2. Hold down the left mouse button and drag to the new location.
Figure 163
3. Release the mouse button. The successor displays in the new box.
Cut and Paste Successors
1. Place the mouse pointer on the successors name and right-click.
2. Select Cut from the options list.
3. Place the mouse pointer on the new location and right-click.
4. Select Paste from the options list. The successor displays in the new
box.
Work with Succession Planning/Succession Planning for Planners
516
Aquire OrgPublisher 10 User Guide
Figure 164
Rearranging Successors in a Box
After adding all of the successors (OrgPublisher Premier), you may want
to rearrange them to indicate who is first (Successor 1), second
(Successor 2), or third (Successor 3) in line for the position.
1. Place the mouse pointer over the name of the successor who should
appear first in the list of successors.
Figure 165
2. Hold down the left mouse button and drag the successor on top of
the current position holder’s name.
517
Work with Succession Planning/Succession Planning for Planners
Aquire OrgPublisher 10 User Guide
Figure 166
3. Release the left mouse button.
Figure 167
4. Place the mouse pointer over the second successor in line for the
position.
5. Hold the left mouse button down and drag the successor on top of
the first in line successor’s name.
6. Release the mouse and the second in line appears below the first in
line successor.
Searching Succession Candidates
When working with a succession planning chart (OrgPublisher Premier),
you can search for succession candidates using the Search dialog or
Search View. When succession planning is enabled, the search feature
includes searches for Successor(s) in a box and Person succession
count.
For general searching information, see the Searching All Fields topic.
Work with Succession Planning/Succession Planning for Planners
518
Aquire OrgPublisher 10 User Guide
Searching for successors in a box
This search option provides a list of people in a box containing a selected
number of successors, and helps you locate where you have no successors
or too many successors for a specific position.
1. Open the Search dialog by selecting Edit from the menu bar, then
Search from the pull-down options, or open the Search View pane
in the List View. You can also click on the Search button
the toolbar.
in
2. If you have selected a specific box in the Chart View, the Search
dialog selects the Search under selected box check box. This begins
the search at that point in the chart. If you want to search the entire
chart, click the Search under selected box check box to clear it.
3. If you are using the Search View and want to start your search from
a specific box in a chart, you must first select a box in the Chart View
and then select the Search under check box. This begins the search
at that point in the chart.
4. Select the All Fields tab.
5. In the Search field, click the drop-down arrow to select
Successor(s) in a box. You can also press the key of the first letter
of the field you want to navigate through the list.
6. In the For field, type the number of successors in a box you want to
find. For instance, if you want to see all boxes that contain more than
one successor, type 1.
7. In the Match field, click the down-arrow to select =Equal to.
8. Click Search Now or Go
. OrgPublisher performs the search
and displays the matching records, successors and managers in the
box in the lower pane.
9. You can save the search results as a group or perform an additional
search.
Searching for person succession counts
The Person succession count uses the employee ID and position type of
<SC> to determine if a person is slated for more than one position. Your
organization may want to see everyone slated for more than one position.
You may also want to create groups showing people slated for 2 positions,
3 positions, etc.
519
Work with Succession Planning/Succession Planning for Planners
Aquire OrgPublisher 10 User Guide
Note:
The results show only the <SC> record, not an entry for the successor's
standard position. In addition, this is a compound search. The Person
succession count search option first goes through the data to find all <SC>
records in the chart. The resulting <SC> records are searched a second time
is to see if any employee IDs appear on the list more than once. Accurate
employee IDs for each record must exist in your data in order to use
this option.
1. Open the Search dialog by selecting Edit from the menu bar, then
Search from the pull-down options, or open the Search View pane
in the List View. You can also click on the Search button
the toolbar.
in
2. If you have selected a specific box in the Chart View, the Search
dialog selects the Search under selected box check box. This begins
the search at that point in the chart. If you want to search the entire
chart, click the Search under selected box check box to clear it.
3. If you are using the Search View and want to start your search from
a specific box in a chart, you must first select a box in the Chart View
and then select the Search under check box. This begins the search
at that point in the chart.
4. Select the All Fields tab.
5. In the Search field, click the drop-down arrow to select Person
successor count. You can also press the key of the first letter of the
field you want to navigate through the list.
6. In the For field, type the number you want to search on. For
instance, if you want to see how many positions contain more than
one successor, type the number 2.
7. In the Match field, click the down-arrow to select >= Greater than
or equal to.
8. Click Search Now or Go
. OrgPublisher performs the search
and displays the matching records in the lower pane.
9. You can save the search results as a group or perform an additional
search.
Side by side profiles are limited to 6 at a time if you auto-pin the
profiles in the Search View.
Work with Succession Planning/Succession Planning for Planners
520
Aquire OrgPublisher 10 User Guide
Spotlighting Succession Groups
You can use the spotlighting a group feature with succession groups
(OrgPublisher Premier) you have created. You can use this feature alone
or you can use it in conjunction with spotlighting search results.
Note:
The Spotlighting feature works only in View Mode.
1. To enable the spotlight group feature, select a succession group to
display in the chart from the Groups View.
2. Right-click on the group label in the Style Bar to view the options list.
3. Click Group filter in chart then Spotlight boxes in group.
The first example uses a succession group created to show people who are
designated to succeed more than one position.
Figure 168
The second example uses a succession group created to find managers
with no successors.
Figure 169
521
Work with Succession Planning/Succession Planning for Planners
Aquire OrgPublisher 10 User Guide
Note:
When printing a chart with the spotlighting feature enabled, if your printer
does not support AlphaBlend, your printed chart will show all boxes as in the
past. See your IT administrator if you have any questions.
Using Search View to Create a Successor
Another easy method for adding successors (OrgPublisher Premier) is to
locate the successor in the Search View pane in the List View or by using
Advanced search button
in the toolbar to open the Search
dialog. Once the person is located, you can drag the name to the box
containing the current position holder.
1. Locate the box containing the current position holder.
2. Open the List View and activate the Search View.
3. Search to locate the successor.
4. Place the mouse pointer on the search result for the successor.
5. Hold down the left mouse button and drag to the box containing the
current position holder.
6. Release the mouse button.
7. The successor is added to the box and the person (Olivia Bailey) now
appears twice in the Search View.
Using Succession Candidates in Groups
After you have created a group or groups with the results you require, you
can use one of several options to indicate persons meeting the succession
group criteria (OrgPublisher Premier). Some examples are:
Search Results for Succession Candidates
The first example uses a group created to show people who are
designated to succeed more than one position.
Work with Succession Planning/Succession Planning for Planners
522
Aquire OrgPublisher 10 User Guide
Figure 170
The second example uses a group created to find managers with no
successors.
Figure 171
523
Work with Succession Planning/Succession Planning for Planners
Aquire OrgPublisher 10 User Guide
Using a Group Icon for Succession Groups
Figure 172
The above example uses a group created to show succession candidates
who are designated to succeed more than one position.
Using a Multi-Report Icon for Succession Groups
Uses the employee ID to determine if a succession candidate is in the
chart more than once. When the user clicks the icon, the Search View
opens with a list of all occurrences of the person in the chart. If indirect
reports are in the chart and the person is also a successor, the indirect
role appears in the list.
Figure 173
Work with Succession Planning/Succession Planning for Planners
524
Aquire OrgPublisher 10 User Guide
9 Box Matrix Wizard
Available in OrgPublisher Premier, the 9 Box Matrix Wizard walks you
through selecting fields for the X-axis (horizontal line) of 3 boxes
assessing performance and the Y-axis of 3 boxes (vertical line) assessing
potential. A combination of the Y and X axis determines the box within the
grid where the employee is placed. The top right-most box displays High
Performance/High Potential employees, while the bottom left-most
box contains Low Performance/Low Potential.
In addition to the fields you want to use for analysis, you can also select
group and position type filters, range limits, and sort order.
Note:
Records displayed in the 9 Box Matrix are associated with the level displayed
in the Chart View.
With the 9 Box Matrix Wizard, you can:
Creating a 9 Box Matrix
Defining 9 Box Performance Field Range Values
Defining 9 Box Potential Field Range Values
Selecting 9 Box Potential and Performance Fields
Filtering Groups in the 9 Box Matrix
Filtering Position Types in the 9 Box Matrix
Modifying 9 Box Matrix Results
Sorting the 9 Box Matrix
Creating a 9 Box Matrix
The 9 Box Matrix feature is available in OrgPublisher Premier. Chart
planners can determine the fields used in a planning chart.
1. Open your chart and click the 9 Box Matrix button
Views toolbar or the Profile View.
2. Click the Maximize docked window button
525
, either in the
.
Work with Succession Planning/9 Box Matrix Wizard
Aquire OrgPublisher 10 User Guide
Figure 174
3. The 9 Box Matrix View opens. It contains no data yet. If no matrix
currently exists, the 9 Box Matrix Wizard opens automatically.
Figure 175
4. If a matrix currently exists, click Tools in the Main menu then select
9 Box Matrix Wizard from the options list to open the wizard.
5. Click Next on the first screen. In the Potential section, click the
down arrow in the Field Name field to choose the field you want to
use for employee potential.
Work with Succession Planning/9 Box Matrix Wizard
526
Aquire OrgPublisher 10 User Guide
Figure 176
6. In the Performance section, click the down arrow to choose the
field you want to use for current performance rating. Click Next.
7. Type the values that place the employees into the low, average, and
high ranges for the potential axis.
527
Work with Succession Planning/9 Box Matrix Wizard
Aquire OrgPublisher 10 User Guide
Figure 177
8. Select the Ignore values above high value check box if you want
to indicate a maximum number to end (High Range). Select the
Ignore values below low value check box to indicate a minimum
number to start (Low Range). If these check boxes are not
selected, any records with a value below 1.00 or above 5.00 (in this
example) are placed in the appropriate row.
When the low limit, high limit, or both are set, records that fall
outside of this range do not appear in the matrix.
9. Click Next. Type the values that place the employees into the low,
average, and high ranges for the performance axis.
Work with Succession Planning/9 Box Matrix Wizard
528
Aquire OrgPublisher 10 User Guide
Figure 178
10.Select the Ignore values below low value check box if you want
to indicate a maximum number to end (High Range). Select the
Ignore values below low value check box to indicate a minimum
number to start (Low Range). If these check boxes are not
selected, any records with a value below 1.00 or above 5.00 (in this
example) are placed in the appropriate row.
11.Click Next. You can choose to Proceed to chart to see all charted
records positioned in the 9 Box Matrix or choose to Provide
additional customization, such as formatting and filtering. Click
Next.
529
Work with Succession Planning/9 Box Matrix Wizard
Aquire OrgPublisher 10 User Guide
Figure 179
12.If you select to add additional customization, the first option is to
choose a Field name and Sort order, Ascending or Descending,
within each box.
Work with Succession Planning/9 Box Matrix Wizard
530
Aquire OrgPublisher 10 User Guide
Figure 180
13.Select the Show colored borders in your 9 box chart if you want
to add color format to the 9 Box Matrix. Click Next.
14.Select the data filters to use in the matrix. By position type allows
you to select the position types to include in the matrix. By group
allows you to select the groups to use in the matrix. Click Next.
531
Work with Succession Planning/9 Box Matrix Wizard
Aquire OrgPublisher 10 User Guide
Figure 181
15.If you select the By position type, this dialog enables you to select
the position types you want to include in the 9 Box Matrix. You also
have the option to Select All or Clear All. Click Next.
Work with Succession Planning/9 Box Matrix Wizard
532
Aquire OrgPublisher 10 User Guide
Figure 182
16.If you select By group, the next dialog enables you to select the
groups you want to include in the 9 Box Matrix. You also have the
option to Select All or Clear All. Click Next.
533
Work with Succession Planning/9 Box Matrix Wizard
Aquire OrgPublisher 10 User Guide
Figure 183
17.Click Next. The wizard displays a summary of your 9 Box Matrix
selections. Click Back if you want to modify any selections. Click
Finish to populate and open the 9 Box Matrix.
Work with Succession Planning/9 Box Matrix Wizard
534
Aquire OrgPublisher 10 User Guide
Figure 184
The 9 Box Matrix View opens, using the field names you selected for
potential and performance. The records in each box are displayed
alphabetically by Last name, First name.
If needed, refine the 9 Box Matrix criteria for more selective results.
Creating a 9 Box Matrix from Pinned Profiles in a
Published Chart
The 9 Box Matrix button
is also available with pinned profiles
(OrgPublisher Premier), and can be used in published PluginX and EChart
rich client charts. The chart administrator sets the values in the 9 Box
Matrix Wizard to display the matrix in a PluginX or EChart rich client chart.
Planners are prompted to set their own values within a planning chart.
You can print the 9 Box Matrix if the Print Wizard has been activated. You
are prompted to print the chart or the 9 Box Matrix. If the 9 Box Matrix
View is maximized, the 9 Box Matrix View prints automatically.
Note:
535
If a 9 Box Matrix is not defined in the original chart, the feature is disabled in
the published chart.
Work with Succession Planning/9 Box Matrix Wizard
Aquire OrgPublisher 10 User Guide
You may receive an error message stating that "The specified graph size is too
small to display the graph with current graph options." Modify the matrix size
or the criteria used to create the matrix.
Selecting 9 Box Potential and Performance Fields
When you create a 9 Box Matrix, available in OrgPublisher Premier, you
select fields you want to use to represent the potential and performance
measurements in your matrix.
1. Open your chart and click the 9 Box Matrix button
.
The 9 Box Matrix View opens. If no matrix currently exists, the 9 Box
Matrix Wizard opens automatically.
2. If a matrix currently exists, click Tools in the Main menu then select
9 Box Data Wizard from the options list to open the wizard.
3. Click Next in the first wizard dialog to reach the select fields dialog.
Figure 185
Work with Succession Planning/9 Box Matrix Wizard
536
Aquire OrgPublisher 10 User Guide
4. In the Potential section of the dialog, click the down arrow in the
Field Name to select the field you want to use to measure the
potential of employees in the matrix results.
5. In the Performance section of the dialog, click the down arrow in
the Field Name to select the field you want to use to measure the
performance of employees in the matrix results. Click Next.
6. Complete the wizard to select range values, sort field, and filter
options then click Finish to view the 9 Box Matrix.
Defining 9 Box Potential Field Range Values
Before you can plot employee potential, the Y-axis (vertical line) of 3
boxes, in the 9 Box Matrix, available in OrgPublisher Premier, you must
define the low, medium, and high ranges. When you set limits, employees
who fall outside the limits are not plotted in the matrix. The medium value
is required, but the high and low values are optional.
1. Open the 9 Box Matrix Wizard by selecting Tools from the Main
menu then 9 Box Matrix Wizard from the options list. You can also
click the 9 Box Matrix button
.The 9 Box Matrix Wizard opens.
2. Follow the wizard dialogs to select your fields then click Next to the
Range Values for plotting employee potential dialog.
3. Type a numeric (integer) value in the fields currently displaying the
default as 1, 2, 4, and 5. As you modify the range values, the
Range Summary section changes to reflect your choices.
4. Select the Ignore values below low value check box if you don't
want to include employees who fall below this value.
5. Select the Ignore values above high value check box if you don't
want to include employees who fall above this value. Click Next to
complete the wizard.
Defining 9 Box Performance Field Range Values
Before you can plot employee performance, X-axis (horizontal line) of 3
boxes, in the 9 Box Matrix, available in OrgPublisher Premier, you must
define the low, medium, and high ranges. When you set limits, employees
who fall outside the limits are not plotted in the matrix. The medium value
is required, but the high and low values are optional.
537
Work with Succession Planning/9 Box Matrix Wizard
Aquire OrgPublisher 10 User Guide
Note:
Records displayed in the 9 Box Matrix are associated with the level displayed
in the Chart View.
1. Open the 9 Box Matrix Wizard by selecting Tools from the Main
menu then 9 Box Matrix Wizard from the options list. You can also
click the 9 Box Matrix button
. The 9 Box Matrix Wizard opens.
2. Follow the wizard dialogs to select your fields and the potential range
values until you reach the Range Values for plotting employee
performance dialog.
3. Type a numeric (integer) value in the fields currently displaying the
default as 1, 2, 4, and 5. As you modify the range values, the
Range Summary section changes to reflect your choices.
4. Select the Ignore values below low value check box if you don't
want to include employees who fall below this value.
5. Select the Ignore values above high value check box if you don't
want to include employees who fall above this value. Click Next to
complete the wizard.
Sorting the 9 Box Matrix
When you create a 9 Box Matrix, available in OrgPublisher Premier, you
can choose to sort the data within the matrix boxes.
Note:
1. Open your chart and click the 9 Box Matrix button
.
The 9 Box Matrix opens. If no matrix currently exists, the 9 Box
Matrix Wizard opens automatically.
2. If a matrix currently exists, click Tools in the Main menu then select
9 Box Matrix Wizard from the options list to open the wizard.
3. Follow the wizard dialogs to select the fields, limits, and filter
options, including Provide additional customization, until you
reach the Display information dialog.
Work with Succession Planning/9 Box Matrix Wizard
538
Aquire OrgPublisher 10 User Guide
Figure 186
4. Select the Field name you want to sort by in the 9 Box Matrix.
5. Select the Sort order, Ascending or Descending. Click Next.
6. Complete the wizard and click Finish to view the matrix.
Selecting 9 Box Filters
When you create a 9 Box Matrix, available in OrgPublisher Premier, you
can select filters to refine your collection of data and personnel.
1. Open your chart and click the 9 Box Matrix button
.
The 9 Box Matrix opens. If no matrix currently exists, the 9 Box
Matrix Wizard opens automatically.
2. If a matrix currently exists, click Tools in the Main menu then select
9 Box Matrix Wizard from the options list to open the wizard.
3. Follow the wizard dialogs to select the fields, limits, and sort options,
including Provide additional customization, until you reach the
Filters dialog.
539
Work with Succession Planning/9 Box Matrix Wizard
Aquire OrgPublisher 10 User Guide
Figure 187
4. Select the By position type check box if you want to select specific
position types through which to filter your matrix.
5. Select the By group check box if you want to select specific groups
through which to filter your matrix. Click Next.
6. Complete the wizard and click Finish to view the 9 Box Matrix.
Filtering Position Types in the 9 Box Matrix
When you create a 9 Box Matrix, available in OrgPublisher Premier, you
can use specific position types to filter the potential and performance
data.
1. Open your chart and click the 9 Box Matrix button
.
The 9 Box Matrix opens. If no matrix currently exists, the 9 Box
Matrix Wizard opens automatically.
Work with Succession Planning/9 Box Matrix Wizard
540
Aquire OrgPublisher 10 User Guide
2. If a matrix currently exists, click Tools in the Main menu then select
9 Box Matrix Wizard from the options list to open the wizard.
3. Follow the wizard dialogs to select the fields, limits, and filter
options, including By position type, until you reach the Filter by
position type dialog.
Figure 188
4. Select the position types you want to include in the 9 Box Matrix. All
position types not selected are omitted from the data collection. You
also have the option to Select All position types or Clear All
selected position types. Click Next.
5. Complete the wizard and click Finish to view the 9 Box Matrix.
Filtering Groups in the 9 Box Matrix
When you create a 9 Box Matrix, available in the OrgPublisher Premier,
you can use specific groups to filter the potential and performance data.
1. Open your chart and click the 9 Box Matrix button
.
The 9 Box Matrix View opens. If no matrix currently exists, the 9 Box
Matrix Wizard opens automatically.
541
Work with Succession Planning/9 Box Matrix Wizard
Aquire OrgPublisher 10 User Guide
2. If a matrix currently exists, click Tools in the Main menu then select
9 Box Data Wizard from the options list to open the wizard.
3. Follow the wizard dialogs to select the fields, limits, and filter
options, including By group, until you reach the Filter by group
dialog.
Figure 189
4. Select the groups you want to include in the 9 Box Matrix. All groups
not selected are omitted from data collection. You also have the
option to Select All groups or Clear All selected groups. Click Next.
5. Complete the wizard and click Finish to view the 9 Box Matrix.
Printing a 9 Box Matrix
You can print the 9 Box Matrix, available in OrgPublisher Premier, if the
Print Wizard has been activated.
1. Open your chart then open the 9 Box Matrix by selecting View in the
Main menu then 9 Box Matrix from the options list. You can also
click the 9 Box Matrix button
Work with Succession Planning/9 Box Matrix Wizard
in the Views toolbar.
542
Aquire OrgPublisher 10 User Guide
2. Click the Print button
in the Main toolbar or select File, Print
Options, and then 9 Box Matrix. The Print Wizard opens. If the 9
Box Matrix is maximized, it prints automatically.
3. Select 9 Box Matrix and click Next.
Figure 190
4. Click Finish to print the view. The printed 9 Box Matrix includes the
designations for each box, such as High Performance-High
Potential or Average Performance-Low Potential.
Modifying 9 Box Matrix Results
Chart administrators and planners can modify the results displayed within
your 9 Box Matrix (available in OrgPublisher Premier) using the wizard or
the Properties button in the view.
1. Click Tools in the Main menu then 9 Box Matrix Wizard if you want
to modify the selected fields and data ranges.
2. If you want to modify sorting, positions or groups selected, click the
Properties button at the bottom of the 9 Box Matrix.
543
Work with Succession Planning/9 Box Matrix Wizard
Aquire OrgPublisher 10 User Guide
Figure 191
3. The 9 Box Matrix Wizard opens at the dialog to select a field and sort
order. Select the down arrow in the Field name and click the field
you want to use.
Figure 192
Any field of data available in the chart can be used for sorting in
Ascending or Descending order.
4. If you selected the By position type, this dialog enables you to
select the position types you want to include in the matrix. You also
have the option to Select All or Clear All. Click Next.
5. If you selected By group, the next dialog enables you to select the
groups you want to include in the matrix. You also have the option to
Select All or Clear All. Click Next.
Work with Succession Planning/9 Box Matrix Wizard
544
Aquire OrgPublisher 10 User Guide
6. The wizard displays a summary of your 9 Box Matrix selections. Click
Back if you want to modify any selections. Click Finish to populate
and open the matrix.
The 9 Box Matrix
a matrix.
button is also available with pinned profiles to create
Creating a Side-by-Side Profile View
Available in OrgPublisher Premier, Side-by-Side Profile View allows you to
look at multiple profiles at the same time. Each profile contains a pin that
“holds the profile” in the view. This feature is available in the application
as well as the charts published as PluginX and EChart rich client published
with OrgPublisher Premier.
When you have selected the side-by-side profiles you want to use, you
can create a new group. You can also pin profiles using 9 Box Matrix
results.
Pinned profiles will be “unpinned” automatically when another style is
selected. You must save as a group to save the pinned profiles.
The side-by-side profiles can be printed by selecting the Profile View in the
Print Wizard.
Note:
All records in the Profile View, pinned or not, are included when you save
profiles as a group.
1. Open the Profile View. The profile for the top box appears.
2. Select the name, job title, or box title in the chart you want to see in
the side-by-side Profile View.
3. Click the pin button in the upper right corner to anchor the profile.
545
Work with Succession Planning/Creating a Side-by-Side Profile View
Aquire OrgPublisher 10 User Guide
Figure 193
The profile is anchored and moved to the right, and a placeholder is
created on the left for the next profile. The text changes to indicate
the number of pinned profiles.
Work with Succession Planning/Creating a Side-by-Side Profile View
546
Aquire OrgPublisher 10 User Guide
Figure 194
4. Click on another person’s name, job title, or box title (depending on
the data you are profiling; you want to compare like data fields) to
populate the placeholder with the selected person’s information.
If the added profile is pinned, both pinned profiles move to the right,
and an additional placeholder appears.
547
Work with Succession Planning/Creating a Side-by-Side Profile View
Aquire OrgPublisher 10 User Guide
Figure 195
Figure 196
5. Continue selecting and pinning the profiles you want, repeating
Steps 2-3.
You can also include search results in the side by side profile by
clicking the Include the search results in Profile View button
.
Side-by-side profiles are limited to 6 at a time if you auto-pin the
profiles in the Search View.
Work with Succession Planning/Creating a Side-by-Side Profile View
548
Aquire OrgPublisher 10 User Guide
Figure 197
Note:
You can click on “auto-pin” as many times as you’d like to append the next six
people into the Profile View along to existing profiles, or you can pin an
unlimited number individually.
Creating a 9 Box Matrix from Pinned Profiles
The 9 Box Matrix button
is also available with pinned profiles in
OrgPublisher Premier. The chart administrator sets the values in the 9 Box
Matrix Wizard to display the matrix in a PluginX or EChart rich client chart.
Planners are prompted to set their own values within a planning chart.
Note:
You may want to dock the Profile View at the bottom of the chart to better
utilize space.
Creating a Group from Side-by-Side Profiles
Available in OrgPublisher Premier, you can create groups from the
displayed and pinned side-by-side profiles.
Note:
All records in the Profile View, pinned or not, are included when you save
profiles as a group.
1. Select the profiles you want to use as a side-by-side profile then click
on the Save the current set of people as a new group button.
The Group Editor dialog opens.
2. The default Group Name displays as Profile Group. You can keep
this name or type over it with the name you want to use.
549
Work with Succession Planning/Creating a Side-by-Side Profile View
Aquire OrgPublisher 10 User Guide
3. Click Save. The Group Editor dialog closes and the new group is
included in the Groups View. You can select the group name from the
Groups View to display the selected people in the Chart View.
Displaying a 9 Box Matrix in Side-by-Side Profile
View
Results from any box within a 9 Box Matrix, available in OrgPublisher
Premier, can be pinned in the Side-by-side Profile View. Pinning provides a
side-by-side viewing for data comparison. Only the first 6 records selected
are pinned at a time.
Note:
Records displayed in the 9 Box Matrix are associated with the level displayed
in the Chart View.
1. Right-click on a name in the matrix you want to pin in the Profile
View. (You can select only one name at a time.)
2. Click Show in profile view.
Note:
Names selected in the 9 Box Matrix display in the Profile View only if the
names are included in the displayed group and the associated position types
are not hidden.
The selected record displays in the side-by-side profile.
Figure 198
Work with Succession Planning/Creating a Side-by-Side Profile View
550
Aquire OrgPublisher 10 User Guide
Auto Pinning Group or Search Results as Sideby-Side Profiles
Available in OrgPublisher Premier, you can use new search results or a
search result from an existing group to automatically pin profiles
(maximum of six records at a time).
Note:
All records in the Profile View, pinned or not, are included when you save
profiles as a group.
1. Conduct your search in the Search View or Search dialog.
2. Click the Include the search results in the Profile View button
. If there are more than six records in the Search Result pane,
OrgPublisher selects the first six to display in the side-by-side profile.
3. If the search results in less than 6 pinned profiles, you can manually
add and pin additional records by selecting a record that matches
your original search criteria.
Figure 199
Note:
551
You can click on “auto-pin” as many times as you’d like to append the next six
people into the Profile View along to existing profiles, or you can pin an
unlimited number individually.
Work with Succession Planning/Creating a Side-by-Side Profile View
Aquire OrgPublisher 10 User Guide
C
HAPTER
13
WORKFORCE ANALYTICS
Formulas
Formula fields allow users to define and populate a new, or existing,
custom field based on values provided in other custom fields or using
other criteria. For example: years of employment; days until an appraisal
is due; percentage of sales quota met; or new salary based on a
percentage increase.
OrgPublisher Premier supports formula fields by using the Windows
Scripting Host to process VBScript. The VBScript function references
values in custom fields and produces results in other custom fields.
• Formulas are processed when the chart is opened and when closing
the custom field dialog.
• Formulas are only processed by the OrgPublisher Premier application
or OrgPublisher Premier via WebAdmin.
• Formulas do not refresh in response to a data edit or structure change.
• Formulas are not processed in any Planning charts
• Formulas are not processed when a user opens a published chart. The
chart will show the data as calculated prior to publishing. This
limitation only applies to formulas that reference the current date.
Inserting Formulas
To insert a formula using OrgPublisher Premier:
1. On the toolbar, click the Custom fields button
.
The Custom Fields Properties dialog box opens.
Workforce Analytics/Formulas
552
Aquire OrgPublisher 10 User Guide
Figure 200
2. At the end of the Field label column, add a new field.
3. Type in the Field label, Type of data, and then click the Formula
button.
The Formula dialog box opens.
553
Workforce Analytics/Formulas
Aquire OrgPublisher 10 User Guide
Figure 201
Note:
The control fields in the formula dialog box are as follows:
Control
Formula window
Results section
Test formula
button
Description
Allows entry of a formula. If blank, the field will not
have a formula. After every keystroke, the Formula
code executed section will be updated.
Formula code executed: Shows code type in the
above area.
Result: Shows the return value of the formula for the
first record
Runs the formula against all records in the chart. This
is useful for discovering data errors due to missing or
unacceptable field values.
4. You can type the formula directly into the Formula dialog, or copy
and paste it from a text file.
Workforce Analytics/Formulas
554
Aquire OrgPublisher 10 User Guide
Figure 202
Note:
To remove a formula, delete the existing text.
5. Click the Test formula on all records button.
If the formula works, OrgPublisher will respond with the followingmessage:
555
Workforce Analytics/Formulas
Aquire OrgPublisher 10 User Guide
Figure 203
6. If errors are found, you must modify, or fix the formula.
Using Levels and Span of Control
New with OrgPublisher Premier, you can calculate and display more
analytical numbers about your organization than ever before.
Counts and Position Type Definitions
If position types are utilized in the chart data, Span of Control/Direct
Report counts will follow the definitions. In the Positions tab of the
Define dialog, shown below, Indirect Reports, Contractors, and Successor
records will not be included in the Span of Control/Direct Report counts.
Figure 204
Using the levels (also known as layers) and span of control feature, each
box within the chart can display the following:
Workforce Analytics/Using Levels and Span of Control
556
Aquire OrgPublisher 10 User Guide
Level/Layer
Layers are the same as levels. The layer in the chart from the top of the
chart in which a box exists id its layer value. The top of the chart is layer
1. The maximum depth of the chart is then the bottom, or last, layer of
the chart. (level number)
Figure 205
Total People in Each Level
The number (total count) of people existing in a level. The total in a level
is the sum of the boxes and is stored in each box in that layer. The Define
dialog demonstrates the counting rules for position types. If a box
contains a position of type Manager, the box is used in the total. If
“contractor” is the type, it is not counted.
Average Number of Direct Reports
This is a span of control option. The average number of people/direct
reports for managers in a specific layer existing in that layer.
• In the sample below, layer 1 has 2 reports from level 2. OrgPublisher
divides 2 by 1 to get 2 for the average.
• In level 2, there are 2 and in level 3 there are 5, where 5 divided by 2
= 2.5 for the average.
• In level 3 there are 5 boxes, with 3 having direct reports. Level 4 has 4
boxes, where 3 divided by 4 = .75 which is rounded up to .8 for the
average.
• In level 4 there is only 1 manager with direct reports with level 5
having 2, where 1 divided by 2 = .5 for the average. (average)
557
Workforce Analytics/Using Levels and Span of Control
Aquire OrgPublisher 10 User Guide
Levels Beneath Each Manager
The number of layers from a specific manager box to the bottom of that
hierarchical branch (maximum depth of the chart).
Example: Box 1 has a maximum depth of 4, based on Box2->Box8>Box12->Box14. Box 3 has a maximum depth of 2 based on Box 6>Box16.
Average Number of Direct Reports Beneath
This is a span of control option. The average number of direct reports per
manager beneath that manager box. The calculation is the total number
of employees divided by the total of all managers.
If a box and its position is counted is affected to the position type and if it
is counted based on the Define dialog count definition. Contractors and
Indirect reports are not counted normally.
Number of Direct Reports for Each Manager
This is a straight direct report calculation for each manager. If a box and
its position is counted is affected to the position type and if it is ‘counted’
based on the Define dialog Count definition. Contractors and Indirect
reports are not counted normally.
Workforce Analytics/Using Levels and Span of Control
558
Aquire OrgPublisher 10 User Guide
Figure 206
Extended Span of Control - Hierarchy
Figure 207
Number of People in Each Level Under a Manager
This is the number of people in the levels below a manager in the chart.
The value is determined based on the current box and calculated from its
location in the chart.
Adding Summary Fields for Levels and Span of
Control
In OrgPublisher Premier, an additional option is available when creating a
summary field using the Sum, Count, and Average levels and span of
control custom fields.
The new field has been added to the bottom of the Custom Field
Properties dialog.
559
Workforce Analytics/Using Levels and Span of Control
Aquire OrgPublisher 10 User Guide
1. Select Data from the menu bar, then Custom Field Properties
from the pull-down menu. You can also use the Custom fields button
in the toolbar. The Custom Field Properties dialog opens.
2. Position the cursor where you want to add the summary field, either
somewhere within existing fields, or at the end. Click Insert. If you
are inserting a field within the list of existing fields, a message dialog
verifies that this is what you want to do.
3. Enter the field name in the Field label column.
4. Press the TAB key to move to the Type column and select Sum or
Average.
5. Press the TAB key to move to the Calc Field and select the level or
span of control numeric field on which to do the calculation.
6. Press the TAB key to move to the Population column and select the
position types, such as total head count, to be included in your
calculation.
7. Press the TAB key to move to the Assigned To column. The Update
Assigned Custom Fields dialog opens. Select the position types you
want to assign the custom field to, such as Manager, Director, or
President.
8. In the same dialog, choose where you want the field to display, Box
title, Job title, or Name. Click OK to accept your changes and close
the text box. (If you click on the position type name rather than the
plus sign (+), the Name component is automatically selected.) Click
OK to close the dialog.
The Sample field displays the contents of the first custom field for
this Type.
The Seq field displays the OrgPublisher Input File record sequence
for that custom field.
9. At the bottom of the Custom Field Properties dialog, click the dropdown arrow to select Hierarchy or Level. The name of this field will
differ, depending on the type of numeric field selected, such as
Count on, Sum on, or Average on.
Workforce Analytics/Using Levels and Span of Control
560
Aquire OrgPublisher 10 User Guide
Figure 208
Depending on the field selected, you may also see an additional
check box to choose whether or not to Include zero values.
Figure 209
10.Click Apply or Close.
In the following sample Paul Melbram is in the red outlined box. If the
Count on option is set to Level, the resulting count is 7.
Figure 210
If the Count on option is set to Hierarchy, the resulting count is 63.
561
Workforce Analytics/Using Levels and Span of Control
Aquire OrgPublisher 10 User Guide
Figure 211
Using Level or Hierarchy Options with Groups
Using a group as the selected Population provides more summary
options. In the sample below, a custom field is created to show the count
of Level 5 employees within a hierarchy.
Figure 212
The chart box results show that Paul Melbram has 48 Level 5 employees in
his hierarchy. Amy Stepp has 0 Level 5 employees in her hierarchy.
Workforce Analytics/Using Levels and Span of Control
562
Aquire OrgPublisher 10 User Guide
Figure 213
Creating a Group for Each Level in the Chart
With OrgPublisher Premier, you can also create additional calculations, if
needed, by level. For instance, if you need to total salary for each level for
display in the Summary View, you can create a group for each level in the
organization. By creating the groups, you can also create a graph.
1. Open the Search dialog by selecting Edit from the Main menu then
Search from the pull-down options, or open the Search View pane
in the List View. You can also click the Open advanced search dialog
button
in the toolbar.
2. If you have selected a specific box in the Chart View, the Search
dialog selects the Search under selected box check box. This
begins the search at that point in the chart. If you want to search the
entire chart, click the Search under selected box check box to
clear it.
3. If you are using the Search View and want to start your search from
a specific box in a chart, you must first select a box in the Chart View
and then select the Search under check box. This begins the search
at that point in the chart.
4. In the Search field, click the drop-down arrow to select the custom
field you want to search, for example, Level for Total Organization.
5. In the For field, type the level you want to use as search criteria, for
example, 2.
563
Workforce Analytics/Using Levels and Span of Control
Aquire OrgPublisher 10 User Guide
Figure 214
6. Click Search Now in the Search dialog or Go in the Search View.
The chart is searched and matching records shown.
7. Click Save as group.
8. Type the name you want to use in the Enter a group name dialog, for
example, Level 2.
9. Click OK to save the group.
10.Repeat Steps 4-9 for each level you want to save as a group.
11.Close the Custom Field Properties dialog and open the Summary
View.
Workforce Analytics/Using Levels and Span of Control
564
Aquire OrgPublisher 10 User Guide
Figure 215
12.Follow the Creating Workforce Analysis Graph procedure if you want
to graph the new summaries. See sample below.
Figure 216
Displaying a Direct Report Count
With the levels and span of control feature in OrgPublisher Premier, you
can show the direct report count for each manager, director, vice
president, and president by creating a custom field and assigning the
Direct Count custom field type.
565
Workforce Analytics/Using Levels and Span of Control
Aquire OrgPublisher 10 User Guide
1. Select Data from the menu bar, then Custom Field Properties
from the pull-down menu. You can also use the Custom fields button
in the toolbar. The Custom Field Properties dialog opens.
2. Position the cursor where you want to add the new custom field,
either somewhere within existing fields, or at the end. Click Insert.
If you are inserting a field within the list of existing fields, a message
dialog verifies that this is what you want to do.
3. Enter the field name in the Field label column.
4. Press the TAB key to move to the Type column. Click the downarrow and select Direct Count.
5. Press the TAB key to move to the Population column and select the
position types, total head count, or planned head count to be
included in your calculation.
6. Press the TAB key to move to the Assigned To column. The Update
Assigned Custom Fields dialog opens. Select the position types you
want to assign the custom field to, such as Manager, Director, Vice
president, or President.
7. In the same dialog, choose where you want the field to display, Box
title, Job title, or Name. Click OK to accept your changes and close
the text box. (If you click on the position type name rather than the
plus sign (+), the Name component is automatically selected.) Click
OK to close the dialog.
The Sample field displays the contents of the first custom field for
this Type.
The Seq field displays the OrgPublisher Input File record sequence
for that custom field.
8. Click Apply then Close. The Direct Count field appears in the chart.
Workforce Analytics/Using Levels and Span of Control
566
Aquire OrgPublisher 10 User Guide
Figure 217
Displaying the Level Number in Each Box
With the levels and span of control feature in OrgPublisher Premier, you
can show the level number where the box is located in each box by
creating a custom field and assigning the Level Number custom field
type.
1. Select Data from the menu bar, then Custom Field Properties
from the pull-down menu. You can also use the Custom fields button
in the toolbar. The Custom Field Properties dialog opens.
2. Position the cursor where you want to add the new custom field,
either somewhere within existing fields, or at the end. Click Insert.
If you are inserting a field within the list of existing fields, a message
dialog verifies that this is what you want to do.
3. Enter the field name in the Field label column.
4. Press the TAB key to move to the Type column. Click the downarrow and select Level Number.
5. Press the TAB key to move to the Population column and select
Total Head Count.
6. Press the TAB key to move to the Assigned To column. The Update
Assigned Custom Fields dialog opens. Select All Position Types.
7. In the same dialog, choose where you want the field to display, Box
title, Job title, or Name. Click OK to accept your changes and close
the text box. (If you click on the position type name rather than the
567
Workforce Analytics/Using Levels and Span of Control
Aquire OrgPublisher 10 User Guide
plus sign (+), the Name component is automatically selected.) Click
OK to close the dialog.
The Sample field displays the contents of the first custom field for
this Type.
The Seq field displays the OrgPublisher Input File record sequence
for that custom field.
8. Click Apply then Close. The Level Number field appears in the
chart boxes.
Figure 218
Displaying the Number of Levels Below a
Selected Box
With the levels and span of control feature in OrgPublisher Premier, you
can show the number of levels below a manager's box by creating a
custom field and assigning the Levels Below custom field type.
1. Select Data from the menu bar, then Custom Field Properties
from the pull-down menu. You can also use the Custom fields button
in the toolbar. The Custom Field Properties dialog opens.
2. Position the cursor where you want to add the new custom field,
either somewhere within existing fields, or at the end. Click Insert.
If you are inserting a field within the list of existing fields, a message
dialog verifies that this is what you want to do.
3. Enter the field name in the Field label column.
Workforce Analytics/Using Levels and Span of Control
568
Aquire OrgPublisher 10 User Guide
4. Press the TAB key to move to the Type column. Click the downarrow and select Levels Below.
5. Press the TAB key to move to the Population column and select the
position types, total head count, or planned head count to be
included in your calculation.
6. Press the TAB key to move to the Assigned To column. The Update
Assigned Custom Fields dialog opens. Select the position types you
want to assign the custom field to, such as Manager, Employee, or
All Position Types.
7. In the same dialog, choose where you want the field to display, Box
title, Job title, or Name. Click OK to accept your changes and close
the text box. (If you click on the position type name rather than the
plus sign (+), the Name component is automatically selected.) Click
OK to close the dialog.
The Sample field displays the contents of the first custom field for
this Type.
The Seq field displays the OrgPublisher Input File record sequence
for that custom field.
8. Click Apply then Close. The Levels Below field appears in the chart
boxes.
Figure 219
569
Workforce Analytics/Using Levels and Span of Control
Aquire OrgPublisher 10 User Guide
Workforce Analysis Graphs
Note:
Workforce Analysis Graph data changes based on where you are in the chart,
just as the Summary View data changes.
Creating Workforce Analysis Graphs
Workforce Analysis Graphs use Summary View data to create graphs
visually depicting your organization. There are 3 graph options: pie chart
graph, horizontal bar chart graph, and vertical bar chart graph. Just as
Summary View data changes as you drill through the chart levels, graph
results also change.
Note:
When using percentages in Workforce Analysis Graphs, OrgPublisher displays
percentages with 2 decimal places.
Graphs are displayed in published PluginX charts and EChart rich client
and thin client. Thin client charts display the graphs as GIF format below
the Summary View. Graph properties are not changeable in published
charts, but may be copied to the clipboard. Graphs do not display when
publishing as PDF, HTML or when sending output to PowerPoint.
Note:
Graph categories with a zero value do not appear in the graph.
1. Open the Summary View.
2. Select the Graphs tab.
3. Maximize the docked window.
4. Click New to open the Graph Properties dialog.
5. Modify the properties for your graph.
Property
Description
Graph Title
Type the text you want to display above the graph.
Graph Labels section
Show Categories Select this option to display the position type or group
name for each chart element.
Show
Select this option to display the percentage each chart
Percentages
element represents compared to the whole.
Show Numbers
Select this option to display the actual count for each
chart element.
Other Category section
Workforce Analytics/Workforce Analysis Graphs
570
Aquire OrgPublisher 10 User Guide
Property
Category Name
Maximum
Categories
Minimum
Percentage
Description
Accept the default "Other" or type a different label. This
label must contain at least 1 character.
Select the maximum number of elements from the
Summary View you want to display. This number can
be between 1 and 12. The default is 5.
The Other category plus the independent elements
equal the 12 elements allowed from the Summary View.
Select the minimum percentage required for an
independent element to display in the graph. Any
element that falls below the percentage is accumulated
in an Other category in the graph. The default is off.
Size
Width
Increase or decrease the width of the graph. The
maximum value is 3000 and the minimum value is
100.
When there are multiple graphs aligned vertically, all
graphs are automatically resized to match the widest
and tallest graph.
Height
Increase or decrease the height of the graph. The
maximum value is 3000 and the minimum value is
100.
Summary Column Select a summary option available in the Summary
View. This is the column used for charting and is the
number displayed when Show Numbers is selected.
The default is the first column in the Summary View.
Select Categories Click this button to open the Select Categories dialog.
Select categories from a list of all items in the Summary
View. At least 1 category, and no more than 12, must
be selected. Click OK.
Select Colors
Click this button to open the Select Colors dialog.
Choose a color for each category displayed in the
graph. Click OK.
Show Legend
When this check box is selected a legend displays for
the graph. The default is selected.
Legend Options
This option is enabled when Show Legend is selected.
Click this button to open the Legend Options dialog.
Select background color, a border around the legend,
font, and placement of the legend within the graph
area. Click OK.
Zoom to Fit
If only one graph exists, select this check box to
expand or shrink the graph to fill the entire graph area.
If there are multiple graphs, the graph expands
horizontally when the graphs are vertically aligned, and
expands vertically when they are horizontally aligned.
If this option is selected, you cannot resize the graph
by dragging the borders.
571
Workforce Analytics/Workforce Analysis Graphs
Aquire OrgPublisher 10 User Guide
Property
Description
Graph Appearance section
Type
Select the type of graph you want to display. The
default is a pie chart graph.
When a horizontal or vertical bar graph is selected, the
Bar Graph Options button is enabled. Click to open
the Bar Graph Options dialog and modify the display of
the bar chart. You can display background lines and
data axis values.
The maximum value displayed on the data axis is
determined by adding 5% to the category with the
highest value. An adjustment is made to the value to
provide open space between the highest value and the
end of the graph.
2D
Select this radio button to display the pie chart or bar
graph in standard two dimensions.
3D
Select this radio button to display the pie chart and bar
graphs in three dimensions.
Bar Graph
Available for bar graphs only. you can select to Display
Options
Background Lines, Display Data Axis Values; and
select the Width of Bars and the X-axis Label Angle.
Preview
This area displays a sample graph with currently
selected options. All graph attributes may not be shown
in this view.
6. Click OK to close the dialog and display the graph.
You can print graphs when the Print Wizard is enabled. To print a graph,
open the Summary View and select the Graph View. Each graph prints one
to a page.
Resizing Workforce Analysis Graphs
Graphs may be made narrower or wider by changing the width in the
Graph Properties dialog or by using the Align button
tab.
in the Graphs
Resizing Graphs using the Graph Properties Dialog
1. Open the Summary View and select the Graphs tab.
2. Click the Edit properties button
dialog.
Workforce Analytics/Workforce Analysis Graphs
to open the Graph Properties
572
Aquire OrgPublisher 10 User Guide
Figure 220
3. Change the Width and Height by using the arrows up or down.
4. Click OK to close the dialog and resize the graph.
Resizing Graphs Using Alignment Buttons
1. Open the Summary View and select the Graphs tab.
2. The Align button
in the Graphs tab toolbar toggles between
horizontal and vertical alignment. Click the horizontal button if you
want to change the width of the graph. When you click this button, it
toggles to the vertical button.
3. Drag the right border of the graph to the width you want.
4. Click the vertical button
if you want to change the height of
the graph. When you click this button, it toggles to the horizontal
button.
5. Drag the bottom border of the graph to the height you want.
6. Save the chart when you have finalized the size of the graph.
Selecting Graph Categories
When you create a workforce analysis graph, you must select the
categories to show in that graph.
1. Open the Summary View and select the Graphs tab.
573
Workforce Analytics/Workforce Analysis Graphs
Aquire OrgPublisher 10 User Guide
Figure 221
2. You can select each category (position type or group) individually or
click
. If you decide to select only specific categories,
you can
boxes.
, and then select the appropriate check
3. in the Category Sorting Method area of the dialog, choose to sort
the selected categories to match the Summary View Order, in the
category Numeric Rank in the graph, or by sorting them in Manual
Order.
4. If you select Manual Order, the
them.
and
are enabled to arrange the categories as you want
5. when you have selected your categories and the sort order, click OK
to close the dialog and return to the Graphs tab. Click Cancel to
discard selections and close the dialog.
Using the Graphs Tab Toolbar
When the Graphs tab is selected in the Summary View, there are several
buttons available. All buttons are enabled when you select a graph.
Workforce Analytics/Workforce Analysis Graphs
574
Aquire OrgPublisher 10 User Guide
Button
Function
Click this button to create a new graph. Double-click on
the new graph to set graph properties.
Click this button to delete the selected graph. A
message asks for confirmation.
Click this button to open the Graph Properties dialog for
the selected graph.
Click this button to toggle the alignment vertically or
horizontally when multiple graphs exist.
Click this button to copy the selected graph to the
clipboard in order to paste into another application.
Printing a Workforce Analysis Graph
Graphs are available for printing when the Print Wizard is enabled. Each
graph will print one to a page.
1. Open your chart then open the Summary View by selecting View in
the Main menu and Summary View from the options list. You can
also click the Summary View button
in the Views toolbar.
2. Select the Graphs tab.
3. Click the Print button
in the Main toolbar. The Print Wizard
opens. If you have more than one graph, each graph prints one to a
page.
4. Select Summary View and click Next.
575
Workforce Analytics/Workforce Analysis Graphs
Aquire OrgPublisher 10 User Guide
Figure 222
5. Click Finish to print the graph. The printed graph displays whatever
is shown in the Graphs tab, such as a legend or categories.
Workforce Analytics/Workforce Analysis Graphs
576
Aquire OrgPublisher 10 User Guide
577
Workforce Analytics/Workforce Analysis Graphs
Aquire OrgPublisher 10 User Guide
C
HAPTER
14
WEB ADMINISTRATION SERVER
Note:
Web Administration supports opening multiple data base charts (OCB, CSV )
as long as those files exist in the SourceCharts folder. Web Administration,
however, does not support creating multiple data source charts from these file
types, neither does it support editing the text file charts using the Data
sources dialog.
Additional installation and storage information can be found in the How to Use
Web Administration tutorial in the Support section on the Aquire Web site at
www.aquire.com.
Web servers do not allow clients to schedule tasks. The OrgPublisher Web
Administration Server allows you to publish charts manually. You can,
however, open the desktop OrgPublisher version and schedule the publishing
definition in the Publish charts dialog using the Web Administration
SourceCharts folder.
1. Log on the server as an administrator or power user.
2. Open the desktop OrgPublisher application. (If default install is used, it
would be in c:/program files/orgpubx).
3. Open the chart (found in the SourceCharts folder).
4. Schedule the publishing definition in OrgPublisher using the Schedules tab.
Also, when you are publishing to ECharts, you must manually schedule the
BAT file created in the first manual publishing. To do this, open the Task
Scheduler on the server to add the .BAT job.
Using Web Administration
OrgPublisher Web Administration runs as an ActiveX control that accesses
files and data on a web server and works much like standard
OrgPublisher. The OrgPublisher Web Administration host is installed to a
web server and is accessed through a web page. Because all chart files
exist on the web server, you can open any chart from any workstation.
Note:
Your IT department may have to manually run a special command to enable
IIS 6 to run 32-bit applications on 64-bit Windows OS. See the OPSDK in the
Downloads section on the Aquire web site.
Web Administration Server/Using Web Administration
578
Aquire OrgPublisher 10 User Guide
Web Administration supports opening multiple data base charts (OCB, CSV )
as long as those files exist in the SourceCharts folder. Web Administration,
however, does not support creating multiple data source charts from these file
types, neither does it support editing the text file charts using the Data
sources dialog.
This option is a custom installation and may involve additional work on the
part of your web administrator. See the OrgPublisher 9 Web
Administration Installation Guide in the Aquire Support Portal.
For each Web Administration installation, a single folder is created for
SourceCharts and another one for PublishedCharts. In addition an
html file, OPAdmin.htm, is created to host the web administration client.
IIS provides security by allowing only chart administrators access to the
source directory on the web server. The IIS account must have full access
to the virtual directory containing the remote server DLL. This is
necessary because the server DLL reads, writes, and deletes files.
Note:
Additional installation and storage information can be found in the How to Use
Web Administration tutorial in the Support section on the Aquire Web site at
www.aquire.com.
You can also create an alternative destination directory to publish Web
Administration charts to a more secured area.
This help file includes notations where features work differently in Web
Administration. You can create new charts or open sample charts.
Because all chart files must exist on the web server, administrators can
open any chart from any workstation. OrgPublisher works much the same
in Web Administration as it does in the desktop.
OrgPublisher with Web Administration can create, format, archive, print,
and publish charts.
Accessing OrgPublisher Web Administration
OrgPublisher Web Administration is installed on a server. The installer
creates a PublishedCharts and a SourceCharts. The network
administrator creates authorization to these folders for anyone who needs
access. Once this is done, a link is provided to anyone who has been
granted access to the folders. The link points to the opadmin.htm for
Web Administration access.
579
Web Administration Server/Using Web Administration
Aquire OrgPublisher 10 User Guide
Importing a Chart
The first time you access OrgPublisher Web Administration, you may not
have charts available or listed in the Select a Chart to Open dialog. You
can create a new chart or import an existing chart.
1. To import a chart, click the Import button. The Import OrgPublisher
Chart dialog opens.
Note:
ODB files must be recreated on the server to point to correct drivers and
database or they may not import.
2. Type the chart name and location in the Import this chart field, or
Browse to the location of the chart you want to import.
3. Select the chart. OrgPublisher returns to the Import OrgPublisher
Chart dialog. Click Import.
The chart name displays in the Select a Chart to Open dialog.
4. Select the imported chart and click Open.
The chart opens in the Web Administration Server.
Opening an Existing Chart
1. Open OrgPublisher. The Select a Chart to Open dialpog appears.
Column name/
Button
New
Delete
Import
Descriptopn/Action
Opens the New Chart Wizard.
Deletes the selected chart.
Imports a chart in the SourceCharts folder in Web
Administration.
Displays the charts as large icon.
Displays the charts as small icons.
Displays the charts as a list.
Displays the charts as a detailed list.
Chart name
Type
Displays the file name of the chart.
Indicates the type of file associated with the chart
name, such as Chart file.
Web Administration Server/Using Web Administration
580
Aquire OrgPublisher 10 User Guide
Column name/
Button
Modified by
Modification date
Lock Status
Locked by
Locked on
Open
Cancel
Descriptopn/Action
Displays the user name of the person who modified the
chart.
Displays the date and time the chart was last modified.
Indicates whether the chart is Locked or Not locked.
Displays the user name of the person who locked the
chart.
Displays the date and time the chart was locked.
Opens the selected chart in Web Administration.
Cancels the action and closes the dialog.
2. Select the Chart name in the list and click Open.
3. If you want to work on or view another chart, click the Open button
in the toolbar to access the Select a Chart to Open dialog.
4. Select the Chart name in the list and click Open.
If you are opening a locked chart, the message dialog opens. The
Chart is Locked by Another User dialog displays the user name of the
person who locked the chart and asks if you want to open the chart
in read-only mode.
Click Open Read-Only or Cancel. You cannot modify a read-only
chart.
Creating a New Chart
If you are viewing a chart in OrgPublisher Web Administration and want to
create a new chart, select File from the menu, then New from the options
list. You can also click the New button in the toolbar.
You can also click the New button in the toolbar in the Select a Chart to
Open dialog.
Clicking the New button opens a new blank chart in OrgPublisher.
Publishing a Chart Using Web Administration
You can publish charts in the OrgPublisher Web Administration Server just
as you do in the desktop OrgPublisher. You can download the
OrgPublisher Software Development Kit (OPSDK)for additional information
about using the Web Administration server.
1. Open OrgPublisher in your browser. The Select a Chart to Open
dialog opens. The columns in this dialog are defined below.
– Chart name - The name given to the chart in Web Administration.
581
Web Administration Server/Using Web Administration
Aquire OrgPublisher 10 User Guide
– Modified by - The login name of the person who last modified the
chart in Web Administration.
– Modification date - The date and time the chart was last modified
in Web Administration.
– Lock Status - Indicates whether the chart is Locked or Not locked in
Web Administration.
– Locked by - The login name of the person who has locked the chart
in Web Administration.
– Locked on - The date and time the chart was locked in Web
Administration.
2. Select a chart to open from the list or select New Chart. Click Open.
The selected chart opens in the browser.
If you try to open a locked chart, a box displays the message The
Chart is Locked by Another User, and gives you an option to
Open Read-Only or Cancel your request.
3. Click the Publish button
in the toolbar. If this is the first
time you are publishing a chart, the wizard opens to the first dialog
which gives you a brief overview of the Publishing Wizard.
4. Accept the default Express Mode if you want to publish a basic
chart. Select Advanced Mode if you want to make detailed option
selections. Click Next.
5. Accept the default Interactive Org Chart selection if you want to
publish to PluginX or EChart. Select the Org Chart Document
radio button if you want to publish a PDF, HTML, or Graphic. Click
Next.
6. Follow the publishing procedure for the publishing format you want:
– Publishing in EChart Rich Client Format
"publishedcharts" to the URL Publish to
– Publishing in EChart Thin Client Format
"publishedcharts" to the URL Publish to
– Publishing in Graphic Format
– Publishing in HTML Format
– Publishing in PDF Format
– Publishing in PluginX Format
- make sure that you add
location
- make sure that you add
location
7. If you publish an EChart to a server, the EChart Link Summary text
box displays the published EChart link. Click on the link to open the
published chart.
Republishing Charts can also occur in Web Administration.
Web Administration Server/Using Web Administration
582
Aquire OrgPublisher 10 User Guide
583
Web Administration Server/Using Web Administration
Aquire OrgPublisher 10 User Guide
C
HAPTER
15
SUPPLEMENTAL INFORMATION
About Conditional Formatting
With OrgPublisher you can format a group by creating a new position type
and assigning the conditional position type to a group. When you assign
conditional formatting to a group, the original format is removed and you
must reassign custom fields. In addition, you can apply conditional colors
to groups or fields within a group using the Adding a Background Color to
a Box Area procedure.
Conditional formatting is not for all users or all formatting needs. This
feature enables you to highlight a particular attribute or search criteria by
graphical representation. Once the position type is created, you can
format the box shape and color, text color and font type, and even the
layout of the information within the box. Conditional formatting is not
designed to display summaries or counts, nor will it replace the original
position type assigned when you created the chart.
If you place the mouse pointer on a conditional position type box, the
Status Bar displays the new/conditional position type. This is true in the
application, PluginX and the EChart rich client. If you do the same in a
secured EChart rich client the Status Bar displays the original position
type to unauthorized end users and the new/conditional position type to
authorized end users.
You can see the original position type in the Update Person dialog in the
OrgPublisher application in Build Mode. You can also right-click on a name
and select Rename to open the Update Person dialog.
You should use conditional formatting if you need to graphically represent
people who meet specific criteria and you do not want to create or add
additional custom position types within your data source, or if you want to
graphically show a subset of an existing position type.
OrgPublisher uses position types to structure the org chart; position types
are key to formatting and summary data.
Supplemental Information/About Conditional Formatting
584
Aquire OrgPublisher 10 User Guide
Conditional Formatting Provisions
• If your EChart contains secured fields, it is recommended that you
either do not publish your chart in thin client format or that you do not
use conditional formatting on secured fields.
• In conditional formatting, the search feature and all calculations follow
the conditional position type. Formatting follows the group. If you
display the Summary View in a chart with conditional formatting, you
should hide either the group or position type of the conditional format.
If you don't, head counts display in both areas.
• If there is more than one group-based position type for which a person
qualifies, the first match is used in Search and Summary tasks.
• If you create a group based on a standard position type, such as
Manager, then associate a custom position type to the group for
conditional formatting, such as Top Performing Manager, the original
position type is no longer a part of the group criteria. For instance, if
you then searched for all "managers" the "top performing managers"
will not be part of your search results because they are now a different
position type. Your Boolean search should use both the original
position type, Manager, and the new position type, Top Performing
Manager, as a criteria using And/Or.
• If you delete the custom position type, the records will return to the
original position type assigned.
• It is recommended that you create separate charts based only on
groups versus charts based only on position types.
• When using conditional formatting to create a position type group for
Employees (record type E), the search results include both direct (E)
and indirect employees (IE). If you need to separate the direct from
indirect employees you can add additional logic to the Group Editor
description of the group, such as:
– OR PositionType = Employee
– AND PositionType <> Indirect Report
About Interactive Charts
When you publish your charts, you can select either an interactive chart or
you can publish an org chart document. An interactive chart enables end
users to perform several tasks, such as conducting detailed searches and
creating their own groups. An org chart document provides fewer end user
features.
585
Supplemental Information/About Interactive Charts
Aquire OrgPublisher 10 User Guide
Published chart features, including multiple viewing levels, chart searches,
ad hoc groups, Smart Links, or print preview, are not available when
publishing to an org chart document. Org chart documents are, however,
cross-platform publishing options.
Interactive Chart options:
• PluginX - When you choose this option, you can provide end users
with the richest interactive experience, allowing them to navigate and
search the chart, create their own groups, access hotspot links, and
provide accessibility to the visually impaired.
• EChart - When you choose this option, you can publish an extremely
large chart in either a rich client or thin client format, publish a realtime chart, and provide field level security and NT authentication.
About Org Chart Documents
When you publish your charts, you can select either an interactive chart,
such as PluginX or ECharts, or you can publish an org chart document. An
interactive chart enables end users to perform several tasks, such as
conducting detailed searches and creating their own groups. An org chart
document provides fewer end user features.
Published chart features, including multiple viewing levels, chart searches,
ad hoc groups, Smart Links, or print preview, are not available when
publishing to an org chart document. Org chart documents are, however,
cross-platform publishing options.
Org Chart Document options:
• PDF - When you select this option, you can choose chart styles and
the top of chart box, and print in Book style. In addition, this is the
EChart thin client printing option. End users must have the Adobe®
Acrobat® Reader® 9 software installed on their PCs.
• HTML - When you select this option, the published chart can contain
basic interactive elements, such as drilling, hotspots, displayable
views, and the email to a group feature.
• Graphic - When you select this option, the published chart is a static
document, such as a JPG, that can be viewed on a browser.
Supplemental Information/About Org Chart Documents
586
Aquire OrgPublisher 10 User Guide
Build and View Modes
OrgPublisher operates in either Build Mode
or View Mode
. You use Build Mode to create, edit, reorganize, and format
charts. You use View Mode to format and view charts as they will be seen
by your users when published.
You cannot hide chart components while in Build Mode, but you can switch
to View Mode at any time. If you try to hide components while in Build
Mode, OrgPublisher automatically switches to View Mode.
Note:
Build Mode features a Compact version so that you can view more of your
chart while you work on it. Click the Compact Build Mode button and
OrgPublisher hides everything in the chart boxes except the names. This way,
you can drag and drop boxes in the Build Mode without all the custom fields,
job, or box titles taking up screen space.
Planning charts are always in Build Mode, and do not reflect special
formatting, such as multi-level peer display, reports in the same box as their
manager, or the Advanced Box Layout settings.
The Compact Build Mode is not available to save as a style, but you can
create a similar chart style by hiding all your chart elements except the
employee names.
Uses for each mode:
Uses
Create 9 Box Matrix
Create side-by-side profiles
Create workforce analysis
graphs
Create charts
Format charts
Format chart components
Drill-up/Drill-down
View charts with components
hidden
Launch browser to view a
hotspot
587
Compact
Build Mode
Build Mode
View Mode
X
X
X
X
X
X
X
X
X
X
X
X
X
X
X
X
X
X
X
X
Supplemental Information/Build and View Modes
Aquire OrgPublisher 10 User Guide
Uses
Create organizational models
Add and organize successors
Compact
Build Mode
Build Mode
X
X
X
X
View Mode
Chart Window
When you start OrgPublisher and open a chart, the OrgPublisher window
opens. This window can have several sections depending on the views you
select for the chart. It contains a main menu and several toolbars, which
you can turn off if you choose. The Style Bar which displays the current
chart style at the top, the Status Bar which displays the levels shown and
the head count for those levels at the bottom of the window, are always
visible.
The main window section, called the Chart View, contains the chart
components, such as data and photos, arranged in boxes. The sample
below includes telephone numbers, departments and head counts. The
Chart View is always displayed, regardless of how many other views you
select.
Supplemental Information/Chart Window
588
Aquire OrgPublisher 10 User Guide
Figure 223
You can move views, except for the Chart View, to display anywhere in
your chart.
OrgPublisher views include:
9 Box Matrix View
Chart View
Groups View
List View
Profile View
Search View
Style View
Summary View
Tree View
Wizard View
589
Supplemental Information/Chart Window
Aquire OrgPublisher 10 User Guide
End User Accessibility
The OrgPublisher PluginX chart can be accessed by JAWS® for Windows
screen reading software for the blind and visually impaired.
When you publish a PluginX chart, you can enable the Section 508
accessibility option in the Publishing Wizard.
An accessible chart works best if published with only the Chart View
available using chart layout 1. We recommend that you not publish
peripheral views, such as Profile View or List View, and that you disable
the Views Toolbar when using the Publishing Wizard. In addition, you
should consider using larger fonts and basic colors.
The following functions are supported in the PluginX chart via the
keyboard.
Functions
Keyboard
COmmand
Find
F key
Find Next
N key
Zoom in
Zoom out
CTRL+
CTRL-
Description
Opens the Enter Search text dialog. This is
equivalent to an All fields search, for example,
type a first or last name, or a job or box title.
Press the space bar or Enter to begin the find, or
press TAB to the Cancel button.
Performs a "find next" matching record function if
a previous search occurred. Searches all fields one
field at a time.
Raises the zoom factor by one level.
Lowers the zoom factor by one level.
Toolbar support is not currently available.
Note:
JAWS hot keys, such as F for the next form field and L for the next list, are
disabled. OrgPublisher PluginX accessible charts do not contain form fields,
lists, links, or tables. If you use a high zoom-in level, you may notice JAWS
takes a little longer to read the screen.
End users can navigate through the chart using the UP, DOWN, LEFT, and
RIGHT arrow keys. The Drill-up/Drill-down to another level function
occurs automatically.
• When a chart is opened the top box is automatically selected.
• A box must always be selected. Drilling on "white space" will not clear
the current box.
Supplemental Information/End User Accessibility
590
Aquire OrgPublisher 10 User Guide
• Only one box is selectable at a time. Hierarchical "trees" are not
available.
• To access a sibling of a selected top box with a drill-up button, click the
up arrow first, then the left or right arrow. If the requested sibling
does not exist, the original box will remain selected.
• If JAWS is running and you tab away to another application, the focus
on the chart may be lost. To regain focus, press ALT TAB to go to
another application and then press ALT TAB again to refocus on the
chart.
Note:
You can also enable the accessibility mode manually by modifying the HTM file
or the registry. To enable accessibility mode via the registry, set the string
registry entry HKEY_CURRENT_USER/SOFTWARE/Aquire/
OrgPublisher/Settings/Accessibility to "1." To enable accessibility via the
HTM file, set the ActiveX parameter named AccessiblityMode to "1" in the
hosting HTML.
Input File Layout Rules
When mapping your data to OrgPublisher, keep in mind the following
points.
Note:
A conditional formatting position type is used for formatting purposes only
and does not override a position type pulled from your data source.
Fields
1. Each input record must be laid out according to the Input File Layout.
2. The first two fields in each record must contain the correct reporting
relationship information before a chart structure can build
successfully.
3. The first 10 fields in each input file must be mapped correctly,
matching the OrgPublisher Input File Layout, although only the first
two fields are required to contain data.
4. Field 5 must contain a unique person or employee ID if you
intend to display multi-relationship icons in your chart. This ID
should not contain sensitive information because it is
displayed in the Update Person dialog and is searchable by
end users.
5. Fields 11, 16, 17, and 19 are reserved fields for use by
OrgPublisher. Populating field 17 with a unique position ID is
strongly recommended when using OrgHistory.
591
Supplemental Information/Input File Layout Rules
Aquire OrgPublisher 10 User Guide
6. Fields 12, 13, and 14 can contain sequence numbers (integers only)
used by OrgPublisher. Field 12 is used to Sort by box ID in the Sort
Options feature.
7. Field 4 contains the record type. The record type defaults to E
(employee) when blank.
8. Use Field 18 for level numbers if you want to use the Multi-level Peer
Display feature. The Multi-level Peer Display feature is not applicable
to Assistant boxes and boxes reporting to Assistants.
9. Custom fields begin with Field 20 and can continue sequentially
through the rest of the fields.
10.If you plan to use the Comparing Two Charts feature, it is strongly
recommended that you create a custom field called Position ID and
assign a unique ID to each instance of a person in the chart. In
addition, each open position should be assigned a unique ID.
11.Summary fields begin with Field 26 and can continue sequentially
through the rest of the fields.
12.It is necessary to enclose fields in quotes only when there is a
comma within the field, for example, "Smith,jr". The following
record is valid, 0001,0002,Box title,B,,,,,,,.
13.Make sure that the Input File Layout does not contain the quote
character within any field. The following record is invalid,
0001,0002,"Sales" Dept.", B,,,,,,,.
14.There should be no blank spaces or special characters (such as #, -,
|, +, =, <, >, @, $, etc.) in field names.
15.You can create open positions in your chart by passing null records
into the Last Name, First Name, and Middle Name input fields
(Fields 6, 7, and 8).
16.When building a succession planning chart, you must select the
Specify custom field order option to map your data. This allows
you to map your data to standard Succession Candidate fields (
Fields 50 - 64).
Record types
1. The Record Type defaults to E (employee) when blank.
2. Record types B and BA do not display names or job titles in the chart
boxes.
Supplemental Information/Input File Layout Rules
592
Aquire OrgPublisher 10 User Guide
3. Chart boxes are built in ascending sequence by Box ID.
4. Job titles display in ascending sequence by Job ID within each box.
5. Each record in an OrgPublisher file represents a position in the chart.
6. Custom position record types should be defined in your text input
file. Custom position record types may be defined in the chart by
selecting Edit from the menu bar, then Define from the pull-down
menu. The record type should include before and after brackets, for
example <T>.
7. The input records may be in any order.
8. If Box IDs are the same for two records and they report to the same
manager, they will be placed in the same box.
9. Assistant boxes (record type BA) cannot have a reporting Assistant
box.
10.Assistant boxes (record type BA) cannot have a reporting Partner
box (record type P).
11.Boxes reporting to Assistant boxes (record type BA) cannot have
reporting boxes.
12.Charts containing Succession Candidate (record type SC) contain no
hierarchical information.
Data files
1. Always use the same text file name each time you export data from
your database. The text file name should match the template file
(OTM) name and should also be located in the same directory as the
template file. OrgPublisher automatically creates the OTM file when
you save your chart.
2. An input text file that does not have a corresponding template file
(OTM) will be assigned a default template automatically by
OrgPublisher.
3. Avoid naming your text data with the extension OCP. This is
reserved for use by OrgPublisher when publishing a file.
4. There should be no blank records at the end of the file.
5. When the AutoTitle feature is enabled, the top box title displayed in
the chart is used as the chart title.
593
Supplemental Information/Input File Layout Rules
Aquire OrgPublisher 10 User Guide
Inserting Chart Components
Buttons for chart components are contained on the Insert toolbar and
listed in the Insert menu. You can insert these components manually or
with the New Chart Wizard.
To insert chart components, you can do one of the following:
• Select the component from the Insert menu.
• Select the component using the shortcut keys. (To identify the
shortcut keys, select the menu option and use the keys displayed next
to the component name.)
• Select a button from the toolbar. (To identify a button, float the cursor
over it. A description appears.)
You must be in Build Mode to create new charts and insert chart
components.
The first component you insert is a box. Boxes are containers for other
chart components such as jobs, people, hotspots, custom fields, and open
positions. Boxes must be inserted in the chart before other components
can be added. There are three types of boxes:
Normal
Assistant
Partner
The box type you will probably use most frequently is the box that inserts
a person, job and box at the same time
. Like the normal box type, this
box is inserted beneath the box on which you drop it. The Insert Person/
Job box inserts a normal box with prompts for box title, job title, and
employee name by position type.
Unique formatting is assigned to the assistant box and partner box.
Assistant boxes are inserted beneath and to the right of the higher-level
box. Multiple assistant boxes alternate to the right and left of this box. A
partner box is inserted on the same level and to the right of the box on
which it is dropped. In addition, you can use a Staff Function box which
works similarly to an Assistant box but allows a full hierarchy beneath it.
In order to use this special box type, you must first create a Staff Function
position type.
Supplemental Information/Inserting Chart Components
594
Aquire OrgPublisher 10 User Guide
It’s important to note that position type is not an actual chart component,
although it controls some of the properties and formats of chart
components. The first time you open OrgPublisher, an employee position
type is automatically assigned to the first inserted box. After that, the
default is the last position type assigned. Review the Selecting a Position
Type for Insert procedure for detailed information.
Additional information can be found in the following topics:
Inserting
Inserting
Inserting
Inserting
Inserting
Inserting
Inserting
Inserting
Inserting
Inserting
Inserting
Inserting
Note:
Assistant Boxes
Normal Boxes
Open Positions
Partner Boxes
People
a Person/Job Box
a Chart Title
a Custom Field for a Single Position Type
a Custom Field for all Position Types
Hotspots
Logos
Photos
Although this section provides information on manually editing a chart,
remember that if you want the changes to remain permanent, you must apply
the changes to your HR database. When your HR data is refreshed and you
open your chart, your manual changes are overwritten.
Menus and Toolbars
OrgPublisher uses a main menu and several toolbars containing buttons
that perform charting functions. You can drag toolbars anywhere on the
OrgPublisher window.
Using toolbar options and buttons, you can open wizards, insert chart
components, navigate through your chart, and search the chart for a
specific employee, position or custom field, to name just some of the
tasks.
The OrgPublisher menus and toolbars are:
Format Toolbar
Insert Toolbar
Main Toolbar
Menu Bar
Navigation Toolbar
595
Supplemental Information/Menus and Toolbars
Aquire OrgPublisher 10 User Guide
Scroll Bars
Status Bar
Style Bar
Text Toolbar
Title Bar
Views Toolbar
Format Toolbar
The Format toolbar contains the buttons you use to format the chart, such
as colors and text, show or hide chart components, or use multi-level
fields.
Button
Description
Chart Design Template
Select a style from "thumbnail" options in the Chart Design
Templates dialog. Applying a formatting template overwrites
any Advanced Box Layout settings you may already have in your
chart.
Change color
Change the color of the selected item. Custom colors are
available for some chart components, such as boxes and chart
backgrounds.
Format boxes
Format the appearance of boxes by position type, across all
styles or for all position types.
Format text
Format the appearance of text for each text component by
position type, across all styles or for all position types.
Legend Properties
Select the properties for a chart icon legend from the Chart
Legend Properties dialog.
Show/hide chart components
Show or hide chart components including position type, box /
job titles, and names.
Custom fields
Add or modify custom fields.
Supplemental Information/Menus and Toolbars
596
Aquire OrgPublisher 10 User Guide
Button
Description
Move down a level
Move the selected box and report-to boxes down a level. Must
be in View Mode with the Show multi-level peers option
selected in the View menu.
Move up a level
Move the selected box and report-to boxes up a level (if not
the top of chart). Must be in View Mode with the Show multilevel peers option selected in the View menu.
Insert Toolbar
The Insert toolbar contains the buttons you use to add components , such
as jobs, people, fields or photos, to the chart.
Note:
When creating a Staff Function box type you must use the Position Type
Wizard.
Button
Description
Insert Box containing a person and job
Inserts a box containing person and job fields into the chart.
Insert box
Inserts a normal box into the chart.
Insert Job
Inserts a job field into a box in the chart.
Insert Person
Inserts a person field into a box in the chart.
Insert Open Position
Inserts an open position field into a box in the chart.
Insert Assistant Box
Inserts an assistant box into the chart.
Insert Partner Box
Inserts a partner box into the chart.
Insert Custom Field
Inserts a custom field or position type field into a box in the
chart.
597
Supplemental Information/Menus and Toolbars
Aquire OrgPublisher 10 User Guide
Button
Description
Insert Hotspot
Inserts a hotspot control into a box in the chart. Option not
available in planning charts.
Insert Photo
Inserts a photo into a box in the chart. Option not available in
planning charts.
Main Toolbar
The Main toolbar contains the buttons associated with standard window
tasks, as well as OrgPublisher options. You can create, save, print, and
format your org charts using buttons.
Button
Description
New
Opens a new chart using the default OrgPublisher
settings.
Open
Opens an existing chart.
Save
Saves the chart. If this is a new chart, the Save As dialog
displays so that you can assign a name to the file.
Publish
Produces a chart in formats suitable for intranet or
Internet publishing. Charts in these formats can be
viewed with Web browsers.
Manage chart archives
Opens OrgHistory Archives dialog to update or create a new
archive chart.
Cut
Sends the selected text or object to the clipboard and
deletes the text or object from the screen.
Copy
Sends a copy of the selected text or object to the
clipboard and leaves the text or object on the screen.
Paste
Copies the contents of the clipboard to the screen.
Supplemental Information/Menus and Toolbars
598
Aquire OrgPublisher 10 User Guide
Button
Description
Undo
Reverses, the latest action. May be repeated to undo
additional actions. You can undo content-related changes,
such as adding, deleting, moving, and copying
information.
Print
Prints the chart. Prints a specific chart view if it is selected
in Print Options or the Print Wizard.
Print preview
Displays the chart as it will look when you print it and is
only available in the Chart View.
Print setup
Opens the system Print Setup dialog.
Send to PowerPoint
Displays the chart as it will look in Microsoft® PowerPoint
and is only available in the Chart View.
Compact Build Mode
The editing mode in which everything except the
employee name is hidden; provides an easy-to-view,
compact chart to facilitate dragging and dropping boxes.
Click the Compact Build Mode button and OrgPublisher hides
everything in the chart boxes except the names. This way,
you can drag and drop boxes in the Build Mode without all
the custom fields, job, or box titles taking up screen
space.
Build Mode
The mode in which you edit your chart. Content and
formatting changes are made while in the Build Mode. Build
Mode also features a Compact version, noted above, so
that you can view more of your chart while you work on it.
Planning charts are always in Build Mode, and do not reflect
special formatting, such as multi-level peer display,
reports in the same box as their manager, or the Advanced
Box Layout settings.
599
Supplemental Information/Menus and Toolbars
Aquire OrgPublisher 10 User Guide
Button
Description
View Mode
Displays your org chart as it will look when published. You
can change formatting in the View Mode, but not content.
Chart components can be hidden so that they do not show
in View Mode.
Context help button
Starts the context-sensitive portion of the help system.
Click the Help button, and then click a toolbar button or
inside a wizard for additional information.
Navigation Toolbar
The Navigation toolbar contains the buttons that help you move through
the chart and find information. You can change the number of levels
viewed, go to the top of the chart, drill-up or drill-down, set the top of
chart, zoom, or display the whole chart using the toolbar buttons.
Note:
The Find Next button and Search from toolbar field can be used together to
enter text of any field (or select from existing fields in a drop-down list) and
search the chart. Searches all fields one field at a time. You can type two
words, such as first name and last name , and press Enter to begin the
search.
Button
Description
Go to top of displayed chart
Click this button to move the Chart View to the top
center of the displayed drilling level.
Groups
Click this button to display the Search dialog at the
Groups tab.
Look For
Use this field to enter your search text. Searches are
based on text you enter in the toolbar field or select
from the drop-down list, if previous toolbar searches
have been performed. You can type one or two words,
such as first name and last name. Searches all fields
one field at a time.
Search
Click this button to display the Search dialog at the
Name tab.
Supplemental Information/Menus and Toolbars
600
Aquire OrgPublisher 10 User Guide
Button
Description
Go
Clicking this button starts the chart search on a box to-box basis for the next instance of a matching record.
Searches based on text you enter in the adjacent
toolbar field or select from the drop-down list.
You can type two words, such as first name and last
name, and then press ENTER to begin the search.
Set Top of Chart
Clicking this button designates the selected box as the
top of your chart for the selected style.
Display Whole Chart
Click this button to display the chart from the highest
box in the hierarchy.
Drill-up and Drill-down
Click this button to enable the drill buttons in your
chart which facilitate navigation between shown and
hidden levels.
Levels
Click this button to select the number of levels from the
drop-down list that you want to display.
Zoom to point
Click this button to make a selected box the center of
the chart display.
Zoom
Click this button to set the zoom percent for the chart
display.
Status Bar
The Status bar contains important information about the chart, such as
levels shown and head count. This information varies, depending about
where in the chart you have placed the cursor.
Data Displayed
Position Type
Number of levels
shown
601
Description
This section displays position type of a selected chart
component or the description of a selected toolbar
button.
This section displays the number of levels shown in the
currently displayed section of the chart.
Supplemental Information/Menus and Toolbars
Aquire OrgPublisher 10 User Guide
Data Displayed
Head count
Description
This section displays the total head count for the
currently displayed chart (Build Mode only), or the
specific job head count for a selected job title within a
box, or the shown head count for the currently
displayed chart (View Mode only).
Note:
Planned head
count
Orphan records and broken hierarchies can adversely
affect summary and security functions. Unexpected
results can occur that may cause head count or other
totals to be incorrect.
This section displays the planned head count for the
chart, which includes the total head count and open
positions.
Style Bar
The Style bar displays the style name of the open chart on the left-hand
side of the bar.
Data Displayed
Style name
Group name
Description
This section displays the name of the style currently
open in your chart. Click the drop-down arrow (if
available) to open the Style View and select another
style.
This section displays the name of the group currently
shown in the chart. Click on the drop-down arrow (if
available) to open the Groups View and select another
group.
With the Style Bar you can:
Showing or Hiding the Style Bar
Editing the Style Bar Label
Pinning the Style View
Opening a Selected Group in the Chart View
Text Toolbar
The Text toolbar contains the buttons you use to format (bold, italic,
underline) and align text (left justify, center, right justify) in the chart
boxes.
Supplemental Information/Menus and Toolbars
602
Aquire OrgPublisher 10 User Guide
Button
Description
Bold
Click this button to make the selected text or numbers bold.
Clicking again removes the bold formatting.
Italic
Click this button to make the selected text or numbers italic.
Clicking again removes the italic formatting.
Underline
Click this button to underline the selected text or numbers.
Click again to remove the underline.
Left justify
Click this button to align the selected text or numbers to the
left of the box or text area.
Center
Click this button to align the selected text or numbers to the
center of the box or text area.
Right justify
Click this button to align the selected text or numbers to the
right of the box or text area.
Title Bar
The title bar displays the OrgPublisher product name and the name of the
open chart. If you have not saved your chart, the title bar displays the
OrgPublisher product name followed by a number.
The title bar contains the Control button in the upper left corner as a chart
icon, and the standard Minimize, Maximize, and Close buttons in the
upper right corner. The Control button can also close OrgPublisher.
Views Toolbar
The Views toolbar contains the buttons you use to select the chart view
you want to display. Click on a button in the toolbar to display the view
name, such as List View and Profile View, and description.
Note:
603
The Tree View is not available when publishing as an EChart thin client or PDF.
Supplemental Information/Menus and Toolbars
Aquire OrgPublisher 10 User Guide
Button
Description
Click this button to open and close the Wizard View, which
displays the available OrgPublisher wizards.
Click this button to open and close the Style View, which
displays the styles available for the open chart.
Click this button to open and close the Tree View, which
displays the chart in an outline format. Click on a position or
name to locate it in the chart.
Click this button to open and close the List View, which lists
employees in the chart. The view contains two panes. One
pane lists only the employees in the portion of the org chart
that is shown. The List View pane shows custom information
such as telephone numbers and office locations and is used as
the index for a chart printed in Book style format. You can click
on a name in this list to locate it in the chart. Columns can be
sorted.
The Search View pane enables you to conduct a search for
specific information, and to create and save a new group. Click
on a name in this list to locate it in the chart. The Search View
can, typically, also list everyone in the chart. Columns can be
sorted.
Click this button to open and close the Profile View, which
displays information about an employee or position, including
custom fields that are defined for that position type.
Click this button to open and close the Summary View, which
displays summary fields and totals by position type and group.
Click this button to open and close the 9 Box Matrix View,
which displays a matrix of employees representing
performance and potential specified in the 9 Box Matrix Wizard.
Note:
The Summary View is not available in published real-time charts.
Scroll Bars
If a chart is too large to display completely in the active OrgPublisher
window, scroll bars display along the right and bottom sides of the
window. You can use the scroll bars to show other parts of the chart or
view.
Supplemental Information/Menus and Toolbars
604
Aquire OrgPublisher 10 User Guide
Menu Bar
The menu bar contains the headings for OrgPublisher’s pull-down menus.
You can create, edit, save, print, and format your org charts using menu
options.
File menu
Menu Option
New
Open
Open for
formatting only
Save
Save As
Publish
Styles
Set template as
default
Print
Print preview
Print setup
Print options
Exit
605
Description
Opens the New Chart Wizard; if a chart is currently
open, asks if you want to save any changes made.
Opens the Open dialog and allows you to select or
Browse to a chart file and open it in OrgPublisher.
Opens the Open dialog and allows you to select or
Browse to a chart file and open it in OrgPublisher and
make only formatting changes.
Use this button if you are working in the OrgPublisher
application to save changes to the chart.
Use this button if you do not want to amend the current
chart file, but do want to save changes in the chart
under a different file name.
Opens either the Publishing Wizard (if you have not
yet published a chart) or Publish charts dialog (if you
have already published a chart) in order to create,
update, or delete a publishing definition.
Opens the Styles dialog in order to create or delete
styles in the current chart.
Makes the current style temple the default for all charts
unless otherwise specified.
Opens the Print Wizard, if enabled, in order to print the
chart; if the Print Wizard is disabled, opens the system
print dialog for your machine.
Opens the Print Preview Type dialog to select either the
Wall chart or Book style.
Opens the system Print Setup dialog for your machine to
set paper size and orientation.
Allows you to select or clear the Use Print Wizard
option, as well as select a view (if open in the chart) or
open the Print Header/Footer Options dialog.
Closes OrgPublisher after asking if you want to save the
modifications in the chart.
Supplemental Information/Menus and Toolbars
Aquire OrgPublisher 10 User Guide
Edit menu
Menu Option
Undo
Cut
Copy
Paste
Rename
Search
Groups
Delete
Define
Move up a level
Move down a
level
Description
In Build Mode, reverses the most recent change made to
the content of the chart.
In Build Mode, cuts the selected box or data and places
it in the "clipboard."
Copies the selected box or data and places it in the
"clipboard."
Pastes the box or data from the clipboard to the
selected location in the chart or another application.
In Build Mode, allows you to rename the selected data
component in the chart.
Opens the Search dialog at the Name tab.
Opens the Groups tab of the Search dialog.
In Build Mode, permanently removes the selected box or
data from the chart.
Opens the Define dialog for position types and hotspot
links.
When in View Mode, moves the selected box up a level
within the hierarchical chain.
When in View Mode, moves the selected box down a
level within the hierarchical chain.
View menu
Menu Option
Build mode
Compact build
mode
View mode
Zoom
Go to top of
displayed chart
Set top of chart
Display whole
chart
Drill up/Driill
down
Description
In this mode, you can edit the chart data or formatting.
Displays only the employee names in the chart boxes,
allowing you more room to work in the Chart View.
In this mode, you can see what the chart will look like
when it is published; you can also due basic formatting,
such as using the multi-level peer display.
Provides list of zoom options for selection.
Moves the Chart View to the top center of the displayed
drilling level.
Designates the selected box as the top of your chart for
the selected style.
Displays the chart from the highest box in the
hierarchy.
Turns the drill feature on or off in the chart.
Supplemental Information/Menus and Toolbars
606
Aquire OrgPublisher 10 User Guide
Menu Option
Description
Show/Hide chart
components
Show custom
Levels
Show all levels
Opens the Show/Hide Chart Components dialog at the
Components tab.
Opens the Show/Hide Chart Components dialog at the
Levels tab.
Reduces the all levels view and returns to the original
number of levels selected to display; only enabled if All
levels has been selected from the Levels drop-down
options.
In the View Mode, enables the use of the Move up a
level and Move down a level buttons.
Opens or closes the List View in the chart.
Opens or closes the Style View in the chart.
Opens or closes the Profile View in the chart.
Opens or closes the Summary View in the chart.
Opens or closes the Tree View in the chart.
Opens or closes the Wizard View in the chart.
Opens or closes the 9 Box Matrix View in the chart.
(OrgPublisher Premier)
Returns maximized views to their original docked state.
Show multi-level
peers
List View
Style View
Profile View
Summary View
Tree View
Wizard View
9 Box Matrix
Reset Docking
Windows Layout
Toolbars
Status bar
Allows you to select the toolbars to view in the
OrgPublisher window, as well as styles and groups
toolbar options.
When selected, the Status bar displays the name of the
selected position type in the chart, as well as the levels
shown and head count.
Insert menu
Menu Option
Select position
type
Person in box
Person
Job
Box
607
Description
When in Build Mode, opens the Select Position Type for
Insert dialog.
When in Build Mode, the cursor changes and, when
clicked inside a box, inserts a new box with a person
label below the clicked box.
When in Build Mode, the cursor changes and, when
clicked inside a box, inserts a person label.
When in Build Mode, the cursor changes and, when
clicked inside a box, inserts a job label.
When in Build Mode, the cursor changes and, when
clicked inside a box, inserts a new box below the
clicked box.
Supplemental Information/Menus and Toolbars
Aquire OrgPublisher 10 User Guide
Menu Option
Open position
Assistant box
Partner box
Custom field
Hotspot
Photo
Logo
Legend
Description
When in Build Mode, the cursor changes and, when
clicked inside a box, inserts an Open position label.
When in Build Mode, the cursor changes and, when
clicked inside a box, inserts an assistant box type
below and to the right (or left, if another assistant box
already exists) of the clicked box.
When in Build Mode, the cursor changes and, when
clicked inside a box, inserts a partner box type to the
right of the clicked box.
When in Build Mode, the cursor changes and, when
clicked inside a box, insert a label for a new custom
field.
When in Build Mode, the cursor changes and, when
clicked inside a box, opens the Hotspot Wizard.
When in Build Mode, the cursor changes and, when
clicked inside a box, opens the Photo Wizard.
Opens the Logo Wizard.
Opens the Chart Legend Properties dialog.
Format menu
Menu Option
Font
Chart design
templates
Text
Boxes
Lines
Chart
Title
Description
Opens the system Font dialog; modifications made in
this dialog change the font across the current style.
Opens the Chart Design Templates dialog.
Opens the Format dialog at the Text tab; modifications
made in this dialog change the text by position type
and data component in the current style.
Opens the Format dialog at the Boxes tab;
modifications made in this dialog change the box style
by position type in the current style.
Opens the Format dialog at the Lines tab; modifications
made in this dialog change the connecting lines by
position type in the current style.
Opens the Format dialog at the Chart tab;
modifications made in this dialog change the current
style.
Opens the Format dialog at the Title tab; modifications
made in this dialog change the title in the current style.
Supplemental Information/Menus and Toolbars
608
Aquire OrgPublisher 10 User Guide
Menu Option
Advanced Box
Layout
Colors
Description
Opens the Format dialog at the Advanced box layout
tab; modifications made in this dialog change the
current style.
Opens the system color grid; changes made in this
dialog change the background color of the current
style.
Tools menu
Menu Option
Style Wizard
Publishing
Wizard
Position type
Wizard
Head count
Wizard
Custom field
Wizard
Hotspot Wizard
Summary Wizard
Logo Wizard
9 Box Matrix
Wizard
Manage
OrgHistory
Archives
Compare two
charts
609
Description
Opens the Style Wizard to create a new style or modify
the current style.
Opens the Publishing Wizard to create a new
publishing definition and choose the publishing
components and formats; if a publishing definition
already exists, open the Publish charts dialog to perform
the same tasks or schedule a publish time.
Opens the Position Type Wizard to create a new
position (chart wide), assign it to a group, if applicable,
and select the box type in which to display it in the
current style.
Opens the Head Count Wizard to select the population
for the head count and in what position to display it in
the current style.
Opens the Custom Field Wizard to create and name a
new custom field (chart wide), and select the position
type and data component to display the field in the
current style.
Opens the Hotspot Wizard to create a hotspot link,
select a base path, and choose position type to display
the hotspot.
Opens the Summary Wizard to select existing numeric
fields for which to create totals in the current style.
Opens the Logo Wizard to add, modify, or delete a logo
in the current style.
Opens the 9 Box Matrix Wizard to convert tracked
performance data into a new or modified matrix grid.
Opens the OrgHistory Archive Wizard in order to ; if
an archive already exists, opens the OrgHistory Archives
dialog to perform the same tasks or compare charts.
Opens the Compare Charts dialog to select the charts for
which you want to view a change report; you can also
customize the change report.
Supplemental Information/Menus and Toolbars
Aquire OrgPublisher 10 User Guide
Data menu
Menu Option
Custom field
properties
Manage data
sources
Refresh
Description
Opens the Custom Field Properties dialog to create,
delete, modify or secure custom fields.
Opens the Data Sources dialog in order to modify or
delete an existing data source (s), or to create a new
source using the New Chart Wizard.
If your chart was built using a data connection,
changes made to data in your HR database are applied
to the chart data.
Options menu
Menu Option
Use Hotspot
Wizard
Messages
Synchronize
navigation
between styles
Photo wait
Sort options
Color scheme
options
Text encoding
options
EChart security
options
Real-time
connection
configuration
Search options
Tree View
options
List View options
Description
Enables or disables the use of the Hotspot Wizard in
OrgPublisher.
Enables error messages while working in OrgPublisher,
for instance errors in hierarchical data.
Retains the same location in the chart when changing
styles.
Displays available wait time to display photos in
OrgPublisher.
Opens the Sorting Options dialog to select the box sort
order.
Opens the Select Color Scheme dialog to choose a color
scheme for the OrgPublisher window.
Opens the Text Input Encoding Options dialog to select
the input file encoding method.
Opens the EChart Multiple Instance User Configuration
dialog to select fields the end user can see when
selecting a record in secured ECharts.
When using Aquire Unifi web service, opens the RealTime Connection Configuration dialog to enable real-time
connection and test web service.
Lists options to customize the Search dialog or enable a
prompt message when searching beyond displayed
levels.
Lists options on how to display data in the Tree View.
Lists option to show all displayed positions.
Supplemental Information/Menus and Toolbars
610
Aquire OrgPublisher 10 User Guide
Menu Option
Description
Profile View
Lists automatic display options of Box Title, Job Title,
options
or Position.
Summary options Lists the option to exclude managers in their own head
count totals.
Group display
Lists the option to automatically display the group
options
selected in the Groups View in the Chart View.
Help menu
Menu Option
User Manual
Help pointer
Getting Started
Guide
Support Portal
Tip of the day
About
OrgPublisher
License
Information
Send Feedback to
Aquire
611
Description
Opens the OrgPublisher help file.
Select to move the pointer and click on a button or
view to display a help topic.
Opens the OrgPublisher Getting Started Guide PDF
document. This guide describes core features and helps
you quickly create a chart.
Opens the Aquire Support Portal web page.
Select to view and enable or disable the Tip of the Day
dialog when opening OrgPublisher.
Displays the OrgPublisher version, copyright, contact,
license, and trademark information.
Opens the Licensing Information dialog; displays the
current license key, features and expiration
information; you can also enter a new key using this
dialog.
Open your system email client with
[email protected] in the To field.
Supplemental Information/Menus and Toolbars
Aquire OrgPublisher 10 User Guide
Publish ECharts
The EChart publishing format enables you to publish extremely large
charts to your Microsoft® IIS (ISAPI enabled) Windows® XP, Windows®
2003 web server, Windows® 2008 web server, or Apache™ HTTP Server
2.0+ running Windows. See the complete EChart Rich Client Publishing
Requirements or EChart Thin Chart Publishing Requirements. Please
review the Publish EChart Thin Client section of this document for more
information on thin client publishing.
If there are multiple listings of the same user ID in a secured EChart, you
can enable the end user to choose the applicable record. Also, when
publishing ECharts you can secure a style to a group. When you publish a
chart for planning, you can assign group access to planning charts and set
default options for change reports used with planning charts as well as the
new comparing charts feature.
The Publishing Wizardattempts to verify that the chart you want to publish
as an EChart qualifies as a valid candidate. This is done by a "behind the
scenes" calculation of records and custom fields . A chart with as many as
a million records can be published as an EChart.
In addition, EChart publishing enables you to set chart security at the user
and field level, as well as select proxy server mode security.
The main consideration to keep in mind is that a candidate for an EChart is
one the requires Windows NT operating system authentication to secure
it, or one in which the combination of the number of records and custom
fields results in a very large file. Publishing in EChart Rich Client Format
provides the following benefits.
EChart publishing can:
• Produce real-time charts.
• Build extremely large charts with improved intranet/Internet load
time.
• Generally enhance construction of large org charts.
• Perform more effectively over dial-up connections.
• Publish a thin client chart to a server, eliminating the need to install
the PluginX on all desktop PCs.
• Reduce the time necessary to sort through the records list in the List
View.
Supplemental Information/Publish ECharts
612
Aquire OrgPublisher 10 User Guide
• Use Windows NT authentication to secure your chart.
If you want to schedule an EChart to publish automatically, you can use
Microsoft Task Scheduler.
You can also review Troubleshooting Tips for Published ECharts if your end
users encounter difficulties opening a chart.
In order to publish an EChart, you must:
• Set up a Microsoft® IIS (ISAPI enabled) Windows® XP, Windows®
2003 web server, Windows® 2008 web server, or Apache™ HTTP
Server 2.0+ running Windows.
1. Create a virtual directory with execute permissions for scripts and
executables.
2. Verify that EChart files, OCP, DLL, HTM, OCS (created when you
publish an EChart), exist in the same directory.
3. Follow the Publishing Wizard, selecting EChart as the publishing
format.
Note:
The EChart htm file must be closed in order to publish successfully. If it is
open when you attempt to publish the EChart, an error message displays
stating that access is denied. Simply close the file and publish again.
Publishing Definitions
When you publish a chart or a portion of a chart with the Publishing
Wizard or Publish charts dialog you are creating a publishing definition
that OrgPublisher automatically saves and adds to a list of existing
publishing definitions. The publishing definition is automatically named
the same as the Box title of the top box that is displayed when you
publish the chart, which you can modify. If you have already published a
chart, the Publish charts dialog is available to create new or updated
publishing definitions.
Note:
The OrgPublisher Web Administration Server allows you to publish charts
manually. You can, however, open the desktop OrgPublisher version and
schedule the publishing definition in the Publish charts dialog using the Web
Administration SourceCharts folder.
When you create a publishing definition in the Publishing Wizard or Publish
charts dialog, you select:
• The publishing definition name.
613
Supplemental Information/Publishing Definitions
Aquire OrgPublisher 10 User Guide
• A publishing format, for example PluginX.
• The location of the published chart.
• Whether or not you want to overwrite the existing HTM file.
• Whether or not you want to send to an FTP web server.
• Whether or not you want to enable org model planning.
• A chart style.
• The toolbars or buttons published with the chart.
• The chart or portion of the chart to be published.
• End user capabilities, such as copy, print, or save.
• A link to a custom PluginX help file.
Entering Connection String for a Unifi Style Chart
When you create a chart using a Unifi style, you can use the Connection
Builder to build the connection string and navigate to the style location.
1. Begin the New Chart Wizard and select Unifi style. Click Next.
2. Click Connection Builder to open the system Data Link Properties
dialog. In the Provider tab, select the OLE DB Provider(s) from
the list, for instance Microsoft OLE DB Provider for SQL Server.
Click Next.
3. In the Connection tab, type or click the down-arrow in the Select
or enter a server name (Use data source name) field to select
the source or server. Select the source or server from the list.
4. In the Enter information to log on to the server area, (if
applicable, select the Use a specific user name and password
field radio button) type the User name and Password.
5. If applicable, select either the Blank password or Allow saving
password check box.
6. Select either the Select the database on the server or Attach a
database file as a database name radio button and type the
applicable database information.
7. Click Test Connection to very the database information is correct.
Supplemental Information/Publishing Definitions
614
Aquire OrgPublisher 10 User Guide
8. Click OK to close the Data Link Properties dialog and return to the
OLE DB connection string dialog. It now contains the connection
string information. Click Next.
9. Complete the New Chart Wizard to create your chart.
Understand Summary Field Values
You use the values in the Custom Field Properties dialog to insert a
summary field into your organizational chart. When building from data,
OrgPublisher writes (and rewrites as data refreshes) to numeric fields
based on calculations.
Note:
If you renewed maintenance from a previous OrgPublisher Enterprise version
that included the organizational planning client, that feature is included in the
OrgPublisher 9 version.
If you renewed maintenance from a previous OrgPublisher Advantage version
your OrgPublisher version now includes the ability to:
• create charts from multiple data source
• work with Web Administration
• use chart security
• add summaries to your chart
• create email distribution list
When selecting a summary field you are prompted to select a field type,
for instance Average or Percentage, and what population you want to
include in the calculation. When your chart is republished or refreshed,
these data fields may change, depending on your source data.
Note:
The Summary View is not available in published real-time charts.
Succession candidates are not included in head counts or summary totals.
These values help you select the type of summary you want.
615
Supplemental Information/Understand Summary Field Values
Aquire OrgPublisher 10 User Guide
Value
Field label
Type
Description
The name of the custom field. Click inside the field to
change the field label. Changes are made across all styles.
The custom field type helps determine the format of the
displayed information and the type of summary field you
insert. Click inside the field to view the drop-down list. The
custom field type is across all styles.
Values include:
Text, Hotspot, Numeric, Currency, Count, Sum,
Average, Minimum, Maximum, Percentage, Date,
Email, Position ID
Calc Field
Population
Before you can create a summary field, you must insert a
numeric custom field.
The calculation field provides a list of numeric custom fields
that have already been inserted into the chart. Click inside
the field to choose the field on which you want to base the
summary processing. This calculation field is across all
styles.
The population determines which position types or groups
are included in the summary. The selected population is
across all styles.
Values include:
Assigned To
Position types and groups defined in your chart
The position type specifies where the roll-up is displayed in
the chart. You can select one or more position types or
groups, if applicable, or leave the field blank if you do not
want the field displayed.
Values include:
All Position Types, individual position types, and groups
defined in your org chart
Note:
In conditional formatting, the search feature and all calculations follow the
conditional position type. Formatting follows the group. If you display the
Summary View in a chart with conditional formatting, you should hide either
the group or position type of the conditional format. If you don't, head counts
display in both areas.
Use a Virtual Directory
When you publish ECharts (desktop OrgPublisher or Web Administration),
whether to a rich client or thin client, or when you publish a real-time
Supplemental Information/Use a Virtual Directory
616
Aquire OrgPublisher 10 User Guide
chart, you publish to the physical directory but the reference to the chart
(or web page) using HTTP must reference the virtual directory, if your web
server uses one. If not, use HTTP://mychart.htm in the URL field in the
Publishing Wizard.
Verify that the chart is published to a virtual directory with execute
permissions. If you are not sure of the structure of your web server,
please contact your Web administrator.
Use Conditional Formatting with Other Features
Some tips for using conditional formatting with other OrgPublisher
features.
• Secure custom fields - It is recommended that you do not create a
conditional position type based on secured fields, because for
performance reasons, the EChart server caches data that hampers the
accurate processing of conditional position types based on secure
fields.
• Chart security - You can use both features at the same time.
• Group icons - The use of group icons and conditional formatting are
meant to highlight different aspects and it is not recommended to use
both features at the same time. Groups based on several criteria
should not be used with conditional formatting.
• Multiple reporting relationships - You can use both features at the
same time.
• Advanced Box Layout Editor - You can use both features at the same
time.
• Custom fields - You can use both features at the same time, except
for the note above about secured EChart fields.
• Position types - The conditional position type displays in the
OrgPublisher application and PluginX chart. The original box type
assignment remains the same. You can see the original position type in
the Update Person dialog.
• Building from data - OrgPublisher calls the original position type
from your data source and uses the conditional position type for
formatting only.
• Publishing - You can use both features at the same time.
617
Supplemental Information/Use Conditional Formatting with Other Features
Aquire OrgPublisher 10 User Guide
• Reporting line formatting - Reporting line formatting is based on
the conditional position type.
• Printing - You can use both features at the same time.
• Sorting chart boxes - You can use both features at the same time.
• End user accessibility - Because this feature is designed to work
with screen reading software for the blind and visually impaired,
conditional formatting is not compatible with accessibility.
• Searching - This feature follows the conditional position type. If there
is more than one group-based position type for which a person
qualifies, the first match is used in search and summary tasks.
• Summaries - Summary counts are based on the conditional position
type. If there is more than one group-based position type for which a
person qualifies, the first match is used in search and summary tasks.
Work with Signed and Read-Only Archive Charts
You can use OrgHistory to take a "snapshot" of your organizational chart
and archive it for reference at a later time. The OrgHistory Archive Wizard
walks you through selecting a directory location, assigning a name and
password, as well as add a signature to the archive.
• OrgHistory defaults to Sign archived charts, which means that if the
archived chart is created and opened in OrgPublisher 7 and later, it
cannot be modified. However, the archived chart can be modified if it
is opened from a previous version of OrgPublisher or in a hex editor.
• When you open an altered "signed" archived chart in OrgPublisher 7
and later, you receive a message telling you that it has been modified.
You can choose not to archive a chart with a signature by clearing the
check box in the OrgHistory Archive Wizard.
• OrgHistory also defaults to Mark archived charts as read-only,
which means that the "read-only file" system flag is set. The chart can
be overwritten if the flag is removed. You can choose not to archive as
read-only by clearing the check box in the OrgHistory Archive Wizard.
Note:
Always open the OrgHistory Archives dialog to verify that your scheduled
chart archived at the correct time.
If you are working with the OrgPublisher Web Administration server, all
archived charts will be created in the server ArchivedCharts folder. In
addition, if end users must access archived charts, they must be stored in the
SourceCharts folder.
Supplemental Information/Work with Signed and Read-Only Archive Charts
618
Aquire OrgPublisher 10 User Guide
You can create a "read-only" archived chart just once a day (using the One
time only scheduling option). If you want to archive an updated version of
your "read-only" chart, you can schedule it to run the next day.
A "read-only" archived chart can be overwritten with an updated version of
the same chart. A message displays verifying that the end user wants to
overwrite the "read-only" archive.
System Requirements and Chart Parameters
Chart Parameters
• As a general rule, the maximum chart width (number of boxes
currently displayed) is approximately 32,000 characters, which is
equivalent to about 1,500 boxes wide using OrgPublisher’s default
setting. If necessary, you can adjust the box width to 15 and the
horizontal spacing to 2 in order to create a chart 1,800 boxes wide. If
you use the drilling feature, you may have more than 1,500 boxes in
width.
• The default maximum number of organizational levels in the Chart
View is 500.
• Each field has a maximum length of 1,000 characters.
• The number of boxes, jobs, open positions and people per chart is
limited only by the amount of memory in your PC.
• There is no practical limit to the number of jobs, open positions or
people per box.
• The maximum number of nodes in the Tree View is 6,537.
• The maximum number of characters in the Tree View is 32,000.
• Only one level of direct reports can be assigned to assistant boxes.
• The default maximum number of records that can be called for EChart
Rich Client printing is 5,000.
• The default maximum number of records that can be called for EChart
Thin Client printing is 500.
• The default maximum time an EChart Thin Client will remain open and
inactive before logging out the end user is ten minutes.
• The default maximum number of chart builds cached for EChart Thin
Client is 200. (Secure charts are not cached.)
619
Supplemental Information/System Requirements and Chart Parameters
Aquire OrgPublisher 10 User Guide
• The default number of cached chart builds that are purged once the
limit is reached is 40.
Browser Requirements
Browser requirements to interactively view charts residing on a web
server or platform:
• Microsoft™ Internet Explorer 6.x and later
Power users of OrgPublisher PluginX require:
• Microsoft Internet Explorer 6.x and later
• 60 MB available hard disk space
• 128 MB RAM
Minimum System Requirements
• Pentium PC compatible or greater
• 512 MB of RAM
• 60 MB available hard disk space
• Microsoft® Windows® XP or Windows® Vista™ operating system
• Adequate storage space for charts
EChart Thin Chart Publishing Requirements
• Compatible with Microsoft Internet Explorer 6.0 and later
• Some advanced features may require "cookies” for full functionality
• Browser must be JavaScript enabled
• A Microsoft® IIS (ISAPI enabled) Windows® XP, Windows® 2003 web
server or Apache™ HTTP Server 2.0+ running Windows
• Web server must grant execute permission to thin client virtual
directory
• Web server must have 1.5 MB of free memory for every 1,000 boxes
charted
Supplemental Information/System Requirements and Chart Parameters
620
Aquire OrgPublisher 10 User Guide
Chart viewing for typical end user requirements:
• Microsoft® Internet Explorer 6 and later for all versions of Windows®
mentioned above
• 128 MB of RAM
• 60 MB available hard disk space
• Available for all web servers, EChart server recommended
EChart Rich Client Publishing Requirements
• Pentium PC compatible or greater
• A Microsoft® IIS (ISAPI enabled) Windows® XP, Windows® Vista™,
Windows® 2003 web server, or Apache™ HTTP Server 2.0+ running
Windows
• A virtual directory with execute permissions for scripts and
executables on the web server
• 60 MB available hard disk space
• 512 MB RAM, depending on chart size
• URL to virtual directory available at publishing time
If publishing real-time:
• Microsoft Data Access Components (MDAC) 2.6 or higher
• ASP.NET support on the web server
• EChart that has been created using an ODBC connection
• Chart must be published to a virtual directory
• Real-time connection with Web service URL must be configured first
Real-time Chart Publishing Requirements
Requirements for publishing real-time charts include:
• Microsoft Data Access Components (MDAC) 2.6 or higher
• ASP.NET support on the web server
• EChart that has been created using an ODBC connection
621
Supplemental Information/System Requirements and Chart Parameters
Aquire OrgPublisher 10 User Guide
• Chart must be published to a virtual directory
Note:
Real-time publishing is not available when creating a chart from multiple
databases.
Web Administration Requirements
Web Administration enables you to use the OrgPublisher application from
any location. The requirements are:
• Pentium PC compatible or greater
• 128 MB RAM
• 60 MB available hard disk space
• A Microsoft IIS (ISAPI enabled) Windows XP, Windows 2003 web
server, Windows 2008 web server, or Apache 2.0+ running Microsoft
Windows
• A virtual directory with execute permissions for scripts and
executables on web server
Planning Chart User Requirements
• Pentium PC compatible or greater
• 256 MB RAM
• 60 MB available hard disk space
• Microsoft® Windows® XP, or Windows® Vista™ operating system
• A virtual directory with execute permissions for scripts and
executables on web server
Supplemental Information/System Requirements and Chart Parameters
622
Aquire OrgPublisher 10 User Guide
623
Supplemental Information/System Requirements and Chart Parameters
Aquire OrgPublisher 10 User Guide
C
HAPTER
16
TROUBLESHOOTING
Note:
Web servers do not allow clients to schedule tasks. The OrgPublisher Web
Administration Server allows you to publish charts manually. You can,
however, open the desktop OrgPublisher version and schedule the publishing
definition in the Publish charts dialog using the Web Administration
SourceCharts folder.
1. Log on the server as an administrator or power user.
2. Open the desktop OrgPublisher application. (If default install is used, it
would be in c:/program files/orgpubx).
3. Open the chart (found in the SourceCharts folder).
4. Schedule the publishing definition in OrgPublisher using the Schedules tab.
Also, when you are publishing to ECharts, you must manually schedule the
BAT file created in the first manual publishing. To do this, open the Task
Scheduler on the server to add the .BAT job.
Troubleshooting Automatic Publishing
If you are experiencing problems with automatic publishing using the
Publish charts dialog, check to ensure:
• you have local Administrator group privileges on Windows® XP,
Windows® 2003 web serve, Windows® 2008 web server, or or
Apache™ HTTP Server 2.0+ running Windows. These privileges are
required in order to set up or run a job automatically.
• Microsoft Task Scheduler is installed. This is a Microsoft program,
usually installed as a component of Microsoft Internet Explorer.
• you are not using letter-mapped drives for automatic publishing (e.g.,
G:\NetworkPath\FileName). In some cases they are not recognized
when running jobs off-line. Instead, use UNC to specify network paths
(e.g., \\ServerName\Path\Filename).
Error messages can be generated in two different log files:
1. Look for the log in the c:\program
files\OrgPub(x)\OPAutoPub.log. (The (X) is the version number
of your OrgPublisher installation, for example, OrgPub9.) Find the
Troubleshooting/Troubleshooting Automatic Publishing
624
Aquire OrgPublisher 10 User Guide
date and time the job was supposed to run, and check for any error
messages.
2. Check the message log for the Microsoft Task Scheduler by clicking
Advanced then View Log. Look for errors such as "file not found" or
"password not valid" based on date and time the job should have
run.
Tips for Automatic Publishing
Diagnosing common problems:
• Did the job ever run before?
– Yes, the job has run before.
– No, the job has never run automatically.
• Did you select the FTP option?
If you experience problems such as,
• the Schedule Status tab’s Status field reads Never Published or it
is blank, or
• if Microsoft Task Scheduler indicates that the publishing job ran, but
your chart is not published or updated
you can use the Troubleshooting Automatic Publishing procedure.
Troubleshooting Automatic Publishing procedure
1. In the Publish charts dialog, in the Schedule Status tab, click View
log. The OrgPub32.LOG opens in Microsoft Notepad. You can use
this as a diagnostic tool by reviewing the schedule information.
2. If you see the Never published message after you have scheduled
a chart to publish, you are probably still working in that org chart in
OrgPublisher. Update your schedule to a new publishing time and
close the chart.
3. If Task Scheduler indicates that your publishing job ran but your
chart is not published or updated, or you can publish charts while
you are logged on but they do not publish while you are logged off,
there may be a conflict with Microsoft IIS. Open the Task Manager
and click the Processes tab. If OrgPub32.exe is still running, this
may be an indication that an IIS conflict exists.
625
Troubleshooting/Troubleshooting Automatic Publishing
Aquire OrgPublisher 10 User Guide
If you installed OrgPublisher on an IIS server to automatically update
charts, you may need to alter your default Distributed COM (DCOM)
settings to allow authentication from any user in the local Administrators
group. Note that changes to the default security settings can alter other
permissions.
IIS alters the default DCOM security access settings, adding its own set of
permissions that allow external access by users to Internet pages, thus
changing the default security template and excluding permissions
previously set up. An administrator must add the local Administrators
group to the default security access list in the DCOMCNFG.EXE utility.
To add the local Administrator group to DCOMCNFG.EXE
1. Execute DCOMCNFG.EXE, usually found in the Windows system
directory.
2. Select the Security tab.
3. Click Edit Default for the Default Access Permissions dialog.
4. Click Add.
5. Browse the local computer and select the local Administrators
group.
6. Click Add.
7. Click OK.
When next you schedule a chart to publish while you are logged out, it
should publish successfully.
If you are using FTP, you must have authority to write to the target server
directory. The FTP server authority must be set to recursive to allow you
to put the file in a directory you create. Otherwise, it will place your files in
the server’s root directory.
Troubleshooting Tips for Published ECharts
If you are experiencing problems with published ECharts, these tips may
answer your questions.
Thin client charts with photos published via Web
Administration:
Check with your system administrator to discuss the following.
Troubleshooting/Troubleshooting Automatic Publishing
626
Aquire OrgPublisher 10 User Guide
• Photos will not display on a secure URL (https).
• The network requires photos be handled by the LocalSystem account.
The IUSR does not have access to the LocalSystem Temporary
Internet Files to read cached photos. This can be changed by granting
the IUSR read access to the Temporary Internet Files.
• The LocalSystem home directory is C:\Documents and
Settings\LocalSystem. The administrator can right-click on this
folder and select Properties and Grant IUSR_MACHINENAME Read
access only to the directory.
• In addition, the virtual directory must be set to run applications in the
IIS process. The virtual directory property Application Protection
should be set to Low.
• Windows XP, under Tools>Options>View, the administrator can
select Show hidden files and folders.
• Changing the IIS user to be a privileged user is not recommended.
Refresh or display troubleshooting
• If your EChart does not display, you may get the error message
"Unable to contact the EChart server at ...", verify that the virtual
directory where the EChart files reside has execute permissions.
• If you generated the chart by a scheduled batch file, verify that you
are not using letter-mapped drives. For example, use
"\\MyServer\path\filename."
• Check your output file name in the publishing definition and remove
any spaces or special characters in the output file name and any
spaces in the definition name.
• Verify that the chart is published to a virtual directory with execute
permissions.
• Run the three separate batch file commands individually on the
"command" line and verify the results. The data should be unloading
and reloading each time you publish.
• Look for generated errors in Task Scheduler>Advanced>View Log.
• Check the c:\Program Files\OrgPub(version #) directory for the
ORGPUB32.log to review any errors that may have been generated
at publishing.
627
Troubleshooting/Troubleshooting Automatic Publishing
Aquire OrgPublisher 10 User Guide
• Verify that the chart administrator has authority to write to all folders
in the tree/path to the directory if you can't find a log. Go to Windows
Explorer and right-click on the appropriate folder. Select Properties
then the Security tab. Select the name to view the permissions.
• Verify the time and date stamp on the output file coincide with the
time you published the chart.
• Stop and restart Microsoft IIS through the Control
Panel>Administrative Tools>Services>World Wide Web
Publishing Service. Right-click on Restart.
• Verify that there are no ORGPUB32 hung instances by looking in the
Task Manager. There must be no OrgPub32 processes running before
the next one can start.
• Reboot your server.
Print troubleshooting
• If you want to override the print default of 5,000 records, you can
manually adjust the registry setting in the client's machine registry.
– Select Start>Run>regedit and locate
HKEY_LOCAL_MACHINE>SOFTWARE>Aquire>OrgPublisher(v
ersion #)>Publish. Change the EChartPrintLimit record to the
number you want to print. This becomes the new default print limit
for ECharts.
– We recommend printing from within the OrgPublisher application on
a PC with the capacity to handle very large charts. Printing enormous
ECharts from the browser downloads all of the "person" data to the
client machine. The network will experience a great deal of traffic
and use much, if not all of the RAM on the client machine.
If the above tips do not resolve your issue, contact Aquire Product
Support at [email protected].
Sending Feedback to Aquire
You can easily send feedback to Aquire via the Help menu.
1. Click Help in the Main menu, and then click Send Feedback to
Aquire.
Troubleshooting/Troubleshooting Automatic Publishing
628
Aquire OrgPublisher 10 User Guide
Figure 224
Your email client launches with the OrgPublisher version information
in the subject line.
2. The email is addressed to [email protected]. Type your
message and click Send.
Your email message will be reviewed and steps taken accordingly by an
Aquire employee.
629
Troubleshooting/Troubleshooting Automatic Publishing