1
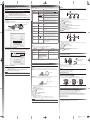
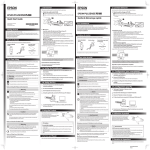
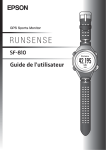
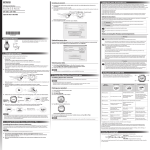
2. Charging and Initial Settings
4. GPS Positioning
Measuring Function for the Device
Charge this device before using it for the first time.
GPS Sports Monitor
This device receives a signal via GPS, and measures distance and pace. To make sure measurements
are performed accurately, try to use the device under the following conditions which allow for easy
reception of GPS signals.
1. Connect the cradle using one of the following methods.
»» Using a PC
Connect the cradle’s USB plug to the computer’s USB port.
This is not guaranteed to work with all computers. Do not use a USB hub. Instead, connect the
cradle directly to the computer.
Locations where you cannot receive signals
Inside rooms
or buildings, or
underground
»» Using the AC adapter
Connect the cradle’s USB plug to the AC adapter’s USB port.
We recommend using the optional AC adapter (Model No.: SFAC02 Conti / SFAC03 UK). If you
do not use a supported AC adapter, you may not be able to charge or it may not operate
correctly.
Quick Start Guide
In tunnels
Locations that are difficult to receive signals
2. Place the device into the cradle.
Locations with electronic
interference, such as
constructions sites and
heavy traffic
Check that the contact points on the device are pointing up and match the contact marks on
the cradle. After placing the device into the bottom of the cradle, push carefully on the top of
the device until it is fixed in place.
Near high-voltage wires
or television towers,
overhead electric wires
for trains, and roads with
skyscrapers
Contact marks
©2014 Seiko Epson Corporation.
All rights reserved.
Printed in Japan
Underwater
In water
1. Go to a location outside with no obstructions overhead, then Press
.
GPS positioning starts, try to keep the device as still as possible. When complete, the screen
flashes, and then the measurement screen is displayed.
Displays the elapsed time (seconds).
When the device is placed correctly, the alarm sounds, the charging screen is displayed, and
charging starts.
3. When charging is complete, remove the device from the cradle.
When the following charging icon is displayed, charging is complete. Hold the cradle and
press the device down into the lower part of the cradle to release the product.
Before Getting Started
Thank you very much for purchasing a RUNSENSE product. Please read this guide carefully to
use this product. A RUNSENSE SF-710 is used for illustration purposes. Screen layout and menus
are common across the range. See the User Manual for more detailed descriptions, which you
can download from the following address.
www.epson.eu/runsense
• Unapproved copying of part or all of this guide is strictly forbidden.
• The content of this guide is subject to change without prior notice.
What’s in the box
It usually takes less than two minutes to complete GPS positioning.
If it takes more than two minutes or Failed is displayed, we recommend selecting
Cancel, moving to a different location, and trying again.
When the measurement screen is displayed, you can start measuring.
Distance, and Speed (Chronograph Function)"
4. Follow the on-screen instructions to set the Language, Units, and user information.
Set your Height,
Weight, DOB,
Gender,
today's date,
and the
Date Format.
Selects the
upper item.
Confirm a
selection.
Go to next
screen.
Selects the
lower item.
Contact your reseller if there are any missing or damaged components.
Cradle
Quick Start Guide
(this document)
Information
Sheet
5. For more accurate Measurements
When using the device for the first time or when the device has not been used for
several months, connect to the GPS network for at least 15 minutes with no
obstructions overhead. This allows the device to calibrate for more precise
measurements.
6. Measuring Time, Distance, and Speed (Chronograph Function)
5. When you are in a location with no obstructions overhead, select Yes.
Main unit
A signal is received from the GPS and time is automatically synchronised.
What is the Chronograph function?
This function allows you to measure split times and lap times simultaneously.
When Complete is
displayed, press .
Split Time
Measures the elapsed time from the start.
Start
An optional AC adapter and heart rate monitor chest
strap can be purchased separately.
When you leave the device for a while, it enters sleep status and the time display turns
off. This is not a malfunction as the display is restored the next time you move the
device. If time synchronisation fails, continue to the next step. The time screen will
automatically be updated the next time a GPS signal has been received.
Lap Time
Records the elapsed time for each lap.
on the device during Chronograph measurement, or by
You can record the laps by pressing button
using the AT lap function.
Measuring
1. For Your Safety
Measurement screen
Make sure you read the manuals (Quick Start Guide and User Manual) first to use this product safely.
Also, this device is equipped with Bluetooth® Smart technology as a built-in wireless function. See the
section "Notes on Electromagnetic Waves" in the User Manual for further details.
The product may malfunction, or an accident may occur if it is handled incorrectly.
• Keep the manuals handy to help you resolve any problems.
• When taking this product out of the country of purchase, check the laws and regulations in the
destination country before you travel.
• This product is not a medical device. Use this product as an indicator during physical exercise.
"6. Measuring Time,
Starts, stops, or resumes recording.
3. Basic Operations
Function of each button
Records laps while measuring.
Resets when recording has stopped.
Change between screens
This device has a Time screen, Measurement screen, Settings screen
(Settings menu and Measure set. menu), and History screen, and
you can perform operations with the following buttons.
1. Press to start measuring.
2. To record a lap, press while measuring.
Lap Number (No.)
Number of laps
Safety Instructions
Lap Distance (LapDist.)
Distance of each lap
The following symbols are used in this guide to indicate possible dangerous operations or handling.
Make sure you understand these warnings before using the product.
Warning
This symbol indicates information that, if ignored, could possibly result in
serious personal injury.
Caution
This symbol indicates information that, if ignored, could possibly result in
personal injury or damage the product.
Lap Time (Lap)
Button
Operation
Time screen
Measurement screen
Settings screen
MEMO
This symbol indicates an action that should be done.
-
Changing between screen.
Confirm a selection.
Long press*1
Turns the power on or off.
Displays the time screen.
(Not available while
measuring.)
From the Settings menu,
the time screen is displayed.
From the Measure set.
menu, the measurement
screen is displayed.
Short press
Turns the light on or off. The light turns on for approximately 10 seconds.
Long press*1
Displays the Settings
menu.
> Settings screen
Displays the Measure set.
menu.
(Not available while
measuring.)
-
Short press
Performs GPS positioning,
and displays the
Measurement screen.
Starts, stops, or resumes
measuring.
Selects the upper item.
Increases the value.
Long press*1
Changes to indoor mode*2
(GPS off ).
(SF-710/SF-510 only)
Displays the time screen.
(Not available while
measuring.)
Selects the upper item.
Speeds through the values.
Short press
Displays your workout
history.
Records laps while
measuring.
Selects the lower item.
Decreases the value.
Long press*1
Sync to Bluetooth® device.
Use this when uploading
measurement data.
Resets*3 while measuring is
stopped.
Selects the lower item.
Speeds through the values.
Short press
This symbol indicates an action that must not be done.
Notes on Using the Product and Components
Warning
Exercise according to your physical capabilities.
Stop exercising and consult your doctor if you feel unwell during exercise.
Do not use or store this product in the following environments. It may cause an electric shock or
fire, or the product may malfunction or be damaged.
•Locations with very high or low temperatures or humidity
•Near volatile substances
•Dusty places
•Near a strong magnetic field (for example, near a loudspeaker)
Do not disassemble this product, and do not attempt to repair this product by yourself. It may
cause an electric shock or accident.
Do not leave this product within reach of young children.
Caution
Stop using the device immediately and consult your doctor if you have an allergic reaction or a
rash while or during use.
The device is water resistant at 5 bar (5 ATM). Although you can use the device for swimming and
so on, do not perform button operations under water.
Do not pour water directly from the tap onto this product. The power of the tap water stream may
be strong enough to compromise the product’s waterproof feature.
Do not wear this product in a bath or sauna. The steam and soap may compromise the waterproof
feature or cause corrosion.
Notes on Using the Cradle
Time taken for each lap
3. Press again to stop recording.
4. Press and hold for a few seconds when you have finished recording to reset the
measurement display.
• The Chronograph screen is composed of four screens, and you can change the screen display by pressing
. You can change the content displayed on screens 1 to 4 by changing Measure set. > Screen. For more
details, see the User Manual.
• After resetting, press and hold or for a few seconds to return to the time screen.
• If no operations are made for 60 minutes on a screen other than the measuring screen, the time screen is
displayed.
• As well as the Chronograph function, there are a variety of other measurement functions. Please see full
User Manual for details.
Recall Data (History Function)
1. Press
2. Use
*1 : Hold down for at least two seconds until the screen changes.
*2 : GPS data is not recorded in indoor mode.
*3 : When you reset the display, it returns to the status before measuring started allowing you to
start the next measurement. Data that has been measured up to that point is stored in the device's
memory.
If no operations are performed after three minutes when the System settings, User settings, or
History screens are displayed, you are returned to the time screen.
on the time screen. The recall screen is displayed.
Time screen
/
to select the data you want to check, and then press
3. To check the recorded data use
/
.
to scroll through the screen.
Detailed recorded results for the activity type, recorded day/start time, time, distance, and
calories burned are displayed on the detailed recall screen. You can also check the pace for
each lap.
Press
to return to the recall screen. Hold down
to return to the time screen.
Understanding the Icons
Warning
Do not use the cradle or AC adapter if they are in any way damaged, faulty or contaminated
by foreign material such as dust, water or dirt. Do not use any adapter other than the specified
adapter for charging.
Run mode
Split time
Walking mode
Average pace
Bike mode
Stops flashing : The signal is being received from the GPS
(GPS On)
GPS positioning
Calories burned
Stops flashing : Communicating with the HR monitor
Editable data
Distance
Current settings
Stride
Lap
4127051-00Black
Front
7. Data Management Using the Web Application (RUNSENSE View)
8. Settings Table
Installing the Run Connect
Measure set.
This device allows you to manage measured data using a dedicated Web application (RUNSENSE
View). To upload measurement data, you need to install Run Connect on your computer and connect
to the Internet.
To open the Measure set. menu, hold down
Install Run Connect before connecting the device to your computer.
1. Access the following website and download Run Connect.
URL https://go-wellness2.epson.com/portal/
You can set the following measurement related functions from the Measure set. menu.
Setting items
Chronograph
Chronograph mode allows you to measure split times and
lap times (section measurement) simultaneously.
Interval
Interval mode allows you to switch between hard (sprint)
or light (recovery) exercises, and repeat using the specific
distance or time set in advance.
Goal
Goal mode measures until the time or distance set in
advance is reached.
GPS
-
Displays the number of GPS satellites being accessed.
AT Lap
SETTING 01-05
OFF
This function records laps automatically, when a time or
distance set in advance is reached. You can set five times or
distances.
AT Pause
ON
OFF
This function automatically stops measuring when you stop
running, and resumes when you continue running.
Target Pace
SETTING 01-03
OFF
Set the target time and pace range for the distance. An alarm
sounds if you are outside the set pace range. You can set three
target paces.
Waypoint
ON
OFF
Store the waypoint that you want to reach from the current
position. An alarm sounds if you reached the waypoint..
HR*1
Zone 1-5
OFF
You can measure your heart rate by wearing the Heart Rate
Monitor Strap (optional). We recommend using the optional
Heart Rate Monitor Strap (Model No.: SFHRM01)
Tap*2
(Only for the
measurement screen)
Lap, Light, Screen
Chg., OFF
You can perform one of the operations set here by tapping
the screen while measuring.
Screen
Screen 1-4
You can display up to four measurement screens. You can
Display Lap Screen change the screen pattern and the measurement items
displayed for each screen.
You can also change the Lap Screen, but this is not displayed
for the interval function.
Contact marks
Run Connect starts.
3. Click Create Account and enter your details.
Select the Activity Type you want to measure.
Set the Mode to suit the measurements you want to make.
Creating an Account (When Using RUNSENSE View for the First Time)
Check that the contact points on the device are pointing up and match the contact marks
on the cradle.
When a time or distance set in advance is reached, laps are recorded automatically. Set the lap time or
distance. You can set five times or distances. However, only one setting can be used while measuring.
Explanation (The initial settings are underlined)
Mode
2. Run the downloaded file and follow the instructions displayed on the setup
screen.
1. Connect the cradle with a USB cable to the PC on which Run Connect is
installed.
2. Place the device into the cradle.
Value
Run, Walk, Bike
Activity Type
on the measurement screen before you start recording.
AT Lap
1. Display the measurement screen.
Press
on the time screen. GPS positioning starts, and the measurement screen is displayed
once positioning is complete.
2. Displays the Measure set. menu.
Hold down
3.
4.
5.
6.
7.
8.
9.
AT Pause
Measuring stops automatically when you stop running, and resumes when you continue running.
1. Display the measurement screen.
Press
on the time screen. GPS positioning starts, and the measurement screen is displayed
once positioning is complete.
*1 Displayed after registering the Heart Rate Monitor.
*2 Only displayed for the SF-710/SF-510.
2. Displays the Measure set. menu.
Hold down
Settings
Uploading your recorded Data
You can set the following device related functions from the Settings menu.
To open the Settings menu, hold down
Connect your RUNSENSE device to the computer. The following box will
automatically appear. Enter your Login ID and Password and click Upload.
Setting items
on the measurement screen.
Select AT Lap.
Select one of the No Data from 1 to 5.
Select whether to set Time or Distance as the length of the lap.
Set the Time or Distance.
Press to complete the settings.
Hold down again to return to the measurement screen.
Press to start measuring.
on the time screen.
Value
Explanation
3.
4.
5.
6.
7.
on the measurement screen.
Select AT Pause.
Select ON.
Press to complete the settings.
Hold down again to return to the measurement screen.
Press to start measuring.
Comm. Settings
HR Monitor
Smart Phone
Register the Heart Rate Monitor and the
smartphone to this device.*1
User Settings
Height, Weight, DOB, Gender, HR
Zone*1
Set the user information.
10. Maintenance
Sys. Settings
Language, Units, Clock, DST, Time
Adjust, Time Zone, Date Format,
Invert Disp., Contrast, Auto Sleep,
AT Light, Alarm, Key Tones, Initialize,
Software Version
Make settings for the device's system.
Looking after your Device
To clean the device, wash the contact points lightly with tap water, wipe away most of the water
with a towel, and then let it dry naturally.
*1 For more information on the Heart Rate Monitor and smartphones, download the User Manual from
the following Epson website. www.epson.eu/runsense
Use low pressure water
to wash the device.
9. Introduction of the main function
View your recorded Data
1. Click Start RUNSENSE View on the Run Connect screen.
Or access the following Web site.
URL https://go-wellness.epson.com/runsense-view/
2. Click the data you want to check from the list.
Goal function
This function allows you to measure until the time or distance set in advance is reached.
Time race
Allows you to set a time as your goal and measure the time taken until that goal is reached. You can
exercise while checking the elapsed time. You can also calculate the estimated distance until the goal is
reached.
MEMO
Contact points
If charging or communicating becomes unstable, clean the contact points on the device and the
cradle with a damp cotton swab.
Do not use any cleaning products on this device.
Option
You can purchase the following optional extras. Contact your local dealer for more information.
• AC adapter Model No. : SFAC02(Conti) / SFAC03(UK)
• Heart Rate Monitor Strap Model No. : SFHRM01
Resetting the System
• For information on using the Web application (RUNSENSE View), see the RUNSENSE View Help.
• For information on linking to other devices, see the User Manual.
You can reset the system by following the below steps.
Hold down all of the buttons (
Distance race
Allows you to set a distance as your goal and measure the time taken until that goal is reached. You can
exercise while checking the distance. You can also calculate the estimated time.
1. Display the measurement screen.
Press
on the time screen. GPS positioning starts, and the measurement screen is displayed
once positioning is complete.
2. Displays the Measure set. menu.
Hold down
3.
4.
5.
6.
7.
8.
on the measurement screen.
Select Mode.
Select Goal.
Select whether to set Time or Distance.
Set the Time or Distance.
Select OK.
Press to start measuring.
When the set time or distance is reached, the “Finish” screen is displayed.
An alarm notifies you when you reach 50% and 90% of the set time or distance.
MEMO
Set the “Estimated Time” or “Estimated Distance” in your screen settings to view and keep track of your
progress. For more details, see the User Manual.
/ / /
).
The screen is reset and the device restarts.
Initialise the device after restarting. “2. Charging and Initial Settings”
Setting data and measurement data remain as they were before the reset was performed.
The time screen will automatically be updated the next time a GPS signal has been
received.
11. Other Features described in the User Manual
• How to set a time and distance for hard and light workouts (Interval Function)
• How to set and measure the target time for one kilometer (Target Pace function)
• How to monitor your heart rate with the Heart Rate Monitor (Heart rate function)
• How to communicate with external devices (Communication function)
• How to set the Tap Function to display a set function (Tap function: SF-710/SF-510 only)
• How to set the device to turn on the light automatically when the screen changes (AT Light function)
For more information on each of the functions mentioned above, download the User Manual from
the following Epson website.
www.epson.eu/runsense
12. Service and Repair
Go to www.epson.eu/runsense for service contact details.
4127051-00Black
Back