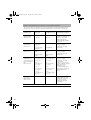
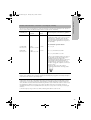
1
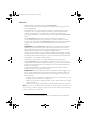
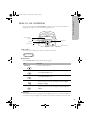
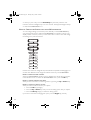
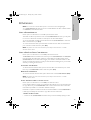
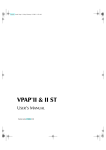
172
page
spine
S8 Lightweight™ System
Reorder number: 338239/1 05 06
USER’S MANUAL
English
www.resmed.com Global Leaders in Sleep and Respiratory Medicine
338239r1 Illustrations.qxd
05/07/05
12:47 PM
Page 1
B
D
INTEGRATED HUMIDIFIER
SETTING UP THE S8™
S8 Lightweight™ System
A
© 2005 ResMed Ltd.
ILLUSTRATIONS
Component of 338239/1
SYSTEM COMPONENTS
HumidAire 3i™
Carry
handle
LCD
screen
Keypad
C
Air outlet
1
2
OTHER ACCESSORIES
Connector
plug
1
3m
Module
Air filter
cover
DC input
Air inlet
1
2
3
3
AC input
2
4
5
5
6
4
© 2005 ResMed Ltd.
3
4
© 2005 ResMed Ltd.
2m
© 2005 ResMed Ltd.
52 cm
E
05/07/05
12:47 PM
Page 2
H
© 2005 ResMed Ltd.
HUMIDAIRE 3i and S8 LIGHTWEIGHT
F
1
I
BLANK MODULE
Data
communications port
USING THE DATA CARD
2
© 2005 ResMed Ltd.
338239r1 Illustrations.qxd
3
USING A HUMIDAIRE™
5
4
6
3
7
2
8
1
0
5
4
5
6
4
3
6
3
7
2
7
2
8
1
8
1
0
DATA CARD MODULE
1
Note: Some products not available in all regions
2
© 2005 ResMed Ltd.
G
2
1
2
3
4
© 2005 ResMed Ltd.
1
© 2005 ResMed Ltd.
0
338239r1.book Page 1 Tuesday, July 5, 2005 1:58 PM
S8 Lightweight™ System
Reorder number: 338239/1 05 06
USER’S MANUAL
English
338239r1.book Page 1 Tuesday, July 5, 2005 1:58 PM
Manufactured by:
ResMed Ltd 1 Elizabeth MacArthur Drive Bella Vista NSW 2153 Australia
Tel: +61 (2) 8884 1000 or 1 800 658 189 (toll free) Fax: +61 (2) 8883 3114 Email: [email protected]
ResMed Offices:
ResMed Corp 14040 Danielson Street Poway CA 92064-6857 USA
Tel: +1 (858) 746-2400 or 1-800-424-0737 (toll free) Fax: +1 (858) 746-2900 Email: [email protected]
ResMed (UK) Ltd 65 Milton Park Abingdon Oxfordshire OX14 4RX UK
Tel: +44 (1235) 862 997 Fax: +44 (1235) 831 336 Email: [email protected]
ResMed Asia Pacific Ltd 14040 Danielson Street Poway CA 92064-6857 USA
Tel: +61 (2) 9886 5000 or 1 800 991 900 (toll free) Fax: +61 (2) 9889 1471 Email: [email protected]
ResMed Austria Purtscherstraße 18, 9500 Villach Österreich
Tel: +43 (4242) 430 830 Fax: +43 (4242) 430 830-4 Email: [email protected]
ResMed BV Nieuwe Parklaan 86, 2587 BV Den Haag Nederland
Tél: +31 (70) 358 6263 Fax: +31 (70) 358 4333 Email: [email protected]
ResMed Finland Niittykatu 6 FIN 02200 Espoo Suomi
Tel: +358 9 8676820 Fax: +358 9 86768222 Email: [email protected]
ResMed GmbH & Co. KG Fraunhoferstraße 16 82152 Martinsried Deutschland
Tel: +49 (0) 89 / 99 01 - 00 or +49 (0) 800 2 777 000 (gebürenfrei) Fax: +49 (0) 89 / 99 01 - 10 55
Email: [email protected]
ResMed Hong Kong Ltd Room 1714 Miramar Tower 132-134 Nathan Road Tsim Sha Tsui Hong Kong
Tel: +852 2366 0707 Fax: +852 2366 4546 Email: [email protected]
ResMed Japan Nihonbashi Hisamatsu Bldg. 4F 2-28-1 Nihonbashi-Hamacho Chuo-Ku, Tokyo 103-0007 Japan
Tel: +81 (3) 3662 5056 Fax: +81 (3) 3662 5040
ResMed Malaysia Sdn Bhd Suite E-10-20, Plaza Mon’t Kiara No. 2, Jalan 1/70C Mon’t Kiara 50480 Kuala Lumpur
Malaysia Tel: +60 3 6201 7177 Fax: +60 3 6201 2177 Email: [email protected]
ResMed NZ Ltd PO Box 51-048 Pakuranga Auckland New Zealand
Tel: +0800 737 633 (NZ toll free) or +64 25 737 633 Fax: +0800 737 634 (NZ toll free) or +64 9 239 0193
Email: [email protected]
ResMed SA Parc de la Bandonnière 2 rue Maurice Audibert 69800 Saint-Priest France
Tel: +33 (0) 4 37 251 251 Fax: +33 (0) 4 37 251 260 Email: [email protected]
ResMed Singapore Pte Ltd 238A Thomson Road # 12-03/04 Novena Square Tower A Singapore 307684
Tel: +65 6284 7177 Fax: +65 6284 7787 Email: [email protected]
ResMed Spain SL C/ Arturo Soria, 245 28033 Madrid España
Tel: +34 (93) 590 8154 Fax: +34 (93) 590 8153 Email: [email protected]
ResMed Sweden AB Industrigatan 2 S-461 37 Trollhättan Sverige
Tel: +46 520 420 110 Fax: +46 520 397 15 Email: [email protected]
Labhardt AG Thannerstrasse 57 CH-4054 Basel Schweiz
Tel: +41 (061) 307 9711 Fax: +41 (061) 307 9722 Email: [email protected]
US DESIGNATED AGENT: ResMed Corp
EU AUTHORIZED REPRESENTATIVE: ResMed (UK) Ltd
www.resmed.com
Protected by patents: US 4944310, US 5199424, US 5522382, US 6705315. Other patents pending.
Design registrations pending.
S8, S8 Lightweight, HumidAire, HumidAire 3i, Mirage, Mirage Activa, Mirage Vista, Ultra Mirage, Mirage Swift, and
ResScan are trademarks of ResMed Ltd. Papillon is a trademark of MAP Medizin-Technologie GmbH.
© ResMed Ltd 2005.
338239r1.book Page iii Tuesday, July 5, 2005 1:58 PM
INTRODUCTION . . . . . . . . . . . . . . . . . . . . . . . . . . . . . . . . . . . . . . . . . . . . . . . 1
YOUR RESPONSIBILITY
1
MEDICAL INFORMATION . . . . . . . . . . . . . . . . . . . . . . . . . . . . . . . . . . . . . . . 1
ABOUT THE S8 LIGHTWEIGHT™
CONTRAINDICATIONS
WARNINGS
CAUTIONS
ADVERSE EFFECTS
CONTENTS
CONTENTS
1
1
2
3
3
THE S8 LIGHTWEIGHT SYSTEM . . . . . . . . . . . . . . . . . . . . . . . . . . . . . . . . . . 5
S8 LIGHTWEIGHT
MASKS
HUMIDIFIERS
RESSCAN DATA CARD MODULE
ACCESSORIES
5
5
6
6
6
HOW TO USE THE S8 LIGHTWEIGHT . . . . . . . . . . . . . . . . . . . . . . . . . . . . . 7
SET UP THE S8 LIGHTWEIGHT
ASSEMBLE THE MASK
START TREATMENT
STOP TREATMENT
7
7
7
8
HOW TO ATTACH A HUMIDIFIER . . . . . . . . . . . . . . . . . . . . . . . . . . . . . . . . 9
ATTACH A HUMIDAIRE 3I HUMIDIFIER
ATTACH A HUMIDAIRE HUMIDIFIER
9
9
HOW TO USE THE KEYPAD . . . . . . . . . . . . . . . . . . . . . . . . . . . . . . . . . . . . . 11
HOW TO CHANGE THE SETTINGS ON YOUR S8 LIGHTWEIGHT
12
S8 MODULES . . . . . . . . . . . . . . . . . . . . . . . . . . . . . . . . . . . . . . . . . . . . . . . . 15
USING A BLANK MODULE
USING A RESSCAN DATA CARD MODULE
15
15
CLEANING AND MAINTENANCE . . . . . . . . . . . . . . . . . . . . . . . . . . . . . . . . . 17
DAILY CLEANING
WEEKLY CLEANING
PERIODIC CLEANING
REPLACING THE AIR FILTER
SERVICING
17
17
17
18
18
FREQUENTLY ASKED QUESTIONS . . . . . . . . . . . . . . . . . . . . . . . . . . . . . . . 19
TROUBLESHOOTING . . . . . . . . . . . . . . . . . . . . . . . . . . . . . . . . . . . . . . . . . . 21
SYSTEM SPECIFICATIONS . . . . . . . . . . . . . . . . . . . . . . . . . . . . . . . . . . . . . . 23
iii
338239r1.book Page iv Tuesday, July 5, 2005 1:58 PM
S8 LIGHTWEIGHT
ACCESSORIES
23
23
INDEX . . . . . . . . . . . . . . . . . . . . . . . . . . . . . . . . . . . . . . . . . . . . . . . . . . . . . . 29
iv
INTRODUCTION
Thank you for choosing the S8 LIGHTWEIGHT™ flow generator. The S8 LIGHTWEIGHT
is a compact, all-in-one package with an inbuilt power supply and the option of
integrated data management and humidification.
This user manual contains the information you need for the correct use of your
S8 LIGHTWEIGHT.
INTRODUCTION
338239r1.book Page 1 Tuesday, July 5, 2005 1:58 PM
YOUR RESPONSIBILITY
The owner or user of this system shall have sole responsibility and liability for any injury
to persons or damage to property resulting from:
• operation which is not in accordance with the operating instructions supplied
• maintenance or modifications carried out unless in accordance with authorised
instructions and by authorised persons.
Please read this manual carefully before use.
This manual contains special terms and icons that appear in the margins to draw your
attention to specific and important information.
• Warning alerts you to possible injury.
• Caution explains special measures for the safe and effective use of the device.
• Note is an informative or helpful note.
MEDICAL INFORMATION
ABOUT THE S8 LIGHTWEIGHT™
The S8 LIGHTWEIGHT continuous positive airway pressure (CPAP) system is indicated
for the treatment of obstructive sleep apnoea (OSA) in adult patients.
The S8 LIGHTWEIGHT CPAP system is intended for home and hospital use.
CONTRAINDICATIONS
The S8 LIGHTWEIGHT is not a life support device and may stop operating during power
failure or certain fault conditions. It should not be used by patients who are dependent
on continuous therapy.
Positive airway pressure therapy may be contraindicated in some patients with the
following pre-existing conditions:
• severe bullous lung disease
• pneumothorax
• pathologically low blood pressure
• dehydration
• cerebrospinal fluid leak, recent cranial surgery, or trauma.
1
338239r1.book Page 2 Tuesday, July 5, 2005 1:58 PM
WARNINGS
Read the entire manual before using the S8 LIGHTWEIGHT.
Advice contained in this manual should not supersede instructions given by the
prescribing physician.
• A patient should not connect a device to the data communication port unless
instructed to do so by their health care provider or physician. Only ResMed
products are designed to be connected to the data communication port.
Connecting other devices could result in injury, or damage to the S8 LIGHTWEIGHT
device.
• The S8 LIGHTWEIGHT should only be used with masks (and connectors)*
recommended by ResMed, or by a physician or respiratory therapist. A mask
should not be used unless the S8 LIGHTWEIGHT device is turned on and operating
properly. The vent hole or holes associated with the mask should never be
blocked.
Explanation: The S8 LIGHTWEIGHT is intended to be used with special masks (or
connectors)* which have vent holes to allow continuous flow of air out of the
mask. When the device is turned on and functioning properly, new air from the
device flushes the exhaled air out through the mask vent holes.
However, when the device is not operating, insufficient fresh air will be provided
through the mask, and the exhaled air may be rebreathed. Rebreathing of exhaled
air for longer than several minutes can, in some circumstances, lead to suffocation.
This applies to most models of CPAP devices.
•
•
In the event of power failure or machine malfunction, remove the mask.
The S8 LIGHTWEIGHT can be set to deliver pressures up to 20 cm H2O. In the
unlikely event of certain fault conditions, pressures up to 30 cm H2O are possible.
• If oxygen is used with this device, the oxygen flow must be turned off when the
device is not operating.
If oxygen has been left on, turn off the flow generator, then wait 30 minutes
before turning on the flow generatory again.
Explanation: When the CPAP device is not in operation and the oxygen flow is
left on, oxygen delivered into the air delivery tubing may accumulate within the
CPAP machine enclosure and create a risk of fire. This applies to most types of
CPAP machines.
• Oxygen supports combustion. Oxygen should not be used while you are
smoking or in the presence of an open flame.
• Always ensure airflow is being generated by the device before the oxygen
supply is turned on.
• Always turn the oxygen supply off before stopping the airflow from the device.
Note: At a fixed rate of supplemental oxygen flow, the inhaled oxygen concentration will
vary, depending on where the oxygen is introduced, the pressure settings, patient breathing
pattern, mask selection and leak rate.
•
•
*
2
Ports may be incorporated into the mask or in connectors that are near the mask.
Do not use the S8 LIGHTWEIGHT if there are obvious external defects or
unexplained changes in performance.
• Do not open the S8 LIGHTWEIGHT case. There are no user serviceable parts inside.
Repairs and internal servicing should only be performed by an authorised service
agent.
• Explosion hazard—do not use in the vicinity of flammable anaesthetics.
•
CAUTIONS
MEDICAL INFORMATION
338239r1.book Page 3 Tuesday, July 5, 2005 1:58 PM
At low pressures, the flow through the exhalation ports of your mask may not
clear all exhaled gas from the tubing. Some rebreathing may occur.
• The airflow for breathing produced by this device can be as much as 6°C higher
than the temperature of the room. Caution should be exercised if the room
temperature is warmer than 32°C.
• When AC mains power (100–240V AC) is not available, always use a ResMed
DC-12 converter. (The DC-12 converter is available as an optional accessory. It is
not supplied with all models.)
• If supplied, the Data Card module is designed for use with specific ResMed
devices.
• Only use the Data Card module (if supplied) as specified in this manual.
Note: The above are general warnings and cautions. Specific warnings, cautions and notes
appear with the relevant instructions in the manual.
•
ADVERSE EFFECTS
Patients should report unusual chest pain, severe headache or increased breathlessness
to their prescribing physician. An acute upper respiratory tract infection may require
temporary discontinuation of treatment.
The following side effects may arise during the course of therapy with the CPAP
device:
• drying of the nose, mouth or throat
• nosebleed
• bloating
• ear or sinus discomfort
• eye irritation
• skin rashes
• chest discomfort.
3
338239r1.book Page 4 Tuesday, July 5, 2005 1:58 PM
4
THE S8 LIGHTWEIGHT SYSTEM
The S8 LIGHTWEIGHT device is part of a system that consists of six elements:
• S8 LIGHTWEIGHT flow generator
• Mask
• Humidifier
• Data management products
• Premium noise guard (front cap)
• Accessories.
THE S8 LIGHTWEIGHT SYSTEM
338239r1.book Page 5 Tuesday, July 5, 2005 1:58 PM
S8 LIGHTWEIGHT
Please refer to the illustrations in section A of the illustration sheet.
FRONT VIEW (A-1)
Shows the keypad and LCD screen, and the air outlet.
REAR VIEW (A-2)
Shows where the module attaches, and the location of the air filter and power sockets.
POWER CORD (A-3)
Power cord to attach the S8 LIGHTWEIGHT to the AC (mains) power.
CARRY BAG (A-4)
The S8 LIGHTWEIGHT carry bag contains two pouches: one for storing the S8 device,
the other for storing the HUMIDAIRE 3i™. When storing the HUMIDAIRE 3i, always put
it in the larger, mesh pouch.
AIR TUBING
The 2 m air tubing (A-5) connects the S8 LIGHTWEIGHT to your mask . You will need
medium 52 cm air tubing (see C-3) to connect the S8 LIGHTWEIGHT to the
HUMIDAIRE™ humidifier.
MASKS
You will also need a ResMed mask system (supplied separately).
The ResMed mask systems that are recommended for use with the S8 LIGHTWEIGHT
are:
NASAL MASKS
•
•
•
•
•
•
MODULAR NASAL MASK
MIRAGE VISTA™ NASAL MASK
ULTRA MIRAGE™ NASAL MASK
MIRAGE™ NASAL MASK
MIRAGE ACTIVA™ NASAL MASK
PAPILLON™.
NASAL PILLOWS SYSTEMS
•
MIRAGE SWIFT™ NASAL PILLOWS SYSTEM.
5
338239r1.book Page 6 Tuesday, July 5, 2005 1:58 PM
FULL FACE MASKS
•
•
•
!
MIRAGE™ FULL FACE MASK
MIRAGE™ FULL FACE MASK SERIES 2
ULTRA MIRAGE™ FULL FACE MASK.
WARNING
ResMed mask systems are compatible for use with the S8 Lightweight. Please refer
to “Warnings” on page 2.
HUMIDIFIERS
A humidifier may be required if you are experiencing dryness of the nose, throat or
mouth. The S8 LIGHTWEIGHT is compatible for use with:
• HUMIDAIRE 3i integrated heated humidifier (Figure B on the illustrations sheet)
• HUMIDAIRE heated humidifier (Figure I on the illustrations sheet).
RESSCAN DATA CARD MODULE
The RESSCAN™ Data Card module and RESSCAN Data Card (C-1) may be used with
the S8 LIGHTWEIGHT either to help your clinician to monitor your treatment or to
provide you with updates to your device settings. See “Using a ResScan Data Card
Module” on page 15 for information about how to use the Data Card module and
Data Card.
ACCESSORIES
Please refer to the illustrations in section C of the illustration sheet.
Other accessories for use with the S8 LIGHTWEIGHT:
• Premium noise guard (front cap): standard with S8 LIGHTWEIGHT (C-2)
• Air tubing 3 m (C-3)
• Medium air tubing 52 cm for HUMIDAIRE connection (C-4)
• DC-12 converter (C-5)
• Blank module (C-6).
Note: ResMed regularly releases new products. Please check our website at
<www.resmed.com>.
6
HOW TO USE THE S8 LIGHTWEIGHT
Please refer to the illustrations in section D of the illustration sheet.
SET UP THE S8 LIGHTWEIGHT
1
Place the S8 LIGHTWEIGHT on a table near the head of your bed.
!
2
CAUTION
Be careful not to place the device where it can be bumped or where someone is
likely to trip over the power cord.
Note: You can also place your S8 Lightweight on the floor beside or underneath your bed.
Ensure that the area is free from dust and clear of bedding, clothes or any other objects
that could block the air inlet.
HOW TO USE THE S8 LIGHTWEIGHT
338239r1.book Page 7 Tuesday, July 5, 2005 1:58 PM
Connect the power cord to the socket at the rear of the flow generator (D-1). Plug
the other end of the power cord into the power outlet.
!
3
WARNING
Make sure the power cord and plug are in good condition and the equipment is not
damaged.
Connect one end of the air tubing firmly onto the air outlet (D-2).
!
WARNING
Only ResMed air tubing should be used with your flow generator. A different
type of air tubing may alter the pressure you actually receive, reducing the
effectiveness of your treatment.
• Blocking the hose while in operation could lead to overheating of the device.
• In the clinical environment any personal computer that is used with your CPAP
system must be at least 1.5 m away from, or at least 2.5 m above, the patient. It
must also comply with the relevant test standard. For personal computers the
international standard is IEC 60950 or equivalent.
•
ASSEMBLE THE MASK
1
Assemble your mask system according to the mask user instructions.
2
Connect your mask system to the free end of the air tubing (D-3).
The S8 LIGHTWEIGHT is now ready for use (D-4).
START TREATMENT
1
Make sure the power is on.
The product name is displayed briefly on the LCD screen, then the standby (Ramp)
screen appears. The key and LCD backlights also turn on.
2
Lie down and arrange the air tubing so that it is free to move if you turn in your sleep.
7
338239r1.book Page 8 Tuesday, July 5, 2005 1:58 PM
!
CAUTION
Do not leave long lengths of air tubing around the top of your bed. They could
twist around your head or neck while you are sleeping.
• Make sure the area around the flow generator is dry and clean. It should also be
clear of bedding, clothes and other potential blockages.
•
3
Alter the ramp time if required (see “How to Change the Ramp Time” on page 13).
4
To start treatment, press the Start/Stop key.
5
Fit your mask as described in the mask user instructions.
!
6
WARNING
A mask should not be used unless the S8 Lightweight device is turned on and
operating properly.
When ramping begins the LCD will display the word "RAMPING", with the current
pressure indicated as dashes. Each dash is approximately equivalent to 2 cm H2O. For
example, 6 dashes represents approximately 12 cm H2O pressure.
STOP TREATMENT
To stop treatment at any time, remove your mask and press the Start/Stop key.
8
HOW TO ATTACH A HUMIDIFIER
ATTACH A HUMIDAIRE 3i HUMIDIFIER
Please refer to the illustration in section E of the illustration sheet, and your HumidAire 3i
manual.
The HUMIDAIRE 3i attaches to the front of the S8 LIGHTWEIGHT to provide heated
humidification. No other accessories are required for its use.
Notes:
HOW TO ATTACH A HUMIDIFIER
338239r1.book Page 9 Tuesday, July 5, 2005 1:58 PM
a. Make sure the water chamber of the HumidAire 3i is empty before you attach or
detach the humidifier.
b. Remove the connector plug on the S8 Lightweight (see section A of the illustrations
sheet) before you attach the HumidAire 3i. Reattach the connector plug firmly
after you detach the HumidAire 3i.
STORING THE HUMIDAIRE 3i
Store the HUMIDAIRE 3i in the larger, mesh-top pouch of the S8 LIGHTWEIGHT carry bag
when not in use.
ATTACH A HUMIDAIRE HUMIDIFIER
Please refer to the illustrations in section I of the illustration sheet.
To connect your S8 LIGHTWEIGHT to a HUMIDAIRE humidifier you need medium sized
(52 cm) air tubing.
1
Fill the HUMIDAIRE water chamber and place inside the HUMIDAIRE. Connect the
medium (52 cm) and long (2 m) air tubing (I-1), and close the humidifier lid.
2
Place the S8 LIGHTWEIGHT on top of the HUMIDAIRE (I-2) and connect the free end of
the medium air tubing to the air outlet (I-3).
Note: To avoid water spilling into the S8 LIGHTWEIGHT, do not put it underneath the
humidifier.
3
Assemble your mask system and connect it to the free end of the long air tubing (I-4).
4
Plug the HUMIDAIRE power cord into a power outlet. Connect the S8 LIGHTWEIGHT
power cord to the socket at the rear of the S8 LIGHTWEIGHT and plug the other end
into a power outlet.
Please refer to the HumidAire User’s Manual for further details.
!
WARNING
Make sure that the power cord and plug are in good condition and the equipment
is not damaged.
The S8 LIGHTWEIGHT is now ready for use with the HUMIDAIRE.
9
338239r1.book Page 10 Tuesday, July 5, 2005 1:58 PM
10
HOW TO USE THE KEYPAD
The control panel of the S8 LIGHTWEIGHT includes an LCD screen and keypad for
navigating through the menus and delivering treatment.
HOW TO USE THE KEYPAD
338239r1.book Page 11 Tuesday, July 5, 2005 1:58 PM
LCD screen
Up key
Right key
Left key
Down key
Start/Stop key
LCD SCREEN
The LCD screen displays the menus and treatment screens.
KEYPAD KEYS
The S8 LIGHTWEIGHT keypad has the following keys:
Key
Function
Start/Stop
• Starts or stops treatment.
Up
• Allows you to increase settings options and scroll through
the S8 LIGHTWEIGHT menu.
Down
• Allows you to decrease settings options and scroll through
the S8 LIGHTWEIGHT menu.
Left
• Performs the function indicated by the guiding text displayed
above it on the LCD screen. Guiding text includes menu,
change and apply.
Right
• Performs the function indicated by the guiding text displayed
above it on the LCD screen. Guiding text includes exit and
cancel.
BACKLIGHTS
The keypad and LCD are equipped with backlights that come on when the device is
powered. The LCD backlight turns off after two minutes of inactivity, and comes back
11
338239r1.book Page 12 Tuesday, July 5, 2005 1:58 PM
on when you press a key. Once the Start/Stop key has been pressed to start
treatment, the LCD backlight stays on for two minutes. The keypad backlight is always
on while the S8 LIGHTWEIGHT is on.
HOW TO CHANGE THE SETTINGS ON YOUR S8 LIGHTWEIGHT
You can change settings (such as Ramp Time, Altitude) on the S8 LIGHTWEIGHT by
using the keypad and LCD. When the S8 LIGHTWEIGHT is in standby mode you can
display a series of screens (a menu) on the LCD screen in order to view and change
the settings for a particular function.
S8 LIGHTWEIGHT
MENU
S8PATIENT
CLASSIC
S8
RAMP
CLASSIC 10min
Menu
ALT:
Change
0-610m
Exit
USED HRS:
USAGE:
LANG:
Change
960
Exit
120/180
Exit
ENGLISH
Exit
SW: SX123456789
Exit
Use the menu screens to change the ramp time, altitude compensation and language. You
can also view details about the usage and software version of your S8 LIGHTWEIGHT.
HOW TO ENTER THE MENU SCREENS
When the S8 LIGHTWEIGHT standby screen is displayed you will see the word ‘Menu’
in the left-hand corner. To select the S8 LIGHTWEIGHT menu, press the Left key.
HOW TO SCROLL THROUGH THE MENU
When you are in the menu, scroll through items by pressing the Up or Down keys.
HOW TO CHANGE A SETTING OPTION
When you have scrolled to the item you require:
1. Press the Left key (Change).
2. Press the Up or Down keys until you see the setting option that you require.
3. Press the Left key (Apply) to select the setting option.
If you wish to exit without changing the option, press the Right key (Cancel).
12
HOW TO EXIT OUT OF A MENU
Press the Right key (Exit). This will take you back to the Patient Menu screen.
HOW TO EXIT OUT OF AN ITEM WITHIN THE MENU
Press the Right key (Exit).
HOW TO CHANGE THE RAMP TIME
During ramp time, the pressure increases from a low pressure to the prescribed
treatment pressure. You can set the ramp time in 5-minute intervals, from 0 minutes
(OFF) up to a maximum ramp time set by your clinician.
The standby screen displays the current ramp time in the right-hand corner. To change
the ramp time, press the Up or Down key until the desired ramp time appears.
Once a ramp time is selected, begin therapy by pressing the Start/Stop key.
When ramping begins the LCD will display the word "RAMPING", with the current
pressure indicated as dashes. Each dash is approximately equivalent to 2 cm H2O. For
example, six dashes represents approximately 12 cm H2O pressure.
HOW TO USE THE KEYPAD
338239r1.book Page 13 Tuesday, July 5, 2005 1:58 PM
HOW TO CHANGE THE ALTITUDE SETTING
If you move or travel with your S8 LIGHTWEIGHT to areas of different altitude, you will
need to adjust the altitude compensation setting. Changes in altitude will affect the
pressure delivered by the S8 LIGHTWEIGHT.
You can use the Altitude setting (ALT) to specify the altitude range at which you are
using your S8 LIGHTWEIGHT. Select the S8 LIGHTWEIGHT menu by pressing the Left key
in the standby (RAMP) screen. Scroll to ALT and select Change (Left key). Press the
Up or Down keys until you see the setting option that you require.
There are four altitude settings to choose from:
• 0–609 m
• 610–1219 m
• 1220–1828 m
• 1829–2591m.
For example, if you are at an altitude of 947 m, your altitude compensation setting
would be 610–1219 m, as 947 m falls within that range.
Press the Left key (Apply) to select the correct setting.
HOW TO CHANGE THE LANGUAGE SETTING
To display menus and messages in a different language, select the S8 LIGHTWEIGHT
menu by pressing the Left key in the standby (Ramp) screen. Scroll to LANG and
select Change (Left key). Press the Up or Down keys until you see the language that
you require.
OTHER VIEWABLE INFORMATION
You can also view the total number of hours of treatment (USED HRS); the number
of sessions that the S8 LIGHTWEIGHT was used in a usage period (USAGE); and the
current software version installed on your unit (SW). Access to all of these screens is
provided via the menu. See “How to enter the menu screens” on page 12.
13
338239r1.book Page 14 Tuesday, July 5, 2005 1:58 PM
MESSAGES ON THE S8 LIGHTWEIGHT LCD
Your clinician may have set your S8 LIGHTWEIGHT to remind you about important
events, such as when to replace your mask, when to insert your Data Card (if your
device is Data Card enabled) and so on.
The reminder message is displayed on the LCD and is visible if the device is not
delivering therapy. The backlight on the LCD flashes when a message is displayed.
Your clinician can set any of the following reminders on your LCD:
14
Message
Description
Action
INSERT CARD
May appear if
your device is
Data Card
enabled.
Insert your Data Card and follow any
instructions that your clinician has given
you. When you have done this, the
message will disappear from the LCD.
Pressing the Left (Ok) key will also
remove the message.
REPLACE
MASK
May appear when
your mask is due
for replacement.
Press the Left (Ok) key to remove the
message from your LCD, and replace your
mask with a new one.
CALL
PROVIDER
May appear as a
reminder to
contact your
clinician; for
example to
discuss how your
therapy is going.
Press the Left (Ok) key to remove the
message from your LCD, and contact your
clinician.
REPLACE
FILTER
May appear as a
reminder to
replace the air
filter on your
device.
Press the Left (Ok) key to remove the
message from your LCD, and replace the
air filter.
SERVICE DUE
May appear as a
reminder to
return your
device for service.
Press the Left (Ok) key to remove the
message from your LCD, and contact your
clinician.
S8 MODULES
Note: Do not remove modules while power is connected to the S8 Lightweight.
Your S8 LIGHTWEIGHT will have one of two modules fitted to the back: a blank module
or a RESSCAN™ Data Card module.
S8 MODULES
338239r1.book Page 15 Tuesday, July 5, 2005 1:58 PM
USING A BLANK MODULE
Please refer to the illustrations in section F of the illustration sheet.
The blank module is a protective cover on the S8 LIGHTWEIGHT. At times, you may wish
to remove or attach this module, for example to use the serial adapter.
To remove the blank module, pull it off the back of the S8 LIGHTWEIGHT to show the
data communications port (F-1).
To attach the blank module, push the blank module onto the data communications
port, until the module clicks into place (F-2).
Note: To protect the data communications port, always ensure there is a module
attached to the device.
USING A RESSCAN DATA CARD MODULE
Please refer to the illustrations in section G of the illustration sheet.
The RESSCAN Data Card module is an accessory to the S8 LIGHTWEIGHT. Use a RESSCAN
Data Card with the Data Card module to collect data and update settings in the
S8 LIGHTWEIGHT. The module and card give your clinician convenient access to data
about your treatment, and can provide you with new device settings from your clinician
without you having to leave home.
ATTACHING THE MODULE
To attach the Data Card module, push it onto the data communications port at the
back of your S8 LIGHTWEIGHT until it clicks into place (G-1).
REMOVING THE MODULE
To remove the Data Card module, pull it off the back of the S8 LIGHTWEIGHT (G-2).
Note: To protect the data communications port, always ensure there is a module
attached to the device.
USING THE DATA CARD TO COLLECT DATA
Please refer to the illustrations in section H of the illustration sheet.
If your clinician needs to review your treatment, they will ask you to use the Data Card
to copy data from your S8 LIGHTWEIGHT, and to return the card to them. The Data
Card will be provided in a convenient mailback envelope.
Data that is copied to a Data Card is still stored and available on the S8 LIGHTWEIGHT.
It takes approximately five seconds to copy data onto the Data Card.
1 INSERT THE DATA CARD
Switch on the S8 LIGHTWEIGHT and wait until you see the standby (Ramp) screen.
•
15
338239r1.book Page 16 Tuesday, July 5, 2005 1:58 PM
Hold the Data Card with the arrow facing up and insert it into the slot in the Data
Card module (H-1).
• Push the card in smoothly until it stops moving (H-2) and messages start
appearing on the LCD.
•
2 COPY DATA ONTO THE DATA CARD
• Data copying starts automatically when the Data Card is inserted into the Data
Card module.
• The “Card Inserted Please Wait” message is displayed on the S8 LIGHTWEIGHT
LCD while data is being copied. Copying takes approximately five seconds.
• The “Copy Complete Remove Card” message is displayed on the LCD when
copying has finished.
• Remove the Data Card from the Data Card module.
3 REMOVE THE DATA CARD
Grip the end of the Data Card and pull it out of the Data Card module (H-3).
4 STORE THE DATA CARD
Your Data Card should be stored in its mailback envelope when not in use.
5 MAIL THE DATA CARD TO YOUR CLINICIAN
A bubble mailer envelope is provided to ensure safe transportation of the Data Card.
When mailing the Data Card to your clinician:
1. Insert the Data Card into the pocket provided on the mailback envelope. Fold up
the mailback envelope.
2. Place the mailback envelope containing the Data Card in the bubble mailer
envelope and seal it.
3. Make sure that your clinician’s name and address details are on the bubble mailer
envelope, and mail it back immediately.
USING THE DATA CARD TO UPDATE SETTINGS
If your clinician has provided a Data Card with new device settings:
• With the device in standby (Ramp) mode, insert the Data Card into the slot on
the Data Card module. Updating will start automatically.
• The “Card Inserted Please Wait” message is displayed on the LCD while updating
is in progress. Updating takes approximately five seconds.
• The “Settings Success Remove Card” message is displayed on the LCD if the
settings were updated successfully.
Note: This message only appears once. If you re-insert the Data Card after you have
updated your settings, this message is not displayed.
• Remove the Data Card from the Data Card module.
• Store the Data Card in its mailback envelope when not in use.
!
16
WARNING
If your clinician has told you to use this Data Card to update the settings on your
device and the “Settings Success” message does not appear, contact your clinician
immediately.
CLEANING AND MAINTENANCE
You should regularly carry out the cleaning and maintenance described in this section.
Refer to your mask manual for detailed instructions.
DAILY CLEANING
Mask
Clean the mask according to the instructions supplied with the mask.
CLEANING AND MAINTENANCE
338239r1.book Page 17 Tuesday, July 5, 2005 1:58 PM
Air tubing
Disconnect the air tubing from the S8 LIGHTWEIGHT (and humidifier, if used) and hang
the tubing and mask in a clean, dry place until next use.
Humidifier
If you are using a humidifier, clean it according to the instructions in the humidifier
user’s manual.
WEEKLY CLEANING
1. Remove the air tubing from the S8 LIGHTWEIGHT and the mask.
2. Wash the air tubing in warm water using mild detergent. Rinse thoroughly, hang,
and allow to dry.
3. Before next use, assemble the mask and headgear according to the user
instructions.
4. Reconnect the air tubing to the air outlet and mask.
PERIODIC CLEANING
1. Clean the exterior of the S8 LIGHTWEIGHT with a damp cloth and mild detergent.
2. Check the air filter for blockage or holes (see “Replacing the Air Filter” on
page 18).
!
WARNING
Beware of electric shock. Do not immerse the unit or power cord in water.
Always unplug the unit before cleaning and be sure it is dry before plugging back
in.
• The mask system and air tubing are subject to normal wear and tear. Inspect
them regularly for damage.
•
17
338239r1.book Page 18 Tuesday, July 5, 2005 1:58 PM
REPLACING THE AIR FILTER
To replace the air filter:
1. Remove the air filter cover at the back of the S8 LIGHTWEIGHT.
Air filter cover
2. Remove and discard the old air filter.
3. Insert a new filter with the blue tinted side facing out from the device.
4. Replace the air filter cover.
Inspect the air filter every month to check if it is blocked by dirt or contains holes. With
normal use of an S8 LIGHTWEIGHT, the air filter needs to be replaced every six months
(or more often if your device is in a dusty environment).
!
WARNING
•
•
Do not wash the air filter. The air filter is not washable or reusable.
The air filter cover protects the device in the event of accidental liquid spillage
onto the device. Ensure the air filter and air filter cover are fitted at all times.
SERVICING
CAUTION
!
Do not attempt to open the S8 Lightweight case. There are no user serviceable
parts inside.
• Inspection and repair should only be performed by an authorised agent. Under
no circumstances should you attempt to service or repair the flow generator
yourself.
•
This product (S8 LIGHTWEIGHT) should be inspected by an authorised ResMed Service
Centre five years from the date of manufacture. Prior to this, the device is intended to
provide safe and reliable operation provided that it is operated and maintained in
accordance with the instructions provided by ResMed. Applicable ResMed warranty
details are provided with the device at the time of original supply. Of course, as with
all electrical devices, if any irregularity becomes apparent, you should exercise caution
and have the device inspected by an Authorised ResMed Service Centre.
If you feel that your flow generator is not performing properly, see “Troubleshooting”
on page 21.
18
FREQUENTLY ASKED QUESTIONS
HOW WILL IT FEEL WHEN I AM BREATHING WITH THE S8 LIGHTWEIGHT?
When you first use your S8 LIGHTWEIGHT, you may feel uncomfortable breathing
against the airflow. This is normal. You will continue to breathe normally while you
sleep. Take time to adjust to this new sensation.
WHAT DO I DO WHEN I WANT TO GET UP IN THE NIGHT?
If you need to get up during the night, remove your mask and stop therapy. Always
remember to restart therapy and put your mask on when you return to bed.
FREQUENTLY ASKED QUESTIONS
338239r1.book Page 19 Tuesday, July 5, 2005 1:58 PM
WHAT DO I DO IF I FEEL AIR LEAKING OUT OF THE MASK?
The flow generator delivers the most effective treatment when the mask is well fitted
and comfortable. Treatment can be affected by leaks, so it is important to eliminate
any leaks that may arise. For example, try repositioning the mask and adjusting the
straps.
If you are using a nasal mask, try to keep your mouth closed during treatment. Air leaks
from your mouth can decrease the effectiveness of your treatment. If mouth leaks are
a problem, a full face mask or chin strap may help. Contact your clinician or equipment
supplier for further details.
If you are using a full face mask and you have problems trying to get a comfortable
mask fit, contact your sleep clinic or equipment supplier. You may benefit from a
different size or style of mask.
ANYTHING SPECIAL I SHOULD DO BEFORE PUTTING THE MASK ON?
Before wearing your mask, wash your face to remove excess facial oils. This will allow
a better fit and prolong the life of the mask cushion.
Do not use moisturiser when wearing a mask.
MY MOUTH FEELS DRY DURING TREATMENT—WHAT CAN I DO?
You may experience dryness of the nose, mouth and/or throat during the course of
treatment, especially during winter. In many cases, a humidifier may resolve this
discomfort. Contact your clinician for advice.
MY NOSE IS IRRITATED DURING TREATMENT—WHAT CAN I DO?
You may experience sneezing and/or a runny or blocked nose during the first few
weeks of treatment. In many cases, nasal irritation can be resolved with a humidifier.
Consult your clinician or equipment supplier for advice.
CAN I TRAVEL WITH THE S8 LIGHTWEIGHT?
International use
Your S8 LIGHTWEIGHT flow generator has an internal power supply that enables it to
operate in other countries. It will operate on power supplies of 100–240 V and
50/60 Hz. No special adjustment is necessary, but you may need a plug adapter for the
power outlet.
19
338239r1.book Page 20 Tuesday, July 5, 2005 1:58 PM
Altitude changes
If you are moving or travelling to a higher or lower altitude, see “How to change the
Altitude setting” on page 13.
On an aircraft
Please consult the medical services department of your carrier if you intend to use your
S8 LIGHTWEIGHT on an aircraft. The S8 LIGHTWEIGHT complies with US FCC Part 15,
Class B requirements.
Note: Do not use your S8 Lightweight while the aircraft is taking off or landing.
CAN I USE MY S8 LIGHTWEIGHT IF MAINS (AC) POWER IS NOT AVAILABLE?
A DC-12 converter is available to connect the S8 LIGHTWEIGHT to a 12V or 24V DC
power source. Contact your clinician for details.
!
20
CAUTION
The device should not be connected to both AC and DC power sources
simultaneously.
TROUBLESHOOTING
If there is a problem, try the following suggestions. If the problem cannot be solved,
contact your equipment supplier or ResMed. Do not attempt to open the device.
Problem
Possible Cause
Solution
No display.
Power not connected.
Ensure the appropriate power cord
is connected to your
S8 Lightweight and the power
switch (if available) is on.
Insufficient air delivered
from S8 Lightweight.
Ramp Time is in use.
Wait for air pressure to build up or
change ramp time.
Air filter is dirty.
Replace air filter.
Air tubing is kinked or
punctured.
Straighten or replace tubing.
Air tubing not connected
properly.
Check air tubing.
Mask and headgear not
positioned correctly.
Adjust position of mask and
headgear.
Cap(s) missing from access
port(s) on mask.
Replace cap(s).
Altitude compensation
setting is incorrect.
Adjust altitude compensation
setting to the correct altitude
range.
Pressure required for
treatment may have changed.
See your clinician to adjust the
pressure.
Excessive air delivered from
the S8 Lightweight.
Altitude compensation
setting is incorrect.
Adjust altitude compensation
setting to the correct altitude
range.
Display error message:
Exxxx
Call Service (where
xxxx defines an error)
or
MOTOR FAULT
Call Service
or
UPLOAD LANGUAGES
Call Service
or
DATA LOST
Call Service
Component failure.
Call service.
TROUBLESHOOTING
338239r1.book Page 21 Tuesday, July 5, 2005 1:58 PM
21
338239r1.book Page 22 Tuesday, July 5, 2005 1:58 PM
22
Problem
Possible Cause
Solution
The following message is
displayed on the LCD
after you try to update
settings using the Data
Card:
Card Error
Remove Card
The Data Card is not inserted
correctly.
Ensure that the Data Card is
inserted with the arrow facing up
and pointing towards the device.
Ensure that the device is switched
on and in standby mode before
you insert the Data Card.
The Data Card is only partly
inserted.
Ensure that the Data Card is
inserted into the slot on the Data
Card module as far as it will go.
You may have removed the
Data Card before settings
were copied to the S8
Lightweight.
Reinsert the Data Card and wait
for the Settings Success
Remove Card message to
appear on the LCD.
The card is not a ResScan
Data Card.
Only use a ResScan Data Card.
The following message is
displayed on the LCD
after you try to copy data
to a Data Card:
Card Error
Remove Card
The Data Card is not inserted
correctly.
Ensure that the Data Card is
inserted with the arrow facing up
and pointing toward the device.
The card is not a ResScan
Data Card.
Use a ResScan Data Card, as
specified in this manual.
The following message is
displayed on the LCD
after you try to update
the settings using the
Data Card:
Settings Invalid
Remove Card
The identification details on
the Data Card do not match
the details on your device.
Contact your clinician
immediately.
The following message is
displayed on the LCD after
you try to update the
settings using the Data
Card:
Settings Error
Remove Card
There is a data error on the
Data Card.
Contact your clinician immediately.
The following message is
NOT displayed on the
LCD after you try to
update the settings using
the Data Card:
Settings Success
Remove Card
The settings were not
updated.
Contact your clinician
immediately.
SYSTEM SPECIFICATIONS
338239r1.book Page 23 Tuesday, July 5, 2005 1:58 PM
SYSTEM SPECIFICATIONS
S8 LIGHTWEIGHT
Performance: Operating pressure range: 4 to 20 cm H2O
Dimensions (H x W x D): 112 mm x 164 mm x 145 mm
Weight: 1.3 kg
Power Supply
Input range for S8 LIGHTWEIGHT with HUMIDAIRE 3i:100–240V, 50/60Hz; 110V,
400Hz; 2.5A < 140VA (110W) (maximum power consumption). Instantaneous
peak power consumption <340VA.
• Refer to the DC-12 converter instructions for DC ratings. Only use the ResMed
DC-12 converter for DC input.
Actual power consumption will vary, depending on factors such as the use of
accessories, height above sea level and ambient temperature. Power consumption
values for typical treatment conditions (using a breathing machine set to 0.5 L and
15 breaths/min with 2 m air tubing and an ULTRA MIRAGE mask) are given in the
following table.
•
Device
Pressure
(cm H2O)
Power
(VA)
Power
(W)
S8 LIGHTWEIGHT
5
17
8
10
23
12
15
29
16
20
34
20
Power outlet for HumidAire 3i
Outlet range: 100–240V, 50/60Hz; 110V, 400Hz; 2.0A
Air Filter: Two-layered, powder-bonded, polyester non-woven fibre
Air Tubing: Flexible plastic, 2 m
Air Outlet: The 22 mm conical outlet complies with EN 1281-1
IEC 60601-1 Classifications: Class II (double insulation), Type CF
Noise Level: Radiated sound pressure is measured at <30dBA at 10 cm H2O and
1 m according to ISO17510-1.
ACCESSORIES
DATA CARD
Dimensions (L x W x D): 65.04 mm x 22.15 mm x 0.85 mm
23
338239r1.book Page 24 Tuesday, July 5, 2005 1:58 PM
DATA CARD MODULE
Dimensions (H x W x D): 49.7 mm x 42.2 mm x 12 mm
ALL DEVICES (WHERE APPLICABLE)
Housing Construction: Flame retardant engineering thermoplastic
Environmental Conditions
Operating Temperature: +5°C to +40°C
Operating Humidity: 10%–95% non-condensing
Storage and Transport Temperature: -20°C to +60°C
Storage and Transport Humidity: 10%–95% non-condensing
Operating Altitude: sea level to 2591 m
Electromagnetic Compatibility
Product complies with all applicable electromagnetic compatibility requirements
(EMC) according to IEC60601-1-2, for residential, commercial, and light industry
environments. For further details, see “Guidance and Manufacturer’s Declaration Electromagnetic Emissions and Immunity” on page 25.
Note: The manufacturer reserves the right to change these specifications without notice.
SYMBOLS WHICH APPEAR ON THE DEVICE
Attention, consult accompanying documents
Type CF equipment
Class II equipment
Drip proof
Dangerous voltage
Start/Stop
24
GUIDANCE AND MANUFACTURER’S DECLARATION - ELECTROMAGNETIC
EMISSIONS AND IMMUNITY
Guidance and manufacturer’s declaration—electromagnetic emissions
The S8 series of devices is intended for use in the electromagnetic environment specified below. The
customer or the user of the S8 device should assure that the device is used in such an environment.
Electromagnetic environment—
guidance
Emissions test
Compliance
RF emissions CISPR11
Group 1
The S8 device uses RF energy only for its
internal function. Therefore, its RF
emissions are very low and are not likely
to cause any interference in nearby
electronic equipment.
RF emissions CISPR 11 with serial
adapter
Class B*
RF emissions CISPR 11 with USB
adapter
Class B
The S8 device is suitable for use in all
establishments, including domestic
establishments and those directly
connected to the public low-voltage
network that supplies buildings used for
domestic purposes.
Harmonic Emissions
IEC 61000-3-2
Class A
Voltage Fluctuations/Flicker
Emissions IEC 61000-3-3
Complies
SYSTEM SPECIFICATIONS
338239r1.book Page 25 Tuesday, July 5, 2005 1:58 PM
* Class B for all system configurations except when a PC is attached to the S8 device via a serial adapter,
in which case the system is Class A compliant. Class A is suitable for use in all establishments other than
domestic and those directly connected to a low voltage power supply network which supplies buildings
used for domestic purposes.
Medical Electrical Equipment needs special precautions regarding EMC and needs to be installed and put
into service according to EMC information provided in this document.
Warnings: The S8 device should not be used adjacent to or stacked with other equipment.
If adjacent or stacked use is necessary, the S8 device should be observed to verify normal operation in
the configuration in which it will be used.
The use of accessories (eg humidifiers) other than those specified in this manual is not recommended.
They may result in increased emissions or decreased immunity of the S8 device.
25
338239r1.book Page 26 Tuesday, July 5, 2005 1:58 PM
Guidance and manufacturer’s declaration—electromagnetic immunity
The S8 series of devices is intended for use in the electromagnetic environment specified below. The
customer or the user of the S8 device should assure that the device is used in such an environment.
IEC60601-1-2
test level
Compliance level
Electrostatic
discharge (ESD)
IEC 61000-4-2
±6 kV contact
±6 kV contact
±8 kV air
±8 kV air
Electrical fast
transient/burst
IEC 61000-4-4
±2 kV for power
supply lines
±2 kV
±1 kV for input/
output lines
Not Applicable
±1 kV differential
mode
±1 kV differential
mode
±2 kV common
mode
±2 kV common
mode
<5% Ut
(>95% dip in Ut)
for 0.5 cycle
< 12V
(>95% dip in 240V)
for 0.5 cycle
40% Ut
(60% dip in Ut)
for 5 cycles
96V
(60% dip in 240V)
for 5 cycles
70% Ut
(30% dip in Ut)
for 25 cycles
168V
(30% dip in 240V)
for 25 cycles
<5% Ut
(>95%dip in Ut)
for 5 sec
<12V
(>95%dip in 240V)
for 5 sec
3 A/m
3 A/m
Immunity test
Surge
IEC 61000-4-5
Voltage dips, short
interruptions and
voltage variations on
power supply input
lines.
IEC 61000-4-11
Power frequency
(50/60 Hz)
magnetic field
IEC 61000-4-8
NOTE: Ut is the AC mains voltage prior to application of the test level.
26
Electromagnetic
environment—guidance
Floors should be wood,
concrete or ceramic tile. If
floors are covered with
synthetic material, the
relative humidity should be
at least 30%.
Mains power quality should
be that of a typical
commercial or hospital
environment.
Mains power quality should
be that of a typical
commercial or hospital
environment.
Mains power quality should
be that of a typical
commercial or hospital
environment.
If the user of the S8 device
requires continued operation
during power mains
interruptions, it is
recommended that the S8
device be powered from an
uninterruptible power
source.
Power frequency magnetic
fields should be at levels
characteristic of a typical
location in a typical
commercial or hospital
environment.
Guidance and manufacturer’s declaration—electromagnetic immunity
The S8 series of devices is intended for use in the electromagnetic environment specified below. The customer or
the user of the S8 device should assure that the device is used in such an environment.
Immunity test
IEC60601-1-2
test level
Compliance
level
Electromagnetic environment—guidance
SYSTEM SPECIFICATIONS
338239r1.book Page 27 Tuesday, July 5, 2005 1:58 PM
Portable and mobile RF communications
equipment should be used no closer to any part
of the S8 device, including cables, than the
recommended separation distance calculated
from the equation applicable to the frequency of
the transmitter.
Recommended separation distance
Conducted RF
IEC 61000-4-6
3 Vrms
150 kHz to 80 MHz
3 Vrms
d = 1.17 √P
Radiated RF
IEC 61000-4-3
10 V/m
80 MHz to 2.5 GHz
10 V/m
d = 0.35 √P 80 MHz to 800 MHz
d = 0.70 √P 800 MHz to 2.5 GHz
where P is the maximum output power rating of
the transmitter in watts (W) according to the
transmitter manufacturer and d is the
recommended separation distance in meters (m).
Field strengths from fixed RF transmitters, as
determined by an electromagnetic site survey,a
should be less than the compliance level in each
frequency range.b
Interference may occur in the vicinity of
equipment marked with the following symbol:
NOTE 1: At 80 MHz and 800MHz, the higher frequency range applies.
NOTE 2: These guidelines may not apply in all situations. Electromagnetic propagation is affected by absorption
and reflection from structures, objects and people.
a
Field strengths from fixed transmitters, such as base stations for radio (cellular/cordless) telephones and land
mobile radios, amateur radio, AM and FM radio broadcast and TV broadcast cannot be predicted theoretically
with accuracy. To assess the electromagnetic environment due to fixed RF transmitters, an electromagnetic site
survey should be considered. If the measured field strength in the location in which the S8 device is used exceeds
the applicable RF compliance level above, the S8 device should be observed to verify normal operation. If
abnormal performance is observed, additional measures may be necessary, such as reorienting or relocating the
S8 device.
b
Over the frequency range 150 kHz to 80 MHz, field strengths should be less than 10 V/m.
27
338239r1.book Page 28 Tuesday, July 5, 2005 1:58 PM
Recommended separation distances between portable and mobile RF communications
equipment and the S8 series of devices
The S8 series of devices is intended for use in an environment in which radiated RF disturbances are controlled.
The customer or the user of the S8 device can help prevent electromagnetic interference by maintaining a
minimum distance between portable and mobile RF communications equipment (transmitters) and the S8 device
as recommended below, according to the maximum output power of the communications equipment.
Separation distance according to frequency of transmitter
m
Rated maximum output
power of transmitter
W
150kHz to 80MHz
80 MHz to 800 MHz
800MHz to 2.5 GHz
d = 1.17 √P
d = 0.35 √P
d = 0.7 √P
0.01
0.17
0.04
0.07
0.1
0.37
0.11
0.22
1
1.17
0.35
0.7
10
3.69
1.11
2.21
100
11.70
3.50
7.0
For transmitters rated at a maximum output power not listed above, the recommended separation distance d in
metres (m) can be determined using the equation applicable to the frequency of the transmitter, where P is the
maximum output power rating of the transmitter in watts (W) according to the transmitter manufacturer.
NOTE 1: At 80 MHz and 800 MHz, the separation distance for the higher frequency range applies.
NOTE 2: These guidelines may not apply in all situations. Electromagnetic propagation is affected by absorption
and reflection from structures, objects and people.
28
338239r1.book Page 29 Tuesday, July 5, 2005 1:58 PM
A
accessories 6
air filter 5, 21
replacing 18
air pressure 21
air tubing 5
cleaning 17
connect to air outlet 7
kinked 21
positioning 7
aircraft 20
airflow
breathing with 19
altitude setting 13, 20, 21
B
backlight
LCD and keypad 11
C
carry bag 5
cleaning
daily cleaning 17
periodic 17
contraindications 1
CPAP 1
D
Data Card 15
copying data 16
data card 22
inserting 15
mailback envelope 16
removing 16
Data Card module 15
DC-12 converter 20
down key 11
dryness
mouth, nose or throat 19
E
error message 21
F
frequently asked questions 19
HumidAire
attaching 9
HumidAire 3i
attaching 9
storage 5
humidifier 19
cleaning 17
humidifiers 6
INDEX
INDEX
I
international use 19
K
keypad 5, 11
keypad keys
functions 11
L
language setting 13
LCD 5, 7, 11
error messages 22
messages 14
left key 11
M
mailback envelope 16
mask 19, 21
air leak 19
attaching 7
cleaning 17
removing 19
mask leak 19
mask port 21
masks 5
medical information 1
menu screens 12
access 12
change 12
exit 13
scrolling 12
module
attaching 5
blank 15
Data Card 15
modules 15
blank 15
H
headgear 21
29
338239r1.book Page 30 Tuesday, July 5, 2005 1:58 PM
N
nasal irritation 19
P
power cord 5, 21
connecting 7
power sockets 5
power sources 20
power supply 23
R
ramp time 8, 13, 21
reminder
replace mask 14
reminders 14
ResScan Data Card module 6
right key 11
S
S8 Lightweight
dimensions 23, 24
servicing 18
settings 12
set-up 7
start treatment 8
stop treatment 8
travelling with 19
setting up 7
software version number 13
standby screen 7
start/stop key 11
SW 13
system specifications 23
T
troubleshooting 21
U
up key 11
Usage 13
use on aircraft 20
Used hours 13
W
weekly cleaning 17
30