1
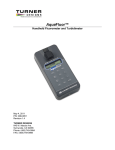
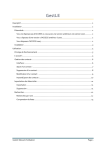
United Nations
Environment Programme
UNEP/GEF South China Sea
Project
Global Environment
Facility
Reversing Environmental Degradation Trends
in the
South China Sea and Gulf of Thailand
USER MANUAL
FOR
THE SOUTH CHINA SEA NUTRIENT CARRYING CAPACITY MODEL
UNEP/GEF/SCS/WEB.3
TABLE OF CONTENTS
1.
PREPARING MICROSOFT EXCEL TO RUN THE MODEL ......................................................... 1
1.1
1.2
SELECTING THE SOLVER ADD-IN ............................................................................................... 1
SETTING THE APPROPRIATE MACRO SECURITY LEVEL ................................................................. 3
2.
DOWNLOADING MODEL DATA ............................................................................................................ 5
3.
RUNNING THE MODEL ................................................................................................................ 7
3.1
EXTRACTING THE MICROSOFT EXCEL FILE FROM THE ZIP FILE..................................................... 7
3.2
OPENING THE MICROSOFT EXCEL FILE ...................................................................................... 8
3.3
ENABLING MACRO REFERENCE................................................................................................. 9
3.4
RUNNING THE MODEL ............................................................................................................. 11
3.5
INTERPRETING THE MODEL OUTPUTS ...................................................................................... 12
3.6
IDENTIFYING THE GEOGRAPHICAL LOCATION OF A SUB-ZONE ................................................... 13
3.7
IDENTIFYING THE LOCATION AND NAMES OF RIVERS IN A SUB-ZONE ............................................. 13
3.7.1 Identifying the location of rivers in a sub-zone ...................................................................... 13
3.7.2 Finding the name of a river in a sub-zone....................................................................... 13
3.8
IDENTIFYING DEPTH DATA USED IN THE MODEL ................................................................................ 16
4.
CHANGING THE RIVER NUTRIENT LOADING DATA.................................................................... 17
5.
ADDING NEW RIVERS OR OTHER SOURCES ........................................................................ 18
ii
UNEP/GEF/SCS/WEB.3
1.
PREPARING MICROSOFT EXCEL TO RUN THE MODEL
The first thing you need to do is to prepare Microsoft Excel to run the model. This involves making
sure that you have the “Solver” add in, and selecting the correct level of macro security.
1.1
Selecting the Solver add-in
STEP 1 – Open Microsoft Excel (see Image 1.1.1).
Image 1.1.1
A blank Microsoft Excel spreadsheet.
STEP 2 – On the main toolbar, select Tools then Add-Ins… (see Image 1.1.2).
Image 1.1.2
The Add-Ins… option on the main toolbar.
1
UNEP/GEF/SCS/WEB.3
STEP 3 – Check the Solver Add-in box and click
Image 1.1.3
(see Image 1.1.3).
The Solver Add-in option selected.
Important Note – SOLVER ADD-IN. If the Solver Add-In option is not listed in the Add-Ins box, you
should reinstall Microsoft Excel and select the solver add-in from the custom installation option.
2
UNEP/GEF/SCS/WEB.3
1.2
Setting the appropriate macro security level
STEP 1 – Select Options in the Tools menu of the main tool bar (see Image 1.2.1).
Image 1.2.1
Options in the Tools menu of the main tool bar.
STEP 2 – Select the Security tab on the Options box (see Image 1.2.2).
Image 1.2.2
The security tab on the options box selected.
3
UNEP/GEF/SCS/WEB.3
STEP 3 – Click on
on the Security page of the Options box shown in Image 1.2.2.
STEP 4 – Select Medium on the Security Level page of the Security box (see Image 1.2.3).
Image 1.2.3
The Medium macro security level selected.
Important Note – SECURITY LEVEL. You are strongly advised not to set the macro security level to
low as your system as your system will be very vulnerable to potentially unsafe macro viruses from
other sources.
4
UNEP/GEF/SCS/WEB.3
2.
DOWNLOADING MODEL DATA
The data for running the carrying capacity model can be downloaded from the Nutrient Carrying
Capacity Model page of the South China Sea Project website <www.unepscs.org>.
STEP 1 – Access the Nutrient Carrying Capacity Model page of the South China Sea Project website
(see Image 2.1).
Image 2.1
The Nutrient Carrying Capacity Model page of the South China Sea Project website
STEP 2 – Select the month for which you would like to download data for from the drop-down menu
on the top left hand side of the page.
STEP 3 – Click on 1 of the 13 sub-zones boxes for which you would like to download data for and
click
Image 2.2
on the File Download box (see Image 2.2).
The File Download box.
5
UNEP/GEF/SCS/WEB.3
STEP 4 – Save the “zip” file to your computer by clicking Save on the Save As box (see Image 2.3).
Image 2.3
The Save As box.
6
UNEP/GEF/SCS/WEB.3
3.
RUNNING THE MODEL
3.1
Extracting the Microsoft Excel file from the zip file
Important Note – WinZip. You must have WinZip (or equivalent) installed on your computer.
STEP 1 – Find the zip file you have saved on your computer.
STEP 2 – Double click on the file and it will open in WinZip (or equivalent) (see Image 3.1.1).
Image 3.1.1
The WinZip main page.
STEP 3 – Select your file on the WinZip main page and click the Extract button.
STEP 4 – Select the location on your computer you wish to extract the Microsoft Excel file to and
click extract (see Image 3.1.2).
Image 3.1.2
The Extract page of WinZip.
7
UNEP/GEF/SCS/WEB.3
3.2
Opening the Microsoft Excel file
STEP 1 – Find and open the Microsoft Excel file that you have saved on your computer.
Important Note – OPENING THE FILE. Upon opening the file you will receive the security warning
shown in Image 3.2.1.
Image 3.2.1
The Security Warning box that will appear on your screen.
STEP 2 – Click Enable Macros on the Security Warning box (see Image 3.2.1).
Important Note – THE MICROSOFT EXCEL FILE. The Microsoft Excel file is comprised of 11
worksheets. The main sheet is Run-Model. You will become familiar with each sheet as you work
through the steps outlined in this manual.
8
UNEP/GEF/SCS/WEB.3
3.3
Enabling Macro Reference
STEP 1 – Select the Run-Model worksheet of the Microsoft Excel file (see Image 3.3.1).
Image 3.3.1
The Run-Model sheet of the Microsoft Excel file.
STEP 2 – Select the Visual Basic Editor from the Macros option of the Tools menu (see Image 3.3.2).
Image 3.3.2
The Visual Basic Editor on the Macros option of the Tools Menu.
9
UNEP/GEF/SCS/WEB.3
STEP 3 – Select References from the Tools menu (see Image 3.3.3).
Image 3.3.3
The References option on the Tools Menu.
STEP 4 – Select the SOLVER reference from the References box and click OK (see Image 3.3.4).
Image 3.3.4
The SOLVER reference selected in the References box.
Important Note – MISSING SOLVER REFERENCE. If you can see MISSING: SOLVER in the list of
available references in the References box, you need to browse for the SOLVER REFERENCE on
your computer. The steps are:
1. Click Browse in the References box
2. Find the solver reference
- Microsoft 2002 = C:/Program Files/Microsoft Office/OFFICE10/Library/SOLVER/SOLVER.xla
- Microsoft 2003 = C:/Program Files/Microsoft Office/OFFICE11/Library/SOLVER/SOLVER.xla
3. Click Open on the Add Reference box
4. Check the SOLVER box in the References box and click OK (see Image 3.3.4).
10
UNEP/GEF/SCS/WEB.3
STEP 5 – Close Microsoft Excel.
STEP 6 – Re-open the Microsoft Excel file.
3.4
Running the Model
STEP 1 – Select the Run-Model worksheet of the Microsoft Excel file.
STEP 2 – Click on the Run Chl-a Estimate box on the Run-Model worksheet (see Image 3.4.1).
Image 3.4.1
The Run Chl-a Estimate box on the Run-Model worksheet.
STEP 3 – Click on the Run Chl-a Estimate box on the Run-Model worksheet (see Image 3.4.1).
Important Note. Upon clicking on the Run Chl-a Estimate box, you will automatically be transferred to
the Chl_calc worksheet. You can observe the model running by looking at the trial solution in the
bottom left hand corner of the Chl_calc worksheet. Running the model for an individual sub-zone may
take 1-2 hours depending on the sub-zone selected and the capability of your computer’s processor.
When the model finishes running you will get a message asking you if you want to replace the file
(see Image 3.4.2).
Image 3.4.2
The replace file message.
STEP 5 – Click Yes on the replace file message (see Image 3.4.2). You will then receive a message
Chl-a Estimate finish... (see Image 3.4.3). Click OK.
11
UNEP/GEF/SCS/WEB.3
Image 3.4.3
3.5
The Chl-a Estimate finish… message box.
Interpreting the Model Outputs
It is possible to observe the model outputs in the Chl_map worksheet (for example see Image 3.5.1).
Image 3.5.1
An example of the Chl_map worksheet after running the model and saving the file.
The numbers in the cells are the predicted Chl-a concentrations in mg/m3, based on the nutrient
loading and oceanographic parameters used in the model for the given sub-zone. A key to the colour
scale used in the Chl_map worksheet is shown in Table 1.
12
UNEP/GEF/SCS/WEB.3
Table 1
Key to the colour scale used in the Chl_map worksheet.
State
Eutrophic
Highly productive
Oligotrophic
Land
3.6
Chlorophyll Concentration (mg/m3)
>2
0.2 - 2
<0.2
-
Colour Scale
Red
Yellow
No Color
Green
Identifying the Geographical Location of a Sub-Zone
The Chl_map worksheet for each sub-zone does not include latitudes and longitudes for given
locations on the selected sub-zone. A general indication of the geographical location of the sub-zone
can be found by looking at where the sub-zone is located within the South China Sea on the Nutrient
Carrying Capacity Model homepage. The latitudes and longitudes for the upper and lower coastal
boundaries of each sub-zone are provided on the Run_Model worksheet for each sub-zone.
3.7
Identifying the Location and Names of Rivers in a Sub-Zone
3.7.1
Identifying the location of rivers in a sub-zone
The locations of the river mouths in each sub-zone that have been incorporated in the model can be
seen by looking at the River_map worksheet (see Image 3.7.1). The red cells are the river mouths
and the numbers in the cells represent the nutrient loading (Chlorophyll equivalent) of the river used in
the model in mg-Chl/s.
Image 3.7.1
3.7.2
A section of the River_map worksheet for a given sub-zone.
Finding the name of a river in a sub-zone
STEP 1 – Record the cell reference (e.g. G5) for a given river on the River_map worksheet (see
Image 3.7.2.1).
13
UNEP/GEF/SCS/WEB.3
Image 3.7.2.1 A river mouth selected on the River_map worksheet.
STEP 2 – Select the In worksheet.
STEP 3 – Click on the cell you recorded the reference for at STEP 1 (see Image 3.7.2.2).
Image 3.7.2.2 An section of the In worksheet for a sub-zone.
STEP 4 – Record the RIVER ID NUMBER provided in fx area of the worksheet.
14
UNEP/GEF/SCS/WEB.3
Important Note – RIVER ID NUMBER 1. In Image 3.7.2.2 you can see =rivers_data!C103 in the fx
area of the worksheet. In this case, the RIVER ID NUMBER is 103. The RIVER ID NUMBER for other
rivers is the number that is provided after the =rivers_data!.
STEP 5 – Select the rivers_data sheet (see Image 3.7.2.3).
Image 3.7.2.3 An example of the rivers_data sheet for a given sub-zone.
Important Note – RIVER ID NUMBER 2. You can use the RIVER ID NUMBER on the rivers_data
page to identify the name of a given river, the country that a river is a located in, the nutrient loading
(Input) used for the river in the model. The Input data or nutrient loading (Chlorophyll equivalent) data
is provided in mg-Chl/s.
15
UNEP/GEF/SCS/WEB.3
3.8
Identifying depth data used in the model
To identify the bottom depth of coastal waters used for each cell of a sub-zone, select the Depth
worksheet (see Image 3.8.1). The maximum depth used in the model is 50 metres. Waters deeper
than 50 metres were considered to be 50 metres deep.
Image 3.8.1
A section of the Depth worksheet for a given sub-zone.
Important Note – U-transp, V-transp, K, and Bal worksheets. These worksheets contain the
circulation data and vertical nutrient removal data used in the model, and the actual mathematical
model. For further information on these aspects of the model, please contact SEA START RC by email [email protected].
16
UNEP/GEF/SCS/WEB.3
4.
CHANGING THE RIVER NUTRIENT LOADING DATA
You can change the nutrient loading data for any river by following these steps:
STEP 1 – Delete all results in the Chl_calc worksheet from previous runs of the model, except the
cell highlighted in red.
STEP 2 – Select the rivers_data sheet for the sub-zone and find the river(s) that you wish to change
the Input data for.
STEP 3 – Change the Input data as required (see Images 4.1 and 4.2).
Image 4.1
A section of the rivers_data sheet for a given sub-zone with the Input cell selected.
Image 4.2
The rivers_data sheet shown in Image 4.1 with the Input data changed for a river.
STEP 4 – Select the Run_Model worksheet.
STEP 5 – Click the Run Chl-a Estimate on the Run_Model worksheet.
STEP 6 – You will be prompted to save and finish the chl-a estimate, save and click OK. You can
interpret the results as shown from Sections 3.4–3.8.
17
UNEP/GEF/SCS/WEB.3
5.
ADDING NEW RIVERS OR OTHER SOURCES
Not all rivers in a sub-zone have been used in the model. Users can add or remove rivers in their
jurisdictions. It is also possible to add inputs from sources other than rivers, such as effluent from
shrimp and fish farms.
STEP 1 – Select the River_map worksheet.
STEP 2 – Select an approximate location on the sheet for the source (river or other).
STEP 3 – Record the cell location for the new source (e.g. S17 in Image 5.1)
Image 5.1
A location on the River_map worksheet selected for a new source.
STEP 4 – Select the rivers_data worksheet.
STEP 5 – Add a new record to the rivers_data worksheet (see Image 5.2). Do not add an Cell ID.
18
UNEP/GEF/SCS/WEB.3
Image 5.2
An example of a new river added to the rivers_data worksheet.
STEP 6 – Select the In worksheet and click on the cell selected at STEP 1 and recorded at STEP 2.
STEP 7 – Type = in the selected cell.
STEP 8 – Select the rivers_data worksheet.
STEP 9 – Select the Input cell for the new river worksheet and press ENTER.
Important Note. If you have followed the STEPS 1-9 correctly, the new source will be displayed on
the River_map worksheet. If you wish to re-run the model with the new river, delete all results in the
Chl_calc worksheet from previous runs of the model, except the cell highlighted in red, and follow the
run model instructions provided in Section 3.
19
UNEP/GEF/SCS/WEB.3
Important Note – Removing Rivers. If you wish to remove the effects of a river or source on the
model outputs, simply set the river or source as inactive by setting the input for the river to 0 in the
rivers_data worksheet.
Important Note – Running the Model for the Entire South China Sea. The instructions provided in
this manual have been provided in relation to the use of the model at the sub-zone level. It is possible,
however, to download data for the whole of the South China Sea from the Nutrient Carrying Capacity
Model page of the South China Sea Project website <www.unepscs.org>. The steps described in this
manual can be directly applied to the modeling of nutrient carrying capacity in the entire South China
Sea basin. Please be warned that running the model for the entire South China Sea will take longer
than 24 hours when using a standard personal computer.
20