1
RollCall-Pro Premium
Installation and Setup Manual
Published by: Current Works, Inc.
April 2015
RollCall-Pro Premium Version 3.2
Contents
3
Table of Contents
Part I Purpose of this Manual
5
Part II RollCall-Pro Installation
5
1 System...................................................................................................................................
Requirements
5
2 System...................................................................................................................................
Software
6
3 System
...................................................................................................................................
Hardware
12
4 Typical
...................................................................................................................................
Installation
13
Part III Starting RollCall-Pro
13
Part IV Setting Custom Configurations
15
1 Setup...................................................................................................................................
Configurations
15
Num ber of Mem
..........................................................................................................................................................
bers
17
Nam e Assignm
..........................................................................................................................................................
ents
17
Nom enclature.......................................................................................................................................................... 19
Results
.......................................................................................................................................................... 19
Font Size and ..........................................................................................................................................................
Style
20
Save Custom ..........................................................................................................................................................
Configuration
21
2 Business
...................................................................................................................................
Rules
21
First Voting Position
.......................................................................................................................................................... 23
Initial Voting Criteria
.......................................................................................................................................................... 23
Request to Speak
..........................................................................................................................................................
(RTS)
24
Motion and Second
.......................................................................................................................................................... 25
Enabling Abstain
..........................................................................................................................................................
Votes
25
Present or Absent
..........................................................................................................................................................
Mem bers
25
Displaying Voting
..........................................................................................................................................................
Results
26
Advanced Business
..........................................................................................................................................................
Rules
26
Save Changes.......................................................................................................................................................... 27
3 Agenda
...................................................................................................................................
- Preload Before Meeting
28
Part V Additional Menu Items
31
1 Display
...................................................................................................................................
Timer
32
2 Print Screen
................................................................................................................................... 33
3 Cancel
...................................................................................................................................
the Current Vote
33
4 Withdraw
...................................................................................................................................
Motion
34
5 About...................................................................................................................................
RollCall-Pro
34
6 Exiting
...................................................................................................................................
RollCall-Pro
35
Part VI Customer Service
36
© 2015 Current Works, Inc.
3
4
RollCall-Pro Installation and Setup Manual
Index
39
© 2015 Current Works, Inc.
Purpose of this Manual
1
5
Purpose of this Manual
The purpose of this Installation & Setup Manual is to assist in the configuration of the
system before using it in a meeting. It is not written specifically for an information
technology professional, but the information it presents is useful for someone with this
background, who might have the responsibility of installing and configuring RollCall-Pro.
There is a separate Operator’s Manual which is designed to assist the person who will
actually operate the RollCall-Pro system in a meeting.
You should also become familiar with the SideKeys User Manual that came with this
System. This manual provides valuable information regarding the setup, maintenance and
trouble shooting of the wireless keypad system.
2
RollCall-Pro Installation
Normally this software is installed on a single PC or laptop computer that is usually
situated in a board/council chamber. The RollCall-Pro System could also be setup on a
network computer that is then accessed through any room with a computer that has a
network connection to the central server where the program was installed. The following
instructions assume a normal PC or laptop installation, but where a network install would
differ, the network installation differences will be noted — the major difference being
where you install the software and where you save the Results.
Note: To install onto the network, you must install the CD onto the network server
computer, BUT the RollCall-Pro USB SideKeys receiver must be installed on the local PC in
board/council chamber in order for the keypads to work correctly.
2.1
System Requirements
Minimum system requirements to run RollCall-Pro include the following:
Pentium III Processor
Microsoft Windows 2000 and up
CD-ROM drive and USB port
RollCall-Pro Hardware (USB SideKeys Receiver and Keypads)
The RollCall-Pro Setup installs all of its files on the drive where the Windows operating
system is installed. The default directory is “C:\RollCall-Pro\”.
Note: RollCall-Pro is designed to operate under 1024 X 768, 1366 X 768, or 1920 X
1080 resolution.
© 2015 Current Works, Inc.
6
2.2
System Software
To install the RollCall-Pro software:
1. Load the RollCall-Pro System CD into the CD-ROM of the computer.
2. The program is not designed to automatically Startup. You must navigate to the CD
and to the Install Directory on it.
3. In the D:/Install Directory (assuming that “D” is the CD-ROM drive), you will see a file
called "RollCallProPremium30Setup.exe". Double-click on this icon and the installation
program will start and guide you through the rest of the installation. Follow the
onscreen instructions.
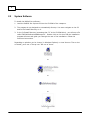
Depending on whether you've chosen (in Windows Explorer) to view Icons or Tiles or List
or Details, you'll see a “Setup icon” like one of these:
or
or
or
© 2015 Current Works, Inc.
RollCall-Pro Installation
7
Figure 2-1. RollCall-Pro Setup Icons
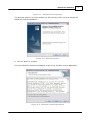
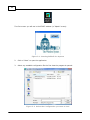
The Welcome Screen is the first window you will encounter after you have started the
RollCall-Pro System installation:
Figure 2-2. Welcome Screen
4. Click on “Next” to continue.
The next RollCall-Pro Software installation screen is the Software License Agreement:
Figure 2-3. Software License Agreement
© 2015 Current Works, Inc.
8
5. Carefully read this agreement and when you are finished reading and willing to accept
the agreement, click on the “I accept...” button and then “Next” to continue.
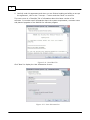
The next screen is a “Read Me” file of information about this latest version of the
software. It contains useful information about the system requirements, customer notes
and planned upgrades of the RollCall-Pro software program:
Figure 2-4. Read Me File
Click “Next” to display the User Information Screen:
Figure 2-5. User Information
© 2015 Current Works, Inc.
RollCall-Pro Installation
9
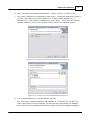
6. Enter your Name and Company/Organization. Choose “Anyone” or “Only for me”.
7. Click “Next” to display the Destination Folder screen. The default Destination Folder is
on the “C” hard drive of the local computer, in a Folder named “RollCall-Pro” (C:
\RollCall-Pro\). If this location is satisfactory, press “Next”. If you want the program
installed elsewhere, click on the “Change” button and see the following screen:
Figure 2-6. Choose the Default Destination Directory
Figure 2-7. Define a Custom Destination Directory
8. It is recommended that you use the default directory.
Also, note that a network installation will probably be “C:\RollCall-Pro\” as well, but
when connecting via a local computer, the network drive will probably be “mapped”
and a shortcut to the application should be created on the local computer's desktop
© 2015 Current Works, Inc.
10
with the mapped network drive name.
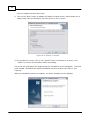
9. Click on the “Next” button to display the Ready to Install Screen, which allows you to
simply verify that the information you have given so far is correct:
Figure 2-8. Ready to Install
10. If everything is correct, click on the “Install” button. If anything is incorrect, click
“<Back” to correct the information before proceeding.
This is the last point where the program asks for information for the installation. From this
point forward, the RollCall-Pro System installation will start and will copy files to your
computer.
When the installation process is complete, the Setup Complete Screen displays:
© 2015 Current Works, Inc.
RollCall-Pro Installation
11
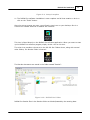
Figure 2-9. Setup Complete
11. The RollCall-Pro software installation is now complete and all that remains to do is to
click on the “Finish” button.
Once the setup screens are gone, you will notice two icons on your desktop. One is a
colorful Icon named “Shortcut to RollCall-Pro Premium":
This icon is linked directly to the RollCall-Pro software application. When you want to start
up the RollCall-Pro software program, simply double -c lic k on this icon.
The other icon provides a shortcut to the Roll Call-Pro Folders where, along with several
other folders, the Results Folder is located:
The Results documents are saved in the folder named “Results”:
Figure 2-10. RollCall-Pro Folder
RollCall-Pro Results files in the Results folder are labeled/named by the meeting date:
© 2015 Current Works, Inc.
12
Figure 2-11. Results Folder
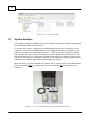
2.3
System Hardware
The hardware needed to complete the system includes the wireless SideKeys Keypads and
the USB SideKeys RollCall-Pro Receiver.
To connect the receiver, simply plug the USB SideKeys Receiver into a USB port on the
computer. Ensure that the USB cable is securely plugged into both the USB port on the
computer as well as the USB SideKeys Receiver. The first time this connection is made
the computer will need to locate and assign the proper USB Drivers to the Receiver. This
step could take from 5 to 30 seconds; be patient and wait for the red light to light-up on
the face of the Receiver. Additional information on the SideKeys wireless keypad system is
available in the SideKeys User Manual included with the system.
Note also that if you have installed the software onto a network server, the USB SideKeys
Receiver hardware must be connected to the local computer, not the network server
computer.
Figure 2-12. System Hardware (Keypads and Receiver)
© 2015 Current Works, Inc.
RollCall-Pro Installation
2.4
13
Typical Installation
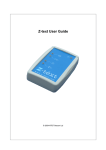
The following diagram and picture give the user an idea on how to setup the system to
work in a City Council Chamber, Board Room, or any room where the system may be used.
Possible scenarios are TV monitors hanging in the corners of a room, a projected display
on a white wall or drop down screen, or a number of other display possibilities. The
projection device can either be a portable system or a permanent hanging projector from
a ceiling.
Figure 2-13. Typical Hardware Setup Diagram
Figure 2-14. Typical Installation Photo
3
Starting RollCall-Pro
Once the RollCall-Pro software is loaded properly and the SideKeys hardware is installed,
the full RollCall-Pro system is ready to operate.
1. Double-click on the RollCall-Pro Shortcut icon that is on your computer desktop:
© 2015 Current Works, Inc.
14
The first screen you will see is the START window (or "Splash" screen):
Figure 3-1. Starting RollCall-Pro System
2.
Click on “Start” to open the application.
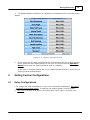
3.
Select any available configuration file the first time the program is opened:
Figure 3-2. Select the Configuration you want to load
© 2015 Current Works, Inc.
Starting RollCall-Pro
15
4. The Member Names contained in the RollCall-Pro configuration that you selected will
appear:
Figure 3-3. Default Settings Screen
5.
At this point you can begin using RollCall-Pro to experiment with the system and see
how it works with this Default Setup. In this case you should read the Operator’s
Manual to see how the System would be used in a meeting.
If you want to configure RollCall-Pro for your particular Board/Council, continue on to
"Setting Custom Configurations".
4
Setting Custom Configurations
4.1
Setup Configurations
1. To change this initial configuration to your own Customized Configuration, Right Click
anywhere on this initial screen. A small pop-up window displays several options.
2. Left Click in the pop-up to Select the “Hide/Unhide Tabs” option, as shown here:
© 2015 Current Works, Inc.
16
Figure 4-1. Pop-up Choice: Hide/Unhide Tabs
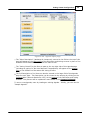
3. The Function Tabs on the right side of the screen will appear, as shown below:
Figure 4-2. RollCall-Pro Display Screen with Tabs
4. To create a custom configuration for your Board/Council click on the “Setup” tab along
the lower right-hand side of the screen to begin this configuration process.
On this Setup page, you will find several pieces of basic information that are required
for Setup:
© 2015 Current Works, Inc.
Setting Custom Configurations
17
Figure 4-3. RollCall-Pro Setup Screen
4.1.1
Number of Members
This is the Number of Voting Member panels that you wish to display on the RollCall-Pro
Display Screen. Select the number of members to display on the screen by clicking the
radio button next to the desired number:
Figure 4-4. Set the Number of Voting Members
4.1.2
Name Assignments
The most important part of the customization process is the Name Assignments section.
This section “assigns” names to the display panels on the Discussion and Voting screens.
This is accomplished by replacing “Member X” with the name of one of your Voting
Members.
© 2015 Current Works, Inc.
18
Figure 4-5. Enter the Names of Members
You can enter Voting Members’ names by clicking on the Member # box and typing the
name in place of the “Member #”. Move to the next box with the keyboard “Tab” key.
It is useful to number the Voting Members, perhaps by District # represented or by their
seating position. Each Member must use the Keypad # that is next to their Name on
this page. For example: Keypad #3 will always buzz-in to register votes for Member 3.
Keypads are physically numbered on the nose label and on the keypad insert:
Figure 4-6. Keypad/Voter Numbers
If the Mayor or Chair or President only votes in the case of a tie, they must always be
assigned to Keypad #1, regardless of which District he/she represents. This Number 1
keypad is the only keypad that can be used to break a Tie Vote.
Special Note: To indicate that a member has no voting privileges but may use a keypad
to request to speak, prefix the member's name with a question mark (?).
© 2015 Current Works, Inc.
Setting Custom Configurations
4.1.3
19
Nomenclature
The nomenclature section allows you to customize the wording of your voting. Some
Boards like to use YES-NO-ABSTAIN, while others like YEA-NAY-ABSTAIN. If you would
like to make up your own custom terms, then select the "Custom" radio button under
"Results Nomenclature" and type in the text you would like to see on your RollCall-Pro
display screen:
Figure 4-7. Choose Nomenclature to be Used in Voting
In addition, you may designate up to two additional labels for "Absent". As the message
to the right of these optional labels above indicates, you can toggle between "Absent",
"Excused", and "Late" (or whatever nomenclature you use) by le ft -c lic king on that
member's results after roll call.
4.1.4
Results
This Setup option allows you to choose whether to save the voting results and where
they should be saved. The defaults are to save them (as a text file) in the Results subfolder within the main RollCall-Pro Folder (the RollCall-Pro Installation process provides a
Shortcut on your desktop to this Folder).
Figure 4-8. Option to Save Results
Not e : If y ou w ish t o sa v e t he Re sult s som e w he re diffe re nt t ha n in t he RollCa ll-Pro folde r,
like on t he Ne t w ork Se rv e r, y ou m ust spe c ify t he loc a t ion pa t h t o w he re y ou w a nt t he
Re sult s sa v e d. T his is done in t he Directory File Name fie ld on t his sc re e n:
Figure 4-9. Path to directory where RCP Results are to be saved
You can also choose to have a copy of the RollCall-Pro voting results display screen
automatically printed at the conclusion of each vote. This provides a paper record of the
voting results.
© 2015 Current Works, Inc.
20
Not e : Se le c t ing t his opt ion, but not ha v ing
a print e r c onne c t e d t o t he c om put e r, w ill
c a use a n Error M e ssa ge during t he
m e e t ing.
Figure 4-10. Auto Print Option & Printer Setup Button
If you choose to "Auto Print" the voting results of each vote, you can also set the "Printer
Setup" by clicking on this button to configure the printer assigned to this computer. The
details that can be set depend on the printer and related drivers you have.
If you choose to "Auto Save" the voting results of each vote taken, RollCall-Pro will save
a "snapshot" of each voting results screen - as a JPG file - in your Results folder.
4.1.5
Font Size and Style
This button lets you adjust the size and style (font) of the text that appears on-screen:
Figure 4-11. Adjust Font Size and Style
Depending on the lengths of the Members' names and titles, you can increase and
decrease the font size accordingly. You can try different font sizes and styles along with
variations in how to write names (District # and Member's name, full proper names, first
initial & last name, last name only, etc.) to get the best public display of Members' names:
Figure 4-12. Adjust Font Size and Style
© 2015 Current Works, Inc.
Setting Custom Configurations
4.1.6
21
Save Custom Configuration
This Setup option allows you to retrieve a previously saved RollCall-Pro Configuration or to
save a newly created or revised Configuration. To save a new, custom RollCall-Pro
Configuration file, click on the “Save File” button. To retrieve a custom RollCall-Pro
Configuration file, click on the “Retrieve File” button (shown below). You can save as
many unique RollCall-Pro Configuration Files as you like in the RollCall-Pro folder.
Figure 4-12. Retrieve or Save new Configurations
Not e : Aga in, if y ou w a nt t o sa v e t he RollCa ll-Pro soft w a re progra m a nd re la t e d
c onfigura t ions on t he ne t w ork se rv e r, y ou m ust spe c ify t he file loc a t ion pa t h t o t he
RollCa ll-Pro folde r a nd t he Configura t ion folde r on t he Se rv e r.
Figure 4-13. Save or Retrieve a Custom RollCall-Pro Configuration File
4.2
Business Rules
The Business Rules for the RollCall-Pro System specify the operating “Rules of Order” that
you use to conduct business and legally “Vote” on decisions. The areas that can be
changed in these rules include:
Rules for the first Voting Position
Initial Voting Criteria
© 2015 Current Works, Inc.
22
Activation of the “Request to Speak” Function
Motion and Second
Enabling Abstain Votes
Activation of the “Present / Absent" Function
Rules about displaying the Votes
Advanced Business Rules
Business Rules are once again accessed via the Tabs on the right side of the display
screen, this time selecting “Options” Tab for the “Business Rules”. These Business Rules
will be covered in depth in this section.
If the Tabs on the right side of the display screen are not visible, Right M ouse -Clic k
anywhere on the screen to access the popup menu. Select the “Hide/Unhide Tabs” and
the Function Tabs will appear along the right side of the screen:
Figure 4-14. Pop-up Choice: Hide/Unhide Tabs
Figure 4-15. Business Rules - Options Screen
© 2015 Current Works, Inc.
Setting Custom Configurations
4.2.1
23
First Voting Position
The Business Rules for “First Voting Position ” are simply the rules that apply to the first
name in the left hand column on the main display. This Member #1 position must be
assigned to the Mayor, Chair or President, if they only vote in the case of a tie vote or if
this is a non-voting position.
This position can hold one of three roles: 1) the official “Tie-Breaker” or 2) have the same
Voting responsibility as every other member or 3) serve as a Non-Voting Member.
Figure 4-16. Defining the Role of the Top Voting Position
The first setting for this Top Voting Position is as the Tie-Breaker Position. This means
that the position:
1. Only votes when a tie occurs,
2. Cannot “Abstain”, and
3. Their vote is not required, unless there is a Tie Vote.
This position is typically filled by the Mayor, Chairman or President of the Board.
The second choice for this position is acting as a “Normal” voter and voting along with
everyone else on the issues. This position will NOT break ties. If a tie vote does occur,
the display will simply show the vote as a tie. The Board would use its own Rules of Order
to decide how the tie vote is resolved.
The last choice in this section is to display the name of the person in charge but not to
give them any voting rights at all. For example, a City might have an Executive that is
not allowed to vote on issues, but regularly sits with the rest of the council members and
runs the meetings. In this case, the Executive’s name would be displayed, but he would
not allowed to vote on any items.
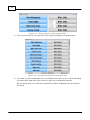
4.2.2
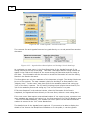
Initial Voting Criteria
This Business Rule allows the user to select what voting criteria will be displayed as the
initial default on the Voting Screen. Choices are:
Majority Vote (Majority of Voting Members Present -- 51% or more);
2/3 Vote (Greater than or equal to 66% of Voting Members Present);
3/4 Vote (Greater than or equal to 75% of Voting Members Present);
© 2015 Current Works, Inc.
24
No Vote Required (No vote will be taken on this issue, will proceed to next
Agenda Item); or
Custom Vote (Actual Number of “Yes” Votes required to Pass, regardless of
how many Voting Members are Present). You must specify this number, if you
wish to use this function.
The actual criteria for each vote can also be adjusted on screen, during the Discussion of
the issue, before the vote is cast.
In this section of the Business Rules, you prescribe which criteria will be displayed initially
when the RollCall-Pro Display Screen first starts up:
Figure 4-17. Set the Voting Criteria Default
4.2.3
Request to Speak (RTS)
The “Request to Speak” function allows the Members to buzz-in during the Discussion
phase of the meeting to speak about the Item before the vote is taken. The Members
simply push the “RTS” button on their keypads and their intent to Speak is displayed on
the Voting screen. They are instantly placed into the queue of speakers in the order of
their request. This section allows the user to enable or disable this function. Additional
details about the use of this function are explained in the Operator’s Manual.
Figure 4-18. Enable Members to use the "Request to Speak" Function
© 2015 Current Works, Inc.
Setting Custom Configurations
4.2.4
25
Motion and Second
The initial setting for this Business Rule is to allow the recording of a Motion by the Clerk
and a Second by Members (using their keypads). It may also be set to allow Members as
well as the Clerk to indicate Motions, and it can also be set to reserve both operations for
the Clerk to perform. Additional details about the use of this function are explained in the
Operator’s Manual.
If you do not want to use the RollCall-Pro Motion and Second feature, you may disable it
by choosing that option from the dropdown menu for this feature:
Figure 4-19. Enable/Disable "Motion and Second" Function
4.2.5
Enabling Abstain Votes
The initial setting for this Business Rule is to activate Abstain Votes. This means that the
Vote Tally will display the number of "Yes", "No", and "Abstain" votes on an item. Another
option is to have RollCall-Pro count abstain votes with the majority (whichever way they
vote). If your rules do not allow for Abstain Votes, disable this function using the
dropdown menu:
Figure 4-20. Enable/Disable Abstain Function
4.2.6
Present or Absent Members
This function allows the members to enter a meeting during the Discussion phase of an
agenda item and make themselves “Present” by pushing the "Yes (Present)" button on
their keypad. Likewise, if they need to leave the meeting they can push the "No
(Absent)" button on their keypad to make themselves “Absent” when they leave. The
default is to have this function Disabled. Additional details about the use of this function
are explained in the Operator’s Manual.
© 2015 Current Works, Inc.
26
Figure 4-21. Enable/Disable the "Present/Not Present" Function
Not e : Ev e n if t his “Pre se nt /Abse nt ” func t ion is disa ble d, t he Cle rk/Le a de r c a n st ill c ha nge
t he Pre se nt /Abse nt st a t us of a ny M e m be r during a ny st a ge of t he m e e t ing by double
c lic king t he m ouse on t he m e m be r’s na m e on t he sc re e n. Se e t he Ope ra t or’s M a nua l for
de t a ils.
4.2.7
Displaying Voting Results
As member votes are cast, their votes are locked in but not displayed publicly. When all
the votes are locked in, the voting results are publicly displayed, unless there is a tie, and
then the #1 Position Member must vote to break the tie before the Voting Results are
displayed. One option for this Business Rule is to display the votes when the last
Confirmed voter has locked in his or her vote.
Alternatively, you may opt to let the Leader choose when to display the results. In this
case, select the second option under the dropdown menu for this item. When this option
is active, a status message at the bottom of the screen will display when the last voter
has confirmed his or her vote. The Leader or Clerk must then click on “Proceed” to
display the results.
This also allows one last opportunity to let any Member change their vote, before the final
voting results are displayed. If, for some reason, a Member is not sure how they voted
and fears that their vote might be wrongly registered, they can have their vote reset, by
the Leader, before disclosure, and recast their vote.
Figure 4-22. Specify When to Display Voting Results
Not e : Se e t he Ope ra t or's M a nua l for how t he Le a de r c a n re se t indiv idua l V ot ing M e m be r
loc ke d v ot e s be fore t he y a re disc lose d.
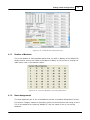
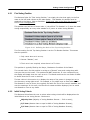
4.2.8
Advanced Business Rules
This section allows the user to set the values for 4 separate options:
1. The minimum number of voters (Quorum) that must be present in order for the session
to go forward
2. The default (starting) number of minutes for the Public Timer
© 2015 Current Works, Inc.
Setting Custom Configurations
27
3. Whether or not to display members' votes as soon as they've confirmed them
4. Whether or not to display confirmation dialog boxes when motions and seconds are
recorded
Figure 4-23. Advanced Business Rules
Regarding the minimum number of voters required (Quorum), if this number of Members
does not buzz-in during the initial Roll Call, the Voting System will not proceed. A notice
will appear in the bottom center of the RollCall-Pro Display Screen indicating an
insufficient number of Voters is Present to conduct official business. Likewise, if the
number of Members “Present” in the meeting falls below this Quorum during the course of
the meeting, the system will not allow a Roll Call Vote.
The Public Timer may be set initially at any value from 1-15 minutes. If you allow public
speakers each to have 5 minutes of speaking time, enter "5" in this field. (You may also
adjust this value up or down at any time the Public Timer is displayed.)
If you would not like to have members vote secretly and disclose their votes all at once,
check the box next to "Display Voter Votes when they are Cast". This will cause
members' votes to be disclosed individually as soon as they have confirmed their votes.
The default setting for "Confirm Motion and Second" is to display on-screen a confirmation
dialog box each time a motion or second is registered. These dialog boxes give you the
option of cancelling a motion or second, in case you make a mistake, which is why this
option is checked by default. However, if you would not like to have RollCall-Pro display
confirmation dialog boxes on-screen when someone motions or seconds, uncheck the
"Confirm Motion and Second" option.
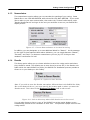
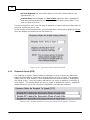
4.2.9
Save Changes
When you have finished setting all the Business Rules for your meeting, you must click on
another Tab to leave this page. When you do, you will be asked if you want to Save your
Business Rules in the Configuration File before proceeding. If you choose not to Save
your changes, they will be active during this session, but they will NOT be active the next
time this Configuration is used.
© 2015 Current Works, Inc.
28
Figure 4-24. Save Business Rules
Special Note: With one exception, if you choose not to Save your changes, the new
settings will be active during this session, but will not be active the next time this
Configuration is used.
This does not apply to Quorum Rules. If you modify the Minimum Number of Voters after
starting RollCall-Pro, you must:
1. Save the configuration file,
2. Exit RollCall-Pro, then
3. Re-launch RollCall-Pro.
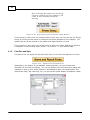
4.3
Agenda - Preload Before Meeting
You can enter a complete list of Agenda Items into the RollCall-Pro system before the
meeting starts. While this is optional, doing so allows you to easily navigate forward and
backward (skipping or jumping around) the agenda, to quickly and easily amend existing
resolutions or even to insert new ones, to revisit an item, and to display the details
behind an item to the Board or Council on the RollCall-Pro main screen.
Click on the Tab “Agenda” on the right side of the screen to view the Agenda input page:
© 2015 Current Works, Inc.
Setting Custom Configurations
29
Figure 4-25. Agenda input page
The “Short Description” (maximum 16 characters) entered in the field at the top of this
page will appear at the bottom left of the Discussion and Voting screens in place of the
standard “Item Number” on the RollCall-Pro main screen.
The “Voting Criteria” for the Item to pass at the top right side of this Agenda page
(including an option for “No Vote Required” if appropriate) will appear at the bottom
right of the RollCall-Pro Discussion and Voting screens.
The Full Description of the Item can also be entered in the large field of this Agenda
page for each Item. This Description can be viewed in the meeting by clicking on the
centered label ("Discuss Resolution 123") at the bottom of the Discussion and Voting
screens. This process will be explained in more detail in the Operator's Manual.
To enter a new Agenda, start by Loading an existing Agenda. Initially, you can use the
“Sample Agenda”.
© 2015 Current Works, Inc.
30
Figure 4-26. Load Agenda - Selection Screen
The contents for each Agenda Item can be typed directly or cut and pasted from another
document.
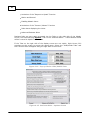
Figure 4-27. Agenda Short Description and Voting Criteria Settings
At a minimum you must enter 1) the Short Description of the Agenda Item and 2) the
Voting Criteria at the top of this page. This Short Description and its Voting Criteria will
appear in the fields at the bottom of the screen during the Discussion and the Voting of
this Item. This information will also be used to record the Discussion info and the Voting
Results in the Results document.
The Description can only be a maximum of 16 characters in length. The Voting Criteria can
be one of five options. The most common criteria for deciding if an Item passes is the
“Majority Vote”. In this case if more than 50% of the members present and voting say
"Yes" on the Item, it passes. The 2/3 and 3/4 Voting criteria require that at least 2/3 or
3/4 of the members present and voting say "Yes" on the Item for it to pass.
If “No Vote Required” is the selected criteria, when the Discussion of the Item is
completed, the Agenda will move directly to the next Item, without a vote taking place.
If the vote on an Item requires some minimal number of Yes votes to pass, no matter how
many members are present and voting (e.g. the Item requires 2/3 of the full Board to pass
– 14 out of 20 Board Members), the “Custom Yes Vote” option can be selected and the
number 14 entered in the “Yes” Votes Needed box.
The detailed text of the Agenda Item is optional. If you want to be able to display the
details of the Item to the Board/Council Members or to the public, it can be typed or
© 2015 Current Works, Inc.
Setting Custom Configurations
31
copied into this Agenda page. In this case, when the Full Description is to be displayed,
the Leader/Clerk simply double -c lic ks on the "Discuss Resolution 123" label at the center
bottom of the Discussion or Voting screen:
Figure 4-28. Agenda Full Description Displayed During Meeting
Double -c lic king on this label will close this detail and return the program either to the
Discussion or Voting phase for that item.
No te : If the Board or Council wishes to edit the Full Description of the Item to reflect the
changes that are under discussion, the Clerk will need to access and edit this Full
Description using the Agenda tab features, not the navigation menu being used to move
forward and backward in the agenda.
When the new Agenda has been entered, it needs to be Saved with an appropriate name,
which is usually the name and date of the meeting. This full agenda can also be printed
out for the record, especially if it was revised during the meeting.
More details on using the Agenda Function during the meeting are provided in the
Operator’s Manual.
5
Additional Menu Items
When you “ right m ouse -c lic k” on the RollCall-Pro screen, you get a pop-up window of
several options. So far we have discussed the "Hide/Unhide Tabs” function. In this
section we will describe the other functions that are also available in this pop-up window:
© 2015 Current Works, Inc.
32
5.1
Display Timer
This function is intended to provide a visual timer to manage the time limit on public input
from individuals to the Board. It can be used any time the Board wishes to set a time limit
on a speaker. To display the timer, right-click on the RollCall-Pro Display Screen and
select "Display Timer" from the menu:
Figure 5-1. Display Timer Option
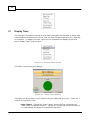
The Public Timer screen then displays:
Figure 5-2. Public Timer Display
Time limits can be set from 1 to 15 minutes using the sliding bar on-screen. There are 3
controls for the Public Timer:
1. Start / Reset - Clicking the "Start / Reset" button the first time begins the
Public Timer countdown sequence. Clicking it a second time resets the timer to
its initial setting and begins the countdown sequence.
© 2015 Current Works, Inc.
Additional Menu Items
33
2. Pause / Resume - Clicking the "Pause / Resume" button the first time stops or
pauses the timer. Clicking it a second time resumes the countdown sequence
from the value where it was paused.
3. Close Timer - Closes the Public Timer Display and returns to the RollCall-Pro
Display Screen.
5.2
Print Screen
This function allows the Leader/Clerk to print a copy of the screen at any point in time
during the meeting.
No te : A printer needs to be attached to the computer for this function to work.
This copy of the screen can be helpful in cases where the Clerk or the Board wants to
document the information displayed on the screen.
For instance: If there is a queue of Members who have “Requested to Speak” on an
Agenda Item, when an Amendment to the Item is proposed, the Clerk might want to
capture the order of this Queue before the discussion on the Amendment proceeds. This
printed copy of the queue would allow the Chairperson to follow the previous order of
Speakers when they resume conversation of the Amended Item.
Simply “ Le ft -Clic k” on the “Print Screen” option to print out a hard copy of the current
screen on the computer.
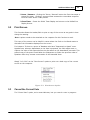
Figure 5-3. Print Screen Option
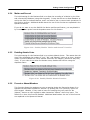
5.3
Cancel the Current Vote
The “Cancel Vote” option, as its name indicates, lets you cancel a vote in progress:
© 2015 Current Works, Inc.
34
Figure 5-4. Cancel Vote Option
The “Cancel Vote” option only works in the middle of a voting session before all the votes
are locked in/confirmed and disclosed. Left Click on the “Cancel Vote” menu item, and
then the system will ask you to confirm your cancellation:
Figure 5-5. Are you sure?
For example, if you are voting on “Item 5”, and after the voting has started, but not been
completed, you might wish to cancel the vote for some reason, e.g., the Criteria to Pass
is incorrect. To cancel the vote, simply right click on the screen and select the “Cancel
Vote” menu item, then click "Yes" in the pop-up confirmation window (above). The voting
session will return to the Discussion of Item 5.
5.4
Withdraw Motion
The “Withdraw Motion” option lets you remove a Motion that has been recorded onscreen:
Figure 5-6. Withdraw Motion Option
When a Motion is withdrawn (or dies due to a lack of a Second), the Clerk uses this
option to return to Discussion on an agenda item with no Motion on the table. Additional
details about the use of this function are explained in the Operator’s Manual.
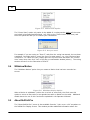
5.5
About RollCall-Pro
The “About RollCall-Pro” screen is also available from the “ right m ouse -c lic k” anywhere on
the RollCall-Pro Display Screen. This window provides additional information about the
© 2015 Current Works, Inc.
Additional Menu Items
35
installed version of RollCall-Pro System that you have:
Figure 5-7. Accessing About RollCall-Pro
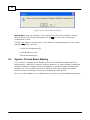
The following figure shows the RollCall-Pro Premium System “About RollCall-Pro" box:
Figure 5-8. About RollCall-Pro Box for Version 3.2
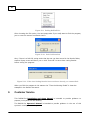
5.6
Exiting RollCall-Pro
When you are finished working with the RollCall-Pro System you can exit the program from
the same pop-up “ right -m ouse c lic k” window. This method of exiting the program provides
some protections from accidental closure and from closing before Voting Results are
saved.
© 2015 Current Works, Inc.
36
Figure 5-9. Exiting RollCall-Pro
After choosing the Exit option, the next popup asks if you really want to Exit the program,
just in case this was an accidental choice:
Figure 5-10. Exit Confirmation
Also, if there is a Roll Call voting result that has not yet been saved in the Results folder,
another Popup screen will direct you to click “Proceed” to save these voting Results
before exiting the program:
Figure 5-11. If the Last Voting Results have not been Saved, you cannot Exit.
When you Exit the program in this manner the “Time the Meeting Ended” is time also
stamped in the Results document.
6
Customer Service
This RollCall-Pro Installation and Setup Manual is intended to provide guidance to
prepare your system for the meeting.
The RollCall-Pro Operator’s Manual is intended to provide guidance in the use of this
system in running the meeting.
© 2015 Current Works, Inc.
Customer Service
37
The SideKeys User’s Manual is intended to provide guidance in the use of the wireless
keypads in this system.
If you need additional assistance in the use of these tools, please contact us.
Current Works, Inc.
1395 Horizon Drive
Johnsburg, IL 60051
888-526-1200
Email: [email protected]
Website: www.rollcallpro.com
Customer Service available Monday-Friday 8:30am – 4:30pm Central Time.
© 2015 Current Works, Inc.
Index
Installation, Software
6
Installation, Typical
13
Index
-M-
-AAbout RollCall-Pro
34
Abstain Votes
25
Additional Menu Items
31
Adjusting Presence/Absence
25
Advanced Business Rules
26
Agenda
28
Auto Print
19
Auto Save
19
-BBusiness Rules
39
21
Members, Number of 17
Minimum Number of Voters
26
Motion, Confirm with Dialog
26
Motion, Enable/Disable
25
Motion, Withdraw
34
-NName Assignments
17
Nomenclature
19
Number of Members
17
Number of Minutes, Timer
26
Number of Voters, Minimum
26
-C-
-P-
Cancel the Current Vote
33
Custom Configurations, Saving
Custom Configurations, Setting
Customer Service
36
Present or Absent Members
25
Print Screen
33
Public Timer
32
Public Timer, Default Number of Minutes
21
15
-D-
-R-
Display Timer
32
Displaying Voting Results
Record Results
19
Request to Speak
24
Results
19
Results, Display Options
26
RollCall-Pro, Exiting
35
RollCall-Pro, Starting
13
26
-EEnabling Abstain Votes
25
Exiting RollCall-Pro
35
-FFirst Voting Position
Font Size and Style
23
20
-IInitial Voting Criteria
Installation, General
© 2015 Current Works, Inc.
23
5
-SSave Changes
27
Save Custom Configuration
21
Second
25
Second, Confirm with Dialog
26
Setting Custom Configurations
15
Speaker Queue
24
Speaker Timer
32
Starting RollCall-Pro
13
System Hardware
12
26
40
RollCall-Pro Installation and Setup Manual
System Requirements
System Software
6
5
-TText Size and Style
Timer
32
20
-VVoting Criteria, Initial
23
Voting, Cancel the Current Vote
33
Voting, First Voting Position
23
-WWithdraw Motion
34
© 2015 Current Works, Inc.