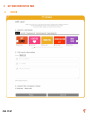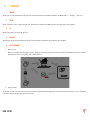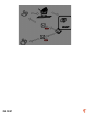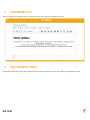
1
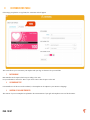
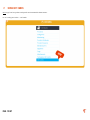
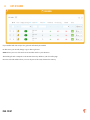
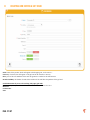
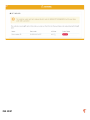
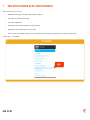
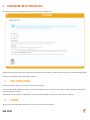
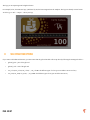
GIFT CARD USER MANUAL
V1.0.0
BY
[Timactive]
Page : 1/47
Contents
I TRANSLATOR AUTHOR.............................................................................................................................................................5
II OVERVIEW........................................................................................................................................................................5
III QUESTIONS AND TECHNICAL PROBLEMS...........................................................................................................................5
1 BY EMAIL..................................................................................................................................................................................................5
2 ONLINE SUPPORT..........................................................................................................................................................................................5
IV INSTALLATION GUIDE.......................................................................................................................................................6
1 SYSTEM REQUIREMENTS...........................................................................................................................................................................6
2 INSTALLATION...........................................................................................................................................................................................6
3 USE OF CUSTOMIZABLE TEMPLATES..........................................................................................................................................................8
A BENEFITS...............................................................................................................................................................................................................8
B SYSTEM REQUIREMENTS FOR IMAGICK.....................................................................................................................................................................8
4 AUTOMATIC CONFIGURATION OF TEMPLATES AND GIFT CARDS..................................................................................................................9
A VERIFICATION OF SYSTEM REQUIREMENTS............................................................................................................................................................9
B INSTALLATION OF THE IMAGICK EXTENSION........................................................................................................................................................10
1 INSTALLATION OF IMAGICK ON A SHARED HOSTING SERVICE.......................................................................................10
2 INSTALLATION OF IMAGICK ON A DEDICATED SERVER......................................................................................... 10
3 ENSURING THAT THE IMAGICK EXTENSION IS PROPERLY INSTALLED................................................................10
5 INSTALLATION READY TO USE.................................................................................................................................................................11
A INFORMATION......................................................................................................................................................................................................11
V USER GUIDE....................................................................................................................................................................12
1 USING TEMPLATES..................................................................................................................................................................................12
A LIST OF TEMPLATES.............................................................................................................................................................................................12
4 THIS SCREEN LISTS THE TEMPLATES WITH THE DETAILS OF EACH ONE...........................................................12
B ADD A TEMPLATE.......................................................................................................................................................................................................13
C CUSTOMIZATION TABLE.......................................................................................................................................................................................14
1 VARIABLE ELEMENTS.................................................................................................................................................. 14
2 CUSTOMIZABLE TEXT.................................................................................................................................................. 14
3 CREATION OF YOUR OWN TEMPLATES.................................................................................................................... 14
2 USING GIFT CARDS...................................................................................................................................................................................15
A LIST OF CARDS.....................................................................................................................................................................................................16
B CREATING AND EDITING A GIFT CARD...................................................................................................................................................................17
Page : 2/47
3 GIFT CARD FRONT OFFICE PAGE...............................................................................................................................................................18
A SCREEN................................................................................................................................................................................................................18
B TEMPLATE...........................................................................................................................................................................................................18
1 AMOUNT:....................................................................................................................................................................... 19
2 FROM:............................................................................................................................................................................ 19
3 TO:.................................................................................................................................................................................. 19
4 MESSAGE:......................................................................................................................................................................... 19
5 RECEPTION MODE:............................................................................................................................................................. 19
C CONFIGURATION OF TEXT.....................................................................................................................................................................................21
D HEIGHT AND WIDTH OF IMAGES............................................................................................................................................................................21
E SEO & URL............................................................................................................................................................................................................22
F CUSTOMIZE THE LABELS IN THE SHOPPING CART.................................................................................................................................................23
4 PDF.........................................................................................................................................................................................................25
A FIELDS.................................................................................................................................................................................................................25
1 PREFIX........................................................................................................................................................................... 25
2
PDF
CONTENT................................................................................................................................................................ 25
3
ORDER INFORMATION.......................................................................................................................................................... 25
4 WIDTH AND HEIGHT OF IMAGE......................................................................................................................................... 26
5 SAVE AND PREVIEW.................................................................................................................................................... 26
5 EMAIL.....................................................................................................................................................................................................27
A DELIVERY METHOD..............................................................................................................................................................................................27
1 OPTION: PRINT AT HOME............................................................................................................................................ 27
2 OPTION: SEND BY EMAIL............................................................................................................................................ 27
B CUSTOMIZATION OF ELEMENTS............................................................................................................................................................................27
C CUSTOMIZATION OF CONTENT..............................................................................................................................................................................27
3 ORDER INFORMATION.......................................................................................................................................................... 28
6 BACK OFFICE ADMINISTRATION ..............................................................................................................................................................29
A RECEIPT OF A GIFT CARD ORDER..........................................................................................................................................................................29
1 ORDER AWAITING PAYMENT (CHECK, WIRE TRANSFER)......................................................................................29
2 ORDER WITH ACCEPTED PAYMENT.......................................................................................................................... 30
3 CANCELED ORDER ..................................................................................................................................................... 30
4 USED CARD.................................................................................................................................................................. 31
5 USED CARD WHOSE ORDER HAS BEEN CANCELED...............................................................................................31
B RECEIPT OF ORDER PLACED WITH A GIFT CARD....................................................................................................................................................32
1 VALID ORDERS............................................................................................................................................................. 32
2 INVALID ORDERS......................................................................................................................................................... 32
Page : 3/47
7 BACK OFFICE OVERVIEW OF GIFT CARDS PURCHASED.............................................................................................................................33
8 PLANNING FOR GIFT CARD DELIVERY.......................................................................................................................................................35
A FIRST VISITOR LAUNCH........................................................................................................................................................................................35
B CRONTAB.............................................................................................................................................................................................................35
9 CUSTOMIZATION OF YOUR GIFT CARD TEMPLATES...................................................................................................................................37
A DOWNLOADING AND INSTALLING INKSCAPE SOFTWARE.......................................................................................................................................37
B USING AN EXISTING TEMPLATE............................................................................................................................................................................37
C SIMPLE MODIFICATION OF TEMPLATE WITH LOGO INTEGRATION..........................................................................................................................37
3 IMPORTING YOUR LOGO....................................................................................................................................................... 37
D SELECTING YOUR OPTIONS.............................................................................................................................................................................................38
1 ADDITIONAL TEXT........................................................................................................................................................ 39
2 TESTING........................................................................................................................................................................... 40
Page : 4/47
I
OVERVIEW
This document is intended to help you install and set up the Gift Card module.
The gift card solution for your Pretashop boutique.
This document will guide you through the installation and usage of the module.
II QUESTIONS AND TECHNICAL PROBLEMS
1
BY EMAIL
For email support, send an email to [email protected], including the name of the module and your purchase order number.
2
ONLINE SUPPORT
If you want to get back to work quickly, your best option for getting help with your questions and technical problems is to visit our online
support center : http://support.timactive.com/projects/carte-cadeau
The first time you visit the online support center, you will have to create an account:
Page : 5/47
To begin an inquiry, select the ‘New Issue’ tab :
Page : 6/47
III INSTALLATION GUIDE
1
SYSTEM REQUIREMENTS
•
•
2
Your version of Pretashop must be >= 1.5
You have the Gift Card module
INSTALLATION
1. First, visit the Back Office (administration page) of Prestashop http://www.myshop.com/admin***/
2. Click the ‘Modules’ tab:
3. Choose ‘Add a new module’, Click on the 'Choose a file' button :
The form in this section enables you to upload the archive file of the module, as downloaded from Addons. You can either
upload a zip file, or a tar.gz one (tarball). The form is straightforward: simply browse to the module's file that you
downloaded, and click the "Upload this module" button. Do not point to the module's uncompressed folder or any of its
unpacked files: only the archive file!
Once you have clicked the button, PrestaShop will upload the module from your computer to its server, unpack it, place the
files in the correct location, and update the page, all within a few seconds. PrestaShop will then display "Module
downloaded successfully".
Modules are not installed by default: you still have to click the module's "Install" button, and then possibly configure its
settings.
Once configuration is complete, be sure to test the module immediately to confirm that it works as planned.
http://doc.prestashop.com/display/PS16/Modules+and+Themes+Catalog#ModulesandThemesCatalogInstallingusingthededicatedform
Page : 7/47
Once uploaded, the module will appear in the tab ‘Prices and Promotion’
4. Click on the ‘Install’ button.
The module has now been successfully installed.
Page : 8/47
3
INFO
USE OF CUSTOMIZABLE TEMPLATES
This feature is not required to use the module. Free and popular PHP Imagick library must be present on your server.
Before continuing with the installation, this section explains the usage of vector images. We will use the phrase “customizable gift card
templates” throughout the rest of the document.
The gift card module can work with SVG images. SVG is a format of vector images. Vector images can be resized without loss of image
quality.
The use of vector images opens up many possibilities within the gift card module. The use of this type of image allows you to customize your
gift card templates in many different ways (text in different languages, color, promotional codes, price…).
Below is the administrative form which allows you to see in detail the different possibilities:
A
BENEFITS
The clients receive gift cards customized according to their selections made while purchasing, discount code, price.
The manager of your boutique can customize the gift card according to the language the user speaks.
To make things easier, the module integrates ready-to-use templates that you just have to modify to incorporate your corporate logo/colors.
Page : 9/47
B
SYSTEM REQUIREMENTS FOR IMAGICK
The usage of customizable templates requires the Imagick extension, a free and popular PHP extension.
To find out if this extension is already installed on your server, go to the Gift Card module configuration of the module.
Click on the ‘Configure’ link which corresponds to Gift Card.
4
A
AUTOMATIC CONFIGURATION OF TEMPLATES AND GIFT CARDS
VERIFICATION OF SYSTEM REQUIREMENTS
If you would like to use customizable templates, you must install the Imagick extension on your system.
On the configuration page, scroll to the bottom of the page until you see this blue box :
Page : 10/47
The extension is installed : if you see the message ‘Imagick is installed you can use generic template'
Page : 11/47
B
INSTALLATION OF THE IMAGICK EXTENSION
This section is only for those who wish to use customizable templates and whose systems do not already have the Imagick extension installed.
If you are not comfortable with the installation, please ask your Webmaster or reach out to our support team.
1
INSTALLATION OF IMAGICK ON A SHARED HOSTING SERVICE
Logically, this extension should already be installed, as a large majority of CMS use this extension. However, if that is not the case, send a
quick request to your host.
Example of an email to send to your host.
Hello
Our site requires the native PHP extension Imagick, could you include this in our hosting service?
Thank you.
2
INSTALLATION OF IMAGICK ON A DEDICATED SERVER
This section provides a list of Linux commands to install Imagick according to the type of server. Imagick is used very frequently, so you can
also find many installation guides on the internet.
These steps should be followed very carefully; if you are not experienced with Linux, ask a more experienced user for help or reach out to our
support team.
First step: connect to your server via SSH
•
For CENTOS servers
Execute the command: yum install php-pecl-imagick.x86_64
If this command does not work, follow the steps below:
1: yum install php-pear gcc
2: yum install ImageMagick ImageMagick-devel ImageMagick-perl
3: pecl install imagick
4: echo extension=imagick.so >> /etc/php.ini
5: service httpd restart
•
For DEBIAN or UBUNTU servers
1. apt-get -y install php5-imagick
Page : 12/47
3
ENSURING THAT THE IMAGICK EXTENSION IS PROPERLY INSTALLED
On the configuration page, scroll to the bottom of the page.
You should now see the message below:
Page : 13/47
5
INSTALLATION READY TO USE
A
INFORMATION
This action automatically creates templates and gift cards 10,30,50,100,150.
The process can take several minutes.
Page : 14/47
IV USER GUIDE
1
USING TEMPLATES
Go to ‘Catalog’ and select -> ‘Templates Gift Cards’
Page : 15/47
A
LIST OF TEMPLATES
THIS SCREEN LISTS THE TEMPLATES WITH THE DETAILS OF EACH ONE
On this screen you can add, modify, copy, or delete a template.
Status tells you if the template is active and thus visible to your clients.
Default: you must have a default template ; this will be used to generate the thumbnails of your products and will be pre-selected in the list of
templates listed on the Gift Card front office page.
B
ADD A TEMPLATE
Click the ‘Add new’ button.
Page : 16/47
Information :
Name: this will be displayed on the Gift Card front office page
Tags: displayed on the front office page ; your customers will be able to select a template based on the occasion : ‘birthday, Valentine’s Day…’
Language: if selected, the design will be displayed in the language of the customer; if not, then in whichever language you use
Image :
This is the image of your gift card. You have two choices: upload a vector graphic in SVG format, in which case the template will considered
customizable (and a new tab will appear), or upload a JPEG, in which case the template will not be customizable.
Page : 17/47
C
CUSTOMIZATION TABLE
If the image you upload is in .svg format, the ‘Customize’ tab will appear.
This screen allows you to customize your template with your logo or whatever else you would like.
1
DATA VARIABLE
Data Variables are the aspects which vary according to the order.
For your information: enter 0 for ‘Price’ if you do not want to show the price on the card.
2
CUSTOMIZABLE TEXT
Customizable text: all the text can be translated, so the template can be adapted to your customer’s language.
3
CREATION OF YOUR OWN TEMPLATES
The creation of your own templates is explained in the 'Customization of your gift card templates' section of this document.
Page : 18/47
2
USING GIFT CARDS
Note: A gift card is a product with specific and customizable characteristics.
Go to ‘Catalog’ and select-> ‘Gift Cards’
Page : 19/47
A
LIST OF CARDS
If you installed and click ready-to-use, gift cards will already be installed.
On this screen, you can add, change, copy or delete a gift card.
Status allows you to see if the card is active and thus visible to your customers.
The default gift card: corresponds to the amount selected by default on your front office page.
Note: the Gift Card module allows you to set the price of the cards, whatever the currency.
Page : 20/47
B
CREATING AND EDITING A GIFT CARD
Name: name of the product, which will appear in the shopping cart, on the invoice…
Currency: if selected, this will appear on the gift card in the customer’s currency
Price: price of the card. Purchase of the card will generate a voucher for the same amount.
Period of Validity: the duration for which the voucher will be valid after the purchase of the gift card.
Useful information if you are also working with paper gift cards
Quantity: the quantity available. Gift cards can be ordered even if the stock is at 0.
Reference:
Code EAN13:
UPC:
Page : 21/47
3
A
GIFT CARD FRONT OFFICE PAGE
SCREEN
Page : 22/47
B
TEMPLATE
1
AMOUNT:
Allows you to select the amount of the gift card. The amount selected by default is defined in the Back-Office → Catalog → Gift Card
2
FROM:
Name of the person who is giving the gift card. This name will appear in the PDF as well as the email sent to the recipient.
3
TO:
Name of the person receiving the gift card.
4
MESSAGE:
The message which will accompany the gift card. This message will appear in the email as well as the PDF.
5
1.
RECEPTION MODE:
Print at home
Below is a diagram summarizing the process. Only the sender of the gift card receives the email containing the gift card; he can then
print either the email or the pdf in order to hand-deliver it.
2.
Send by email
On the delivery date, an email will be sent to the recipient with his personalized gift card. An email notification will also be sent to the sender
to let him know that the gift card has been delivered.
Page : 23/47
Page : 24/47
C
CONFIGURATION OF TEXT
You can change the text during the setup of the module. See the ‘Front office and configuration’ section.
D
HEIGHT AND WIDTH OF IMAGES
The height and width of the images can be adjusted during the setup of the module. See the ‘Front office and configuration’ section.
Page : 25/47
If you adjust the height and width of the images, you will have to regenerate the images for modifying each of the templates.
Page : 26/47
E
SEO & URLS
Add the necessary information for SEO.
Go to the ‘SEO & URLs’ tab in your Back Office
Click on the ‘Add New’ button.
Select the page ‘giftcard – choicegiftcard’ as shown in the example below :
Page : 27/47
F
CUSTOMIZE THE LABELS IN THE SHOPPING CART
You can change the labels during the setup of the module. See the ‘Front office and configuration’ section.
Page : 28/47
These labels are visible in the shopping cart, the order, and the invoice, as shown below:
The content within the box has been personalized by the customer.
Page : 29/47
4
PDF
The PDF is sent by email to the customer and to the gift card recipient. You can view and print the PDF by visiting the order in the Back
Office.
The gift card module allows you to customize the PDF in simple HTML format and preview the result.
The PDF can be customized during the setup of the module. See the section ‘PDF.’
Page : 30/47
A
FIELDS
1
PREFIX
Prefix of the name of the PDF file.
2
PDF CONTENT
The content in simple HTML format which will be generated in PDF format.
3
ORDER INFORMATION
These will be filled in by the information provided during the order.
{$card_from} : ‘From’ name entered during gift card purchase
{$card_lastname} : 'Recipient' name of recipient entered during gift card purchase
{$card_price} : amount of the gift card
{$card_code} : discount code generated during purchase
{$card_message} : message entered during purchase
{$card_expirate} : expiration date of the gift card
{$card_image} : image corresponding to the template selected during purchase
{$shop_name} : name of boutique
{$shop_link} : link to your boutique
{$width_logo} : width of boutique logo (in pixels)
{$height_logo} : height of logo (in pixels)
{$logo_path} : URL of logo image
4
WIDTH AND HEIGHT OF IMAGE
Use this to integrate the image into your PDF
5
SAVE AND PREVIEW
Allows you to save the completed form and see a preview in your previously selected language.
Page : 31/47
5
EMAIL
A
RECEPTION MODE
The customer selects the reception mode during purchase
1
OPTION: PRINT AT HOME
giftcardprintathome.html: an email with information about the gift card purchase. Only the customer will receive this email.
2
OPTION: SEND BY EMAIL
giftcardsend_recipient.html: an email with the gift card information. Only the recipient will receive this email.
giftcardsend_notifcustomer.html: an email notification that the gift card has been sent to the recipient. Only the customer will receive this
email.
B
CUSTOMIZATION OF ELEMENTS
These elements can be modified in module configuration. See section ‘Email’
Page : 32/47
C
CUSTOMIZATION OF CONTENT
You can customize the content of the emails using the Prestashop translation tool: Localization → Translations.
Next => Go to ‘Emails for the Gift Card module'.
3
INFORMATION
{$giftcard_from} : 'From’ name entered during gift card purchase
{$giftcard_lastname} : 'Recipient' name of recipient entered during gift card purchase
{$giftcard_price} : amount of the gift card
{$giftcard_code} : discount code generated during purchase
{$giftcard_message} : message entered during purchase
{$giftcard_image} : URL of the image corresponding to the template selected during purchase
{$firstname} : customer’s first name
{$lastname} : customer’s last name
Page : 33/47
6
BACK OFFICE ADMINISTRATION
The gift card module allows you to view and manage gift card orders by accessing the Back Office. Find the ‘Orders’ tab in order to view gift
card orders that have been placed.
This section addresses the management of:
•
an order including one or more gift cards
•
an order placed using a gift card as payment
A
RECEIPT OF A GIFT CARD ORDER
If an order contains one or more gift cards, you will see ‘Gift Card Purchased’ information block.
This information block allows you to:
•
Preview and print the PDF
•
Cancel a gift card
•
View the details, code, and amount of discount voucher
•
View the status of the gift card (used or unused), and, for used cards, view the order for which the voucher was used
Page : 34/47
Different cases are possible on this screen:
1
ORDER AWAITING PAYMENT (CHECK, WIRE TRANSFER)
The email is not sent and the voucher for the order is not generated
2
ORDER WITH ACCEPTED PAYMENT
The code is generated and the email is sent
3
CANCELED ORDER
A message indicates the gift card should be canceled
Page : 35/47
Canceling a gift card
Activating a previously canceled gift card.
Page : 36/47
4
USED CARD
A message indicates the gift card has been used in order #11. You can consult the associated order.
5
USED CARD WHOSE ORDER HAS BEEN CANCELED
The gift card was used before the card could be canceled.
Page : 37/47
Page : 38/47
B
RECEIPT OF ORDER PLACED WITH A GIFT CARD
This screen allows you to:
•
Consult the order associated with a gift card
•
Receive an alert if the order associated with the gift card is invalid (canceled, reimbursed)
Different possible cases:
1
VALID ORDERS
2
INVALID ORDERS
Page : 39/47
Page : 40/47
7
BACK OFFICE OVERVIEW OF GIFT CARDS PURCHASED
This screen allows you to access:
•
Information about gift cards purchased (amount, template)
•
The orders associated with the cards
•
The status of purchases
•
Information about the personalization of the gift cards
•
Reception modes: Print at home, Send by email
•
The record of actions taken: emails sent or actions taken by your employees (cancellation or activation of gift cards)
‘Orders’ tab → ‘Gift Cards’
Page : 41/47
8
PLANIFICATION FOR GIFT CARD DELIVERY
This can be modified in the configuration of the module. See section ‘Planification’
The gift card module must verify daily which gift cards should be sent according to the delivery date selected by the customer during purchase.
A script is executed daily. The module offers two options :
A
FIRST VISITOR LAUNCH
It is the first visitor of the day, or can also be a crawler (Google, Bing,…)
Technically: the module attaches to hookFooter, and when the first visitor goes on your site, the module is notified. The gift card module will
verify the gift cards to be sent.
The problem with this method is its dependence on site visits, and the inability to plan an exact date and time of delivery.
B
CRONTAB
This is the recommended method, which allows you to select the exact time of delivery.
Page : 42/47
Contact your Webmaster or host so they can put in place the line indicated in bold on the module configuration page.
For example, the line to use in crontab for the site prestashopdemo.timactive.com is:
30 4 * * * curl http://prestashopdemo.timactive.com/modules/giftcard/cron.php&token= PVUNZXE23JRKFS6QI4L8
Page : 43/47
9
INKSCAPE CUSTOMIZATION OF YOUR GIFT CARD TEMPLATES
Further information about customization…
This section shows you how to customize a gift card template based on an existing template.
Note: dimensions of a gift card—height: 300 px, width: 191 px. Dimensions of reference used for example for credit cards.
The software used in this tutorial is inkspace, the recommended free software for creating vector images.
A
DOWNLOADING AND INSTALLING INKSCAPE SOFTWARE
http://www.inkscape.org/fr/telechargement/
Launch inkscape.
B
USING AN EXISTING TEMPLATE
Find the list of available templates in the gift card module in datadefault/template/ par exemple 1.svg,2.svg...
In inkscape, File->Open and find the svg file you would like to use as your template.
C
SIMPLE MODIFICATION OF TEMPLATE WITH LOGO INTEGRATION
1
IMPORTING YOUR LOGO
Page : 44/47
The logo you are importing must be high-resolution.
For example, below, the Timactive logo, symbolized by TA, has been integrated into the template. The logo was already in SVG format.
To do this, go to: File → Import →Select your logo
D
SELECTING YOUR OPTIONS
If you want to add additional elements, you must ensure that the gift card module will accept them by following the naming rules below :
•
giftcard_price : price of the gift card
•
giftcard_code : code of the gift card
•
var_color1, var_color2, var_color3,...., var_color10 : the different types of colors (you can define at most 10 colors)
•
var_text1, var_text2, var_text3,...., var_text10 : the different types of text (you can define at most 10)
Page : 45/47
1
ADDITIONAL TEXT
As indicated above, text options must begin with 'var_text' + a number, i.e. : var_textMYNUMBER, and the number must be less than 10
See below the example of additional text 'Mon texte'
Assign a variable
Right-click on your text, then object properties and in the ‘Id’ box, enter “var_textYOURNUMBER”
Page : 46/47
V
AUTHOR TRANSLATIONS
Flynn Meaney : Published author – New York, official Timactive writer.
Romain De Véra : Timactive Only Slide.
Page : 47/47