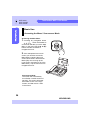
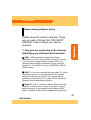
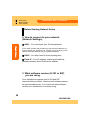
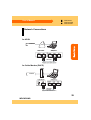
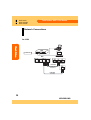
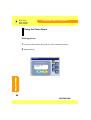
1
User’s Manual
Contents
Introduction
Introduction…………...………..……………..…....…11
Important safety instructions ...………...……….....12
Important safety instructions ………………………………….12
When moving your videophone ………………….…………….14
Product Features …………………..………………..15
Front Features (WVP-2100) …………………………….........15
Front Features (WVP-2100W) ………………….……….........16
Front Features (WVP-2100S) ………………….……….........17
Rear Features …………………………………..………………18
Keypad …………………………………………..………………19
Unpacking your videophone …………………..………………20
Connecting your Videophone ………….…………..21
Basic Connections ……………………………………………..21
Connecting other devices ……………………….…………….23
Basic Use ………………………………….…………..23
Entering Data into Your Phone ………………………………..24
Accessing the Menu / Screensaver Mode …….…………….26
Basic Setup
Before Starting Network Setup …………………….27
Network Connections ……………………………….29
5
WOOKSUNG
TelePhoSee WVP-2100 Series
Contents
H.323 Network Setup ……………..…………………31
for ADSL (dynamic IP type) ….……….………………………31
for ADSL (fixed IP type) ….…………….………………………32
for Cable Modem (DHCP) ……………..…………………..….33
for LAN (public IP type) ………………..………………….…..35
Gatekeeper Setup …………………………………...…………35
SIP Network Setup ………………..…………………36
Basic Network Setup …………………..…………………..….36
Server Setup ………………………………………………..…..38
Advanced Setup …………………………………………..……40
IP Sharing ……………………….………………….…41
Connections …………………………..……………………...…41
Videophone Setup ……………………………….……………..43
Computer Setup ………………………………………….....…44
Checking the Network Setup ………………………46
Basic Use
Making Calls ………………......……………………..47
Making calls over the Internet ………..……………………….47
Making calls over the telephone line (PSTN) …………….….48
Using the REDIAL button …………………………………..….48
Receiving Calls …………………………………...….49
Other Functions …………………………………..….50
Using the SELF-VIEW button ……………….………………..50
Using the VOLUME / MUTE / PRIVACY buttons ……….….52
6
WOOKSUNG
User’s Manual
Contents
Advanced Use
Using the Phonebook ……………….………………53
Accessing the Phonebook ………………..…………………..53
Registering numbers in the Phonebook ……………………..55
Calling from the Phonebook ………………..…………………55
Searching entries …………………………….……….………..55
Using the SPEED DIAL button ……..……………..56
Calling with Speed Dial ……………………..…………………56
Using Call History ……………………....……………57
Calling with Call History …………………….………………...57
Using Auto Answering ……………….…………….58
Recording your greeting message …………..……………….58
Playing your greeting message ……………..………………..58
Enabling / Disabling Auto Answering ………………………..59
Playing your recorded messages …………...………………..60
Recording a Call ……………………….…………….61
Recording the Call …………………………..…………………61
Playing back the recorded call ……………….………………..62
Using the Photo Room ………………..……………63
Taking a photo …………………………………………………..63
Viewing photos ……………………………….…………………64
Labeling photos ……………………………..………………….65
Deleting photos ………………………………………………...66
Transferring photos to your computer ………………………..67
7
WOOKSUNG
TelePhoSee WVP-2100 Series
Contents
Monitoring ………..……………..……………………68
Setting monitoring ………….…………………………………..68
Using Monitoring ………..………………………………………69
External Camera Control …….……………………..70
Connecting an external camera ….……………………………70
Remote camera control ………………………………………..71
Local camera control …………………………………………..72
Sending a Quality Still Image …..………………….73
Using the OSD during a Call …..…………………..75
Serial Communication …………..……………….....76
Advanced Setup
Other Network Configurations …………….………78
User ID ……………………………………………….………...78
Max Bandwidth …………………………………………………78
Call Forwarding …………………………………………………79
Codecs ………………………………………..……….80
Video Codec …………………………………………………….80
Resolution …………………………………………….…………80
Video Quality …………………………………………..………..81
Audio Codec ………………………………………….…………81
8
WOOKSUNG
User’s Manual
Contents
Display Options ………………………..…………….82
Language ……………………………………..…………………82
Date & Time ……………………………………………………..82
Self View ……………………………………..…………………83
OSD View …………………………………….………………..83
Clock ……………………………………..…………….84
Time server setup …………………………….………………..84
Alarm ………………………………………….…………………85
Bell ……………………………………….…………….86
Main Volume ……………….…………………………………..86
Bell Volume ……………..……………………………………..86
Bell …………………………..…………………………………..86
A/V Input & Output …………………………………..87
Video Input ………………………..……………………………87
Video Output ……………………………………………………87
Audio Input ………………………………………………………87
Audio Output ……………………….……………………………87
Ext. Camera ………………………..…………………………..87
Signaling ……………………….……………………..88
Fast Start …………………………..…………………………...88
Tunneling ………………………….……………………………88
GRQ …………………………………………………………….88
DTMF Type ………………………..……………………………89
TCP Port …………………………….…………………………..89
Precautions …………………….……………………..90
Maintenance …………………..………………………91
9
WOOKSUNG
TelePhoSee WVP-2100 Series
Contents
Appendix
Troubleshooting……………………………………….92
Computer Network Setup
Walkthrough for IP Sharing ……………..…………96
Windows 98 network setup ………………………..…………..97
Windows XP network setup …………………………………..100
Product Specifications …………………….………103
Contact Us …………………………………..……….104
Warranty ……………………………………..………105
10
WOOKSUNG
Introduction
Thank you for purchasing the TelePhoSee WVP-2100 Internet Videophone!
The TelePhoSee WVP-2100 connects over the Internet, making cost-free
visual communication possible! The TelePhoSee WVP-2100 connects with
fixed IP, PPPoE ADSL and DHCP Internet access. The TelePhoSee WVP2100 is compliant with the H.323/SIP international standard protocol and is
compatible with any other videophones using the same protocol. Great for
first time users with its simple setup and user-friendly graphics interface. The
TelePhoSee WVP-2100 makes communication a totally new experience!
The future of visual communication is now at your fingertips. Now you can
visually communicate and see your family, friends and business associates
no matter where they are. Business conferences are easy. With a
videophone you can show graphs, pictures, products and demonstrate
features immediately without the time and money cost of travel. With the
TelePhoSee Internet Videophone, you’ll never need to worry about your
phone bill again!
The pages relating to features supported by each of
the WVP-2100 versions are indicated by the code
on the top of each page of this manual.
■ (Supported), □ (Not Supported)
WOOKSUNG
■
□
■
Introduction
User’s Manual
WVP-2100
WVP-2100W
WVP-2100S
11
■
■
■
WVP-2100
WVP-2100W
WVP-2100S
TelePhoSee WVP-2100 Series
Introduction
Important safety instructions
IMPORTANT!
DO NOT OPEN UP THE BASE UNIT
Doing so will render your one (1) year
guarantee invalid and will disavow you of any
customer service privileges. Only a
technician certified by WOOKSUNG should
attempt to open up the unit for customer service.
WOOKSUNG ELECTRONICS will not be held
responsible for any damage or personal injury
due to the misuse of this product.
12
WOOKSUNG
■
■
■
WVP-2100
WVP-2100W
WVP-2100S
Important safety instructions
When using this videophone, the following basic safety precautions
must always be observed to reduce the risk of fire, electric shock, or
personal injury.
Introduction
User’s Manual
1. Read and understand all instructions.
2. Follow all warnings and instructions marked on this videophone.
3. Do not open up the base unit. Failure to comply will result in forfeiture
of product guarantee rights.
4. Unplug this videophone from wall outlets before cleaning. Do not use
liquid or aerosol cleaners. Use a damp and soft cloth for cleaning.
5. Do not use this videophone near water, for example, near a bathtub,
washbowl, kitchen sink, or the like.
6. Install this videophone securely on a stable surface. Serious damage
may result if the unit falls.
7. Do not cover the slots or openings of the videophone, as they are
provided for ventilation and protection against overheating. Never
place this videophone near a radiator, or in a place where proper
ventilation is not provided.
8. Do not place objects on the power cord. Install the videophone where
no one can step on the cord.
9. Use only the power source provided with the unit. If you are not sure of
the type of the power supply of your home, consult your dealer or local
power company.
10. Do not overload wall outlets and extension cords as this can result in
the risk of fire or electric shock.
11. Never spill any liquid on the videophone.
12. During thunderstorms, avoid using this videophone. There may be a
remote risk of electric shock from lightning.
13
WOOKSUNG
■
■
■
WVP-2100
WVP-2100W
WVP-2100S
TelePhoSee WVP-2100 Series
Introduction
Important safety instructions
When moving your videophone
Do not grasp the screen when lifting the phone. Grasp the bottom
or the sides of the base.
When swiveling the display
The LCD display of the WVP-2100 and WVP-2100W is designed to
swivel 175 degrees in each direction. Do not apply excessive force
when swiveling as this may damage the unit.
14
WOOKSUNG
Product Features
Front Features (WVP-2100)
4
1
2
3
WVP-2100
WVP-2100W
WVP-2100S
Introduction
■
□
□
User’s Manual
5
1
Handset
4
CCD Camera
2
Power Light
5
Speakerphone
Microphone
3
TFT Color LCD
15
WOOKSUNG
□
■
□
WVP-2100
WVP-2100W
WVP-2100S
TelePhoSee WVP-2100 Series
Introduction
Product Features
Front Features (WVP-2100W)
4
1
2
3
5
1
Handset
4
CCD Camera
2
Power Light
5
Speakerphone
Microphone
3
TFT Color LCD
16
WOOKSUNG
□
□
■
User’s Manual
Introduction
Product Features
Front Features (WVP-2100S)
1
2
1
Handset
2
Power Light
3
Speakerphone
Microphone
WVP-2100
WVP-2100W
WVP-2100S
3
17
WOOKSUNG
■
■
■
WVP-2100
WVP-2100W
WVP-2100S
TelePhoSee WVP-2100 Series
Introduction
Product Features
Rear Features
3
8
2
9
1
10
4
7
5
6
1
Power Switch
6
External Video Output
2
Power Connector
7
External Video Input
3
RS-232C Serial Port
8
Phone (PSTN) Port
4
External Audio Output
9
LAN Port
5
External Audio Input
10
PC Port
18
WOOKSUNG
■
■
■
User’s Manual
WVP-2100
WVP-2100W
WVP-2100S
Introduction
Product Features
Keypad
Self-View Record/Stop
F1
F2
Play/Stop
F3
5
1
Volume
2
4
Speed Dial
Mute
Privacy
Redial
PSTN
Flash
3
7
SEND
6
1
Function Keys
2
Dial pad
3
Function Keys
▶ Self-View
▶ Speed-dial
▶ Record/Stop
▶ Video Privacy /
Audio Mute
▶ Play/Stop
▶ Redial
▶ Function 1, 2, 3
▶ PSTN
▶ Flash
4
Volume
7
Speakerphone
5
OK and
Navigation
6
Send
19
WOOKSUNG
■
■
■
WVP-2100
WVP-2100W
WVP-2100S
TelePhoSee WVP-2100 Series
Introduction
Product Features
Unpacking your videophone
Before initial use: Please read the IMPORTANT SAFETY
INSTRUCTIONS before use. The following accessories are
included with your phone. Carefully unpack your system and check
the supplied accessories with this list. If something is missing,
please contact your dealer.
① Main Unit
③ Power
Adaptor
(AC 110~220V)
② Handset
④ LAN Cable
(Straight type)
⑤ User’s Manual
20
WOOKSUNG
WVP-2100
WVP-2100W
WVP-2100S
Connecting your Videophone
Basic Connections
1 Connect the handset to the port located on the side of the
videophone.
Introduction
■
■
■
User’s Manual
2 Connect the videophone to your Internet port through the LAN port
on the back of the videophone.
- Use the LAN cable supplied by your Internet service provider
3 Connect the power adaptor to the POWER port. Connect the
power.
Power Adaptor
LAN Cable
21
WOOKSUNG
■
■
■
WVP-2100
WVP-2100W
WVP-2100S
TelePhoSee WVP-2100 Series
Introduction
Connecting your Videophone
Basic Connections
4. Turn the Power Switch to ON. Wait for the chime notifying that the
system has successfully booted up. The LED will light up.
Lights up
22
WOOKSUNG
■
■
■
User’s Manual
WVP-2100
WVP-2100W
WVP-2100S
Introduction
Connecting your Videophone
Connecting other devices
Computer
Power
Internet
VISCA
cable*
PSTN phone
(to use your existing
phone line)
External
Camera
Mic
Speaker
*for optional camera control
23
WOOKSUNG
■
■
□
WVP-2100
WVP-2100W
WVP-2100S
TelePhoSee WVP-2100 Series
Introduction
Basic Use
Entering Data into Your Phone
You can enter numerical or text data into your videophone by using
the onscreen keyboard or the key pad.
Entering data using the touch screen
1 Tap the screen to highlight the field where you want to enter text.
2 Onscreen Multilanguage Keyboard
If
appears in the field, tap
and the onscreen keyboard will
appear. Tap the characters to enter.
3 If
appears on the screen, tap
to make your
selection.
Note
You can use the
key to enter the dot [ . ] in IP addresses
24
WOOKSUNG
■
■
■
User’s Manual
WVP-2100
WVP-2100W
WVP-2100S
Introduction
Basic Use
Entering Data into Your Phone
Entering data without the touch screen
1 Use the
buttons to highlight the field you want to enter
text.
2 If
appears, press the OK button and the onscreen keyboard
will appear. Use the
buttons and OK button to highlight
the characters and enter them.
- You can also use the keypad to enter numbers without the
keyboard, using the
button to delete. Use the
button to enter
the dot [.]in IP addresses.
3 If
appears on the screen, use the
buttons to make
your selection.
The Onscreen Multilanguage Keyboard
Choose the language type of the keyboard from the icons in the
lower right corner of the screen. You can also press the
button
for SHIFT, and the
button for BACKSPACE.
WOOKSUNG
25
□
■
□
WVP-2100
WVP-2100W
WVP-2100S
TelePhoSee WVP-2100 Series
Introduction
Basic Use
Accessing the Menu / Screensaver Mode
Accessing the Main Menu
1.
Pressing any navigation button
when the handset is
on the hook will take you to the Main
Menu. In the menu use the
buttons and the OK button to
navigate the menu.
2. If the videophone has a touch
screen you can also access the
Main Menu by tapping the touch
screen twice when in Screensaver
Mode (Tap once to bring up the
Logo Screen, and twice to go to the
Main Menu). Tap the menu icons to
navigate the menu.
Screensaver Mode
The screen will automatically
turn off after a certain amount of
inactivity. The screen will power
down after 30 sec. in the Logo
Screen, and after 20 min. when
in the menus.
26
WOOKSUNG
User’s Manual
Please read this section carefully. There
are a couple of things that YOU MUST
KNOW in order to setup your phone
properly.
1. How you are connected to the Internet.
(Identifying your Network Environment)
① ADSL - ADSL stands for Asymmetric Digital
Subscriber Line. It's a type of DSL, where you connect
to the Internet through an ADSL modem (NOT your
common dialup modem) connected to your common
phone line. You MUST be using a EXTERNAL PPPoE
ADSL modem.
Basic Setup
Before Starting Network Setup
② DHCP - If you are connected through cable TV, this is
what you're using. You are connected to the Internet
through a cable modem (NOT your common dialup
modem) connected to your TV cable. DHCP stands for
Dynamic Host Configuration Protocol.
③ Fixed IP - This is commonly called LAN (Local Area
Network). If all you have is a jack in the wall or a long
cable slinking up to your desk and no modem (ADSL,
cable, or dialup) in sight, this is probably what you have.
27
WOOKSUNG
■
■
■
WVP-2100
WVP-2100W
WVP-2100S
TelePhoSee WVP-2100 Series
Before Starting Network Setup
2. How to connect to your network.
(Network Settings)
① ADSL - You must know your ID and password.
Basic Setup
If your ADSL provider has provided you with a fixed IP address you
must configure your videophone to ‘Fixed IP (you must know your IP
address, netmask address, and your gateway address).
② DHCP - You don't need to know anything else.
③ Fixed IP - Your IP address, subnet mask address,
gateway address, and a DNS server address.
3. What software version (H.323 or SIP)
you are using
Your videophone supports both H.323 and SIP
communication protocols. However both software cannot
be used simultaneously. You must know what software
version your videophone is currently using.
28
WOOKSUNG
■
■
■
User’s Manual
WVP-2100
WVP-2100W
WVP-2100S
Network Connections
for ADSL
ADSL
ADSL Modem
Videophone
Basic Setup
Internet
LAN Cable
(Supplied with the ADSL modem)
for Cable Modem (DHCP)
Internet
Cable Modem
Videophone
LAN Cable
(Supplied with the cable modem)
29
WOOKSUNG
■
■
■
WVP-2100
WVP-2100W
WVP-2100S
TelePhoSee WVP-2100 Series
Network Connections
for LAN
Basic Setup
Internet
Hub
Videophone
LAN Cable
Computer
(Supplied with the
videophone)
LAN Cable
30
WOOKSUNG
■
■
■
User’s Manual
WVP-2100
WVP-2100W
WVP-2100S
H.323 Network Setup
for ADSL (dynamic IP type)
Connect the Videophone
1 Check that the network cable from the ADSL modem is connected to
- Use the cable provided with the modem.
2 Set the videophone network settings.
Videophone Network Setup
1 Press
3 On the Network Type Menu select
or tap the touch
ADSL as your network type. Select
screen to display the Main Menu.
NEXT.
2 On the Main Menu screen, select
4 Enter your ADSL user name
CONFIGURATION then select
and password. Select NEXT.
NETWORK then NETWORK TYPE
Basic Setup
the LAN port on the videophone.
to go to the Network Type Menu.
ADSL<PPPoE>
Network Type
Network Type
05/04 09:00 AM
User ID
Password
ADSL
05/04 09:00 AM
Previous
Previous
Next
Next
Cancel
Cancel
5 In the Gatekeeper Menu select
NO USE if you are not subscribed
to a Gatekeeper service. Select
NEXT to review your network
settings, and select APPLY to
confirm.
31
WOOKSUNG
■
■
■
WVP-2100
WVP-2100W
WVP-2100S
TelePhoSee WVP-2100 Series
H.323 Network Setup
for ADSL (fixed IP type)
Connect the Videophone
1 Check that the network cable from the ADSL modem is connected to the
LAN port on the videophone.
Basic Setup
- Use the cable provided with the modem.
2 Set the videophone network settings.
Videophone Network Setup
1 Press
or tap the touch
screen to display the Main Menu.
2 On the Main Menu screen, select
CONFIGURATION
then
select
NETWORK then NETWORK TYPE
to go to the Network Type Menu.
Network Type
Network Type
05/04 09:00 AM
4 Enter your IP address, subnet
mask address and gateway
address. Select NEXT.
Fixed IP
IP Addr
05/04 09:00 AM
211.30.78.55
Netmask
255.255.255.0
Gateway
211.30.78.1
Previous
Next
Fixed IP
Cancel
Previous
Next
Cancel
3 On the Network Type Menu
select ADSL as your network type.
Select NEXT.
5 In the Gatekeeper Menu select
NO USE if you are not subscribed
to a Gatekeeper service. Select
NEXT to review your network
settings, and select APPLY to
confirm.
32
WOOKSUNG
■
■
■
User’s Manual
WVP-2100
WVP-2100W
WVP-2100S
H.323 Network Setup
for Cable Modem (DHCP)
Connect the Videophone
1 Check that the network cable from the cable modem is connected to the
- Use the cable provided with the modem.
2 Set the videophone network settings.
Videophone Network Setup
1 Press
4 In the Gatekeeper Menu select
Basic Setup
LAN port on the videophone.
NO USE if you are not subscribed
or tap the touch
screen to display the Main Menu.
to a Gatekeeper service. Select
NEXT to review your network
settings, and select APPLY to
2 On the Main Menu screen, select
confirm.
CONFIGURATION then select
NETWORK then NETWORK TYPE
to go to the Network Type Menu.
Network Type
Network Type
3 On the Network Type Menu
select DHCP as your network type.
05/04 09:00 AM
DHCP
Previous
Next
Select NEXT.
Cancel
33
WOOKSUNG
■
■
■
WVP-2100
WVP-2100W
WVP-2100S
TelePhoSee WVP-2100 Series
H.323 Network Setup
for LAN (public IP type)
Connect the Videophone
1 Check that the network cable from the network hub DOWNLINK port is
connected to the LAN port on the videophone.
Basic Setup
2 Set the videophone network settings.
Fixed IP
Videophone Network Setup
IP Addr
1 Press
or tap the touch
screen to display the Main Menu.
05/04 09:00 AM
211.30.78.55
Netmask
255.255.255.0
Gateway
211.30.78.1
Previous
Next
2 On the Main Menu screen, select
CONFIGURATION then select
NETWORK then NETWORK TYPE
to go to the Network Type Menu.
Network Type
4 Enter your IP address, subnet
mask address and gateway address.
Select NEXT.
3 On the Network Type Menu
select FIXED IP as your network
type. Select NEXT.
Network Type
Cancel
5 In the Gatekeeper Menu select
05/04 09:00 AM
Fixed IP
Previous
NO USE if you are not subscribed
to a Gatekeeper service. Select
NEXT to review your network
settings, and select APPLY to
confirm.
Next
Cancel
34
WOOKSUNG
■
■
■
User’s Manual
WVP-2100
WVP-2100W
WVP-2100S
H.323 Network Setup
A Gatekeeper is a name server that frees you from the burden of
having to enter long Internet addresses. (In the case of ADSL and
DHCP, your address changes every time you use the service,
making it extremely difficult to make calls this way.) Instead, the
Gatekeeper gives an ID (also called an ‘Alias’ or ‘IPN’) to your phone.
All you have to do is connect your phone and you can receive calls
made to your Alias wherever you are. However, to receive
gatekeeper service you must subscribe to a separate service. Please
contact your dealer for more information.
1 Go to the Gatekeeper Menu
through the Network Type setup
or through the GATEKEEPER
icon on the Network Menu.
Gatekeeper
IP Addr
05/04 09:00 AM
211.30.78.55
User ID
TelePhoSee
E.164 No.
54546879
Previous
2 If you are using a Gatekeeper
Next
select USE. Otherwise select NO
USE.
3 Select NEXT to configure your
Gatekeeper.
Basic Setup
Gatekeeper Setup
Cancel
4 Select NEXT to review your
network settings.
Enter the IP address of your
Gatekeeper, your Alias (user ID). You
can also optionally enter an E.164
5 Select APPLY to confirm.
number.
35
WOOKSUNG
■
■
■
WVP-2100
WVP-2100W
WVP-2100S
TelePhoSee WVP-2100 Series
SIP Network Setup
Basic Network Setup
The basic network setup for SIP connections is similar to H.323
setup. You must know what type of network you are using first. Refer
to Before Starting Network Setup (P.27) to see what network you are
using.
Basic Setup
Settings by network type
(Configuration-Network-Network Type)
1 Press
Menu.
or use the touch screen to access the Main
2 Enter the Network Type menu by selecting CONFIGURATIONNETWORK-NETWORK TYPE.
Network
Previous
05/04 09:00 AM
Network Type
Misc.
Server
Advance
IP Share
Network Check
36
WOOKSUNG
■
■
■
User’s Manual
WVP-2100
WVP-2100W
WVP-2100S
SIP Network Setup
Basic Network Setup
4 Select NEXT to enter the network settings.
Selected
Network type
Settings
Fixed IP
Use the keypad to enter the IP, netmask, gateway,
and DNS server addresses.
ADSL
Enter your ADSL ID and password.
DHCP
No further settings are necessary.
Basic Setup
3 Select your network type from Fixed IP, ADSL, and DHCP.
5 Select NEXT to enter the Server setup menu.
Server Configuration
Server
05/04 09:00 AM
Off
Previous
Next
Cancel
37
WOOKSUNG
■
■
■
WVP-2100
WVP-2100W
WVP-2100S
TelePhoSee WVP-2100 Series
SIP Network Setup
Server Setup (Configuration ▶ Network ▶ Server)
About the SIP Proxy server
The SIP Proxy server is used to allocate a simple ID to your
Basic Setup
videophone so that even if your IP address changes, such is the
case with ADSL and DHCP, others will be able to contact you
through your ID. SIP proxy server services are a separate service
which you must subscribe to use.
ServerConfiguration
IP Addr
Port
User ID
Password
Expires
05/04 09:00 AM
proxy.com
5060
Previous
[email protected]
password
Next
3600
Cancel
38
WOOKSUNG
■
■
■
User’s Manual
WVP-2100
WVP-2100W
WVP-2100S
SIP Network Setup
Server Setup (Configuration ▶ Network ▶ Server)
2 Select ON to configure the server. Select NEXT.
Select OFF if you are not subscribed to a SIP service.
3 Enter the SIP server IP address, Server Port, your User ID,
Password, and Expire Time (Expires).
Basic Setup
1 Display the ServerConfiguration menu through the NETWORK
TYPE setup sequence or by selecting the SERVER icon on the
Network menu.
4 Select NEXT to review your settings.
5 Select APPLY to apply your server settings.
ServerConfiguration
Network Type: Fixed IP
IP Addr : 10.1.2.5
NetMask: 255.255.255.0
Gateway : 10.1.1.1
DNS
: 202.30.143.11
Server Configuration: Use
Server Addr: proxy.com
Port: 5060
User: [email protected]
Password: password
05/04 09:00 AM
Previous
Apply
Cancel
Notes: Expired Time
This is the amount of time Proxy server registration is valid, after which the
videophone automatically renews registration. Default is 3600 seconds, but
the time recommended by the Proxy server is usually set.
39
WOOKSUNG
■
■
■
WVP-2100
WVP-2100W
WVP-2100S
TelePhoSee WVP-2100 Series
SIP Network Setup
Advanced Setup
Advanced Setup menu can be accessed through (Configuration ▶
Network ▶ Advance). You can setup DTMF type, FIR protocol, and
Audio PacketTime. Please attempt to change the menu settings
only if you are a professional user.
Basic Setup
DTMF (Inband, RFC2833)
This defines the type of DTMF tone sent when the keypad is
pressed. ‘Inband’ will send the actual DTMF tone, while RFC2833
is an outband protocol which sends the information about which
button was pressed.
FIR (RTCP, RTP, Info)
FIR(Fast Intra-frame Request) setting sets the default protocol
when requesting a full frame of video is the case the video breaks
up during calls.
Audio PacketTime (20ms, 30ms)
Audio PacketTime sets the sending time of the Audio RTP packet.
Advance
05/04 09:00 AM
DTMF Type
Inband
FIR
RTCP
Audio PacketTime
20ms
Apply
Reset
Back
40
WOOKSUNG
■
■
■
User’s Manual
WVP-2100
WVP-2100W
WVP-2100S
IP Sharing
Connections
The IP sharing feature enables TelePhoSee to share an IP with another
computer, or other network equipment. This means that you can connect
your computer to your TelePhoSee and surf the Internet through it without
where Internet access is limited, such as in the home.
Connections for sharing an IP between your videophone and a
computer
1 Using the LAN cable supplied with your videophone, connect the
Basic Setup
needing another IP address assigned to you. This can be particularly helpful
PC port located on the back of the videophone with the computer
LAN port.
2 Set the videophone IP Sharing settings and the computer network
settings accordingly. (Refer to P.41~43)
Internet
ADSL Modem
Videophone
LAN Cable
(Supplied with the ADSL modem)
Computer
LAN Cable
(Supplied with the videophone)
41
WOOKSUNG
■
■
■
WVP-2100
WVP-2100W
WVP-2100S
TelePhoSee WVP-2100 Series
IP Sharing
Connections
Connections for sharing an IP between your videophone and
more than one computer
1 Using the LAN cable supplied with your videophone, connect the
Basic Setup
PC port located on the back of the videophone with the network hub
UPLINK port.
2 Connect the hub DOWNLINK ports with the computers LAN ports.
3 Set the videophone IP Sharing settings and the computer network
settings accordingly. (Refer to P.41~43)
Internet
ADSL Modem
Videophone
LAN Cable
(Supplied with the ADSL modem)
Hub
LAN Cable
Computer
LAN Cable
(Supplied with the videophone)
42
WOOKSUNG
■
■
■
User’s Manual
WVP-2100
WVP-2100W
WVP-2100S
IP Sharing
Videophone Setup
1 Go to the IP Share Menu through the IP SHARE icon on the
Network Menu.
sharing feature.
- Set to NO USE if you are not using IP sharing, and want to use your
videophone as a basic dummy hub.
3 Set the Gateway setting.
- The default factory setting is192.168.2.1
Basic Setup
2 Set the IP Sharing category to USE if you want to use the IP
- If you are using more than one TelePhoSee unit with IP Sharing enabled in
your network, set the gateway setting in each phone to 192.168.2.1,
192.168.3.1, 192.168.4.1, 192.168.5.1….. respectively.
4 Set the Netmask setting.
- The default factory setting is 255.255.255.0.
Unless you know your network very well, we suggest that you do not change
this setting.
5 Select APPLY to apply your settings.
IP Share
05/04 09:00 AM
IP Share
Use
Gateway
192.168.2.1
Netmask
255.255.255.0
Apply
Reset
Back
Continue on next page
for computer settings…
43
WOOKSUNG
■
■
■
WVP-2100
WVP-2100W
WVP-2100S
TelePhoSee WVP-2100 Series
IP Sharing
Computer Setup (refer to appendix for more details)
Basic Setup
1 Go to the network settings in
2 Set the Gateway
your computer, or other network
equipment connected to your
phone. Select ‘TCP/IP’ and click
‘Properties’.
that of the connected phone as
address to
designated in the IP SHARING
menu.
44
WOOKSUNG
User’s Manual
■
■
■
WVP-2100
WVP-2100W
WVP-2100S
IP Sharing
Computer Setup (refer to appendix for more details)
4 Set the DNS address
- When the Gateway address is set to - You must set the appropriate DNS
address in order to log on to Internet
192.168.2.1, you can set the
sites properly. Contact your Internet
connected computers’ IP addresses
service provider for your DNS
to 192.168.2.2 ~ 192.168.2.254. Do
address.
not use the same address for any two
equipment. Likewise, if the Gateway
address is set to 192.168.x.1, set the
connected computers’ IP addresses
Basic Setup
3 Set the IP address.
to 192.168.x.2 ~ 192.168.x.254.
45
WOOKSUNG
■
■
■
WVP-2100
WVP-2100W
WVP-2100S
TelePhoSee WVP-2100 Series
Checking the Network Setup
Configuration ▶ Network ▶ Network Check
After setting up the network you can confirm that your phone is
correctly connected by using Network Check.
Basic Setup
1 Select the NETWORK CHECK icon
on the Network Menu.
2 CONNECTION IS OK will appear if the connection is valid. If not,
the screen will read CONNECTION IS BROKEN.
Network
Previous
Serial Com.
05/04 09:00 AM
접속환경
게이트키퍼
IP Share
Misc.
Signaling
Network Check
Connection is OK
46
WOOKSUNG
■
■
■
User’s Manual
WVP-2100
WVP-2100W
WVP-2100S
Making Calls
Making calls over the Internet
Making calls with TelePhoSee is as
simple as calling with your oldfashioned telephone. The only
difference is that you have to press
the SEND button after dialing.
Call
1 Lift the handset or press the
05/04 09:00 AM
Voice Call
SPEAKERPHONE button.
Video Call
- Calling to an audio-only phone in
VIDEO CALL mode will show only
your Self-View on the display.
Calling to a videophone in SPEECH
CALL mode will only enable audio
communication.
3 Dial an IP address, IPN, or
telephone number.
- Use the
button to enter the
dot [.] in IP addresses.
Notes
You can switch from the handset to the
speakerphone at anytime by pressing
the SPEAKERPHONE button. When
using the speakerphone you can
replace the handset. You can also
switch to the handset from the
speakerphone at anytime by lifting the
handset.)
Basic Use
2 Select whether you want to
make a VIDEO CALL (Default)
or a SPEECH CALL (Audioonly) by highlighting the icons.
You can use the MUTE button and the
PRIVACY button to block your outgoing
audio and video before making a call.
4 Press the SEND button.
- The videophone will now dial.
5 When finished talking, replace
the handset or press the
SPEAKERPHONE button.
47
WOOKSUNG
■
■
■
WVP-2100
WVP-2100W
WVP-2100S
TelePhoSee WVP-2100 Series
Making calls
Making calls over the
telephone line (PSTN)
Your videophone also has a
connection for your old telephone
line.
1 Lift the handset or press the
SPEAKERPHONE button.
2
Press the PSTN button.
3 Dial the telephone number.
Basic Use
4 When finished, hang up or
press the SPEAKERPHONE
button again.
Notes
Pressing the PSTN button before
lifting the handset or pressing the
SPEAKERPHONE button will
enable PSTN calling in
speakerphone mode.
Using the REDIAL
button
Instant Redialing
1 Lift the handset or press the
SPEAKERPHONE button.
2
Press the REDIAL button.
- The most recently dialed number
will automatically redial.
Sent Calls History
1 Press the REDIAL button in
the logo screen or in
screensaver mode.
- The Sent Calls History menu will
appear.
2
Select the number you wish
to redial.
3 Press the SEND button.
48
WOOKSUNG
User’s Manual
■
■
■
WVP-2100
WVP-2100W
WVP-2100S
Receiving Calls
rings, lift the handset or press
the SPEAKERPHONE button.
2
When finished, replace the
handset or press the
SPEAKERPHONE button again.
Notes
You can use the MUTE button and
the PRIVACY button to block your
outgoing audio and video before
receiving a call.
Adjust the screen angle to prevent
glare and severe backlight
conditions.
Receiving calls during calls
If an Internet call is received during
a PSTN call the PSTN button light
will blink. Pressing the PSTN
button ends the PSTN call and
receives the Internet call.
If a PSTN call is received during an
Internet call, the PSTN button will
also flash. However, pressing the
button will put the Internet call on
hold while receiving the PSTN call.
Pressing it again resumes the
Internet call.
Basic Use
1 When the videophone bell
49
WOOKSUNG
■
■
□
WVP-2100
WVP-2100W
WVP-2100S
TelePhoSee WVP-2100 Series
Other Functions
Using the SELF-VIEW button
Pressing the SELF-VIEW button
when you are not in conversation
displays the self camera image,
allowing you to check your own
image and enabling you to
compose yourself in front of the
camera before making a call.
During conversation the SELFVIEW button is used to move your
self-image
Moving your self-image during a
call
Basic Use
You can change the position of your
self-image or remove it by
repeatingly pressing the SELFVIEW button during a call. Each
time you press the SELF-VIEW
button, the image moves to a new
position in a clockwise direction,
disappearing once every cycle.
You can also move the self-image
by touching one of the four corners
of the screen. The self-image will
move to the corresponding area.
Touching the self-image again will
remove it.
50
WOOKSUNG
User’s Manual
■
■
□
WVP-2100
WVP-2100W
WVP-2100S
Other Functions
Using the SELF-VIEW button
Adjusting your image using the OSD
(On-Screen Display)
Use the OSD (the bar that appears on the bottom of the screen) to
adjust the self-image before you make a call. You can adjust the
brightness, contrast, hue, saturation of the camera image. The
changes you make here affect only the outgoing video.
1 Press the SELF-VIEW
button in the logo screen or in
screensaver mode.
to display the OSD.
3 Press
to select
Brightness, Contrast, Hue,
Saturation, Default Setting, OK,
and Cancel. Press
to
adjust the setting.
Basic Use
2 Press
4 Select Default Setting if you
want to reset to factory settings,
OK to apply the settings, or
Cancel to cancel all changes.
5 Press the OK button.
51
WOOKSUNG
■
■
■
WVP-2100
WVP-2100W
WVP-2100S
TelePhoSee WVP-2100 Series
Other Functions
Using the VOLUME / MUTE / PRIVACY buttons
Using the VOLUME buttons
Press the VOLUME buttons to adjust the volume of the handset
earpiece and speakerphone (including the keypad sound effects).
Ending a conversation resets the volume settings to the main volume
set in the Bell Menu. (CONFIGURATION-BELL)
Using the PRIVACY button
Press the PRIVACY button to black out your outgoing video.
PRIVACY will deactivate when you end your conversation. Press
PRIVACY again during a call to deactivate. PRIVACY can also be
enabled BEFORE answering or making a call.
Basic Use
Using the MUTE button
Press the MUTE button to mute your outgoing voice. Like PRIVACY,
MUTE will deactivate when you end your conversation. PSTN calls
do not support MUTE. Press MUTE again during a call to deactivate.
MUTE can also be enabled BEFORE answering or making a call.
52
WOOKSUNG
■
■
■
User’s Manual
WVP-2100
WVP-2100W
WVP-2100S
Using the Phonebook
Accessing the Phonebook
Your videophone provides up to 300 entries (and 9 numbers per
entry) for you to store most frequently used numbers so you can dial
them more easily. Access the PHONEBOOK from the Main Menu, or
by pressing SPEED-DIAL whenever the phone is on the hook.
Phonebook
05/04 09:00 AM
[0000] John
(1) 213.85.77.45
Call
[0001] James
(1) 3447895
Add
View
[0002] Paul
(1) 108.73.46.112
Find
Delete
Back
Phonebook
0
Name
John
Save
Phone No.
CallType
Bell
1)
213.85.77.45
Video
Bell 1
Back
Advanced Use
S.Dial
05/04 09:00 AM
53
WOOKSUNG
■
■
■
WVP-2100
WVP-2100W
WVP-2100S
TelePhoSee WVP-2100 Series
Using the Phonebook
Registering numbers in the Phonebook
1 In the Phonebook Menu select
7 Set the bell type
the ADD icon.
You can allocate a number its own
bell chime, so you can hear if it is a
personal, business or emergency
phone call.
2 Allocate a quick dial number
(from 0 to 9999) to the phone
number.
3 Enter the name of your
8 Select SAVE to save the entry
and return to the Phonebook
Menu, or BACK to cancel.
contact.
4 Enter the IP address, IPN, or
telephone number of your
contact.
Phonebook
S.Dial
05/04 09:00 AM
0
Name
Advanced Use
5 Enter up to 9 numbers per
Phone No. 1)
name using
. The speed dial
number refers to the first
number only.
CallType
Bell
John
Save
213.85.77.45
Video
Back
Bell 1
6 Set the call type
Select between VIDEO, SPEECH,
or PSTN.
54
WOOKSUNG
■
■
■
User’s Manual
WVP-2100
WVP-2100W
WVP-2100S
Using the Phonebook
Calling from the
Phonebook
Searching entries
1 Highlight the entry you wish to
dial by scrolling (
) through
the list or using the touch screen.
1 Select the FIND icon.
Remember, you can store up to 9
numbers per entry.
3 Select the CALL icon or press
the SEND button. The highlighted phone number is
automatically dialed.
Phonebook
[0000] John
(1) 213.85.77.45
[0001] James
(1) 3447895
[0002] Paul
(1) 108.73.46.112
05/04 09:00 AM
Call
Add
3 In the Text field enter your
search string.
4 Select FIND.
Your search results are sorted by
relevance, the most relevant one is
highlighted for you.
Modifying entries
1 Highlight the entry you wish to
modify.
View
Find
Delete
Back
2 Select VIEW to modify, and
DELETE to delete the entry.
Advanced Use
2 Choose the number you wish
to dial by pressing 1 through 9
on the key pad.
2 In the Item field select
between Speed Dial, Phone
Number, and Name.
55
WOOKSUNG
■
■
■
WVP-2100
WVP-2100W
WVP-2100S
TelePhoSee WVP-2100 Series
Using the SPEED DIAL button
Your videophone provides a Speed Dial feature for you to allocate
frequently used numbers so that you can dial them easily. A Speed
Dial number is allocated when you register a number in the
Phonebook.
Calling with Speed Dial
1 Lift the handset, press the SPEAKERPHONE button or press the
PSTN button.
2
Press the SPEED DIAL button.
3
Enter the Speed Dial number you wish to dial.
4 Press the SEND button.
Advanced Use
Notes
Pressing the SPEED DIAL button when the hook is down displays the
Phonebook.
56
WOOKSUNG
■
■
■
User’s Manual
WVP-2100
WVP-2100W
WVP-2100S
Using Call History
Your videophone will also store the last 300 sent and received
numbers, respectively, with the date and time the call was
made/received. The latest number dialed or received is at the top of
the list. You can select the number that you wish to dial from the list
and make a phone call easily and quickly without having re-enter the
number.
Calling with Call History
1 Press the Menu button to display Main menu and select CALL
HISTORY.
2 Select either SENT CALLS or RECEIVED CALLS.
3 Highlight the number you with to dial by scrolling through the list
(
) or using the touch screen.
4 Select the CALL icon or press the SEND button.
05/04 09:00 AM
Notes
An icon indicating
whether the call was a
video call or a speech
call is also shown.
Previous
Sent Calls
Received Calls
You can also SAVE the
number into the
Phonebook. Select
DELETE to erase a
number, or CLEAR to
erase the entire list.
Advanced Use
Call History
57
WOOKSUNG
□
■
□
WVP-2100
WVP-2100W
WVP-2100S
TelePhoSee WVP-2100 Series
Using Auto Answering
The WVP-2100W has a built-in video/audio answering machine
allowing you to record video/audio greeting messages for automatic
playback when you are unable to receive calls.
Recording your greeting message
1 With the phone on the hook, press the RECORD/STOP button to
start recording.
The speakerphone is initially enabled, but you can lift the handset to record
your voice through it. Replacing the handset will not stop the recording.
2 Press the RECORD/STOP button again to stop recording.
Your videophone will store the message into memory and playback the
message for you to review.
Playing your greeting message
Advanced Use
You can review your greeting message again by enabling Auto
Answering. (Refer Enabling/disabling Auto Answering.)
58
WOOKSUNG
User’s Manual
□
■
□
WVP-2100
WVP-2100W
WVP-2100S
Using Auto Answering
Enabling / Disabling Auto Answering
1 Press the PLAY/STOP button or select the AUTO ANSWERING
icon in the Main Menu to enable Auto Answering.
You will see the amount of left memory and then a playback of your OGM.
The LED will flash indicating that Auto Answering is enabled.
2 Lift the handset or press the SPEAKERPHONE button to disable
Auto Answering. The LED will stop flashing.
Advanced Use
Notes
Your videophone will record up to approx. 2 minutes of messages (128kbps
calls)
59
WOOKSUNG
□
■
□
WVP-2100
WVP-2100W
WVP-2100S
TelePhoSee WVP-2100 Series
Using Auto Answering
Playing your recorded messages
1 When Auto Answering is enabled, press the PLAY/STOP button or
select the RECORDS LIST icon in the Main Menu.
2 Highlight the record you wish to playback by scrolling through the
list (
) or using the touch screen.
3 Select the PLAY icon.
Select DELETE to erase the recording, or CLEAR to erase the entire list.
Records List
05/04 09:00 AM
0. 05/27 04:34 PM
[absence]
1. 05/27 04:32 PM
[record]
Play
Delete
Advanced Use
2. 05/27 04:30 PM
[record]
Clear
Back
60
WOOKSUNG
User’s Manual
□
■
□
WVP-2100
WVP-2100W
WVP-2100S
Recording a Call
You can record your contact’s video/audio during conversation into
the phone memory for later playback.
Recording the Call
1 During a call, press the RECORD/STOP button on the base unit to
start recording. ‘Record’ in red will appear on the OSD.
You can record only once per call. A total of approx. 2 minutes of
video/audio recording is possible (128kbps).
Advanced Use
2 Press the RECORD/STOP button again to stop recording.
61
WOOKSUNG
□
■
□
WVP-2100
WVP-2100W
WVP-2100S
TelePhoSee WVP-2100 Series
Recording a Call
Playing back the recorded call
1 RECORDS LIST icon in the Main Menu.
2 Highlight the record you wish to playback by scrolling through the
list (
) or using the touch screen.
3 Select the PLAY icon or press the PLAY/STOP button.
Select DELETE to erase the recording, or CLEAR to erase the entire list.
Records List
05/04 09:00 AM
0. 05/27 04:34 PM
[absence]
1. 05/27 04:32 PM
[record]
Play
Delete
Advanced Use
2. 05/27 04:30 PM
[record]
Clear
Back
62
WOOKSUNG
□
■
□
User’s Manual
WVP-2100
WVP-2100W
WVP-2100S
Using the Photo Room
You can use the built-in camera as a digital camera to easily take
photos and send them to your computer.
Taking a photo
1 Press the SELF-VIEW button to show your camera image on the
screen.
2
Press the RECORD/STOP button to freeze the image.
If you do not want to save the still image press the button again to unfreeze
the image.
3 While the image is frozen press the PLAY/STOP button to save
the image.
Photo Room
05/04 09:00 AM
[0000] John
(1) 213.85.77.45
[0002] Paul
(1) 108.73.46.112
View
Label
Delete
Send
Config
Back
Advanced Use
[0001] Jane
(1) 3447895
63
WOOKSUNG
□
■
□
WVP-2100
WVP-2100W
WVP-2100S
TelePhoSee WVP-2100 Series
Using the Photo Room
Viewing photos
1 Select PHOTO ROOM in the Main Menu.
2 Select the photo you want to see from the list and select VIEW.
3 Press any other button to return to the Photo Room.
Menu
05/04 09:00 AM
To Logo
Phonebook
Call History
Configuration
Auto Answer
Records List
Photo Room
Information
Advanced Use
Photo Room
05/04 09:00 AM
[0000] John
(1) 213.85.77.45
[0001] Jane
(1) 3447895
[0002] Paul
(1) 108.73.46.112
View
Label
Delete
Send
Config
Back
64
WOOKSUNG
User’s Manual
□
■
□
WVP-2100
WVP-2100W
WVP-2100S
Using the Photo Room
Labeling photos
1 In the Photo Room select the photo you want to label from the list.
2
Select LABEL.
Advanced Use
3 Label your photo using the onscreen keyboard and select OK.
65
WOOKSUNG
□
■
□
WVP-2100
WVP-2100W
WVP-2100S
TelePhoSee WVP-2100 Series
Using the Photo Room
Deleting photos
1 In the Photo Room select the photo you want to delete from the list.
2
Select DELETE.
Photo Room
Do you want to delete?
2002/11/07 14:05
noname
05/04 09:00 AM
View
Label
Delete
Send
Config
Back
Advanced Use
66
WOOKSUNG
□
■
□
User’s Manual
WVP-2100
WVP-2100W
WVP-2100S
Using the Photo Room
Transferring photos to your computer
To upload your pictures onto your computer you need to download a
separate computer program.
Downloading the program onto your PC
1 Using your Internet browser log on to www.wooksung.com.
2 Download the photo program onto your computer from Support.
Transferring photos
1 In the Photo Room select
CONFIG and enter the IP
address of your computer.
Configuration
photo program on your
computer.
3 Select the photo you want to
send and select SEND.
Server
213.85.77.62
Apply
Reset
Back
Advanced Use
2 Execute the downloaded
05/04 09:00 AM
67
WOOKSUNG
■
■
■
WVP-2100
WVP-2100W
WVP-2100S
TelePhoSee WVP-2100 Series
Monitoring
You can monitor your home through your videophone remotely while
you are away using the monitoring feature. Also, you can set a
password to prevent unauthorized persons from monitoring your
home.
Setting monitoring
1 Go to the Monitoring Menu through the MONITORING icon on the
Configuration Menu.
2 Set Monitoring to ON to enable monitoring.
3 Set a 4-digit password (RECOMMENDED)
If you do not set the password any person calling will be able to monitor
through your videophone.
4 Set a ring time
The Ring Time is the time your videophone will ring before automatically
receiving the incoming call.
5 Select APPLY to save your settings.
Monitoring
Advanced Use
Monitoring
05/04 09:00 AM
Off
Password
****
Ring Time
2 sec
Apply
Reset
Back
68
WOOKSUNG
User’s Manual
■
■
■
WVP-2100
WVP-2100W
WVP-2100S
Monitoring
Using Monitoring
1 Call your monitoring enabled phone.
2 Your phone will answer the call after one ring.
If a password is set, your phone will block the video and mute the audio,
and you will not be able to monitor the area.
3 Enter the 4-digit password to start monitoring.
Advanced Use
4 Hang up the phone to end monitoring.
69
WOOKSUNG
■
■
■
WVP-2100
WVP-2100W
WVP-2100S
TelePhoSee WVP-2100 Series
External Camera Control
You can control local external cameras (the external camera
connected to your phone) and remote external cameras (the external
camera connected to your contacts phone) through your videophone
during a call. With compatible pan/tilt cameras, you can control
pan/tilt cameras connected to videophone. Currently only the Sony
EVI-D30 model and Canon VC-C4 model are controllable.
Connecting an external camera
1 Connect the video cable.
Connect the output port of the external camera with the video input port of
the videophone with a RCA video cable (sold separately).
2 Connect the camera control cable.
Connect the VISCA input port of the external camera with the RS-232C port
of the videophone.
3 Connect the external camera power.
Advanced Use
70
WOOKSUNG
User’s Manual
■
■
■
WVP-2100
WVP-2100W
WVP-2100S
External Camera Control
Remote camera control
You can control your contact’s (remote) external camera during a
call.
1 Switching between internal and external cameras
Press the
button to toggle between your contact’s internal and
external cameras. If the camera is controllable, a yellow
will be
displayed in the right end of the OSD.
2 Remote camera control
Advanced Use
The remote external camera can be only controlled when the yellow
is displayed on the OSD. Use the keypad to control the
camera. If the keypad is pressed repeatedly the camera will move
faster.
71
WOOKSUNG
■
■
■
WVP-2100
WVP-2100W
WVP-2100S
TelePhoSee WVP-2100 Series
External Camera Control
Local camera control
You can control your own (local) external camera during a call.
Press
twice and press 4 on your keypad to enter EXT. CAMERA
CONTROL mode. You must be in EXT. CAMERA CONTROL mode
to control your camera.
1. Switching between internal and external cameras
Press the
button to toggle between your internal and external
cameras. If the camera is controllable, a yellow camera
will be
displayed in the right end of the OSD. A blue camera
is display
if the external camera is not controllable.
2. Local camera control
The remote external camera can be only controlled when the yellow
camera
is displayed on the OSD. Use the keypad to control the
camera. If the keypad is pressed repeatedly the camera will move
faster.
Advanced Use
72
WOOKSUNG
User’s Manual
■
■
■
WVP-2100
WVP-2100W
WVP-2100S
Sending a Quality Still Image
H.261 Annex D
Recommendation H.261 Annex D Graphic Transfer mode reads and
interleaves four decoded pictures to resulting in a higher resolution
graphic picture. This is a particularly useful feature when you want to
send an image of a document, an action that normally requires higher
resolution for easier recognition .
H.261 video codec with CIF resolution must be enabled on both calling and
receiving phones. (Refer to Codecs)
Sending your still image
1 Press the F1 button during a video conversation to send a still
image. The OSD will display STILL IMAGE TRANSFERING. When
sending is complete the screen will display your contact’s video
again.
2 Your contact’s videophone OSD will display STILL IMAGE
RECEIVING. When receiving is complete your contact’s videophone
will display the still image. Your contact can press the F3 button to
return to video.
1 Press F2 to receive your contact’s still image. The OSD will
display STILL IMAGE RECEIVING. When receiving is complete your
contact’s still image will be displayed. You can press the F3 button to
return to video.
2 Your contact’s videophone OSD will display STILL IMAGE
TRANSFERING. When receiving is complete your contact’s display
will return to video.
Advanced Use
Receiving your contact’s still image
73
WOOKSUNG
■
■
■
WVP-2100
WVP-2100W
WVP-2100S
TelePhoSee WVP-2100 Series
Using the OSD During a Call
The OSD is the bar that appears on the bottom of your screen
showing the current state of your phone. The OSD can also be used
to adjust your outgoing image and to set the maximum bandwidth of
your phone. Press the OK button or touch the center of the screen to
display the OSD.
1 Use
and the numbers on the keypad to select the function
you want to adjust.
1. Camera Adjust
Adjust the Camera settings. Press
press
to adjust the setting.
to select the options and
To exit, select Default Setting to reset to factory settings, OK to apply the
new settings, or Cancel to cancel all changes. Then press the OK button.
Advanced Use
74
WOOKSUNG
■
■
■
User’s Manual
WVP-2100
WVP-2100W
WVP-2100S
Using the OSD during a call
2. Camera Input
Press 1 to select the internal camera or 2 for the external camera.
3. Maximum Bandwidth
Press
and the according number on the keypad to set the
bandwidth.
1: 64kbps
2: 128kbps
3: 192kbps
Enter:Exit
1: 256kbps 2: 384kbps 3: 512kbps Enter:Exit
Enter:Exit
4. External Camera Control
Selecting the External Camera Control option sets the phone to
either:
- External Camera Control Mode (pan/tilt/zoom control)
- Monitoring Mode (Closed circuit camera selection)
depending on the type of camera connected.
2 Press the OK button to exit.
Advanced Use
1: 768kbps
75
WOOKSUNG
■
■
■
WVP-2100
WVP-2100W
WVP-2100S
TelePhoSee WVP-2100 Series
Serial Communication
You can use the serial jack (RS-232C) on the back of the videophone
for data communication to external devices. Currently digital
stethoscopes and headphones for use during tele-medicine sessions
are applied. Future applications including blood pressure and glucose
diagnostic equipment are also in development.
1 Connect the device’s serial adapter to the serial jack
located on the back of the phone.
IMPORTANT: ONLY USE SERIAL CABLES
APPROVED BY WOOKSUNG ELEC.
2 Go to the SERIAL COM. menu from the MAIN MENU by selecting
CONFIGURATION – NETWORK – SERIAL COM.
3 Select the USE field and set to
SENDER for a transmitting
device (ex: stethoscopes) and
RECEIVER for a receiving
device (ex: headphones).
Serial Comm
Use
05/04 09:00 AM
NoUse
Speed
9600
DataBit
8
Parity
None
StopBit
2
Apply
Reset
Advanced Use
4 Set the other settings
according to the serial device.
Back
Example: for digital stethoscopes
and headphones
SPEED: 9600, DATABIT: 8,
PARITY: NONE, STOPBIT: 2
5 Select APPLY.
Serial communication will start when
your call is connected.
76
WOOKSUNG
User’s Manual
■
■
■
WVP-2100
WVP-2100W
WVP-2100S
Serial Communication
Advanced Use
Notes
If you are not using serial communication, set the serial communication
setting to NO USE. If the setting is set to USE, external camera control may
not operate properly.
77
WOOKSUNG
■
■
■
WVP-2100
WVP-2100W
WVP-2100S
TelePhoSee WVP-2100 Series
Advanced Setup
Other Network Configurations
(Configuration-Network-Misc.)
User ID
The User ID is the Caller ID that appears on your contact’s phone.
If you have subscribed to a Gatekeeper service your User ID is the
same as the User ID in the Gatekeeper Menu. Changing your User
ID will thus affect the User ID in the Gatekeeper Menu (and vise
versa).
Max Bandwidth
(64kbps, 128kbps, 192kbps, 256kbps, 384kbps, 512kbps, 768kbps)
Setting this value to the bandwidth of your Internet line will result in
the best quality video. However setting the bandwidth to a higher or
lower value than that of your Internet line will result in a degradation
of video quality. In the case of ADSL set to the uploading bandwidth.
Misc.
User ID
Max BW
Call FWD
05/04 09:00 AM
TelePhoSee
192kbps
Apply
None
Dest.Addr
NA Int.
10 sec
Back
78
WOOKSUNG
WVP-2100
WVP-2100W
WVP-2100S
Other Network Configurations
(Configuration-Network-Misc.)
Call Forwarding
TelePhoSee has a call forwarding feature that forwards your calls to
an alternate number when you are unable to receive your call
Type
When
None
No forwarding
No Answer
Forwards your calls if you don’t answer the phone
for a set time (No Answer Interval)
Busy
Forwards when you are engaged in conversation
Unconditional
Unconditionally forwards your calls
Advanced Setup
■
■
■
User’s Manual
Forwarding number
Set the number to forward to in the DEST.ADDR field.
No Answer Interval
(10sec, 20sec 30sec)
Set the No Answer
Interval in the NA INT.
Misc.
User ID
Max BW
Call FWD
05/04 09:00 AM
TelePhoSee
192kbps
Apply
None
Dest.Addr
NA Int.
10 sec
Back
79
WOOKSUNG
■
■
■
WVP-2100
WVP-2100W
WVP-2100S
TelePhoSee WVP-2100 Series
Advanced Setup
Codecs
(Configuration-Codecs)
Codec stands for compressor/decompressor; a codec is a technology
standard for compressing and decompressing data. Video/audio
quality depends on what kind of codec you use. Here not only can
you set the default video/audio codecs, you can also set the video
resolution, and video quality.
Video Codec
(H.263, H.261)
This is where you set your default video codec. Your videophone
supports two types of video codec: H.263 and H.261. Even if your
contact is not using the same codec, your phone will automatically
adjust to enable video calls. H.263 has a higher degree of
compression efficiency than H.261.
Resolution
(CIF, QCIF)
CIF (352×288) and QCIF (176×144).
CIF displays a more detailed (higher resolution) image than QCIF.
However, QCIF can enable a maximum frame rate of 30fps,
displaying a more dynamic but less detailed picture. CIF is the
recommended setting, unless you need a particularly fast frame rate.
CODEC
Video CODEC
Resolution
05/04 09:00 AM
H.263
CIF
Video Quality
Normal
Audio CODEC
G.723.1
Jitter Buffer
Apply
Reset
90ms
Back
80
WOOKSUNG
WVP-2100
WVP-2100W
WVP-2100S
Codecs
(Configuration-Codecs)
Video Quality
(Maximum Speed, Fast Speed, Normal, Good Image,
Best Image)
Advanced Setup
■
■
■
User’s Manual
This controls the quality of the video. A faster speed gives smoother
movement but can result in loss of detail. A slower speed gives a
clearer image but slow movement.
Audio Codec
(G.723.1, G.711-A, G.711-μ)
This is where you set your default audio codec. Your videophone sup
ports three types of audio codec. Even if your contact is not using the
same codec, your phone will automatically adjust to enable calls. You
can choose between G.723.1, G.711 A-Law, and G.711 μ-Law.
Not much difference in audio quality is perceived between the codecs
so the recommended codec is G.723.1 for its narrower bandwidth.
(6.3 or 5.3Kbps compared to G.711 64Kbps)
Jitter Buffer
This sets the audio buffer for video-audio synchronization.
CODEC
Video CODEC
Resolution
05/04 09:00 AM
H.263
CIF
Video Quality
Normal
Audio CODEC
G.723.1
Jitter Buffer
Apply
Reset
90ms
Back
81
WOOKSUNG
■
■
■
WVP-2100
WVP-2100W
WVP-2100S
TelePhoSee WVP-2100 Series
Advanced Setup
Display Options
(Configuration-Display)
Here you can set display options such as menu language,
showing/hiding date & time, default self-image position, and default
OSD view.
Language
(English, Korean, Japanese)
This is where you set your menu language. TelePhoSee presently
supports English, Korean and Japanese menus.
Date & Time
(Both, Date, Time, None)
You can display either Date or Time, or both, on the menu screen.
Display
Language
Date&Time
SelfView
OSD View
05/04 09:00 AM
English
Both
Apply
Left Top
On
Reset
Back
82
WOOKSUNG
WVP-2100
WVP-2100W
WVP-2100S
Display Options
(Configuration-Display)
Self View
(Top Left, Top Right, Bottom Right, Bottom Left, None)
Advanced Setup
■
■
□
User’s Manual
This sets the default self-image window position. During a call you
can change or hide the self-image by pressing the SELF-VIEW
button. (Refer Using the Self-View Button)
OSD View
(On, Off)
You can set the OSD to be shown or hidden as default. During a call
you can show/hide the OSD by tapping the screen or pressing the
MENU pad.
Selecting ON displays the OSD for 1 min. at the start of the call, after
which it is hidden. Tapping the screen or pressing the ENTER button
displays the OSD for an additional1 min.
Selecting OFF hides the OSD until the screen is tapped or the
ENTER button is pressed, which displays the OSD for 1 min.
Display
Language
Date&Time
SelfView
OSD View
05/04 09:00 AM
English
Both
Apply
Left Top
On
Reset
Back
83
WOOKSUNG
■
■
■
WVP-2100
WVP-2100W
WVP-2100S
TelePhoSee WVP-2100 Series
Advanced Setup
Clock
(Configuration-Clock)
Time server setup
Your videophone uses time servers around the world to
automatically set its time. Here you can set the time servers for
automatic time and date setting. You can set up to three time servers.
(Default factory settings are sufficient)
Set your time zone, and whether you are using Daylight Savings
Time
1
Enter the IP address of the time servers in the blanks. (Factory
settings are sufficient)
2 Select your time zone.
3 Turn on daylight saving time (DST) when in effect.
Clock
TimeSvr1
05/04 09:00 AM
203.255.112.4
TimeSvr2
204.123.2.72
TimeSvr3
133.100.9.2
TimeZone
GMT+09:00
Apply
Reset
DST
Off
Back
84
WOOKSUNG
■
■
■
WVP-2100
WVP-2100W
WVP-2100S
Advanced Setup
User’s Manual
Alarm
You can set the alarm time and
alarm bell.
1 Set the alarm setting to ON to
enable the alarm.
2 Set the alarm time and type.
3 Select APPLY.
Alarm
05/04 09:00 AM
Alarm
Off
Hour
12
Minute
0
AM/PM
AM
Bell
Apply
Bell 1
Back
85
WOOKSUNG
■
■
■
WVP-2100
WVP-2100W
WVP-2100S
TelePhoSee WVP-2100 Series
Advanced Setup
Bell
(Configuration-Bell)
You can set telephone’s default main volume, bell volume and bell
melody as you like.
Main Volume (0 ∼ 5)
Controls the volume of the handset, speakerphone (including the
keypad sound effects). During conversation, use the VOLUME
buttons to adjust the main volume directly. Ending the conversation
resets the volume settings to the volume set in the ‘Bell Menu’.
Bell Volume
You can adjust the bell volume to any of three levels.
Bell
This is the default bell melody for numbers not stored in the
Phonebook.
86
WOOKSUNG
WVP-2100
WVP-2100W
WVP-2100S
Advanced Setup
■
■
■
User’s Manual
A/V Input & Output
(Configuration-A/V In&Out)
You can configure audio/video input & output settings.
Video Input (Int, Ext)
This defines the source of the outgoing video. The factory default is
set to INT (Internal camera), but you can connect an external
camera or other video source to the Video IN jack and set to Ext.
Video Output (NTSC,
PAL)
You can show the display on an
external display (NTSC or PAL)
by connecting an external
display (such as a TV monitor)
to the Video OUT jack
Ext. Camera
Select the camera model you
are using for external camera
control.
A/V In&Out
Video In
Audio Input (Int, Ext)
Video Out
You can connect an external
microphone to the Audio In port
of the videophone and set the
Audio Input setting to Ext.
Audio In
Audio Output (Int, Ext)
You can connect an external
speaker to the Audio Out port of
the videophone and set the
Audio Output setting to Ext. The
videophone must be in
speakerphone mode.
Audio Out
Ext. Camera
05/04 09:00 AM
Int
NTSC
Apply
Int
Int
Reset
EVI-D30
Back
Notes
NTSC is short for National
Television Standards Committee.
The NTSC is responsible for
setting television and video
standards in the United States.
PAL is short for Phase
Alternating Line, the dominant
television standard in Europe.
87
WOOKSUNG
■
■
■
WVP-2100
WVP-2100W
WVP-2100S
TelePhoSee WVP-2100 Series
Advanced Setup
Signaling
(Configuration-Network-Signaling)
The Signaling menu is used for setting advanced gatekeeper server
settings. Users should contact their gatekeeper service provider
before attempting to change the default settings.
Fast Start
This feature is used to open audio and video in advance for
immediate connection when calling and receiving. When using
services such as “Color Ring” (service of music bell instead of
ringing tone while waiting for connection), this feature must be turned
on. However, this feature should be supported by the VOIP (Internet
Phone) service provider.
Tunneling
When this feature is enabled the currently used signaling channel is
used instead of opening a new media channel.
GRQ
This feature allows to check
whether a gatekeeper is
providing service. In the case
gatekeeper does not support
GRQ(Gatekeeper Request)
function, enabling the GRQ
feature disables gatekeeper
registration.
Signaling
05/04 09:00 AM
Fast Start
On
Tunneling
On
GRQ
Off
DTMF Type
TCP Port
AlphaNum
Apply
Reset
Static
Back
88
WOOKSUNG
■
■
■
WVP-2100
WVP-2100W
WVP-2100S
Signaling
DTMF Type
DTMF type refers to the method of delivering dial tone. DTMF(Dual
Tone Multi Frequency) includes of inband and outband features.
Inband type consists of Alpha Numeric and Signal types. Outband
feature is the type that transmits DTMF tones.
Advanced Setup
User’s Manual
TCP Port
This feature allows choosing between Static and Dynamic TCP port
type when transmitting signals. Some gatekeeper maintain
connection only with dynamic TCP port. In most cases, TCP port is
set to static.
89
WOOKSUNG
■
■
■
WVP-2100
WVP-2100W
WVP-2100S
TelePhoSee WVP-2100 Series
Advanced Setup
Precautions
Power Adaptor
The power adaptor included with your videophone is a ‘Free voltage’
adaptor capable of plugging into 110V~240V power outlets. Do not
use any power adaptor other than the adaptor included.
Copyright warning
Television programs, pictures and other material may be
copyrighted. Unauthorized recording or storing of such materials
violates the provision of copyright laws.
Call recording warning
Unauthorized call recording without consent from the other party
may result in the violation of privacy laws.
90
WOOKSUNG
■
■
■
WVP-2100
WVP-2100W
WVP-2100S
Maintenance
- Clean the screen with a soft cloth. If you use a glass cleaning liquid,
do not use any type of cleaner containing an anti-static solution or
Advanced Setup
User’s Manual
similar additive as this may scratch the screen’s coating.
- Do not rub, touch, or tap the surface of the screen with sharp or
abrasive items such as ballpoint pen or screwdriver. This type of
contact may result in a scratched display.
- Clean the cabinet, panel and controls with a soft cloth lightly
moistened with a mild detergent solution. Do not use any type of
abrasive pad, scouring powder or solvent, such as alcohol or
benzene.
91
WOOKSUNG
■
■
■
WVP-2100
WVP-2100W
WVP-2100S
TelePhoSee WVP-2100 Series
Troubleshooting
Remedy
The picture does not
appear on the screen.
• Check if your contact has disabled his/her
video.If you attempt to call an audio-only
H.323 phone (VoIP phone), only your selfview will appear on the screen.
Appendix
Symptom
• Check if you (or your contact) have set the
video input to external (pg. 46) and have not
connected and operated the external camera
properly.
No sound from the
handset or the
speakerphone.
• Check if the handset is plugged in. (pg. 8)
• Check if your contact has muted his/her audio.
• Check if your contact has set the audio input
to external and have not connected and
operated the external microphone properly.
The audio is breaking
up.
• This is usually due to the poor state of the
network. Lower the bandwidth settings. If
video frame rate is too slow resulting in jerky
video due to lowering the bandwidth, change
the video resolution settings to QCIF or video
quality to faster speed.
92
WOOKSUNG
■
■
■
User’s Manual
WVP-2100
WVP-2100W
WVP-2100S
Symptom
Remedy
Video freezes
frequently during
conversation.
• This is also usually due to the poor state of
the network. Lower the bandwidth settings. If
video frame rate is too slow resulting in jerky
video due to lowering the bandwidth, change
the video resolution settings to QCIF or video
quality to faster speed.
The unit cannot be
operated by any
means.
• Reboot the system by switching the power off
and then on again.
‘ADSL not connected’
appears.
• Check if your ADSL modem is connected and
operating properly. Some modems require a
twisted pair cable for proper operation.
Appendix
Troubleshooting
• Check your ID and password.
• Turn off the modem and wait for 5 minutes,
turn on the modem and turn on the phone.
(Some modems require about 5 minutes to
reestablish an internet connection)
93
WOOKSUNG
■
■
■
WVP-2100
WVP-2100W
WVP-2100S
TelePhoSee WVP-2100 Series
Troubleshooting
Symptom
Remedy
‘Gatekeeper
registering failed’
appears.
• Check ‘Network Check’ in ConfigurationNetwork. Check your Gatekeeper address, ID,
and E.164 settings.
Appendix
• Contact your VoIP service provider.
There is a few
seconds delay before
system responds after
selecting an icon or
pressing a button.
This happens when your phone cannot connect
to your Gatekeeper and attempts to reconnect.
Check your Gatekeeper settings or set to ‘No
Use’.
I can hear the dial
tone but I can’t make
calls.
Check ‘Network Check’ in ConfigurationNetwork.
The clock is showing
the wrong time.
Apply your clock settings again to recalibrate
your time.
I am behind a firewall
and I can’t make calls.
Try opening the following firewall ports:
TCP: 1720, 5050
UDP: 1719, 1024, 5000~5003
Contact your network administrator.
94
WOOKSUNG
■
■
■
User’s Manual
WVP-2100
WVP-2100W
WVP-2100S
Symptom
Remedy
I can make IP calls
but I can’t make
PSTN calls.
• Check if your Gatekeeper or SIP server
settings are correct.
• Check if your videophone has a PSTN option
installed.
The screen constantly
flickers.
Make sure you are using the correct camera
type (NTSC, PAL) for your country.
Appendix
Troubleshooting
95
WOOKSUNG
■
■
■
WVP-2100
WVP-2100W
WVP-2100S
TelePhoSee WVP-2100 Series
Appendix
APPENDIX
Appendix
Computer Network Setup
Walkthrough for IP Sharing
96
WOOKSUNG
User’s Manual
■
■
■
WVP-2100
WVP-2100W
WVP-2100S
Network Setup Walkthrough for IP Sharing
Windows 98 network setup
Appendix
1 From the [Start] menu, select
[Settings] and then select
[Control Panel].
2 Double click [Network].
97
WOOKSUNG
■
■
■
WVP-2100
WVP-2100W
WVP-2100S
TelePhoSee WVP-2100 Series
Network Setup Walkthrough for IP Sharing
Windows 98 network setup
3 In the box labeled ‘The
following network components
are installed’, select TCP/IP.
Click the [Properties] button.
Appendix
If TCP/IP is listed twice, then
choose the one followed by the
name of your Ethernet card (do not
choose TCP/IP Dial-up Adapter).
4 In the TCP/IP Properties
window, click on the IP Address
tab. Make sure that ‘Specify an
IP address’ is
selected. Enter the IP Address
and Subnet Mask address.
98
WOOKSUNG
User’s Manual
■
■
■
WVP-2100
WVP-2100W
WVP-2100S
Network Setup Walkthrough for IP Sharing
Windows 98 network setup
5 Click on the Gateway tab. In
Appendix
the box labeled ‘New gateway’,
enter the Gateway Address.
Click the Add button.
6 Click on the DNS
Configuration tab. Select Enable
DNS.
If the DNS is already configured
then you do not have to change
the settings
In the DNS Server Search Order
box enter the DNS server for
your network and click the Add
button. Repeat for other DNS
addresses.
Enter an arbitrary Host and
Domain information.
7 Click OK several times and
reboot.
99
WOOKSUNG
■
■
■
WVP-2100
WVP-2100W
WVP-2100S
TelePhoSee WVP-2100 Series
Network Setup Walkthrough for IP Sharing
Windows XP network setup
1 From the [Start] menu, select
[Control Panel].
Appendix
2 Click on Network and Internet
Connection.
100
WOOKSUNG
User’s Manual
■
■
■
WVP-2100
WVP-2100W
WVP-2100S
Network Setup Walkthrough for IP Sharing
Windows XP network setup
4 Right-click ‘Local Area
Appendix
3 Click on Network Connections.
Connection’ and select
‘Properties’.
101
WOOKSUNG
■
■
■
WVP-2100
WVP-2100W
WVP-2100S
TelePhoSee WVP-2100 Series
Network Setup Walkthrough for IP Sharing
Windows XP network setup
5 Select TCP/IP. Click the
[Properties] button.
If TCP/IP is listed twice, then
choose the one followed by the
name of your Ethernet card (do not
choose TCP/IP Dial-up Adapter).
Appendix
6 Select ‘Use the following IP
address’. Enter the IP address,
Subnet mask address, and
Gateway address.
Select ‘Use the following DNS
server addresses’, and enter the
DNS address(es).
If the DNS is already configured
then you do not have to change
the DNS settings.
7 Click OK several times.
102
WOOKSUNG
User’s Manual
Product Specifications
WVP-2100
WVP-2100W
WVP-2100S
Standard
H.323 or SIP
H.323 or SIP
H.323 or SIP
Network Speed
10/100 Mbps
10/100 Mbps
10/100 Mbps
Codec
H.261, H.263, H.264
H.261, H.263, H.264
H.261, H.263, H.264
Resolution
CIF, QCIF
CIF, QCIF
CIF, QCIF
Codec
G.711-A/u, G.723.1
G.711-A/u, G.723.1
G.711-A/u, G.723.1
Echo Cancellation
Echo Cancellation
Echo Cancellation
Speaker phone
Speaker phone
Speaker phone
LCD
4" TFT Color LCD
5" TFT Color LCD
None
Image sensor
Color CCD
Color CCD
Color CCD
Standard
NTSC, PAL
NTSC, PAL
NTSC, PAL
Resolution
270K Pixel
270K Pixel
270K Pixel
Video IN/OUT
RCA type
RCA type
RCA type
Audio IN/OUT
RCA type
RCA type
RCA type
Serial
1 Port
1 Port
1 Port
Touch Screen
None
Yes
None
IP sharing
Yes
Yes
Yes
AC Input
AC 100 ~ 240V
AC 100 ~ 240V
AC 100 ~ 240V
Power type
SMPS Adapter
SMPS Adapter
SMPS Adapter
Input frequency
50 ~ 60 Hz
50 ~ 60 Hz
50 ~ 60 Hz
DC Output
DC 12V (1.5A)
DC 12V (1.5A)
DC 12V (1.5A)
Video
System
Audio
Features
Display
LCD
Module
(Option)
Camera
I/O Interface
Appendix
Network
Power
The Camera specification of the WVP-2100S relates to the external camera module.
103
WOOKSUNG
TelePhoSee WVP-2100 Series
Contact Us
Appendix
Homepage: www.wooksung.com
Headquarters
7F Art Venture Bldg., 395 Mannyeon-dong, Seo-gu,
Daejeon, 302-834 S.Korea
Tel
: +82-42-366-1000
Fixed IP
: 218.54.226.151
Fax
: +82-42-364-3600
Seoul Office
#307 Hanwha Jinnexvill, 706-20 Yeoksam-dong, Kangnam-gu,
Seoul, 135-080 S.Korea
Tel
: +82-2-2051-0045
Fixed IP
: 218.145.145.36
Fax
: +82-2-3288-2094
104
WOOKSUNG
WOOKSUNG One (1) Year Limited Warranty
U.S., Canada and Europe
WARRANTY COVERAGE
WOOKSUNG's warranty obligations are limited to the terms set forth below: WOOKSUNG Electronics, Inc. ("WOOKSUNG") warrants this
hardware product against defects in materials and workmanship for a period of ONE (1) YEAR from the date of original retail purchase. If a
defect exists, at its option WOOKSUNG will (1) repair the product at no charge, using new or refurbished replacement parts, (2) exchange the
product with a product that is new or which has been manufactured from new or serviceable used parts and is at least functionally equivalent
to the original product, or (3) refund the purchase price of the product. A replacement product/part assumes the remaining warranty of the
original product or ninety (90) days from the date of replacement or repair, whichever provides longer coverage for you. When a product or
part is exchanged, any replacement item becomes your property and the replaced item becomes WOOKSUNG's property. When a refund is
given, your product becomes WOOKSUNG's property.
OBTAINING WARRANTY SERVICE
If you purchased the product in the U.S. and Canada, deliver the product, at your expense, to any WOOKSUNG Authorized Service Provider
located in U.S. and Canada. If you purchased the product in Europe, deliver the product to any WOOKSUNG Authorized Service Provider in
the country where you purchased the product. Be aware, however, that not all countries have WOOKSUNG Authorized Service Providers and
not all Authorized Service Providers have all parts or replacement units for the product. If the product cannot be repaired or replaced in the
country it is in, it may need to be sent to a different country or directly to WOOKSUNG. To locate an WOOKSUNG Authorized Service
Provider refer to the service and support reference materials accompanying the product or visit our web site at http://www.wooksung.com/.
When you contact the WOOKSUNG Authorized Service Provider, you will be asked to furnish your name, address, telephone number, and
proof of the original purchase (receipt) containing a description of the product(s), purchase date, and the appropriate WOOKSUNG serial
number(s).
Note: Before you deliver your product for warranty service it is your responsibility to keep a separate backup copy of the system
configuration and user data. You will be responsible for reconfiguring the system and
restoring user data and passwords. Data recovery is not included in the warranty service and WOOKSUNG is not responsible for
data that may be lost or damaged during transit or a repair.
EXCLUSIONS AND LIMITATIONS
This Limited Warranty applies only to hardware products manufactured by or for WOOKSUNG that can be identified by the "WOOKSUNG"
trademark, trade name, or logo affixed to them. The Limited Warranty does not apply to any non-WOOKSUNG hardware products or any
software, even if packaged or sold with WOOKSUNG hardware. Non-WOOKSUNG manufacturers, suppliers, or publishers may provide their
own warranties. WOOKSUNG and its Authorized Service Providers are not liable for any damage to or loss of any programs, data, or other
information stored on any media, or any non-WOOKSUNG product or part not covered by this warranty. Recovery and reinstallation of system
and application software and user data are not covered under this Limited Warranty. This warranty does not apply: (a) to damage caused by
accident, abuse, misuse, misapplication, or non-WOOKSUNG products; (b) to damage caused by service (including upgrades and
expansions) performed by anyone who is not an WOOKSUNG Authorized Service Provider; (c) to a product or a part that has been modified
without the written permission of WOOKSUNG; or (d) if any WOOKSUNG serial number has been removed or defaced
THIS WARRANTY AND REMEDIES SET FORTH ABOVE ARE EXCLUSIVE AND IN LIEU OF ALL OTHER WARRANTIES, REMEDIES AND
CONDITIONS, WHETHER ORAL OR WRITTEN, EXPRESS OR IMPLIED. WOOKSUNG SPECIFICALLY DISCLAIMS ANY AND ALL
IMPLIED WARRANTIES, INCLUDING, WITHOUT LIMITATION, WARRANTIES OF MERCHANTABILITY AND FITNESS FOR A
PARTICULAR PURPOSE. IF WOOKSUNG CANNOT LAWFULLY DISCLAIM IMPLIED WARRANTIES UNDER THIS LIMITED WARRANTY,
ALL SUCH WARRANTIES, INCLUDING WARRANTIES OF MERCHANTABILITY AND FITNESS FOR A PARTICULAR PURPOSE ARE
LIMITED IN DURATION TO THE DURATION OF THIS WARRANTY. No WOOKSUNG reseller, agent, or employee is authorized to make
any modification, extension, or addition to this warranty.
WOOKSUNG IS NOT RESPONSIBLE FOR DIRECT, SPECIAL, INCIDENTAL OR CONSEQUENTIAL DAMAGES RESULTING FROM ANY
BREACH OF WARRANTY OR CONDITION, OR UNDER ANY OTHER LEGAL THEORY, INCLUDING BUT NOT LIMITED TO LOST
PROFITS, DOWNTIME, GOODWILL, DAMAGE TO OR REPLACEMENT OF EQUIPMENT AND PROPERTY, ANY COSTS OF
RECOVERING, REPROGRAMMING, OR REPRODUCING ANY PROGRAM OR DATA STORED IN OR USED WITH WOOKSUNG
PRODUCTS, AND ANY FAILURE TO MAINTAIN THE CONFIDENTIALITY OF DATA STORED ON THE PRODUCT. WOOKSUNG
SPECIFICALLY DOES NOT REPRESENT THAT IT WILL BE ABLE TO REPAIR ANY PRODUCT UNDER THIS WARRANTY OR MAKE A
PRODUCT EXCHANGE WITHOUT RISK TO OR LOSS OF PROGRAMS OR DATA. Some states and provinces do not allow the exclusion or
limitation of incidental or consequential damages or exclusions or limitations on the duration of implied warranties or conditions, so the above
limitations or exclusions may not apply to you. This warranty gives you specific legal rights, and you may also have other rights that vary by
state or province.
(c)2002 WOOKSUNG Electronics, Inc. All rights reserved. WOOKSUNG, the WOOKSUNG logo and TelePhoSee are trademarks of
WOOKSUNG Electronics, Inc., registered in Korea and other countries.