1
NETBOX User’s Manual
Trademark:
All trademarks are the property of their respective owners.
Version:
User’s Manual V1.0 for NETBOX.
P/N: 3A222V800-000-G
!
Caution : refers to important information that can help you to use NETBOX
better, and tells you how to avoid problems.
ARNING
!
W
CA
UT
IO
N
Symbol description:
Warning: indicating a potential risk of hardware damage or physical injury may
exist.
WEEE:
The use of this symbol indicates that this product may not be treated as household
waste. By ensuring this product is disposed of correctly, you will help prevent potential
negative consequences for the environment and human health, which could otherwise be caused by inappropriate waste handling of this product. For more detailed
LQIRUPDWLRQDERXWUHF\FOLQJRIWKLVSURGXFWSOHDVHFRQWDFW\RXUORFDOFLW\RI¿FH\RXU
household waste disposal service or the shop where you purchased this product.
CAUTION
RISK OF EXPLOSION IF BATTERY IS REPLACED
BY AN INCORRECT TYPE
DISPOSE OF USED BATTERIES ACCORDING
TO THE INSTRUCTIONS
© All rights reserved.
All trade names are registered trademarks of respective manufacturers listed.
$OOLPDJHVDUHIRUUHIHUHQFHRQO\SOHDVHUHIHUWRWKHSK\VLFDOSURGXFWIRUVSHFL¿FIHDWXUHV
CA
UT
IO
N
Safety Notice :
!
Before using this product, please read the below safety notice carefully,
this will help to extend the product’s lifecycle, and work normally.
Ŷ :KHQ1(7%2;LVZRUNLQJSOHDVHPDNHVXUHLWVYHQWLODWLRQV\VWHPLV
working.
Ŷ 7KHSRZHUDGDSWHULVGLVVLSDWLQJKHDWGXULQJQRUPDOXVHSOHDVHEHVXUH
not to cover it and keep it away from your body to prevent discomfort or
injury by heat exposure.
Ŷ 3OHDVHXVHWKHSRZHUDGDSWHUWKDWFRPHVZLWKWKHSURGXFW¶VSDFNDJH
wrong power adapter may damage your device.
Ŷ 0DNHVXUHDOOWKHSHULSKHUDOVDUHSURSHUO\FRQQHFWHGEHIRUHXVLQJ1(7BOX.
Ŷ 7KLVSURGXFWVKRXOGRQO\EHXVHGLQDQHQYLURQPHQWZLWKDPELHQWWHPperatures between 0ƕC and 40ƕC.
Ŷ $OZD\VVKXWGRZQWKHFRPSXWHUEHIRUHLQVWDOOLQJRUXQLQVWDOOLQJWKHSHripheral which does not support hot plug.
Ŷ 'LVFRQQHFWDOOSHULSKHUDOVEHIRUHVHUYLFLQJRUGLVDVVHPEOLQJWKLVHTXLSment.
Ŷ 3OHDVHGRQRWGLVDVVHPEOHWKLVSURGXFWE\\RXUVHOIany disassembly not
approved by the original manufacturer may result in malfunction, and void
warranty.
Ŷ 5LVNRIH[SORVLRQLIEDWWHU\LVUHSODFHGE\DQLQFRUUHFWW\SHSOHDVHGLVpose of used batteries according to the instructions.
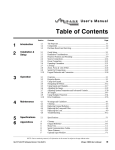
TABLE OF CONTENTS
Chapter 1 Introducing the NETBOX
Product Overview .....................................................................................2
/(',QGLFDWRU,QWURGXFWLRQ........................................................................4
Chapter 2 Placing and connecting the NETBOX
Placement of NETBOX
2QWKH'HVN .........................................................................................6
2QWKH'LVSOD\%DFN.............................................................................6
Connection of NETBOX
Connect the Monitor .............................................................................8
&RQQHFWWKH86%'HYLFHV....................................................................8
Connect the Network Cable .................................................................8
Connect the Power Cord ......................................................................9
Chapter 3 Install Windows OS
Install Windows XP................................................................................. 11
Install Windows 7 ...................................................................................15
The NETBOX is a compact and easy to use desktop. It features all
the desktop capabilities but with a slim body design which enables
your to browse the internet in a relaxable and comfortable way.
This chapter introduces the following information:
Ŷ3URGXFW2YHUYLHZ
Ŷ
/(',QGLFDWRU,QWURGXFWLRQ
NETBOX features all the desktop capabilities but with a slim body design which enables you to
1
browse the internet in a relaxable and comfortable way.
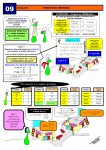
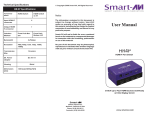
1-1 Product Overview
1. Top View
(190mm)
7.5in
5.3in
(135mm)
2. Front Side View
0.95in
(24mm)
//6B/('
1
2
3
4
5
//6B/('
6
7
8
9
No.
Name
'HVFULSWLRQ
1
Headphone Port
Connects to a headphone
2
0LFURSKRQH,QDQG63',),Q
Port
Connects to a microphone or playback devices with
optical connectors(3.5mm jack)
3
Multi-Function Card Reader
6XSSRUWV6'6'+&06063UR00&PHPRU\FDUGV
4
USB Ports
Connect to USB devices
5
:/$1B/('
Indicates Wireless connection states
6
//6B/('
Indicates different system states
7
+''B/('
Indicates hard disk states
8
Suspend Button with
,QWHJUDWHG/(',QGLFDWRU
Enter suspend mode in operating system
Indicates suspend states
9
Power Button with
,QWHJUDWHG/(',QGLFDWRU
Turning the power on/off
Indicates system states
2
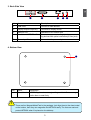
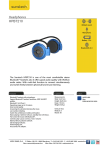
3. Back Side View
1
1
2
3
4
5
No.
Name
'HVFULSWLRQ
1
USB Ports
Connect to USB devices
2
'LVSOD\2XWSXW3RUW9*$
Connects to display device
3
Network Port
Standard RJ-45 network port
4
/LQH2XWDQG63',)2XW3RUW
Connects to powered analog speakers or recording devices with optical connectors(3.5mm jack)
5
Power Input Port
Connects to the power adapter
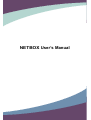
4. Bottom View
1
No.
CA
UT
IO
N
1
!
Name
'HVFULSWLRQ
Sheet Metal
1(7'9'RSWLRQDODFFHVVRU\RUMagnet-Metal-Feet can magQHWL]HWKHPWRVHDW¿UPO\
There are four Magnet-Metal-Feet in the package. Just align them to the sheet metal
on the bottom, then they can magnetize the NETBOX easily. The feet can seat and
protect NETBOX when it is placed on the tabletop.
3
1
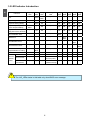
1-2 LED Indicator Introduction
Indication
Suspend_ Power_ +''B
/('
/('
/('
WLAN_
/('
LLS_ LLS_ LLS_ LLS_ LLS_
/(' /(' /(' /(' /('
Boot
-
Green
Red
Blink
-
-
-
-
-
-
S0(Working Mode)
-
Green
-
-
Off
Off
Off
Off
Off
S1(Power-Saving Mode)
-
Green
Off
-
Off
Off
Off
Off
Off
Red
Blink
-
Off
-
Off
Off
Off
Off
Off
-
Off
Off
-
Off
Off
Off
Off
Off
CPU Initialization Error
-
-
-
-
Blue,
Blink
-
-
-
-
'5$0(UURU
-
-
-
-
-
Blue,
Blink
-
-
-
BIOS Boot Block Fail
-
-
-
-
-
-
-
Blue,
Blink
-
BIOS Checksum Error
-
-
-
-
-
-
-
-
Blue,
Blink
CMOS Cleared [Press
Suspend Button for 4Sec.]
-
Red,
Blink
-
-
-
-
-
-
-
+''5:'DWD
-
-
Red
-
-
-
-
-
-
Link to AP
-
-
-
Blue
-
-
-
-
-
No Link to AP
-
-
-
Blink
(Once every 5Sec.)
-
-
-
-
-
'DWD
Transmission
-
-
-
Blink
,QGH¿QLWHLQWHUYDO
-
-
-
-
-
S3(Standby Mode)
[Press Suspend Button]
S4(Hibernation Mode)&
S5(System Power Off Mode)
CA
UT
IO
N
Wireless
Network
Enable
!
7KH//6B/('VVWDWXVLQWKLVWDEOHRQO\VKRZ%,26HUURUPHVVDJH
4
In this chapter, the placement and the connection of some necessary peripherals will be introduced.
This chapter includes the following information:
Ŷ3ODFHPHQWRI1(7%2;
Ŷ
&RQQHFWLRQRI1(7%2;