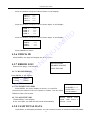
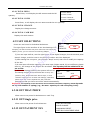
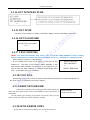
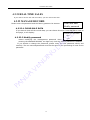
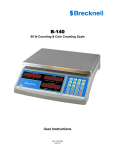
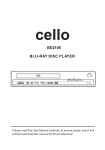
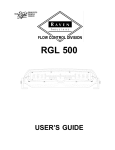
1
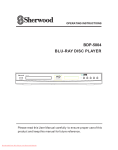
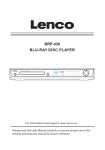
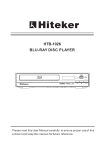
VENDING MACHINE
CONTENTS
CHAPTER 1 QUICK INSTRUCTION ................................................ 2
1.1
PRE-USE PRELIMINARIES ....................................................................................................................................... 2
1.2 CUSTOMER’S OPERATION GUIDE ................................................................................................................................. 2
CHAPTER 2 CAUTIONS ............................................................... 4
D
CHAPTER 3 DESCRIPTIONS OF VENDING MACHINE ........................ 5
LIM
ITE
3.1. SPECIFICATIONS AND FIELDS OF APPLICATION ........................................................................................................ 5
3.2THE SKETCH MAPS OF VENDING MACHINES AND THEIR KEY PARTS........................................................................... 5
CHAPTER 4 ADMINISTRATOR PROGRAMMING GUIDE ...................... 8
4.1 HOW TO TURN THE VENDER ON?.................................................................................................................... 8
4.2 PROGRAMS &USAGES .................................................................................................................................................. 8
G
CHAPTER 5 GUIDES FOR LOADING PRODUCT .............................. 16
IN
CHAPTER 7 INSTALLING A COIN MECHANISM .............................. 19
VE
N
D
CHAPTER 8 THE MAINTENANCE AND TROUBLE SHOOTING ............ 20
8.1 CLEANNESS AND MAINTENANCE OF THE MACHINE ................................................................................................... 20
8.2 MAINTAINING THE MACHINE ...................................................................................................................................... 20
8.3 TROUBLESHOOTING ................................................................................................................................................... 20
PA
N
D
A
CHAPTER 9 LIMITED WARRANTY ............................................... 22
1
VENDING MACHINE
Chapter 1 Quick Instruction
1.1 Pre-Use preliminaries
1.1.1 Unpack machines and components
Dismantle all packing materials such as wooden base, tapes, strands, form plastics, cardboard,
etc.
1.1.2 Lay the machine in a suitable location
D
1.1.3 Install coin mechanism
LIM
ITE
After installation, please check the alignment of the coin insert chute and cashbox chute. Insert
some coins to check that they can drop to the coin changer and exit from the return cup
properly.
1.1.4 Power on, machine self-test
VE
N
D
See chapter 6
IN
1.1.5 Loading commodities
G
When the door is open, door handle and lock will mount out automatically. Insert the key, spin
the handle counter-clockwise till the lock completely open, and then pull the lock handle to open
the door.
1.1.6 Set prices and other parameters
Before you use the machine,you should first set price of each selection of products and stick
A
price labels, which are offered together with machines, onto each track accordingly.
See chapter 4<<Administrator's programming guide\4.2 Programs &usages>> for more
details.
D
1.1.7 Fill coins for change
N
You need to load enough amounts of coins into coin mechanism. Make sure the door of coin tube
is closed.
PA
Please refer to chapter 7 <<Installing a coin mechanism>>
1.1.8 Delivery Tests
1.2 Customer’s operation guide
As required in the part of peruse preliminaries, customers can use the vending machines
according to the following steps.
1.2.1 Select product and enter commodity number
Check the selection ID of product needed through glass window of machine and press it on
customer's keyboard. After entering valid number, the machine will automatically display the
2
VENDING MACHINE
unit price and the received sum. If you want to choose another item, please directly enter the
column ID.
1.2.2 Insert cash
1.2.3 Picking up product
VE
N
D
1.2.4 Coin return/change-giving
IN
G
LIM
ITE
Push the delivery door forward and pick the product you have bought.
D
Through bill validators or coin acceptors, insert banknotes or coins with suitable and acceptable
kinds of cash. After inserting enough money, the machine will automatically deliver that product
into delivery box. You may insert one bill or one piece of coin at a time, and after a 2-second
interval, you can continue inserting money.
The vender will return your changes automatically, please get coins change in coin return box.
PA
N
D
A
Also you can press coin-return button to return your money back manually;
3
VENDING MACHINE
Chapter 2 Cautions
Notices for safety reasons
2. 1 Power source
Must power off
The standby voltage, Herz and Amperes applied to our vending machines are 220V/50Hz/. If
the voltage is altering in a relatively wide range for AV 220V/50Hz if voltage is 187~242V), it
LIM
ITE
D
may cause abnormal sound of compressor, abnormal working condition of machine, or result in
burning of compressor and other troubles. To avoid these problems, a voltage-steady device
(over 1000Watt) is required to use additionally.
2. 2 Ground
VE
N
D
IN
G
Must connect to ground
A three-pin plug is used in the power harness.
In whatever condition, never cut out or dismantle this three-pin
plug.
A reserved isolated socket shall be used for safe ground
connection purposes.
2. 3 protect the power harness cable
D
A
No touch!
Do not pull or trundle the cable. Make sure to pull out the plug directly
from socket by holding tightly the plug itself instead of handling the
cable. When transporting or moving machine, please store the cable
into the power harness cable box.
PA
N
2. 4 Strict prohibition of dismantling or modification
by untrained technician.
No dismantling permitted.
Repair and maintenance requires a qualified trained technician to
perform the particular task. Or else unrepairable trouble may be
caused.
2. 5It is strictly prohibited to load
It should be noted or obeyed
Flammable, explosive hazardous articles or materials with dense corrosive acids or alkalis.
4
VENDING MACHINE
Chapter 3 Descriptions of vending
machine
3.1. Specifications and fields of application
It can sell bottled or canned cold beverages with specialized size (at an adjustable temperature
of 3℃~14℃)and also vend small regular supplies such as snacks. It was featured at a
LIM
ITE
D
combination function of a set of beverage machine with a set of non-refrigerated snack machine,
adaptable to changes of different seasonable to save electricity costs site rentals and invested
capitals on machinery.
3.2The sketch maps of vending machines and their key parts
G
(1) The out look sketch map
IN
Tray
A
VE
N
D
Selection
7’’ LCD
LCD display
User keypad
Lock
Bill entry
D
Coin entry
N
Coin return button
PA
Coin return cup
Delivery box
Lock: It is a sort of vending machine-oriented lock with high Intensity and excellent quality for
against theft.
Toughened glass: It’s a sort of high intensity glass with safe quality to man In case of crashed.
LCD: A visual interface used here to show the operating status of machine.
User keyboard: Used for buyer to execute the vending operation.
Bill entry: insert a bill here for buyer.
Coin return button: a key for buyer to press to get his/her changes.
Coin entry: Insert coins here (one by one) for buyer.
5
VENDING MACHINE
Coin return cup: Buyer gets his/her coin balance here.
(2) The inside looks of machine
Speaker
SPRING
7”LCD
PCB
D
Keypad
LIM
ITE
Bill box
Bill entry
Lock
Coin track
G
Return button
IN
Coin mechanism
VE
N
D
Coin return box
Coin overflow box
Cooling system
Power control
Delivery box
Please refer to the relative section of the machine for illustration
D
A
Tray: product loaded here and dispensed by its spiral as a vending action.
VMC: the micro-computer controller of vending machine with 6 tray interface from A to E, MDB
interface, power supply interface, temperature controlling board interface, etc.
PA
N
Service keyboard: it gives the service personnel the means to program, retrieve data from,
and view diagnostic information about the vending machine.
LCD PCB board which controls the display information of LCD.
Bill acceptor, a optional equipment used to accept and store the specific bills.
Coin track: a coin passing way between the coin inserting entry of the vending machine to the
entry of the coin mechanism.
Coin return mechanism: a set of mechanism used to pass the return action which origins
from the coin return button of the vending machine and ends at the return rockey of the coin
mechanism.
Coin mechanism: A indispensable equipment which is capable of accepting, storing and
dispensing coins. It interfaces with the VMC through MDB protocol.
Delivery door: it is either convenient for buyer to get the product or anti-theft.
Cooling system: it is used to decrease, keep at a lower level of temperature.
Spring: it is used to push the item out of the tray while vending.
6
VENDING MACHINE
IN
G
LIM
ITE
D
(3) Sketch map of cooling system
VE
N
D
①Cooling cabinet, a device capable of storing and dispensing can and bottle beverage.
②Temperature retaining box, a special box which is used to keep the temperature of
D
A
evaporator.
③Electric fan of condenser, a device used to decrease the temperature of condenser.
④Copper pipe: the pipe used to connect the compressor, condenser and evaporator.
⑤Water cup, used to contain the water from the evaporator.
⑥Evaporator, a equipment used to evaporating the cool liquid.
⑦Electric fan of evaporator: a device to blow and convey cold wind.
⑧Condenser, cooling the gas with high temperature and high pressure into liquid with lower
PA
N
temperature and lower pressure.
⑨Temperature controlling board: a PCB used to control the cooling system.
⑩Compressor: used to change the gas with lower temperature and pressure into gas with
higher temperature and pressure.
7
VENDING MACHINE
Chapter 4 Administrator Programming Guide
4.1 HOW TO TURN THE VENDER ON?
All the power switches are placed on the
power control board as the following
picture shows.
1) Plug the power harness in;
2) Push the RCD (residual current device)
to “ON” place to power on the vender.
3) Turn on the power switch (the left
one).
4) Open the other four switches on the
panel which control transformer power
supply, fluorescent lamp, air conditioning
and glass heating respectively.
Temperature control
Glass heating
Refrigerating
LIM
ITE
D
Light switch
Main power
Fuse
RCD
Attention: When the switches which
G
control transformer power supply, LED
lights, the power and the air conditioning are open, the lamps in the switch are bright, but
VE
N
D
IN
when the glass heating switch open, the lamp is off!
4.2 Programs &usages
Four service mode buttons navigate the service menu.
Button
This key is used to increase a numeric
value, or move forward through the
various service mode functions
This key is used to decrease a
numeric value , or move backward
through the various service mode
functions
This key is used to confirm ,accept ,
or enter into a service mode function
This key is used to Exit Service MODE
or to leave a service mode function.
S4
S2
S1
PA
# Enter
N
↓(0)
D
A
↑(8)
Definition
*Cancel
Entering service mode
Enter service mode, open the vendor door and Press Button S1, then press S4 quickly (SEE
THE RIGHT PICTURE). And the display will show “PLEASE INPUT PASSWORD”, the default is
000000. At the time, you can use the keypad on the front of the machine to move through the
various service mode menus. The menus will be seen as the following picture shows.
MENUS
DISPALY
EXPLAINATION
8
Operation step
VENDING MACHINE
↑(8) upward
TOTAL SALES
TOTAL
****
BILL 1
BILL 8
COIN1
COIN8
BILL&COIN QTY
CASH
SALES
*** …
***
***…
***
CHECK ID
CASH TOTAL DATA
TOTAL BILLS
TOTAL COINS
TOTAL CHANGE
TOTAL CASH BOX
SET SELECTIONS
NO
001
PRICE
5.00
CAPACITY 060
Input the slot NO or press
enter to next slot
calculating the total
items sold and total
cash sales for all
slots
Press cancel to return
Cash & coin quantity
received
Press enter to page down
Check the ID
Press cancel to return
Set the unit price and
stock of some slot
VE
N
D
ERROR LOG
MOTOR ERROR
PAYMENT SYS ERR
LOCK THE VMD
Check sales quantity
and sales amounts
Input the slot NO or press
enter to next slot
D
SALE PER SELECT
NO
***
STOCK
***
CAPACITY ***
PRICE
***
NO
***
QTY
***
SALES AMOUT ***
TOTAL ITEMS SOLD
***
move > and press enter to
save
LIM
ITE
SELECTION INFO
Choose
Chinese
or
English
for
vender
display
check
stock
and
capacity of some slot
G
>LANGUAGE/语言
↓(0) downward
IN
> choose cursor
Choose the subdirectory
menu and press enter to
check error code and press
enter again to clear the
error records
Choose the subdirectory
menu and press enter to
check the sum
Move > to choose and
input the set figures, also
the price and the capacity
The capacity must not exceed the maximum capacity. and capacity=199
means no limit
SET TRAY PRICE
D
A
SET SINGLE PRICE
PA
N
SET PAYMENT SYS
SET DROP SENSOR
SET TEMPERATURE
1 SET BILL RETURN
2 GIVE CHANGE
3 MAXIMUM CREDIT
4 SET BILL COIN FORCE
VEND
1. SET ALL MOTORS
2. SET single MOTOR
3. CANCEL MOTOR
4. TEST SENSOR
5. SENSOR SELF TEST
BEFORE SELECTION
↑(8)ADD
↓(0)REDUCE
SET TEMPERATURE
**
SET TIME
SET PASSWORD
ENTER NEW PASSWORD
******
TEST MOTOR
INPUT 0 TEST ALL
INPUT MOTOR #
***
*START #RETURN
set the same price
for Selections on
each Tray
set the same price
for all Selections in
the vender
set the features of
the payment system
Input the tray NO and the
tray price figures
Input the price figures
Choose the subdirectory
menu and set
Set the drop sensor
test method and set
according to your
need
See 4.2.13
Set temperature
Input numbers or press
↑ (8 ) / ↓ ( 0 )
to
ADD/REDUCE
Set date and time
Input the Corresponding
figures
Input the new numbers
Set a new password
for entering menus
Test the motor. Input
the selection ID, the
9
Input the selection ID
NO. ; 0 means all motors
VENDING MACHINE
DROP SENSOR ERR
GIVE CHANGE
VEND NEW MOTOR
REAL TIME SALES
Clear sale data
Modify password
Press enter to set and
cancel to return
Set according to your need
LIM
ITE
MANAGE RECORD
Choose and enter
when the vending has
been failed
Send error message
by GPRS
Send
real
time
message
including
trade message.
Set
the
manage
password and clear
all the record data
SEND ERROR GPRS
Shows the sum when you
manually insert coins
D
COIN FILL
motor of this ID will
move around
Shows the count of
the coins of each
denomination
Two ways to be set
4.2.1LANGUAGE
G
When the choose cursor point to [LANGUAGE/语言], Press ENTER to language selecting. There are
two languages optional, Chinese and English.
4.2.2 SELECTION INFO
VE
N
D
IN
NO
***
This function is used for checking the stock and capacity of any
STOCK
***
slot. When the choose cursor point to this menu, Press ENTER to the
CAPACITY ***
query the stock, capacity and the price of the NO show slot. And
PRICE
***
press ENTER to next slot, press CANCEL to return.
Attention: The STOCK amount must be manually updated
in program every time after the machine is refilled (Refer to Section 5.2).
4.2.3 SALE PER SELECT
A
NO
***
D
Press ENTER, you will see the sales quantity and sales amounts of the
re-press
QTYslot. Then ***
ENTER to next slot.
SALES AMOUT
N
***
PA
4.2.4 TOTAL SALES
Press ENTER: This function is used for calculating the total
items sold and total cash sales for all slots.
TOTAL ITEMS SOLD
***
TOTAL CASH
SALES
****
4.2.5 BILL&COIN QTY
Press ENTER to inquire the Cash quantity. It will display:
BILL
BILL
BILL
BILL
1
2
3
4
***
***
***
***
10
VENDING MACHINE
Press any button except the cancel button. It will display:
BILL
BILL
BILL
BILL
5
6
7
8
***
***
***
***
COIN
COIN
COIN
COIN
1
2
3
4
***
***
***
***
COIN
COIN
COIN
COIN
5
6
7
8
LIM
ITE
Press any button except the cancel button again. It will display:
***
***
***
***
IN
G
Press CANCEL to return.
4.2.6 CHECK ID
D
Press any button except the cancel button again. It will display:
VE
N
D
Press ENTER, the page will display the ID is ******.
4.2.7 ERROR LOG
Enter to this page, it will display:
MOTOR ERROR
PAYMENT SYS ERR
LOCK THE VMD
A
4.2.7.1 MOTOR ERROR
CODE**
CODE**
PA
N
***SLOT
***SLOT
D
Press ENTER, it will display:
4.2.7.2 PAYMENT SYS ERR
Press ENTER, the menu display as shown, it is used for
processing the status of the coin system in trouble. You can press
ENTER to clear the records.
4.2.7.3 LOCK THE VMD
Press ENTER, it will display:
If the vend fails, the VMD will be locked automatically.
BILL
*** ***
CHANGER *** ***
CASHLESS *** ***
CLEAR PRESS *
SERIES ERROR WILL
LOCK VMD INPUT 9
NEVER LOCK
4.2.8 CASH TOTAL DATA
Press Enter, it will display as shown. You can use this function to check the total cash data.
11
VENDING MACHINE
4.2.8.1 TOTAL BILLS
TOTAL BILLS
TOTAL COINS
TOTAL CHANGE
TOTAL CASH BOX
Press Enter, it will display the bill amount and the bill
quantity.
4.2.8.2 TOTAL COINS
Press Enter, it will display the coin amount and the coin quantity.
4.2.8.3 TOTAL CHANGE
Display the change amount.
Display the cash amount
4.2.9 SET SELECTIONS
Users can set Prices for Individual Selections.
LIM
ITE
D
4.2.8.4 TOTAL CASH BOX
The right figure is the interface of 001 slot Settings. For
example, you want to set the unit price of the 001 slot to be 5, the
5.00
060
steps:
G
capacity as 50; you can execute the following
NO
001
PRICE
CAPACITY
IN
1) You can input 005.00, see the right figure, If the digital changes, but the decimal point
VE
N
D
doesn’t change, and the zeros in the front of number won’t be displayed.
2) After setting the unit price, you will hear “beep” sound, and turn to modify the capacity
of the slot.
3) In case input 050 as the capacity (you must input 3 digits words, if it is insufficient, please
enter 0), the change of the surface are as shown. The capacity will be unlimited if it’s
set as 199.
4) When the Setting finished, the system will turn to
A
the setting surface of the 002 slot after a beep. If it
D
needs to reset, please follow the above steps, or click
“cancel” button to turn to other slot settings, otherwise,
NO
PRICE
CAPACITY
001
20.0
050
N
please click “ok” on the keyboard to exit, the slot
parameters that you have set will be saved automatically.
PA
Attention: the capacity of the slot must not exceed the maximum capacity, which depends
on the coil number of spring (e.g., the max. capacity of a 15-coil spring is 15).
4.2.10 SET TRAY PRICE
Allow user to set prices for Selections on each Tray
4.2.11 SET Single price
Allow user to Set prices for all Selections
4.2.12 SET PAYMENT SYS
12
1 SET BILL RETURN
2 GIVE CHANGE
3 MAXIMUM CREDIT
4 SET BILL COIN FORCE VEND
VENDING MACHINE
The function is used to set the features of the payment system of the machine.
4.2.12.1 SET BILL RETURN
Bill stayed at the recycler before dispensing the item or not
4.2.12.2 GIVE CHANGE
Coin change giver enabled/disabled
4.2.12.4 SET BILL COIN FORCE VEND
.
LIM
ITE
Maximum amount of cash inserted at one time
D
4.2.12.3 MAXIMUM CREDIT
VE
N
D
IN
G
This menu is used to Enabled/disabled the acceptance of denominations of bills and coins.
“1111111111111111” is the default value; the end digit indicates the smallest denomination
of the bills /coins, increasing from right to left.
”1” indicates “accepted”,”0” indicates “unaccepted”.
For example: Bill validator can accept two denominations $1, $5. We will make Bill $1,
to be accepted, Bill $5 unaccepted, then we set the right digit as “1” , the second right
digit as “0” .
Coin changer can accept two denominations $0.1, $0.5. We will make coin $0.1, accepted,
Coin $0.5 unaccepted, then we set the right digit as “1”, the second right digit as “0”.
D
A
1. SET BILL KINDS
1111111111111111
2. SET COIN KINDS
1111111111111111
PA
N
4.2.13 SET DROP SENSOR
13
1. SET BILL KINDS
111111111111101
2. SET COIN KINDS
111111111111110
VENDING MACHINE
4.2.14 SET TEMPERATURE
4.2.15 SET TIME
LIM
ITE
D
Set time of the machine “years—months—days—hours–minutes—seconds”
4.2.16 SET PASSWORD
G
ENTER NEW PASSWORD
******
4.2.17 TEST MOTORS
IN
(Note: You must first disable drop sensor <Re: 4.2.13 SET DROP SENSOR> before testing
motors, otherwise the motors will rotate 90 degree more <i.e., 450 degree> during the test)
VE
N
D
After entering to menu, it will display:
test only the aisle rotation. For example, if you input 001, it is
INPUT 0 TEST ALL
INPUT MOTOR #
***
only to test 001 aisle rotation. * indicates input began after
*START #RETURN
If you choose the 0 side of all aisles, it will test all the
rotation of
the aisle. If you choose” INPUT MOTOR”, it will
A
keys. # indicates return to interface.
D
4.2.18 COIN FILL
PA
N
Shows the count of the coins of each denomination being inserted .Manual dispense of
the Coin mech. is enabled in the menu option.
4.2.19 DROP SENSOR ERR
This menu is used when the vending has been failed. When the
cursor has being point to this menu, Press ENTER to enter to this menu, it
will display:
You can select [give change] to give back you money. Also you can
select [vend new motor] to continue another vending.
4.2.20 SEND ERROR GPRS
If you want to send error by GPRS, you can choose this item.
14
GIVE CHANGE
VEND NEW MOTOR
VENDING MACHINE
4.2.21 REAL TIME SALES
If you want to known the real time sales, you can choose this item.
4.2.22 MANAGE RECORD
Please enter the password and the factory password is 000000.
Clear sale data
Modify password
4.2.22.1 CLEAR SALE DATA
D
If you want to clear all the record data, you can choose this item. Press ENTER to enter to
this page, it will display:
CLEAR ALL RECORD
YES
NO
LIM
ITE
4.2.22.2 Modify password
PA
N
D
A
VE
N
D
IN
G
means modifying the management password when
entering the MANAGE RECORD, six digits only. And the default password is 000000.
If you decide to change the password, please enter the new password slowly and
carefully. The two entered passwords must be the same in the processing of reset a new
password.
15
VENDING MACHINE
Chapter 5 Guides for Loading Product
When there is no goods in some column, please add goods in time. Pay attention that the goods
loaded must be equal to the selection capability set. Please load goods according to the
following two steps.
5.1 Manually loading products
VE
N
D
IN
G
LIM
ITE
D
1) Put both hands on the tray and Pull the tray toward you enough then you will let the tray into
the loading position.
2) The width, thickness and height of the loaded items should match with
the width of the tray column, the screw-pitch of the spiral and the distance
between the tray and the neighboring upper tray respectively.
3) The items should be in succession put rearwards and avoid suppressing
the spiral.
4) To avoid the bottled drinks falling down accidentally or jammed by the
spirals, they should be loaded to the column where the starting position of the spiral points to
the direction of 1 or 11 o’clock (leftward or rightward) as shown below.
Rightward 11:00
A
Leftward 1:00
PA
N
D
5) To avoid jammed by the spiral, the bagged, and canned items should be loaded to the column
where the starting position of the spiral points to the direction as shown below.
Leftward 5:00
Rightward 8:00
16
VENDING MACHINE
6) To avoid jammed by the spiral, the small bagged items should be loaded to the column where
the starting position of the spiral points to the direction as shown below.
Rightward 5:00
D
Leftward 7:00
LIM
ITE
7) Other item without above mentioned singular package should be loaded by trial.
8) Push the tray toward the back of the cabinet, and then return the trays to the vending
position.
5.2 Update STOCK amount in program
VE
N
D
IN
G
After all columns are refilled, press [S2] key on mainboard and a hint will be displayed on LCD
to ask if all columns have been refilled. At this time, please press “enter” to confirm, and the
STOCK amount of each columns will be updated.
NOTE:
①Steps 5.1and 5.2 must be done when adding goods generally.
②the loading goods quantity in some selection must be equal to the set capacity(see 4.2.9 SET
A
SELECTIONS)
③when capacity=199 (unlimited), step 5.2 need not to do.
D
Chapter 6 Refrigeration settings
N
6.1 Adjust the controlling temperature
PA
Press Button SET, the temperature number will flash, and then press “△” or “▽”to increase or
decrease the temperature. Then press SET to confirm and exit .If not press any Button, It will go
back to the previous temperature in 10 seconds.
6.2Temperature control
When the machine is switched on, the actual inside temperature is higher than the controlling
temperature + temperature allowance, the compressor will start. The compressor will
start .When the actual inside temperature is lower than the controlling temperature +
temperature allowance , The compressor will stop .
Note: In order to protect the compressor, the stand-by time must exceed to delay time
(default value: 4 minutes).
17
VENDING MACHINE
6.3 Parameters setting
Press Button SET ,and hold for 6 seconds, and enter into parameter - setting page .The page
show E1 and flash , press again and it will show the default value .(Press Button △ or ▽to modify and
save the new value).
Press Button SET to set E2, E3, E4, E5 following the above steps like E1.
If you don’t press any button in 10 seconds, it will return to normal operating mode and
save the new value at the same time.
Setting range
Default vale
E1
Lowest controlling temperature
-45℃ ~ controlling
temperature
-2℃
E2
Highest controlling temperature
E3
Temperature allowance
E4
Delay time
E5
Temperature adjustment
D
Function
controlling
temperature~45℃
1~10℃
20℃
LIM
ITE
Parameter
0~10min
sensor
6.4 Parameters Lockout
4℃
4min
-10~10℃
VE
N
D
IN
G
Press and hold Button ▽ for 10 seconds, it displays OFF, which means the parameters are locked.
Once in lockout status, the parameters and controlling temperature value can’t be modified .If it
displays ON, it means the parameters are unlocked. (Default value = ON)
6.5 Timing defrost
PA
N
D
A
After working for a defrosting period (Default value = 2hours), the compressor will stop
automatically; after the defrost time (Default value = 15mins), it will go to the refrigeration mode
automatically.
When Defrost Period =“00”,the defrost function will be cancelled. Press Button SET, and hold
for 6 seconds, and enter into parameter - setting page.
The page displays F1 in flash, press again and it will show the default value (Default value=
15mins).Press Button SET again to set the F2 (Default value = 2hours). (Press Button △ or ▽ to
modify and save the new value).
If you don’t press any button in 10 seconds, it will return to normal operating mode
6.6 Over temperature mode
The temperature must not exceed the safety one. When the temperature sensor sensed
the actual temperature inside of the machine is higher or lower than the limit , it displays
18
“HH”or “LL”.
VENDING MACHINE
Chapter 7 installing a coin mechanism
Coin mechanism is an indispensable equipment of the vending machine which is used to accept,
store coins and to give changes. The vending machine employs the MDB protocol as the
communication interface between the VMC (vending machine controller) and its equipments.
So you should install a coin mechanism with MDB protocol and some proper coin tubes in the
vending machine.
PA
N
D
A
VE
N
D
IN
G
LIM
ITE
D
You can select a coin mechanism either via our company or from any other third party whoever
can offer the equipment.
Before connecting a coin mechanism with the VMC by their MDB plugs, please power off the
vending machine.
19
VENDING MACHINE
Chapter 8 the maintenance and trouble shooting
8.1 cleanness and maintenance of the machine
D
Clearing the inside and outside parts of machine by using a soft towel
or sponge with neutral liquid in a given period. Neither using scrubbing
brush, steel wire brush, nor using acid liquid such as decontaminating
powder, gasoline, banana water, acet and the like. Never wash any
circuit board of the machine for insulation-protection reason.
LIM
ITE
8.2 maintaining the machine
If the machine is not used for a long time, its power supply should be
cut off by unplugging the power outlet.
harness
Bill
red light of the bill
validator is on display
message reads: Coins
Only bills inserted cann't
be accepted
N
D
A
validator
certain motors do
not work in a good
condition
goods
was
prevented
moving by springs, thus
can't fall into the delivery
box
PA
Delivery
System
Cause
IN
Cable
Symptom
No messages or reaction
on the customers keypad
screen after power on
when customer make a
selection, the column ID is
Invalid
All the column ID for a
whole tray are Invalid
1.the plug of Machine is loose
2.Security device inside machine is Off
Relative motor assembly is broken; Main
controller board problem; Or connection
Problem
Malfunction in main Board driving part or
bad connection btw trays and transferring
panel
Bill insert passage way get stuck
VE
N
D
items
G
8.3 Troubleshooting
Goods is not delivered but
credit is enough much.
motor of any track
stays in a certain
Position
Machine beeps when the
door closed, showing error
message.
1.motor is broken down
2.Micro-driving switch is in bad connection
or malfunction
3.One of cables are broken
4.malfunction is in the driving parts of
main board or bad
connection between tray and transferring
Panel
goods is not matching the delivery spring
1.the selected products are all sold out;
2.products are not completely pushed
out( spring turned half a circle); 3.motor
connection coupler is broken;
4.jam inside delivery motor; 5.springs for
delivery Block products
1.bad touch or malfunction in
limited switch; 2.shape of coupler is
changed erratically
Situations are as described in operator's
guide
20
Fix/remedy
1. Plug in the socket firmly and
tightly
2. press the button to switch it on
Change motor Assembly; check
the harness relative; replace the
main board of small motors,
replace the main board, check
the harness relative
Take off the bill validator, press
the button to open the sensor
part of recognition, clear the jam
and reinstall the validator onto
the machine.
1.repair or replace motor
2.connect switch
3.repair of replace cable harness
of motors
4.change the main board or
repair
the circuit of motor driving
adjust/change goods into a
suitable track
1.load products
2. Try purchase again
3.replace coupler
4.make adjustments or replace
the motor.
1. Replace new switch for
position limit. 2.replace coupler
1.reset power 2.correct the error
by following instructions shown
on display
VENDING MACHINE
board
Display shows out of
service vendor doesn't
accept
cash
customer
unable to purchase.
No display; disordered
display
message;
continuous beeping sound
coin
mechanism
the display screen is
streaked with Serious dark
lines
the display shows "No
changes, please continue
Buying
Lack of change coins inside the coin box
rare object or coins get stuck in entrance
or passageway or coin sensor
1.No enough changes or coin mechanism
can t recognize enough changes inside
itself 2.coin return track jam
3. Abnormal stuff gets into mechanism
that prevent coins fall into coin return cup.
4.erractic coin return because coin erected
in coin tubes
5.coin is stuck with dirt like adhesive Tape
1.Temperature-Control
Board
is
malfunction, compressor is powered off or
bad Connection in Harness
Temperature-Control Board is malfunction
or the controlling harness is in bad
Connection
the evaporating fan is broken, cooling
system gets stuck, lack of refrigerant
1.machine is too close to wall;
2.compressor is covered with dust;
3.abnormal working condition with motors
of fan;
4.Lack of refrigerant;
5.bad sealing the door of cooling box;
Refrigera
VE
N
D
IN
G
Coins can not be
inserted or machine can't
detect coins
Incorrect changes after
vends
malfunction in LCD Display
compressor does not work
-tion
system
compressor can not stop
working
N
D
A
compressor is working but
it
can't
Cool
the
beverages; cooling effect
is bad
D
control
add adequate amount of coins
into
coin box
1.use a tweezer or other tools
pick out the rare object that stuck
inside the coin mechanism
2.pull out the sensor tenderly and
clear the stuck
1. Loading coins properly under
guide under supervisor's test
mode, inserting coins directly,
Press esc button to quit mode.
2. Clear the jammed stuff 3.clear
coin return track 4.add a proper
amount of coins into the coin box
and give out one coin for
inspection
on
Change-giver.
5.take out and clean the coins
from mechanism
replace
temperature-control
board, switch on compressor,
check harness
replace
temperature-control
board, check harness
LIM
ITE
Main
1.during no-vend period; 2.not motors
available for using 3.malfunction on
motors or relative connection is abnormal
4.MDB cable harness problem
5.power supply problem
6.coin mechanism is broken
7.problem in main board
1.Power problem
2.display board problem
3.main control board
1.modify settings; 2.repair or
replace motor; 3.repair of change
connection harness; 4.repair or
change MDB cable harness;
5.connect power cable or replace
battery; 6.repair or replace the
coin
mechanism; 7.replace the main
board with a new one
1.replace the switch with a new
one or adjust connection to reset
the main board; 2.replace it with
a new LCD display; 3.replace
main control board
replace it with a new LCD display
move the machine to change its
position, clear the dust on the
surface of compressor, check
motor for fan, ask expert to add
refrigerant, adjust the seal of
door
PA
Please make sure you are clear how to settle the problems in above-listed events, if problems
still can't be solved, please contact after sales service center for inquiry.
21
VENDING MACHINE
Chapter 9 LIMITED WARRANTY
LIM
ITE
D
Subject to the limitation specified herein, all parts included on original equipment manufactured
by our company and sold to purchaser are warranted for One (1) year from the date of shipment
of the equipment in question.
This warranty applies only to the original purchaser of the Merchandiser and is null and void if
the Merchandiser is sold during the period of warranty.
Defective parts will be repaired or replaced free of charge when the defective part is returned,
with transportation charges prepaid by purchaser, to a destination designated by our company.
This warranty does not include any cost of service rendered or repairs made by customer on
Merchandiser, or parts, unless authorization to incur such expense has been given in writing by
us prior to incurring such expense.
This warranty does not apply to A) electrical components, wiring, or circuits or mechanical parts
or assemblies damaged as a result of operating the Merchandiser at other than the design
voltage and frequency specified on the Electrical Rating Tag, or B) in event of vandalism, fire or
negligence, or C) fluorescent lamps, ballasts, starters or other expendable items, or D) when
seal is broken on electronic boards, or E) when other manufactured components are installed in
our machines.
PA
N
D
A
VE
N
D
IN
G
OUR COMPANY SHALL NOT BE RESPONSIBLE FOR CONSEQUENTIAL OR PUNITIVE
DAMAGES.
22