1
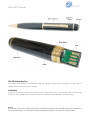
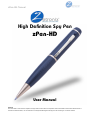
zPen-HD Manual
High Definition Spy Pen
zPen-HD
User Manual
NOTICE
The information in this manual is subject to change without notice. Zetronix Corporation shall not be liable for technical or editorial errors or
omissions contained herein; nor for incidental or consequential damages furnishing from the furnishing or use of this material.
zPen-HD Manual
The HD Video Spy Pen
Is a simple, multifunctional recording device built into a working ballpoint pen. Take photos, record audio, or
capture HD video with the touch of a button.
In the Box
In the box you will find the zPen-HD Video Spy Pen, a USB cable, an AC power adapter, and a mini disc that
contains a driver that allows the device to be used as a webcam (32-bit Windows computers only).
NOTICE
The information in this manual is subject to change without notice. Zetronix Corporation shall not be liable for technical or editorial errors or
omissions contained herein; nor for incidental or consequential damages furnishing from the furnishing or use of this material.
zPen-HD Manual
Getting Started
The first step in using your device is charging it. Connect the device to a USB port on your PC or plug it into AC
power with the included adapter. While charging, the LED indicator will blink yellow and will become solid when
the battery is full. Before first use, we suggest charging the device for 4 hours.
If you plan on viewing your files on your computer, we suggest using VLC Player. The most recent version can
be downloaded at no cost from http://www.videolan.org.
To power the device on, hold down the ON/OFF button for 2-3 seconds. The LED indicator will be yellow/blue
while the device is booting. When in video mode (Mode Switch 2) the pen LED will glow yellow for 2 – 3 sec
then will automatically stat recoding and the LED will change to blinking blue. The pen will blink 3 times to let
you know the device is recording then stop blinking and remain 100% stealth while recording.
To power the
device off, hold down the ON/OFF button for 2-3 seconds, and the LED light will turn off.
Recording Video
To record video, move the Mode switch to the 2nd position (all the way to the left). While in video standby, the
LED indicator will be yellow. Press the Record button to begin recording video. The LED will blink blue while
recording. The pen will blink 3 times to let you know the device is recording then stop blinking and remain
100% stealth while recording.
Press the Record button again to save your current file and stop recording.
(The devices will automatically stat recording after it has booted up)
Taking Photos
To take photos move the Mode switch to the 1st position. After the device is turned on in Mode Switch 1 it will
automatically start recording audio after boot up (Yellow LED will be slowly blinking.) Press the Record button
once to stop recording audio; the yellow LED will be solid. To take a photo press the record button, the LED will
blink blue to indicate it is capturing and storing your photo, and will return to solid green.
Recording Audio
To record audio, move the Mode switch to the 1st position. Turn the unit on and the unit will automatically start
recording audio after booting up. While recording, the LED will slowly blink yellow. To stop recording and save
the file, press and hold for 2 – 3 to shut the pen off.
To start recording again press and hold the record button
to turn it on and the pen will start automatically recording.
NOTICE
The information in this manual is subject to change without notice. Zetronix Corporation shall not be liable for technical or editorial errors or
omissions contained herein; nor for incidental or consequential damages furnishing from the furnishing or use of this material.
zPen-HD Manual
Reviewing Files on a Computer
To view your files on a computer, simply connect the device via the supplied USB cord or by inserting the
device directly into a USB port, making sure the device is powered OFF. It will connect as a removable drive,
and depending on the settings on your PC, it may automatically notify you that new hardware has been
detected. If so, select Open Folder to View Files. (If nothing is happening when the device is plugged it, it may
be possible that the USB is either not properly connected or connected backward, we suggest reversing the
rotation 180 degrees of the USB connector and insure that the USB connections are lined up)
If it is not automatically detected, click Start on your desktop. Select My Computer if you are using Windows, or
Computer if using Windows Vista or Windows 7. The device should be listed as a Removable Disk under the
Devices With Removable Storage section. Open that drive, there should be 4 subfolders AUDIO, IMAGE,
SYSTEM, and VIDEO.
The Video files will be stored in the VIDEO folder, the audio files in AUDIO folder and
photos in the IMAGE folder. As mentioned earlier, we suggest using VLC Player to play back video files.
On a Mac OS X System open the finder icon, the pen will be listed under devices in the left hand side on the
bottom of the finder menu with an eject button next to it. As mentioned earlier, we suggest using VLC Player to
play back video files in Mac.
Using Your Device as a Webcam
This device can only be used as a webcam on 32-bit Windows operating systems. If you are not using a
Windows computer, or are using a 64-bit Windows computer, this function will not work.
To use your device as a webcam, you will first need to install the driver from the included CD. Run the
executable file named PC Camera_Driver to install it. Follow the prompts on your screen and then reboot your
computer.
To access the webcam functionality of the device, with power off, hold down the RECORD button and connect
the device to your computer via USB. This should mount the device on your PC in webcam mode.
Setting Time and Date
Setting the time and date stamp on your device is easy. Simply create a .txt file on your computer and name it
“time”. In that file you will enter the date and time in the following format: year.month.day hour:minute:second.
(Ex. 2011.01.31 12.00.00 Y)Setting Time and Date
To turn the time and date stamp off, enter N instead of Y.
There is also a sample txt file on the included CD.
Once you’ve created the file, connect the device to your computer via USB and save the .txt file to the device’s
root directory NOT IN ANY OF THE SUB FOLDERS. When you connect the device to your computer, it will be
assigned a drive letter (ex. C:, D:, E:). When you open that drive, you are in the root directory, or topmost level
of the drive.
After you have loaded the file, safely disconnect the device from your computer, turn the device on and off, and
the time and date you loaded should now appear on any new videos and photos you record.
NOTICE
The information in this manual is subject to change without notice. Zetronix Corporation shall not be liable for technical or editorial errors or
omissions contained herein; nor for incidental or consequential damages furnishing from the furnishing or use of this material.
zPen-HD Manual
Basic Specifications
Format
Resolution
Recording Time
Battery Life
Audio / WAV
N/A
1,000 min per 1 GB
75 Min
Video
AVI 1280x720
20 min per 1 GB
75 Min
Photo
JPEG 4032x3024
N/A
N/A
Troubleshooting
Problem: The device seems to have frozen and isn’t reacting when any buttons are pressed.
Solution: This usually occurs if the device receives too many commands in too short a time. To reset the device,
insert a pin into the reset hole and hold for 2 – 3 sec
Problem: When playing back my video, I can hear audio, but have no video.
Solution: This most often occurs if your computer’s media player is having trouble with your files. Try using
VLC player, which can be downloaded for free at http://www.videolan.org.
Problem: My video playback is “choppy” or “stuttering.”
Solution: If this is occurring, try copying the video files to your PC. This happens when the file is too large to be
played back using your USB connection. If that does not help please format the drive of the Pen.
F.Y.I.
When there is insufficient space the blue LED will flash for about 10 sec before the Pen saves the last files and
shuts down.
When there is insufficient battery life the yellow LED will flash for 10 sec before the Pen saved the last files and
shuts down.
To download a PDF version of this manual or to receive addition technical support of
please go to
http://suport.zetonix.com
NOTICE
The information in this manual is subject to change without notice. Zetronix Corporation shall not be liable for technical or editorial errors or
omissions contained herein; nor for incidental or consequential damages furnishing from the furnishing or use of this material.
zPen-HD Manual
6. Limited Warranty from Zetronix Corp.,
Zetronix Corporation (“Zetronix”) warrants this product against defects in material or workmanship as follows:
PRODUCT: Zetronix will repair this product with new or refurbished parts, free of charge, for a period of one (1) year from the date of
original purchase in the event of a defect in materials or workmanship. REPAIRS: Zetronix will repair or replace defective parts used in the
repair or replacement of this product with new or refurbished parts, free of charge, for a period equal to the remainder of the original limited
warranty period on the original product, or for 60 days after the date of the repair or replacement, whichever is longer. This warranty is
extended only to the original purchaser. Proof of purchase in the form of a bill of sale or receipted invoice, which is evidence that the unit is
within the warranty period, must be presented to obtain warranty service. To obtain warranty service, you must take this product, or deliver
the product freight prepaid, in either its original packaging or packaging affording an equal degree of protection, to Zetronix Corporation.
See below for additional information. This warranty only covers failures due to defects in materials and workmanship, which occur during
normal use. The warranty does not cover damages which occurred in shipment, cosmetic damage, damage that is attributable to acts of
God, failures which are caused by products not supplied by the warrantor, or failures which result from accident, misuse, abuse, neglect,
mishandling, faulty installation, misapplication, improper installation, operation or maintenance, alteration, modification, introduction of
sand, humidity or liquids, line power surge, improper voltage supply, lightning damage, or subjecting the product to
operating/environmental conditions in excess of the maximum values or below the minimum values set forth in the applicable
specifications, or products serviced by anyone other than Zetronix. This warranty is invalid if the factory-applied serial number has been
altered or removed from the product. This warranty does not cover products sold AS IS or WITH ALL FAULTS. This warranty excludes
consumable parts such as batteries and power supplies.
THERE ARE NO EXPRESS WARRANTIES EXCEPT AS LISTED ABOVE. REPAIR OR REPLACEMENT AS PROVIDED UNDER THIS
WARRANTY IS THE EXCLUSIVE REMEDY OF THE PURCHASER. MYVU SHALL NOT BE LIABLE FOR LOST PROFITS, LOST
SALES, LOSS OF USE OF THE PRODUCT, OR OTHER INCIDENTAL OR CONSEQUENTIAL DAMAGES RESULTING FROM THE
USE OF THIS PRODUCT, OR ARISING OUT OF ANY BREACH OF THIS WARRANTY. ALL EXPRESS AND IMPLIED WARRANTIES,
INCLUDING THE WARRANTIES OF MERCHANTABILITY, FITNESS FOR A PARTICULAR PURPOSE AND TITLE, ARE LIMITED TO
THE APPLICABLE WARRANTY PERIOD SET FORTH ABOVE.
imitation of liability
SELLER SHALL HAVE NO LIABILITY FOR ANY CLAIM, LOSS, DAMAGE OR EXPENSE OF ANY KIND, INCLUDING FOR LOST
PROFITS, SPECIAL, INDIRECT, CONSEQUENTIAL, EXEMPLARY OR INCIDENTAL DAMAGES, WITH RESPECT TO THE
SELECTION, QUALITY, CONDITION, MERCHANTABILITY, SUITABILITY, FITNESS, OPERATION, PERFORMANCE, OR THE USE,
MAINTENANCE OR REPAIR OF THE PRODUCTS EVEN IF SELLER OR BUYER HAS BEEN ADVISED OF THE POSSIBILITY
THEREOF. THE PRICE STATED HEREIN WAS ARRIVED AT IN CONSIDERATION FOR LIMITING SELLERS WARRANTIES AND
LIABILITY AS PROVIDED HEREIN.
Some states do not allow the exclusion or limitation of incidental or consequential damages, or allow limitations on how long an implied
warranty lasts, so the above exclusions or limitations may not apply to you. This warranty gives you specific legal rights and you may also
have other rights, which vary from state to state.
If a problem with this product develops during or after the warranty period, please contact: Zetronix Corporation,
NOTICE
The information in this manual is subject to change without notice. Zetronix Corporation shall not be liable for technical or editorial errors or
omissions contained herein; nor for incidental or consequential damages furnishing from the furnishing or use of this material.