1
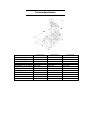
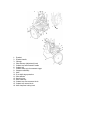
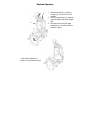
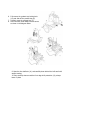
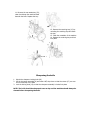
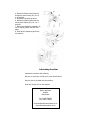
Models SSV300T,
SSV350T & SSV370T
USER AND
MAINTENANCE MANUAL
User Manual SSV300T, SSV350T & SSV370T REV. 1.0
Technical Specification
E
D
C
SSV300T
KNIFE DIAMETER (mm)
SLICE THICKNESS (mm)
CAPACITY (W X H) (mm)
FOOTPRINT (L X W) (mm)
C (mm)
D (mm)
E (mm)
NET WEIGHT (kg)
300
0-2
230 x 190
400 x 340
600
720
580
45.5
SSV350T
350
0 – 2.5
270 x 240
650 x 400
710
870
800
81
SSV370T
370
0 – 2.5
270 x 250
650 x 400
710
870
800
81.5
8
10
12
3
13
r_
16
14
11
—
1.
2.
3.
4.
5.
6.
7.
8.
9.
10.
11.
12.
13.
14.
15.
16.
Flywheel
Flywheel handle
Carriage
Slice thickness (adjustment) knob
Product tray fast movement handle
Product tray
Product clamp grip & movement trigger
Sharpener assembly
Knife
Front knife edge protection
Slice deflector
Receiving tray
Rear waste tray
Product tray slow movement knob
Product tray removal knob
Knife sharpener locking knob
12
Machine Operation
7
Machine operation
1. Rotate the flywheel (1) until the
front of the
Turn thecarriage
fywhe@l 1 drawing
(3) is the
to the
carriage 1 tcewards the cperatori:
Pull up machine
tha product grip 7;
10
Place Lh product to be sl iced on
the tray
4. Place the product to be
sliced onto the product tray (6)
2. Lift the product clamp (7) upwards,
using the handle and clamp trigger
grip
3. Re-position the front knife edge
protection (10) so that the knife is
ready for cutting
Lowei the produc t g Hp 7 to hold
the product:
Lower the lever 5 and move it to
.:tiaw
the product
near the blade
to
hold
the product
5. Lower the product clamp (7)
6. User the handle 5, push downDrawing
and slide
thet nocir the
the produ:
blade
or an product
-ay can be carried
product tray (6) towards the knife
until
is out
more precisely using the knob 14;
close to the front edge of the knife
Set up the slice NI kness desired
operatingadjust
the gracketed
7. Rotate knob 14 if necessary toby finely
the kncb 4
1.0+2 mm); Tuna the flywheel 1 to
position of the product.
start
8. Set the slide thickness by setting
thickness
ing the
and pia
ing the slides on
,
knob (4) to the correct setting. the tra 12.
9. Rotate the flywheel (1) to move the carriage and
rotate the knife to create the first slice. Check the
slice thickness and adjust the thickness knob
accordingly.
Cleaning the machine
NOTE; when rotating the flywheel the knife should
'Wolfing: A Ways wear non-scratch
rotate anti-clockwise.
and and-skid protection gloves
when carryillp out the operations
described above. A tisays operate
with great care and avoid an}`
elishacdon.
['ANGER OF CUTS!
1
Remove the pircduc t from the ay
6;
Turn the flywheel 1 by drawing
the carriage 3 near the
operator;
Press the lever 5 down and at the
some time to the- light; Unscrew
the imacie:
Cleaning the machine
WARNING; Always wear anti-cut gloves when cleaning the machine. Take care
and pay attention at all times
DANGER OF CUTS AND INJURY !
The machine should be cleaned at least once a day
1. Remove the product from the tray (6)
2. Rotate the flywheel (1) to bring the carriage (3) close the operator
3. Re-position the front knife edge protection (10) to so that it covers the front edge of
the knife.
4. Press the handle (5) down and slide the product tray (6) away from the knife
5. Unscrew the product tray locking knob (15)
6. Full remove the product tray locking knob
(15) and slide off the product tray (6)
7. Carefully clean the carriage tray (3).
8. Clean the knife, clean away from the centre
as shown in the diagram below
9. Open the slice deflector (11) and carefully clean behind the knife and knife
support casting
10. Very carefully clean around the front edge knife protection (10), always
leaver in place
11. Remove the rear waste tray (13),
clean it and clean the machines base
beneath the knife. Replace the tray
12. Remove the receiving tray (12) by
unlocking the retaining clips and clean
the tray
13. Clean the remainder of the machine
14. Replace the receiving tray and lock
into place
17
Sharpening the knife
1. Unlock the sharpener locking knob (16)
2. Lift the sharpener assembly (8) and rotate 180̊, drop down so that the stones (17) are over
the front and top of the knife
3. Lock the locking knob (16) so that the sharpener assembly is locked into place
NOTE: The knife should be sharpened once as day and the machine should always be
cleaned before sharpening the knife
4. Rotate the flywheel and press the
sharpening stone button (8.1) for 10
to 15 seconds.
5. Release the sharpening button
6. Rotate the flywheel and press the
honing stone button (8.2) for 2 to 3
seconds.
7. Return the sharpening assembly (8)
into it original position and lock into
place.
8. Clean all the sharpening dust from
the machine
Lubricating the slicer
Lubricate the machine after cleaning
Add one or tow drops of all at the 5 points shown above.
Only use the oil provided with the machine.
Clean any excess oil from the machine
South Coast Systems Ltd
Station Approach
Buxted
East Sussex
Tel: 01825 732497
Fax: 01825 732845
[email protected]
www.southcoastsystems.co.uk