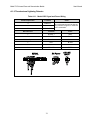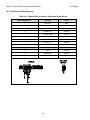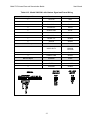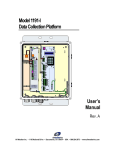
1
Model 2715 Universal Power and Communication Module User’s Manual Rev. A Copyright © 2013, All Weather, Inc. All Rights Reserved. The information contained herein is proprietary and is provided solely for the purpose of allowing customers to operate and/or service All Weather, Inc. manufactured equipment and is not to be released, reproduced, or used for any other purpose without written permission of All Weather, Inc. Throughout this manual, trademarked names might be used. Rather than put a trademark (™) symbol in every occurrence of a trademarked name, we state herein that we are using the names only in an editorial fashion and to the benefit of the trademark owner, and with no intention of infringement. All Weather, Inc. and the All Weather, Inc. logo are trademarks of All Weather, Inc. Disclaimer The information and specifications described in this manual are subject to change without notice. Latest Manual Version For the latest version of this manual, see the Product Manuals page under Reference on our web site at www.allweatherinc.com/. All Weather, Inc. 1165 National Drive Sacramento, CA 95834 Tel.: (916) 928-1000 Fax: (916) 928-1165 Contact Customer Service Phone support is available from 8:00am - 4:30pm PT, Monday through Friday. Call 916-928-1000 and ask for “Service.” Online support is available by filling out a request at www.allweatherinc.com/customer/support.html E-mail your support request to [email protected] Model 2715 Universal Power and Communication Module User’s Manual Revision History Revision A Date 2013 Feb 24 Summary of Changes Initial release. Model 2715 Universal Power and Communication Module User’s Manual TABLE OF CONTENTS 1. OVERVIEW .........................................................................................................................1 1.1 Accessories and Replaceable Parts ............................................................................................. 2 2. FUNCTIONAL DESCRIPTION ............................................................................................3 2.1 Power .......................................................................................................................................... 3 2.2 Communication Module ............................................................................................................. 4 2.3 Other Inputs ................................................................................................................................ 5 2.4 Other Sensors .............................................................................................................................. 5 3. CONNECTIONS ..................................................................................................................6 3.1 Detailed Descriptions and Pinouts .............................................................................................. 7 3.2 Terminal Block Plugs ................................................................................................................. 9 4. ASSEMBLY AND INSTALLATION .................................................................................... 10 4.1 Add-On Modules ...................................................................................................................... 10 4.2 Backup Battery ......................................................................................................................... 11 4.3 Mounting Inside an Enclosure .................................................................................................. 12 5. SOFTWARE REFERENCE ............................................................................................... 14 5.1 Binary Firmware ....................................................................................................................... 14 5.2 Serial Configuration File .......................................................................................................... 15 5.2.1 Editing a Serial Configuration File ................................................................................... 15 5.3 Poll Commands ......................................................................................................................... 19 5.3.1 Regular Poll Commands ................................................................................................... 19 5.3.2 Emulated Poll Commands................................................................................................. 22 5.3.3 Check Sum Calculation..................................................................................................... 24 6. SPECIFICATIONS ............................................................................................................ 25 7. EMISSIONS AND CONFORMANCE ................................................................................ 27 8. WARRANTY ...................................................................................................................... 28 APPENDIX A — SENSORS SUPPORTED BY THE UPCM ................................................. 29 A.1 Sensor Wiring Reference Diagrams ........................................................................................ 30 A.1.1 Barometric Pressure Sensors ............................................................................................ 30 A.1.2 Freezing Rain Sensors ...................................................................................................... 31 A.1.3 Motor-Aspirated Radiation Shield (MARS) .................................................................... 33 A.1.4 Present Weather Sensors .................................................................................................. 34 A.1.5 Present Weather and Visibility Sensors ........................................................................... 35 A.1.6 Rain Gauge ....................................................................................................................... 36 A.1.7 Runway Surface Sensor ................................................................................................... 37 A.1.8 Temperature/Relative Humidity Probe ............................................................................ 38 A.1.9 Thunderstorm/Lightning Detector ................................................................................... 39 A.1.10 Ultrasonic Wind Sensors ................................................................................................ 40 Model 2715 Universal Power and Communication Module User’s Manual 1. OVERVIEW The Model 2715 Universal Power and Communication Module (UPCM) provides a surge-suppressed power supply and communication interface that is used to supply power to weather sensors and to provide a communication interface between the sensor(s) and the data processing system. The UPCM provides electrical surge suppression circuitry on all power, signal, and communication interfaces to protect against lightning and other line transients. The protection circuit consists of gas discharge tubes, TVS diodes, and current-limiting devices. The UPCM has AC and DC outputs, which can be turned on/off via on-board switches or via commands sent to the serial and Ethernet interfaces. The UPCM monitors its own status using current and voltage detection circuits, and it monitors the environment in which it operates using temperature and relative humidity sensors. The temperature information is used to control an optional enclosure heater. Set points for turning the heater on/off are adjustable, and can be set by the user. The UPCM has two sets of serial ports and one RJ-45 jack. Optional serial port modules may be added to increase the number of sensors connected through a serial port. The following serial and Ethernet protocols are supported. Ethernet Protocols Supported Serial Protocols Supported 3-wire RS-232 (no flow control) TCP/IP 10/100Base-T RS-485 half duplex RS-485 full duplex* The UPCM is configured via a configuration file on a microSD card. The device identity and the serial port parameters are configured via the configuration file on the microSD card. All configuration items are user configurable. The following power outputs are available to power devices connected to the UPCM. Power Outputs Surge-suppressed AC input line voltage 24 V AC 12/24 V DC +5 V and -12 V DC (optional) * The implementation of RS-485 is electrically equivalent to RS-422. 1 Model 2715 Universal Power and Communication Module User’s Manual 1.1 ACCESSORIES AND REPLACEABLE PARTS The following accessories and replaceable parts are available for the Model 2715 Universal Power and Communication Module. Part Number Description M404893-00 Serial Port Module M404895-00 +5 V and –12 V DC Output Module M406306-00 256MB microSD Card M442089-00 10 A 250 V, 5x20 mm Slow Blow Fuse M438130-00 Backup Battery MicroSD cards up to 4GB may be used. 2 Model 2715 Universal Power and Communication Module User’s Manual 2. FUNCTIONAL DESCRIPTION Figure 1 shows a block diagram the Model 2715 Universal Power and Communication Module. The UPCM has a power supply section and a communication module, each with surge suppression Figure 1. Model 2715 Universal Power and Communication Module 2.1 POWER The primary AC input power, 85–265 V AC at 47–63 Hz may be wired through a plug or directly from a junction box. The wiring must be able to support up to 10 A. An AC line output is available to provide power to optional heaters located inside the enclosure that will come on under thermostat control when the temperature inside the enclosure drops below a userdefined value, which is 0°C by default. A relay under software control does the actual on/off switching of the AC line output. The AC line output may be used to supply AC power if there are no enclosure heaters. 3 Model 2715 Universal Power and Communication Module User’s Manual There is a 24 V AC output that operates at the same frequency as the primary AC input voltage. Backup DC power is available from an optional backup battery. The backup battery is normally charged through a charger connected to the transformer and the DC rectifier, or via a connection to an optional solar panel, as determined by an OR diode between the optional solar panel and the DC rectifier. The solar panel must supply 8–37 V DC, and the voltage must be at least 15 V DC to charge the backup battery. A second OR diode determines whether DC power is supplied to the DC regulator through the battery charger or from the backup battery. An interlock prevents the battery from being charged when the temperature inside the enclosure drops below the user-defined set point. The main 12/24 V DC output may be set manually to either 12 V DC or 24 V DC. Once set, the same voltage level applies to all the 12/24 V DC outputs, which are available on the serial ports. These outputs may be turned on/off by the microprocessor in the communication module. The table below summarizes the power inputs/outputs. Voltage Inputs Voltage Outputs Switched AC line voltage AC line voltage 24 V AC +5 V DC for current monitors and relays (available internally only) Rectified AC input or Solar Panel or Backup Battery +3.3 V DC for microprocessor (available internally only) Regulated DC voltages +12/24 V DC +5 V DC (optional add-on module) -12 V DC (optional add-on module) 2.2 COMMUNICATION MODULE The UPCM has two sets of serial ports and one RJ-45 jack. Optional serial port modules may be added to increase the number of sensors connected. The following serial protocols are supported. Ethernet Protocols Supported Serial Protocols Supported 3-wire RS-232 (no flow control) TCP/IP 10/100Base-T RS-485 half duplex RS-485 full duplex† The default configuration for the serial ports is set at the factory based on what sensors and devices are used with a particular UPCM. The configuration may be modified or updated in the field using a microSD card containing the new configuration file. † The implementation of RS-485 is electrically equivalent to RS-422. 4 Model 2715 Universal Power and Communication Module User’s Manual 2.3 OTHER INPUTS The UPCM has a counter/tachometer input. The counter input is used to measure actual counts, such as bucket tips in a tipping-bucket rain gauge. The tachometer input can measure rotations such as a fan motor. The UPCM has one active low digital input, which can be used to monitor a door switch. 2.4 OTHER SENSORS A temperature sensor and a relative humidity sensor are located inside the UPCM enclosure to monitor the environment. 5 Model 2715 Universal Power and Communication Module User’s Manual 3. CONNECTIONS Figure 2 shows the key connections to the Model 2715 Universal Power and Communication Module. They are explained in detail in this section. Figure 2. UPCM Connections 6 Model 2715 Universal Power and Communication Module User’s Manual 3.1 DETAILED DESCRIPTIONS AND PINOUTS All the connections are via pluggable terminal blocks. The pitches of each set of terminal blocks are different to facilitate connected the terminal blocks correctly once they are wired. Therefore, it is imperative that the terminal blocks be wired correctly. Connect the primary AC input power, 85–265 V AC at 47–63 Hz to the AC LINE INPUT. The AC line may be wired through a plug or directly from a junction box. The wiring must be able to support up to 10 A. Terminal Block Wiring Summary BLACK wire to AC-IN-L WHITE wire to AC-IN-N Figure 3. UPCM AC Line Input Pinout GREEN wire to EARTH GND Two 10 A, 250 V slow-blow FUSES protect the hot and neutral AC input lines, one fuse for each line. Remember to turn the ON/OFF SWITCH to OFF and disconnect the AC line input before replacing a fuse. The ON/OFF SWITCH turns the AC POWER on/off. The AC LINE OUTPUT supplies the surge-suppressed AC line input voltage for use by other devices such as heaters used to warm up the enclosure. This line has a relay on it, which may be controlled in software to turn the heaters on/off. Terminal Block Wiring Summary BLACK wire to AC-OUT-L WHITE wire to AC-OUT-N Figure 4. UPCM AC Line Output Pinout GREEN wire to EARTH GND The 24 V AC output provides a surge-suppressed 24 VAC output voltage for use by other devices. Terminal Block Wiring Summary BLACK wire to 24VAC-OUT-L WHITE wire to 24VAC-OUT -N GREEN wire to EARTH GND Figure 5. UPCM 24 V AC Line Output Pinout The BACKUP BATTERY portion of the terminal block plug is wired as follows. o RED wire to BATTERY+ o BLACK wire to BATTERY7 Model 2715 Universal Power and Communication Module User’s Manual The SOLAR PANEL portion of the terminal block plug is wired as follows. Positive output from solar panel to SOLAR IN+ Negative output from solar panel to SOLAR IN - The DC OUT output of the terminal block plug outputs surge-suppressed 12/24 V DC for use by other sensors or devices. Figure 6. UPCM DC Power Pinout Terminal Block Wiring Summary Positive connection to DC OUT+ Negative output to DC OUT Use the 12/24 V DC SWITCH to select whether the DC output will be 12 V or 24 V DC. Note that this selection affects the DC output voltages on the DC OUT output of the terminal block and the DC outputs on the serial outputs. The DC ON/OFF SWITCH turns the DC outputs on/off. Whether done manually or under software control, this is a convenient way to reboot any sensor or device connected without having to do the power cycling at the device itself. Note that this operation affects the DC output voltages on the DC OUT output of the terminal block and the DC outputs on the serial outputs. The ETHERNET jack allows a Cat5/6 Ethernet cable to connect the UPCM to a 10/100Base-T network. The SWITCH terminal block plug may be wired to a switch that opens when the door to the enclosure containing the UPCM is opened. It may also be used to monitor any other location where an active low monitoring needs to be done. Figure 7. UPCM Switch Pinout The microSD CARD contains a configuration file for the UPCM serial setup. You may remove this card to edit the configuration settings using a text editor such as Notepad. Once you replace the microSD card, you will have to power cycle the UPCM microprocessor using the DC ON/OFF SWITCH for the new settings to take effect. Connect the SERIAL OUTPUT 1 and SERIAL OUTPUT 2 terminal block plugs to serial cables. One serial cable typically goes to the sensor or other device, and the other serial cable is typically connected to a computer or other data processor. Figure 8 provides the pinouts for the serial output terminal block plugs. Additional serial port modules may be added if more serial outputs are needed. 8 Figure 8. UPCM Serial Output Pinouts Model 2715 Universal Power and Communication Module User’s Manual Connect the TACHOMETER terminal block plug to the device whose frequency or counts you will be measuring. Figure 9 provides a typical pinout to use this feature with a fan motor. Note that only the INPUT pin is used and that 12/24 V DC power is also supplied. Figure 9. Fan Tach Connector Pinout Similarly, only the INPUT pin would be connected for counting as long as the device has a ground connection to the UPCM. Appendix A lists the sensors and other devices supported by the UPCM and provides detailed wiring recommendations. 3.2 TERMINAL BLOCK PLUGS Table 1 identifies the terminal block plugs uses for the various UPCM connections. Table 1. Terminal Block Plugs Part Number Location Description FCIconnect 20020004-D021B01LF Switch 2-position plug 3.81 mm pitch FCIconnect 20020004-D031B01LF Fan Tachometer 3-position plug 3.81 mm pitch FCIconnect 20020004-D081B01LF Serial Port Output 8-position plug 3.81 mm pitch FCIconnect 20020007-G061B01LF DC Power (DC Output, Solar Input, Backup Battery) 6-position plug 5.00 mm pitch Phoenix 1767012 AC Line Input 3-position plug 7.62 mm pitch Phoenix 1786187 24 V AC Output 3-position plug 5.08 mm pitch Phoenix 1828812 AC Line Output 3-position plug 7.62 mm pitch 9 Model 2715 Universal Power and Communication Module User’s Manual 4. ASSEMBLY AND INSTALLATION The Model 2715 Universal Power and Communication Module is typically already installed inside an enclosure at the factory along with any optional add-on modules and the backup battery. This chapter will help you if you have to remove the UPCM or any of its add-ons, or if you are planning to install it in your own enclosure. 4.1 ADD-ON MODULES Figure 10 illustrates how an add-on module is installed on the UPCM. Figure 10. Installing Serial Port or Voltage Add-on Modules 1. The stand-offs (shown in red) should be in place on the UPCM cover. You may have to remove screws and replace them with the stand-offs. 2. Position the connectors at the bottom of the add-on module to mate with the existing connectors on printed circuited board. 3. Line up the add-on module with the stand-offs and snap it in place so that the stand-off holds the top in place. 10 Model 2715 Universal Power and Communication Module User’s Manual 4.2 BACKUP BATTERY Figure 11 illustrates how the backup battery is installed on the UPCM. Figure 11. Installing Backup Battery 1. Insert the cable ties into the backup battery mounting slots on the side of the UPCM as shown in Figure 11. The cable ties must have a length of at least 40 cm (16"). 2. Position the backup battery and secure it firmly to the side of the UPCM enclosure with the cable ties. You may cut off any excess from the cable ties. 3. Remove the terminal plug, and connect the backup battery wires to the BACKUP BATTERY portion of the terminal block plug, which is wired as follows (see Chapter 3 for more information). RED wire to BATTERY+. BLACK wire to BATTERY-. Plug the terminal block plug into place. 11 Model 2715 Universal Power and Communication Module User’s Manual 4.3 MOUNTING INSIDE AN ENCLOSURE Figure 12 illustrates how to mount the UPCM inside an enclosure. Figure 12. Mounting UPCM Inside an Enclosure 1. Position the mounting slots at the bottom of the back of the UPCM over the mounting screws, and slide it into place so that it rests on the mounting screws. 2. Tighten the #8 spring-load panel screw at top of the UPCM to secure it and the UPCM inside the enclosure. 12 Model 2715 Universal Power and Communication Module User’s Manual Figure 13 provides the locations for the mounting screws and the screw position for the #8 spring-load panel screw to help you design your own mounting site. Figure 13. Mounting Screw Placement 13 Model 2715 Universal Power and Communication Module User’s Manual 5. SOFTWARE REFERENCE A boot loader is installed on the Model 2715 Universal Power and Communication Module at the factory. The binary firmware is typically installed, and a microSD card containing the serial configuration for the intended use of the UPCM will be in place. Chapter 3 describes where the microSD card is located and shows the on/off switch referred to in this chapter. The status LEDs are above the microSD card slot. The red status LED should blink slowly (approximately once per second) while the UPCM is operating normally. 5.1 BINARY FIRMWARE This section explains how to install or update the binary firmware. 1. Turn the DC power supply off (DC on/off switch). 2. Remove the microSD card containing the serial configuration file. 3. Insert a microSD card containing the binary firmware to be installed once you have verified that the name of the firmware file is frmw.bin. 4. Turn the DC power supply on (DC on/off switch). 5. The red status LED blinks rapidly (approximately ten times per second) for a few seconds after being powered on. Wait until the red status LED begins to blink slowly (approximately once per second). 6. Turn the DC power supply off (DC on/off switch). 7. Replace the microSD card containing the serial configuration file. 8. Turn the DC power supply on (DC on/off switch). Once the boot loader detects the binary firmware file on the microSD card, it will compare the currently installed binary firmware against the file and only update if the file differs. If the red status LED does not blink as expected, check the microSD card. 14 Model 2715 Universal Power and Communication Module User’s Manual 5.2 SERIAL CONFIGURATION FILE The microSD card containing the serial configuration file is normally kept in the microSD card slot. If it becomes necessary to change the serial configuration, contact All Weather, Inc., for a microSD card that already has the desired configuration. Alternatively, you may remove the existing microSD card, place it in an adapter or a USB microSD card device, and use your computer to edit the configuration file using a text editor such as Notepad. This section explains how to remove and replace the microSD card containing the serial configuration file. The serial configuration file name is myfile.txt. 1. Turn the DC power supply off (DC on/off switch). 2. Remove the microSD card containing the serial configuration file. 3. Replace the microSD card containing the new serial configuration file. 4. Turn the DC power supply on (DC on/off switch). 5. The status LEDs are above the microSD card slot. The red status LED blinks rapidly (approximately ten times per second) for a few seconds after being powered on. Wait until the red status LED begins to blink slowly (approximately once per second). If the red status LED does not blink as expected, check the microSD card. 5.2.1 Editing a Serial Configuration File The default configuration for the serial ports is set at the factory based on what sensors and devices are used with a particular UPCM. This section provides the configuration parameters to allow you to edit the serial configuration file. In all cases, the = sign separates the parameter and its configuration value. All parameters must be specified for a valid serial configuration file. UPCM IP Address Configuration Parameter Configuration STATIC_IP 0 = DHCP IP address 1 = static IP address IP_ADDR_1 IP_ADDR_2 IP_ADDR_3 IP_ADDR_4 first nibble of IP address, 0–255 second nibble of IP address, 0–255 third nibble of IP address, 0–255 fourth nibble of IP address, 0–255 SUBNET_1 SUBNET_2 SUBNET_3 SUBNET_4 first nibble of subnet mask, 0–255 second nibble of subnet mask, 0–255 third nibble of subnet mask, 0–255 fourth nibble of subnet mask, 0–255 GATEWAY_1 GATEWAY_2 GATEWAY_3 GATEWAY_4 first nibble of gateway, 0–255 second nibble of gateway, 0–255 third nibble of gateway, 0–255 fourth nibble of gateway, 0–255 15 The UPCM may be addressed via an IP address or via an RS485 serial network address. If you do not intend to access the UPCM over a TCP/IP-based network, assign a nonroutable IP address. Model 2715 Universal Power and Communication Module Configuration SER0_PROT Protocol 0 – RS-232 1 – RS-485 Full Duplex 2 – RS-485 Half Duplex SER0_BAUD Baud rate 0 – 2400 bps 1 – 4800 bps 2 = 9600 bps 3 – 19200 bps 4 = 38400 bps 5 = 57600 bps 6 = 115200 bps SER0_DATA Data Bits 5, 6, 7, 8, or 9 Parameter Configuration SER1_PROT Protocol 0 – RS-232 1 – RS-485 Full Duplex 2 – RS-485 Half Duplex SER1_BAUD Baud rate 0 – 2400 bps 1 – 4800 bps 2 = 9600 bps 3 – 19200 bps 4 = 38400 bps 5 = 57600 bps 6 = 115200 bps SER1_DATA Data Bits 5, 6, 7, 8, or 9 SER0_PAR Parity 69 = Even parity 78 = No parity 81 = Odd parity SER1_PAR Parity 69 = Even parity 78 = No parity 81 = Odd parity SER0_STOP Stop Bits 1 or 2 SER1_STOP=1 Stop Bits 1 or 2 SER0_TE Termination 0 = Off 1 = On SER1_TE Termination 0 = Off 1 = On Serial Port 2 Serial Port 1 Parameter User’s Manual 16 Model 2715 Universal Power and Communication Module Serial Port 3 (if present) Parameter User’s Manual Configuration SER2_CONFIG 1=Serial Port add-on module SER2_PROT Protocol 0 – RS-232 1 – RS-485 Full Duplex 2 – RS-485 Half Duplex SER2_BAUD Baud rate 0 – 2400 bps 1 – 4800 bps 2 = 9600 bps 3 – 19200 bps 4 = 38400 bps 5 = 57600 bps 6 = 115200 bps SER2_DATA Data Bits 5, 6, 7, 8, or 9 SER2_PAR Parity 69 = Even parity 78 = No parity 81 = Odd parity SER2_STOP Stop Bits 1 or 2 SER2_TE Termination 0 = Off 1 = On Web Interface Parameter USER User name PASSWORD Password Parameter RS-485 Network Configuration Configuration PSU_ADDR_H Power supply address upper nibble PSU_ADDR_L Power supply address lower nibble 17 Valid RS-485 network addresses range from 0000 0000 to 0110 0011 (0–99). Model 2715 Universal Power and Communication Module Power Supply Hardware Configuration Settings Parameter User’s Manual Configuration EN_DCOUT 0 = DC Output disabled at boot 1 = DC Output enabled at boot EN_ACOUT 0 = AC Output disabled at boot 1 = AC Output enabled at boot 2 = AC Output used with thermostat at boot EN_CHRGR 0 = Battery Charger disabled 1 = Battery Charger enabled PORT1_MODE PORT2_MODE 1 = Model 6495 Freezing Rain Sensor 2 = Model 6496 Freezing Rain Sensor 3 = Model 6497 Present Weather and Visibility Sensor 4 = Model 2040/2041 Wind Sensor 5 = Model 6505 Thunderstorm/Lightning Detector 6 = Model 6490 Present Weather Sensor 7 = Model 7150 Barometric Pressure Sensor 8 = Model 5190/5191 Temperature/Relative Humidity Probe 255 = No sensor MIN_TEMP Thermostat turn-on temperature (°C) MAX_TEMP Thermostat turn-off temperature (°C) 18 Model 2715 Universal Power and Communication Module User’s Manual 5.3 POLL COMMANDS All poll commands must be followed by a carriage return (0x0D) and a line feed (0x0A). All responses will be terminated with a carriage return and a line feed. Default serial port settings are 9600 8N1. Verify the serial configuration settings after power-cycling the UPCM. 5.3.1 Regular Poll Commands Poll Command PWRaaSTAT<CR><LF> PWRaaENV<CR><LF> PWRaaCONFIG GET IP<CR><LF> PWRaaCONFIG SET IP ip.ip.ip.ip,sub.sub.sub.sub,gw.gw.gw.gw <CR><LF> PWRaaCONFIG GET PORT port<CR><LF> PWRaaCONFIG SET PORT port,baud,data,parity,stop<CR><LF> PWRaaCONFIG GET OUTPUT<CR><LF> PWRaaCONFIG SET OUTPUT output,acenable or dcenable<CR><LF> PWRaaCONFIG GET ADDRESS<CR><LF> PWRaaCONFIG SET ADDRESS aa<CR><LF> PWRaaGET ID<CR><LF> PWRaaREBOOT<CR><LF> PWRaaVER<CR><LF> Response =PWRaaSTAT,vdc,idc,dcenable,vac,iac,acenable,t,r,1,1,1, batv,bati,batcharge,batcenable,solarv,pwrsrc,count,rpm, door,protocol,baud,data,parity,stop,protocol,baud,data, parity,stop,protocol,baud,data,parity,stop,p1mode, p2mode,cccc<CR><LF> =PWRaaENV,Tt,Rr,Dd,cccc <CR><LF> =PWRaaCONFIG GET IP,ip.ip.ip.ip,sub.sub.sub.sub,gw.gw.gw.gw, mac-mac-mac-mac-mac-mac,cccc<CR><LF> =PWRaaCONFIG GET IP,ip.ip.ip.ip,sub.sub.sub.sub, gw.gw.gw.gw,mac-mac-mac-mac-mac-mac,cccc<CR><LF> =PWRaaCONFIG GET PORT,port,protocol,baud,data, parity,stop,cccc<CR><LF> =PWRaaCONFIG GET PORT,port,protocol,baud,data, parity,stop,cccc<CR><LF> =PWRaaCONFIG OUTPUT,1,dcenable,2,acenable,cccc<CR><LF> =PWRaaCONFIG OUTPUT,1,dcenable,2,acenable,cccc<CR><LF> =PWRaaCONFIG ADDRESS,aa,cccc<CR><LF> =PWRaaCONFIG ADDRESS,aa,cccc<CR><LF> =PWRaaCONFIG ID,id,cccc<CR><LF> =PWRaaREBOOTING<CR><LF> =PWRaaVER,ver,cccc<CR><LF> 19 Model 2715 Universal Power and Communication Module User’s Manual The data fields in the poll responses are described below. Data Field Description ␍␊ Carriage return followed by line feed id Two-character system ID, ASCII decimal encoded aa Two-character address, ASCII encoded decimal, 00-99 cccc Four-character CRC16, ASCII encoded hexadecimal port Port “1”, “2”, or “modem” protocol RS232=”2”, RS485 Half Duplex=”H”, RS485 Full Duplex=”F”, Modem=”M” baud Baud rate, “2400”, “4800”, “9600”, “19200”, “38400”, “57600”, “115200” data Data bits, “7” or “8” parity Parity is “N”=None, “E”=Even, or “O”=Odd stop Stops bits, “1” or “2” p1mode Port 1 sensor mode, 6495=”1”, 6496=”2”, 6497=”3”, 2040=”4”, 6500=”5”, 6490=”6”, 7150=”7”, 5191=”8” p2mode Port 1 sensor mode, 6495=”1”, 6496=”2”, 6497=”3”, 2040=”4”, 6500=”5”, 6490=”6”, 7150=”7”, 5191=”8” ip One- to three-character IP address octet, ASCII encoded decimal sub One- to three-character subnet mask octet, ASCII encoded decimal gw One- to three-character gateway address octet, ASCII encoded decimal mac Two MAC address octet, ASCII encoded hexadecimal, lower case n Number “1”, “2”, or “3” output DC=“1”, AC=“2” door Door is open=”1”, door is closed=”0” vdc One to five character DC voltage, ASCII encoded decimal idc One to five character DC current, ASCII encoded decimal dcenable DC output, enabled=”1”, disabled=”0” vac One- to five-character AC voltage, ASCII encoded decimal iac One- to five-character AC current, ASCII encoded decimal acenable AC output, enabled=”1”, disabled=”0” t One- to three-character temperature in °C, ASCII encoded decimal r One- to three-character relative humidity, ASCII encoded decimal d One- to three-character dew point in °C, ASCII encoded decimal batv One- to five-character battery voltage, ASCII encoded decimal bati One- to five-character battery current, ASCII encoded decimal batcharge Battery charging, charging=”1”, not charging=”0” 20 Model 2715 Universal Power and Communication Module Data Field User’s Manual Description batcenable Battery charger enabled=”1”, disabled=”0” solarv One- to five-character solar input voltage pwrsrc Power source, AC=”1”, Solar=”2”, Battery=”3” count Count for fan tach or tipping bucket input, one to five characters, ASCII encoded decimal rpm Fan tach, one to five characters, ASCII encoded 21 Model 2715 Universal Power and Communication Module User’s Manual 5.3.2 Emulated Poll Commands Emulated Poll Command WINDaa<CR><LF> USWS00<CR><LF> {F00RDD}<CR><LF> PWVSaa<CR><LF> FRRAaa<CR><LF> LTXaa<CR><LF> SEND 0aa<CR><LF> Response =WINaa direction speed status error error error cccc<CR><LF> =aa direction speed error error error cccc<CR><LF> {F00rdd 001;rh;%RH;halarm;htrend;temp;°C;talarm;ttrend;ctype;calc;°C;calarm; ctrend;001;ver;sn;name;alarm;c<CR><LF> =WxxPppppSssss XnnnLnnnKnnnHnnnTttt errorcount msgcount cccc<CR><LF> =Comm_Error Error_in_input_msg errorcount msgcount cccc<CR><LF> =Timeout_Error Check_power/cables errorcount msgcount cccc<CR><LF> =frequency status 0 count cccc<CR><LF> =LTXaa,Istatusmode,G@Efault,Vswversion,seq,bearing,distance,Ccccc<CR><LF> =pressure pressure pressure trend temp sign sss cccc<CR><LF> The data fields in the poll responses to the emulated poll commands are described below. Data Field Emulated Poll Commands Description ␍␊ Carriage return followed by line feed aa Two-character address, ASCII-encoded decimal, 00-99 direction ASCII-encoded decimal wind direction speed ASCII-encoded floating point wind speed error ASCII-encoded decimal error field cccc Four-character ASCII-encoded hexadecimal CRC16 C Single-byte checksum Rh Relative humidity or analog value, formatted as: %.2f halarm Humidity or analog value alarm=”001”, no alarm=“000” htrend Humidity or analog value trend, “+”, ”-“, “=”, or “ “ temp Temperature value, formatted as: signed %.2f talarm Temperature alarm =”001”, no alarm =”000” ttrend Temperature trend, “+”, “-“, “=”, or “ “ ctype Calculated parameter type, no calculation=”nc”, dew point=”Dp”, frost point =”Fp” calc Calculated numerical value, formatted as %.2f calarm Calculated parameter alarm=”001”, no alarm =”000” ctrend Calculated parameter trend, “+”, “-“, “=”, or “ “ Ver Firmware version, formatted as: %c%f Sn Serial number, ten character ASCII field name Sensor name field 22 Model 2715 Universal Power and Communication Module User’s Manual Data Field Emulated Poll Commands Description alarm Alarm Byte, out-of-limits value=”000”, sensor quality=”005”, humidity simulator=”006”, temperature simulator=”007” frequency count Probe frequency, 5-char ASCII-encoded unsigned decimal integer Variable-length ice accretion count field, ASCII-encoded unsigned decimal integer Two-character ASCII field, One character for status and one for status mode Two-character ASCII field for fault code Six-character ASCII-encoded software version number Variable-length ASCII-encoded start-of-sequence number Variable-length ASCII-encoded bearing to lightning strike in degrees Variable-length ASCII-encoded distance to strike in nautical miles Six character fixed point pressure in the format %2.3f (xx.xxx) Six character fixed point pressure trend in the format %2.3f (xx.xxx), insufficient data=“**.***” Two-character ASCII-encoded decimal integer, temperature in degrees C Negative temperature=”-“, a space character represents positive temperature Three-character status field, one character for each sensor statusmode fault swversion Seq bearing distance pressure trend temp sign sss 23 Model 2715 Universal Power and Communication Module User’s Manual 5.3.3 Check Sum Calculation The CRC is calculated using a standard crc-16 formula. The algorithm is as follows. U32 crc = 0; // CRC values for crc16 routine static unsigned int crc_vals[] = { 0x0000, 0xc0c1, 0xc181, 0x0140, 0xc601, 0x06c0, 0x0780, 0xc741, 0xcc01, 0x0cc0, 0x0d80, 0xcd41, 0x0a00, 0xcac1, 0xcb81, 0x0b40, 0xd801, 0x18c0, 0x1980, 0xd941, 0x1e00, 0xdec1, 0xdf81, 0x1f40, 0x1400, 0xd4c1, 0xd581, 0x1540, 0xd201, 0x12c0, 0x1380, 0xd341, 0xf001, 0x30c0, 0x3180, 0xf141, 0x3600, 0xf6c1, 0xf781, 0x3740, 0x3c00, 0xfcc1, 0xfd81, 0x3d40, 0xfa01, 0x3ac0, 0x3b80, 0xfb41, 0x2800, 0xe8c1, 0xe981, 0x2940, 0xee01, 0x2ec0, 0x2f80, 0xef41, 0xe401, 0x24c0, 0x2580, 0xe541, 0x2200, 0xe2c1, 0xe381, 0x2340, 0xa001, 0x60c0, 0x6180, 0xa141, 0x6600, 0xa6c1, 0xa781, 0x6740, 0x6c00, 0xacc1, 0xad81, 0x6d40, 0xaa01, 0x6ac0, 0x6b80, 0xab41, 0x7800, 0xb8c1, 0xb981, 0x7940, 0xbe01, 0x7ec0, 0x7f80, 0xbf41, 0xb401, 0x74c0, 0x7580, 0xb541, 0x7200, 0xb2c1, 0xb381, 0x7340, 0x5000, 0x90c1, 0x9181, 0x5140, 0x9601, 0x56c0, 0x5780, 0x9741, 0x9c01, 0x5cc0, 0x5d80, 0x9d41, 0x5a00, 0x9ac1, 0x9b81, 0x5b40, 0x8801, 0x48c0, 0x4980, 0x8941, 0x4e00, 0x8ec1, 0x8f81, 0x4f40, 0x4400, 0x84c1, 0x8581, 0x4540, 0x8201, 0x42c0, 0x4380, 0x8341, }; 0xc301, 0x0500, 0x0f00, 0xc901, 0x1b00, 0xdd01, 0xd701, 0x1100, 0x3300, 0xf501, 0xff01, 0x3900, 0xeb01, 0x2d00, 0x2700, 0xe101, 0x6300, 0xa501, 0xaf01, 0x6900, 0xbb01, 0x7d00, 0x7700, 0xb101, 0x9301, 0x5500, 0x5f00, 0x9901, 0x4b00, 0x8d01, 0x8701, 0x4100, 0x03c0, 0xc5c1, 0xcfc1, 0x09c0, 0xdbc1, 0x1dc0, 0x17c0, 0xd1c1, 0xf3c1, 0x35c0, 0x3fc0, 0xf9c1, 0x2bc0, 0xedc1, 0xe7c1, 0x21c0, 0xa3c1, 0x65c0, 0x6fc0, 0xa9c1, 0x7bc0, 0xbdc1, 0xb7c1, 0x71c0, 0x53c0, 0x95c1, 0x9fc1, 0x59c0, 0x8bc1, 0x4dc0, 0x47c0, 0x81c1, 0x0280, 0xc481, 0xce81, 0x0880, 0xda81, 0x1c80, 0x1680, 0xd081, 0xf281, 0x3480, 0x3e80, 0xf881, 0x2a80, 0xec81, 0xe681, 0x2080, 0xa281, 0x6480, 0x6e80, 0xa881, 0x7a80, 0xbc81, 0xb681, 0x7080, 0x5280, 0x9481, 0x9e81, 0x5880, 0x8a81, 0x4c80, 0x4680, 0x8081, 0xc241, 0x0440, 0x0e40, 0xc841, 0x1a40, 0xdc41, 0xd641, 0x1040, 0x3240, 0xf441, 0xfe41, 0x3840, 0xea41, 0x2c40, 0x2640, 0xe041, 0x6240, 0xa441, 0xae41, 0x6840, 0xba41, 0x7c40, 0x7640, 0xb041, 0x9241, 0x5440, 0x5e40, 0x9841, 0x4a40, 0x8c41, 0x8641, 0x4040 while(*strPtr != 0) { crc = crc_vals[(*strPtr ^ crc) & 0xff] ^((crc >> 8) & 0xff); strPtr++; } return crc; 24 Model 2715 Universal Power and Communication Module User’s Manual 6. SPECIFICATIONS Parameter Specification Electrical 85–265 V AC, 10 A 47–63 Hz AC Supply Voltage Protected by two 10 A slow-blow fuses, surge-suppressed AC line voltage is also available to power other devices up to 500 W Pluggable Terminal Blocks, 7.62 mm pitch Solar 8–37 V DC (must be at least 15 V DC to charge backup battery) 24 V AC, 8 A 47–63 Hz AC Output Voltage Connectors Pluggable Terminal Blocks, 5.08 mm pitch Switch-selectable for 12 V DC or 24 V DC, 100 W max. (same selection applies to all DC voltage outputs) DC Output Voltage Pluggable Terminal Blocks, 5.00 mm pitch and on Serial Port connectors Connectors DC Output Module (optional) -5 V DC, 2A +12 V DC, 1A Connectors Pluggable Terminal Blocks, 3.81 mm pitch Backup Battery (optional) 12 V DC, 5 A•h Individually Configurable Serial Ports Number of Serial Ports 3 (including one optional serial port) RS-485 (half duplex) RS-485 (full duplex)‡ 3-wire RS-232 (no flow control) Serial Protocols Serial Baud Rates 1200 to 115200 bps Maximum Packet Size 1 kB Data Bits Serial Port Parameter Settings 5, 7, or 8 Parity Odd Even None Stop Bits 1 or 2 Serial Port Connectors ‡ Pluggable Terminal Blocks, 3.81 mm pitch The implementation of RS-485 is electrically equivalent to RS-422. 25 Model 2715 Universal Power and Communication Module User’s Manual Parameter Specification Ethernet Port TCP/IP 10/100Base-T Connector RJ-45 Jack Fan Tachometer Frequency Range 0 to 10,000 Hz Maximum Voltage 5 V DC Connector Pluggable Terminal Blocks, 3.81 mm pitch Counter Count Range 0 to 10,000 s-1 Maximum Voltage 5 V DC Connector Pluggable Terminal Blocks, 3.81 mm pitch Environmental Operating and Storage Temperature without enclosure heater -40 to +70ºC (-40 to +158ºF) with enclosure heater -70 to +70ºC (-94 to +158ºF) Humidity 0–100% (noncondensing) Mechanical Mounting Two mounting slots at bottom of enclosure, diameter = 0.11" (0.29 cm), held in place by #8 spring-load panel screw at top of enclosure Enclosure Aluminum Enclosure 2.50" W × 13.50" H × 5.23" D (33.7 cm × 34.3 cm × 13.3 cm) Backup Battery 1.94" W × 10.63" H × 3.10" D (4.9 cm × 27.0 cm × 7.9 cm) Dimensions Weight 5.5 kg (12 lb) Shipping Weight 7.5 kg (17 lb) 26 Model 2715 Universal Power and Communication Module User’s Manual 7. EMISSIONS AND CONFORMANCE The Model 2715 Universal Power and Communication Module conforms to the following standards. FCC Part 15 B This device complies with Part 15 of the FCC Rules. Operation is subject to the following two conditions: 1. This device may not cause harmful interference, and 2. This device must accept any interference received, including interference that may cause undesired operation. This equipment generates, uses and can radiate radio frequency energy and, if not installed and used in accordance with the instructions, may cause harmful interference to radio communications. To comply with the limits for an FCC Class B computing device, always use shielded signal cords. 27 Model 2715 Universal Power and Communication Module User’s Manual 8. WARRANTY Unless specified otherwise, All Weather Inc. (the Company) warrants its products to be free from defects in material and workmanship under normal use and service for one year from date of installation or a maximum of two years from date of shipment, subject to the following conditions: (a) The obligation of the Company under this warranty is limited to repairing or replacing items or parts which have been returned to the Company and which upon examination are disclosed, to the Company’s satisfaction, to have been defective in material or workmanship at time of manufacture. (b) The claimant shall pay the cost of shipping any part or instrument to the Company. If the Company determines the part to be defective in material or workmanship, the Company shall prepay the cost of shipping the repaired instrument to the claimant. Under no circumstances will the Company reimburse claimant for cost incurred in removing and/or reinstalling replacement parts. (c) This warranty shall not apply to any Company products which have been subjected to misuse, negligence or accident. (d) This warranty and the Company’s obligation thereunder is in lieu of all other warranties, express or implied, including warranties of merchantability and fitness for a particular purpose, consequential damages and all other obligations or liabilities. No other person or organization is authorized to give any other warranty or to assume any additional obligation on the Company’s behalf, unless made in writing and signed by an authorized officer of the Company. 28 Model 2715 Universal Power and Communication Module User’s Manual APPENDIX A — SENSORS SUPPORTED BY THE UPCM Table A-1 lists the sensors and ancillary devices supported by the Model 2715 Universal Power and Communication Module. Table A-1. Sensors and Ancillary Devices Supported by the UPCM Sensor Power Supplies 110/220 V AC 24 V AC Barometric Pressure 7150 7190 Freezing Rain 6495 12 V DC 24 V DC Tach RS-485 (half duplex) May use UPCM AC line output if there are no internal enclosure heaters Freezing Rain 6496 M482221-00 Serial RS-232 RS-485 (receive only, full duplex) MARS 8191 Present Weather 6490 6490-I RS-232 Present Weather and Visibility 6497 M482230-00 RS-232 Rain Gauge 6030 RS-232 Runway Surface Sensor 6900 RS-485 (half duplex) Temperature/Relative Humidity Probe 5191 RS-485 (half duplex) Thunderstorm/Lightning 6505 RS-232 Wind 2040 RS-485 (full duplex) RS-485 (full duplex) Wind 2040H 2040HH 2041HH 29 Not applicable Model 2715 Universal Power and Communication Module User’s Manual A.1 SENSOR WIRING REFERENCE DIAGRAMS All sensors and other devices typically receive AC power via the AC line input. It is possible for more than one sensor or device to be used with one UPCM, in which case the one AC line input will power all the devices associated with that UPCM. One serial port is typically connected to a computer or other data processing system. That leaves the second serial port for the serial interface to the sensor or other device. Another sensor or device would use the serial port on a Serial Port add-on module. A.1.1 Barometric Pressure Sensors Table A-2. Model 7150 and 7190 Signal and Power Wiring Serial Output 2 Pin Function Color 1 DCOUT+ BLUE 2 POWER GND WHITE 3 RS-485– ORANGE 4 RS-485+ GREEN 5 SIGNAL GND RED AC Line Input Function Color 1 HOT BLACK 2 NEUTRAL WHITE 3 GROUND GREEN 30 Model 2715 Universal Power and Communication Module User’s Manual A.1.2 Freezing Rain Sensors Table A-3. Model M482221-00 and Model 6496 Signal and Power Wiring Serial Output 2 Pin Function Color 4 RS-232 Tx WHITE 5 SIGNAL GND BLACK 7 RS-232 Rx RED 8 SHIELD SHIELD AC Line Input Function Color 1 HOT BLACK 2 NEUTRAL WHITE 3 GROUND GREEN Note that the Model 6466 Freezing Rain Sensor may use the UPCM AC line output only if there are no internal enclosure heaters. 31 Model 2715 Universal Power and Communication Module User’s Manual Table A-4. Model 6496 and M482221-00 Signal and Power Wiring Serial Output 2 Pin Function Color 1 DCOUT+ RED 2 POWER GND BLACK 5 SIGNAL GND GREEN 6 RS-485 Rx– BROWN 7 RS-485 Rx+ WHITE 8 SHIELD SHIELD AC Line Input Function Color 1 HOT BLACK 2 NEUTRAL WHITE 3 GROUND GREEN 32 Model 2715 Universal Power and Communication Module User’s Manual A.1.3 Motor-Aspirated Radiation Shield (MARS) Table A-5. Model 8191 Signal and Power Wiring DC Power Pin Function Color 1 DCOUT+ RED 2 DCOUT– BLACK Tach Pin Function Color 1 IN WHITE AC Line Input Function Color 1 HOT BLACK 2 NEUTRAL WHITE 3 GROUND GREEN 33 Model 2715 Universal Power and Communication Module User’s Manual A.1.4 Present Weather Sensors Table A-6. Model 6490 and 6490-I Signal and Power Wiring Serial Output 2 Pin Function Color 1 HTR + 12 V + 12 V DC YELLOW RED 2 POWER GND BLACK 4 SNS Rx GREEN 5 Tx/Rx RTRN BLACK 7 SNS Tx WHITE Not connected — BLUE BLACK AC Line Input Function Color 1 HOT BLACK 2 NEUTRAL WHITE 3 GROUND GREEN 34 Model 2715 Universal Power and Communication Module User’s Manual A.1.5 Present Weather and Visibility Sensors Table A-7. Model 6497 and M482230-00 Signal and Power Wiring Serial Output 2 Pin Function Color 1 HTR + 12 V + 12 V DC YELLOW RED 2 POWER GND BLACK 4 SNS Rx GREEN 5 Tx/Rx RTRN BLACK 7 SNS Tx WHITE Not connected — BLUE BLACK AC Line Input Function Color 1 HOT BLACK 2 NEUTRAL WHITE 3 GROUND GREEN 35 Model 2715 Universal Power and Communication Module User’s Manual A.1.6 Rain Gauge Table A-8. Model 6030 Signal and Power Wiring Serial Output 2 Pin Function Color 1 + 12 V DC RED 2 POWER GND BLACK 4 SENSOR Rx BLUE 5 SIGNAL GND BLACK (2 wires) 7 SENSOR Tx GREEN AC Line Input Function Color 1 HOT BLACK 2 NEUTRAL WHITE 3 GROUND GREEN 36 Model 2715 Universal Power and Communication Module User’s Manual A.1.7 Runway Surface Sensor Table A-9. Model 6900 Signal and Power Wiring Serial Output 2 Pin Function Color 3 RS-485 D– BLACK 4 RS-485 D+ WHITE 5 SIGNAL GND RED AC Line Input Function Color 1 HOT BLACK 2 NEUTRAL WHITE 3 GROUND GREEN 37 Model 2715 Universal Power and Communication Module User’s Manual A.1.8 Temperature/Relative Humidity Probe Table A-10. Model 5191 Signal and Power Wiring Serial Output 2 Pin Function Color 1 +12 V DC GREEN 2 POWER GND GRAY 3 RS-485 D– BLUE 4 RS-485 D+ RED AC Line Input Function Color 1 HOT BLACK 2 NEUTRAL WHITE 3 GROUND GREEN 38 Model 2715 Universal Power and Communication Module User’s Manual A.1.9 Thunderstorm/Lightning Detector Table A-11. Model 6505 Signal and Power Wiring Serial Output 2 Pin Function 3 RS485 D– 4 RS485 D+ 5 SIGNAL GND Color Any colors may be used as long as they match the signals on each end of the connection. DC Power Pin Function Color 1 DCOUT + RED 2 DCOUT – BLACK AC Line Input Function Color 1 HOT BLACK 2 NEUTRAL WHITE 3 GROUND GREEN 39 Model 2715 Universal Power and Communication Module User’s Manual A.1.10 Ultrasonic Wind Sensors Table A-12. Model 2040 (No Heaters) Signal and Power Wiring Serial Output 2 Pin Function Color 1 +24 V DC RED 2 POWER GND BLACK 3 RS-485 Rx– BLACK 4 RS-485 Rx+ WHITE 5 SIGNAL GND BLUE Not connected — BLACK 6 RS-485 Tx– BLACK 7 RS-485 Tx+ GREEN 8 SHIELD SHIELD AC Line Input Function Color 1 HOT BLACK 2 NEUTRAL WHITE 3 GROUND GREEN 40 Model 2715 Universal Power and Communication Module User’s Manual Table A-13. Model 2040/2041 with Heaters Signal and Power Wiring Serial Output 2 Pin Function Color 1 +24 V DC RED 2 POWER GND BLACK 3 RS-485 Rx– BLACK 4 RS-485 Rx+ WHITE 5 SIGNAL GND BLUE Not connected — BLACK 6 RS-485 Tx– BLACK 7 RS-485 Tx+ GREEN 8 SHIELD SHIELD 24 V AC Output Function Color 24VAC OUT-L ORANGE BROWN YELLOW 2 24VAC OUT-N BLACK 3 POWER GND SHIELD AC Line Input Function Color 1 HOT BLACK 2 NEUTRAL WHITE 3 GROUND GREEN 1 41 All Weather Inc. 1165 National Drive Sacramento, CA 95818 Fax: 916.928.1165 Phone: 916.928.1000 Toll Free: 800.824.5873 2715-001 Revision A February, 2013