1
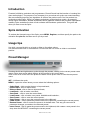
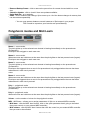
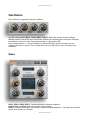
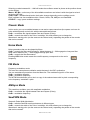
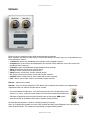
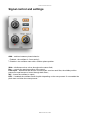
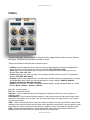
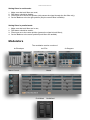
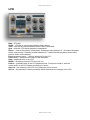
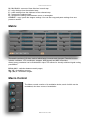
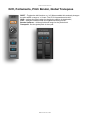
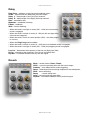
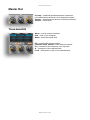
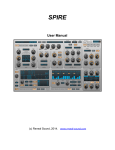
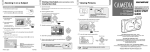
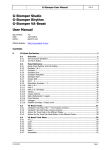
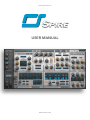
www.reveal-sound.com
USER MANUAL
© Reveal Sound, 2015
www.reveal-sound.com
Introduction"
!
Founded in 2009 by musicians and programmers, Reveal Sound had the intention of creating firstclass audio plugins. The purpose of our company is to prove that soft-synths can sound amazing.
We are constantly improving our algorithms to achieve the perfect result. Our first product is a
synthesizer called Spire. Spire is a software polyphonic synthesizer that combi n es powerful
sound engine modulation, flexible architecture and a graphical interface that provides unparalleled
usability. Spire embodies the best of both software and hardware synthesizers. This guide will
show you how to use the Spire.!
!
Spire Activation"
!
To activate the licensed copy of the Spire, press MENU, Register, and then specify the path to the
activation file spire.lic, that was sent to you by e-mail.!
!
!
Usage tips"
!
Use shift + mouse left click on a knob or slider to fine adjust values;!
Use mouse double click or command/ctrl + mouse left click on a knob or slider to set default
position.!
!
!
Preset Manager"
!
!
!
!
!
Pressing the left and right buttons cycles through the presets; clicking on the current preset name
opens a drop down menu which displays all the presets in the current bank.!
Click on the circle to the left of the preset to rename it then press enter to save the new preset
name.!
!
INIT – initiliazes the synth;!
MENU – opens the menu where you can select the following options:!
!
Select Bank - click to select factory or imported bank;!
Import Bank - click to import bank;!
Remove Bank - click to remove imported bank;!
Load Bank – click to load a user bank;!
Save Bank – click to save the current bank;!
Load Preset – click to load a user preset. Available multi-selection;!
Save Preset – click to save the current preset;!
Copy Preset – click to copy the current preset to the clipboard;!
Paste Preset – click to paste the preset saved to the clipboard, overwriting the current preset;!
Restore Preset - click to restore the preset to its default state. This way you can undo all
parameter changes you made to the selected preset;!
• Insert Preset - click to paste the preset saved to the clipboard; this creates a new preset in the
drop down list WITHOUT overwriting the current preset;!
•
•
•
•
•
•
•
•
•
•
© Reveal Sound, 2015
www.reveal-sound.com
• Remove Backup Preset - click to remove the preset from its current slot and add it to a new
slot;!
• Check for Update - click to check if there are updates available;!
• Spire Web Site - go to website;!
• Undo - click to undo the last change, Spire stores up to 10 of the lastest changes in memory that
can be undone sequentially.!
!
! You can copy presets between several instances of Spire open in your project.!
This is useful to reproduce your favorite user preset bank(s).!
!
!
Polyphonic modes and Midi Learn"
!
!
!
!
!
!
!
Mono 1 – mono mode.!
The pitch glides up to the selected note instead of starting immediately on the pressed note.!
(Portamento).!
Envelopes are retrigged on each new note.!
!
Mono 2 – mono mode.!
When two notes are held down at the same time the pitch glides to the last pressed note (Legato).!
Envelopes are retrigged on each new note.!
!
Mono 3 – mono mode.!
The pitch glides up to the selected note instead of starting immediately on the pressed note.
(Portamento).!
Envelopes are triggered when a note is first pressed and only retrigged when the note has been
released and a new note is pressed.!
notes.!
!
Mono 4 – mono mode.!
When two notes are held down at the same time the pitch glides to the last pressed note (Legato).!
Envelopes are triggered when a note is first pressed and only retrigged when the note has been
released and a new note is pressed.!
!
Poly 1 – polyphonic mode.!
The pitch glides up to the selected note instead of starting immediately on the pressed note
(Portamento).!
!
Poly 2 – polyphonic mode.!
When two notes are held down at the same time the pitch glides to the last pressed note (Legato).!
!
Voices – set the number of voices for the polyphonic modes.!
!
MIDI – MIDI learn – allows you to assign parameters of Spire to an external MIDI controller.!
• Midi learn - click the MIDI ‘learn’ button, click on the synth parameter that’s going to be linked
then press control on your external MIDI controller.;!
• Midi unlearn - click the MIDI ‘learn’ button then click the control on your external MIDI controller
that you want to be unlinked.!
© Reveal Sound, 2015
www.reveal-sound.com
!
!
!
Oscillators"
!
Spire features 4 completely identical oscillators.!
!
!
!
!
!
!
!
!
!
Use the knobs labelled OSC1, OSC2, OSC3, OSC4 to adjust the volume of each oscillator.!
When the knob is set all the way to the left the oscillator is completely shut off and the LED light
immediately to the left is unlit. Knob position within a 1-30 (yellow LED)!
Knob values between 1 - 30 (as indicated by a yellow LED light) add the oscillator into the
rendering but pass no sound. This is useful when you are only want to use an oscillator as a
modulator.!
!
!
Wave"
!
!
!
!
!
!
!
!
!
!
!
!
!
!
!
!
!
!
!
!
!
!
!
!
!
!
OSC1, OSC2, OSC3, OSC4 – Switches between individual oscillators.!
Octave Note, and Fine knobs set the pitch of the oscillator.!
Phase – controls the position of the phase. Selecting a value between 0 – 29 means the oscillator
will be “free-running” or "random".!
© Reveal Sound, 2015
www.reveal-sound.com
Selecting a value between 30 – 1000 will make the oscillator restart its phase at the position shown
on the display.!
Wave + WT Mix – select any of the 49 available waveforms and mixes it with the signal at a level
set by the ‘WT Mix’.!
CtrlA, CtrlB – multifunctional knobs, their tasks change depending on the oscillator mode.!
Each oscillator has four available modes: Classic, Noise, FM, AMSync and SawPWM.!
CPY/PST – copy / paste oscillator settings.!
!
!
Classic Mode"
!
In this mode, you can crossfade between a saw and a square waveform (the square can have its
pulse width adjusted) and mix this with the wavetable waveforms.!
CtrlA – crossfades the signal between Saw and Square (Pulse);!
CtrlB – controls the width of the Pulse. In addition, this knob allows you to change the!
Waveform’s starting point (not the same as the Phase knob), expanding the palette of the sounds
that can be created.!
!
!
Noise Mode"
!
Noise generation that can be shaped by filters.!
CtrlA – controls the filter cutoff frequency. Values between 0 – 500 engage the Low pass filter
while values between 501 – 1000 engage the high pass filter. !
CtrlB – controls the filter Resonance.!
Enabling KEY follow mode means the cutoff frequency corresponds to the note’s
frequency.!
!
!
FM Mode"
!
Frequency modulation mode.!
This uses the same phase modulation mode that was in the DX7 synthesizer.!
You can modulate any waveform from the Wave list. The modulator signal is a Sine wave.!
CtrlA – modulation intensity;!
CtrlB – modulation frequency.!
The WT MIX knob allows you to mix in a copy of the selected wave with its pitch corresponding!
to the frequency modulator’s pitch.!
!
!
AMSync Mode"
!
This combines oscillator sync with amplitude modulation.!
CtrlA – crossfades the signal between Saw and Square (Pulse);!
CtrlB – modulation frequency.!
!
SawPWM Mode"
!
Sawtooth Pulse Width Modulation!
CtrlA – switches SawPW waveform between 4 different types.!
CtrlB – controls the width of the Pulse. In addition, this knob allows you to change the!
Waveform’s starting point (not the same as the Phase knob), expanding the palette of the sounds
that can be created.
© Reveal Sound, 2015
www.reveal-sound.com
Unison"
!
!
!
!
!
!
!
!
!
!
!
!
!
!
!
!
!
!
!
!
!
!
!
!
Spire has a very powerful unison with several advanced settings.!
Each oscillator can have its own unison. Choose the number of voices (up to 9), its spread and one
of the following modes:!
• 1 Octave all voices are distributed in the current octave (regular unison);!
• 2 Octave part of the voices are distributed in the current octave while the rest of the voices are
distributed one octave up;!
• 3 Octave voices are distributed evenly between three octaves;!
• Cmaj chrd unison voices form a major chord;!
• Cm chrd unison voices form a minor chord;!
• Cmaj7 unison voices form a major seventh chord ;!
• С7 unison voices form a major chord with a minor seventh;!
• Cmmaj7 unison voices form a minor chord with a minor seventh;!!
• Cm7 unison voices form a minor chord with a major seventh.!
!
Detune – detunes the voices.!
!
Density – this is a unique parameter. This allows you to detune the voices in an irregular way;
experiment with it to achieve unique unison sounds.!
!
• You can simulate a Supersaw - turn the Density knob to the far right and set the
unison to 7 voices (using 9 voices makes the sound more dense and delicious!).!
!
• Simulate a Hypersaw by turning the Density knob to the center. ANA button
must be turned off (oscillator starts with a random phase position).!
!
All other Density positions result in a unique grouping of voices.!
Also, by changing the number of voices, their spread and their pitch distribution you can achieve
quite unusual results. The results are interesting, try experimenting with it!
© Reveal Sound, 2015
www.reveal-sound.com
Signal control and settings"
!
!
!
!
!
!
!
!
!
!
!
!
!
!
!
!
!
!
!
!
!
!
!
!
ANA – switches between phase behavior:!
!
• Enabled - the oscillator is “free-running”;!
• Disabled - the oscillator starts with a random phase position.!
!
!
Wide – distributes unison voices throughout the stereo field;!
Pan – controls the panning position of the sound;!
Filter input – determines the amount of sound that’s sent into each filter, the middle position
passes an equal amount of sound through both filters.;!
INV – inverts the oscillator’s output;!
KEY – if enabled the oscillator tracks its pitch depending on the note pressed. If not enabled the
pitch does not follow the notes pressed
© Reveal Sound, 2015
www.reveal-sound.com
!
!
Filters"
!
!
!
!
!
!
!
!
!
!
!
!
!
!
!
!
!
!
!
!
!
!
!
There are two filters; both can be set to different modes independently. Each mode has different
filter types. The filters can be routed in parallel or serial.!
!
These are the filter modes and their respective types:!
!
• Perfecto a unique algorithm that combines the best characteristics of analog anddigital filter
types. Great for a broad spectrum of sounds. Modes: LP4, BP4, HP4, Peak!
• Acido type does not repeat at 100%, but good for simulating TB-303 sounds and not only.
Modes: LP1, LP2, LP3, LP4!
• Infecto type does not repeat at 100%, but simulates the filter sound of a Virus TI synthesizer.
Modes: LP2, BP2, HP2, Notch!
• Scorpio another unique algorithm by our team that combines the best characteristics of analog
and digital filter types. Great for a broad spectrum of sounds. Modes: RedLP2, RedLP4,
BlackLP2, BlackLP4, BlackHP, BlackBP!
• Combo filter consists of a series of regularly spaced spikes, giving the appearance of a comb.
Modes: Mono +, Mono -, Stereo +, Stereo -"
!
Cut 1,2 – cutoff frequency;!
Res 1,2 – resonance amount;!
Keytrack – when enabled the filter cutoff frequency follows the midi note, both in positive or
negative values;!
Filter Balance – this controls the filters balance. If the knob at zero you hear the first filter, when
the knob in the middle, you can hear both, and when the knob in the right position, you will hear
only the second filter;!
LINK – when enabled both filter’s cutoffs are linked. If enabled, set the second filter’s cutoff to the
middle position and it will follow the first filter cutoff. When the second filter is set to positions other
than center the cutoff frequency will be offset to a higher or lower value than the first filter cutoff;!
PAR – switches between parallel or serial filter modes. When the button active the filter is in
parallel mode, when the button in inactive the filter is in serial mode.
© Reveal Sound, 2015
www.reveal-sound.com
Setting filters in serial mode:"
!
1.
2.
3.
4.
Make sure that both filters are used;!
PAR button should be disable;!
Filter Input set to the far left position (this passes the signal through the first filter only);!
Set the Balance to the far right position (only the second filter is audible).!
1.
2.
3.
4.
Make sure that both filters are in use;!
PAR button should be enable;!
Filter Input set to the center position (passes the signal to both filters);!
Set the Balance to the center position (both filters are audible).!
!
!
!
Setting filters in parallel mode:"
!
!
!
Modulators"
!
!
!
The modulation section consists of!
4x Envelopes! !
!
Macro Control!!
!
!
!
!
!
!
!
!
!
!
!
!
!
!
4x LFOs!
!
!
!
Matrix!
!
PicthWheel ! ModWheel
© Reveal Sound, 2015
!
2x Steppers!
www.reveal-sound.com
Envelope"
!
!
!
!
!
!
!
!
!
!
!
!
!
!
!
!
!
ENV1, "ENV2, "ENV3, "ENV4 – switches between envelopes;!
CPY/PST – copy / paste the settings of the envelope;!
ATT – time it takes the envelope to rise from 0 to 1000;!
DEC – time it takes the envelope to fall from the attack level to sustain level;!
SUS – the level the sound sustains at after the decay envelope has ended;!
SLT – time it takes the envelope to fall from the sustain level to the slope level;!
SLL – the level the sound sustains at after the sustain envelope has ended;!
REL – time it takes the envelope to drop to 0 after the note has been released.!
!
You can choose the curve type for each envelope stage by clicking on the graphic display:!
ATT – Lin, Exp, Pow;!
DEC – Exp1, Exp2, Pow; ! !
SLT – Lin, Exp, Pow;!
REL – Exp1, Exp2, Pow.!
!
To the right of the sliders are controls for linking the envelopes to sound sources and adjusting their
velocity sensitivity:!
AMT 1+2 – the intensity of the envelope on its respective sound source;!
VEL 1+2 – the intensity of velocity sensitivity which determines the strength of the envelope.!
!
! Note: Envelope 1 controls the output amplitude of the all 4 Oscillators."
!
In order to assign, for example, the second envelope to the amplitude of the second oscillator, set
the volume of OSC2 to 30 (the minimum audible value). Then in envelope 2 assign one of the
modulation sources to Osc Amp2 (OscMixer) and adjust the amount.
© Reveal Sound, 2015
www.reveal-sound.com
LFO"
!
!
!
!
!
!
!
!
!
!
!
!
!
!
!
!
!
Rate – LFO rate;!
SYNC – LFO rate is synchronized with the host’s tempo;! !
Time – sets the time synchronization when SYNC is activated;!
Sym – shifts the LFO signal upwards or downwards;!
Phase – controls the position of the phase. Selecting a value between 0 – 29 means the phase
will be “free-running”. Selecting a value between 30 – 1000 will make the phase restart at the
position shown on the display;;!
Form (dropdown menu) – select a waveform for the LFO;! !
Form (slider) – transforms the shape of the waveform;!
!
Amp – amplitude level of the LFO;! !
MONO – switches monaural LFO mode off / on;!
!
Fade in – gradually fades in the LFO amplitude level. To adjust the fade in, hold the!
mouse down on the LFO display and drag up or down;!
!
Amt 1+2 – the intensity of the LFO on its respective sound source;!
Vel 1+2 – the intensity of velocity sensitivity which determines the strength of the LFO.
© Reveal Sound, 2015
www.reveal-sound.com
Stepper"
!
!
!
!
!
!
!
!
!
!
!
!
!
!
!
!
!
!
Stepper is an advanced step sequencer with a flexible waveform editor. For each step, you can
assign a unique waveform. The individual waveforms combine to form sequences that range from
simple to intricate patterns.!
!
Each step is divided into three zones: the “Start” (1), the “Center” (2) and the “End” (3) with its own
editor (4). Editing is done by holding the mouse on the display and moving it.!
!
Command / Ctrl + click on the amplitude of an individual step in the step sequencer graphic to
make it equal to the amplitude of end of the previous step.!
!
Command / Ctrl + click on the amplitude of an individual step to make it equal to the amplitude
start of the next step.!
!
Command / Ctrl + click in the center of the amplitude of an individual step to make it to make the
start and end of the current step equal.!
!
Knob Rate – sets modulation rate;!
Time – sets the synchronization rate;!
MONO – switches monaural LFO mode off / on;!
Mode – synchronization mode:!
• Free – the position and speed of the step sequencer are “free-running”;!
• Sync – the step sequencer’s speed is synchronized;!
• Spos – the step sequencer’s speed and position are synchronized.!
!
RTRG – retriggers the step sequencer when a new midi note is triggered.!
Start – loop start position.!
End – loop end position.!
LOOP – on / off of the loop mode.!
!
For example, if the loop mode is set to retrigger, the loop mode is engaged, 'start' is set to 4 and
'end' is set to 6 the stepper will start from step 1 and then enter the loop once its reached step 4.!
1-2-3 “4-5-6” “4-5-6” “4-5-6”…"
!
If you choose the same settings but Retrig is turned off, the stepper will play directly from the start
of the loop. “4-5-6” “4-5-6” “4-5-6”… It will NOT begin at step 1.!
!
© Reveal Sound, 2015
www.reveal-sound.com
X1, X2, X3, X4 – amount of time divisions in each step.!
C – copy settings from the selected step.!
P – paste settings from the clipboard to the selected step.!
R – reverses the selected step.!
H – switches the editing mode between curve or rectangular.!
CPY/PST – copy / paste the stepper settings. You can also copy and paste settings from one
preset to another.!
!
!
Matrix"
!
The matrix consists of 15 slots, each of which have 2 sources and 4 targets. Potential sources!
Include: oscillators, LFO, envelopes, steppers, MIDI signals and MIDI controllers.!
Almost every parameter can be modulated in spire! This allows for virtually unlimited signal routing
possibilities!!
!
PG1,2,3,4,5 – switches between matrix pages;!
Src 1,2 – modulation sources;!
Trg 1,2,3,4 – modulation targets.!
!
!
!
Macro Control"
!
!
The Macro control consists of 4 modulation knobs, each of which can be
modulated, also be a source of modulation.
© Reveal Sound, 2015
www.reveal-sound.com
Drift, Portamento, Pitch Bender, Global Transpose"
!
!
DRIFT – Toggles the drift function on / off. When enabled this randomly changes
the pitch within a range of +/-3 cent. The LFOs' frequencies also drift;!
Glide – adjusts the time it takes for the pitch to glide to its destination;!
LOG – switches between linear and logarithmic sliding curves;!
Bender Up/Down – defines pitch bend range for the pitch wheel.!
Transpose - Set the global pitch of the synth.
© Reveal Sound, 2015
www.reveal-sound.com
FX section"
!
Shaper"
!
Available modes:!
Soft, Warm, Hard, Clip, Tube1, Tube2, Tube3, FBsin, FBtri, Flt
+dcm (filter+decimator), dcm (only decimator)."
!!
Band – if enabled, only the distorted signal within the low cut and
high cut value will be audible;!
HQ - enable the 8x oversampling mode;!
Drive – distortion strength;!
Bit – bit depth reduction knob;!
S.Rate – sample rate reduction knob;!
Low Cut – determines the frequency of the low cut (high pass) filter;!
Hi Cut – determines the frequency of the hi cut (low pass) filter;!
Dry/Wet – crossfades between the dry and wet signal.!
!
!
!
!
Phaser and Vowel"
!
Stages – mode selection: 6 Stages, Vowel Low-Mid-Hi;!
Pre – if it is enabled, the effect will be before the shaper in the signal
chain;"
Freq – base frequency;"
F.Back – feedback;"
Spread – stereo widening;"
Rate – modulation rate;"
Depth " – modulation depth;"
Dry/Wet – crossfades between the dry and wet signal."
!
!
!
!
!
Chorus and Flanger"
!
Mode – the first mode is Flanger. Other modes (2 - 6) activate
different Chorus algorithms;!
Delay – delay;!
F.Back – feedback;!
Rate – modulation rate;!
Depth – modulation depth;!
Wide – stereo widening;!
Low Cut – determines the frequency of the low cut (high pass) filter;
!!
Hi Cut – determines the frequency of the hi cut (low pass) filter;!
Dry/Wet – crossfades between the dry and wet signal.
© Reveal Sound, 2015
www.reveal-sound.com
Delay"
!
Ping-Pong – switches on the ping pong feedback mode;!
SYNC – synchronizes the delay time to host’s tempo;!
Delay "L – delay length of the Left (First) channel;!
Delay "R – delay length of the Right (Second) channel;!
Rate – modulation rate;!
Modulate – modulation intensity;!
F.Back – feedback;!
Wide – stereo widening:!
!
• When the knob is set right of center (501 - 1000) the normal delay
mode is engaged;!
• When the knob is set left of center (0 - 500) the left and right delay
channels are swapped;!
• When the knob is set to its center position (500) – the delay output
is in mono;!
!
• When the Ping-Pong button enabled:!
• When the knob is set left of center (0 – 500) the cross feedback mode is engaged;!
• When the knob is set right of center (501 - 1000) the pingpong mode is engaged;!
!
Low Cut – determines the frequency of the low cut (high pass) filter; !
Hi Cut – determines the frequency of the hi cut (low pass) filter;! !
Dry/Wet – crossfades between the dry and wet signal.!
!
!
!
!
Reverb"
!
Mode – reverb modes: Plate1, Plate2;!
SYNC – syncs the predelay time with the host’s tempo;!
Predelay – time delay before reverb triggering;!
Damp – determines how much high frequencies are dampened;!
Wide – stereo widening;!
Decay ! – reverb decay time;!
Color – low pass and high pass filter;!
Dry/Wet – crossfades between the dry and wet signal.
© Reveal Sound, 2015
www.reveal-sound.com
Master Out"
!
!
X-Comp – multiband upward/downward compressor.!
It’s disabled when the knob is in it's rightmost position;!
Velocity – determines the amount of velocity sensitivity;!
Volume – overall level.!
!
Three-band EQ"
!
!
!
Warm - normal or warm character;!
Soft - clear or soft character;!
Boost - boost the overall level.!
!
!
EQ – on/off button of the equalizer;!
LowShelf, Peak, HiShelf – band selection buttons;!
Frq – determines the frequency of the eq band;!
Q – resonance of the selected band ;!
Level – attenuation or gain of the selected band.
© Reveal Sound, 2015
www.reveal-sound.com
Arpeggiator"
!
!
!
!
!
!
!
!
!
!
!
!
!
!
!
!
!
!
The arpeggiator functions as an automatic arpeggio or sequence performance depending on the
selected mode.!
!
Modes:"
!
•
•
•
•
•
•
•
•
•
•
•
•
•
•
!
Up – ascending notes order, starting with the lowest note;!
Down – descending notes order, starting with the highest note;!
Up/Down – ascending then descending note order. Lower and upper notes are not!
restarted when a change of direction occurs;!
Up/Down2 – ascending then descending notes order. Lower and upper notes are!
restarted when a change of direction occurs;!
Down/Up – descending then ascending notes order. Lower and upper notes are not!
restarted when a change of direction occurs ;!
Down/Up2 – descending then ascending notes order. Lower and upper notes are!
restarted when a change of direction occurs;!
Random – random notes order;!
Ordered – order in which the notes were pressed;!
Step – plays a sequence of note defined in the step sequencer;!
Chord – plays all held notes using the step sequencer.!
On/Off – engages or disengages the arpeggiator;!
Gate – length adjustment for the note;!
Time – sets the synchronization rate;!
Swing – affects the time position of each odd note (step). The swing factor can be either positive
or negative. Thus, the Swing affects the Steppers’ modules as long as the synchronization time of
the Stepper and Arp are identical.!
Octave – each arpeggio cycle can be transposed up to 4 octaves. Transposition does not occur
when one octave is selected.!
End – the sequence can be looped by setting an ‘end’ value. By default it is set to “No” and does
not loop.!
!
To use the sequence, switch the arpeggiator mode to Step or Chord.!
!
Transpose determines the pitch of each note in sequence determined by the MIDI notes triggered.!
!
!
© Reveal Sound, 2015
www.reveal-sound.com
Velocity – determines velocity value of each note in sequence. If the velocity is set to zero, the
note is silent. The length of each note can be extended by using the Hold button (right arrow
symbol). This is useful for making slide effects.!
!
Velocity Modes:!
!
Key – each note in the arpeggio uses its own velocity value, determined by the current MIDI note.!
Hold – all notes have the same velocity value as the first played MIDI note (until released).!
Step – takes the velocity value from the step sequencer.!
Step+Key – takes into account both the step sequencer and MIDI note’s velocities.!
Step+Hold – takes into account both the step sequencer and the first played MIDI note’s (until
released) velocities.
© Reveal Sound, 2015