1
ConneXium
Ethernet Cabling System
TCSESM Managed Switch
Configuration Manual
31007122.02
8/2008
www.schneider-electric.com
2
Table of Contents
Safety Information . . . . . . . . . . . . . . . . . . . . . . . . . . . . . . . . . . . . 7
About the Book . . . . . . . . . . . . . . . . . . . . . . . . . . . . . . . . . . . . . . . 9
Chapter 1
The User Interfaces . . . . . . . . . . . . . . . . . . . . . . . . . . . . . . . . . . 11
The System Monitor . . . . . . . . . . . . . . . . . . . . . . . . . . . . . . . . . . . . . . . . . . . . . . 11
The Command Line Interface (CLI). . . . . . . . . . . . . . . . . . . . . . . . . . . . . . . . . . . 13
The Web-Based Interface . . . . . . . . . . . . . . . . . . . . . . . . . . . . . . . . . . . . . . . . . . 14
Chapter 2
Entering the IP Parameters . . . . . . . . . . . . . . . . . . . . . . . . . . . . 19
Basics of the IP Parameters . . . . . . . . . . . . . . . . . . . . . . . . . . . . . . . . . . . . . . . .
Configuring the ESM using the Command Line Interface . . . . . . . . . . . . . . . . . .
Configuring the ESM Using the Ethernet Switch Configurator (ESC)
Software . . . . . . . . . . . . . . . . . . . . . . . . . . . . . . . . . . . . . . . . . . . . . . . . . . . . . . .
Loading the System Configuration from the Memory Back Up
Adapter (EAM). . . . . . . . . . . . . . . . . . . . . . . . . . . . . . . . . . . . . . . . . . . . . . . . . . .
System Configuration Using BOOTP . . . . . . . . . . . . . . . . . . . . . . . . . . . . . . . . .
System Configuration Using DHCP . . . . . . . . . . . . . . . . . . . . . . . . . . . . . . . . . .
System Configuration Using DHCP Option 82 . . . . . . . . . . . . . . . . . . . . . . . . . .
System Configuration Using the Web-Based Interface . . . . . . . . . . . . . . . . . . . .
Faulty Device Replacement . . . . . . . . . . . . . . . . . . . . . . . . . . . . . . . . . . . . . . . .
Chapter 3
19
23
25
28
29
33
38
39
41
Loading and Saving Settings . . . . . . . . . . . . . . . . . . . . . . . . . . 43
Loading Settings . . . . . . . . . . . . . . . . . . . . . . . . . . . . . . . . . . . . . . . . . . . . . . . . . 43
Saving Settings . . . . . . . . . . . . . . . . . . . . . . . . . . . . . . . . . . . . . . . . . . . . . . . . . . 50
Chapter 4
Loading Software Updates . . . . . . . . . . . . . . . . . . . . . . . . . . . . 53
Loading Software from the EAM Memory Back-up Adapter . . . . . . . . . . . . . . . . 53
Loading Software Updates from the TFTP Server . . . . . . . . . . . . . . . . . . . . . . . 56
Loading Software Updates via HTTP . . . . . . . . . . . . . . . . . . . . . . . . . . . . . . . . . 58
3
Chapter 5
Port Configuration . . . . . . . . . . . . . . . . . . . . . . . . . . . . . . . . . . . 61
Port Configuration Dialog Box . . . . . . . . . . . . . . . . . . . . . . . . . . . . . . . . . . . . . . . 61
Switching the Ports on and off . . . . . . . . . . . . . . . . . . . . . . . . . . . . . . . . . . . . . . . 64
Selecting the Operation Mode . . . . . . . . . . . . . . . . . . . . . . . . . . . . . . . . . . . . . . . 65
Propagate Connection Error Messages. . . . . . . . . . . . . . . . . . . . . . . . . . . . . . . . 66
Chapter 6
Protection from Unauthorized Access. . . . . . . . . . . . . . . . . . . 67
The Password for SNMP Access. . . . . . . . . . . . . . . . . . . . . . . . . . . . . . . . . . . . . 67
Setting the Telnet/Web-Based Access . . . . . . . . . . . . . . . . . . . . . . . . . . . . . . . . 71
Disabling the Ethernet Switch Configurator (ESC) Function . . . . . . . . . . . . . . . . 73
Port Security . . . . . . . . . . . . . . . . . . . . . . . . . . . . . . . . . . . . . . . . . . . . . . . . . . . . 74
Chapter 7
Synchronizing the System Time of the Network. . . . . . . . . . . 79
Protocols for Synchronizing the System Time of the Network . . . . . . . . . . . . . . . 79
Entering the System Time . . . . . . . . . . . . . . . . . . . . . . . . . . . . . . . . . . . . . . . . . . 80
Simple Network Time Protocol (SNTP) . . . . . . . . . . . . . . . . . . . . . . . . . . . . . . . . 82
Precision Time Protocol (PTP). . . . . . . . . . . . . . . . . . . . . . . . . . . . . . . . . . . . . . . 86
Interaction between PTP and SNTP . . . . . . . . . . . . . . . . . . . . . . . . . . . . . . . . . . 90
Chapter 8
Network Load Control . . . . . . . . . . . . . . . . . . . . . . . . . . . . . . . . 93
Directed Frame Forwarding . . . . . . . . . . . . . . . . . . . . . . . . . . . . . . . . . . . . . . . . . 93
Multicast Application . . . . . . . . . . . . . . . . . . . . . . . . . . . . . . . . . . . . . . . . . . . . . . 99
The Rate Limiter . . . . . . . . . . . . . . . . . . . . . . . . . . . . . . . . . . . . . . . . . . . . . . . . 111
QoS/Priority . . . . . . . . . . . . . . . . . . . . . . . . . . . . . . . . . . . . . . . . . . . . . . . . . . . . 113
IP ToS/DiffServ . . . . . . . . . . . . . . . . . . . . . . . . . . . . . . . . . . . . . . . . . . . . . . . . . 122
IP DSCP Mapping . . . . . . . . . . . . . . . . . . . . . . . . . . . . . . . . . . . . . . . . . . . . . . . 126
Flow Control. . . . . . . . . . . . . . . . . . . . . . . . . . . . . . . . . . . . . . . . . . . . . . . . . . . . 129
VLANs . . . . . . . . . . . . . . . . . . . . . . . . . . . . . . . . . . . . . . . . . . . . . . . . . . . . . . . . 131
Configuring VLANs . . . . . . . . . . . . . . . . . . . . . . . . . . . . . . . . . . . . . . . . . . . . . . 133
Setting up VLANs. . . . . . . . . . . . . . . . . . . . . . . . . . . . . . . . . . . . . . . . . . . . . . . . 135
Chapter 9
Operation Diagnostics. . . . . . . . . . . . . . . . . . . . . . . . . . . . . . . 143
Sending Traps . . . . . . . . . . . . . . . . . . . . . . . . . . . . . . . . . . . . . . . . . . . . . . . . . . 143
Contact Signal . . . . . . . . . . . . . . . . . . . . . . . . . . . . . . . . . . . . . . . . . . . . . . . . . . 147
Monitoring the Device Status of the ESM . . . . . . . . . . . . . . . . . . . . . . . . . . . . . 152
Displaying the Port Status . . . . . . . . . . . . . . . . . . . . . . . . . . . . . . . . . . . . . . . . . 155
Event Counter on Port Level . . . . . . . . . . . . . . . . . . . . . . . . . . . . . . . . . . . . . . . 156
Displaying the SFP Status . . . . . . . . . . . . . . . . . . . . . . . . . . . . . . . . . . . . . . . . . 159
Topology Discovery . . . . . . . . . . . . . . . . . . . . . . . . . . . . . . . . . . . . . . . . . . . . . . 161
Detecting IP Address Conflicts . . . . . . . . . . . . . . . . . . . . . . . . . . . . . . . . . . . . . 164
Reports . . . . . . . . . . . . . . . . . . . . . . . . . . . . . . . . . . . . . . . . . . . . . . . . . . . . . . . 166
Monitoring Port Traffic . . . . . . . . . . . . . . . . . . . . . . . . . . . . . . . . . . . . . . . . . . . . 167
4
Chapter 10
10.1
10.2
10.3
Appendices
EtherNet/IP . . . . . . . . . . . . . . . . . . . . . . . . . . . . . . . . . . . . . . . . 169
Introduction to EtherNet/IP and the TCSESM Switch . . . . . . . . . . . . . . . . . . . .
What is EtherNet/IP. . . . . . . . . . . . . . . . . . . . . . . . . . . . . . . . . . . . . . . . . . . . . .
Verification of EtherNet/IP Protocol Settings. . . . . . . . . . . . . . . . . . . . . . . . . . .
EtherNet/IP Parameters . . . . . . . . . . . . . . . . . . . . . . . . . . . . . . . . . . . . . . . . . .
Configuring the TSCESM Switch as an EtherNet/IP Adapter in a
Premium System . . . . . . . . . . . . . . . . . . . . . . . . . . . . . . . . . . . . . . . . . . . . . . . .
Overview of the TCSESM EtherNet/IP Premium Network Setup . . . . . . . . . . .
Adding EDS Files . . . . . . . . . . . . . . . . . . . . . . . . . . . . . . . . . . . . . . . . . . . . . . .
Automatically Detect and Add the TCSESM Switch . . . . . . . . . . . . . . . . . . . . .
Configuring the TCSESM Switch Properties . . . . . . . . . . . . . . . . . . . . . . . . . . .
Viewing the TCSESM Switch Data . . . . . . . . . . . . . . . . . . . . . . . . . . . . . . . . . .
SEND_REQ Example-Get_Attributes_Single . . . . . . . . . . . . . . . . . . . . . . . . . .
Configuring the TSCESM Switch as an EtherNet/IP Adapter in a
Quantum System. . . . . . . . . . . . . . . . . . . . . . . . . . . . . . . . . . . . . . . . . . . . . . . .
Overview of the TCSESM EtherNet/IP Quantum Network Setup . . . . . . . . . . .
Adding an EDS File . . . . . . . . . . . . . . . . . . . . . . . . . . . . . . . . . . . . . . . . . . . . . .
Automatically Detect and Add the TESESM Switch . . . . . . . . . . . . . . . . . . . . .
Configuring the TCSESM Switch Properties . . . . . . . . . . . . . . . . . . . . . . . . . . .
Viewing the TCSESM Switch Data . . . . . . . . . . . . . . . . . . . . . . . . . . . . . . . . . .
MPB_MSTR Example-Get_Attributes_Single . . . . . . . . . . . . . . . . . . . . . . . . . .
171
172
173
175
185
186
188
191
193
196
198
204
205
207
210
212
215
217
. . . . . . . . . . . . . . . . . . . . . . . . . . . . . . . . . . . . . . . . . . . . . 223
What is in this Appendix? . . . . . . . . . . . . . . . . . . . . . . . . . . . . . . . . . . . . . . . . . 223
Appendix A
General Information . . . . . . . . . . . . . . . . . . . . . . . . . . . . . . . . . 225
The Management Information Base (MIB) . . . . . . . . . . . . . . . . . . . . . . . . . . . .
MIB II . . . . . . . . . . . . . . . . . . . . . . . . . . . . . . . . . . . . . . . . . . . . . . . . . . . . . . . . .
Private MIB . . . . . . . . . . . . . . . . . . . . . . . . . . . . . . . . . . . . . . . . . . . . . . . . . . . .
SNMP V2 Module MIB . . . . . . . . . . . . . . . . . . . . . . . . . . . . . . . . . . . . . . . . . . .
RFCs . . . . . . . . . . . . . . . . . . . . . . . . . . . . . . . . . . . . . . . . . . . . . . . . . . . . . . . .
IEEE Standards. . . . . . . . . . . . . . . . . . . . . . . . . . . . . . . . . . . . . . . . . . . . . . . . .
Dimension Drawings . . . . . . . . . . . . . . . . . . . . . . . . . . . . . . . . . . . . . . . . . . . . .
The Two-Pin DIP Switch Settings . . . . . . . . . . . . . . . . . . . . . . . . . . . . . . . . . . .
General Technical Software Data . . . . . . . . . . . . . . . . . . . . . . . . . . . . . . . . . . .
Switches and Accessories. . . . . . . . . . . . . . . . . . . . . . . . . . . . . . . . . . . . . . . . .
Copyright for Integrated Software . . . . . . . . . . . . . . . . . . . . . . . . . . . . . . . . . . .
Appendix B
225
228
246
255
261
263
264
266
267
268
269
Switch Function Examples . . . . . . . . . . . . . . . . . . . . . . . . . . . 281
Setting Up the DHCP Server for Option 82 . . . . . . . . . . . . . . . . . . . . . . . . . . . . 281
TFTP Server for Software Updates . . . . . . . . . . . . . . . . . . . . . . . . . . . . . . . . . . 285
Glossary
. . . . . . . . . . . . . . . . . . . . . . . . . . . . . . . . . . . . . . . . . . . . . 291
Index
. . . . . . . . . . . . . . . . . . . . . . . . . . . . . . . . . . . . . . . . . . . . . 295
5
6
Safety Information
§
Important Information
NOTICE
Read these instructions carefully, and look at the equipment to become familiar with
the device before trying to install, operate, or maintain it. The following special
messages may appear throughout this documentation or on the equipment to warn
of potential hazards or to call attention to information that clarifies or simplifies a
procedure.
The addition of this symbol to a Danger or Warning safety label indicates
that an electrical hazard exists, which will result in personal injury if the
instructions are not followed.
This is the safety alert symbol. It is used to alert you to potential personal
injury hazards. Obey all safety messages that follow this symbol to avoid
possible injury or death.
DANGER
DANGER indicates an imminently hazardous situation, which, if not avoided, will
result in death or serious injury.
WARNING
WARNING indicates a potentially hazardous situation, which, if not avoided, can result
in death, serious injury, or equipment damage.
31007122 8/2008
7
Safety Information
CAUTION
CAUTION indicates a potentially hazardous situation, which, if not avoided, can result
in injury or equipment damage.
PLEASE NOTE
Electrical equipment should be installed, operated, serviced, and maintained only by
qualified personnel. No responsibility is assumed by Schneider Electric for any
consequences arising out of the use of this material.
© 2008 Schneider Electric. All Rights Reserved.
8
31007122 8/2008
About the Book
At a Glance
Document Scope
The Schneider Electric ConneXium Industrial Ethernet Offer is comprised of a
complete family of products and tools required to build the infrastructure of an
Industrial Ethernet network.
The offer includes:
z
z
z
switches, hubs, and transceivers
gateways
cables, connectors, and accessories
This manual contains a device description, safety instructions, technical data and all
the other information you need to install the ConneXium ESM Ethernet switches
before you start configuring them. This manual contains all the information you need
to choose and configure a ConneXium ESM Ethernet switch.
Validity Note
31007122 8/2008
The data and illustrations found in this book are not binding. We reserve the right to
modify our products in line with our policy of continuous product development. The
information in this document is subject to change without notice and should not be
construed as a commitment by Schneider Electric.
9
About the Book
Related
Documents
Title of Documentation
Reference Number
ConneXium Ethernet Cabling System Managed Switch Redundancy 31007126
Manual
Product Related
Information
ConneXium Ethernet Cabling System Managed Switch Command
Line Interface
31007130
ConneXium Ethernet Cabling System Managed Switch Installation
Manual
31007118
Schneider Electric assumes no responsibility for any errors that may appear in this
document. If you have any suggestions for improvements or amendments or have
found errors in this publication, please notify us.
No part of this document may be reproduced in any form or by any means, electronic
or mechanical, including photocopying, without express written permission of
Schneider Electric.
All pertinent state, regional, and local safety regulations must be observed when
installing and using this product. For reasons of safety and to ensure compliance
with documented system data, only the manufacturer should perform repairs to
components.
When devices are used for applications with technical safety requirements, please
follow the relevant instructions.
Failure to use Schneider Electric software or approved software with our hardware
products may result in improper operating results.
Failure to observe this product related warning can result in injury or equipment
damage.
User Comments
10
We welcome your comments about this document. You can reach us by e-mail at
[email protected]
31007122 8/2008
The User Interfaces
1
The System Monitor
Features of the
System Monitor
The System Monitor enables you to:
z
z
z
z
z
z
Data Transfer
Parameters
31007122 8/2008
select the boot operating system
update the operating system
start the selected operating system
end the System Monitor
erase the saved configuration
show the boot code information
The following table shows the data transfer parameters.
Parameter
Value or Status
Speed
9600 baud
Data
8 bit
Parity
none
Stopbit
1 bit
Handshake
off
11
The User Interfaces
Opening the
System Monitor
12
Open the System Monitor as follows:
Step
Action
Comment
1
Using a terminal cable, connect the V.24
RJ11 socket to
z either a terminal
z or a COM port of a PC with terminal
emulation according to VT 100
The V.24 interface of the switch supports
the baud rates 9600 and 19200 (default
setting: 9600).
For the physical connection refer to the
Installation User Manual.
2
Start the terminal program on the PC, and
establish a connection with the switch.
While the ESM is booting, the following
message appears on the terminal:
Press <1> to enter System Monitor 1...
3
Type 1 within one second to start System
Monitor 1.
Subsequently, System Monitor 1 displays
the following information:
1. Select Boot Operating System
2. Update Operating System
3. Start Selected Operating System
4. End (reset and reboot)
5. Erase main configuration file
6. Show Bootcode Information
4
Select the desired menu by typing its
number.
5
To leave a submenu and to return to the
main menu of the System Monitor, press
ESC.
31007122 8/2008
The User Interfaces
The Command Line Interface (CLI)
Features of the
CLI
The CLI allows you to
z
z
z
use all device functions via a local or remote connection
provides you with a familiar environment for configuring IT devices
feed several devices with identical configuration data, due to its script ability
For a detailed description of the CLI, refer to the reference guide Command Line
Interface.
Interfaces to
Access the CLI
The CLI can be accessed using
z
z
Abbreviating
Keywords
Opening the CLI
the V.24 port (out-of-band) or
Telnet (in-band).
In the CLI, you can abbreviate keywords as follows:
Step
Action
1
Type the first letters of the keyword.
2
Press the TAB key.
Comment
The command line interface adds the
remaining letters for you.
Open the CLI as follows:
Step
1
Action
Comment
Connect the device via the V.24 interface to
z a terminal
z or to a COM port of a PC with terminal
emulation according to VT 100
A window in which you are asked to
enter your user name appears on the
screen. (A maximum of five users are
permitted to access the CLI).
using a serial cable, and press any key
(p. 12), or start the CLI using Telnet.
31007122 8/2008
2
Type a user name.
3
Press the ENTER key.
4
Type the password.
5
Press the ENTER key.
The default setting for the user name is
admin. You can change the user name
later in the CLI.
These entries are case sensitive.
The default setting for the password is
private. You can change the password
later in the CLI.
These entries are case sensitive.
13
The User Interfaces
The Web-Based Interface
Requirements
To open the Web-based interface, you will need a Web browser (a program that can
read hypertext), for example, Netscape Navigator/Communicator version 6.0 or
higher or Microsoft Internet Explorer version 5.5 or higher.
Enabling the
Web-Based
Interface
The following table shows the steps to enable the Web-based interface.
14
Step
Action
1
Connect the ESM switch to an
Ethernet cable.
2
Start your Web browser.
3
Make sure that Java Script is active on
your browser.
4
Establish the connection by entering
the IP address of the switch with which
you want to administer the Web-based
network management in the address
field of the Web browser. Enter the
address in the following form:
http://xxx.xxx.xxx.xxx
Comment
The Web-based interface uses the plugin JavaTM runtime environment version
1.4. x, 1.5 x or 1.6. x If this is not
installed on your computer, an
installation via the Internet starts
automatically the first time you start the
Web-based interface. If your computer is
not connected to the Internet, or you do
not have access to the Java plug-in,
install the version on the enclosed CDROM.
For NT users and computers not
connected to the Internet:
Cancel the installation and install the
plug-in from the enclosed CD-ROM.
Start the program file j2re1_4_0-wini.exe in the Java directory on the CDROM.
31007122 8/2008
The User Interfaces
Login Screen
The figure below shows the login window.
OK
Logging In
Log in as follows:
Step
31007122 8/2008
Action
Comment
1
Select the desired language.
Choose english or german.
2
user: read access
In the login pull-down menu, select
either user or admin access to access admin: read and write access
the switch.
3
For read permission, enter the
password public.
For read/write permission, enter the
password private (default setting).
Change the password from these default
settings to protect the switch against
unauthorized access.
4
Click OK.
The system screen appears.
15
The User Interfaces
System Screen
The figure shows the system screen of the ESM switch.
Device Status
Alarmstarttime
18.11.05 11:37
Alarmreason
Power supply 2
Device view
System Data
Name
TCSESM_2FF96F
Location
Schneider TCSESM
Contact
Schneider Electric
Basic module
HW: 1.30
Power supply 1/2
present / Failed
Temperature (°C)
Uptime
0
33
1
2
3
4
5
6
7
8
70
0 day(s), 3:10:17
Set
Reload
?
Help
Reloading data in 90 sec
The Set and
Reload Buttons
The table explains the Set and Reload buttons.
Set
Reload
Click the Set button to apply the changes you Click the Reload button to update the system
have made to the dialogs.
screen.
16
31007122 8/2008
The User Interfaces
The Tree View
The figure below shows the tree view of the Web-based interface. All path
references in the manual refer to this tree view. For example: Go to Basics, System.
Basic settings
System
Network
Redundancy
HIPPER-Ring
Software
Ring/Network Coupling
Rapid Spanning Tree
Port Configuration
Load/Save
Restart
Global
Port
Security
Password/SNMP access
SNMPV1/V2 Access
Diagnostics
Event Log
Ports
Telnet/Web Access
Port Security
Statistics
Utilization
SFP modules
Time
SNTP
PTP
Switching
Global
Topology Discovery
Port Monitoring
Device Status
Filter for MAC addresses
Signal Contact
Rate Limiter
Alarm (Traps)
Multicasts
Report
VLAN
IP Address Contact Detection
Selftest
Global
Current
Static
Advanced
DHCP Relay Agent
EtherNET/IP
Command Line
Port
QoS/Priority
Global
Port configuration
802.1D/P-Mapping
IP DSCP Mapping
31007122 8/2008
Help
About
Index
17
The User Interfaces
18
31007122 8/2008
Entering the IP Parameters
2
Basics of the IP Parameters
Background
Information
concerning the
IP Address
The IP address is used for the configuration of the ESM. The IP address background
information is discussed here.
The IP addresses consist of four bytes. These four bytes are written in decimal
notation, each separated by a dot. Five classes of IP addresses were defined in RFC
790 (1992). The most frequently used address classes are A, B and C.
The following table describes IP address classification.
Class
Net Address
A
1 byte
Host Address Address Range
3 bytes
1.0.0.0 to 126.255.255.255
B
2 bytes
2 bytes
128.0.0.0 to 191.255.255.255
C
3 bytes
1 bytes
192.0.0.0 to 223.255.255.255
D
224.0.0.0 to 239.255.255.255
E
240.0.0.0 to 255.255.255.255
The network address, assigned by ARIN (American Registry for Internet Numbers),
represents the fixed part of the IP address.
The following figure shows the bit notation of the IP address.
0
31
Network address
Host address
The network address represents the fixed part of the IP address. The worldwide
leading regulatory board for assigning Internet addresses is the IANA (Internet
Assigned Numbers Authority). If you need an IP address block, contact your Internet
service provider. Internet service providers should contact their local higher level
organization:
z APNIC (Asia Pacific Network Information Centre): Asia/Pacific region
z DARIN (American Registry for Internet Numbers): Americas and Sub-Sahara
Africa
31007122 8/2008
19
Entering the IP Parameters
z
z
LACNIC (Regional Latin-American and Caribbean IP Address Registry): Latin
America and some Caribbean Islands
RIPE NCC (Réseaux IP Européens): Europe and Surrounding Regions
The bit representation of the IP address is shown in the following figure.
Class
Net ID -7 bits
Host ID - 24 bits
Net ID - 14 bits
Host ID - 16 bits
Net ID - 21 bits
Host ID - 8 bits
Multicast Group ID - 28 bits
reserved for future use - 28 bits
All IP addresses belong to class A when their first bit is a zero, i.e., the first decimal
number is 126 or less.
The IP address belongs to class B if the first bit is 1 and the second bit is 0, i.e., the
first decimal number is between 128 and 191.
The IP address belongs to class C if the first two bits are a 1, i.e., the first decimal
number is higher than 191.
Assigning the host address (host ID) is the responsibility of the network operator,
who is solely responsible for the uniqueness of the assigned IP addresses.
Network Mask
Routers and gateways subdivide large networks into subnetworks. The network
mask assigns the individual devices to particular subnetworks.
The subdivision of the network into subnetworks is performed in much the same way
as IP addresses are divided into classes A to C (net ID).
The bits of the host address (host ID) that are to be shown by the mask are set to
one. The other host address bits are set to zero in the network mask (see the
following example).
The following figure shows an example of a network mask.
Decimal notation
255.255.192.0
Binary notation
11111111.11111111.11000000.00000000
Subnetwork mask bits
Class B
20
31007122 8/2008
Entering the IP Parameters
The following figure shows an example of IP addresses with subnetwork allocation
in accordance with the network mask from the above example.
Decimal notation
129.218.65.17
128 < 129 ≤ 191 → Class B
binary notation
10000001.11011010.01000001.00010001
Subnetwork 1
Network address
Decimal notation
129.218.129.17
128 < 129 ≤ 191 → Class B
binary notation
10000001.11011010.10000001.00010001
Subnetwork 2
Network address
Example of Network Mask Usage
In a large network it is possible that gateways and routers separate the management
card from its management station. How does addressing work in such a case?
The figure below shows a management agent that is separated from its
management station by a router.
Romeo
Juliet
Lorenzo
LAN 1
LAN 2
Sending Data
The management station Romeo wants to send data to the management agent
Juliet. Romeo knows Juliet's IP address and also knows that the router Lorenzo
knows the way to Juliet.
Example
31007122 8/2008
21
Entering the IP Parameters
Romeo therefore puts his message in an envelope and writes Juliet's IP address on
the outside as the destination address. For the source address he writes his own IP
address on the envelope.
Romeo then places this envelope in a second one with Lorenzo's MAC address as
the destination and his own MAC address as the source. This process is comparable
to going from layer three to layer two of the ISO/OSI base reference model.
Finally, Romeo puts the entire data packet into the mailbox. This is comparable to
going from layer two to layer one, i.e., to sending the data packet over the Ethernet.
Lorenzo receives the letter and removes the outer envelope. From the inner
envelope he recognizes that the letter is meant for Juliet. He places the inner
envelope in a new outer envelope and searches his address list (the ARP table) for
Juliet's MAC address. He writes her MAC address on the outer envelope as the
destination address and his own MAC address as the source address. He then
places the entire data packet in the mail box.
Juliet receives the letter and removes the outer envelope, exposing the inner
envelope with Romeo's IP address. Opening the letter and reading its contents
corresponds to transferring the message to the higher protocol layers of the ISO/OSI
layer model.
Juliet would now like to send a reply to Romeo. She places her reply in an envelope
with Romeo's IP address as destination and her own IP address as source. The
question then arises, where should she send the letter, since she did not receive
Romeo's MAC address. It was lost when Lorenzo replaced the outer envelope.
In the MIB, Juliet finds Lorenzo listed under the variable aNetGateway → IPAddr as
a means of communicating with Romeo. The envelope with the IP addresses is
therefore placed in a further envelope with the MAC destination address of Lorenzo.
The letter then travels back to Romeo via Lorenzo, in the same manner that the first
letter traveled from Romeo to Juliet.
22
31007122 8/2008
Entering the IP Parameters
Configuring the ESM using the Command Line Interface
General
Information
Concerning the
Configuration via
CLI
Choose the CLI method if
z
z
you preconfigure your switch outside its operating environment, or
if you have no network access to the switch.
Note: If there is no terminal or PC with terminal emulation available in the vicinity
of the installation location, you can also enter the IP parameters in your working
environment prior to performing the ultimate installation.
Entering the IP
Parameters
Using the CLI
31007122 8/2008
Enter the IP parameters using the CLI as follows:
Step Action
1
Establish a connection to the switch,
following the instructions made in the step
action table ( p. 13.
2
Change to the privileged EXEC mode by
entering enable, and press ENTER.
3
Enter the password, and press ENTER.
4
Disable DHCP by typing network protocol
none, and press the ENTER key.
Comment
Press ENTER without typing the
password, since the default setting is no
password.
23
Entering the IP Parameters
Step Action
5
Configuring the
Switch Using the
Web-Based
Interface
24
Enter the following IP parameters: IP
address, network mask and, if applicable,
gateway
6
Save the configuration entered by typing the
command:
copy system:running-config nvram:startupconfig
and press ENTER.
7
Confirm that you wish to save by pressing Y.
Comment
z IP address
The default setting local IP address
of the switch is 0.0.0.0.
z network mask
Enter the networks mask here if your
network has been divided into
subnetworks, and if these are
identified with a network mask.
The default setting of the network
mask is 0.0.0.0.
z gateway
This entry is only needed if the switch
and the management station/tftp
server are located in different
subnetworks.
Type the IP address of the gateway
between the subnetwork of the
switch and the path to the
management station.
The default setting of the IP address
is 0.0.0.0.
After entering the IP parameters using the CLI, you can easily configure the ESM
using the Web-based interface ( p. 39).
31007122 8/2008
Entering the IP Parameters
Configuring the ESM Using the Ethernet Switch Configurator (ESC) Software
General
Information
Select the IP address using the ESC software if
z
z
the ESM is already installed on your network, or
if there is another Ethernet connection between your PC and the ESM available.
Note: You can easily configure additional parameters using the Web-based
interface (p. 39).
Note: The installation of the ESC involves installing the version 3.0 of the WinPcap
software package.
If an earlier version of WinPcap is already installed on the PC, you must uninstall
it first. A newer version remains intact when you install the Ethernet Switch
configurator. However, this cannot be guaranteed for all future versions of
WinPcap. If the installation of the ESC has overwritten a newer version of
WinPcap, you must uninstall WinPcap 3.0 and then reinstall the new version.
Installing the
ESC Software
31007122 8/2008
Install the WinPcap software on your PC as follows:
Step
Action
1
To install the ESC software on your PC, start the installation program on the CD
supplied with the switch, and follow the instructions given by the program.
2
Start the ESC program.
Subsequently, the screen displayed below appears.
25
Entering the IP Parameters
This figure shows the start screen of the ESC.
Ethernet Switch Configurator
File
Exit
Edit
Signal
Status
1
?
Properties
MAC Address
00:80:63:14:DB:D9
WWW
Access
Rescan
IP Address
Net Mask
WWW 255.255.255.0
149.218.112.103
Default Gateway
0.0.0.0
Product
RS2
Name
TCSES:_2FF96F
Click here to switch on/off flashing the signal light of the selected device.
General
Information
concerning the
ESC Software
When the ESC software is started, it automatically searches the network for devices
supporting the ESC protocol.
The ESC program uses the first PC network card found. If your computer has more
than one network card, you can select them on the toolbar of the ESC program.
The ESC program displays a line for each device which responds to the ESC
protocol.
Configuring your
ESM Using the
ESC
Configure the ESM as follows:
Step Action
1
Select the device line of the ESM.
2
Click the symbol with the two green dots in the toolbar to set the LEDs for the selected
device flashing.
To switch off the flashing, click the symbol again.
3
Double-click the device line of your switch to open the window displayed below:
In this dialog you can enter your device name as well as the IP parameters.
Properties for MAC Address 00:80:63: 2 ...
Name:
TCSES:_2FF96F
IP Configuration
IP Address:
149.218.112.102
Subnet Mask:
255.255.255.0
Default Gateway:
0.0.0.0
OK
26
Cancel
31007122 8/2008
Entering the IP Parameters
Step Action
4
Enter your device name as well as your IP parameters.
5
For security reasons, switch off the ESC function for the device in the Web-based
interface after you have assigned the IP parameters to the device (p. 73).
6
Save the settings you have made so they will still be available after restart (p. 50).
Note: After the IP address has been entered and saved, the ESM loads the local
configuration settings (p. 43).
31007122 8/2008
27
Entering the IP Parameters
Loading the System Configuration from the Memory Back Up Adapter (EAM)
Uses of the EAM
The EAM is a USB device used for
z
z
z
Loading the
System
Configuration
from the EAM
storing the configuration data of an ESM,
storing the ESM software,
providing back-up for an inoperable ESM.
In case the switch becomes inoperative, the EAM enables a very simple
configuration data transfer by means of a substitute switch of the same type.
When you start the switch, it checks for an EAM. If it detects an EAM with a valid
password and valid software, the ESM loads the configuration data from the EAM.
The password is valid if
z
z
the password on the ESM matches the password on the EAM, or
the default password is saved on the ESM.
To save the configuration data in the EAM (p. 50).
Note: If you replace an ESM, ensure that the DIP switch settings on the
replacement switch are identical to the original one.
EAM Status
The status of the EAM is indicted in the EAM Status area of the Load/Save dialog
box (p. 44) as listed below:
Status
Meaning
NotPresent
No EAM connected.
ok
The configuration data on the EAM and the ESM are identical.
removed
The EAM was removed after booting.
NotinSync
The configuration data on the EAM and the ESM are not consistent.
OutOfMemory
The local configuration data is too extensive to be stored on the EAM.
WrongMachine
The EAM’s configuration data came from a different device type and cannot
be read by the ESM.
ChecksumErr
The configuration data is damaged.
You can refresh the EAM Status display by clicking on the Reload button.
28
31007122 8/2008
Entering the IP Parameters
System Configuration Using BOOTP
Basic
Information
To configure the ESM using BOOTP, you need a BOOTP server. The BOOTP
server matches the configuration data to the ESM on the basis of its MAC address.
Note: For loading the configuration data, the ESM default setting is DHCP mode,
so this method requires changing the ESM to the BOOTP mode.
Configuration
Procedure Using
CLI or the WebBased Interface
31007122 8/2008
Configure the ESM as follows:
Step Action
1
Activate BOOTP to receive the configuration data in the CLI ( p. 39).
2
Change to the privileged EXEC mode by typing enable, and press the ENTER key.
3
Enable BOOTP by typing:
network protocol BOOTP
and pressing the ENTER key.
4
Perform the configuration, providing the BOOTP server with the switch data listed
under ESM Data for BOOTP Server (below).
5
Save the configuration performed by typing the command:
copy system:running nvram:startup-config
and pressing the ENTER key.
6
Confirm that you wish to save the configuration by pressing Y.
29
Entering the IP Parameters
ESM Data for
BOOTP Server
Provide the BOOTP server with the following ESM data:
# /etc./bootptab for BOOTP-daemon bootpd
#
# gw -- gateways
# ha -- hardware address
# ht -- hardware type
# ip -- IP address
# sm -- subnet mask
# tc -- template
.global:/
:gw=0.0.0.0:/
:sm=255.255.240.0:
rs2:01:ht=ether
net:ha=008063086501:ip=149.218.17.83:tc=.global:
rs2_02:ht=ethernet:ha=008063086502:ip=149.218.17.84:tc=.global:
Note: Lines that start with a # character are comment lines. The lines under global
make the configuration of several devices easier. The template (tc) allows you to
allocate the global configuration data (tc=.global:). The direct allocation of the
hardware or IP address occurs in the device lines (rs2-0).
30
31007122 8/2008
Entering the IP Parameters
Flow Chart for
the BOOTP
Process
This figure illustrates the BOOTP process.
Start-up
Load boot configuration
Local
Default
Load settings from
flash memory
ESM initialization
ESM runs with settings
from local flash.
DHCP
or
BOOTP?
Yes
Send
DHCP/
BOOTP
requests
No
No*
Reply from
DHCP/BOOTP
server?
Yes
Save IP parameter
and config file
URL locally
Initialize IP stack
with IP parameters
2
31007122 8/2008
ESM is manageable
31
Entering the IP Parameters
The following figure shows part 2 of the BOOTP/DHCP process.
2
Start tftp process
with config
file URL of DHCP
Load remote
configuration from
Yes URL of DHCP?
No
No*
tftp
successful?
Yes
Load remote
configuration?
Yes
Start tftp process
with config file URL of
local configuration
No
tftp
successful?
Load transferred
config file
No*
Yes
Save transferred
config file local
and set
boot configuration
to local
Load transferred
config file
Loading of
configuration data
is complete
Note: The agent of the ESM does not support IEEE 802.3 frame type.
32
31007122 8/2008
Entering the IP Parameters
System Configuration Using DHCP
General
Information
To configure the system via DHCP (Dynamic Host Configuration Protocol), you need
a DHCP server. The DHCP server matches the configuration data to the ESM on the
basis of its MAC address or its system name.
The DHCP (responds similar to the BOOTP and offers in addition the configuration
of a DHCP client with a name instead of the MAC address. For the DHCP, this name
is known as the client identifier in accordance with rfc 2131.
The ESM uses the name entered under sysName as the client identifier in the
system group of the MIB II. You can enter the system name directly via SNMP, the
Web-based management or the user interface.
Configuration
Procedure Using
the CLI or the
Web-Based
Interface
31007122 8/2008
Configure the ESM as follows:
Step
Action
1
Connect the ESM to a serial cable when using the CLI and to an Ethernet cable when
using the Web-based interface.
2
Activate DHCP to receive the configuration data in the CLI (p. 39).
3
Change to the privileged EXEC mode by typing enable, and press the ENTER key.
4
Enable DHCP by typing configure protocol DHCP, and press the ENTER key.
5
Perform the configuration, providing the DHCP server with the required switch data.
6
Save the configuration performed by typing the command copy system:running
nvram:startup-config, and press the ENTER key.
7
Confirm that you wish to save the configuration by pressing Y.
33
Entering the IP Parameters
Flow Chart for
the DHCP
Process
On startup, an ESM receives its configuration data according to the BOOTP/DHCP
procedure described in the following chart:
Start-up
Load boot configuration
Local
Default
Load settings from
flash memory
ESM initialization
ESM runs with settings
from local flash
DHCP
or
BOOTP?
Yes
Send
DHCP/
BOOTP
requests
No
No*
Reply from
Yes
DHCP/BOOTP
server?
Save IP parameter
and config file
URL locally
Initialize IP stack
with IP parameters
2
34
ESM is manageable
31007122 8/2008
Entering the IP Parameters
The following shows part 2 of the BOOTP/DHCP process.
2
Start tftp process
with config
file URL of DHCP
Load remote
configuration from
Yes URL of DHCP?
No
No*
tftp
successful?
Yes
Load remote
configuration?
Yes
Start tftp process
with config file URL of
local configuration
No
tftp
successful?
Load transferred
config file
No*
Yes
Save transferred
config file local
and set
boot configuration
to local
Load transferred
config file
Loading of
configuration data
is complete
The ESM sends its system name to the DHCP server. The DHCP server can then
assign an IP address as an alternative to the MAC address by using the system
name.
In addition to the IP address, the DHCP server sends
z
z
the tftp server name (if present) and
the name of the configuration file (if present).
The ESM accepts this data as configuration parameters (p. 39). If an IP address has
been assigned by a DHCP server, it will be permanently saved in the local memory.
31007122 8/2008
35
Entering the IP Parameters
The ESM requests these DHCP options:
Option
Meaning
1
subnet mask
2
time offset
3
router
4
time server
12
host name
66
tftp server name
67
bootfile name
The special feature of DHCP in contrast to BOOTP is that the server can only
provide the configuration parameters for a certain period of time (lease). When the
time period expires (lease duration), the DHCP client must attempt to renew the
lease or negotiate a new one. A BOOTP-similar response can be set on the server
(i.e., the same IP address is always assigned to a particular client using the MAC
address), but this requires the explicit configuration of a DHCP server in the network.
If this configuration was not performed, a random IP address (whichever one
happens to be available) is assigned.
Default setting is DHCP enabled.
As long as DHCP is activated, the ESM attempts to obtain an IP address. If it cannot
find a DHCP server after restarting, it will not have an IP address.
To activate or deactivate DHCP, refer to System Configuration Using the WebBased Interface, p. 39.
Below you can view an example of a DHCP configuration file:
# /etc/dhcpd.conf for DHCP Daemon
#
subnet 149.218.112.0 netmask 255.255.240.0 {
option subnet-mask 255.255.240.0;
option routers 149.218.112.96;}
#
# Host berta requests IP configuration
# with her MAC address
#
host berta {
hardware ethernet 00:80:63:08:65:42;
fixed-address 149.218.112,82;
}
#
# Host hugo requests IP configuration
36
31007122 8/2008
Entering the IP Parameters
# with his client identifier.
#
host hugo {
#
option dhcp-client-identifier "hugo";
option dhcp-client-identifier 00:68:75:67:6f;
fixed-address 149.218.112.83;
server-name "149.218.112.11";
filename "/agent/config.dat";
}
Lines that start with a # character are comment lines.The lines preceding the
individually listed devices refer to settings that apply to all the following devices.The
fixed-address line assigns a permanent IP address to the device.
31007122 8/2008
37
Entering the IP Parameters
System Configuration Using DHCP Option 82
General
Information
If you want to configure the system using DHCP Option 82, you need a DHCP server
with Option 82. The DHCP server matches the configuration data to the ESM based
on its physical connection.
As with the classic DHCP, on startup an agent receives its configuration data
according to the BOOTP/DHCP process flow chart (p. 34).
The system configuration is based on the classic DHCP protocol on the device being
configured, whereas Option 82 is based on the network topology. This procedure
allows you to always assign the same IP address to any device connected to a
particular location (port of a switch) on the LAN. For the installation and configuration
of a DHCP Option 82 server (p. 281.)
The figure shows an application example of DHCP Option 82.
PLC
Switch (Option 82)
MACH 3002
ESM
IP =
149.218.112.100
MAC-Address=
00:80:63:10:9a:d7
DHCP-Server
IP =
149.218.112.1
IP =
149.218.112.100
38
31007122 8/2008
Entering the IP Parameters
System Configuration Using the Web-Based Interface
Configuration
Procedure Using
the Web-Based
Interface
Perform the configuration as follows:
Step Action
1
Connect the ESM to an Ethernet cable.
2
Open the Web-based interface.
3
Go to Basics → Network.
The figure below shows the Network dialog box.
BOOTP/DHCP
Mode
MAC address
00:80:63:51:F5:00
DHCP
BOOTP
System name
PM mit fast K07
DHCP
Local
Local
IP address
149.218.17.14
Netmask
255.255.240.0
Gateway address
149.218.20.96
VLAN
ID
1
Ethernet Switch Configurator Software
Operation
On
Off
Set
4
Access
read-write
Reload
?
Help
Under Mode select where the ESM receives its IP parameters from:
z In the BOOTP mode, the configuration parameters are assigned via a BOOTP or DHCP server on the basis
of the MAC address of the ESM.
z In the DHCP mode, the configuration parameters are assigned via a DHCP server on the basis of the MAC
address or the name of the ESM.
z In the Local mode, the net parameters in the ESM memory are used.
5
Enter the parameters according to the mode selected.
6
In the System Name line, enter the system name applicable to the DHCP protocol.
31007122 8/2008
39
Entering the IP Parameters
Step Action
40
7
In the Local frame, assign an Agent IP address, a Netmask and a Gateway Address to the ESM.
8
In the VLAN ID group box, you can assign a VLAN ( p. 294) to the ESM.
Note: If you enter a value of 0 here, the agent can be accessed by all VLANs.
9
An alternative method to assign the IP address is to use the Ethernet Switch Configurator software provided
with the ESM (p. 25).
10
Save the settings you have made to ensure they are still available after restart (p. 50).
31007122 8/2008
Entering the IP Parameters
Faulty Device Replacement
Solutions for
Faulty Device
Replacement
There are two plug-and-play solutions available for replacing an inoperative ESM:
z
z
First, you can configure the new switch using an Memory back up adapter (EAM)
(p. 43).
Second, you can configure the new switch using DHCP Option 82 (p. 38).
In both cases, the same configuration data which the inoperative ESM had are
transferred to the new ESM during booting.
31007122 8/2008
41
Entering the IP Parameters
42
31007122 8/2008
Loading and Saving Settings
3
Loading Settings
Sources for
Loading Settings
During operation, the ESM enables you to load settings from the following sources:
z
z
z
z
the local non-volatile memory
the Memory back up adapter (If a Memory back up adapter (EAM) is connected
to the ESM, the ESM always loads its configuration from the EAM.)
a file on the connected network (the default setting)
a binary file or an editable script on a PC
Whenever it is restarted, the ESM automatically loads its configuration data from the
local non-volatile memory, provided that you have not activatd BOOTP/DHCP and
no EAM is connected to the switch.
Note: When loading a configuration, do not access the switch until it has loaded
the configuration file and has made the new configuration settings. Depending on
the complexity of the configuration settings, this procedure can last between 10200 seconds.
Loading Settings
from the Local
Non-Volatile
Memory Using
the Web-Based
Interface
31007122 8/2008
You can load the ESM locally from its non-volatile memory as long as you have not
activated the BOOTP/DHCP server and an EAM is not connected to the switch.
43
Loading and Saving Settings
Proceed as follows using the Web-Based Interface:
Step
Action
1
Open the Web-based interface (p. 14).
2
Go to Basics → Load/Save.
The Load/Save dialog box appears as shown below.
Load
from Device
from URL
from URL & save to Device
via PC
Load configuration
Save
to Device
URL:
to URL (binary)
to URL (script)
to PC (binary)
to PC (script)
Save configuration
tftp://192.168.1.100/product/product.cfg
Delete
current configuration
Delete configuration
current configuration and from Device
EAM
Status
notPresent
Undo modifications of configuration
Function
Period to undo while connection is lost [s]
Set
3
Select from Device in the Load group box.
4
Click Load Configuration.
Loading Settings
from the EAM
Watchdog IP address
Reload
0.0.0.0
?
Help
The EAM can be used in the event of a switch that becomes inoperative or to correct
a misconfigured switch. The two conditions for using the EAM are:
z
z
44
600
the ESMs settings must have been previously saved (p. 50) to the EAM
the EAM must be connected to the ESM
31007122 8/2008
Loading and Saving Settings
To load settings to the ESM from the EAM:
Step
Action
1
Remove power from the ESM
2
Connect the EAM to the USB port on the ESM
3
Power on the ESM
Upon power up, the ESMs configuration and IP address settings will be
automatically loaded to its memory. The EAM can be removed once the loading is
completed.
Note: If an EAM remains connected to the ESM, the ESM will load its configuration
from the EAM during each restart of the switch.
Loading Settings
from the Local
Non-Volatile
Memory Using
the Command
Line Interface
(CLI)
Proceed as follows in the CLI:
Step
Action
1
Connect the ESM to a serial cable.
2
Open the CLI.
3
Enter the command enable to change to the privileged EXEC mode.
4
Enter the command copy nvram:startup-config system:runningconfig to load the configuration data from the local non-volatile memory.
Note: If an EAM is connected to the ESM, the ESM always loads its configuration
from the EAM. For information on how to save a configuration file onto an EAM
using the CLI, refer to Saving Locally on the EAM (p. 50).
Loading Settings
from a File
The ESM enables you to load the configuration data from a file in the connected
network, provided that no EAM is connected to it.
Loading Settings
from a File Using
the Web-Based
Interface
Proceed as follows using the Web-Based Interface:
Step
1
Action
Open the Web-based interface ( p. 14).
31007122 8/2008
45
Loading and Saving Settings
Step
Action
2
Go to Basics → Load/Save.The Load/Save dialog box appears (see above).
3
In the Load group box:
z select from URL if you want the ESM to load the configuration data from a file but still retain its locally
saved configuration.
z select from URL & Save to Device if you want the ESM to load the configuration data from a file and to
save it as the ESM’s local configuration.
z Select via PC if you want the ESM to load the configuration data from a PC file and retain its locally saved
configuration.
4
If you select from a PC, skip to last step (Load Configuration).
5
In the URL edit box, type the path (see below) under which the ESM will find the configuration file.
6
Click Load Configuration.
Format of the
URL
The URL identifies the path to the tftp server from which the device loads the
configuration file. The URL is in the format: tftp://[IP address of the tftp server]/[path
name]/[file name] for example: tftp://149.218.112.5/switch/config.dat
Example of
Loading a File
from the TFTP
Server Using the
Web-Based
Interface
Load a file from the tftp server as follows:
46
Step
Action
1
In order to download a file from the tftp server, you have to save the configuration
file to the corresponding path of the tftp server with the file name, e.g. switch/
switch_o1.cfg (p. 51) .
2
Type the path to the tftp server in the URL text box, e.g.
tftp://149.218.112.5/ESM/config.dat.
To load from an ETY or NOE module, the URL is:
tftp://IPaddress//RAM0/switch rolename.prm where the IPaddress
is the IP address of the module and switch rolename is the roll name assigned
to the switch.
31007122 8/2008
Loading and Saving Settings
Trouble
Shooting Using
the Web-Based
Interface
Loading Settings
from a File Using
the CLI
Resetting the
Configuration to
the Default
Settings
31007122 8/2008
If you get an status message while saving the configuration (step 1, above), refer to
the below procedure:
Step
Action
Comment
1
One reason for the status message may
View the status of the loading
be that the loading procedure has not
procedure by selecting from URL &
Save to Device of the Load group box. been completed. DHCP/BOOTP does
not finish the loading procedure until a
valid configuration has been loaded.
2
If DHCP/BOOTP cannot find a valid
configuration, then finish the loading
process by loading the ESM’s local
configuration by selecting from Device
of the Load group box.
Load settings from a file as follows:
Step
Action
1
Connect the ESM to a serial cable.
2
Open the CLI.
3
Enter the enable command to change to the privileged EXEC mode.
4
Enter the command copy tftp://149.218.112.159/switch/
config.dat nv-ram:startup-config if you want the switch to load the
configuration data from a tftp server in the connected network.
The ESM enables you to:
z
z
reset its current configuration to the default settings (The locally saved
configuration is retained.),
reset the ESM to the default settings. After a restart, the IP address is also set to
the default setting.
47
Loading and Saving Settings
Resetting the
Configuration to
the Default
Settings Using
the Web-Based
Interface
Resetting the
Configuration to
the Default
Settings Using
the System
Monitor
Adjusting for
Interruptions to
the ESM
Reset the configuration to the default settings as follows:.
Step
Action
1
Open the Web-based interfacenterface (p. 14)
2
Go to Basics → Load/Save.
3
In the Delete group box:
z select current configuration if you want the ESM to have its current
configuration reset to the default settings and have its locally saved
configuration retained.
z select current configuration and from Device if you want the ESM to have its
current configuration reset to the default settings and have its IP address
reset to the default setting after the next restart.
4
Click Delete configuration.
Reset the configuration to the default settings as follows:
Step
Action
Comment
1
Connect the ESM V.24 socket to a
terminal or VT 100 emulator PC using
a terminal cable.
2
Open the System Monitor.
3
Select 5 Erase main configuration file. This menu allows you to reset the switch
to its default settings. The ESM saves
configurations which differ from the
default settings in the ESM.cfg file of the
flash memory.
4
Press the ENTER key.
This deletes the existing settings of the
ESM.cfg file and returns it to the default
settings.
When an interruption to the ESM connection occurs, the Load/Save dialog box
provides a means for you to automatically reload the last configuration that was
saved. You accomplish this with the Undo modifications of configuration function.
When this function is activated, and the ESM is interruped for a longer period of time
than you specify, the switch will reload the last configuation that was saved prior to
the interruption.
48
31007122 8/2008
Loading and Saving Settings
Activating the
Undo
Modifications
Funcion
Watchdog IP
Address
31007122 8/2008
You should activate the Undo modifications of configuration function before you
configure the ESM, so that if an interruption occurs during the configuration, you will
be reconnected to the switch again. To do this, proceed as follows:
Step
Action
1
Open the Web-based interfacenterface (p. 14)
2
Go to Basics → Load/Save.
3
Select Functionin the Undo modifications of configuration group box.
4
Enter a value in the Period to undo while connection is lost text box. The
range is 10 to 600 seconds and the default value is 600 seconds.
Note:Deactive the function after you have successfully saved the ESM
configuration (p. 50). This will prevent the switch from reloading the
configuration when you close the web interface.
The Watchdog IP address appearing on the Load/Save dialog box indicates the IP
address of the PC that activated the watchdog function. The ESM monitors the link
to the PC, checking for interruptions.
49
Loading and Saving Settings
Saving Settings
Options for
Saving Settings
The ESM enables you to save the settings you have made
z
z
z
Saving Locally
and on the EAM
Using the WebBased Interface
Saving Locally
and on the EAM
Using the CLI
50
locally
locally and on the EAM
to a file
Save the current configuration data as follows:.
Step
Action
1
Connect the ESM to an Ethernet cable.
2
Open the Web-based interface.
3
Go to Basics → Load/Save.
4
Click to Device in the Save group box.
5
Click Save Configuration.
As a result, the ESM saves the current configuration data to the local non-volatile
memory and, provided that an EAM is connected, also to the EAM.
Save the current configuration data as follows:
Step
Action
1
Connect the ESM to a serial cable.
2
Open the CLI.
3
Enter the command enable to change to the Privileged EXEC mode.
4
Enter the command:
copy system:running-config nvram:startup-config
to save the current configuration data to both the local non-volatile memory and
to the EAM if an EAM is connected.
31007122 8/2008
Loading and Saving Settings
Saving to a File
Using the WebBased Interface
Save the configuration data to a file as follows:.
Step Action
1
Connect the ESM to an Ethernet cable.
2
Open the Web-based interface.
3
Go to Basics → Load/Save.
4
Click to URL in the Save group box.
5
Type in the URL edit field the path
under which you want the ESM to save
the configuration file.
6
Click Save Configuration.
Comment
The URL marks the path to the tftp server on
which the switch saves the configuration file.
The URL is written as follows:
tftp://IP address of the tftp server/path name/
file name
e.g. tftp://149.218.112.5/switch/config.dat.
To save from an ETY or NOE module, the
URL is:
tftp://IPaddress//RAM0/switch rolename.prm
where the IPaddress is the IP address of the
module and switch rolename is the roll name
assigned to the switch.
Note: The configuration file contains all configuration data, including the password.
Thus, note the access rights on the tftp server.
Saving to a File
Using the CLI
This table outlines the procedure to save the current configuration data to a file using
the command line interface.
Step Action
1
31007122 8/2008
Connect the ESM to a serial cable.
2
Open the CLI.
3
Enter the command enable to change to the privileged EXEC mode.
4
Enter the command:
copy nvram:startup-config tftp://149.218.112.159/switch/config.dat
if you want the switch to load the current configuration data from a tftp server in the
connected network.
51
Loading and Saving Settings
52
31007122 8/2008
Loading Software Updates
4
Loading Software from the EAM Memory Back-up Adapter
Checking the
Software
Release Installed
Using the WebBased Interface
Loading
Procedure Using
the CLI
Check the software release installed on your ESM as follows:
Step Action
1
Open the Web-based interface.
2
Connect the ESM with an Ethernet cable.
3
Go to Basics | Software to view the release number of the software installed on your
ESM.
Load the software from the EAM as follows:
Step Action
Comment
1
Connect the EAM to which you have copied the ESM
software to the USB port of the ESM.
2
Connect the ESM to a terminal or a VT 100 emulator
using a terminal cable.
3
Start the terminal program on the PC and establish a
connection with the ESM.
4
Reboot the ESM.
While the ESM is booting, the following message
appears on the terminal:
Press <1> to enter System Monitor 1...
5
Type 1 within 1 s to start System Monitor 1.
System Monitor 1 displays the following:
1. Select Boot Operating System
2. Update Operating System
3. Start Selected Operating System
4. End (reset and reboot)
5. Erase main configuration file
6. Show Bootcode Information
31007122 8/2008
53
Loading Software Updates
Step Action
Comment
6
Select 2, and press the ENTER key to copy the software On concluding the update, the System Monitor
from the EAM into the local memory of the ESM.
prompts you to press any key to continue.
7
Select 3 to start the new software on the ESM.
Loading the
Software from
the EAM Using a
Computer
Like a standard USB memory stick, you can also connect the EAM to an USB port
of your PC and copy the ESM software to the main directory of the EAM (p. 50).
Further System
Monitor Options
In addition, the System Monitor features further options in connection with your ESM
software:
z
z
Swapping the
Software Images
swapping the software images available
performing a cold start
Swap the software images as follows:
Step Action
1
54
On the start screen of the System
Monitor, select:
1 Boot Operating System
Comment
A new screen appears.
31007122 8/2008
Loading Software Updates
Step Action
2
Performing a
Cold Start
1 Swap Os images
The memory of the ESM offers space for
two images of the software. Via this item
you can load a new version of the
software without erasing the existing
version.
2 Copy image to backup
Via this item you can save a copy of the
active software.
3 Test stored images in Flash mem.
Via this item you can test whether the
stored images in the flash memory
contain valid codes.
4 Test stored images in USB mem.
Via this item you can test whether the
stored images of the software on the
EAM contain valid codes.
5 Apply and store selection
Via this item you can apply and store the
selection of the software.
6 Reformat Flash file system
Via this item you can reformat the flash
file system.
7 Cancel selection
Via this item you can cancel the
selection and leave this dialog without
changes.
Perform a cold start as follows:
Step Action
1
31007122 8/2008
On the new screen, select 1 to swap
the two software images available (In
connection with the swapping of the
images see also 1 - 7).
Comment
On the start screen of the System Monitor, select 4 End (reset and reboot) to perform
a cold start.
55
Loading Software Updates
Loading Software Updates from the TFTP Server
TFTP Server
Note: For a tftp tftp update you need a tftp server on which the ESM software you
wish to load is saved.
Loading
Procedure Using
the Web-Based
Interface
Download ESM software updates from the tftp server as follows:
Step Action
1
Connect the ESM to an Ethernet cable.
2
Open the Web-based interface.
3
Go to Basics | Software.
The screen below shows the Software dialog box.
Stored version RAM: Running version BAK: Backup version
2.00 2005-05-06 23:13 RAM: 2.00 2005-05-06 23:13 BAK: 2.00 2005-05-06 16:53
tftp Software Update
URL
tftp://192.168.1681.100/product/product.bin
tftp-Update
http Software Update
...
File
Reload
http-Update
?
Help
In the tftp Software Update block, the URL text box identifies the path to the software stored on the tftp server.
It is written as follows:
tftp://IP address of the tftp server/path name/file name (e.g. tftp://149.218.112.4/esm/esm.bin
4
56
In the URL text box, enter the correct path to the tftp server.
31007122 8/2008
Loading Software Updates
Step Action
5
Click tftp Update to load the software from the tftp server onto the ESM.
One of the following messages is displayed when the update has been completed:
z Update completed successfully.
z Update failed. Reason: incorrect file.
z Update failed. Reason: an inoperable condition exists when saving.
6
After the loading procedure has been completed successfully, activate the new software as follows:
Go to Basics | Restart, and perform a cold start.
The ESM reloads the software from its non-volatile memory, restarts, and performs a selftest.
7
Close the browser window: File | Close to return to the Software dialog box.
8
Click Reload on the Software dialog box to re-enable your access to the ESM.
31007122 8/2008
57
Loading Software Updates
Loading Software Updates via HTTP
Loading
Procedure
Proceed as follows to update the software on your switch:
Step Action
1
Connect the ESM to an Ethernet cable.
2
Open the Web-based interface.
3
Go to Basics | Software.
The following dialog box appears:
Stored version RAM: Running version BAK: Backup version
2.00 2005-05-06 23:13 RAM: 2.00 2005-05-06 23:13 BAK: 2.00 2005-05-06 16:53
tftp Software Update
URL
tftp://192.168.1681.100/product/product.bin
tftp-Update
http Software Update
...
File
Reload
58
http-Update
?
Help
4
Click the ... button in the http Software Update block. This allows you to browse to the location on your PC
where the ESM software is located.
5
Select the ESM software file.
6
Click on http Update to transfer the software from the http server onto the ESM.
One of the following messages is displayed when the update has been completed:
z Update completed successfully.
z Update failed. Reason: incorrect file.
z Update failed. Reason: inoperable condition exists when saving.
7
After the loading procedure has been completed successfully, activate the new software as follows:
Go to Basics | Restart, and perform a cold start.
The ESM reloads the software from its non-volatile memory, restarts, and performs a selftest.
31007122 8/2008
Loading Software Updates
Step Action
8
Close the browser window: File | Close to return to the Software dialog box.
9
Click Reload on the Software dialog box to re-enable your access to the ESM.
31007122 8/2008
59
Loading Software Updates
60
31007122 8/2008
Port Configuration
5
Port Configuration Dialog Box
Purpose
The tabular format of the Port Configuration dialog box allows you to configure every
port on the ESM switch.
Accessing the
Port
Configuration
Dialog Box
You can access the Port Configuration dialog box from the ESM’s web-based
browser:
Module
Port
1
1
1
1
2
2
2
Step
Port Name
Action
1
Connect the ESM to an Ethernet cable.
2
Open the Web-based interface.
3
Go to Basics → Port Configuration. The Port Configuration dialog box appears
on the screen as shown below.
Port on
Propagate
connection error
Auto
Manual
negotiation Configuration
100 Mbit/s FDX
100 Mbit/s FDX
100 Mbit/s FDX
100 Mbit/s FDX
100 Mbit/s FDX
100 Mbit/s FDX
100 Mbit/s FDX
1
2
3
4
1
2
3
Link/
Cable
Flow Con
Current settings Crossing
Unsupported
Unsupported
100 Mbit/s FDX Automatic
Automatic
Automatic
Automatic
Automatic
?
Set
Help
Reload
The various features of the Port Configurator dialog box are described below
31007122 8/2008
61
Port Configuration
Naming the Ports
You can enter an arbitrary name for every port in the Port Name column.
Activating the
Ports
You can activate each of the ports by clicking the check box in the Port on column.
Identifying Link
Alarms
You can specify that a port’s signal contact is to be opened when a link alarm occurs
by clicking the check box in the Propagate connection error column.
Setting the Port’s
Operating Mode
You can set the operating mode for each port in the Manual Configuration column.
There are four selections that appear in a drop-down box when you click on the
port’s entry point in that column. The selectable operating modes are:
z
z
z
z
10 Mbit/s half-duplex (HDX)
10 Mbit/s full-duplex (FDX)
100 Mbit/s half-duplex (HDX)
100 Mbit/s full-duplex (FDX)
Note: The choice of operating mode is determined by the media module.
Automatic
Selection of the
Port’s Operating
Mode
You can make the selection of a port’s operating mode occur automatically by
clicking the check box in the Autonegotiation column. Once it’s activated, it takes a
few seconds for the operating mode to be set.
Note: The active automatic configuration has priority over the manual
configuration.
Display of the
Current
Operating Mode
62
The Link/Current settings column displays a port’s current operating mode and by
virtue of that fact identifies that the port has an existing connection.
31007122 8/2008
Port Configuration
TP Port
Connections
In the Cable Crossing column, you can sign the connections for a twisted pair (TP)
port configuration providing that automatic configuration is not activated for the port.
There are three selections that appear in a drop-down box when you click on the
port’s entry point in that column. The selections are:
z
enable-the ESM swaps the transmitting and receiving wire pair of the TP cable
connected to the port (MDIX).
z
disable-the ESM does not swap the transmitting and receiving wire pair of the TP
cable connected to the port (MDI).
unsupported-the ESM does not support this function it is either an optical port or
a TP SFP port.
z
Activating Flow
Control for a Port
You can activate flow control (p. 129) at a port by clicking the check box in the Flow
Control column. This action must occur in conjunction with the ESM’s Switching
Global feature.
Note: You can activate flow control at all the ESM ports with the Switching Global
dialog box (p. 130).
31007122 8/2008
63
Port Configuration
Switching the Ports on and off
Enhancing
Access Security
In the the default setting for the ESM, all ports are switched on. To enhance access
security, you should switch off the ports which are not in use.
Procedure Using
the Web-Based
Interface
Switch the ports on and off as follows:
Module
1
1
1
1
2
2
2
Port
Step
Port Name
Action
1
Connect the ESM to an Ethernet cable.
2
Open the Web-based interface.
3
Go to Basics → Port Configuration.
4
To switch on ports,in the Port On column, select the ports which a device will be
connected to.
5
To switch off ports,in the Port On column, de-select the ports which a device will
not be connected to.
Port on
Propagate
connection error
Manual
Auto
negotiation Configuration
100 Mbit/s FDX
100 Mbit/s FDX
100 Mbit/s FDX
100 Mbit/s FDX
100 Mbit/s FDX
100 Mbit/s FDX
100 Mbit/s FDX
1
2
3
4
1
2
3
Link/
Cable
Flow Con
Current settings Crossing
Unsupported
Unsupported
100 Mbit/s FDX Automatic
Automatic
Automatic
Automatic
Automatic
?
Set
64
Help
Reload
31007122 8/2008
Port Configuration
Selecting the Operation Mode
Default Settings
The default setting for all ports is Auto-negotiation mode.
Procedure Using
the Web-Based
Interface
Change to Auto-negotiation mode as follows:
Step
Action
1
Connect the ESM to an Ethernet cable.
2
Open the Web-based interface.
3
Go to Basics → Port Configuration.
4
If the device connected to this port requires a fixed setting
z select the operation mode (transfer speed, duplex operation) in the Manual
Configuration column,
z and deactivate the port in the Auto-negotiation column.
Note: The active auto-negotiation has priority over the manual configuration.
31007122 8/2008
65
Port Configuration
Propagate Connection Error Messages
General
Information
If the ESM is set to default, it will display a connection status message via the signal
contact and the LED display. The ESM allows you to disable the displaying of
connection status messages, in order to prevent a device that has been turned off
from being interpreted as an interrupted line.
Activating
Connection Error
Messages
Activate the connection error messages as follows:
66
Step
Action
1
Connect the ESM to an Ethernet cable.
2
Open the Web-based interface.
3
Go to Basics → Port Configuration.
4
In the Propagate connection error column, select the ports whose connections
you want to mask the displaying of the connection status message.
31007122 8/2008
Protection from Unauthorized
Access
6
The Password for SNMP Access
Description of
the Password for
SNMP
A network management station communicates with the switch via the Simple
Network Management Protocol (SNMP).
Every SNMP packet contains the IP address of the sending computer and the
password under which the sender of the packet would like to access the switch MIB.
The switch receives the SNMP packet and compares the IP address of the sending
computer and the password with the entries in the MIB of the switch. If the password
has the appropriate access right, and if the IP address of the sending computer has
been entered, then the switch will allow access.
The default setting is that the switch can be accessed using the public (read only)
and the private (read and write) passwords and their respective login names (user
or path) from every computer.
Protecting your
Switch from
Unwanted
Access
31007122 8/2008
Protect your switch from unauthorized access as follows:
Step
Action
1
Define a new password which you can access from your computer with all rights.
2
Treat this password with discretion, as everyone who knows the password can
access the switch MIB with the IP address of your computer.
3
Limit the access rights of the known passwords, or delete their entries.
67
Protection from Unauthorized Access
Entering the
Password for
SNMP Access
Using the WebBased Interface
Step
Proceed as follows to enter the password for SNMP access:
Action
1
Connect the ESM to an Ethernet cable.
2
Open the Web-based interface.
3
Go to Security → Password/SNMP.
The dialog enables you to change the read and read/write passwords for access to the ESM via the
Web-based interface/CLI/SNMP.
Please note that passwords are case-sensitive.
For security reasons, the read password and the read/write password must not be identical.
The Web-based interface and the user interface communicate using SNMP version 3.
The following figure is displayed on the screen:
Select password (CLI/WEB/SNMP)
Modify read-write password (admin)
Modify read-only password (user)
New password
Please retype
Set
68
?
Help
4
Select Modify read-only password (user) to enter the read-only password.
5
Enter the new read-only password in the line New password, and repeat the entry in the line Please
retype.
6
Select Modify read-write password (admin) to enter the read-write password.
31007122 8/2008
Protection from Unauthorized Access
Step
Action
7
Enter the new read-write password in the line New password, and repeat the entry in the line Please
retype.
Note: If you do not know a password with read/write access, you will not have access to the ESM.
Note: After changing the password for write access, restart the Web-based interface to access the
ESM.
Note: For security reasons, the passwords are not displayed. Note down each change. You cannot
access the ESM without a valid password!
Note: For security reasons, SNMP version 3 encrypts the password. Enabling SNMPv1 or SNMPv2
unencrypts the password.
Note: As many applications do not accept passwords shorter than 8 characters, you should use 8
characters for the password.
8
To unencrypt the password, go to Security → SNMPv1/v2 Access, and select SNMPv1 enabled or
SNMPv2 enabled.
9
Go to Security → SNMPv1/v2.
The following dialog box appears.
SNMPv1 enabled
SNMPv2 enabled
Index
Password
0 public
1 private
IP Address
0.0.0.0
0.0.0.0
Set
IP mask
0.0.0.0
0.0.0.0
Reload
Access Mode
Active
read-only
read-write
Create entry
Delete
?
Help
TheSNMPv1/v2 dialog box allows you to select the access using SNMPv1 or SNMPv2. The default
setting for SNMPv1/v2 is both protocols are enabled, which allows you to communicate with earlier
versions of SNMP.
Please note that passwords are case-sensitive.
10
31007122 8/2008
To be able to communicate with earlier versions of SNMP, select SNMPv1/2 enabled.
69
Protection from Unauthorized Access
Step
70
Action
11
Select SNMPv1 enabled or SNMPv2 enabled in the table to determine which IP addresses are
allowed to access the ESM and which type of passwords are to be used.
The table allows you to create up to 8 entries.
For security reasons, the read password and the read/write password must not be identical.
Please note that passwords are case-sensitive.
12
To create a new line in the table Click Create entry.
13
To delete an entry, select the line in the table and click Delete.
The items in the table have the following meanings:
z Index: current number for this table entry
z password: the computer must use to have access to the ESM; This password is independent of
the SNMPv3 password.
z IP address: IP address of the computer permitted to access the ESM
z IP mask: IP mask to the IP address
z Access Mode: determines if the computer has read-only or write access
z Active: enabling/disabling this entry
31007122 8/2008
Protection from Unauthorized Access
Setting the Telnet/Web-Based Access
Description of
Telnet Access
The Telnet server of the ESM allows you to configure the ESM using the Command
Line Interface (CLI). You can switch off the Telnet server to prevent Telnet access
to the ESM.
The default setting is that the server is switched on.
After the Telnet server has been switched off, the ESM can no longer be accessed
using a Telnet connection.
Note: The Telnet server may be reactivated using the CLI or the Web-based
interface via Security → Telnet/Web Access.
Description of
Web-Based
Access
The Web server of the ESM allows you to configure the ESM using the Web-based
interface. You can switch off the Web server to prevent Web access to the ESM.
The default setting is that the server is switched on.
After the Web server has been switched off, the ESM can no longer be accessed
using a Web browser.
Note: The Web server may be reactivated using the CLI.
Disabling and
Enabling Telnet
or Web-Based
Access Using the
Web-Based
Interface
31007122 8/2008
You can disable and enable Telnet or Web access as follows:
Step
Action
1
Connect the ESM to an Ethernet cable.
2
Open the Web-Based interface.
3
Go to Security → Telnet/Web Access.
4
Switch off/on the server to which you wish to disable/enable access.
71
Protection from Unauthorized Access
Enabling and
Disabling Telnet
Access Using the
Command Line
Interface (CLI)
Enabling and
Disabling WebBased Access
Using the CLI
72
You can enable and disable Telnet access as follows:
Step
Action
1
Connect the ESM to a serial cable.
2
Open the CLI.
3
Enter the enable command to change to the privileged EXEC mode.
4
Enter the transport input telnet command to switch on the Telnet server.
5
Enter the no transport input telnet command to switch off the Telnet server.
You can enable and disable the Web access via the CLI as follows:
Step
Action
1
Enter the enable command to switch to the privileged EXEC mode.
2
Enter the ip http server command to switch on the Web server.
3
Enter the no ip http server command to switch off the Web server.
31007122 8/2008
Protection from Unauthorized Access
Disabling the Ethernet Switch Configurator (ESC) Function
Description of
the ESC Software
The ESC software (p. 25) allows you to assign an IP address to the ESM on the
basis of its MAC address.
Note: For security reasons, either limit or switch off completely the ESC function of
the ESM after assigning the IP parameters.
Disabling and
Limiting the ESC
Function Using
the Web-Based
Interface
Disabling,
Limiting and
Enabling the
Ethernet Switch
Configurator
Function Using
the Command
Line Interface
31007122 8/2008
You can disable or limit the ESC function as follows:
Step
Action
1
Connect the ESM to an Ethernet cable.
2
Open the Web-based interface.
3
Go toBasics → Network.
4
Switch off the ESC function in the Ethernet Switch Configurator Software group
box, or limit access to Read Only.
You can disable, limit or enable the Ethernet Switch Configurator function as follows:
Step
Action
1
Connect the ESM to a serial cable.
2
Open the CLI.
3
Type the command enable to switch to the privileged EXEC mode.
4
Type the command network protocol Ethernet Switch Configurator
off to switch off the Ethernet Switch Configurator function.
5
Type the command network protocol Ethernet Switch Configurator
read-only to switch on the ESC function with the Read access right.
6
Type the command network protocol Ethernet Switch Configurator
read-write to switch on the ESC function with the Read and Write access right.
73
Protection from Unauthorized Access
Port Security
Description of
Port Access
Control
The ESM protects every port from unauthorized access.
Depending on your choice, the ESM checks either the MAC address or the IP
address of the connected device.
The IP-Based Port Security allows for limiting access to a maximum of 10
addresses.
The following functions are available for monitoring every individual port:
z
z
Who has access to this port?
The ESM recognizes two classes of access control:
z
all: There is no access restriction.
z user: Only an assigned user has access.
You define this user with his MAC or IP address.
What should happen after an unauthorized access attempt?
The ESM can respond in three selectable ways to an unauthorized access
attempt:
z none: no response
z trapOnly: message by sending a trap
z portDisabled: message by sending a trap and disabling a port
Note: Since the ESM is a layer 2 device, it translates the stored IP addresses into
MAC addresses. In so doing, a MAC address should be assigned to exactly one IP
address. Please bear in mind that when you use a router, several IP addresses can
be assigned to one MAC address, namely that of the router. This means that all
packets of the router will pass the port unchecked if the permitted IP address is that
of the router. If a connected device sends packets with other MAC addresses and
a permitted IP address, the ESM will disable the port.
74
31007122 8/2008
Protection from Unauthorized Access
Defining IPBased Port
Access Control
Using the WebBased Interface
Step
Define IP-based port access control as follows:
Action
1
Connect the ESM to an Ethernet cable.
2
Open the Web-based interface.
3
Go to Security → Port Security.
The following dialog box appears.
Configuration
MAC-Based Port Security
Module Port
1
1
1
1
2
2
2
2
1
2
3
4
1
2
3
4
Port
Status
enabled
enabled
enabled
enabled
enabled
enabled
enabled
enabled
Allowed
MAC-Address
00:00:00:00:00:00
00:00:00:00:00:00
00:00:00:00:00:00
00:00:00:00:00:00
00:00:00:00:00:00
00:00:00:00:00:00
00:00:00:00:00:00
00:00:00:00:00:00
IP-Based Port Security
Current
MAC-Address
00:00:00:00:00:00
00:00:00:00:00:00
00:00:00:00:00:00
00:E0:18:95:D8:61
00:00:00:00:00:00
00:00:00:00:00:00
00:00:00:00:00:00
00:0D:60:6F:1E:E0
Set
Reload
Allowed
IP-Address
0.0.0.0
0.0.0.0
0.0.0.0
0.0.0.0
0.0.0.0
0.0.0.0
0.0.0.0
0.0.0.0
Action
none
none
none
none
none
none
none
none
?
Help
4
Choose IP-Based Port Security.
5
Enter in the Allowed IP address column the IP address of the device with which data exchange is
permitted at this port. (Up to 10 addresses (each separated by a space) can be entered).
Without an entry, data can be received from any device.
31007122 8/2008
75
Protection from Unauthorized Access
Step
6
Action
In the Action column, select one of the following reactions to an unauthorized access attempt:
z no action none)
z message by sending a trap trapOnly)
z the respective port in the Port Configuration table is disabled (p. 61) and trap portDisabled( is sent.
An entry in the Port Configuration table is part of the configuration and is saved with the configuration.
An alarm (trap) can only be sent if at least one recipient is entered under Configuring Traps Using the
Web-Based Interface, p. 145 and if both the appropriate status andPort Security are marked.
Defining MACBased Port
Access Control
Using the WebBased Interface
Step
1
Define the MAC-based port access control as follows:
Action
Connect the ESM to an Ethernet cable.
2
Open the Web-Based Interface.
3
Go to Security → Port Security.
The following dialog box appears.
Configuration
MAC-Based Port Security
Module Port
1
1
1
1
2
2
2
2
1
2
3
4
1
2
3
4
Port
Status
enabled
enabled
enabled
enabled
enabled
enabled
enabled
enabled
Allowed
MAC-Address
00:00:00:00:00:00
00:00:00:00:00:00
00:00:00:00:00:00
00:00:00:00:00:00
00:00:00:00:00:00
00:00:00:00:00:00
00:00:00:00:00:00
00:00:00:00:00:00
Current
MAC-Address
00:00:00:00:00:00
00:00:00:00:00:00
00:00:00:00:00:00
00:E0:18:95:D8:61
00:00:00:00:00:00
00:00:00:00:00:00
00:00:00:00:00:00
00:0D:60:6F:1E:E0
Set
76
IP-Based Port Security
Reload
Allowed
IP-Address
0.0.0.0
0.0.0.0
0.0.0.0
0.0.0.0
0.0.0.0
0.0.0.0
0.0.0.0
0.0.0.0
Action
none
none
none
none
none
none
none
none
?
Help
31007122 8/2008
Protection from Unauthorized Access
Step
Action
4
Choose MAC-Based Port Security.
5
In the Allowed MAC Address column, enter the MAC address of the device with which data exchange is
permitted at this port.
Without an entry, data can be received from any device.
6
Press the left mouse button to copy an entry from the Current MAC Address column into the Allowed MAC
Address column.
The Current MAC Address column shows the MAC address of the device from which data was received last.
7
In the Action column, select one of the following reactions to an unauthorized access attempt:
z no action none
z message by sending a trap trapOnly
z the respective port in the Port Configuration table is disabled (p. 61) and trap portDisabled is sent.
An entry in the Port Configuration table is part of the configuration and is saved with the configuration.
An alarm (trap) can only be sent if at least one recipient is entered under Configuring Traps Using the
Web-Based Interface, p. 145 and if both the appropriate status and Port Security are marked.
31007122 8/2008
77
Protection from Unauthorized Access
78
31007122 8/2008
Synchronizing the System Time of
the Network
7
Protocols for Synchronizing the System Time of the Network
SNTP and PTP
When you synchronize the system time of the network, the ESM allows you to use
either the Simple Network Time Protocol (SNTP) or the Precision Time Protocol
(PTP). The accuracies of both protocols differ.
If you only require accuracies in the order of milliseconds, the Simple Network Time
Protocol (SNTP) offers a low-cost solution.
Areas of application of this protocol are:
z
z
z
log entries
time stamping of production data
production control
The Precision Time Protocol (PTP), which is described in the IEEE 1588 standard,
achieves accuracies in the order of fractions of microseconds.
Note: Choose the protocol which best meets your requirements. When using both
protocols at the same time, bear in mind that they interact.
31007122 8/2008
79
Synchronizing the System Time of the Network
Entering the System Time
Entering the
System Time
Using PTP or
SNTP
If there is no reference watch available, you can enter the system time in the ESM
so that you can use it like a reference clock (p. 83).
Making TimeRelated Settings
Using the WebBased Interface
Make settings independent of PTP or SNTP as follows:
Step
Action
1
Connect the ESM to an Ethernet cable.
2
Open the Web-based interface.
3
Go to Time.
4
Make your time-related settings in the screen below.
IEEE 1588 / SNTP time
Set Time from PC
System time
Time Source
local
Local offset [min]
Set Offset from PC
Set
80
Reload
?
Help
31007122 8/2008
Synchronizing the System Time of the Network
Possible TimeRelated Settings
You can make the following settings independent of PTP or SNTP:
z
z
z
z
z
z
IEEE 1588 Time displays the time received via PTP. SNTP Time displays the
time with reference to Universal Time Coordinated (UTC). This means the same
time is displayed worldwide and that differences are not taken into account.
System Time uses IEEE 1588/SNTP time, allowing for the local time difference
of IEEE 1588/SNTP time:
System Time= IEEE 1588/SNTP time + Local offset.
Time Source displays the origin of the following time. The ESM automatically
selects the source with the highest precision.
If you click Set Time from PC, the switch will load the PC’s time as the system
time and calculate IEEE 1588/SNTP time, allowing for the local time difference.
IEEE 1588/SNTP time = System time - Local offset.
Local offset allows you to display/enter the time difference between local time and
IEEE 1588/SNTP time.
If you click Offset from PC, the switch will calculate the time zone on your PC, on
the basis of which it will calculate the local time difference.
Note: When setting the time zones with summer and winter times, make an
adjustment for the local offset. The switch can also receive the IP address of the
SNTP server as well as the local offset from a DHCP server.
Setting the
System Time and
Entering
Differences
Between IEEE
1588 and SNTP
Time Using the
CLI
31007122 8/2008
Set the system time and enter the difference between SNTP and IEEE 1588 as
follows:
Step
1
Action
Connect the ESM to a serial cable.
2
Open the CLI.
3
Enter the enable command to change to the privileged EXEC mode.
4
Enter the configure command to change to the configuration mode.
5
Enter the sntp time <YYYY-MM-DD HH:MM:SS> command to set the switch
system time.
6
Enter the sntp client offset <-1000 to 1000> command to enter the time offset
between local time and IEEE1588/SNTP Time.
81
Synchronizing the System Time of the Network
Simple Network Time Protocol (SNTP)
Description of
SNTP
SNTP has a hierarchical structure. The SNTP server provides Universal Time
Coordinated (UTC). UTC is the time which is referenced to SNTP. The same time is
displayed worldwide.
Local time differences are not taken into account.
The ESM supports the SNTP server and the SNTP client functions.
The figure below shows a SNTP application example.
PLC
GPS
Client
NTPServer
Switch
Switch
Switch
149.218.112.0
Client
Client
Server
149.218.112.1
Preparing the
SNTP
Configuration
82
Client
Server
149.218.112.2
Client
Server
149.218.112.3
Prepare the configuration as follows:
Step
Action
1
To gain an overview of how the system time is passed on, draw a network plan
which shows all devices involved in SNTP.
Please bear in mind that the accuracy of the system time depends on signal
running time.
2
Switch on the SNTP function on all devices whose time you want to set using
SNTP.
3
If you do not have a reference clock at your disposal, use a switch as the
reference clock, and set its system time as accurately as possible.
31007122 8/2008
Synchronizing the System Time of the Network
Note: To ensure the most accurate system time distribution possible, do not use
network components (routers, switches) which do not support SNTP in the signal
path between the SNTP server and the SNTP client.
Configuring
SNTP
Step
1
Configure the SNTP as follows:
Action
Connect the ESM to an Ethernet cable.
2
Open the Web-based interface.
3
Go to Time → SNTP.
The figure below shows the SNTP dialog.
Configuration SNTP Client and Server
Operation
On
Off
Configuration SNTP Server
Anycast destination address
0.0.0.0
VLAN ID
0
Anycast send interval [s]
0
Disable Server at local time source
SNTP Status
Configuration SNTP Client
External server address
0.0.0.0
Redundant server address
0.0.0.0
Server request interval [s]
0
Accept SNTP Broadcasts
Threshold for obtaining the UTC [ms] 30
Disable Client after successful synchronization
Set
Reload
?
Help
4
In the Configuration SNTP Client and Server group box, switch the SNTP function on or off.
When it is switched off, the SNTP server does not send any SNTP packages and does not reply to
any SNTP requests.
The SNTP client does not send any SNTP requests and does not interpret any broadcast/multicast
packages.
5
Go to the SNTP Status group box to view server messages such as Server cannot be reached.
31007122 8/2008
83
Synchronizing the System Time of the Network
Step
84
Action
6
Go to the Configuration SNTP Server group box, and enter under Anycast destination address the
IP address to which the SNTP server on the switch sends the SNTP data packets (target address:
255.255.255.255, the SNTP packets are broadcast). Target address: 224.0.1.1, the SNTP packets
are sent to the multicast.
7
Go to the Configuration SNTP Server group box, and specify under VLAN ID the VLAN to which the
ESM may periodically send SNTP packets.
8
Go to the Configuration SNTP Server group box, and specify under Anycast send interval the interval
at which the ESM sends SNTP packets (valid entries: 1 second to 3600 seconds, default: 120
seconds).
9
Go to the Configuration SNTP Server group box, and observe the state of the Disable Server at local
time source check box. When it is selected, the ESM disables the SNTP server function if the status
of the time source is local (p. 80).
10
Go to the Configuration SNTP Client group box, and enter under External server address the IP
address of the SNTP server from which the switch periodically obtains the system time.
11
Go to theConfiguration SNTP Client group box, and enter under Redundant server address, enter
the IP address of the SNTP server from which the ESM periodically obtains the system time if the
ESM does not receive an answer from the External Server Address within 0.5 seconds after making
the query.
Note: If you receive the system time from an external/redundant server address, do not accept any
SNTP broadcasts. Otherwise you do not know whether the ESM displays the time from the server
entered, or the time from an SNTP broadcast package.
12
Go to the Configuration SNTP Client group box, and specify under Server request interval the interval
at which the ESM requests SNTP packages (valid entries: 1 second to 3600 seconds, default 30
seconds).
13
Click Accept SNTP Broadcasts if you want the ESM to obtain the system time from SNTP broadcast/
multicast packages which it receives.
14
Go to the Configuration SNTP Client group box, and enter a value in ms under Threshold for
obtaining the UTC [ms]. This is used to reduce the frequency of time alterations. The ESM obtains
the UTC as soon as the deviation to the server time is above or below this threshold.
15
Click Disable Client after successful synchronization if you want the ESM to have no further time
synchronizations after it has adjusted its time with the server.
31007122 8/2008
Synchronizing the System Time of the Network
Configuration
Example
31007122 8/2008
The following table shows a configuration example:
Switch
149.218.112.1
149.218.112.2
Operation
On
On
Any cast destination address
224.0.1.1
224.01.1
Server VLAN ID
1
1
Anycast Send Interval
120
120
Client External Server Address
149.218.112.0
149.218.112.1
Server Request Interval
30
30
Accept SNTP Broadcasts
No
No
85
Synchronizing the System Time of the Network
Precision Time Protocol (PTP)
Function
Description of
PTP
The requirement for running time-critical applications over a LAN is a precision time
management system. The IEEE 1588 standard with the Precision Time Protocol
describes a procedure that is based on the reference clock principle. This means
that the clocks in a LAN are synchronized according to the most precise clock
reference or grandmaster clock) in that LAN.
This procedure permits synchronization of the clocks with an accuracy on the scale
of hundredths of nanoseconds. The synchronization messages have virtually no
effect on the network load. PTP uses multicast communication.
Factors influencing precision are:
z
Accuracy of the Reference Clock IEEE 1588 classifies clocks according to their
accuracy. An algorithm that measures the accuracy of the available clocks in the
network determines the most accurate time for the grandmaster clock.
The following table explains what some stratum numbers stand for.
Stratum Number
Specification
0
To assign for temporary, special purposes a better value to one clock
than to all other clocks within the network.
1
Designates the clock with the highest precision as the reference clock.
A stratum 1 clock can be both a boundary and an ordinary clock.
Stratum 1 clocks include GPS clocks and calibrated atomic clocks. A
stratum 1 clock cannot be synchronized using PTP from another clock
in the PTP system.
2
Designates the clock as the second-choice reference clock and cannot
be synchronized using PTP from another clock in the PTP system.
3
Designates the clock that can synchronize other devices using an
external cable as the reference clock.
4
Designates the clock as the reference clock.
5-254
Reserved
255
Default Setting (Such a clock should never be the best master clock).
z
z
86
Cable Delays; Device Delays
The communication protocol defined by IEEE 1588 allows you to measure cable
delays. Formulas for calculating the current time eliminate delays.
Accuracy of Local Clocks
The communication protocol defined by IEEE 1588 takes into account the
inaccuracy of local clocks relative to the reference clock. Calculation formulas
permit the synchronization of local time, allowing for the inaccuracy of the local
clock relative to the reference clock.
31007122 8/2008
Synchronizing the System Time of the Network
The figure illustrates delay and jitter problems when synchronizing clocks.
Reference
(Master clock)
Local
(Slave clock)
PTP
PTP
UDP
UDP
IP
Delay + Jitter
Delay + Jitter
MAC
Phy
IP
MAC
Delay + Jitter
Phy
LAN
To get around the delay and jitter in the protocol stack, IEEE 1588 recommends
inserting a special hardware time stamp unit between the MAC and the PHY layer.
Devices or modules with the name supplement RT are equipped with a time stamp
unit.
The delay and jitter in the LAN increases in the media and transmission devices
along the transmission path.
The cable delays are relatively constant. Changes occur very slowly. This fact is
taken into account by IEEE 1588. So measurements and calculations are performed
on a regular basis.IEEE ignores the inaccuracy caused by device delays and device
jitter by defining boundary clocks. Boundary clocks are clocks that are integrated
into the devices. These clocks are synchronized on one side of the signal path and,
on the other side of the signal path, they are used to synchronize the subsequent
clocks (ordinary clocks).
The following figure illustrates how a boundary clock works.
PLC
GPS
Reference
(Grandmaster Clock)
Ordinary Clock
Switch
Ordinary Clock
Slave
Master
Boundary Clock
31007122 8/2008
87
Synchronizing the System Time of the Network
Independent of the physical communication paths, PTP provides logical
communication paths you define when you set up PTP subdomains. Subdomains
are designed to create groups of clocks that are time-independent of the rest of the
domain. Typically, the clocks use the same communication paths that other clocks
use.
The following figure illustrates how subdomains work.
PLC
Ordinary Clock
GPS
Reference
(Grandmaster Clock)
Switch
PTP Sub domain 1
Boundary
Clock
PTP Sub domain 2
88
31007122 8/2008
Synchronizing the System Time of the Network
Setting Up Your
Network and
Enabling PTP
31007122 8/2008
You can set up your network and enable PTP as follows:.
Step
Action
1
Draw a network plan showing all devices involved in PTP.
2
Connect all connections you need to distribute PTP information to devices
equipped with an integrated time stamp unit (RT modules).
Devices which are not equipped with a time stamp unit obtain the PTP
information and set their clocks accordingly. They are not involved in the
protocol.
3
Connect all devices to Ethernet cables.
4
Open the Web-based interface.
5
Go to Time → PTP.
6
Select On to enable the PTP function on all devices whose time you want to
synchronize using PTP.
7
Click Set to retain your setting.
8
If there is no reference clock available, designate a switch as reference clock,
and set the system time as precisely as possible.
89
Synchronizing the System Time of the Network
Interaction between PTP and SNTP
Suggested
Configuration of
Devices
PTP and SNTP permit each other to coexist in one network. However, since both
protocols influence the system time of the device, situations may occur in which they
compete with each other.
Note: Configure the devices in such a way that each device receives the system
time exclusively from one source. If you want the switch to receive the system time
using PTP, enter the external server address 0.0.0.0, and do not accept any SNTP
broadcasts when performing the SNTP client configuration. If you want the switch
to receive the system time using SNTP, make sure that the best clock is connected
to the SNTP server. Thus, both protocols receive the time from the same server.
Application
Example
This figure shows an application example of the coexistence of PTP and SNTP.
PLC
GPS
SNTP-Client
NTPServer
SNTP
SNTP
149.218.112.0
SNTP
SNTP-Client
SNTP Client
SNTP Server
SNTP Server
SNTP Server
PTP
PTP
149.218.112.2
149.218.112.3
PTP
149.218.112.1
The requirements made to network time accuracy are rather high, however the end
devices exclusively support SNMP, which is less precise than PTP. SNTP achieves
an accuracy of milliseconds, whereas PTP has an accuracy of fractions of
microseconds (see fig. above).
90
31007122 8/2008
Synchronizing the System Time of the Network
The following table shows an application example.
Switch
149.218.112.1
149.218.112.2
149.218.112.3
Function
On
On
On
Clock Mode
PTP Mode Boundary PTP Mode Boundary
Clock
Clock
PTP Mode Boundary
Clock
Preferred Master
False
False
False
PTP
SNTP
Function
On
On
On
Anycast Destination
Address
224.0.1.1
224.0.1.1
224.0.1.1
Server VLAN ID
1
1
1
Anycast Send
Interval
30
30
30
Client External
Server Address
149.218.112.0
0.0.0.0
0.0.0.0
Server Request
Interval
Any
Any
Any
Accept SNTP
Broadcasts
No
No
No
In the example above, the left switch receives as the SNTP client the system time
from the NTP server using SNTP. The switch assigns to a time received from an
NTP server the stratum clock number 2 (p. 86). Thus, the left switch becomes the
reference clock for PTP synchronization. PTP is active in all three switches,
ensuring that, relative to each other, the system times of the switches are
synchronized precisely. As the connectable end devices in the example exclusively
support SNTP, all three switches serve as SNTP servers.
31007122 8/2008
91
Synchronizing the System Time of the Network
92
31007122 8/2008
Network Load Control
8
Directed Frame Forwarding
Directed Frame
Forwarding
Functions
Directed frame forwarding is a method used by the ESM switch to avoid
unnecessary increases in the network load. The switch features the following
directed frame forwarding functions:
z
z
z
z
store-and-forward
multi-address capability
removal of aged learned addresses
static address entries
Store-andForward
All data received by a ESM switch are stored, and their validity is checked. Invalid
and defective tagged frames (> 1522 bytes or CRC status messages) as well as
fragments (< 64 bytes) are discarded. Only valid tagged frames are forward by the
ESM.
Multi-Address
Capability
An ESM switch learns all the source addresses for a port and is capable of learning
up to 8,000 addresses. Only frames with:
z
z
z
unknown addresses
these addresses or
a multi/broadcast address
in the destination address field are sent to this port.
The ESM floods data packets with an unknown destination address.
The ESM directly distributes data packets with a known destination address.
The ESM enters learned source addresses in its filter table.This becomes necessary
if more than one terminal device is connected to one or more ports. It is thus possible
to connect several independent subnetworks to an ESM.
31007122 8/2008
93
Network Load Control
Removal of Aged
Learned
Addresses
The ESM monitors the age of the learned addresses in its filter table. Learned
address entries which exceed 30 seconds of aging time are deleted by the ESM
from its filter table.
Note: A reboot deletes the learned address entries.
Entering the
Aging Time in the
Web-Based
Interface
Enter the aging time as follows:
Step
Action
1
Connect the ESM to an Ethernet cable.
2
Open the Web-based interface.
3
Go to Switching → Global to open the Switching Global dialog box.
MAC Address
00.80.65.51.82.8D
Aging Time (s) 30
Flow Control
Address Learning
Frame size
94
1522
1632
4
Enter the Aging Time (s) for all dynamic entries in the range from 10 to 630
seconds (Unit: 1 second, default setting: 30).
5
Click Set to apply the aging time of all learned addresses.
31007122 8/2008
Network Load Control
Filter Function
One of the most important functions of an ESM switch is the filter function. It selects
tagged frames according to certain defined patterns called filters. These patterns
are associated with switching rules. This means that a tagged frame received at the
port of a switch is compared to the patterns. If a pattern matches the tagged frame,
the switch will either transmit or reject the packet according to the switching rules for
the affected ports.
The following are valid filter criteria:
z destination address,
z broadcast address,
z multicast address,
z VLAN membership.
The individual filters are stored in the Forwarding Database (FDB) filter table. The
table is divided into three parts, a static part and two dynamic parts.
z
z
z
The management administrator describes the static part of the filter table
(dot1qStaticTable).
During operation, the ESM switch is capable of learning which ports will receive
tagged frames from which source addresses. This information is stored in the
dynamic part of the table (dot1qTpFdbTable)
Addresses learned from the neighboring agent and those learned by GMRP are
written to another dynamic part.
Addresses already located in the static filter table are automatically transferred by
the switch into the dynamic part.
An address entered statically cannot be overwritten through learning.
Note: If the redundancy manager is active, it is not possible to make permanent
unicast entries.
Note: In the filtering database, you can create up to 100 filters for multicast
addresses.
31007122 8/2008
95
Network Load Control
Assigning Filter
Addresses
You assign filter addresses with the Filter for MAC addresses dialog box (shown
below).
Each row of the table represents one filter. Filters specify the way in which data
packets (frames) are sent. The filters are derived in either of two ways:
z
z
created manually
set automatically (learned status)
Those data packets whose destination address is manually entered in the table are
sent from the receiving port to the ports marked in the table.
Those data packets whose destination address is not entered in the filter table (set
automatically) are sent from the receiving port to all other ports.
96
31007122 8/2008
Network Load Control
Entering Static
Addresses
31007122 8/2008
You assign filter address with the Filter for MAC addresses dialog box.
Step
Action
1
In the tree view of the web-based interface, select Switching → Filters for MAC
addresses to bring up the dialog box (shown above).
2
Click on Create to bring up the Create Filter dialog box.
3
Type in the address of the desired filter in the Address box.
4
Click on the appropriate port number in the destination ports box.
5
Click on Set to create the filter and return to the Filters for MAC addresses
dialog box.
6
Repeat steps 2 to 5 to create each additional required filter.
97
Network Load Control
Deleting Learned
Address Entries
You can delete address entries with learned status from the filter table as follows:
Step
Action
1
In the tree view of the web-based interface, select Basics → Restart to bring up
the Restart dialog box.
2
Click on Reset MAC Address table.
Cold start
Warm stare
Reset MAC Address table
Reset ARP table
Reset port counters
Delete logfile
Disabling the
Directed Frame
Fowarding
The ESM switch allows you to disable the learning of addresses and observe the
data at all the ports. When this occurs, the ESM transfers all the data from all ports
to all ports. To disable address learning:
Step
Action
1
In the tree view of the web-based interface, select Switching → Global to bring
up the Global dialog box.
2
Click on Address Learning.
MAC Address
00.80.65.51.82.8D
Aging Time (s) 30
Flow Control
Address Learning
Frame size
3
98
1522
1632
Click on Set.
31007122 8/2008
Network Load Control
Multicast Application
Description of
Multicast
Application
The data distribution in the LAN distinguishes between three distribution classes
with reference to the addressed recipient:
z unicast (one recipient)
z multicast (a group of recipients)
z broadcast (every recipient that can be reached)
In the case of a multicast address, switches pass all data packets with a multicast
address to all ports in the multicast group. This leads to an increased bandwidth
requirement.
Protocols such as GMRP and processes such as IGMP Snooping enable the
switches to exchange information by means of the targeted distribution of multicast
data packets. The distribution of the multicast data packets exclusively to those
ports to which the recipients of these multicast data packets are connected, reduces
the bandwidth required.
You can recognize IGMP multicast addresses by the area in which an address is
located:
z MAC multicast address (01:00:5E:00:00:00 - 01:00:5E:FF:FF:FF)
z IP multicast address class D (224.0.0.0 - 239.255.255.255)
31007122 8/2008
99
Network Load Control
Example of a
Multicast
Application
The cameras for machine surveillance normally transmit their images to monitors
located in the machine room and in the monitoring room. In an ESM IP transmission,
a camera sends its image data with a multicast address over the network.
To prevent the many images from slowing down the entire network, the ESM uses
the GMRP to distribute multicast address information. As a result, those images with
a multicast address are only distributed to those ports that are connected to the
associated monitors for surveillance.
The figure shows a multicast application example.
1st floor
2nd floor
Control room
100
31007122 8/2008
Network Load Control
Description of
IGMP Snooping
The Internet Group Management Protocol (IGMP) describes the distribution of
multicast information between routers and end devices on layer 3.
Routers with an active IGMP function periodically send queries to find out which IP
multicast group members are connected to the LAN.
Multicast group members reply with a report message. This report message
contains all parameters required by the IGMP. The router records the IP multicast
group address from the report message in its routing table. Then the router transfers
frames with this IP multicast group address in the target address field only in
accordance with the routing table.
Devices that no longer want to be members of a multicast group can cancel their
membership with a Leave message (from IGMP version 2), and they do not transmit
any more report messages. In IGMP versions 1 and 2, the router removes the
routing table entry if it does not receive any report messages within a specified
period of time (aging time). If there are a number of routers with an active IGMP
function in the network, then they work out among themselves which router carries
out the query function when using IGMP version 2. If there is no router in the
network, a suitably equipped switch can carry out the query function.
A switch that connects a multicast receiver with a router can evaluate the IGMP
information with the aid of the IGMP Snooping procedure.
IGMP Snooping translates IP multicast group addresses into MAC multicast
addresses, so that the IGMP functions can also be used by layer 2 switches. The
switch records the MAC addresses of the multicast receivers, which are obtained by
the IGMP snooping from the IP addresses, in the static address table. Thus the
switch blocks multicast packets at those ports to which no multicast receivers are
connected.
31007122 8/2008
101
Network Load Control
Description of
GMRP
The GARP Multicast Registration Protocol (GMRP) describes how multicast
information is distributed to other switches on layer 2 level. Thus switches can learn
multicast addresses. When a multicast address is entered in the static address
table, the ESM sends this information to all ports. This tells the connected switches
to pass this multicast address on to this switch.
The GMRP describes the distribution of data packets with a multicast address as the
target address. Devices that want to receive data packets with a multicast address
as the target address carry out the registration of the multicast address with the aid
of the GMRP. For a switch, registration involves entering the multicast address in
the filter table. When a multicast address is entered in the filter table, the switch
sends this information in a GMRP packet to all the ports. Therefore the connected
switches know that they have to send this multicast address to this switch. The
GMRP enables packets with a multicast address in the target address field to be
sent to the ports entered. The other ports are not affected by these packets.
Data packets with unregistered multicast addresses are sent to all ports by the
switch
Default setting: GMRP Enabled
Devices that do not support GMRP can be integrated into the multicast addressing
scheme by means of a static filter address entry on the connector port.
The multicast tree is set up within 5 seconds in a network of up to 20 ESM modules,
after the multicast address has been entered for the first time at an ESM port. This
time period depends on the Join Time that is set (default setting = 200 ms).
Setting Up
Multicast
Applications
102
You setup multicast applications consisting of the IGMP snooping process and the
GMRP protocol on the ESM through the use of the Multicast dialog box. The
following discussions describe the settings available on the Multicast dialog box to
configure the ESM to support both these multicast applications.
31007122 8/2008
Network Load Control
Global Settings
Step
The Global Configuration section of the Multicast dialog box allows you to globally
enable and disable the IGMP snooping and GMRP functions for the entire ESM. In
order to gain access to these selections, proceed as follows:
Action
1
Connect the ESM to an Ethernet cable.
2
Open the Web-based interface.
3
Go to Switching → Multicasts.
4
Click on IGMP Snooping to display the Multicasts dialog box with the global IGMP Snooping function
switched on.
Global Configuration
IGMP Snooping
IGMP Querier
IGMP Querier active
GMRP
Protocol Version
disabled
Transmit interval [s] 125
Module
1
1
1
1
2
2
2
Unkno
IGMP Settings
1
IGMP
IGMP
Port IGMP enabled Forw. Automatic
All Query Port
1
2
3
4
1
2
3
2
3
Current Querier IP-Address
0.0.0.0
Sen
Max Response Time (sec)
10
Sen
Group Membership Interval (sec) 260
Static
Query
Port
disable
disable
disable
disable
disable
disable
disable
Learned
Query
Port
Set
Reload
GMRP on
GMRP Service Require
Forward all unregistered g
Forward all unregistered g
Forward all unregistered g
Forward all unregistered g
Forward all unregistered g
Forward all unregistered
Forward all unregistered g
5
If the IGMP snooping is switched off
z the switch does not evaluate query and report packets received, and
z it sends (floods) received data packets with a multicast address as the target address to all ports.
6
Click on GMRP to turn GMRP on and off globally for the switch (p. 108).
7
Click on disabled to disable IGMP Snooping and GMRP.
31007122 8/2008
Disc
103
Network Load Control
IGMP Global
Settings
IGMP Snooping allows you to enable IGMP snooping for the entire ESM.
If IGMP Snooping is disabled, then:
z
z
the switch does not evaluate query and report packets received, and
it sends (floods) received data packets with a multicast address as the target
address to all ports.
The following discussions explain the various selections on the Multicast dialog box
that are available in the IGMP global mode.
IGMP Querier
The IGMP Querier section provides options for performing the query function as
described below.
IGMP Querier active
Use this check box to switch the query function on/off.
Protocol Version
This option allows you to select IGMP protocol version 1, 2 or 3.
Note: If you use IGMP version 1 in a subnetwork, then you must also use IGMP
version 1 in the entire network. Also, If a number of routers are connected to a
subnetwork, you must use IGMP version1, so that all the routers receive all the
IGMP reports.
Transmit Interval [s]
Here you enter the interval at which the device sends query packets. The interval
can range between 2 to 3599 s (seconds), and the default is set to 125 s.
All IGMP-capable terminal devices respond to a query with a report message, which
increases the network traffic load. If you want to reduce this load factor, select large
sending intervals but be aware that this will result in longer switching times.
If you want short switching times, select small sending intervals as long as you can
accept the increased network load.
104
31007122 8/2008
Network Load Control
IGMP Settings
The IGMP Settings section provides options for response time and interval periods
for multicast group members responding to queries.
Current Querier IP-Address
Indicates the IP address of the router that has the query function.
Max Response Time (sec)
Here you specify the period within which the Multicast group members respond to a
query. The period can range between 1 to 3598 seconds (sec), and the default is set
to 10 sec. Try to select a random values for their response to prevent all the multicast
group members from responding to the query at the same time.
Select a larger response time if you want to reduce the load on your network and
can accept the resulting longer switching times.
Select a smaller response time if you require short switching times and can accept
the increased network load.
Group Membership Interval (sec)
Enter a specific period for which a dynamic Multicast group remains entered in the
switch if it does not receive any report messages. The period can range between 3
to 3600 seconds (sec), and the default is set to 260 sec.
Unknown
Multicasts
This frame provides you with three different selections, when the ESM switch is in
the IGMP mode, for sending packets with an unknown MAC/IP Multicast address
that was not learned through IGMP snooping. The selections are as follows:
Send to Query Ports
Selecting this option allows the switch to send packets with an unknown MAC/IP
Multicast address to all query ports.
Send to All Ports
Selecting this option allows the switch to send packets with an unknown MAC/IP
Multicast address to all ports.
Discard
Selecting this option causes the switch to discard all packets with an unknown MAC/
IP Multicast address.
Note: The way in which unlearned Multicast addresses are handled also applies to
the reserved addresses from the Local Network Control Block 224.0.0.0 thru
224.0.0.255. This can have an effect on higher-level routing protocols.
31007122 8/2008
105
Network Load Control
Known
Multicasts
This frame provides you with two different selections, when the ESM switch is in the
IGMP mode, for sending packets with a known MAC/IP Multicast address that were
learned through IGMP snooping. The selections are as follows:
Send to Query and registered Ports
This option allows the switch to send packets with a known MAC/IP Multicast
address to all query ports and to registered ports. The advantage of this selection is
that it works in most applications without any additional configuration
Send to Registered Ports
This option allows the switch to send packets with a known MAC/IP Multicast
address to registered ports. The advantage of this selection, which deviates from the
standard, is that it uses the available bandwidth optimally through direct distribution.
Individual IGMP
Port Settings
With in the table portion of the Multicast dialog box are several column selection
pertaining to the IGMP mode that are made against individual ports on the ESM.
Each of these settings are described below.
IGMP Enabled
per Port
This table column allows you to enable/disable the IGMP for each port whenever the
global IGMP Snooping is enabled (p. 103). No registrations can be made for a port
when its check box is unchecked.
IGM Forward All
per Port
The IGMP Forw. All table column allows you to switch the Forward All function on/
off for each port whenever the global IGMP Snooping is enabled. Selecting the
IGMP Forward All check box causes the switch to forward all the data packets with
a multicast address in the target address field to this port.
Note: In the case of a ring interruption when the switch is connected to a HIPER
ring, you can ensure quick reconfiguration of the network for data packets with
registered multicast target addresses by:
z switching on the IGMP both globally and at the ring port, and
z switching on the IGMP Forw. All per port on the port rings.
IGMP Automatic
Query per Port
106
The IGMP Automatic Query Port table column indicates which ports the switch has
learned as query ports whenever automatic is selected in theStatic Query Port
column (see below).
31007122 8/2008
Network Load Control
Static Query per
Port
The Static Query Port column of the table can display one of three conditions for
each switch port:
z
z
z
Learned Query
per Port
31007122 8/2008
disabled-switch sends IGMP report messages to the ports at which it receives
IGMP queries.
enabled-switch sends IGMP report messages to other selected ports.
automatic-switch sends IGMP report messages to other connected ESM
switches.
The Learned Query Port column displays the ports on which the switch has received
IGMP queries if disable is selected in the Static Query Port table column (see
above).
107
Network Load Control
GMRP Global
When you click on GMRP in the Global Configuration section of the Multicast dialog
box, it appears as shown below:
Global Configuration
IGMP Snooping
IGMP Querier
IGMP Querier active
GMRP
Protocol Version
disabled
Transmit interval [s] 125
Module
1
1
1
1
2
2
2
Unkno
IGMP Settings
1
IGMP
IGMP
Port IGMP enabled Forw. Automatic
All Query Port
1
2
3
4
1
2
3
2
3
Current Querier IP-Address
0.0.0.0
Send
Max Response Time (sec)
10
Send
Disc
Group Membership Interval (sec) 260
Static
Query
Port
disable
disable
disable
disable
disable
disable
disable
Learned
Query
Port
Set
Reload
GMRP on
GMRP Service Require
Forward all unregistered g
Forward all unregistered g
Forward all unregistered g
Forward all unregistered g
Forward all unregistered g
Forward all unregistered
Forward all unregistered g
When the GMRP is selected, the GMRP function is switched on globally for the
entire ESM.
If GMRP is switched off
z
z
z
the switch does not generate any GMRP packets,
the switch does not evaluate any GMRP packets received, and discards them,
and
it sends (streams) received data packets with a multicast address as the target
address for all ports.
The switch is transparent for received GMRP packets, regardless of the GMRP
setting.
Individual GMRP
Port Settings
108
Within the table portion of the Multicast dialog box are two column selections
pertaining to the GMRP mode that are made against individual ports on the ESM.
Each of these settings are described below.
31007122 8/2008
Network Load Control
GMRP on per
Port
The GMRP on table column enables you to switch on/off the GMRP for each port
when the global GMRP is switched on. When you switch off the GMRP at a port, no
registrations can be made for this port, and GMRP packets cannot be sent out of this
port.
Note: If the switch is connected to a HIPER ring, in the case of a ring interruption
you can ensure quick reconfiguration of the network for data packets with
registered multicast target addresses by:
z
z
GMRP Service
Requirement per
Port
Devices that do not support GMRP can be in integrated into the Multicast addressing
by means of:
z
z
31007122 8/2008
switching on the GMRP at the ring ports globally, and
switching on the IGMP Forward All per port on the ring ports
selecting Forward all groups in the GMRP Service Requirement column. The
ESM enters ports with the selection Forward all groups in all Multicast filter
entries learned via GMRP.
a static filter address entry on the connecting port
109
Network Load Control
Disabling Global
Settings
When you click on disabled in the Global Configuration section of the Multicast
dialog box, it appears as shown below:
Global Configuration
IGMP Snooping
IGMP Querier
IGMP Querier active
GMRP
Protocol Version
disabled
Transmit interval [s] 125
Module
1
1
1
1
2
2
2
Unknow
IGMP Settings
1
IGMP
IGMP
Port IGMP enabled Forw. Automatic
All Query Port
1
2
3
4
1
2
3
2
3
Current Querier IP-Address
0.0.0.0
Send
Max Response Time (sec)
10
Send
Group Membership Interval (sec) 260
Static
Query
Port
Set
Leamed
Query
Port
disable
disable
disable
disable
disable
disable
disable
disable
GMRP on
Disca
GMRP Service Requirem
Forward all unregistered grou
Forward all unregistered grou
Forward all unregistered grou
Forward all unregistered grou
Forward all unregistered grou
Forward all unregistered grou
Forward all unregistered grou
Reload
When disabled is selected, both the IGMP Snooping and GMRP global functions are
deactivated.
110
31007122 8/2008
Network Load Control
The Rate Limiter
Description of
the Rate Limiter
To improve the data exchange reliability during high rates of traffic, the ESM switch
can limit traffic levels.
By entering a rate limit for each port, the amount of traffic the switch receives or
transmits is determined.
The switch samples the received and transmitted data and will discard data above
the max limit.
A global setting activates/deactivates the broadcast limiter function at all ports.
Accessing the
Rate Limiter
Dialog Box
To access the Rate Limiter dialog box proceed as follows:
Step
Action
1
Connect the ESM to an Ethernet cable.
2
Open the Web-based interface.
3
Go to Switching → Rate Limiter to bring up the Rate Limiter dialog box (shown
below).
Ingress Limiter (kbit/s)
Function
Module
IIngress
Packet Types
Port
1
1
1
1
2
2
2
1
2
3
4
1
2
3
BC
All
BC
BC + MC
BC + MC + uUC
On
Egress Limiter (Pkt/s) Packet Type: BC
Off
Function
Off
Egress
Limit (Pkt/s)
Packet Type: BC
Ingress
Limiter Rate (kbit/s)
Egress Limiter (kbit/s) Packet T
Function
On
Off
Egress
Limit (Kbit/s)
Packet Type: all
0
0
0
0
0
0
0
0
0
0
0
0
0
0
0
0
0
0
0
0
0
Set
31007122 8/2008
On
Reload
111
Network Load Control
Selection
Options
The three areas across the top of the dialog box allow you to enable or disable the
input (ingress) and output (egress) data limits for all the ESM ports. Each of these
three areas are related to a particular type of data packet:
z
z
z
Selecting On in the Ingress Limiter (kbit/s) frame enables the input limiting
function for all the ESM ports.
Selecting On in the Egress Limiter (Ptk/s) Packet Type: BC frame enables the
broadcast output limiter function for all the ESM ports.
Selecting On in the Egress Limiter (kbit/s) Packet Type: all frame enables the
output limiter function for all packet types at all the ESM ports.
Selecting Off in any of these frames disables the function.
Individual Port
Settings
The individual port settings are configured from the columns in the table of the Rate
Limiter dialog box. The Module and Port columns identify the ESM switch (Module)
and its associated Ports.
The Ingress Packet Types column contains a drop-down combo box that provides
the following packet type selections:
z
z
z
z
All: limits the total inbound data volume of the port.
BC: limits the broadcast packets received at the port.
BC + MC: limits the broadcast and Multicast packets received at the port.
BC + MC + uUC: limits the broadcast, Multicast and unknown Unicast packets
received at the port.
The Ingress Limiter Rate (kbit/s) column sets the limit for the inbound packet type.
Either of two values can be entered:
z
z
0: no ingress limit at this port (this is the default setting).
A value > 0: maximum inbound traffic rate in kbit/s that can be received at the
port.
The Egress Limiter (Ptk/s) Packet Type: BC column sets the limit for broadcast
packets. Either of two values can be entered:
z
z
0: no rate limit for outbound broadcast packets at this port (this is the default
setting).
A value > 0: maximum number of outbound broadcast packets per second that
can be sent at the port.
The Egress Limiter (kbit/s) Packet Type: all column sets the limit for the entire data
stream. Either of two values can be entered:
z
z
112
0: no rate limit for the outbound data stream at this port (this is the default setting).
A value > 0: maximum outbound transmission rate in kbit/s that can be sent at
the port.
31007122 8/2008
Network Load Control
QoS/Priority
Descripton of
Prioritization
The Quality of Service (QoS) function prevents high-priority time-critical data traffic
such as language/video or real-time data from being disrupted by less critical traffic
during busy periods. By assigning high traffic classes for time-critical data and low
traffic classes for less time-critical data, you ensure optimal data flow for time-critical
data traffic.
The ESM supports four priority queues (traffic classes in compliance with IEEE
802.1D). The assignment of received data packets to these classes depends on
z
z
z
z
z
The priority of the data packet contained in the VLAN tag when the receiving port
was configured to "trust dot 1p".
The QoS information (ToS/DiffServ) contained in the IP header when the
receiving port was configured to "trust ip-dscp".
The port priority when the port was configured to "no trust".
The port priority when receiving non-IP packets when the port was configured to
"trust ip_dscp".
The port priority when receiving data packets without a VLAN tag and when the
port was configured to "tust dot 1p".
The ESM considers the classification mechanisms in the sequence listed above.
Data packets can contain prioritizing/QoS information in accordance with:
z
VLAN Tagging
VLAN priority based on IEEE 802.1Q/802.1d (Layer 2)
The VLAN tag is integrated into the MAC data frame for the VLAN and prioritization
functions in accordance with the IEEE 802.1 Q standard. The VLAN tag consists of
4 Bytes. It is inserted between the source address field and the type field.
For data packets with a VLAN-tag, the ESM evaluates:
z the priority information at all times, and
z the VLAN information, if VLANs have been set up.
Data packets with VLAN tags that contain priority information but no VLAN
information (VLAN ID = 0) are called priority tagged frames
31007122 8/2008
113
Network Load Control
Assignment of
Priorities
The assignment of the priority entered in the tag to the four priority classes is as
follows:
Entered Priority
Priority Class
IEEE 802.1D Traffic Type
0
1 - normal
Best effor (default)
1
0 - low
Background
2
0 - low
Standard
3
1 - normal
Excellent effort (business critical)
4
2 - high
Controlled load (streaming multimedia)
5
2 -high
Video; less than 100 milliseconds delay
6
3 - admin
Video; less than 10 milliseconds delay
7
3 - admin
Network control
Note: Network protocols and redundancy mechanisms use the highest traffic class
3. Therefore, you must select other traffic classes for application data.
Tag Field
Length/Type Field
6
4 2
42-1500 octets
Frame Check
Sequence Field
Source Address Field
6
Pad Field
Destination Address Field
1
Data Field
Start Frame Delimiter Field
7
Data Field
Preamble Field
An Ethernet data packet with a tag is shown in the following figure:
4
t
minimum 64, maximum 1522 octets
114
31007122 8/2008
Network Load Control
The format of the tag field is shown in the following figure:
Tag protocol identifier (2 x 8 bit)
User Priority (3-bit)
Canonical format identifier
(1-bit)
VLAN identifier
(12-bit)
4 octets
Although VLAN prioritizing is widespread in the industry sector, it has a number of
limitations:
z
z
z
31007122 8/2008
The additional 4-byte VLAN tag enlarges the data packets. With small data
packets, this leads to a larger bandwidth load.
End-to-end prioritizing requires the VLAN tags to be transmitted to the entire
network, which means that all network components must be VLAN-capable.
Routers cannot receive or send packets with VLAN tags via port-based router
interfaces.
115
Network Load Control
The Global
Dialog
The QoS/Priority Global dialog box is shown below
VLAN Priority for Management packets
0
IP-DSCP Value for Management packets
0 (be/cs0)
Number of Queues per port
4
Trust Mode
trustDot1p
Set
Reload
?
Help
With this dialog you can do the following:
Enter the VLAN Priority for Management packets inthe range 0 to 7 (default setting
is 0)
z
z
In order for you to have full access to the management of the switch, even when
there is a high network load, the switch enables you to priotize management
packets.
In prioritizing mamagement packets (SNMP), Telnet, and so on), the switch
sends the management packets with priority information.
Note the assignment of the VLAN priority to the traffic class (p. 114).
Enter the IP-DSCP Value for Management packets in the range 0 to 63 (default
setting is 0 (be/cs0)).
z
z
In order for you to have full access to the management of the switch, even when
there is a high network load, the switch enables you to priotize management
packets.
In prioritizing mamagement packets (SNMP), Telnet, and so on), the switch
sends the management packets with priority information.
Note the assignment of the VLAN priority to the traffic class (p. 114).
116
31007122 8/2008
Network Load Control
Note: Certain DSCP values have DSCP names, such ad be/cs0 to cs7 (class
selector) or af11 to af43 (assured forwarding) and ef (expedited forwarding).
Display the maximum Number of Queues per port possible per port.
z
Assigning
Priorities to
Received Data
packets
The switch supports four priority queues (traffic classes in compliance with IEEE
802. 1D).
Select the Trust Mode globally. You use this to specify how the switch handles
received data packets that contain priority information.To accomplish this, the ESM
provides three options that you can choose globallly for all ports. These options are
selectable from theTrust Mode list (available by clicking on the scroll bar) shown
below.
The three options are descirbed as follows:
untrusted:
z
The switch ignores the priority information in the packet and always assigns the
packets the port priority of the receiving port.
trustDotIp:
z
z
The switch prioritizes received packets that contain VLAN tag information
(assigning them to a traffic class-see 802. 1D/p Mapping) in accordance with this
information.
The switch prioritizes received packets that contain no tag information (assigning
them to a traffic class (p. 119)) in accordance with the port priority of the received
port.
trustlpDscp:
31007122 8/2008
z
The switch prioritizes received IP packets (assigning them to a traffic class-see
IP DSCP Mapping) in accordance with their DSCP value.
z
The switch prioritizes received packets that are not IP packets (assigning them to
a traffic class-see Entering the port priority) in accordance with the port priority of
the receiving port.
117
Network Load Control
VLAN Priority
Remarking
For receivied IP packets, the switch also performs VLAN priority remarking. In VLAN
priority remarking, the switch modifies the VLAN priority of the IP packets if the
packets are to be sent with a VLAN tag (ref Setting up the VLAN). Based on the
traffic class to which the IP packet was assigned (see above), the switch assigns the
new VLAN priority to the IP packet in accordance with the table below.
For example: a received IP packet with a DSCP value of 32 (cs4) is assigned to
traffic class 2 (default setting). The packet was received at a port with port priority 2.
In accordance with the table below, the VLAN priority is set to 4.
Port
Configuration
Traffic
Class
New VLAN priority when receiving New VLAN priority when receiving
port has an even port priority
port has an odd port priority
0
0
1
1
2
3
2
4
5
3
6
7
The Port Configuration dialog box (partial view shown below) allows you to
configure the switch’s ports. With it, you can assign a port priority to a port.
The columns in dialog box represent the following:
z
z
z
118
Module-the module of the switch on which the port is located.
Port-the port to which this entry applies.
Port priority-here you enter the port priority.
31007122 8/2008
Network Load Control
Entering the Port
Priority
To assign port priorities, do the following:
Step
Action
1
Connect the ESM to an Ethernet cable.
2
Open the Web-based interface.
3
Go to QoS/Priority → Port Configuration to bring up the Port Configuration dialog
box.
4
Enter the priority number (0-7) in the Port Priority column for Port 1.
5
Repeat step 4 for each additional port on the ESM switch that data packets are
sent from.
According to the priority entered, the switch assigns the data packets that it receives
at each port to a traffic class as shown below:
Port
Priority
Traffic Class (default
setting)
IEEE 802.1D Traffic Type
0
1
Best effort (default)
1
0
Background
2
0
Standard
3
1
Excellent effort (business critical)
4
2
Controlled load (streaming multimedia)
5
2
Video, less than 100ms of latency and jitter
6
3
Voice, less than 10ms of latency and jitter
7
3
Network control reserved traffic
Requirement:
z
z
z
31007122 8/2008
setting in the Global: Trust Mode dialog box: untrusted, or
setting in the Global: Trust Mode dialog box: trustDot1p and the data packets do
not contain a VLAN tag, or
setting in the Global: Trust Mode dialog box: trustlpDscp and the data packets are
not IP packets.
119
Network Load Control
802.1D/p
Mapping
The 802.1D/p Mapping dialog box allows you to assign a traffic class to every VLAN
priority.
Entering the
Traffic Class
To map traffic classes to VLAN priorities, do the following:
120
Step Action
1
Connect the ESM to an Ethernet cable.
2
Open the Web-based interface.
3
Go to QoS/Priorty → 802.1D/p Mapping to bring up the 802.1D/p Mapping dialog box.
4
Enter the desired value from 0 to 3 in the Traffic Class for every VLAN priority.
31007122 8/2008
Network Load Control
The switch assigns a default traffic class to the VLAN Priorities as shown in the table
below:
VLAN Priority
Traffic Class (default
setting)
IEEE 802.1D Traffic Type
0
1
Best effort (default)
1
0
Background
2
0
Standard
3
1
Excellent effort (business critical)
4
2
Controlled load (streaming multimedia)
5
2
Video, less than 100ms of latency and jitter
6
3
Voice, less than 10ms of latency and jitter
7
3
Network control reserved traffic
Note: Network protocols and redundancy mechanisms use the highest traffic class
3. Therefore, you select other traffic classes for application data.
31007122 8/2008
121
Network Load Control
IP ToS/DiffServ
Overview
The Type of Service (ToS) field in the IP header has been part of the IP protocol from
the start, and it is used to differentiate various services in IP networks. Back then,
there were various ideas about differentiated treatment of IP packets, due to the
limited bandwidth available along with the problem of unreliable connection paths.
With the continuous increase in available bandwidth, there was no need to use the
ToS field. Only with the real-time requirements of today’s networks has the ToS field
become significant again.
ToS Byte
Selecting the ToS byte of the IP header enables you to differentiate between
different services.
The ToS byte is shown below:
Bits
0
1
2
Precedence
4
3
5
6
Type of Service
7
MBZ
The bit arrangement of the ToS field in the IP header is as follows:
Bits 0-2
IP Precedence Defined Bits 3-6
Type of Service Defined
111
Network Control
0000
all normal
110
Internetwork Control
1000
minimize delay
101
CRITIC/ECP
0100
maximize throughput
100
Flash Override
0010
maximize reliability
011
Flash
0001
minimize monetary cost
010
Immediate
001
Priority
000
Routine
Bit 7 must be set to 0 (zero)
122
31007122 8/2008
Network Load Control
Differentiated
Services
The newly defined Differentiated Services field in the IP header in FRC2474, often
known as the DiffServ Code Point or DSCP, replaces the ToS field and is used to
mark the individual packets with a DSCP. As such, the packets are divided into
different quality classes.
The first three bits of the DSCP are used to divide the packets into classes. The next
three bits are used to further divide the classes on the basis of different criteria. In
contrast to the ToS byte, DiffServ uses six bits for the division of up to 64 different
service classes.
The differentiated Services field in the IP header is shown below.
4
0
1
3
5
6
2
7
Bits
Currently
Differentiated Services Codepoint
Unused
(DSCP) RFC 2474
(CU)
Class Selector
Codepoints
31007122 8/2008
123
Network Load Control
The Per-Hop
Behavior
Classes
The different DSCP values get the device to employ a different forwarding behavior,
called the Per-Hop Behavior (PHB). The PHB classes include:
z
z
z
z
Class Selector (CS0-CS7): for reasons of Compatiblity to ToS Precedence.
Expedited Forwarding (EF): premium service. Reduced delay, jitter + packet loss
(RFC 2598).
Assured Forwarding (AF): provides a differentiated schema for handling different
data traffic (RFC 2597).
Default Forwarding/Best Effort: no particular prioritizing.
The PHB class selector assigns the seven possible IP precedence values from the
old ToS field to specific DSCP values, thus ensuring the downwards compatibility.
This arrangement is shown in the following table:
ToS Meaning
Precedence Value
Assigned DSCP
Network Control
111
CS7 (111000)
Internetwork Control
110
CS6 (110000
Critical
101
CS5 (101000
Flash Override
100
CS4 (100000
Flash
011
CS3 (011000
Immediate
010
CS2 (010000
Priority
001
CS1 (001000
Routine
000
CS0 (000000
The table below shows the mapping of the DSCP values onto the traffic classes.
DSCP Value
DSCP Name
0
Best Effort/CS0
1-7
8
1
1
CS1
9,11, 13, 15
0
0
10, 12, 14
AF11, AF12, AF13
0
16
CS2
0
17, 19, 21, 23
0
18, 20, 22
AF21, AF22, AF23
0
24
CS3
1
25, 27, 29, 31
1
26, 28, 30
AF31, AF32, AF33
1
32
CS4
2
33, 35, 37, 39
34, 36, 38
124
Traffic Class (default setting)
2
AF41, AF42, AF43
2
31007122 8/2008
Network Load Control
DSCP Value
DSCP Name
Traffic Class (default setting)
40
CS5
2
41, 42, 43, 44, 45, 47
2
46
EF
2
48
CS6
3
CS7
3
49-55
56
57-63
31007122 8/2008
3
3
125
Network Load Control
IP DSCP Mapping
Introduction
126
The IP DSCP Mapping dialog box (partial view shown below) allows you to assign
a traffic class to every DSCP value.
31007122 8/2008
Network Load Control
Entering the
Traffic Class
To map traffic classes for DSCP values, do the following:
Step
Action
1
Connect the ESM to an Ethernet cable.
2
Open the Web-based interface.
3
Go to QoS/Priority → IP DSCP Mapping to bring up the IP DSCP Mapping dialog box.
4
Enter the desired value from 0 to 3 in the Traffic Class for every DSCP value (0-63).
The different DSCP values get the switch to employ a different forwarding behavior,
the Per-Hop Behavior (PHB).
The PHB classes include:
z
z
z
z
31007122 8/2008
Class Selector (CS0 to CS7): For reasons of compatibility to TOS/IP precedence
Expedited Forwarding (EF): Premium service. Reduced delay, jitter + packet loss
(RFC 2598).
Assured Forwarding (AF): Provides a differentiated schema for handling
dirfferent data traffic (RFC 2597)
Default Forwarding/Best Effort: No particular prioritizing
127
Network Load Control
The following table illustrates the mapping of the DSCP values onto the traffic
classes.
DSCP Value
DSCP Name
0
Best Effort/CS0
1-7
8
1
1
CS1
9,11,13,15
0
0
10,12,14
AF11, AF12, AF13
0
16
CS2
0
18,20,22
AF21, AF22, AF23
0
24
CS3
17,19,21,23
0
25,27,29,31
1
1
26,28,30
AF31, AF32, AF33
1
32
CS4
2
34, 36, 38
AF41, AF42, AF 43
2
40
CS5
2
33, 35, 37, 39
2
41,42,43,44,45, 47
2
46
EF
2
48
CS6
3
CS7
3
49-55
56
57-63
128
Traffic Class (default setting)
3
3
31007122 8/2008
Network Load Control
Flow Control
Description of
Flow Control
Flow control is a mechanism which acts as an overload protection. During periods
of heavy traffic it holds off additional traffic.
In the example below, the functioning of flow control is displayed graphically.
Workstations 1, 2 and 3 want to simultaneously transmit a large amount of data to
workstation 4. The combined bandwidth of Workstations 1, 2 and 3 is larger than the
bandwidth of workstation 4 to the switch. This leads to an overflow of the send queue
of port 4. The left-hand funnel symbolizes this status.
Port 1
Port 4
Workstation 1
Workstation 2
Switch
Port 2
Port 3
Workstation 3
Workstation 4
If the flow control function at ports 1, 2 and 3 of the switch is turned on, the switch
reacts before the funnel overflows. Ports 1, 2 and 3 send a message to the
connected devices that no data may be received at present.
Full Duplex Link
31007122 8/2008
In the above example there is a full duplex link between workstation 2 and the
switch. Before the send queue of Port 4 overflows, the switch sends a request to
workstation 2 to include a small break in the sending transmission.
129
Network Load Control
Half Duplex Link
In the above example there is a half duplex link between workstation 2 and the
switch. Before the send queue of port 4 overflows, the switch sends data so that
workstation 2 detects a collision and thus interrupts the transmission.
Setting Flow
Control in the
Web-Based
Interface
You can set flow control as follows in the web-based interface.
130
Step
Action
1
Connect the ESM to an Ethernet cable.
2
Open the Web-based interface.
3
Go to Basics → Port Configuration.
4
Enable flow control for a particular port by checking Flow Control for the appropriate
port number.
5
Go to Switching → Global.
This dialog enables you to
z switch off flow control at all ports, or
z switch on flow control at all ports which have been selected for flow control in the
configuration table.
31007122 8/2008
Network Load Control
VLANs
Description of
VLANs
A virtual LAN (VLAN) consists of a group of network subscribers in one or more
network segments which can communicate with each other as if they belonged to
the same LAN.
VLANs are based on logical (instead of physical) links and are flexible elements in
the network design. The biggest advantage of VLANs is the fact that they permit the
formation of user groups based on their subscriber function and not on their physical
location or medium.
Since broadcast/multicast data packets are transmitted exclusively within a virtual
LAN, the remaining data is not affected.
The VLAN function is defined in the IEEEE 802.1Q standard. The maximum number
of VLANs is limited by the structure of the VLAN tag to 4094 (p. 113).
The following figure shows a VLAN application example.
VLAN Yellow
ESM
VLAN Green
VLAN Yellow
VLAN Green
VLAN Yellow
VLAN Green
31007122 8/2008
131
Network Load Control
VLAN Keywords
z
z
z
z
z
z
Ingress Rule
Ingress rules stipulate how incoming data are to be handled by the switch.
Egress Rule
Egress rules stipulate how outgoing data are to be handled by the switch.
VLAN Identifier
The assignment to a VLAN is executed using VLAN ID. Every VLAN in a network
is identified with an ID which must be unique, i.e. every ID may only be assigned
once in the network.
Port VLAN Identifier (PVID)
The management assigns a VLAN ID for every port. Thus, it is known as the port
VLAN ID.
The switch adds a tag to every packet received without a tag. This tag contains a
valid VLAN ID.
When a data packet is received with a priority tag, the switch adds the port VLAN
ID.
Member Set
The member set is a list of ports belonging to a VLAN.
Each VLAN has a member set.
Untagged Set
The untagged set is a list of the ports of a VLAN which send data packets without a
tag. Every VLAN has an untagged set.
132
31007122 8/2008
Network Load Control
Configuring VLANs
Configuration
Procedure Using
the Web-Based
Interface
Step
Configure VLANs as follows:
Action
1
Connect the ESM to an Ethernet cable.
2
Open the Web-based interface.
3
Go the Switching → VLAN → Global.
The VLAN Global dialog box opens:
Version
version1
Max. VLAND ID
4042
Max. supported VLANs
256
Number of VLANs
1
VLAN 0 Transparent Mode
Learning
Mode
Independent VLAN
Shared VLAN
Status
Independent VLAN
Shared VLAN
Reload
Delete
?
Help
In this dialog box you will find all tables and attributes to configure and monitor the VLAN functions
complying with IEEE 802.1Q standard.
Note: When configuring VLAN, the port to which your management station is connected must be able
to send data of the management station after saving the VLAN configuration. If you assign the port to
the VLAN with ID 1, the management station data will be sent.
To set up VLANs, specify the desired VLANs in the desired VLAN Static table (p. 136).
After setting up VLANs, specify the rules for received data in the VLAN Port table (p. 139).
31007122 8/2008
133
Network Load Control
Step
Action
4
Activate the VLAN 0 Transparent Mode in order to be able to send priority-tagged packets without
VLAN membership, (that is, with VLAN ID 0). In this mode, the VLAN ID 0 remains in the packet,
regardless of the setting of the port VLAN ID in the VLAN Port dialog box (p. 139).
Note: In the transparent mode, the devices ignore the set port VLAN ID. Set the VLAN membership
of the ports of VLAN 1 to member (M) or untagged (U) (p. 137).
5
Use the Delete button to restore all the default VLAN settings of the device (default settings).
6
Save the VLAN configuration so that it is effective after restart, then restart the switch.
Note: The 256 VLANs available can use any VLAN ID in the range of 1 to 4042.
Note: In the HIPER-Ring with VLANs, you should select only operate devices with
the software that supports this function.
Note: In the HIPER-Ring configuration, select for the ring ports:
VLAN ID 1 and Ingress Filtering are disabled in the port table (see Specifying
Rules for Data Received, p. 139), and
z VLAN affiliation U in the static table (see Defining the VLAN Membership of the
Ports, p. 137).
z
Note: In the Ring/Network coupling configuration, select for the coupling and
partner coupling ports:
z VLAN ID 1 and Ingress Filtering disabled in the port table (p. 139), and
z VLAN affiliation U in the static table (p. 137).
134
31007122 8/2008
Network Load Control
Setting up VLANs
Simple VLAN
Example
The following example reflects a standard implementation of ESM switches in a
simple VLAN configuration shown below.
VLAN yellow
(ID = 2)
VLAN brown
(ID = 1)
149.218.112.76
VLAN green
(ID = 3)
Network
Management
Station
149.218.112.208
The yellow and green VLANs (IDs 2 and 3) contain terminal devices connected to
ports on two EMS and a network management station that makeup the brown VLAN
(ID 1).
31007122 8/2008
135
Network Load Control
Creating VLANs
Step
Set up VLANs as follows:
Action
1
Connect the ESM to an Ethernet cable.
2
Open the Web-based interface.
3
Go to Switching | VLAN | Static.
The following dialog box appears.
VLAN Static
VLAN ID
1
Name
Default
Status
Set
4
1.1 1.2 1.3 1.4 2.1 2.2 2.3 2.4
active U
U
U
Reload
U
U
U
U
Create entry
U
Delete
?
Help
Click Create entry. The VLAN-ID dialog box appears as shown below:
VLAN-ID
?
Please enter VLAN ID
OK
136
Cancel
5
Enter the appropriate VLAN ID (2 for the example).
6
Click OK. A new VLAN entry appears in the VLAN Static dialog box
7
Repeat steps 4, 5 and 6 for VLAN 3.
31007122 8/2008
Network Load Control
Step
8
Action
Type in the names for each of the VLANs as shown below.
VLAN Static
VLAN ID
Name
Status
Brown
active U
U
U
U
U
U
U
U
2
Yellow
active U
U
U
U
U
U
U
U
3
Green
active U
U
U
U
U
U
U
U
Set
9
1.1 1.2 1.3 1.4 2.1 2.2 2.3 2.4
1
Reload
Create entry
Delete
?
Help
Click Set to apply the VLAN configuration.
Defining the
VLAN
Membership of
the Ports
Next, you need to define the relationship of the ESM ports to the VLANs. You do this
by using the VLAN static dialog box to assign membership roles to each of the ESM
ports that are connected to the VLANs.
You can choose from the following options which are selectable from a drop-down
list box that appears whenever you click on the ID column in the VLAN table.
z
z
z
z
-: not a member of the VLAN
M: a member of the VLAN (packet is transmitted with a tag
F: not a member of the VLAN
U: a member of the VLAN (packet is sent without a tag)
With regards to our VLAN example, the port assignments will be made in
accordance with the following assumptions:
z
z
z
31007122 8/2008
Ports 1.1 to 1.3 are assigned to the end devices of the yellow VLAN.
Ports 2.1 to 2.4 are assigned to the end devices of the green VLAN.
Since end devices normally do not sent data packets with a tag, the setting U
must be selected for these ports.
137
Network Load Control
z
Port 1.4 serves as an uplink to the next switch in the brown VLAN, so it is
assigned the M setting to allow VLAN information to be passed on.
The end result of configuring the VLAN membership of the ESM ports this way would
appear as shown below:
VLAN Static
VLAN ID
Name
Status
1.1 1.2 1.3 1.4 2.1 2.2 2.3 2.4
1
Brown
active -
-
-
U
-
-
-
-
2
Yellow
active U
U
U
M
-
-
-
-
3
Green
active -
-
-
M
U
U
U
M
F
U
Set
Reload
Create entry
Delete
?
Help
You need to apply your settings by clicking Set.
138
31007122 8/2008
Network Load Control
Specifying Rules
for Data
Received
After setting up VLANs, you need to specify the rules for receiving data packets at
each port by the ESM. There are three rules that apply as follows:
z
z
z
Port VLAN ID:
specifies to which VLAN a received untagged data packet is assigned to.
Acceptable Frame Types:
determines whether data packets can also be received untagged.
Ingress Filtering:
specifies whether the received tags are evaluated.
In order to apply these rules to the ports of the ESM switch you need to access the
VLAN Port dialog box by selecting Switching | VLAN | Port.
As you can see, the last three columns of the table represent the rules discussed
above. The Acceptable Frame Types column contains a drop-down list box that
offers you a choice of admitAll or admitOnlyVlanTagged whenever you click on a
column entry.
VLAN Port
Port
Module
Acceptable
Frame Types
Port VLAN ID
Ingress
Filtering
1
1
2
admitAll
1
2
2
admitAll
1
3
2
admitAll
1
4
1
admitAll
2
1
3
admitAll
2
2
2
3
3
admitAll
admitAll
2
4
3
3
U
admitAll
Set
Reload
?
Help
With regards to our VLAN example, the rules will be applied in accordance with the
following assumptions:
Ports 1.1-1.3 and 2.1-2.4
z
31007122 8/2008
Ports 1.1 to 1.3 of the switch are assigned to the terminal devices of the yellow
VLAN identified as VLAN ID 2.
139
Network Load Control
z
z
Ports 2.1 to 2.4 of the switch are assigned to the terminal devices of the green
VLAN identified as VLAN ID 3.
Since terminal devices normally do not send data packets with a tag, you select
admitAll in the Acceptable Frame Types column for each one.
Port 1.4
z
z
Port 1.4 functions as the uplink port to the next ESM switch. It belongs to the
brown VLAN and is thus assigned VLAN ID 1. To ensure that only data packets
with a VLAN tag can be received at this port, it is assigned the admitOnlyVlanTagged setting in the Acceptable Frame Types column.
So that the tags received at this port are evaluated, check the Ingress Filtering
checkbox.
The figure of the VLAN Port dialog box shown above represents the settings for the
VLAN example discussed above. Save your settings by clicking Set.
140
31007122 8/2008
Network Load Control
Saving the VLAN
Settings
Step
1
Finally, you need to save the VLAN configuration to non-volatile memory. Proceed
as follows:
Action
Select System → Load/Save to display the Load/Save dialog box.
Load
from Device
from URL
from URL & save to Device
via PC
Load configuration
Save
to Device
URL:
to URL (binary)
to URL (script)
to PC (binary)
to PC (script)
Save configuration
tftp://192.168.1.100/product/product.cfg
Delete
current configuration
Delete configuration
current configuration and from Device
EAM
Status
notPresent
Undo modifications of configuration
Function
Period to undo while connection is lost [s]
Set
600
Watchdog IP address
0.0.0.0
Reload
2
In the Save panel, click on to Switch.
3
Click on Save Configuration to save the VLAN configuration to non-volatile memory.
31007122 8/2008
?
Help
141
Network Load Control
142
31007122 8/2008
Operation Diagnostics
9
Sending Traps
SNMP Traps
If unusual events occur during normal operation of the ESM, they are reported
immediately to the management station. This is done by means of so-called trap
alarms that bypass the polling procedure. (Polling means to query the data stations
in regular intervals). Traps make it possible to react quickly to critical situations.
Examples for such events are:
z
z
z
hardware reset
changing the basic device configuration
segmentation of a port
Traps can be sent to various hosts to increase the transmission reliability for the
messages. A trap message consists of a packet that is not acknowledged.
The management agent sends traps to those hosts that are entered in the target
table (trap destination table). The trap destination table can be configured with the
management station via SNMP.
SNMP Trap
Listing
31007122 8/2008
All possible traps that can occur are listed in the following table.
Trap Description
A trap is sent if....
authenticationFailure
A station attempts to access an agent without
permission.
coldStart
A cold and warm start occurs during the boot process
after successful management initialization.
saMemoryBackupAdapterTrap
The Memory back up adapter is inserted or removed.
linkDown
The link to a port breaks.
linkUp
The link to a port is re-established.
saTemperature
This alarm message is sent if the temperature exceeds
the limit set.
saPowerSupply
The status of the voltage supply changes.
saSignallingRelay
The status of the signal contact changes.
143
Operation Diagnostics
SNMP Traps
when Booting
144
Trap Description
A trap is sent if....
newRoot
The sending agent becomes the new root of the
spanning tree.
topologyChange
The transmission mode of a port changes.
risingAlarm
An RMON alarm input exceeds the upper threshold.
fallingAlarm
an RMON alarm input falls below the lower threshold.
saPortSecurityTrap
A MAC address is detected at the port which does not
correspond to the current settings of:
z saPortSecPermission and
z saPorSecAction set either to trapOnly (2) or
portDisable (3).
saModuleMapChange
The hardware configuration has changed.
saBDPUGuardTrap
A BPDU is received at a port although the BPDU guard
function is activated.
hmMrpRecorfig
Is sent if the configuration of the MRP-Ring changes
saRingRedReconfig
when the configuration of the redundant ring changes.
saRingRedCplReconfig
The configuration of the redundant ring/network coupling
changes.
saSNTPTrap
Status messages occur in connection with the SNTP
protocol (e.g., server not available).
saRelayDuplicateTrap
A duplicate IP address is detected in connection with the
DHCP Option.
IIdpRemTablesChangeTrap
This alarm message is sent if an entry in the topology
table changes.
Note: The trap coldStart is sent during every boot procedure.
31007122 8/2008
Operation Diagnostics
Configuring
Traps Using the
Web-Based
Interface
Step
Configure the traps as follows:
Action
1
Connect the ESM to an Ethernet cable.
2
Open the Web-based interface.
3
Go to Diagnostics → Alarms (Traps).
Access this dialog with the read-write password.
The Alarms (Traps) dialog allows you to specify both the events triggering an alarm (trap) and the
persons these alarms should be sent to.
This figure shows the Alarms (Traps) dialog box.
Selection
Index
Address
149.218.112.159
Enabled
Authentication
Link Up/Down
Spanning Tree
Chassis
Redundancy
Port security
Set
Reload
Create entry
Delete
?
Help
4
In the IP Address column, enter the IP address of a network management station which the traps
should be sent to.
5
In the Enabled column, mark the entries which should be taken into account when traps are being
sent.
6
In the Selection group box, check the trap categories from which you want to send traps.
31007122 8/2008
145
Operation Diagnostics
Selecting Events
Triggering an
Alarm
You can have an alarm triggered in case of the following events by selecting them
in the Selection group box of the Alarms (Traps) dialog box.
Event
Description
Authentication
The switch has rejected an unauthorized access attempt.
Cold Start
The switch has been turned on.
Link Up
The link to the device at one port of the switch has been established.
Link Down
The link to the device at one port of the switch has been interrupted.
Spanning Tree
The topology of the Rapid Spanning Tree has changed.
Chassis
Chassis encompasses the following events:
z Power Supply: The status of a supply voltage has changed as shown
on the System dialog box.
z Signal Contact: The status of the signal contact has changed. To
follow the event, go to Signal Contact, and select generate Trap.
z Media Module: A media module has been added or removed.
z Memory back up adapter: The Memory back up adapter has been
inserted or removed.
z Temperature: The value has been exceeded/fallen below the
temperature threshold.
146
Redundancy
The status of the HIPER-Ring or the redundant coupling of HIPER-Rings/
network segments has changed.
Port Security
A data packet has been received on one port from an unauthorized end
device.
31007122 8/2008
Operation Diagnostics
Contact Signal
Description of
the Contact
Signal
The signal contacts are for:
z
z
controlling external devices by manually setting the signal contacts,
monitoring proper functioning of the ESM which makes it possible to perform
remote diagnostics.
By means of the potential-free signal contact (relay contact, closed circuit) a contact
break is reported. This can be due to:
z
z
z
z
z
z
z
inoperative power supply:
the absence of the supply voltage 1/2,
power supply voltage 1 or 2 < 18 V
a continuous malfunction in the ESM (internal 3.3 VDC voltage),
values that exceed or fall below the set temperature threshold,
removing a module,
removing the back up configuration adapter,
the defective link status of at least one port
With the ESM, the displaying of the link status can be masked by the
management for each port (p. 66). The link status is not monitored in the default
settings.
HIPER ring event:
the loss of redundancy guarantee (in redundancy manager mode). The Ring
redundancy is not monitored in the default setting, Ignore.
redundant ring network coupling event:
the loss of redundancy guarantee. Redundant ring network coupling is not
monitored in the default setting Ignore. In stand-by mode the ESM reports
additionally the following conditions:
z the missing link status of the control line,
z partner device in stand-by mode.
The management setting determines which events causes a contact to the ESM.
Note: With non-redundant supply of the mains voltage, the ESM reports an
absence of power. You can prevent this message by applying the supply voltage
over the two inputs or by switching off the monitoring function.
Manually Setting
the Signal
Contact
This mode enables you to carry out the remote switching of each signal individually.
You have the following applications options:
z
z
31007122 8/2008
simulating an inoperative condition during PLC status monitoring,
remote controlling a device using SNMP, for instance switching on a camera.
147
Operation Diagnostics
Setting Up
Procedure Using
the Web-Based
Interface
Step
Set the signal contact as follows:
Action
1
Connect the ESM to an Ethernet cable.
2
Open the Web-based interface.
3
Go to Diagnostics → Signal Contact.
4
Click Manual setting in the Mode Signal contact frame to set contact to manual.
Mode Signal contact
Monitoring correct operation
Manual setting
Device Status
generate Trap
Manual setting
Contact
Set
148
Opened
Closed
Reload
5
Click Opened in the Manual setting group box to open the contact.
6
Click Closed in the Manual setting group box to close the contact.
?
Help
31007122 8/2008
Operation Diagnostics
Configuring the
Signal Contact
for Monitoring
Correct
Operation in the
Web-Based
Interface
Step
Configure the signal contact as follows:
Action
1
Go to Diagnostics → Signal Contact.
2
Click Monitoring correct operation in the Mode Signal contact frame, to use the contact for function
monitoring.
Mode Signal contact
Monitoring correct operation
Manual setting
Device Status
generate Trap
Monitoring correct operation
Contact
Opened (error)
Closed (ok)
Powersupply 1
Monitor
Ignore
Powersupply 2
Monitor
Ignore
Temperature
Monitor
Ignore
EAM removal
Monitor
Ignore
Connection Error
Monitor
Ignore
HIPER-Ring
Monitor
Ignore
RingNetwork Coupling
Monitor
Ignore
Set
Reload
?
Help
3
In the Monitoring correct operation frame, select the events which you want to monitor by clicking on
their associated Monitor option buttons.
4
For temperature monitoring, go to Basics → System in the main tree directory.
31007122 8/2008
149
Operation Diagnostics
Step
5
Action
In the line Temperature (°C) of the System Data group box, set the temperature thresholds to be
monitored.
System Data
Name
TCSESM_2FF96F
Location
Schneider TCSESM
Contact
Schneider Electric
Basic module
HW: 1.30
Power supply 1/2
present / Failed
Temperature (°C)
6
0
33
70
0 day(s), 3:10:17
Uptime
Deselect those events that you do not want to monitor by clicking on the appropriate Ignore option
button.
Displaying the
Device Status
You can view the signal contact state in three ways:
z
z
z
using the LED display
using the Web-based interface
executing a query in the command line interface
To view the signal contact status with the Web-based interface, proceed as follows:
Step
Action
1
Open the Web-based interface.
2
Go to Diagnostics → Signal Contact in the main tree directory to display the Signal Contact dialog box
(partial view shown below).
Mode Signal contact
Monitoring correct operation
150
Trapconfiguration
Manual setting
3
Click on the Device Status option button.
4
Go to Basics → System in the main tree directory.
Device Status
generate Trap
31007122 8/2008
Operation Diagnostics
Step
5
Action
Observe the Device Status frame in the upper left-hand corner of the ESM system display (shown
below).
Device Status
Alarmstarttime
11.04.05 08:46
Time of the oldest existing alarm
Alarmreason
Power supply 2
Cause of the oldest existing alarm
Symbol indicates the device status
31007122 8/2008
151
Operation Diagnostics
Monitoring the Device Status of the ESM
Overview
The device status function provides a summary of the overall condition of the ESM.
The ESM device status enables you to:
z
z
z
z
What the Device
Status Reports
Signal the device status out-of-band via a signal contact.
Signal the device status by sending a trap when the device status changes.
Detect the device status on the Web-based interface on the system side.
Query the device status in the Command Line Interface.
The device status of the ESM includes:
z
z
z
z
z
z
z
Incorrect supply voltage-the absence of at least one of the two supply voltages,
or the device (internal supply voltage) becomes inoperative on a permanent
basis.
The temperature threshold has been exceeded or has not been reached.
The removal of a module (for modular devices0:
The removal of the EAM.
The defective link status of at least one port. With the ESM, the indication of link
status can be masked by the management for each port. On delivery, there is no
link monitoring.
HIPER-Ring event-the absence of the redundancy (in redundancy manager
mode). On delivery, there is no ring redundancy monitoring.
Ring/network coupling event-absence of the redundancy. On delivery, there is no
ring redundancy monitoring.
The following conditions are also reported by the ESM device status in the standby
mode:
z
z
Incorrect link status of the control line.
Partner ESM is in the standby mode.
The management setting specifies which events determine the device status.
Note: With non-redundant voltage supply, the device reports the absence of a
supply voltage. You can prevent this message by feeding the supply voltage over
both inputs, or by switching off the monitoring.
152
31007122 8/2008
Operation Diagnostics
Configuring the
Device Status
To setup the ESM device status, perform the following:
Step
Action
1
Connect the ESM to an Ethernet cable.
2
Open the Web-based interface.
3
Select Diagnostics → Device Status to display the Device Status dialog box.
Device Status
Error
Ok
Monitoring
Powersupply 1
Monitor
Ignore
Powersupply 2
Monitor
Ignore
Temperature
Monitor
Ignore
EAM removal
Monitor
Ignore
Connection Error
Monitor
Ignore
HIPER-Ring
Monitor
Ignore
RingNetwork Coupling
Monitor
Ignore
Trapconfiguration
Generate Trap
Set
31007122 8/2008
Reload
?
4
In the Monitoring frame, select the events you want to monitor by clicking on their
associated Monitor option buttons.
5
For temperature monitoring, select the Temperature Monitor option button.
6
Go to Basics → System in the main tree directory
153
Operation Diagnostics
Step
7
Action
In the line Temperature (°C) of the System Data group box, set the temperature
thresholds to be monitored.
System Data
Name
TCSESM_2FF96F
Location
Schneider TCSESM
Contact
Schneider Electric
Basic module
HW: 1.30
Power supply 1/2
present / Failed
0
Temperature (°C)
Uptime
8
Displaying the
Device Status
70
33
0 day(s), 3:10:17
Deselect those events that you do not want to monitor by clicking on the
appropriate Ignore option button.
To determine the time and cause of the oldest existing ESM alarm, go toBasics →
Systemin the main tree directory and observe Device Status frame in the upper lefthand corner of the ESM system display.
Device Status
Alarmstarttime
11.04.05 08:46
Time of the oldest existing alarm
Alarmreason
Power supply 2
Cause of the oldest existing alarm
Symbol indicates the device status
154
31007122 8/2008
Operation Diagnostics
Displaying the Port Status
Using the WebBased Interface
Step
You can display the port status as follows:
Action
1
Connect the ESM to an Ethernet cable.
2
Open the Web-Based interface.
3
Go to Basics → System.
The figure below shows the device view.
1
2
4
31007122 8/2008
3
4
5
6
7
8
Point the mouse arrow at the symbols for the individual ports at the bottom of the screen.
As a result, a box will appear which indicates the port status and other port-related information.
155
Operation Diagnostics
Event Counter on Port Level
The Port
Statistics Table
The port statistics table allows experienced network administrators to identify
possible problems occurring in the network.
This table shows you the contents of various events counters. After a restart, all the
event counters begin at zero. The counters add up the events which have been
transmitted and received.
The following table explains the content of various event counters.
Counter
Possible Problems
Received Fragments
z The controller of the connected device is
faulty.
z Electromagnetic interference is injected
into transfer medium.
CRC Status
z The controller of the connected device is
inoperative.
z Electromagnetic interference is injected
into the transfer medium. There is a faulty
component in the network.
Collisions
z The controller of the device is inoperative.
z The network expansion is too big or the
line is too long.
z A packet has collided with an interference
signal.
156
31007122 8/2008
Operation Diagnostics
Opening the
Statistics Table
Dialog in the
Web-Based
Interface
Step
Open the statistics table as follows:
Action
1
Connect the ESM to an Ethernet cable.
2
Open the Web-based interface.
3
Go to Diagnostics → Ports → Statistics. The Statistics table appears:
Transmitted Received Received
Received Detected Detected Packets Packets
Module Port Unicast
Fragments CRC errors Collisions 64 bytes 65 to 127 bytes
Packets
Octets
Packets
1
1
0
0
0
0
0
0
0
0
1
1
0
0
0
0
0
0
0
0
1
1
0
0
0
0
0
0
0
0
1
1
0
0
0
0
0
0
0
0
3
3
0
0
0
0
0
0
0
0
3
3
0
0
0
0
0
0
0
0
3
3
0
0
0
0
0
0
0
0
3
3
0
0
0
0
0
0
0
0
4
4
0
0
0
0
0
0
0
0
4
4
0
0
0
0
0
0
0
0
4
4
0
0
0
0
0
0
0
0
4
4
0
0
0
0
0
0
0
0
5
5
676091 274384
274384
0
0
0 377820
214446
5
5
266919 2030742 1208661399
0
0
0 664755
385734
5
5
0
0
0
0
0
0
0
0
5
5
0
0
0
0
0
0
0
0
Reload
31007122 8/2008
?
Help
157
Operation Diagnostics
Resetting Port
Counters Using
the Web-Based
Interface
158
Reset port counters as follows:
Step
Action
1
Go to Basics → Restart.
2
Click Reset port counters.
31007122 8/2008
Operation Diagnostics
Displaying the SFP Status
Properties of
SFP Modules
By having the SFP status displayed, you can view the current connection to the SFP
modules and their properties. The properties include:
z
z
z
z
z
31007122 8/2008
module type
support provided in the media module
temperature in degrees Celsius
transmission power in mW
reception power in mW
159
Operation Diagnostics
Opening the SFP
Module Dialog
Box in the WebBased Interface
Step
Open the SFP module dialog box as follows:
Action
1
Connect the ESM to an Ethernet cable.
2
Open the Web-based interface.
3
Go to Diagnostics → Ports → SFP modules. The SFP module dialog box opens:
Module
1
Module
type
Port
3
Supported
Temperature
in Celsius
M-SFP-SXLC
42 1.7929
Reload
160
Tx Power
in mW
Rx Power
in mW
3.5840
?
Help
31007122 8/2008
Operation Diagnostics
Topology Discovery
Description of
Topology
Discovery
IEEE 802.1AB describes the Link Layer Discovery Protocol (LLDP).
LLDP allows users to automatically detect the topology of their LANs. A device with
active LLDP
z
z
z
sends its own connection and management information to neighboring devices of
the shared LAN if they have LLDP activated,
receives connection and management information from neighboring devices of
the shared LAN if they have LLDP activated,
and sets up a management information scheme and object definitions for saving
connection information of neighboring devices that have LLDP activated.
The connection information contains as its most significant element the precise and
unique ID of a connection endpoint: MSAP (MAC Service Access Point). This is
composed of the MAC address of the device and a port ID that is unique to this
device.
The contents of the connection and management information are:
z
z
z
z
z
z
z
z
z
z
z
z
31007122 8/2008
chassis ID (its MAC address)
port ID (its port MAC address)
description of the port
system name
system description
currently activated system capabilities
Interface ID of the management address
VLAN-ID of the port
status of autonegotiation on the port
medium, half/full duplex setting and transmission speed setting of the port
information about the redundancy protocol (STP, RSTP, HIPER ring, ring
coupling, dual homing) activated at this port
VLAN information concerning the port (VLAN ID and VLAN name)
This information can be called up from a network management station. With this
information, the network management station is able to display the topology of
the network.
LLDP uses an IEEE-MAC address for exchanging information. This address is
normally not routed by switches. This is why switches without LLDP support drop
the LLDP packets. Consequently, a non-LLDP-capable device between two
LLDP-capable devices prevents the exchange of LLDP information.To avoid this,
ESM Switch send additional LLDP packets to the ESM Multicast-MAC address
01:80:63:2F:FF:0B. ESM Switch with the LLDP function are thus also able to
exchange LLDP information with each other via devices which themselves are
not LLDP-capable.
161
Operation Diagnostics
The Management Information Base (MIB) of an LLDP capable ESM Switch holds
out the LLDP information in the lldp-MIB and in the private salldp-MIB.
Displaying
Topology
Discovering the
Web-Based
Interface
Step
1
Display topology discovery as follows:
Action
Connect the ESM to an Ethernet cable.
2
Open the Web-based interface.
3
Go to Diagnostics → Topology Discovery. The table shows you the selected information to neighbor
devices.
Configuration
Operation
Module
2
162
Off
Port Neighbour MAC Address Neighbour IP Address Neighbour Port Description Neighbour System Name
1 00:80:63:33:24:00
Set
4
On
Reload
149.218.112.171
Slot 3 Module 2 Interface 2 TCSESM0
Show LLDP entries exclusivley
?
Help
Click Show LLDP entries exclusively to reduce the number of topology table entries.
In this case, the topology table hides entries of devices without active topology discovery function.
31007122 8/2008
Operation Diagnostics
Explanation
concerning the
Topology
Discovery Dialog
Box
If several devices are connected to a port, for example via a switch, the table shows
one line for each connected device.
If
z
z
devices with active topology discovery function and
devices without active topology discovery function
are connected to a port, the Topology Discovery table hides the devices without
active topology discovery.
If
z
31007122 8/2008
only devices without active topology discovery are connected to a port, the table
will contain one line for this port symbolically for all devices.
MAC addresses of devices that the Topology Discovery table hides for the sake
of clarity, are located in the Address table (p. 95).
163
Operation Diagnostics
Detecting IP Address Conflicts
Introduction
By definition, each IP address may only be assigned once within a subnetwork. If
two or more devices erroneously share the same IP address within one subnetwork,
this will inevitably lead to malfunctions, including communications disruptions with
devices that have this IP address. A means must be provided to detect such a
situation (referred to as IP address confliction) when it occurs on a subnetwork.
Address Conflict
Detection
The ESM uses an Address Conflict Detection (ACD) mechanism to detect and
eliminate IP address conflicts.
The ACD’s -four modes of operation are described below:
164
Mode
Meaning
enable
Enables active and passive detection.
disable
Disables the function.
activeDectectionOnly
Enables active detection only. After connecting to a network or after
an IP address has been configured, the ESM immediately checks
whether its IP address already exists within the network. If it does,
the switch will return to the previous configuration, if possible, and
make another attempt after 15 seconds. Under no circumstances
will the switch connect to the network with a duplicate IP address.
passiveOnly
Enables passive detection only. The ESM listens passively to the
network to determine whether its IP address already exists. If it
detects a duplicate IP address, it will initially defend its address by
employing the ACD mechanism and sending out gratuitous ARP’s.
If the remote connection does not disconnect from the network, the
management interface of the ESM will then disconnect from the
network. Every 15 seconds thereafter, it will poll the network to
determine if there is still an address conflict. If there isn’t, it will
connect back to the network.
31007122 8/2008
Operation Diagnostics
Accessing ACD
In order to access the ACD mechanism on the ESM, perform the following steps:
Step
Action
1
Connect the ESM to an Ethernet cable.
2
Open the Web-based interface
3
Go to Diagnostics → IP Address Conflict Detection to display the dialog box.
Timestamp
IP Address
Status
enable
Fault State
false
MAC address
Set
Reload
?
Help
The ESM logs each IP address conflict that occurs in the main table of the dialog
box. For each conflict, the table lists:
z
z
z
the time it occurs
the conflicting IP address
the MAC address of the device which the ESM conflicted with
For each IP address, the ESM logs a line with the above information for the last
conflict that occurred.
You can delete the table by restarting the ESM.
Configuring ACD
31007122 8/2008
To configure the ESM’s ACD function, scroll to the desired mode in the Status field.
The choices are identical to those listed in the table above.
165
Operation Diagnostics
Reports
Explanation of
the Various
Report Types
For diagnosis purposes, the ESM allows you to use the following reports:
z
z
Viewing and
Sending the
Reports Using
the Web-Based
Interface
166
Log File:
An HTML file in which the ESM records all important switch internal events.
System Information:
Information in an HTML file containing all system relevant data.
These reports provide technicians with the information required for servicing the
ESM.
Proceed as follows to view and open the reports:
Step
Action
1
Connect the ESM to an Ethernet cable.
2
Open the Web-based interface.
3
Go to Diagnostics → Reports.
A window is opened which shows the following links:
z Log File
z System Information
4
Click Log File to open the HTML file in a new browser window.
5
Click System Information to open the HTML file in a new browser window.
31007122 8/2008
Operation Diagnostics
Monitoring Port Traffic
Port Mirorring
In port mirroring, data traffic related to one port (the source port) is copied to another
(the destination port). Data traffic at the source port is not influenced by port
mirroring. A management tool connected to the destination port, like an RMON
probe, can observe data traffic at the source port.
The destination port forwards data to be sent and blocks received data.
Port monitoring is shown in the figure below:
PLC
ESM
Backbone
RMON-Probe
31007122 8/2008
167
Operation Diagnostics
Monitoring Port
Traffic
Step
Monitor port traffic as follows:
Action
1
Connect the ESM to an Ethernet cable.
2
Open the Web-based interface.
3
Go to Diagnostics → Port Mirroring. The following window below appears:
Module
Port
Source port
Destination port
enabled
Set
168
Reload
Delete
?
4
Select the source port whose data traffic you wish to monitor.
5
Select the destination port to which you have connected your management tool.
6
Click enabled to enable the function.
Help
31007122 8/2008
EtherNet/IP
10
At a Glance
Overview
This chapter describes EtherNet/IP and its application to industrial network contol
systems that utilize TCSESM managed Ethernet switches.
What's in this
Chapter?
This chapter contains the following sections:
31007122 8/2008
Section
Topic
10.1
Introduction to EtherNet/IP and the TCSESM Switch
Page
171
10.2
Configuring the TSCESM Switch as an EtherNet/IP Adapter in
a Premium System
185
10.3
Configuring the TSCESM Switch as an EtherNet/IP Adapter in
a Quantum System
204
169
EtherNet/IP
170
31007122 8/2008
EtherNet/IP
10.1
Introduction to EtherNet/IP and the TCSESM
Switch
At a Glance
Introduction
This section introduces the concept of the EtherNetI/IP protocol and its application
to the TCSESM switch.
What's in this
Section?
This section contains the following topics:
Topic
What is EtherNet/IP
31007122 8/2008
Page
172
Verification of EtherNet/IP Protocol Settings
173
EtherNet/IP Parameters
175
171
EtherNet/IP
What is EtherNet/IP
Introduction
EtherNet/IP, which is accepted worldwide, is an industrial communication protocol
standardized by ODVA (Open DeviceNet Vendor Association) on the basis of
Ethernet. It is based on the widely used transport protocols TCP/IP and UDP/IP.
EtherNet/IP thus provides a wide basis, supported by leading manufacturers, for
effective industrial data communication.
UDP/IP Unicast
UDP/IP Unicast/Multicast
EtherNet/IP-Stack
Controller
EtherNet/IP and
CIP
EtherNet/IP adds the Common Industrial Protocol (CIP) to Ethernet as an
application level for industrial automation applications
Application
Layer
Host-to Host
Layer
Internet
Layer
Network Access
Layer
FTP
HTTP
DNS
CIP
SNMP
BOOTP
DHCP
UDP
TCP
IP
IP
IEEE 802.3 Ethernet
CIP is used for implicit, real-time I/O messaging and explicit information messaging
that are not time critical.
Support for
EtherNet/IP
172
Schneider Electric’s ConneXium ESM Ethernet switches fully support the EtherNet/
IP protocol.
31007122 8/2008
EtherNet/IP
Verification of EtherNet/IP Protocol Settings
Overview
Once the TCSESM Managed switch has been configured according to the
procedures in the Configuration manual, you need to:
z
z
z
verify that the EtherNet/IP has been activated
download the EDS file to your PC
check that IGMP Snooping is active
The steps for accomplishing this procedure are described below.
Activating
EtherNet/IP
Step
To activate the Ether Net/IP protocol and load the EDS file, perform the following
steps.
Action
1
In the tree view of the Web-based interface select Advanced → EtherNet/IP to bring up the EtherNet/IP
dialog box.
2
Select the EtherNet/IP check box.
3
Click Set to activate the EtherNet/IP protocol.
4
Click Download EDS File to load the EDS file onto your PC.
31007122 8/2008
173
EtherNet/IP
Step
Action
5
Select the directory on the PC file where you want the EDS file and device icon to be saved. The File name
field displays the path to the directory where the files will be saved. In the example shown, they will be saved
to My Documents.
6
Click Save. The downloaded EDS file will be saved to the directory you selected in step 5.
Deactivating
IGMP Snooping
174
To activate the IGMP Snooping function, perform the following steps.
Step
Action
1
In the tree view of the Web-based interface select Switching → Multicasts to
bring up the Multicasts dialog box (p. 103).
2
Click IGMP Snooping in the Global Configuration frame area.
3
Click Set to activate the IGMP Snooping function (p. 101).
31007122 8/2008
EtherNet/IP
EtherNet/IP Parameters
Introduction
This section describes the objects that makeup the EtherNet/IP parameters for the
TCSESM Managed Switch.
Identity Object
The ESM switch supports the identity object (class code 01) of EtherNet/IP. The
Schneider Electric manufacturer ID is 243. Schneider uses the manufacturerspecific ID 149 (95 hex) to designate the Managed Ethernet Switch product type.
Class Code
Hexadecimal
Decimal
16#01
1
Class Attributes
Attribute ID
Access
Name
1
Get
2
Get
3
4
Need
Data Type
Details
Vendor ID
UNIT
Schneider
Device Type
UNIT
Vendor Specific Definition
Get
Product Code
UNIT
Product Code: mapping is defined for
every device type, e.g. xxxxxxxxxxxxxx
Get
Revision
STRUCT
USINT Major
USINT Minor
Revision of the EtherNet/IP
implementation, currently 1.1, Major &
Minor Revisions.
5
Get
Status
WORD
Not used
6
Get
Serial Number
UDINT
Serial number of the device (contains last
3 bytes of MAC address).
7
Get
Product Name
Short String
(max. 32 byte)
Displays as "Schneider" + order code,
e.g. Schneider xxxxxxxxxxxxxx.
31007122 8/2008
175
EtherNet/IP
TCP/IP Interface
Object
The ESM switch supports an instance (instance 1) of the TCP/IP Interface Object
(class code f5hex) of EtherNet/IP.
In the case of write access, the ESM switch stores the complete configuration in its
flash memory. Saving can take 10 seconds. If the save process is interrupted, for
example, by a power cut, the switch may crash.
Note: The switch replies to the configuration set request with a response before it
finishes saving the configuration.
Class Code
Hexadecimal
Decimal
16#f5
245
Class Attributes
Attribute ID
Access
Name
Data Type
Details
1
Get
Status
DWORD
Interface Status (0 = Interface not configured,
1 = interface contains valid configuration.
2
Get
Interface
DWORD
Capability flags
Bit 0 = BOOTP Client.
Bit 1 = DNS Client.
Bit 2 = DHCP Client.
Bit 3 = DHCP-DNS Update.
Bit 4 = Configuration settable (within CIP).
Other bits reserved (0).
3
Set/Get
Config Control
DWORD
Bit 0-3:
Value 0 = using stored config.
Value 1 = using BOOTP.
Value 2 = using DHCP.
Bit 4 = 1 device uses DNS for name lookup
(always 0 because not supported).
Other bits reserved (0).
4
Get
Physical Link
Object
Structure:UINT Path
size EPATH Path
Path to the Physical Link Object, always
(20hex, F6hex, 24hex, 01hex) describing
instance 1 of the Ethernet Link Object.
176
31007122 8/2008
EtherNet/IP
Attribute ID
Access
Name
Data Type
5
Set/Get
Interface
Configuration
P IP Stack Configuration (IP-Address,
Structure: UDINT IP
Netmask, Gateway, 2 Nameserver (DNS, not
address
supported) and the domain name).
UDINT Netmask
UDINT Gateway
address
UDINT Name server 1
UDINT Name server 1
STRING Domain
name
6
Set/Get
Host name
STRING
31007122 8/2008
Details
Host name (for DHCP DNS Update.
177
EtherNet/IP
Ethernet Link
Object
The ESM switch supports at least one instance (instance 1 is the instance of the
CPU Ethernet Interface) of the Ethernet Link Object of EtherNet/IP.
Class Code
Hexadecimal
Decimal
16#f6
246
Class Attributes
Attribute ID
Access
Name
1
Get
Interface speed UDINT
Used interface speed in MBits/s (10, 100, 1000,...) 0
is used when the speed has not been determined or
is invalid because of inoperable status conditions.
2
Get
Interface flags
DWORD
Interface Status Flags:
Bit 0 = Link State (1=Link).
Bit 1 = Halfduplex (0)/Full duplex (1).
Bit 2-4 = Autoneg Status (0- Autoneg in progress, 1Autoneg inoperative, 2-Autoneg inoperative but
Speed detected, 3-Autoneg success, 4-No
Augoneg).
Bit 5 = manual configuration require reset (always 0
because not needed).
Bit 6 = hardware inoperable status condition.
3
Get
Physical
Address
ARRAY of 6
USINTs
MAC address of physical interface.
4
Get
Interface
Counters
Struct MIB II
Counters each
UDINT
InOctets, InUcastPackets, InNUcastPackets,
InDiscards, InErrors, InUnkownProtos, OutOctets,
OutUcastPackets, OutNUcastpackets,
OutDiscards, OutErrors.
5
Get
Media
Counters
Struct Ethernet
MIB Counters
each UDINT
Alignment Errors, FCS Errors, Single collision,
Multiple Collision, SQE Test Errors, Deferred
Transmissions, Late Collisions, Excessive
Collisions, MAC TX Errors, Carrier Sense Errors,
Frame Too Long, MAC RX Errors.
6
Get/Set
Interface
Counters
Struct Control
Bits WORD
Forced Iface
Speed UINT
Control Bits:
Autoneg enable/disable Bit 0, enable=1, Duplex
mode (Bit1, full duplex=1), if Autoneg disabled (Bit 0
set to 0).
Interface speed in MBits/s: 10, 100,..., if Autoneg
disabled (Control Bit 0 set to 0).
178
Data Type
Details
31007122 8/2008
EtherNet/IP
Enhancements to the Ethernet Link Object-the ESM switch supports additional
manufacturer-specific attributes described below.
Attribute ID
Access
Name
Data Type
Details
100 =64hex
Get
Ethernet
Interface Index
UDINT
Interface/Port Index (ifIndex out of MIBII)
101 =65hex
Get/Set
Port Control
DWORD
Bit 0 (RO) Link state (0 link down, 1 link up)
Bit 1 (R/W) Link admin state (0 disabled, 1
enabled)
Bit 8 (RO) Access violation alarm
Bit 9 (RO) Utilization alarm
102 =66hex
Get
Interface
Utilization
UDINT
The existing Counter out of the private MIB
hmlfaceUtilization is used. Utilization in
percentage (Unit 1% = 100,%/100). RX Interface
Utilization.)
103 =67hex
Get/Set
Interface
Utilization
Alarm Upper
Threshold
UDINT
Within this parameter the variable
hmlfaceUtilizationAlarmUpper-Threshold can be
accessed. Utilization in percentage (Unit 1% =
100). RX Interface Utilization Upper Limit.
104 =68hex
Get/Set
Interface
Utilization
Alarm Lower
Threshold
UDINT
Within this parameter the variable
hmlfaceUtilizationAlarmLower-Threshold can be
accessed. Utilization in percentage (Unit 1% =
100). RX Interface Utilization Lower Limit.
105 =69hex
Get/Set
Broadcast limit
UDINT
Broadcast limiter Service (Egress BC-Frames
limitation, 0 = disabled), Frames/second.
106 =6Ahex
Get
Ethernet
Interface
Description
STRING
(max. 64 Bytes)
even number of
Bytes
Interface/Port Description (from MIB II ifDescr),
e.g. "Unit: 1 Slot: 2 Port: 1 - 10/100 MBit TX", or
"unavailable", max. 64 Bytes.
31007122 8/2008
179
EtherNet/IP
Ethernet Switch
Agent Object
The ESM switch supports the Schneider-specific Ethernet Switch Agent Object for
the switch configuration and information parameters with one instance (instance 1)x
Class Code
Hexadecimal
Decimal
16#95
149
Class Attributes
Attribute ID
Name
Details
01
Switch Status
DWORD (32 bit) RO
Bit 0
Overall state (0=ok, 1=inoperative)like the signal contact.
Bit 1
Power Supply 1 (0=ok, 1=inoperative or not existing).
Bit 2
Power Supply 2 (0=ok, 1=inoperative or not existing).
Bit 3
Power Supply 3 (0=ok, or not possible on this platform
1=inoperative or not existing).
Bit 4
Power Supply 4 (0=ok, or not possible on this platform
1=inoperative or not existing).
Bit 5
Power Supply 5 (0=ok, or not possible on this platform
1=inoperative or not existing).
Bit 6
Power Supply 6 (0=ok, or not possible on this platform
1=inoperativeor not existing).
Bit 7
Power Supply 7 (0=ok, or not possible on this platform
1=inoperative or not existing).
Bit 8
Power Supply 8 (0=ok, or not possible on this platform
1=inoperative or not existing).
Bit 11
Signal Contact 1 (0=closed, 1=open).
Bit 12
Signal Contact 2 (0=closed, 1=open).
Bit 16
Temperature (0=ok, 1=inoperative).
Bit 17
Fan (0=ok or no fan, 1=inoperative).
Bit 24
Module removed (1=removed).
Bit 25
ACA removed (1=removed).
Bit 28
HIPER-Ring (1=inoperative).
Bit 29
Ring-/Netcoupling (1=inoperative).
Bit 30
180
Connection status condition(1=inoperative).
02
Switch
Temperature
Struct(INT RO Temperature °FINT RO Temperature °C).
03
Reserved
Always 0, attribute is reserved for future use.
31007122 8/2008
EtherNet/IP
Attribute ID
Name
Details
04
Switch Max
Ports
UINT (16 bit) RO Maximum number of Ethernet Switch
Ports.
05
Multicast
UINT (16 bit) RW.
Settings (IGMP
Snooping
Bit 0
RW
IGMP Snooping (1=enabled, 0=disabled).
Bit 1
RW
IGMP Querier (1=enabled, 0=disabled).
Bit 2
RO
IGMP Querier Mode 1 (1=Querier, 0=Non-Querier).
Bit 4-6
RW
IGMP Querier Packet Version V1 =2, V2 = 2, V3 = 3 Off=0
(IGMP Querier disabled).
Bit 8-10
RW
Treatment of all Unknown Multicasts (Railswitch only): 0 =
Send To All Ports, 1 = Send To Query Ports, 2 = Discard.
Switch Existing
Ports
ARRAY OF DWORD (RS20) RW Bitmask Link Admin
Status Switch Ports.
06
Per Bit
starting with
Bit 0 (=Port 1)
07
1=Port existing, 0=Port not available. Array (bit mask) size
is adjusted at the size of maximum number of Switch ports
(e.g. max. 28 Ports => 1 DWORD is used (32bit).
Switch Port
Control
Per Bit
starting with
Bit 0 (=Port 1)
08
0=Port enabled, 1=Port disabled. Array (bit mask) size is
adjusted at the size of maximum number of Switch ports
(e.g. max. 28 Ports => 1 DWORD is used (32bit).
Switch Port
Mapping
ARRAY OF USINT (BYTE, 8 bit) RO Instance number of
the Ethernet-Link-Object.
All Ethernet Link Object Instances for the existing
Ethernet Switch Ports (1..N, maximum number of ports).
When the entry is 0, the Ethernet Link Object for this port
does not exist.
Starting with
index 0 (=Port
1)
0x9
ARRAY OF DWORD RW Bitmask Link Admin Status
Switch Ports.
Switch Action
Status
DWORD (32 bit) RO
Bit 0
RO
Flash write in progress.
Bit 1
RO
Flash write inoperative.
The Schneider specific Ethernet Switch Agent Object offers the addition vendor
specific service with the service code 0 x 35 to save the switch configuration. The
switch replies the save configuration request as soon as it has saved the
configuration to the flash memory.
31007122 8/2008
181
EtherNet/IP
I/O Data
182
The precise meaning of the individual bits of the device state in the I/O data are
described in the Ethernet Switch Agent Object (above).
I/O Data
Value (data types and size to be defined) Direction
Device status
Bitmask (see Switch Agent Attribute 1)
Input, DWORD 32 bit
Link status
Bitmask, one Bit per port
0=NoLink, 1=Link
Input, DWORD
Output Links
admin. state
applied
Bitmask, (one Bit per port) to acknowledge
output
Link state change can be denied, e.g. for
controller access port.
0=port enabled, 1=port disabled
Input, DWORD
Utilization
alarm
Bitmask, one Bit per port
0=No alarm, 1=alarm on port
Input, DWORD
Access
Bitmask, one Bit per port
violation alarm 0=No alarm, 1=alarm on port
Input, DWORD
Multicast
Connections
Integer, number of connections
Input, DINT 32 bit
TCP/IP
Connections
Integer, number of connections
Input, DINT 32 bit
Link admin.
state
Bitmask, one Bit per port
0=port enabled, 1=port disabled
Output, DWORD
31007122 8/2008
EtherNet/IP
Mapping of the
Ethernet Link
Object Instances
31007122 8/2008
The following table displays the mapping of the ESM switch port number to the
Ethernet Link object Instance
Ethernet Link Object Instance
TCSESM Switch
1
CPU
2
1
3
2
4
3
5
4
6
5
7
6
8
7
9
8
10
9
11
10
12
11
13
12
14
13
...
...
183
EtherNet/IP
Supported
Services
184
The following table give an over view of the supported services by the EtherNet/IP
implementation for the objects instance.
Service Code
Identity Object
TCP/IP Interface
Object
Ethernet Link
Object
Switch Agent
Object
Get Attribute All
(0x01)
All attributes
All attributes
All attributes
All attributes
Get Attribute All
(0x02)
-
Settable attributes (3, 5, 6)
-
Get Attribute
Single (0x0e)
All attributes
All attributes
All attributes
All attributes
Get Attribute All
(0x10)
-
Settable attributes Settable
(3, 5, 6)
attributes (6,
0x65, 0x68,
0x69)
Settable
attributes (7)
Reset (0x05)
Parameter (0,1)
-
-
-
Save
Configuration
(0x35)
Vendor specific
Parameter (0,1)
-
-
Save switch
configuration
31007122 8/2008
EtherNet/IP
10.2
Configuring the TSCESM Switch as an EtherNet/IP
Adapter in a Premium System
At a Glance
Introduction
The section describes the configuration of a TSCESM switch as an EtherNet/IP
adapter in a Premium system using Unity Pro software.
What's in this
Section?
This section contains the following topics:
Topic
Overview of the TCSESM EtherNet/IP Premium Network Setup
31007122 8/2008
Page
186
Adding EDS Files
188
Automatically Detect and Add the TCSESM Switch
191
Configuring the TCSESM Switch Properties
193
Viewing the TCSESM Switch Data
196
SEND_REQ Example-Get_Attributes_Single
198
185
EtherNet/IP
Overview of the TCSESM EtherNet/IP Premium Network Setup
Introduction
186
The addition of the EtherNet/IP function to Schneider’s Connexium Managed Switch
product line allows the ESM to be configured as an EtherNet/IP adapter in a
Premium system using a TSX ETC 100 EtherNet/IP module. An example of such an
arrangement is described below.
31007122 8/2008
EtherNet/IP
Network
Topology
The required hardware and the connections involved to develop a network topology
looks like this:
TSX PSY 2600 M
power supply
TSX P57 4634
controller
PC with Unity Pro
192.168.001.090
TSX ETC 100
192.168.001.004
TCSESM083F2CU0
Connexium Switch
TSX ETC 100
192.168.001.00
1734-OB2E/C
digital output
STB PDT 3100
power supply
1734-AENT
192.168.001.015
1734-IB2/C
digital input
Note: On the Connexium
switch only the 24Vdc
(P2) supply is connected.
8 I/O modules
To re-create this example, be sure to:
z
z
use the IP addresses for your own configuration’s:
z PC
z TSX ETC 100 EtherNet/IP communication module
z STB NIC 2212 EtherNet/IP network interface module
z 1734-AENT PointIO adapter
check all wiring
Note: Unity Pro software running in the PC is used to configure the TSX P57 4634
controller. In this example, the PC is indirectly wired to the CPU’s Ethernet port via
the Ethernet switch. Alternatively, you could bypass the switch and directly wire the
PC to another one of the CPU’s ports.
31007122 8/2008
187
EtherNet/IP
Adding EDS Files
Overview
Before the TCSESM switch can be configured in a Premium system, the TCSESM
EDS file has to be added to the Unity Pro EtherNet/IP configuration tool’s Device
Library.The tool includes an EDS Management wizard that you can use to add one
or more EDS files to the Device Library. The wizard presents a series of instruction
screens that:
z
z
simplify the process of adding EDS files to the Device Library, and
provide a redundancy check in case you attempt to add duplicate EDS files to the
Device Library
Note: During the following procedure, you can select Devices → Options... to open
the Display Options window, where you can enable/disable messages indicating
the EDS file you are adding is a duplicate—or a different version—of an existing
EDS file.
188
31007122 8/2008
EtherNet/IP
Adding EDS Files
To add one or more EDS files to the Device Library:
Step
Action
1
Open the Unity project with ETC configured.
2
Open the ETC module properties.
3
Click on the EtherNet/IP button to open the EIP configuration tool.
4
Do one of the following:
z in the Device Library, click the Add button
, or
z select Library → Add
Page 1 of the wizard opens.
5
Click Next.
Page 2 of the wizard opens:
EDS Management
EtherNet/IP TM
Select the Location of the EDS File(s):
Add File(s)
Add all the EDS from the Directory
Look in Subfolders
Browse...
Directory or File Name:
The EDS Files usable in EIP-CT are registered in the EDS base. Select the
location of the file(s) and click on the Next button to insert the EDS files in the
base.
< Back
6
31007122 8/2008
Next >
Cancel
Help
In the Select the Location of the EDS File(s) section, select either:
z Add File(s), to add one or more EDS files you will individually select, or
z Add all the EDS Files from the Directory, to add all files from a folder you will
select.
z Select Look in Subfolders to add EDS files in subfolders beneath the
folder you select
189
EtherNet/IP
Step
7
Action
Click the Browse button.
The Open dialog opens.
The Open dialog opens:
Open
Look in:
ETHERNETIP_IP_EDS
temp
004D00800010101.eds
004D00C007A0101.eds
004D00C00720101.eds
004D00C00730101.eds
004D00C00730201.eds
004D000C00790101.eds
0001000A000A0101.eds
0001000A000A0201.eds
0001000A001A0101.eds
0001000A000A0201.eds
0001000A0001B101.eds
001000A001C01
001000A001D01
001000A001E01
001000A001F01
001000A006A01
001000A006B01
File name:
Open
Files of type:
Cancel
8
Use the Open dialog to navigate to and select:
z one or more EDS files, or
z a folder containing EDS files
9
After you have made your selection(s), click Open.
The dialog closes and your selection appears in the Directory or File Name field.
10
Click Next.
The wizard compares the selected EDS files against existing files in the Device
Library.
11
(Conditional) If one or more selected EDS files are duplicates and if notice of
redundant files is enabled in the Display Options dialog, a File Already Exists
message displays.
Close the message.
12
Page 3 of the wizard opens indicating the Status of each device you attempted
to add:
z a green check mark indicates the EDS file can be added
z a blue informational icon indicates a redundant file
z a red check mark indicates an invalid EDS file
(Optional) Select a file in the list, then click View Selected File to open it.
190
13
Click Next to add the nonduplicate files.
Page 4 of the wizard opens, indicating the action is complete.
14
Click Finish to close the wizard.
The device(s) you added can now be inserted into your EtherNet/IP
configuration.
31007122 8/2008
EtherNet/IP
Automatically Detect and Add the TCSESM Switch
Overview
Use the Unity Pro EtherNet/IP configuration tool to automatically detect the
TCSESM switch. After it is detected, you can add it to your project.
Note: The TCSESM must be active online with a valid IP address before you can
detect and add it to your project.
31007122 8/2008
191
EtherNet/IP
Detecting and
Adding Network
Devices
To automatically detect the TCSESM and then add it to your project, follow these
steps:
Step
Action
1
Launch the configuration tool from the Configuration page of the EtherNet/IP
communication module’s Properties window.
2
In the configuration tool, begin on-line operations by clicking the Go Online
button
3
.
Click the Configuration tab to enable automatic network detection:
Device Library
4
Network Detection
Click the Read Network Configuration toolbar button
.
The configuration tool searches the network for EtherNet/IP devices, classifies
them using the device EDS file, then lists the EtherNet/IP devices it detects.
Network
1734-AENT Ethernet/IP Adapter: 192.168.001.015
PointIO Chassis 3 Slot
1734-AENT PointIO Ethernet/IP Adapter Revisor
PointIO 2pt 24Vdc sink Input
PointIO 2pt 24Vdc Source Output Enhanced
Schneider TCSESM083F2CU0: 192.168.001.041
5
Select the 1734-AENT PointIO Adapter in the Network Detection window.
6
Click the Insert in Configuration button
to open the Properties window,
where you can configure the 1734-AENT PointIO adapter.
192
31007122 8/2008
EtherNet/IP
Configuring the TCSESM Switch Properties
Overview
The TCSESM switch properties window presents the following tabbed pages. Only
some of these pages need to be edited for this example:
In this page...
Do the following...
General
z input device name
z configure IP address
z add the device to the project configuration
Connections
31007122 8/2008
Accept the default settings.
Online Parameters
Accept the default settings, if any.
Module Informations
(Read-only page—no configuration required)
Port Configuration
(Read-only page—no configuration required)
EDS File
(Read-only page—no configuration required)
193
EtherNet/IP
Configuring the
TCSESM
194
The following settings were used in the sample configuration:
Step
Action
1
Click on the General page:
2
In the General page, edit the following settings:
Device Name
TCSESM
Number
The sequence of the device in the Devices window. for
this example, type in 041.
Active Configuration
Be sure this checkbox is selected.
IP Address
192.168.001.041
31007122 8/2008
EtherNet/IP
Step
Action
3
Click on the Connection page:
4
Under Configured Connections, select General.
5
Under Connection Parameters, select Request Packet Interval (RPI).
6
Select the value and change it to 100.
7
Click OK to save your settings and close the properties window.
A node is added to the project configuration in the Devices window:
Module EIP: Auto 10/100 Mb - IN %MW100 - OUT %MW300
TCP/IP: Static - 192.168.001.100
[000] Local Ethernet/IP slave
[015] 192.168.001.015 PointIP 1734-AENT
[041] 192.168.001.041 TCSESM TCSESM083F2CU0
The next step is to view the remote device’s inputs and outputs.
31007122 8/2008
195
EtherNet/IP
Viewing the TCSESM Switch Data
Overview
Because the Device Library includes EDS files for the TSCESM switch PointIO
adapter and its discrete input and output modules, the Unity Pro EtherNet/IP
configuration tool automatically:
z
z
creates a single rack optimized CIP connection from the TCSESM’s EtherNet/IP
communication module to the 1734-AENT, and
configures each input and output item by assigning:
z an item name
z an address location
z a size allotment based on its data type
Note: In this example, the configuration tool created a single rack optimized
connection, which is a more efficient use of CIP connections. A rack optimized
connection can be used only with discrete (digital) I/O modules. For analog I/O
modules, each analog module must be connected to the TCSESM using a
separate connection.
196
31007122 8/2008
EtherNet/IP
Viewing the
TCSESM Switch
Data
To view the automatically created CIP connection and the I/O items in the Unity Pro
EtherNet/IP configuration tool:
Step
1
Action
In the Protocol window, navigate to and select Position: 000 Consume Data From/
Produce Data to:
Module EIP: Auto 10/100 MB- IN %MW100 - OUT %MW300
TCP/IP: Static - 192.168.001.100
[000]Local Ethernet/IP slave
[015] 192.168.001.015 POINTIO 1734-AENT
[015] 192.168.001.041 TCSESM TCSESM083F2CU0
ITem Configuration Device Name: TCSESM
Position: 000 Consume Data From/Produce Data to
The automatically configured input and output items appear on the right side of the
screen in the I/O area (shown below).
2
31007122 8/2008
If necessary, use the horizontal scroll bar to scroll to the far right of the input or
output area and display the Address column, which identifies the location of the
input or output in the TSX ETC 100:
197
EtherNet/IP
SEND_REQ Example-Get_Attributes_Single
Overview
The following unconnected explicit messaging example shows you how to use the
SEND_REQ function block to retrieve the switch status (Ethernet Switch Agent
Object-Class 149 (hex 95), Instance 1, Attribute ID1)—using the
Get_Attributes_Single service.
You can perform the same explicit messaging service using the Online Action
window of the Unity Pro EtherNet/IP configuration tool..
Implementing
the SEND_REQ
Function Block
To implement the SEND_REQ function block, you need to create and assign
variables for the following blocks, as follows:
TON
start
T#500ms
IN
PT
R_TRIG
start
Q
ET
CLK
AND_BOOL
IN1
Management_Param[0].0
ADDR(‘0.4.0.10’)
Request_Code
Data_to_Send
Management_Param
Input Variables
198
OUT
Send_data_bytes
IN2
Q
MOVE
SEND_REQ
EN
ENO
ADR
RECP
CODE
EN
IN
ENO
OUT
Management_Param[3]
Received_Data
EMIS
GEST ........ GEST
Management_Param
Variables need to be created and assigned to input pins. For the purpose of this
example, variables have been created—and named—as described below. (You
can, of course, use different variable names in your explicit messaging
configurations.)
Input pin
Variable
Data type
IN
start
BOOL
IN
Send_data_bytes
INT
CODE
Request_Code
INT
EMIS
Data_to_Send
Array [0...4] of 5 INT
31007122 8/2008
EtherNet/IP
Input/Output
Variables
Output Variables
Configuring the
Address Input
Parameter
A single variable needs to be created and assigned to the dual input/output GEST
pins. For the purpose of this example, a variable has been created—and named—
as described below. (You can, of course, use different variable names in your
explicit messaging configurations.)
Input pin
Variable
Data type
GEST
Management_Param
Array [0...3] of 4 INT
A variable also needs to be created and assigned to the single RECP output pin.
(The names assigned to the output variable apply only to this example, and can be
changed in your explicit messaging configurations.)
Output pin
Variable
Data type
RECP
Received_Data
Array [0...3] of 4 INT
To configure the Address parameter, use the ADDR function to convert a character
string to an address, as follows:
z
ADDR("{network.station} rack.module.channel.destination address")
Note: The parameters {network station} are required only when both the scanner
and target devices are part of different networks, but the stations are connected via
Fipway network.
The channel parameter value is always 0.
Note:
The parameters {network station} are required only when both the scanner and
target devices are part of different networks, but the stations are connected via
Fipway network.
z The channel parameter value is always 0.
z
For this example, the Address Input Parameter is: ADDR{0.2.0.41}.]
Configuring the
Request_Code
Variable
31007122 8/2008
The Request_Code variable identifies the function type for the SEND_REQ function
block—in this case, a CIP request:
Variable
Description
Value (hex)
Request_Code
Code identifies a CIP request
16#000E
199
EtherNet/IP
Configuring the
Data_to_Send
Variable
The Data_to_Send variable identifies the type of explicit message and the CIP
request:
Variable
Data_to_Send[0]
Description
Value (hex)
Message type:
16#0000
z 0000 (unconnected), or
z 0001 (connected)
In this example, unconnected is selected.
Configuring the
Management_
Param Variable
200
Data_to_Send[1]
High byte = Request path size (03)
Low byte = Service: Get_Attribute_Single (0E)
16#030E
Data_to_Send[2]
High byte = Class (01)
Low byte = Class Segment (20)
16#9520
Data_to_Send[3]
High byte = Instance (01)
Low byte = Instance Segment (24)
16#0124
Data_to_Send[4]
High byte = Attribute (01)
Low byte = Attribute Segment (30)
16#0130
The Management_Param variable manages the explicit message:
Variable
Description
Value (hex)
Management_Param[0]
High byte = Exchange number (managed by
system)
Low byte = Activity bit (managed by system)
(read-only)
Management_Param[1]
High byte = Operation report
Low byte = Communication report
(read-only)
Management_Param[2]
Timeout in ms—0 indicates infinite
16#0000
Management_Param[3]
At input = Length of Data_to_Send variable (in
bytes)
At output = Length of Received_Data variable
(in bytes)
16#000A
31007122 8/2008
EtherNet/IP
Create and
Configure the
Send_data_
bytes Variable
The Send_data_bytes variable is used to specify the number of bytes in the explicit
message to be sent to the end deice. It is copied into the Management_Param(3)
variable before the send_req is activated.
For this example the number of bytes is 10 decimal (A hex).
A single variable needs to be created to specify the length of data to send.
Variable
Data_to_Send[0]
Description
Value (hex)
Message type:
16#0000
z 0000 (unconnected), or
z 0001 (connected)
In this example, unconnected is selected.
31007122 8/2008
Data_to_Send[1]
High byte = Request path size (03)
Low byte = Service: Get_Attribute_Single (0E)
16#030E
Data_to_Send[2]
High byte = Class (01)
Low byte = Class Segment (20)
16#9520
Data_to_Send[3]
High byte = Instance (01)
Low byte = Instance Segment (24)
16#0124
Data_to_Send[4]
High byte = Attribute (01)
Low byte = Attribute Segment (30)
16#0130
201
EtherNet/IP
Viewing the
Response
Use a Unity Pro Animation table to display the Received_Data variable array. The
Received_Data variable array consists of the entire data buffer.
To display the CIP response, follow these steps:
Step
Action
1
In Unity Pro, select Tools → Project Browser to open the Project Browser.
2
In the Project Browser, select the Animation Tables folder, then click the right mouse
button. A pop-up menu appears.
3
Select New Animation Table in the pop-up menu. A new animation table and its
Properties dialog both open.
4
In the Properties dialog, edit the following values:
5
Name
Type in a table name. For this example: Received_Data.
Functional module
Accept the default <None>.
Comment
(Optional) Type your comment here.
Number of animated
characters
Type in 100, representing the size of the data buffer in
words.
The completed Properties dialog looks like this:
Properties
Name:
Functional module:
Received_Data
<None>
Comment:
Extended String Animation
Number of animated characters
100
OK
range: (20-300)
Cancel
Click OK to close the dialog.
6
202
In the animation table’s Name column, type in the name of the variable assigned to
the databuffer, Received_Data, and press Enter. The animation table displays the
Received_Data variable.
31007122 8/2008
EtherNet/IP
Step
Action
7
Expand the Received_Data variable to display its word array, where you can view
the CIP response at Received_Data(0-4):
Note: Each array entry presents 2 bytes of data in little endian format, where the
least significant byte is stored in the smallest memory address. For example, ‘8E’ in
word[0] is the lower byte, and ‘00’ is the upper byte.
In the above figure, the Received_Data(2) variable shows the Ethernet Switch Agent
Object (class 149, instance 1, attribute 1) Switch Status.
For this example the hex value 0803 translates to the following:
z
z
z
31007122 8/2008
Bit 0 = 1 Overall State Inoperative
Bit 1 = 1 Power Supply 1 Inoperative (as previously noted, only Power Supply 2
is connected)
Bit 11 - 1 Signal Contact Open
203
EtherNet/IP
10.3
Configuring the TSCESM Switch as an EtherNet/IP
Adapter in a Quantum System
At a Glance
Introduction
This section describe the configuration of a TSCESM switch as an EtherNet/IP
adapter in a Quantum system using Unity Pro software
What's in this
Section?
This section contains the following topics:
Topic
Overview of the TCSESM EtherNet/IP Quantum Network Setup
204
Page
205
Adding an EDS File
207
Automatically Detect and Add the TESESM Switch
210
Configuring the TCSESM Switch Properties
212
Viewing the TCSESM Switch Data
215
MPB_MSTR Example-Get_Attributes_Single
217
31007122 8/2008
EtherNet/IP
Overview of the TCSESM EtherNet/IP Quantum Network Setup
Introduction
31007122 8/2008
The addition of the EtherNet/IP function to Schneider’s Connexium Managed Switch
product line allows the ESM to be configured as an EtherNet/IP adapter in a
Quantum system using a 140 NOC 77100 EtherNet/IP module. An example of such
an arrangement is described below.
205
EtherNet/IP
Network
Topology
The required hardware and the connections involved to develop a network topology
looks like this:
TSX PSY 2600 M
power supply
TSX P57 4634
controller
PC with Unity Pro
192.168.001.090
TSX ETC 100
192.168.001.004
TCSESM083F2CU0
Connexium Switch
192.168.001.41
140 NOC 7710
192.168.001.100
1734-OB2E/C
digital output
Slot
0 1 2
1734-IB2/C
digital input
1734-AENT
192.168.001.015
STB PDT 3100
power supply
Note: On the Connexium
switch only the 24Vdc
(P2) supply is connected.
8 I/O modules
To re-create this example, be sure to:
z
z
use the IP addresses for your own configuration’s:
z PC
z TSX ETC 100 EtherNet/IP communication module
z STB NIC 2212 EtherNet/IP network interface module
z 1734-AENT PointIO adapter
check all wiring
Note: Unity Pro software running in the PC is used to configure the TSX P57 4634
controller. In this example, the PC is indirectly wired to the CPU’s Ethernet port via
the Ethernet switch. Alternatively, you could bypass the switch and directly wire the
PC to another one of the CPU’s ports.
Refer to the Quantum 140 NOC 77100 EtherNet/IP Communication Module User
Manual (31008209) for complete details on configuring a Quantum EtherNet/IP
system.
206
31007122 8/2008
EtherNet/IP
Adding an EDS File
Overview
Before the TCSESM switch can be configured in a Quantum system, the TCSESM
EDS file has to be added to the Unity Pro EtherNet/IP configuration tool’s Device
Library.The tool includes an EDS Management wizard that you can use to add one
or more EDS files to the Device Library. The wizard presents a series of instruction
screens that:
z
z
simplify the process of adding EDS files to the Device Library, and
provide a redundancy check in case you attempt to add duplicate EDS files to the
Device Library
Note: During the following procedure, you can select Devices → Options... to open
the Display Options window, where you can enable/disable messages indicating
the EDS file you are adding is a duplicate—or a different version—of an existing
EDS file.
31007122 8/2008
207
EtherNet/IP
Adding EDS Files
To add one or more EDS files to the Device Library:
Step
Action
1
Open the Unity project with ETC configured.
2
Open the ETC module properties.
3
Click on the EtherNet/IP button to open the EIP configuration tool.
4
Do one of the following:
z in the Device Library, click the Add button
, or
z select Library → Add
Page 1 of the wizard opens.
5
Click Next.
Page 2 of the wizard opens:
EDS Management
EtherNet/IP TM
Select the Location of the EDS File(s):
Add File(s)
Add all the EDS from the Directory
Look in Subfolders
Browse...
Directory or File Name:
The EDS Files usable in EIP-CT are registered in the EDS base. Select the
location of the file(s) and click on the Next button to insert the EDS files in the
base.
< Back
6
208
Next >
Cancel
Help
In the Select the Location of the EDS File(s) section, select either:
z Add File(s), to add one or more EDS files you will individually select, or
z Add all the EDS Files from the Directory, to add all files from a folder you will
select.
z Select Look in Subfolders to also add EDS files in subfolders beneath the
folder you select
31007122 8/2008
EtherNet/IP
Step
7
Action
Click the Browse button.
The Open dialog opens.
Open
Look in:
ETHERNETIP_IP_EDS
temp
004D00800010101.eds
004D00C007A0101.eds
004D00C00720101.eds
004D00C00730101.eds
004D00C00730201.eds
004D000C00790101.eds
0001000A000A0101.eds
0001000A000A0201.eds
0001000A001A0101.eds
0001000A000A0201.eds
0001000A0001B101.eds
001000A001C01
001000A001D01
001000A001E01
001000A001F01
001000A006A01
001000A006B01
File name:
Open
Files of type:
Cancel
8
Use the Open dialog to navigate to and select:
z one or more EDS files, or
z a folder containing EDS files
9
After you have made your selection(s), click Open.
The dialog closes and your selection appears in the Directory or File Name field.
10
Click Next.
The wizard compares the selected EDS files against existing files in the Device
Library.
11
(Conditional) If one or more selected EDS files are duplicates and if notice of
redundant files is enabled in the Display Options dialog, a File Already Exists
message displays.
Close the message.
12
Page 3 of the wizard opens indicating the status of each device you attempted
to add:
z a green check mark indicates the EDS file can be added
z a blue informational icon indicates a redundant file
z a red check mark indicates an invalid EDS file
(Optional) Select a file in the list, then click View Selected File to open it.
31007122 8/2008
13
Click Next to add the non-duplicate files.
Page 4 of the wizard opens, indicating the action is complete.
14
Click Finish to close the wizard.
The device(s) you added can now be inserted into your EtherNet/IP
configuration.
209
EtherNet/IP
Automatically Detect and Add the TESESM Switch
Overview
Use the Unity Pro EtherNet/IP configuration tool to automatically detect the
TCSESM switch. After it is detected, you can add it to your project.
Note: The TCSESM must be active online with a valid IP address before you can
detect and add it to your project.
210
31007122 8/2008
EtherNet/IP
Detecting and
Adding Network
Devices
To automatically detect the TCSESM and then add it to your project, follow these
steps:
Step
Action
1
Launch the configuration tool from the Configuration page of the EtherNet/IP
communication module’s Properties window.
2
In the configuration tool, begin on-line operations by clicking the Go Online
button
3
.
Click on the Configuration tab to enable automatic network detection:
Device Library
4
Network Detection
Click the Read Network Configuration toolbar button
.
The configuration tool searches the network for EtherNet/IP devices, classifies
them using the device EDS file, then lists the EtherNet/IP devices it detects.
Network
1734-AENT Ethernet/IP Adapter: 192.168.001.015
PointIO Chassis 3 Slot
1734-AENT PointIO Ethernet/IP Adapter Revisor
PointIO 2pt 24Vdc sink Input
PointIO 2pt 24Vdc Source Output Enhanced
Schneider TCSESM083F2CU0: 192.168.001.041
5
Select the 1734-AENT PointIO Adapter in Network Detection window.
6
Click the Insert in Configuration button
.
The Properties window opens, where you can configure the 1734-AENT PointIO
adapter.
31007122 8/2008
211
EtherNet/IP
Configuring the TCSESM Switch Properties
Overview
The TCSESM switch Properties window presents the following tabbed pages. Only
some of these pages need to be edited for this example:
In this page...
Do the following...
General
z input device name
z configure IP address
z add the device to the project configuration
Connections
212
Accept the default settings.
Online Parameters
Accept the default settings, if any.
Module Informations
(Read-only page - no configuration required)
Port Configuration
(Read-only page - no configuration required)
EDS File
(Read-only page - no configuration required)
31007122 8/2008
EtherNet/IP
Configuring the
TCSESM
31007122 8/2008
The following settings were used in the sample configuration:
Step
Action
1
Click on the General page:
2
In the General page, edit the following settings:
Device Name
TCSESM
Number
The sequence of the device in the
Devices window. for this example,
type in 041.
Active Configuration
Be sure this checkbox is selected.
IP Address
192.168.001.041
213
EtherNet/IP
Step
Action
3
Click on the Connection page:
4
Under Configured Connections select General.
5
Under Connection Parameters select Request Packet Interval (RPI).
6
Select and change the value to 100.
7
Click OK to save your settings and close the properties window.
A node is added to the project configuration in the Devices window:
Module EIP: Auto 10/100 Mb - IN%MW100 - OUT%MW300
TCP/IP: Static - 192.168.001.100
[000] Local Ethernet/IP slave
[015] 192.168.001.015 PointIP 1734-AENT
[041] 192.168.001.041 TCSESM TCSESM083F2CU0
The next step is to view the remote device’s inputs and outputs.
214
31007122 8/2008
EtherNet/IP
Viewing the TCSESM Switch Data
Overview
Because the Device Library includes EDS files for the TSCESM switch PointIO
adapter and its discrete input and output modules, the Unity Pro EtherNet/IP
configuration tool automatically:
z
z
creates a single rack optimized CIP connection from the TCSESM’s EtherNet/IP
communication module to the 1734-AENT, and
configures each input and output item by assigning:
z an item name
z an address location
z a size allotment based on its data type
Note: In this example, the configuration tool created a single rack optimized
connection, which is a more efficient use of CIP connections. A rack optimized
connection can be used only with discrete (digital) I/O modules. For analog I/O
modules, each analog module must be connected to the TCSESM using a
separate connection.
31007122 8/2008
215
EtherNet/IP
Viewing the CIP
Connection and
I/O
To view the automatically created CIP connection and the I/O items in the Unity Pro
EtherNet/IP configuration tool:
Step
1
Action
In the Protocol window, navigate to and select Position: 000 Consume Data From/
Produce Data to as shown below:
Module EIP: Auto 10/100 MB- IN%MW100 - OUT%MW300
TCP/IP: Static - 192.168.001.100
[000]Local Ethernet/IP slave
[015] 192.168.001.015 POINTIO 1734-AENT
[015] 192.168.001.041 TCSESM TCSESM083F2CU0
ITem Configuration Device Name: TCSESM
Position: 000 Consume Data From/Produce Data to
The automatically configured input and output items appear on the right side of the
screen in the I/O area (shown below).
2
216
If necessary, use the horizontal scroll bar to scroll to the far right of the input or
output area and display the Address column, which identifies the location of the
input or output in the TSX ETC 100:
31007122 8/2008
EtherNet/IP
MPB_MSTR Example-Get_Attributes_Single
Overview
The following unconnected explicit messaging example shows you how to use the
MBP_MSTR function block to retrieve the switch status [Ethernet Switch Agent
Object-Class 149 (hex 95), Instance 1, Attribute ID1] module, using the
Get_Attributes_Single service.
You can perform the same explicit messaging service using the Online Action
window of the Unity Pro EtherNet configuration tool.
Implementing
the MBP_MSTR
Function Block
To implement the MBP_MSTR function block, you need to create and assign
variables for the following blocks, as follows:
MBP_MSTR_1
1
send_request
abort_request
Input Variables
31007122 8/2008
MBP_MSTR
ACTIVE
ENABLE
ABORT
ERROR
SUCCESS
CONTROL
DATABUF
EM_actie
EM_error
EM_success
EM_control
EM_data
Variables need to be created and assigned to input pins. For the purpose of this
example, variables have been created—and named—as described below. (You
can, of course, use different variable names in your explicit messaging
configurations.)
Input pin
Variable
Data type
ENABLE
send_request
BOOL
ABORT
abort_request
BOOL
217
EtherNet/IP
Output Variables
Control Array
218
A variable also needs to be created and assigned to output pins. (The names
assigned to the output variable apply only to this example, and can be changed in
your explicit messaging configurations.)
Output pin
Variable
Data type
ACTIVE
EM_active
BOOL
ERROR
EM_error
BOOL
SUCCESS
EM_success
BOOL
Address
CONTROL
EM_control
Array of 9 words
% MW500
DATABUF
EM_data
Array of 100 words
% MW600
The control array parameter (EM_control) consists of 9 contiguous words. You need
to configure only some control words; other control words are read-only and are
written to by the operation. In this example, the control array defines the operation
as an unconnected explicit message, and identifies the target device.
Register
Description
Configure
Setting (hex)
CONTROL [0]
Operation:
Low byte = OE (CIP explicit message)
High byte =
z 00 (unconnected), or
z 01 (connected)
Yes
16#000E
(unconnected)
CONTROL [1]
Status: read-only (written by operation).
No
—
CONTROL [2]
Data buffer length = 100 words
Yes
16#0004
CONTROL [3]
Response offset: offset–in words–for the Yes
beginning of the explicit message
response in the databuffer
16#0004
CONTROL [4]
Slot of the 140 NOC 771 00 module:
Low byte = 0 (not used)
High byte = slot location
Yes
16#0004
CONTROL [5]
Device number: from the Devices
window of the Unity Pro EtherNet/IP
configuration tool
Yes
16#0029
CONTROL [6]
CIP request length (in bytes)
Yes
16#0008
CONTROL [7]
Length of received response (written by
operation)
No
—
CONTROL [8]
(Reserved)
No
—
31007122 8/2008
EtherNet/IP
Configuration of
the Management
Param Variable
CIP Request
Request
word
The Management_Param variable manages the explicit message:
Variable
Description
Value (hex)
Management_Param[0]
High byte = Exchange number (managed by
system)
Low byte = Activity bit (managed by system)
(read-only)
Management_Param[1]
High byte = Operation report
Low byte = Communication report
(read-only)
Management_Param[2]
Timeout in ms—0 indicates infinite
16#0000
Management_Param[3]
At input = Length of Data_to_Send variable (in
bytes)
At output = Length of Received_Data variable (in
bytes)
16#000A
The CIP request is located at the beginning of the databuffer and is followed by the
CIP response. In this example, the CIP request calls for the return of a single
attribute value (switch state), and describes the request path through the target
device’s object structure leading to the target attribute:.
High byte
Low byte
Description
Value
(hex)
Description
Value
(hex)
1
Request path size (in words)
16#03
EM Service: Get_Attributes_Single
16#OE
2
Request path: class assembly object
16#95
Request path: logical class segment
16#20
3
Request path: Instance
16#01
Request path: logical instance segment
16#24
4
Request path: attribute
16#01
Request path: logical attribute segment
16#30
Combining the high and low bytes, above, the CIP request would look like this:
31007122 8/2008
Request word
Value
1
16#030E
2
16#9520
3
16#0124
4
16#0130
219
EtherNet/IP
Viewing the
Response
Use a Unity Pro Animation table to display the Received_Data variable array. The
Received_Data variable array consists of the entire data buffer, which includes:
z
z
z
z
CIP request (4 words) located in EM_data(1-4)
CIP service type (1 word) located in EM_data(5)
CIP request status (1 word) located in EM_data(6)
CIP response (in this case, 10 words) located in EM_data(7-16)
To display the CIP response, follow these steps:
Step
Action
1
In Unity Pro, select Tools → Project Browser to open the Project Browser.
2
In the Project Browser, select the Animation Tables folder, then click the right
mouse button. A pop-up menu appears.
3
Select New Animation Table in the pop-up menu. A new animation table and its
Properties dialog both open.
4
In the Properties dialog, edit the following values:
5
Name
Type in a table name. For this example: Received_Data.
Functional module
Accept the default <None>.
Comment
(Optional) Type your comment here.
Number of animated
characters
Type in 100, representing the size of the data buffer in
words.
The completed Properties dialog looks like this:
Properties
Name:
Functional module:
Received_Data
<None>
Comment:
Extended String Animation
Number of animated characters
100
OK
range: (20-300)
Cancel
Click OK to close the dialog.
6
220
In the animation table’s Name column, type in the name of the variable assigned to
the databuffer: Received_Data and press Enter. The animation table displays the
Received_Data variable.
31007122 8/2008
EtherNet/IP
Step
Action
7
Expand the Received_Data variable to display its word array, where you can view
the CIP response at Received_Data(0-4):
Note: Each array entry presents 2 bytes of data in little endian format, where the
least significant byte is stored in the smallest memory address. For example, ‘8E’ in
word[0] is the lower byte, and ‘00’ is the upper byte.
In the above figure, the EM_data(6) variable shows the Ethernet Switch Agent
Object (class 149), instance 1, attribute 1) Switch Status.
For this example the hex value 0803 translates to the following:
z
z
z
31007122 8/2008
Bit 0 = 1 Overall State Inoperative
Bit 1 = 1 Power Supply 1 Inoperative (as previously noted, only Power Supply 2
is connected)
Bit 11 - 1 Signal Contact Open
221
EtherNet/IP
222
31007122 8/2008
Appendices
At a Glance
What's in this
Appendix?
31007122 8/2008
The appendix contains the following chapters:
Chapter
Chapter Name
Page
A
General Information
225
B
Switch Function Examples
281
223
Appendices
224
31007122 8/2008
General Information
A
The Management Information Base (MIB)
MIB Description
The Management Information Base (MIB) is designed in the form of an abstract tree
structure.
The branching points are the object classes. The leaves of the MIB are called
generic object classes. Wherever necessary for unambiguous identification, the
generic object classes are instantiated, i.e. the abstract structure is imaged on the
reality, by specifying the port address or the source address.
Values (integers, time ticks, counters or octet strings) are assigned to these
instances. These values can be read and, in some cases, modified. The object
description or object ID (OID) identifies the object class. The subidentifier (SID) is
used for instantiation.
Example:
The generic object class
saPSState (OID = 1.3.6.1.4.1.3833.1.1.14.1.2.1.3)
is the description of the abstract information power supply state. It is, however, not
possible to read any information from this, as the system does not know which
power supply is meant.
Specification of the subidentifier (2) images this abstract information on the reality
(instantiates it), which means that it refers to power supply 2. A value is assigned to
this instance and can then be read.
The instance get 1.3.6.1.4.1.248.14.1.2.1.3 2, for example, returns the
response 1, which means that the power supply is ready for operation.
31007122 8/2008
225
General Information
MIB
Abbreviations
Syntax
Definitions
The following table defines the abbreviations used in the MIB.
Abbreviation
Meaning
Comm
Group access rights
Con
Configuration
Descr
Description
Fan
Fan
ID
Identifier
Lwr
Lower (e.g., threshold)
PS
Power supply
Pwr
Supply voltage
sys
System
UI
User Interface
Upr
Upper (e.g., threshold)
ven
Vendor (Schneider Electric)
The following table defines the syntax terms used in the MIB.
Term
Definition
Integer
an integer in the range 0-232
IP address
xxx.xxx.xxx.xxx
(xxx = integer in the range 0-255)
MAC address
12-digit hexadecimal number in accordance with ISO / IEC 8802-3
Object Identifier
x.x.x.x... (e.g., 1.3.6.1.1.4.1.3833...)
Octet String
ASCII character string
PSID
power supply identifier (power supply number)
Time Ticks
Stopwatch
elapsed time (in seconds) = numerical value / 100
numerical value = integer in the range 0-232
Timeout
time value in hundredths of a second
time value = integer in the range 0-232
226
Type Field
4-digit hexadecimal number in accordance with ISO / IEC 8802-3
Counter
Integer (0-232) whose value is incremented by 1 when certain events
occur.
31007122 8/2008
General Information
MIB Tree
Structure
The following flowchart describes the tree structure of the ESM MIB.
1 iso
3 org
6 dod
1 internet
2 mgmt
4 private
6 snmp V2
1 mib-2
1 enterprises
3 modules
1 system
3833 groupe Schneider
10 framework
2 interfaces
1 Transparent Ready Ethernet
11 mpd
3 at
1 switch
12 target
4 ip
14 saConfiguration
13 notification
5 icmp
15 usm
6 tcp
16 vacm
7 udp
11 snmp
16 rmon
17dot1dBridge
26 snmpDot3MauMGT
Note: Not all devices support all object classes. The value not supported is given
in response to a non-supported object class request. Any attempt to alter a nonsupported object class produces the message bad value.
31007122 8/2008
227
General Information
MIB II
System Group
(1.3.6.1.2.1.1)
The system group is a required group for all systems. It contains system-related
objects. If an agent has no value for a variable, then the response returned includes
a string of length 0.
(1) system
|-- (1) sysDescr
|-- (2) sysObjectID
|-- (3) sysUpTime
|-- (4) sysContact
|-- (5) sysName
|-- (6) sysLocation
|-- (7) sysServices
|-- (8) sysORLastChange
|-- (9) sysORTable
|-- (1) sysOREntry
|-- (1) sysORIndex
|-- (2) sysORID
|-- (3) sysDescr
|-- (4) sysORUpTime
228
31007122 8/2008
General Information
System Group
Objects
The following table describes the member objects of the system group.
Object
OID
Syntax
Access
Description
sysDescr
1.3.6.1.2.1.1.1.0
ASCII String
(Size: 0-255
Read
Is a verbal description of the entry. This value
should contain the full name and version number of
type of system hardware, operating system
software, and network software. The description
must consist only of printable ASCII characters.
sysObjectID
1.3.6.1.2.1.1.2.0
Object identifier
Read
Is the authorization identification of the
manufacturer of the network management system
that is integrated in this device. This value is placed
in the SMI enterprises subtree (1.3.6.1.4.1) and
describes which type of device is being managed.
For example: if the manufacturer Schneider
Electric is assigned the subtree 1.3.6.1.4.1.3833,
then he can assign his switch the identifier
1.3.6.1.4.1.3833.1.1.
sysUpTime
1.3.6.1.2.1.1.3.0
Time ticks
Read
Is the time in 1/100 seconds since the last reset of
the network management unit.
sysContact
1.3.6.1.2.1.1.4.0
ASCII string
(size: 0-255)
Read and Is the clear-text identification of the contact person
write
for this managed node along with the information
about how that person is to be contacted.
sysName
1.3.6.1.2.1.1.5.0
ASCII string
(size: 0-255)
Read and Is a name for this node for identifying it for
write
administration. By convention, this is the fully
qualified name in the domain.
sysLocation
1.3.6.1.2.1.1.6.0
ASCII string
(size: 0-255)
Read and the physical location of this node (e.g., staircase,
write
3rd floor)
sysServices
1.3.6.1.2.1.1.7.0
Integer (0-127)
Read
This value indicates the services offered by the
node. It is an integral value calculated by summing
2(layer - 1) for each ISO layer for which the node
provides service.
For example:
A node primarily provides routing functions (OSI
layer 3):
sysServices = 2(3-1) = 4
A node is a host and offers application and network
services (OSI layers 4 and 7):
sysServices = 2(4-1) + 2(7-1) = 72
31007122 8/2008
229
General Information
Interface Group
(1.3.6.1.2.1.2)
The interface group contains information about the device interfaces.
(2) interfaces
|-- (1) ifNumber
|-- (2) ifTable
|-- (1) ifEntry
|-- (1) ifIndex
|-- (2) ifDescr
|-- (3) ifType
|-- (4) ifMtu
|-- (5) ifSpeed
|-- (6) ifPhysAddress
|-- (7) ifAdminStatus
|-- (8) ifOperStatus
|-- (9) ifLastChange
|-- (10) ifInOctets
|-- (11) ifInUcastPkts
|-- (12) ifInNUcastPkts
|-- (13) ifInDiscards
|-- (14) ifInErrors
|-- (15) ifInUnknownProtos
|-- (16) ifOutOctets
|-- (17) ifOutUcastPkts
|-- (18) ifOutNUcastPkts
|-- (19) ifOutDiscards
|-- (20) ifOutErrors
|-- (21) ifOutQLen
|-- (22) ifSpecific
230
31007122 8/2008
General Information
Address
Translation
Group
(1.3.6.1.2.1.3)
The address translation group is required for all systems. It contains information
about the assignment of addresses.
(3) at
|-- (1) atTable
|-- (1) atEntry
|-- (1) atIfIndex
|-- (2) atPhysAddress
|-- (3) atNetAddress
Internet Protocol
Group
(1.3.6.1.2.1.4)
The internet protocol group is required for all systems. It contains information
affecting IP switching.
(4) ip
|-- (1) ipForwarding
|-- (2) ipDefaultTTL
|-- (3) ipInReceives
|-- (4) ipInHdrErrors
|-- (5) ipInAddrErrors
|-- (6) ipForwDatagrams
|-- (7) ipInUnknownProtos
|-- (8) ipInDiscards
|-- (9) ipInDelivers
|-- (10) ipOutRequests
|-- (11) ipOutDiscards
|-- (12) ipOutNoRoutes
|-- (13) ipReasmTimeout
|-- (14) ipReasmReqds
|-- (15) ipReasmOKs
|-- (16) ipReasmFails
|-- (17) ipFragOKs
|-- (18) ipFragFails
|-- (19) ipFragCreates
|-- (20) ipAddrTable
|-- (1) ipAdEntAddr
|-- (1) ipAdEntAddr
31007122 8/2008
231
General Information
|-- (2) ipAdEntIfIndex
|-- (3) ipAdEntNetMask
|-- (4) ipAdEntBcastAddr
|-- (5) ipAdEntReasmMaxSize
|-- (21) ipRouteTable
| |-- (1) ipRouteEntry
|-- (1) ipRouteDest
|-- (2) ipRouteIfIndex
|-- (3) ipRouteMetric1
|-- (4) ipRouteMetric2
|-- (5) ipRouteMetric3
|-- (6) ipRouteMetric4
|-- (7) ipRouteNextHop
|-- (8) ipRouteType
|-- (9) ipRouteProto
|-- (10) ipRouteAge
|-- (11) ipRouteMask
|-- (12) ipRouteMetric5
|-- (13) ipRouteInfo
|-- (22) ipNetToMediaTable
| |-- (1) ipNetToMediaEntry
|
|-- (1) ipNetToMediaIfIndex
|
|-- (2) ipNetToMediaPhysAddress
|
|-- (3) ipNetToMediaNetAddress
|
|-- (4) ipNetToMediaType
|-- (23) ipRoutingDiscards
232
31007122 8/2008
General Information
ICMP Group
(1.3.6.1.2.1.5)
The internet control message protocol group is obligatory for all systems. It contains
all the information on status handling and control for data exchange in the Internet.
(5) icmp
|-- (1) icmpInMsgs
|-- (2) icmpInMsgs
|-- (3) icmpInDestUnreachs
|-- (4) icmpInTimeExcds
|-- (5) icmpInParmProbs
|-- (6) icmpInSrcQuenchs
|-- (7) icmpInRedirects
|-- (8) icmpInEchos
|-- (9) icmpInEchoReps
|-- (10) icmpInTimestamps
|-- (11) icmpInTimestampReps
|-- (12) icmpInAddrMasks
|-- (13) icmpInAddrMaskReps
|-- (14) icmpOutMsgs
|-- (15) icmpOutErrors
|-- (16) icmpOutDestUnreachs
|-- (17) icmpOutTimeExcds
|-- (18) icmpOutParmProbs
|-- (19) icmpOutSrcQuenchs
|-- (20) icmpOutRedirects
|-- (21) icmpOutEchos
|-- (22) icmpOutEchoReps
|-- (23) icmpOutTimestamps
|-- (24) icmpOutTimestampReps
|-- (25) icmpOutAddrMasks
|-- (26) icmpOutAddrMaskReps
31007122 8/2008
233
General Information
Transfer Control
Protocol Group
(1.3.6.1.2.1.6)
The transfer control protocol group is required for all systems that have implemented
TCP. Instances of objects that describe information about a particular TCP
connection exist only as long as the connection exists.
(6) tcp
|-- (1) tcpRtoAlgorithm
|-- (2) tcpRtoMin
|-- (3) tcpRtoMax
|-- (4) tcpMaxConn
|-- (5) tcpActiveOpens
|-- (6) tcpPassiveOpens
|-- (7) tcpAttemptFails
|-- (8) tcpEstabResets
|-- (9) tcpCurrEstab
|-- (10) tcpInSegs
|-- (11) tcpOutSegs
|-- (12) tcpRetransSegs
|-- (13) tcpConnTable
| |-- (1) tcpConnEntry
|
|-- (1) tcpConnState
|
|-- (2) tcpConnLocalAddress
|
|-- (3) tcpConnLocalPort
|
|-- (4) tcpConnRemAddress
|
|-- (5) tcpConnRemPort
|-- (14) tcpInErrs
|-- (15) tcpOutRsts
234
31007122 8/2008
General Information
User Datagram
Protocol Group
(1.3.6.1.2.1.7)
The user datagram protocol group is required for all systems that have implemented
UDP.
(7) udp
|-- (1) udpInDatagrams
|-- (2) udpNoPorts
|-- (3) udpInErrors
|-- (4) udpOutDatagrams
|-- (5) udpTable
| |-- (1) udpEntry
Simple Network
Management
Protocol Group
(1.3.6.1.2.1.11)
|
|-- (1) udpLocalAddress
|
|-- (2) udpLocalPort
The simple network management protocol group is required for all systems. In
SNMP installations that have been optimized to support either just one agent or one
management station, some of the listed objects will contain the value O.
(11) snmp
|-- (1) snmpInPkts
|-- (2) snmpOutPkts
|-- (3) snmpInBadVersions
|-- (4) snmpInBadCommunityNames
|-- (5) snmpInBadCommunityUses
|-- (6) snmpInASNParseErrs
|-- (7) not used
|-- (8) snmpInTooBigs
|-- (9) snmpInNoSuchNames
|-- (10) snmpInBadValues
|-- (11) snmpInReadOnlys
|-- (12) snmpInGenErrs
|-- (13) snmpInTotalReqVars
|-- (14) snmpInTotalSetVars
|-- (15) snmpInGetRequests
|-- (16) snmpInGetNexts
|-- (17) snmpInSetRequests
|-- (18) snmpInGetResponses
31007122 8/2008
235
General Information
|-- (19) snmpInTraps
|-- (20) snmpOutTooBigs
|-- (21) snmpOutNoSuchNames
|-- (22) snmpOutBadValues
|-- (23) not used
|-- (24) snmpOutGenErrs
|-- (25) snmpOutGetRequests
|-- (26) snmpOutGetNexts
|-- (27) snmpOutSetRequests
|-- (28) snmpOutGetResponses
|-- (29) snmpOutTraps
|-- (30) snmpEnableAuthenTraps
|-- (31) snmpSilentDrops
|-- (32) snmpProxyDrops
RMON Group
(1.3.6.1.2.1.16)
This part of the MIB provides a continuous flow of current and historical network
component data to the network management. The configuration of alarms and
events controls the evaluation of network component counters. The agents inform
the management station of the evaluation result by means of traps depending on the
configuration.
(16 rmon
|--(1) statistics
|--(1) etherStatsTable
|--(1) etherStatsEntry
|--(1) etherStatsIndex
|--(2) etherStatsDataSource
|--(3) etherStatsDropEvents
|--(4) etherStatsOctets
|--(5) etherStatsPkts
|--(6) etherStatsBroadcastPkts
|--(7) etherStatsMulticastPkts
|--(8) etherStatsCRCAlignErrors
|--(9) etherStatsUndersizePkts
|--(10) etherStatsOversizePkts
|--(11) etherStatsFragments
236
31007122 8/2008
General Information
|--(12) etherStatsJabbers
|--(13) etherStatsCollisions
|--(14) etherStatsPkts64Octets
|--(15) etherStatsPkts65to127Octets
|--(16) etherStatsPkts128to255Octets
|--(17) etherStatsPkts256to511Octets
|--(18) etherStatsPkts512to1023Octets
|--(19) etherStatsPkts1024to1518Octets
|--(20) etherStatsOwner
|--(21) etherStatsStatus
|--(2) history
|--(1) historyControlTable
|--(1) historyControlEntry
|--(1) historyControlIndex
|--(2) historyControlDataSource
|--(3) historyControlBucketsRequested
|--(4) historyControlBucketsGranted
|--(5) historyControlInterval
|--(6) historyControlOwner
|--(7) historyControlStatus
|--(2) etherHistoryTable
|--(1) etherHistoryEntry
|--(1) etherHistoryIndex
|--(2) etherHistorySampleIndex
|--(3) etherHistoryIntervalStart
|--(4) etherHistoryDropEvents
|--(5) etherHistoryOctets
|--(6) etherHistoryPkts
|--(7) etherHistoryBroadcastPkts
|--(8) etherHistoryMulticastPkts
|--(9) etherHistoryCRCAlignErrors
|--(10) etherHistoryUndersizePkts
|--(11) etherHistoryOversizePkts
31007122 8/2008
237
General Information
|--(12) etherHistoryFragments
|--(13) etherHistoryJabbers
|--(14) etherHistoryCollisions
|--(15) etherHistoryUtilization
|--(3) alarm
|--(1) alarmTable
|--(1) alarmEntry
|--(1) alarmIndex
|--(2) alarmInterval
|--(3) alarmVariable
|--(4) alarmSampleType
|--(5) alarmValue
|--(6) alarmStartupAlarm
|--(7) alarmRisingThreshold
|--(8) alarmFallingThreshold
|--(9) alarmRisingEventIndex
|--(10) alarmFallingEventIndex
|--(11) alarmOwner
|--(12) alarmStatus
|--(9) event
|--(1) eventTable
|--(1) eventEntry
|--(1) eventIndex
|--(2) eventDescription
|--(3) eventType
|--(4) eventCommunity
|--(5) eventLastTimeSent
|--(6) eventOwner
|--(7) eventStatus
|--(2) logTable
|--(1) logEntry(1)
|--(1) logEventIndex
|--(2) logIndex
238
31007122 8/2008
General Information
|--(3) logTime
|--(4) logDescription
|--(19) probeConfig
|--(15) smonCapabilities
|--(22) switchRMON
|--(1) smonMIBObjects
|--(1) dataSourceCaps
|--(1) dataSourceCapsTable
|--(1) dataSourceCapsEntry
|--(1) dataSourceCapsObject
|--(2) dataSourceRmonCaps
|--(3) dataSourceCopyCaps
|--(4) dataSourceCapsIfIndex
|--(3) portCopyConfig
|--(1) portCopyTable
|--(1) portCopyEntry
|--(1) portCopySource
|--(2) portCopyDest
|--(3) portCopyDestDropEvents
|--(4) portCopyDirection
|--(5) portCopyStatus
dot1dBridge
(1.3.6.1.2.1.17)
This part of the MIB contains bridge-specific objects.
(17) dot1dBridge
|--(1) dot1dBase
|--(1) dot1dBaseBridgeAddress
|--(2) dot1dBaseNumPorts
|--(3) dot1dBaseType
|--(4) dot1dBasePortTable
|--(1) dot1dBasePortEntry
|--(1) dot1dBasePort
|--(2) dot1dBasePortIfIndex
|--(3) dot1dBasePortCircuit
|--(4) dot1dBasePortDelayExceededDiscards
31007122 8/2008
239
General Information
|--(5) dot1dBasePortMtuExceededDiscards
|--(2) dot1dStp
|--(1) dot1dStpProtocolSpecification
|--(2) dot1dStpPriority
|--(3) dot1dStpTimeSinceTopologyChange
|--(4) dot1dStpTopChanges
|--(5) dot1dStpDesignatedRoot
|--(6) dot1dStpRootCost
|--(7) dot1dStpRootPort
|--(8) dot1dStpMaxAge
|--(9) dot1dStpHelloTime
|--(10) dot1dStpHoldTime
|--(11) dot1dStpForwardDelay
|--(12) dot1dStpBridgeMaxAge
|--(13) dot1dStpBridgeHelloTime
|--(14) dot1dStpBridgeForwardDelay
|--(15) dot1dStpPortTable
|--(1) dot1dStpPortEntry
|--(1) dot1dStpPort
|--(2) dot1dStpPortPriority
|--(3) dot1dStpPortState
|--(4) dot1dStpPortEnable
|--(5) dot1dStpPortPathCost
|--(6) dot1dStpPortDesignatedRoot
|--(7) dot1dStpPortDesignatedCost
|--(8) dot1dStpPortDesignatedBridge
|--(9) dot1dStpPortDesignatedPort
|--(10) dot1dStpPortForwardTransitions
|--(11) dot1dStpPortPathCost32
|--(16) dot1dStpVersion
|--(17) dot1dStpTxHoldCount
|--(18) dot1dStpPathCostDefault
|--(19) dot1dStpExtPortTable
240
31007122 8/2008
General Information
|--(1) dot1dStpExtPortEntry
|--(1) dot1dStpPortProtocolMigration
|--(2) dot1dStpPortAdminEdgePort
|--(3) dot1dStpPortOperEdgePort
|--(4) dot1dStpPortAdminPointToPoint
|--(5) dot1dStpPortOperPointToPoint
|--(6) dot1dStpPortAdminPathCost
|--(3) dot1dSr
|--(4) dot1dTp
|--(1) dot1dTpLearnedEntryDiscards
|--(2) dot1dTpAgingTime
|--(3) dot1dTpFdbTable
|--(1) dot1dTpFdbEntry
|--(1) dot1dTpFdbAddress
|--(2) dot1dTpFdbPort
|--(3) dot1dTpFdbStatus
|--(4) dot1dTpPortTable
|--(1) dot1dTpPortEntry
|--(1) dot1dTpPort
|--(2) dot1dTpPortMaxInfo
|--(3) dot1dTpPortInFrames
|--(4) dot1dTpPortOutFrames
|--(5) dot1dTpPortInDiscards
|--(5) dot1dStatic
|--(1) dot1dStaticTable
|--(1) dot1dStaticEntry
|--(1) dot1dStaticAddress
|--(2) dot1dStaticReceivePort
|--(3) dot1dStaticAllowedToGoTo
|--(4) dot1dStaticStatus
|--(6) pBridgeMIB
|--(1) pBridgeMIBObjects
|--(1) dot1dExtBase
31007122 8/2008
241
General Information
|--(1) dot1dDeviceCapabilities
|--(2) dot1dTrafficClassesEnabled
|--(3) dot1dGmrpStatus
|--(4) dot1dPortCapabilitiesTable
|--(1) dot1dPortCapabilitiesEntry
|--(1) dot1dPortCapabilities
|--(2) dot1dPriority
|--(1) dot1dPortPriorityTable
|--(1) dot1dPortPriorityEntry
|--(1) dot1dPortDefaultUserPriority
|--(2) dot1dPortNumTrafficClasses
|--(3) dot1dTrafficClassTable
|--(1) dot1dPortPriorityEntry
|--(1) dot1dTrafficClassPriority
|--(2) dot1dTrafficClass
|--(3) dot1dGarp
|--(1) dot1dPortGarpTable
|--(1) dot1dPortGarpEntry
|--(1) dot1dPortGarpJoinTime
|--(2) dot1dPortGarpLeaveTime
|--(3) dot1dPortGarpLeaveAllTime
|--(4) dot1Gmrp
|--(1) dot1dPortGmrpTable
|--(1) dot1dPortGmrpEntry
|--(1) dot1dPortGmrpStatus
|--(2) dot1dPortGmrpFailedRegistrations
|--(3) dot1dPortGmrpLastPduOrigin
|--(7) qBridgeMIB
|--(1) qBridgeMIBObjects
|--(1) dot1qBase
|--(1) dot1qVlanVersionNumber
|--(2) dot1qMaxVlanId
|--(3) dot1qMaxSupportedVlans
242
31007122 8/2008
General Information
|--(4) dot1qNumVlans
|--(5) dot1qGvrpStatus
|--(2) dot1qTp
|--(1) dot1qFdbTable
|--(1) dot1qFdbEntry
|--(1) dot1qFdbId
|--(2) dot1qFdbDynamicCount
|--(2) dot1qTpFdbTable
|--(1) dot1qTpFdbEntry
|--(1) dot1qTpFdbAddress
|--(2) dot1qTpFdbPort
|--(3) dot1qTpFdbStatus
|--(3) dot1qTpGroupTable
|--(1) dot1qTpGroupEntry
|--(1) dot1qTpGroupAddress
|--(2) dot1qTpGroupEgressPorts
|--(3) dot1qTpGroupLearnt
|--(4) dot1qForwardAllTable
|--(1) dot1qForwardAllEntry
|--(1) dot1qForwardAllPorts
|--(2) dot1qForwardAllStaticPorts
|--(3) dot1qForwardAllForbiddenPorts
|--(5) dot1qForwardUnregisteredTable
|--(1) dot1qForwardUnregisteredEntry
|--(1) dot1qForwardUnregisteredPorts
|--(2) dot1qForwardUnregisteredStaticPorts
|--(3) dot1qForwardUnregisteredForbiddenPorts
|--(3) dot1qStatic
|--(1) dot1qStaticUnicastTable
|--(1) dot1qStaticUnicastEntry
|--(1) dot1qStaticUnicastAddress
|--(2) dot1qStaticUnicastReceivePort
|--(3) dot1qStaticUnicastAllowedToGoTo
31007122 8/2008
243
General Information
|--(4) dot1qStaticUnicastStatus
|--(2) dot1qStaticMulticastTable
|--(1) dot1qStaticMulticastEntry
|--(1) dot1qStaticMulticastAddress
|--(2) dot1qStaticMulticastReceivePort
|--(3) dot1qStaticMulticastStaticEgressPorts
|--(4) dot1qStaticMulticastForbiddenEgressPorts
|--(5) dot1qStaticMulticastStatus
|--(1) dot1qVlan
|--(1) dot1qVlanNumDeletes
|--(3) dot1qVlanStaticTable
|--(1) dot1qVlanStaticEntry
|--(1) dot1qVlanStaticName
|--(2) dot1qVlanStaticEgressPorts
|--(3) dot1qVlanForbiddenEgressPorts
|--(4) dot1qVlanStaticUntaggedPorts
|--(5) dot1qVlanStaticRowStatus
|--(5) dot1qPortVlanTable
|--(1) dot1qPortVlanEntry
|--(1) dot1qPvid
|--(2) dot1qPortAcceptableFrameTypes
|--(3) dot1qPortIngressFiltering
|--(4) dot1qPortGvrpStatus
|--(5) dot1qPortGvrpFailedRegistrations
|--(6) dot1qPortGvrpLastPduOrigin
244
31007122 8/2008
General Information
MAU
Management
Group
(1.3.6.1.2.1.26)
The MAU management group is responsible for setting the autonegotiation
parameters.
(26) snmpDot3MauMgt
|-- (2) dot3IfMauBasicGroup
| |-- (1) ifMauTable
|
|-- (1) ifMauEntry
|
|-- (1) ifMauIfIndex
|
|-- (2) ifMauIndex
|
|-- (3) ifMauType
|
|-- (4) ifMauStatus
|
|-- (5) ifMauMediaAvailable
|
|-- (6) ifMauMediaAvailableStateExits
|
|-- (7) ifMauJabberState
|
|-- (8) ifMauJabberingStateEnters
|
|-- (9) ifMauFalseCarriers
|
|-- (10)ifMauTypeList
|
|-- (11)ifMauDefaultType
|
|-- (12)ifMauAutoNegSupported
|-- (5) dot3IfMauAutoNegGroup
| |-- (1) ifMauAutoNegTable
|
|
31007122 8/2008
|-- (1) ifMauAutoNegEntry
|-- (1) ifMauAutoNegAdminStatus
|
|-- (2) ifMauAutoNegRemoteSignaling
|
|-- (4) ifMauAutoNegConfig
|
|-- (5) ifMauAutoNegCapability
|
|-- (6) ifMauAutoNegCapAdvertised
|
|-- (7) ifMauAutoNegCapReceived
|
|-- (8) ifMauAutoNegRestart
245
General Information
Private MIB
Overview
The private MIB is for configuring the device-specific properties of the ESM. The
groups below are implemented in the ESM from the private MIB saConfiguration
(OID = 1.3.6.1.4.1.3833.1.1.14).
z
z
z
z
z
Device Group
saChassis (OID = 1.3.6.1.4.1.3833.1.1.14.1)
saAgent (OID = 1.3.6.1.4.1.3833.1.1.14.2)
saUserGroup (OID = 1.3.6.1.4.1.3833.1.1.14.3)
saRingRedundancy (OID = 1.3.6.1.4.1.3833.1.1.14.5)
saProducts (OID = 1.3.6.1.4.1.3833.1.1.14.10)
The device group contains information on the status of the ESM hardware.
(14) saConfiguration
|-- (1) saChassis
| |-- (1) saSystemTable
|
|-- (1) saSysProduct
|
|-- (2) saSysVersion
|
|-- (3) saSysGroupCapacity
|
|-- (4) saSysGroupMap
|
|-- (5) saSysMaxPowerSupply
|
|-- (6) saSysMaxFan
|
|-- (7) saSysGroupModuleCapacity
|
|-- (8) saSysModulePortCapacity
|-- (9) saSysGroupTable
|-- (1) saSysGroupEntry
|-- (1) saSysGroupID
|-- (2) saSysGroupType
|-- (3) saSysGroupDescription
|-- (4) saSysGroupHwVersion
|-- (5) saSysGroupSwVersion
|-- (6) saSysGroupModuleMap
|-- (7) saSysGroupAction
|-- (8) saSysGroupActionResult
|-- (11) saInterfaceTable
246
31007122 8/2008
General Information
|-- (1) saIfEntry
|-- (1) saIfaceGroupID
|-- (2) saIfaceID
|-- (3) saIfaceStpEnable
|-- (4) saIfaceLinkType
|-- (5) saIfaceAction
|-- (6) saIfaceNextHopMacAddress
|-- (7) saIfaceFlowControl
|-- (8) saIfacePriorityThreshold
|-- (9) saIfaceName
|-- (10) saIfaceTrunkID
|-- (11) saIfacePrioTOSEnable
|-- (12) saIfBcastLimit
|-- (13) saIfaceUtilization
|-- (14) saIfaceUtilizationControlInterval
|-- (20) saSysChassisName
|-- (21) saSysStpEnable
|-- (22) saSysFlowControl
|-- (23) saSysBOOTPEnable
|-- (24) saSysDHCPEnable
|-- (25) saSysTelnetEnable
|-- (26) saSysHTTPEnable
|-- (27) saSysPlugAndPlay
|-- (29) saBcastLimiterMode
|-- (30) saSystemTime
| |-- (2) saPSTable
|
|-- (1) saPSEntry
|
|-- (1) saPSSysID
|
|-- (2) saPSID
|
|-- (3) saPSState
|-- (5) saCurrentAddressTable
|-- (1) saCurrentAddressEntry
|-- (1) saCurrentAddress
31007122 8/2008
247
General Information
|-- (2) saCurrentAddressReceivePort
|-- (3) saCurrentAddressStaticEgressPorts
|-- (4) saCurrentAddressEgressPorts
|-- (5) saCurrentAddressStatus
| |-- (10) saESMext
|
|-- (1) saESMOperMode
|
|-- (2) saESMConfigError
|
|-- (3) saESMSigRelayState
|
|-- (4) saSigLinkTable
|
|-- (1) saSigLinkEntry
|
|-- (1) saSigLinkID
|
|-- (2) saSigLinkAlarm
|-- (5) saSigTrapReason
|-- (6) saSigReasonIndex
|-- (7) saESMTopologyGroup
|-- (1) saESMPartnerIpAddress
|-- (2) saESMTopologyTable
|-- (1) saESMTopologyEntry
|-- (1) saESMTopologyLinkID
|-- (2) saESMTopologyIpAddress
|-- (9) saESMDisableLearningGroup
|-- (1) saESMDisableLearningStatus
|-- (10) saESMSigRelayGroup
|-- (1) saESMSigRelayMode
|-- (2) saESMSigRelayManualState
|-- (11) saESMVlanGroup
|-- (1) saESMVlanMode
|-- (2) saESMVlanStatus
|-- (12) saESMSelftestGroup
|-- (1) saESMSelftestResult
|-- (2) saESMSelftestMode
|-- (13) saESMPSGroup
|-- (1) saESMPSAlarm
248
31007122 8/2008
General Information
Management
Group
The management group contains parameters for configuring the management
agent.
(14)saConfiguration
|-- (2) saAgent
| |-- (1) saAction
| |-- (2) saActionResult
| |-- (3) saNetwork
|
|-- (1) saNetLocalIPAddr
|
|-- (2) saNetLocalPhysAddr
|
|-- (3) saNetGatewayIPAddr
|
|-- (4) saNetMask
|-- (7) saNetAction
|-- (8) saNetVlanID
|-- (20) saNetEthernetSwitchConfigurationGroup
|-- (1) saNetEthernet Switch ConfigurationStatus
|-- (1) saNetSNTPStatus
|-- (2) saNetSNTPServer
|-- (3) saNetSNTPTime
|-- (4) saNetSNTPLocalOffset
|-- (5) saNetSNTPServer2
|-- (6) saNetSNTPSyncInterval
|-- (7) saNetSNTPAcceptBroadcasts
|-- (8) saNetSNTPAnycastAddr
|-- (9) saNetSNTPAnycastVlan
|-- (10) saNetSNTPAnycastInterval
|-- (11) saNetSNTPOperStatus
|-- (50) saNetSNMPGroup
|-- (1) saNetSNMPv1Status
|-- (2) saNetSNMPv2Status
|-- (3) saNetSNMPv3Status
|-- (4) saNetSNMPAccessStatus
| |-- (4) saFSTable
|
31007122 8/2008
|-- (1) saFSUpdFileName
249
General Information
|
|-- (2) saFSConfFileName
|
|-- (3) saFSLogFileName
|
|-- (4) saFSUserName
|
|-- (5) saFSTPPassword
|
|-- (6) saFSAction
|
|-- (8) saFSActionResult
|-- (9) saFSBootConfiguration
|-- (10) saFSRunningConfiguration
|-- (200) saBackupConfigGroup
|
|-- (1) saBackupConfigAdapterStatus
| |-- (5) saTempTable
|
|-- (1) saTemperature
|
|-- (2) saTempUprLimit
|
|-- (3) saTempLwrLimit
| |-- (7) saAuthGroup
|
|-- (1) saAuthHostTableEntriesMax
|
|-- (2) saAuthCommTableEntriesMax
|
|-- (3) saAuthCommTable
|
|-- (1) saAuthCommEntry
|
|-- (1) saAuthCommIndex
|
|-- (2) saAuthCommName
|
|-- (3) saAuthCommPerm
|
|-- (4) saAuthCommState
|
|
|-- (4) saAuthHostTable
|-- (1) saAuthHostEntry
|
|-- (1) saAuthHostIndex
|
|-- (2) saAuthHostName
|
|-- (3) saAuthHostCommIndex
|
|-- (4) saAuthHostIpAddress
|
|-- (5) saAuthHostIpMask
|
|-- (6) saAuthHostState
| |-- (8) saTrapGroup
|
250
|-- (1) saTrapCommTableEntriesMax
31007122 8/2008
General Information
|
|-- (2) saTrapDestTableEntriesMax
|
|-- (3) saTrapCommTable
|
|-- (1) saTrapCommEntry
|
|-- (1) saTrapCommIndex
|
|-- (2) saTrapCommCommIndex
|
|-- (3) saTrapCommColdStart
|
|-- (4) saTrapCommLinkDown
|
|-- (5) saTrapCommLinkUp
|
|-- (6) saTrapCommAuthentication
|
|-- (7) saTrapCommBridge
|
|-- (8) saTrapCommRMON
|
|-- (9) saTrapCommUsergroup
|
|-- (10)saTrapCommDualHoming
|
|-- (11)saTrapCommChassis
|
|-- (12)saTrapCommState
|
|
|-- (4) saTrapDestTable
|-- (1) saTrapDestEntry
|
|-- (1) saTrapDestIndex
|
|-- (2) saTrapDestName
|
|-- (3) saTrapDestCommIndex
|
|-- (4) saTrapDestIpAddress
|
|-- (5) saTrapDestIpMask
|
|-- (6) saTrapDestState
| |-- (9) saLastAccessGroup
|
|-- (1) saLastIpAddr
|
|-- (2) saLastPort
|
|-- (3) saLastCommunity
| |-- (10) saMulticast
|
|
31007122 8/2008
|-- (1) saIGMPGroup
|-- (2) saIGMPSnoop
|
|-- (1) saIGMPSnoopStatus
|
|-- (2) saIGMPSnoopUnknownMode
|
|-- (3) saIGMPSnoopAgingTime
251
General Information
|
|-- (10) saIGMPSnoopQueryTable
|
|-- (1) saIGMPSnoopQueryEntry
|
|
|-- (2) saIGMPSnoopQueryPorts
|
|-- (11) saIGMPSnoopFilterTable
|
|-- (1) saIGMPSnoopFilterEntry
|
|
|-- (1) saIGMPSnoopFilterVlanIndex
|-- (2) saIGMPSnoopFilterAddress
|
|-- (3) saIGMPSnoopFilterLearntPorts
|
|-- (12) saIGMPSnoopForwardAllTable
|
|-- (1) saIGMPSnoopForwardAllEntry
|
|-- (1) saIGMPSnoopForwardAllVlanIndex
|
|-- (2) saIGMPSnoopForwardAllStaticPorts
|
|-- (13) saIGMPSnoopQueryStaticTable
|
|-- (1) saIGMPSnoopQueryStaticEntry
|
|-- (1) saIGMPSnoopQueryStaticVlanIndex
|
|-- (2) saIGMPSnoopQueryStaticPorts
|
|-- (100) saIGMPQuerierGroup
|
|-- (1) saIGMPQuerierStatus
|
|-- (2) saIGMPQuerierMode
|
|-- (3) saIGMPQuerierTransmitInterval
|
|-- (4) saIGMPQuerierMaxResponseTime
|
|-- (5) saIGMPQuerierProtocolVersion
|
|-- (11) saRelayGroup
|
|-- (1) saRelayOption82Status
|
|-- (2) saRelayOptionRemoteIDType
|
|-- (3) saRelayOptionRemoteID
|
|-- (10) saRelayServerGroup
|
|-- (1) saRelayDHCPServerIpAddr
|
|-- (2) saRelayDHCPServer2IpAddr
|
|-- (3) saRelayDHCPServer3IpAddr
|
|
252
|-- (1) saIGMPSnoopQueryVlanIndex
|-- (4) saRelayDHCPServer4IpAddr
|-- (11) saRelayInterfaceTable
31007122 8/2008
General Information
|
User Groups
Group
|-- (1) saRelayIfEntry
|
|-- (1) saRelayIfaceGroupID
|
|-- (2) saRelayIfaceID
|
|-- (3) saRelayIfaceOption82Enable
|
|-- (4) saRelayIfaceBCRequestFwd
|
|-- (20) saRelayBCPktInCnt
|
|-- (21) saRelayMCPktInCnt
|
|-- (22) saRelayPktServerRelayCnt
|
|-- (23) saRelayPktClientRelayCnt
|
|-- (24) saRelayErrCnt
|
|-- (25) saRelayLastDuplicateIP
The user groups group contains parameters for configuring the user group
functions.
(14) saConfiguration
|-- (3) saUserGroup
|-- (4) saPortSecurityTable
|-- (1) saPortSecurityEntry
|-- (1) saPortSecSlotID
|-- (2) saPortSecPortID
|-- (3) saPortSecPermission
|-- (4) saPortSecAllowedUserID
|-- (5) saPortSecAllowedGroupIDs
|-- (6) saPortSecConnectedUserID
|-- (7) saPortSecAction
|-- (8) saPortSecAutoReconfigure
Redundancy
Group
The redundancy group contains parameters for configuring the redundancy
functions.
(14) saConfiguration
|-- (5) saRingRedudancy
|-- (1) saRingRedTable
|-- (1) saRingRedEntry
|-- (1) saRingRedPrimGroupID
|-- (2) saRingRedPrimIfIndex
31007122 8/2008
253
General Information
|-- (3) saRingRedPrimIfOpState
|-- (4) saRingRedRedGroupID
|-- (5) saRingRedRedIfIndex
|-- (6) saRingRedRedIfOpState
|-- (7) saRingRedOperState
|-- (8) saRingRedMode
|-- (9) saRingRedConfigOperState
|-- (2) saRingCouplingTable
|-- (1) saRingCouplingEntry
|-- (1) saRingCplInterconnGroupID
|-- (2) saRingCplInterconnIfIndex
|-- (3) saRingCplInterconnIfOpState
|-- (4) saRingCplControlGroupID
|-- (5) saRingCplControllfIndex
|-- (6) saRingCplControlIfOpState
|-- (7) saRingCplControlMode
|-- (8) saRingCplPartnerIpAddr
|-- (9) saRingCplPartnerInterconnGroupID
|-- (10) saRingCplPartnerInterconnIfIndex
|-- (11) saRingCplPartnerInterconnIfOpState
|-- (12) saRingCplOperState
|-- (13) saRingCplMode
|-- (14) saRingCplRowStatus
|-- (15) saRingCplConfigOperState
|-- (16) saRingCplCouplingLinks
|-- (10) saProducts
|-- (2) ESMx7100
254
31007122 8/2008
General Information
SNMP V2 Module MIB
Overview
The SNMP V2 Module MIB is based on the SNMP MIB (Simple Network
Management Protocol Group).
Framework
Group
The framework group contains parameters for describing SNMP Management
Frameworks.
(3) snmpModules
|-- (10) snmpFrameworkMIB
| |-- (2) snmpFrameworkMIBObjects
|
MPD Group
|-- (1) snmpEngine
|
|-- (1) snmpEngineID
|
|-- (2) snmpEngineBoots
|
|-- (3) snmpEngineTime
|
|-- (4) snmpEngineMaxMessageSize
The MPD group (Message Processing and Dispatching) contains parameters for
dispatching SNMP messages which are potentially in different SNMP versions. It
defines the procedures for dispatching potentially multiple versions of SNMP
messages.
|-- (3) snmpModules
| |-- (11) snmpMPDMIB
|
31007122 8/2008
|-- (2) snmpMPDMIBObjects
|
|-- (1) snmpUnknownSecurityModels
|
|-- (2) snmpInvalidMsgs
|
|-- (3) snmpUnknownPDUHandlers
255
General Information
Target Group
The Target group contains parameters for specifying targets of SNMP management
operations.
|-- (3) snmpModules
| |-- (12) snmpTargetMIB
|
|
|
|
|-- (1) snmpTargetSpinLock
|-- (2) snmpTargetAddrTable
|-- (1) snmpTargetAddrEntry
|
|-- (1) snmpTargetAddrName
|
|-- (2) snmpTargetAddrTDomain
|
|-- (3) snmpTargetAddrTAddress
|
|-- (4) snmpTargetAddrTimeout
|
|-- (5) snmpTargetAddrRetryCount
|
|-- (6) snmpTargetAddrTagList
|
|-- (7) snmpTargetAddrParams
|
|-- (8) snmpTargetAddrStorageType
|
|-- (9) snmpTargetAddrRowStatus
|
|
256
|-- (2) snmpTargetObjects
|-- (3) snmpTargetParamsTable
|-- (1) snmpTargetParamsEntry
|
|-- (1) snmpTargetParamsName
|
|-- (2) snmpTargetParamsMPModel
|
|-- (3) snmpTargetParamsSecurityModel
|
|-- (4) snmpTargetParamsSecurityName
|
|-- (5) snmpTargetParamsSecurityLevel
|
|-- (6) snmpTargetParamsStorageType
|
|-- (7) snmpTargetParamsRowStatus
|
|-- (4) snmpUnavailableContexts
|
|-- (5) snmpUnknownContexts
31007122 8/2008
General Information
Notification
Group
The Notification group contains parameters for specifying targets for notification
filtering.
(3) snmpModules
|-- (13) snmpNotificationMIB
| |-- (1) snmpNotifyObjects
|
|
|-- (1) snmpNotifyEntry
|
|-- (1) snmpNotifyName
|
|-- (2) snmpNotifyTag
|
|-- (3) snmpNotifyType
|
|-- (4) snmpNotifyStorageType
|
|-- (5) snmpNotifyRowStatus
|
|-- (2) snmpNotifyFilterProfileTable
|
|-- (1) snmpNotifyFilterProfileEntry
|
|-- (1) snmpNotifyFilterProfileName
|
|-- (2) snmpNotifyFilterProfileStorType
|
|-- (3) snmpNotifyFilterProfileRowStatus
|
31007122 8/2008
|-- (1) snmpNotifyTable
|-- (3) snmpNotifyFilterTable
|
|-- (1) snmpNotifyFilterEntry
|
|-- (1) snmpNotifyFilterSubtree
|
|-- (2) snmpNotifyFilterMask
|
|-- (3) snmpNotifyFilterType
|
|-- (4) snmpNotifyFilterStorageType
|
|-- (5) snmpNotifyFilterRowStatus
257
General Information
USM Group
The USM group (User-Based Security Model) defines the elements of procedure for
providing SNMP message level security.
(3) snmpModules
| |-- (15) snmpUsmMIB
| |-- (1) usmMIBObjects
|
|
|-- (1) usmStatsUnsupportedSecLevels
|
|-- (2) usmStatsNotInTimeWindows
|
|-- (3) usmStatsUnknownUserNames
|
|-- (4) usmStatsUnknownEngineIDs
|
|-- (5) usmStatsWrongDigests
|
|-- (6) usmStatsDecryptionErrors
|
|
|
|
258
|-- (1) usmStats
|-- (2) usmUser
|-- (1) usmUserSpinLock
|-- (2) usmUserTable
|-- (1) usmUserEntry
|
|-- (1) usmUserEngineID
|
|-- (2) usmUserName
|
|-- (3) usmUserSecurityName
|
|-- (4) usmUserCloneFrom
|
|-- (5) usmUserAuthProtocol
|
|-- (6) usmUserAuthKeyChange
|
|-- (7) usmUserOwnAuthKeyChange
|
|-- (8) usmUserPrivProtocol
|
|-- (9) usmUserPrivKeyChange
|
|-- (10) usmUserOwnPrivKeyChange
|
|-- (11) usmUserPublic
|
|-- (12) usmUserStorageType
|
|-- (13) usmUserStatus
31007122 8/2008
General Information
VACM Group
The VACM group (View-based Access Control Model) defines the elements of
procedure for controlling access to management information.
(3) snmpModules
| |-- (16) snmpVacmMIB
| |-- (1) vacmMIBObjects
|
|
|
|
|
|-- (1) vacmContextEntry
|-- (1) vacmContextName
|-- (2) vacmSecurityToGroupTable
|-- (1) vacmSecurityToGroupEntry
|
|-- (1) vacmSecurityModel
|
|-- (2) vacmSecurityName
|
|-- (3) vacmGroupName
|
|-- (4) vacmSecurityToGroupStorageType
|
|
|
|-- (5) vacmSecurityToGroupStatus
|-- (4) vacmAccessTable
|-- (1) vacmAccessEntry
|
|-- (1) vacmAccessContextPrefix
|
|-- (2) vacmAccessSecurityModel
|
|-- (3) vacmAccessSecurityLevel
|
|-- (4) vacmAccessContextMatch
|
|-- (5) vacmAccessReadViewName
|
|-- (6) vacmAccessWriteViewName
|
|-- (7) vacmAccessNotifyViewName
|
|-- (8) vacmAccessStorageType
|
|-- (9) vacmAccessStatus
|
|-- (5) vacmMIBViews
|
|-- (1) vacmViewSpinLock
|
|-- (2) vacmViewTreeFamilyTable
|
31007122 8/2008
|-- (1) vacmContextTable
|-- (1) vacmViewTreeFamilyEntry
|
|-- (1) vacmViewTreeFamilyViewName
|
|-- (2) vacmViewTreeFamilySubtree
|
|-- (3) vacmViewTreeFamilyMask
259
General Information
260
|
|-- (4) vacmViewTreeFamilyType
|
|-- (5) vacmViewTreeFamilyStorageType
|
|-- (6) vacmViewTreeFamilyStatus
31007122 8/2008
General Information
RFCs
List of RFCs
The following table contains a list of RFCs:
RFC 768 (UDP)
RFC 783 (TFTP)
RFC 791 (IP)
RFC 792 (ICMP)
RFC 793 (TCP)
RFC 826 (ARP)
RFC 854 (Telnet)
RFC 855 (Telnet Option)
RFC 951 (BOOTP)
RFC 1112 (IGMPv1)
RFC 1155 (SMIv1)
RFC 1157 (SNMPv1)
RFC 1212 (Concise MIB Definitions)
RFC 1213 (MIB2)
RFC 1493 (Dot1d)
RFC 1542 (BOOTP Extensions)
RFC 1643 (Ethernet-Like MIB)
RFC 1757 (RMON)
RFC 1769 (SNTP)
RFC 1867 (HTML/2.0 Forms W/File Upload Extensions)
RFC 1901 (Community-Based SNMP v2)
RFC 1905 (Protocol Operations for SNMP v2)
RFC 1906 (Transport Mappings for SNMP v2)
RFC 1907 (MIB2)
RFC 1908 (Coexistence Between SNMP v1 and SNMP v2)
RFC 1945 (HTTP/1.0)
RFC 2068 (HTTP/1.1)
RFC 2131 (DHCP)
RFC 2132 (DHCP Options)
RFC 2233 (The Interface Group MIB Using SMI v2)
RFC 2236 (IGMPv2)
31007122 8/2008
261
General Information
RFC 2239 (MAU MIB)
RFC 2246 (The TLs Protocol, Version 1.0)
RFC 2271 (SNMP Framework MIB)
RFC 2346 (AES Ciphersuites for Transport Layer Security)
RFC 2570 (Introduction to SNMP v3)
RFC 2571 (SNMP Framework)
RFC 2572 (SNMP MPD)
RFC 2573 (SNMP Applications)
RFC 2574 (SNMP USM)
RFC 2575 (SNMP VACM)
RFC 2576 (Coexistence Between SNMP v1, v2 and v3)
RFC 2578 (SMI v2)
RFC 2579 (Textual Conventions for SMI v2)
RFC 2580 (Conformance Statements for SMI v2)
RFC 2613 (SMON)
RFC 2618 (RADIUS Authentication Client MIB)
RFC 2620 (RADIUS Accounting MIB)
RFC 2674 (Dot1p/Q)
RFC 2818 (HTTP over TLs)
RFC 2851 (Internet Addresses MIB)
RFC 2865 (RADIUS Client)
RFC 2866 (RADIUS Accounting)
RFC 2868 (RADIUS Attributes for Tunnel Protocol Support)
RFC 2869 (RADIUS Extensions)
RFC 2869 (RADIUS Support for EAP)
RFC 2933 (IGMP MIB)
262
31007122 8/2008
General Information
IEEE Standards
List of IEEE
Standards
31007122 8/2008
The following table lists the IEEE standards applying to the ESM.
Standard
Explanation
IEEE 802.1 D
Switching, GARP, GMRP, Spanning Tree
(supported via 802.1S implementation
IEEE 802.1 D-1998
Media Access Control (MAC) bridges
(includes IEEE 802.1p Priority Dynamic and
Multicast Filtering, GARP, GMRP)
IEEE 802.1 Q-1998
Virtual Bridged Local Area Networks
(VLAN Tagging, port-based VLANs, GVRP)
IEEE 802.1 S
Multiple Spanning Tree
IEEE 802.1 v
Protocol-Based VLANs
IEEE 802.1 w.2001
Rapid Reconfiguration, supported via 802.1S
implementation
IEEE 802.1 X
Port Authentication
IEEE 802.3 - 2002
Ethernet
IEEE 802.3 ac
VLAN Tagging
IEEE 802.3 ad
Link Aggregation with static LAG and LACP
Support
IEEE 802.1 X
Port Authentication
IEEE 802.3 x
Flow Control
263
General Information
Dimension Drawings
4 and 8 Port
Versions
mm
inch
131
5.16
3,6
0.14
46
1.8
30,48
111
13,73
1.2
4.37
0.54
74
2.91
30,48
264
131
5.16
3,6
0.14
1.2
111
13,73
4.37
0.54
31007122 8/2008
General Information
16 and 24 Port
Versions
mm
inch
110
31007122 8/2008
130
5.12
3,6
0.14
4.33
30,48
110,3
13,73
1.20
4.34
0.54
265
General Information
The Two-Pin DIP Switch Settings
The Two-Pin DIP
Switch
The settings of the two-pin DIP switch, located on the front of the TCSESM switch,
determines which of the following modes the switch is in:
z
z
z
z
HIPER-Ring Redundancy Mode
HIPER-Ring Redundancy Manager Mode
Standby Mode
Software Mode
The DIP switch setting combinations are described below
The figure shows the DIP switch with both switches in the ON position.
RM
Stand by
DIP Switch
Settings
DIP Switches
RM
ON
The table shows the various DIP switch settings you can make and what modes
each pair of settings represent.
ESM Operation Mode
Stand-By
Default ESM Firmware Settings
HIPERRing
Redundancy Ring
Manager
Ports
Ring
Coupling
Coupling
Port
OFF
OFF
HIPER-Ring Redundancy Mode
ON
OFF
1&2
ON
4
ON
OFF
HIPER-Ring Redundancy
Manager Mode
ON
ON
1&2
ON
4
OFF
ON
Standby Mode (HIPER-Ring
Coupling, or Network Coupling)
ON
ON
1&2
ON
4
ON
ON
Software Mode-Use Web or CLI to OFF
configure MRP or RSTP
Software Mode-Use Web or CLI to
configure MRP Coupling or
Network coupling
266
OFF
31007122 8/2008
General Information
General Technical Software Data
ESM
VLAN
31007122 8/2008
The following table shows the technical data of the ESM.
Switch
Data
Latency
- 1000 MBit/s
max. 3.5 μs
- 100 MBit/s
max. 4.5 μs
- 100 MBit/s
max. 19 μs
MAC address table
up to 8000 entries
Static Address Filter
up to 100 entries
(in RM (redundancy manager) mode: 0
unicast entries
The following table shows the VLAN-related technical data of the ESM.
VLAN
Data
VLAN ID
1 to 4062
Number of VLANs
max. 256 simultaneously per switch
Number of VLANs
max. 256 simultaneously per port
Number of VLANs with GMRP (VLAN 1)
max. 256 simultaneously per switch
Number of VLANs with GMRP (VLAN 1)
max. 256 simultaneously per port
267
General Information
Switches and Accessories
Scope of
Delivery
The delivery comprises:
z
z
z
z
selected switch version
terminal block for supply voltage and signal contact
description and manuals
CD ROM
Order Numbers
Part Number
4 Port Version
8 Port Version
Description
TCSESM043F23F0
4 10/100 TX Managed
TCSESM043F1CU0
3 10/100 TX 1 100 FX-MM Managed
TCSESM043F2CU0
2 10/100 TX 2 100 FX-MM Managed
TCSESM043F1CS0
3 10/100 TX 1 100 FX-SM Managed
TCSESM043F2CS0
2 10/100 TX 2 100 FX-SM Managed
TCSESM083F23F0
8 10/100 TX Managed
TCSESM083F1CU0
7 10/100 TX 1 100 FX-MM Managed
TCSESM083F2CU0
6 10/100 TX 2 100 FX-MM Managed
TCSESM083F1CS0
7 10/100 TX 1 100 FX-SM Managed
TCSESM083F2CS0
6 10/100 TX 2 100 FX-SM Managed
TCSESM083F2CX0
6 10/100 TX 1 100 FX-MM 1 100 FX-SM Managed
16 Port Version
TCSESM163F23F0
16 10/100 TX Managed
TCSESM163F2CU0
14 10/100 TX 2 100 FX-MM Managed
24 Port Version
TCSESM243F2CU0
22 10/100 TX 2 100 FX-MM Managed
Gigabit - 10 Port Version TCSESM103F23G0
TCSESM103F2LG0
Fiber Media Modules
Accessories
268
8 10/100 TX 2 10/100/1000 TX Managed
8 10/100 TX 2 1000 SFP (fiber) Managed
Note: These products ship with open sockets (SFP) on the
fiber ports, so in order to use these ports, you must order 1,
or 2, media modules shown below.
TCSEAAF1LFU00
SFP-SX/LC fiber module for Gigabit
TCSEAAF1LFS00
SFP-LX/LC fiber module for Gigabit
TCSEAAF1LFH00
SFP-LH/LC fiber module for Gigabit
TCSEAM0100
Memory Backup Adapter
31007122 8/2008
General Information
Copyright for Integrated Software
GNU Lesser
General Public
License
Version 2.1, February 1999
Copyright (C) 1991, 1999 Free Software Foundation, Inc.
59 Temple Place, Suite 330, Boston, MA 02111-1307 USA
Everyone is permitted to copy and distribute verbatim copies of this license
document, but changing it is not allowed.
[This is the first released version of the Lesser GPL. It also counts as the successor
of the GNU Library Public License, version 2, hence the version number 2.1.]
Preamble
The licenses for most software are designed to take away your freedom to share and
change it. By contrast, the GNU General Public Licenses are intended to guarantee
your freedom to share and change free software--to make sure the software is free
for all its users.
This license, the Lesser General Public License, applies to some specially
designated software packages--typically libraries--of the Free Software Foundation
and other authors who decide to use it. You can use it too, but we suggest you first
think carefully about whether this license or the ordinary General Public License is
the better strategy to use in any particular case, based on the explanations below.
When we speak of free software, we are referring to freedom of use, not price. Our
General Public Licenses are designed to make sure that you have the freedom to
distribute copies of free software (and charge for this service if you wish); that you
receive source code or can get it if you want it; that you can change the software and
use pieces of it in new free programs; and that you are informed that you can do
these things.
To protect your rights, we need to make restrictions that forbid distributors to deny
you these rights or to ask you to surrender these rights. These restrictions translate
to certain responsibilities for you if you distribute copies of the library or if you modify
it.
For example, if you distribute copies of the library, whether gratis or for a fee, you
must give the recipients all the rights that we gave you. You must make sure that
they, too, receive or can get the source code. If you link other code with the library,
you must provide complete object files to the recipients, so that they can re-link them
with the library after making changes to the library and recompiling it. And you must
show them these terms so they know their rights.
We protect your rights with a two-step method: (1) we copyright the library, and (2)
we offer you this license, which gives you legal permission to copy, distribute and/or
modify the library.
31007122 8/2008
269
General Information
To protect each distributor, we want to make it very clear that there is no warranty
for the free library. Also, if the library is modified by someone else and passed on,
the recipients should know that what they have is not the original version, so that the
original author's reputation will not be affected by problems that might be introduced
by others.
Finally, software patents pose a constant threat to the existence of any free
program. We wish to make sure that a company cannot effectively restrict the users
of a free program by obtaining a restrictive license from a patent holder. Therefore,
we insist that any patent license obtained for a version of the library must be
consistent with the full freedom of use specified in this license.
Most GNU software, including some libraries, is covered by the ordinary GNU
General Public License. This license, the GNU Lesser General Public License,
applies to certain designated libraries, and is quite different from the ordinary
General Public License. We use this license for certain libraries in order to permit
linking those libraries into non-free programs.
When a program is linked with a library, whether statically or using a shared library,
the combination of the two is legally speaking a combined work, a derivative of the
original library. The ordinary General Public License therefore permits such linking
only if the entire combination fits its criteria of freedom. The Lesser General Public
License permits more lax criteria for linking other code with the library.
We call this license the Lesser General Public License because it does Less to
protect the user's freedom than the ordinary General Public License. It also provides
other free software developers Less of an advantage over competing non-free
programs. These disadvantages are the reason we use the ordinary General Public
License for many libraries. However, the Lesser license provides advantages in
certain special circumstances.
For example, on rare occasions, there may be a special need to encourage the
widest possible use of a certain library, so that it becomes a de facto standard. To
achieve this, non-free programs must be allowed to use the library. A more frequent
case is that a free library does the same job as widely used non-free libraries. In this
case, there is little to gain by limiting the free library to free software only, so we use
the Lesser General Public License.
In other cases, permission to use a particular library in non-free programs enables
a greater number of people to use a large body of free software. For example,
permission to use the GNU C Library in non-free programs enables many more
people to use the whole GNU operating system, as well as its variant, the GNU/
Linux operating system.
Although the Lesser General Public License is Less protective of the users' freedom,
it does ensure that the user of a program that is linked with the Library has the
freedom and the wherewithal to run that program using a modified version of the
Library.
270
31007122 8/2008
General Information
The precise terms and conditions for copying, distribution and modification follow.
Pay close attention to the difference between a work based on the library and a
work that uses the library. The former contains code derived from the library,
whereas the latter must be combined with the library in order to run.
Terms and
Conditions
Terms and conditions for copying, distribution, and modification are listed in this
topical discussion.
0—This License Agreement applies to any software library or other program which
contains a notice placed by the copyright holder or other authorized party saying it
may be distributed under the terms of this Lesser General Public License (also
called this License). Each licensee is addressed as you.
A library means a collection of software functions and/or data prepared so as to be
conveniently linked with application programs (which use some of those functions
and data) to form executables.
The library below refers to any such software library or work that has been
distributed under these terms. A work based on the Library means either the
Library or any derivative work under copyright law: that is to say, a work containing
the Library or a portion of it, either verbatim or with modifications and/or translated
straightforwardly into another language. (Hereinafter, translation is included without
limitation in the term modification.)
Source code for a work means the preferred form of the work for making
modifications to it. For a library, complete source code means all the source code
for all modules it contains, plus any associated interface definition files, plus the
scripts used to control compilation and installation of the library.
Activities other than copying, distribution and modification are not covered by this
License; they are outside its scope. The act of running a program using the Library
is not restricted, and output from such a program is covered only if its contents
constitute a work based on the Library (independent of the use of the Library in a
tool for writing it). Whether that is true depends on what the Library does and what
the program that uses the Library does.
1—You may copy and distribute verbatim copies of the Library's complete source
code as you receive it, in any medium, provided that you conspicuously and
appropriately publish on each copy an appropriate copyright notice and disclaimer
of warranty; keep intact all the notices that refer to this License and to the absence
of any warranty; and distribute a copy of this License along with the Library.
You may charge a fee for the physical act of transferring a copy, and you may at your
option offer warranty protection in exchange for a fee.
2—You may modify your copy or copies of the Library or any portion of it, thus
forming a work based on the Library, and copy and distribute such modifications or
work under the terms of Section 1 above, provided that you also meet all of these
conditions:
(a) The modified work must itself be a software library.
31007122 8/2008
271
General Information
(b) You must cause the files modified to carry prominent notices stating that you
changed the files and the date of any change.
(c) You must cause the whole of the work to be licensed at no charge to all third
parties under the terms of this License.
(d) If a facility in the modified Library refers to a function or a table of data to be
supplied by an application program that uses the facility, other than as an argument
passed when the facility is invoked, then you must make a good faith effort to ensure
that, in the event an application does not supply such function or table, the facility
still operates, and performs whatever part of its purpose remains meaningful.
(For example, a function in a library to compute square roots has a purpose that is
entirely well-defined independent of the application. Therefore, Subsection 2d
requires that any application-supplied function or table used by this function must be
optional: if the application does not supply it, the square root function must still
compute square roots.)
These requirements apply to the modified work as a whole. If identifiable sections of
that work are not derived from the Library, and can be reasonably considered
independent and separate works in themselves, then this License, and its terms, do
not apply to those sections when you distribute them as separate works. But when
you distribute the same sections as part of a whole which is a work based on the
Library, the distribution of the whole must be on the terms of this License, whose
permissions for other licensees extend to the entire whole, and thus to each and
every part regardless of who wrote it.
Thus, it is not the intent of this section to claim rights or contest your rights to work
written entirely by you; rather, the intent is to exercise the right to control the
distribution of derivative or collective works based on the Library.
In addition, mere aggregation of another work not based on the Library with the
Library (or with a work based on the Library) on a volume of a storage or distribution
medium does not bring the other work under the scope of this License.
3—You may opt to apply the terms of the ordinary GNU General Public License
instead of this License to a given copy of the Library. To do this, you must alter all
the notices that refer to this License, so that they refer to the ordinary GNU General
Public License, version 2, instead of to this License. (If a newer version than version
2 of the ordinary GNU General Public License has appeared, then you can specify
that version instead if you wish.) Do not make any other change in these notices.
Once this change is made in a given copy, it is irreversible for that copy, so the
ordinary GNU General Public License applies to all subsequent copies and
derivative works made from that copy. This option is useful when you wish to copy
part of the code of the Library into a program that is not a library.
272
31007122 8/2008
General Information
4—You may copy and distribute the Library (or a portion or derivative of it, under
Section 2) in object code or executable form under the terms of Sections 1 and 2
above provided that you accompany it with the complete corresponding machinereadable source code, which must be distributed under the terms of Sections 1
and 2 above on a medium customarily used for software interchange.
If distribution of object code is made by offering access to copy from a designated
place, then offering equivalent access to copy the source code from the same place
satisfies the requirement to distribute the source code, even though third parties are
not compelled to copy the source along with the object code.
5—A program that contains no derivative of any portion of the Library, but is
designed to work with the Library by being compiled or linked with it, is called a work
that uses the LIbrary. Such a work, in isolation, is not a derivative work of the
Library, and therefore falls outside the scope of this License.
However, linking a work that uses the Library with the Library creates an
executable that is a derivative of the Library (because it contains portions of the
Library), rather than a work that uses the library. The executable is therefore
covered by this License. Section 6 states terms for distribution of such executables.
When a work that uses the library uses material from a header file that is part of
the Library, the object code for the work may be a derivative work of the Library even
though the source code is not. Whether this is true is especially significant if the work
can be linked without the Library, or if the work is itself a library. The threshold for
this to be true is not precisely defined by law.
If such an object file uses only numerical parameters, data structure layouts and
accessors, and small macros and small inline functions (ten lines or less in length),
then the use of the object file is unrestricted, regardless of whether it is legally a
derivative work. (Executables containing this object code plus portions of the Library
will still fall under Section 6.)
Otherwise, if the work is a derivative of the Library, you may distribute the object
code for the work under the terms of Section 6. Any executables containing that
work also fall under Section 6, whether or not they are linked directly with the Library
itself.
6—As an exception to the Sections above, you may also combine or link a work that
uses the Library with the Library to produce a work containing portions of the
Library, and distribute that work under terms of your choice, provided that the terms
permit modification of the work for the customer's own use and reverse engineering
for debugging such modifications.
You must give prominent notice with each copy of the work that the Library is used
in it and that the Library and its use are covered by this License. You must supply a
copy of this License. If the work during execution displays copyright notices, you
must include the copyright notice for the Library among them, as well as a reference
directing the user to the copy of this License. Also, you must do one of these things:
31007122 8/2008
273
General Information
(a) Accompany the work with the complete corresponding machine-readable source
code for the Library including whatever changes were used in the work (which must
be distributed under Sections 1 and 2 above); and, if the work is an executable
linked with the Library, with the complete machine-readable work that uses the
Library as object code and/or source code, so that the user can modify the Library
and then re-link to produce a modified executable containing the modified Library.
(It is understood that the user who changes the contents of definitions files in the
Library will not necessarily be able to recompile the application to use the modified
definitions.).
(b) Use a suitable shared library mechanism for linking with the Library. A suitable
mechanism is one that (1) uses at run time a copy of the library already present on
the user's computer system, rather than copying library functions into the
executable, and (2) will operate properly with a modified version of the library, if the
user installs one, as long as the modified version is interface-compatible with the
version that the work was made with.
(c) Accompany the work with a written offer, valid for at least three years, to give the
same user the materials specified in Subsection 6a, above, for a charge no more
than the cost of performing this distribution.
(d) If distribution of the work is made by offering access to copy from a designated
place, offer equivalent access to copy the above specified materials from the same
place.
(e) Verify that the user has already received a copy of these materials or that you
have already sent this user a copy.
For an executable, the required form of the work that uses the Library must
include any data and utility programs needed for reproducing the executable from it.
However, as a special exception, the materials to be distributed need not include
anything that is normally distributed (in either source or binary form) with the major
components (compiler, kernel, and so on) of the operating system on which the
executable runs, unless that component itself accompanies the executable.
It may happen that this requirement contradicts the license restrictions of other
proprietary libraries that do not normally accompany the operating system. Such a
contradiction means you cannot use both them and the Library together in an
executable that you distribute.
7—You may place library facilities that are a work based on the Library side-by-side
in a single library together with other library facilities not covered by this License, and
distribute such a combined library, provided that the separate distribution of the work
based on the Library and of the other library facilities is otherwise permitted, and
provided that you do these two things:
(a) Accompany the combined library with a copy of the same work based on the
Library, uncombined with any other library facilities. This must be distributed under
the terms of the sections above.
274
31007122 8/2008
General Information
(b) Give prominent notice with the combined library of the fact that part of it is a work
based on the Library, and explaining where to find the accompanying uncombined
form of the same work.
8—You may not copy, modify, sublicense, link with, or distribute the Library except
as expressly provided under this License. Any attempt otherwise to copy, modify,
sublicense, link with, or distribute the Library is void, and will automatically terminate
your rights under this License. However, parties who have received copies, or rights,
from you under this License will not have their licenses terminated so long as such
parties remain in full compliance.
9—You are not required to accept this License, since you have not signed it.
However, nothing else grants you permission to modify or distribute the Library or
its derivative works. These actions are prohibited by law if you do not accept this
License. Therefore, by modifying or distributing the Library (or any work based on
the Library), you indicate your acceptance of this License to do so, and all its terms
and conditions for copying, distributing or modifying the Library or works based on it.
10—Each time you redistribute the Library (or any work based on the Library), the
recipient automatically receives a license from the original licensor to copy,
distribute, link with or modify the Library subject to these terms and conditions. You
may not impose any further restrictions on the recipients' exercise of the rights
granted herein. You are not responsible for enforcing compliance by third parties
with this License.
11—If, as a consequence of a court judgment or allegation of patent infringement or
for any other reason (not limited to patent issues), conditions are imposed on you
(whether by court order, agreement or otherwise) that contradict the conditions of
this License, they do not excuse you from the conditions of this License. If you
cannot distribute so as to satisfy simultaneously your obligations under this License
and any other pertinent obligations, then as a consequence you may not distribute
the Library at all. For example, if a patent license would not permit royalty-free
redistribution of the Library by all those who receive copies directly or indirectly
through you, then the only way you could satisfy both it and this License would be
to refrain entirely from distribution of the Library.
If any portion of this section is held invalid or unenforceable under any particular
circumstance, the balance of the section is intended to apply, and the section as a
whole is intended to apply in other circumstances.
It is not the purpose of this section to induce you to infringe any patents or other
property right claims or to contest validity of any such claims; this section has the
sole purpose of protecting the integrity of the free software distribution system which
is implemented by public license practices. Many people have made generous
contributions to the wide range of software distributed through that system in
reliance on consistent application of that system; it is up to the author/donor to
decide if he or she is willing to distribute software through any other system and a
licensee cannot impose that choice.
31007122 8/2008
275
General Information
This section is intended to make thoroughly clear what is believed to be a
consequence of the rest of this License.
12—If the distribution and/or use of the Library is restricted in certain countries either
by patents or by copyrighted interfaces, the original copyright holder who places the
Library under this License may add an explicit geographical distribution limitation
excluding those countries, so that distribution is permitted only in or among countries
not thus excluded. In such case, this License incorporates the limitation as if written
in the body of this License.
13—The Free Software Foundation may publish revised and/or new versions of the
Lesser General Public License from time to time. Such new versions will be similar
in spirit to the present version, but may differ in detail to address new problems or
concerns.
Each version is given a distinguishing version number. If the Library specifies a
version number of this License which applies to it and any later version you have
the option of following the terms and conditions either of that version or of any later
version published by the Free Software Foundation. If the Library does not specify
a license version number, you may choose any version ever published by the Free
Software Foundation.
14—If you wish to incorporate parts of the Library into other free programs whose
distribution conditions are incompatible with these, write to the author to ask for
permission. For software which is copyrighted by the Free Software Foundation,
write to the Free Software Foundation; we sometimes make exceptions for this. Our
decision will be guided by the two goals of preserving the free status of all derivatives
of our free software and of promoting the sharing and reuse of software generally.
276
31007122 8/2008
General Information
No Warranty
15—BECAUSE THE LIBRARY IS LICENSED FREE OF CHARGE, THERE IS NO
WARRANTY FOR THE LIBRARY, TO THE EXTENT PERMITTED BY
APPLICABLE LAW. EXCEPT WHEN OTHERWISE STATED IN WRITING THE
COPYRIGHT HOLDERS AND/OR OTHER PARTIES PROVIDE THE LIBRARY AS
IS WITHOUT WARRANTY OF ANY KIND, EITHER EXPRESSED OR IMPLIED,
INCLUDING, BUT NOT LIMITED TO, THE IMPLIED WARRANTIES OF
MERCHANTABILITY AND FITNESS FOR A PARTICULAR PURPOSE. THE
ENTIRE RISK AS TO THE QUALITY AND PERFORMANCE OF THE LIBRARY IS
WITH YOU. SHOULD THE LIBRARY PROVE DEFECTIVE, YOU ASSUME THE
COST OF ALL NECESSARY SERVICING, REPAIR OR CORRECTION.
16—IN NO EVENT UNLESS REQUIRED BY APPLICABLE LAW OR AGREED TO
IN WRITING WILL ANY COPYRIGHT HOLDER, OR ANY OTHER PARTY WHO
MAY MODIFY AND/OR REDISTRIBUTE THE LIBRARY AS PERMITTED ABOVE,
BE LIABLE TO YOU FOR DAMAGES, INCLUDING ANY GENERAL, SPECIAL,
INCIDENTAL OR CONSEQUENTIAL DAMAGES ARISING OUT OF THE USE OR
INABILITY TO USE THE LIBRARY (INCLUDING BUT NOT LIMITED TO LOSS OF
DATA OR DATA BEING RENDERED INACCURATE OR LOSSES SUSTAINED BY
YOU OR THIRD PARTIES OR A FAILURE OF THE LIBRARY TO OPERATE WITH
ANY OTHER SOFTWARE), EVEN IF SUCH HOLDER OR OTHER PARTY HAS
BEEN ADVISED OF THE POSSIBILITY OF SUCH DAMAGES.
END OF TERMS AND CONDITIONS
31007122 8/2008
277
General Information
Applying These
Terms
If you develop a new library, and you want it to be of the greatest possible use to the
public, we recommend making it free software that everyone can redistribute and
change. You can do so by permitting redistribution under these terms (or,
alternatively, under the terms of the ordinary General Public License).
To apply these terms, attach the following notices to the library. It is safest to attach
them to the start of each source file to most effectively convey the exclusion of
warranty; and each file should have at least the copyright line and a pointer to
where the full notice is found.
<one line to give the library's name and a brief idea of what
it does.> Copyright (C) <year> <name of author>
This library is free software; you can redistribute it and/or modify it under the terms
of the GNU Lesser General Public License as published by the Free Software
Foundation; either version 2.1 of the License, or (at your option) any later version.
This library is distributed in the hope that it will be useful, but WITHOUT ANY
WARRANTY; without even the implied warranty of MERCHANTABILITY or
FITNESS FOR A PARTICULAR PURPOSE. See the GNU Lesser General Public
License for more details.
You should have received a copy of the GNU Lesser General Public License along
with this library; if not, write to the Free Software Foundation, Inc., 59 Temple Place,
Suite 330, Boston, MA 02111-1307 USA.
Also add information on how to contact you by electronic and paper mail. You should
also get your employer (if you work as a programmer) or your school, if any, to sign
a copyright disclaimer for the library, if necessary. Here is a sample; alter the
names:
Yoyodyne, Inc., hereby disclaims all copyright interest in the
library `Frob' (a library for tweaking knobs) written by James
Random Hacker.
<signature of Ty Coon>, 1 April 1990
Ty Coon, President of Vice
That's all there is to it!
278
31007122 8/2008
General Information
The Legion Of
The Bouncy
Castle
Copyright (c) 2000 The Legion Of The Bouncy Castle (http://www.bouncycastle.org)
Permission is hereby granted, free of charge, to any person obtaining a copy of this
software and associated documentation files (the Software), to deal in the Software
without restriction, including without limitation the rights to use, copy, modify, merge,
publish, distribute, sublicense, and/or sell copies of the Software, and to permit
persons to whom the Software is furnished to do so, subject to the following
conditions:
The above copyright notice and this permission notice shall be included in all copies
or substantial portions of the Software.
THE SOFTWARE IS PROVIDED AS IS, WITHOUT WARRANTY OF ANY KIND,
EXPRESS OR IMPLIED, INCLUDING BUT NOT LIMITED TO THE WARRANTIES
OF MERCHANTABILITY, FITNESS FOR A PARTICULAR PURPOSE AND
NONINFRINGEMENT. IN NO EVENT SHALL THE AUTHORS OR COPYRIGHT
HOLDERS BE LIABLE FOR ANY CLAIM, DAMAGES OR OTHER LIABILITY,
WHETHER IN AN ACTION OF CONTRACT, TORT OR OTHERWISE, ARISING
FROM, OUT OF OR IN CONNECTION WITH THE SOFTWARE OR THE USE OR
OTHER DEALINGS IN THE SOFTWARE.
31007122 8/2008
279
General Information
280
31007122 8/2008
Switch Function Examples
B
Setting Up the DHCP Server for Option 82
Introduction
The procedure for setting up a DHCP server for Option 82 is described on the
following pages. Prior to performing that procedure, read the following safety
warning and be aware of the consequences that can result from changing the
existing port connections on the ESM switch.
WARNING
UNINTENDED EQUIPMENT OPERATION
If IP addresses are assigned using DHCP option 82, changing the port to which a
device is connected will cause its IP address to change.
z Do not change device port connections on the ESM.
z When performing maintenance on an ESM, make sure to label each Ethernet
cable with the ESM port number assigned so that you can reestablish the same
configuration.
Failure to follow these instructions can result in death, serious injury, or
equipment damage.
31007122 8/2008
281
Switch Function Examples
Option 82
Application
Example
DHCP option 82 allows you to assign the same IP address to any device connected
to a particular switch port. The server shown in the example below must support
option 82.
PLC
ESM (option 82)
MAC address =
00:80:63:0f:7c:2e
DHCP server
IP = 84.16.127.5
IP = 84.16.127.30
IP = 84.16.127.30
282
31007122 8/2008
Switch Function Examples
Configuring a
Switch for DHCP
Option 82
Step
1
Action
Log in to the Web-based interface (p. 14).
OK
2
Go to Advanced → DHCP Relay Agent.
Server IP Address
1 0.0.0.0
2 0.0.0.0
3 0.0.0.0
4 0.0.0.0
DHCP Option 82
Operation
On
Off
Type
MAC
Manual Value (Type
DHCP server RemoteID A1 04 C0 A8 A8 C8
Type display
192.168.168.200
DHCP Relay disabled
Mod- Port
Circuit-ID
Option 82 on
1
1 B6 06 00 00 01 00 01
1
2 B6 06 00 00 01 00 01
1
3 B6 06 00 00 01 00 01
1
4 B6 06 00 00 01 00 01
1
5 B6 06 00 00 01 00 01
1
6 B6 06 00 00 01 00 01
1
7 B6 06 00 00 01 00 01
1
8 B6 06 00 00 01 00 01
Set
Schneider
Reload
?
Help
3
In line 1 of the Server IP Address group box, enter the DHCP server’s IP address.
4
In the Operation line of the DHCP Option 82 group box, select On.
5
Choose MAC from the drop-down list in the Type line.
6
Click Set to save the configuration.
31007122 8/2008
283
Switch Function Examples
DHCP Option 82
Server Hardware
Address
DHCP option 82 servers require that you input a hardware address. This address
consists of the switch’s remote ID and circuit ID. The circuit ID identifies the port on
the switch where the device to which you want to assign an IP address is connected.
The addresses of remote ID and circuit ID are shown on the DHCP Relay Agent web
page, which is shown in step 2 of the procedure above. In the screen above, the
remote ID is A104C0A8A8C8. If the device is connected to port 7 of the switch, then
the circuit ID is B606000001000107.
Note: One tool you may use to set up DHCP server option 82 on your PC is
haneWIN, which can be downloaded from the www.hanewin.de website. You may
elect to use other appropriate software, like those included with Windows 2000
servers or Linux operating systems.
The haneWIN software can be tested for 30 calendar days from the date of the first
installation before deciding whether you want to purchase a license. Schneider
Electric does not guarantee in any way that the product will function as described
and disclaims any responsibility for damages that may result from its use.
284
31007122 8/2008
Switch Function Examples
TFTP Server for Software Updates
Switch Software
The ESM software is in the flash memory by default. The ESM boots the software
from the flash memory.
Software updates can be realized via a tftp server. This presupposes that a tftp
server has been installed in the connected network and that it is active.
Note: An alternative to the tftp update is the http update. If you perform an http
update you do not have to configure the tftp server.
The ESM requires the following information for updating software from the tftp
server:
z
z
z
its own IP address (entered permanently),
the IP address of the tftp server or gateway to the tftp server,
the path in which the operating system of the tftp server is located.
File transfer between the ESM and the tftp server is handled by way of the Trivial
File Transfer Protocol (tftp).
Management station and tftp server may be made up of one or more computers.
Preparation of the tftp server for the ESM software involves:
z
z
Prerequisites for
Setting Up the
TFTP Process
31007122 8/2008
setting up the ESM directories and copying ESM software,
setting up the tftp process.
The general prerequisites for setting up the tftp process are the following:
z
The ESM knows its local IP address and the IP address of tftp server/gateway.
z
The TCP/IP stack and tftp are installed on the tftp server.
285
Switch Function Examples
Setting up the
TFTP Process
The following table shows the steps for setting up the tftp process, with subsequent
tables providing a breakdown according to operating system and application.
Step
Action
Comment
1
Check if the tftp daemon (background
process) is running.
Check whether the file etc/inetd.conf
contains the following line:
z in SunOS
tftp dgram udp wait root /usr/
etc/in.tftpd in.tftpd -s /
tftpboot,
z in HP
tftp dgram udp wait root /usr/etc/in.tftpd
tftpd.
2
Check whether the status of this process The status should be IW.
is IW.
3
If the process is not in the file, or if the
related line is commented out (#), modify
etc/inetd.conf accordingly.
4
Enter the UNIX command man tftp.
The command ps does not always show the tftp daemon, although it is actually
running.
286
31007122 8/2008
Switch Function Examples
Tftp Installation
on HP
Workstations
31007122 8/2008
The following table describes the special steps to be taken when installing tftp on HP
workstations.
Step
Action
1
Enter the user tftp in the For example:
file /etc/passwd.
tftp:*:510:20:tftp server:/usr/tftpdir:/
bin/false
Where:
tftp = user ID
* = in the password field
510 = sample user ID
20 = sample group ID
tftp server = reely selectable designation
/bin/false = mandatory entry (login shell).
Comment
2
Test the tftp process.
For example:
cd /tftpboot/ESM
tftp <tftp-Servername>
get ESM/ESM.bin
rm ESM.bin.
287
Switch Function Examples
Flowchart for
Setup
The following flowchart summarizes the procedure for setting up the tftp server with
SunOS and HP.
Checking the tftp process
Edit the file
/etc/inetd.conf
No
Is tftp*
commented
out?
Yes
Delete the comment
character»# from this line
»
Re-initialize inetd.conf
by entering
kill-1 PID
No
Problems with
the tftp server?
Yes
Test the tftp process
e.g.,
cd /tftpboot/ESM
tftp <tftp-Servername>
get ESM/ESM.bin
Response if the process is running: Received...
rm ESM.bin
Checking of the
tftp process
completed
* tftp dgram udp wait root/usr/etc/in.tftpd in.tftpd /tftpboot
288
31007122 8/2008
Switch Function Examples
Software Access
Rights
The agent needs read permission to the tftp directory with the ESM software.
Directory
Structure of the
Software
The following table shows the directory structure of the tftp server with stated access
rights, once the ESM software has been installed.
Filename
Access
TCSESM.xxxxx.bin
444-r--r--r-
d = directory; r = read; w = write; x = execute
1st position designates d (directory)
2nd to 4th positions designate access rights of user
5th to 7th positions designate access rights of user groups
8th to 10th positions designate access rights of all others.
31007122 8/2008
289
Switch Function Examples
290
31007122 8/2008
Glossary
D
DHCP
Dynamic Host Configuration Protocol. A protocol used by networked devices
(clients) to obtain the parameters necessary for operation in an IP network. It
reduces system administration workload, allowing devices to be added to the
network with little or no manual configurations.
DSCP
DiffServ Code Point. A networking architecture that specifies a simple, scalable and
coarse-grained mechanism for classifying, managing network traffic and providing
Quality of Service guarantees on modern IP networks.
E
EAM
Memory back up adapter. A USB device which stores the configuration data of the
ESM switch. If the switch becomes inoperative, the configuration data can be easily
transferred to another switch.
F
FDB
31007122 8/2008
forwarding database, which stores addresses (MAC addresses or network
addresses) against the relevant forwarding data (that is, port numbers).
291
Glossary
G
GARP
General Attribute Registration Protocol. A standard for registering a client station
into a multicast domain. GARP is an industry-standard protocol defined by IEEE
802.1P.
GMRP
GARP Multicast Registration Protocol. A General Attribute Registration Protocol
application that provides a constrained multicast flooding facility. GMRP is an
industry-standard protocol defined by IEEE 802.1P.
I
ICMP
Internet Control Message Protocol. TCP/IP protocol used to send status and control
messages. For example, a router uses ICMP to notify the sender that its destination
node is not available.
IGMP
Internet Group Management Protocol. A protocol that governs the management of
multicast groups in a TCP/IP network.
L
LLDP
Link Layer Discovery Protocol. A protocol that provides a method for switches,
routers and access points to advertise their identification, configuration and
capabilities to neighboring devices that store the data in a MIB (management
information base).
N
NTP
292
Network Time Protocol. Used to update the real time clock in a computer. There are
numerous primary and secondary servers in the Internet that are synchronized to
the international time standard Coordinated Universal Time (UTC) via radio, satellite
or modem.
31007122 8/2008
Glossary
Q
QoS
Quality of Service. A function that identifies high-priority time-critical data traffic such
as language/video or real-time data and reduces possible disruptions caused by
less critical traffic during busy network periods.
R
RFC
Request For Comment. A document that describes the specifications for a
recommended technology. RFCs are used by the Internet Engineering Task Force
(IETF) and other standards bodies.
RM
Redundancy Manager. A switch function which allows you to close both ends of a
backbone in a line-type configuration to create a redundant HIPER ring.
RSTP
Rapid Spanning Tree protocol. A protocol that provides a loop free topology for any
LAN (Local Area Network) or bridged network.
S
SFP
Small Form Factor Pluggable interface. An industry standard daughter card used in
networking. Its main advantage is that new speeds can be interfaced to an
expensive network device by changing only the SFP card.
T
TFTP
31007122 8/2008
Trivial Transfer File Protocol. A version of the TCP/IP FTP protocol that has no
directory or password capability.
293
Glossary
V
VLAN
294
Virtual Local Area Network. A logical subgroup within a local area network that is
created via software rather than manually moving cables in the wiring closet.
31007122 8/2008
B
AC
Index
Numerics
C
1734-AENT
configuring, 193, 212
viewing I/O addresses, 196, 215
802.1D.p dialog box, 120
CLI
A
address translation group, 231
alarms (traps), 75
dialog box, 75
screen shot, 145
B
bit notation
illustration, 19
BOOTP
figure of system configuration using
BOOTP, 31
system configuration using BOOTP, 29
broadcast limiter, 111
description, 111
setting, 111
31007122 8/2008
access via Telnet, 13
access via V.24, 13
features of the CLI, 13
opening the CLI, 13
cold start
performing a cold start, 55
communications with network management
station, 67
configuration
DHCP server option 82, 38
ports, 61
resetting the configuration to the default
settings, 48
configuration data, 28
configuration procedure
using the Web-based interface, 39
configuring the ESM
using the Command Line Interface, 23
contact signal
description, 147
copyright
applying terms of, 278
GNU Lesser General Public License, 269
Legion of the Bouncy Castle, 279
no warranty, 277
terms and conditions, 271
295
Index
D
default settings
resetting the configuration to the default
settings, 47
destination address, 21
detect network devices, 191, 210
device group, 246
DHCP
defined, 33
options requested during ESM
configuration, 36
DHCP relay agent, 283
DHCP server option 82
configuration, 38
dialog box
alarms (traps), 75
password, 68
directed frame forwarding
learning addresses, 94
multi-address capability, 93
store and forward, 93
displaying the SFP status, 159
dot1dBridge, 239
DSCP
traffic class, 127
E
EAM
loading the System Configuration from,
28
status of, 28
EDS file
add, 188, 207
enhancing access security, 64
entering the IP parameters
loading the system configuration from the
Memory back up adapter, 28
using the CLI, 23
entering the IP parameters using the CLI, 23
entering the system time, 80
ESC
software, 73
ESM
login, 15
296
Ethernet Switch Configurator function
disabling, limiting and enabling using the
Web-based or the Command Line
Interface, 73
Ethernet Switch Configurator software
installing, 25
event counter on port level, 156
explicit message
Get_Attributes_Single, 198, 217
F
figure
DHCP/BOOTP configuration, 34
password screen, 68
flow control
full duplex link, 129
half duplex link, 130
introduction, 129
frame switching
tagging, 113
from the default settings, 43
G
general technical software data, 267
generic object class, 225
GMRP, 99, 102
H
HP
tftp process, 286
http
loading software updates, 58
I
ICMP group, 233
IEEE standards, 263
IGMP, 99
IGMP snooping, 101
illustration
VLAN tag, 115
interface group, 230
31007122 8/2008
Index
internet protocol group, 231
IP address
classification, 19
description, 19
IP address with subnetwork allocation
figure, 21
IP DSCP
mapping, 126
IP parameters, 23
basics, 19
entering the IP parameters using the
Ethernet Switch Configurator software,
25
IP-DSCP
value for management packets, 116
ISO/OSI, 22
L
loading settings, 43
from a file, 45
from a file in the connected network, 43
from the local non-volatile memory, 43
from the local non-volatile memory using
the Command Line Interface, 45
from the local non-volatile memory using
the Web-based interface, 43
from the Memory back up adapter, 43
loading settings from
the tftp server, 46
loading software from
Memory back up adapter, 53
loading the settings
from a file, 45
loading the system configuration
from the Memory back up adapter, 28
login screen, 15
M
MAC address, 22
management agent
figure, 21
management group, 249
Management Information Base (MIB), 225
31007122 8/2008
mapping
traffic classes to VLAN priorities, 120
MAU management group, 245
Memory back up adapter
application, 28
loading software, 53
loading the system configuration from the
EAM, 28
purpose of the Memory back up adapter,
28
MIB
abbreviations, 226
description, 225
syntax, 226
tree structure, 227
MIB tree structure
figure, 227
MIB, module
SNMP V2, 255
multicast
GMRP per port, 109
multicast application
description, 99
example of an application, 100
multicasting, 102
N
network mask
assigning devices to subnetworks, 20
figure, 20
O
object class, 225
object description, 225
object ID, 225
operation diagnosis
diagnosis dialog, 166
reports, 166
operation mode
selecting, 65
option 82
example, 282
297
Index
P
S
password, 28
dialog box, 68
PHB
classes, 127
port access control
defining MAC-based port access control,
76
description, 74
IP-based port access control, 75
Port Configuration dialog box, 118
port mirroring, 167
Port Priority
entering, 119
port traffic
monitoring port traffic, 167
ports
configuration, 61
prioritization
assignment of priorities, 114
description, 113
private MIB, defined, 246
PTP
enabling, 89
functional description, 86
saving locally and on the EAM
using the CLI, 50
using the Web-based interface, 50
saving to a file
using the CLI, 51
using the Web-based interface, 51
SEND_REQ, 198, 217
server option 82
example, 282
set button, 16
signal contact
configuration, 149
display, 150
setting manually, 147
simple network management protocol group,
235
SNMP, 67
SNMP traps
definition, 143
types, 143
SNMP V2
management framework, 255
module MIB, 255
MPD group, 255
notification group, 257
target group, 256
USM group, 258
VACM group, 259
SNTP
configuration, 83
description, 82
preparation of configuration, 82
screenshot, 83
software updates
tftp server for software updates, 285
software updates using tftp
update requirements, 285
source address, 21
static address entries, 95
subidentifier, 225
SunOS
tftp process, 286
system configuration
using BOOTP, 29
Q
QoS/Priority
description, 113
global dialog box, 116
R
redundancy group, 253
reload button, 16
resetting the configuration
to the default settings, 47
RFCs, 261
RMON group, 236
298
31007122 8/2008
Index
system group, 228
system group objects, 229
System Monitor
data transfer parameters, 11
opening, 12
system network time
protocols, 79
T
target table
configuration, 143
TCP, 234
Telnet
description of Telnet access, 71
setting the Telnet access, 71
Telnet access
disabling and enabling Telnet access
using the Web-based or the Command
Line Interface, 71
tftp process
HP, 286
installing on HP workstations, 287
setting up, 285
SunOS, 286
tftp server
directory structure, 289
flowchart for setup, 288
loading settings from the TFTP server,
46
loading software updates, 56
tftp server for software updates, 285
tftp server setup
figure, 288
traffic class
assignment to VLAN priorities, 121
transfer control protocol group, 234
trap destination table
configuration, 143
trap message
definition, 143
Trust Mode, 117
three options, 117
31007122 8/2008
U
user datagram protocol group, 235
user groups group, 253
V
VLAN
priority for management packets, 116
simpleVLAN example, 135
VLAN prioritizing
limitations of, 115
VLAN tag
description, 113
format, 115
illustration, 115
W
Web access
disabling and enabling Web access
using the Web-based or the Command
Line Interface, 71
Web-based Interface
description of Web-based access, 71
Web-based interface, 24, 25
login, 14
requirements, 14
setting the Web-based access, 71
299
Index
300
31007122 8/2008


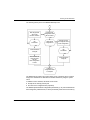


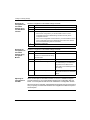


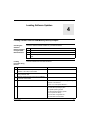


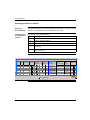


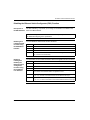


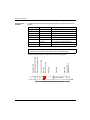


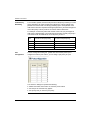


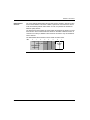


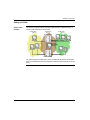


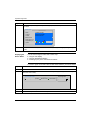


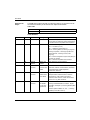


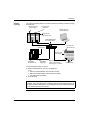


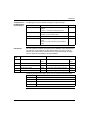


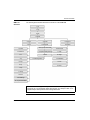

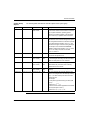


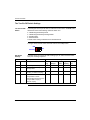


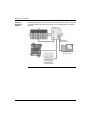


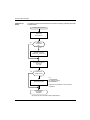


![[Unlocked] GUÍA DEL USUARIO FOCUS 30 V 1.02](http://vs1.manualzilla.com/store/data/006176544_1-0930e4412e813c25403ac67d81b514d6-150x150.png)