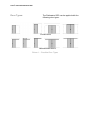
1
User’s manual Railmaster SDC
Intradoor, Inc
User’s Manual
Railmaster Sliding Door Controller
(SDC)
Version: 1
Date of Edition: 11-03-08
Publisher: Intradoor, Inc
Address: 2850 Elmwood Avenue, Rochester, NY, 14618
Telephone: +1-585-752-7525
E-mail: [email protected]
Web: www.intradoor.com
User’s manual Railmaster SDC
User’s Guide
To be used by
This user’s guide is to be used by anyone who is to perform any work with or on the
Railmaster. Work in this context means: Installation, Setting Up, Changing any
settings on the Railmaster, Using the Railmaster in any way, Performing any service
or repairs on the Railmaster.
Minimum level of knowledge and experience
The person who is to perform any work with or on the Railmaster must have enough
technical knowledge and experience to perform these actions safely. He or she is
knowledgeable with the use of a PDA (Personal Digital Assistant), and he or she is
trained for the installation of the Railmaster by the manufacturer.
Clues for the use of this manual
The user of this manual must at all times comply with any safety precautions in this
manual in addition to any general safety precautions and common sense. The failure
to follow these precautions may lead to dangerous situations for the user and/ or
others.
Explanation of terminology
Attention!
-Additional information or a possible problem
Warning!
-Failure to carefully follow the manual’s instructions may cause
Danger!
personal injury and/ or damage to the machine
-Mortal danger, threat of loss of life
Pictograms
The following pictograms appear on the Railmaster:
Dangerous Electric Current!
Danger! (Only on externally sliding doors)
User’s manual Railmaster SDC
1. Foreword
The function of the Railmaster
The Railmaster is an operating system for automatic opening and closing of doors in
residences, health care centers and offices. Opening the door can happen using
several manual or automatic sensors. Closing will take place after a certain
predetermined (programmable) time.
The Railmaster can also be connected to a centralized fire alarm system. In case of a
fire the door that is controlled by the Railmaster can fulfill a roll as fire door. To
prevent blocking an escape route, the door, controlled by the Railmaster can always
be opened manually, whether or not there is electrical current.
Unprescribed Use
The Railmaster is not suitable for use to open exterior doors
The Railmaster is not suitable for use in an industrial environment
The Railmaster is not suitable for use in an area with danger of explosion
User’s manual Railmaster SDC
2. Technical Specifications
Description:
Automatic Sliding Door Controller
Type:
Railmaster
Area of Application:
Pocket-, Wall-mount-, Bypass- and Multipass doors
Controls:
Manual contacts, Contact mats, Manual
remote controls, RF remote controls, Central
controls, etc.
Extra functions:
Locks, Fire Doors
Environmental Influences:
-Temperature:
-Maximum Humidity:
5 ºC – 40 ºC (41F – 104F)
90% at 20 ºC (68F), 50% at 40 ºC (104F)
Electric Specifications Motor:
-Voltage:
-Amperage:
-Power Supply Connection:
-Non-operational Wattage:
-Operational Wattage:
24 VDC
6A
VDS 1,5 mm2; VMDS 1 mm2
± 0, 5 Watt
± 145 Watt
Motor:
-Type:
-RPM:
Valeo GPMG 404
160 RPM.
Performance Specifications:
-At 160 RPM:
-At 540 RPM:
max. 0,3 m/s; adjustable in 5 steps
max. 0,8 m/s; adjustable in 5 steps
Dimensions:
-Driving Unit:
-Turning Wheel Unit:
-Door Mounting Unit:
160 x 90 x 90 mms.
150 x 45 x 45 mms.
90 x 90 x 5 mms.
Weight Specification:
-Maximum Door Weight:
100 kg (220 lbs.)
Sensor Specifications:
-Manual sensors (sensor 1 and 2):
Potential Free Contact
User’s manual Railmaster SDC
-Fire Alarm Sensor (sensor 3):
-RF sensor:
Remarks:
Potential Free Contact
434 MHz Manual Emitter
When several manually controlled wired
sensors control one door, all sensor contacts
can be connected to work parallel.
Driving Belt:
PU / Aramite
Maintenance Intervals:
The Railmaster SDC is completely
maintenance free.
Settings:
Freely programmable with Personal Digital
Assistant (PDA) and software package SD
Toolkit
IP-classification:
-Controls:
-Power Supply 110 VAC – 24 VDC:
IP 00
IP 44
Applied Normatives:
-Driver:
-Controls:
-Power Supply 110 VAC – 24 VDC:
-Pictograms:
Sound Emission:
EN 294
EN 349
EN 811
EN 60204-1
EN 61000-6-1
EN 61000-6-3
EN 55022
EN 61000-3-2-3
EN 61000-4-2, 3, 5, 6, 8, 11
ENV 50204
EN 55024
NEN 3011
The level of produced sound pressure
created by the Railmaster SDC is less than
70 dB(A).
User’s manual Railmaster SDC
Door Types:
The Railmaster SDC can be applied with the
following door types:
Pocket doors
Wall Mounted Doors
Picture 1 – Possible Door Types
User’s manual Railmaster SDC
3. Precautions and safety instructions
The installer of a Railmaster system
The installer of a Railmaster system possesses a minimum of relevant technical
education at WEB level 2 and has sufficient experience. Installation of a Railmaster
system may only be executed by a qualified installer that has received education
from the manufacturer.
The maintenance technician of the Railmaster system
The maintenance technician of the Railmaster system possesses a minimum of
relevant technical education at WEB level 2 and has sufficient experience. Repairs of
a Railmaster system may only be executed by a qualified installer that has received
education from the manufacturer.
Assembly in wet spaces (Bathrooms)
When a Railmaster system is assembled to control an entrance for (wet) bathrooms,
the printboard MUST NOT be placed in zone 0. When using the 230 VAC – 24 VDC
power supply, the power supply MUST NOT be placed in zone 0 or 1.
Ignoring the following safety instructions can be of Mortal Danger!
Mortal Danger!
The Railmaster system uses a 230 VAC current. Any maintenance or repair has to
happen when the current is off. The system needs to be unplugged. Any repair or
maintenance on the system can be of mortal danger when the power supply is still
connected to any electrical current
Warning!
Before the installer of the Railmaster releases the system for general use, the
installer needs to test the system and make sure the system is installed properly and
works correctly. Ignoring this safety instruction can cause dangerous situations and
harm to any normal user.
User’s manual Railmaster SDC
Warning!
Prohibit children from playing with the control buttons of the Railmaster system. Do
not let children play with the remote controls of the Railmaster system. Ignoring these
safety instructions may cause dangerous situations and harm to any normal user.
User’s manual Railmaster SDC
4. Description of the Railmaster
4.1 Operation
The normal position of a door that is controlled by the Railmaster SDC is a closed
position. After operating the sensor, the door will open at high speed. At a moment
that is determined during installation, the door will slow down to low speed and stops
when the door is opened completely. The door will stay open for a predetermined
period, and will automatically close. The door will start closing at high speed and will
slow down at a predetermined moment to low speed until it is fully closed.
4.2 Controls
The Railmaster SDC can be controlled in four different ways:
-Using a manually controlled contact; This contact can be activated using a button.
-Using a person detection system; The presence of persons can for instance be
detected using a radar or an IR-sensor.
-Using a RF-sensor.
-Using a fire alarm system; When the Railmaster SDC is connected to an activated
fire alarm system, the door will automatically close. The door can still be controlled
using the RF manual emitter, and simple manual control is also still possible
4.3 Safety Measures
The Railmaster SDC is equiped with several safety measures which guarantee that
with normal use of the door, no situations will arise where people can get hurt. All
safety measures are automatic.
Warning!
When the power supply is connected to the electric point, the printboard is under
electric current. Touching the track side of the printboard with a conducting part can
cause a short circuiting which can damage the printboard.
User’s manual Railmaster SDC
5
Testing
When the instructions as described in paragraphs 5.1 and 5.2 are executed, the Railmaster
can be tested and used according to the following steps.
1. Close the door.
2. Move the driving belt with the mounting unit in such a way that the 50 mm position
sticker, which detects the closing position, is in front of the sensor.
3. Mount the mounting unit on the door.
4. Press the reset button of the printboard for 3 seconds.
5. Operate a sensor or the RF manual emitter to open the door. The door will slowly open
entirely and then stop. After the programmed amount of timethat the door is open, the
door will again close.
6. Make sure the door closes properly. If the door does not close properly follow the
guidelines under paragraph 5.4.
7. Build the framing around the door opening.
8. The door is ready for use.
5.1
•
Tuning
Follow the following guidelines if the door is not properly closed:
-
Turn off the power supply of the Railmaster by pulling the plug from the socket.
-
Measure the distance that the door still has to travel from where it is to where it is
fully closed.
-
Slide the door open far enough to make sure that the 50 millimeter position
sticker, which detects the closed position, is accessible.
-
Mark the spot where the sticker is.
-
Remove the sticker from the driving belt.
-
Add the distance between the 30 millimeter position sticker and the marked
position to the distance that the door still has to travel to close completely.
-
Attach the position sticker to the belt on this spot.
-
Put the plug of the power supply back in the socket.
-
Operate the door with one of the sensors to make sure the door closes properly
and completely.
User’s manual Railmaster SDC
-
•
In case the door still doesn’t close properly or completely, repeat these steps until
it does.
Follow the following instructions if the door runs into the frame at slow speed:
-
Turn off the power supply of the Railmaster by pulling the plug from the socket.
-
Slide the door open far enough to make sure that the 50 millimeter position
sticker, which detects the closed position, is accessible.
-
Mark the spot where the sticker is.
-
Remove the sticker from the driving belt.
-
Attach the position sticker a little closer to the 30 millimeter position.
-
Put the plug of the power supply back in the socket.
-
Operate the door with one of the sensors to make sure the door closes properly
and completely.
-
In case the door still doesn’t close properly or completely, repeat these steps until
it does.
User’s Manual Railmaster SDC
6.
Use
6.1 Normal Use
The normal position of a door that is controlled by the Railmaster is a closed position. After
operating the sensor, the door will open at high speed. At a moment that is determined
during installation, the door will slow down to low speed and stops when the door is opened
completely. The door will stay open for a predetermined period, and will automatically close.
The door will start closing at high speed and will slow down at a predetermined moment to
low speed until it is fully closed. When the door comes in contact with an obstacle during
opening or closing, it will change direction and start moving at low speed.
6.2 Manual Control
Regardless of the position of the door and the presence of electrical current, it will always be
possible to open and close the door manually.
User’s Manual Railmaster SDC
7.
Maintenance and Cleaning
The Railmaster SDC is completely maintenance free. Once a year the connection of the door
assembler needs to be checked. The Railmaster SDC and the power supply need to be
checked regularly conform the demands of NEN 3140. The cleaning of the complete
automatic sliding door system needs to be executed conform the instructions of the door
supplier.
User’s Manual Railmaster SDC
8.
Switching Off
The Railmaster SDC needs to be switched off by pulling the plug from the socket. The door
can still be operated manually.
.
User’s Manual Railmaster SDC
9.
9.1
Deconstruction, Demolition,
Storage and Transport
Deconstruction
The Railmaster can be deconstructed using the following guidelines:
1. Remove the Railmaster from any current by pulling the plug of the power supply from the
socket. If the power supply is connected directly to the wiring in the wall, the connection
clamps and the wiring need to be disconnected from the power supply.
2. Disconnect the door from the mounting unit.
3. Remove the door following the guidelines of the door supplier.
4. Remove the framing around the door opening.
5. Disconnect the wiring from the printboard (power supply, sensor(s), fire alarm
connections).
6. Unscrew the Railmaster and remove the Railmaster from the door frame.
9.2
Demolition
For demolition of the Railmaster the following needs to be done:
1. Execute steps 1 – 6 from paragraph 9.1.
2. Remove the power supply.
3. If needed the Railmaster can be taken apart further into parts.
9.3
Storage
Storage of new and reusable Railmasters has to find place in spaces that comply with the
following environmental specifications:
- temperature:
- maximum humidity:
9.4
5 ºC – 40 ºC (41 F – 104 F)
90% at 20 ºC (68 F), 50% at 40 ºC (104 F)
Transport
Transport of the Railmaster has to be done in such a way that there is no chance of damage.
User’s Manual Railmaster SDC
10. Malfunctions and Repairs
10.1 Malfunctions
•
The door does not close completely
Follow the next steps to solve this malfunction:
•
-
Turn off the power supply of the Railmaster by pulling the plug from the socket;
-
Operate the door with one of the sensors to make sure the door closes properly
and completely.
-
In case the door still doesn’t close properly or completely, repeat these steps until
it does.
-
Measure the distance that the door still has to travel from where it is to where it is
fully closed;
-
Slide the door open far enough to make sure that the 50 millimeter position
sticker, which detects the closed position, is accessible;
-
Mark the spot where the sticker is;
-
Remove the sticker from the driving belt;
-
Add the distance between the 30 millimeter position sticker and the marked
position to the distance that the door still has to travel to close completely;
-
Attach the position sticker to the belt on this spot;
-
Put the plug of the power supply back in the socket;
The door runs into the frame during opening or closing
Follow the next steps to solve this malfunction:
-
Turn off the power supply of the Railmaster by pulling the plug from the socket.
-
Slide the door open far enough to make sure that the 50 millimeter position
sticker, which detects the closed position, is accessible.
-
Mark the spot where the sticker is.
-
Remove the sticker from the driving belt.
-
Attach the position sticker a little closer to the 30 millimeter position.
-
Put the plug of the power supply back in the socket.
-
Operate the door with one of the sensors to make sure the door closes properly
and completely.
User’s Manual Railmaster SDC
-
•
In case the door still doesn’t close properly or completely, repeat these steps until
it does.
Overige storingen
For all other malfunctions the manufacturer needs to be contacted.
10.2
Repairs
For repairs of the Railmaster and for replacing the driving belt the manufacturer needs to be
contacted.
In case the Railmaster comes supplied with a power supply from another manufacturer,
replacing the wiring of the power supply may only be done by qualified personnel.
User’s Manual Railmaster SDC
11.
Environment and Waste
The Railmaster does not contain dangerous materials. All parts of the Railmaster can be
recycled or handled as normal waste.