1
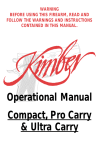
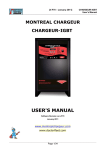
MATCH 2.0
[OWNER’S MANUAL]
© Copyright 2013 NEMO Arms | 3582 Hwy 93 S | Kalispell, Montana 59901
1
2
Phone: (406) 752-NEMO (6366) | Email: [email protected] | www.nemoarms.com
WARNING
SAFETY GUIDELINES
1 Please read and understand this manual before attempting to handle or
use your firearm. Take a firearms safety course to ensure firearm safety
and knowledge. Local, state and federal Law Enforcement and Fish and
Game departments provide excellent courses on firearm safety.
2 Always handle your firearm as if it were loaded.
3 Never point your rifle at anything you do not intend to shoot.
4 Do not handle firearms while impaired under the influence of alcohol or drugs.
5 Never leave a loaded firearm unattended.
6 Be sure firearm is unloaded and bolt is open before handing it to someone.
7 Before starting an inspection, be sure to clear the rifle. Do not pull the
trigger until the rifle has been cleared. Inspect the chamber to ensure
that it is empty and no ammunition is in position to be chambered.
8 Do not keep live ammunition near work area.
9 Only use ammunition designed for your firearm. Failure to use the proper caliber
ammunition will cause damage to your firearm and may result in injury or death.
10 Only use quality commercial ammunition that is in good condition.
Using corrosive, lacquer coated, damaged, hand loaded, steel or
aluminum cased ammunition will void the warranty and if used, may
cause personal injury or death. Since reloading practices are beyond our
control, we disclaim all liability for damage or injury that may result.
11 When shooting your firearm, know your target and beyond.
12 Use eye and ear protection when shooting your firearm.
13 Never alter or modify your firearm. Do not disassemble
your firearm beyond this manual.
14 Only a qualified gunsmith should service, repair
or modify your firearm in any way.
15 Obey all local, state and federal laws in regards of discharging,
handling, storage, security and transportation of your firearms.
16 Cleaning, discharging, handling of your firearm and ammunition may result in
exposure to toxic and hazardous substances. Wash hands thoroughly after
exposure. Read all warnings on ammunition, cleaning and lubrication products.
17 To avoid injury to your eyes, use care when removing and installing
spring-loaded parts, cleaning, lubricating and handling of your firearm.
© Copyright 2013 NEMO Arms | 3582 Hwy 93 S | Kalispell, Montana 59901
3
18 Never allow another person(s) to handle, shoot, clean and
lubricate or use your firearm if they do not understand or
have not read the safety guidelines of this manual.
19 Do not rely on the firearm’s safety. It is only to be used as
a supplement to safe firearm handling procedures.
20 Do not touch the trigger or trigger guard unless you are ready to fire.
21 The bolt must be completely closed in full battery when firing
your weapon. Failure to have the bolt closed will cause a
catastrophic failure that will result in injury or death.
22 DO NOT interchange bolt assemblies from one rifle/carbine
to another. Doing so may result in injury or death.
23 Bolt cam pin must be installed or rifle/carbine will blow up while firing.
If the bolt cam pin is not installed, injury or death may result.
24 If there is water or an obstruction in the barrel, including the
chamber and barrel extension, do not fire. The gun may explode
and cause damage to firearm and personal injury or death.
25 Do not drop your firearm, it may discharge. A dropped firearm must be inspected
by a qualified gunsmith to ensure firearm is undamaged and safe to operate.
26 There is no safety substitute for common sense. You, the owner are the most
important safety device when it comes to the use of your NEMO Arms, Inc.
firearm. The safe use of your firearm is your personal responsibility. Failure to
follow these basic guidelines may result in property damage, injury or death.
27 Clean and inspect your firearm regularly. Failure to clean and
inspect your firearm regularly will void your warranty, and if
discharged may cause property damage, injury or death.
28 If you notice a difference in sound or recoil from your firearm, stop firing. There
may be a bullet lodged in the barrel, ammunition malfunction, overheated
barrel or firearm, or could indicate any number of problems. Point firearm in
safe direction. Wait 15 minutes for rifle to cool. After 15 minutes, unload rifle
and clear chamber. Check bore for unburned gunpowder, brass or lodged
bullet. Bullet, brass, primer, foreign object and unburned gunpowder must
be removed before re-chambering another round and firing. Failure to clear
foreign objects and re-chambering another round on top of any debris,
may cause a catastrophic failure causing damage to your firearm, injury
or death. Take firearm to a qualified gunsmith for removal of bullet stuck
in barrel or debris that cannot be removed for removal and inspection.
29 Extended, continuous or rapid firing will raise barrel to unsafe temperature.
At this temperature, any live ammunition in chamber may detonate without
pulling trigger. The heat from the barrel alone may cause ammunition
to detonate. Allow adequate time for firearm to cool to prevent an
overheated barrel. Allow barrel to cool to ambient air temperature.
30 Do not exceed 10-12 rounds per minute to prevent an overheated
barrel, reduced barrel life and/or voiding your warranty.
4
Phone: (406) 752-NEMO (6366) | Email: [email protected] | www.nemoarms.com
31 You must check your ammunition prior to using your OMEN. It
must be within SAAMI specifications for size and pressure.
32 Blown and pierced primers will damage bolt and firing pin. A pierced
primer will cause firing pin to continue to pierce primers and may cause
a catastrophic failure to your rifle and serious injury or death. Your
firing pin must be changed out immediately upon piercing primers.
33 The firing pin spring must be installed. Failure to install the firing
pin spring after cleaning may cause accidental discharge, or
out of battery discharge, resulting in injury or death.
Under no circumstances will NEMO Arms, Inc. nor any affiliated suppliers be
responsible for any property damage, injury or death that results from:
»» Failure to read and understand owners manual.
»» Disregarding the safety guidelines and warnings in this manual.
»» The criminal or negligent use of the firearm.
»» Alterations, improper or negligent modifications to the firearm.
»» The use of non-standard, defective, improper or reloaded ammunition.
»» Failure to clean and keep firearm in good working order
This manual must accompany this firearm and be transferred with it
upon change of ownership or when presented to another person.
SERIAL NUMBER INFORMATION
Record the serial number of your NEMO ARMS, Inc. firearm. The serial number
is on the lower receiver, on the mag well. Attach a copy of the proof of purchase/
sales record. Keep a copy of the owners manual and proof of purchase/sales
record in a secure place. These materials will be necessary if the firearm is
damaged, stolen or returned to NEMO Arms, Inc. for warranty or repair.
Serial Number:
Purchase Date:
Model Number:
Caliber:
Place of Purchase:
© Copyright 2013 NEMO Arms | 3582 Hwy 93 S | Kalispell, Montana 59901
5
6
Phone: (406) 752-NEMO (6366) | Email: [email protected] | www.nemoarms.com
ADJUSTABLE GAS BLOCK
15
1
14
2
13
12
FRONT PIVOT PIN
HANDGUARD CLAMP
TOP PICATINNY RAIL
INDEX TAB
MAGAZINE
3
INDEX TAB
4
11
BOLT RELEASE
9
TRIGGER
MAG CATCH
10
5
UPPER RECEIVER
REAR TAKEDOWN PIN
LOWER RECEIVER
SAFETY SELECTOR
8
7
6
BUFFER TUBE
© Copyright 2013 NEMO Arms | 3582 Hwy 93 S | Kalispell, Montana 59901
7
9
10
PISTOL GRIP
REAR TAKEDOWN PIN
1
MAG RELEASE
2
8
3
FRONT PIVOT PIN
TRIGGER GUARD
REMOVEABLE SIDE
CHARGING HANDLE &
BOLT CARRIER GROUP
7
HANDGUARD
6
BARREL
4
5
COMPENSATOR
ADJUSTABLE GAS
BLOCK KNOB
AMMUNITION
The OMEN is optimized to use quality ammunition. Semi-automatic
rifles perform differently than bolt action rifles and cannot handle hot
loads. Do not use ammunition that exceeds maximum chamber pressure
recommended by SAAMI (Sporting Arms and Ammunition Manufacturers’
Institute) The maximum pressure is 64,000 PSI, Piezo measured.
The maximum COAL (Cartridge Over All Length) that can be used
in the OMEN is up to 3.50 inches. You must check your chamber
dimensions before loading ammunition beyond SAAMI length.
There are many different manufacturers of ammunition and loads for the
.300 Win. Different ammunition, bullet weights and powder combinations
will cause varying degrees of accuracy and performance of the rifle.
Lighter loads, and bullet weights may cause the rifle to not lock
the bolt back on the last round. Lighter loads can be hot loads and
could cause cycling issues, pierced or blown primers.
Really hot loads or heavy bullet weights may cause
over-gassing, pierced or blown primers.
Soft primers, or loose primers may cause blown or ”dropped” or pierced primers.
The OMEN is designed to perform the best with military-grade hard primers.
Ammunition not to be used in the OMEN:
»» Hornady Superformance.
»» Federal Fusion
»» Any ammunition that shows excessive pressure signs such as flattened
primers, blown primers, pierced primers, excessive ejector marks or
excessive extractor marks. **Some ejector marks and ejector marks
are due to the semi-automatic design of the AR platform**
WARNING
If your ammunition is blowing or piercing primers,
discontinue shooting. Completely field strip and
clean rifle. Inspect and replace firing pin if it has
a damaged tip. Use different ammunition.
8
Phone: (406) 752-NEMO (6366) | Email: [email protected] | www.nemoarms.com
WARNING
BEFORE YOU OPERATE YOUR
FIREARM FOR THE FIRST TIME
Be sure to check your rifle to see if it is loaded and that you know how to clear
the rifle and use the safety before operating the rifle for the first time.
Be sure to clean and check your rifle to see if there are any
obstructions in the barrel before firing rifle for the first time.
.: NOTES :.
Only use quality, commercially loaded ammunition that is in good condition.
Using corrosive, over-pressured, damaged, steel or aluminum-cased ammunition
will void the warranty and if used, may cause personal injury or death.
Prior to firing the rifle for the first time, clean the rifle bore and
chamber. The barrel will be broken in after 25-100 rounds.
Check the rifle for excessive lubrication after the first time you have
used it. There may be excessive lubrication or preservative on
your rifle from transfer and storage purposes at the factory.
NEMO Arms, Inc. fit and function checks and inspects each rifle. NEMO
cannot guarantee fit or function with any other manufacturers components.
Excessive and repeated firing will cause premature wear and
degradation of the rifle. Do not exceed 10-12 rounds per minute.
ALUMINUM COMPONENTS
Never use abrasives or metal/wire brushes or harsh chemicals on
aluminum components and finishes. Use a soft cloth, or soft nylon
brush to clean aluminum components and aluminum finishes
PLASTIC/POLYMERS
Never use solvents, metal/wire brushes or harsh chemicals on
plastic/polymers. They will scratch or soften the material.
ADJUSTING THE MAGAZINE CATCH
Insert magazine into the mag well. The magazine catch the magazine in place.
Pressing the magazine catch button should release the magazine. To adjust the
magazine catch, use a cleaning rod to press in on the magazine catch button
until the left side of the magazine catch sticks out beyond the receiver. To tighten,
turn the magazine catch clockwise; to loosen, turn it counterclockwise.
© Copyright 2013 NEMO Arms | 3582 Hwy 93 S | Kalispell, Montana 59901
9
LUBRICATION OF YOUR RIFLE AND COMPONENTS
Lightly Lubed: A film of CLP barely visible to the eye.
Generously Lubed: Heavy enough CLP so that it can be spread with the finger.
Your rifle has been generously lubed from the factory. This is to allow for function
during the break-in period. Your rifle will be broke in after 20-100 rounds of
ammunition. After this time, you should clean your entire rifle and re-lubricate.
A clean rifle will function much better than a dirty rifle. Having a clean,
lubricated rifle will alleviate a lot of potential functioning problems.
Only apply generous lubrication to the areas that need it. Applying
excessive lubrication traps dirt and debris at a faster rate.
If you are using your rifle in sub-freezing weather, use
a CLP that is rated for winter/arctic use.
PERSONAL PROTECTIVE EQUIPMENT
Reducing the sound by at least 30 decibels is highly recommended. Repeated
exposure to the high decibels that firearms produce may cause permanent
hearing loss. Use ear protection (ear plugs or ear muffs) at all times.
The use of shooting glasses is encouraged. Quality shooting glasses protect you
from spent shell casings, burned and unburned powder and gasses, and UV rays.
Beware of a hot barrel or muzzle after shooting rapid fire or extended shooting.
BARREL BREAK-IN AND CLEANING INSTRUCTIONS
We’ve compiled information from several barrel makers on the best barrel
break-in and cleaning for your rifle barrel. Using these break-in procedures
and cleaning instructions, you can ensure that your barrel will clean
easily in the future and that you will achieve maximum accuracy.
COPPER FOULING: Caused by bullet jacket material left in the barrel.
POWDER FOULING: Caused by burned and unburned powder left in the barrel.
During the first few rounds, a lot of copper fouling will be left in the barrel.
It is important to remove this fouling, completely, after each shot, to help
prevent a build-up later on. Powder fouling is ongoing, but is easy to
remove. Do not use moly coated bullets during break-in procedure.
BARREL BREAK-IN
Cleaning items needed: Brush, action rod guide, rifle barrel solvent: noncopper removing solvent, copper removal solvent and CLP (cleaner/lubricant/
preservative). There are many good brands of each of these cleaning items
For break-in, the barrel should be cleaned after every shot for the first 5-20
rounds or until copper fouling stops. Before shooting your rifle for the first time,
10
Phone: (406) 752-NEMO (6366) | Email: [email protected] | www.nemoarms.com
the barrel needs to be cleaned to remove the preservative. Use only quality,
factory ammunition. Do not use lacquer coated ammunition at any time.
1 Saturate a patch with a copper removing solvent and thoroughly soak
the barrel. Do not use a bronze/copper cleaning tip, as this will give false
cleaning indications. Only use a steel or carbon/poly cleaning rod and
jag. Keep using copper soaked patches until there is no more blue on
the patches (the blue is the dissolved copper). The copper fouling will
be heavy for a few rounds and then taper off quickly in one or two shots.
Do not let copper solvent stand in barrel more than 10 minutes.
2 Push a dry patch through the barrel.
3 Fire a single round.
4 Repeat steps 1-3 for the first 5-10 rounds.
5 Shoot two three-shot groups, remove copper after each group (steps 1-2).
6 Your barrel is now broken-in.
NORMAL BARREL CLEANING
For normal cleaning, after break-in and following 10-25 shots or after a
shooting session, clean the barrel using a powder solvent or CLP only.
Use a clean patch and soak it with the powder solvent/CLP and soak
the barrel. Use a bronze or poly brush and stroke the barrel 5-8 times.
Do not use a stainless steel brush in your barrel at any time.
Push a clean patch through. Push a CLP soaked patch through the barrel.
Repeat cleaning if patch is fouled. After cleaning the barrel, run a CLP patch
through the barrel for storage. Run a dry patch through barrel prior to shooting.
PERIODIC COPPER FOUL BARREL CLEANING
If your accuracy degrades and your shot groups open up at approximately +/- 300
rounds or so, use a copper removing solvent to check for copper fouling. Use
steps 1-2 of the barrel break-in procedure for the copper fouling procedure.
ABRASIVE BARREL CLEANERS
Using an abrasive cleaner is not recommended.
MOLY OR COATED BULLETS
Shooters using moly or coated bullets need to clean their barrels
every 25 rounds. Use the normal barrel cleaning procedure.
CLEANING EQUIPMENT TIPS
Using the correct equipment to clean your barrel is important. An
action rod guide will keep your rod straight in the barrel and keeps
your rifle from getting uneven wear and damaging the rifling.
© Copyright 2013 NEMO Arms | 3582 Hwy 93 S | Kalispell, Montana 59901
11
Use a quality coated cleaning rod as well. The coating on the rod will prevent
damages to your barrel, and there are also nylon coated cables that work very
well now too. These are available from Otis or Dewey. Both of these companies
make a very good complete cleaning kit for your rifle at a reasonable price.
Be sure to use a preservative on your barrel when storing
it. Run a dry patch through before shooting.
Store your rifle in a dry place to prevent rusting.
Do not let solvent get inside the action or any other surfaces on your rifle, as
they may damage them. Do not over-lubricate freshly cleaned surfaces.
20 MOA PICATINNY RAIL
The Watchman model OMEN has built-in 20 MOA into the upper
receiver and handguard. This gives the operator more adjustment
in elevation at extreme distances with their optic.
FIELD STRIPPING AND CLEANING BOLT CARRIER GROUP
The OMEN from NEMO Arms, Inc. has a patented bolt carrier. This bolt carrier
group looks very different than the standard AR-15 or AR-308 type bolt carriers.
TO FIELD STRIP AND CLEAN YOUR BOLT CARRIER GROUP:
1 Ensure your rifle is unloaded and the chamber is clear.
12
Phone: (406) 752-NEMO (6366) | Email: [email protected] | www.nemoarms.com
2 Depress the front pivot pin and rear takedown pin. Separate the upper receiver
from the lower receiver.
© Copyright 2013 NEMO Arms | 3582 Hwy 93 S | Kalispell, Montana 59901
13
3 Remove the charging handle by pulling it out firmly. The side charging handle is
captured in the bolt carrier by a detent. It is held into place much like some
semi-automatic shotguns.
4 Remove the bolt carrier group from the upper receiver.
14
Phone: (406) 752-NEMO (6366) | Email: [email protected] | www.nemoarms.com
5 Remove the firing pin retaining pin from the bolt carrier.
© Copyright 2013 NEMO Arms | 3582 Hwy 93 S | Kalispell, Montana 59901
15
6 Pull bolt out until it stops. With the bolt pulled out, pull the firing pin straight back
as far as it can go, until it stops. Line up the cam pin straight with gas key.
PULL OUT BOLT, AND PULL BACK
FIRING PIN AS FAR AS IT CAN GO
LINE UP CAM PIN WITH GAS KEY
16
Phone: (406) 752-NEMO (6366) | Email: [email protected] | www.nemoarms.com
7 Remove the cam pin and then the firing pin.
© Copyright 2013 NEMO Arms | 3582 Hwy 93 S | Kalispell, Montana 59901
17
8 Remove the bolt from the bolt carrier.
9 Remove the firing pin. The firing pin spring is conical. The small spring end
goes on first. **Warning** The firing pin spring must be installed! Failure to
install the firing pin spring may cause accidental discharge, or out of
battery discharge.
10 Remove the extractor from the bolt. Depress the rear
of the extractor, push the extractor pin out.
11 Clean out all of the carbon, brass and foreign debris
from the extractor and on the inside of the bolt.
Your bolt carrier group is now completely field stripped for cleaning.
»» Do not remove the gas key.
»» Do not disassemble the rear of the bolt carrier. This part of the bolt carrier only
needs to be disassembled if the spring needs replacement or if it needs to be
repaired.
PUSH OUT EXTRACTOR PIN WITH A PUNCH
18
Phone: (406) 752-NEMO (6366) | Email: [email protected] | www.nemoarms.com
CLEAN OUT CARBON AND DEBRIS
INSIDE BOLT AND EXTRACTOR
Clean all of the parts using a solvent. Remove carbon build up, debris, dirt, brass
and lubricant using cotton swabs and nylon brush. Pieces of brash or primers in the
bolt or fire control group can cause malfunction or build up on the firing pin causing
weapon malfunction, slam fire, or automatic fire. After cleaning, lightly lubricate all
surfaces of the extractor, bolt, bolt carrier, cam pin and firing pin. There should be
a light film over all of the surfaces. Reassemble the bolt carrier group by reversing
the order of disassembly. Be patient and do not force parts together or bend them
to assemble. To insert the side charge handle, the slot must face up to engage.
Additional Lubricant - Add two drops of CLP to the bolt cam pin slot, one
drop to the entrance of the gas key hole. Lubricate the running surface on the
bolt carrier with a higher viscosity lubricant or grease. The running surface on
the bolt carrier is where the carrier touches and rides the upper receiver.
CLEANING THE UPPER AND LOWER RECEIVER
1
Ensure your rifle is unloaded and the chamber is clear.
2
Depress the front pivot pin and rear takedown pin. Separate
the upper receiver from the lower receiver.
3
Remove the side charging handle by pulling it out firmly. The side
charging handle is captured in the bolt carrier by a detent. It is
held into place much like some semi-automatic shotguns.
4
Remove the bolt carrier group from the upper receiver.
© Copyright 2013 NEMO Arms | 3582 Hwy 93 S | Kalispell, Montana 59901
19
5
Clean the internal part of the upper receiver and barrel extension
using a solvent. Remove carbon build up, debris, dirt, brass and
lubricant using cotton swabs and nylon brush. Lightly lubricate
the upper receiver and barrel extension, leaving a light film. Clean
the barrel and chamber after cleaning the upper receiver.
6
Install the cleaned bolt carrier group and install the side charging handle.
7
When the trigger and lower receiver well become very dirty (such as when
firing with a suppressor), it is not always necessary to remove the trigger group
for cleaning. Spray down the trigger group with electrical contact cleaner to
remove residual oil and dirt. Next, use compressed air to blow off the trigger
group and then flush liberally with a light lubricant as CLP or equivalent.
Blow off excess lubricant with compressed air and lubricate the following:
»» Each side of the disconnector above the trigger pin;
»» Hammer and trigger sears;
»» Face of the disconnector;
»» Hammer tail where it contacts the disconnector;
»» Top of each side of the hammer spring where
the spring contacts the receiver wall.
See the trigger schematic for lubrication points on page 30.
20
Phone: (406) 752-NEMO (6366) | Email: [email protected] | www.nemoarms.com
OMEN ADJUSTABLE GAS BLOCK
Your rifle may be equipped with an adjustable gas block so that your rifle will
run with a variety of ammunition and/or suppressed. The rifle is designed to
run with a fully opened gas port, even with the adjustable gas block. If you are
using hot ammunition or if you are using a suppressor, it may be necessary
to adjust your gas port down to alleviate function or cycling issues.
The adjustable gas block has four settings, from fully opened
to nearly completely shut off. The triangle at the top of the gas
block is the indicator for the positions of the adjustments.
To make an adjustment, the cap on the front of the gas block is
depressed towards the rear of the rifle. While depressed, rotate cap in
either direction until you reached the desired setting. The cap is spring
loaded and the adjustment stops will have a positive location.
The adjustment stops are indicated with a dot or series of dots on the cap
to show which position the cap is in. Four dots indicate that the gas port
is open fully. Three dots indicates the gas port is 58 percent open. Two
dots indicates the gas port is 44 percent open. One dot indicates the gas
port is open 25 percent. The gas port does not close completely off.
••••
•••
••
•
Full,
completely open gas port.
58 percent open gas port.
44 percent open gas port.
25 percent open gas port.
© Copyright 2013 NEMO Arms | 3582 Hwy 93 S | Kalispell, Montana 59901
21
USING THE ADJUSTABLE GAS BLOCK
Your rifle is designed to work with the adjustable gas block on the
fully open position, indicated by four dots across from the triangle.
The triangle will indicate which position the setting is on.
FOUR DOTS ON ADJUSTMENT KNOB: FULLY OPEN
TRIANGLE INDICATOR
THREE DOTS ON ADJUSTMENT KNOB: 58% OPEN
22
Phone: (406) 752-NEMO (6366) | Email: [email protected] | www.nemoarms.com
Having your setting on one or two dots should only be used if using a
sound suppressor. The adjustable gas block does not have a setting
to completely shut the gas off. Closing off the gas port from fully open
(four dots) may cause your rifle to short stroke or not cycle.
TWO DOTS ON ADJUSTMENT KNOB: 44% OPEN
ONE DOT ON ADJUSTMENT KNOB: 25% OPEN
© Copyright 2013 NEMO Arms | 3582 Hwy 93 S | Kalispell, Montana 59901
23
CLEANING AND MAINTAINING THE ADJUSTABLE GAS BLOCK
It is necessary to maintain your adjustable gas block to keep it in good
working order. The best way to keep functioning is to be sure rotate
it through all of the four adjustment stops every forty (40) rounds.
To clean your adjustable gas block, follow these procedures:
1 Ensure your rifle is unloaded and the chamber is clear and
the rifle barrel and gas block are cool to the touch.
2 Push in the adjustment cap and rotate it through all of the stops
four times. If it is hard to depress or sticky, Plunge the knob in on all
of the stops 10 times or until it depresses and rotates freely.
3 Using a carbon cleaner, pour a small amount into the shaft between
the adjustment cap and gas block. Add a few drops into the two holes
on the top front of the gas block and the two holes on the side front
of the gas block. Let carbon cleaner soak for 5-10 minutes.
4 Push in the adjustment cap and rotate it through all of the stops approximately
4-5 times, ensuring the holes are saturated with carbon cleaner.
5 Use compressed air to blow out the holes where you added the
carbon cleaner. Blow out all carbon and carbon cleaner.
6 Repeat step 3-5 until there is no carbon residue left and adjustment
knob rotates freely and positively locks into each adjustment setting.
7 Do not add lubricant or CLP to holes/springs after cleaning. This will
allow dirt and carbon to attract more and may cause binding. The gas
blocks and components will not rust, as they are stainless steel.
There is no need to disassemble the gas block to clean the internal components.
If your adjustment knob is bound up or will not move, use a small hammer
and tap the knob in until it stops against the gas block. Place a flat
headed screwdriver head between the cap and gas block and gently tap
the screw driver until there is enough space to pry out the cap out fully.
Repeat until you can depress it by hand. Clean per steps 2-7 above.
24
Phone: (406) 752-NEMO (6366) | Email: [email protected] | www.nemoarms.com
ADJUSTING AND CLEANING THE ADJUSTABLE GAS BLOCK
LOCATE AND FIRMLY
GRASP KNOB
PUSH KNOB INTO GAS BLOCK,
WHILE CONMPLETEY DEPRESSED
ROTATE TO DESIRED SETTING
© Copyright 2013 NEMO Arms | 3582 Hwy 93 S | Kalispell, Montana 59901
25
Using a carbon remover, pour a small amount into the shaft between the
adjustment cap and gas block. Add a few drops into the two holes on the
top front of the gas block and the two holes on the side front of the
gas block. Let carbon remover soak for 5-10 minutes. OTIS brand
Carbon Remover works well. Rotate knob through all the
settings, blow out all the holes with compressed air.
26
Phone: (406) 752-NEMO (6366) | Email: [email protected] | www.nemoarms.com
STUCK/FROZEN KNOB ON ADJUSTABLE GAS BLOCK
If your adjustable gas block knob is stuck/frozen or bound up, it is
full of carbon. This can happen in as many as 10 rounds, depending
upon ammunition and usage. Follow these steps:
1 Using a small hammer, gently tap the adjustable gas block knob towards
the gas block until it stops. This does not require a lot of force.
2 Using a small, thin screwdriver, gently pry the knob away from the gas
block. This will loosen the carbon from the knob and gas block.
3 Use your fingers and press in the knob and rotate through
al of the stops. If the knob is still frozen or still sticky, repeat
steps one and two until you can move it by hand.
4 Clean the gas block using Otis Carbon Remover per
the cleaning and maintenance section.
GENTLY TAP KNOB TOWARDS THE
GAS BLOCK UNTIL IT STOPS
© Copyright 2013 NEMO Arms | 3582 Hwy 93 S | Kalispell, Montana 59901
27
GENTLY PRY THE KNOB AWAY FROM
THE GAS BLOCK
PUSH KNOB INTO GAS BLOCK, WHILE
COMPLETEY DEPRESSED. ROTATE THRU
ALL OF THE SETTTINGS TO BREAK LOOSE
ALL OF THE CARBON
28
Phone: (406) 752-NEMO (6366) | Email: [email protected] | www.nemoarms.com
OMEN GEISSELE®
SUPER SEMI-AUTOMATIC ENHANCED TRIGGER (SSA-E)
The Geissele Super Semi-Automatic Enhanced (SSA-E) Trigger is a finely-tuned
semi-automatic-only version of our full-auto, two stage combat trigger presently
used in the U.S. Special Operations Community. Built on the chassis of the Geissele
SSA, the SSA-E provides enhanced trigger control and weapon accuracy while
maintaining the robustness and reliability of our combat-proven two-stage trigger.
The SSA-E’s reduced 1st and 2nd stage pull weights result in a trigger with a smooth,
light 1st stage take-up and a crisp, candy cane-like 2nd stage break. The SSA-E is
ideal for use in precision Squad Designated Marksman type rifles where weapon
ENHANCED TRIGGER
accuracy and reliabilitySSA-E
are SUPER
criticalSEMI-AUTOMATIC
and a non-adjustable
drop in trigger is desired.
Trigger Profile
Geissele Super Semi-Automatic Enhanced vs. Stock AR-15
10
9
Trigger Force (lb)
8
SSA-E
7
Stock AR15
6
5
4
3
2
1
0
0.150
0.140
0.130
0.120
0.110
0.100
0.090
0.080
0.070
0.060
0.050
0.040
0.030
0.020
0.010
0.000
Trigger Deflection (inch)
© Copyright 2013 NEMO Arms | 3582 Hwy 93 S | Kalispell, Montana 59901
29
Super Semi-Automatic (SSA-E) Trigger
U.S. Pat. 7,600,338
GEISSELE AUTOMATICS®
1. PERFORMANCE ADVANTAGES FOR THE SHOOTER
»» The Geissele SSA-E has a pull weight of about 3.5 lbs. There is 2.3
lbs. on the 1st stage and 1.2 lbs. on the 2nd stage. The pull weights
and sear engagement are non adjustable by the shooter.
»» Trigger and hammer are made from quality tool steel.
30
Phone: (406) 752-NEMO (6366) | Email: [email protected] | www.nemoarms.com
»» Sear surfaces are cut by a wire edm machine. Sears cut this way
are very accurate and the non-directional surface finish of the wire
edm gives a smooth trigger pull without the associated grittiness
of directional machining marks left by a milling cutter.
»» The initial force needed to start the disengagement of the sear surfaces
is low and the force linearly increases at a low rate. This helps the shot
to fall at the initial point of aim and aids in building shooter confidence
in his weapons ability to put the rounds where his sight is pointing.
»» The Geissele SSA-E trigger allows the shooter to slap through the trigger pull
on close in shots but also set up a long range shot with a crisp trigger break.
»» A full force hammer spring is used for quick locktime and positive ignition
of all types of ammo. There is no lightened hammer spring used.
»» The hammer is lighter than a standard AR15 hammer. The lightened
hammer favorably decreases locktime over a standard hammer
from 8.5 to 5.1 ms and increases accuracy of the weapon.
2. ADVANTAGES FOR THE ARMORER
»» The Geissele SSA-E is a simple design that is very similar to
the original M16 trigger. The number of parts is identical.
»» There are no adjustment screws to come loose.
»» All springs are captive; they will not get lost during disassembly in the field.
»» The entire trigger can be dissembled for cleaning (no rivets or staked parts).
»» The trigger can be installed without removing the safety.
• Sear engagement is pre-set from the factory.
»» Hammer and trigger pins are a close slip fit into nominal receiver holes
so the trigger can be installed and removed with rudimentary tools.
»» Triggers come with a slave pin for the trigger/
disconnector assembly for easy installation.
3. SAFETY ADVANTAGES
»» The Geissele SSA-E is a 2 stage trigger where there is generous overlap
of the sear surfaces which contributes to safety and a low tendency of
any inadvertent movement of the trigger to discharge the weapon.
»» The Geissele SSA-E has a patented pseudo sear that is almost identical
to the standard AR15 single stage sear. However, this secondary sear
has surfaces that never touch during normal operation. This sear
prevents the hammer from falling unless the trigger is pulled.
»» The secondary safety sear contributes to shooter confidence in dynamic/
vehicle situations where a fellow shooter’s muzzle may cover him.
There is firm knowledge that even with the safety in the fire position
the weapon can never discharge unless the trigger is pulled.
»» Trigger timing is robust and parts have been sized to operate with a
certain amount of wear to the working surfaces. The trigger is designed
to operate in dusty, abrasive environments that cause wear.
© Copyright 2013 NEMO Arms | 3582 Hwy 93 S | Kalispell, Montana 59901
31
MAINTENANCE AND WEAR
NOTE: Your rifle has parts and components that will wear and will need
replacement. This is normal. These parts have a service life and will need
to be replaced to keep your rifle in safe, optimum operational order. Parts
will wear faster under heavy use or use under unusual conditions and may
need to be replaced sooner than the scheduled replacement. Even though
parts that need to replaced appear in good condition to the naked eye, they
are fatigued and need to be replaced. Most of the parts are inexpensive and
are part of the field stripping procedure. If you are unsure how to replace a
maintenance item, have the parts replaced by a qualified armorer or gunsmith.
**Parts must be replaced by a qualified armorer or gunsmith
»» Extractor: Replace after 500 rounds
»» Extractor Spring: Replace after 750 rounds
»» Bolt Ejector Spring: Replace after 1000 rounds
»» **Bolt Carrier Extension Spring: Replace after 1000 rounds
»» Firing Pin Retaining Spring: Replace after 1000 rounds
»» **Check Headspace After 300-600 rounds
»» Check Firing Pin For Damage After Each Shooting Session
Or When Cleaning, Replace If Damaged or Worn
»» Check Safety Selector Operation Each Shooting Session Or When Cleaning,
**Replace Selector, Detent and Spring If Not Working or Damaged
»» Buffer Spring: Replace after 1000 rounds
»» **Barrel and Bolt: Replace after 1000 rounds
»» Trigger Spring: Replace after 2000 rounds
»» Hammer Spring: Replace after 2000 rounds
»» Cam Pin: Replace if Cracked, Damaged or Worn or after 1000-2000 rounds
OPERATION UNDER UNUSUAL CONDITIONS
NOTE: Unusual conditions are defined as any climatic condition
requiring special maintenance of the weapon. Perform the maintenance
outlined for the climate that most applies to your operational area.
HOT, DRY, DUSTY CLIMATES
Hot, dry climates are usually dusty and sandy areas.
They are hot during daylight and cool at night.
»» Dust and sand will get into the rifle and will cause malfunctions
and excessive wear on component working surfaces through
abrasive action during the firing operations.
32
Phone: (406) 752-NEMO (6366) | Email: [email protected] | www.nemoarms.com
»» Corrosion is less likely to form on metal parts in a dry climate; therefore, lubricate
internal working surfaces only with a small amount of cleaner, lubricant and
preservative (always shake CLP prior to use). Do not lubricate external parts
of the rifle. Doing so will only collect dust and sand, making the rifle difficult
to keep clean. Do not lubricate internal components of the magazines.
»» Using additional equipment - i.e., protective cap and spare magazine protective
bags and overall rifle protective cover will help keep dust and sand from getting
into the rifle. Use these items as the situation warrants. As a minimum effort to
keep dust and sand out of your rifle, a cartridge magazine installed in the rifle,
and a muzzle cap on the muzzle. NOTE: Before firing, remove the protective
cap and keep for later use. However, it is not dangerous to fire the rifle with the
protective cap. The cap will blow off when the first round is fired and may be lost.
WET, SNOWY, RAINY, MOIST OR HUMID CLIMATES
Snowy, rainy, moist or humid climates are usually any foggy,
rainy, snowy, coastal area. NOTE: These conditions can be
found anywhere, including desert areas at times.
»» Perform maintenance according to the appropriate climatic condition.
Use additional equipment - protective cap and spare magazine, protective
bags and overall rifle protective cover as the situation warrants.
»» Always keep the rifle dry. Using a protective cap will help keep water out
of the barrel. Always drain/remove any water, snow or ice from the barrel
before firing. Dry the bore with a swab and cleaning rod, if necessary.
»» Moisture will cause steel or iron parts to rust, corrode and/or seize.
Proper lubrication and inspection are necessary for all parts in
damp, wet, snowy, icy or moist conditions. Dry rifle/components
off with cloth and re-lubricate with CLP, if necessary.
»» Never store your rifle in a damp/wet area. Always store your rifle in dry conditions.
Check you rifle for corrosion after long periods of storage for corrosion.
TROUBLESHOOTING
MY RIFLE WON’T FIRE
»» Check to see if the safety selector is on “FIRE” mode.
»» Check to ensure firing pin is in good condition and is assembled correctly.
»» Defective ammunition. Discard ammunition and reload with new ammunition.
»» Too much oil/preservative/CLP in firing pin recess.
»» Bolt carrier must be fully forward, into battery.
»» Magazine or chamber is not loaded, reload.
»» Bolt not in battery.
© Copyright 2013 NEMO Arms | 3582 Hwy 93 S | Kalispell, Montana 59901
33
THE BOLT WON’T UNLOCK
»» The bolt and barrel extension are dirty. Field strip, clean and lubricate.
SPENT RIFLE CARTRIDGE WON’T EXTRACT.
»» Dirty or corroded ammunition. Remove spent, stuck cartridge by
using a cleaning rod to push out round. Be careful not to damage
rifling. Clean chamber and use new, clean ammunition.
»» Carbon or dirty chamber. Clean chamber.
»» Fouling or carbon on extractor. Clean bolt, extractor and chamber.
»» Broken or worn extractor spring. Replace extractor spring.
»» Broken or worn extractor. Replace extractor.
MY RIFLE WON’T FEED CORRECTLY
»» Rifle dirty. Field strip and clean rifle, including bolt carrier group,
upper receiver assembly and barrel. Re-lubricate.
»» Dirty ammunition or dirty magazine. Clean magazine
and use new, clean ammunition.
»» Defective magazine. Discard and replace with new magazine.
»» Buffer assembly restricted. Field strip and clean and lubricate
buffer assembly. Replace buffer spring if necessary.
»» Magazine not seated. Adjust magazine catch by pressing mag catch button
and turning catch clockwise to tighten or counter clockwise to loosen.
»» Loose or misaligned gas block. Tighten gas block
screws and ensure gas block is on straight.
»» Rifle over or undergassed. Adjust gas block. Call a
qualified gunsmith or NEMO Arms, Inc.
THE BOLT CARRIER WILL NOT FULLY ENGAGE AND IS HUNG UP
»» Bolt carrier group is dirty. Point rifle in safe direction, move safety selector
to “SAFE”, drop magazine and clear the rifle. Field strip and clean and
lubricate upper receiver, charging handle and bolt carrier group.
»» Point rifle in safe direction, move safety selector to “SAFE”, drop magazine
and clear the rifle. Use caution in removing stuck round and stay away
from rifle muzzle. Do not pry round with screwdriver or other sharp object.
Pull or gently tap charging handle back and/or gently bang rifle butt on
the ground, push charging handle forward and bullet will drop clear. Field
strip and clean and lubricate upper receiver and bolt carrier group.
»» Firing pin spring bound up on bolt. Field strip bolt carrier clean,
reassemble. Replace firing pin spring if necessary.
34
Phone: (406) 752-NEMO (6366) | Email: [email protected] | www.nemoarms.com
THE BOLT WON’T LOCK
»» The bolt and barrel extension are dirty. Field strip and clean.
»» Bolt extractor frozen. Field strip and clean.
»» Bolt carrier group dirty. Field strip and clean and lubricate
upper receiver, charging handle and bolt carrier group.
»» Weak buffer spring. Replace buffer spring.
I AM GETTING PIERCED OR BLOWN PRIMERS
»» Blown primers: The ammunition is too hot. Use different ammunition.
»» Pierced primers: Ammunition too hot, primers too soft. Firing pin
tip may be damaged. Inspect firing pin tip for damage. Replace
firing pin if needed. Check bolt for pitting, replace if needed.
»» Headspace is too loose. Have a qualified gunsmith
check headspace. Replace barrel as needed.
© Copyright 2013 NEMO Arms | 3582 Hwy 93 S | Kalispell, Montana 59901
35
STOCK ADJUSTMENT
36
Phone: (406) 752-NEMO (6366) | Email: [email protected] | www.nemoarms.com
© Copyright 2013 NEMO Arms | 3582 Hwy 93 S | Kalispell, Montana 59901
37
ACCURACY GUARANTEE
NEMO Arms, Inc. guarantees the OMEN rifle to shoot a 3-shot subMOA (1.047 inches or less) after the break-in period using matchquality ammunition. Every OMEN rifle is different. You will have
to find what your OMEN rifle shoots the most accurately.
To measure a group measure the center of the hole
from the holes that are the farthest apart.
Mils and MOA differ from an inch because they are angular, not linear,
measurements. An inch equals an inch no matter how far away it is.
What is MOA? MOA stands for minute of angle. There are 360 degrees in a
circle and each degree is divided into 60 minutes. If we round to the nearest
1⁄100 of an inch, at 100 yards 1 degree measures 62.83 inches. One MOA,
1⁄60 of that, measures 1.047 inches. While 1 MOA at 100 yards equals 1.047
inches, at 200 yards it equals 2.094 inches (2 x 1.047). To calculate MOA at
any distance, multiply 1.047 by the distance in yards and divide by 100.
What is a MIL? MILS (milliradians) is another angular measurement. There are
6.2832 (π x 2) radians per circle. There are 1,000 mils per radian so, there are
6,283.2 mils in a circle. There are 21,600 MOA in a circle, so a little quick division
determines there are 3.4377 MOA per mil. At 100 yards, 3.4377 MOA equals 3.599
inches (3.4377 x 1.047). Rounded up, one mil equals 3.6 inches at 100 yards.
A mil is so large, it’s broken into tenths in order to make precise adjustments. If you
have a riflescope with mil adjustments, each click equals 1⁄10 mil. A tenth of a mil
equals .36 inch or .9144 centimeter
at 100 yards. Since 1⁄10 of a mil is an angular
measurement, it will be slightly larger at 100 meters than at 100 yards because
100 meters equals 109.361 yards. At 100 meters, 1⁄10 of a mil equals .9999
centimeter. Practically speaking, 1⁄10 of a mil equals 1 centimeter at 100 meters.
Because mil, like MOA, is an angular measure, the length it represents
increases with distance. For example, 1 mil at 100 yards equals 3.6 inches
and 7.2 inches at 200 yards. To calculate how many inches are in a mil at
any distance, multiply 3.6 times the distance in yards and divide by 100.
LIMITED WARRANTY
LIMITED THREE-YEAR WARRANTY
NEMO Arms, Inc firearms, parts or products are warranted to be free from defects
in materials and craftsmanship to the initial purchaser for a period of three years.
NEMO Arms, Inc. will remedy any such defect of which NEMO Arms, Inc. is given
written notice. The liability of NEMO Arms, Inc. under this warranty shall be limited
solely to the obligation to repair or replace the firearm, part or product or defect
at its discretion, and to pay transportation and insurance charges for return of the
firearm, parts or product to owner for a rightful warranty claim. This warranty is not
transferable. Modification of any NEMO Arms, Inc. firearm, parts or product will
void warranty. This warranty does not cover normal wear, or any damage resulting
from careless handling, neglect, unauthorized repairs or adjustments, corrosion
or improper or reloaded ammunition or failure to perform normal maintenance.
38
Phone: (406) 752-NEMO (6366) | Email: [email protected] | www.nemoarms.com
Warranty claims must state (in writing) the model number, the serial number, the
part number (if applicable), a description of the difficulty experienced and include
the original receipt with date of purchase. The firearm, part or product concerned
should be shipped via normal ground shipping (transportation charges prepaid) to:
The Warranty Department
NEMO Arms, Inc.
3582 Highway 93 South
Kalispell, Montana 59901
The owner should insure firearm, parts or product shipment. NEMO Arms,
Inc. is not responsible for loss or damage in transit. NEMO Arms, Inc. will pay
shipping and insurance charges for the return of a firearm, parts or product
to its owner if the related claim is a proper claim for warranty work. Under
no circumstances shall NEMO Arms, Inc. be responsible for incidental or
consequential damages with respect to economic loss or injury to property,
whether as a result of express or implied warranty, negligence or otherwise.
PRIVACY POLICY
NEMO Arms, Inc. respects the privacy of all individuals and
businesses. We will never sell or share our customers information to
anyone. This includes names, phone numbers, fax numbers, E-mail
addresses, physical addresses, IP addresses or databases.
NORMAL WEAR PARTS AND COMPONENTS
The OMEN has parts that will wear and have to be replaced. This is normal.
Each rifle is different and each rifle will wear differently depending upon user
and conditions. Some parts will wear significantly faster than others.
»» Springs are a normal wear part and must be replaced per
the schedule or sooner if function is affected
»» Buffer. Wear (denting) on the face of the buffer on the OMEN is normal.
The buffer does not have to be replaced if the face is dented.
REPLACEMENT PARTS
You can visit our Web site at www.nemoarms.com or call us
at (406) 752-6366 or e-mail us at [email protected] to find
any replacement part or add an accessory to your rifle.
© Copyright 2013 NEMO Arms | 3582 Hwy 93 S | Kalispell, Montana 59901
39
40
Phone: (406) 752-NEMO (6366) | Email: [email protected] | www.nemoarms.com