1
-
Océ
Posterizer™ Pro
Client
POP into retail
o
User manual
Application guide
Copyright
© copyright-2010 Océ
All rights reserved. No part of this work may be reproduced, copied, adapted, or transmitted
in any form or by any means without written permission from Océ.
Océ makes no representation or warranties with respect to the contents hereof and specifically disclaims any implied warranties of merchantability or fitness for any particular purpose.
Further, Océ reserves the right to revise this publication and to make changes from time
to time in the content hereof without obligation to notify any person of such revision or
changes.
Edition: 2010-12
Contents
Contents
Chapter 1
Preface.................................................................................................................5
Trademarks.................................................................................................6
Notes for the reader...................................................................................7
Chapter 2
Océ Posterizer Pro - Presentation ....................................................................9
Océ Posterizer Client................................................................................10
Chapter 3
Install and configure the Client ......................................................................11
Compatibility and requirements.............................................................12
Hardware and software requirements..............................................12
Install the Client........................................................................................13
Install and configure the Client application......................................13
Update the application ......................................................................16
Uninstall the software........................................................................17
Set the Client interface.............................................................................18
Interface of the Client module...........................................................18
Get to know the main concepts.........................................................20
Set the customized settings and the user interface preferences....22
Set the application default behavior ................................................23
Set the Store code for the Print Manager.........................................25
Configure a local printer..........................................................................26
Install and configure a printer for a local print................................26
Chapter 4
Basic operations to create and send your first poster..................................29
Create and print or send your first poster .............................................30
You can also..............................................................................................32
Chapter 5
Advanced settings............................................................................................35
Load a chart..............................................................................................36
Update the chart.................................................................................36
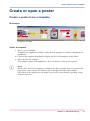
Create or open a poster ..........................................................................37
Create a poster from a template.......................................................37
Open a poster.....................................................................................39
Adjust the poster properties..............................................................40
Resize a poster....................................................................................41
Create a connection to a database..........................................................42
3
Contents
Connect to a CSV or Excel file...........................................................42
Connect to a database........................................................................44
Set the content of the poster ..................................................................46
Fill in the fields of a poster................................................................46
Preview a poster ................................................................................49
Create a set of posters (associated templates)................................50
Print a poster: Send to the FTP folder / print locally.............................51
Send a poster/set of posters for printing..........................................51
Print posters generated from a data file...........................................53
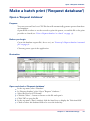
Make a batch print ('Request database')................................................55
Open a 'Request database' ...............................................................55
Print a 'Request database' as a batch ..............................................57
Format of a 'Request database' command file................................58
Save posters.............................................................................................60
Save or export a poster .....................................................................60
View and manage the log file..................................................................61
View, print or archive the 'Log file' ..................................................61
4
Chapter 1
Preface
Trademarks
Trademarks
Océ, Posterizer Pro are registered trademarks of Océ.
Microsoft®, Windows®, Access ®, ActiveX ® Data Object, ODBC ™, Windows XP®,
Windows Server 2003®, Windows Vista® , Windows Server 2008® and Windows 7® are
either registered trademarks or trademarks of Microsoft® Corporation in the United States
and/or other countries.
Oracle ® and Oracle database are registered trademarks of Oracle and/or its affiliates.
BDE is a trademark or registered trademarks of Borland Software Corporation in the
United States and other countries.
DB2® is a trademark or registered trademark of IBM Corporation in the United States,
other countries, or both.
Products in this publication are referred to by their general trade names. In most, if not
all cases, these designations are claimed as trademarks or registered trademarks of their
respective companies.
6
Chapter 1 - Preface
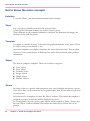
Notes for the reader
Notes for the reader
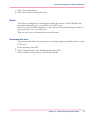
Introduction
This manual helps you to use Posterizer Pro. The manual contains a description of the
product and guidelines to use and operate Posterizer Pro.
Definition
Attention-Getters
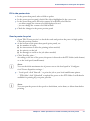
Parts of this user manual require your special attention. These parts can provide the following:
■ Additional general information, for example information that is useful when you
perform a task
■ Information to prevent property damage.
Note, Attention, and Caution
The words Note and Attention draw your attention to important information.
The attention-getters with the corresponding icons#
Word
Icon
Indicates
Note
Tips or additional information about the correct operation of the product.
Attention
Information to prevent property damage, for example
damage to the product or files.
Chapter 1 - Preface
7
Notes for the reader
8
Chapter 1 - Preface
Chapter 2
Océ Posterizer Pro - Presentation
Océ Posterizer Client
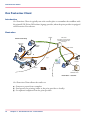
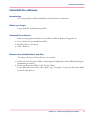
Océ Posterizer Client
Introduction
Océ Posterizer Client is typically run at the retailer place to streamline the workflow with
his printed POP (Point Of Purchase) signage provider, when the print provider is equipped
with Posterizer Pro software.
Illustration
Client
module
Print Provider Shop
Templates
Data Entry
Module
FTP server
(anywhere on the Internet,
possibly hosted by Print
Provider)
Pos
ste
Po
rs
Wide Format
Templates
ters
Designer
Module
Ema
il
s
s
er
st
Po
Print Manager
Jo
Module
b
Small
Format
Products table
Posters
Products
database server
Retail Store – Customer
Océ Posterizer Client allows the retailer to:
■
■
■
10
Generate a poster from a template
Send posters for printing (either at the print provider or locally)
Get updated templates from the print provider
Chapter 2 - Océ Posterizer Pro - Presentation
Chapter 3
Install and configure the
Client
Hardware and software requirements
Compatibility and requirements
Hardware and software requirements
Hardware requirements
#
Processor
1.6 GHz or more
Memory
2 GBytes or more
Disk space
200 MB for software installation
1 GB free space recommended to run the application
Note:
The actual amount of disk space needed to run
the application depends on the volume and
type of data processed
Display
1024x768 or higher
Network
Broadband (2 Mbit/s or more)
Connection to the Internet
FTP traffic allowed
Operating System
■
■
■
■
Windows XP (SP2 or higher) Professional
Windows Vista (Business or Ultimate), 32 bits
Windows 7 (Professional, Enterprise or Ultimate), 32 bits
Windows 7 (Professional, Enterprise or Ultimate), 64 bits (the software will run in
32 bits compatibility mode)
Language of the Operating system: English, French, German, Dutch or Spanish
12
Chapter 3 - Install and configure the Client
Install and configure the Client application
Install the Client
Install and configure the Client application
Introduction
There are two ways to install the Client according to the elements your print provider
sent:
■
■
Installation from the complete installation package (including or not including the
license)
Install the .exe file and all the application will be completely configured.
Installation using the the standard installation package for the Client, the configuration
file and the license.
Install the application and then install the license and the configuration file.
Before you begin
■
■
■
If you received the installation package without a dongle, make sure you sent the
Physical Address (Host ID) of your workstation to your print provider to get a license.
Log in with the Administrator profile
During the activation, make sure that the workstation is connected to the network.
That workstation must use the same adapter whose Physical Address was communicated in the license file request.
Required tool
■
■
■
■
■
Internet access, from the workstation, to the FTP server used to exchange information
with the print provider
The complete and customized installation package for the Client or the standard installation package
The license file when needed
The configuration file when needed
The dongle when needed
Install the application
1. Double-click the .EXE file to run it.
A wizard opens.
2. Select your language
Chapter 3 - Install and configure the Client
13
Install and configure the Client application
3. Accept the license agreement
4. Read the installation notes and check the software and hardware requirements
5. Follow the instructions of the wizard and install the application:
- for all the users on this computer
- only for the current profile (Administrator only, not recommended)
6. Select a destination folder on which the users have Read/Write rights
7. Click 'Finish' and view the Readme file
The application is installed and shortcuts are created.
8. If you use a dongle, connect it to the workstation.
Activate the application (when needed)
1.
2.
3.
4.
Double-click the shortcut icon to run the application
An activation window opens
Browse to the license file
Open it
The license is installed
Import the configuration file (when needed)
At first start of the application, a pop up prompts you to import the configuration file.
Select the configuration file and import the .ini file.You can also do it later:
In the top menu, select 'Tools'
Select 'Import Client configuration'
Browse to the .ini file (configuration settings) provided by the print provider
Click 'OK' to open it
Confirm the installation
The configuration settings are imported.
6. From the FTP menu, check that the 'Chart FTP settings...' and the 'Poster FTP settings'
are filled in.
Adjust the proxy settings when needed.
7. From the 'Configuration' menu, check the 'Application folders...'
1.
2.
3.
4.
5.
Check the 'Store code'
1. Jointly with the print provider, define a UNIQUE 'Store code' that will identify the
posters sent by this Client
2. In the 'Store code' window, check or enter the code
3. In the application, open the 'Configuration' menu
14
Chapter 3 - Install and configure the Client
Install and configure the Client application
4. Select 'Store information...'
5. Fill in the information about the store
Result
The Client is configured. It automatically checks the content of the FTP folder and
downloads the chart when it is available on the FTP server.
Select one of the available templates to create, fill in and send for printing (locally or at
print provider's) one or several posters.
When needed, you can download the chart afterwards.
Download the chart
The print provider shares the custom chart containing templates, formulas, fonts...on the
FTP server.
1. In the top menu select FTP
2. Select 'Graphical chart' and 'Download chart from FTP...'
All the elements of the charts are downloaded locally.
Chapter 3 - Install and configure the Client
15
Update the application
Update the application
Introduction
Start the installation of a new version of the application to launch the update.
1. Double click on the setup.exe file to start the installation of the new application
2. The installer detects that a previous version is installed.
The update notification window opens and proposes to update the application.
3. Click 'Yes' to start the update
Result
The configuration, user preferences, pending jobs (active and inactive jobs) are conserved
in the user's Posterizer folder.
16
Chapter 3 - Install and configure the Client
Uninstall the software
Uninstall the software
Introduction
You can partially or fully uninstall the software from a workstation
Before you begin
Log in with the Administrator profile
Uninstall the software
Remove the program from the Control Panel ('Add or Remove Programs') or
1. Go to the Posterizer installation folder
2. Double click on 'Setup.exe'
3. Select 'Remove'
Remove the related folders and files
To remove all traces of the software, you can also:
1. Delete the Oce\Posterizer folder containing the configuration files (defined during the
installation procedure)
2. Delete the Posterizer folder in the 'Temp' folder:
In the Windows start menu, select 'Run', type "%temp%". Locate the Posterizer folder
in the list and delete it.
Chapter 3 - Install and configure the Client
17
Interface of the Client module
Set the Client interface
Interface of the Client module
Introduction
The Client module is made of 5 main parts
Illustration
[4] Client UI
#
1
18
The top menu and the toolbar from which you can:
- Configure the application settings
- Set the poster and objects settings
- Connect to a database
- View and manage the logfile
Chapter 3 - Install and configure the Client
Interface of the Client module
2
The associated templates panel, where you can:
- Select one or several associated templates to print posters with same content
but different layout
- set the settings for each selected template: number of copies, sleeve, doublesided option, background color (according to the template settings)
3
The poster preview panel where you can:
- Select the objects to highlight them in the poster data panel
- Preview the content of the poster
- Preview the poster template settings
4
The poster data panel where you can:
- Fill in the poster data fields
- View, filter and select the products from a database
5
The print panel where you can:
- Send the poster or set of posters for printing to the local spool or to the
FTP folder
- Add a message for the print provider
- Indicate a priority job or request the print provider to defer the job
- Check all posters sent to the local spool
- Check all posters to be uploaded to the FTP folder
- Activate the printing of the posters stored in the local spool
- Upload the posters to the FTP folder in order to be processed by the print
provider
- Open or save the posters
Chapter 3 - Install and configure the Client
19
Get to know the main concepts
Get to know the main concepts
Definition
To use the Client , you must understand some basic concepts.
'Chart'
It is a repository of folders created by the print provider.
A chart gathers the main elements you need to create a poster.
Those elements are the templates themselves, the fonts, the formulas, the images, the
database -if any- and the posters.
'Template'
A template is a model of poster. It describes the graphical elements of the poster. Those
are objects that you can modify or not.
Associated templates are templates that share the same objects structure. You use them
to create at once several posters of different sizes and/or layout with the same product
information
'Object'
The objects compose a template. There are six objects categories:
■
■
■
■
■
■
'Text' objects
'Price' object
'Formula' object
'Image' objects
'Shape' objects
'Barcode' objects
'Sleeve'
In a shop, a sleeve is a pouch, with transparent areas, used to display and protect a poster.
On a sleeve, there can be some fixed text or graphics that, then, do not need to be printed
on each poster.
In Posterizer Pro, a template can have the 'Sleeve' attribute. This means the template is
designed to prepare posters that will be displayed in a sleeve.
As a consequence, in such a poster, some objects will be marked as 'Sleeve' objects: they
have the 'Sleeve' attribute enabled. This means that these objects do not have to be
printed.
20
Chapter 3 - Install and configure the Client
Get to know the main concepts
■
■
It is possible to preview the poster or to make a test print with it. You can see how the
poster will look like when displayed in its sleeve.
The 'Sleeve' attribute can also be used to print posters on preprinted material.
Chapter 3 - Install and configure the Client
21
Set the customized settings and the user interface preferences
Set the customized settings and the user interface preferences
Purpose
Configure the application settings to display the default settings and the user interface
the way you want.
Set the customized settings
1. In the top menu, select 'Configuration'
2. In 'Customize...' set the following settings:
■ The maximum 'Copy count' for a poster
■ The measurements 'Units'
■ The 'User interface language'
Set the user interface preferences
1. In the top menu select 'View'
2. Set the way to display the application user interface:
■ Select 'Highlight required objects' to display in red (in the poster data panel) the poster
fields set as required in the template
■ Check 'Messages' to display the 'Messages' panel.
Any text message (*.mess) stored in the 'Chart/Messages' (or 'Messages') folder will
be displayed in this panel when opening the application for this environment.
■ Select the position of the preview panel
■ Select the toolbars you want to display in the user interface
22
Chapter 3 - Install and configure the Client
Set the application default behavior
Set the application default behavior
Purpose
Configure the way the application behaves when it opens a template, and when it sends
a poster for printing.
Set the sleeve settings
1.
2.
3.
4.
Close any open poster
In the top menu select 'View'
Select 'Sleeve...'
Set whether the sleeves are enabled when you open a template and how they are displayed
in the preview panel
Set the behavior of the template data
1. In the top menu select 'View'
2. Select 'Maintain poster data...'
3. In the 'Poster data' window define the content of a poster when you open a template:
- the data from the template ('Maintain template data')
- the data from the last poster ('Maintain entered data')
- no data ('Clear all data')
Note:
These options are applicable only to fields that are not connected to a database.
Fields connected to a database are always and automatically filled in (when the database
is connected).
4. Set the content and properties of the poster after you sent the poster for printing:
- Keep or erase the poster data content ('Clear all data')
In that case, only the data you locked on the poster data panel (green padlock) will remain.
- Keep or reset the copy count
Chapter 3 - Install and configure the Client
23
Set the application default behavior
Illustration
[5] Locked content
Lock poster data
To keep poster data from one poster to another you can lock them:
1. In the poster data panel, click on the name of the field for which you want to keep the
data
2. A green padlock is displayed in front of the selected field
When you selected 'Clear all data' in the 'After sending to the Print Manager' section of
the 'Poster data', only the data in the fields with the green lock will remain.
Shortcuts to perform actions on poster data
1. In the top menu, select 'Edit'
2. Select 'Plus'
You find the shortcuts to:
- 'Clear poster data'
- Clear the data of the following poster you will open
- Fill in all the decimal fields with '00'
- Fill in all the fields with 'lorem ipsum' dummy content
- 'Clear image cache lists'
24
Chapter 3 - Install and configure the Client
Set the Store code for the Print Manager
Set the Store code for the Print Manager
Purpose
For your communication with the print provider (Print Manager module), it is important
that your 'Store code' and your store information are correctly defined.
This information is used by the print provider when dealing with your posters:
■
■
the print provider knows who to contact in your company
the print provider knows how and where to ship your posters
Check the 'Store code'
1. Jointly with the print provider, define a UNIQUE 'Store code' that will identify the
posters sent by this Client
2. In the 'Store code' window, check or enter the code
3. In the application, open the 'Configuration' menu
4. Select 'Store information...'
5. Fill in the information about the store
Chapter 3 - Install and configure the Client
25
Install and configure a printer for a local print
Configure a local printer
Install and configure a printer for a local print
Introduction
You can print posters of small format locally on a local or network small format printer.
In this case, you will use the small format printer installed on the operating system.
Illustration
Configure a printer
In the operating system settings open the 'Printers' folder ('Printers and faxes')
Add a small format printer when needed
Open the Client module
In the 'File' top menu, select 'Printer configuration'
In the list of printers installed on the operating system, select the small format printer to
be used by default for local printing
6. Configure the printer driver settings
7. Set the 'Print options' and the advanced print options
1.
2.
3.
4.
5.
26
Chapter 3 - Install and configure the Client
Install and configure a printer for a local print
#
'Print
margins'
Enter a value for the additional white space (software margins) to add
around the poster. These margins will be added to the printer margins.
Set also the size of the horizontal (X) and vertical (Y) gutter between 2
posters.
Note:
This poster spacing will not apply between the 2 sides of a
double sided poster.
'Crop
marks'
Define if the crop marks have to be printed:
'On': always, for each file (independently of the file settings)
'Off': never, for no file (independently of the file settings)
'File defaults': print the crop marks when they are set on the poster file
Define the 'Type' and 'Size' of the crop marks.
'Double
sided'
Check whether the printer allows duplex printing. So you can decide
where to define the double siding.
Select 'Software' when your printer has no duplex capability or when
you do not want to use it. When 'Software' is selected, the software will
print the recto and verso of the poster on the same sheet. You will obtain
the double sided poster by folding the sheet in two.
Select 'Printer' when the printer has duplex capabilities (and is configured
as default for that).
The 'Double sided offsets' fields allow to define a vertical and horizontal
shift between the 2 sides of the poster.
'Paper color'
Select the default color of paper on this printer.
When several colors are available on a printer, create different instances
of the printer to use one instance per color.
When you activate 'Print posters on white background' the background
of the poster file is not printed and remains white.
'Ink reduction (%)'
Depending on the color of the paper, define the level of ink reduction
for colored inks (the higher level of reduction, the clearer they will be)
and for black ink (it will make gray)
The adjustment of this feature allows you savings on ink costs and avoid
the paper deformation due to an excess of ink in dense areas.
'Special'
Select 'Print only one row' when you print several posters on a same roll
via the 'Optimization' feature (wide format printer)
The software will send each row of posters separately to the printer and
cut the roll according to the size of the image (check the setting in the
wide format printer driver)
Chapter 3 - Install and configure the Client
27
Install and configure a printer for a local print
28
Chapter 3 - Install and configure the Client
Chapter 4
Basic operations to create
and send your first poster
Create and print or send your first poster
Create and print or send your first poster
Introduction
You can easily make and send your first poster for printing.
Purpose
Open a template in the Client to complete and check the content of the poster.
When the poster is ready, you can print it locally (small format) or send it to the print
provider for printing.
Update the chart from ' FTP '
The chart is automatically updated when you open the Client . When needed, you can
manually check for an update:
1. On the top menu, select ' FTP '
2. In 'Graphical chart', select 'Verify new chart on FTP...'
3. When a new chart is detected, the application downloads it into the Posterizer
Client/Chart_date folder.
Select a template to create the poster
1. In the 'Select a poster template' pane, click on the selected template to display the complete
list of associated templates
2. Double click on the selected template to open it
The application opens the template and displays a preview.
The top panel displays the associated templates. The content and the name of these associated templates are the same, only the indication between '[ ]' signs changes (size, color,
format). The eye icon shows which selected template is displayed in the preview panel.
Double click on an associated template to set it as the main one.
3. In the top panel, check one or several associated templates
4. Enter the requested number of copies for each template
5. In case the template allows it, set the double sided, the sleeve and the background color
settings
When one of these settings is marked with a cross, you cannot change its value (locked
in the template).
30
Chapter 4 - Basic operations to create and send your first poster
Create and print or send your first poster
Fill in the poster data
1. In the poster data panel, select a field to update
2. In the poster preview panel, check if the object highlighted is the correct one
3. In the poster data panel, fill in the content of each field to be filled in:
- you must supply the content of a field displayed in red
- you can change the content of a field in black
4. Check the changes in the poster preview panel
Send a poster for print
1. Open 'File'/'Poster preview' to check the result and preview the poster in high quality
Close the preview window.
2. At the bottom of the poster data panel (print panel), set:
■ the number of copies
■ the instructions to defer the printing (when needed)
■ the priority on the job
■ the message to attach to the job (when needed)
3. Click 'Send for print...'
According to the size of the poster, the poster is directed to the FTP folder (wide format)
or to the local spool (small format).
Note:
You can check the maximum size of posters sent to the local spool in 'Configuration'/'Poster dispatcher settings...'.
4. - 'Local spool': click 'Print all...' to print the job to your local small format printer
- ' FTP folder': click 'Upload all' to upload the poster to the FTP folder. It will then be
available for printing by your print provider
Note:
You can open the posters in the spool to check them, resize them, or delete them before
printing.
Chapter 4 - Basic operations to create and send your first poster
31
You can also...
You can also...
Connect to a .xls or .csv file to fill in the poster fields
1.
2.
3.
4.
5.
6.
7.
In the top menu, click 'Database'
Select 'Connect'
Select the database file format
Browse to the location of the database file
Open the file
Select the table/sheet when requested
Validate to open the database content
Note:
Find detailed information related to the connection to a database in ‘Connect to a CSV
or Excel file’ on page 42.
Send a collection of posters to print
1. In the 'Data' window, select a data record to print
Check the poster preview in the preview panel
2. Click on the arrow to move the selected record to the list of posters to print (to the bottom
part of the window)
The application will create one poster per selected records and per selected associated
template. It will automatically fill in the fields of the poster with data from the database.
Click on the double arrow ('Select all records') to select all the records from the database.
All the records are added to the list of selected records.
3. Click 'Send for print...'
All selected posters are directed to the FTP folder (wide format) or to the local spool
(small format).
Note:
You can check the maximum size of posters sent to the local spool in 'Configuration'/'Poster dispatcher settings...'.
4. - ' FTP folder': click 'Upload all' to upload the poster to the FTP folder. It will then be
available for printing by your print provider
- 'Local spool': click 'Print all...' to print the job to your local small format printer
Posters will be printed following the settings set in the associated templates panel (templates
selected, number of copies for each template...)
32
Chapter 4 - Basic operations to create and send your first poster
You can also...
Send a small format poster to the print provider
You can send your small format poster to the print provider for printing.
1. Display the poster on the main screen
2. Fill in the poster fields
3. In the print panel click, on the FTP line, click 'Save'
The poster is added to the list of posters to be uploaded to the FTP folder.
4. Upload it to the FTP folder. It will be available for download by the print provider.
Chapter 4 - Basic operations to create and send your first poster
33
You can also...
34
Chapter 4 - Basic operations to create and send your first poster
Chapter 5
Advanced settings
Update the chart
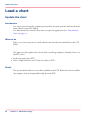
Load a chart
Update the chart
Introduction
You create posters from the templates generated by the print provider and stored in the
chart (shared on the FTP folder).
You downloaded the chart the first time you open the application (see ‘Download the
chart’ on page 15).
When to do
Before you create new posters, check whether the chart has been modified on the FTP
folder.
The print provider updates the custom chart containing templates, formulas, fonts...on
the FTP server.
1. In the top menu select FTP
2. Select 'Graphical chart' and 'Verify new chart on FTP...'
Result
The system checks if there is a new chart available on the FTP. When the chart is available,
the complete chart is downloaded locally from the FTP.
36
Chapter 5 - Advanced settings
Create a poster from a template
Create or open a poster
Create a poster from a template
Illustration
[7] Select a template
Select a template
1. Select a poster template
Templates are organized in folders. Only the first template in a folder is displayed as a
thumbnail.
2. Click on the template thumbnail to display the list of all templates in the folder
3. Select the relevant template
The template opens in the application. You can check it in the preview panel.
Note:
All the other associated templates are displayed in the top panel: they are posters with
same name, same content but different size or background color (for example)
Select them in the application top panel if you want to send them for printing, along
with the main one.
Chapter 5 - Advanced settings
37
Create a poster from a template
Illustration
[8] 'Poster information...'
Get information on the poster created from a template
1. In the top menu select 'File'
2. Select 'Poster information...' to open the 'Poster information' window
3. You can check:
- the location, name, and properties of the template file
- the 'Poster' properties
- the 'Objects' used in the template and their properties
- the 'Images', 'Fonts', and 'Formulas' used in the template. A missing element is written
in red color.
- the 'Database' to which the template is related, when any. A missing database is marked
with a red cross.
38
Chapter 5 - Advanced settings
Open a poster
Open a poster
Introduction
You can open already created posters to edit them.
Open a saved poster
1.
2.
3.
4.
In the top menu, select 'File'
Select 'Open...' to open the folder where the saved posters are stored
Search and select the poster
Click 'Open' to open it in theClient
Note:
Only the poster opens. The related templates are not available.
'Open poster from log file'
1. In the top menu, select 'File'
2. Select 'Open from log file...'
A search window pops up
3. Enter one or several keywords from the poster
4. Click 'Next'
5. Select the poster in the list of posters recorded in the 'Log file'
6. Click 'OK' to open it in the Client
Chapter 5 - Advanced settings
39
Adjust the poster properties
Adjust the poster properties
Purpose
When the selected template allows it, you can adjust some poster properties.
Illustration
1. In the top menu, select 'Poster'
2. Check and adjust the available poster properties: double-sided, sleeve printing, background
color
You can check or uncheck the available settings (written in black)
You cannot modify the grayed out settings. They are locked in the selected template.
Note:
The changes you make for a template apply only to this template. The associated templates
remain unchanged.
Result
You can see and check the changes in the associated templates panel.
Any change is immediately displayed in the preview panel.
Preview the poster and set the 'Double sided type'
1.
2.
3.
4.
40
In the top menu, select 'File'
Select 'Poster preview'
Use the icons to select 'Horizontal double sided' or 'Vertical double sided'
You can preview the poster the way it will be printed
Chapter 5 - Advanced settings
Resize a poster
Resize a poster
Purpose
You can resize a poster to change the size set in the template
1.
2.
3.
4.
In the top menu, select 'File'
Select 'Resize'
In the 'Select size' window, select a standard or a custom page size.
Check or uncheck the 'Resize objects' when needed
Chapter 5 - Advanced settings
41
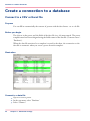
Connect to a CSV or Excel file
Create a connection to a database
Connect to a CSV or Excel file
Purpose
You can fill in automatically the content of posters with the data from a .csv or .xls file.
Before you begin
The objects in the poster and the fields of the data file (csv, xls) must match. The poster
template must have been designed using the fields names of the data file ('Content source':
'Database').
When the data file associated to a template is stored in the chart, the connection to the
data file is automatic when you create a poster from the template.
Illustration
Connect to a data file
1. Open or create a poster
2. In the top menu, select 'Database'
3. Select 'Connect'
42
Chapter 5 - Advanced settings
Connect to a CSV or Excel file
4.
5.
6.
7.
Select the format of the data file (CSV, Excel)
Browse to the location of the file
Open the file
Select the table or sheet when requested
Result
The 'Database' tab displays the content of the data file.
Select the data records to display them in the poster data panel ('Objects' tab) and in the
preview panel.
Display the content of the data file
1. In the poster data panel, check if the data file is connected
2. To display the complete data file in the 'Data' window, click the 'View' icon
The 'Database' tab opens
3. In the top menu ('Database' tab) click the hand icon to display the 'Selection field'
4. Check or select the field to be set as the index key
5. To display a preview of a poster for each record of the data file, click the left/right arrows
Chapter 5 - Advanced settings
43
Connect to a database
Connect to a database
Introduction
You can get posters data from different database connections and sources:
#
Connections:
■ ODBC
■ ADO
■ BDE Alias
■ ...
Sources
■ Access
■ DB2
■ Oracle
■ ...
Before you begin
The objects in the poster and the fields of the database must match. The poster template
must have been designed using the fields names of the database ('Content source':
'Database').
Illustration
Connect to a database
Note:
When the template is related to a database stored in the chart, the connection to the
database is automatically made when you create a poster from the template.
Make sure you perform the steps 7 and 8 (below) to be able to select the records.
1. In the top menu, select 'Database'
44
Chapter 5 - Advanced settings
Connect to a database
2.
3.
4.
5.
6.
7.
8.
Select 'Connect'
Select the format of the database
Browse to the location of the database file or open the connection
Open the database
Select the table to use
In case of a .csv or .xls file, click the hand icon to open the 'Selection field'
Select the field to be used as the index primary key
Chapter 5 - Advanced settings
45
Fill in the fields of a poster
Set the content of the poster
Fill in the fields of a poster
Introduction
A poster is made of different objects: 'Image', 'Text', 'Formula', 'Price'...
In the template, the objects can be set as editable or fixed. The user input can be set as
free, required or forbidden.
In the Client you are able to fill in the objects fields for which content is free or required.
The required fields are displayed in red font.
You can manually fill in the content of the fields or import it from a data file.
Illustration
Manually fill in the poster data
1. Create or open a poster
2. In the poster data panel, select a field of the poster
46
Chapter 5 - Advanced settings
Fill in the fields of a poster
3.
4.
5.
6.
The content of the field is highlighted in the poster data panel and the object is surrounded
in the poster preview panel.
In the top menu, select 'Object' to display the menu of the settings and properties that
are available for this object
Check or adjust the object settings and properties
In the poster data panel enter the content in the field (when required or allowed)
Repeat the action for all poster fields to fill in
Fill in the poster fields with the content of a database file
1.
2.
3.
4.
5.
On the top of the poster data panel, check if the database is connected
To display the database content, go to the 'Database' tab of the poster data panel
Click the hand icon to display the 'Selection field'
Check or select the database field to be set as the index key
To display a preview of a poster for each record of the database, select the records or click
the left/right arrows
Filter/Search in a database file
In the poster data panel, check if the database is connected
To display the database content, go to the 'Database' tab of the poster data panel
In the top menu ('Database' tab) type one or several words in the 'Search' field
Select 'and' to search for records that contain all the words, select 'or' to search for records
that contain one of the words.
5. Click the green tick to start the search
1.
2.
3.
4.
Note:
You can also search for a record directly in the poster data panel:
- Enter the reference of the record in the related field
Example: type '123' in a 'Code' field
- Click on the glasses near to the field
The application will display the records which hold '123' as the code number.
Result
The 'Send for print' button becomes red to indicate that a change was made in the poster.
When the content of the poster fields is complete, you can:
■
Check the poster settings and options
Chapter 5 - Advanced settings
47
Fill in the fields of a poster
■
■
■
■
48
Preview the poster
Send the poster for printing
Print the poster locally
Save the poster
Chapter 5 - Advanced settings
Preview a poster
Preview a poster
Introduction
In the preview panel, you check the content of a poster.
In the 'Poster preview' you can check the poster as it will be printed
1.
2.
3.
4.
Create or open a poster
Fill in the poster data
In the top menu select 'File'
Select 'Poster preview'
Result
A high resolution preview of the poster is displayed, full screen.
You can:
■
■
Test the layout of the double-sided option (horizontal or vertical)
Click on the print icon to print the poster locally (small format only)
Click 'Close' to exit the preview and come back to the main window.
Chapter 5 - Advanced settings
49
Create a set of posters (associated templates)
Create a set of posters (associated templates)
Purpose
You can print a set of posters with the same content but based on different associated
templates.
Illustration
1. Create a new poster from a template
2. Fill in the poster objects fields
3. In the associated templates panel, check the other poster templates to print
Note:
The content of the objects fields will be the same for all posters
4. When available, check and adjust the properties of each associated poster: click on the
icons to set the double-sided, sleeve printing, background color.
Note:
To be able to preview an associated template you must set it as the main one: double click
on it. The current main template becomes an associated template and the selected template
becomes the main one.
5. Set the number of copies of each poster
Result
The set of posters is ready to be sent for printing.
50
Chapter 5 - Advanced settings
Send a poster/set of posters for printing
Print a poster: Send to the FTP folder /
print locally
Send a poster/set of posters for printing
Purpose
When a poster is ready to print, send it for local or distant (print provider) printing.
When to do
After the:
■
■
■
■
Fill in of the poster data
Check of the poster properties
Check of the poster preview
Selection of the associated templates (when any)
Illustration
Set the print settings and print
1. From the print settings panel (at the bottom of the poster data panel), set the number of
copies to print
2. To defer the printing, select the date and time when the print provider must print the
job
3. To put high priority on the job, select the '!' icon
4. To attach a message to the poster:
- Select the 'mail' icon
- Click the 'edit' icon to compose and view your message
The message will be displayed in the print provider application
5. Click 'Send for print...'
According to the size of the poster, the poster is directed to the FTP folder (wide format)
or to the local spool (small format)
Chapter 5 - Advanced settings
51
Send a poster/set of posters for printing
Note:
You can check the maximum size of posters sent to the local spool in 'Configuration'/'Poster dispatcher settings...'.
6. - 'Local spool': click 'Print all...' to print the job to your local small format printer
- ' FTP folder': click 'Upload all' to upload the poster to the FTP folder. It will then be
available for printing by your print provider
Open a sent poster
You can open the list of posters that are in the spool (local or before the upload to the
FTP folder)
1. Click 'Open...'
That opens the folder where all posters waiting to be printed or uploaded are stored.
In the local spool folder, you can also see the status of the posters
2. In the local spool folder, select one or several posters to:
- Add them to the print list
- Display and check them
- Resize them
- Delete them
You can check and adjust the 'Printer configuration...'
3. Click 'Print' to print one or several posters to the local printer
4. Check the status in the 'Printed posters' tab
5. In the FTP folder, you can check the list of posters to be uploaded to the FTP
You can also:
- Display and check a poster
- Rename or delete a file
Send a small format poster to the print provider
You can send your small format poster to the print provider for printing.
1. Display the poster on the main screen
2. Fill in the poster fields
3. In the print panel click, on the FTP line, click 'Save'
The poster is added to the list of posters to be uploaded to the FTP folder.
4. Upload it to the FTP folder. It will be available for download by the print provider.
52
Chapter 5 - Advanced settings
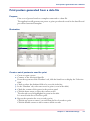
Print posters generated from a data file
Print posters generated from a data file
Purpose
Print a set of posters based on a template connected to a data file.
The application will generate one poster to print per selected record in the data file and
per selected associated template.
Illustration
Create a set of posters to send for print
1. Create or open a poster
2. Connect to the associated data file
3. From the top menu of the 'Database' tab, click the hand icon to display the 'Selection
field'
4. Check or select the database field to be set as the index key
5. In the 'Database' tab, select one record to print (a row in the table)
6. Check the content of the poster in the preview panel
7. Click the down arrow to select the current record.
The selected record is highlighted in green in the table.
It is stored in the list of record to print.
8. Repeat the operation for every record to print
Click the up arrow to remove a record from the list of records to print
Click the double arrows to add or remove all the records
Chapter 5 - Advanced settings
53
Print posters generated from a data file
Make a query to filter the records to print
1. Connect to a data file or go to the 'Database' tab of the poster data panel
2. Create a query to filter the records:
- Enter the elements of the query in the 'Search' field (text, number...)
- Select the operator: 'or' or 'and'
the green tick to launch the query
Click
3.
Only the filtered records remain in the table.
Sort the records of the data file
1. Connect to a data file or go to the 'Database' tab of the poster data panel
2. Select the category to sort on
3. Click on the column title of this category
All the records are grouped by category and by alphabetical/numerical order
4. Select the records to add to the list of records to print
Result
Click 'Send for print' to send the selected posters (and associated templates when selected)
to
- The local spool (small format posters)
- The list of posters to be uploaded into the FTP folder
54
Chapter 5 - Advanced settings
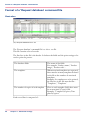
Open a 'Request database'
Make a batch print ('Request database')
Open a 'Request database'
Purpose
You can create an Excel or a CSV file that will automatically generate posters from data
and templates.
Open the file to select or sort the records to print the posters, or send the file to the print
provider as a batch (see ‘Print a 'Request database' as a batch ’ on page 57).
Before you begin
Create the database request file (.xls or .csv), see ‘Format of a 'Request database' command
file’ on page 58.
Close any poster open in the application.
Illustration
Open and check a 'Request database'
1.
2.
3.
4.
5.
6.
7.
In the top menu, select 'Database'
In 'Request database' select 'Open "Request" database...'
Select the Excel or CSV format
Click the 'Select'... button to browse to the file and open it
Click 'OK' to open the file
In the top menu ('Data' window) click the hand icon to display the 'Selection field'
Check or select the database field to be set as the index key
Chapter 5 - Advanced settings
55
Open a 'Request database'
Result
The 'Data' window displays a table that contains the poster data, the templates to use
and the number of copies for each template.
Select and print records
1. In the 'Data' window, select a record to print
2. Click the down arrow to add the record to the table of selected records (click the double
down arrow to select all records)
3. When all needed records are selected, click '&Send "RequestDB" for print...' to send
them to print
Result
The posters to print by the print provider are ready to be uploaded to the FTP folder.
Click 'Upload all' to make them available on the FTP folder.
56
Chapter 5 - Advanced settings
Print a 'Request database' as a batch
Print a 'Request database' as a batch
Purpose
Build a list of requests database files to generate posters and send them to FTP folder as
a batch.
Before you begin
Create the request database files (.xls or .csv), see ‘Format of a 'Request database' command
file’ on page 58.
Close any poster open in the application.
1.
2.
3.
4.
In the top menu, select 'Database'
In 'Request database' select 'Print "Request" databases...'
Select one or several print request files (.xls or .csv files)
Click 'Send all "Print request" posters to the Print Manager...'
Result
The application generates all the poster files from the request files and send them to the
list of posters to upload to the FTP.
Click 'Upload all' to make them available on the FTP folder.
Chapter 5 - Advanced settings
57
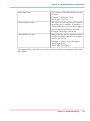
Format of a 'Request database' command file
Format of a 'Request database' command file
Illustration
[17] 'Request database' file: .xls
The 'Request database' command file is a .xls or .csv file.
This file contains a list of records.
The first line in the file is the header. It declares the fields and the print settings to be
used to print the posters:
#
The database fields
The name of the fields
For example: 'Product name'; 'Product
image'; 'Product code'...
The templates
When associated templates are requested,
there must be as many templates declared
in the file as the number of associated
templates.
Example: if 2 templates are to be printed,
the first line in the file must declare :
'Template1', 'Template2'
The number of copies of each template
Close to each template field, there must
be an associated 'Copies' field.
Example: 'Template1;Copies1;Template2;Copies2'
Each record line is composed of :
58
Chapter 5 - Advanced settings
Format of a 'Request database' command file
#
Each field value
The content of the fields declared in the
first line
Example: 'Veal Breast';'Veal
Breast.jpg';'12456745'....
Each template name
The name of each template file declared
in the first line (Template1, Template2...)
The template must contain objects whose
content match the fields in the table
Example: 'Meat Sign [letter].ptf'
The number of copies
Integer that specifies the number of copies
for each template# that have to be generated for the record.
Example: to print 1 copy of template
'Meat Sign [letter]':
'Meat Sign [letter].ptf;1'
The template files (.ptf) must be located (anywhere) under the templates folder of the
chart folder.
Chapter 5 - Advanced settings
59
Save or export a poster
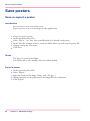
Save posters
Save or export a poster
Introduction
Save a poster to store it for a later reuse.
Export a poster to use it as an image in other applications
1.
2.
3.
4.
5.
6.
Create (or open) a poster
In the top menu select 'File'
Select 'Save as...' (or 'Save' after a modification of an already saved poster)
In the 'Save file' window, select or create the folder where you will store the poster file
Change or keep the 'File name'
Click 'Save'
Result
The poster is stored in the folder.
You will be able to edit, modify, and save it when needed.
Export a poster
1.
2.
3.
4.
5.
60
In the top menu select 'File'
Select 'Export...'
Select the format of the image (.bmp, .emf, .tiff, .jpg...)
When requested, set the properties of the image file (size, resolution..)
Click 'Export'
Chapter 5 - Advanced settings
View, print or archive the 'Log file'
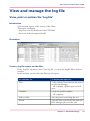
View and manage the log file
View, print or archive the 'Log file'
Introduction
You can make reports of the activity of the Client .
This report can display:
- the posters sent by the Client to the FTP folder
- the status of the jobs printed locally
Illustration
Create a log file report: set the filter
In the 'Log file' top menu, select 'View log file...' to open the Logfile 'Filter and sort'
window.
In this window you can select the filters for the report:
#
You can filter on:
To display the report for:
'User'
- only a selected user who sent the poster
to the Print Manager
- 'all' to display a global report with all
users
'Template'
- only one specific template
- 'all' templates
'Full text filter'
only the posters containing this text
'Period'
a specific date or period of time when the
Print Manager processed the jobs
Chapter 5 - Advanced settings
61
View, print or archive the 'Log file'
Define the criteria and the order to sort the posters in the report.
Create a log file report: define the 'Log file settings' (Administrator only)
■
■
■
Log in as an Administrator (In the 'Configuration' top menu, select 'Administrator
login' and enter the password)
In the 'Log file' top menu, select 'Settings...' to open the Logfile 'Log file settings'
window.
Define the log process and frequency:
Select the behavior for logging: frequency and content of the recording. By default,
it will log the actions of the 7 last days.
Optimize the access to the logfile (for a faster access)
By default, there is no log file archived.
Manage the log file: print, export and clear the report
The log file displays the requested report, according to the filter your set.
Note:
Regularly clear the report to clean up the logfile database and optimize the future access
time.
The 'File name' is the name of the .psf file sent to the printer.
Double click on a column header (or click the 'Sort' icon) to sort the jobs by this criteria
(by date or by user for example).
You can move and resize the columns.
From this view you can click on the buttons in the top menu to:
■
■
■
■
■
■
■
■
62
Revert to the 'Filter' tab
Revert to the 'Sort' tab to sort the report by a specific criteria
Print the full report
'Export the log file in a text file': a .csv file you can open in Excel for example
Create and apply another 'Full text filter'
Navigate through the report (using the arrows)
Delete one record or all records in the report, clear the report or pack the data of the
table into a database file and save it.
Perform operations on posters. Select one poster in the list (a symbol appears in the
first column) and deploy the 'Poster operations' menu to:
- View the details of the poster
- Edit the poster in the Client : you can then modify the poster and resend it
Chapter 5 - Advanced settings
Index
Index
P
Activation
Activation .......................................................14
C
Chart
Chart ..............................................................20
Download .......................................................15
Update .....................................................30, 36
Configuration
Configuration .................................................14
Customize
Customize ......................................................22
D
Database
Database .........................................................47
Connection .....................................................44
CSV, XLS .......................................................32
CSV, XLS files ................................................42
Search .............................................................47
Set of posters ..................................................53
Poster
Create a set .....................................................50
Export ............................................................60
Open .......................................................39, 52
Print ...............................................................51
Properties .......................................................40
Save ................................................................60
Poster data
Behavior .........................................................23
Create content ................................................46
Database content ............................................47
Lock ...............................................................24
Shortcuts ........................................................24
Poster preview
Poster preview ................................................49
Print
Print ...............................................................31
Posters from database ......................................32
Printer
Configure .......................................................26
Local ...............................................................26
R
Installation
Installation .....................................................13
Request database
Batch ..............................................................57
Create .............................................................58
Open ..............................................................55
Print as batch ..................................................57
Print records ...................................................56
L
S
Local print
Configure printer ............................................26
Log file
Log file ...........................................................61
Sleeve
Sleeve .............................................................20
Sleeves
Behavior .........................................................23
Small format poster
Print provider ..........................................33, 52
Store code
Store code ................................................14, 25
I
O
Object
Object ............................................................20
Objects
Properties .......................................................46
Settings ...........................................................46
T
Template
Template ........................................................20
63
Index
Associated template ........................................20
Open ..............................................................37
Select ..............................................................30
Templates
Select template ................................................37
U
Uninstall
Uninstall .........................................................17
V
View
User interface ..................................................22
64
+3
+3
+3
-
Beyond the Ordinary
o
Printing for
Professionals
Professionals everywhere look to Océ for digital printing
and document management. In the office, Océ systems
keep the information of business and government
flowing. In manufacturing, architecture, engineering,
and construction, Océ wide-format printers set the
standard, while our display graphics systems help people
produce banners, billboards, and other large, colorful
applications. In corporate print facilities, marketing
service bureaus, and the graphic arts industry, Océ
systems print transaction documents, mailings,
newspapers, manuals, and books - on demand and at the
highest speeds. And Océ Business Services manages the
complete document workflows of customers around the
world. It all helps you go “Beyond the Ordinary” in
printing and document management.
Océ. Illustrations and specifications do not necessarily apply to products
and services offered in each local market. Technical specifications are
subject to change without prior notice. All other trademarks are the
property of their respective owners.
For more information visit us at:
2010-12
www.oce.com
US