1
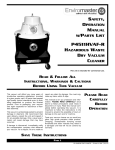
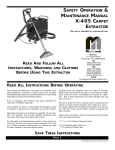
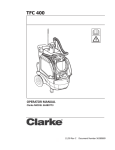
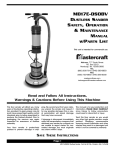
SAFETY,
OPERATION
AND
MAINTENANCE
MANUAL
RA-300 SCRUBBER
This Unit is intended for commercial user.
READ & FOLLOW
ALL INSTRUCTIONS,
WARNINGS & CAUTIONS
BEFORE USING
THIS SCRUBBER
This scrubber will afford you many years of
trouble-free operating satisfaction, provided it is given proper care. All parts have
passed rigid quality control standards prior
to being assembled to produce the finished
product. Prior to packaging, the scrubber
was again inspected for assurance of flawless assembly.
Your scrubber is protectively packed to
prevent damage in shipment. We recommend that upon delivery, unpack your
scrubber and inspect it for any possible
damage. Only a visual examination will
reveal damage that may have occurred in
transit.
If damage is discovered, immediately notify
the transportation company that delivered
your scrubber. As a shipper, we are unable
to report any claim for damage. You must
originate any claim within 5 days of delivery.
The manufacturer takes no responsibility
for damages caused to property or persons due to improper use of the scrubber.
Operating instructions must always be
available for the operator. The scrubber
may only be operated by persons who have
been fully trained and authorized to use it.
READ ALL
INSTRUCTIONS
BEFORE
OPERATING
SAVE THESE INSTRUCTIONS
PAGE 1
RA-300 Manual - Part No 258407 - Printed in USA 01-27-10
IMPORTANT
SAFETY
INSTRUCTION
WARNING:
To Avoid Electric Shock, Do Not Expose To Rain
Store Indoors.
When using this equipment basic precautions should
always be followed, including the following:
1) DO NOT leave the electric scrubber
when plugged in. Unplug from outlet when
not in use and before servicing.
10) DO NOT use this scrubber for dry
vacuuming. This scrubber is not fitted with
a fine dust filter.
2) Turn OFF all controls before unplugging.
11) DO NOT use the scrubber to pick up
flammable or combustible liquids such as
gasoline or use in areas where they may
be present.
3) This is NOT a toy. Close attention is
necessary when used around or near children.
4) Use only as described in this safety
manual. Use only manufacturer's recommended attachments and accessories.
5) DO NOT use electric scrubber with
damaged cord or plug. If the scrubber is
not working as it should, because it has
been dropped, damaged, left outdoors or
dropped into water, contact an authorized
service center or the factory.
6) DO NOT pull electric scrubber by the
cord, use cord as a handle, close a door
on cord or pull cord around sharp edges
and corners. DO NOT run scrubber over
cord. Keep the cord away from heated
surfaces.
7) DO NOT unplug the scrubber by pulling
on the cord. To unplug, grasp the plug,
not the cord.
8) DO NOT handle the plug of the electric
scrubber with wet hands.
9) Store scrubber indoors in a dry area.
DO NOT expose to freezing temperatures.
CARE OF THE
SCRUBBER
This scrubber is designed to be safe when
used to per-form cleaning functions as
specified. Should damage occur to electrical parts, the unit should NOT be used
until the damage is repaired by the manufacturer or an authorized service center.
This will avoid further damage to the
scrubber or injury to the user.
PAGE 2
12) DO NOT use this scrubber to clean
surfaces that have dust or substances
which are flammable, poisonous, caustic,
or irritants and represents a health hazard.
13) DO NOT use where anesthetics or
oxygen are used.
14) DO NOT use an extension cord unless
absolutely necessary. If an extension cord
is used, then wire size must be #14 or
larger and should not exceed 50 feet in
length. The extension cord must be a
three-wire grounded type.
15) Replace damaged or worn parts
immediately with genuine original equipment parts to maintain safety and to protect your limited warranty.
16) DO NOT run pump dry. When the
solution tank is empty, turn off the pump.
17) NEVER drive scrubber over steps.
Electrical equipment must be connected
to a properly grounded outlet only. (See
grounded instructions)
These instructions are for your protection
and information. PLEASE READ CAREFULLY! Failure to follow instructions or
precautions could result in injury or damage to the user and/or the scrubber.
DANGER:
Improper use of the grounding plug can result in a risk of electric shock.
Electrical equipment must be grounded. If
it should mal-function or breakdown,
grounding provides a path of least resistance for electrical current to reduce the
risk of electric shock. The scrubber is
equipped with a cord having an equipmentgrounding conductor and grounding plug.
The plug must be inserted into an appropriate outlet that is properly installed and
grounded in accordance with all local
codes and ordinances.
GROUNDING
SAFETY
INSTRUCTIONS
If repair or replacement of the cord or plug
is necessary, DO NOT connect the grounded wire to either flat blade terminal. The
wire with insulation having an outer surface that is green with or without yellow
stripes is the grounding wire.
GROUNDING
METHODS
This electric equipment is for use on a nominal 120 volt circuit, and has a grounded
plug that looks like the plug illustrated in (Fig
A). A temporary adaptor that looks like the
adaptor illustrated in (Fig B & C) may be
used to connect this plug to a 2-pole receptacle as shown in (Fig B) if a properly
grounded outlet is not available.
The temporary adaptor should be used only
until a properly grounded outlet (Fig A) can
be installed by a qualified electrician. The
green color rigid ear, lug or the like extending from the adaptor must be connected to
a permanent ground such as a properly
grounded outlet box cover. Whenever the
adaptor is used, it must be held in place by
a metal screw (Fig 3).
WARNING:
Improper connection of the equipment-grounding conductor can result in a risk
of electric shock. Check with a qualified electrician or service person if you are
in doubt as to whether the outlet is properly grounded.
DO NOT modify the plug provided with the equipment. If it will not fit the outlet,
have a proper outlet installed by a qualified electrician.
Note: In Canada, the use of a temporary adaptor is not permitted
by the Canadian Electrical Code.
PAGE 3
OPERATION
SCRUBBER
OF
1) This scrubber is designed for wet
cleaning on waterproof surfaces inside
buildings. All other usage is improper.
2) The manufacturer takes no responsibility for damage due to improper use of the
scrubber. The user takes the entire risk
for damage due to improper use.
3) Following the operating, maintenance
and repair instructions are required.
4) The appropriate accident prevention
rules, as well as other known regulations
for health and safety in operation must be
followed.
SAFETY &
CHEMICAL
INFORMATION
5) Any changes to the scrubber will void
the warranty. Any damage that may occur
as a result of those changes will be the
sole responsibility of the owner.
6) Check the suitability of the floor surface
before using the scrubber.
7) Check that the wheels and brushes will
not damage any surface to be cleaned,
especially gymnasium floors.
8) If the scrubber is misused, the manufacturer will not be responsible for any
form of warranty.
Operation Safety
Chemicals
1) DO NOT run the brushes when the
scrubber is stationary as it may cause
damage to the surface being cleaned.
1) Always consult correct use and safety
precautions as detailed on manufacturers
label. If required, wear appropriate recommended clothing and safety glasses.
2) Tilt scrubber back when moving, especially over thresholds or sills to prevent
damage to the brushes.
3) When transporting in elevators, there
safety regulations and precautions are to
be respected as well as maximum load
capacity of the elevator.
2) Only use low foaming and non-flammable chemicals which do not include hazardous components.
3) DO NOT use flammable, poisonous,
hazardous or explosive chemicals.
WHAT TO USE WITH SCRUBBER
Type Of Cleaning
Chemicals
Scrub Brushes/Pads
Daily or weekly cleaning on waterproof surfaces.
Floor cleaner, degreaser, maintenance
cleaner, scented cleaner depending
upon the degree of dirt on surface.
Nylon brushes, red, green or white
pads depending on condition of floor.
Note: Maximum water and chemical temperature is 72° F
ROUTINE
MAINTENANCE
If you maintain this scrubber properly it will
stay in working order for a long period of
time. Check the unit regularly for any wear
and tear.
1) Check rubber squeegee blades.
2) DO NOT clean scrubber with pressure
washer.
3) When servicing or making repairs use
only genuine original equipment parts.
PAGE 4
4) Repairs and service should only be
made by an authorized service center or
the factory.
5) Monthly Maintenance: Check all gaskets, tighten loose nuts and bolts.
6) Every (6) months check vacuum motor
carbon brushes, if worn to 3/8” length or
less replace.
SCRUBBER
FEATURES
Intermittent Solution Lever
Vacuum
Switch
Brush/Solution Switch
Cord and Cord Wrap
Adjustable/Folding Handle
Quick Release Brush ystem
Sight Dome
Solution/Recovery
Tank
Compact Fold-Up Design
Handle Grip
Squeegee
Disc Brushes
Removable Easy Fill Tank
Tank Construction:
Scrub Path:
Cleaning Direction:
Brush Spread:
Squeegee Width:
Solution Capacity:
Recovery Capacity:
Vacuum Motor:
Brush Motor:
Brush Speed:
Brush Pressure:
Water Output:
Power Cord:
Storage Dimensions:
Includes:
Net Weight:
Rotationally Molded Polyethylene
13.5”
Forward/Back
Two (6.5”)
15”
3.5 Gallons
4 Gallons
120 Volt, By-Pass - 850 Watts
200 Watts
200 RPM
22 Lbs
.2 (GPM)
25 Ft, 3 Wire Grounded
15” W X 22” L X 16” H
6.5” Counter Rotating Scrub Brush
48 Lbs Net/54 Lbs Shpg
PAGE 5
SCRUBBER
SPECIFICATIONS
OPERATING
PROCEDURES
1) Prepare the floor surface by sweeping
or vacuuming before using the scrubber.
10) Plug-in the power cord, turn on the
vacuum switch,and then the brush switch.
2) Make sure all the switches are OFF.
Solution Lever
3) Select the proper floor brushes or pad
drivers and floor pads for the cleaning
operations.
Handle Height
Adjustment
Handle Angle
Adjustment
4) Adjust the handle to the best position
for comfortable operation.
5) Add the chemical required. Check the
label for dilution rates.
6) Fill a clean bucket with clean water, and
pour it into the solution tank opening,
maximum capacity 3.5 gallons.
Gasket
11) Start cleaning by squeezing the solution lever and push the scrubber forwards
or backwards.
Squeegee
Lever
12) If the floor is very dirty, turn OFF the
vacuum switch. Using the squeegee lever,
lift the squeegee off the floor. Squeeze the
solution lever to add more cleaning solution
to the floor. Scrub the floor thoroughly.
13) Turn ON the vacuum switch, lower
the squeegee to the floor, and vacuum up
the dirty solution.
Short Solution
Hose
14) While cleaning, monitor foam level in
the recovery tank. If heavy foam is building, pour a quality defoamer into the
recovery tank.
Rear Rim
7) Place the solution hose to the far side of the tank making sure the hose is not bent. Place the
dome to the rear rim of the tank and
press the dome gasket gently into the
front rim.
8) Check to make sure the short solution
hose located at the bottom right on the
scrubber is plugged into the female QDC
connector.
9) When using an external cleaning tool
unplug the hoe and plug in the solution
hose to the attachment you are using.
PAGE 6
15) Periodically check the solution level in
the tank. NEVER allow brushes or pads to
run dry, otherwise both the pump and the
floor may be damaged.
16) Periodically inspect the squeegee
blades for obstructions (sand, cigarette
butts, paper etc) clear, then continue the
cleaning.
17) Before refilling the solution tank, flush
the recovery tank with clean water.
1) Remove dome cover from the tank and
set it down behind the scrubber.
DAILY
6) Empty the solution bladder and rinse
with clean water.
7) Hang up the solution bladder to dry.
8) Flush out the recovery tank with clean
water to remove dirty solution. Drain tank.
9) When replacing the bladder make sure
it fits properly
into the recovery tank.
2) Lift tank by the grip and carry it to a
floor drain or sink.
10) The bladder tab must be fitted on the
left side of solution tank opening seen
from the rear operators position.
Drain Plug
11) Clean the dome, cover, vacuum hose
and solution hose thoroughly. Make sure
that the solution hose filter is also
cleaned.
3) Remove the drain plug from recovery
tank and empty the tank.
4) Remove solution bladder from tank by
pulling tab on the bladder upwards gently.
5) Once the edge of the bladder comes
over tank rim opening, push the entire
bladder into the tank and remove bladder
through the large opening of the recovery
tank.
12) Clean the scrubber and squeegee
with a damp cloth.
13) Store squeegee in the raised position
to prevent damaging the blades.
14) Rinse brushes or pads with clean
water. To remove brushes or pads, tilt
scrubber back and slightly pull them downward. When replacing make sure they
lock into the grooves.
IMPORTANT:
DO NOT leave solution in the bladder.
After each use thoroughly wash out the bladder.
This will help extend the bladder’s life.
PAGE 7
MAINTENANCE
TROUBLE
SHOOTING
GUIDE
CAUTION:
Before working on the scrubber disconnect power cord.
PROBLEM: Scrubber does not run, no power.
Possible Cause
Possible Solution
1) Fuses or circuit breakers have tripped.
1) Check and replace fuses or reset
circuit breakers.
PROBLEM: Insufficient vacuuming power.
Possible Cause
Possible Cause
1) Debris caught under squeegee blades.
1) Remove debris and wipe blades with
clean cloth.
2) Connect hose.
3) Reseat tank cover correctly or replace
gasket.
4) Clean filter with water.
5) Check drain plug and replace properly.
2) Vacuum hose not connected.
3) Tank cover not properly seated or gasket
on the dome cover is damaged.
4) Filter in tank cover blocked.
5) Recovery tank drain plug not properly placed.
PROBLEM: Squeegee not picking up water.
Possible Cause
1)
2)
3)
4)
Possible Cause
Rubber blades on squeegee dirty or worn-out.
Squeegee not in contact with floor.
Recovery tank full.
Vacuum hose loose or hose is damaged.
1)
2)
3)
4)
Clean or replace blades.
Check blades and replace if necessary.
Empty recovery tank.
Reinstall or replace hose.
PROBLEM: Little or no water flow going to brushes.
Possible Cause
Possible Cause
1) Solution line blocked.
1) Flush out solution tank and lines
with clean water.
2) Unclog filter.
3) Refill solution tank.
2) Solution tank filter clogged.
3) Solution tank empty.
WARNING:
Service and repairs, should only be performed by an
authorized service center.
777 South Street P.O. Box 3210, Newburgh, NY 12550-0606
TEL: (800) 835-7812 (845) 565-8850 FAX: (845) 565-9392
www.mastercraftusa.com - [email protected]
PAGE 8
RA-300 Manual - Part No 258407 - Printed in USA 01-27-10