1
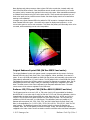
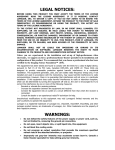
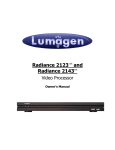
Lumagen® Tech Tip 2
Gamma, Grayscale and Gamut Calibration
Introduction
Many displays have over-saturated colors. For these displays the primary and secondary color
coordinates lie outside the CIE color triangle. The CIE diagram in Figure 1 shows an example of a
display with over-saturated colors. Many displays and projectors with this anomaly don’t have a
way to correct the problem. Other displays use an inappropriate method in an attempt to resolve
this issue, which also leads to color errors.
Such color inaccuracy is most noticeable in flesh-tones and natural colored objects such as grass.
In the Radiance™ series, Lumagen® uses an advanced “linear Gamma 3D color palette” to
independently correct the primary and secondary color points, and has recently added the ability
in the 20XX series, to independently correct a total of 729 points (9x9x9) throughout the linear
Gamma RGB color cube.
Because of this, the Radiance can accurately correct colors, providing a linear response, including
mitigating the non-linear response exhibited by many displays and projectors.
Figure 1: CIE chart with over-saturated colors
Color Management
This tutorial is intended for experienced calibrators. If you don’t have proper training, and an
accurate color probe, Lumagen recommends having your projector/display calibrated by a
calibration expert.
The Lumagen Radiance Series of video processors has an advanced Color Management System
(CMS). The CMS can be used to correct the color-of-gray (often called “Grayscale” or “White
Balance”), Gamma, black-level and white-level. The Radiance can independently correct the
primary and secondary color points, and colors within the RGB color cube, on displays where the
color points are outside the CIE color triangle and now, starting with software rev 081413 on the
20XX series, up to 729 points throughout the color space.
© 2013 Lumagen, Inc.
1
Radiance Tech Tip 2, Rev 5
Many displays and video processors claim to have CMS color controls but, instead, really only
have Color/Hue/Offset controls. Color/Hue/Offset controls should not be used to try to correct
the primary colors, because they operate in the wrong color space. Other manufactures attempt
to calibrate the primaries using HLS color space controls. These controls also operate in a nonlinear color space and so provide incorrect results. Set these display controls to neutral before
starting a new calibration.
Lumagen uses a linear-Gamma RGB color palette for CMS correction. Lumagen believes that
linear Gamma RGB color space – the native color space for displays and projectors – is the
correct color space to use for color correction. This allows the primary and secondary colors to be
corrected, while maintaining correct color interpolation.
Figure 2: CIE chart after calibration
Original Radiance 8-point CMS (SW Rev 050312 and earlier)
The original Radiance 8-point color gamut control is programmable at the corners of a linearGamma RGB color cube; Red, Green, Blue, Cyan, Magenta, Yellow, and Black, for a total of 8
points. It uses a 3D RGB color-palette to allow both the primary and secondary color points to be
independently calibrated for (x,y) and Y values. The 3D palette works in linear RGB color space.
The Radiance processes the incoming values to remove the Gamma pre-emphasis. Next, the 3D
RGB palette processes the image. Finally, the Gamma pre-emphasis is reapplied to the video.
Note: The black corner of the cube is adjusted in the Grayscale calibration menu. The other
seven corners of the cube are adjusted in the CMS menu.
Radiance 125/729-point CMS (SW Rev 091612/081413 and later)
The 3D gamut can be set to use 8,125, or 729 points (only 8/125 are available for Radiance
Mini/XS/XD/XE. A new color cube is used, for both the 8 ,125, and 729 point calibration, which is
located inside the older linear-Gamma RGB color cube. Note that 0% is 16/255, and 100% is
235/255. The 125-point color gamut consists of a 5x5x5 array of points. The 729 point size,
available on 20XX or later units, is a 9x9x9 array. The calibration points are located at (2.2
Gamma reference points) 0%, 25%, 50%, 75%, and 100% video levels for Red, Green, and
Blue, in all combinations (or 0, 12.5% ,25%, 37.5% ,50% ,62.5%, 75% ,87.5% ,100% for 729
point gamuts). The Radiance processes the incoming values to remove the Gamma preemphasis. Next, the 3D RGB palette processes the image. Finally, the Gamma pre-emphasis is
reapplied to the video. Note: You do not need to convert non-linear colors into linear colorspace.
© 2013 Lumagen, Inc.
2
Radiance Tech Tip 2, Rev 5
The values are converted to non-linear space internally for use in the 3D gamut. Values outside
the 0 to 100% range are interpolated to provide good results for below-black and above-white.
Transitioning to 091612, and Later, Software
When updating software from pre-091612 software releases, the original 8-point CMS values are
automatically updated to preserve the original calibration. Since the older software and new
software control different points in the RGB color cube, the numbers in the menu are different,
but will provide essentially the same results.
Video Pipeline
For new software, 091612 and later, the 3D RGB palette and 1D RGB grayscale palette are in
series. The video pipeline first goes through the 3D RGB palette and then goes through the 1D
grayscale palette. Because of this order, you need to calibrate the Gamma-Factor, then the 11 or
21-point grayscale/Gamma, with default values in the 3D-RGB-palette. Then, when you calibrate
the gamut 3D-RGB-palette, the Gamma-Factor and grayscale-calibration affect the results.
Calibration Procedure
Test patterns are required for each measurement in this procedure. The Radiance processor can
generate all the necessary test patterns internally. Using the Radiance internal test patterns will
provide the most accurate calibration results.
The following procedure will work for an 8-point,125, or 729-point, CMS calibration. Due to the
greater number of points, we recommend using automatic calibration software for a 125/729 point calibration. ChromaPure, SpectraCal (CalMAN), and Light Illusion have developed
automated calibration software for the Radiance. Note: When using automated calibration
software, you should follow their workflow for the calibration.
The Radiance has many setup and calibration features. Refer to the User Manual and Technical
Tips, posted on our website, for details about the proper setup of your theater.
It is important to do the calibration steps in the following sequence:
1
Install the Radiance. For the XS/XE/20XX connect an audio receiver or Pre/Pro to
HMDI Output 1 and a video display to HDMI Output 2. By default the Radiance
automatically selects video output resolution and rate, and reports supported audio
modes, as read from the device on Output 1 (or for the RadianceMini, the only
output), back to the sources. If you need to change the output modes or audio
modes, see the Radiance User Manual for your unit.
2
The Radiance output aspect ratio, which should match the display, is set by default
to “16:9” (1.78). To change the output aspect ratio, press “MENU> Output> Styles>
[Style]> Aspect Ratio”. Note: For a projector that has an anamorphic lens see the
appropriate Radiance Technical Tip for setup instructions.
3
The Radiance HDMI output type is set by default to “RGB.” To change the output
type press “MENU> Output> Style> [Style]> HDMI Format> Type”. There are
selections for RGB, YCbCr 444, and YCbCr 422. Lumagen recommends setting the
output of the Radiance to YCbCr 422 for displays that support this mode.
4
Save the new settings by pressing “Menu, Save, OK, OK, OK”.
5
Set the display controls to factory defaults or neutral, including black level
(brightness), white level (contrast), sharpness and all color settings. Turn off all the
“special” display features that are intended to enhance the image, such as noise
reduction and edge enhancement. Lumagen recommends using the controls in the
Radiance for these features.
© 2013 Lumagen, Inc.
3
Radiance Tech Tip 2, Rev 5
6
During calibration, disable Dynamic-Iris and Dynamic-Contrast on the display, if your
display has these features. Lumagen recommends leaving these off because they can
have a negative impact on the overall image quality for real images.
7
After each calibration step, you may wish to view real images to double check the
calibration up to that point.
8
The Radiance must be in “Service Mode” (Press “MENU 0910”) to perform the
following calibrations. Note: Calibration Software selects service mode automatically.
9
You may wish measure the “Pre-calibration” values. You can do this manually or
automatically by using calibration software. This can provide a good comparison of
pre- and post- calibration results.
10
Set the black-level (brightness) and white-level (contrast) using the controls on the
display. If the display controls are too coarse, or lack the proper range, you can use
the Radiance output–configuration black-level and white-level to adjust the black, or
white, output level (MENU> Output> Styles> [style]> HDMI Format> Type).
When black is properly calibrated, a -4% bar cannot be differentiated from a 0%
black background, and a +4% bar can be barely seen against a 0% black
background. In fact, in a well-designed display/projector, when properly calibrated,
even a -1% bar cannot be differentiated from a 0% black background, and +1% bar
can, while viewing the “Black Ramp” contrast test pattern from the Radiance. Note:
Use the Radiance ‘Reference’ test patterns for setting the display controls.
It is important to note that many displays will have different black levels depending
on the average picture level (APL) of the image. The Radiance “Contrast 1” pattern
with a –4% and a +4% vertical bar on the sides is a high APL image. It is better to
use the low APL Radiance “Contrast 2” pattern, which has -4% to 4% vertical bars in
1% steps in the center, and the “Black Ramp” pattern to insure that dark scenes
have a correct black level setting. Note: Setting black slightly too dark is better than
setting black slightly too bright. If black is too bright the image will look “softer” than
it should.
Contrast 1
Contrast 2
Black Ramp
For white level the 96% and 104% vertical bars should be differentiable from the
100% background, and the 104% bar should not be “crushed” which may show as a
color change verses the 100% background and 96% bar. Use the Radiance “Contrast
1” and “White Ramp” patterns.
Contrast 1
11
White Ramp
Check the default Gamma curve of the display. Specifications call for a Gamma of
2.2, however many professionals prefer a Gamma of 2.4. You can use either the
© 2013 Lumagen, Inc.
4
Radiance Tech Tip 2, Rev 5
display’s Gamma control function, or the Radiance’s Gamma-Factor control to do an
initial coarse calibration of Gamma. Depending on the display, it may be necessary to
later use the Radiance’s 11, or 21, point parametric Grayscale/Gamma function to
correct for non-linearity in the display Gamma. These steps must be performed
before the gamut calibration. The Gamma-Factor control “MENU> Output> CMS’s>
[CMS]> Gamma-Factor” allows either internal patterns, or an external pattern
generator, to be used.
Many digital flat-panel displays intentionally come with a low measured Gamma,
sometimes as low as 1.8 to 1.9. This is often done to mask dark-area noise issues in
the display. When this display flaw exists, calibrating for a correct Gamma of 2.2 is
likely to expose this dark-area noise. In this case, you need to make a trade-off
between correct Gamma and minimizing the visibility of the dark-area noise.
The “Gray: Window” pattern can be set to small, normal, or full-screen window. A
small window pattern works best on plasmas and other displays where the result
varies, depending on the area covered by the window pattern, due to the display’s
power supply limitations. It is best to use the Radiance “Window 1” or “Window 2”
patterns. Note: Press “4” to select between Window 1 (medium), Window 2 (small),
Window 3 (large), and external test patterns. Press “8” to show/hide the menu.
Window 1
Window 2
Window 3
Measure the Gamma curve of the display in either 5% or 10% increments and
calculate the average Gamma. Use the Lumagen Gamma-Factor to approximate the
desired display Gamma. Set Gamma-Factor = Desired_Gamma/Measured_Gamma.
In order to support whiter-than-white and blacker-than-black, in the Gamma-Factor,
Lumagen includes the entire range of values (i.e. 0 to 4095 with 12-bit pixel depth,
where black = 256) in the Gamma curve. This means that changes to the Radiance
Gamma-Factor also change the black and white levels. Note: black and white levels
should be recalibrated after changing the Radiance Gamma-Factor.
12
If the display has a grayscale calibration feature, you may choose to adjust the
100% point grayscale using the display’s calibration control. In this case use the
Lumagen 100% gray “Window 1” or “Window 2” patterns.
Window 1
13
Window 2
Window 3
Calibrate grayscale, and Gamma, using the Radiance 11 or 21-point parametric
grayscale/Gamma calibration (MENU> Output> CMS’s> [CMS #]> Gray/Gamma). If
you have an auto-calibration program this can be done automatically. Note: Once
any gamut entry is changed, do not change any grayscale entries or the GammaFactor!
© 2013 Lumagen, Inc.
5
Radiance Tech Tip 2, Rev 5
14
Recheck the black and white level of the display and adjust if needed. Note: This
may affect your Grayscale/Gamma calibration, and if so you might need to redo
those steps while leaving the black and white levels as adjusted in this step.
15
The Radiance Color-Gamut control can only bring display color points toward the
center (i.e. toward the white point) of the CIE diagram. That is, the Color-Gamut
control can’t drive the display’s color beyond its physical capability. It is important to
note that many displays have a color temperature selection (e.g. default, warm,
natural, etc.). These selections generally affect the primary and secondary (x,y)
points. Before starting the color-gamut calibration, when possible, select a color
mode for which all the primary and secondary points are at, or outside, the CIE color
triangle for the desired color space.
16
Some comments on color probes: There is great debate about the accuracy of color
probes in measuring primary and secondary colors. For tri-stimulus probes, the
accuracy is mainly determined by the color filter’s response curve, and having a
specific set of offsets for each display type. For spectral-radiometers, the number of
sample-points often determines accuracy and low-light performance. Lumagen
recommends caution when using the results obtained from color probes. For example
a color probe may be inaccurate at 10% luminance, and using it to calibrate at this
level would therefore give inaccurate results. A number of commercially available
probes are not as accurate as many believe for measuring primary and secondary
colors, or taking low-light readings. Higher accuracy probes can cost $10K and up.
17
Lumagen believes that it is better to err on the side of slight over-saturation, rather
than to allow potential under-saturation of the primary or secondary points. Given
that there is a potentially unknown error in the probe’s (x,y) point reading, it may be
that having readings slightly outside the CIE triangle will provide better visual results
than (inaccurate) readings that exactly match the CIE chart.
18
Measure the (x,y) and “Y” values for all the primary and secondary colors, and white.
19
Enter the measured white “Y” values into a luminance calculator, which is available
on the Lumagen website (http://www.lumagen.com/testindex.php?module=utilities).
This calculator will output the expected (x,y) and “Y” values for each primary and
secondary point. Calibration software can take these readings, and calculate
expected results automatically.
20
The luminance (“Y” value) for white may need to be reduced in order to have
enough luminance in the primary and secondary colors. This is a common failing in
displays and projectors, which is easily overcome using the Radiance. Between the
primary and secondary colors, find the color with a Y, which has a measured value
that is the smallest percentage of the calculated value. If this is above the calculated
value, there is no need to adjust the white-point Y value. Otherwise, reduce the Y of
white, by the same percentage as the percentage the selected primary/secondary
color is below its calculated Y value (MENU> Output> CMS’s> [CMS #]> Color
Gamut). While performing this step make sure to control the R, G, B balance to
maintain the correct (x,y) point for white.
21
At this point, you can work to get the (x,y) and Y values for each primary and
secondary color, to match the targets, by editing the RGB color values. Start with the
points farthest from their target values. This step can be done using calibration
software, to simplify the task. There is a bit of art in this adjustment, since the RGB
calibration color-space does not align with the (x,y) and Y of the CIE diagram. So,
you need to iterate between adjusting (x,y) and adjusting Y, for each point.
22
Save your new settings by pressing “Menu, Save, OK, OK, OK”. Remember to save
your Radiance settings after any changes, or you will lose your work, when
the unit powers down!
© 2013 Lumagen, Inc.
6
Radiance Tech Tip 2, Rev 5
23
Take post-calibration readings to make sure you are within target error values (dE’s).
24
Watch - and judge - real video material. It is possible for a calibration to
measure well, but provide poor image quality. Using the Radiance, this is generally
not an issue. But this step is always a good idea and a way to sit back and enjoy the
great image quality you've achieved using your Radiance.
© 2013 Lumagen, Inc.
7
Radiance Tech Tip 2, Rev 5