1
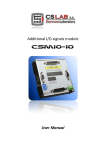
Applies to hardware version : v1 Applies to firmware version : v2.00 Rev 1.0 © copyright 2014 – CS-Lab s.c. INDEX 1. Introduction .......................................................................................................................... 4 1.1 Signs used in this guide ............................................................................................................ 4 1.2 Standards compliance .............................................................................................................. 4 1.3 Technical data sheet ................................................................................................................ 5 1.4 Drive and brushless motor running - checklist ........................................................................ 6 2. Block connection scheme ...................................................................................................... 8 2.1 Brushless motors (AC / BLDC) .................................................................................................. 9 2.2 Brushed motors (DC).............................................................................................................. 10 3. PINs description on drive connectors ................................................................................... 11 3.1 Connectors arrangement (M4-…040K model) ....................................................................... 11 3.2 Connectors arrangement (M4-…075K model) ....................................................................... 11 3.3 CN1 - Signals connector ......................................................................................................... 12 3.4 CN2 - communication connector (model M4-…075K) ........................................................... 13 3.5 CN3 - power output stage connector .................................................................................... 14 3.6 CN4 - CAN connector (model M4-…040K) ............................................................................. 14 3.7 CN5 –CAN and configuration connector (model M4-…040K) ................................................ 15 4. I/O circuits internal construction ......................................................................................... 16 4.1.1 Encoder inputs ............................................................................................................. 16 4.1.2 HALL sensors inputs ..................................................................................................... 16 4.1.3 STEP/DIR control signals inputs ................................................................................... 16 4.1.4 Digital inputs IN0 – IN5 ................................................................................................ 17 4.1.5 Digital outputs OUT0 – OUT2 ...................................................................................... 17 5. Starting and configuration ................................................................................................... 18 5.1 Configuration - diagnostic software utility installation ......................................................... 19 5.1.1 USB-RS232 converter installation ................................................................................ 19 5.1.2 csServoManager utility software installation .............................................................. 20 5.2 csServoManager - general rules and notes............................................................................ 20 5.2.1 Connection with a drive ............................................................................................... 20 5.2.2 CAN bus connection ..................................................................................................... 21 5.2.3 Toolbar ......................................................................................................................... 22 5.2.4 State bar ...................................................................................................................... 24 5.2.5 Entering numerical values ........................................................................................... 25 5.2.6 Saving in non-volatile memory .................................................................................... 25 5.3 „Parameters Monitor” window – real-time parameters preview ......................................... 26 2 simDrive™ - AC Servo Drive User Guide 5.4 Motor parameters configuration ........................................................................................... 29 5.4.1 Motor type ................................................................................................................... 29 5.4.2 Nominal motor parameters ....................................... Błąd! Nie zdefiniowano zakładki. 5.4.3 Brushless motor parameters (AC/BLDC) ...................................................................... 30 5.4.4 Motor constants .......................................................................................................... 31 5.4.5 Coupling (Incremental encoder) .................................................................................. 31 5.4.6 HALL sensors – rotor position coupling ........................................................................ 31 5.4.7 Reference signal (STEP/DIR) ........................................................................................ 32 5.4.8 Electronic gear ............................................................................................................. 32 5.5 Digital inputs/outputs configuration ..................................................................................... 33 5.5.1 Digital inputs function ................................................................................................. 34 5.5.2 Default inputs functions assignement ......................................................................... 34 5.5.3 Digital outputs functions ............................................................................................. 34 5.5.4 Default outputs functions assignement ....................................................................... 34 5.6 PID regulator tuning ............................................................................................................... 35 5.6.1 Initial settings of PID regulator .................................................................................... 35 5.6.2 Manual PID regulator tuning procedure...................................................................... 36 5.6.3 Automatic PID regulator tuning procedure ................................................................. 39 5.7 Torque scan function - csTorqueScan™ ................................................................................. 41 6. Drive alarm flags description ............................................................................................... 43 7. Drive overload characteristic ............................................................................................... 44 8. A addition - Firmware update .............................................................................................. 45 8.1 csServoManager™ utility update ........................................................................................... 45 8.2 simDrive™ firmware update .................................................................................................. 45 9. B addition - What is PID controller (regulator) ...................................................................... 46 9.1 What is PID controller ............................................................................................................ 46 9.2 PID controller terms (parameters) operation ........................................................................ 47 9.2.1 The proportional term – P............................................................................................ 47 9.2.2 The integral term – I .................................................................................................... 47 9.2.3 The Derivative term – D ............................................................................................... 48 9.2.4 The „sixth” sense – the mysterious K VFF parameter ..................................................... 48 10.C addition – Slave axis ......................................................................................................... 49 11.D addition – Diagnostics via Mach3 software ....................................................................... 50 simDrive™ AC Servo Drive - USER G UIDE 3 1. Introduction 1.1 Signs used in this guide __________________________________________________________________________________ Potential danger and/or possible injury risk __________________________________________________________________________________ Useful information, tips __________________________________________________________________________________ Warning, failure to comply with these warnings may lead to inappropriate functioning or damage of the device __________________________________________________________________________________ 1.2 Standards compliance simDrive™ servo drives were designed and made in accordance with the national and international standards for industrial control systems based on electronic components: EN 61800-5-1 EN 61800-3 EN 61000-6-2 EN 61000-6-4 EN 61000-3-2 EN 61000-3-3 Adjustable speed electrical power drive systems - Safety requirements - Electrical, thermal and energy Adjustable speed electrical power drives systems. EMC requirements and specific test methods Electromagnetic compatibility (EMC). Generic standards – Immunity for industrial environments Electromagnetic compatibility (EMC). Generic standards Emission standard for industrial environments Electromagnetic compatibility (EMC). Limits for harmonic current emissions Electromagnetic compatibility (EMC). Limitation of voltage changes, voltage fluctuations and flicker in public lowvoltage supply systems, The product was made in lead-free technology, RoHS compliant. The simDrive™ servo drive is a high-voltage device that can be hazardous to your health and life Before you start any installation turn off the power of the device and wait min. 10 minutes – it is the time needed to discharge a capacitor. 4 simDrive™ - AC Servo Drive User Guide 1.3 Technical data sheet PARAMETER M4-H075K Model Power supply voltage of a power output stage Maximum output current Maximum output 2 power Recommended motor powerBłąd! Nie zdefiniowano zakładki. Motor types supported 3 Power output stage protection M4-H040K Model 325 VDC M4-L075K Model 1 M4-L040K Model 155 VDC 12 A 6A 20 A 10 A 3.0 kW 1.2 kW 2.2 kW 1.2 kW 750 kW 400 W 750 W 400 W DC / BLDC / AC- Synchronous (HALL) Short circuit, overload, overvoltage and thermal Digital inputs number 6 Digital outputs number 3 Encoder inputs number 1 Logic supply voltage Power consumption (24V) 24VDC +/-10% 5W Maximal permissible voltage on I/O lines Maximal load on an output line Signal type of position/speed defining Max. STEP signal frequency Max. encoder signal frequency Encoder type Encoder signal type PC connection (configuration) Connection with a motion controller (diagnostics) Ambient temperature range Relative humidity 30VDC 50mA (STEP/DIR) Differential signal 4 MHz 8 MHz incremental TTL 4 Differential RS232 CAN bus o o 0 C do +50 C 10% do 95% (without condensation) 1 Recommended power supplying way is 230V AC power supply by CS-Lab s.c. company. The difference between maximal drive power and recommended motor comes from the fact that the drive should have some power reserves to be able to overload the motor. The second reason is limitation of heat given off from the drive. 3 Brushless motors (BLDC, AC and linear AC) must have digital HALL sensors. 4 Recommended resolution: 1000 – 8000 (in fact 4000 – 32000 including all edges) 2 simDrive™ AC Servo Drive - USER G UIDE 5 1.4 Drive and brushless motor running - checklist Below you can find a checklist with all the activities and operations needed to start up a new drive. These operations are listed in the order they should be done. In further chapters you will also find detailed description of the activities described below Operation name Make necessary electrical connections: • Motor encoder • Motor Hall sensors • Phases: U, V, W and motor ground • I/O signals (Servo on / Reset / Alarm) • STEP/DIR control signals (STEP/DIR) • CAN bus • 24V logic power supply (don't turn the power supply on yet!) • HV power output stage power supply (don't turn the power supply on yet!) Install the csServoManager™ software and possibly the controller to the USB-RS232 converter (if you connect with the drive through RS232 port). Turn on the 24V logic power supply, for the time being do not turn on the HV power output stage power supply yet. Now we are connecting with the drive. If you connect with the drive via CSMIO/IP controller and you have more than one drive on the CAN bus then you have to set addresses for the drives – read chapter 5.2.2 - „Connection through the CAN bus" If the motor supplier is CS-Lab s.c. company load configuration template for the particular model (available on www.cs-lab.eu) and save the configuration in non-volatile memory by pressing icon. Open parameters monitor window and select "Position (Encoder)" from the list. Turn a motor shaft left and right. Counter should count alternately up and down, depending on motor shaft rev direction. If the counter doesn't change the value or it skips only between -1 up to 1 then verify encoder connection. In the parameters monitor window select "HALL sensors state" from the list. Turn the motor shaft and watch indications. The sensors state should change in one of the following sequences – depending on revs direction: • C__/CB_/_B_/_BA/__A/C_A/C__(etc.) • C__/C_A/__A/_BA/_B_/CB_/C__ (etc.) If the sequence is incorrect or the state is „___” or „ABC” then verify HALL sensors connection. Open „JOG I/O control” and verify I/O signals operation (for that you need to set the necessary signals in CNC software – e.g. Mach3). It is good to test simDrive™ outputs by setting the output on manual mode and clicking "set/clr" buttons. Change assignment of the function to I/Os in configuration window 6 if necessary. simDrive™ - AC Servo Drive User Guide Operation name Verify motion control STEP/DIR signals operation. For that select from the list in parameters monitor window - "Reference Position" and make a move in CNC software (it does not matter if the motor will not move at the moment as there is no power on a power output stage). "Reference Position" counter should increase or decrease its value - it depends on motion direction in CNC software. If it is a motor bought from CS-Lab s.c. and configuration template had been loaded before you can skip this point. Open motor parameters configuration window and set the parameters: • Motor type • Nominal voltage and current values and nominal revs. • Pole pairs number • Resistance and inductance of windings. If it is unknown - enter 0. • Torque and voltage constants (if unknown - enter 0). • Encoder counting direction and pulses number per encoder rev incl. all edges. it's a value usually presented by a manufacturer as x4 (e.g. if it stays 2500 on the encoder for us it mean 10 000) • Set HALL signals negation if necessary. Save the configuration in non-volatile memory with csServoManager button, close the connection in and switch off the 24V power supply for min. 5s. Next switch it on and connect with the drive . Open PID regulators tuning window and ensure that the needed values in there are safe for the first run (look at chapter 5.6.1 - „Initial settings of PID regulator") Enable power output stage voltage (HV) and open "JOG I/O control" window. Next click „Reset”. The drive should change its status into "Ready", next - click - the drive should change its status into "Running". Test the motion on low revs (about 50-100 rev/min) – few revs left and right. If a motor doesn't move or it jerks and/or it reports an error then verify connection and settings again (especially motor parameters configuration). If you want to use automatic PID regulators tuning function - skip this point. In „JOG I/O Control” go to "Motion planner" tab. Set speed to 150RPM, 3000 RPM/s acceleration and relative motion as pulses number per encoder rev - it's range of 1 motor rev. Next - start cyclic motion . Launch automatic PID regulator tuning in "PID regulator tuning" window" tuning" tab or tune the regulators manually as following: • current regulator • speed regulator • position regulator on "Automatic Save the configuration in non-volatile memory and click to disconnect the drive. Verify if the drive works properly when CNC controller and software control the motion (e.g. Mach3 and CSMIO/IP). If everything works fine the drive is ready to work. simDrive™ AC Servo Drive - USER G UIDE 7 2. Block connection scheme Below you will find connection demonstration scheme of three-phase brushless motor (AC) and brushed motor (DC). It is easy to notice that both schemes are almost the same. For DC motor we use only extreme phases for power supply (U and W) of which we connect DC motor „+” to U phase and „-„ to W phase. Moreover, in case of DC motor there is no need to use HALL sensors. CAN bus connection is optional but recommended if we use the drive with CSMIO/IP-x controller and Mach3 software. Thanks to the CAN connection with CSMIO/IP controller we get additional capability for fast drive diagnostics directly in Mach3 software. In case of breakdown the drive status will be saved in a log file. Drive I/O signals connection with a motion controller is also optional but we recommend Alarm, Reset, Servo ON and E-Stop signals connection. The drive has HOME signal and encoder index synchronization function. It means that you can have precise homing even if CNC motion controller doesn't have such function. If we want to use it then we connect the HOME signal to the simDrive™ (to one of digital inputs) and not to CNC controller, and we connect one of the drive outputs to a CNC controller. We set the drive digital input as "Home In" and we set the output as "Home Out" as well. The voltage in the simDrive™ device may be dangerous for your health and life. Before you start any installation - turn off the device and wait at least 10 minutes – it is the time needed to discharge capacitors. Do not disconnect or connect any wires (except diagnostic wire) when the device is working. It may cause unpredictable motor behavior and in extreme cases it may damage the servo drive. 8 simDrive™ - AC Servo Drive User Guide 2.1 Brushless motors (AC / BLDC) simDrive™ AC Servo Drive - USER G UIDE 9 2.2 Brushed motors (DC) 10 simDrive™ - AC Servo Drive User Guide 3. PINs description on drive connectors 3.1 Connectors arrangement (M4-…040K model) CN3 – power output stage connector CN5 CAN and configuration CN4 CAN connector CN1 – Signal connector 3.2 Connectors arrangement (M4-…075K model) CN3 – Power output stage connector CN2 – Configuration connector CN1 – Signal connector simDrive™ AC Servo Drive - USER G UIDE 11 3.3 CN1 - Signals connector Front view of the drive's connector/ from the soldering side Pin number 1 2 3 4 5 6 7 8 9 10 11 12 13 14 15 16 17 18 19 20 21 22 23 24 25 26 27 28 29 30 31 32 33 34 35 36 37 Signal +24V STEP+ DIR+ OUT0 [C] OUT1 [C] OUT2 [C] IN0 IN2 IN4 IN_COMMON CAN_L ENC_A+ ENC_B+ ENC_Z+ HALL_A+ HALL_B+ HALL_C+ +5V Out GND GND STEPDIROUT0 [E] OUT1 [E] OUT2 [E] IN1 IN3 IN5 CAN_H GND ENC_AENC_BENC_ZHALL_AHALL_BHALL_CGND Description Logic power supply (24V DC) Step signal (positive input of an optocoupler) Direction signal (positive input of an optocoupler) Digital output 0 (Collector) [Alarm] Digital output 1 ( Collector ) [# Homing - output] Digital output 2 ( Collector ) [Brake] Input 0 [# Homing - input] Input 2 [Reset] Input 4 Common inputs pin CAN bus (L) Encoder A (+) Input Encoder B (+) Input Encoder Z (+) Input HALL sensor A (+) Input HALL sensor B (+) Input HALL sensor C (+) Input 5V Output for encoder and HALL sensors power supply GND (0V) of encoder and HALL sensors GND (0V) of logic power supply Step signal (negative input of an optocoupler) Direction signal (negative input of an optocoupler) Digital output 0 (Emitter) [Alarm] Digital output 1 (Emitter) [# Homing - output] Digital output 2 (Emitter) [Brake] Input 1 [Servo ON] Input 3 Input 5 CAN bus (H) GND (0V) for CAN signals Encoder A (-) Input Encoder B (-) Input Encoder Z (-) Input HALL sensor A (-) Input HALL sensor B (-) Input HALL sensor C (-) Input GND (0V) (Further description- next page) 12 simDrive™ - AC Servo Drive User Guide Permissible output lines load is 50mA. Outputs overload may cause their damage. Encoder, HALL sensors and STEP/DIR signals operate in TTL (5V) standard. Higher voltage may cause outputs circuit damage in the device. If it's necessary to connect the mentioned signals in 24V standard then please contact with CS-Lab company first to consult and select correct converter. Next to the digital inputs and outputs there are default functions assigned in square brackets. The ‘#’ sign means that input/output in reversed logic, that is 0V is an active state and 24V is inactive state. Connection made in accordance with the default function assignment has the advantage that you do not have to configure inputs and outputs when starting the drive. 3.4 CN2 - communication connector (model M4-…075K) Front view of the device's connector PIN number 1 2 3 4 5 6 Signal GND TxD Ext. 5V RxD NC NC Description GND (0V) Transmitting line RS232 5V/100mA output Receiving line RS232 - simDrive™ AC Servo Drive - USER G UIDE 13 3.5 CN3 - power output stage connector Connector view from the top PIN number 1 2 3 4 5 6 Signal HV(+) HV(-) PE W V U Description (+) Power supply of power output stage (-) Power supply of power output stage Ground Motor power supply (W phase) Motor power supply (V phase) Motor power supply (U phase) 3.6 CN4 - CAN connector (model M4-…040K) Front view of the device's connector PIN number 1 2 3 4 5 6 7 8 9 (housing) 14 Signal CAN H GND CAN L Shield Description CAN bus GND (0V) CAN bus Wire shielding simDrive™ - AC Servo Drive User Guide 3.7 CN5 –CAN and configuration connector (model M4-…040K) Front view of the device's connector PIN number 1 2 3 4 5 6 7 8 9 (housing) Signal RxD TxD CAN H GND CAN L Shield Description RS232 – diagnostics and configuration RS232 – diagnostics and configuration CAN bus (H signal) GND (0V) CAN bus (L signal) Wire shielding simDrive™ AC Servo Drive - USER G UIDE 15 4. I/O circuits internal construction 4.1.1 Encoder inputs 4.1.2 HALL sensors inputs 4.1.3 STEP/DIR control signals inputs 16 simDrive™ - AC Servo Drive User Guide 4.1.4 Digital inputs IN0 – IN5 4.1.5 Digital outputs OUT0 – OUT2 simDrive™ AC Servo Drive - USER G UIDE 17 5. Starting and configuration simDrive™ device was designed for CNC control systems. Due to relatively narrow range of application configuration process was simplified so a user - operator doesn't have to break through all the dozens of parameters which he won't use anyway. The configuration parameters were divided into functional groups what makes the configuration fast and clear. The only more difficult thing for not experienced users is PID regulator tuning and configuration of parameters needed when using brushless motors. Knowledge and experience are in this case highly valuable nevertheless reading this manual carefully even less experienced users will be able to set the simDrive™ device properly. To configure the drive we need csServoManager configuration utility available free on http://www.cs-Lab.eu, while a converter and a cable can be purchased in our online store http://www.cs-Lab.eu. The converter and the cable are not required for configuration if the drive is used with CSMIO/IP - CNC motion controller by CS-Lab company and connected with the controller via CAN bus (chapter 5.2.2 – „Connection through CAN bus”) The first drive run you should always perform with power output stage power supply turned off! First - set motor type, I/O signals, verify E-Stop signal work and set initial (small) values of PID regulator gains (chapter 5.6 - „PID regulator tuning”). Only then you can switch power output stage voltage and start further configuration. 18 simDrive™ - AC Servo Drive User Guide 5.1 Configuration - diagnostic software utility installation 5.1.1 USB-RS232 converter installation If we use USB-RS232 converter purchased from CS-Lab company we should install driver first. USB-RS232 converter driver setup program is installed during simDrive™ Software Package setup by default. When simDrive™ setup finishes you can click on windows start menu and find: “simDrive Software Package / Install USB-Serial Converter” After driver installer launching you should follow the screen information. After a short time the installation is finished. RS232 converter's driver installation is not required when simDrive device is connected to CSMIO/IP - CNC motion controller (CAN bus connection required). In this case a PC can communicate with simDrive device through CSMIO/IP controller and CAN bus. simDrive™ AC Servo Drive - USER G UIDE 19 5.1.2 csServoManager utility software installation csServoManager utility is provided as convenient software installer what basically makes the installation process runs automatically. Start the csServoManagerSetup.exe file downloaded from www.cs-lab.eu/en or provided on a CD attached to a package. Then click „Next >” till the end of the installation process. 5.2 csServoManager - general rules and notes In csServoManager utility software there were only necessary options implemented for configuration and diagnostics. This way the software is simple in operation so you can cope with it easily. Below you will find rules/notes of using this software. 5.2.1 Connection with a drive After we start the csServoManager we will see a window where we choose a drive to connect with and interface language as well. First click "Scan" button. You will see all detected devices in the list. They will be divided into devices connected through serial port and devices connected to CSMIO/IP controller via CAN bus. If the application won't find any devices you should verify your wiring, logic power supply (24V) and if USB drive is installed - if we use USB-RS232 converter. You should also verify CAN addresses assignment (chapter below). If you will get information about incompatible version you should update your csServoManager™ and simDrive™ firmware. Always up to date software you will find on http://www.cs-lab.eu. You can read more about software update in chapter: „Addition A - Firmware update". 20 simDrive™ - AC Servo Drive User Guide 5.2.2 CAN bus connection The principle of simDrive and CSMIO/IP controller connection through CAN bus The most convenient way of connection is connection via CAN bus and CSMIO/IP controller. You only have to set drives addresses first. The addresses range is: 104 - 109 (we recommend keeping the order with axis signs, so: 104 for X axis, 105 for Y axis, and so on). The new drive has by default 96 address. If two or more drives on the CAN bus will have the same address, the communication won't be possible. The main problem then to set the CAN addresses is that you need to be connected first. There are two solutions (we consider it basing on three drives on X, Y, Z axes): 1. (Recommended) Following addresses setting • As a drive default address is 104, X axis drive doesn't require any address change. • Y axis drive address change into 105 o Switch off power supply (24V) of X and Z axes drives and click "Scan" in csServoManager software window. In the list you will see one drive (Y) with its address 104. Select drive from the list and click "Connect". o In the software "Configuration" menu click "Communication" and change the address into 105. o Save the configuration in non-volatile memory (Configuration Save in flash memory) o End the connection (the first icon on the left on a toolbar) • Z axis drive address change into 106 o Switch off power supply (24V) of X and Y drives, connect Z axis drive power supply. o Connect with the drive and set address 98 in the Configuration Communication menu. o Save the configuration in non-volatile memory (Configuration Save in flash memory) • Switch OFF and ON the 24V power supply of all the drives so the new settings will be visible for all the devices. • Now, after clicking "Search" in the connection window all three drives should appear with their addresses 104, 105 and 106. 2. (Alternatively) CAN addresses setting by serial RS232 (COM) port connection. If we have the RS232 wire or the USB-RS232 converter we can plug-in, one by one, to each drive, connecting and changing the CAN addresses (Configuration Communication). You should remember to save the configuration every time in non-volatile memory (Configuration Save in flash memory) and to switch the drives 24V power supply OFF and ON after that. Only then the devices will be shown on the CAN bus with their new addresses. simDrive™ AC Servo Drive - USER G UIDE 21 5.2.3 Toolbar The most frequently used functions are available on a toolbar so this way you have easy access to them. The icons have the following functions assigned (from the left): ICON Corresponding menu function - File Load Parameters File Save Parameters Configuration Save to flash memory Tools Parameters monitor Tools Fast scope Tools JOG I/O control 22 Description Disconnection/connection with a drive. If e.g. we have finished configuration of one drive and we want to start another then we click the icon to disconnect. Then we plugin a wire to another drive and click the icon again to connect. Loading settings from a file. It's worth to save drive configuration after it's set. In breakdown situation and replacement necessity we can use the configuration we saved in a file. Save settings to a file. (IMPORTANT!) Settings file save in non-volatile memory. You should click the icon after you make changed the drive's configuration. If you don't then previous drive's settings will show up after its power supply will be off. Real-time preview of drive parameters. After clicking on the icon a window with a list of all the important settings will show up. We can see them as a graph as well. It's very useful tool during configuration and drive tuning. Function of high-speed oscilloscope (available with further software versions). It opens a window where we can verify and/or manually set inputs/outputs state. With further software version it will be possible to manually turn on and control a simDrive™ - AC Servo Drive User Guide motor. Tools Show alarms It opens a window with an alarms list. Configuration PID tuning It opens a window for PID regulators tuning. Configuration Motor parameters Configuration IO Signals - simDrive™ AC Servo Drive - USER G UIDE Motor parameters settings. Drive's digital inputs and outputs configuration. Tests window. It's not used in normal operation. It was designed for tests of some of the function. 23 5.2.4 Status bar The status bar shows current state and drive connection details. 5.2.4.1 Connection state icons Description Icon No connection. This sign blinking means connection attempt. If it lights up constantly it means the connection was established and is active. 5.2.4.2 Connection interface Sign RS232 CSMIO/IP->CAN Description Direct connection with a PC through serial RS232 port (COM port or USB-RS232 converter) Connection through LAN network, a PC communicates via CSMIO/IP controller in this case. CAN bus drive connection with CSMIO/IP controller is required. 5.2.4.3 Port Sign COMx x.x.x.x (name) Description COM port number when direct connection through RS232 port. If it's connection through CSMIO/IP controller the controller's IP address and name is displayed. 5.2.4.4 An address of a device If we connect directly (RS232) the address is always 1 but if we connect with a drive through CAN bus and CSMIO/IP controller then simDrive CAN address is displayed. 24 simDrive™ - AC Servo Drive User Guide 5.2.5 Entering numerical values After we enter the value into text area we should always approve it with „Enter” key. Only then the new parameter value will be transmitted to simDrive device. We are able to see if the edited parameter value was approved looking at text area backlight. The green backlight color means that the value is approved and sent to the drive and the orange backlight color means that the value hasn't been send to the drive yet. 5.2.6 Saving in non-volatile memory Changes made in the drive configuration will be lost after power supply disconnection if we don't press the icon on our toolbar or "Save in flash memory" in „Settings” menu. Sometimes we do not want to save the changes e.g. when we test new settings we can accidentally put the drive out of adjustment. If the new settings weren't saved in non-volatile memory it's enough to switch the drive power off and on (24V logic power supply) and all previous data will be restored. If we do any configuration changes after the drive was switched on - the icon will blink red us that the changes are not saved in non-volatile memory (flash). simDrive™ AC Servo Drive - USER G UIDE telling 25 5.3 „Parameters Monitor” window – real-time parameters preview During drive configuration it's very useful to have the possibility to watch the parameters and information about them up-to-date. We call the preview window by clicking the icon „ToolsParameters Monitor” from the menu. on the toolbar or by selecting On the left side of the window there is a list with the parameters. On the right upper side there is a real-time data chart of chosen parameter. Under the chart there are options related to it: • Refresh frequency – the chart refresh frequency • Auto scale – automatic / manual scale of the chart Y axis • Max/Min – min/max values settings for Y axis if manual scale of Y axis is enabled. Under the "chart control" group there are current digital inputs and outputs of a drive states displayed along with functions assigned to them. In the bottom part there is current position rate (user's units). It can be an angle, inch or mm. You only have to enter encoder pulses number per the chosen unit in „Steps per unit" area. So if an encoder has 10000p/rev and the drive is driven by 20mm pitch ball screw and we want to have the axis position displayed as mm: 10000[p/rev] / [20mm/rev] = 500[p/mm]. So we enter 500 into the "Steps per unit" area. 26 simDrive™ - AC Servo Drive User Guide Here is a list of parameters which preview is available with their short description. PARAMETER NAME Firmware version Drive status Alarm flags DESCRIPTION Drive firmware version Current drive state Alerts. Detailed alerts description in menu „ToolsShow Alerts” or after pressing the icon on the toolbar. Warnings. Detailed alerts description in menu Warning flags „ToolsShow Alerts” or after pressing the icon on the toolbar. Digital inputs state. You can see extended preview after Digital inputs pressing on the toolbar or by selecting „ToolsJOG and I/O control” from the menu. Digital outputs state. You can see extended preview after Digital outputs pressing on the toolbar or by selecting „ToolsJOG and I/O control” from the menu. Current voltage value on pin 18 (encoder and Hall sensors power supply) of a signal connector. Correct value: 5V +/10% Current value of logic power supply. Correct value: 24V +/10% Power output stage temperature (OC) Current state of torque scanner (function csTorqueScan™) Current state of PID regulators autotuning function. Current stage of PID regulators tuning. „1” value means that internal motion planner in a drive finished operation and is in idle state. Encoder position counter Controller position counter that is counter directly connected with STEP/DIR signal. The speed is counted on a motor's encoder The speed is counted on STEP/DIR control signal (converted from frequency to revs/min) The acceleration is counted on STEP/DIR control signal STEP signal frequency Current deviation from the target position in encoder pulses. Max. temporary deviation from target position. Current deviation from target speed. Max. temporary deviation from target speed that results from measured STEP signal frequency Encoder faulty readouts number. This value should be „0”. If the value is higher than zero then it means wiring problems or encoder failure. Encoder failure is very rare; usually it's poor quality wiring or no contact of one of encoder signal. Value higher than zero also means that positioning errors will appear. Mechanical angle of motor rotor defined by an encoder Electronic angle of motor rotor defined by encoder (Brushless motors only). Electrical angle of motor rotor External 5V output 24V power supply Power stage temperature Torque scan state Autotuner state Autotuner tuning state Planner idle flag Encoder position Reference position Encoder velocity Reference velocity Reference acceleration STEP frequency Following error Following error (Max) Velocity error Velocity error (Max) Encoder errors Mechanical angle (encoder) Electrical angle (encoder) Electrical angle (HALL) simDrive™ AC Servo Drive - USER G UIDE 27 Electrical angle (sensorless) HALL sensors state Phase U current Phase V current Phase W current Vector ‘id’ current Vector ‘iq’ current ‘id’ Vector reg. error ‘iq’ Vector reg. error Peak output current DC bus voltage DC bus voltage (Min) DC bus voltage (Max) Output power Current PID output Velocity PID output Position PID output 28 defined by HALL sensor. Absolute difference between the angle and electrical angle from encoder shouldn't exceed 45O. Higher value means incorrect configuration of HALL sensors, wrong order of HALL sensors connection, or interferences on an encoder caused by poor quality wiring. (Brushless motors only). Electrical angle defined by mathematical model of a motor. It requires correct settings of inductance and resistance parameters of motor windings. (Brushless motors only). Current HALL sensors state. It allows you to quickly check if all three sensors are working properly. Current U phase current of a motor Current V phase current of a motor Current W phase current of a motor (Brushed motors). „d” vector current. Its values should be close to "0" Current consumed by a motor, that provides a torque Current ‘id’ vector adjustment deviation (brushless motors only) - during operation values should be close to "0". Current ‘iq’ vector adjustment deviation - during operation values should be close to "0". Max. temporary current consumed by a motor. Current voltage on DC bus Minimal temporary voltage on DC bus. You can preview how much the voltage decrease under load. Maximal temporary voltage on DC bus. You can preview how much the voltage increase during breaking. Current output power (motor consumption power) Current regulator output value (V RMS) Velocity regulator output value (A) Position regulator output value (RPM) simDrive™ - AC Servo Drive User Guide 5.4 Motor parameters configuration We strongly recommend to use simDrive™ 325 VDC servo drives together with motors offered by CS-Lab company. There are configuration templates for these motors ready for download and thanks to them we do not need to set the motor parameters ourselves. CS-Lab s.c. technical support doesn't include other companies motors configuration problems however the simDrive™ is enough universal to be set correctly to work with almost every synchronous AC/BLDC or brushed DC motor. Caution! There are different types of brushless motors (AC). Generally we differentiate two types of them: synchronous (with permanent magnets) and asynchronous. simDrive™ servo drive - just like most other servo drives available on the market - requires synchronous motors. The asynchronous motors (often used on spindles) require an inverter. We start the servo drive configuration from motor parameters setting. Open configuration window from menu „ConfigurationMotor parameters” or press the icon on the toolbar. 5.4.1 Motor type In this group we chose type of the motor we have connected to our simDrive™. We have to possibilities here: • „DC Motor” (DC brushed motor) • „AC Motor” (AC or BLDC brushless motor). simDrive™ AC Servo Drive - USER G UIDE 29 5.4.2 Motor rated values Here we set three very important parameters: Parameter name Voltage Speed Current Description Nominal motor voltage. The value is usually placed on a motor nameplate. Nominal motor RPM. The value should be also placed on a motor nameplate. Nominal motor current. The value should be also placed on a motor nameplate. By entering incorrect values in this group you can permanently damage the motor. CS-Lab s.c. company does not take any responsibility for damage caused by incorrect drive configuration. 5.4.3 Brushless motor parameters (AC/BLDC) This group applies only to brushless motors. We set the parameters as follows: Parameter name R L Pole pairs 30 Description Motor winding resistance. In current software version this parameter is not supported and you do not have to enter it. With future software versions the parameter can be important for sensorless methods of determining an angle of a rotor a (motor commutation). Motor winding resistance. In current software version this parameter is not supported and you do not have to enter it. With future software versions the parameter can be important for sensorless methods of determining an angle of a rotor a (motor commutation). Motor pole pairs number. It's very important parameter which value you can sometimes find on a motor nameplate or in motor documentation. If we do not have knowledge about number of the poles pairs then we can verify it by trial and error method. Motors usually have 4 pairs of poles. It won't damage the motor if you enter incorrect poles pairs number, it will cause the motor to jerk and stop. After short time you will see an over current alert or position and/or velocity tolerance overrun alert. simDrive™ - AC Servo Drive User Guide 5.4.4 Motor constants Parameter name Torque constant Voltage constant 5.4.5 Motor torque constant stated in Nm/A. If you do not have documentation of your motor then enter 0. Voltage constant stated in V/1000RPM. If you don't know this value you can enter 0 but it will decrease positioning quality at dynamic acceleration/braking. This value can be easily determined, it's enough to set motor revs on 1000 rev/min after the motor was initially tuned and then read "Current PID Output" parameter value from the parameters monitor list. We enter absolute value of that parameter into this area. Feedback (Incremental encoder) Parameter name Pulses/rev Reversed 5.4.6 Description Description Pulses number per encoder rev (resolution). The parameter has special relevance for brushless motors as an encoder enables precise motor commutation. The value we enter here should be actual resolution (manufacturers usually inform about ¼ of the value because they don't include a quadrature decoder). Incorrect value won't cause the motor damage but it won't be working properly. Sometimes it won't be even able to perform one single rev and sometimes after few revs taken current starts to increase rapidly and over current alert shows up. Depending on an encoder type it can be necessary to reverse pulses counting direction. Incorrect value entered won’t cause the motor damage but the motor won't be working properly. Usually in this situation the motor jerks and goes into alarm state. HALL sensors – rotor feedback Parameter name Invert HALL signals Description It's a very important parameter for brushless motors. Sometimes the HALL sensors used in a motor have reversed logic. In this case we select this option. If we are not sure about that – incorrect setting won’t cause the motor damage but it won't be working properly. It causes motor jerking after we turn on the power or when we try to move. simDrive™ AC Servo Drive - USER G UIDE 31 5.4.7 Reference signal (STEP/DIR) Description Parameter name Change of motor revs direction. The parameter affects only external STEP/DIR signal control. Invert dir 5.4.8 Electronic gearing Sometimes the connected motor have a high resolution encoder - e.g. 40000 𝑖𝑚𝑝 𝑟𝑒𝑣 and a CNC controller is not able to provide STEP signal with enough frequency to fully exploit motor revs range. As an example: motor with 40000 revs. 𝑖𝑚𝑝 𝑟𝑒𝑣 encoder has 3000 5000 𝑟𝑒𝑣. 𝑚𝑖𝑛. = 83,33 𝑟𝑒𝑣 𝑚𝑖𝑛. nominal revs and 5000 𝑟𝑒𝑣. 𝑚𝑖𝑛. maximal 𝑟𝑒𝑣. 𝑠𝑒𝑐. Now we can easily calculate max. frequency of STEP signal: 83,33 𝑟𝑒𝑣 𝑠𝑒𝑐 × 40000 𝑖𝑚𝑝 𝑟𝑒𝑣 = 3,33 𝑖𝑚𝑝 𝑠𝑒𝑐 = 3,33𝑀𝐻𝑧. Let's assume that we connect the drive to CSMIO/IP-M motion controller which provides 125kHz max. frequency STEP signal. We would just only get 187 𝑟𝑒𝑣 𝑚𝑖𝑛. ! Here now the electronic gear comes to the rescue. Thanks to it we can set a multiplier x20 and we 𝑟𝑒𝑣 get 3750 𝑚𝑖𝑛.. The electronic gear function is set by two parameters: X and Y. Set motor's position is expressed by the formula: 𝑀𝑂𝑇𝑂𝑅 ′ 𝑆 𝑃𝑂𝑆𝐼𝑇𝐼𝑂𝑁 = 𝐼𝑁𝑃𝑈𝑇 𝑆𝐼𝐺𝑁𝐴𝐿 × 𝑋 𝑌 In our example we enter X=20, and Y=1. We are going to multiply the input signal by 20. Obviously using this function we can divide the input signal if there is such a need. However it is usually used for multiplying. To keep the settings saved after power is off - on the toolbar press icon after settings change. The input signal multiplying (as shown in the example above) has negative influence on motor's culture of work and on positioning accuracy. According to this fact we do not recommend the multiplying use in applications which require great motion smoothness and precision. In such situations we need to use CNC controller that is able to provide STEP signal with enough frequency – e.g. CSMIO/IP-S which generates 4MHz max frequency STEP signal. 32 simDrive™ - AC Servo Drive User Guide 5.5 Digital inputs/outputs configuration If we have already set motor parameters then it is time for digital inputs and outputs settings unless the signals were connected in accordance with default settings (chapter 5.5.2 and 5.5.4). I/O configuration window can be called out from the menu: „Configuration I/O signals” or by clicking on the icon on our toolbar. To assigne a function to an input or an output you should click right mouse button on the nput or the output and select demanded function. You can also reverse operation logic for each input or output by selecting “Change polarization” option. It’s good to clear all current settings first before the configuration. For inputs we select 0 input and we click on 5 input while holding „Shift” key at the same time. Click on all this way selected inputs with right mouse button and select unused. We do the same for the outputs. If „Servo ON” function is not assigned to any input then the drive (and power output stage) is all the time enabled. So in this case it is very important to not connect power output stage during first configuration of the drive. Otherwise if PID controllers and/or motor parameters aren’t set properly then the running motor will go into oscillations or will rotate uncontrollably. To keep all settings changes saved after Power is off – click on the simDrive™ AC Servo Drive - USER G UIDE icon on the toolbar. 33 5.5.1 Digital inputs function Function E-Stop Home In Reset Servo ON Limit++ Limit-- Description Emergency stop Homing signal input (for doming signal and encoder index synchronization) Alarm reset Załączanie końcówki mocy – przejście ze stanu gotowości do stanu pracy Positive limit Negative limit Default state Inactive Active Inactive Active Inactive Inactive 5.5.2 Default inputs functions assignment A new drive has input functions assigned by default. Obviously you can set it freely but if you connect in accordance with the default settings you will not need to set inputs in csServoManager™. Digital input number 0 1 2 3 4 5 5.5.3 Home out 5.5.4 Description Information about an alarm (interruption of operation) Homing signal output synchronized with encoder index (it requires doming input defining for proper operation) Motor’s electromagnetic brake control. The output defined as a brake is active if motor’s voltage is enable and a drive works correctly. In ready and alarm state the brake output is inactive. Default outputs functions assignment Digital output number 0 1 2 34 Default polarization Reversed Normal Normal - Digital outputs functions Function Alarm Brake Default function Homing input Servo ON Reset - Default function Alarm Homing output Brake Default polarization Normal Reversed Normal simDrive™ - AC Servo Drive User Guide 5.6 PID controller tuning For beginners it's the hardest stage of the configuration but following the manual even they can tune the PID controller properly and pretty fast. Before we enter power output stage (HV) and we switch a servo drive on („Servo ON”) we should first enter initial, low values of the controller to avoid loud motor oscillation right after we turn the motor. Open PID tuning window from our menu „ConfigurationPID tuning” or click on the on the toolbar. icon 5.6.1 Initial settings of PID regulator Optimal, initial values for various motor types may differ significantly however in the table below there are parameters which should be „safe” in most of cases – they shouldn’t cause motor oscillations after it is turned on. PID controller type Position Parameter Kp Ki Kd Max following error Value 0,1 0 0 Encoder imp/rev number (incl. all edges), so as for now we allow for +/- 1 motor rev error Speed Kp Ki Kd 0,25 0,02 0 Current Kp Ki 2 0,05 Feedforward V ff A ff 1 0 simDrive™ AC Servo Drive - USER G UIDE 35 5.6.2 Manual PID controller tuning procedure You should connect power output stage power supply (HV), however be ready to disconnect the power supply in case if something was set incorrectly and motor will start to vibrate or rotate uncontrollably. You can use JOG function directly from csServoManager (ToolsJOG I/O control) during tuning. Step by step tuning process looks as follows: • Make sure you won’t cause mechanical damage of a machine axis and if any other person doesn’t work at the axis as a motor will start to rotate in a moment. • Press the button. The driver state should change into „Running”, if there is an „Alarm” we can delete it by pressing „Reset”. You should set low motion velocity value, about 50 rev/min and try to move an axis pressing the revs buttons – into the right and into the left. If you use the settings from „Initial settings of PID controller” section the motor should move. Due to very small accelerations the motion can be a bit „ponderous” and unequal but it’s normal. • When you hear squeaks or you get an overload or short circuit alarm you should decrease PID current controller values – group: „Current [PI] regulator”. Decrease the K p by ¼. I fit won’t help try to decrease the parameter again by ¼ and additionally the K i parameter also by ¼. Very rare some untypical motors theoretically refuse to cooperate but practically we haven’t noticed a situation like that. o If the motor jerks and the drive shuts down or the motor makes only a fraction of a revolution and current increases till alarm overload state appear then one of possible reason may be: Encoder counting direction set incorrectly Incorrect connection of HALL sensors HALL signals polarization set incorrectly Incorrect motor’s phases connection Motor’s pairs of poles number entered incorrectly Failure of motor windings, HALL sensors or an encoder If the motor rotates then part of the hardest work is behind us and now we can start the real tuning (description below). o • 36 simDrive™ - AC Servo Drive User Guide • • • • • • Leave the „JOG” tab and go to „Motion planner” and 100 RPM velocity and about 1500 RPM/s acceleration, position equal to encoder impulses per rev number (1 motor revolution) set “Relative”. Make sure if the motion in 1 motor revolution range won’t cause damage of a machine axis mechanics and if any other person doesn’t work at the axis as a motor will start to rotate in a moment. Click button. The motor should start to rotate left and right in one motor revolution range. Current controller tuning: o Increase K p gain of current controller slowly until you get first symptoms of overshoot - buzzing and squealing. Next decrease the K p slowly by 25%. If we get an alarm state during the current controller tuning then you should decrease the gain value by 25% and press „Reset” and again. o We tune the K i parameter of current controller the same way. Slowly increase the gain and at first squealing or laud noises decrease the K i value by 25%. Velocity controller tuning: o Increase K p gain of velocity controller slowly until you get first symptoms of overshoot - buzzing and squealing. Next decrease the K p slowly by 25%. o We tune the K i parameter of velocity controller the same way. Slowly increase the gain an at first vibrations decrease the K i value by 25%. Position controller tuning: o Increase K p gain of position controller slowly until you get first symptoms of overshoot - buzzing and vibrations. Next decrease the K p slowly by 20%. simDrive™ AC Servo Drive - USER G UIDE 37 In most of cases at this stage of the tuning the procedure is finished but for new machines or machines that were not used for a long time probably you will have to tune current and position controller once again when mechanics is livened up and run in. In case an axis has a tendency to go into vibrations you can try to suppress them by increasing K d gain of velocity controller. If it didn’t help you can try to decrease the K p of position controller by 10% and K p and K i of velocity controller as well. To keep the changes saved after power supply is off – press changes or select “Save to flash” from “Configuration” menu. icon on a toolbar after you done the Remember to approve the values you type n by pressing „Enter”. It is worth to watch “Max following error” parameter during tuning in a parameter monitor window ( ). After we finish the tuning we can set max allowed following position error in a PID tuning window approximately on a four-fold value of measured max following error so if “Max following error = 23” in a parameter monitor window, then we set „Max following error” parameter in a PID tuning window – to 100. 38 simDrive™ - AC Servo Drive User Guide 5.6.3 Automatic PID regulator tuning procedure simDrive servo driver allows for automatic PID regulator tuning. At the beginning we should notice that due to variety of motors and mechanical systems the autotuning may not work property for every one of them and it may be necessary to tune the PID manually. Autotuning function is available in a PID tuning window and to open it click „Configuration→PID tuning” from a menu or click icon on the toolbar and go to “Autotuning” tab. Usually we recommend keeping default settings if you have any problems you can just experiment using other settings. We start the autotuning by clicking “Start”. A motor starts to rotate and you can see a progress bar. The procedure may take few minutes. simDrive™ AC Servo Drive - USER G UIDE 39 5.6.3.1 Autotuning configuration parameters Parameter Velocity Acceleration Distance Tuning rigidity Description Max motion velocity during autotuning. By default it is 500 RPM, if such rotation speed in not safe for a machine or it exceeds motor capacity then you should decrease it. Autotuning acceleration. By default 3000 RPM/s. For small accelerations the autotuning may be less precise so you should decrease the parameter only if it is absolutely necessary. Distance of motion. By default +/-0,5 rev. Higher values can make the autotuning lasts longer. Greater rigidity means better positioning but also oscillations are more likely to happen. Less rigidity – the positioning is worst but oscillations are less likely to happen. The autotuning procedure requires a motor to be in motion and mechanically mounted on a machine so you need to be careful and verify if there is enough space for the motion (by default a motor Turing autotuning rotate by +/- 0,5 of a rev) and also if no one else works on the machine at the moment. You should be ready to turn off the drive immediately as well. To keep your changes saved after power is off – press icon after autotuning is finished. During the autotuning you can notice knocking, squeaks, vibrations etc. It is normal. If these symptoms last constantly longer than 5 sec. then you should stop the autotuning by pressing „Stop” button. 40 simDrive™ - AC Servo Drive User Guide 5.7 Torque scan function - csTorqueScan™ Some motors have large torque ripple in a rev angle function. simDrive servo drive enables a measurement of these ripples and lets for proper compensation entering in a real time. It makes positioning is more precise and vibrations are suppressed (without the compensation the vibrations would occur at some velocity ranges). This function is designed for rather more advanced users as precise tuning requires from a user more experience and skill to asses an operations of a motor. „csTorqueScan™” tab is available in PID tuning window. Scanning and attuning procedure looks as follows: 1. Motor scanning • Make sure that any other person doesn’t work on a machine and that there are no obstacles for the motor to perform +/- 2 revs. • Make sure that PID controllers have already been tuned earlier. • Make sure that power outputs stage power supply (HV) is enable and a drive is ready (if it is in alarm state – scanning won’t start). • Set „Ampl.” Slider to 1 value and „Phase” to 0. • Click „Scan” button and wait until the scanning is finished. 2. Amplitude and phase tuning (the hardest stage that requires a bit of “sense”). • We find at what velocity there is resonance – small vibrations of a motor. For that we can use JOG function – we set small acceleration value and during the acceleration try to hear or even touch a machine (touch only in the place where is no risk of crushing!). • In motion at the resonance velocity we regulate “Phase” with the slider to get as small vibrations as possible. The best way is to test it at both-sides motion so the motor rotates alternately right and left (you can use “Motion planner” function in a JOG window). • As we have found optimal position of the “Phase” slider we can try to decrease the amplitude to get the smoothest motion. (further description- next page) simDrive™ AC Servo Drive - USER G UIDE 41 The ripples measurement procedure requires a motor to be in motion and mechanically mounted on a machine so you need to be careful and verify if there is enough space for the motion (by default a motor during autotuning rotate by +/- 0,5 of a rev) and also if no one else works on the machine at the moment. For proper operation of csTorqueScan™ function constant mechanical load is required. If a machine mechanics doesn’t assure that (for example an axis drive is on a straight tooth bar) the measurement should be done on an unloaded motor – it needs to be demounted and probably PID controller detuning will be necessary as a motor without mechanical load requires other settings of velocity and position regulators. To keep your changes saved after power is off – press 42 icon after autotuning is finished. simDrive™ - AC Servo Drive User Guide 6. Drive alarm flags description You can open current alarms and warnings information window from the menu “Tools→show alarms” or click icon from the toolbar. Alarm name To high voltage on a DC bus Motor overload (!) Over current protection Power output stage overheat Following error (velocity controller) To low voltage on a DC bus Following error (position controller) Error state of HALL sensors Rotor positioning error Unsuccessful calibration of LEM sensors! Description Overvoltage on a power output stage DC circuit. The alarm shows up when we power the power output stage with too high voltage or if energy received from a motor during braking raises power supply voltage up. In the second situation we should decrease acceleration in a CNC controller, increase capacitors capacitance in a power supply or to use a special power module by CS-Lab company that allows for braking resistor connection. Overload. Motor input current was exceeded for too long (chapter 7 - „Drive overload characteristic”. Może to oznaczać zbyt duże obciążenie mechaniczne silnika, awarię silnika, bądź źle skonfigurowane parametry silnika. Short circuit alarm. Means: power supply wires short circuit, motor malfunction, power output stage malfunction. It may also appear at incorrectly set current PID regulator or very rapid acceleration/deceleration. It means driver overheat. You should wait till the driver cools down and if the problem persists then you assure better cooling for the driver and a control cabinet. Rotational speed of a motor differs too much from the set speed It means to high revs or incorrectly set motor parameters or PID regulators. Power supply voltage of a power output stage is too low. This alarm also occurs if HV voltage wasn’t entered, also at too weak power supply or if power supply of a power outputs stage is broken. A driver wasn’t able to keep set positioning tolerance. You should check settings of a max. following error in a PID tuning settings or correct acceleration/braking ramps in a CNC controller. Incorrect HALL sensors read-outs. Some sensor can be broken or (more often) connection faults, a bad quality wire or a shield incorrect connection. The error appears also when we have connected DC motor and we still do not have a drive reconfigured. In this case you should set a motor type and save the settings and next turn the drive 24V power supply off and on. A rotor positioning terror. Unsuccessful procedure of a rotor position definition after power is turned on. Verify motor settings and connection. LEM current sensors unsuccessful calibration. Contact with service. simDrive™ AC Servo Drive - USER G UIDE 43 Alarm name Configuration readout error, default settings loaded EEPROM memory breakdown Resonance detected! ESTOP signal active Hardware limit active Description CRC32 control value in device memory was incompatible and default settings were loaded. It means drive’s settings loss and/or non-volatile memory of a device malfunction. If the problem persists after another configuration – contact with service. Non-volatile memory breakdown. Contact with service. A drive at a standstill verifies if a motor went into oscillations caused by incorrect PID controller settings. In case of high oscillations detection the drive turns off to save mechanics of a machine. E-Stop input is active. Restart of a drive won’t be possible until E-Stop signal is active. Limit+ or limit- input is active. Restart of a driver won’t be possible until any of the hardware limits will be active. If any of the alarm occurs a drive will stop working and disable power output stage. A dynamic brake is enabled to slow down quickly. If allowed current is exceeded during the braking then over current alarm may occur. To start a drive again after alarm state it’s required to give „Reset” on digital input or a reset from csServoManager™ utility. 7. Drive overload characteristic simDrive™ servo driver allows for a triple motor’s overload for 3 sec. However if the motor is only a bit overloaded the allowed time lengthens. Below – a characteristic of the allowed time of overload (vertical axis) in its value function (horizontal axis). 44 simDrive™ - AC Servo Drive User Guide 8. A addition - Firmware update Firmware updates can be downloaded here: http://www.cs-lab.eu. The .zip archives include: • Up to date configuration – diagnostics utility - csServoManager™ (install version) • simDrive™ servo driver firmware files (firmware) • Uploader which is a software for simDrive™ firmware updating 8.1 csServoManager™ utility update csServoManager utility update comes down to (section 5.1.2 – “ csServoManager utility software installation”). an installer launching 8.2 simDrive™ firmware update simDrive™ firmware update requires simDriveUploader.exe launching. First make a copy of your servo drive settings and save them in csServoManager™. Update procedure looks as follows: 1. Make sure that simDrive™ servo driver is connected through RS232 (COM) port (updates through CAN bus is not supported) 2. Select your language and press „Start” 3. Wait until the uploader will detect the connected drive. 4. Select the file with new firmware. 5. Wait until the update process ends. 6. Close the uploader. Only control system fitter/installer should perform the update because after update to newer firmware version there can some new additional functions appear which need to be set. Update performed by unqualified staff can lead to incorrect drive operation so it may even be not able to use till it will finally be set correctly. simDrive™ servo drive firmware must be compatible with csServoManager™ version. In other case connection will not be possible. Always update csServoManager™ and simDrive™ firmware as well. simDrive™ AC Servo Drive - USER G UIDE 45 9. B addition - What is PID controller (regulator) 9.1 What is PID controller As opposed to stepper motors which are, we can say, controlled "blindly", servo drives work in so called closed loop, so when they control a motor they check if its position is compliant with the set position. If actual rotor position differs from the expected one, there is a current correction entered to overcome the existing error. If the motor overtook the position that was set, it just slows down or speeds up to catch up if the set position overtook the actual position. It is just like driving a car we would like to catch up another car next to us. If it is running away we step on the gas and speed up and if we are too far we let up on the gas to slow down. What happens if the car we want to align with doesn't make it any easier and every moment speeds up or slows down, moreover we are already nervous and we overreact stepping on the gas or brake to the limit time and time again? As a result, we will still pass the chased car, being most of the time far away from it. As a result, we will still pass the chased car, being most of the time far away from it. Translating this analogy to a CNC machine, it would appear that axes do not follow the set motion path and a lot of machining inaccuracies would arise. Servo drives require fast and precise correction to the position error. Going back to the cars comparison, the point is that the driver from the chasing car should be as experienced as possible, so he could predict behavior of the second running away car and to react precisely as the situation evolves. In servo drives PID controller is the driver. The controller is a mathematical algorithm that is responsible for motor reaction on deviations from set position. The PID name derives from the following terms of the controller. • • • 46 Proportional Integral Derivative simDrive™ - AC Servo Drive User Guide 9.2 PID controller terms (parameters) operation There are like tens of thousands descriptions of PID controller work in the Internet, but for most of people - putting it mildly - they are rather vague and actually do not say anything. In this section we present the PID controller blocks described in a few words so you could get the logic of their operation. 9.2.1 The proportional term – P It is the easiest part of the controller. It makes that correction is greater the larger position error is. The error is calculated in the following way: 𝑃𝑒𝑟𝑟 = 𝑃 − 𝑃𝑒𝑛𝑐 Where: P err : position error P : current, set position P enc : actual position of an encoder An output of the proportional term is calculated by the formula: 𝑂𝑈𝑇𝑃 = 𝐾𝑃 ∗ 𝑃𝑒𝑟𝑟 Where: OUT P : output of proportional term Kp : Proportional gain P err : Position error Let’s assume that the set position= 0, Kp = 10 and analyze the situation for a few different actual positions of a motor: • Motor position = 0: Error is zero, so the ‘P’ term has also zero output so there is no correction (because it is not necessary). • Motor position = 1: Error = (0 – 1) = -1. The output = 10 * -1 = -10. • Motor position = 5: Error = (0 – 5) = -5. The output = 10 * -5 = -50. • Motor position = -5: Error = (0 – (-5)) = 5. The output = 10 * 5 = 50. As you can see above correction is greater the larger the error value is and direction of the correction is opposite to the error direction. This part of the PID controller is effective at larger error values, for smaller error values it is not doing very well. 9.2.2 The integral term – I For some users unfamiliar with mathematics the integral may sounds scary, in fact the term operation is very easy. An output of the integral term of PID controller depends on the position error and the duration of the error. Let’s assume that the Integral eliminated most of the position error, but there a small error left due to friction e.g. 10 p. of an encoder. With so small error the Proportional control does not correct too much and its output is not able to overcome the friction. SO the motor stands and the error remains. Here we have the Integral term ‘I’. To simplify let’s assume that the controller works once per second and Ki (gain) = 1. In this situation ‘I’ output will look like this: • Time t=0s : output = 0 • Time t=1s : output = 10 simDrive™ AC Servo Drive - USER G UIDE 47 • • • Time t=2s … Time t=10s : output = 20 : output = 100 The example above shows that even a small error may cause large offset (correction) value if it lasts for longer time. In practice we deal not with seconds but with fraction of seconds because the PID controllers work from a few hundred to several thousand times per second. Matching the ’P’ and ‘I’ terms we get a controller which immediately reacts on large error values (P), and some other deviations it corrects with small delay (I). So it all starts to work pretty well. 9.2.3 The Derivative term – D After reading descriptions of ‘P’ and ‘I’ terms we can come to conclusion, that we do not need nothing more. In many situations that is true and very often in practice the derivative gain ‘D’ is set to 0, what cause it is skipped. However sometimes there is necessity to add some stabilization element as "sharply" tuned ‘P’ and ‘I’ may cause unwanted vibrations near the set point. Here the derivative term ‘D’ will be helpful which works as a dumper - prevents sudden, rapid movements. The ‘D’ reacts the stronger the faster a position error changes. If the error increases fast, the ‘D’ control will react towards ‘-‘strongly. If the error decreases quickly then the ‘D’ control will strongly react towards „+”. 9.2.4 The „sixth” sense – the mysterious KVFF parameter Where this parameter comes from if we described all the terms of PID controller? Actually it is not another PID controller term it is rather an element which makes PID controller work easier. Looking carefully at all the three PID terms descriptions we can see that outputs of each term depend on a position error. So the controller does not work if the position error is zero. The problem is that we want the error to be as small as possible, the best if it would be zero because it means the best accuracy of work we do. Here we have the K VFF parameter which reacts in advance, before the error occurs. Of course working in advance base on prediction and prediction is never 100% sure, so some error occur for sure and PID has got then work to do but in practice well-matched K VFF gain is able to decrease temporary position errors even up to ten times. 48 simDrive™ - AC Servo Drive User Guide 10. C addition – Slave axis Many drives have so called slave axis function available used by mechanics, installers, operators for slave axis implementation in CNC machines in which single axis is driven by two motors. This is not always an optimal solution as these both motors work then like they were mechanically connected. Why not? - You can ask. That's what the function is all about, right? Let’s say that we have gantry milling machine and the gantry is controlled by two motors, one each side. If we turn the power off the motors become "loose” and the gantry is set in the lowest tension position. The problem is that in this situation gantry perpendicularity almost never can be kept, so when we want to mill a square we get a diamond shape. There is no way to correct these inaccuracies as after we switch the power on - the gantry's both-side drives are like "stuck" together. In a system based on simDrive™ servo drives and dedicated CNC controller – CSMIO/IP-S the slave axis function is implemented in a different way namely - the function is done by CSMIO/IP-S controller. This controller during homing performs special procedure of geometry correction in which these both-side drives of our sample milling machine gantry work independently – as completely separate axes. Only after geometry correction is done the both-side drives will be electronically linked to work as one. According to the above - the slave axis function implementation in the drive would be pointless. The function is done by dedicated CSMIO/IP-S controller. simDrive™ AC Servo Drive - USER G UIDE 49 11. D addition – Diagnostics via Mach3 software simDrive™ servo drive can be connected through CAN bus with dedicated CNC controller – CSMIO/IP-S. In current firmware version it lets for the drive diagnostics directly in Mach3 and there is no need to use USB-RS232 or to start csServoManager™. In Mach3 select „Plugin Control CSMIO_IP plugin” from the menu, go to „Expansion modules” tab and click „simDrive™”. In the newly opened window you will see: • Encoder position counter • Following error • Motor load (current absorbed by a motor) • Hall sensors state • Drive state • Digital inputs and outputs state • Power output stage temperature • Alarms shown as easy control led Moreover if we connect simDrive™ servo drives with a controller through the CAN bus - information about axis disabling cause (an alarm type) will be saved in CSMIO/IP log if situation like this happens. In case of any problems it can make diagnostics easier. If we want to connect more than one drive through the CAN bus you need to set CAN addresses for the drives. Look at 5.2.2 chapter - „CAN bus connection”. 50 simDrive™ - AC Servo Drive User Guide