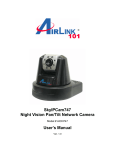
1
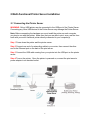
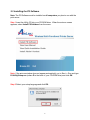
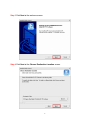
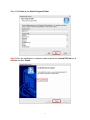
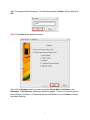
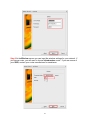
Wireless USB 2.0 1-Port Multi-Functional
Printer Server
Model # AMPS240W
User’s Manual
Ver. 1A
Table of Contents
1 Introduction .................................................................................................................. 3
1.1 Package Contents ................................................................................................. 3
1.2 System Requirements ........................................................................................... 3
2 Multi-Functional Printer Server Installation................................................................... 4
2.1 Connecting the Printer Server................................................................................ 4
2.2 Installing the PS Software...................................................................................... 5
2.3 Configuring the Printer Server ............................................................................... 8
2.4 Configuring the Computer.................................................................................... 14
3 Web Configuration Utility............................................................................................ 16
3.1 Connecting to the Web Configuration Utility ........................................................ 16
3.2 Management........................................................................................................ 17
3.2.1 Management J System .................................................................................. 18
3.2.2 Management J Wireless................................................................................. 20
3.2.3 Management J Network ................................................................................. 20
3.2.4 Management J User....................................................................................... 21
3.3 Configuration ....................................................................................................... 22
3.3.1 Configuration J System .................................................................................. 22
3.3.2 Configuration J Wireless ................................................................................ 22
3.3.3 Configuration J Network ................................................................................. 25
3.3.4 Configuration J User ...................................................................................... 26
3.3.5 Configuration J E-mail ................................................................................... 27
3.3.6 Configuration J SNMP.................................................................................... 30
3.4 Tools.................................................................................................................... 31
3.4.1 Tool J Print Test ............................................................................................. 31
3.4.2 Tool J E-mail .................................................................................................. 31
3.4.3 Tool J Reset ................................................................................................... 32
3.4.4 Tool J Factory Reset ...................................................................................... 32
3.4.5 Tool J Firmware Upgrade............................................................................... 32
3.4.6 Tool J Backup ................................................................................................ 34
3.5 Help ..................................................................................................................... 35
Appendix – Specification ............................................................................................... 36
Technical Support ......................................................................................................... 37
2
1 Introduction
Congratulations on purchasing your Wireless 1-Port USB 2.0 Multi-Functional Printer
Server. It is the easiest and fastest way to deploy printers on your network.
The Wireless MFP print server complies to IEEE 802.11g/b that allows you to share
your All-in-One multi-functional printer wirelessly on your local area network (LAN). You
can do printing, faxing, and scanning on any of your computers that connects to the
network. It also features a Web-based Configuration Utility, which allows you to set up
the Print Server through the web browser easily and quickly. It manages the flow of
print files from computers to the connected printer, delivering print jobs to highperformance printer much faster than a file server or a PC acting as a print server can.
1.1 Package Contents
Unpack the package and check all the items carefully, and be certain that you have:
•
•
•
•
•
•
•
1-Port USB 2.0 Wireless MFP server
Stand
AC Power Adapter
Quick Installation Guide
Installation CD
RJ-45 Ethernet Cable
Antenna
If any item contained is damaged or missing, please contact your local dealer
immediately. Also, keep the box and packaging materials in case you need to ship the
unit in the future.
1.2 System Requirements
•
•
Operating System: Microsoft Windows 2000/XP/Vista
For Web Configuration: Microsoft® Internet Explorer 5.5, Netscape® Navigator
4.78 or above
3
2 Multi-Functional Printer Server Installation
2.1 Connecting the Printer Server
WARNING: Only a USB printer may be connected to the USB port of the Printer Server.
Connecting any other USB device to the Printer Server may damage the Printer Server.
Note: Before connecting the hardware you must install the printer on each computer
you plan to use with the printer. Make sure that you are able to print, scan, and fax from
each with your multi-functional printer directly connected to your computer(s).
Step 1 Power down the printer and the printer server.
Step 2 Connect one end of a networking cable to your router, then connect the other
end to the Ethernet port on the back of the print server.
Step 3 Connect the USB cable coming from your printer into the USB port on the printer
server.
Step 4 Turn on the printer. Once the printer is powered on, connect the print server’s
power adapter to an electrical outlet.
4
2.2 Installing the PS Software
Note: The PS Software must be installed on all computers you plan to use with the
print server.
Step 1 Insert the Utility CD into your CD-ROM drive. When the autorun screen
appears, select Install PS Software from the menu.
Note: If the autorun window does not appear automatically, go to Start -> Run and type
D:\Utility\Setup.exe (where D is the letter of your CD-ROM drive) and click OK.
Step 2 Select your setup language and click OK.
5
Step 3 Click Next at the welcome screen.
Step 4 Click Next at the Choose Destination Location screen.
6
Step 5 Click Next at the Select Program Folder.
Step 6 Once the installation is complete, make sure that the Launch PS-Link box is
checked and click Finish.
7
2.3 Configuring the Printer Server
Note: The following steps only need to be performed one time from one computer.
Step 1 Click the Discover button and your printer should show up under Server Name.
If your print server does not show up, check all power and network cable connections to
the printer. You may also need to disable any software firewalls you have on your
computer.
Step 2 Once the printer server appears in the Server Name box, click on it. You should
see your printer next to Device name. Click on the Setup Wizard button.
8
Step 3 A password box will appear. The default password is admin. Enter it and click
OK.
Step 4 Click Next at the welcome screen.
Step 5 At the System screen you can change the Server Name, Port Name, and
Password. Click Next after making the desired changes. If you do not have a specific
Server Name, Port Name, or Password that you would like to use, click Next to accept
the default settings.
9
Step 6 At the Wireless screen you can input the wireless settings for your network. If
you have a router, you will want to choose Infrastructure mode. If you are unsure of
your SSID, contact your router manufacturer for assistance.
10
Step 7 At the Wireless Encryption screen you can enter the wireless security settings
of your router. If you do not use encryption, click Disable and then Next. If you are
using encryption, you can get the encryption settings from your router or router
manufacturer and enter them here. Afterwards, click Next.
For WEP encryption, select WEP and enter your settings into the boxes below.
For WPA-PSK, Select WPA-PSK and enter your Pre-Shared Key into the box. Please
note that the print server only supports TKIP and does not support AES
11
Step 8 If you have a specific IP address you would like to assign to the print server,
select Manually Assign and enter your custom settings. Otherwise, select DHCP
Assign Automatically and click Next.
Step 9 If your network uses a workgroup name other than WORKGROUP, you can
enter it here and click Next. Most users will want to leave this setting as it is and click
Next.
12
Step 10 If you have specific AppleTalk settings, you can enter them here. Most users
will want to leave this setting as it is and click Next.
Step 11 Click Save to save the changes to your print server.
If you plan to use the print server wirelessly, you can now disconnect the Ethernet cable
between the print server and the router.
13
2.4 Configuring the Computer
Note: The following steps must be completed on all computers you plan to use with the
print server.
Step 1 Double click on the PS-Link icon in the system tray to open the PS-Link
software.
Step 2 Click the Discover button and your printer should show up under Server Name.
If your print server does not show up, check all power and network cable connections to
the printer. You may also need to disable any software firewalls you have on your
computer.
Step 1 Select your print server from the Server Name box and click the Link button.
14
Step 2 Click OK at the Link Successfully screen. You will see notices appearing in
the bottom right-hand corner of your screen as Windows configures the printer.
Step 3 Once you see a notice that says Your new hardware is installed and ready to
use, go to Start -> Control Panel and double click on Printers and Faxes (Windows
Vista Users click on Printers instead of Printers and Faxes).
Step 4 In Printers and Faxes (or Printers) you will see a copy of your printer. Right
click on the copy and click Set as Default Printer.
Congratulations, the configuration is now complete. Remember to repeat all steps in
Section 4 on each of the computers you plan to use with the print server.
15
3 Web Configuration Utility
3.1 Connecting to the Web Configuration Utility
The MFP Server can be accessed and managed in the use of not only the enclosed PS
Software program (see also the Using PS-Link Software chapter), but also the Web
Configuration Utility. The latter method will be introduced in this chapter.
To begin managing the MFP Server, simply launch the PS-Link software and click on the Web
Setup button.
A new web browser window will open, prompting you for a username and password. Both the
Username and Password are admin. Enter admin into the boxes and click OK to be taken to
the Web Configuration screen.
16
The Web Configuration Utility contains four categories: Management, Configuration, Tools,
and Help. You may click a desired category from the bar, to display its submenu and select a
desired option listed in the left column, and then the corresponding content will show up in the
right column.
3.2 Management
The Management screen displays the basic information of the MFP Server, including these
options: System, Network, and User.
17
3.2.1 Management J System
As previous screen shows, the System option displays the status of your MFP Server, printer,
and network for your reference:
Device Status
Display information about the MFP Server, including its model type, firmware version, MAC and
IP addresses, and up time.
18
Printer Status
All information about your printer, such as the given name for the printer, speed, printer status
(on/ off line), and further status of your printing tasks, will be listed in this field.
Ethernet Status
You can also monitor the network connection, transmission speed, duplex status, and the
packets status in this field.
3.2.2 Management J Wireless
Click the Wireless item in the left column to display the information of the wireless LAN.
Clicking Refresh will update the information.
Wireless Status
The items in this field display the information of the wireless LAN, such as the connection mode
(Infrastructure or Ad-Hoc), SSID, channel, data transfer rate, WEP encryption, and the packets
status.
19
3.2.3 Management J Network
Click the Network option of Management to display the LAN information:
Auto IP
This field displays the current settings of TCP/IP, pre-configured in TCP/IP field that is located
on Network of Configuration category, for your verification. The current configuration contains
DHCP/BOOTP, UPnP, and MAC Bonjour/Rendezvous.
20
TCP/IP Printing
For you to monitor the status of your printing tasks through TCP/IP.
Microsoft Network Printing
For you to monitor the status of your printing tasks through Microsoft Network.
MAC AppleTalk Printing
For you to monitor the status of your printing tasks through MAC AppleTalk.
To refresh or reload the latest information on this page, click Refresh button.
3.2.4 Management J User
Click the User option of Management to enter the following page to view the detailed users’
printing log for your reference.
Users Printing Log
Display the information of users about MAC and IP addresses of users, usernames, and status
of printing tasks.
To refresh or reload the latest information on this page, click Refresh button.
21
3.3 Configuration
The Configuration category allows you to set up the configuration of System, Network, User,
Email, and SNMP.
3.3.1 Configuration J System
Click System item of Configuration to display the following page, which contains two fields:
System Device and Port Settings.
System Device
You are allowed to do the basic set up for your MFP Server, including:
-
Server Name: Specify a name for the MFP Server.
-
Location (optional): Designate a location for the MFP Server.
-
Admin Contact (optional): Assign an administrator name for the MFP Server.
-
Password: Specify an administrator password with 3 to 8 characters. To set up the
password, please enter the password in the New Password, and then enter the same one
again in the Confirm Again.
22
Port Setting
In this field, you can specify a Port Name for the MFP Server, and give a brief description for it.
Furthermore, it allows you to enable or disable PJL Printer setting by selecting Yes or No from
the pull-down menu.
NOTE: PJL (Print Job Language) has certain job requirements that must be met to work
correctly. For more information, please refer to your printer’s manual.
After done the System configuration, click Save button to restore the new configuration, or
Cancel button to abandon.
Configuration J Wireless
23
Wireless Interface
-
-
-
Connection Mode: Select one of the three connection modes.
• Infrastructure (default) - Connects to compatibly configured wireless AP or router in a
WLAN.
• Ad-Hoc - Connect to compatibly configured wireless clients in the peer-to-peer mode.
SSID: Assign the SSID in this box. You can manually input the name or select one from the
pull-down menu. To search the available wireless AP within the network, click the Site
Survey button.
Wireless Channel: Select the channel from the pull-down menu. The default setting is 11.
Transmission Rate: Select the data transmit rate from the pull-down menu. The default
setting is Fully Automatic.
WEP Encryption
This field allows you to configure the settings of data encryption. Please remember that the
WEP key must be set before the data encryption is enforced.
-
WEP Encryption: This option allows you to select Disable, 64 bits, and 128 bits for the
encryption setting.
WEP Key Format: You can decide the network key to be encoded by ASCII (ASCII
characters) or HEX (hexadecimal digitals).
Authentication Type: You can set the authentication type by selecting the settings: Open
System, Shared Key, and Both.
Then, enter the key(s) for the network in the Key box (1~4).
WPA-PSK
Wi-Fi Protected Access is systems to secure wireless (Wi-Fi) networks.
-
Preshared Key: key in the preshared number (8-63 ASCII or 64 HEX characters)
Advanced Setting
This field allows you to configure more settings, including:
- Beacon Interval: Enter the number of beacon interval time in millisecond.
- Preamble: This option allows you to set the length of preamble. Setting options are: Long it is set to 144 bits; Short - it is set to 72 bits.
TIP: Once you have changed the settings in each option, click Save to store the settings, or Cancel to
abandon.
24
3.3.2 Configuration J Network
Click Network item of Configuration to display the following page, which contains two fields:
TCP/IP, Microsoft Network, and Apple Talk.
TCP/IP
This field allows you to configure the TCP/IP setting, including:
25
-
IP Address: You may select to set up IP address manually or automatically. For Manually
Assign, you should IP, Subnet Mask, and Default Gateway addresses in the corresponding
frames.
-
DNS Server Address: There are two frames for you to designate DNS Server address.
-
UPnP: For you to enable or disable UPnP mode.
-
MAC Bonjour/Rendezvous: For you to enable or disable MAC Bonjour/Rendezvous mode.
-
Second HTTP Port: For you to enable or disable remote Web Configuration and IPP
Printing.
Microsoft Network
Enter the name of the Workgroup that you want the MFP Server associated with in this field.
AppleTalk (Does not support in this hardware version)
3.3.3 Configuration J User
Click User item of Configuration to display the following page, which contains two fields:
Printing Control and Define Users.
26
Printing Control
Allow you to enable or disable authorized users and unauthorized users that are listed in the
User List to access the MFP Server.
After done the configuration, click Save button to restore the new configuration, or Cancel
button to abandon.
Define Users
For you to edit User List: add/delete users in/from the User List. The User List at the bottom of
the screen displays the current defined user and its related information for the MFP Server.
3.3.4 Configuration J E-mail
Click Email item of Configuration to display the following page, which contains two fields:
Email Account, Email Notification, and Email Printing.
27
E-mail Account
You may assign an E-mail address to the MFP Server, so that your mail of the account can be
printed out directly through the printer (ASCII text only). To enable this function, enter the Email account in the MFP Server E-mail Address frame.
-
Incoming E-mail (POP3) Server Address: Enter the server address that is used to receive
your E-mail here.
-
Outgoing E-mail (SMTP) Server Address: Enter the server address that is used to send
your E-mail here.
Moreover, if your mail server needs to verify the user when sending E-mail, you have to input
Account Name and Password as well.
E-mail Notification
You can specify the MFP Server to send you an alter message via E-mail when the printer
status is changed. To enable this function, check Yes for the Enable e-mail notification for
printer status changing option. Also, enter the administrator’s E-mail address in the Admin Email Address frame.
E-mail Printing
For you to do E-mail Printing configuration, including:
-
E-mail Printing (ASCII Text Only): Allows you enable or disable the E-mail printing in
ASCII text format only.
-
Receive E-mail Interval: Allow you to set up a time interval in minute in order to
check/receive E-mail periodically.
After done the configuration, click Save button to restore the new configuration, or Cancel
button to abandon.
28
3.3.5 Configuration J SNMP
Click SNMP item of Configuration to display the following page:
SNMP Management
Allow you to use SNMP (Simple Network Management Protocol) to manage complex networks.
-
Community 1/2/3: Enter a name in the Name frame, and configure the Access Right by
selecting Read Only or Read/Write from the pull-down menu.
After done the configuration, click Save button to restore the new configuration, or Cancel
button to abandon.
29
3.4 Tools
The Tools category provides several tools for you to do various testing, reset the device, and
upgrade firmware.
3.4.1 Tool J Print Test
Print Test
You may click the Test button to print a test page.
NOTE: This tool is only available for DOS Printing Printer.
3.4.2 Tool J E-mail
30
Test E-mail Account
Click Test button to send a test E-mail to the given administrator’s E-mail address.
Receive E-mail
Click Yes button to immediately check and receive E-mail, and then print out the mail when
available.
3.4.3 Tool J Reset
Reset
Click Yes button to immediately reset the MFP Server.
3.4.4 Tool J Factory Reset
31
Factory Reset
Click Yes button to reload the factory settings of the MFP Server.
3.4.5 Tool J Firmware Upgrade
Firmware Upgrade
When a new version of firmware is available (e.g. downloading from the manufacturer’s
website), you can upgrade the firmware of your MFP Server by clicking Browse button to point
to the firmware file, and then click Upgrade button to start the upgrade or Cancel button to
abandon.
32
3.4.6 Tool J Backup
Backup Device Configuration to File
Click Backup button to backup your current configuration of the MFP Server to file and restore it
in the computer.
Restore Device Configuration from File
You can reload a configuration file that you pre-saved by clicking Browse button to point to the
backup file, and then Restore button to save, or Cancel button to abandon.
33
3.5 Help
The Help category provides brief information about the MFP Server for your reference.
34
Appendix – Specification
Printer Port
• 1 USB 2.0 Port
Wireless Standard
• IEEE 802.11g/b
Networking
• 1 auto-negotiating 10/100 Mbps RJ-45 port
Supported Protocols
• TCP/IP, SMB, NetBEUI, AppleTalk, BOOTP, SNMP,
Telnet, TFTP, FTP, LPD, RARP, DHCP, IPP
System Hardware
• SDRAM: 8M Byte
• Flash ROM: 2M Byte
Security
• WPA-PSK
• WEP 64/128-bit
Power
• DC 5V, switching type
LED
•
Power, USB, LAN
Supported OS
• Windows 2000/XP/Vista
Warranty
• 1- Year Limited Warranty
35
Technical Support
E-mail: [email protected]
Toll Free: 1-888-746-3238
Web site: www.airlink101.com
*Printer server may not support all printers. Go to the Airlink101 website to view the printer compatibility list
*Theoretical maximum wireless signal rate based on IEEE standard 802.11g specifications. Actual data throughput
will vary. Network conditions and environmental factors, including volume of network traffic, building materials and
construction, mix of wireless products used, radio frequency interference (e.g., cordless telephones and microwaves)
as well as network overhead lower actual data throughput rate. Specifications are subject to change without notice.
All products and trademarks are the property of their respective owners. Copyright ©2007 AirLink101®
36