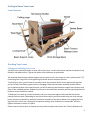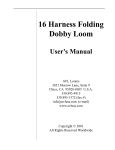
1
Little Weaver User’s Manual AVL Looms 2360 Park Avenue Chico, CA 95928-6785 USA Ph. 530-893-4915 Fax 530-893-1372 www.avlusa.com Version 1 June 2013 Contents Introduction ............................................................................................................................................................... 1 Getting to Know Your Loom .................................................................................................................................. 2 Loom Diagram ........................................................................................................................................................................ 2 Working Your Loom ............................................................................................................................................................. 2 Folding and Unfolding Your Loom ............................................................................................................................. 2 Power .................................................................................................................................................................................... 3 Changing Your Reed ........................................................................................................................................................ 3 Automatic Warp Tension ............................................................................................................................................... 3 Advancing the Warp ........................................................................................................................................................ 3 Tension Release Lever .................................................................................................................................................... 3 Dust Control ........................................................................................................................................................................ 3 Setting up Your New Loom ................................................................................................................................................ 4 Getting Started ........................................................................................................................................................... 4 Software .................................................................................................................................................................................... 4 First Time Starting Up Your Loom .................................................................................................................................. 4 USB ......................................................................................................................................................................................... 4 WiFi ........................................................................................................................................................................................ 4 Weaving Action ...................................................................................................................................................................... 5 Shutting Down ........................................................................................................................................................................ 5 Glossary of Terms .................................................................................................................................................................. 6 Learning to Weave ................................................................................................................................................................ 8 Finding or Designing a Pattern .................................................................................................................................... 8 How to Read a Weaving Draft ......................................................................................................................................... 8 Warping Your Loom ........................................................................................................................................................ 8 Calculating Yarn Usage ...................................................................................................................................................... 8 Using a Warping Board ...................................................................................................................................................... 9 Warping Your Beam.......................................................................................................................................................... 11 Threading, Sleying and Tying On ..............................................................................................................................13 Threading .............................................................................................................................................................................. 13 i Sleying ..................................................................................................................................................................................... 14 Tying-On ................................................................................................................................................................................. 14 Weaving ..............................................................................................................................................................................15 Winding Shuttles ................................................................................................................................................................ 15 Begin Weaving..................................................................................................................................................................... 15 Finishing Your Woven Fabric.....................................................................................................................................16 Edges ........................................................................................................................................................................................ 16 Washing .................................................................................................................................................................................. 17 Resources .................................................................................................................................................................. 18 Books and Print ....................................................................................................................................................................18 Online .......................................................................................................................................................................................18 Workshops and Community............................................................................................................................................18 Transporting and/or Shipping Your Loom .................................................................................................... 18 Troubleshooting ..................................................................................................................................................... 19 Weaving Issues .....................................................................................................................................................................19 Technical/Computer Issues ............................................................................................................................................20 Loom/Mechanical Issues ..................................................................................................................................................20 ii Introduction Congratulations on your new Little Weaver and welcome to the AVL family! Your Little Weaver stands on the shoulders of some pretty phenomenal advancement in the world of weaving. AVL Looms has been in the business of designing and building some of the world’s finest handweaving looms since 1976. Our innovation in floor looms established the benchmark for production hand weavers. AVL was the first to come out with a computerized dobby1, or Compu-Dobby® as we call it, for the hand weaver. This innovation opened up a world of complex patterns previously unattainable without tremendous tedium. Now, in an effort to make weaving more accessible and appealing to a greater number of crafters, we’ve created Little Weaver. Little Weaver is a computerized table top loom that automatically selects your harnesses according to the pattern you’ve chosen on your computer. All you need to do is weave! 1 A dobby is an apparatus that selects harnesses on the loom according to a predetermined pattern. Traditionally, a weaver had to use flip levers or treadles to lift harnesses individually. This required a lot of mental work and restricted the pattern to the number of treadles or levers that could fit on the loom, or that the weaver could use at one time. 1 Getting to Know Your Loom Loom Diagram Working Your Loom Folding and Unfolding Your Loom You will notice small black knobs on each side of your loom. Loosen the knobs to position the beams in the folded or unfolded position. Tighten the knobs once the beams are positioned. The attached aluminum bars (beam support locks) contain a slot in the shape of a short, blocky letter U ( ). Positioning into a leg of the U and tightening the knobs secures the beam position. To unfold your loom, you will want to use both hands, one on either knob. Loosen both knobs and then pull up on both front beam support locks to disengage. Slide the front beam assembly forward. When you’ve pulled the beam all the way forward, you will be able to press the beam support locks down to lock them in the unfolded position. Repeat this process for the back beam assembly and then gently tighten the knobs to secure the beams in place. To fold your loom back up, loosen the knobs, pull up on the beam support locks and slide the beams toward the loom castle. Depending on how much woven fabric you have wound onto your cloth storage beam, you may not be able to push the front beam assembly all the way to where it can engage the final leg of the slot. In this case, simply push the beam assembly as far forward as is comfortable, and then tighten the knobs to secure it in place. Please note that if your loom is warped, you may need to release the tension. See Tension Release Lever. 2 Power Around the world, there are two common alternating current-based (AC) voltages available: 110-120 volts and 220-240 volt. In the US, the standard household power voltage is 110-120 volt. In many other countries, the standard is 220-240 volts. Please verify which power voltage is used in your household and then check that the Little Weaver is set to that power voltage. WARNING! Powering your Little Weaver with the wrong voltage will damage it and may cause a fire. On the back of the Little Weaver, you will see a red switch that will read either 115V or 230V. If you need to change the power voltage, you will need a small flat screwdriver or other suitable tool to gently shift the switch up or down to display the correct voltage setting. Changing Your Reed Most standard sized reeds that are 16” in width or shorter will fit on the Little Weaver. To remove the reed, loosen the beater handle wing nuts enough to allow the beater top up and off the beater legs, but not so much that the wing nuts disconnect from the screws. Lift the beater top up and off and then lift the reed out. Reverse the procedure to install the new reed. Automatic Warp Tension Little Weaver is equipped with an automatic warp tension system based on the age-old live weight principle that is well-known in weaving circles. It is much better than a locking brake warp tension because it decrease stress on the warp and loom mechanisms, and it maintains a consistent warp tension even through advancing the warp. Another really nice feature of this system is that without any adjustment on the tensioning system the warp beam is allowed to turn freely in the direction for winding on the warp. Friction from turning the warp beam in the other direction creates your warp tension, yet allows warp advancement, again without any adjustment on the tension system. Advancing the Warp To advance the warp, grasp the Cloth Storage Beam knob and roll the warp onto the beam. The locking mechanism on the cloth storage beam is designed to allow for free turning in winding on cloth/warp. The resistance you feel will be the warp beam automatic warp tension. Enough force must be applied in turning to overcome the frictional force holding the warp beam. Tension Release Lever If you need to release the tension on your warp, such as when you are folding or unfolding your loom for storage or travel, there is a tension release lever on the cloth beam. To release the tension, simply flip the lever into the down position. The lever will swing away from the loom and the Cloth Beam will rotate freely. To put tension back onto the warp, flip the lever into the up position and then wind the Cloth Beam in the appropriate direction to rewrap onto the Cloth Beam. (Warp over the top of the beams and away from the loom). Dust Control Little Weaver has two primary dust control features: the fan filter on the right side of the loom and a brush in the center of the top sheet metal cover. The fan filter may be vacuumed in place or removed for cleaning. Use gentle suction or mild soap and water and let dry before replacing. The brush may only be vacuumed with gentle suction. It is recommended that you perform these steps periodically or whenever you notice dust or fiber build up to keep your Little Weaver running smoothly. 3 Setting up Your New Loom Little Weaver comes factory pre-configured and tested. It will arrive in its specially designed box ready for weaving. You only need to plug in the power and USB cords, warp the loom and select a pattern to weave. IMPORTANT! Save your Little Weaver packaging. The box and foam insert are designed and tested to protect your Little Weaver through the rough treatment of shipping. Keeping them will save you the hassle and cost of acquiring replacements should you ever need to ship your Little Weaver. Also, the foam inserts fit perfectly into the Little Weaver Rolling Case (sold separately) for added protection during travel! Getting Started Software Little Weaver requires a computer and software (commonly called a loom driver) to drive it. The loom driver tells the Little Weaver which harnesses to lift in order to achieve your weaving pattern. AVLDrive is AVL’s standalone loom driver, and it is free. AVLDrive uses WIF (Weaving Information File) files and is available for download at the AVL website: www.avlusa.com/catalog/software/avldrive/. Download the AVLDrive manual for instructions on its use. Alternatively, some weaving design software programs (such as WeavePoint and Fiberworks) have an AVL loom driver built in, allowing you to drive your loom directly from your design software. You will need to make sure that the version of the loom driver in the software is compatible with the Little Weaver. First Time Starting Up Your Loom To run your loom, plug in the power and USB cords and select the ‘On’ position for the power switch. (You will only need to plug in the USB cord the first time you start Little Weaver. You do not have to do this on subsequent occasions if you choose to connect via WiFi instead of USB.) You may hear faint clicking. This is a startup sequence performed by Little Weaver. Once completed, Little Weaver is ready to weave. Now you have a choice of how you would like to connect Little Weaver to your computer: wired through USB or wireless through WiFi. USB Since you already have the cable connected, start your loom driver and you are weaving! With AVLDrive, this requires only that you select your WIF file. With other software programs, procedures vary and you should consult the associated software operation manual. Hint: Both WeavePoint and Fiberworks consider the Little Weaver a Compu-Dobby IV. WiFi WiFi requires that you have: A WiFi router pre-installed and running either WPA, WPA2 or no security The WiFi passphrase (if WPA or WPA2) That Little Weaver is within range of the router WiFi signal. You will use AVLAdmin to set Little Weaver up on your WiFi system. AVLAdmin is free software available for download at the AVL website: www.avlusa.com/catalog/software/avldrive/. Follow the instructions in the AVLAdmin user manual to setup WiFi on Little Weaver. When done, disconnect the USB cable, restart Little Weaver, and start your loom driver. Upon entering the loom driver, input/paste the assigned Internet Protocol (IP) address and you are ready to weave! Little Weaver will remember the IP address for all weaving sessions. Should your router decide to change the IP address, you can reconnect using the USB cable and AVLAdmin to copy the new IP address. 4 Weaving Action One of the best features of Little Weaver is how the shed is changed. With most table looms, the weaver must reset levers for each shed, which destroys your weaving rhythm. With Little Weaver, the shed action is tied to the beater movement. By pulling the beater forward to beat, internal mechanisms close the shed and change it for the next pick. Push the beater back and the shed opens, ready for you to throw the shuttle. Thus, your weaving action is simplified to beat – throw shuttle, beat – throw shuttle, which allows a very nice weaving rhythm to follow. More on beating…Little Weaver beating action is intended to be smooth, yet firm. This is in contrast to floor looms in which you beat abruptly, fast and (possibly) hard. As you pull the Little Weaver beater forward you will need to ever so slightly pause allowing the shed change to occur. You will hear or feel a faint, rapid clicking to indicate the shed change. This happens in milliseconds, but it is still possible to move the beater too fast and cause a mis-lift. It will take a little practice to get used to, but once you do, it will become second nature. Also, should you prefer multiple beats per shed, push the beater forward half way to avoid causing a shed change with each successive beat. Every so often, you will need to advance your woven cloth to keep the fell line in the working range of the shedding mechanism. The most obvious indicator for this is that you will start needing to pull harder on the beater in order to cause the shed change. Eventually, the fell line will move too close to the harnesses and shed changes will cease. When this happens, it’s time to advance the warp. To advance the warp, grasp the knob on the cloth storage beam and turn with one hand and pull the beater forward with the other until the reed is a short distance from but not touching the breast beam. Shutting Down Exit the loom driver, and then beat once. Little Weaver may now be powered off. Should you forget and power off with on open shed, do not worry. Little Weaver has a self-correcting action to reset the harnesses. Pull the beater forward once or twice and all harnesses should be reset and working in unison. 5 Glossary of Terms Beat/Beating: The act of pulling the beater toward you after placing a weft thread, to push it into place. Bobbin: A reel, spool or cylinder that holds yarn. Cross: Also known as a lease, the weaver’s cross is formed when preparing the warp threads. Every other thread is crisscrossed, so that when you are ready to thread the loom, the threads are in order. Dent: The space between the metal teeth on a reed. ‘Dents per inch’ (DPI) refers to the number of spaces per inch on a reed. Draft: A weaving draft is the instructions for a particular weave structure, or design. It includes the threading and treadling directions as well as a view of what the weave will look like – the drawdown. EPI: The number of warp threads per inch is referred to as Ends per Inch. This is your warp density. Fell Line: The line between what you have woven already and what has not been woven yet; the last pick or weft that you beat into position. Harness: Also known as a shaft in the weaving industry, a harness is one of a set of frames on a loom that holds a set of heddles. Each warp end is threaded through one of the heddles. Each harness contains multiple heddles (and thus warp threads). Your pattern is created by the combination of harnesses that are lifted for each pick and the combination of warp threads that are contained on each harness. Heddle: The heddles are installed on the harnesses and have a small opening (the eye) in the middle of each one through which warp threads are threaded. Loom Waste: The length of warp yarn that extends from where the warp is attached to the warp beam rod to the fell line at the end of a woven warp. This length of yarn cannot be woven as it cannot reach the beater and fell line. Pick: Each placement of a weft thread and beating it into place is considered a pick. Pirn: A pirn is a specific type of bobbin that your weft thread is wound onto and inserted into a shuttle. PPI: The number of weft threads per inch is referred to as Picks per Inch, or PPI. This is your weft density. Quill: A small cardboard tube used as a bobbin in small boat shuttles. Reed: A reed resembles a comb with metal teeth that are precisely spaced apart, through which warp threads are placed. The reed is used to beat the weft threads into place and to keep a specific EPI. Also see Dent. Selvedge: The edges of your woven fabric. Set, Sett: This is the number of ends per inch. Set is the verb, sett is the noun. The scarf was set at 20 EPI. The warp sett was 20 EPI. Shed: The opening that is created in the warp threads by lifting some of the harnesses. The shuttle passes through the shed to insert the weft thread. Shot: Also called a pick, one throw of the shuttle is called a shot (also see Throw) Shuttle: A shuttle is a tool normally made of wood that holds the weft thread. The thread can be wound around a pirn that is then inserted into the shuttle. The shuttle is thrown back and forth through the warp threads and releases the weft thread as it goes, creating the weave. Sleying: The process of pulling warp yarn between the dents of a reed. 6 Solenoid: Each harness has its own solenoid, an electronically controlled actuator hidden inside the Little Weaver that physically selects or unselects the harness based on your pattern. Swift: A tool for holding a skein of yarn in order to easily transfer the yarn to a different “put-up” such as a ball, cone or directly to the warping board. Take-up: The amount of warp that is used up by going over and under the weft threads. Thread: Thread refers to the yarn that you are using in the warp and weft. Threading: Your threading refers to the order in which you have placed your warp threads onto the harnesses. Throw: Throwing the shuttle refers to moving the shuttle through the shed opening in the warp. Warp: The set of threads that are held in tension on your loom from the back beam to the front beam. This term is also used as a verb, which refers to the act of putting the warp threads onto the loom. Warping Board: A warping board is a frame with pegs on it that weavers use to measure out their warp threads and line them up in such a way for winding onto their warp beam. Weft: The thread that is inserted perpendicular to the warp threads to create your fabric. 7 Learning to Weave So you’ve decided to weave, now what? Well, there are 5 basic steps to weaving: Find or design a pattern for the number of harnesses you are using. Warp your loom. Thread, sley and tie on your warp. Start weaving! Turn your woven fabric into a finished piece. In addition to the information provided in this manual, there are many books, workshops and tutorials available on weaving. See Resources at the back of this manual. Finding or Designing a Pattern For beginning weavers, we recommend a 5/2 perle cotton yarn, set at 20 ends per inch (EPI). It’s also good to start with a nice round number, like 10 inches, for your weaving width to make calculations easier. The website www.handweaving.net is an excellent resource for weaving patterns. They have a directory with over 56,000 patterns and weaving files that are free to download. To start, you will want to look for a pattern that is simple in its threading and balanced in its weave, meaning all harnesses are used equally. You’ll also want a pattern that is set at an EPI that is compatible with the dent sized reed you have. The Little Weaver comes standard with a 10 DPI (dents per inch) reed. This means that a 10 EPI fabric would have one end in each of the reed’s dents, a 20 EPI fabric would put two in each dent, and a 15 EPI fabric would alternate between putting one thread and two threads in every other dent. You can get creative with this as long as you try to spread the warp as evenly as possible across the reed. How to Read a Weaving Draft There are some fantastic resources out there on how to design and read weaving drafts, including a chapter in Peggy Osterkamp’s book, Weaving for Beginners. We will be adding a short tutorial section to this manual at a later date. Keep a look out for manual revisions! Warping Your Loom Loom warping is one of the most important aspects of good weaving. The quality of your woven fabric and the ease with which you can weave is largely dependent on the quality of your warp. You will want to spend the extra time to make sure your warp is tight and even. Many common issues that weavers encounter with their looms can be attributed to a warp that was wound poorly. Calculating Yarn Usage To calculate how much yarn you’ll need for your warp, take the width of the weaving multiplied by the length of the weaving plus extra to cover shrinkage and loom waste and multiple by EPI. So a 10 inch wide fabric set at 20 EPI will need 200 ends. Now take this number and multiply by the length of your warp. Say you would like a scarf that is 2 yards long. You will need to account for shrinkage in the finished cloth according to the type of yarn you are using, and the only way to know for sure what that percentage will be is to weave a small sample, measure it, wash it and then measure the percentage amount that it shrank. In addition to shrinkage, you will need to account for loom waste, which is about 2 feet on the little weaver, and take-up. For simplicity’s sake, we will assume a warp length of 3 yards. Now multiply 200 ends by 3 yards and you get 600 yards of yarn needed for the warp of this project. You will need a slightly lesser amount of weft thread. It is always recommended to put on a little more than you need just in case. It’s also a good idea to buy more than you need, so that in case you do need more yarn, it is from the same dye lot and will match the rest of your yarn. Different dye lots can vary in color. 8 When buying yarn for weaving, cones are much more convenient. You will want your yarn in such a way that it is easy to pull long, straight lengths of yarn quickly without it tangling. If you only have skeins of yarn, don’t worry! There are methods and devices, such as swifts, available for converting skeins of yarn to cones or spools. Using a Warping Board Now that you have your yarn, it’s time to prepare it for warping onto your loom. Using a warping board will help you to measure your warp threads to the precise length you need and help you to create the weaver’s cross. A warping board is a frame that you can hang on the wall with strategically placed pegs that stick out that you use to wrap your warp threads around. Warping boards are available for purchase from AVL. When winding your warp on to a warping board, make sure you put in two crosses: the threading cross (about 20” in from the first peg) and the raddle cross (about 8” in from the last peg). In the threading cross, each thread crosses the next thread in opposite directions and allows you to choose the threads in exactly the right order when you are ready to thread the loom. 9 In the raddle cross, groups of threads cross each other rather than the thread-by-thread crossing of the threading cross. This cross allows you to distribute the warp quickly and evenly across the raddle prior to beaming the warp. The number of threads in a raddle group can be determined by the number of ends to be placed in each section of the raddle. This number is determined by the desired epi and dents per inch of the raddle. For a sett of 20 epi and a raddle with 4 dents per inch, each raddle cross group would be 5 threads. Note that the Little Weaver raddle is 4 dents per inch. A false cross doesn’t look like either a threading or a raddle cross. It looks similar to the threading cross, except that the X is circled by threads. It is important to distinguish these two because if you tie the false cross, you will have no cross at all when you take it off the warping board. This false cross disappears during the warping. Before removing the warp from the board or the reel, secure the crosses. Use four ties to secure each cross. These ties go on each side of both pegs holding the cross. It is usually a good idea to use different 10 color threads for the ties on the tops of the pegs and another color to tie the bows underneath the pegs. By color-coding your ties, you are less likely to twist the warp later. Remove the warp from the warping board by chaining or by winding on the kite stick. Start from the threading cross and proceed to the raddle cross. Warping Your Beam AVL recommends warping your loom back to front, which means using a raddle. If you have a Little Weaver Raddle, you will now need to insert it to the top of your loom using the holes provided and remove the lid by undoing the hook & loop strips. Place two lease sticks in the raddle cross of your warp and secure together with string through the holes in the ends of the sticks. (If you do not have lease sticks, you can substitute smooth dowels or rods to keep the cross separated.) Now remove the ties from the raddle cross and spread the warp out on the sticks. Then distribute yarn in the raddle by dropping each raddle cross group into a dent in the raddle, making sure to keep your warp centered in the raddle. The loop ends of your warp should face the back of the loom. Secure the lid over the raddle with the hook & loop strips. Insert the rod through the end loops of the warp and tie it to the apron rod. If you do not have a raddle, you will probably want to warp your loom front to back. Start by sleying the reed at the appropriate EPI, threading your yarn through the appropriate heddles and tying your warp ends in evenly distribute groups to your apron rod that is attached by strings to the warp beam. This arrangement will keep your warp spread to the proper width as you wind it onto the warp beam. 11 Wind the warp beam until you reach the rod, keeping the rod strings as flat and evenly across as possible. Your strings and warp threads will go over the top of the beam and then back and around. If you’re standing on the right side of the loom, with the back of the loom to your right, you should be winding the beam clockwise. Note that if you have tied your warp to the tie-on rod, as opposed to slipping the loop ends over the rod, you will need to make sure that your knots do not poke into your warp or cause a bump in your warp. As you’re winding on, when you get to the rod with your warp tied on, you will want to use some sort of thick and semi-stiff material to “hide” the knots. A piece of cardboard, or maybe even a paper towel roll with a cut down the middle, will do the trick. You want a flat and even surface across the warp beam; which means that you should not have bumps in your warp caused by the knots you used to tie the warp onto the beam. You just need enough cardboard to wrap around the beam once and cover your warp across its entire width. To keep the rest of your warp tidy and keep the layers separate while winding on to the warp beam, you’ll want to use a nice thick paper like cut-up brown paper bags, or craft paper to wind on in between the layers. You want your warp to be as smooth, tight and compact as possible. Heavy wrapping paper or seventy pound craft paper works well. The length of your paper (or series of papers) will depend on how long your warp is. The width of your paper should be 4 inches wider than your warp. You will then fold over one inch of paper down each side, which will give a thicker edge of paper that sticks out one inch past your warp on each side. This helps to keep your yarns from slipping off on the sides and keeps the thickness of each wrap around the warp beam even all the way across. Be sure the warp is wound between the two folded edges, but not overlapping them. You want your warp to be a smooth, firm cylinder. You are now ready to wind on your warp! Keep a firm hand on the warp threads and use your other hand to turn the beam. Your warp will go over the top of the beam and around the back (continue in the same direction you wound on the rod strings). Be mindful of keeping all the warp threads tight and even relative to each other. You will want to take a moment to pinch, pluck (like you would the strings on a harp) and comb the warp threads every turn of the beam or so. This helps to keep the yarn from sticking to itself and helps you to draw out any slack you might have in individual threads. Make sure that you have a layer of your prepared paper between each layer of yarn and that each layer of warp threads is spread evenly and centered across the beam. 12 Threading, Sleying and Tying On Threading Your weaving draft will determine how many heddles you’ll need on which harnesses. If you need to move heddles from one harness to another, you’ll need to unclip the linkage retainer, unhook the linkage strip from the harness, pull the harness out of the loom and then remove one of the harness sides for each harness that you plan to move heddles to or from. The linkage retainer is a small black plastic clip that secures the linkage strip to the bottom of the harness. The linkage strip is a small copper wire that comes up from the Little Weaver insides and has a hook at the top that inserts into one of the two small holes in the bottom of each harness frame. Take note of which of the two holes on the harness frame the linkage strip is connected to. You will notice that the harnesses alternate using every other hole. The reason for this is that there is not enough room between the harnesses for two retaining clips to sit side-by-side. It is not important which holes are used for the linkage strips, except that you cannot use the same side hole for two adjoining harnesses. To unclip the linkage retainer, locate the open side of the clip, which will be on the left side if you are facing the loom from the back. See diagram. Push the clip off of the linkage strip (push toward the right if facing the loom from the back) and it will swing horizontally. Then pull the clip off the end of the linkage strip. This will allow you to remove the linkage strip hook from the hole in the harness. The linkage strip should stay attached to the loom. Pull the harness vertically up out of the loom. After removing the harnesses that you want to add or subtract heddles from, you will need a small Phillipshead screwdriver to remove one side of the harness end. You do not need to remove both ends. Just unscrew the small screw at the top and the one at the bottom. Remove or add the heddles needed and then screw the end back onto the harness, taking care to orient the face-side (side with screw head) in the same direction as the other end. When placing the harness back into place, make sure that the face-side is facing forward toward the front of the loom, and that your retaining clips are alternated between the two holes in the harness frame so no two are touching. Now that you’ve got the correct number of heddles on each harness and your warp is wound and ready to go, it’s time to thread your heddles. Many weavers find it advantageous to use a threading hook to help 13 get the threads through the heddle eyes. Use your weaving draft to guide you as to which threads go into which harnesses and in which order. A common, and possibly the easiest, threading pattern is a Straight Draw. This means that your first thread would go in on your first harness, the second thread in on the second harness, third in on the third and so on till you reach the last harness and then start again from the first harness. You could also start with your first thread on the last harness, the second one on the second to last harness, etc. When threading, make sure that there is a straight path from the warp beam to the front of the loom (and all the way through the reed which we’ll get to). If any of your threads cross over another thread, they will lift together and cause problems in your shed and your pattern. Some weavers find it helpful to move aside all heddles except for one small batch at a time. With that small batch, you can space the heddles apart so that you are sure to grab the correct heddle each time, and then move it to the other side once you’ve threaded it. It is also a good idea loosely tie together each group of threads as you go, so that they do not accidentally pull back through the heddles. You’ll want to be able to undo this knot later. Sleying Once you have threaded all the heddles and have checked that none of your threads overlap, you are ready to sley the reed. There is a tool, called a patent denter, which makes it easier to sley the reed. Patent denters are available through AVL. Evenly space your heddles across the harnesses. Try to make sure the threads are as straight as possible in their path and are not pulling the heddles to the side on their way through the loom. Now take your warp’s width (Number of ends x EPI) and center that measurement on the reed to determine which reed dent to start sleying. Pull the threads forward enough so that they reach several inches to a foot past the beater. You want to pull enough thread through the reed that it cannot easily slip back through. If you’ve tied groups of threads, go ahead and untie the first group. If you are working right to left, find the rightmost thread (make sure it is not crossed and has a straight path from the beam through the heddle) and pull it through the reed. If you are doing multiple threads per dent, you can pull them through together. If you are using a patent denter, you will have to pull all threads for each dent at once, as it will advance to the next dent when you push it back to get the next thread or set of threads. Again, you will want to tie loose knots that can easily be undone in each group of threads as you sley them. It is very easy to accidentally bump the reed or pull the threads back through the reed, so the knot will prevent that from happening. Tying-On Now that you’ve sleyed the entire reed, you are ready to tie on to the cloth beam rod. Take a group of an inch or less of threads, untie the knot and pull each thread tightly. Make sure the thread is not hung up or caught or twisted on anything and has a straight path from the warp beam all the way through to your hand. Pluck and stroke the threads to get them all even and then tie a sturdy knot at the end of the threads. Do this for each group. After you have your groups of tied warp threads, you will lash them to the cloth beam rod with another sturdy string. Use a thicker type string that will not break under tension. Start by tying this string to one end of the cloth beam rod, and then thread the string through the first group of threads (through the middle of the group, behind the knot) and then back around the rod. Repeat this for each next group of threads. You will notice now that you can tighten or loosen the tension of each group to the rod by moving the slack in the string. Even the tension between the groups as best you can, winding the cloth beam to give you overall tension. When the tension is even between all the groups, tighten the warp beam and the cloth beam so that the warp threads are taut and advanced enough to have several inches of warp threads between the reed, going over the breast beam and toward the cloth beam. You will want another piece of 14 cardboard or stiff paper to cover the knots on your cloth beam, so that the knots don’t introduce discrepancies in tension across your warp. A great resource is Peggy Osterkamp’s Weaving Tips on her blog site (See Resources at the end of this manual). She gives great advice on “lacing on”, general warping, and many other weaving topics. A little side note: Peggy and Jim Ahrens were great friends. Weaving Winding Shuttles There are many different types of shuttles available, with different pros and cons. For the Little Weaver, we suggest a low profile boat shuttle or small end feed handshuttle. Table looms necessarily have a smaller shed than full size looms, so having a lower profile shuttle will enable you to pass the shuttle through the shed much more easily. Small boat shuttles are much less expensive than small end feed shuttles and are more than adequate for use with a Little Weaver. End feed shuttles are more expensive, but have a special tensioning device inside that allows you to weave more quickly without having to adjust the selvedges as you go. They only let out as much yarn as you need when tensioned properly for the type of yarn you have. Slubby or bumpy yarn may be more suited for a boat shuttle or other free flowing shuttle. Inside a shuttle, the weft yarn is wound around a pirn, bobbin or paper quill. For sake of ease, we will refer to all three as a bobbin. To wind your weft yarn onto your pirns, there are winding tools available, such as AVL’s Electric Bobbin Winder or other manufacturer’s mechanical winders. To wind a pirn for an end feed shuttle, you will want to start at the back of the pirn and build up the yarn to the appropriate thickness (that will fit inside the shuttle without rubbing on the sides) before continuing toward the top of the pirn. This is because the pirn will stay stationary and not spin while the yarn is taken from the tip of the pirn. You don’t want to take yarn from the back of the pirn before taking yarn from the tip because it will cause snags and dragging. So winding your pirn from back to tip will ensure the smoothest pull of yarn for the whole pirn. To wind a boat shuttle bobbin you have much more leniency in how you wind it, because the yarn is free flowing and the bobbin spins freely, allowing lots of yarn to come from the shuttle no matter which side of the bobbin it’s coming from. Begin Weaving Now that you have your design picked out, your loom warped and your pirns wound, you are ready to weave! Make sure that your Little Weaver is plugged in, and your computer is connected by following the instructions found earlier in the Setting up Your Loom portion of this manual. Open a tabby weave to test that your threads are lifting correctly and that you don’t have any accidental mis-threadings or crossed threads. If you do, visit the troubleshooting section at the end of this manual. Once you’re ready to start weaving, open your weaving file in your weaving software and proceed to the loom control function according to your software’s instructions. Please note that AVLDrive is automatically in loom control mode at all times. To lift the first set of harnesses for your first pick, pull the beater all the way forward and then push it all the way back. Check that the correct harnesses are lifted according to your weaving file. If all is good – go ahead and throw the shuttle across. For the first pick, leave a tail on your weft yarn of about one to two times the width of your warp. This will allow us to weave in the tail end of the weft yarn. To advance to the next pick, pull/squeeze the beater toward you until about ¼ to ½ an inch past the point at which you hear the solenoids click to change harness selection. This is also called beating or a beat. After beating, push the beater back and throw your second pick. Now take the tail end 15 of the weft that you left out on the first pick and pull it across through the shed as well. You will continue pulling the tail back and forth across each shed until the tail is completely woven in. Now continue throwing the shuttle and beating until you’ve woven about an inch. As you are weaving, you will need to advance the warp about every inch or so. There is a nice sweet spot to weave in that is about 1 to 2 inches deep. This means keeping your fell line in the same consistent spot relative to the loom. To advance the warp, you do not need to adjust anything in the back of the loom as the warp break is a dynamic slipping break that will let go of yarn as you need it. When it’s time to advance the warp, simply turn the wheel on the cloth beam or turn the cloth beam itself. Be careful not to advance the warp too far or your beater will not reach and you will have a gap in your weft thread picks. You will want to keep an eye on your selvedges and keep the weft thread consistently firm as it rounds the corner from each pick to the next. You can beat twice or as many times as you need, as long as you don’t push the beater back to the spot where it changes to the next shed. If this does happen by accident, use your software to reverse or go back to the intended pick. To stop weaving and resume at a later time, you will want your software to remember which pick you were on, so that you can pick up the pattern right where you left off. It can also be a good idea to write down the pick number in case something happens with your software. To power down your loom, just turn off your software (saving your spot according to the software’s procedures) and then switch the power button to off. It should not matter where your beater is positioned. After your loom is turned off, you can push the beater back and then forward to reset the harnesses. This is especially necessary if you plan to travel with your loom as it is safer for the harnesses to be in their resting position. To resume weaving after a break, just plug it in, connect to your computer, turn on your software and your loom and switch your software to weaving mode. Push the beater back and then forward to engage the harnesses and resume where you left off. Finishing Your Woven Fabric Edges So you’ve woven to the end of your warp; now what? Well, you will want to secure the warp ends from unraveling after you take your fabric off the loom. There are different ways of doing this including sewing, knotting and fringe twisting. If you plan to sew up your fabric into something such as a purse, clothing or accessories, you may want to sew the raw edges. You may also want to sew the edge if you want a clean, flat edge with minimal fringe. To sew the edge by hand, some people find it easier to leave the fabric on the loom to sew. This keeps your final weft pass straight and taut and prevents it from unraveling before you get the chance to sew it. Take a needle (or tapestry needle) with matching thread and sew the edge using an overcast stitch, whip stitch, blanket stitch or hem stitch. You can also cut the fabric from the loom and hand stitch or machine stitch the edge. Make sure that when you cut, you leave enough unwoven warp threads attached (fringe) to keep the piece intact before you get a chance to sew it. If you want to cut the fabric through a woven portion, you can sew two lines across the fabric and then cut between them. You can also cut and sew pieces of your woven fabric together. Just make sure to run a stitch along each edge before cutting. There are times that you may want to sew two pieces of fabric together without the bulky seam line that handwoven fabric tends to make. Instead of a traditional seam, you can butt the two 16 pieces together and use a tapestry needle with a matching thread and alternately pick up weft loops along the edges between the two pieces. If you plan to use the fabric as a no-sew piece such as a scarf, placemat or table runner, you may want a decorative edge such as knots or twisted fringe. To knot the fabric, decide how many threads per knot. You’ll want each knot to be as even as possible, so using a number that fits nicely into the number of ends you have is recommended. You can sew a temporary line across the fabric to keep it together while you are knotting, and then remove it once you’re done. Overhand knots work great and you can make these knots all the way across from edge to edge. Once you have tied all your knots, use a pair of sharp scissors to cut the fringe to the desired length. To make twisted fringe, there are fringe twisting tools available, but you can also easily do it by hand. Take the total number of threads you want for one twisted fringe and split it in half. Take one half of the threads and twist them together. Going in the direction that the thread is already twisted will keep your thread from unraveling. Then twist the second half threads in the same direction, while keeping a hold of both halves. You’ll develop a technique for using all your different fingers to hold the different sections and do the twisting. After both halves have been twisted in the same direction, put them together and carefully twist them both together in the opposite direction. You’ll notice they will want to twist up together. Depending on the type of yarn you’re using, you may want to put a small overhand knot at the end of each twisted fringe. Washing You will want to wash your fabric after you’ve secured all the edges. You may be amazed at the difference in the fabric from when it came off the loom to after washing it. You’ll want to use a delicate wash cycle or wash it by hand and then most likely hang your fabric or lay flat to air dry. Of course the details of washing and drying your fabric will depend on the type of yarn you’ve used. For example, many weavers use wool and then wash it in a particular way to create a felted piece. You will want to keep in mind shrinkage of your fabric. Of course, as mentioned earlier, the surest way to know how much or how little your fabric will shrink is to weave a sample size, measure it, wash it and then measure the difference in size afterwards. You can then apply the percentage of shrinkage to the final fabric to give you an idea. 17 Resources Books and Print Handwoven Magazine, by Interweave Press, is a great resource for news in the world of weaving, new techniques and weaving projects. They also have a website with a user forum where weavers can get together and communicate and give advice: www.weavingtoday.com Shuttle Spindle & Dyepot is a publication by HGA. See HGA under Workshops and Communities. Weaving for Beginners is an excellent Illustrated Guide Book for beginning weavers, written by Peggy Osterkamp. Peggy’s book takes you step by step through every process of weaving, beginning to end, in fine detail and easy-to-understand illustrations. Weaving for Beginners is available for sale through AVL. Online AVLusa.com has video tutorials on warping and using the Little Weaver. Look under Resources -> Library. Handweaving.net is an excellent source of over 56,000 free weaving draft files and features a large image gallery of woven pieces done by handweaving.net visitors along with the weaving details for each piece. PeggyOsterkamp.com is a fantastic website full of weaving tips and weaving help. Weavespindye.org is HGA’s online presence. See HGA under Workshops and Communities. WeavingToday.com is Handwoven Magazine’s online presence. See Handwoven Magazine under Books and Print. Weavolution.com is an online international handweaving community where weavers can connect with others to share projects and insights and gain inspiration. Workshops and Community HGA (Handweavers Guild of America) was founded in 1969 and brings people together from many different fiber crafts. HGA provides educational programs, conferences and an award-winning publication, Shuttle Spindle & Dyepot. You can visit their website at www.weavespindye.org. Maximizing Your AVL class taught at AVL’s facility in Chico, CA is a great class for the experienced and the novice alike. In this class, you’ll learn all about maintaining your loom, designing woven structures, warping to weaving and weaving software basics. Weavers’ Guilds are a great venue for personal interaction and support from other weavers in your local area. You may be able to find a local guild by asking your local yarn shop or by doing an online search. You can also take a look through this list maintained by Camilla Valley Farms: www.camillavalleyfarm.com/other/weavingguilds.htm Transporting and/or Shipping Your Loom If transporting your loom in the optional rolling case, you can use the original custom fitted foam packing that your loom was shipped with, inside the rolling case. Just place the bottom foam into the bottom of the rolling case, place the loom inside and then place the top foam on top. Be careful to not tip the Little Weaver onto its side or upside-down, as it is in its most stable position when it is upright. If you need to ship your Little Weaver, you must package it in the original box with the original foam packaging and restraints, or serious damage can occur. If you do not have your original packaging, you can contact AVL to purchase new packaging. If you are sending your Little Weaver back to AVL under warranty, 18 packaging may be provided to you. You will need to make sure that the beams are folded in and that the harnesses are set at rest and restrained. Troubleshooting Weaving Issues Dropped Threads If a thread breaks or drops during weaving and it is not a necessary thread for your pattern, or you prefer to just continue weaving, you can wrap the thread around a bobbin or pirn and hang it from the back of the loom. As you weave, continue wrapping the excess of the thread around the bobbin. Crossed Threads You will notice that you have crossed threads, if when you do a test tabby lift pattern, you notice that a particular thread lifts when it shouldn’t, but when it’s neighbor is lifted. To fix, you will need to remove the thread from the reed and from the heddle, reroute it correctly and then tie on. Skipped Heddle You can mock up a heddle by taking a piece of string and making it into a loop that goes around the bottom and top harnesses (don’t tie the loop together just yet!) and has two knots in the middle that create the eye. Take both ends of your string, looped around the bottom harness and tie a knot at the bottom of where the eye should be and tie a second knot at the top of where the eye should be. Then tie the two ends of your loop together over the top harness. Fell line is Crooked Beat with hand in center of the beater. 19 Technical/Computer Issues Connection to Computer 1. Check power to the loom and verify that the loom goes through start up at power on. 2. Check your communications connection and verify that the loom driver indicates connected. Wrong Harnesses Lifting 1. 2. 3. 4. 5. 6. Reset harnesses by turning off loom driver, then beating to engage the self-correcting mechanism. Check pattern against harnesses lifted to ensure it is not a design problem. Pause slightly with the beater forward to allow new shed selection to occur. Ensure you are pushing the beater back to the bumpers after the beat. Advance the warp so that the shedding mechanism is within range. Check that none of the warp threads are crossed, or wrapped around nearby heddles. Loom/Mechanical Issues Harnesses not Lifting 1. 2. 3. 4. Check power to the loom and verify that the loom goes through start up at power on. Check your communications connection and verify that the loom driver indicates connected. Ensure the pick in use requires lifted harnesses. Check that none of the warp threads are crossed, or wrapped around nearby heddles. Shed Not Changing 1. Ensure you are pushing the beater back to the bumpers after the beat. 2. Advance the warp so that the shedding mechanism is within range. 3. Check your communications connection and verify that the loom driver indicates connected. Warp Tension 1. Wind warp on beam(s) in opposite direction. 2. Check that the folding legs are locked in extended position. 20