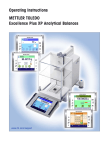
1
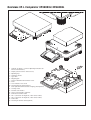
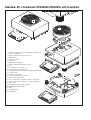
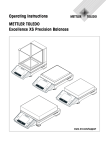
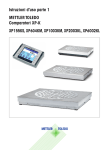
METTLER TOLEDO
XP-L Comparators
XP26003L, XP32003L, XP64003L, XP64002L, XP64002L-T
Supplementary Instructions to the Operating Instructions for XP Precision Balances
LEERE SEITE
Overview: XP-L Comparator XP32003L/ XP64002L
10
6
4
F
3
12
2
1
8
4
3
3
F
12
9
XP2
000
4M
5
F
F
7
1 Terminal (for details s. Section 5 Operating Instructions for
XP Precision Banlances)
2 Display (Touch-sensitive “Touch Screen”)
3 Operating keys
4 SmartSens sensors
5 Type name
6 Weighing pan
7 Points of attachment for terminal or cover
8 Cover
9 Level indicator / level sensor
10 Fastening point for anti-theft device
11 Cover plate for below-the-balance weighing (hook optional)
12 Leveling screws
13 RS232C serial interface
14 Slot for second interface (optional)
15 Connector for terminal cable
16 Aux 1 (connection for “ErgoSens”, hand- or foot-switch)
17 Aux 2 (connection for “ErgoSens”, hand- or foot-switch)
18 Power cable
19 Fastening for terminal stand (optional)
19
18
7
19
15
7
11
13
7
14
16 17
Overview: XP-L Comparator XP26003L/XP64003L with Levelmatic
10
6
21
6
4
F
3
12
2
1
8
4
23
3
3
F
12
22
20
9
XP6
400
21
2L
5
F
F
7
19
18
7
19
15
11
7
13
14
7
2L
F
400
F
XP6
1 Terminal (for details s. Section 5 Operating Instructions for
XP Precision Banlances)
2 Display (Touch-sensitive “Touch Screen”)
3 Operating keys
4 SmartSens sensors
5 Type name
6 Weighing pan Levelmatic
7 Points of attachment for terminal or cover
8 Cover
9 Level indicator / level sensor
10 Fastening point for anti-theft device
11 Cover plate for below-the-balance weighing (hook optional)
12 Leveling screws
13 RS232C serial interface
14 Slot for second interface (optional)
15 Connector for terminal cable
16 Aux 1 (connection for “ErgoSens”, hand- or foot-switch)
17 Aux 2 (connection for “ErgoSens”, hand- or foot-switch)
18 Power cable
19 Fastening for terminal stand (optional)
20 Adapter plate with base plate
21 Cover
22 Secondary base
23 Pan support
16 17
Contents
5
Contents
1
Your XP-L Comparator .................................................................................................................................... 6
1.1
1.2
1.3
1.4
Introduction .................................................................................................................................................... 6
Contents of the Supplementary Operating Instructions .......................................................................................... 6
Safety first ...................................................................................................................................................... 6
Disposal ........................................................................................................................................................ 6
2
Setting up the comparator .............................................................................................................................. 7
2.1
2.2
2.2.1
2.2.2
2.3
2.3.1
2.3.2
2.4
2.4.1
2.4.2
2.5
2.6
2.6.1
2.7
2.7.1
2.7.2
2.8
Standard equipment ........................................................................................................................................ 7
Setting up the comparator without Levelmatic ..................................................................................................... 7
Placing the terminal ......................................................................................................................................... 7
Setting the reading angle .................................................................................................................................. 8
Setting up the comparator with Levelmatic .......................................................................................................... 9
Installing the balance cable in the terminal ......................................................................................................... 9
Installing the Levelmatic ................................................................................................................................. 10
Selecting the location and leveling the balance ................................................................................................. 11
Selecting the location ..................................................................................................................................... 11
Leveling the balance ...................................................................................................................................... 11
Power supply ................................................................................................................................................ 13
Setting up the terminal separately, XP32003L and XP64002L ............................................................................ 14
Removing the terminal and placing it within range of the weighing platform ......................................................... 14
Transporting the balance ................................................................................................................................ 15
Transporting over short distances .................................................................................................................... 15
Transporting over long distances ..................................................................................................................... 15
Weighing below the balance ........................................................................................................................... 16
3
Special instructions for XP-L comparators ..................................................................................................... 17
3.1
3.2
3.3
3.3.1
Location ....................................................................................................................................................... 17
Load the comparator ..................................................................................................................................... 17
Settings for the XP-L comparators .................................................................................................................... 17
Factory setting differences compared to the standard types ................................................................................. 17
4
Cleaning and service .................................................................................................................................... 18
5
Technical data and accessories ..................................................................................................................... 19
5.1
5.2
5.3
5.4
5.5
5.6
General data ................................................................................................................................................. 19
Model-specific data ....................................................................................................................................... 20
Dimensions XP32003L, XP64002L ................................................................................................................ 21
Dimensions XP26003L, XP64003L ................................................................................................................ 22
Draft shield dimensions XP W64 ..................................................................................................................... 23
Accessories .................................................................................................................................................. 24
6
Index ........................................................................................................................................................... 26
Your XP-L Comparator
6
1
Your XP-L Comparator
1.1
Introduction
Thank you for choosing a METTLER TOLEDO balance.
To operate the balance you should basically follow the Operating Instructions for Standard XP Precision
Balances.
However, in these Supplementary Operating Instructions you will find information about how your
balance differs from the Standard XP Precision Balances.
When working with the WeighCom application, use the operating instructions “WeighCom Application for
XP Comparator Balances” that were included with the delivery.
1.2
Contents of the Supplementary Operating Instructions
These Supplementary Operating Instructions contain the following information:
– Scope of delivery
– Layout of the balance
– Installing the Levelmatic and cover
– Location selection and leveling
– Power supply
– Transporting
– Weighing below the balance
– Instructions for XP-L Comparators
– Cleaning and service
– Technical data
– Accessories
– Index
1.3
Safety first
Always operate and use your balance according to the instructions contained in the Standard Operating Instructions for XP Precision
Balances.
The instructions for setting up your new balance must be strictly observed.
1.4
Disposal
In conformance with the European Directive 2002/96/EG on Waste Electrical and Electronic Equipment
(WEEE) this device may not be disposed of in domestic waste. This also applies to countries outside the EU,
per their specific requirements.
Please dispose of this product in accordance with local regulations at the collecting point specified for electrical
and electronic equipment.
If you have any questions, please contact the responsible authority or the distributor from which you purchased
this device.
Should this device be passed on to other parties (for private or professional use), the content of this regulation
must also be related.
Thank you for your contribution to environmental protection.
Setting up the comparator
7
2
Setting up the comparator
This Section describes how to unpack your new balance, set it up and prepare it for operation. On completion of the steps described
in this section, your balance is ready for operation.
Note: The balance must be disconnected from the power supply when carrying out all setup and mounting
work, as well as when the housing of the weighing terminal is opened during everyday operation.
2.1
Standard equipment
XP-L Comparator
– Weighing platform
– Weighing pan 280 x 360 mm (XP32003L and XP64002L)
– Levelmatic ∅ 220 mm and cover (XP26003L, XP64003L and XP64002L-T)
– Terminal with terminal support (XP32003L and XP64002L) and protective cover
– Draft shield XP W64 (XP26003L and XP64003L)
– Country-specific power cable
– Supplementary Operating Instructions (this document)
– Standard Operating Instructions for XP Precision Balances
– Operating instructions “WeighCom Application for XP Comparator Balances”
– Production certificate
– EC declaration of conformity
2.2
Setting up the comparator without Levelmatic
2.2.1
Placing the terminal
The terminal can be attached to the long or short side of the balance.
– Mount the weighing pan.
– Carefully turn the weighing platform over onto the weighing pan.
A
Attaching the terminal to the long side:
– Dismantle the cover (B) by removing the 2 screws (A).
B
Setting up the comparator
8
A
D
E
– Attach the terminal to the terminal support (C) as shown, using the
screws (A) from the cover that was removed.
– Insert the terminal cable (D) into the cable channel, as shown.
– Screw the connector of the terminal cable into the socket (E).
– Turn the balance back over into position.
C
Attaching the terminal to the short side:
F
– Dismantle the cover (G) by removing the 2 screws (F).
G
H
D
E
– Attach the terminal with terminal support to the points of attachment (H)
with the screws (F).
– Insert the terminal cable (D) into the cable channel, as shown.
– Screw the connector of the terminal cable into the socket (E).
– Turn the balance back over into position.
2.2.2
Setting the reading angle
To change the reading angle, press in the two buttons (A) on the back of the terminal.
The top of the terminal can then be pulled up or down until it engages in the desired
position. A total of 3 setting positions are available.
A
A
Setting up the comparator
9
2.3
Setting up the comparator with Levelmatic
2.3.1
Installing the balance cable in the terminal
A
A
– Place the terminal on the operating surface.
Note: Ensure that a soft, clean surface is used so as not to damage the terminal
surface.
– Open the housing by pressing the 2 buttons (A) for adjusting the terminal and
swiveling the housing base upwards.
– Pull the cable with the retaining ring (B) through the opening on the housing base
(see diagram).
B
– Return the terminal to its normal position and open it so that the cable can be
accessed.
C
– Insert the cable into the top housing (C).
– Close both parts of the housing until the retaining ring (B) is positioned in the cable
opening of the housing base.
B
– Place the retaining ring (B) behind the two guideways and check that it is secure
(tension relief).
B
Note: Before closing the housing, always check that the plug is inserted
correctly into the terminal plug-in connection.
– Now close the housing by pressing the two buttons (A) for adjusting the terminal
until the housing base engages in the top housing.
A
A
Setting the reading angle (see Section 2.2.2)
Setting up the comparator
10
2.3.2 Installing the Levelmatic
– Attach the base plate (A) to the adapter plate (C) using the 4
screws (B).
B
B
A
C
– Place the attached adapter plate (D) on the housing base (E).
– Put on the cover (F).
I
– Place the secondary base (G) on the base plate.
– Put on the pan support (H).
– Place the Levelmatic weighing pan (l) on top.
H
F
G
D
E
XP64
002L
F
F
Setting up the comparator
11
2.4
Selecting the location and leveling the balance
2.4.1
Selecting the location
Select a stable, vibration-free position that is as horizontal as possible. The surface must
be able to safely carry the weight of a fully loaded balance.
Observe ambient conditions (see Section 5.1).
Avoid the following:
– Direct sunlight
– Powerful drafts (e.g. from fans or air conditioners)
– Excessive temperature fluctuations
If the balance is not horizontal from the beginning, it will have to
be leveled during initial operation (see Section 2.4.2)
2.4.2
Leveling the balance
Your balance has a built-in level sensor, that constantly checks the correct horizontal alignment and prompts you to make an
adjustment, if necessary.
When the level sensor detects that the level is incorrect, the warning text at left will appear
and a warning beep will sound. A status icon will also appear in the upper right-hand
corner of the display (below the time).
To level the balance, press the “Info” button. This will start the Leveling Assistant. The
Leveling Assistant will guide you step by step through the leveling process.
If you press “OK” instead, the balance will return to the weighing operation. The status
icon, however, will continue to be displayed, and the warning text will reappear after 15
minutes.
Setting up the comparator
12
➧
Press the button that matches your site
and your configuration.
➧
Remove the weighing pan so you can
monitor the level indicator.
Turn the leveling foot all the way up, in the
direction of the red arrow.
Now press “Forward”.
Now press “Forward”.
The red arrow indicates the direction in
which you need to turn the footscrews.
Turn the footscrews in the direction indicated until the air bubble is in the inner circle
of the level indicator. If you are unable to
do this on your first attempt, you can press
the button again that matches the current
position of the air bubble at any time.
➧
Press the button that matches the position
of the air bubble in the level indicator.
As soon as the air bubble is in the inner circle of the level indicator, the balance has been leveled correctly
(left figure = leveled correctly, right figure = leveled incorrectly), and you can press the “Forward” button.
➧
If the balance was leveled correctly, the
status icon will no longer appear in the
upper right-hand corner of the display.
➧
Unscrew the footscrew until it “lightly”
touches the supporting surface.
Press the “Exit” button to exit the Leveling
Assistant and return to weighing mode.
Now press “Forward”.
Note: You can also level the balance at any time without using the Leveling Assistant. As soon as the warning message appears,
press the “OK” button to cancel the dialogue. Level the balance by turning the footscrews as described above. As soon as the level
is correct, the status icon in the upper right-hand corner of the display will disappear.
Setting up the comparator
13
2.5
Power supply
Your balance has been supplied with a country-specific power cable.
First, check to see whether the power plug fits your local power supply connection. If this is not the case, on
no account connect the balance to the power supply, but contact the responsible METTLER TOLEDO dealer.
Connect the balance to the power supply. Do not connect the balance to outlets that are not grounded! Do
not use extension cords without PE conductors!
Important: Guide the cables so that they cannot become damaged or interfere with the weighing process!
Ensure that the connectors can never come into contact with liquids!
Once connected to the power supply, the balance performs a self-test and is then ready for operation.
Note: If the display field remains dark, even though the power connection is functioning, disconnect the
balance from the power supply, then check that the terminal cable is inserted correctly (see Section 2.6.1,
Figure 3).
Setting up the comparator
14
2.6
Setting up the terminal separately, XP32003L and XP64002L
2.6.1
Removing the terminal and placing it within range of the weighing platform
The terminal is connected to the weighing platform with a cable. The terminal can be removed from the weighing platform and located
separately to ensure the optimum setup of your workplace.
Setting up the terminal separately
A
– Switch off the balance.
D
– Carefully turn the weighing platform over onto the weighing pan.
– Carefully pull the terminal cable (D) out of the cable channel.
– Remove the screws (A) and lift the terminal with terminal support (C) off
the weighing platform.
C
– Open the housing by pressing the 2 buttons (I) for adjusting the terminal.
– Unplug the cable (K) and pull it out of the housing through the opening.
– Remove the 2 knurled screws (L) and detach the terminal support.
– Pull the cable back through the base of the housing and plug it in.
– Close the terminal and place it in the desired position.
– If possible, insert the terminal cable (D) back into the cable channel.
– Turn the balance back over into position.
The cable can also be led out the back or the side of the
weighing platform.
If you would like to place the terminal farther away from the
balance, we recommend that you use the extension cable
from our accessories range (see Section 5.6).
F
F
Setting up the comparator
15
2.7
Transporting the balance
Switch off the balance and disconnect it from the power supply. Remove any interface cables from the balance.
2.7.1
Transporting over short distances
Observe the following instructions to transport your balance over a short distance to a
new location.
Hold the balance with both hands and lift it. Carry the balance to the new location.
F
F
Refer to the notes in Section 2.4.1 regarding selection of an optimum
location.
2.7.2
Transporting over long distances
If you would like to transport or send your balance over long distances, or if the balance may not be transported in an upright position,
use the complete original packaging.
Setting up the comparator
16
2.8
Weighing below the balance
Your balance is equipped with a hanger for carrying out weighings below the work surface (weighing below the balance).
Note: For below the balance weighing, you will need hook 11132565 from the
accessories (Section 5.7).
Preparing for below-the-balance weighing
– Switch off the balance
– Disconnect the balance from the power supply.
– Remove any interface cable
A
B
– Remove the Levelmatic (depending on the model)
• Levelmatic weighing pan (A)
• Pan support (B)
• Secondary base (C)
• Cover (D)
• Adapter plate with base plate (E)
D
C
E
XP64
002L
F
F
– Tilt the weighing platform backwards until the cover plate (G) is visible.
– Remove the 2 screws (F) and the cover plate (G).
The hanger is now accessible.
F
– Fasten the hooks (optional) with screws.
G
Then return the balance to its normal position and simply reinstall all components in
the reverse order.
Special instructions for XP-L comparators
17
3
Special instructions for XP-L comparators
To fully utilize the high resolution of the balance, some specific rules must be observed. These will enable you to obtain the best
possible results.
3.1
Location
Take care to choose a good location (see also Chapter 2.4).
We recommend you to operate the balance on a stone bench. Other surfaces can have a negative effect on the weighing performance.
3.2
Load the comparator
Because of the high resolution of the balance, even minute differences of temperature or humidity can affect the result. Make sure
that the weighing pan is clean and that the weighing sample is acclimatized.
– Do not touch the reference and test weights with bare hands.
– Always use gloves or working aids that do not damage the weights when loading and unloading the balance.
3.3
Settings for the XP-L comparators
3.3.1
Factory setting differences compared to the standard types
AutoZero:
Is switched off at initial operation and after a factory reset (resetting to the factory settings), but can be switched
on again when required.
When changing over to the “WeighCom” application, “AutoZero” is automatically switched off. When changing
back to the “Weigh” application, the previous status of “AutoZero” is restored.
When comparing masses, “AutoZero” must not be switched on, because it can distort the measurement
values.
ProFACT:
Is switched off at initial operation and after a factory reset (resetting to the factory settings). When comparing
masses, it is not advisable to switch “ProFACT” on.
Cleaning and service
18
4
Cleaning and service
Every now and then, clean the weighing pan, the levelmatic (depending on the model), draft shield (depending on the model),
housing and terminal of your balance using a damp cloth. Your balance is made from high-quality, durable materials and can
therefore be cleaned with a standard, mild cleaning agent.
Please observe the following notes
– On no account use cleaning agents, which contain solvents or abrasive ingredients, as this can result in
damage to the terminal overlay.
– Ensure that no liquid comes into contact with the balance or the terminal.
– Never open the balance or the terminal - they contain no components, which can be cleaned, repaired or
replaced by the user.
Please contact your METTLER TOLEDO dealer for details of the available service options. Regular servicing by an
authorized service engineer ensures constant accuracy for years to come and prolongs the service life of your
balance.
Technical data and accessories
19
5
Technical data and accessories
In this Section you will find the most important technical data for your comparator. Accessories from the METTLER TOLEDO range
increase the functionality and open up additional areas of application (see Section 5.7).
5.1
General data
Power supply
• Power supply
115-240V, -15%/+10%, 50/60Hz, 0.4A
• Power cable
3-core, with country-specific plug
Protection and standards
• Overvoltage category:
Class II
• Degree of pollution:
2
• Protection:
Protected against dust and water, IP44
• Standards for safety and EMC:
See Declaration of Conformity (separate brochure 11780294)
• Range of application:
For use only in closed interior rooms
Environmental conditions
• Height above mean sea level:
Up to 4000 m
• Ambient temperature:
10 - 30°C ± 0.5°C /24h
• Relative air humidity:
40 at 70% ± 2%
Materials
• Housing:
Sheet aluminum, die cast, laquered, plastic and chrome steel
• Terminal:
Die-cast zinc, chromed and plastics
• Weighing pan:
Chrome-nickel steel X5 Cr Ni 18 10
• Draft shield
Plastic, chrome-nickel steel, aluminium and glas
• Levelmatic
Chrome-nickel steel and aluminium
Standard equipment
• Delivered with balance:
Balance with country-specific power cable
Draft shield XP W64 (XP26003L/XP64003L)
RS232C interface
Protective cover for the terminal
Ready for below-the-balance weighing (hook optional)
Feedthrough for antitheft device
• Documentation:
Supplementary Operating Instructions (this document)
Standard Operating Instructions for XP Precision Balances
Operating Instructions “WeighCom Application for XP Comparator Balances”
Production certificate
CE declaration of conformity
Technical data and accessories
20
5.2
Model-specific data
Technical data (limit values)
Model
XP26003L
XP32003L
XP64003L
XP64002L
XP64002L-T
64.1 kg
Maximum load
26.1 kg
32.1 kg
64.1 kg
64.1 kg
Readability
1 mg
5 mg
5 mg
10 mg
10 mg
Repeatability at nominal load (ABA, measured at) 1)
3 mg (26 kg)
10 mg (30 kg)
8 mg (60 kg)
25 mg (60 kg)
30 mg (60 kg)
Repeatability at low load (ABA, measured at) 1)
2 mg (1 kg)
5 mg (2 kg)
4 mg (5 kg)
10 mg (5 kg)
15 mg (5 kg)
Electrical weighing range
0…26100 g
0…32100 g
0…64100 g
0…64100 g
0…64100 g
0…2.4 kg
Pre-load with fullrange
0…1.5 kg
0…1.5 kg
0…2.4 kg
0…2.4 kg
Linearity (electrical weighing range)
25 mg
40 mg
50 mg
50 mg
50 mg
Eccentric load deviation (measured at) 2)
0.2 g (8 kg)
0.25 g (12 kg)
0.35 g (24 kg)
0.4 g (24 kg)
0.5 g (24 kg)
Sensitivity offset
1 x 10 - 5 ·Rnt
1 x 10 - 5 ·Rnt
1.5 x 10 - 5 ·Rnt
1.5 x 10 - 5 ·Rnt
2 x 10 - 5 ·Rnt
Sensitivity temperatur drift 3)
3 x10 - 6 / ºC ·Rnt
3 x10 - 6 / ºC ·Rnt
3 x10 - 6 / ºC ·Rnt
5 x10 - 6 / ºC ·Rnt
1x10 - 5 / ºC ·Rnt
Sensitivity stability 4)
1.5 x10 -5 /a·Rnt
2 x10 -5 /a·Rnt
1.5 x10 -5 /a·Rnt
3 x10 -5 /a·Rnt
5 x10 -5 /a·Rnt
Settling time
8…12 s
8…12 s
8…12 s
8…12 s
8…12 s
Interface update rate
23 /s
23 /s
23 /s
23 /s
23 /s
Adjustment built in
proFACT
proFACT
proFACT
proFACT
proFACT
5 kg
5 kg
10 kg
10 kg
Adjustment with external weights
Weighing platform dimensions (W x D x H) [mm]
360 x 280 x 185
360 x 280 x 130
360 x 280 x 185
10 kg
360 x 280 x 130
360 x 280 x 185
194 x 133 x 58
Terminal dimensions (W x D x H) [mm]
194 x 133 x 58
194 x 133 x 58
194 x 133 x 58
194 x 133 x 58
Weighing pan dimensions (W x D) [mm]
∅ 220 (Levelmatic)
360 x 280
∅ 220 (Levelmatic)
360 x 280
∅ 220 (Levelmatic)
Free space above weighing pan (mm)
350
–
350
–
–
Weight [kg]
15.7
10.7
15.7
10.7
25
Draft shield dimensions (W x D x H) [mm]
634 x 498 x 620
–
634 x 498 x 620
–
–
Typical data for determination of the measurement uncertainty
Model
XP26003L
XP32003L
XP64003L
XP64002L
XP64002L-T
Repeatability (sd) typical
1.5mg+ 6 x10 - 8 ·Rgr
4mg + 2 x10 -7 ·Rgr
3.5 mg + 8 x10 -8 · Rgr
8mg + 3 x10 -7 ·Rgr
12mg + 6 x10 -7 ·Rgr
Differential nonlinearity (sd) typical
5 x10 -12 g·Rnt
5 x10 -11 g·Rnt
4 x10 -12 g·Rnt
8 x10 -11 g·Rnt
8 x10 -11 g·Rnt
Differential eccentric load deviation (sd) typical
1 x10 -6 · Rnt
3 x10 -6 · Rnt
1.5 x10 -6 · Rnt
5 x10 -6 · Rnt
8 x10 -6 · Rnt
Sensitivity offset (sd) typical 3)
1 x10 -6 · Rnt
2 x10 -6 · Rnt
2 x10 -6 · Rnt
4 x10 -6 · Rnt
5 x10 -6 · Rnt
Rgr = gross weight
Rnt = net weight (sample weight)
sd
= Standard deviation
a
= Year (annum)
1)
2)
3)
4)
Value out of 5 ABA measurements according to OIML R111
According to OIML R76, with levelmatic error is negligible
In the temperature range 10…30°C
Sensitivity drift/year after putting into operation for the first time, with the ProFACT self-calibration function activated
Technical data and accessories
21
5.3
Dimensions XP32003L, XP64002 L
12
68
71
130
133
46
177
216
425
360
145
296
280
15
194
145
Technical data and accessories
22
Dimensions XP26003L, XP64003L
45
59
158
133
185
5.4
46
~177
216
425
~145
280
360
~145
296
∅ 220
15
194
180
140
Technical data and accessories
23
615.5
749.5
618.5
634
550
609.8
30
620
Draft shield dimensions XP W64
12.2
351.5
550
30
610
498
630
5.5
Technical data and accessories
24
5.6
Accessories
You can increase the functionality of your balance with accessories from the METTLER TOLEDO range. The following options are
available:
Printer
RS-P42: Printer with connection cable RS232, for recording results
00229265
BT-P42: Bluetooth printer with wireless connection to the balance
11132540
Optional interfaces
RS232C (second RS232C interface)
11132500
LocalCAN: Connection for max. 5 instruments with LocalCAN connection
11132505
MiniMettler (downward compatibility to older devices from METTLER TOLEDO)
11132510
PS/2: For connection of commercially available keyboards and barcode readers
11132520
BT (Bluetooth): For wireless connection of up to 7 peripheral devices
11132530
BTS (Bluetooth): For wireless connection to a BT-P42 printer, BT-BLD auxiliary display or to a PC
11132535
Ethernet: For connection to an Ethernet network
11132515
e-Link IP65 EB01: Ethernet connection to the e-Link network with IP65 protection
11120003
Cable for RS232C interface (for standard interface or option 11132500)
RS9 – RS9 (m/f), connection cable for computer or RS-P42 printer, length = 1 m
11101051
RS9 – RS25 (m/f), connection cable for computer (IBM XT or compatible), length = 2 m
11101052
RS9 – RS9 (m/m), connection cable for devices with DB9 socket (f), length = 1 m
21250066
Cable for LocalCAN interface (option 11132505)
LC-RS9: Cable for connecting a PC with RS-232C, 9-pin, length = 2 m
00229065
LC-RS25: Cable for connecting a printer or PC with RS-232C, 25-pin (m/f), length = 2 m
00229050
LC-RS open: Cable for connecting the MT ComBus system, length = 4 m
21900640
LC-CL: Cable for connecting a device with METTLER TOLEDO CL interface (5-pin), length = 2 m
00229130
LC-LC03: Extension cable for LocalCAN, length = 0.3 m
00239270
LC-LC2: Extension cable for LocalCAN, length = 2 m
00229115
LC-LC5: Extension cable for LocalCAN, length = 5 m
00229116
LC-LCT: Cable branch (T-connector) for LocalCAN
00229118
Cable for MiniMettler interface (option 11132510)
MM – RS9f: RS232C connection cable for MiniMettler Interface, length = 1.5m
00210493
Auxiliary display (displays only the weight value and unit, if defined)
RS/LC-BLD: Auxiliary display with RS232 & LC connection and external power supply, with table stand
00224200
RS/LC-BLDS: Auxiliary display with RS232 & LC connection for table stand or balance stand
11132630
BT-BLD bluetooth auxiliary display for wireless connection to balance with BTS interface, with table stand
11132555
LC-AD: Auxiliary display, active, with table stand
00229140
LC-ADS: Auxiliary display, active, with table stand
00229150
Technical data and accessories
25
Input/output devices
ErgoSens: programmable sensor for hands-off operation, cable length = 0.6 m
11132601
LC-IO: Relay interface with digital inputs and outputs, switch eight different devices on and off
21202217
LC-FS: Foot switch with adjustable function for balances with LocalCAN interface
00229060
LC switchbox; connect up to three balances with LocalCAN interface to a printer
00229220
Barcode reader RS232
• AC adapter 230V EUR
• AC adapter 115V USA
21900879
21900882
21900883
Software
LabX pro balance (network capable solution for management of weighing data)
11120301
LabX light balance (management of weighing data made easy)
11120317
LabX direct balance (simple data transfer)
11120340
Freeweigh. Net
21900895
MC Link (Windows® software for comparative weighings
11116504
Various
Terminal extension cable, length = 4.5 m
11600517
Wall fixture for terminal
11132665
Protective cover for terminal
11132570
Anti-theft device (steel cable)
11600361
Stand for terminal, terminal hight over weighing pan = 0.3 m
11132653
Draft shield XP W64 to cover the entire balance, (W x D x H) 498 x 630 x 634 mm
11134470
Hook for the hanger
11132565
Reference weights
Reference weight E1 20 kg SCS certified
00159221
Reference weight E1 50 kg SCS certified
00159231
Index
26
6
Index
A
M
Accessories 24
Adjustment 11
Auxiliary display 24
Materials 19
Model-specific data
O
B
Below the balance weighing
Optional interfaces
Overview 3, 4
16
C
24
P
Cable for RS232C interface
Cleaning 18
Contents 6
24
Placing the terminal 7
Power supply 13, 19
Printer 24
Protection and standards
D
Reference weights 25
Removing the terminal 14
S
E
Environmental conditions
Equipment 7
19
F
Factory setting differences
17
G
19
I
Input/output devices 25
Installing the balance cable in the terminal
Installing the Levelmatic 10
Interfaces 24
L
Level sensor 11
Leveling Assistant 11
Leveling the balance 11
Load the comparator 17
Location 17
19
R
Dimensions XP26003L, XP64003L 22
Dimensions XP32003L, XP64002L 21
Display field remains dark 13
Disposal 6
Draft shield dimensions XP W64 23
General data
20
9
Safety 6
Scope of delivery 6
Selecting the location 11
Self-test 13
Service 18
Set it up and prepare 7
Setting the reading angle 8
Setting up the comparator with Levelmatic 9
Setting up the comparator without Levelmatic 7
Setting up the terminal separately 14
Settings for the XP-L comparators 17
Software 25
Special instructions for XP-L comparators 17
Standard equipment 19
T
Technical data 19
Terminal 8
Transporting over long distances 15
Transporting over short distances 15
Transporting the balance 15
LEERE SEITE
To protect your METTLER TOLEDO product’s future:
METTLER TOLEDO Service assures the quality, measuring accuracy
and preservation of value of all METTLER TOLEDO products for years
to come.
Please send for full details about our attractive terms of service.
Thank you.
*P11780871*
Subject to technical changes and to changes in
the accessories supplied with the instruments.
© Mettler-Toledo AG 2006
11780871 Printed in Switzerland 0611/2.12
Mettler-Toledo AG, Laboratory & Weighing Technologies, CH-8606 Greifensee, Switzerland
Phone +41-44-944 22 11, Fax +41-44-944 30 60, Internet: http://www.mt.com