1
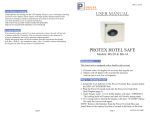
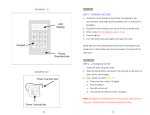
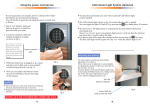
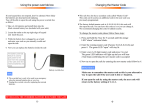
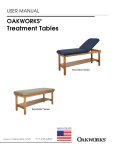
Using the Power override battery box:
If the internal batteries of the safe die, you can always give power to
the lock from the outside by using the included battery override box.
1. Slide the battery box cover and install 4 AA batteries
2. Plug in the jack in the power override hole in the scanner
3. Now open the safe as you would by using your fingerprint
NEVER LOCK THE POWER OVERRIDE BOX INSIDE THE SAFE.
P
REV. 06.12
PROTEX
SAFE CO.
USER MANUAL
Power Override Box
PROTEX FINGERPRINT
WALL SAFE
Model: FW-1814Z
Installation:
We recommend hiring a contractor or a handyman to install
the safe in your home or office.
Installation Steps:
1. Locate an interior wall that you would know for sure that there are no pipes
running inside. Make sure there is no bathroom or a shower on the other
side of that wall.
2. Using a Stud Finder, locate a good location between two wall studs at approx.
the height of your eyes.
3. Using a level and a measuring tape, draw a rectangular of 18” high x 14” wide.
(to make sure, measure the size of the back of the safe and make the rectangular
about a ¼” larger to have some play).
4. Using a hand held drywall saw, cut the dry wall according to the marking.
DO NOT USE AN ELECTRIC SAW.
5. Remove the drywall cutout and make sure there are no interference
inside the wall to install the safe
6. Insert the safe into the wall and install to the wall studs from the inside
of the safe using the lag bolts provided. It is recommended to drill pilot holes
for bolts.
page 4
Step 1. – Opening the safe.
Make sure safe is in an upright position. (not laying down).
1. Install the 4 AA batteries in the power override box and plug it
in below the fingerprint reader in the left hole. This will give the
lock power to open the safe so you can install the batteries inside
the safe.
2. Press the wake-up button and place your finger on the glass scanner
until the LED turns green followed by a long beep.
3. The safe door will slowly spring open
NOTE: The safe will open with any finger if no fingerprint is enrolled.
Install 4 AA batteries in the black battery box located in the
back of the door, inside the safe.
(continue next page)
page 1
Step 2. – Closing the safe.
Scanner
1. To close the safe, push and hold the door shut, press the
wake-up button and wait until the safe is locked.
Fingerprint
Scanner
Wake-Up
Button
Note: You will hear the bolts extending and locking the safe
Step 3. – Enrolling fingerprints.
1. Open the safe by following step 1.
2. Press the red setup button located inside the safe
on back of door (see diagram).The scanner will flash red
.
3. While the scanner flashes red immediately place your finger
(preferably your index) flat on the fingerprint scanner
wait until the scanning process is done and the green LED goes
on twice with two beeps.
4. Remove your finger from the scanner, your fingerprint is now enrolled.
NOTE: To add additional fingerprints, repeat step 3. You can enroll up to
30 different fingerprints.
LED Indicator
Power Override
Hole
Initializing: Restoring Factory Setting
1. Open the safe and leave the door open
2. Remove one of the batteries from the battery box inside the safe
3. Press and hold the wake-up button for 3 seconds and release.
4. Press and hold the red setup (programming ) button, while holding
the button insert the battery back into the battery box.
5. Keep holding the red setup button until the LED indicator flashes
green twice with 2 beeps.
7. Release the setup button and the safe is now initialized back to factory
settings. Now any fingerprint can open the safe
Using the Emergency override key:
Setup Button
Deleting:
To delete fingerprints (users), go to: Initialization Process
You cannot delete individual users. You must delete
all users.
Please use this key only if the scanner is not reading your
fingerprint for some reason.
DO NOT use this key to open the safe on a regular bases.
To use the key, gently unscrew the chrome keyhole cap located
below and left of the scanner. Insert the key with the notch
pointing upwards and turn counter-clockwise to open the safe.
NEVER LOCK THE KEYS INSIDE THE SAFE. ALWAYS KEEP
THE KEYS OUTSIDE OF THE SAFE IN A HIDDEN PLACE.
(continue next page)
page 2
page 3