1
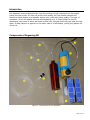
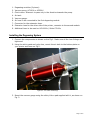
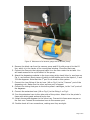
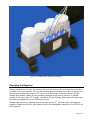
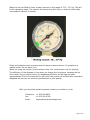
Ink Degasser for Pro-HP Bulk System
Installation and Operation Manual
Ink Degassing Solution for Seiko and HP9000 Bulk Ink System
Revised 01 August 2009
TABLE OF CONTENTS:
Introduction ........................................................................................................... 2
Components of Degassing Kit ................................................................................... 2
Installing the Degassing System ............................................................................... 3
Operating the Degasser ........................................................................................... 5
Page 1 of 6
Introduction
Ink degasser removes dissolved air from the printing ink as it passes from the supply
bottle into the printer. Air-free ink works more stable, will less nozzle outages and
therefore allows higher print speeds, higher print yield with better quality. Principle of
operation: as the ink passes through the degassing unit, it flows along the porous
membrane, the pores of which are sized so that only the gas molecules can pass through
them. A deep vacuum is applied on the other side of a membrane, pulling the gasses out
of the ink.
Components of Degassing Kit
Figure 1. Components of the Degasser
Page 2 of 6
1. Degassing modules (2 pieces).
2. Vacuum pump, AC120V or AC220V.
3. Check valve. Allows air to pass only in the direction towards the pump.
4. Air tank.
5. Vacuum gauge.
6. Air hose to be connected to the first degassing module.
7. Connector for the extension hose.
8. Extension hose for the other side of the printer, connects to the second module.
9. Additional hose to be used on HP10000s / Seiko CP100s.
Installing the Degassing System
1. Connect the components as shown on the Fig.1. Make sure all the Luer fittings are
tightened.
2. Using the sticky pads and nylon ties, mount the air tank to the bottom plate on
your printer as shown on Fig.2.
Figure 2. Air tank mounting.
3. Mount the vacuum gauge using the sticky Velcro pad supplied with it, as shown on
Fig. 3.
Page 3 of 6
Figure 3. Placement of a vacuum gauge and a vacuum pump.
4. Remove the black cap from the vacuum pump and fill it with pump oil to the fill
line, which is in the center of the round glass window. Close the black cap.
5. Connect the Pump to the tubing and place it on the floor under the air tank. You
will need access to the on/off switch of the pump.
6. Attach the degassing modules to the trays using sticky-back Velcro’s, as shown on
Fig. 4, and connect short pieces of tubing to the bottles and to the inputs 1, 2 and
3 of the degasser. Note that the 4th port is not used on this system.
7. Connect the Luer fitting of the air hose (#6 on Fig.1) to the “Vacuum” port of the
degassing unit. Make sure the other vacuum port is capped.
8. Connect the tubing that goes to the bulk system’s cartridges, to the “out” ports of
the degasser.
9. Connect the extension hose (#8 on Fig.1) to the fitting 1 on Fig.1.
10. Run the extension hose to the other side of the printer. Attach it to the printer’s
frame with sticky pads and small nylon ties.
11. Attach the second degasser to the other tray. Connect ink lines same way as on
the first one. Connect the extension hose to the vacuum port.
12. Double-check all Luer connections, making sure they are tight.
Page 4 of 6
Figure 4. Installing the degassing modules.
Operating the Degasser
Before charging the ink into the printer, check if the vacuum will be stable and there are
no leaks in any connections. Turn on the vacuum pump and watch the vacuum gauge. As
the vacuum reaches the level of -28” Hg, turn off the pump. Now the vacuum should
remain fairly stable. Watch for any vacuum changes in the next 2 minutes. It should
remain at the same level. If it drops, re-tighten all Luer fittings. Slow leaks will take place
because the degassers are not filled with ink yet.
Release the vacuum by opening one of the caps on the 2nd vacuum port of a degassing
module. Charge the ink into your printer (follow the installation manual for Pro-CP/Pro-HP
bulk system).
Page 5 of 6
When the ink has filled all lines, create a vacuum in the range of -28”…-30” Hg. This will
be the operating range. The vacuum will slowly drop with time, so check it twice a day
and replenish vacuum if needed.
Please note that the vacuum pump does not have a vacuum sensor. It operates in a
manual mode. Do not leave it on.
When not using the printer, let the vacuum drop. You need vacuum only for printing.
The efficiency of the degasser is low when you charge the ink system, because the ink
flow is high. As you keep printing, the degassing efficiency will be high and after
approximately 500ml of consumed ink (per color) the printer will be filled with completely
degassed ink and you will see the improvements in print quality.
With your technical questions please contact your dealer or us at:
Telephone: +1 905 820 8833
Fax:
+1 905 820 8768
Email:
[email protected]
Page 6 of 6