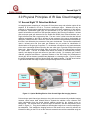
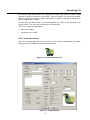
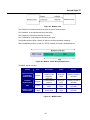
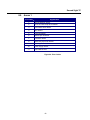
1
Second Sight TC Remote Gas Detection System The information and technical data disclosed in this document may be used and disseminated only for the purposes and to the extent specifically authorized in writing by General Monitors. Instruction Manual 1210 General Monitors reserves the right to change published specifications and designs without prior notice. SECONDSIGHT Part No. Revision MANSECONDSIGHT A/12-10 Second Sight TC This page is intentionally left blank. ii Second Sight TC Table of Contents ABOUT THIS MANUAL ............................................................................................................... 8 Format Conventions................................................................................................................................8 Notes, Cautions, and Warnings .................................................................................................8 Contacting Customer Support....................................................................................................8 1.0 INTRODUCTION .................................................................................................................... 9 1.1 1.2 1.3 1.4 Notice .........................................................................................................................................9 Special Warning .........................................................................................................................9 Description ...............................................................................................................................10 1.3.1 Detection Head Characteristics ..................................................................................10 1.3.2. Characteristics of the Power Adapter .........................................................................11 1.3.3. Characteristics of the Portable PC..............................................................................11 Operating Principle...................................................................................................................12 1.4.1 Autonomous Mode ..........................................................................................................12 1.4.2 Remote Mode..................................................................................................................13 2.0 QUICK START GUIDE AND PHYSICAL PRINCIPLES OF IR GAS CLOUD IMAGING .... 14 2.1 Receipt of Equipment......................................................................................................................14 2.2 Installation Considerations..............................................................................................................14 2.3 Starting the System.........................................................................................................................15 2.4 Ethernet Network Connection between Head and Network ...........................................................16 2.4.1 Opening a Session..........................................................................................................17 2.4.2 Connecting to the Remote Second Sight Application .....................................................18 3.0 PHYSICAL PRINCIPLES OF IR GAS CLOUD IMAGING ................................................... 20 3.1 Second Sight TC Detection Method................................................................................................20 3.2 Gas Cloud Measurement ................................................................................................................21 4.0 COMPONENTS .................................................................................................................... 23 4.1 Detection Head ...............................................................................................................................23 4.2 Power Supply Unit...........................................................................................................................23 4.3 Portable PC.....................................................................................................................................23 5.0 INSTALLATION.................................................................................................................... 24 5.1 Installation of the Detection Head ...................................................................................................24 5.1.1 Attaching the Head on the Tripod ...................................................................................24 5.1.2 Positioning and Orienting the Head ................................................................................24 5.1.3 Installation of the Power Supply Unit ..............................................................................24 5.2 Installation of the Portable PC ........................................................................................................25 5.2.1 Place of Installation .........................................................................................................25 5.2.2 Portable PC’s Power Supply...........................................................................................25 5.3 Electrical Installation .......................................................................................................................25 5.3.1 Precautions .....................................................................................................................25 5.3.2 Ethernet Network Connection between Head and the PC .............................................25 5.3.3 Connecting the Detection Head's Power Supply ............................................................25 5.3.4 Connecting the Power Supply Unit .................................................................................26 5.4 Detector Location Guidelines..........................................................................................................26 5.5 Field of View....................................................................................................................................27 iii Second Sight TC 5.6 Environmental Factors ....................................................................................................................27 6.0 USE AND OPERATION ....................................................................................................... 28 6.1 Operational Principle.......................................................................................................................28 6.2 Presentation of the Remote Mode ...........................................................................................28 6.2.1 Starting the Client Application.........................................................................................28 6.2.2 Remote Connection to Second Sight Camera................................................................29 6.2.3 General Operational Indicators .......................................................................................30 6.2.4 Command Buttons ..........................................................................................................32 6.2.5 Log Tab ...........................................................................................................................42 6.2.6 Peripherals Indicator Lights ............................................................................................42 6.2.7 Image block Status Indicator...........................................................................................44 6.2.8 Count Down Before Calibration ......................................................................................44 6.2.9 Map Display ....................................................................................................................44 6.2.10 About.............................................................................................................................45 7.0 INSTALLING CLIENT SOFTWARE..................................................................................... 47 7.1 7.2 7.3. Installation Guidelines ..............................................................................................................47 7.1.1. Action #1: Uncompress the Software.........................................................................47 7.1.2. Action #2: Installation of the XviD Codec...................................................................49 7.1.3. Action #3: Installation of the Microsoft Framework V2.0............................................49 7.1.4. Action #4: Network Parameter ...................................................................................50 Firewall and Network Parameters............................................................................................51 7.2.1 Action #5: Firewall Parameter....................................................................................51 7.2.2. Action #6: Create a Remote Drive .............................................................................53 SdSClient First Use..................................................................................................................54 7.3.1. Action #7: Create Administrator Account...................................................................54 8.0 MODBUS INTERFACE ........................................................................................................ 56 8.1. 8.2. 8.3. 8.4. 8.5. Ethernet RJ45 Socket ..............................................................................................................56 Auxiliary Socket........................................................................................................................57 Communication Protocol ..........................................................................................................58 8.3.1. IP Video Link ...............................................................................................................58 8.3.2. Identification Protocol (UDP) Between Client and Server...........................................58 Modbus IP ................................................................................................................................58 8.4.1. ModbusProtocol ..........................................................................................................58 8.4.2. Functions Codes .........................................................................................................60 8.4.3. Identification ................................................................................................................60 8.4.4. Commands..................................................................................................................61 8.4.5. System’s Parameters ..................................................................................................61 8.4.6. Detection’s Parameters...............................................................................................62 8.4.7. Status ..........................................................................................................................62 8.4.8. Zones ..........................................................................................................................65 8.4.9. CIFS Protocol..............................................................................................................65 8.4.9. Video Alarms Files ......................................................................................................65 8.4.10. Log File .......................................................................................................................65 Annex 1 ....................................................................................................................................66 9.0 MAINTENANCE AND WARRANTY..................................................................................... 67 9.1. Maintenance.............................................................................................................................67 iv Second Sight TC 9.2. 9.3. Obtaining Service.....................................................................................................................68 Warranty...................................................................................................................................68 10.0 TROUBLESHOOTING GUIDE ................................................................................. 69 11.0 CUSTOMER SUPPORT ........................................................................................... 71 Other Sources of Help...........................................................................................................................71 12.0 12.1. 12.2. 12.3. 12.4. APPENDIX................................................................................................................ 72 Specifications ...........................................................................................................................72 Software Version......................................................................................................................72 Power Supply Specifications....................................................................................................73 Regulatory Agency Approvals..................................................................................................74 v Second Sight TC Table of Figures Figure 1: Second Sight TC Detection Head ........................................................................................................ 10 Figure 2: Power Supply Unit................................................................................................................................ 11 Figure 3: Rugged Portable PC ............................................................................................................................ 11 Figure 4: Principle of the Second Sight System .................................................................................................. 12 Figure 5: Position of the Light Indicators on the Back Side................................................................................. 13 Figure 6: System Human-Machine Interface....................................................................................................... 13 Figure 7: Packed System .................................................................................................................................... 14 Figure 8: Status Indicators................................................................................................................................... 15 Figure 9: Open Ethernet Connector .................................................................................................................... 17 Figure 10: Network Cable.................................................................................................................................... 17 Figure 11: Client Software Icon ........................................................................................................................... 17 Figure 12: Connected cameras on the Map ........................................................................................................ 18 Figure 13: Network in the Process of Connecting or Not Connected.................................................................. 18 Figure 14: Principal Application Screen .............................................................................................................. 19 Figure 15: Optical Building Blocks of the Second Sight Gas Imaging Camera................................................... 20 Figure 16: The Infrared Spectral Filtering Scheme of Second Sight................................................................... 21 Figure 17: Front and Back Views Detection Head .............................................................................................. 23 Figure 18: Lock and Safety Device Button .......................................................................................................... 24 Figure 19: Power Supply Connector.................................................................................................................... 26 Figure 20: Connected Power Cable .................................................................................................................... 26 Figure 21: Power Supply ..................................................................................................................................... 26 Figure 22: Icon of Client Software on the Desktop.............................................................................................. 28 Figure 23: Remote Session Screen..................................................................................................................... 29 Figure 24: Different Connected Cameras............................................................................................................ 30 Figure 25: Network in the Process of Connecting or Not Connected.................................................................. 30 Figure 26: Hourglass Indicator ............................................................................................................................ 31 Figure 27: Grey Indicator..................................................................................................................................... 31 Figure 28: Green (Normal Operation) Indicator................................................................................................... 31 Figure 29: Exclamation Mark Indicator ................................................................................................................ 31 Figure 30: Alarm Gas Indicator............................................................................................................................ 32 Figure 31: Login Icon and Login Window ............................................................................................................ 32 Figure 32: Login Window and Additional Icon ..................................................................................................... 32 Figure 33: Creation of New Account Window...................................................................................................... 33 Figure 34: Change Standby Mode or Detection Mode ........................................................................................ 33 Figure 35: Zones Icon.......................................................................................................................................... 33 Figure 36: Active and Inactive Zones .................................................................................................................. 34 Figure 37: Mute Buzzer Icon ............................................................................................................................... 34 Figure 38: Configuration Icon .............................................................................................................................. 35 Figure 39: Configuration Window ........................................................................................................................ 35 Figure 40: Gas Icon ............................................................................................................................................. 36 Figure 41: List of Gases ...................................................................................................................................... 36 Figure 42: Camera Parameters Icon ................................................................................................................... 37 Figure 43: Camera Window................................................................................................................................. 37 Figure 44: Manual Focus Buttons........................................................................................................................ 38 Figure 45: Graph Icon.......................................................................................................................................... 39 Figure 46: Graph Window.................................................................................................................................... 39 Figure 47: Video Icon........................................................................................................................................... 39 Figure 48: Video Recorder Windows................................................................................................................... 40 Figure 49: Record Video Icon.............................................................................................................................. 40 Figure 50: Recording Mode (Red Square) .......................................................................................................... 41 vi Second Sight TC Figure 51: Stop Icon ............................................................................................................................................ 41 Figure 52: Confirmation Popup............................................................................................................................ 41 Figure 53: “Log” Window Example ...................................................................................................................... 42 Figure 54: Peripheral Indicator Lights.................................................................................................................. 42 Figure 55: Infrared Sensor’s Status Indicator...................................................................................................... 42 Figure 56: Status Indicator for the Lens Cover Command .................................................................................. 43 Figure 57: Temperature Sensor’s Status Indicator.............................................................................................. 43 Figure 58: Status Indicator of the Filter Wheel .................................................................................................... 43 Figure 59: Power Status Indicator ....................................................................................................................... 43 Figure 60: Image Block Bar Graph ...................................................................................................................... 44 Figure 61: Non-accurate Measurement Indicator Light ....................................................................................... 44 Figure 62: Countdown before Calibration............................................................................................................ 44 Figure 63: Map Display........................................................................................................................................ 45 Figure 64: About Second Sight Client Software .................................................................................................. 46 Figure 65: Create a New Folder .......................................................................................................................... 47 Figure 66: New Second Sight Client Empty Folder .............................................................................................. 47 Figure 67: Second Sight Client Folder................................................................................................................. 48 Figure 68: Create a Shortcut ............................................................................................................................... 48 Figure 69: SdSClient Shortcut Icon on the Desktop............................................................................................ 49 Figure 70: The XviD Final Installer ...................................................................................................................... 49 Figure 71: The Framework Express Setup.......................................................................................................... 49 Figure 72: Last Screen of the Framework 2.0 Installation................................................................................... 50 Figure 73: Local Area Connections Properties Windows .................................................................................... 50 Figure 74: Firewall Window ................................................................................................................................. 52 Figure 75: Firewall Exceptions Tab ..................................................................................................................... 52 Figure 76: Selection of SdSClient Software ........................................................................................................ 53 Figure 77: Selection of Exceptions Software....................................................................................................... 53 Figure 78: Mapping Network Drive Z:.................................................................................................................. 54 Figure 79: Create Administrator Account ............................................................................................................ 55 Figure 80: Second Sight TC ................................................................................................................................ 56 Figure 81: Back View of Camera......................................................................................................................... 56 Figure 82: Pin of the Auxiliary Connector ............................................................................................................ 57 Figure 83: Wiring of the Auxiliary Connector....................................................................................................... 57 Figure 84: Infrared Image .................................................................................................................................... 58 Figure 85: Modbus Link ....................................................................................................................................... 59 Figure 86: Modbus TCP/IP Encapsulated Frame................................................................................................ 59 Figure 87: MBAP Header .................................................................................................................................... 59 Figure 88: Function Codes .................................................................................................................................. 60 Figure 89: Identification Parameters.................................................................................................................... 60 Figure 90: Available Commands ......................................................................................................................... 61 Figure 91: System’s Parameters ......................................................................................................................... 62 Figure 92: Status ................................................................................................................................................. 65 Figure 93: Inhibited Zones................................................................................................................................... 65 Figure 94: Error Codes ........................................................................................................................................ 66 Figure 95: Non-accurate Measurement Indicator Light ....................................................................................... 67 Table of Tables Table 1: Meaning of the Light Indicators ............................................................................................................. 16 Table 2: Troubleshooting Table........................................................................................................................... 70 vii Second Sight TC About This Manual This manual provides instructions for operating, and maintaining the General Monitors (GM) Second Sight TC. The intended audience includes installation personnel, field service technicians, and other technical staff involved in using a Second Sight TC. Format Conventions Several format conventions are used throughout this manual for Notes, Cautions, and Warnings. These conventions are described below. Notes, Cautions, and Warnings NOTE: Notes provide supplementary details such as exception conditions, alternate methods for a task, time saving tips, and references to related information. CAUTION: These notices describe precautions to prevent hazardous conditions that may damage the equipment. WARNING: These notices describe precautions to prevent hazardous conditions that may cause injury to people working with the equipment. Contacting Customer Support Forr additional product information not contained in this manual, please contact General Monitors Customer Support. Refer to Section 9 for contact information. 8 Second Sight TC 1.0 Introduction Loss of gas containment in the oil and gas and chemical process industries can have undesirable safety and environmental consequences. If leaks are not discovered at an early stage, they can accumulate into dangerous gas clouds that can ignite and create explosions or inflict harm as toxic agents. Gas leaks produce a financial loss as well. A recent report by British Petroleum estimates a single cavity pressure vent at an unmanned offshore platform released approximately 500 m3 (17,970 ft3) of hydrocarbon gas per day or the equivalent of ₤10,000 ($19,900) over a four week period 1 . The same report estimates the oil and gas concern loses about 4,000 tons of natural gas per year due to fugitive emissions. IR gas cloud imaging offers several benefits that complement conventional and ultrasonic gas detection methods. First, IR gas imaging provides continuous wide area coverage per device, with typical spans of 1 km in length by 0.5 km in width (approx. 0.6 mi by 0.3 mi). With fields of view of 15° to 60°, IR cameras can supervise entire sectors of a plant with detailed spatial resolution. Second, IR gas imaging conveys a rich stream of information: the dynamic representation of gas flux allows users to identify not only the specific zones from which gas plumes originate, but also the direction of dispersal, leading to efficient responses to hazardous events. Finally, imaging is immune to major sources of false alarms. Due to the characteristics of the absorption bands for most hydrocarbon gases, IR imaging is unaffected by the absorption of water, carbon dioxide, and other atmospheric constituents present in a plant atmosphere. 1.1 Notice All information contained in this instruction manual applies only to the setup and operation of the Second Sight TC remote gas detection system. The IR gas cloud imaging camera is easy to set up and operate. Nevertheless, this manual should be read in full, and the information contained herein understood, before attempting to operate it. The Second Sight TC remote gas detection system is designed and manufactured by Bertin Technologies 2 . 1.2 Special Warning WARNING: Toxic, combustible and flammable gasses & vapors are very dangerous. Extreme caution should be used when these hazards are present. CAUTION: Avoid shocks to the detection head. The system is designed to operate between -10°C and 55°C and be stored between -20°C and + 60°C. 1 BP Report BH300101, BP SNS Environmental Publication. 2 www.bertin.fr 9 Second Sight TC 1.3 Description 1.3.1 Detection Head Characteristics The detection head is based on passive multi-spectral infrared imaging technology. The system is shipped with a lens with a 30° average field and a database chosen chose for detecting methane, ethane, propane and butane. The following figure represents the front and back views of the head. Figure 1: Second Sight TC Detection Head The system can operate autonomously or connected to the portable PC. The detection head's electric power is provided with a specific power supply unit included in the system's shipment. The head’s power consumption is approximately 80 W. Under the sun visor, an automated mechanism can be used to close the window of the infrared lens. This cover performs two functions: • Protection of the infrared lens during transport • Black body to periodically standardize the infrared image. 10 Second Sight TC 1.3.2. Characteristics of the Power Adapter The power supply unit operates on 100-240V / 50-60Hz line power, and powers the detection head (24V direct current), the power supply unit’s consumption is approximately 80 W. Figure 2: Power Supply Unit The power supply is certified by the following regulatory agencies: • CE Mark • ATEX EX II 3 G (Ex nA II T4) The technical specifications are provided in Section 10.2. 1.3.3. Characteristics of the Portable PC The laptop PC provided as an option with the system is a DELL laptop model Latitude E6400 ATG (or equivalent ruggedized laptop). Figure 3: Rugged Portable PC 11 Second Sight TC 1.4 Operating Principle The operating principle is that infrared radiation emitted by objects produces thermal contrast, which when detected by an infrared camera, can provide a measure of gas concentration. Gas is identified by comparing the emissivity of the gas across several filters with those of a library of calibration gases. GAS Figure 4: Principle of the Second Sight System The system, which is entirely passive, makes a spectral analysis of the scene at a distance using an appropriate filter set. The system updates the measurement in a time less than 2 seconds. The use of an infrared camera requires automatic recalibration regularly every 30 minutes. This makes the system blind for a few seconds, which is indicated by the system’s general status indicator. The head of the Second Sight detection system is entirely autonomous, the portable PC is only connected to the head as a client in order to view alarms and adjust the surveillance parameters. The fact that the client is connected to the head does not influence the detection system’s operation. 1.4.1 Autonomous Mode The autonomous mode refers to the head’s operation when the client (portable PC) is not connected. In autonomous mode, the head performs the detection with the last parameters defined by the user. When a detection alarm goes off, the red light located on the back of the head blinks and an audible signal is made. When operation is normal without alarm, only the green light is on. The following figure shows the position of the lights on the head. 12 Second Sight TC Figure 5: Position of the Light Indicators on the Back 1.4.2 Remote Mode The remote mode interfaces with the detection head with the help of the portable PC, in order to visualize the system status and detections, make adjustments, activate or deactivate the system, etc. The following figure shows an overall view of the human-machine interface (HMI). Figure 6: System Human-Machine Interface 13 Second Sight TC 2.0 Quick Start Guide and Physical Principles of IR Gas Cloud Imaging 2.1 Receipt of Equipment Each element of the Second Sight system is shipped in a separate container. The following figure shows the complete packed system. Figure 7: Packed System The Second Sight head is shipped in its transport container (Pelicase 1660). In order to take it out of its housing, place your hands in the holes on both sides of the head (see green arrows), and grip it by its sides. Be careful, the head weighs 18 kg (40 lbs). CAUTION: Be sure not to grip or apply force on the hood visor. 2.2 Installation Considerations There are no standard rules for placement, since the optimum location varies with each application. Some factors to consider when selecting locations are the following: • System should be accessible for occasional response checks. • The line of sight should be free from items that may block the beam (i.e. building, parked truck or moving machinery). 14 Second Sight TC • The unit should be reasonably protected. • The unit should not be mounted too close to a radio transmitter or similar equipment. • Mount the Second Sight TC unit so that direct sunlight does not enter the front window. • Locate the unit away from concentrated sources of heat. • Mount away from sources of excessive vibration and away from high voltage/high current power lines. • The tripod must be installed on a stable surface. The legs must be spread out as far as possible to assure good system stability. The length of the legs must be adjusted so that the level is horizontal. 2.3 Starting the System The detection head is powered up directly by the power supply unit. The system status is indicated by two light indicators located on the back of the head and a buzzer inside the head. The following figure indicates the position of the status indicators on the head. Red Indicator Green Indicator Figure 8: Status Indicators After powering up the light indicators light up in a continuous way, after a few seconds (approximately 30 seconds) the 4 fans begin to turn. Then, while initializing the on board driver software, the green and red lights blink. After the head has finished its initialization, if an anomaly has been detected at the self-test level, the green light goes out and the red light lights up continuously. If the initialization has been performed correctly and no anomaly has been detected during selftests, the red light turns off. The green light then lights up continuously if the system is in stand-by (non-active surveillance), or blinks if the surveillance mode is active. A gas detection alarm is indicated by the red light blinking, the green light turning off and a beep. The table on the following page summarizes the various states: 15 Second Sight TC Green Light Red Light Buzzer Description Turning on the system. Warning! The fans are powered up for approximately 35 seconds after connecting the power supply unit’s. One short beep One short beep indicates the beginning of the system initialization. During the entire initialization the two lights blink. The system has started up, the stand-by mode is activated, with no surveillance. The system has started up, the surveillance mode is activated. Repeated beeps Indicates a detection of gas. An anomaly has been detected during the system's monitoring self-tests. Table 1: Meaning of the Light Indicators 2.4 Ethernet Network Connection between Head and Network The system can operate in two modes, autonomous or remote, while the detection method remains the same. Only the user interface makes the two operational modes different. Using the Ethernet network cable provided with the system one can establish a connection between the detection head and the portable PC (100 meters maximum allowed before repeaters are required). From the back of the camera, unscrew the connector’s protective cap. Insert the cable, and then turn the connector ring. 16 Second Sight TC Figure 9: Open Ethernet Connector Figure 10: Network Cable 2.4.1 Opening a Session Start up the laptop, when the window session is open, a shortcut on the screen called "Second Sight Client" is used for starting the client software: Figure 11: Client Software Icon 17 Second Sight TC 2.4.2 Connecting to the Remote Second Sight Application When the client software finds the SOCIS camera on the Ethernet LAN, a camera appears on the map. To connect the laptop on this camera one must click on the green icon dedicated to this camera. A blue overlay will overcome the selected camera. This interface allows the user to choose the connected gas imaging system. Figure 12: Connected cameras on the Map If the connection is not made, take the following actions: • Check the Ethernet network cable connection between the detection head and the portable PC. In the task bar (next to the clock) an icon indicates the status of this connection. Figure 13: Network in the Process of Connecting or Not Connected • Check the status of the detection head with the help of the indicator lights (see Table 1). • As a last resort, perform a “hard reboot” of the detection head, stopping it (unplug the power supply unit) for a minimum of 30 seconds, then restart (plug the power supply unit again). WARNING: Restarting must occur at least 30 seconds after stopping. When running for the first time, the application appears as in the following figure: 18 Second Sight TC Figure 14: Principal Application Screen By default, the application is in user mode. 19 Second Sight TC 3.0 Physical Principles of IR Gas Cloud Imaging 3.1 Second Sight TC Detection Method An imaging system comprising of a long wave IR focal plane array and collection optics will be sensitive to all radiation in the 8 to 14 micron wavelength region. Whereas this may be sufficient for thermal imaging applications that monitor the surface temperature of hot objects, the detection, identification (gas type) and quantification of a gas cloud require the use of specific infrared filters to perform a multi-spectral analysis of the incoming IR radiation. Infrared point and open path gas detectors like the IR400 and IR5500 from General Monitors use a single reference filter and a single active filter. The term “active” refers to the fact that infrared radiation transmitted by this filter is affected by the presence of the gas to be detected via absorption, whereas the term “reference” refers to the fact that infrared radiation transmitted by this filter is not affected by the presence of the gas to be detected. The two filters traditionally used in infrared point and open path gas detectors do not provide for identification or discrimination of the gas type or species, i.e., the detector will respond to any gas that absorbs at the active wavelength without informing the user which type of gas has crossed the optical beam path. When using Second Sight, there is provision for up to six infrared filters mounted on a filter wheel. The use of multiple filters allows the camera to simultaneously identify, quantify, and display the type and amount of gas within a family. For example, gas clouds of methane, propylene and butane – important members of the VOC family and constituents of natural gas, can be detected, quantified and displayed on a viewing monitor. Figure 15 shows the optical arrangement inside the Second Sight gas imaging camera. The filter wheel motion is synchronized with the image acquisition and processing function of the camera. Infrared Camera Specific Optics Processing Unit Filter Wheel Figure 15: Optical Building Blocks of the Second Sight Gas Imaging Camera Point and open path infrared gas detectors, along with several commercially available imaging cameras, utilize narrow band infrared filters to separate the radiation at the reference and active wavelengths from the broad thermal radiation emitted by the infrared source or background. The infrared filters of Second Sight are different, with the transmission profile shown in Figure 16. They permit radiation at wavelengths longer than a cutoff wavelength to be transmitted. This enables the imaging function of the camera to be more fully utilized; the infrared flux falling on the FPA is not the miniscule amount that would be transmitted using the 20 Second Sight TC conventional narrow band pass filter approach. The reference filter has the longest wavelength cutoff and is not affected by the presence of gas. It enables the background scene and the infrared radiation background from the scene to be defined. The active filters, known as measurement filters, have shorter cutoffs and are sensitive to the presence of gas. The cutoff wavelengths are selected per gas to be detected. As shown in Figure 16, the active filter 1 will detect methane gas, whereas active filter 2 will not detect methane gas. Differential radiometry techniques are used to compare the images obtained through the measurement and reference filters, to subsequently provide quantitative information for each gas detected. Figure 16: The Infrared Spectral Filtering Scheme of Second Sight As the system have six different filters, one can imagine a lot of couple of reference / active filters and each gas (depending on it’s absorption spectra) will done a specific response on all the different filters couple. This specific “signature” of the gas on all the different filters couple, will be use by the system to identify the chemicals compounds. The building blocks of the imaging camera described above, along with sophisticated image processing techniques to improve signal to noise and eliminate false alarms, result in a remote gas detection system designed to provide an additional layer of safety in the detection of combustible gases. 3.2 Gas Cloud Measurement In addition to supplying a large area of coverage and the simultaneous detection of four combustible gases, Second Sight is designed for ease of use. A human machine interface, illustrated in Figure 6: System Human-Machine Interface, allows operators to see target gases as they are detected by the IR camera. Levels of gas concentrations overlaid on the image provide a unique picture of gas dispersal that allows personnel not only to address the source of a leak, but also to respond more effectively to an alarm based on the direction of motion of the gas cloud. The gas measurement provided by the Second Sight is in units of LEL-m. This detection unit of concentration time path length is the same as that used for open path combustible gas detectors like the IR5500 from General Monitors. This is because both open path and imaging gas detection calculate the presence of gas over a path length rather than at a single point. The red color indicates that the presence of butane is in excess of that required 21 Second Sight TC to trigger the alarm, while yellow indicates warning and green the detection of the gas at low levels. The image is updated every 2 seconds, while the Second Sight can indicate an alarm within 8 seconds. The minimum detection levels are gas specific: a) 0.1 LEL-m for methane, b) 0.1 LEL-m for propylene, c) 0.5 LEL.m for propane, and d) 0.3 LEL-m for butane. Second Sight can also be factory configured for a host of other gases. Second Sight is designed for continuous operation, outdoors and indoors, day and night. It has good immunity to common sources of infrared radiation that are potential false alarms. This is because the detection of gas is carried out by three differential infrared imaging processes: spatial, spectral and temporal. Further details of the image processing techniques employed are available elsewhere 3,4 . 3 th J. L. Maillart et al., “Second Sight: Stand-off Equipment for Chemical Gas Detection,” 9 Symposium on Protection Against Chemical and Biological Warfare Agents, Gothenburg, Sweden, May 22 – 25, 2007. 4 P. Bernascolle and G. Pelous, “Remote Detection of Natural Gas Clouds in Open Field Imagery,” SPIE Aerosense Conference, Orlando, Florida, USA, April 1999. 22 Second Sight TC 4.0 Components 4.1 Detection Head The detection head is based on passive multi-spectral infrared imaging technology. The system is shipped with a lens with a 30° average field and a data base chosen specifically for selecting the following gases: methane, ethane, propane and butane. The following figure represents the front and back views of the head. Figure 17: Front and Back Views Detection Head The system can operate autonomously or connected to the portable PC. The detection head's electric power is provided with a specific power supply unit optional in the system's shipment. The head’s power consumption is approximately 100 W. Under the sun visor, an automated mechanism can be used to close the window of the infrared lens. This cover performs two functions: • Protection of the infrared lens during transport • Black body to periodically standardize the infrared image 4.2 Power Supply Unit The power supply unit operates on 100-240 V / 50-60 Hz line power, and powers the detection head (24V direct current) the power supply unit’s consumption is approximately 100W. 4.3 Portable PC The laptop PC provided as an option with the system is a Dell laptop model Latitude E6400 ATG (or equivalent ruggedized laptop). 23 Second Sight TC 5.0 Installation 5.1 Installation of the Detection Head 5.1.1 Attaching the Head on the Tripod Before installing the detection head on the tripod, it is appropriate to check all the locks of the tripod’s moving parts, in particular the site and bearing lock buttons of the swivel joint. To install the head on the tripod, the base plate (attached under the head) must be slid from the back to the front. The safety device engages automatically, and is then locked with the button at the back. To remove the head, unlock the brake then push the safety lock device button. Then, slide the attachment plate into the dovetail towards the back of the head. These operations are easier if performed by two people. The following figure shows the attachment support of the head on the tripod: Figure 18: Lock and Safety Device Button 5.1.2 Positioning and Orienting the Head The tripod is a classic type, each axis has a brake and lock device. The length of the legs and how far they open is adjustable. The most stable recommended position is that in which the “spider” is most open. 5.1.3 Installation of the Power Supply Unit The power supply unit must be installed at a distance less than 2 meters from the detection head. 24 Second Sight TC 5.2 Installation of the Portable PC 5.2.1 Place of Installation The shipped portable PC (as an option) is a rugged portable PC, which means that it is resistant to shocks and vibrations (MIL-STD 810F). It is also designed to be compliant with IP 54, which means it is resistant to water and dust. In addition, the laptop can withstand falls from a height of 90 cm and may be used in extreme climatic conditions as low as -10°C. It can be moved at a maximum distance of 100 m from the detection head. 5.2.2 Portable PC’s Power Supply The autonomy of the portable PC’s battery is approximately 5 to 6 hours. For prolonged use, use the power adaptor provided with the PC. 5.3 Electrical Installation 5.3.1 Precautions When running the cables, avoid placing them where they can be crushed by pedestrian or vehicle traffic or pinched by a closing door or hatch. Be careful not to expose the cables to a heat source. The line power is connected last. 5.3.2 Ethernet Network Connection between Head and the PC Using the Ethernet network cable provided with the system one can connect the detection head to the portable PC (100 m maximum length without repeaters). From the side of the head, unscrew the Ethernet connector’s protective cap (Figure 9). Insert and then turn the connector ring. Then connect the cable on the PC. 5.3.3 Connecting the Detection Head's Power Supply The power supply cable provided with the system is for powering the head. On the back of the head, unscrew power supply protective cap. 25 Second Sight TC Figure 19: Power Supply Connector Insert and then turn the connector ring. Figure 20: Connected Power Cable 5.3.4 Connecting the Power Supply Unit Figure 21: Power Supply Then connect the cable to the line power. 5.4 Detector Location Guidelines Several variables are involved in selecting locations to install IR gas cloud imaging cameras. There are no hard and fast rules defining the optimum location to ensure proper gas detection. Nevertheless, the following general guidelines should be followed when installing the camera: 26 Second Sight TC • Avoid areas in which objects are known to move frequently, particularly when said objects occupy a large portion of the camera’s field of view • Avoid areas in which the contrast is poor • Point the camera downward so as to avoid direct sunlight • Install the camera on a stable surface • Avoid large obstructions in the field of view • Do not install a camera below a glass or plastic window or any other material that attenuates IR radiation 5.5 Field of View The lenses, along with the size of the FPA, determine the range and field of view (FOV). Second Sight uses a set of germanium lenses coated for optimum transmission in the long wave infrared region. The optics can be factory selected to provide a wider field of view at a shorter range of detection or a narrower FOV and a longer range (see options below): • 30° FOV for 1,000 meters range (standard factory setting) • 12° FOV for 2,000 meters range (optional) • 60° FOV for 500 meters range (optional) 5.6 Environmental Factors • Observe the ambient temperature range for the specific model – refer to Environmental Specifications. For outdoor installations or other areas exposed to intense, direct solar radiation, the detector may reach temperatures well above specifications. For this condition, a shade cover may be required to bring the detector temperature within specifications. As with any cover or object nearby, make sure the field of view of the detector is not obstructed. • Avoid conditions of ice build up on the optical detector windows. Complete icing-over of the IR window can result in fault conditions. 27 Second Sight TC 6.0 Use and Operation 6.1 Operational Principle In autonomous mode, the application runs automatically and loads the last configuration defined by the user. Events are indicated only by the lights and buzzer on the back of the detection head. In the remote operational mode, the operator can access (via the portable PC interface) the most complete data on the system’s status. One can view the visible or infrared video, perform adjustments, and consult the recorded data. 6.2 Presentation of the Remote Mode 6.2.1 Starting the Client Application When the head is turned on, the server application automatically runs and loads the last parameters used. Start up the laptop. Once the window session is opened, a shortcut on the screen called "Second Sight Client" is used to start the client software which connects directly to the head: Figure 22: Icon of Client Software on the Desktop When the connection is performed, the following screen is displayed: 28 Second Sight TC Figure 23: Remote Session Screen 6.2.2 Remote Connection to Second Sight Camera When the client software found a Second Sight camera on the Ethernet LAN, a camera appears on the map. To connect the laptop on this camera you must click on the green icon dedicated to this camera. A blue overlay will overcome the selected camera. This user friendly interface allows the user to choose the connected gas imaging system. The field of view depends in the image on the lens embedded in the camera. 29 Second Sight TC Figure 24: Different Connected Cameras If the connection is not made, take the following actions: • Check the Ethernet network cable connection between the detection head and the laptop. In the task bar (next to the clock) an icon indicates the status of this connection. Figure 25: Network in the Process of Connecting or Not Connected • Check the status of the detection head with the help of the indicator lights (see table paragraph 3.2). • Try a software reboot of the system by using the Start / Stop icon on the client software. • As a last resort, perform a “hard reboot” of the detection head, stopping it (“off” on the power supply unit) for a minimum of 30 seconds, then restart (“on” on the power supply unit). WARNING: Restarting must occur at least 30 seconds after stopping. 6.2.3 General Operational Indicators A series of status lights located in the right-hand corner of the graphical interface lets the user view the system status. The colors code is simple: • Hourglass: the system is in initialization mode. 30 Second Sight TC Figure 26: Hourglass Indicator • Grey: the system is ok but it is not in detection mode, or it is not connected, try to check the network cable. Figure 27: Grey Indicator • Green: the system is operating normally. The gas concentration measurement is valid. Figure 28: Green (Normal Operation) Indicator • Yellow (yellow exclamation point): the system is operating, but the measurement is not effective. Two possible reasons: Either the system is recalibrating the infrared camera, in which case the detection will restart after a few seconds, or the scene contrast is not sufficient for various possible reasons (bad weather, or because the infrared lens is dirty). Figure 29: Exclamation Mark Indicator • Red: When the system is in surveillance mode, a gas detection alarm is indicated by the red indicator. The alarm goes off when the gas level measured in the scene surpasses the alarm threshold. 31 Second Sight TC Figure 30: Alarm Gas Indicator 6.2.4 Command Buttons Command buttons are localized on the right hand of the main MHI. 6.2.4.1 Change the User The application offers the possibility to trace the system's users. For this, a login system with password allows for identifying the system's user. Click once on the login icon to modify the current user and access the login window. Figure 31: Login Icon and Login Window The login window is user level dependant; the administrator level can create new account, and the login window is the following: Figure 32: Login Window and Additional Icon A click on the icon opens a new window where the administrator can create (and remove) new accounts (ex. login, password, and level). 32 Second Sight TC Figure 33: Creation of New Account Window 6.2.4.2 Surveillance and Detection Mode You can use the button below to change the operational mode: active surveillance mode (detection) or standby mode without surveillance. It can take the two following aspects: Detection in progress. Click to stop detection Detection stopped. Click to launch detection Figure 34: Change Standby Mode or Detection Mode This action is user’s level dependant: • User level: Disable • Supervisor level: Enable 6.2.4.3 Zones Icon Figure 35: Zones Icon The Zones icon allows operators to create zones of interest in the infrared image. Each zone may be active (gas detection is done in this zone) or inactive (gas detection is not activated in this zone). This function is useful for inhibiting vehicle crossing zones, for example. On the infrared image we have the display of two things. First, a square grid, one can with the mouse (and enough user privilege) clicks on each square to change from active (clear transparent squares) to inactive (light green colored squares always displayed on the infrared image). Second, a light blue overlay on the infrared image, the supervisor can use it to identify and visualize the pixels with enough contrast. The blue overlay is computed by the system only in detection mode so this feature must be use with the detection active. The two functions are coupled so the green zones (inactive for the gas detection) are not blue. 33 Second Sight TC Figure 36: Active and Inactive Zones This action is restricted to users according to their security level. • User level: Disable • Supervisor level: Enable 6.2.4.4 Mute Buzzer Alarm The following button can be use by the operator to enable/disable the buzzer alarm on the camera. Figure 37: Mute Buzzer Icon This action is user’s level dependant: • User level: Disable 34 Second Sight TC • Supervisor level: Enable 6.2.4.5 Administrator Configuration Some software parameters can be defined by the administrator, a click on the icon open the window. Figure 38: Configuration Icon Figure 39: Configuration Window • Contrast threshold: This value is the minimum level of contrast to be able to have detection. The higher this value the better is the detection quality but with a lower number of valid points in the image. This value need to be balanced between good detection coverage (a lot of valid points) and a high level of false alarm. With a poor contrasted background this value can be set to 2, with a well contrasted background this value can be set to 5. A value under 3 will increase the false alarm rate. Default value: 3 • Gauge threshold: This value represent the minimum concentration level of an analyzed cloud, a value of X mean that we look for a cloud with a minimum concentration set to the alarm threshold divided by X. The higher this value the lower the minimum gas concentration takes into account. This value need to be balanced between a good detection of “small” cloud and an increase of the number of cloud (false alarm cloud) detected by the system. Default value: 1 • Confidant threshold: This value is the minimum confidant level to start an alarm. Default value: 100 • NUC interval: It’s the time (in minutes) between two consecutive Non Uniformity Correction (NUC) of the focal plane array of infrared detectors. Default value: 30 • Val Conf Min: This value is the minimum of the confident level to visualise the cloud (in false colour) in the image. 35 Second Sight TC Default value: 0.5 • Deviation: This value concerns the spectral correlation between the live signal and the recorded finger print in the data base. The higher this value the lower the selectivity of the spectral correlation. This value need to be balanced between a very precise identification of the finger print of the gas and a more tolerant detection of a mixed gas for example. The higher this value the higher the false alarm level of course. Default value: 0 • K: This value concerns the temporal aspect of the signal. To be detected a gas cloud must be present in K images over K+1. A high value of K decrease the false alarm rate, but also increase the response time before an alarm. Default value: 3 • Freeze background: This box is use to suppress the automatic zeroing of the signal. This zeroing is avoided automatically in case of alarm, so the system can follow the evolution of the moving (or not moving) cloud. Default value: non active At the first start the system will upload all the default setting. This action is user’s level dependant: • User level: Disable • Supervisor level: Disable • Administrator level: Enable 6.2.4.6 Gas Selection Click on a gas icon and the list of proposed gases will appear. A layer appears in the first column for each selected gas. Figure 40: Gas Icon Figure 41: List of Gases 36 Second Sight TC The Second Sight camera filters are configured for specific gas and the number of gas detection is based on the filters in the system. Only four gases in the list can be selected. When the system is in detection mode, the presence of gases in the field is display as an overlay image on the IR image. For each gas, the default value of the alarm threshold is in %LEL-m and illustrated in the second column. This value can be change by a click on the line. This action is user’s level dependant: • User level: Disable • Supervisor level: Enable 6.2.4.7 Camera Parameters Click on the camera parameter icon and the list of the camera characteristics will appear. Someone are user modifiable and other are factory define. Figure 42: Camera Parameters Icon Figure 43: Camera Window 37 Second Sight TC User defines parameters: • Identification number (useful if we have many camera in the same network) • Name of the camera (may be more explicit than a number) • Description of the camera, position, unity name… • Auto focus: Disable / Enable When the autofocus function is disabled and the detection mode is off, the following buttons appear in the screen and one can manually focus the camera. Figure 44: Manual Focus Buttons • Recorded data: Compressed (.avi file format) or Raw (proprietary format useful in case of troubleshooting) • Optional GPS installed or not • If no embedded GPS, field to feel with the geographical position of the camera (WGS84 format) • Optional compass installed or not • If no embedded compass, field to feel with the azimuth of the line of sight (° from the North, West = 270°) • Remote pan tilt installed or not • Field of view of the camera Factory defines parameters: • Date of the last maintenance • Firmware • Serial number • Model… All this parameters are useful in case of troubleshooting to well define the camera. This action is user’s level dependant: • User level: Disable • Supervisor level: Enable 38 Second Sight TC 6.2.4.8 Graphic Click on a graphic icon to open the graph window showing a graphic with the average concentration curves, of the gases measured over time. Figure 45: Graph Icon You can shrink, reset or expand the vertical and horizontal axes of the graph by using the mouse. Figure 46: Graph Window 6.2.4.9 Video Recorder Icon The Second Sight system will record a video file for each alarm. The factory setting is the file will start with the alarm and stop 2 minutes after the end of the alarm. Figure 47: Video Icon 39 Second Sight TC Figure 48: Video Recorder Windows The video recorder is an operation that allows the user to return to an alarm. Use the list to select an alarm. Three actions can be performed by the recording function: • Play • Delete (from the camera memory) • Import (record on the client laptop the video file) The different buttons are the standard commands of a video recorder: rewind, fast forward, play and stop. The RAW data tab is useful in case of troubleshooting. 6.2.4.10 Manual Record of a Video File Click on a record icon will open the following windows: Figure 49: Record Video Icon 40 Second Sight TC Figure 50: Recording Mode (Red Square) This allows the user by clicking on the button to record an .AVI file of the infrared field of view as it is presented in the HMI (with the gas cloud in false colors). It is the same button, to record Raw Data, when the Raw Data mode is selected. 6.2.4.11 Shutting Down the Camera Click on the stop icon will shut down the system. Figure 51: Stop Icon A warning popup will ask you a confirmation. Figure 52: Confirmation Popup 41 Second Sight TC If you press Yes: This will stop the camera and the embedded software. When the user tries to close the application the system saves the necessary parameters and closes the cover in order to protect the lens. To restart the system the user must perform what we have call before a “hard reboot” of the detection head, stopping it (unplug the power supply unit) for a minimum of 30 seconds, then restart (plug the power supply unit). If you press No: The embedded computer and software will restart. This action is what we have call before a “software reboot.” If you press Cancel: you cancel the action. This action depends on the user’s level of security: • User level: Disable • Supervisor level: Enable 6.2.5 Log Tab Use the log window to consult the various events recorded by the application. Events include change of mode, detection alarm, periodic calibrations, status notification, and user login. Figure 53: “Log” Window Example A right click of the mouse on the log zone will show you some option to save and import the text file. 6.2.6 Peripherals Indicator Lights The Second Sight system automatically checks the embedded elements in the instrument such as internal temperature probes. A series of status lights located at the bottom of the graphical user interface lets the user view the state of these various peripherals. Figure 54: Peripheral Indicator Lights 6.2.6.1 IR Sensor Status Indicator The indicator normally is green. If it light red, it means that the system's infrared sensor has encountered a problem. Figure 55: Infrared Sensor’s Status Indicator 42 Second Sight TC 6.2.6.2 Status Indicator for the Focusing and Lens Cover Command The indicator normally is green. If it light red, it means that the system's focusing or lens cover command has encountered a problem. Figure 56: Status Indicator for the Lens Cover Command 6.2.6.3 Temperature Sensor Status Indicator The indicator normally is green. If it light red, it means that the system's internal temperature sensors are out of range or defective. Figure 57: Temperature Sensor’s Status Indicator 6.2.6.4 Status Indicator of the Filter Wheel Command The indicator normally is green. If it light red, it means that the system's filter wheel’s driver has a defect. Figure 58: Status Indicator of the Filter Wheel 6.2.6.5 Power Supply Status Indicator The indicator normally is green. If it light red, it means that the system's power supply has not enough voltage. Figure 59: Power Status Indicator 43 Second Sight TC 6.2.7 Image block Status Indicator The “Image block…” cursor gives an indication of the percentage of pixels in the image where the measurement of the gas concentration is considered by the system as “valid.” If this percentage falls below a certain threshold, the system is no longer apt to give an accurate measurement of the gas concentration in the image. The indicator normally is green; it means that we have enough valid point in the image. If it light yellow, it means that we have low valid point in the image, but the detection still work. If it light red, it means that we have not enough valid point in the image and the detection is no longer possible. This status will be indicated to the user by a change of the general operational indicator. Figure 60: Image Block Bar Graph When the image block indicator is red the gas detection is not operational and the yellow indicator light turns on. Figure 61: Non-accurate Measurement Indicator Light 6.2.8 Count Down Before Calibration The “Time before calibrating the IR camera” gives an indication of the time that remains before the system makes a new calibration of the infrared camera (NUC). This occurs every thirty minutes and the calibration lasts less than 40 seconds. During this time the gas detection is not operational and the yellow indicator light turns on. Figure 62: Countdown before Calibration 6.2.9 Map Display We can see on the map the position of the camera and the field of view. The position (and the line of sight) and the field of view can be defined manually in the camera characteristic window. 44 Second Sight TC Figure 63: Map Display A click on the map zone will ask you if you want to add a map. Then the software will ask you an image in JPEG format and you have to feel the geographical coordinates (WGS84 format) of the 2 opposites angles (top right and bottom left) of the image. So this action is user’s level dependant: • User level: Disable • Administrator level: Enable 6.2.10 About When you press the F1 button on the keyboard, the following windows appear: 45 Second Sight TC Figure 64: About Second Sight Client Software A click on the OK button will close this window. 46 Second Sight TC 7.0 Installing Client Software 7.1 Installation Guidelines 7.1.1. Action #1: Uncompress the Software Create a new folder. Figure 65: Create a New Folder Name it as C:\Program Files\SecondSightClient Figure 66: New Second Sight Client Empty Folder Uncompress in this new folder the SecondSightClient.zip file. 47 Second Sight TC Figure 67: Second Sight Client Folder Create a shortcut on the Desktop of the SdSclient file. With a right click of the mouse choose “send to Desktop’ (create shortcut). Figure 68: Create a Shortcut On the desktop rename the shortcut as SdSClient. 48 Second Sight TC Figure 69: SdSClient Shortcut Icon on the Desktop 7.1.2. Action #2: Installation of the XviD Codec To be able to read the recorded and compressed alarm video file the system need the XviD Codec. Install the XviD video codec by launching the installation wizard. Figure 70: The XviD Final Installer Follow the instruction by clicking on next and finish. The wizard will automatically create an XviD folder. 7.1.3. Action #3: Installation of the Microsoft Framework V2.0 The Second Sight Client Software needs the Microsoft Framework V2.0 (or higher). Install the framework V2.0 tools (Microsoft Corporation) by launching the installation wizard. Figure 71: The Framework Express Setup 49 Second Sight TC Follow the instruction by clicking on next and finish. The wizard will automatically create a Framework folder. Figure 72: Last Screen of the Framework 2.0 Installation At this step, all the needed software is installed. 7.1.4. Action #4: Network Parameter To have a good communication between the laptop and the Second Sight TC camera we need to control some parameter of the Ethernet network. Open the local Area Connections Properties windows. Figure 73: Local Area Connections Properties Windows 50 Second Sight TC Select the Internet Protocol TCP/IP click on properties. Select “Use the following IP address.” Manually write the IP address: 172.16.100.xxx (1 < xxx < 255) except the value of the camera’s serial number and manually write the subnet mask: 255.255.224.0. Then click on “OK.” 7.2 Firewall and Network Parameters 7.2.1 Action #5: Firewall Parameter If the client laptop uses the Windows firewall we have to add some exceptions. 51 Second Sight TC Figure 74: Firewall Window Select the Exceptions tab. Figure 75: Firewall Exceptions Tab Click on the “Add Program…” button, and browse the folder to select the SdSClient.exe software. 52 Second Sight TC Figure 76: Selection of SdSClient Software After adding the Second Sight Client Software selects it in the list. Figure 77: Selection of Exceptions Software Now the Second Sight Client software can discuss thru the Windows Firewall with the camera server software. 7.2.2. Action #6: Create a Remote Drive In the “My Computer” windows select in the “Tools” menu the “Map Network Drive…” tab. 53 Second Sight TC Manually fill the lines Drive: Z: and Folder: \\172.16.100.xxx\Log$, where “xxx” represent the serial number of the Second Sight camera. Then click “Finish.” Figure 78: Mapping Network Drive Z: 7.3. SdSClient First Use 7.3.1. Action #7: Create Administrator Account When a user launches the Second Sight client software for the first time, he must create an administrator account. To create this account, please enter a login name, a password, and the password confirmation. When done, press the “Add” button. 54 Second Sight TC Figure 79: Create Administrator Account The installation and the parameterization of the Second Sight Client Software are now finished and it is ready to work. 55 Second Sight TC 8.0 Modbus Interface The following picture shows the Second Sight TC camera: Figure 80: Second Sight TC All the connectors are on the rear face of the camera. Ethernet RJ45 Auxiliary Power connector Figure 81: Back View of Camera 8.1. Ethernet RJ45 Socket The Ethernet socket is a SOURIAU RJF21G. This connector is compatible with a normal RJ45 cable, but to insure the sealing of the connection one must use with a SOURIAU 8500-06D or SOURIAU RJF6x. The communication link uses a Modbus TCP/IP protocol. The infrared images are sending in binary mode on the TCP/IP link in JPEG format, the flux is one image by second. The LOG files are sending with a CIFS protocol. 56 Second Sight TC The client software is able to automatically detect the camera on the network thanks to a UDP protocol. 8.2. Auxiliary Socket The auxiliary socket is a SOURIAU UTOW01210SH6. This connector must be use with a SOURIAU 85106RC1210P50. The following picture describes the pin of the auxiliary connector: Figure 82: Pin of the Auxiliary Connector The table describes the wiring of this connector: Pin Use Affectation A 5V B D+ USB USB port for maintenance purpose C D- D GND E TX+ F G RS232 / RS422 / RS485 TX- / GND RX+ H RX- / GND J NC SPARE K Description Factory define RS232, RS422 or RS485 for optional communication like the remote controlled pan tilt Reserved pins NC Figure 83: Wiring of the Auxiliary Connector 57 Second Sight TC 8.3. Communication Protocol 8.3.1. IP Video Link The Second Sight camera sends pictures (384 x 272 pixels) in the Jpeg standard compressed format. The frequency is about 2 Hz. The transmission use the TCP/IP protocol (Port #5000, can be modified). Information on the gas cloud is incrusted in the image (Name, Confidence level, Time…). Figure 84: Infrared Image 8.3.2. Identification Protocol (UDP) Between Client and Server When connected, the client software periodically sends a frame request on the network (port #532, can be modified). This message contains “SECONDSIGHT_CLIENT” followed by a 16 Bytes key. If a camera receives this message, it sends back a frame “SECONDSIGHT_SERVER” followed by a modified 16 Bytes key. This 16 Bytes key is the way to secure the connection between the two systems. 8.4. Modbus IP 8.4.1. ModbusProtocol The Modbus protocol is used to establish a communication in a “client – server” mode on the Ethernet TCP/IP network. There are 4 different types of messages: Request Confirmation Indication Response 58 Second Sight TC Figure 85: Modbus Link The “Request” is the frame sends by the client to start to communication. The “Indication” is the request receives by the server. The “Response” is the frame sends by the server. The “Confirmation” is the response receives by the client. The Modbus protocol (client / Server) is used for real time information exchange. When the Modbus protocol is used on a TCP/IP network, the frame is encapsulated as: Figure 86: Modbus TCP/IP Encapsulated Frame The MBAP header contains: Champ Size Description Client Server Transaction identification 2 Bytes Identification number of the Request / Response Init by the client Send by request to the client Protocol identification 2 Bytes 0 for the Modbus protocol Init by the client Send by request to the client Size 2 Bytes Size in Byte of the frame Init by the client Send by request to the client Distant system identification 1 Byte Distant system identification Init by the client Send by request to the client Figure 87: MBAP Header 59 Second Sight TC 8.4.2. Functions Codes In the case of Second Sight the Function Codes are: Function Code # Description 8 Communication link status 21 Read of the camera ID 6 Send an order 3 Read of the system parameters 5 Read of the detection parameters 16 Write of the system parameters 15 Write of the detection parameters 4 Read of the system status 9 Read of the zones of interests 17 Write of the zone of interests Figure 88: Function Codes The first address is 0x0001. 8.4.3. Identification Function code #21, read access. This information is in an integer 16 bits format. The following table shows all the available parameters: Address Functions Status 1 ID number of the camera Integer 16 bits 2-3 Server software version 4 Bytes 4-5 Detection software version 4 Bytes 6-7 Infrared camera driver version 4 Bytes 8-9 Mechanical driver version 4 Bytes 10-11 Filter wheel driver version 4 Bytes 12-13 Modbus communication version 4 Bytes 14 Serial number of the camera Integer 16 bits format 15 Second Sight model Fixed to 2 Figure 89: Identification Parameters 60 Second Sight TC 8.4.4. Commands Function code #6, write access only. This function code is used by the client to send command to the camera; these commands are in an Integer 16 bits format. The following table shows all the available commands: Address 1 Functions Status Shut down or sleeping mode of the camera 0: Shut down the camera 1: Sleeping mode 2: Restart the camera 2 Start or stop the detection 0: Stop the detection 1: Start the detection 3 0: Move backward of X steps 5 Manual focus 1: Move forward of X steps 4 Start an automatic search of the best focus 0: Search on the whole position 5 Black out, for discretion purpose No parameters 6 Remote control of the optional pan tilt 1: Upward rotation at 1°/s 1: Fine search around the actual position 2: Right rotation at 1°/s 3: Left rotation at 1°/s 4: Downward rotation at 1°/s 5: Stop moving 7 Record of the video file 0: Off 1: On Figure 90: Available Commands 8.4.5. System’s Parameters Function code #3, read access. Function code #16, write access. These parameters are in an Integer 16 bits format. The following table shows all the available parameters: 5 The X number of moving steps is define in the system’s parameters. 61 Second Sight TC Address Functions Status 1 Number of step for the focusing motor Integer 16 bits 2 Auto focus 0: Off 1: On 3 Buzzer 0: Off 1: On 4 Light 0: Off 1: On 5 GPS available 0: No 1: Yes 6 Compass available 0: No 1: Yes 7 Motorized pan tilt 0: No 1: Yes 8 File format for data record 1: Compressed AVI files format 2: Raw data 9 Horizontal field of view 12°, 30° or 60° 10-13 Longitude 4 integers (16 bits) example 04°07'53" E 14-17 Latitude 4 integers (16 bits) example 43°17'32" N 18 Azimuth Integer (16 bits) in ° from the North (0° for the North and 90° for the East) Figure 91: System’s Parameters 8.4.6. Detection’s Parameters Function code #5, read access. Function code #15, write access. These parameters are in an Integer 16 bits format. 8.4.7. Status Functions code #4, read access only. These function code are used by the client software to know the status of the Second Sight camera, in 16 bits integer format. The following table shows all the available commands: 62 Second Sight TC Address 1 Function Status General status of the camera 1: Init 2: Focusing in progress 2: Non Uniformity Correction in progress 3: System ready detection stopped 4: Detection mode 5: Alarm Negative value for default (see the annex #1 for error code) 2 IR detector status 0: IR detector Ok -1: Com default -2: Sensibility default -3: Time default -4: Temperature default -5: Memory default 3 Pilot motor board status (Focus and Black body) 0: Board Ok -1: Com default -2: Black body default -3: Focus default -4: Front switch default -5: Back switch default 4 Pilot of the filter wheel 0: Board OK -1: Com default -2: Init or zero default -3: Motor default -4: Temperature default 5 GPS status 0: GPS Ok 1: Uninstalled GPS -1: Com default -2: Positioning default 6 Compass status 0: Compass Ok 1: Uninstalled compass -1: Com default 63 Second Sight TC Address 7 Function Status Remote pan tilt status 0: Remote pan tilt Ok 1: Uninstalled pan tilt -1: Com default -2: Position default 8 CPU board status 0: CPU Ok -1: Storage media E: default -2: Temperature default -3: Insufficient memory default -4: Computing time default 9 Compass azimuth Integer (16 bits) in ° from the North (0° for the North and 90° for the East) 10 IR detector temperature Integer 16 bits format, in degree Celsius 11 Pilot of the temperature Integer 16 bits format, in degree Celsius 12 Horizontal position of the remote pan tilt Integer 16 bits format 13 Vertical position remote pan tilt Integer 16 bits format 14 Detection in progress filter wheel of the 0: Detection Off 1: Detection On 15 Video file recording 0: Record Off 1: Record On 16-19 Time & date of the system Clock ticks number corresponding to the date. Integer 64 bits format 20 Detector sensibility Integer 16 bits format 21-22 Time before the next Non Uniformity Correction Integer 32 bits format in seconds 23-26 Longitude (GPS) 4 Integers 16 bits format (04°07'53" E) 27-30 Latitude (GPS) 4 Integers 16 bits format (43°32'38" N) 31 System black out 0: Off 1: On 33-96 Gases detection results (up to 32 gases) Integer 32 bits format for each gases corresponding to the estimate concentration. 97-130 Detection confidence (up to 32 gases) Integer 32 bits format for each gases 64 Second Sight TC Address 131-164 Function Status Gas alarm (up to 32 gases) For each gases: 0: No alarm 1: Alarm On Figure 92: Status 8.4.8. Zones Function code #9, read access. Function code #17, write access. These function code are used by the client software to know the inhibited zones or to define the inhibited zones, in 16 bits integer format. The zone is an area of 24 raw and 17 lines. The following table shows all the available commands: Address 0x0001- Functions Status Zones 0: Detection On 0x0199 1: Detection Off Figure 93: Inhibited Zones 8.4.9. CIFS Protocol This protocol is use for the share of the: Event recorded in the log file Alarm video file. All the events and the video alarms files are recorded in a log file, they are accessible in a read only access mode from the client software (thank to a network share of the files). 8.4.9. Video Alarms Files The shared directory inside the camera with all the recorded video files is in read and suppress access mode thanks to the client software. This directory contains also a text file describing all the video and alarms files. 8.4.10. Log File In the same way, the log file is accessible only by the client software in a shared directory. 65 Second Sight TC 8.5. Annex 1 Error codes Signification -1 Infrared detector default -2 Focus or external flap driver default -3 Filter wheel driver default -4 GPS default -5 Compass default -6 Remote pan tilt default -7 Processor default -8 Black body flap motor default -9 Focusing motor default -10 Power supply default -11 Low batteries level Figure 94: Error Codes 66 Second Sight TC 9.0 Maintenance and Warranty 9.1. Maintenance The system requires low maintenance. The Second Sight TC camera is fitted with an auto calibrating feature. Every 30 minutes, a 30 second auto calibration takes place. The system's internal software computes the calibration parameters with a black body (external flap). During this auto calibration, the system is inhibited. Seven potential faults are permanently monitored: • Infrared camera • Filters wheel • Calibration black body (flap) • Focusing system • Internal temperature • Contrast of the image Figure 95: Non-accurate Measurement Indicator Light If the system is permanently in “contrast fault,” the lens must be cleaned. A visual check of the windows has to be done from time to time depending on the amount of dust in the environment. Once a year, the IR gas cloud imaging system must be serviced for maintenance. The service can be performed either at the factory, or upon consultation with Bertin, at the place of installation. The following tasks are performed as part of routine maintenance: • Cleaning of all the internal optics (lenses, filters and IR detector) • Inspection of the infrared window • Inspection of the cooling fan • Change of internal desiccant • Check the system fault diagnostic Any of the inspected parts above will be replaced if found excessively worn or defective. 67 Second Sight TC In most countries it is illegal to dispose of the battery with other garbage. General Monitors has a Recycle Program in place to recycle the used batteries. NOTE: The removal of particulate matter and any film buildup on the external windows is necessary to ensure proper sensitivity of the system. It is recommended that the windows be cleaned at least every 30 days if the detector is located in a particularly dirty environment. 9.2. Obtaining Service The Second Sight TC IR gas cloud imaging camera contains no user serviceable parts. To obtain information regarding factory service, contact General Monitors or your General Monitors representative. Please have the following information available: • Instrument model number (on the nameplate) • Instrument serial number (on the nameplate) • Description of the problem 9.3. Warranty Caution: There are no user serviceable parts inside Second Sight TC. Work performed by persons not authorized by Bertin Technologies or General Monitors will void the warranty. Bertin Technologies warrants the Second Sight TC IR gas cloud imaging camera to be free from defects in workmanship or material under normal use and service within one year from the date of shipment. Bertin will repair or replace without charge any equipment found to be defective during the warranty period. Full determination of the nature of, and responsibility for, defective or damaged equipment will be made by Bertin personnel. Defective or damaged equipment must be shipped prepaid to Bertin or the representative from which shipment was made. In all cases, this warranty is limited to the cost of the equipment supplied by Bertin. The customer will assume all liability for the misuse of this equipment by its employees or other personnel. All warranties are contingent upon proper use in the application for which the product was intended and do not cover products which have been modified or repaired without Bertin’s approval or which have been subjected to neglect, accident, improper installation or application, or on which the original identification marks have been removed or altered. Except for the express warranty stated above, Bertin disclaims all warranties with regard to the products sold, including all implied warranties of merchantability and fitness and the express warranties stated herein are in lieu of all obligations or liabilities on the part of Bertin for damages including, but not limited to, consequential damages arising out of / or in connection with the use or performance of the product. 68 Second Sight TC 10.0 Troubleshooting Guide The following table lists potential problems that can affect the Second Sight TC camera. Follow the individual steps to pinpoint and define circuit ailments. This section is intended to be a guide in correcting problems which may arise in the field. General Monitors should be contacted for assistance if the corrective action listed does not eliminate the problem. Condition Possible Solution The Second Sight system does not start The boot procedure takes about 30 seconds. Wait until camera finishes the booting sequence. Check the power supply cable and the power supply. Camera appears to operate normally, but the HMI does not appear in the PC Check Ethernet cable is properly connected to PC and detection head, check in the taskbar of the computer desktop whether network is connected, and check if IP address conflicts with that of the PC. If connection problem persists, start a new session. All status indicators in HMI interface are blinking Stop and restart the Second Sight software (soft reboot). Otherwise, try to shut down the system with the power supply, wait for 30 seconds, and restart camera (hard reboot). The temperature sensor status indicator is blinking The heat sink and the fan may be dirty. If this is the case, clean heat sink and fan. The heat sink and the fan should be cleaned regularly. The temperature sensor or the fan may be defective. Call Bertin Technologies or assigned representative for repair. Orange indicator is on The system is in self-calibrating mode. Wait for 30 seconds. Check the IR window – a dirty window produces low contrast in the image. If the field of view doesn’t have enough contrast, try changing the angle of the camera or its location. The system displays a fuzzy image Check the IR window and clean it. If focus is not sharp then stop the detection and restart the camera. The internal auto focusing system will fix the problem. Otherwise, call Bertin Technologies or assigned representative for repair. 69 Second Sight TC I see clouds or spots in the HMI screen, but the camera is not alarming Check whether relevant gases have been selected for gas detection. Appearance of small spots or flashes of color on the screen are no indication that a gas cloud is present. The camera determines alarm condition by averaging gas concentration across a selected zone. Thus, the size and the place of the zone of interest are very important. Call Bertin Technologies or assigned representative for assistance in the design of the zones. I cannot change or select new gases in the gas selection table When the system is in detection mode, one cannot change the selected gases. In order to reconfigure the camera, stop the detection and select a new gas in the selection table. A user must have the appropriate user authorization to add or remove gases to be detected from the list. I know that gas clouds are present in the field, but the camera is not alarming Check whether relevant gases have been selected for gas detection; ensure all tile zones are active; check the value of the alarm threshold. Instrument no longer saves video images Check available hard drive space. If disk is full, save files to external disk. If sufficient memory space is available, call Bertin Technologies or assigned representative for assistance Instrument constantly alarms even if there is no gas in the field Inspect the background to see if there is any moving object near camera. Avoid large moving objects in the field of view or reconfigure the detection zone to avoid the moving object. Table 2: Troubleshooting Table 70 Second Sight TC 11.0 Customer Support General Monitors’ Offices Area UNITED STATES Phone/Fax/Email Corporate Office: 26776 Simpatica Circle Lake Forest, CA 92630 Toll Free:+1-800-446-4872 Phone: +1-949-581-4464 Fax: +1-949-581-1151 Email: [email protected] 9776 Whithorn Drive Houston, TX 77095 Phone: +1-281-855-6000 Fax: +1-281-855-3290 Email: [email protected] UNITED KINGDOM Heather Close Lyme Green Business Park Macclesfield, Cheshire, United Kingdom, SK11 0LR Phone: +44-1625-619-583 Fax: +44-1625-619-098 Email: [email protected] IRELAND Ballybrit Business Park Galway Republic of Ireland Phone: +353-91-751175 Fax: +353-91-751317 Email: [email protected] SINGAPORE No. 2 Kallang Pudding Rd. #09-16 Mactech Building Singapore 349307 Phone: +65-6748-3488 Fax: +65-6748-1911 Email: [email protected] MIDDLE EAST LOB12, #G20 P.O. Box 61209 Jebel Ali, Dubai United Arab Emirates Phone: +971-4-8143814 Fax: +971-4-8857587 Email: [email protected] Other Sources of Help General Monitors provides extensive documentation, white papers, and product literature for the company’s complete line of safety products. Many of these documents are available online at the General Monitors website at http://www.generalmonitors.com. 71 Second Sight TC 12.0 Appendix 12.1. Specifications Type: LWIR infrared camera Technology: Un-cooled micro bolometer detector Spatial resolution: 384 x 272 pixels Spectral range: 8 to 14 µm Spectral resolution: Up to 6 infrared filters Horizontal field of view: 30° (12° and 60° optional) Detection in the field: Update less than 2 seconds Detection less than 8 seconds Sensitivity: Methane: 0.1 LEL-m Propylene: 0.1 LEL-m Butane: 0.3 LEL-m Propane: 0.5 LEL-m Dimensions of the analysis head: 670 x 280 x 330 mm3 Weight of the detection head: 18 kg Temperature range in use: -10°C to +55°C (+14°F to +131°F) Temperature range in storage: -20°C to +60°C (-4°F to +140°F) Power supply: 220 V / 50 Hz – 100 W HMI by portable PC Possibility of operating several detection heads in the sensor network (Ethernet) 12.2. Software Version This version of the user manual is compliant with the Second Sight TC Client software version 1.3.0.8 72 Second Sight TC 12.3. Power Supply Specifications Input Specifications: Input voltage: nominal 100 – 240 VAC – AC range 85 – 264 VAC Input frequency: 47 – 63 Hz Harmonic limits EN 61000-3-2, Class A Input current at full load (typ.): 1.0 A @ 230 VAC, 2.0 @ 115 VAC Output Specifications: Output voltage adjustable range: 24 – 28 VDC Output regulation (10 to 90% load variation): 2.5% Ripple and noise (20 MHz bandwidth): < 50 mV peak to peak Electronic short circuit protection current limitation at 110 % typ. (automatic recovery) Output over voltage protection <40 V Hold-up time: > 20 ms General Specifications: Operating temperature range: -40 °C to +85°C Power de-rating: above + 60 °C 2.0 %/K Humidity: up to 100% RH with condensation Reliability (calculated MTBF according IEC 61709): > 900,000 h @ 40°C Safety Standards: Information technology equipment: IEC/EN 60950-1 Control equipment for hazardous location: UL 1604 (Class I, Division 1 & 2, group A, B, C & D, T4) Electrical equip. for potentially explosive atmospheres: IEC/EN 60079-15 (Class I, Zone 2, EEx nA IIC T4) Industrial control equipment: UL 508 Electrical equipment for machines: EN 60204-3 Electronic equipment for power installation: EN 50178 Safety transformers: EN 61558-2-8 Safety Approvals and Certifications: CB report: IEC/EN 60950-1 UL: UL 508 listing, UL 1604 IEC: ATEX, IECEx scheme Case dimensions: Case protection: IP 67 (IEC 60529), NEMA 4X rated, UL 50 Enclosure material: die-cast aluminum Size: 174 mm x 93 mm x 56 mm (6.85” x 3.66” x 2.20”) Weight: 1,000g (35.3 oz) 73 Second Sight TC 12.4. Regulatory Agency Approvals Regulatory Agencies The IR camera is certified by the following regulatory agencies: • CE Mark • CSA (CAN/CSA-C22.2 No. 61010.1-04 and UL Std. No. 61010-1 (2nd Edition)) Classification Area and Protection Methods Second Sight TC is certified as follows: • Protection Method Not applicable • Area Classifications General use, non-hazardous locations Conforms With Electromagnetic Compatibility Directive (89/336/EEC) ADDENDUM Product Disposal Considerations This product may contain hazardous and/or toxic substances. EU Member states shall dispose according to WEEE regulations. For further General Monitors’ product WEEE disposal information please visit: www.generalmonitors.com/customer_support/faq_general.html All other countries or states: please dispose of in accordance with existing federal, state and local environmental control regulations. 74