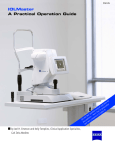
1
DGH 6000 (SCANMATE-A) ULTRASONIC A-SCAN A Scanmate DGH 6000 OPERATOR’S MANUAL For Use with Scanmate Software v3.0.0 Equipment Manufactured By Authorized Representative DGH TECHNOLOGY, INC. EMERGO EUROPE 110 SUMMIT DR IVE SUITE B EXTO N, PA 1934 1 USA (6 10) 594 -9100 Page 1 of 121 EC REP Molenstraat 15 2513 BH, The Hague The Netherlands Phone: +31.70.345.8570 6000-INS-OMENG Rev. 2 Page 2 of 121 6000-INS-OMENG Rev. 2 TABLE OF CONTENTS GENERAL DEVICE DESCRIPTION................................................................................ 7 DEVICE CLASSIFICATION ............................................................................................. 8 INDICATIONS FOR USE .................................................................................................. 8 WARNINGS AND CAUTIONS ........................................................................................ 8 4.1 Meaning of Signal Words ............................................................................... 8 4.2 Device Labels ................................................................................................. 9 4.3 Description of Symbols .................................................................................. 9 4.4 General Cautions and Warnings ................................................................... 10 5 PRESCRIPTION DEVICE STATEMENT ...................................................................... 11 6 OPERATOR QUALIFICATIONS ................................................................................... 11 7 USE OF ULTRASOUND IN OPTHALMIC MEASUREMENTS .................................. 11 7.1 Introduction to Ultrasound ............................................................................ 11 7.2 Using Ultrasonic Signals to Ascertain Correct Probe Alignment................. 12 7.3 Ultrasonic Measurement ............................................................................... 14 8 ULTRASONIC EXPOSURE AND INTENSITIES ......................................................... 16 8.1 Tissue Exposure to Ultrasound Energy ........................................................ 16 8.2 Ultrasonic Intensities .................................................................................... 16 9 BIOMETRIC MEASUREMENT CAPABILITIES.......................................................... 17 10 SOFTWARE INSTALLATION INSTRUCTIONS ......................................................... 17 10.1 Automatic Launching of the Installation Program........................................ 19 10.2 Manual Launching of the Installation Program ............................................ 19 10.3 Welcome Screen ........................................................................................... 19 10.4 Setup Configuration ...................................................................................... 20 10.5 .NET Framework Installation ....................................................................... 21 10.6 SQL Server ................................................................................................... 21 10.7 Crystal Reports Installation .......................................................................... 23 10.8 DGH Scanmate Drivers ................................................................................ 24 10.9 DGH Scanmate Installation .......................................................................... 26 10.10 DGH Scanmate License Agreement Window .............................................. 27 10.11 Selecting an Installation Folder .................................................................... 27 10.12 Installation..................................................................................................... 28 10.13 Database Configuration ................................................................................. 29 11 INSTALLATION OF SCANMATE DRIVERS............................................................... 33 11.1 Connecting USB Interface Module................................................................ 33 11.2 Found New Hardware Wizard ....................................................................... 33 11.3 Automatically Install Drivers......................................................................... 34 11.4 Windows Logo Testing .................................................................................. 34 11.5 Complete Installation of Drivers.................................................................... 35 11.6 Further Driver Installation ............................................................................. 35 12 STARTING THE SCANMATE SOFTWARE ................................................................. 36 12.1 Launching the Application............................................................................. 36 12.2 Splash Screen ................................................................................................. 36 12.3 Login Screen .................................................................................................. 36 12.4 No USB Devices Detected Warning .............................................................. 37 1 2 3 4 Page 3 of 121 6000-INS-OMENG Rev. 2 13 CONFIGURING THE SCANMATE SOFTWARE ......................................................... 38 13.1 System Preferences ....................................................................................... 38 13.2 Operator Preferences ..................................................................................... 41 13.3 Doctor Preferences ........................................................................................ 43 13.4 Configuring Custom Velocities .................................................................... 45 13.5 Adding IOLs to the Database ........................................................................ 46 13.6 Personalizing Lens Constants ....................................................................... 48 13.6.1 Overview ....................................................................................................... 49 13.6.2 Procedure ...................................................................................................... 50 14 THE PATIENT DATA SCREEN ..................................................................................... 53 14.1 Patient Data Screen Controls ........................................................................ 53 14.2 Entering a New Patient ................................................................................. 54 14.3 Searching for a Patient .................................................................................. 55 14.4 Editing a Patient Record ............................................................................... 55 14.5 Creating a New Procedure ............................................................................ 56 14.6 Entering Pre-Operative Data ......................................................................... 56 14.7 Entering Post-Operative Data ....................................................................... 56 15 THE A-SCAN SCREEN ................................................................................................... 58 15.1 Selecting the Operator ................................................................................... 58 15.2 Selecting the Lens and Vitreous Type .......................................................... 58 15.3 Selecting OD or OS ...................................................................................... 59 15.4 Selecting Automatic Stop versus Manual Stop Mode .................................. 59 15.5 Automatic Measurement Mode..................................................................... 59 15.6 Manual Measurement Mode ......................................................................... 59 15.7 Selecting Immersion or Contact Measurement Modes ................................. 61 15.8 Setting the Corneal Compression Sensitivity ............................................... 61 15.9 Performing a Contact Measurement ............................................................. 62 15.10 Performing an Immersion Measurement ...................................................... 65 15.11 Saving a Measurement File ........................................................................... 69 15.12 Saving a Video Buffer .................................................................................. 69 15.13 Reviewing Measurements ............................................................................. 69 15.14 Review Video of Exam ................................................................................. 69 16 THE B-SCAN SCREEN ................................................................................................... 70 17 THE IOL CALCULATOR SCREEN ............................................................................... 71 17.1 IOL Calculator Screen Controls.................................................................... 72 17.2 Patient Information ....................................................................................... 72 17.3 Selecting the Doctor ...................................................................................... 72 17.4 Eye Selection ................................................................................................ 72 17.5 Post Refractive Selection .............................................................................. 73 17.6 Measurement Source ..................................................................................... 73 17.7 Corneal Refractive Index .............................................................................. 73 17.8 Corneal Power (K1 and K2) ......................................................................... 74 17.9 Desired Refraction ........................................................................................ 74 17.10 Selecting IOLs .............................................................................................. 74 17.11 Selecting IOL Power Calculation Formulas ................................................. 74 17.12 Selecting Personalized Lens Constants ......................................................... 75 17.13 K Correction Method Selection .................................................................... 75 Page 4 of 121 6000-INS-OMENG Rev. 2 17.14 IOL Calculator Outputs................................................................................. 75 17.15 Saving Pre-Operative Data ........................................................................... 75 17.16 Post Refractive Calculation Methods............................................................ 76 17.17 Using the Post Refractive Calculator ............................................................ 79 17.18 Performing IOL Calculations ........................................................................ 81 17.19 Overview of IOL Power Calculation Formulas ............................................ 82 17.20 Factors Impacting the Accuracy of IOL Power Calculations ....................... 83 18 CREATING REPORTS .................................................................................................... 85 18.1 IOL Calculator Report .................................................................................. 85 18.2 A-Scan Short Report ..................................................................................... 85 18.3 A-Scan Custom Report ................................................................................. 85 18.4 Using Reports ............................................................................................... 86 18.5 Saved Reports ............................................................................................... 87 19 DATABASE MANAGEMENT ........................................................................................ 88 19.1 Backing Up the DGH-Scanmate Database ................................................... 88 19.2 Restoring the DGH-Scanmate Database ....................................................... 89 19.3 Copying or Moving the Database ................................................................. 91 19.4 Deleting a Database ...................................................................................... 93 19.5 Attaching an Existing DGH-Scanmate Database to a DGH Database Server ........................................................................................................... 94 19.6 Importing and Exporting Data ...................................................................... 97 19.7 Configuring Firewall for DGH Database Server .......................................... 98 20 ELECTROMAGNETIC COMPATIBILITY .................................................................. 105 21 CARE AND MAINTENANCE ...................................................................................... 106 21.1 Care of Transducer...................................................................................... 106 21.2 Cleaning and Disinfecting the Transducer Tip ........................................... 107 21.3 Cleaning and Disinfecting the Immersion Shell ......................................... 110 21.4 Care of USB Interface Module ................................................................... 110 21.5 Cleaning the USB Interface Module ........................................................... 110 21.6 Operating Conditions .................................................................................. 110 21.7 Verifying A-Scan Calibration ..................................................................... 110 21.8 Storage ........................................................................................................ 111 21.9 Transportation ............................................................................................. 112 21.10 Disposal....................................................................................................... 112 22 TROUBLESHOOTING .................................................................................................. 113 23 WARRANTY .................................................................................................................. 115 24 LIFETIME / SHELF-LIFE.............................................................................................. 115 25 CUSTOMER SERVICE ................................................................................................. 116 APPENDIX A COMPUTER SYSTEM SPECIFICATIONS............................................. 117 APPENDIX B SCANMATE-A SPECIFICATIONS ......................................................... 118 APPENDIX C REFERENCES ........................................................................................... 119 APPENDIX D TERMS AND ABBREVIATIONS ............................................................ 121 Page 5 of 121 6000-INS-OMENG Rev. 2 Page 6 of 121 6000-INS-OMENG Rev. 2 1 General Device Description The DGH 6000 is a diagnostic ultrasound device used by professionals in the ophthalmic field to perform axial length (AXL), anterior chamber depth (ACD), and lens thickness (LT) measurements of the human eye. Measurements are obtained using ultrasonic pulse echo technology, whereby short bursts of ultrasonic energy are transmitted and the resulting echoes are captured, amplified, filtered and processed. The DGH 6000 is comprised of three main components: a detachable 10-MHz transducer, a USB interface module and the Scanmate software application. The transducer uses a single element piezoceramic with a starting frequency of 12.5 MHz +/- 1.25 MHz. This ceramic, after it has been damped, runs at a center frequency of 10.0 MHz nominal. The tip of the transducer has a spherical radius of curvature, which focuses the acoustic beam at 23.0 mm nominal. It is also equipped with a fixation LED to facilitate probe alignment. The USB Interface Module contains the electronics used to pulse the transducer as well as to measure, filter and amplify the resulting echoes from internal eye structures. The USB Interface Module is powered and controlled via a USB 2.0 cable, which must be connected to a PC or laptop computer running the Scanmate software application. The Scanmate software interprets the digital signals transmitted by the USB Interface Module and displays a live “Amplitude Scan” which shows the relative magnitude and distance of the echo spikes received by the transducer. Specific time distances between the captured echo spikes are then measured and converted into distance information. A digital signal processing algorithm is used to analyze the waveform, ensuring that the probe is properly aligned at the time of measurement. The software assists the user in performing replacement IOL power calculations using established formulas. The user can save videos or measurement files or create reports to document the results of the exam. The captured A-Scan waveforms, associated measurements, and IOL calculations should be evaluated only by trained medical personnel. The DGH 6000 does not conduct nor provide any diagnoses, drive therapeutic outputs, or determine or maintain any life sustaining or life threatening equipment. Page 7 of 121 6000-INS-OMENG Rev. 2 2 Device Classification Device: System, Imaging, Pulsed Echo, Ultrasonic Panel: Radiology Product Code: IYO Device Class: II Regulation Number: 21 CFR 892.1560 Device: Diagnostic Ultrasonic Transducer Panel: Radiology Product Code: ITX Device Class: II Regulation Number: 21 CFR 892.1570 3 Indications for Use The intended use of the DGH 6000 is the measurement of axial length, anterior chamber depth, and lens thickness of the human eye. The DGH 6000 is also intended to calculate the optical power of an IOL that is to be implanted during cataract surgery. The DGH 6000 is intended to be used solely by qualified medical professionals. Clinical consideration and judgment should be applied when using the DGH 6000. 4 Warnings and Cautions 4.1 Meaning of Signal Words In this manual, the signal words “Warning” and “Caution” are used to highlight important safety and usage instructions. All users of the DGH 6000 must understand the meanings of these signal words. Signal Word ! WARNING ! CAUTION Page 8 of 121 Meaning Indicates a potentially hazardous situation which if not avoided could cause injury or harm to the equipment or erroneous results. Indicates a potentially hazardous situation which if not avoided may result in minor injury or harm to the equipment. 6000-INS-OMENG Rev. 2 4.2 Device Labels The label shown below is located on the underside of the USB Interface Module. 4.3 Description of Symbols This symbol indicates the degree of protection against electric shock. The DGH 6000 Scanmate-A is classified as type BF equipment. This symbol indicates that the DGH 6000 Scanmate-A is an IEC Protection Class II (double insulated) device. This symbol instructs the operator to read the operating manual. 0120 This mark indicates that Notified Body 0120 (SGS United Kingdom Ltd) has certified the management system of DGH Technology, Inc. meets the requirements applicable requirements of 21 CFR 1010 (Performance Standards for Electronic Products: General) and 21 CFR 1050 (Performance Standards for Sonic, Infrasonic, and Ultrasonic Radiation-Emitting Products). The device also conforms to the following International Standards: Page 9 of 121 EN 60601-1: Medical electrical equipment – Part 1: General requirements for safety – IEC 60601-1 EN 60601-1-2: Medical electrical equipment – Part 1: General requirements for safety. Collateral standard: Electromagnetic compatibility requirements and tests. IEC 60601-1-2 NEMA Standard Publication UD-2: Acoustic Output Measurement Standard for Diagnostic Ultrasound Equipment NEMA Standard Publication UD-3: Standard for Real-Time Display of Thermal and Mechanical Acoustic Output Indices on Diagnostic Ultrasound Equipment 6000-INS-OMENG Rev. 2 EC REP yyyy This symbol indicates that Emergo Europe is the European Authorized Representative for this device. This symbol indicates that DGH Technology, Inc. is the manufacturer of the DGH 6000 Scanmate-A device. The YYYY under the symbol indicates the year the device was manufactured. REF This symbol indicates that the model number of this device is DGH 6000. SN This symbol indicates the serial number of the device. YYYY indicates the year of manufacture and XXXX indicates the unit number. This symbol located on the DGH 6000 indicates that the equipment consists of electronic assemblies and other components that may be subject to Directives 2002/96/EC, 2003/108/EC, and 2002/95/EC of the European parliament, which advises that electrical and electronic devices must not be disposed of as normal domestic refuse. In order to prevent environmental risks or endangerments by non-professional disposal, the disposal of this product, including any accessories, must comply with valid practices as outlined in Directives 2002/96/EC, 2003/108/EC, and 2002/95/EC and local regulations. All electronic components and systems should be returned to Original Manufacturer for disposal. 4.4 General Cautions and Warnings ! CAUTION Transducers must be cleaned after each use. Cleaning the transducer is an essential step prior to effective disinfection. Follow the manufacturer’s instructions when using disinfectants. ! WARNING Do not allow sharp objects, such as scalpels or cauterizing knives, to touch the transducer or cables. ! WARNING Equipment not suitable for use in the presence of flammable mixtures. Page 10 of 121 6000-INS-OMENG Rev. 2 5 Prescription Device Statement ! CAUTION The DGH 6000 is a prescription device and is only to be used by, or under the supervision of, a licensed physician. 6 Operator Qualifications This DGH 6000 is intended to be used by trained medical professionals. The medical professional operating the DGH 6000 must have a general knowledge of the use of ultrasonic medical devices. Use of the DGH 6000 requires adequate dexterity to position the probe safely. The DGH 6000 uses audio feedback to inform the operator of the scan status. 7 Use of Ultrasound in Opthalmic Measurements 7.1 Introduction to Ultrasound Ultrasound offers a non-invasive method to examine the interior of solid objects. Ultrasonic pulses consist of sound waves of a frequency level too high to be heard by the human ear. When a sound impulse strikes an interface, some sound is reflected, and some sound is transmitted. Because some sound will pass through the surface and be reflected by the next surface, complex structures can be examined with ultrasound. When ultrasound penetrates an object with several interfaces, the reflected ultrasound can be observed on a graphic display as a two-dimensional waveform with peaks that are related to the positions of the interfaces. The DGH 6000 transducer emits ultrasound pulses and detects ultrasound signals that have been reflected back. The time delay between the echoes is used to calculate distances between surfaces in the eye. Note: Ultrasound cannot travel through air because air is not dense enough for the high frequency waves to propagate. Ultrasonic measurements must therefore be performed by direct contact or through a denser medium such as water. Page 11 of 121 6000-INS-OMENG Rev. 2 7.2 Using Ultrasonic Signals to Ascertain Correct Probe Alignment Sound travels in straight lines, so the direction of reflected sound is based solely on its angle of incidence. Sound hitting an interface perpendicularly will reflect back along the same path that it approached (Figure 7-A). Sound hitting an interface at an angle will reflect at an angle away from the source (Figure 7-B). The transmitted sound will continue on at a lesser amplitude because of reflected energy lost at the interface. When reflected ultrasound is shown as a two-dimensional waveform, the peaks are related to the positions of the interfaces. By comparing the relative height (intensity) of the peaks, one can determine the angle at which the sound is striking it (Figures IA and I-B). Steadily diminishing peaks are an indicator that the ultrasound is not perpendicular to the interfaces. Figure 7-A Sound hitting an interface perpendicularly. Figure 7-B Sound hitting an interface at an angle. Using these properties of ultrasound, the alignment of an ultrasound beam through the eye can be determined. Proper alignment is crucial to the accuracy of measurements that will be used for IOL calculations. Figure 7-C illustrates an ultrasonic pattern typical when alignment along the visual axis is met. Please note the two high, clear peaks representing the anterior lens and posterior lens interfaces, along with a strong peak representing the retinal interface. Figure 7-D illustrates a pattern representing misalignment. Incorrect alignment will result in improper measurements. Page 12 of 121 6000-INS-OMENG Rev. 2 Figure 7-C Correct alignment along the visual axis. Figure 7-D Incorrect alignment along the visual axis. The DGH 6000 Scanmate-A incorporates a pattern recognition program that automatically checks for proper alignment. It first looks for the proper pattern of reflectance peaks from each expected interface. Then the software examines the retinal spike for particular signal characteristics which are produced only by retinal interfaces. Incorrect signal patterns will not be measured until the alignment is corrected. Audible feedback will guide the operator to proper alignment. Page 13 of 121 6000-INS-OMENG Rev. 2 7.3 Ultrasonic Measurement The speed of sound increases in denser materials. Liquids or substances containing large amounts of water conduct ultrasound very well; air does not conduct ultrasound. Figure 7-E shows a list of the established speeds of sound for ophthalmic structures. Normal or Cataractous Cornea Aqueous Lens- Normal Lens- Cataractous Vitreous Silicone Oil IOL PMMA IOL Silicone 1641 m/s 1532 m/s 1641 m/s 1629 m/s 1532 m/s 980 m/s 2780 m/s 980 m/s PMMA or Silicone Aqueous Vitreous Aqueous Cornea Phakic Aphakic Pseudophakic Figure 7-E Speeds of sound for ophthalmic structures. Using the relationship between the density of a material and the speed of sound, ophthalmic A-Scans obtain distances in the eye by performing a two-step process. First, a pulse of sound is timed as it travels through the eye, reflects off the retina, and returns to the transducer. Second, the lengths are calculated based on the travel time and the speed of sound through the eye: distance = velocity × time 2 Early ophthalmic ultrasonic units used an average speed of sound of 1550 m/s phakic eyes and 1532 m/s for aphakic eyes. The DGH 6000 Scanmate-A lets user select the type of eye being examined, and will then automatically use proper speed for each part of the eye. Using specific velocities for each part of eye increases the accuracy of measurements. Ex: for the the the lens thickness (normal) = 1641 m/s × time (s) 2 Cornea thickness in all eye types is assumed to be 550 µm, with a velocity of 1641 m/s. This assumption is part of the ACD calculation. Anterior Chamber Depth is defined as the measured distance from anterior vertex of the cornea and the anterior vertex of the lens. In pseudophakic eyes, the lens thickness is not measured. A standard thickness is assumed, depending on the type of implant present. The following table summarizes the assumed thicknesses and velocities. Page 14 of 121 6000-INS-OMENG Rev. 2 Material PMMA IOL Silicone IOL Acrylic IOL Velocity (m/s) 2780 980 2180 Thickness (µm) 700 1350 800 Note: The velocities table within the Scanmate application displays the preset velocities and allows the user to specify a custom velocity and thickness to be used for calculation. Custom velocities are selected as Custom Aphakic, Custom Phakic, or Custom Pseudophakic lens types. Page 15 of 121 6000-INS-OMENG Rev. 2 8 Ultrasonic Exposure and Intensities 8.1 Tissue Exposure to Ultrasound Energy The ultrasound energy emitted by the DGH 6000 is low intensity and will have no adverse effects on the patient and/or operator. However, the operator is still cautioned to perform examinations using the principle of ALARA (As Low As Reasonably Achievable). All examinations should be done so that the patient receives as little ultrasound radiation as possible. Do not hold the probe against the eye or other tissue with the system activated except when making a measurement. Do not make unnecessary measurements. 8.2 Ultrasonic Intensities The DGH 6000 has only one mode, and ultrasonic intensity settings are not under the control of the operator. Thus, the values below are the values to be expected for a typical transducer. Since the DGH 6000 is not capable of exceeding either a TI of 1.0 or an MI of 1.0 in any operating mode, the output of the system is reported as shown in the Table below. The appropriate Thermal Index is the Thermal Index for Soft Tissue, TIS, for the non-scanning case with a beam aperture of less than 1.0 cm. Output Summary Table Transducer Model (used with DGH 6000) Ispta.3 TI Type DGH6006 0.469 mW/cm2 TIS non-scan, 0.0004 Aaprt < 1.0 TI Value MI Ipa.3 @ MImax 0.131 3.49 W/cm2 The acoustic output values given above are based on a presumed attenuation of ultrasound on tissue, as developed by the U.S. Food and Drug Administration in 1985, and later incorporated into other international standards. The attenuated intensity in the eye at the transducer focus (corresponding to maximum intensity) may be calculated according to the formula recommended by the FDA: I t = I w × e(−0.069 × f × z ) where It is the estimated in situ intensity, Iw is the measured intensity in water at the focus of the transducer, f is the ultrasonic frequency, and z is the distance from the face of the probe to the transducer focus, which is the point of measurement (23 millimeters). Page 16 of 121 6000-INS-OMENG Rev. 2 The nominal piezoceramic (crystal) frequency of these transducers is 10 MHz. The actual frequency of a particular transducer may vary from this value. The tissue calculations above were done with the measured frequency of the transducer used for the tests. 9 Biometric Measurement Capabilities The following table shows the measurement range and capabilities for the DGH 6000 (Scanmate A). Parameter Axial length Anterior chamber depth Lens thickness 10 Range 15 mm to 40 mm 2.0 mm to 6.0 mm 2.0 mm to 7.5 mm Accuracy +/- 0.1mm +/- 0.1 mm +/- 0.1 mm Resolution 0.01 mm 0.01 mm 0.01 mm Software Installation Instructions The following section describes the installation process for the Scanmate software. Before proceeding, review Appendix A Computer System Requirements to make sure the computer meets the minimum system requirements for the Scanmate software. Please consider the desired usage of the DGH 6000 Scanmate-A before installation. The data recorded can either be saved on the computer operating the DGH 6000, on a networked computer, or on a server. Deciding whether a system will be used to perform scans, store data, or both will determine which software components should be installed. Standalone Operation: A single computer is used to operate the DGH 6000 A-scan, review the data collected, and store the database. Page 17 of 121 6000-INS-OMENG Rev. 2 Networked to a Server: The database is stored on a server on the local network. Any networked computer can be set up to perform scans and review the data collected. Networked with other Computers: Multiple computers perform A-Scans, and all the data is stored in a single database on one of the computers. Once the desired configuration has been determined, the installation wizard will ensure that only the necessary components are installed on each system. Note: Depending on the security settings of the computer system, the computer may ask for permission at various points during the installation process. Click “Yes” to allow the installer to make the necessary changes to the computer system during installation. ! WARNING Using “Non-Essential” Software in Conjunction with the Scanmate System Could Have Unknown / Adverse Impact on the Operation of the Device and is Therefore Not Recommended. Page 18 of 121 6000-INS-OMENG Rev. 2 10.1 Automatic Launching of the Installation Program Insert the Scanmate DVD into the DVD drive of the computer, or connect a USB drive with the Scanmate installation files. If the installation does not start automatically, follow step 10.2 below. 10.2 Manual Launching of the Installation Program On most systems, the installer launches automatically upon placing the DVD in the DVD drive. In some cases, the Windows system policy may require manual launching of the application. • • • • • 10.3 Insert the Scanmate DVD or USB drive Go to “My Computer” Right-click on the DVD / USB drive icon Select “Explore” Double-click “Setup.exe” Welcome Screen A Welcome Screen will appear at the beginning of the installation. Click the “Next” button to continue with the installation. Click “Cancel” to exit the installation. Page 19 of 121 6000-INS-OMENG Rev. 2 10.4 Setup Configuration There are three possible installation configurations. If the DGH 6000 will be used in a networked environment, the DGH Database Server should be installed on a computer or server before the Scanmate Software is installed on other computers. The first choice is to “Install the Scanmate Software and Create a New DGH Database Server” on the current computer. This choice will be used for standalone operation. In a networked arrangement, this choice will also be used for the computer that houses the database if that computer will be used to perform A-scans. Choosing to “Install Scanmate software and Connect to an Existing DGH Database Server” will prepare a computer to operate the A-Scan. The information collected by the A-Scan will be saved on a networked database; the database should already be installed on a network location before selecting this option. “Create New DGH Database Server” will only install the DGH Database Server. This choice will be used for a server or networked computer that will store patient records but will not be used to perform A-scans. Click on one of the three icons to select the desired setup option. The setup will begin automatically. Page 20 of 121 6000-INS-OMENG Rev. 2 10.5 .NET Framework Installation The .NET framework is necessary for the proper operation of the DGH Scanmate software. If it is not present, the installer will install the .NET framework before proceeding. Click “Start” to begin. If prompted, click “Next” to install the .NET framework. If the .Net framework is already present, or when it has completed installing, a success window will appear. Click “Next” to continue. 10.6 SQL Server Note: If the computer being set up will only be used to perform scans and will not host the database, this step will automatically be skipped by the installer. Please proceed to section 10.7: Crystal Reports. The DGH-Scanmate database requires SQL Server 2008 R2. The installer will check for the presence of this application. If it is not present, the installer will install the necessary SQL Server 2008 R2 pre-requisites before proceeding. It may be necessary to restart the computer in order to complete the SQL Server installation; if prompted, restart the computer and restart the installation procedure. Page 21 of 121 6000-INS-OMENG Rev. 2 If installing SQL Server for the Scanmate application for the first time, an administrator name and password must be created. The server will be named DGHServer. The system administrator log-in name is “sa” by default; please record the password in a secure place. SERVER NAME DGHServer LOG-IN NAME sa PASSWORD ________________________ Note: Please select a strong password. Depending on the security settings of the system, the SQL application may reject a weak password (such as “password”). A strong password contains a mixture of capital and lowercase letters, numbers, and symbols and is at least 8 characters long. Please review the SQL Server 2008 R2 End User License Agreement (EULA) before continuing. After selecting the “I Agree” button, click the “OK” button to continue. Page 22 of 121 6000-INS-OMENG Rev. 2 10.7 Crystal Reports Installation Note: If the computer or server being set up will only be used to house the database and will not perform A-scans, this step will automatically be skipped by the installer. Crystal Reports 2008 is a pre-requisite used by the Scanmate software to create and view reports. Page 23 of 121 6000-INS-OMENG Rev. 2 Click “Start” to begin installation. The installer will provide a notification when finished; click “Next” to continue. 10.8 DGH Scanmate Drivers Note: If the computer or server being set up will only be used to host the database and will not perform scans, this step will automatically be skipped by the installer. Click “Start” to install the DGH Scanmate drivers. The installer will now install the drivers to operate the DGH 6000. All DGH devices must be disconnected from the USB port(s) during the driver installation process. A warning window will appear as a reminder. Page 24 of 121 6000-INS-OMENG Rev. 2 When the drivers have been installed, a success window will appear. Clicking “Next” will conclude all prerequisite installations. To continue with installation of the DGH Scanmate software, click the “Install Scanmate” button. Page 25 of 121 6000-INS-OMENG Rev. 2 10.9 DGH Scanmate Installation Note: If the computer or server being set up will only be used to host the database and will not perform scans, this step will automatically be skipped by the installer. The DGH Scanmate Setup Wizard will launch automatically once the prerequisites have been successfully installed. Click “Next” to continue. Note: If the DGH Scanmate program has already been installed on the current computer, it will be detected. The Setup Wizard will be able to repair many installation problems; it can also uninstall the DGH Scanmate to allow a new “clean” installation. A choice will be offered to repair or remove the Scanmate program. Select either Repair or Remove and click “Finish”. Page 26 of 121 6000-INS-OMENG Rev. 2 10.10 DGH Scanmate License Agreement Window Note: If the computer or server being set up will only be used to host the database and will not perform scans, this step will automatically be skipped by the installer. Please proceed to section 10.13: Configuration Please review the End User License Agreement (EULA) before continuing. After selecting the “I Agree” button, click the “Next” button to continue. 10.11 Selecting an Installation Folder Note: If the computer or server being set up will only be used to host the database and will not perform scans, this step will automatically be skipped by the installer. By default, the Scanmate software will be installed in the “C:\Program Files\DGH Technology, Inc\DGH Scanmate” folder. If a different location is desired, it can be selected here. On computers with multiple users, the software can be made either available to all users, or only available to the current user logged in during the installation. Click “Next” to continue. Page 27 of 121 6000-INS-OMENG Rev. 2 10.12 Installation Note: If the computer or server being set up will only be used to host the database and will not perform scans, this step will automatically be skipped by the installer. During installation, a progress bar will appear in the installation dialog box. When the installation has finished successfully, it will be replaced by an “Installation Complete” announcement. Click “Close” to exit the installer. A new shortcut will now appear on the desktop. Please complete the configuration steps before launching the Scanmate application. Page 28 of 121 6000-INS-OMENG Rev. 2 10.13 Database Configuration After successful installation, a configuration dialog will automatically launch. This establishes how the Scanmate software will connect with the SQL database. Click “Start” to begin. Select the DGH Database Server you wish to connect to in the combo box. If no database servers are listed, select “Browse For More” to get a list of all available DGH Database Servers. Enter the adminstrator password created in section 10.6 and click the “Connect” button. When the Connection Status shows “Connected”, click the “Next” button. Page 29 of 121 6000-INS-OMENG Rev. 2 Note: When sharing the database over a network, make sure the firewall on the computer hosting the database has been configured to allow access to SQL Server. Client computers will be unable to connect to the database unless this is done. See section 19.7 for details on firewall configuration. Note: In order to connect to the SQL database server over a network, both the computer hosting the database and the client computer must be in the same Workgroup or Domain. Once connected to the SQL Server, click the Next button. A database can now be created. If a DGH-Scanmate database already exists, the installer will configure the DGH Scanmate application to connect to the existing database. If a prior database version exists, select “Update DB” to update it to the latest version. Page 30 of 121 6000-INS-OMENG Rev. 2 The following message may appear if the DGH Database Server was previously uninstalled and the database was not removed. If the database contains files that should be retained, refer to section 19.5 “Attaching an Existing DGH-Scanmate Database to a DGH Database Server”. If the previous database is not wanted, delete it before proceeding. Click on “Create DB” to continue. After successful database creation, a notification screen will appear. Click “Next” to continue. Page 31 of 121 6000-INS-OMENG Rev. 2 A database user must be created. A single log-in will be used for all users of the computer system. To avoid being accidentally locked out of the system, it is recommended that the user name and password be written down in a secure location. USER NAME ______________________ PASSWORD ______________________ Note: Please select a strong password. A strong password contains a mixture of capital and lowercase letters, numbers, and symbols. Click “Save” to save the configuration settings. A final window will appear to confirm that the configuration was completed successfully. Page 32 of 121 6000-INS-OMENG Rev. 2 11 Installation of Scanmate Drivers In order to complete the driver installation, connect the DGH 6000 USB Interface Module to an available USB 2.0 port. The drivers will automatically be installed. If this does not happen, the steps below will ensure correct installation of the DGH Scanmate drivers. Note: The following steps may vary depending on the version of the Windows Operating System being used. 11.1 Connecting USB Interface Module Connect the DGH 6000 USB Interface Module to an available USB 2.0 port. 11.2 Found New Hardware Wizard Once plugged in, the “Found New Hardware Wizard” should appear automatically. If the “Found New Hardware Wizard” does not appear, launch the “Add New Hardware Wizard” manually. The “Add New Hardware Wizard” can be launched in Control Panel or by typing “hdwwiz” into the search box in the start menu. Do not use Windows Update to search for software. Select the “No, not this time” option and press the Next button. Page 33 of 121 6000-INS-OMENG Rev. 2 11.3 Automatically Install Drivers Select the “Install the software automatically (Recommended)” option. Click the “Next” button to continue with the installation. 11.4 Windows Logo Testing During the installation process, the “Windows Logo testing” warning screen may appear. Click the “Continue Anyway” button to continue with the installation. Page 34 of 121 6000-INS-OMENG Rev. 2 11.5 Complete Installation of Drivers After successful driver installation, the “Completed the Found New Hardware Wizard” window appears. Click the “Finish” button to complete the installation. 11.6 Further Driver Installation The DGH Scanmate has two sets of drivers. The second set of drivers will be installed the first time the Scanmate application is launched. Note: You must install the drivers for each USB port you wish to use the Scanmate product(s) with. It is recommended that you install the drivers on each USB port of the computer at this time, following the steps above. Page 35 of 121 6000-INS-OMENG Rev. 2 12 Starting the Scanmate Software 12.1 Launching the Application Once installed, the “DGH Scanmate” shortcut appears on the Windows desktop and in the start menu. Click on the desktop icon to start the DGH Scanmate application. 12.2 Splash Screen The Scanmate splash screen will appear while the application loads. 12.3 Login Screen A single username and password is used to gain access to the software and database for all users. By default, the Scanmate software is set to automatically log in when the application is started using the username and password specified in System Preferences. To change this setting, uncheck the “Automatic Login” preference in the System Preferences menu. If a login is requested, enter the username and password created in section 10.13. Page 36 of 121 6000-INS-OMENG Rev. 2 12.4 No USB Devices Detected Warning If the USB Interface Module is not attached, a warning box will appear. Clicking “OK” will complete the log-in and allow the Scanmate software to be used without the USB Interface Module. Although no scans can be completed, the software can still be used to perform IOL calculations or view completed reports, saved measurements and saved videos. If the Scanmate software is being used without the USB Interface Module attached, the software will require probe key authentication before using, and after every 20 hours of use. Warnings will appear every hour after 15 hours of use. To provide authentication, plug a USB Interface Module into a USB port; authentication will complete in a few seconds. Page 37 of 121 6000-INS-OMENG Rev. 2 13 Configuring the Scanmate Software 13.1 System Preferences The “System Preferences” window provides controls to set various configuration items for the system. The System Preferences window can be accessed by selecting Preferences System from the Menu Bar. The “Automatically Start With New Patient” checkbox allows the user to select if the program starts with a new patient or if the user is required to search for a patient upon program startup. When the checkbox is enabled the program will begin a new patient file upon system startup. The “Automatic Login” checkbox allows the user to select if login is required upon system startup or if the user is automatically logged in. By default this checkbox is enabled, indicating that the username and password will be entered automatically. The “Default Keratometer Index (nc)” box is provided to give the user the ability to configure the default index of refraction used on the IOL Calculator screen. Page 38 of 121 6000-INS-OMENG Rev. 2 ! WARNING To avoid IOL power calculation errors, it is important that the corneal refractive index (nc) of the keratometer used to calculate corneal power matches the default refractive index (nc) set in System Preferences for the DGH Scanmate. The default nc should be set before K1 and K2 are entered for a patient. The nc associated with each set of corneal power measurements can be reviewed or adjusted on the IOL Calculator Screen. Failure to adjust the default nc to match the nc of the keratometer used to measure corneal power can result in errors in the IOL Calculation. See section 17.19 of this guide for more details. The “Report PDF Export Location” setting allows the user to specify the default directory where pdf reports will be exported. The default directory can be any local or mapped network drive. The “Selected A-Scan Transducer” drop-down menu is used to select which AScan transducer is being used. A “Default” transducer will be preloaded with a Compression Sensitivity of 0 (i.e. no measurements will be locked out due to corneal compression). See Section 15.8 for more details. Additional A-Scan transducers can be added and selected. To enter a new transducer, click on the “Configure” button next to the drop-down menu. This will open the “Configure Transducer” window. Each transducer entered should be identified by its serial number. The Comp. Sensitivity number will reflect the adjustment of the slider on the A-Scan screen (see section 15.8) for the selected transducer. Click “Apply” to save the transducers entered, or “OK” to save and exit the window. Once transducers have been successfully created, they will be available to be selected in the drop-down box. Page 39 of 121 6000-INS-OMENG Rev. 2 The “Database Location” textbox specifies the location of the DGH Database Server hosting the DGH-Scanmate database. To change the Database Server that the DGH Scanmate application connects to, select the “Change Configuration” button and follow the steps described in section 10.13. The “Database Name” textbox displays the name of the DGH-Scanmate database. The default database name is created automatically when installing the system and is not user configurable. The “Username” textbox displays the username that the Scanmate application uses to connect to the database. To change the username, select the “Change Configuration” button and follow the steps described in section 10.13. The “Password” textbox displays the password that the Scanmate application uses to connect to the database. To change the password, select the “Change Configuration” button and follow the steps described in section 10.13. The “Hint” textbox allows the user to enter a hint for the password. If a user is logging in manually, clicking the “Show Hint” button at log-in will display the hint text. To change the hint, select the “Change Configuration” button and follow the steps described in section 10.13. Page 40 of 121 6000-INS-OMENG Rev. 2 13.2 Operator Preferences The “Operator Preferences” window provides controls to identify Operators and configure their preferences. The Operator Preferences window can be accessed by selecting Preferences Operator from the Menu Bar. Note: Please refer to the DGH 8000 Scanmate-B User Guide for information on configuring B-Scan related Operator Preferences. The “New” button allows the user to create new operators and assign preferences to the newly created operator. The “Edit” button allows the user to make changes to an existing operator’s preferences. To change an operator’s preferences, click the “Edit” button while the desired operator’s name is selected in the “Name” dropdown box. Changes to operator preferences are saved by clicking the “Apply” button, or can be discarded by clicking “Cancel”. The “OK” button will save the current settings and close the “Operator Preferences” window. The “Delete” button will delete an operator from the system. When clicked, the user is prompted for confirmation prior to deleting the operator’s preferences. Page 41 of 121 6000-INS-OMENG Rev. 2 The “Name” combo box selects an existing operator from the database to view, edit, or delete their preferences. Selecting an operator’s name will display that operator’s preferences on the screen. The “Notes” textbox allows the user to associate notes to an operator’s preferences. A-Scan Operator Preferences The A-Scan “Video Playback Speed” slide bar adjusts the frames per second (fps) that the A-Scan video is played for the currently selected operator. The speed of video playback can be adjusted from 1 to 20 fps. The A-Scan “Video Buffer Frames” slide bar adjusts the size of the buffer used when capturing A-Scan video. Moving the slide bar from left to right increases the number of frames stored in the buffer. Increasing the number of frames that can be stored in the buffer allows the user to determine the amount of video that is captured before recording is stopped. The video buffer can be configured to store from 0 (zero) to 1024 frames. The A-Scan “Probe LED Intensity” slide bar adjusts the default intensity of the LED on the probe for the currently selected operator. The intensity (brightness) can be adjusted from 0 (zero) to 100. Page 42 of 121 6000-INS-OMENG Rev. 2 13.3 Doctor Preferences The “Doctor Preferences” window provides controls for the user to identify Doctors and configure their preferences. Doctor Preferences define the default protocol for performing A-Scans and IOL Calculations. The Doctor Preferences window can be accessed by selecting Preferences Doctor from the Menu Bar. The “New” button allows the user to create new doctor profiles and assign preferences to the newly created doctor. The “Edit” button allows the user to make changes to an existing doctor’s preferences. The user can change a doctor’s preferences by clicking this button while the desired doctor’s name is selected in the “Name” combo box. The “Delete” button deletes a doctor from the system. When clicked, the user is prompted for confirmation prior to deleting the doctor’s preferences. The “Name” combo box selects an existing doctor from the database to view, edit, or delete their preferences. The “Default Doctor” checkbox selects which doctor will be automatically placed on the Patient Data and IOL Calculator Screens. If only one doctor exists, that doctor is automatically set as the default doctor. The “Notes” text box is provided to allow the user to associate notes to a doctor’s preferences. The “AXL Std Deviation Threshold” textbox allows the user to enter the AXL standard deviation threshold for the currently selected doctor. This threshold defines the standard deviation that the eight (8) axial length Page 43 of 121 6000-INS-OMENG Rev. 2 measurements in the measurement bank must fall within for the system to automatically stop scanning. See Section 15.4 for more details on automatic and manual stop mode. The “ACD Std Deviation Threshold” textbox allows the user to enter the ACD standard deviation threshold for the currently selected doctor. This threshold defines the standard deviation that the eight (8) anterior chamber depth measurements in the measurement bank must fall within for the system to automatically stop scanning. See Section 15.4 for more details on automatic and manual stop mode. The “Lens Std Deviation Threshold” textbox allows the user to enter the lens standard deviation threshold for the currently selected doctor. This threshold defines the standard deviation that the eight (8) lens thickness measurements in the measurement bank must meet for the system to automatically stop scanning. See Section 15.4 for more details on automatic and manual stop mode. The “Default Measurement Mode” radio buttons allow the user to select either contact or immersion as the default A-Scan measurement mode for the currently selected doctor. Variables in timing used while aligning the probe can be adjusted in the “Timing” box. Setting “Measurement Delay” to 0 ms will make the DGH 6000 take measurements as soon as alignment is achieved. Setting some “Measurement Delay” is useful in ensuring that a variety of different measurements are used to create an average. The “Alignment Timeout” setting allows the user to specify how long the A-Scan probe can be applanated before a message appears indicating why the waveforms aren’t meeting the measurement criteria. The “Min Cases Before Using Personalized Constants” textbox allows the user to set the minimum number of Procedures that must be performed before a Personalized Lens Constant is calculated for a given IOL model. See section 13.6 for more details on calculating personalized lens constants. The “Meas Source” combo box allows the user to choose the measurement source that the IOL Calculator uses by default for the currently selected doctor. The user can choose to use DGH 6000 Average, DGH 6000 Single, or User Input as the selected doctor’s preferred default measurement source. The IOL Calculator Screen will automatically load using the Default Measurement Source for the selected doctor. See section 16.6 for more information on selecting a Measurement Source. Page 44 of 121 6000-INS-OMENG Rev. 2 The IOL 1 / IOL 2 / IOL 3 tabbed display allows the user to specify up to three preferred IOLs for the currently selected doctor. The default IOL manufacturer (Mfg), model, and formula are selected from searchable combo boxes for each preferred IOL. The IOL Calculator Screen will automatically load the Preferred IOL tabs for the currently selected doctor. IOLs are created in the IOL Information Table (see section 13.5). If more than three IOLs exist for a doctor, the additional IOLs can be selected on the IOL Calculator Screen. 13.4 Configuring Custom Velocities The “A-Scan Velocities Table” button on the Doctor Preferences Screen provides the user access to the Velocities Table dialog. From this screen, the user can view the speeds of sound for each lens and vitreous type. These values are used by the software in calculations interpreting measurements taken by the DGH 6000. This screen also allows the user to enter desired speeds of sound for custom phakic, aphakic, and pseudophakic lenses. See section 7.3 for more information about using the speed of sound in ultrasonic measurement. Note: The Scanmate software can only store one set of custom velocities; changing these values under one doctor’s preferences will change them for all users. 0.70 980.00 1.35 0.80 Page 45 of 121 6000-INS-OMENG Rev. 2 13.5 Adding IOLs to the Database The “IOL Configuration Table” button opens the IOL Information Table dialog. From this screen, the user can create, edit, view, or delete IOLs from the database. The IOL Information Table can only be opened when a doctor’s preferences are being created or edited. IOLs are specific to the doctor that creates them. If more than one doctor will be using the DGH 6000, they will each need to enter their preferred IOLs. The “New” button creates new IOL records. When this button is clicked, previously read-only textboxes become enabled and editable. The “Edit” button allows the user to make changes to an existing IOL configuration for the selected Doctor. Note: When the lens constants specified by the IOL manufacturer are changed, the personalized lens constants will be recalculated for the IOL record if “Automatic Personalized Lens Constants Update” is enabled. ! WARNING Editing the manufacturer’s A-constant will impact the Personalized Lens Constant Calculations for the selected IOL Page 46 of 121 6000-INS-OMENG Rev. 2 The “Delete” button deletes an IOL configuration for the selected doctor. The IOL information record will not be removed from the database, but it is marked as inactive. The “Doctor” combo box selects an existing doctor from the database to view, edit, add, or delete IOL information that is associated with the specified doctor. The “Manufacturer” combo box allows the user to view, enter and edit the manufacturer of an IOL. The “Model” combo box allows the user to view, enter and edit the model of the IOL. The “Manufacturer’s A-Constant” is entered by the user based on the IOL manufacturer’s specifications. The “Step Range” combo box has two possible selections: ½ Diopter and ¼ Diopter. The “Type” combo box has two possible selections: Posterior and Anterior. The “Calculate from Mfg. A-Const” button will become active when the Manufacturer’s A-Constant has been entered on the left. Clicking this button will automatically calculate and display all constants needed for the SRK®-II, SRK®-T, Hoffer® Q, Holladay 1, and Haigis formulas. These values can also be entered individually. The ACD Constant used for the Binkhorst II formula is not calculated from the Manufacturer’s A-Constant and should be entered here if the Binkhorst II formula will be used with this IOL. The “Notes” textbox allows the user to record any notes associated with an IOL configuration. Page 47 of 121 6000-INS-OMENG Rev. 2 13.6 Personalizing Lens Constants Personalization of lens constants helps to improve the accuracy of a given IOL power calculation formula by correcting for consistent prediction errors caused by: • • • • Surgical Technique A-Scan Biometry Measurements Keratometer Biometry Measurements IOL Style / Geometry The “Personalized Lens Constants Table” allows the user to manage how Personalized Lens Constants are calculated. The table displays all Pre-Operative, Post-Operative, patient, and procedure information associated with the currently selected Doctor and IOL. The information in the table is placed in a default column order; however, the user is provided with the ability to rearrange the columns into any order. The ability to sort the entire table allows the user to rearrange the rows based on the selected column. The Personalized Lens Constants Table is opened by selecting in the Menu Bar: Preferences Doctor, then choosing to edit the selected doctor, and then clicking the “Personalized Lens Constants Table” button. Page 48 of 121 6000-INS-OMENG Rev. 2 13.6.1 Overview The DGH 6000 assists the user in performing personalized lens constant calculations for the following formulas: • • • • SRK®-T (A-Constant) Hoffer® Q (pACD) Holladay 1 (SF) Haigis (Single Optimization of a0) Note: The DGH 6000 performs a Single Optimization (a0) for the Haigis Formula. Triple Optimization (a0, a1 and a2) is unavailable at this time. The Personalized Lens Constants Table contains the following features: Doctor - The “Doctor” combo box selects an existing doctor from the database. Personalized Lens Constant calculations are performed for the currently selected doctor. Manufacturer - The “Mfg” combo box selects the manufacturer of an IOL. The list of IOL manufacturers is limited based on the manufacturers that are associated with the selected doctor. Model - The “Model” combo box selects the model of an IOL. The list of IOL models is limited based on the models that are associated with the selected doctor and the selected manufacturer. A-Constant - The “A-Constant” textbox allows the user to view the A-Constant for the currently selected IOL. This is the Manufacturer’s A-Constant that was entered in the IOL Information Table. ACD - The “ACD” textbox allows the user to view the ACD-Constant for the currently selected IOL. This is the ACD-Constant that was entered in the IOL Information Table. Current Personalized Constants - The “Current Personalized Constants” group box displays the lens constants that are currently being used for the selected Doctor and IOL. All textboxes within this group box are read-only unless the user clicks the “Edit” button. Once the “Edit” button is selected, all textboxes become editable to allow the user to manually change any of the current constant values for the selected Doctor, IOL Manufacturer and IOL Model. If a value outside of the accepted range for each variable is entered, it will be highlighted in red and must be corrected before continuing. New Personalized Constants - The “New Personalized Constants” group box displays the lens constants as they are calculated by selecting and deselecting records in the “Personalized Lens Constants” table. This allows the doctor to view the updated calculation before accepting it with the “Up Arrow” button. Up Arrow – When this button is clicked, the values that are displayed within the “New Personalized Constants” textboxes are stored in the “Current Personalized Constants” textboxes. Page 49 of 121 6000-INS-OMENG Rev. 2 Automatic Constants Update - The “Automatic Constants Update” checkbox will enable or disable the Automatic Constants Update feature. This feature automatically calculates and updates the personalized lens constant for the selected doctor and lens based on the records in the table that have “Use Record” selected. The Personalized Lens Constants are also automatically recalculated when new records for the specified doctor and IOL manufacturer and model are created and the “Add to Personalized Lens Table” checkbox on the “Patient Data” Screen is checked. The number of records used to calculate the constants are also counted and stored automatically upon each recalculation. Automatically Calculated Personalized Constants are only available for use once the number of selected records exceeds the “Min Cases Before Using Personalized Constants” set in Doctor Preferences. Min Cases Before Using Personalized Constants – This value is displayed on the Personalized Constants table. The minimum number of cases used in calculating personalized constants is set in Doctor Preferences. It cannot be edited on this screen. Selected Cases – This value is a counter that notifies the user how many records have been selected in the Use Record column. It cannot be edited on this screen, but will update automatically as records are selected or deselected for use in personalized constant calculations. 13.6.2 Procedure Personalized Lens Constants can be manually calculated by the following procedure: 1. Select the “Patient Data” Page and either enter a new patient or select an existing patient. Fill out all of the fields in the Patient Info section of the page as described in section 14. Note: Ensure that the nc set in System Preferences matches the corneal refractive index of the Keratometer used to measure the K values. 2. Select the “A-Scan” Screen and perform either an Immersion or Contact AScan Measurement as described in sections 15.9 and 15.10. Note: DGH does not recommend mixing Contact and Immersion measurement results when calculating personalized lens constants. 3. Select the “IOL Calculator” Screen and perform IOL Calculations as described in section 17. Save the Pre-Operative Data used to perform the calculations by selecting the “Save” button. 4. Perform the lens replacement surgery. Record the actual lens model and power that was used. Page 50 of 121 6000-INS-OMENG Rev. 2 5. Enter the Stabilized “Post-Operative” results in the Patient Data Screen. Review the Pre-Operative data and Post-Operative Results and decide if the Procedure should be included in the Personalized Lens Constant Calculation. If the Procedure is a good candidate, select the “Add to Personalized Constants” checkbox. Note: Selection of consistent results is the most critical step in Calculating Personalized Lens Constants. Personalized Lens Constants only compensate for consistent errors in predicting the power of the implanted IOL. For this reason, all steps used to measure the patient, calculate the IOL power and perform the lens replacement surgery should be performed as identically as possible. Ultimately it is up to the doctor to decide which results to use, but in general the following guidelines should be observed: • • • • • Do not include results where complications occurred during the procedure. Only include results where the same surgical technique was used. Do not include results from patients that have undergone refractive eye surgery. Only include results where the A-Scan measurement was performed using the same technique, measurement mode (immersion or contact) and instrument. Only include results where the Corneal Power measurements were made with the same instrument. 6. After a large population of results has been acquired for a given doctor and IOL model, navigate to the Personalized Lens Constants Table to view the Procedures that were performed by the selected doctor using the selected lens. Review the Procedures that have “Use Record” selected and modify as necessary. See step 5 for considerations on filtering which results to use. 7. The “New Personalized Constants” group box shows the results of the Personalized Lens Constants calculation based on the Procedures that are currently selected in the table. The “Current Personalized Constants” group box displays the lens constants that are currently being used for the selected Doctor and IOL. 8. Use the “Up Arrow” to replace the “Current Personalized Constants” with the “New Personalized Constants”. These new Personalized Lens Constants will now be available for use in future IOL power calculations. Automatically calculating lens constants is similar to the procedure described above except that the lens constants are recalculated as soon as “Add to Personalized Constants Table” checkbox is selected on the Patient Data Screen. See step 5 for more details. Page 51 of 121 6000-INS-OMENG Rev. 2 ! WARNING Results for Patients That Have Undergone Corneal Refractive Surgery Should Not Be Used To Calculate Personalized Lens Constants. ! WARNING Only A-Scan Measurements Performed Using the DGH 6000 Should Be Used to Calculate Personalized Lens Constants. ! WARNING Only Stabilized Post-Operative Results Should Be Used to Calculate Personalized Lens Constants. ! WARNING Corneal Power Measurements Used For Calculating Personalized Lens Constants Should Be Performed Using the Same Keratometer. Page 52 of 121 6000-INS-OMENG Rev. 2 14 The Patient Data Screen The Scanmate application will automatically open the Patient Data Screen upon startup. The Patient Data Screen allows the user to Create, Review and Edit patient records. By default this screen will open in Search Mode. It is also possible to configure the Patient Data Screen to automatically open a new blank patient record each time the program is launched. To change this setting, select the “Automatically Start with a New Patient” preference in the System Preferences menu. 14.1 Patient Data Screen Controls The Patient Data Screen operates in three distinct modes of operation: “Search and View”, “Edit / Save Data”, and “New Patient.” The action buttons on the top right hand side of the screen change availability depending on the current mode of the Patient Data screen. The patient data screen buttons include: • • • • New Search Edit / Save Undo Page 53 of 121 6000-INS-OMENG Rev. 2 The “New” button is used to enter new patients in the DGH-Scanmate database. When clicked, the “Last Name”, “First Name”, and “ID#” combo boxes change to plain text boxes and allow the user to enter a new patient. The “Search” button is used to search for patients in the DGHScanmate database. When selected, the “Patient Info” controls are closed for editing and all combo boxes become auto-suggest fields. The “Edit” button is used to edit patient records in the DGH-Scanmate database. When selected, the “Patient Info” and “Pre-Operative” controls become enabled for editing. The “Post-Operative” controls become enabled for editing only if valid “Pre-Operative” data exists for the selected procedure. The “Save” button saves New or Modified patient records to the DGHScanmate database. The “Undo” button allows the user to undo the last changes that were made to the Patient’s Record. All fields will revert to the most recent saved state. 14.2 Entering a New Patient Select the "New” button and enter the following required fields: • • • Last Name First Name ID Number The ID Number must be unique for each patient. The Scanmate Software will prevent a new patient from being saved to the database if a patient with the same ID Number already exists. A default unique ID number is created based on the date and time the new patient is entered; this can be replaced with any other numbering system desired. The Patient’s Last Name, First Name and ID Number are required fields and must be entered before the record can be saved. The following optional fields can also be entered at this time: • • • • • • Patient Date of Birth Patient Gender Doctor Comments K1 and K2 (OS + OD) Desired Refraction (OS + OD) Page 54 of 121 6000-INS-OMENG Rev. 2 Note: It is important that the corneal refractive index (nc) used by the keratometer to calculate the corneal power matches the default corneal refractive index (nc) set in System Preferences. The default nc should be set before K1 and K2 are entered for a patient. The nc associated with each set of corneal power measurements can be reviewed or adjusted on the IOL Calculator Screen. Failure to adjust the default nc to match the nc of the keratometer used to measure corneal power can result in errors in the IOL Calculation. See section 17.20 of this guide for more details. Select the “Save” button once all of the desired fields have been entered. A new Procedure will be created once the patient record has been saved. Procedures are used by the Scanmate software to associate a set of patient measurements and calculations (Pre-Operative Data) to a set of surgical outcomes (Post-Operative Data). 14.3 Searching for a Patient Select the “Search” button to search for a patient record that has been saved in the database. Patients can be searched for by Last Name, First Name, or by ID Number. To search by Last Name, type the first few letters of the patient’s last name in the Last Name field. The software will automatically show all the results that match the letters that have been typed. The desired Last Name can then be selected from this list. If there is more than one patient in the database with the selected Last Name, the desired patient can be selected using either the First Name and ID Number fields. Only patients that have the currently selected Last Name will be available in these fields. To search by ID Number, type the desired ID number into the ID Number field. Alternatively, the ID Number can be selected from the drop-down list. Once the desired ID Number has been selected, the unique patient associated with that ID will appear on the screen. Once a patient record has been loaded, the Procedures associated with that record can be searched by selecting the Procedure list box. 14.4 Editing a Patient Record Select the desired patient record to be edited following the steps described in section 14.3. Once the patient record has been loaded, select the “Edit” button. All of the editable fields will change from read-only fields to white, editable text boxes. Once the desired changes have been made, select the “Save” button to save the changed record. Note: Once a patient record has been modified, all associated Measurement Files, Video Files and IOL Calculations will be updated to reflect the changes. Page 55 of 121 6000-INS-OMENG Rev. 2 14.5 Creating a New Procedure Procedures are used by the Scanmate software to associate a set of patient A-Scan measurements and calculations (Pre-Operative Data) to a set of surgical outcomes (Post-Operative Data). Patient records can contain multiple procedures. To create a new Procedure, select the desired patient record following the steps described in section 14.3. Once the patient record has been loaded, select “New Procedure” from the Procedure List Box. The pre-operative and post-operative data fields will be blank and ready for the new procedure information to be entered. (Note: To enter data, you must first select “Edit”). To return to an existing procedure, click on the Procedure List Box and select the desired procedure. Once selected, all of the pre-operative and post-operative data associated with that procedure will be visible. 14.6 Entering Pre-Operative Data Pre-Operative Data is the biometric measurement and procedure data that was used as the basis to perform IOL power calculations for a patient. This information is automatically imported from the IOL Calculator Screen when the save button on the IOL Calculator Screen is selected. The following Pre-Operative data fields can be entered on the Patient Data Screen: • • • K1 K2 Desired Rx Pre-Operative Data entered in the Patient Data Screen is automatically imported into the IOL Calculator Screen. The corneal refractive index (nc) associated with the K1 and K2 values can be viewed and changed on the IOL Calculator screen; if it is not changed, the default nc from the System Preferences menu will be used. 14.7 Entering Post-Operative Data The Post-Operative Section of the Patient Data Screen allows the user to input the stabilized surgical results for the current patient and procedure. This section of the Patient Data Screen is only editable if valid Pre-Operative Data has been entered for the selected eye. The following data fields are available: • • • • • • • Surgery Date The date that the lens replacement surgery was performed. Doctor The surgeon that performed the lens replacement surgery. Personalized constants are performed for this doctor. IOL Mfg The manufacturer of the implanted IOL Model The model of the implanted IOL Power The power of the implanted IOL Sph The Stabilized Post-Operative Spherical Refractive Error Cyl The Stabilized Post-Operative Cylindrical Refractive Error Page 56 of 121 6000-INS-OMENG Rev. 2 • Add to Personalized Constants Table Selecting this checkbox indicates that the Doctor would like to include these Results in the Calculation of Personalized Lens Constants. See section 13.6 for more information about Personalized Lens Constants. ! WARNING Results for Patients That Have Undergone Corneal Refractive Surgery Should Not Be Used To Calculate Personalized Lens Constants. ! WARNING Only A-Scan Measurements Performed Using the DGH 6000 Should Be Used to Calculate Personalized Lens Constants. ! WARNING Only Stabilized Post-Operative Results Should Be Used to Calculate Personalized Lens Constants. ! WARNING Corneal Power Measurements Used For Calculating Personalized Lens Constants Should Be Performed Using the Same Keratometer. Page 57 of 121 6000-INS-OMENG Rev. 2 15 The A-Scan Screen The A-Scan Screen allows the user to perform and review A-Scan Measurements for the currently selected patient. Refer to section 14 for details on how to load or create patient records. The default settings for this page are dependent on the currently selected Doctor and Operator. The default settings can be changed by selecting Preferences Operator or Preferences Doctor. 15.1 Selecting the Operator The name of the Operator performing the measurement can be selected using the Operator drop down box. If the operator is not listed in the drop down box, add the new Operator by selecting Preferences Operator New 15.2 Selecting the Lens and Vitreous Type The lens and vitreous type of the patient can be selected using the drop-down box and radio buttons directly under the operator selection box. The currently selected lens and vitreous type is displayed in the top left hand corner of the waveform display screen. Page 58 of 121 6000-INS-OMENG Rev. 2 15.3 Selecting OD or OS The eye currently being measured (OD or OS) can be selected by pressing the “Change Eye” button. The currently selected eye is shown in the top left hand corner of the waveform display screen. 15.4 Selecting Automatic Stop versus Manual Stop Mode The Stop Mode selection is located in the status strip, below the waveform display. In automatic stop mode (Auto Stop), scans are stopped when the measurement criteria are met, the video buffer fills up, or the user clicks “Stop Scan.” In order to meet the measurement criteria, eight measurements must be obtained that meet the ranking (3 star) and standard deviation requirements. The standard deviation requirements can be viewed and adjusted by selecting Preferences Doctor. If eight valid measurements are not obtained prior to the video buffer expiring, the scan will time out. Two long beeps will signal that the scan has timed out. A message will appear indicating that the measurements did not meet the measurement selection criteria or the standard deviation requirements. In Manual Stop mode, scans are only stopped when the user clicks “Stop Scan,” or if the video buffer expires. 15.5 Automatic Measurement Mode The DGH Scanmate software can be configured for automatic or manual measurement mode. The Automatic and Manual Measurement modes are selected using the drop down box below the waveform display. Scans must be performed in automatic measurement mode, but captured scans can be examined in either automatic or manual mode. In Automatic Measurement Mode, the DGH 6000 uses a pattern recognition algorithm to determine when the probe is properly aligned. The alignment algorithm first looks for the proper pattern of reflectance peaks from each expected interface. Then the algorithm examines the retinal spike for particular signal characteristics which are produced only by retinal interfaces. Waveforms that meet the DGH 6000 alignment criteria are ranked and put into the measurement bank. 15.6 Manual Measurement Mode Manual mode is not available during a scan. When viewing a completed scan or a saved video, manual mode can be selected from the drop-down below the waveform display screen. In this mode, measurements can be manually entered into the measurement bank. This is achieved by using the and cursor keys to scroll through the captured waveforms. On the desired frame, the measurement can be added to the bank by RIGHT-CLICKING in the measurement bank and selecting the INSERT key. Measurements can be removed from the measurement bank by RIGHTCLICKING the measurement with the mouse and pressing the DELETE key. Page 59 of 121 6000-INS-OMENG Rev. 2 On a desired frame, the measurement points can be set by the user. In contact mode three red arrows represent measurement points that can be selected; they represent the anterior and posterior lens surfaces (L1 and L2) and the retina (R). In immersion mode, the corneal peak is also visible in the waveform and is indicated by an additional arrow at the leftmost echo. The red arrows can be moved horizontally by clicking on an arrow with the mouse, holding the mouse button, and moving the mouse until the arrow is in the desired position. When a measurement arrow is released the arrow snaps to the closest intersection of the measurement level and the displayed waveform. The measurement points can only be adjusted when the video is paused. The horizontal green line represents the measurement level. In manual mode, it can be adjusted up and down while the video is paused or playing. The three sliders control the gain at the three measurement points (L1, L2, and R). They can be adjusted independently while the video is paused or playing. The amount of gain is displayed as a percentage of the incoming waveform amplitude. Page 60 of 121 6000-INS-OMENG Rev. 2 15.7 Selecting Immersion or Contact Measurement Modes The DGH 6000 is capable of performing both “direct contact” and “water immersion” measurements. Direct contact means that the ultrasonic probe must be applanated to the cornea. This method is the quickest and most convenient way of taking measurements. Because there is the possibility of indenting the cornea using the Contact method, the measured axial length may be shorter than its actual value. To improve accuracy, the DGH 6000 has a pattern recognition program that rejects any measurement which contains a significant amount of corneal indentation; however, some degree of indentation may still exist. The skill and technique of the operator will reduce possible corneal indentation. The Compression Lockout Sensitivity setting determines how much indentation will be tolerated (see section 15.8). When using the “Immersion” mode, measurements are obtained in a column of water while the probe is suspended above the eye. Since the probe does not actually touch the eye, corneal compression is not an issue. Immersion mode increases both measurement accuracy and precision. To completely eliminate corneal indentation, “Immersion” mode should be used. The Contact and Immersion Measurement modes are selected using the drop-down box at the bottom left of the waveform display screen. 15.8 Setting the Corneal Compression Sensitivity When in Contact Measurement Mode, the Operator can control the Compression Lockout Sensitivity. The Comp Sens slider at the bottom right of the waveform display screen adjusts the amount of corneal compression that the software will allow when taking measurements in contact mode. Setting this slider higher will allow less compression, making measurements more accurate but also more difficult to obtain. The optimal setting for Comp Sens will be different for each probe and will depend on the operator’s technique. The Compression Lockout Sensitivity can be adjusted before replaying videos or on any paused frame to see the impact on the measurements. A red/green indicator next to the Comp Sens slider will show whether a measurement can be taken from a frame: if the indicator is red, there is too much compression for a measurement at that sensitivity level. If the indicator is green, a measurement can be taken. When properly set, the Comp Sens control should limit corneal compression in Contact Mode to 0.15 mm or less. Page 61 of 121 6000-INS-OMENG Rev. 2 15.9 Performing a Contact Measurement Before each biometry procedure, the ultrasound probe must be cleaned. Section 21 for Cleaning and Disinfection Instructions.) (See 1. Launch the Scanmate Software Application as described in section 12. 2. Select the “Patient Data” Page and either enter a new patient or select an existing patient. Fill out all of the fields in the Patient Info section of the page as described in section 14. 3. Navigate to the “A-Scan” page and select the eye to be measured (OD or OS) by clicking the “Change Eye” button. 4. Configure the unit for contact mode by selecting “Contact” in the drop-down box on the bottom edge of the screen. 5. Select the name of the Operator performing the measurement. If the operator is not listed in the drop-down box, add the new operator by selecting Preferences Operator New. 6. Select the correct Lens Type and Vitreous type for the eye to be measured. 7. Adjust the compression lockout sensitivity track bar (Comp Sens) to the desired setting. Increasing the Compression Sensitivity will decrease the amount of error due to corneal compression, but will make it more difficult to obtain measurements. See section 15.8 for more details. 8. Position the display for easy visibility during patient examination. 9. Seat or recline the patient in a comfortable position for both the Patient and Operator. Use a firm, comfortable head rest to prevent head movement during the exam. 10. Anesthetize the cornea and ask the patient to fixate with their fellow eye on a spot on the ceiling or wall. 11. Press the “Start Scan” button. A waveform will be displayed on the screen, but the unit will not begin recording. 12. The hand holding the transducer can be stabilized on the cheek or forehead of the patient. This will help minimize indentation of the cornea or excessive movement. 13. The transducer can now be applanated to the cornea. Applanation should be observed from a vantage point that allows the operator to look across the topography of the eye. The transducer should be perpendicular to the surface of the eye as it approaches the cornea. This method aids in seeing the exact moment when the transducer contacts the cornea so indentation of the cornea will be minimized. Applanation should be made as close to the visual axis as possible. An aid in this can be to point the back side of the tranducer at the fixation target while touching the front portion of the transducer to the center of the cornea. Page 62 of 121 6000-INS-OMENG Rev. 2 Note: When applanating the transducer, be particularly careful that contact is made with the center of the transducer tip. 14. At the moment of applanation, the unit will start beeping at a rate of approximately one beep per second. This means that proper coupling has been achieved and sound pulses are being transmitted through the eye. If the beeping stops, then the transducer is no longer applanated to the eye and a slight pressure should be applied to restore applanation. The DGH 6000 will only record the live waveforms and perform measurements when it detects that proper coupling has been achieved. * * * IMPORTANT * * * In order to obtain measurements, the transducer must be in proper alignment. Audible feedback from the unit is a key element for achieving proper alignment. Measurements are best obtained by concentrating on the audible feedback while visually aligning the transducer. It is not recommended that the operator view the waveforms on the graphic display during the actual measurement cycle. The interpretation of the audible tones that are emitted during the measurement cycle is explained below. 15. The alignment of the transducer may need slight adjustments; keep the tip in contact as the angle is changed slightly. As the transducer is brought closer to alignment, the beep rate will increase. 16. When the transducer is properly aligned, a beep with a higher tone will sound. Each high-pitched beep indicates a successful 3 star measurement being recorded in the measurement bank. The axial length measurement can be observed on the graphic display along with its echo waveform. Measurements for the anterior chamber depth and lens thickness are also given. If the unit is configured for the “Aphakic” lens type, only the axial length will be given. 17. In Auto Stop mode, the scan will stop automatically as soon as 8 measurements are obtained that meet the ranking (3 star) and standard deviation requirements. In Manual Stop mode, the user must select the “Stop Scan” button to stop the scan. 18. If a measurement is not obtained successfully when applanation occurs and the beep rate is still approximately once per second, remove the transducer from the cornea and position the transducer at a slightly different location or angle. Repeat this removal and repositioning procedure until either a successful measurement or a very rapid beep rate is obtained. Page 63 of 121 6000-INS-OMENG Rev. 2 19. At the higher beep rate, measurements can be obtained by slightly tilting the back end of the transducer while the tip remains stationary and applanated at the same location. As soon as proper alignment is achieved, a measurement will be obtained provided that there is no corneal indentation present. 20. If a lower tone beep is heard during the alignment procedure, cornea indentation may be occurring. The DGH 6000 uses a special algorithm that prohibits any measurements from being obtained if the cornea is significantly indented. The Compression Sensitivity (Comp Sens) track bar adjusts the sensitivity of the unit in detecting corneal compression. If low-pitched beeps are heard, maintain the transducer alignment and slowly withdraw the transducer from the cornea until measurements are obtained. 21. If 8 valid measurements have not been obtained before the video buffer is full, the scan will time out as indicated by two long beeps. A message will appear indicating that the measurements did not meet the measurement selection criteria or the standard deviation requirements. Note: The default video buffer duration is 1024 frames. This can be adjusted in the Preferences System menu. 22. All of the waveforms captured during the exam can be reviewed on the display by pressing the or cursor keys. If the currently selected waveform is associated with a measurement in the measurement bank, the corresponding record in the measurement bank will be highlighted. 23. The video buffer can be played or rewound to the beginning by clicking on the arrow buttons in the bottom right corner. The slider bar beneath the arrow buttons can also be used to select an image for viewing from the video buffer series. 24. If a measurement is observed which is suspect because it does not agree with the other measurements, it may be removed or replaced with a different measurement: 25. a) Using the mouse, RIGHT-CLICK the measurement in the measurement bank you wish to remove. b) Press the DELETE key to erase the measurement from the measurement bank. c) Use the and cursor keys to scroll through the captured waveforms and add the desired measurement to the measurement bank by RIGHTCLICKING on the measurement bank and selecting the INSERT key. After obtaining the desired measurements for the first eye (“OD” or “OS”), the operator may obtain measurements on the same patient’s other eye, if desired, by clicking on the “Change Eye” button and repeating the steps above. Note: The measurement data for the first eye will remain stored in memory while measurements are being obtained on the second eye. Page 64 of 121 6000-INS-OMENG Rev. 2 26. After measurements have been taken, the operator may save a video that stores all of the waveforms captured during the exam, or a measurement file that stores the eight (8) measurements and their associated waveforms. 27. The video buffer and associated measurements will remain in memory for each eye (OS or OD) until either a new scan is performed for that eye, or a new patient is selected. The “Clear Meas” button clears the measurement bank of the currently selected eye, but does not clear the video buffer. 15.10 Performing an Immersion Measurement Note: The Prager Shell included with the DGH 6000 comes with instructions for use and images illustrating the catheter tubing connection. Please refer to these sheets for more detailed instructions regarding the immersion shell. Before each biometry procedure, both the ultrasound transducer and the immersion shell must be cleaned. This is in addition to disinfection procedures that should be performed between patients. (See Section 21 for Cleaning and Disinfection Instructions.) The asepsis procedure most commonly employed with a biometry transducer is a wipe-down with an alcohol prep. The immersion shell can be cleaned by removing the catheter tubing and washing using a bactericidal liquid soap followed by a thorough hot water flush; some practitioners insure asepsis by including a soak in hydrogen peroxide, alcohol, or Cidex. It is recommended that busy biometry departments should acquire two or three shells, allowing one or more shells to be in the cleaning cycle while another one is in use. DGH recommends using fresh saline for each patient. The catheter tubing provided with the immersion shell has a backflow check valve, so it can be attached to either a syringe or a sterile BSS squeeze bottle. If using tubing that does not have a check valve, only a syringe may be used. 1. Launch the Scanmate Software Application as described in section 12. 2. Select the “Patient Data” Page and either enter a new patient or select an existing patient. Fill out all of the fields in the Patient Info section of the page as described in section 14. 3. Navigate to the “A-Scan” page and select the eye to be measured (OD or OS) by pressing the “Change Eye” button. 4. Configure the unit for immersion mode by selecting “Immersion” in the drop-down box at the bottom edge of the screen. 5. Select the correct Lens Type and Vitreous type for the eye to be measured. Page 65 of 121 6000-INS-OMENG Rev. 2 6. Select the name of the Operator performing the measurement. If the operator is not listed in the “Operator” drop down box, add the new operator by selecting Preferences Operator New. 7. Position the unit for easy visibility during patient examination. 8. Seat or recline the patient in a comfortable position so that the head can be positioned in a nearly horizontal plane. Use a firm, comfortable head rest to prevent unwanted head movement. 9. Insert the biometry probe into the clean and disinfected shell. Gently insert the transducer into the shell until it reaches the auto-stop point. Verify that the transducer tip is even with the line scored on the barrel of the shell. Once the correct position has been found, tighten the white nylon set screw to hold the transducer in place. Do not overtighten the set screw. The software will work only if the probe is in the proper position. 10. Connect the catheter tubing to the immersion shell filler port and to the saline reservoir (either a syringe or bottle). 11. Administer routine topical anesthesia to the patient’s eye. 12. Place a towel on the patient’s shoulder and rest the saline reservoir on the towel. Hold onto the transducer and shell in preparation for the insertion, with the filler port and transducer cord oriented in a position that is comfortable for the operator and the patient. 13. Press “Start Scan” to start the measurement sequence. 14. Direct the patient to look upward. Pull the patient’s lower eye lid down and insert the flared rim inside the lid (the lower portion of the shell will make contact with the sclera while the upper part of the shell will be held away from the eye). Then direct the patient to look straight ahead with the other, uncovered eye, toward a fixation point. Lift the patient’s upper eyelid and gently pivot the upper portion of the shell into the upper fornix, making sure by close inspection that it is in the fornix and not atop a fold in the conjunctiva. This pivotal motion avoids contact with the cornea and insures centration of the device around the limbus. 15. Rest the left palm holding the immersion shell on the patient’s forehead to reduce shell pressure on the eye. In this position, the palm acts as the fulcrum or pivot point for the shell. If necessary, the operator can stabilize the shell with the other hand and make micro-adjustments. A tissue may be placed on the temporal canthus to catch any excess saline. Page 66 of 121 6000-INS-OMENG Rev. 2 16. Pick up the saline reservoir from its place on the patient’s shoulder and slowly inject the saline into the shell. As soon as the liquid fills the shell sufficiently to reach the tip of the transducer (about 2cc), a beep rate of approximately once per second will be heard. This means that proper coupling has been achieved and sound pulses are being transmitted through the eye. * * * IMPORTANT * * * In order to obtain measurements, the transducer must be in proper alignment. Audible feedback from the unit is a key element for achieving proper alignment. Measurements are best obtained by concentrating on the audible feedback while viewing the transducer with shell as it is aligned with the visual axis. It is not recommended that the operator view the waveforms on the graphic display during the actual measurement cycle. The significance of the audible tones that are emitted during the measurement cycle is explained below. 17. If the transducer is in proper alignment when the saline is injected, measurements will be obtained almost instantaneously as indicated by a beep with a higher tone. The axial length measurement can be observed on the graphic display along with its echo waveform. Measurements for the anterior chamber depth and lens thickness are also given. If the unit is configured for the “Aphakic” lens type, only the axial length will be given. 18. As soon as proper alignment is achieved, a measurement will be obtained as indicated by a beep with a higher tone. Each high-pitched beep indicates a measurement being recorded in the measurement bank. 19. In Auto Stop mode, the scan will stop automatically as soon as 8 measurements are obtained that meet the ranking (3 star) and standard deviation requirements. In Manual Stop mode, the user must select the “Stop Scan” button to stop the scan. 20. If a measurement is not obtained instantaneously and the beep rate remains approximately once per second, then the transducer is out of alignment. Move the shell around the sphere of the eye to bring the line of the transducer closer to the visual axis. The beep rate will increase as the transducer approaches the visual axis. 21. If 8 valid measurements are not obtained prior to the video buffer expiring, the scan will time out as indicated by two long beeps. A message will appear indicating that the measurements did not meet the measurement selection criteria or the standard deviation requirements. Note: The default video buffer duration is 1024 frames. This can be adjusted in the Preferences System menu. Page 67 of 121 6000-INS-OMENG Rev. 2 22. If the unit has trouble obtaining measurements, then the transducer alignment procedure described in steps 17-20 should be repeated until successful. If transducer alignment is not successful, the shell should be removed from the patient’s eye (see step 23) and the procedure should be repeated from step 13. 23. After measurements are obtained, remove the shell from the patient’s eye. Direct the patient to look straight ahead during removal. Raise the patient’s upper eyelid, which releases the top part of the shell from under the eyelid. Then pivot the shell downward, directing the patient to continue to look straight ahead. Then pull the shell away from the eye without contacting the cornea. Upon the initial release, the remaining contents of the shell (1-3cc of liquid) will spill down the patient’s cheek. Be prepared with a towel or tissue. 24. All of the waveforms captured during the exam can be reviewed on the display by pressing the or cursor keys. If the currently selected waveform is associated with a measurement in the measurement bank, the corresponding record in the measurement bank will be highlighted. 25. The video buffer can be played or rewound to the beginning by clicking on the arrow buttons in the bottom right corner. The slider bar beneath the arrow buttons can also be used to select an image for viewing from the video buffer series. 26. If a measurement is observed which is suspect because it does not agree with the other measurements, the measurement may be removed and replaced as follows: 27. a) Using the mouse, RIGHT-CLICK the measurement in the measurement bank you wish to remove. b) Press the DELETE key to erase the measurement from the measurement bank. c) Use the and cursor keys to scroll through the captured waveforms and add the desired measurement to the measurement bank by RIGHTCLICKING on the measurement bank and selecting the INSERT key. After obtaining the desired measurements for the first eye (“OD” or “OS”), the operator may scan the same patient’s other eye by clicking the “Change Eye” button and repeating the steps above. Note: The measurement data for the first eye will remain stored in memory while measurements are being obtained on the second eye. 28. After measurements have been taken, the operator may save a video that stores all of the waveforms captured during the exam, or a measurement file that stores the eight (8) measurements and their associated waveforms. Page 68 of 121 6000-INS-OMENG Rev. 2 29. The video buffer and associated measurements will remain in memory for each eye (OS or OD) until either a new scan is performed for that eye, or a new patient is selected. The “Clear Meas” button clears the measurement bank of the currently selected eye, but does not clear the video buffer. 15.11 Saving a Measurement File A Measurement File is a group of up to eight (8) A-Scan measurements and their associated waveforms for both OS and OD. Measurement Files can be saved by selecting the “Save” Button on the upper right hand corner of the A-Scan Screen. The “Save” Button will also save all changes that have been made to the Patient Data or IOL Calculator since the last save. Alternatively, Measurement Files can be saved using the toolbar at the top of the screen by selecting: File Save A-Scan Measurements 15.12 Saving a Video Buffer From the toolbar at the top of the screen, select: File Save A-Scan Video to save a video recording of the current exam. 15.13 Reviewing Measurements From the toolbar at the top of the screen, select: File Open A-Scan Measurements to review previous exam information captured for the current patient. 15.14 Review Video of Exam From the toolbar at the top of the screen, select: File Open A-Scan Video to review stored videos for the current patient. The video can be played back in the measurement window and the AXL, ACD and LT measurements can be recalculated. Page 69 of 121 6000-INS-OMENG Rev. 2 16 The B-Scan Screen The B-Scan Screen allows the user to perform and review B-Scan exams for the currently selected patient. Please refer to the DGH 8000 Scanmate-B User Guide for more information on using the B-Scan Screen. Page 70 of 121 6000-INS-OMENG Rev. 2 17 The IOL Calculator Screen The IOL Calculator Screen allows the user to perform and review intraocular lens power calculations for the currently selected patient. If available, measurements and the selected lens and vitreous type are automatically loaded from the A-Scan page. Information from the Patient Data screen, including Patient Name, Patient ID, Doctor, Corneal Power (K1 and K2), and Desired Rx are also automatically loaded. The Pre-Operative section of the IOL calculator contains fields for all of the necessary patient data inputs for performing an IOL calculation. Any inputs for performing an IOL Power Calculation that are either missing or out of range are automatically highlighted in red. The results of the IOL calculation (Target IOL Power, Emmetropic Power, and Range of IOL Power and Refractions) are displayed for up to three (3) IOLs for each eye. Page 71 of 121 6000-INS-OMENG Rev. 2 17.1 IOL Calculator Screen Controls Depending on the selections made by the user, up to four (4) action buttons are available at the top right corner of the IOL Calculator Screen. The “K-Corr” button launches the Post Refractive Surgery Calculator. The “Post Refractive” checkbox must be selected for at least one eye (OS or OD) for this button to be available. The “Calculate” button allows the user to perform calculations using the selected formula for each of the six (6) selected IOLs on the screen. The Target IOL Power, Emmetropic, and Range of IOL Power and Refractions are all calculated for each selected IOL. The “Save” button saves the pre-operative data for the current patient and current procedure. When clicked, the pre-operative data on the IOL Calculator screen is sent to the patient data screen and will become part of that patient file. In addition, measurement data on the A-Scan Page and patient data is automatically saved and the IOL information is automatically saved with the pre-op data. The “Print” button will create and print an IOL Calculator Report. When clicked, the report is automatically saved and sent to the default printer. To preview the report before printing, use the menu bar to go to Reports IOL Calculator Report 17.2 Patient Information The Name and ID Number of the patient currently selected on the Patient Data Screen are displayed in the top left corner of the IOL Calculator Screen. This information can be verified to confirm that the calculation is being performed on the correct patient. 17.3 Selecting the Doctor The doctor performing the IOL Calculations can be selected using the “Doctor” drop-down box. This field will default to the Doctor that was selected on the Patient Data Screen. If the doctor is not listed in the drop-down box, add the new doctor by selecting Preferences Doctor New. When a doctor is selected, the doctor’s preferred IOLs and Formulas will automatically be loaded into the IOL Calculator. See section 13.3 for more information on configuring preferred IOLs and formulas. 17.4 Eye Selection By default, the Scanmate software will perform IOL Power Calculations for both OS and OD. Use the “Calculate OD” or “Calculate OS” checkboxes to change this default setting when performing calculations on only one eye. Page 72 of 121 6000-INS-OMENG Rev. 2 17.5 Post Refractive Selection Select the “Post Refractive” checkbox if the patient has previously undergone refractive eye surgery. Selecting this checkbox enables the post refractive calculator which assists the doctor in predicting the true corneal power of eyes that have undergone corneal refractive surgery. See section 16.16 and 16.17 for more details on using the Post Refractive Calculator. 17.6 Measurement Source The “Measurement Source” drop-down box allows the user to select the source of the Pre-Operative Measurement values. The following options are available: • • • DGH 6000 Average DGH 6000 Single User Input When “DGH 6000 Average” is selected, the average and standard deviation of the Anterior Chamber Depth, Lens Thickness, and Axial Length measurements are displayed in the pre-operative data section of the IOL Calculator. The total number of measurements used to create the average is displayed in the “Total #” field. When “DGH 6000 Single” is selected, the Anterior Chamber Depth, Lens Thickness, and Axial Length measurements for the currently selected waveform on the A-Scan page is displayed in the pre-operative data section of the IOL Calculator. When “User Input” is selected, the user is able to manually enter the desired Anterior Chamber Depth, Lens Thickness, and Axial Length measurements. The Measurement Source field will default to the current doctor’s default measurement source. The measurement type, lens type and vitreous type will be imported from the A-Scan screen when either DGH 6000 Average or DGH 6000 Single is selected. When “User Input” is selected, the lens type and vitreous type fields become drop-down boxes for the user to select and the measurement type field is removed. 17.7 Corneal Refractive Index The Corneal Refractive Index (nc) of the keratometer used to calculate the corneal power (K1 and K2) for the current patient should be entered in this field. This field will automatically be completed with the default corneal refractive index (nc) set in System Preferences, but it can be changed by the user on this screen. Note: Failure to adjust the default nc to match the actual nc of the keratometer used to measure corneal power can result in errors in the IOL Calculation. See section 16.20 of this guide for more details. Page 73 of 121 6000-INS-OMENG Rev. 2 17.8 Corneal Power (K1 and K2) The corneal power values (K1 and K2) for the current patient are entered in these fields. If available, these values will automatically be imported from the Patient Data Screen. When the “Save” button is selected on the IOL Calculator Screen, these values will automatically be saved in the “Pre-Operative Data” section of the Patient Data Screen for the current patient and procedure. These fields must be completed before performing IOL calculations. Corneal power can be entered in either millimeters (mm) or diopters (D); the software will automatically determine which units to use, so the user only needs to enter the number. K1 and K2 must be entered in the same units. For Post Refractive calculations, these fields will display the Corrected Corneal Power (Kcorr) calculated by the Post Refractive Surgery Calculator. Kcorr is a readonly value, which can only be modified by changing the inputs to the Post Refractive Surgery Calculator. Please refer to sections 17.16 and 17.17 for more information on the Post Refractive Surgery Calculator. 17.9 Desired Refraction The desired surgical refractive result (Desired Rx) is entered in this field. If available, this value will automatically be imported from the Patient Data Screen. When the Save button is selected on the IOL Calculator Screen, the entered value will automatically be saved in the “Pre-Operative Data” section of the Patient Data Screen for the current patient and procedure. 17.10 Selecting IOLs These tabs (IOL 1, IOL 2, and IOL 3) allow the user to select one of three preferred IOLs on which to base the IOL implant power calculation. This selection will default to the preferred IOLs for the currently selected Doctor. If the desired IOL is not one of the three preferred IOLs, it can be selected using the drop-down lists. First select the manufacturer from a list of all the available manufacturers for IOLs entered for the current doctor. The model drop-down list will then offer a choice of all the IOL models entered for that manufacturer. See section 13.3 for more information on configuring preferred IOLs and formulas. 17.11 Selecting IOL Power Calculation Formulas The formula selection drop-down box allows the user to choose a formula to use to perform an IOL Power Calculation for the selected lens. Each pre-set IOL has a preferred formula associated with it that will appear automatically in this box, but all other formulas can be selected from the drop-down list. If the Post Refractive Calculator has been used to calculate Kcorr, only the appropriate formulas will be available for selection. Page 74 of 121 6000-INS-OMENG Rev. 2 17.12 Selecting Personalized Lens Constants The “Personalized” checkbox allows the user to use a personalized lens constant for the selected formula. This checkbox is only selectable if the lens constant for the selected formula can be personalized, and the “minimum number of cases” has been reached using the currently selected IOL. (See section 13.6 for more information on how to calculate personalized lens constants) 17.13 K Correction Method Selection This drop-down box selects between different methods of predicting the true corneal power of eyes that have undergone corneal refractive surgery. This field is only available if the Post Refractive Calculator has been used. If the K Correction Method is changed to a method that requires information that has not been completed, the Post Refractive Calculator will reopen to request the additional inputs. If the new method chosen does not require more information, the Kcorr value will automatically be updated to the result of the method. 17.14 IOL Calculator Outputs When the “Calculate” button is selected, the DGH Scanmate will perform IOL calculations using the selected formula for each of the six (6) selected IOLs on the screen. Any necessary inputs for performing an IOL Power Calculation that are either missing or out of range are automatically highlighted in red. The Target Power is the ideal result. However, since IOLs are only manufactured in discrete power increments, an IOL must be selected having a power that comes closest to the Target Power. To aid the operator in selecting an IOL with the most appropriate power, the DGH Scanmate performs the following calculations: • • • • • An IOL power that predicts Emmetropia. A target IOL power that is based on the desired postoperative refraction. A selected IOL having a power that comes closest to the target IOL power. A postoperative refraction predicted by using the selected IOL power. Postoperative refractions predicted by using IOL powers for five power increments above and below the selected IOL power. The power increments are set for each IOL in the IOL configuration table in Doctor Preferences, by selecting ½ or ¼ diopter. 17.15 Saving Pre-Operative Data The “Save” button allows the user to save the pre-operative data for the current patient and current procedure. When clicked, the pre-operative data on the IOL Calculator screen is sent to the patient data screen; measurement data on the A-Scan Page is saved if unsaved; and the IOL information is saved with the pre-operative data. Page 75 of 121 6000-INS-OMENG Rev. 2 17.16 Post Refractive Calculation Methods It has been well established that the corneal power for patients that have undergone corneal refractive eye surgery cannot be accurately measured using current keratometry or topography methods. The Post Refractive Calculator included with the DGH Scanmate helps predict the true corneal power for patients that have undergone corneal refractive surgery. The DGH Scanmate is equipped with the following methods for calculating the corrected corneal power (Kcorr): • • • • • History Derived Clinically Derived Refraction Derived Contact Lens Over-Refraction Double K These methods have been implemented as described in H. John Shammas’s book “Intraocular Lens Power Calculations” published by Slack Incorporated 2004. The mathematical formulas used for each of these methods can be found in Appendix C of this User Manual. Page 76 of 121 6000-INS-OMENG Rev. 2 The best method in any instance will depend largely on the available patient information. The following section gives a brief description of the post-refractive formulas and their required inputs. History Derived – The History Derived method is considered to be one of the most accurate methods for determining the true post-surgical corneal power. Unfortunately, it also requires the most information about the patient – some of which may not be available. This History Derived method calculates the amount of correction that was achieved through refractive surgery and adds it to the presurgical corneal power. This method can be used with 3rd generation formulas (SRK/T, Hoffer Q or Holladay 1). Required Inputs • • • Pre Refractive Surgery K measurements Pre Refractive Surgery Spectacle Refraction (S.E.) Post Refractive Surgery Spectacle Refraction (S.E.) Clinically Derived - The advantage of this formula is that no information prior to the refractive surgery is needed. The only input required for this method is the average (post-surgical) manual keratometry measurement of corneal power. The disadvantage is that since the amount of correction achieved through refractive surgery is unknown, it is not factored into the calculation. This method can be used with 3rd generation formulas (SRK/T, Hoffer Q or Holladay 1). Required Inputs • Post Refractive Surgery K measurements Refraction Derived - This method is useful when the pre-operative K values are unknown, but the pre-operative spectacle refraction is known. Required Inputs • • • Pre Refractive Surgery Spectacle Refraction (S.E.) Post Refractive Surgery K measurements Post Refractive Surgery Spectacle Refraction (S.E.) Page 77 of 121 6000-INS-OMENG Rev. 2 Contact Lens Over-Correction (CL Over-Corr) - This method requires the doctor to place a plano hard contact lens of a known curvature on the patient’s eye. If the refraction remains the same, the corneal curvature is equal to that of the contact lens. If the over-refraction results in a higher myopic error, the difference in refraction is added to the base curve value. This method can be used with 3rd generation formulas (SRK/T, Hoffer Q or Holladay 1). Required Inputs • • • • Contact Lens Base Curve Contact Lens Power Contact Lens Over-Refraction (S.E.) Post Refractive Surgery Spectacle Refraction (S.E.) Double-K (SRK-T) – This method uses the pre-refractive corneal power to estimate the post-refractive anterior chamber depth (also known as effective lens position). The post-refractive corneal power is estimated using the History Derived Method. This method can be used with the SRK/T formula. Required Inputs • • • Pre Refractive Surgery K measurements Pre Refractive Surgery Spectacle Refraction (S.E.) Post Refractive Surgery Spectacle Refraction (S.E.) * * * IMPORTANT * * * The corrected corneal power (Kcorr) calculated using the formulas described above should NOT be interpreted as a suggested or recommended corneal power on the part of DGH Technology, Inc. The calculated corrected corneal power (Kcorr) should be used as a guideline only. It is based upon the accuracy of the post refractive formula used and the data entered. The determination of the corrected corneal power (Kcorr) to use for performing IOL Power Calculations must be made by the surgeon, based on personal experiences and previous postoperative results. Page 78 of 121 6000-INS-OMENG Rev. 2 17.17 1. Using the Post Refractive Calculator Select the “Post Refractive” checkbox on the IOL Calculator Screen next to the eye that has previously undergone corneal refractive surgery. This will automatically open the Post Refractive Calculator. Note: The Post Refractive Calculator can be opened again at any time by selecting the “Kcorr” button on the IOL Calculator Screen. The “Kcorr” button is inactive until the “Post Refractive” checkbox has been selected. 2. When the “Post Refractive” checkbox is selected, the Pre-Operative Data group box on the IOL Calculator and Patient Data screen will change in the following ways: • K1 and K2 will be replaced with Kcorr or Pre Ref. K and Post Ref. K (Pre Refractive Surgery and Post Refractive Surgery) depending on the Post Refractive Method selected. • The values Kcorr, Pre Ref. K, and Post Ref. K are “read only” • K1 and K2 are entered automatically into the “Post Refractive Surgery” section of the Post Refractive Calculator Note: Deselecting the “Post Refractive” checkbox will return all fields to their original configuration. 3. In the Post Refractive Calculator, select the desired eye(s) on which to perform Post Refractive calculations using the “Calculate OD” and “Calculate OS” checkboxes. 4. Select the desired Post Refractive formula using the method drop-down box. The required inputs for the selected method will then be highlighted in white. 5. Enter all known inputs. If a field is gray, that input is not required for the selected method, but it can still be edited. K1 and K2 values can be entered as either mm or D, but both K values in a section must be in the same units. Pre-Surgical and Post-Surgical K values can be entered in different units. Note: The refractive index (nc) displayed in the IOL Calculator will be automatically transferred to both the Pre-Surgical and Post-Surgical sections of the Post Refractive Calculator. If a different keratometer was used for Pre-Surgical measurements, the correct nc for that keratometer must be entered in the Post Refractive Calculator. Page 79 of 121 6000-INS-OMENG Rev. 2 6. Select the “Calculate” button to calculate the corrected corneal power (Kcorr). If a required input is missing, the calculation will be cancelled and the necessary field will be highlighted in red. A successful calculation will display the Kcorr in the “Outputs” section of the calculator. Kcorr is given in diopters (D) using a keratometer index (nc) of 1.3375. 7. Once calculated, the results will automatically be imported into the IOL Calculator Screen and used for IOL Power Calculations. Selecting the “OK” button without calculating will close the calculator and save the values entered, but will not import a Kcorr to the IOL Calculator. 8. Use the “K Correction Method” drop-down box on the IOL Calculator Screen to see the corrected corneal power (Kcorr) predicted by the other Post Refractive Formulas. If the new method selected requires information that has not been entered, the Post Refractive Calculator will open automatically. 9. Once the desired Post Refractive Formula has been selected, proceed with the IOL Power Calculation. Note: Only IOL Power Calculation Formulas that are compatible with the currently selected Post Refractive Calculation Method will be available for selection in the IOL Calculator. Page 80 of 121 6000-INS-OMENG Rev. 2 17.18 Performing IOL Calculations The general procedure for performing IOL Calculations is as follows: 1. Select the “Patient Data” Page and either enter a new patient or select an existing patient. Complete the fields in the Patient Info section of the page as described in section 14. 2. Select the “A-Scan” Screen and perform either an Immersion or Contact AScan Measurement as described in sections 15.9 and 15.10. A saved file from a previous measurement can also be used. 3. Select the “IOL Calculator” Screen. The measurement and patient data information will automatically be imported from the A-Scan and Patient Data Screens. Verify that the information is correct and enter any missing PreOperative Data. 4. Select the Doctor that is performing the Lens Replacement Surgery using the drop down box. The preferred IOLs and formulas will automatically be loaded for the selected Doctor. 5. By default, the Scanmate software will perform IOL Power Calculations for both OS and OD. If only one eye will be calculated, select the desired checkbox (“Calculate OD” or “Calculate OS”) and deselect the other checkbox. 6. If the Patient has previously undergone corneal refractive surgery, select the “Post Refractive” checkbox. This will automatically open the Post Refractive Calculator. See section 17.17 for more information about performing Post Refractive Calculations. 7. Select the Measurement Source. Choices include: • • • DGH 6000 Average DGH 6000 Single User Input If User Input is selected, complete the required fields. 8. If desired, modify the IOLs and formulas using the appropriate drop-down boxes. The “default” lens constant for the selected IOL and formula will be shown underneath the formula selection box. 9. If desired, select the “Personalized Constant” checkbox. This option will only be available if a personalized lens constant has been calculated for the currently selected Doctor and IOL. When selected, the personalized lens constant will replace the default lens constant. (See section 13.6 for more information on calculating personalized lens constants) 10. When all the inputs are correct, select the “Calculate” button to see the outputs of the IOL Calculator. 11. Save the pre-operative data for the current patient and procedure by selecting the “Save” button. Page 81 of 121 6000-INS-OMENG Rev. 2 * * * IMPORTANT * * * The calculated IOL powers are NOT to be interpreted as suggested or recommended implant powers on the part of DGH Technology, Inc. The calculated IOL should be used as a guideline only. It is based upon the accuracy of the IOL formula used and the data entered. The final IOL implant power selection must be made by the surgeon, based on personal experiences and previous post-operative results. 17.19 Overview of IOL Power Calculation Formulas The following IOL Power Calculation formulas are included in the DGH Scanmate IOL Calculator. • SRK®-II • SRK®-T • Haigis • Hoffer® Q • Holladay 1 • Binkhorst II The formulas selected for inclusion are commonly used, and have been refined from earlier models. IOL power calculation formulas have evolved from the first models to become more accurate in a wider range of cases; selecting the appropriate IOL formula will be based on the individual practitioner’s judgment and experience. There are two types of first generation formulas, theoretical and regression. The theoretical formulas, such as those developed by Thijssen, Colenbrander, Fyodorov, Binkhorst and vand der Heijde are based on a two lens system, where the cornea and pseudophakic lens focus images on the retina. The first generation regression formulas were empirically derived from a large sample of patients that had undergone lens replacement surgery. The SRK® formula developed by Sanders, Retztlaff and Kraff is an example of a first generation regression formula. First generation IOL Power Calculation formulas calculated IOL power as a function of the measured Axial Length and Corneal Power. These formulas typically assumed a constant value for the post-operative anterior chamber depth. Due to this assumption, they often predict incorrect replacement lens powers for eyes that are longer or shorter than average. The second generation formulas such as Binkhorst II, Hoffer®, Shammas and SRK®-II attempt to correct the errors in predicting replacement IOL powers that typically occur for long and short eyes. They did this by relating the predicted postoperative ACD to the axial length. The shortcoming of this approach is that it assumes that shorter eyes always have short anterior chamber depths and vice versa. Page 82 of 121 6000-INS-OMENG Rev. 2 Third and fourth generation formulas have further refined the method for predicting the post-operative ACD. The SRK®/T, Hoffer® Q and Holladay 1 formulas predict the post-operative ACD using the measured corneal power (or radius) as well as the axial length. The Haigis formula uses the pre-operatively measured ACD and axial length to predict the post-operative ACD. All third and fourth generation formulas allow doctors to personalize their lens constants based on their surgical results with a particular IOL. 17.20 Factors Impacting the Accuracy of IOL Power Calculations Many factors play a role in predicting the correct IOL power for a patient. Several of the most common factors are described in the following sections. Axial Length Axial length measurement is the most important factor affecting IOL power calculations. An error of 1.0 mm affects the postoperative refraction by approximately 2.5 diopters. Corneal Power Corneal power is the second most important factor affecting IOL power calculations. A keratometer is an instrument that measures the central 3.3 mm of the anterior curvature of the cornea in its two meridians. The readings are called K-readings. There are two potential sources of error in keratometry. First, failure to calibrate the instrument can cause all readings to be in error by as much as 0.2 mm or 1.0 D. A second source of error is hidden in the diopter calculation of any keratometer. Keratometers cannot directly measure the refracting power of the cornea in diopters. Rather, they measure the radius of curvature of the anterior corneal surface and then convert this millimeter measurement into diopters. Because only the anterior surface of the cornea is measured, the effect of the posterior surface on the overall refracting power must be taken into account to convert the measurement into diopters. The dioptric scale used for this conversion is based on an adjusted refractive index. The true refractive index of the cornea is 1.376, but to estimate the true refracting power of the cornea from only the radius of the anterior surface, a fictitious refractive index (nc) is used. This index varies with the make of keratometer. A radius of 7.8 mm will thus read 43.27, 43.08, or 42.56 D respectively, depending on which keratometer is used. These differences may not be of much importance in contact lens fitting or the determination of corneal astigmatism. However, these differences are significant when calculating IOL power. Any IOL power calculation formula which requires the dioptric power of the cornea is subject to this source of error. With the same data, one may calculate IOL powers varying by almost a full diopter depending on the make of the keratometer used. Page 83 of 121 6000-INS-OMENG Rev. 2 With both potential sources of error in mind, consider that an error of 1 diopter in the measurement of the corneal power produces an error of about 1 diopter in the postoperative refraction. Postoperative Anterior Chamber Depth The anterior chamber depth is another factor that affects IOL power calculations. An error of 1.0 mm affects the postoperative refraction by approximately 1.0 diopter in a myopic eye, 1.5 diopters in an emmetropic eye, and up to 2.5 diopters in a hyperopic eye. Surgical Technique Changes in corneal curvature are often noted postoperatively. This fact as well as differences between actual placement and predicted placement of the IOL can produce an error. An intraocular lens placed in the posterior segment requires a stronger power, and inserting the implant with the convex side backwards necessitates an even stronger lens. Implant Power The implant power is measured differently by different manufacturers. This may require adjustments to IOL power predictions. Page 84 of 121 6000-INS-OMENG Rev. 2 18 Creating Reports Reports can be created for viewing from the Menu Bar. The DGH Scanmate software can produce IOL Calculator Reports, A-Scan Short Reports, A-Scan Custom Reports and B-Scan Reports. Reports can be printed out, saved as PDF files and added to the patient record database. All reports are created with a header that includes the Patient’s Name, ID Number, Doctor and Operator, and identifies the revision of the DGH Scanmate software used to generate the report. 18.1 IOL Calculator Report The IOL Calculator Report presents the results of calculations by the three selected IOL models for each eye. To create an IOL Calculator Report, click on “Reports” in the Menu Bar. Select “IOL Calculator Report”. A report will be created of the data currently available; any fields which are missing will appear as blank in the report. The standard IOL Calculations Report includes data for both OS and OD, and for three IOL models. If there is no need to view the IOL Report on the computer screen, clicking the “Print” button on the IOL Calculator will instantly send the report to the default printer and save it to the patient file. 18.2 A-Scan Short Report The A-Scan Short Report presents images of the waveforms captured and a table of measurements for each eye. To create an A-Scan Short Report, click on “Reports” in the Menu Bar. Select “A-Scan Short Report”. If there is no A-Scan data available, the software will prompt the user to create a scan. If there is no need to view the A-Scan Short Report on the computer screen, clicking the “Print” button on the A-Scan page will instantly send the report to the default printer and save it to the patient file. 18.3 A-Scan Custom Report The A-Scan Custom Report allows the user to select which information to include in the report. To create a Customized Report, click on “Reports” in the Menu Bar. Select “A-Scan Custom Report”. A dialog box will open allowing the user to customize the report being created. Page 85 of 121 6000-INS-OMENG Rev. 2 Once the desired options have been selected, click on the “Generate Report” button to create the report. 18.4 Using Reports All types of reports can be printed, browsed, and saved in the same ways. Clicking the small printer icon in the top left corner will send the report to the printer. The arrows and page icon next to the printer icon will navigate through the report. The “Export to PDF” button will save the report as a PDF to the Default Data Directory specified in System Preferences. A browser window will open to allow the user to select the save location and name of the PDF created. The “Save to DB” button will add the report to the DGH-Scanmate database. Once saved, the report can be retrieved by searching the patient’s name or ID number. Clicking “Cancel” will exit the report and return to the Scanmate application. Page 86 of 121 6000-INS-OMENG Rev. 2 18.5 Saved Reports To view a previously saved report, select the patient through the Patient Data screen search. Using the Menu Bar, go to File Open Report A dialog box will display all the saved reports available for that patient. Each report is automatically given a unique name consisting of the type of report, the date it was created, and the time it was created. If more than one report is created within the same minute, these reports will then be numbered 1, 2, 3, etc. Saved reports can be printed or saved as PDF files. Page 87 of 121 6000-INS-OMENG Rev. 2 19 Database Management Patient data, scan images, measurements, video files, and reports created by the Scanmate application are saved in an DGH-Scanmate database. The database allows patient records to be shared, centralized, or accessed remotely, according to the needs of each biometry department. For example, several operators in a large practice could use several DGH 6000 or DGH 8000 units simultaneously, but all patient records would be stored in a central database. Or, a doctor could perform scans in an examination room, then later access patient records from an office computer. The database can be backed-up and restored, migrated to another location, or removed. 19.1 Backing Up the DGH-Scanmate Database Electronic records should be backed up regularly as a safeguard against loss due to computer malfunction, damage, or theft. 1) Open the Back Up / Restore window by selecting: File Database Back Up / Restore 2) Connect to the DGH Database Server by entering the system administrator password that was created when the DGH Database Server was installed (see section 10.6 for details). Page 88 of 121 6000-INS-OMENG Rev. 2 3) Select the desired database to Back Up from the combo box and select the “Back Up” button. 4) Once the back up process has completed, a message box will display the location of the backup file. It is recommended that the backups be performed regularly and stored in a safe location. Preferably, backup files should not be stored on the same physical drive that hosts the database. 19.2 Restoring the DGH-Scanmate Database If it is necessary to restore a prior database, the back-up version can be reinstalled. Any records added since the date of the last back-up will be lost, so regular back-ups are essential. 1) Open the Back Up / Restore window by selecting: File Database Back Up / Restore Page 89 of 121 6000-INS-OMENG Rev. 2 2) Connect to the DGH Database Server by entering the system administrator password that was created when the DGH Database Server was installed (see section 10.6 for details). 3) Select the desired database to Restore from the combo box and select the “Restore” button. Page 90 of 121 6000-INS-OMENG Rev. 2 4) A message box will appear to warn you that the Restore Process will delete the current database. Any data that was saved since the last back up will be lost. 5) Select “Yes” if you wish to continue. The Restore Process will attempt to restore the database from the backup file. 19.3 Copying or Moving the Database If the database must be moved from its current computer or server location, it can be transferred intact to a new location. It is also possible to create a copy of the database which can be used as a Back Up. 1) Launch SQL Server Management Studio on the computer hosting the database. Management Studio can be found from the Windows Start Menu by selecting: Programs Microsoft SQL Server 2008 R2 SQL Server Management Studio 2) Connect to DGHServer by entering the system administrator password that was created when the DGH Database Server was installed (see section 10.6 for details). 3) It is necessary to “Stop” the DGH Database Server before the database can be copied or moved. Right click on the DGHServer and Select Stop. Note: This will disconnect all active users from the database and should only be performed when the database is not being actively used. Page 91 of 121 6000-INS-OMENG Rev. 2 4) Navigate to the DGH Technology, Inc directory using Windows Explorer. This can typically be found at: C:\Program Files\DGH Technology, Inc. 5) Copy the “Data” folder and Paste it in the desired location. For back-up purposes, this folder can be stored anywhere, though preferably on a separate physical drive. If you plan to use the database on a different computer, the “Data” folder must be placed in the DGH Technology, Inc folder that was created when the DGH Database Server was installed on that computer. See section 19.5 for details on attaching the database to a new instance of the DGH Database Server. 6) To continue to use the database on the original computer, the DGH Database Server must be restarted. In Management Studio, right click on DGHServer and Select Start. Page 92 of 121 6000-INS-OMENG Rev. 2 19.4 Deleting a Database The following steps describe how to permanently delete the DGH-Scanmate database. ! WARNING Ensure that the database has been successfully moved or backed-up before deleting. Deleting the database without backing-up will result in data loss. 1) Launch SQL Server Management Studio on the computer hosting the database. Management Studio can be found from the Windows Start Menu by selecting: Programs Microsoft SQL Server 2008 R2 SQL Server Management Studio 2) Connect to DGHServer by entering the system administrator password that was created when the DGH Database Server was installed (see section 10.6 for details). Page 93 of 121 6000-INS-OMENG Rev. 2 3) Expand Databases, right click on DGH-Scanmate and select Delete. 19.5 Attaching an Existing DGH-Scanmate Database to a DGH Database Server Moving the DGH-Scanmate database or re-installing the DGH Database Server will require the DGH-Scanmate database to be re-attached to the DGH Database Server. 1) Launch SQL Server Management Studio on the computer hosting the database. Management Studio can be found from the Windows Start Menu by selecting: Programs Microsoft SQL Server 2008 R2 SQL Server Management Studio 2) Connect to DGHServer by entering the system administrator password that was created when the DGH Database Server was installed (see section 10.6 for details). Page 94 of 121 6000-INS-OMENG Rev. 2 3) Under the DGHServer, right click on Databases Folder and select Attach. 4) The “Attach Databases” dialog window will open. Click the “Add” button 5) The “Locate Database Files” dialog window will open. Browse to the .mdf file for the old DGH-Scanmate database. If it was installed in the default location, the .mdf file will be in: C:\Program Files DGH Technology Inc Data DGH Scanmate DGH-Scanmate.mdf Select the .mdf file and click the “OK” button. Page 95 of 121 6000-INS-OMENG Rev. 2 6) The “Attach Databases” dialog window will now show the DGH-6000.mdf. Click OK. Page 96 of 121 6000-INS-OMENG Rev. 2 19.6 Importing and Exporting Data Individual measurement and video files can be imported or exported from the DGHScanmate database to be consulted in other locations or by other practitioners. The Scanmate software must be installed on a computer to view measurement or video files. To export a measurement file, use the menu bar at the top to go to File Export Export Measurements The measurements currently in the measurement bank will be saved as a .meas file. To export a video file, use the menu bar at the top to go to File Export Export Video Buffer The images currently in the video buffer will be saved as a .vdo file. To import a measurement file that is not currently in the database, use the menu bar at the top to go to File Import Import Measurements A browser window will open to select a .meas file to open. The opened file will replace any information currently in the patient data fields and the measurement bank. The opened file can be saved into the database at this point. To import a video buffer that is not currently in the database, use the menu bar at the top to go to File Import Import Video Buffer A browser window will open to select a .vdo file to open. The opened file will replace any information currently in the patient data fields and the video buffer. The opened file can be saved into the database at this point. Page 97 of 121 6000-INS-OMENG Rev. 2 19.7 Configuring Firewall for DGH Database Server When sharing the database over a network, the firewall of the computer hosting the database must be configured to allow access to SQL Server. Client computers will be unable to connect to the database unless this is done. Note: opening ports in your firewall may make your computer less secure and increase the risk of it being exploited by malicious software. The following procedure describes the necessary steps for configuring the firewall to allow access to a DGH Database Server that is being hosted on Microsoft Server 2003, 2008, Windows Vista, Windows 7 or Windows 8. 1) On the Start menu of the computer / server hosting the database, click Run, type WF.msc, and then click OK. 2) Right-Click on Inbound Rules and select New Rule. Page 98 of 121 6000-INS-OMENG Rev. 2 3) Select Port and then Next 4) Select TCP and Specific Local Ports. Enter port number 1433 and then select Next. Page 99 of 121 6000-INS-OMENG Rev. 2 5) Select Allow the connection and then select Next. 6) Select the network profiles where you want this rule to apply and then select Next. Page 100 of 121 6000-INS-OMENG Rev. 2 7) Enter a name for this Rule and then select Finish. 8) Open UDP port 1434 by repeating the steps above, using UDP instead of TCP, and entering 1434 instead of 1433 in step number 4. Page 101 of 121 6000-INS-OMENG Rev. 2 Configuring DGH Database Server to Use the Static Port defined above 1) Launch SQL Server Configuration Manager and Expand “SQL Server Network Configuration”. Select Protocols for DGHServer. 2) Right-Click on TCP/IP and select Properties. 3) Select the IP Addresses Tab and Scroll down to IPAll. 4) Delete the “0” from TCP Dynamic Ports field and enter 1433 in the TCP Port field. Page 102 of 121 6000-INS-OMENG Rev. 2 5) Select “OK” and Acknowledge the pop-up message instructing you that the SQL server must be restarted for the changes to apply. 6) Left-Click on SQL Server Services in the left hand console panel. Page 103 of 121 6000-INS-OMENG Rev. 2 7) Right-Click on SQL Server (DGHServer) in the right hand details pane and select Restart. Page 104 of 121 6000-INS-OMENG Rev. 2 20 Electromagnetic Compatibility Like other medical equipment, the DGH 6000 Scanmate-A requires special precautions to ensure electromagnetic compatibility with other electrical medical devices. To ensure electromagnetic compatibility (EMC), the DGH 6000 must be installed and operated according to the EMC information provided in this manual. The DGH 6000 has been designed and tested to comply with EN 60601-1-2 requirements for EMC with other devices. ! CAUTION Portable and mobile RF communications equipment may affect the normal function of the DGH 6000 Scanmate A. ! CAUTION Do not use cables or accessories other than those provided with the DGH 6000 Scanmate A, as they may result in increased electromagnetic emissions or decrease immunity to such emissions. Guidance and Manufacturer’s Declaration: Electromagnetic Emissions and Immunity The DGH 6000 Scanmate A is intended for use in the electromagnetic environment specified below. The customer or the user of the DGH 6000 should ensure that it is used in such an environment. Environmental Phenomena Radiated Emissions Electrostatic Discharge Radiated Immunity EFT I/O Only Conducted Immunity I/O Only Test In Accordance to EN60601-1-2 EN60601-1-2 EN60601-1-2 EN60601-1-2 EN60601-1-2 Page 105 of 121 Level Criteria Group 1 Class a ±2Kv ±4Kv ±8Kv contact discharge Under Limit 36.202.1 (j) ±2Kv ±4Kv ±8Kv air discharge 80MHz-2.5GHz 3V/m 80%@1kHz ±2Kv 5/50 5kHz 0.15 – 80MHz 3Vrms 80%@1kHz Basic Standard CISPR 11 Notes EN61000-4-2 Apply to all accessible components 36.202.1 (j) EN61000-4-3 36.202.1 (j) EN61000-4-4 Expose all parts of EUT to field None 36.202.1 (j) EN61000-4-6 None Measure at 5 meters 6000-INS-OMENG Rev. 2 Guidance and Manufacturer’s Declaration: Electromagnetic Immunity The DGH 6000 Scanmate A is intended for use in the electro-magnetic environment specified below. The customer or the user of the DGH 6000 should ensure that it is used in such an environment. Field strength from fixed transmitters, such as base stations for radio (cellular/cordless) telephones and land mobile radios, armature radio, AM and FM radio broadcast and TV broadcast, cannot be predicted theoretically with accuracy. To assess the electromagnetic environment due to fixed RF transmitters, an electromagnetic site survey should be considered. If the measured field strength in the location in which the DGH 6000 is used exceeds the applicable RF compliance level, the DGH 6000 should be observed to verify normal operation. If abnormal performance is observed, additional measures may be necessary, such as reorienting or relocating the DGH 6000. 21 Care and Maintenance ! WARNING Users of the DGH 6000 Scanmate-A have an obligation and responsibility to provide the highest degree of infection control possible to patients, co-workers and themselves. To avoid cross contamination, follow all infection control policies established for the office, department or hospital as they apply to personnel and equipment 21.1 Care of Transducer Be careful when handling the transducer. If the transducer is dropped on a hard surface it can be damaged. Regularly check the transducer front face for damage, as this may impair the performance of the device. The transducer may be submersed in water up to the cable (not wetting the connector) during normal use. The transducer should be cleaned after every use, using the following protocol: 1. Wear protective gloves when performing the cleaning process. 2. Disconnect the transducer from the unit. 3. Use a soft cloth (or equivalent) dampened with a mild soap or 70% isopropyl alcohol solution to remove any particulate matter or body fluids that remain on the probe tip, probe housing and probe cable (if applicable). Do not immerse the entire probe in the cleaning solution. Caution: Care must be taken to prevent any liquids from coming into contact with the probe connector 4. To remove remaining particulates, rinse probe with water. Do not immerse the probe in the rinse solution. Page 106 of 121 6000-INS-OMENG Rev. 2 5. Wipe with a dry cloth; or wipe with a water-dampened cloth to remove soap residue, and then wipe with a dry cloth. ! WARNING Do Not Attempt To Open the Transducer or USB Interface Module 21.2 Cleaning and Disinfecting the Transducer Tip Keep the transducer tip clean and disinfected. To prevent patient-to-patient infection, a disinfection procedure should be followed after each patient. After disinfection, the tip should be rinsed in sterile distilled water before using. The following disinfectants are recommended due to their compatibility with the probe tip material. Disinfectant Concentration Tested* Cavicide Solution (10-20%) Isopropyl Alcohol and (1-5%) Ethylene Glycol Monobutyl Ether Cavicide Wipe (10-20%) Isopropyl Alcohol and (1-5%) Ethylene Glycol Monobutyl Ether Cidex 2.55% (w/w) Glutaraldehyde Cidex OPA 6.2% by (w/w) Ortho-Phthalaldehyde (1,2 – benzenedicarboxaldehyde) Isopropyl Alcohol 70% (v/v) Isopropyl Alcohol Household Bleach 0.6% (w/w) Sodium Hypochlorite Hydrogen Peroxide 3% (w/w) H2O2 Milton 2% (w/w) Sodium Hypochlorite *Note: The concentrations listed in this table are the specific concentrations that were tested by DGH to ensure compatibility with the probe tip material. DGH does not endorse or recommend the concentrations listed in the table above. Page 107 of 121 6000-INS-OMENG Rev. 2 ! WARNING DGH makes no claims about the biological effectiveness as a disinfectant of any of the products listed above. Furthermore, DGH makes no claims regarding the effectiveness of any of these products for killing any known, or unknown, bacteria, virus, or other micro-organisms. DGH only claims that these products, when used properly, will not harm the transducer tip. Instructions for Disinfecting Transducer Surfaces when Using a Cavicide Wipe 1. Wear protective gloves when performing the disinfecting procedure. 2. Detach the transducer from the unit. 3. Check the expiration date on the wipes that are being used. Use only wipes that are within the expiration date. 4. Thoroughly wet down the transducer tip, housing and cable (if applicable) according to the standard operating procedure (SOP) or equivalent document established by your facility or institution. Caution: Care must be taken to prevent any liquids from coming into contact with the probe connector. 5. Follow the instructions in the SOP for the duration of exposure to the disinfectant. 6. If applicable, follow the instructions outlined in the SOP for rinsing the probe tip. 7. Examine the probe for damage such as cracks, splitting, or sharp edges or projections. If damage is evident, discontinue use of the probe and contact a customer service representative. Instructions for Disinfecting Patient Contact Surfaces when Using a Liquid Disinfectant 1. Wear protective gloves when performing the disinfecting procedure. 2. Detach the transducer from the unit. 3. Check the expiration date on the solution that is being used. Use only solutions that are within the expiration date. 4. Mix the disinfectant listed in the table above according to the standard operating procedure (SOP) or equivalent document established by your facility or institution. 5. Immerse the tip of the transducer approximately ¼ inch (6.35) mm in the disinfectant solution. 6. Follow the instructions in the SOP for the duration of probe tip immersion. DGH probe tips may be damaged if immersed for longer than 1 hour. Page 108 of 121 6000-INS-OMENG Rev. 2 7. If applicable, follow the instructions outlined in the SOP for rinsing the probe tip. 8. Examine the transducer for damage such as cracks, splitting, or sharp edges or projections. If damage is evident, discontinue use of the probe and contact a customer service representative. ! WARNING It is the responsibility of the user to remain current with the latest information from the relevant disinfectant manufacturer concerning instructions, effects, necessary concentrations, immersion times and rinse requirements. ! WARNING Using a non-recommended disinfectant, incorrect solution strength, or immersing the probe tip deeper than described in step #5 (above), or for a period longer than 1 hour can damage or discolor the probe tip and will void the probe warranty. Do not immerse the probe tip for longer than one hour. The probe tip may be damaged by longer immersion times. Disinfect the probe tip using only the liquid solutions above. Using autoclave, gas (EtO), or other non DGH Technology approved methods will damage the probe and void the warranty. ! WARNING The transducer should NEVER be autoclaved or subjected to intense heat. As a general rule, the above cleaning instructions are sufficient to disinfect the transducer in ordinary use. Do not scratch or chip the conical transducer tip, which makes contact with the cornea. Page 109 of 121 6000-INS-OMENG Rev. 2 21.3 Cleaning and Disinfecting the Immersion Shell The immersion shell is not sold sterile, and must be cleaned and disinfected before each use. The immersion shell cannot be autoclaved. Clean as described in the immersion shell Instructions for Use (included in package). The catheter tubing cannot be reused. 21.4 Care of USB Interface Module Keep the USB transducer plug dry at all times. Regularly check the transducer and USB cables for cuts, cracks and kinks. The presence of these defects can impair the performance of the device. 21.5 Cleaning the USB Interface Module The DGH 6000 USB Interface module housing and USB cable can be cleaned using a cloth dampened with a mild soap and water solution. The connectors should not be exposed to water. 21.6 Operating Conditions The DGH6000 (Scanmate A) should be operated between temperatures of 18oC and 40oC. 21.7 Verifying A-Scan Calibration The DGH 6000 uses a pattern recognition algorithm that looks for unique characteristics of the human retina to obtain true probe alignment. Under normal usage, the DGH 6000 will not recognize standard plastic interface phantoms as eyes to be measured. For this reason, the DGH 6000 must be placed into a test mode to check calibration on a standardized polystyrene block, provided with the unit. The procedure for entering the test mode and verifying proper calibration of the unit is described below. 1. Navigate to the Patient Data Page by selecting the “Patient Data” tab. In the “Last Name” drop-down box, select “Test Block”. 2. Navigate to the A-Scan Page by selecting the “A-Scan” tab. The current eye should be displayed as “Test Block” in the waveform display screen, and the lens type drop-down box should be frozen, displaying “Test Block”. 3. Set the provided polystyrene reference block on a stable, level surface. Apply a small drop of water to the end of the reference block. 4. Applanate the probe tip to the center of the reference block. The probe tip and reference block have equal diameters to facilitate positioning. Page 110 of 121 6000-INS-OMENG Rev. 2 5. The DGH 6000 should measure the reference block almost instantaneously. If not, move the probe tip slightly until a measurement is obtained. 6. Observe axial length measurements to be within the stated tolerance marked on the reference test block. 7. Readings outside these limits do not necessarily indicate the DGH 6000 is out of calibration. Erroneous measurements may be due to the following: a) During the test mode, the algorithm does not preclude measurement of tear film as it does during normal operation. Therefore, if excessive water was placed on the reference block, the water depth may be measured causing longer axial length measurements. b) The polystyrene reference block is sensitive to temperature. The block must be stabilized at 72°F ±10°F before measurements are taken. If an erroneous reading is obtained, verify that these fault conditions are not present and repeat the measurements on the reference block. 8. If the reference block readings are outside the limits stated above, it is possible that the unit is defective and needs repair. Contact the Customer Service Department of DGH Technology, Inc. at (610) 594-9100 to arrange for repair. 9. If desired, the results of the calibration check can be saved in the “Test Block” patient folder. 21.8 Storage When the DGH 6000 is not being used, it should be stored in a clean, dry area. To prevent damage to the DGH 6000, do not store in areas where it might be exposed to: • Excessive vibration • Excessive dust and dirt • Liquids or condensation • Impact Store the DGH 6000 under the following ambient conditions: • Temperature: - 10°C to 50C° (14°F to 122°F) • Relative Humidity: 20% to 80% • Atmospheric pressure: 70 kPa to 106 kPa Page 111 of 121 6000-INS-OMENG Rev. 2 21.9 Transportation Never carry the DGH 6000 by the USB or transducer cables. Never bend the USB or transducer cables in a tight radius. This could result in damage to the cables. Transport the DGH 6000 under the following ambient conditions: • Temperature: -10°C to 50C° (14°F to 122°F) • Relative Humidity: 20% to 80% (no condensation) • Atmospheric pressure: 70 kPa to 106 kPa When transporting the DGH 6000 to a different field location or when returning it for repair or maintenance, use the original DGH 6000 packing enclosure. If the original package is not available, pack in such a way that the DGH 6000 is protected. 21.10 Disposal Contact DGH Technology, Inc. before disposing of the DGH 6000. Concerning the WEEE label, the following information is for EU member states: The use of this symbol indicates that this product should not be treated as household waste. By ensuring that this product is disposed of correctly, you will help prevent potential negative consequences for the environment and human health, which could otherwise be caused by inappropriate waste-handling of this product. For more information concerning the return and recycling of this product, please consult DGH Technology, Inc. Page 112 of 121 6000-INS-OMENG Rev. 2 22 Troubleshooting If a problem is experienced with the DGH 6000, try the suggestions listed below: Error During Installation of .Net Framework • In order to install the .Net framework on Windows SBS Server 2008, the following steps are necessary: 1. On the Start Menu select: START Administrative Tools Server Manager. 2. Click on "Features" in the left panel of the Server Manager dialog box. 3. Click on "Add Features" in the Features panel of the Server Manager dialog box. 4. Expand the ".NET Framework 3.5.1 Features" in the Select Features dialog box. 5. In the expanded ".NET Framework 3.5.1 Features" list, check ONLY ".NET Framework 3.5.1" and click the Next button. 6. Click the Install button on the "Confirm Installation Selections" dialog box. 7. When the "Installation Results" dialog box appears, click the Close button. Error During Installation of SQL Server 2008 R2 • Confirm that the user has administrative privileges on the system where SQL Server is being installed. • If SQL was previously uninstalled, the computer must be restarted before SQL can be installed again. • Depending on the security settings of the system, the SQL Server installation may fail if a “Strong” password isn’t used. Make sure the system administrator password uses a mixture of capital and lowercase letters, numbers and symbols and is at least 8 characters long (!DGHTest1 is an example of a strong password). Unable to Connect to DGH-Scanmate Database • Confirm that the location, user name and password for connecting to the database are correct. • If the database was moved, or SQL server was re-installed, you will need to reattach the DGH-Scanmate database to the DGH Database server. See section 19.5 for details. • If connecting to a database over the network, verify that the computer hosting the database is powered ON and the firewall on the computer hosting the database has been configured to allow access to SQL Server (see section 19.7 for details). In addition, verify that both computers are in the same WORKGROUP or DOMAIN. Page 113 of 121 6000-INS-OMENG Rev. 2 Unable to Connect to DGH Database Server • Confirm that the location (computer name) and password for connecting to the database server are correct. • If connecting to a database over the network, verify that the computer hosting the database is powered On and the firewall on the computer hosting the database has been configured to allow access to SQL Server (see section 19.7 for details). In addition, verify that both computers are in the same WORKGROUP or DOMAIN. • If the system administrator password for SQL Server has been lost or forgotten, it will be necessary to reset it using Management Studio. 1. Launch Management Studio as described in section 19. 2. Select “Windows Authentication” instead of “SQL Server Authentication”. 3. Right-Click on the “sa” User Account (found under Security Logins) and select Properties. 4. Enter and confirm the new password. USB Interface Module Not Connected • Confirm that the drivers have been installed for the USB 2.0 port the module is currently connected to. See section 10.8 for details. • Confirm that the USB cable is firmly connected to the USB Interface Module. • Try connecting the USB Interface Module to a different USB port on the computer. Probe Key Expired • The USB Interface Module must be connected to the PC running the Scanmate application after every 20-hours of use. • If connecting the USB Interface Module does not reset the Probe Key, try the steps described in “USB Interface Module Not Connected” section of the troubleshooting guide. Unable to Get a Measurement • Verify that the correct measurement mode (Immersion / Contact) and “Eye Type” has been selected. • If performing a Contact measurement, it may be necessary to adjust the Compression Sensitivity (Comp Sens). See section 15.8 for details. • If performing an Immersion measurement, verify that the transducer is properly inserted in the Prager Shell. See section 15.10 for details. Page 114 of 121 6000-INS-OMENG Rev. 2 • 23 There will be some eyes which cannot be measured in Automatic Measurement (Auto Meas) mode. In these cases, measurements can be made by using the Manual Measurement (Manual Meas) mode. Warranty DGH Technology, Inc. “DGH” warrants each new DGH 6000 and its accompanying accessories (hereinafter called “Equipment”) to be free from defects in material and workmanship for twelve (12) months from the date of delivery to the original purchaser. This warranty is not applicable to any defect that is the result of an accident, misuse, mishandling, neglect, improper installation, improper repair or improper modification by persons other than DGH. This warranty does not apply if the Equipment has not been operated and maintained in accordance with the operating and maintenance manuals and instructions or bulletins issued in respect thereof by DGH. The cost of servicing replaceable and expendable items including parts and labor made in connection with the routine maintenance services as described in such Operator’s Manual is not covered under this warranty and is the responsibility of the purchaser. This warranty is strictly limited to replacement or repair of the part that is found to be defective in material and workmanship. At the option of DGH, said part shall be replaced or repaired free of charge, F.O.B. our factory by DGH. DGH reserves the right to make changes in the design and material of Equipment without incurring any obligations to incorporate such changes in Equipment already completed on the effective date of any such changes. This is the only warranty of this product and is expressly in lieu of all other warranties, expressed or implied by law or otherwise, including any implied warranties of merchantability and of fitness for a particular purpose. Without regard to the alleged defect, DGH does not, under any circumstances, assume any responsibility for the loss of time, inconvenience or other consequential damages, including but not limited to, loss or damage of personal property, or loss of revenue. DGH has neither assumed nor authorized any other person (including any distributor authorized to sell its Equipment) to assume for it any other liability in the connection with the sale of Equipment. 24 Lifetime / Shelf-life The shelf-life / lifetime indicated for this device is 10 years. Page 115 of 121 6000-INS-OMENG Rev. 2 25 Customer Service If you are having problems with this unit, please refer to the appropriate sections of this manual. Most service calls result from a misinterpretation of the operation of the instrument. The instructions in this manual have been carefully reviewed to ensure error-free performance of the DGH-6000. However, if you feel there is a problem with the unit or a transducer, please contact the Customer Service Department at the address below. DGH Technology, Inc. can also be contacted via our website at www.dghkoi.com. When contacting us, please provide the model and serial number for the unit. The model number and serial number are located on the underside of the USB Interface module and can also be viewed on the display by selecting the “About” button found on the “Help” toolbar. Manufactured by: DGH TECHNOLOGY, INC. TECHNOLOGY, INC. 110 SUMMIT DR IVE SUITE B EXTO N, PA 1934 1 USA (6 10) 594 -9100 Authorized European Representative: EMERGO EUROPE EC REP Page 116 of 121 Molenstraat 15 2513 BH, The Hague The Netherlands Phone: +31.70.345.8570 6000-INS-OMENG Rev. 2 APPENDIX A COMPUTER SYSTEM SPECIFICATIONS Minimum System Requirements Processor: 32 bit or 64 bit, 2 GHz Memory: 2 GB RAM Optical Drive: DVD-ROM (For Software Installation) Hard Drive:1 GB minimum, 100 GB recommended Ports: USB 2.0 Display: 1024 x 768 Resolution Peripherals: Mouse (or Touchpad), Keyboard and Speakers (For Alignment Audible Feedback) AC Power Supply: Medical Grade Compatible Operating Systems Microsoft Windows XP SP3 or higher (32 Bit) Microsoft Windows Vista SP1 or higher (32 or 64 Bit) Microsoft Windows 7 (32 or 64 Bit) Microsoft Windows 8 (32 or 64 Bit) Microsoft SBS (2003 or 2008) - SQL Server Installation Only ! WARNING The use of a “Non-Medical” grade AC Adapter could potentially cause harm to the system, the operator and/or the patient. ! WARNING Using “Non-Essential” Software in Conjunction with the Scanmate System Could have Unknown / Adverse Impact on the Operation of the Device and is Therefore Not Recommended. ! WARNING Due to the Threat of Computer Viruses, it is Recommended that an Anti-Virus Program be Installed on the Computer Running the Scanmate Application and that Patient Records Be Backed up Regularly. Page 117 of 121 6000-INS-OMENG Rev. 2 APPENDIX B Transducer USB Interface Module Measurement Range Accuracy Measurement Modes IOL Formulas Post Refractive Formulas Archive Functions Environmental Page 118 of 121 SCANMATE-A SPECIFICATIONS Starting Frequency: 12.5 MHz +/- 1.25 MHz. Damped Frequency: 10.0 MHz (nominal) Fixation LED Focused Acoustic Beam (23.0 mm nominal) Detachable (via Lemo REDEL Connector) Probe Dimensions: L 55.7 mm x D 6.6 mm Cord Length: 195 cm Dimensions: L 146 mm x W 88 mm x H 38 mm Weight: 285 gm Interfaces: USB 2.0 + Lemo 4 pin Connector Power Requirements: 5 VDC, 500 mA (2.5 W max). Integrated Probe Holder Axial Length (AXL): 15 mm to 40 mm Anterior Chamber Depth (ACD): 2.0 mm to 6.0 mm Lens Thickness (LT): 2.0 mm to 7.5 mm Measurement Repeatability: ± 0.03 mm STDEV (Immersion) Resolution: 0.01mm Water Immersion Contact SRK-T, SRK-II, Binkhorst II, Holladay 1, Hoffer Q, Haigis Double K, History Derived, Clinically Derived, Refraction Derived, Contact Lens Patient Data, Exam Information, Measurement Files, Video Files, IOL Calculation Reports Operating Temp 18oC to 40oC Storage Temp -10°C to 50oC Relative Humidity 20% to 80% (no condensation) Atmospheric pressure 70 kPa to 106 kPa 6000-INS-OMENG Rev. 2 APPENDIX C REFERENCES IOL formulas: The IOL Power Calculations are based on formulas published in peerreviewed journals. Binkhorst II JEDMED Internal documents, based on Binkhorst, R.D. “Pitfalls in Determination of Intraocular Lens Power Without Ultrasound.” Opthalmic Surgery 7:68 (1976): 69-82. STORZ CompuScan LT. User Manual. Haigis Haigis, W. Personal communication, based on documents prepared July 2, 2008. Received Feb 2, 2009. Hoffer Q Hoffer, K.J. “The Hoffer Q formula: A comparison of theoretic and regression formulas.” Journal of Cataract and Refractive Surgery 19:6 (Nov 1993): 700-712. Errata in Journal of Cataract and Refractive Surgery 33:1 (Jan 2007): 2. Author response in Journal of Cataract and Refractive Surgery 33:1 (Jan 2007): 2-3. Holladay 1 Holladay J.T., et al. “A three-part system for refining intraocular lens power calculations.” Journal of Cataract Refractive Surgery 14:1 (Jan 1988): 17-24. SRK-II Sanders, D.R., et al. “Comparison of the SRK-II Formula and Other Second Generation Formulas.” Journal of Cataract and Refractive Surgery 14:2 (Mar 1988): 136-141. SRK-T Retzlaff, JA et al. “Development of the SRK/T Intraocular Lens Implant Power Calculation Formula.” Journal of Cataract and Refractive Surgery 16:3 (May 1990): 333-340. Errata in Journal of Cataract and Refractive Surgery 16:4 (Jul 1990): 528. Page 119 of 121 6000-INS-OMENG Rev. 2 Post Refractive Surgery Formulas By in large, these methods have been implemented as described in H. John Shammas’s book “Intraocular Lens Power Calculations” published by Slack Incorporated 2004. History Derived Kcorr = pre-Kavg - S.E.post - S.E.pre (1 - S.E.post) (1 - S.E.pre) Refraction Derived Kcorr = post-Kavg - 0.23 x S.E.post - (1 - S.E.post) S.E.pre (1 - S.E.pre) Clinically Derived Kcorr = (1.14 x post-Kavg) - 6.8m-1 Contact Lens Over Correction Kcorr = CLbase curve + CLover 1 – 0.012m⋅CLover - S.E.post + CLpower (1 - S.E.post) Double K The Double K method modifies the SRK-T formula to use both pre- and post- refractive surgery K values. The pre-refractive surgery K value is used to calculate the effective lens position, and the post-refractive surgery K value is used for IOL power calculations. Aramberri, J. “Intraocular Len Power Calculation After Corneal Refractive Surgery: Double-K Method.” Journal of Cataract and Refractive Surgery 29:11 (Nov 2003): 2063-2068. Page 120 of 121 6000-INS-OMENG Rev. 2 APPENDIX D TERMS AND ABBREVIATIONS The following terms and abbreviations are used within this Operator’s Manual and in the Scanmate-A program: A-constant ACD ACD (constant) a0 AXL CLbase curve CLover CLpower IOL Kcorr K1 K2 LT nc pACD post-Kavg pre-Kavg Rx S.E.post S.E.pre SF Page 121 of 121 The A-constant is a constant provided by an IOL manufacturer to be used in IOL power calculations. Anterior Chamber Depth is defined as the measured distance from anterior vertex of the cornea and the anterior vertex of the lens. The ACD constant is a constant provided by the IOL manufacturer to be used in Binkhorst formula IOL power calculations. The a0 constant is calculated from the manufacturer’s A-constant to be used in Haigis formula IOL power calculations. Axial Length is the distance between the front face of the cornea and the front face of the retina of the eye. The contact lens base curve is the known curvature of the plano hard contact lens. The contact lens over correction is the measured refraction with the plano lens in place. The contact lens power is the known power of the plano hard contact lens. Intra Ocular Lens The corrected K value that should be used in IOL calculations for patients who have previously undergone refractive surgery. Corneal Power in Vertical Meridian (D) Corneal Power in Horizontal Meridian (D) Lens Thickness The keratometer constant. The pACD constant is calculated from the manufacturer’s A-constant to be used in Hoffer Q formula IOL Power calculations. Average of K1 and K2 values measured after refractive surgery. Average of K1 and K2 values measured before refractive surgery. Refractive error (D) Refractive error measured after refractive surgery. Refractive error measured before refractive surgery. The Surgeon Factor constant is calculated from the manufacturer’s A-constant to be used in Holladay 1 formula IOL Power Calculations 6000-INS-OMENG Rev. 2