1
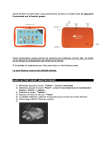
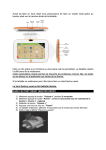
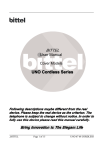
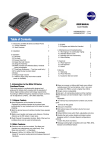
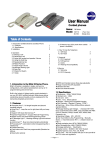
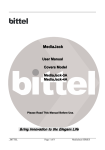
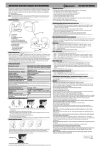
BITTEL
User Manual
Multi-Media Parts
of
UNOMedia Series
ed description maybe differen
Follow
Followed
differentt from the real device. Please
keep the real device as the criterion. The telephone is subject to
change without notice. In order to fully use this device please
read this manual carefully.
We bring good things to Ho
spitality.
Hospitality.
Thank you for purchasing a Bittel product.
_______________________________________________________________________
BITTEL
Page 1 of 9
UNO Media Multi-Media Parts
MAIN FEATURES
UNOMedia series telephones are specially designed to meet the need of
hotel guestroom. UNO is made of first class electrical materials, awarded
several patents, which give UNO a variety of functions and magnificent
appearance. Further more it also own special multi-media features, such
as, such as alarm, FM radio, HiFi acoustics, charging and playing all
Apple products and other mobile phones, Passive Infrared Detector (PIR)
and Intelligent Backlit Display, Snooze, etc.
Some features as below:
● Alarm , Radio , audio , power charge in one device
● Easy port to connect iPod/iPhone/iPad/other mobile phone, MP3 audio
device , premium stereo acoustics
● USB Charge Port for portable type mobile device, such as Apple, Samsung,
HTC, etc
● Audio input cable
● Adjust clock time with special wireless timing cloner
● Multi-Function Cable, supporting portable type mobile device, such as Apple,
Samsung, HTC, etc
● Passive Infrared Detector, which can auto activate LCD and Snooze
( UNOMedia 4/5)
● Intelligent Backlit Display
● Daylight Saving Time(DST) auto change
LOCATION AND CONTROL
_______________________________________________________________________
BITTEL
Page 2 of 9
UNO Media Multi-Media Parts
UNOMedia 3 Series
1
HOLD
2
MUTE
CONF
FLASH
REDIAL
VOL -
VOL +
SPKR
LINE1
LINE2
5
3
4
9
10
6
7
8
10
LA
7
9
N
8
1. Display window——Display the Time, Alarm, Sound and Caller ID
2. Infrared Receiving Area ----- Receive the signal of the Infrared Time Control,
3. Apple Dock – Charge and play Apple device
4. Function keys of acoustics——For realizing the features of the acoustics.
5. Battery box——Support continue power to clock when no outside power.
6. LINE IN port——Port for iPod, MP3 and other audio signal connection
7. iPod USB port——Power charge port for iPod, iPhone and other devices.
8. USB Charge port ——Power charge for other portable electrical equipments.
9. iPod Cable --- Used for connecting iPod, iPhone, etc
10. Audio Cable ---- Used for connecting music player and mobile phone.
UNOMedia 4/5 Series
_______________________________________________________________________
BITTEL
Page 3 of 9
UNO Media Multi-Media Parts
1
2
3
4
闹钟
媒体选择 音响开关
FM选台
设置
开关
音量 贪睡/亮度调节
11
12
5
7
9
6
10
8
14
13
1. Function keys of acoustics: For realizing the features of the acoustics.
2. Lightning Connector (Only for UNOMedia 5): charge and play iPhone 5, Mini
3.
4.
5.
6.
7.
8.
9.
10.
11.
12.
13.
14.
iPad,etc
Intelligent Backlit Display
PIR Area
Multi-Function Cable
Multi-Function charging base
Micro USB Connector
Apple Dock for iPhone 4 and iPad
Lightning Connector for iPhone 5 and Mini iPad
Audio Cable ---- Used for connecting music player and mobile phone
Multi-Function Cable Holder
Infrared Receiving Area ----- Receive the signal of the Infrared Time Control,
USB Charge Port, charging for mobile phone, etc
iPod USB charge port, charging for Apple device.
HOW TO USE
Note: For UNOMedia 3, the acoustic volume can be adjusted by
MUSIC VOLUME+/- button and UNOMedia 4/5 is MUSIC +/- button. In
this user manual, we will use MUSIC VOLUME+/- to explain.
1. Acoustic Part
Press AUDIO ON/OFF key to enter or exist audio play mode, then press
RADIO/LINE IN key to realized cyclical selection of LINE IN and FM-RADIO
mode.
1) Play Apple device
Connect the device to LINE IN port through the audio line;
Connect the device through Apple Dock;
Connect the device by Lightning Connector (UNOMedia 5);
_______________________________________________________________________
BITTEL
Page 4 of 9
UNO Media Multi-Media Parts
Then press the LINE IN key to select the LINE IN mode to realize the audio
playing.
2) Play other devices
Connect the device to LINE IN port through the audio cable, then press the
LINE IN key to select the LINE IN mode to realize the audio playing.
3) Play FM radio
Press RADIO/LINE IN key to select the FM-RADIO mode, then press
TUNING+/-select the needed frequency. With each press the frequency will
change 0.1MHz, press TUNING+/-for while to enter into searching frequency
forward or backward, it will stop automatically after searching FM signal.
4) Press AUDIO ON/OFF to Pause or Play. Press VOUME+/- to adjust the
volume, total level 0-30, factory default is 15.
5) AUDIO OFF mode, press TUNING+ for a while, LCD display ON or OFF (ON
or OFF the hotel mode), ON: volume 0—20, OFF: volume 0-30.
6) AUDIO OFF mode, press RADIO/LINE IN not release, LCD display Time,
Month, Day , Year , DST Zone and easy to view the setting parameters.
7) Detect the device mode intelligently
If telephone ringing or off-hook under FM-RADIO or LINE IN mode, the
telephone can PAUSE audio playing , after the phone call finished or ringing
stopped it can resume to playing mode again.
2. Set Time
Under AUDIO OFF mode (not LINE IN or FM-RADIO working mode) to set the
time
● Press VOLUME- key 1S,hour digit flashing on the LCD , press TUNING+/- to
adjust hour.
● Press VOLUME- key, minute digit flashing, press TUNING+/- to adjust minute.
● Press VOLUME- key or no operation to finish the setting.
● Press VOLUME+ key to adjust 12 hour format and 24 hour format.
3. Set alarm
●Set Alarm Time
1) Press ALARM SET key, the hour digit display on the LCD, press the
VOLUME+/- to adjust the hour.
2) Press the ALARM SET key, the minute display on the CLD, press VOLUME+/to adjust the minute.
3) Press the ALARM SET key or no operation to finish the setting.
_______________________________________________________________________
BITTEL
Page 5 of 9
UNO Media Multi-Media Parts
4. Activate the Alarm
Press ALARM key to start and close alarm. In start mode the alarm and its
mark on the top right corner, when in close mode, the alarm and its mark
disappear.
5. Alarm snooze feature
1) For UNOMedia 3, when alarm ringing, press any key (except for ALARM
button) or pick up the handset, it will activate the Snooze. After 10 minutes it
will ring again.
2) For UNOMedia 4/5, when alarm ringing, it will auto activate Snooze once the
guests approach the phone in 30cm.
Alarm ringing during playing mode, it exist playing mode automatically.
In AUDIO OFF mode, press ALARM VOLUME key to adjust the alarm indicator
volume, each press increase 5, the top level is 20. The default is 10.
6. Adjust LCD brightness
1) For UNOMedia 3, in off-alarm mode, press SNOOZE to adjust the LCD
brightness, there are Mid. Hi and Off, three levels for selecting.
2) For UNOMedia 4/5, normally the Backlit Display is off and it will light when
there is call, operating the phone or somebody approach the phone. In offalarm mode, press SNOOZE to adjust the LCD brightness, there are Mid. Hi
and Off, three levels for selecting.
7. Charge port
1)There are two USB ports, charge for some devices with mini USB line.
* iPod USB port ---For charging iPod, iPhone apple devices .
*USB Charge port—— For charging mobile phone and other peripheral products.
2) LINE IN audio input port --- With 3.5mm dual track audio lines connect
iPod/MP3 to acoustics.
3) Multi-Function cable
4) Apple Dock and Lightning Connector
7. Homing system
Press ALARM for 2 seconds the device enter into homing system. It’s easy
for housekeeping.
8. Change clock
clock’’s battery
First please take off the battery from the battery cabinet (pic 11) on the back of
the phone. Then please install new battery. The specification of the battery is
3V, 50Mah.
_______________________________________________________________________
BITTEL
Page 6 of 9
UNO Media Multi-Media Parts
Note: The anode of the battery should be toward outside. The battery should be
changed every two years
9. Change time
First install two 7# 1.5V batteries into the before using it. Pay attention to the
polarity of the battery. Don’t mix the old and new batteries.
Remote Time Control
1. LCD Display
2. DST SET key——Set DST time.
3. TIME SET key——Set time and date.
4. TIME PROG key——Adjust time and
date .
5. DST PROG key ——Adjust DST time.
6. UP key —— Upward key.
7. DOWN key——Downward key.
Set time with the Remote Time Control
●Press TIME SET key, hour digits flashing, press UP/DOWN key to adjust,
●Press TIME SET key, press UP/DOWN key to adjust minute,
●Press TIME SET key, press UP/DOWN key to adjust month,
●Press TIME SET key, press UP/DOWN key to adjust day,
●Press TIME SET key, press UP/DOWN key to adjust year,
●Press TIME SET key, LCD display the time, setting finished.
Set DST area code with the Remote Time Control
●Press DST SET key, then press UP/DOWN key to set the area code:
00= DST OFF, 01=USA/Canada, 02=Europe/Russia/Swiss;
03= Mexico,
04=New Zealand
Adjust Time
● After above setting, press TIME PROG or DST PROG at the right upper
direction within 10cm near the base LCD to adjust the TIME or DST Time.
Conversion of 12- Hour Format and 24- Hour Format
●When LCD display time, press TIME SET over 2 seconds to realize the
conversion.
_______________________________________________________________________
BITTEL
Page 7 of 9
UNO Media Multi-Media Parts
Note: If the attached Remote Time Control is different than above image, please
according to the attached object.
Maintenance and troubleshooting
1. Acoustics no sound
Check the device connect to power or not
Check the 10pins ribbon cable and AUDIO CONNECTION
2. No signal or nersy noise after radio selected the channel
Adjust the direction of the radio antenna
No the selected channel in local
FCC APPROVAL
Complies with Part 68 of the FCC rules. On the bottom of this telephone is a label
that contains, among other information, the FCC registration number and the
ringer equivalence number (REN) for this telephone. If requested, you must
provide this information to the Telephone Company.
CE APPROVAL
Complies with CE approval.
JACKS
Use RJ11C USOC standard modular jacks.
WARRANTY
This product is warranted for a period of 12 months from the date of purchase
against faulty materials or workmanship. If during this period a defect arises, we
may repair or replace the product, at Bittel’s discretion, provided that:
1) The product has not been used for any purpose other than normal use,
2) Unauthorized product repair or modifications have not been attempted.
3) The product has never been used in a harsh or corrosive environment.
4) No damage in transit
THIS LIMITED WARRANTY GIVES THE BUYER SPECIFIC LEGAL RIGHTS.
THE BUYER MAY ALSO HAVE OTHER RIGHTS WHICH VARYFROM
JURISDICTION TO JURISDICTION.
This warranty is only valid for merchandise purchased directly from Bittel or
dealers or distributors Bittel Co. authorized .
FCC WARNING
_______________________________________________________________________
BITTEL
Page 8 of 9
UNO Media Multi-Media Parts
This device complies with part 15 of the FCC Rules. Operation is subject to the
following two conditions: (1) This device may not cause harmful interference, and
(2) this device must accept any interference received, including interference that
may cause undesired operation.
CONTACTING BITTEL
Telephone:
(86) 633-2212119/2212113/2212103/2212125
Internet: www.bittelgroup.com
Email:
[email protected]
Address: Shandong Bittel Electronics Co.;Ltd.
No. 1 Rizhao North Road, Rizhao,
Shandong, 276800, China
Copyright © 2013 Bittel Inc. All rights reserved.
M510680110000 V2
_______________________________________________________________________
BITTEL
Page 9 of 9
UNO Media Multi-Media Parts