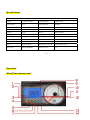
1
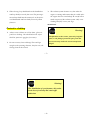
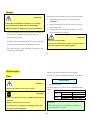
Meaning of the Signs Please pay special attention to the statements and instructions that follow these signs: Attention! Warning! This sign draws your attention to important advice and instructions, which if disregarded can lead to the risk of accident and injury. Each one of these safety precautions informs you of the following. This sign draws your attention to information about improper or risky handling of your scooter, which can cause damage to the machine Environment! This sign draws your attention to important instructions about safeguarding the environment. What kind of danger is at hand? What may happen? What you can do to avoid or reduce the risk of injury or damage to equipment? ~1~ Safe Driving ¾ Warning! Make yourself easy to see to avoid an accident which is not your fault: ─ Wear bright or reflective clothing. ─ Do not ride in the blind spot of other Riding a scooter requires you to observe specific motorists. safety precautions to ensure you personal safety. ¾ Please familiarize yourself with these precautionary entrances and at side street junctions. measures before you start riding. ¾ Rules for safe riding ¾ Observe the local laws and regulations of the country you are riding in. ─ Keep within the speed limits and never Always make a “pre-ride inspection” before you ride faster than conditioned warranty. start the engine. By doing this you protect the ─ signal well before you make a turn or change machine from damage and may prevent an lanes. Your size and maneuverability could accident. ¾ Be especially alert at crossroads, exists and surprise other motorists. Persons in possession of a valid scooter driver’s license must only drive the scooter. ~2~ ¾ When driving, keep both hands on the handlebars ¾ The exhaust system becomes very hot when the and keep both feet on the foot rests. The passenger engine is running and remains hot for a while after must always hold onto the motorcycle or the driver the engine has been switched off. Be careful not to with both hands and have both feet on the pillion touch any parts of the exhaust system. Only wear footrests. clothing that fully covers your legs. Amendments Protective clothing ¾ Warning! Always wear a helmet as well as boots, gloves or protective clothing. You should also wear a face Modifications to the scooter, removal of original shield or protective goggles if necessary. ¾ parts, or the fitting of non-CPI spare parts and accessories may render the scooter unsafe and Do not wear any loose clothing! This could get illegal. caught in the operating elements, the foot rests, the driving chain or the wheels. ~3~ Warning! The installation of a performance kit results in the loss of warranty and road traffic admission. ~4~ Specifications MODEL NO. GTR 180 Engine 1 cylinder, 4 stroke Front suspension Hydraulic fork Displacement 169 cc Rear suspension Oil pneumatic shock absorbers, adjustable Cylinder bore/stroke Ø61×57.8 mm Compression rate 10.3 : 1 Emission limits Euro 2 Front tire 110/70-17-4PR Cooling Liquid Rear tire 120/80-16-4PR Transmission Automatic CVT Fuel capacity 9L Gross weight 116 kgs Starter Electric Lubricating system Separation Disc Brake Front ∮280, Rear ∮ 210 mm Max. torque 15N-M/5000RPM Battery YTX9A-BS, 12V/9AH Starter Electronic/Kick Dimensions L x W x H 1932x725x1163 mm Max. power 8.9KW/7000RPM Exhaust system Steel ~5~ Operation Mastiff instrument panel ~6~ 1. Battery voltage alarm When battery voltage is equal or lower than 12,0V the system starts the alarm routine, and it begins to blink on the battery logo and the MIN indication. This feature has no effect on the other dashboard function. Alarm is reset when the battery voltage rises up to 12,5V. Alarm is operative every time the system detects a low voltage condition. 2. Average speed function (AVE) This information is displayed on the small 7 segments (digits 1÷5) followed by the AVE logo. The value shows the average speed of the vehicle (Km/h or Mph depending on the selected measurement unit) calculated in relation of the distance (TD) and the time needed to cover it (LAP). Date is refreshed every 0, 1 not stored in the resident memory. It’s possible to reset this value in the AVE function pressing for 3 seconds the pushbutton until all digits are set to zero. This operation is possible whether the vehicle is moving or is stationary. Another reset is foreseen when LAP or TD have reached their maximum value. 3. Automatic chronometer function (LAP) This feature works together with TD and AVE and it is displayed on the 1÷5 digits followed by the LAP indication. This value is the effective time of travel of the vehicle and it could be expressed in MM:SS if time is less then 1 hour and HH:MM if time is more than 1 hour. Working together with TD counter, it starts automatically at the first pulse of the speed sensor, and it stops automatically in 3 sec after the last pulse. When LAP is operative the separation digit between hour and minute is blinking, this does not happen when the LAP function is not in action. The LAP date is not saved in memory, and it is possible to reset it by pushing the relative button for three seconds; this operation is possible whether the vehicle is moving or is stationary. By resetting LAP, also TD and AVE will be set to zero. 4. Fuel indicator The system turns on the indicator when the connector input # 15 is low, fill with gasoline as soon as possible. 5. Oil indicator The system turns on the indicator when the mileage counter meets 300km at the first time and every 1000km afterwards; please replenish 4-cycle CPI mixed oil as soon as possible. ~7~ 6. Radiator temperature liquid indicator The system turns on the indicator when the connector input # 16 is low. 7. Direction light indicator The system turns on the indicator when the status of #2 or #13 are high, synchronized with the direction light indicators activation. 8. Speedometer Forward speed is based on km/mile per hour. 9. Rev counter function (RPM) ‧ This information is shown by the stepper motor. ‧ Maximum value displayed = 11000 Round per minute as indicated by the graphic scale. ‧ The value is expressed in round per minute. 10. Automatic trip function (TD) This feature permits to visualize the automatic partial totalizer on board. It is displayed on the 2÷5 digits with the TD logo. The displayed data are relative to the distance covered by the vehicle, and it could be expressed in Km or Miles (depending on the selected measurement unit). Maximum resolution is 0, 1 Km or Miles. This counter starts automatically at the first pulse of the speed sensor. Date are not saved permanently in memory, in fact it is possible to reset the TD value by pressing for more than 3 seconds the pushbutton until on the display the TD value is reset to “000.0”. TD resetting (that is possible also while the vehicle is moving) has also effect on the LAP and AVE value that will be set to 0. When the value reaches 999.9 the system sets to 0 on the three digits and restarts counter. 11. Totalizer function (TOD) This feature describes the function/visualization of the on-board Totalizer. The information is displayed on 1÷5 digits and it has near the TOD indication. It is possible to choose the measurement unit, the possibility are km (default value) and Miles. This value 2 memorized in a non-volatile memory (E Prom) and it is updated every Km done. The standard use of the instrumentation does not permit to erase the memorized value. The maximum value that is possible to show is 99.999 km (or Miles), over that the Totalizer will be reset to zero. Minimum resolution possible is 1 Km/1 Miles. ~8~ 12. Current time function (Time) This feature visualizes the current time using the 1÷5 digits. The time format is HH:MM and it is always displayed even if the micro-controller switches to Sleep-Mode status. The clock set up is only possible when the vehicle is stopped. To modify the current time it is necessary to push the button in the TIME indication function until only the TIME logo and the dedicated digits remain active. At this moment it is possible to modify the hour value first, and then minute value, data that could be changed is blinking at f=1Hz duty=50%. A short hit to the pushbutton increases the selected value of one unit. To switch from minute to hour and vice versa it is necessary a long hit on the pushbutton whereas to return to the operation mode it is necessary to press the pushbutton for 3 seconds at least. Remark The system switches to operating mode if after 20 sec no setting or changes are mode. ‧ Visualization sequence from 0:00 to 23:59 ‧ Clock accuracy±2.5”/day ‧ The current time information is not saved in memory Remark When entered in the clock set up if speed is≠0 the system switches automatically to the standard operative mode. All the modifications made before speed≠0 are saved in the memory. 13. High beam indicator If dimmer switch is at “HI”, the indicator will light. 14. Low beam indicator If dimmer switch is at “LOW”, the indicator will light. 15. Measurement unit setting Keep pressing the pushbutton in TOD function till the only information displayed is the wheel circumference and the other ones are switched off. A long hit will switch to another digit of the total value. When the new value setup is finished and the last significant digit is blinking! It is necessary to keep pressing the pushbutton for at least 3 secs to save the new data. At this point the system shows 2 possible measurement units KM/H or MPH and the selected one is blinking. When the new data is saved, the system switches to the normal operative mode. ~9~ Starting the Engine Starting a cold engine: Attention! Read these operating instructions carefully before driving your scooter. ¾ Fold up the side stand. ¾ Turn on the ignition. If the lights are on, switch off the light on the left handlebar controls to make all the battery power available. ¾ Warning! There is a danger of poisoning if the engine is run in enclosed spaces. “START” Press the button in the right handlebar controls (the starter starts the engine) START ENGINE WITH KICK STARTER PEDAL: ¾ If scooter has not been used for a long time, it may be uneasy to start. Turn throttle grips by 1/8-1/4 round and start engine again. ¾ ~ 10 ~ If cold start, warm up engine for 2-3 minutes. Attention! ¾ Set engine stop switch to ¾ Open the throttle about 1/4 turn. USA version: If the engine does not start immediately, release the When starting the engine, the light will be starter button, wait for a few seconds and then simultaneously on by a relay connection! press it again. Never press the starter button for ¾ longer than 5 seconds. Fold up side stand. ¾ Turn on the ignition. Press the “START” button in the right handlebar controls (the starter starts the engine) Starting a warm engine ¾ . If the lights are on, switch off the light on the left handlebar controls to make all the battery power available. ~ 11 ~ Ignition Lock 1. : The electric power of engine is turned off and engines stops You can take off the key. 2. : The electric power of engine is connected and you can start. You cannot take off the key. 3. : The steering handing is locked. You can take off the key. ~ 12 ~ Warning: Front wheel suspension If there is any damage or The inspection of front fork leaking oil, you should Make sure to keep scooter on stable location to take it to your dealer to prevent turn over. check. 1. Visual inspection The inspection of steering bearing Check the surface of front fork internal tube, whether scratched, damaged or leaking oil. The worn or loose of steering bearing can be dangerous. Place a wooden case under buttom of 2. Operation inspections engine to keep wheel away from floor. Hold the Place scooter on a level place buttom of front fork and shake fork forth and back. If a. Put your hands on the grips, keep scooter on the it is loose, check with your dealer. vertical position, and hold the front rear brake Attention! handle to prevent scooter slippery forward. b. Operate handlebar up and down for several times to check the operation situation of the front fork. If you are not sure, check the damping adjustment before driving! ~ 13 ~ Warning When the brake handler is in operation, if you feel loose, it means something wrong with braking system and it is dangerous. Don’t drive it before the problem is solved, and take it to your dealer to check at once. Clearance Front brake@ Series 10~20 ㎜ Drum brake Disk brake 3~5 ㎜ Warning! Rear brake@ 10~20 ㎜ The installation of performance increasing components results in the loss of warranty and 3~5 ㎜ makes it illegal to ride the scooter on public roads. ~ 14 ~ Fuel Tank Cap 1.Open the cover under fuel tank cap. 2. Open: Insert key into keyhole, turn right and then draw fuel tank cap back. 3 Close: Push fuel tank cap to the original position, turn left and take out the key. Warning! Before you start your ride, make sure that the fuel tank is closed tightly. ~ 15 ~ Seat Lock Open: 1. Insert switch key into the keyhole and turn it left, you willbe able to pull rear seat up. 2. Pull the ring in the case to pull open the seat. Close: Press the seat, it will lock automatically. Warning! Never ride with a helmet hanging from the scooter. The helmet may be caught by something or knock against something, ~ 16 ~ Lubrication Change oil and clean filter at first 300km and every 1000km after. Gasoline Make sure the fuel tank has enough fuel. Assigned fuel Total 4 stroke E/G monopoly oil Using fuel without lead only. 1.0 liter SAE 15W-40 ~ 17 ~ Running in It is important for the first 1000 km of a scooter if it is to be used for long. Thus, please read following information carefully. It must not carry stuff overweight in first 1000 km because of a new E/G,. each part will interact to get the 2. 150~500 km Avoid long term operation over 1/2 throttle. 3. 500~1000 km Avoid driving speed over 3/4 throttle. correct operative clearance. In this period, you must avoid Warning extensive wide open throttle or any action to cause E/G over heat. You must change gear oil after driving for 500km. Warning If you find anything wrong with E/G in the period of running in, you should contact your dealer at once. 4. above 1000 km Avoid long term operation with completely wide open throttle, you should occasionally change speed. 1. 0~150 km Warning Avoid operate over 1/2 throttle. Stop the E/G for 5~10 minutes after running for one hour. Often change speed of If you found anything wrong with E/G in the period of scooter and avoid operate at the same location of throttle running in you should contact your dealer at once. without brake. ~ 18 ~ Operating Instructions Braking Always apply both brakes simultaneously. Just using one brake reduces the braking effect. Warning! Please observe the following instructions: ¾ Reduce speed when approaching a curve. Braking in a curve may cause skidding. ¾ Apply the brakes with care on wet roads. ¾ On long, steep, downhill streets, use the braking effect of the engine by shifting down. You can supplement this by applying both brakes intermittently. Never brake too hard. This can lead to the wheels locking and the scooter out of control. ~ 19 ~ Stopping the engine Turn off the ignition to switch off the scooter. Lock the steering to prevent theft and lock the fuel cock. Attention! If the scooter is left unattended (even for a short period) you should always remove the ignition key. Do not park the scooter on soft or sloping ground. Warning! The exhaust silencer and pipes can become very hot! The exhaust can continue running for some time after the ignition has been switched off. Always park the scooter so that pedestrians and children cannot come into contact with these parts. ~ 20 ~ Refueling Warning! Warning! There is a danger of fire and explosion when handling fuel. Never refuel in an enclosed space! Recommended fuel: Unleaded regular petrol with an octane rating of 89 or higher. Do not overfill the fuel tank. Make sure that no fuel is spilled onto the hot engine. Fuel tank capacity: Total: 9L ~ 21 ~ Winter Driving Instructions If you also drive your scooter in winter and live in a country with a moderate or cold climate, please observe the following instructions: ¾ Before winter starts, protect the chromium-plated and unprotected metal and painted parts with a corrosion protection agent recommended by a specialist dealer. ¾ Apply this corrosion protection agent to the scooter as specified in the maintenance schedule. ¾ Before the winter period starts, treat the ignition lock with a commercially available lock lubricant. ¾ At the end of winter remove all protective measures. ~ 22 ~ Simple Maintenance Tool set This user’s guide contents some information about maintenance. However, a proper torque-wrench to lock screws is necessary. Tool set Attention! If the scooter is modified, it will effect the scooter performance and cause danger. ~ 23 ~ 2. Take off oil plug and drainage-screw to release gear oil. 3. Tight drainage-screw to 1.8 kgf-m. Gear oil 4. Add gear oil 1. Place scooter on the level location, then take off the 5. Install oil plug and check gear oil if it is leaking. cover. Total gear oil 0.16L Switch 0.14L The series of gear oil SAE90 oiler screw Attention! Drainage screw Prevent any extra stuff to get into gear tank when you add or release gear oil. Moreover, prevent gear oil to stick on the tire. ~ 24 ~ Attention! Air Cleaner 1.draw the Air cleaner filter Don’t use oil or low ignition point of solvent to wash air cleaner. It will cause fire or explosion, Warning Don’t fold and twist filter otherwise it will be damaged. 2.Cover proper SAE10W30 oil after filter is wrenched to dry. 3. Install filter, filter cover and left side cover. ~ 25 ~ Grips Warning! Turn around grips; check the operation situation and Don’t operate E/G without installing filter to avoid free clearance. Make sure grips will return to screw. serious worn away of piston and cylinder. When it looses, it will return to initial location automatically because of elasticity. Attention! Don’t make oil spread or overflow on exhaust pipe. Because the appearance temperature is quite high; it will fire when it touches oil. ~ 26 ~ Brakes Attention! Check the brake fluid level before every riding! Air in the brake system reduces the braking efficiency and it is dangerous for you and others! Checking the brake fluid level in the front wheel brake: ¾ Normal fluid level is between “UPPER” and “LOWER”. ¾ When the fluid level is near the lower level mark, check brake pads. ¾ If brake pads are not in good condition, it usually means somewhere is leaking. Please note that new brake oil hose have to be worn in during the first 500km in order to develop their Attention! optimal braking effect. If there is not enough brake fluid, air may get into the braking system and reduce the braking efficiency. Do not mix brake fluids! This can cause chemical reactions, which can have a deleterious effect on the braking effect! For your own safety, your CPI dealer should carry out bleeding the brake fluid. ~ 27 ~ Maintenance Observe the legal tread depth in your country. In any case, the tires should be changed, at the latest. Tires Tire Pressure Attention! 1 The pressure of tire You must adjust tire pressure to meet standard before Always ride with the correct tire pressure! riding. Warning! Worn tires reduce the scooter’s stability and may lead to TIRE PRESSURE INFORMATION 1 PERSON 32PSI/2.3BAR FRONT 2 PERSONS 36PSI/2.5BAR 1 PERSON 32PSI/2.3BAR REAR 2 PERSONS 36PSI/2.5BAR accidents. Replace worn tires with new ones! Let CPI dealer or authorized workshop perform your tire repairs and replacements. Remark: When you measure tire pressure, you have to wait until the tire is cool. ~ 28 ~ Attention! Warning! Don’t carry stuff overweight to prevent tire gets burned and cause danger. Use only those tires, which are approved for your scooters (see the Technical Date section and the 2 outer tires. entries in the authorized documentation) You must check the situation of tire before riding. If outer tire is over-worn away or with nail, glass crumbs Warning! on it or with crack on the surface, take it to your dealer to fix it at once. Change the same size of tire. It is forbidden to smoke when handling fuel or cleaning fluids with similar properties-there is a danger of fire and explosion. ~ 29 ~ Carburetor Attention! The cleaning of the carburetor, especially the jets and the fine filter under the float valve must only be performed in a workshop. For this purpose the carburetor must be dismounted from the engine. The fine filter in the carburetor prevents dirt from entering and contaminating the nozzle system. Engine problems (such as the engine stalling at high speed) may be caused by dirt in this filter! The carburetor has been adjusted optimally by the Do not confuse engine failure with the regulation of manufacturer or during the inspection done by your the speed by the speed limited in the ignition box. dealer. Any unauthorized change of the settings has a negative effect on the following: ¾ Engine performance ¾ Petrol consumption ¾ Exhaust emissions ¾ Environment Petrol hose and connections: ¾ Check the clamps are tight ¾ If required, replace the hose with an original hose from the CPI dealer. ~ 30 ~ ¾ The specification of fuse. Fuse The change of fuse. Turn off the main switch, check fuse whether it is melt apart. ¾ Please follow rule of capacity to change when fuse is changed. ¾ Take off the screw of battery, open cap, the fuse is in the fuse box of battery. ¾ Open fuse box, then take fuse out and pull clip out ~ 31 ~ z z z When you change electrical parts (lights and speedometer), please use assigned specification parts. If the used specification is warp fuse it is easy to break as battery will afford different voltage. Avoid washing with strong running water. Warning z z z ~ 32 ~ Disassemble Don’t put to much force on wire clip when you take it off. Assemble Please check clip, wire whether loose after fuse is installed, as this is the main reason to cause temperature increasing. You should note it. Don’t use the fuse except assigned capacity, it is main reason to cause wire over heat and fire damage. z Battery Please take battery away, if the polarity of battery is decayed. Battery inspection z Please cover with slightly piece of Grease or Petrolatum This type uses the battery without filling water. Vaseline on the terminal of battery, and then install You don’t need to fill and check. connector after you clean it. Warning z Don’t open Battery cap absolutely. z The automatic discharge ability of battery will reduce, if you don’t use it for a long time. Take it off from scooter and charge it, then place it in cool and ventilated location. z If scooter stops to use for a long time, please take out Warning z assembling and disassembling. z positive first, then assembles negative. z If the screw of battery is loosened, you should tight it completely. Please take screw of battery out and loosen battery screws when you want to clean it. You must turn off the main switch when you disassemble, then take negative off but install the negative of the battery. The polarity You must keep away from fire when you are ~ 33 ~ If the scooter is not going to be ridden for over 6 weeks, the following steps are to be undertaken before putting it in the garage: ¾ Remove the battery and store in a dark place where the temperature is between 5℃/40℉ and 20℃/68℉. Attention! Recharge when the battery is in the scooter: Switch off the ignition. Ensure that the polarity of the charging cables is correct. Ensure that the r-echarging site is well ventilated. If necessary, the battery must be recharged first ¾ When removing the battery, first disconnect the negative lead and then the positive. ¾ When re-installing, first connect the positive lead and then the negative. ¾ Before driving the scooter again, check that the battery is charged and, if necessary, re-charge. ~ 34 ~ Warning! Warning! Store the battery out of the reach of children! Oxyhydrogen (electrolyte gas) is emitted during charging! Ensure that there is adequate ventilation in the area where you are charging the battery! Smoking and naked lights are forbidden! Avoid making sparks! ~ 35 ~ Spark Plug Inspection 1. Cleaning: ¾ It is the best way to clean with the cleaner of spark plug. 2. Adjustment: ¾ Normally the side electrode gap is 0.8-0.9 ㎜. (As shown) 3. Recommended spark plug: NGK-DPR7EA-9 ¾ Too large gap, deposit and electrode erosion will result in incomplete spark. ¾ Do not use the spark plug not recommended. ~ 36 ~ Cleaning and Preserving Frequent and thorough cleaning not only improves the appearance of your scooter but also improves its overall operating performance. The life expectancy of many of the engine components is also increased and corrosion prevented. ¾ Seal the end pipe of the exhaust to prevent water entering. ¾ Soften up heavy soiling with copious water before the actual washing process. ¾ Use detergents which do not attack the painting or other protective surface layers to remove dirt. Pay attention to the information provided by the manufacturer of the cleaning substance. ¾ A brush helps to clean heavily soiled places. ¾ Thoroughly rinse dirt and cleaner off with water. ~ 37 ~ ¾ Immediately after washing, dry all surfaces with compressed air or a soft cloth. ¾ Clean the seat with vinyl upholstery cleaner to High pressure water, e.g. from a high-pressure keep the cover soft and shiny. cleaner, can damage certain components of the scooter. Therefore spray with a low-pressure spray. ¾ Car wax can be applied to all the painted and The following areas are to be protected from water chromium-plated parts of the scooter. getting in: Compound cleaning and waxing agents should ─ Carburetor and the intake area below the not be used. ¾ Start the engine and go for a short test ride. Seat ─ Wheel hubs ─ Instruments ─ Ignition switch ─ Exhaust outlet ─ Main brake cylinder Attention! ~ 38 ~ ¾ Slide back the protective caps on the operating Environment! levers on the handlebars, dry the surfaces underneath and lubricate the joints. Ensure that you dispose of the waste water according to the regulations. ~ 39 ~ Storage If you are going to store your scooter for an extended period (60 days or more) then a number of precautionary measures must be taken to prevent any damage during this period. After the scooter has been thoroughly cleaned, prepare Attention! . When using the starter only to rotate the crankshaft, the spark plug cable must be removed and grounded so that there will be no sparks. the scooter for storage as follows: ¾ Empty the fuel tank, the fuel line and the float housing of the carburetor. ¾ Remove the spark plug. Squirt a little engine oil SAE 20W20 into the spark plug hole, and then replace the spark plug. Turn the engine over a few times with the starter (ground the ignition cable) in order to distribute the oil over the cylinder walls. ~ 40 ~ ¾ Adjust the tire pressure to correct one. ¾ Put the scooter on stands so that both wheels are off the ground. ¾ When storing in humid or salty air, a light film of oil must protect all exposed metal surfaces. Do not allow oil to come into contact with rubber components or the seat. ¾ Remove the battery, recharge it and store it in a dry place. It must be recharged once a month. The battery must not be stored at either very high or very low temperatures (over 30℃/86℉ below 0℃/32℉ Attention! Necessary repairs should be made before putting the scooter into storage. Do not start the engine during the storage period. ~ 41 ~ Re-start after Storage Attention! ¾ Charge the battery and fit it, making sure that the polarity is correct (black cable is negative, and red cable positive). ¾ Fill the tank with new petrol. ¾ Check the oil level. ¾ Check the brake fluid level. ¾ Check the tire pressure. ¾ Check operating safety in accordance with the road traffic regulations. When working on the ignition system there is danger from the high voltage. Therefore, the ignition must always be switched off. Attention! To work on the fuel system, one has to avoid the risk of fire and explosion. Smoking, naked lights and sparks are forbidden. ~ 42 ~ Driving Instructions ¾ Safe driving Lights and horn: Check the headlight, rear and brake lights, indicators, warning lights and horn are functioning properly. ¾ Warning! Tires: Check the condition and pressure of the tires. Check that your scooter is roadworthy before driving. It ¾ is essential to carry out a complete safety check. Fuel level: Check the fuel level and fill up if necessary. Warning! Pre-ride checks: The following list of checks does not take very long, but the If you notice any irregularities before driving, the increased safety gained is worth much more than the few necessary repairs must be made before riding the moments needed for the checks. ¾ scooter. Front and rear brakes: ~ 43 ~ ¾ Individual riding styles: Always observe traffic regulations strictly, especially the speed limits. Warning! Loading: Your safety on the road is very much determined by your personal conduct and the way you drive. Warning! Therefore: Carrying baggage affects the scooter’s performance ¾ Do not drive when you are tired. and stability because it changes the center or gravity. ¾ Never drive when you are not fit to ride (for Adjust your way of riding and speed accordingly. Do instance, when you are under the influence of not exceed the maximum authorized load! alcohol, drugs or medication) ¾ Always adjust your speed to road and traffic conditions. ~ 44 ~ The GTR is not designed for carrying a large amount of baggage. However, if you want to take baggage with you, please observe the following instructions: ¾ Keep the baggage weight as low as possible. ¾ Place the baggage as near as possible to the center of gravity of the scooter. ¾ Distribute the weight as evenly as possible. ¾ Check regularly that the baggage is secure. No part of the baggage or securing gear may come into contact with any of the scooter’s moving parts, e.g. a wheel. ~ 45 ~ Drive Economically and Protect the Environment Environment! Using moderate acceleration reduces the fuel consumption; environmental damage and engine wear The engine should not be warned up while stationary. considerably. Environment! When the engine is idling it takes a very long time for it to reach operating temperature. During the warm-up period the wear and pollutant emissions are especially Try to avoid driving at maximum speed. high. Therefore, ride off with a low engine speed shortly after starting the engine. Fuel consumption, exhaust gases and vehicle noise increase disproportionately at high speeds. Environment! Do not accelerate at full throttle. ~ 46 ~ Environment! Drive at a steady speed and by alert. Unnecessary acceleration and braking may result in higher fuel consumption. Environment! Turn the engine off during traffic delays. ~ 47 ~ General Remarks All maintenance work should be carried out at regular Attention! intervals. If you do not process the necessary tools or The distance intervals specified in the maintenance knowledge to carry out repairs or maintenance, you schedule are guidelines. are advised to get this work done by your They may be affected by the following factors: authorized CPI dealer. ¾ How you ride ¾ Weather conditions ¾ Road conditions Improperly performed repairs and maintenance work may lead to the loss of warranty claims. Regular maintenance work, adjustments and lubrication carried out by your authorized CPI dealer provide the basis for many years of safe and efficient operation of your motorcycle. ~ 48 ~ The on-board tool kit supplied can be used not just in the case of a break-down but also for carrying out some of Warning! the maintenance work specified in the maintenance schedule. During the warranty period, your CPI dealer should Do not make any of your own adjustments or changes carry out all maintenance works. to the engine or chassis components, by doing this, Fire and safety at work regulations must be observed you put yourself and others at risk. ¾ during all care and maintenance works! Geographic location Environment! Depending on the severity of the above-mentioned factors, even shorter intervals may be necessary. The instructions in this chapter provide you with information on how to perform small maintenance tasks and help in the event of a break-down. Please observe the environment and fire protection regulations when handling fuel and lubricants. Dispose of used oil according to the legal regulations. ~ 49 ~ Only use the fuel and lubricants recommended by us! Top up lubricants or brake fluid only with the original fluids. Mixtures can have adverse effects or cause damage. Let CPI dealer determines the cause of losses of fuel, lubricants and brake fluid - there could be leakage! ~ 50 ~ Br R/W L/B Br Ch L Ch R B B G/R G Y Dg R G/R G Br Y Dg G/Y G/R Br Br L/B Dg L B/W Ch L B/W LG/Y k m /h G LG/Y Circuit Diagram Br Po MODLE LG/Y POSTION LIGHT G/W Br G/W G/Y G/W POSITION LIGHT G/W LG/B LG/B Br SPEED SENSOR Pass ~ 51 ~ Identification Number 1. Key number Your key's identification number is engraved on the plastic plate beside. Your key is as shown in the above photo. Record this number at the scooter certificate and store carefully. Provide for reference if you need a new key. 2. Manufacturer’s data plate and frame number You can see the manufacturer's data plate sitting between the handle and the front wheel. Take off the right side cap on the right leg shield's cover, the frame number will appear. ~ 52 ~ ~ 53 ~