1
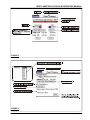
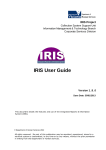
FLAME MONITORING SYSTEM
FLAMETOOLS FOR PALM
INSTALLATION GUIDE AND USER MANUAL
WORLD LEADER IN FLAME MONITORING
IRIS FLAMETOOLS FOR PALM OPERATING MANUAL
INTRODUCTION
FlameTools for Palm is a software package that provides setup, monitoring and diagnostic tools for IRIS
Flame Monitoring Systems. The software runs on a
Personal Data Assistant (PDA) using the Palm Operating System.
FlameTools for Palm requires the IRIS Interface kit
Model PDA-P53x and is compatible with the following
IRIS Signal Processors:
Model P520 / P522 (Modbus RS-422 connection)
Model P531 (Modbus RS-422 and Modbus EIA-232
connection)
Model P532 (Modbus RS-422 connection)
Model 700 (IRIS RS-422 connection)
Model 800 (IRIS RS-232 connection with optional cable)
SYSTEM REQUIREMENTS
Palm Powered PDA with a serial EIA-232 port.
Interface Cable to match the IRIS Signal Processor
INSTALLING THE SOFTWARE
The software is a standard “prc” executable for Palm
OS and can only be installed by HotSync.
Note: this software is copy protected and a
code key is required for operation.
A serial number is generated by the program
when it is installed this serial number is needed
to provide a Code Key that will unlock the program.
After the program is unlocked the key is automatically saved in the device and via hot sync.
A hard reset (erase all data from the device) can
be tolerated if a Hotsync is used to restore the
program.
UNINSTALLATION AND UPGRADING
When upgrading to a later version of FlameTools for
Palm, do not delete the currently installed software.
Doing so would delete any stored data and settings
related to the FlameTools program. Your Code Key
Page 2
will also be deleted. Simply install the new version
over the existing version.
CONNECTING THE PALM PDA
The connections described below uses the IRIS PDAP53x interface kit available separately from IRIS.
See figures 13A to 13D.
Palm PDA to P531 Front (RS-232) connector:
Plug the Palm connector into the Palm universal
connector (bottom).
Plug the other end of the converter into the
“Interface” port on the front of the P531.
NOTE: The Palm PDA will be charging (no additional power is required)
Palm PDA to P532 / P531 or 700SP Modbus connector:
Plug the Palm connector into the Palm universal
connector (bottom).
Plug the other end of the converter into the DB25 F
to 6 pin modular adaptor.
Plug the 6 pin modular adaptor into receptacle on
the P532/P531 or 700SP.
Optional RS-422 devices can be “daisy chained”
from the other receptacle.
NOTE: The Palm battery will discharge unless the
external power supply is connected.
Palm PDA to P522 Modbus connector:
Plug the Palm connector into the Palm universal
connector (bottom).
Plug the other end of the converter into the DB25 F
to 6 pin modular adaptor.
Plug the 6 pin modular adaptor into the modular to
TRM5 / 4 pin adaptor
Plug TRM5 / 4 pin adaptor into the receptacle at
the base of the P522
Optional RS-422 devices can be “daisy chained” by
making parallel connections.
NOTE: The Palm battery will discharge unless the
external power supply is connected.
DO NOT: leave the connector plugged into the Palm
while not in use. (The palm will be discharged).
IRIS FLAMETOOLS FOR PALM OPERATING MANUAL
FEATURES
Flame Wizard Theory and Functionality:
Premise 1:
Flame ON should be set lower that
the lowest acceptable flame signal when no other
burners are on. (Lowest background signal).
Premise 2:
Flame OFF should be set higher than
the highest background signal.
Premise 3:
The gain should be set to give a
reading of 1200 when lowest acceptable signal and
background.
Premise 4:
It is almost impossible to achieve 1
and 2 above consecutively.
To provide filter wizard functionality it is necessary to
configure the furnace for two radically different signals.
1. When the furnace is a dark as possible with one
burner at its minimum intensity.
2. When the furnace is at full capacity with only the
burner in question turned off.
Using FlameTools for Palm it is possible to capture
data on the wizard whenever the current furnace load
is appropriate. This data can be saved. When both of
capacity scenarios have been recorded the operator
can compare the specific samples and determine the
best settings for the flame scanner.
For IR gain and filter this can be done using Auto
Sample (from less than 2 minutes to greater than 1
hour).
After comparing two samples FlameTools will
provide recommended settings.
For UV gain or 700/800 series viewing heads or fixed
filter IR a similar result can be accomplished by using
Hi Low History:
After the level of the furnace / flame is at an
appropriate load then reset the history of the
channel in question. (global history reset menu is
also available)
Flame Tools will record the highest and lowest
signal and the time they took place for all devices
detected. (even ones not currently being displayed)
Once these values have been determined the
difference between the highest low flame and the
lowest high flame and set flame off and flame on
25% and 75% between these values.
Given the Hi Low history and the filter samples signal
fluctuation and variability of different settings can be
determined.
For example: There may be other configuration
parameters that should be optimized and still
provide adequate discrimination at another filter
level.
Configuration Archive Functionality:
All device parameters can be saved to the Palm
Memo Pad:
Can be saved one at a time or automatically saved
on detection.
Can save labels or not (for use on spread sheets).
Standard PC to Palm desktop access.
Saved on Hotsync and can be imported to
documents.
Edit on your Palm with Memo Pad or IRIS Memo
(the latter can be used to send the configuration to a
device for restore or clone functionality.
QUICK START GUIDE
Connect the Palm PDA to the P53x or P52x device
accordingly (see connector guide).
From the “ALL” or “IRIS” category select Flame Tools
to start the program.
Communications
If the correct device is not displayed: Tap the COMMUNCATIONS button in the upper right corner. It will
read DETECT! if no device has been detected.
You should now see the communications screen with
all the addresses listed.
1. Select the device type from the drop down menu.
If you are plugged into the front port of the P531,
the Baud and Address #64 will be selected
automatically, or just tap the P531 icon in
the lower right corner (where 64 would be)
2. Or select baud rate and then tap on the address
number. (recommended)
If a device is detected at that address:
The address will turn green
The device and version will be automatically
updated.
Page 3
IRIS FLAMETOOLS FOR PALM OPERATING MANUAL
3. Alternatively you can Detect devices:
NOTE: Only the correct baud rate MUST be
selected before detection. Faster detection may be
done by manually tapping known addresses and
waiting for detection. (2 seconds)
Note: Shaded addresses will be queried and may
cause a delay indicated by delayed packet display (The Red Circle line).
One P53x or three P52x can be green (displayed) at
once. The last detected device will be green. For multiple P52x selections just tap the address and wait for
it to turn green.
4. Push DONE when you are ready to view the Green
addressed device(s)
Main Screen:
This is the screen that will be displayed at start up:
The main page is divided into a top status line and 6
sectors. Each of the 3 channels is divided to a Primary and Alternate sector with the bar graph in between. (P522 areas are divided into A and B sectors).
Minimal instructions:
Tap the "VH #" text to access viewing head pages (for
each sector).
Tap the "Chan" text to access channel pages (for each
sector).
Flame on , off and alarm "flags" can be dragged (even
gray ones). Tapping flags will show current setting.
NOTE: Most pages and alerts have "Help screens"
and menus hidden behind the page title.
If No device detected then go back to the Communications form and detect one.
Check Save whenever detected.
This has the effect of saving each configuration
every time an address box turns green in the communications form.
Tap "OK"
This will take you to the communications form.
Tap "detect"
Each time an address turns green its configuration
is being saved.
After all addresses have been detected exit FlameTools and Hot sync.
Open the Palm desk top application on the PC
Click Memo Pad
Select IRISconfig category
Select all configurations that you would like to send to
excel.
Copy the selected items
Open excel and click on the First cell (A1)
Paste the cells into the spread sheet
The Excel macro source code can be found on the
IRIS web site. It will allow you to rearrange the saved
data in to one column for each device.
RESTORE AND CLONE
Delayed Packet indicator: The red circle with
line could mean lost communications (if steadily
on) Occasional flashes are normal especially if changing pages or viewing alerts.
The restore and clone feature allows you to restore
configurations to devices or clone the configuration of
one device to another. This can be done individually or
to an entire category (loop) of devices.
IMPORT CONFIGURATION DATA INTO
EXEL
Procedure:
After detecting at least one device:
Tap the main "Flame Tools 5" menu.
1. Configure the device for RS-422
communications.
Set the baud rate, parity and address from the front
panel buttons.
Tap "Tools"
2. Establish communications with FlameTools
Tap "Config Save"
Check Include headings. This has the effect of saving
the labels for your spreadsheet.
Tap "Save this single configuration now"
Page 4
Note: communications parameters must be the same
as the device
IRIS FLAMETOOLS FOR PALM OPERATING MANUAL
3. Save Configuration.
From the main menu, select “Config Save”.
Select save single configuration or multiple
configurations during detect.
If Save Multiple Configurations is selected:
In Multiple mode the Address of the error
configuration must be opened first to see the line of
the error.
Changing parameters:
Most of the parameters can be modified in the Memo
form as a text file and sent to the devices: See Table 1
for data entry restrictions.
check “save whenever detected”
Select “OK” to go back to the communications
page.
Tap the address multiple times (each time the
address is detected, shown as a change to green,
the configuration is saved).
4. Restore / clone configuration:
Steps 1 and 2 must be performed for the new device.
From the main menu, go to IRIS memo.
For single configuration restore:
Select the device to restore
The preferred method of changing settings is to use
the graphic interface due to the reduced possibility of
making data entry errors.
Conversion from a text file (memo) to configurations
goes through 3 stages of checking and verification:
1. Parse:
Formatting is checked (each parameter is verified
by it’s line).
Over / Under range checking for parameter values
that are not valid.
Non numerical characters are ignored (you can add
short comments).
Device parameters can be modified (optional)
Address must be on the first line after a # character.
Push the “Send” button.
For multiple configurations:
Make sure all configurations to send are in a unique
category. (This can be done in IRIS or Palm memo
or in Palm desktop).
Device parameters can be modified.
Push the “send category” button.
Cloning:
Change the address in the memo to the same as
that of the new device.
The device type must be supported (P522, P520,
P531, P532).
2. Restore:
Before sending some parameters to the device,
they are checked for conflict. (i.e. Flame On , Flame
off , IR gain viewing head types and settings)
3. Device:
If the device detects an invalid configuration, a
Modbus error and register number will be
generated.
Verify that exactly the same model viewing head is
connected.
Push the send button.
5. Error codes
If Restore success is displayed (without previous error
message) then all the changes have been applied.
Please verify.
If a Parse error or a Restore error occurs:
The location of the first error will be highlighted (top
of display).
Page 5
IRIS FLAMETOOLS FOR PALM OPERATING MANUAL
Notes:
CONTACT INFORMATION
Modification of the first line of the record are
recommended to reflect a new name for the
configuration that is consistent with the devices
functionality (The # and an address number MUST be
on the first line)
For further information contact:
Palm Data base for the Memo application is shared by
the IRIS memo application.
Any Parameter (font, sort order, etc.) changes done in
IRIS memo will not be remembered or applied to Palm
Memo but all setting changes in the Palm memo will
be applied to IRIS memo and used as the default
settings.
Sales and applications support:
IRIS SYSTEMS INC.
7583 Vantage Place
Delta, BC, Canada V4G 1A6
Ph. 800-667-IRIS, FAX 604-581-9790
email: [email protected]
Factory and repairs:
IRIS SYSTEMS INC.
(JB Systems, Inc.)
4944 113th Avenue N
Clearwater, FL 33760
Ph. 727-545-3900, FAX 727-547-9589
Private records cannot be seen with IRIS memo.
Iris memo does not contain beaming send functionality
this can be accomplished by using the Palm Memo
application (same data).
Communication parameters cannot be changed or
altered using the IRIS Memo restore (the baud rate
and Address Must be programmed via front panel buttons)
Once entered, the IRIS memo application cannot return to Flame tools without going to the main menu.
Copyright © 2005, PalmSource, Inc. PalmSource, Palm OS, Palm Powered, Graffiti, HotSync and certain other trademarks and logos
appearing herein, are trademarks or registered trademarks of PalmSource, Inc. or its affiliate in the United States, France, Germany,
Japan, the United Kingdom, and other countries. These marks may not be used in connection with any product or service that does not
belong to PalmSource, Inc., in any manner that is likely to cause confusion among customers, or in any manner that disparages or discredits PalmSource, Inc., its licensor, its subsidiaries or affiliates. All other brands and trademarks used herein are or may be trademarks
of, and are used to identify other products or services of, their respective owners. All rights reserved.
Page 6
IRIS FLAMETOOLS FOR PALM OPERATING MANUAL
TABLE 1 : P531 AND P532 RESTORE DATA RESTRICTION TABLE
Address #3 10:24 am 2-2-05
Model: P
Version:
1=4->20;0=0->20 mA
1 = Panel enabled:
Flame On A Prim:
Flame Off A Prim:
Alarm A Prim:
View Head # A Prim :
1=IR;2=UV;0=Unknown
Time Delay A Prim :
FFRT A Prim :
Output gain A Prim:
Flame On A Alt.:
Flame Off A Alt.:
Alarm A Alt.:
View Head # A Alt :
1=IR;2=UV;0=Unknown
Time Delay A Alt. :
FFRT A Alt. :
Output gain A Alt.:
Flame On B Prim:
Flame Off B Prim:
Alarm B Prim:
View Head # B Prim:
1=IR;2=UV;0=Unknown
Time Delay B Prim :
FFRT B Prim :
Output gain B Prim:
Flame On B Alt.:
Flame Off B Alt.:
Alarm B Alt.:
View Head # B Alt:
1=IR;2=UV;0=Unknown
Time Delay B Alt. :
FFRT B Alt. :
Output gain B Alt.:
Flame On C Prim:
Flame Off C Prim:
Alarm C Prim:
View Head # C Prim:
1=IR;2=UV;0=Unknown
Time Delay C Prim :
FFRT C Prim :
Output gain C Prim:
Flame On C Alt.:
Flame Off C Alt.:
Alarm C Alt.:
View Head # C Alt:
1=IR;2=UV;0=Unknown
Must contain # followed by address (modify the rest to name the record)
Read only (used to parse data for device)
Read only
Read only
Read only
Must be > flame off and < 3000
Must be < flame on
Must be < 3000
Viewing head 1,2,3 or 0 for none
Must not be 0 for advanced VH else it must be 0
0,1,2,or 3
1,2,or 3
0 to 100
Must be > flame off and < 3000
Must be < flame on
Must be < 3000
Viewing head 1,2,3 or 0 for none
Must not be 0 for advanced VH else it must be 0
0,1,2,or 3
1,2,or 3
0 to 100
Must be > flame off and < 3000
Must be < flame on
Must be < 3000
Viewing head 1,2,3 or 0 for none
Must not be 0 for advanced VH else it must be 0
0,1,2,or 3
1,2,or 3
0 to 100
Must be > flame off and < 3000
Must be < flame on
Must be < 3000
Viewing head 1,2,3 or 0 for none
Must not be 0 for advanced VH else it must be 0
0,1,2,or 3
1,2,or 3
0 to 100
Must be > flame off and < 3000
Must be < flame on
Must be < 3000
Viewing head 1,2,3 or 0 for none
Must not be 0 for advanced VH else it must be 0
0,1,2,or 3
1,2,or 3
0 to 100
Must be > flame off and < 3000
Must be < flame on
Must be < 3000
Viewing head 1,2,3 or 0 for none
Must not be 0 for advanced VH else it must be 0
Page 7
IRIS FLAMETOOLS FOR PALM OPERATING MANUAL
TABLE 1 : P531 AND P532 RESTORE DATA RESTRICTION TABLE (Continued)
Time Delay C Alt. :
FFRT C Alt. :
Output gain C Alt.:
View Head #1 Type:
IR gain VH 1 Prim:
IR gain VH 1 Alt.:
IR filter VH 1 Prim:
IR filter VH 1 Alt.:
UV gain VH 1 Prim:
UV gain VH 1 Alt.:
View Head #2 Type:
IR gain VH 2 Prim:
IR gain VH 2 Alt.:
IR filter VH 2 Prim:
IR filter VH 2 Alt.:
UV gain VH 2 Prim:
UV gain VH 2 Alt.:
View Head #3 Type:
IR gain VH 3 Prim:
0,1,2,or 3
1,2,or 3
0 to 100
Read only
If >100 last 2 digits must be >37
If >100 last 2 digits must be >37
1 to 8 (Must be 1 if no IR in VH)
1 to 8 (Must be 1 if no IR in VH)
0 To 99
0 To 99
Read only
If >100 last 2 digits must be >37
If >100 last 2 digits must be >37
1 to 8 (Must be 1 if no IR in VH)
1 to 8 (Must be 1 if no IR in VH)
0 To 99
0 To 99
Read only
0 to 9 (Must be 0 if no IR VH)(must Not be Zero if IR VH)
IR gain VH 3 Alt.:
UV gain VH 3 Prim:
UV gain VH 3 Alt.:
0 to 9 (Must be 0 if no IR VH)(must Not be Zero if IR VH)
0 to 9 (Must be 0 if no UV VH)(must Not be Zero if UV VH)
0 to 9 (Must be 0 if no UV VH)(must Not be Zero if UV VH)
Viewing head Types
0 = No Viewing head
1 = 556 uv
2 = 552 ir
3 = 550 both
5 = S556A
6 = S552A
7 = S550A
9 = 706-800 UV
10 = 702-800 IR
13 = S556B
14 = S552B
15 = S550B
Page 8
Not advanced
Not advanced
Not advanced
Not advanced
Advanced VH
Advanced VH
Advanced VH
Not advanced
Not advanced
Advanced VH
Advanced VH
Advanced VH
IRIS FLAMETOOLS FOR PALM OPERATING MANUAL
FIGURE 1 – MAIN MENU SCREEN
FIGURE 2
Page 9
IRIS FLAMETOOLS FOR PALM OPERATING MANUAL
FIGURE 3
FIGURE4
Page 10
IRIS FLAMETOOLS FOR PALM OPERATING MANUAL
FIGURE 5
FIGURE 6
Page 11
IRIS FLAMETOOLS FOR PALM OPERATING MANUAL
FIGURE 7
FIGURE 8
Page 12
IRIS FLAMETOOLS FOR PALM OPERATING MANUAL
FIGURE 9
FIGURE 10
Page 13
IRIS FLAMETOOLS FOR PALM OPERATING MANUAL
FIGURE 11: THE FILTER WIZARD SCREEN
FIGURE 12: IRIS PDA-P53x CONNECTOR INTERFACE KIT
Page 14
IRIS FLAMETOOLS FOR PALM OPERATING MANUAL
FIGURE 13A: P531 CONNECTION
FIGURE 13B: P531/P532 MODBUS CONNECTION
FIGURE 13C: P522 MODBUS CONNECTOR
FIGURE 13D: MODEL 800 WITH OPTIONAL CABLE
Page 15