1
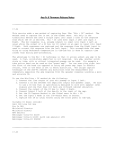
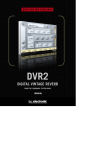
WELCOME TO CAB-LAB 3.0 IMPULSE RESPONSE MIXER AND TOOLS
Cab-Lab 3 is a powerful IR mixer. The Fractal Audio Systems Cab Simulator Block uses Impulse
Response (“IR”) technology to reproduce the sounds of real speakers. With onboard “Factory” cabs
plus our innovative “User Cab” memories, you have access to a limitless range of tones. IRs are widely
available in our official “Cab Packs” and many third-party libraries. You can even capture your own
IRs using the Axe-Fx II.
Sometimes a truly personalized tone, however, goes beyond a single IR. For decades, artists,
producers and engineers have been “crafting” tone using a mixer to blend the sound of different
mics or speakers. Cab-Lab allows you to use this same process, combining up to 8 individual IRs,
auditioning the results in real time as you mix, and saving the result as a new User Cab IR for use in
your own presets.
The totally new mixer in Cab-Lab 3 also goes beyond simple combining, with mix tools to process,
trim, filter, and adjust phase. You can even listen in real time while you adjust faders, whether using
the Standalone version and an audio interface (including the Axe-Fx II), or the Plugin version in
your DAW to process live or pre-recorded material. The Standalone version also includes tools to
help you capture, convert, and batch process IRs, making it an exceptionally valuable component
of a complete IR workflow. Either way, Cab-Lab gives you the tools you need to create your own
signature tones—and delivers results of the high quality you have come to expect from Fractal
Audio Systems.
1
STANDALONE AND PLUGIN VERSIONS
Cab-Lab now comes in two versions. The Standalone is run like any other application such as
Axe-Edit or Fractal-Bot. The Plugin version requires a host application, like Reaper, Logic, Sonar,
Cubase, or another digital audio workstation. A feature comparison chart follows.
WHAT’S NEW/ FEATURE COMPARISON
Feature
Standalone
Mix up to eight IRs
Yes
NEW! Graphical display of mix
Yes
output
NEW! Per-channel IR processing
Yes
tools for IR phase, delay, filtering,
and mode.
NEW! Factor out the influence of
Yes
a power amp using a Reference IR
Combine IRs in Series
Yes
NEW! Real Time Audio Processing
Yes, through an audio interface
NEW! Useful to “re-cab” recorded
“raw amp” tracks
NEW! IR Audition EZ Setup
Save Mixes to your computer
Connect to an Axe-Fx II via USB
Facilitate the IR Capture Process
Batch convert .wav or .ir to .syx
NEW! Batch process .ir files using
a “Reference IR”
NEW! Individual and batch
rename tools
Self-updating on new version
release
Create files for commercial use
Not possible
Yes
Yes, both .ir and .syx formats
Yes. Use the Axe-Fx II as an
audio interface during mixing,
and/or save resulting mixes
directly to user cab slots
(including scratch pad)
Yes. Use the utility to capture IRs
through a graphical user interface
Yes, using the included
conversion tools
Yes, using the included
conversion tool
Yes, using the included
conversion tool
Yes
No. Requires a commercial
license.
2
Plugin
Yes
Yes
Yes
Yes
Yes
Yes, through a compatible
plugin host
Yes
Not possible
Yes, both .ir and syx formats
Not possible
Not possible
Not possible
Not possible
Not possible
Not possible
No. Requires a commercial
license.
MINIMUM REQUIREMENTS
SYSTEM REQUIREMENTS FOR ALL VERSIONS
•
2.0 GHz or higher processor
•
2GB RAM minimum, 4GB or higher recommended
•
Internet connection required for activation
•
iLok License Manager and an iLok.com account — free at http://www.ilok.com
MAC VERSIONS
•
Intel Processor
•
OSX 10.6 or higher (10.9 recommended for Axe-Fx II USB Audio.)
•
PLUGIN: 64-bit AU capable host software.
WINDOWS VERSIONS
•
Microsoft Windows 8/7/Vista
•
PLUGIN: 64- or 32-bit VST capable host software
INSTALLATION
Unzip the Cab-Lab download file, then find and double click the installer for your operating system. If
you purchased the BUNDLE, please find and run the two separate installers for the Standalone and Plugin
versions.
ACTIVATION USING ILOK LICENSE MANAGER
Cab-Lab 3 requires activation before use.
Your Activation Code will be sent to the email address on your order within one business day.
You will also need a free iLok account and the iLok License Manager:
Find it at https://ilok.com/#!license-manager
You do not need a physical iLok, but if you have one you may use it to make your activation portable.
Activate by choosing “Redeem Activation Code” from the “Licenses” menu of the iLok License Manager.
IMPORTANT! Please activate the plugin version prior to launching the host. If not, the plugin may fail
validation, requiring you to manually rescan plugins after activation.
3
GETTING STARTED WITH THE STANDALONE VERSION
Once you have installed and activated Cab-Lab, getting started is quite easy.
The standalone version works best when you have an Axe-Fx II connected to
your computer with USB and appropriate driver for Mac or Windows installed.
Find drivers at http://www.fractalaudio.com/support.php
Launch Cab-Lab from your Applications folder or Start Menu and select your
Axe-Fx II from the connect menu at the top of the screen. Your Axe-Fx should
be detected automatically and a small green check should appear on the left
side in the Cab-Lab title bar with the word “Connected!”
The Axe-Fx II connection let you use all of the
mixing, sending, and saving options of Cab-Lab, plus all of the items in the
tools menu. You can use the scratchpad and EZ Setup functions to audition
your cab mixes, though you’ll need to press “Send to Scratchpad” after every
change.
LIVE MODE SETUP
LIVE MODE lets you hear all changes as you make them in Cab-Lab. It requires an audio interface, and your
connected Axe-Fx II is a perfect choice. Note that other interfaces can also be used with excellent results.
1. Launch Cab-Lab. For the best way to test Live Mode, load at least one IR into a Mixer Slot now.
2. On your Axe-Fx II, load a preset for use during the Cab-Lab session and BYPASS its Cab block. You
don’t need to SAVE, and you can even run Axe-Edit at the same time if desired. Connect your Axe-Fx II
to whatever you would normally use for full range/direct monitoring: speakers, headphones, etc.,
though if you were to play this preset right now, it should sound pretty nasty with no cab...
3. In Cab-Lab, enable Live Mode by pressing the Live Mode button
4. Choose Audio Settings from the Cab-Lab Settings menu. Select
your Axe-Fx II for both the Output and Input ports. You should
now be able to hear the audio processed by Cab-Lab. You can reduce latency by lowering the Audio
Buffer Size settings found under Show Advanced Settings... You should be able to make it tolerable,
though if you go TOO low you’ll experience popping and crackles.
You’ll also notice a setting for Sample Rate, but the
Axe-Fx operates at a fixed Sample rate of 48k.
A TEST button in the Select Audio Device screen
sends a sine tone to the outputs of your
Axe-Fx II for troubleshooting.
While LIVE MODE is running, the sound of
your Axe-Fx II is “hijacked” before it reaches
Out 1. It makes a round trip to Cab-Lab and is returned
directly to the Axe-Fx Output 1 Jacks. Therefore, your
Cab mix is the final effect — after any blocks on the
grid. Audio is processed in full stereo—even though any
IRs you export will be mono.
5. Close the Live Mode screen and enjoy Cab-Lab! Remember, in LIVE MODE, you won’t need to use the
Send to Scratch Pad feature.
6. The BYPASS button (upper right) can be useful if you want to bypass Cab-Lab while using a 3rd party
audio interface.
4
GETTING STARTED WITH THE PLUGIN VERSION
Once you have installed and activated Cab-Lab, getting started is quite easy. The plugin version runs as a
plugin in your compatible host DAW or Sequencer.
Just like the Standalone version, the plugin requires that you feed it a signal with no cab processing. On
the Axe-Fx II, this means bypassing the Cab block, though you could just as readily use a real amp into a
direct box capable of converting speaker level to line level.
Cab-Lab for Mac runs as a 64-bit AU plugin. The Windows version comes in both 32- and 64-bit VST form.
Because each of the different host environments requires a different specific set of instructions, this
manual will be expanded in the future with step-by-step tutorials for each platform.
Tools and certain other functions which require a MIDI-over-USB connection to the Axe-Fx II are not
supported by the Cab-Lab plugin version. These are noted elsewhere in this manual.
5
MIXER SLOTS
The Cab-Lab mixer is designed so you can load IRs to create mixes.
The mixer has eight channels or “slots” numbered for easy identification.
1
2
(1) LOAD BUTTON - The LOAD button in each mixer channel launches a
file browser. Cab-Lab mixer can open three formats:
.ir files – Fractal Audio Systems proprietary “raw” Impulse Response files,
such as those provided with every UltraRes™ Fractal Audio Cab Pack, or
those created when you capture or convert your own UltraRes™ IRs.
.syx files – Fractal Audio Systems “standard” resolution User Cab IRs (i.e.
non UltraRes™). This includes many files from our earlier Cab-Packs, most
3rd party IRs, and your own standard-res captures. UltraRes .syx files
cannot be loaded in Cab-Lab.
3
4
5
.wav files – Cab-Lab is able to load mono impulse responses in .wav
format.
You may combine IRs of different formats using the Cab-Lab mixer.
If you select more than one file in the OPEN dialog, Cab-Lab will
place each one into its own Mixer channel.
In the Standalone version, you can also drag and drop one or more
files from Finder or Explorer directly into the mixer.
(2) CLEAR BUTTON - To clear an IR from any mixer channel, click the x
button or click the topmost x to clear IRs from all channels.
(3) IR NAME - The IR name is also shown. IR files may also contain internal Cab Names, for use on screen
in the Axe-Fx or Axe-Edit.
Double-clicking the Cab Name allows you to permanently change it in the source file.
Be aware that the file name will not also change.
(4) ULTRA RES INDICATOR – UltraRes™ IRs will be indicated for any IR with a special symbol
(5) PLAY BUTTON – (Standalone Only, Requires a connected Axe-Fx) The “Play” button in each slot
allows you to send the currently loaded IR for that slot to a Scratchpad or User Cab memory in the Axe-Fx
II. This is useful for auditioning or comparison purposes.
6
THE IR MIXER
Each Mixer Slot has a corresponding set of controls in the mixer.
4
(1) FADER – Eight faders allow you to set the relative levels of
loaded IRs. Cab levels are set in dB, making it easy to precisely
transfer values from another environment.
Double Click to zero any fader. Use the mouse Scroll Wheel or Up
and Down arrows to adjust a selected fader in 0.1 dB increments.
Hold Command (Mac) or CTRL (Win) for 1.0 dB increments.
1
2
3
NOTE: Mixes are normalized, so you cannot use Cab-Lab to adjust
the level of a single IR.
(2) FIELD – Each fader has a field to show the precise value set.
Clicking the field allows you to use the computer keyboard to
enter a precise value.
(3) MUTE AND SOLO BUTTONS - Each channel has MUTE
and SOLO buttons, allowing you to make quick changes when
auditioning or saving a mix. If you mute ALL of the channels in
LIVE mode or using the Plugin version, processing is bypassed
instead of silenced.
(4) MIXER MODE SELECTOR – The normal way of using the
mixer is in Parallel mode. Switching to “Series” changes the fundamental way that Cab-Lab works. Instead
of mixing cab IRs together in parallel like a mixer would, it runs them together in series. This might be
used to combine a normal IR with a “corrective” IR (perhaps exported from a Tone Match block). Although
you can combine up to eight IRs in this way, we recommend limiting it to two.
(5) MIXER CHANNEL TOOLS BUTTON – The mixer channel tools button opens a flyout with
additional options for the selected channel. Only one flyout can be opened at a time.
7
IR MIXER CHANNEL TOOLS FLYOUT
9
7
8
6
The Mixer Channel Tools flyout appears when you click the tools button (wrench icon)
(6) PHASE REVERSE – When this button is pressed, the phase is reversed for the current channel.
(7) PROCESSING MODE – Determines how the raw IR data will be processed before mixing. The
default is Min Phase (Minimum Phase Transformation) which ensures that all IRs are time aligned.
Auto Trim removes superfluous data from the beginning of the IR but does not apply Min Phase
Transformation. Selecting None disables all processing, so the inherent time characteristics and phase of
the raw IR will be used, though you can still time-compensate individual IRs using the Delay control (8)
(8) DELAY - Adds 0.00-1.00 ms of delay to the channel so you can manually time align (or offset) IRs.
(9) EQUALIZATION – Simple Low Pass and High Pass filters allow tone shaping an individual IR.
IR MIX OUTPUT PLOT
The mix output plot shows a graphical representation of your current IR or IR mix, with the option to
display frequency domain or time domain information.
8
REFERENCE IR PROCESSING
The reference IR section of Cab-Lab includes control to load, mute, or clear a reference IR. When a
reference IR is loaded, its name appears.
WHAT IS A REFERENCE IR?
An IR created using a power amp will contain the tonal coloration imparted by the power amp. (No amp is
TRULY flat.) A separate IR of just the power amp can be used to correct this effect. When you load the power
amp IR as a “Reference IR”, it is subtracted individually from every IR in your Mix to correct the overall
response. (Creating a reference IR will be covered in a different document). Note that a separate Reference
IR batch processing utility can be found under the tools menu of the standalone version of Cab-Lab. IRs
captured using the “MIC+DI” method of the Axe-Fx II do NOT have power amp coloration, so they do not
require reference processing.
SAVE + EXPORT OPTIONS
1
(1) MIX NAME FIELD – Enter a name for your IR mix.
Names are stored in the IR and for its filename.
Every User Cab can be given a name of up to 31 characters.
Names are displayed in the edit menu of the Cab block and
in Axe-Edit so you know which user cab is selected.
2
3
A name is required for Cab-Lab to send or save a mix.
To enter a name, click the name field, type the desired
name, and press Enter/Return.
Please note that cab names can include characters that are illegal in computer file naming systems (ex: / \ |
* ). When you save a cab mix to disk, these will be removed from the name of the file.
(2) SEND MIX TO SCRATCHPAD – (Standalone Only, Requires a connected Axe-Fx) The
SCRATCHPAD is a temporary cab memory area in the Axe-Fx II, ideal for auditioning mix ideas without
overwriting a User Cab memory slot. This button sends the IR to whichever Scratchpad is selected in the
dropdown beneath it.
(3) EZ SETUP – (Standalone Only, Requires a connected Axe-Fx) temporarily configures the Cab
block of your current preset to use the “SCRATCHPAD” selected in the “Audition To” dropdown. This means
you will be able to hear the result immediately when using the Send Mix to Scratch Pad button. The
SCRATCHPAD is cleared when you power down your Axe-Fx II so remember also to send your finished mix
to a User Cab location in the Axe-Fx II or save it as a file!
9
(4) SAVE MIX TO USER CAB – The Axe-Fx II contains
memory locations for storing User Cabs. When you use
Cab-Lab to send a mix to a numbered User Cab memory
location, it remains there indefinitely until you overwrite
or otherwise remove it.
(4) SAVE MIX TO FILE – Use this option to save your
Cab-Lab mix for sharing or archiving.
4
When Output Format (in the Settings Menu) is set to
“Standard”, two .syx files are saved, one for the Axe-Fx II
5
(Original or Mark II) and one for the XL. (The two models
have different SysEx IDs and use different cab numbering
systems.) The file in XL format will have “_XL” appended to its name automatically. If you use Fractal-Bot,
either of these files can be loaded in to any Axe-Fx II, but 3rd party MIDI Utilities are unable to make the
conversion and you will need to use the appropriate file for the model connected.
When the Output Format is set to “UltraRes”, three files are created: two .syx files (one for the Original/
Mark II, and one for the XL) plus an Impulse Response or “.ir” file. The .ir file contains raw data for loading
into future Cab-Lab mixer sessions.
THE SESSION MENU
The session menu gives you a way to save all of the IRs that you have loaded, plus any mixer settings
you’ve made, so you can continue working where you left off even after quitting Cab-Lab. Session files
can also be shared, providing a way for you to show others your own take on combining IRs.
The IR Search Paths... option in the Settings menu makes it even easier to use shared sessions by helping
Cab-Lab find IRs on your computer when a session is loaded.
10
TOOLS (STANDALONE VERSION ONLY)
WAV2SYX AND IR2SYX CONVERSION UTILITIES
Wav2Syx and IR2Syx allow you to create standard or UltraRes user cab files from entire directories of .wav
or .ir files.
When the Output Format (found in the Settings menu) is set to “Standard”, two .syx files are saved per
source .wav or .ir (one for the Axe-Fx II Original or Mark II, and one for the XL.) The files in XL format will
have “_XL” appended to their name automatically.
When the Output Format is set to UltraRes™, three files are created for each source .wav (two .syx files—
one for the Original/Mark II, and one for the XL) and an Impulse Response or “.ir” file. The .ir file contains
raw data for loading into a Cab-Lab mixer session. (Naturally, ir2Syx does not create an extra set of .ir files.)
NOTE: If you use Fractal-Bot, either of the .syx files can be loaded in to any Axe-Fx II, but 3rd party MIDI
Utilities are unable to make the conversion and you will need to use the appropriate file for the model
connected.
Wav2Syx requires mono .Wav files which have been deconvolved (but they can be of any sample rate or
bit depth.)
If any invalid IRs are found in a directory a notification will appear and the conversion process will halt.
IR RENAME
The IR Rename utility allows you to change the “Internal name” of an UltraRes™ .syx file—that is, the name
which will be displayed in the Axe-Fx or Axe-Edit when the cab is loaded. It also works for non UltraRes
.syx IRs and for .ir files, but these can also be renamed in the Cab-Lab mixer by double clicking the green
“Cab Name” text. See #2 above under Cab-Lab features)
IR CAPTURE
The IR Capture utility allows remote control of the entire IR Capture process using the Axe-Fx II. You can
perform all required operations through the software for greater convenience and the benefit of built in
step-by-step help. The utility is self-guided with built-in help. A link to the IR Capture Guide is included in
the Cab-Lab Help menu of the standalone version.
REF IR BATCH
This utility applies reference IR processing to all of the IRS found in a specified directory. A reference IR is
used to remove the effects of a power amp used to capture other IRs. A separate document will cover the
creation and use of reference IRs.
IR RENAME
This allows you to rename a single IR, with an option to keep the file name in sync with the internal name.
COPY FILENAME TO IR NAME
This batch utility processes all IRs in a directory, changing the internal name of each to match its file name
When you combine this with 3rd party file naming utilities such as RenameMan or ABetterRenamer, it
provides a very powerful way to batch rename IRs (Hello to all you Cab Pack authors!)
11
CHECK FOR UPDATES
(Standalone Only) Cab-Lab updates itself over the Internet. This normally happens automatically and
you will be alerted when a new version is available. If you’d like to check manually, choose the Check for
Updates option in the Cab-Lab menu.
TROUBLESHOOTING
We’ve found through previous versions that Cab-Lab requires very little troubleshooting or support.
If you are getting errors when trying to connect to the Axe-Fx II, an inferior USB cable may be the problem.
Rely on high quality cables such as those from http://www.fractalaudio.com/cables
Another common cause of trouble is the computer itself. Interference from another USB Device may be
to blame. Solutions vary, and range from simply trying a different USB port, to doing a complete manual
uninstall of the offending MIDI driver.
Installing the latest version of the Axe-Fx II driver may also help.
GETTING HELP
If you need help with Cab-Lab, please contact our support team via http://support.fractalaudio.com
Please be sure to include all the information we will need to help you.
1. Details of the computer.
2. Details about how you have things connected.
3. Details on any 3rd party devices such as Audio/MIDI Interfaces.
4. Details on your sequencer or DAW if using the plugin version.
5. Version numbers: Cab-Lab, computer OS, FW versions for your Fractal product, etc.
6. Steps to reproduce a given issue.
7. Things you’ve already tried to fix it.
8. Anything else we might need to know.
Our forum at http://forum.fractalaudio.com/forum.php can also be a valuable resource, with members
helping members around the clock.
12