1
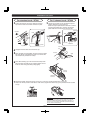
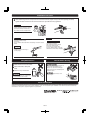
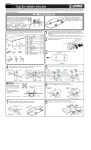
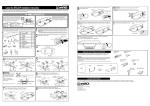
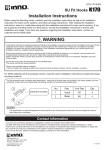
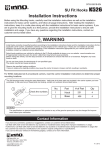
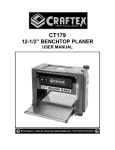
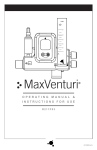
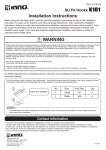
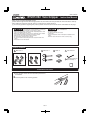
5420-103618
RT201/202 Velo Gripper
Instruction Manual
Thank you for purchasing this INNO product.
Please read through this manual thoroughly before use, and make sure that you follow all of the instructions carefully.
After reading this instruction manual, store it in a safe place for future reference.
If you have any questions regarding this product, please contact the service center shown at the bottom of the page.
Parts or loaded items falling from the rack can cause
serious accidents, involving passers by or other cars,
which may lead to serious injury or death.
㨯Before using this product, check the vehicle compatibility table to make
sure it is compatible with your vehicle.
㨯Before using this product, check the type of objects that can be loaded
and maximum load weights according to the type of vehicle.
㨯Before driving, make sure that the knob is not loose.
㨯Do not attempt to modify the carrier system.
㨯Do not use crossbars and loading items that exceed the width of the
vehicle.
㨯This product is not for off-road use.
There is risk of injury, or damage to the rack,
vehicle, or loaded items.
㨯Always drive safely.
㨯Do not use automatic car washes.
㨯Load evenly.
㨯Remove the bed liner when it interrupts the installation of the
carrier.
㨯Maximum load of this carrier is 1 bike or 33 lbs (15kg)
Product Contents
2 Bike rod: 2
1 Main unit: 2
RT201
3 Plate: 2
4 Hex wrench: 1
RT202
or
5 Instruction manual
(this manual): 1
For standard
For C-channel
Installation Procedure
the side rails of the truck bed where product is to
1 Clean
be installed.
2 Place the plate on the mounting position.
US-1
Installation Procedure
For standard truck / RT201
For C-channel truck / RT202
the eye bolt 1/2 way to allow the clamp to
3 Loosen
slip over the truck bed rail and centered on plate.
the eye bolt 1/2 way to allow the square
3 Loosen
plate to slide into the C-channel rail.
When the square plate doesn’t slide due to interior
mounting bolt inside the C-channel, the square
plate needs to be removed from the eye bolt.
Pushing
Outside
Pushing
Plate
Plate
Eye bolt
Square
plate
Inside
Square plate
Truck body
Truck body
Eye bolt
C-channel
Eye bolt
Hex bolt
4 Untighten the hex bolts and remove the cap.
the bike rod and reattach the cap and the hex bolts
5 Place
but don’t tighten until determining how much of the bike
Cap
Outside
Strap
rod needs to be protrude from clamp.
Bike rod
Buckle
bike standing up in the truck bed and strap down
6 Place
both front fork and seat stay by inserting straps around
forks and then through buckles pulling tightly.
Inside of
truck bed
Outside of
truck bed
the position of the bike rod by moving in or out to line up with the bike frame, crank-arm,
7 Adjust
and/or fork. When position of the bike is most vertical, tighten hex bolts firmly by the provided wrench located
on cap.
If the cranks and or pedal hit the body of the truck, it may be
necessary to adjust bike position repeat steps 4 through 7 to
secure or cover crank and or pedal with a protective covering
as not to cause vehicle damage
US-2
Installation Procedure
determining that the clamps over the rail of the truck bed, tighten the eye bolt while pushing the clamp
8 After
against the side wall of the truck bed. And make sure eye bolts are firmly tightened.
Before driving, check front and rear
clamps and bars for looseness, and the
eye bolt (2 locations) for looseness, if
any of them are loose, re-tighten them.
Pushing
Please make sure you follow instruction in the attachment
instruction manual correctly.
Load evenly.
Do not install the bike rods with the end sticking out from the side of
vehicle.
Tie-Down
To use tie-down:
㨯Maximum force of this D-ring is
66 lbs (30kgf)
To lock Velo Gripper
To lock bike and clamps:
With a tapered-end cable, thread
through eye bolts and bike.
A 5’ to 6’ long and smaller than
0.75 inch diameter cable is normally
sufficient to lock two clamps and bike.
Daily Maintenance
Checks before driving
Part inspection
Wash off dirt and mud with water.
Clean the product, and inspect each of
the parts for abnormalities. If you
discover any deformed or damaged
parts, discontinue use immediately and
replace the parts.
Wipe off dirt with a damp wet
towel.
Allow it to dry in the shade.
Storage
Store in a dry place indoors, out of
direct sunlight.
Do not use solvents such as thinner etc.
Do not lubricate screws or bolts.
Contact Information
If you have any complaints, requests or comments, please contact us at the service center listed below. Car Mate USA shall not be held liable for any
accidents or incidental losses arising from improper installation or use, nor for those arising from installation or use after the customer has made any
modifications to the system’s original configuration or specifications.
[email protected]
US-3