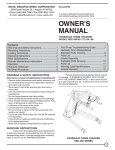
1
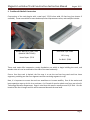
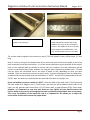
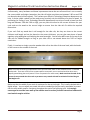
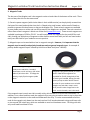
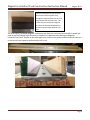
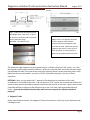
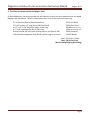
Magnetic Levitation Track Construction Instruction Manual
August 2012
This document is intended to be used by Science Olympiad teams to assist them in building a
magnetically-levitated track that will meet all specifications in the event rules for Magnetic Levitation
and allow students to calibrate a maglev car in preparation for tournaments. This manual can also be
used by Event Supervisors to construct a Magnetic Levitation track to be used at Science Olympiad
tournaments.
This document was created by Andy Hamm, National Maglev Event Supervisor in 2011 & 2012, and
Science Olympiad Head Coach at Boyceville Middle/High School in Boyceville, WI. Any questions can
be directed to him at [email protected]
Track Specifications
One of the main concerns with the Maglev event that has been expressed is the cost to purchase a
track to allow students to build and calibrate Maglev vehicles. These tracks can cost anywhere from
$85 to nearly $200. It was decided that a Maglev track could be created that is not only as consistent
as a professionally-built track, but also less expensive.
This Track Construction Instruction Manual will provide instructions on how to build two different
styles of Maglev tracks...a cheap version and a more-expensive version. Please note the differences
and be assured that very competitive vehicles can be created to run on either track. A more expensive
track does not ensure a better vehicle score; rather, students are strongly encouraged to work with
their vehicle(s) often to learn how to optimize their specific vehicle(s).
The most expensive part of a Maglev track is the magnets, the 2013 rules allow a four foot (~1.22 m)
track. The side rails of the track must be between 2.00 cm and 5.00 cm. The track width is encouraged
to be 2 9/16” wide (65.1 mm), but this is not a requirement if you are bringing your own track to
competition. Event supervisor-provided tracks must have a width of 2 9/16” (65.1 mm).
Wood Maglev Track (Cheaper Version)
1. Supplies Needed to Build One Four Foot Long Track (Wood Version)
1 Steel Stud, 3 5/8 Inches Wide, 10 feet long (use shorter if available)
1 x 6 Piece of Wood (actually around 3/4 inches thick), at least 4 feet long
2 strips of wood, at least 4 feet long, between 2.00 cm and 5.00 cm tall, at least 3/4 inch wide
27 7/16” drywall screws, 1/2" long
4 small (around 5/8 inch) brass finishing nails or pins
1 north polarity magnetic strip 3/4 inches wide, around 1/8 inches tall, 4 feet long
1 south polarity magnetic strip 3/4 inches wide, around 1/8 inches tall, 4 feet long
OR instead of magnetic strips around 120 ceramic rectangular magnets 1” x 3/4" x 3/16”
Tools Needed for Construction: Hack Saw or Chop Saw, Planer, Phillips Screw Driver, Hammer, Drill,
Wood Glue, Ruler/Measuring Tape, Caliper
Page 1
Magnetic Levitation Track Construction Instruction Manual
August 2012
2. Track Base & Side Rail Construction
Construction of the track begins with a steel stud, 3 5/8 inches wide, 10 feet long (use shorter if
available). These are available at most hardware/home improvement stores, and examples include:
Marino Ware 10 ft. Steel Track
(Model # 358VT2510H)
Home Depot - $5.91
Steel Stud 3 5/8” Wide
10 ft. Long
Pro Build - $3.89
These steel studs offer inexpensive, sturdy foundations on which to begin building the track, and
wooden side rails can be attached to the sides of the steel stud easily.
Since a four foot track is desired, the first step is to cut the ten foot long steel stud into three
segments, providing two four foot segments and the remaining segment is scrap.
Next, it is important to mount the stud to a wood base to increase stability. One of the easiest and
least-expensive ways to do this is to purchase a 1 x 6 board of wood or obtain one from your school’s
Technology Education Department. Keep in mind that this wood is actually around 3/4” thick. Cut this
board to four feet in length and this will be mounted beneath the steel stud.
Page 2
Magnetic Levitation Track Construction Instruction Manual
Note the steel stud on top of the 1 x 6
wood, in this case pine.
August 2012
The steel stud is connected to the 1 x 6
wood underneath it with screws in the
middle of the stud. Be sure to keep the
screws in the middle to not be in the way
of the magnets to be added later! Use
nine screws spaced around 7.5 cm apart.
The screws used throughout the construction were 7/16 inch drywall screws, phillips head, 1/2 inch
long.
Now, it is time to construct the wooden side rails to ensure the track is the correct width, as this is the
most important part of the construction. It is of the utmost importance to get the width of the track as
close to the required width as possible to ensure that your students’ cars and calibrations will be
correct on tournament day (if your students are using the event supervisor-provided track). The side
rails can either be constructed out of one piece of wood or two, depending on what you have
available. Either can be used to construct a precise track. If you are bringing your track to competition,
be advised that the track width need only be between 2” and 3”. You are still recommended to be near
2 9/16” wide, but there is no need to plane the wood side rails down to a specific size.
If you are building a track to a width of 2 9/16”…since the width of the steel stud is 3 5/8 inches and
the track width for a Maglev track is 2 9/16 inches, and side rails will be added to both sides of the
track, you will generally want wood that is 17/32 inches wide, or approximately 0.531 inches wide.
However, it is important to note that steel studs can vary slightly and you should measure the
interior width of your steel stud throughout the track and make any adjustments that are necessary.
This is why the addition of the wood side rails is so important as this allows you to adjust the
construction of the track to ensure the proper width.
Page 3
Magnetic Levitation Track Construction Instruction Manual
August 2012
Unfortunately, many hardware and home improvement stores do not sell wood that is cut to exactly
the correct width and height (remember, the side rail height restrictions are between 2.00 cm and 5.00
cm above the level of the magnets). This is where your district’s Technology Education department can
help. A device called a planar can be used to very precisely trim the thickness of a piece of wood. By
purchasing (or finding in your Technology Education department) two strips of wood at least four feet
long and between 2.00 and 5.00 cm high, you can plane this wood to the correct thickness for your
track and cut the wood to the correct height to ensure that the side rails fit within the required
dimensions.
If you can’t find any wood that is tall enough for the side rails, but they are close to the correct
thickness and length and can be planed to the correct thickness, you can glue two pieces of wood
together using wood glue and clamping the wood overnight. You can also add screws to the top of the
side rails for added strength as long as your side rails to not extend above the 5.00 cm height
restrictions.
Finally, it is easiest to simply screw the wooden side rails to the sides of the steel stud, with the heads
of the screws on the outside of the track.
Note the screws connecting the wood side rails to the steel stud, which is also screwed into the 1 x 6 board
underneath. There are a total of nine screws used for connection, one on each end and the other seven
equally spaced along the track (around 7.5 cm of separation for each screw). Make sure that the ends of the
screws do not protrude into the track as you want a very smooth side wall to minimize frictional drag on
the Maglev cars.
Make sure that the width of your track is consistent for the entire length. This is easily checked with a
digital caliper. You can adjust your wood side rails as needed (as they are easily removable) to ensure
that the track width remains consistent throughout the entire five foot long track. It is strongly
encouraged to sand the inner walls of the wooden track to reduce frictional interactions between the
track and the maglev vehicles.
Page 4
Magnetic Levitation Track Construction Instruction Manual
August 2012
3. Magnetic Tracks
The last part of the Maglev track is the magnetic tracks on both sides of the bottom of the track. There
are two ways that this can be constructed.
1) Ceramic square magnets (with circular holes in their middle section) can be physically screwed into
the base of the steel stud and then into the 1 x 6 board using small screws, with as small of heads as
possible to prevent frictional losses or drag on the Maglev cars. These ceramic magnets are available
at many hobby stores or online and can also be used on the Maglev cars and sled. One such store that
offers these ceramic magnets is Kelvin out of New York (www.kelvin.com). These ceramic magnets are
available in packages of 250 for $32.50. You will need around 120 magnets for the track (60 for each
side), leaving you with plenty of magnets to either build a second track with you left over steel stud or
many cars and sleds for your students to use to practice.
2) Magnetic tape can be used with no loss in magnetic strength. However, it is important that the
magnetic tape be north/south polarity-based tape and not general magnetic tape. An example of
polarity-based magnetic tape is offered by Kelvin out of New York (Item: 640102).
Ceramic rectangular magnets as sold by
hobby stores and Kelvin. Standard
dimensions are 1.0 inch long x 3/4 inches
wide x 3/16 inches thick. To change the
polarity, simply flip the magnet upside
down.
Magnetic tape (polarity-based) as sold by
Kelvin. Two 10 foot segments are
available for $34.95, though only 4 feet
of each type is needed, leaving you with
plenty of tape to either build a second
track or for your students to use to build
Maglev cars and sleds. Keep in mind
that you will receive 2 segments in the
mail…one is the north, one is the south.
If the magnetic tape is used, one side is usually sticky, which allows it to stick to the track better. In
addition, since a steel stud was used, the magnetic strips are going to tend to want to stay in place due
to the magnetic attraction to the steel stud underneath the strip. It is also recommended to nail the
ends of the magnetic strip down into the steel stud and 1 x 6 board underneath using small brass nails
or pins around 5/8 inches long, which are available at most local hardware stores. Finishing nails with
very small heads work best for this.
Page 5
Magnetic Levitation Track Construction Instruction Manual
August 2012
Note the small brass pin that is nailed
into the end of the magnetic strip,
through the steel stud and into the 1 x 6
board underneath the steel stud. This
ensures that the end of the magnetic
strip does not become detached from
the steel stud and warp upwards over
time.
You now have a completed Magnetic Levitation track! Below is a picture of a track that I created and
used at the 2012 Wright State University Invitational as a demonstration during the Magnetic
Levitation Trial Event. Results on this track were very similar to the results students had with their cars
on the much more expensive professionally-built track.
Page 6
Magnetic Levitation Track Construction Instruction Manual
August 2012
4. Total Cost for Wood Maglev Track
As described earlier, one of the major concerns with this event is the high cost. Below is a description
of the cost of the two tracks (five feet long) I was able to create for Boyceville MS & HS (Boyceville, WI)
to practice with during the 2011-2012 competitive season. A four foot track will be slightly cheaper
than listed below:
1 Steel Stud to Above Dimensions (for 2 tracks)
2 1 x 6 Blocks of Pine to Above Dimensions
4 Strips of Wood for Side Walls to Above Dimensions
54 7/16” drywall screws, 1/2" long (Box of 100 Purchased)
8 small (around 5/8 inch) brass finishing nails or pins (Box of 100)
1 KELVIN Polarity Magnetic Strip Bundle (10 feet long for 2 tracks)
$3.89 (Pro Build)
$3.76 (Pro Build)
$4.62 (Pro Build)
$3.99 (Fleet Farm)
$4.99 (Fastenal)
$34.95 (Kelvin)
Total: $56.20 for 2 Tracks
Total: $28.10 Per Track
Aluminum Maglev Track (More Expensive, More Adjustable Version)
1. Supplies Needed to Build One Four Foot Long Track (Aluminum Version)
.
1 x 6 piece of wood (actually around 3/4 inches thick), at least 4 feet long
4 small (around 5/8 inch) brass finishing nails or pins
2 aluminum angle segments, four feet long, up to 2” x 2” x 1/8”
1 aluminum flat bar, four feet long, 1” wide (OPTIONAL)
21 7/16” screws, 1’2” long
1 north polarity magnetic strip 3/4 inches wide, around 1/8 inches tall, 4 feet long
1 south polarity magnetic strip 3/4 inches wide, around 1/8 inches tall, 4 feet long
OR instead of magnetic strips around 120 ceramic rectangular magnets 1” x 3/4" x 3/16”
Tools Needed for Construction:
Ruler/Measuring Tape, Caliper
Hack Saw or Chop Saw, Phillips Screw Driver, Hammer, Drill,
2. Side Rail Track Construction
The aluminum side rail Maglev track begins with the 1 x 6 piece of wood, cut to a four-foot length. The
two aluminum angle segments will make the side rails, with the “L” pointing away from the track (see
images below).
Page 7
Magnetic Levitation Track Construction Instruction Manual
TOP: A Side View of the Aluminum Side
Rail Maglev track. Note the 1 x 6 piece
of wood on the bottom and the location
for the aluminum angle.
BOTTOM: Top View of Track
August 2012
A Top View of the Aluminum Side Rail
Maglev track. This diagram shows the
ceramic magnets used; however,
north/south polarized magnetic tape
could also be used. Make sure that the
magnetic tape comes in two rolls and
each roll (north vs. south polarity) is
placed on an opposite side of the track.
The aluminum angle segments can be screwed into the 1 x 6 base using the 7/16” screws. For a four
feet segment seven screws should be sufficient. Affix one screw near each end of the aluminum angle
and separate the other five screws evenly across the segment (about 9 inches separating each screw).
Make sure that the track width is as close to 2 9/16” as possible, especially if you are an Event
Supervisor.
OPTIONAL…Next, you can attach the 1” segment of flat aluminum to the bottom of the track,
immediately in the middle of the track. You can again use 7/16” screws, but you want the heads of the
screws to be as small as possible to prevent contact with the vehicles on the track. Again, seven screws
should be sufficient to attach the flat aluminum bar to the 1 x 6 base, each separated by about 9
inches. If you do not add the aluminum flat, make sure your magnets are aligned and placed
properly!
3. Magnetic Tracks
Please read the above section 3 on Magnetic Tracks to learn how to set this up in your aluminum side
rail Maglev track.
Page 8
Magnetic Levitation Track Construction Instruction Manual
August 2012
4. Total Cost for Aluminum Side Rail Maglev Track
As described earlier, the aluminum side rails will cause this track to be more expensive than the Wood
Maglev track listed above. Below is a description of the cost of two tracks (four feet long):
2 1 x 6 Blocks of Pine to Above Dimensions
21 7/16” screws, 1/2" long (Box of 100 Purchased)
4 1.5” x 1.5” x 1/8” Aluminum Angle, 4 Feet Long
2 1” x 1/8” Aluminum Flat Bar, 4 Feet Long
8 small (around 5/8 inch) brass finishing nails or pins (Box of 100)
1 KELVIN Polarity Magnetic Strip Bundle (10 feet long for 2 tracks)
$3.76 (Pro Build)
$3.99 (Fleet Farm)
$26.48 (OnlineMetals.com)
$5.04 (OnlineMetals.com)
$4.99 (Fastenal)
$34.95 (Kelvin)
Total: $79.21 for 2 Tracks
Total: $39.61 Per Track
(Not including Shipping & Handling)
Page 9