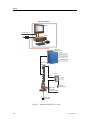
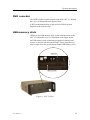
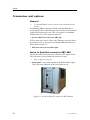
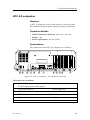
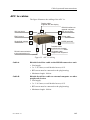
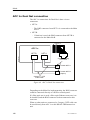
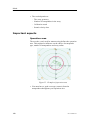
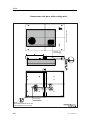
1
Instruction Manual HiPAP High Precision Acoustic Positioning 857-164055 HiPAP High Precision Acoustic Positioning Instruction Manual About this document Rev Date Written by Checked by Approved by R 15.06.06 GM KVG JEF Renamed computer to APC 1x. Reduced cable gland information. Updated Transceiver unit wiring diagram to rev. C. Minor corrections in the text. © 2006 Kongsberg Maritime AS. All rights reserved. No part of this work covered by the copyright hereon may be reproduced or otherwise copied without prior permission from Kongsberg Maritime AS. The information contained in this document is subject to change without prior notice. Kongsberg Maritime AS shall not be liable for errors contained herein, or for incidental or consequential damages in connection with the furnishing, performance, or use of this document. Strandpromenaden 50 P.O.Box 111 N-3191 Horten, Norway Instruction Manual Additional manuals Display manual Separate manual supplied with the display. This is not a Kongsberg Maritime document. Keyboard manual Separate manual supplied with the keyboard. This is not a Kongsberg Maritime document. Remarks References Further information about the HiPAP system may be found in the following manuals: • APOS for HiPAP Instruction Manual • HiPAP hull units Instruction Manual The reader The maintenance information is intended to be used by a trained maintenance technician or engineer, with experience of electronic and digital circuitry, computers and electromechanical design. The level of information is based on Kongsberg Maritime’s maintenance philosophy: The onboard technical personnel shall, with the help of the documentation and the system’s built-in test functions, be able to identify malfunctions, locate the fault, and replace major parts, modules and components on the “Line Replaceable Unit” (LRU) level. He/she will however not attempt to repair the LRUs. The installation information is intended for the design and installation engineers at the shipyard performing the installation. The information is supplied as the basis for the shipyard’s own installation drawings applicable to the vessel. On completion of the installation, this section may be used for reference purposes during system maintenance. Note Distributed copies of this manual will not be updated. 857-164055 / R I HiPAP High voltage safety warning The voltages used to power this equipment are potentially lethal. Even 110 volts can kill. Whenever possible, the following precautionary measures should be taken before any work is carried out inside the equipment: • Switch off all high-voltage power supplies. • Check the operation of any door interlocks and any other safety devices. • Completely discharge all high-voltage capacitors. It should be noted that interlocks and safety devices are normally located only at regular access points, and high voltages may be exposed during dismantling. Caution II Never work alone on high-voltage equipment! Refer to general safety procedures. 857-164055 / R Instruction Manual Contents INTRODUCTION . . . . . . . . . . . . . . . . . . . . . . . . . . . . . . . . . . . . . . . . . . . . . . Manual content . . . . . . . . . . . . . . . . . . . . . . . . . . . . . . . . . . . . . . . . . . . . . . . . Abbreviations . . . . . . . . . . . . . . . . . . . . . . . . . . . . . . . . . . . . . . . . . . . . . . . . . General guidelines . . . . . . . . . . . . . . . . . . . . . . . . . . . . . . . . . . . . . . . . . . . . . 1 1 1 2 Installation . . . . . . . . . . . . . . . . . . . . . . . . . . . . . . . . . . . . . . . . . . . . . . . Maintenance . . . . . . . . . . . . . . . . . . . . . . . . . . . . . . . . . . . . . . . . . . . . . Backup . . . . . . . . . . . . . . . . . . . . . . . . . . . . . . . . . . . . . . . . . . . . . . . . . 2 2 3 Supply conditions . . . . . . . . . . . . . . . . . . . . . . . . . . . . . . . . . . . . . . . . . . . . . . 4 Equipment responsibility . . . . . . . . . . . . . . . . . . . . . . . . . . . . . . . . . . . Project management . . . . . . . . . . . . . . . . . . . . . . . . . . . . . . . . . . . . . . . Installation, supervision and commissioning . . . . . . . . . . . . . . . . . . . . Guarantee period . . . . . . . . . . . . . . . . . . . . . . . . . . . . . . . . . . . . . . . . . . 4 4 5 6 SYSTEM DESCRIPTION . . . . . . . . . . . . . . . . . . . . . . . . . . . . . . . . . . . . . . . Introduction . . . . . . . . . . . . . . . . . . . . . . . . . . . . . . . . . . . . . . . . . . . . . . . . . . Systems overview . . . . . . . . . . . . . . . . . . . . . . . . . . . . . . . . . . . . . . . . . . . . . . HiPAP 500 . . . . . . . . . . . . . . . . . . . . . . . . . . . . . . . . . . . . . . . . . . . . . . . . . . . HiPAP 350 . . . . . . . . . . . . . . . . . . . . . . . . . . . . . . . . . . . . . . . . . . . . . . . . . . . HiPAP 450 . . . . . . . . . . . . . . . . . . . . . . . . . . . . . . . . . . . . . . . . . . . . . . . . . . . Upgrade to HiPAP 500 . . . . . . . . . . . . . . . . . . . . . . . . . . . . . . . . . . . . . . . . . . System units . . . . . . . . . . . . . . . . . . . . . . . . . . . . . . . . . . . . . . . . . . . . . . . . . . Operator station configuration . . . . . . . . . . . . . . . . . . . . . . . . . . . . . . . . . . . . HiPAP system principles . . . . . . . . . . . . . . . . . . . . . . . . . . . . . . . . . . . . . . . . 7 7 7 7 8 9 9 10 13 14 General . . . . . . . . . . . . . . . . . . . . . . . . . . . . . . . . . . . . . . . . . . . . . . . . . HiPAP processing . . . . . . . . . . . . . . . . . . . . . . . . . . . . . . . . . . . . . . . . . 14 14 APC 1x . . . . . . . . . . . . . . . . . . . . . . . . . . . . . . . . . . . . . . . . . . . . . . . . . . . . . . 16 Description . . . . . . . . . . . . . . . . . . . . . . . . . . . . . . . . . . . . . . . . . . . . . . External connections . . . . . . . . . . . . . . . . . . . . . . . . . . . . . . . . . . . . . . . Power initialization . . . . . . . . . . . . . . . . . . . . . . . . . . . . . . . . . . . . . . . . 16 16 16 DVD recorder . . . . . . . . . . . . . . . . . . . . . . . . . . . . . . . . . . . . . . . . . . . . . . . . . USB memory stick . . . . . . . . . . . . . . . . . . . . . . . . . . . . . . . . . . . . . . . . . . . . . GPS receiver signals . . . . . . . . . . . . . . . . . . . . . . . . . . . . . . . . . . . . . . . . . . . . GPS Input signal converter (1PPS converter) . . . . . . . . . . . . . . . . . . . . . . . . Keyboard . . . . . . . . . . . . . . . . . . . . . . . . . . . . . . . . . . . . . . . . . . . . . . . . . . . . Trackball . . . . . . . . . . . . . . . . . . . . . . . . . . . . . . . . . . . . . . . . . . . . . . . . . . . . . Display . . . . . . . . . . . . . . . . . . . . . . . . . . . . . . . . . . . . . . . . . . . . . . . . . . . . . . 1PPS Converter (option) . . . . . . . . . . . . . . . . . . . . . . . . . . . . . . . . . . . . . . . . Transceiver units description . . . . . . . . . . . . . . . . . . . . . . . . . . . . . . . . . . . . . 17 17 18 18 19 19 19 20 21 Introduction . . . . . . . . . . . . . . . . . . . . . . . . . . . . . . . . . . . . . . . . . . . . . . External connections . . . . . . . . . . . . . . . . . . . . . . . . . . . . . . . . . . . . . . . Power initialization . . . . . . . . . . . . . . . . . . . . . . . . . . . . . . . . . . . . . . . . 21 21 22 857-164055 / R III HiPAP Transceiver unit principles . . . . . . . . . . . . . . . . . . . . . . . . . . . . . . . . . . . . . . . 23 Introduction . . . . . . . . . . . . . . . . . . . . . . . . . . . . . . . . . . . . . . . . . . . . . . Transmission . . . . . . . . . . . . . . . . . . . . . . . . . . . . . . . . . . . . . . . . . . . . . Reception . . . . . . . . . . . . . . . . . . . . . . . . . . . . . . . . . . . . . . . . . . . . . . . Navigation . . . . . . . . . . . . . . . . . . . . . . . . . . . . . . . . . . . . . . . . . . . . . . . 23 24 24 24 Transceiver unit options . . . . . . . . . . . . . . . . . . . . . . . . . . . . . . . . . . . . . . . . . 25 General . . . . . . . . . . . . . . . . . . . . . . . . . . . . . . . . . . . . . . . . . . . . . . . . . Serial to Dual Net converter SBC 400 . . . . . . . . . . . . . . . . . . . . . . . . . Ethernet converter for fibre-optic . . . . . . . . . . . . . . . . . . . . . . . . . . . . . 25 25 26 MAINTENANCE . . . . . . . . . . . . . . . . . . . . . . . . . . . . . . . . . . . . . . . . . . . . . . . Overview . . . . . . . . . . . . . . . . . . . . . . . . . . . . . . . . . . . . . . . . . . . . . . . . . . . . Before you start . . . . . . . . . . . . . . . . . . . . . . . . . . . . . . . . . . . . . . . . . . . . . . . Preventive maintenance . . . . . . . . . . . . . . . . . . . . . . . . . . . . . . . . . . . . . . . . . 27 27 27 27 Topside units . . . . . . . . . . . . . . . . . . . . . . . . . . . . . . . . . . . . . . . . . . . . . 27 Maintenance philosophy . . . . . . . . . . . . . . . . . . . . . . . . . . . . . . . . . . . . . . . . 28 General . . . . . . . . . . . . . . . . . . . . . . . . . . . . . . . . . . . . . . . . . . . . . . . . . Error detection . . . . . . . . . . . . . . . . . . . . . . . . . . . . . . . . . . . . . . . . . . . . Verification . . . . . . . . . . . . . . . . . . . . . . . . . . . . . . . . . . . . . . . . . . . . . . 28 28 29 Maintenance schedule . . . . . . . . . . . . . . . . . . . . . . . . . . . . . . . . . . . . . . . . . . Backup . . . . . . . . . . . . . . . . . . . . . . . . . . . . . . . . . . . . . . . . . . . . . . . . . . . . . . Software upgrade . . . . . . . . . . . . . . . . . . . . . . . . . . . . . . . . . . . . . . . . . . . . . . Tools . . . . . . . . . . . . . . . . . . . . . . . . . . . . . . . . . . . . . . . . . . . . . . . . . . . . . . . . 30 30 30 31 Standard tools . . . . . . . . . . . . . . . . . . . . . . . . . . . . . . . . . . . . . . . . . . . . Special tools . . . . . . . . . . . . . . . . . . . . . . . . . . . . . . . . . . . . . . . . . . . . . 31 31 APC 1x internal . . . . . . . . . . . . . . . . . . . . . . . . . . . . . . . . . . . . . . . . . . . . . . . 32 How to open the APC 1x unit . . . . . . . . . . . . . . . . . . . . . . . . . . . . . . . How to close the APC 1x unit . . . . . . . . . . . . . . . . . . . . . . . . . . . . . . . 33 33 Replacement of APC 1x unit parts . . . . . . . . . . . . . . . . . . . . . . . . . . . . . . . . . 34 Dust filter . . . . . . . . . . . . . . . . . . . . . . . . . . . . . . . . . . . . . . . . . . . . . . . Replacing the hard disk . . . . . . . . . . . . . . . . . . . . . . . . . . . . . . . . . . . . 35 36 Replacing the DVD unit . . . . . . . . . . . . . . . . . . . . . . . . . . . . . . . . . . . . Replacing the power supply . . . . . . . . . . . . . . . . . . . . . . . . . . . . . . . . . Replacing circuit boards . . . . . . . . . . . . . . . . . . . . . . . . . . . . . . . . . . . . 36 37 38 Keyboard . . . . . . . . . . . . . . . . . . . . . . . . . . . . . . . . . . . . . . . . . . . . . . . . . . . . Trackball . . . . . . . . . . . . . . . . . . . . . . . . . . . . . . . . . . . . . . . . . . . . . . . . . . . . . Transceiver units . . . . . . . . . . . . . . . . . . . . . . . . . . . . . . . . . . . . . . . . . . . . . . 39 39 40 Overview . . . . . . . . . . . . . . . . . . . . . . . . . . . . . . . . . . . . . . . . . . . . . . . . Transceiver unit internal layout . . . . . . . . . . . . . . . . . . . . . . . . . . . . . . 40 41 IV 857-164055 / R Instruction Manual Replacement of transceiver unit parts . . . . . . . . . . . . . . . . . . . . . . . . . . . . . . 44 Line Replaceable Units (LRUs) . . . . . . . . . . . . . . . . . . . . . . . . . . . . . . Opening / closing door . . . . . . . . . . . . . . . . . . . . . . . . . . . . . . . . . . . . . Replacement of circuit boards . . . . . . . . . . . . . . . . . . . . . . . . . . . . . . . Replacement of units . . . . . . . . . . . . . . . . . . . . . . . . . . . . . . . . . . . . . . Replacing a fan unit . . . . . . . . . . . . . . . . . . . . . . . . . . . . . . . . . . . . . . . Replacing the HTC-10 LRUs . . . . . . . . . . . . . . . . . . . . . . . . . . . . . . . . PCBs . . . . . . . . . . . . . . . . . . . . . . . . . . . . . . . . . . . . . . . . . . . . . . . . . . . Replacing fuses . . . . . . . . . . . . . . . . . . . . . . . . . . . . . . . . . . . . . . . . . . . Cooling unit (optional) . . . . . . . . . . . . . . . . . . . . . . . . . . . . . . . . . . . . . Replacing the Serial to Dual Net converter (SBC 400 unit) . . . . . . . . Dust filters . . . . . . . . . . . . . . . . . . . . . . . . . . . . . . . . . . . . . . . . . . . . . . . 44 44 45 46 50 51 52 53 55 56 57 INSTALLATION . . . . . . . . . . . . . . . . . . . . . . . . . . . . . . . . . . . . . . . . . . . . . . . Overview . . . . . . . . . . . . . . . . . . . . . . . . . . . . . . . . . . . . . . . . . . . . . . . . . . . . General installation information . . . . . . . . . . . . . . . . . . . . . . . . . . . . . . . . . . APC 1x installation . . . . . . . . . . . . . . . . . . . . . . . . . . . . . . . . . . . . . . . . . . . . 58 58 58 59 Introduction . . . . . . . . . . . . . . . . . . . . . . . . . . . . . . . . . . . . . . . . . . . . . . Unit location . . . . . . . . . . . . . . . . . . . . . . . . . . . . . . . . . . . . . . . . . . . . . Logistics . . . . . . . . . . . . . . . . . . . . . . . . . . . . . . . . . . . . . . . . . . . . . . . . 19” rack installation . . . . . . . . . . . . . . . . . . . . . . . . . . . . . . . . . . . . . . . Desktop installation . . . . . . . . . . . . . . . . . . . . . . . . . . . . . . . . . . . . . . . Cabling . . . . . . . . . . . . . . . . . . . . . . . . . . . . . . . . . . . . . . . . . . . . . . . . . 59 59 59 59 60 60 Transceiver unit installation . . . . . . . . . . . . . . . . . . . . . . . . . . . . . . . . . . . . . . 61 Introduction . . . . . . . . . . . . . . . . . . . . . . . . . . . . . . . . . . . . . . . . . . . . . . Unit location . . . . . . . . . . . . . . . . . . . . . . . . . . . . . . . . . . . . . . . . . . . . . Logistics . . . . . . . . . . . . . . . . . . . . . . . . . . . . . . . . . . . . . . . . . . . . . . . . Procedure . . . . . . . . . . . . . . . . . . . . . . . . . . . . . . . . . . . . . . . . . . . . . . . Cooling unit (option) . . . . . . . . . . . . . . . . . . . . . . . . . . . . . . . . . . . . . . . 61 62 62 62 63 TECHNICAL SPECIFICATION . . . . . . . . . . . . . . . . . . . . . . . . . . . . . . . . . Overview . . . . . . . . . . . . . . . . . . . . . . . . . . . . . . . . . . . . . . . . . . . . . . . . . . . . APC 1x . . . . . . . . . . . . . . . . . . . . . . . . . . . . . . . . . . . . . . . . . . . . . . . . . . . . . . Keyboard . . . . . . . . . . . . . . . . . . . . . . . . . . . . . . . . . . . . . . . . . . . . . . . . . . . . Trackball . . . . . . . . . . . . . . . . . . . . . . . . . . . . . . . . . . . . . . . . . . . . . . . . . . . . . Display . . . . . . . . . . . . . . . . . . . . . . . . . . . . . . . . . . . . . . . . . . . . . . . . . . . . . . Transceiver unit . . . . . . . . . . . . . . . . . . . . . . . . . . . . . . . . . . . . . . . . . . . . . . . 64 64 65 66 66 66 67 Cooling unit (option) . . . . . . . . . . . . . . . . . . . . . . . . . . . . . . . . . . . . . . . 68 CIRCUIT BOARDS AND POWER UNITS DESCRIPTION . . . . . . Overview . . . . . . . . . . . . . . . . . . . . . . . . . . . . . . . . . . . . . . . . . . . . . . . . . . . . APC 1x computer . . . . . . . . . . . . . . . . . . . . . . . . . . . . . . . . . . . . . . . . . . . . . . 69 69 70 Motherboard . . . . . . . . . . . . . . . . . . . . . . . . . . . . . . . . . . . . . . . . . . . . . BlueStorm/PCI serial adapter board . . . . . . . . . . . . . . . . . . . . . . . . . . . Ethernet board . . . . . . . . . . . . . . . . . . . . . . . . . . . . . . . . . . . . . . . . . . . . ATI Radeon Video adapter board . . . . . . . . . . . . . . . . . . . . . . . . . . . . . Power supply . . . . . . . . . . . . . . . . . . . . . . . . . . . . . . . . . . . . . . . . . . . . . 71 73 75 76 77 857-164055 / R V HiPAP Transceiver unit - circuit boards and units . . . . . . . . . . . . . . . . . . . . . . . . . . . 78 Overview . . . . . . . . . . . . . . . . . . . . . . . . . . . . . . . . . . . . . . . . . . . . . . . . Transmitter/receiver board (TRB) . . . . . . . . . . . . . . . . . . . . . . . . . . . . . POWEC power supply . . . . . . . . . . . . . . . . . . . . . . . . . . . . . . . . . . . . . Main control panel . . . . . . . . . . . . . . . . . . . . . . . . . . . . . . . . . . . . . . . . Responder Terminal Block (RTB) . . . . . . . . . . . . . . . . . . . . . . . . . . . . Connections . . . . . . . . . . . . . . . . . . . . . . . . . . . . . . . . . . . . . . . . . . . . . 78 79 83 85 87 89 HTC-10 computer . . . . . . . . . . . . . . . . . . . . . . . . . . . . . . . . . . . . . . . . . . . . . 90 General . . . . . . . . . . . . . . . . . . . . . . . . . . . . . . . . . . . . . . . . . . . . . . . . . Technical details . . . . . . . . . . . . . . . . . . . . . . . . . . . . . . . . . . . . . . . . . . Connections . . . . . . . . . . . . . . . . . . . . . . . . . . . . . . . . . . . . . . . . . . . . . Transceiver memory control (TMC II) board . . . . . . . . . . . . . . . . . . . . Serial I/O board (Digi board) . . . . . . . . . . . . . . . . . . . . . . . . . . . . . . . . SBC 400 . . . . . . . . . . . . . . . . . . . . . . . . . . . . . . . . . . . . . . . . . . . . . . . . 90 90 90 91 94 95 Switch settings . . . . . . . . . . . . . . . . . . . . . . . . . . . . . . . . . . . . . . . . . . . . . . . . 96 APC 1x computer . . . . . . . . . . . . . . . . . . . . . . . . . . . . . . . . . . . . . . . . . Display unit . . . . . . . . . . . . . . . . . . . . . . . . . . . . . . . . . . . . . . . . . . . . . . HTC-10, Digi board . . . . . . . . . . . . . . . . . . . . . . . . . . . . . . . . . . . . . . . 96 96 96 CABLE LAYOUT AND INTERCONNECTIONS . . . . . . . . . . . . . . . . . . Overview . . . . . . . . . . . . . . . . . . . . . . . . . . . . . . . . . . . . . . . . . . . . . . . . . . . . Cable gland assembly procedure . . . . . . . . . . . . . . . . . . . . . . . . . . . . . . . . . . 97 97 98 Purpose . . . . . . . . . . . . . . . . . . . . . . . . . . . . . . . . . . . . . . . . . . . . . . . . . General procedure . . . . . . . . . . . . . . . . . . . . . . . . . . . . . . . . . . . . . . . . . Securing and terminating the cables . . . . . . . . . . . . . . . . . . . . . . . . . . . 98 98 99 Basic cabling requirements . . . . . . . . . . . . . . . . . . . . . . . . . . . . . . . . . . . . . . Cable plan . . . . . . . . . . . . . . . . . . . . . . . . . . . . . . . . . . . . . . . . . . . . . . . . . . . . 100 103 General . . . . . . . . . . . . . . . . . . . . . . . . . . . . . . . . . . . . . . . . . . . . . . . . . 103 APC 1x cables . . . . . . . . . . . . . . . . . . . . . . . . . . . . . . . . . . . . . . . . . . . . . . . . 104 Connections . . . . . . . . . . . . . . . . . . . . . . . . . . . . . . . . . . . . . . . . . . . . . Serial lines (Com) RS-232 connector . . . . . . . . . . . . . . . . . . . . . . . . . . Serial lines (Com) RS-422 . . . . . . . . . . . . . . . . . . . . . . . . . . . . . . . . . . Printer connector . . . . . . . . . . . . . . . . . . . . . . . . . . . . . . . . . . . . . . . . . . VGA to display connector . . . . . . . . . . . . . . . . . . . . . . . . . . . . . . . . . . 106 107 107 108 108 Transceiver unit cabling . . . . . . . . . . . . . . . . . . . . . . . . . . . . . . . . . . . . . . . . . 109 General . . . . . . . . . . . . . . . . . . . . . . . . . . . . . . . . . . . . . . . . . . . . . . . . . Transducer cable connection procedure . . . . . . . . . . . . . . . . . . . . . . . . Transducer cable connections . . . . . . . . . . . . . . . . . . . . . . . . . . . . . . . . Connection diagrams . . . . . . . . . . . . . . . . . . . . . . . . . . . . . . . . . . . . . . Terminal blocks and options . . . . . . . . . . . . . . . . . . . . . . . . . . . . . . . . . 109 109 110 110 111 Transceiver unit cables . . . . . . . . . . . . . . . . . . . . . . . . . . . . . . . . . . . . . . . . . . Transceiver unit interconnections . . . . . . . . . . . . . . . . . . . . . . . . . . . . . . . . . 112 114 Overview . . . . . . . . . . . . . . . . . . . . . . . . . . . . . . . . . . . . . . . . . . . . . . . . Cables J . . . . . . . . . . . . . . . . . . . . . . . . . . . . . . . . . . . . . . . . . . . . . . . . . Cable A and L . . . . . . . . . . . . . . . . . . . . . . . . . . . . . . . . . . . . . . . . . . . . 114 115 116 VI 857-164055 / R Instruction Manual Terminal Block Converter . . . . . . . . . . . . . . . . . . . . . . . . . . . . . . . . . . . . . . . 118 General . . . . . . . . . . . . . . . . . . . . . . . . . . . . . . . . . . . . . . . . . . . . . . . . . 118 Synchronization . . . . . . . . . . . . . . . . . . . . . . . . . . . . . . . . . . . . . . . . . . . . . . . 119 Synchronization line for Dual HiPAP, cable M (option) . . . . . . . . . . . External synchronization, cable N . . . . . . . . . . . . . . . . . . . . . . . . . . . . 119 119 GPS Input signals connections . . . . . . . . . . . . . . . . . . . . . . . . . . . . . . . . . . . . IPPS Converter (option) . . . . . . . . . . . . . . . . . . . . . . . . . . . . . . . . . . . . . . . . . 122 122 SINGLE/DUAL NET INSTALLATION . . . . . . . . . . . . . . . . . . . . . . . . . . 124 Overview . . . . . . . . . . . . . . . . . . . . . . . . . . . . . . . . . . . . . . . . . . . . . . . . . . . . 124 APC 1x . . . . . . . . . . . . . . . . . . . . . . . . . . . . . . . . . . . . . . . . . . . . . . . . . . . . . . 125 Connections . . . . . . . . . . . . . . . . . . . . . . . . . . . . . . . . . . . . . . . . . . . . . Connector pin allocations . . . . . . . . . . . . . . . . . . . . . . . . . . . . . . . . . . . 125 126 APC 1x Dual Net connection . . . . . . . . . . . . . . . . . . . . . . . . . . . . . . . . . . . . . HiPAP transceiver unit Dual Net connection . . . . . . . . . . . . . . . . . . . . . . . . . 127 128 Dual fibre-optic net . . . . . . . . . . . . . . . . . . . . . . . . . . . . . . . . . . . . . . . . Dual copper net . . . . . . . . . . . . . . . . . . . . . . . . . . . . . . . . . . . . . . . . . . . Spare parts list . . . . . . . . . . . . . . . . . . . . . . . . . . . . . . . . . . . . . . . . . . . . 128 129 129 INTEGRATED OPERATION WITH KM’S DYNAMIC POSITIONING (SDP) SYSTEM . . . . . . . . . . . . . . . . . . . . . . . . . . . . . . . 130 Introduction . . . . . . . . . . . . . . . . . . . . . . . . . . . . . . . . . . . . . . . . . . . . . . . . . . 130 Integrated operation with SDP . . . . . . . . . . . . . . . . . . . . . . . . . . . . . . . . . . . . 130 9.2 HiPAP/HPR 400 and DP - one Operator Station . . . . . . . . . . . . . . . . . HiPAP/HPR 400 and DP - multiple Operator Stations . . . . . . . . . . . . . 130 130 Equipment handling . . . . . . . . . . . . . . . . . . . . . . . . . . . . . . . . . . . . . . . 131 Introduction . . . . . . . . . . . . . . . . . . . . . . . . . . . . . . . . . . . . . . . . . . . . . . Transportation . . . . . . . . . . . . . . . . . . . . . . . . . . . . . . . . . . . . . . . . . . . . Initial preservation . . . . . . . . . . . . . . . . . . . . . . . . . . . . . . . . . . . . . . . . Inspection and unpacking . . . . . . . . . . . . . . . . . . . . . . . . . . . . . . . . . . . 131 131 132 134 Storage . . . . . . . . . . . . . . . . . . . . . . . . . . . . . . . . . . . . . . . . . . . . . . . . . After use storage . . . . . . . . . . . . . . . . . . . . . . . . . . . . . . . . . . . . . . . . . . Re-packing . . . . . . . . . . . . . . . . . . . . . . . . . . . . . . . . . . . . . . . . . . . . . . ESD precautions . . . . . . . . . . . . . . . . . . . . . . . . . . . . . . . . . . . . . . . . . . Temperature protection . . . . . . . . . . . . . . . . . . . . . . . . . . . . . . . . . . . . . Warranty . . . . . . . . . . . . . . . . . . . . . . . . . . . . . . . . . . . . . . . . . . . . . . . . 137 137 139 140 141 141 SPARE PARTS . . . . . . . . . . . . . . . . . . . . . . . . . . . . . . . . . . . . . . . . . . . . . . . . . 142 Introduction . . . . . . . . . . . . . . . . . . . . . . . . . . . . . . . . . . . . . . . . . . . . . . . . . . 142 Operator station . . . . . . . . . . . . . . . . . . . . . . . . . . . . . . . . . . . . . . . . . . . . . . . 142 Transceiver units . . . . . . . . . . . . . . . . . . . . . . . . . . . . . . . . . . . . . . . . . . . . . . 143 857-164055 / R VII HiPAP HIPAP / HPR 400 TEST AND ALIGNMENT PROCEDURES . . . 144 Introduction . . . . . . . . . . . . . . . . . . . . . . . . . . . . . . . . . . . . . . . . . . . . . . . . . . 144 Purpose . . . . . . . . . . . . . . . . . . . . . . . . . . . . . . . . . . . . . . . . . . . . . . . . . . . . . . 144 Test certificates . . . . . . . . . . . . . . . . . . . . . . . . . . . . . . . . . . . . . . . . . . . . . . . 144 Visual inspection . . . . . . . . . . . . . . . . . . . . . . . . . . . . . . . . . . . . . . . . . . . . . . 144 Test and alignment . . . . . . . . . . . . . . . . . . . . . . . . . . . . . . . . . . . . . . . . . . . . . 145 Test procedures introduction . . . . . . . . . . . . . . . . . . . . . . . . . . . . . . . . . . . . . 145 Operation unit / station . . . . . . . . . . . . . . . . . . . . . . . . . . . . . . . . . . . . . . . . . . 146 HiPAP / HPR 400 transceiver unit . . . . . . . . . . . . . . . . . . . . . . . . . . . . . . . . . 148 Roll, pitch and heave sensor . . . . . . . . . . . . . . . . . . . . . . . . . . . . . . . . . . . . . 149 Heading sensor . . . . . . . . . . . . . . . . . . . . . . . . . . . . . . . . . . . . . . . . . . . . . . . . 151 Cabling . . . . . . . . . . . . . . . . . . . . . . . . . . . . . . . . . . . . . . . . . . . . . . . . . . . . . . 152 Applying power to the system . . . . . . . . . . . . . . . . . . . . . . . . . . . . . . . . . . . . 155 Remarks and signatures . . . . . . . . . . . . . . . . . . . . . . . . . . . . . . . . . . . . . . . . . 156 HIPAP / HPR CUSTOMER ACCEPTANCE TEST . . . . . . . . . . . . . . . 157 Introduction . . . . . . . . . . . . . . . . . . . . . . . . . . . . . . . . . . . . . . . . . . . . . . . . . . 157 Purpose . . . . . . . . . . . . . . . . . . . . . . . . . . . . . . . . . . . . . . . . . . . . . . . . . . . . . . 157 Test certificates . . . . . . . . . . . . . . . . . . . . . . . . . . . . . . . . . . . . . . . . . . . . . . . 157 Visual inspections . . . . . . . . . . . . . . . . . . . . . . . . . . . . . . . . . . . . . . . . . . . . . . 158 Test and alignments . . . . . . . . . . . . . . . . . . . . . . . . . . . . . . . . . . . . . . . . . . . . 158 VIII Test results . . . . . . . . . . . . . . . . . . . . . . . . . . . . . . . . . . . . . . . . . . . . . . Test procedures introduction . . . . . . . . . . . . . . . . . . . . . . . . . . . . . . . . . 158 159 Hull unit (Transducer 1) . . . . . . . . . . . . . . . . . . . . . . . . . . . . . . . . . . . . . . . . . Hull unit (Transducer 2) . . . . . . . . . . . . . . . . . . . . . . . . . . . . . . . . . . . . . . . . . Operator unit . . . . . . . . . . . . . . . . . . . . . . . . . . . . . . . . . . . . . . . . . . . . . . . . . Simulator / training mode . . . . . . . . . . . . . . . . . . . . . . . . . . . . . . . . . . . . . . . Transducer 1 using a transponder . . . . . . . . . . . . . . . . . . . . . . . . . . . . . . . . . . Transducer 2 using a transponder . . . . . . . . . . . . . . . . . . . . . . . . . . . . . . . . . . Printout on printers . . . . . . . . . . . . . . . . . . . . . . . . . . . . . . . . . . . . . . . . . . . . . Alignment for integrated navigation . . . . . . . . . . . . . . . . . . . . . . . . . . . . . . . 160 162 164 166 167 169 171 172 General . . . . . . . . . . . . . . . . . . . . . . . . . . . . . . . . . . . . . . . . . . . . . . . . . Logistics . . . . . . . . . . . . . . . . . . . . . . . . . . . . . . . . . . . . . . . . . . . . . . . . Procedure . . . . . . . . . . . . . . . . . . . . . . . . . . . . . . . . . . . . . . . . . . . . . . . HiPAP / HPR alignment at sea . . . . . . . . . . . . . . . . . . . . . . . . . . . . . . . Roll / pitch / heading alignment . . . . . . . . . . . . . . . . . . . . . . . . . . . . . . Offset values . . . . . . . . . . . . . . . . . . . . . . . . . . . . . . . . . . . . . . . . . . . . . Test results . . . . . . . . . . . . . . . . . . . . . . . . . . . . . . . . . . . . . . . . . . . . . . 172 172 172 173 173 174 175 Spare parts . . . . . . . . . . . . . . . . . . . . . . . . . . . . . . . . . . . . . . . . . . . . . . . . . . . Remarks and signatures . . . . . . . . . . . . . . . . . . . . . . . . . . . . . . . . . . . . . . . . . 176 177 Remarks . . . . . . . . . . . . . . . . . . . . . . . . . . . . . . . . . . . . . . . . . . . . . . . . Signatures . . . . . . . . . . . . . . . . . . . . . . . . . . . . . . . . . . . . . . . . . . . . . . . 177 177 857-164055 / R Instruction Manual LBL / MULBL POSITIONING CUSTOMER ACCEPTANCE TEST 178 Introduction . . . . . . . . . . . . . . . . . . . . . . . . . . . . . . . . . . . . . . . . . . . . . . . . . . 178 Purpose . . . . . . . . . . . . . . . . . . . . . . . . . . . . . . . . . . . . . . . . . . . . . . . . . . . . . . 178 Important aspects . . . . . . . . . . . . . . . . . . . . . . . . . . . . . . . . . . . . . . . . . . . . . . 179 Operation area . . . . . . . . . . . . . . . . . . . . . . . . . . . . . . . . . . . . . . . . . . . . Ships system / seabed footprint . . . . . . . . . . . . . . . . . . . . . . . . . . . . . . Transponder types / surface . . . . . . . . . . . . . . . . . . . . . . . . . . . . . . . . . Choosing the transponder type . . . . . . . . . . . . . . . . . . . . . . . . . . . . . . . 179 180 181 182 Test certificates . . . . . . . . . . . . . . . . . . . . . . . . . . . . . . . . . . . . . . . . . . . . . . . Visual inspections . . . . . . . . . . . . . . . . . . . . . . . . . . . . . . . . . . . . . . . . . . . . . . Test and alignments . . . . . . . . . . . . . . . . . . . . . . . . . . . . . . . . . . . . . . . . . . . . Test procedure introduction . . . . . . . . . . . . . . . . . . . . . . . . . . . . . . . . . . . . . . Procedure overview . . . . . . . . . . . . . . . . . . . . . . . . . . . . . . . . . . . . . . . . . . . . Test procedures . . . . . . . . . . . . . . . . . . . . . . . . . . . . . . . . . . . . . . . . . . . . . . . . 182 182 182 183 183 184 Hull unit . . . . . . . . . . . . . . . . . . . . . . . . . . . . . . . . . . . . . . . . . . . . . . . . APOS software . . . . . . . . . . . . . . . . . . . . . . . . . . . . . . . . . . . . . . . . . . . 184 184 Transceivers . . . . . . . . . . . . . . . . . . . . . . . . . . . . . . . . . . . . . . . . . . . . . . . . . . Transponders . . . . . . . . . . . . . . . . . . . . . . . . . . . . . . . . . . . . . . . . . . . . . . . . . LBL calibration . . . . . . . . . . . . . . . . . . . . . . . . . . . . . . . . . . . . . . . . . . . . . . . LBL Positioning . . . . . . . . . . . . . . . . . . . . . . . . . . . . . . . . . . . . . . . . . . . . . . . MULBL positioning . . . . . . . . . . . . . . . . . . . . . . . . . . . . . . . . . . . . . . . . . . . . Remarks and signatures . . . . . . . . . . . . . . . . . . . . . . . . . . . . . . . . . . . . . . . . . 184 184 185 187 189 191 DRAWING FILE . . . . . . . . . . . . . . . . . . . . . . . . . . . . . . . . . . . . . . . . . . . . . . . 192 Overview . . . . . . . . . . . . . . . . . . . . . . . . . . . . . . . . . . . . . . . . . . . . . . . . . . . . 192 Drawings . . . . . . . . . . . . . . . . . . . . . . . . . . . . . . . . . . . . . . . . . . . . . . . . . . . . . 192 INDEX . . . . . . . . . . . . . . . . . . . . . . . . . . . . . . . . . . . . . . . . . . . . . . . . . . . . . . . . . 207 857-164055 / R IX HiPAP X 857-164055 / R Introduction INTRODUCTION Manual content This is the Instruction manual for the High Precision Acoustic Positioning (HiPAP) system. The manual contains the descriptions and illustrations required to install and maintain the HiPAP units. → The HiPAP hull units are described in a separate manual. The system is described down to circuit board level, named as the Line Replaceable Units (LRUs). Block diagrams and drawings are used to simplify the descriptions. The manual also defines the equipment responsibility, and provides general information about preservation, packing and storage of the units. Abbreviations The following abbreviations are used in this manual: 857-164055 / R APC Acoustic Positioning Computer APOS Acoustic Positioning Operator Station BOP Blow Out Preventer COS Common Operator Station DP Dynamic Positioning DGPS Differential Global Positioning System GPS Global Positioning System HiPAP High Precision Acoustic Positioning HPR Hydroacoustic Position Reference HTC -10 HiPAP Transceiver Computer I/O Input/Output LBL Long Base Line LRU Line Replaceable Unit MULBL Multi-User Long Base Line PCB Printed Circuit Board ROV Remotely Operated Vehicle RTB Responder Terminal Block SBC Single Board Computer SDP Simrad Dynamic Positioning SSBL Super Short Base Line SSLBL Super Short and Long Base Line 1 HiPAP General guidelines Warning Kongsberg Maritime AS accepts no responsibility for any damage or injury to the system, ship or personnel caused by drawings, instructions and procedures not prepared by Kongsberg Maritime. Training courses are available from Kongsberg Maritime AS. Installation The guidelines for installation presented in this manual must be regarded as a base for detailed plans prepared by the installation shipyard. These plans must include drawings, instructions and procedures specific to the ship in which the equipment is to be installed. These drawings must be approved by the local maritime classification society Warning The installation instructions given in this document must be followed. Failure to do so may render the guarantee void. Maintenance The technical descriptions included in this manual are intended to to be used by maintenance technician and/or engineer, with experience of computer-based electronic circuitry. It is also strongly recommended that the personnel are familiar with the basic principles of hydroacoustic technology, and in particular, positioning systems. The maintenance personnel are expected to replace faulty Line Replaceable Units (LRUs) (circuit boards or modules), but not to perform circuit board repairs. In order to find the faulty component, it is also expected that the maintenance personnel have access to standard electronic instruments, such as oscilloscopes and multimeters. Note 2 If your organization (or vessel) does not have the appropriate personnel available, you are strongly advised to contact either Kongsberg Maritime or your dealer for assistance. 857-164055 / R Introduction Backup General You are advised to take backup of all operator stations at regular intervals (1-3 months), and every time major changes has been performed in configuration and /or user settings. Software upgrade Caution A system backup must be performed when the software has been upgraded. → 857-164055 / R For backup procedures, refer to the Backup files document, doc no 859-216300. 3 HiPAP Supply conditions Equipment responsibility Upon receipt of the equipment the system owner or installation shipyard automatically becomes fully responsible for the equipment, unless otherwise stated in the contract. This responsibility covers the storage period before installation, the actual installation, commissioning, and the period between the completion of the commissioning and the acceptance of the equipment by the end user (normally the owner of the vessel or platform into which the equipment is to be installed). Project management Project manager Kongsberg Maritime AS will normally appoint a dedicated project manager for the delivery project. The manager will follow up the installation and delivery, and will be the installation shipyard’s and end user’s point of contact. Installation performed by Kongsberg Maritime Kongsberg Maritime AS will assist during the installation if specified in the contract or requested by the installation shipyard or customer. Before any installation work by Kongsberg Maritime AS can begin, all cables (at least those which are in any way connected with the system) must be run and connected to their respective terminations. These cables together with the transducer installation will then be checked by the Kongsberg Maritime AS engineers before they are used. Depending upon the availability of electrical power either from the generators on board or from ashore, the equipment related to the system, and the various parts of the system will be tested during the Setting to Work (STW) period. This requires that interfaces to equipment delivered by other subcontractors are ready for integration testing. Delays may occur if any of the equipment related to the system is not available for Kongsberg Maritime AS for testing. During sea trials, the vessel must be at Kongsberg Maritime’s disposal when required, even though we cannot be held responsible for expenses relating to the running costs of the vessel. 4 857-164055 / R Introduction After completion of the commissioning, the equipment should be officially handed over to the end user and the appropriate documents signed in accordance with the contract. All defects or deviations from the contract must be specified in detail in these documents. It should be noted that if such defects or deviations are not specified, they cannot be used by any of the parties concerned as valid reason for not signing the documents. Installation, supervision and commissioning Electrical and mechanical installation The installation shipyard is normally responsible for the installation of the entire system. In addition, the shipyard is responsible for providing and connecting all cables other than special cables supplied with the equipment. The actual installation and cable laying must comply with the vessel’s classification rules and the recommendations given in this manual. During the installation period, the equipment must be covered in such a way that it is protected from dust, paint spray/splashes and welding/cutting sparks. Precautions must be taken to ensure that no part of the equipment is used as a work platform, or for any other purpose for which it was not designed. Note Any damage incurred during the installation period, even with a Kongsberg Maritime AS representative present, is the installation shipyard’s responsibility unless it can be proven that the damage was due to production or material defects in the equipment delivered by Kongsberg Maritime AS, or irresponsibility by Kongsberg Maritime AS personnel. Pre-commissioning and acceptance tests Pre-commissioning and acceptance tests are conducted by Kongsberg Maritime AS personnel. 857-164055 / R 5 HiPAP Installation tests The Kongsberg Maritime installation period (after shipyard installation) is normally divided into three consecutive phases: • The initial start-up and dock-side testing period. This period is normally known as Setting-to-Work (STW). • Dock-side commissioning under operational conditions. This commissioning period is normally ended with a Harbour Acceptance Test (HAT). • Sea Acceptance Test (SAT) with final commissioning under operational conditions at sea. The extent of the tests is normally defined in the contract. If required during a contractual test period, the shipyard must provide assistance necessary for the rapid and efficient completion of the work even when the work is to be performed outside normal working hours. This requirement includes assistance from subcontractors when applicable. Excessive waiting time resulting from delays caused by the shipyard will be charged to the shipyard. HAT and SAT are performed according to Kongsberg Maritime test procedures Guarantee period The guarantee period for the system (as specified in the contract) normally begins as soon as acceptance documents have been signed. 6 857-164055 / R System description SYSTEM DESCRIPTION Introduction This section presents the standard HiPAP units, and the standard configurations of an operation station. Systems overview All HiPAP systems have common software and hardware platforms and thereby offer the same kind of additional functionality and options. The following HiPAP systems are available: • HiPAP 500 • HiPAP 350 • HiPAP 450 HiPAP 500 The HiPAP 500 has a full spherical transducer body including 241 transducer elements. This model has close to full accuracy in the half sphere coverage sector and is the preferred system where the best possible performance is required. (Cd31026) The HiPAP 500 transducer has a diameter of 392 mm and will be installed with the 500 mm gate valve. 857-164055 / R 7 HiPAP HiPAP 350 The HiPAP 350 has a spherical transducer with a cylindric body including 46 transducer elements. This model has good accuracy in the ± 60_ coverage sector and is suited for operations where the major positioning targets are within this sector. (C d3 10 63 ) The HiPAP 350 transducer has a diameter of 320 mm and will be installed with the same 350 mm gate valves as the existing HPR systems. It may also be installed with the 500 mm gate valve. 8 857-164055 / R System description HiPAP 450 The HiPAP 450 system has the same operational and technical performance as the HiPAP 350 system. → Refer to page 8 for more information. The HiPAP 450 transducer is the same unit as the HiPAP 500 but only the 46 lower sector elements of the sphere are “activated” and in use. The HiPAP 450 uses the same hull units as the HiPAP 500. → Refer to page 10 for more information. HiPAP 500 transducer head ( Cd 31 020 ) HiPAP 350 SSBL performance Upgrade to HiPAP 500 The HiPAP 450 can be upgraded to full HiPAP 500 performance. This is done by: • Installation of 6 additional Transmitter / Receiver Boards in the transceiver unit. • APOS software upgrade. 857-164055 / R 9 HiPAP System units A HiPAP system consists of the following units: • Operator station comprising (same for all HiPAP systems): - LCD display - APC 1x computer - Keyboard and trackball • Transceiver unit (system-specific) - HiPAP 500 Transceiver Unit - also used for the HiPAP 450 system - HiPAP 350 Transceiver Unit • Hull unit (system-specific) - HiPAP 500 Hull Unit - also used for the HiPAP 450 system - HiPAP 350 Hull Unit • Hoist Control Unit (same unit for all HiPAP systems) • Remote Control Unit (same unit for all HiPAP systems) Note The Display and keyboard are described in separate documents. Note The hull units, Hoist Control Unit and Remote Control Unit are described in the HiPAP hull units Instruction Manual. 10 857-164055 / R System description Operator Station Display Position output GPS Input (option) APC 1x HiPAP 500 Transceiver Unit R Power Motion sensor Heading sensor Responder drive HiPAP 500 Hull Unit Power Hoist Control Unit Power Gate valve Remote Control Unit (Cd4783b) Gate valve position indicator HiPAP 500 Transducer Figure 1 Standard HiPAP 500 / HiPAP 450 system units 857-164055 / R 11 HiPAP Operator Station Display Position output GPS Input (option) APC 10 HiPAP 350 Transceiver Unit R Power Motion sensor Heading sensor Responder drive HiPAP 350 Hull Unit Power Hoist Control Unit Power Gate valve Remote Control Unit (Cd4783c) Gate valve position indicator HiPAP 350 Transducer Figure 2 Standard HiPAP 350 system 12 857-164055 / R System description Operator station configuration The HiPAP system may be configured in two ways: 1 Stand alone - Stand alone APC 1x computer - LCD display - Keyboard - Trackball The stand alone configuration can be fitted as: - Contained in a standard 19” rack * The LCD display and the APC 1x computer are fitted into a standard 19” rack unit. The keyboard and the trackball may be placed on a desk, or on a suitable shelf. The transceiver unit is installed close to the hull unit. - Desktop system * The LCD display, the APC 1x computer, the keyboard and the trackball sit on a desk top or a purpose-built shelf. The transceiver unit is installed close to the hull unit. 2 857-164055 / R Integrated in the same operator console as a Dynamic Positioning (DP) system (COS controller is used). 13 HiPAP HiPAP system principles General The HiPAP system provides accurate positions of subsea targets such as: • Remotely Operated Vchicles (ROVs), • towed bodies or • fixed transponders. HiPAP processing • The HiPAP system determines the position of a subsea target (transponder or responder) by controlling a narrow reception beam towards its location. The system uses a digital beam-former, which takes its input from all the transducer elements. • The system uses a number of wide fixed beams to generate an approximate position for the target. Once this is achieved, it uses data from all the elements on the hemisphere facing the target to compute the narrow reception beam and optimise the directional measurement. • The range is measured by noting the time delay between interrogation and reception. The system will control the beam dynamically so it is always pointing towards the target. The target may be moving, and the vessel itself is affected by pitch, roll and yaw. Data from a roll/pitch sensor is used to stabilise the beam for roll and pitch, while directional data from a compass is input to the tracking algorithm to direct the beam in the correct horizontal direction. • The HiPAP transceiver can operate with up to 56 transponders simultaneously, and it uses the HPR 400 transponders channels. HiPAP processing - LBL mode Long Base Line (LBL) - This mode is similar to the HiPAP processing, but the transceiver positions up to 8 LBL transponders for each interrogation. Both ranges and directions to the transponders are measured. The data is sent to the APC 1x. 14 857-164055 / R System description HiPAP processing - telemetry The unit transmits acoustic telemetry messages, and receives and decodes the acoustic telemetry message from the transponder. The data is sent to the APC 1x. HiPAP processing - MULBL Multi-User Long Base Line (MULBL) - In this mode the transceiver continuously listen for replies from the transponder. Each replay is detected, and directions and the time difference between replies are sent to the APC 1x. The time differences are the delta ranges that is used in the MULBL positioning algorithm. Dual HiPAP system HiPAP is designed to operate with one or two sets of transceivers/transducers, both operated from the same operator station(s). The dual system uses both transducers to measure the position of one single target (transponder/responder), by controlling beam forming and directional measurement separately for each system in parallel. This means that both systems will measure and calculate a position for the same reply pulse from the transponder. → Refer to figure on page 125. For the dual configuration a synchronisation line between the transceiver are required. Benefits of a dual system: • Accuracy - The improvement factor from 1 to 2 transducers is 1 . 2 This is based on the statistical improvements when using two independent systems. One transducer will give a horizontal bearing accuracy of 0.3°, while two transducers will give 0.2°. • Redundancy - The two transducers will normally be installed at different locations onboard. One transducer may then have a better location with respect to noise environments and reflections than the other. The computed position will be a weighted mean of these two measurements, if one of the systems fails to receive a reply, the other system may still receive it and the position will still be computed. • Quality - When two transducers are used, the system will check and report if the positions from the two systems differ by more than a pre set value. Information about the position quality will also be available based on error ellipses. 857-164055 / R 15 HiPAP APC 1x Description (Cd31080) An APC 1x unit is constructed of steel and aluminium panels and machined aluminium sections. The same unit is used for all types of installation (desktop or rack), with additional mounting brackets or rails as required. Figure 3 APC 1x unit - desktop version, an APC 11 is shown here External connections All external connections to the APC 1x unit are made via plugs located on the rear of the unit. → APC 1x connections, page 107 Power initialization The APC 1x unit can be powered from either a 115 Vac or 230 Vac supply. Caution Ensure the switch is set to the power supply available before plugging the mains supply cable into the power outlet. The power on/off switch is located behind the hinged cover on the front panel. The switch is of the “push-for-on, push-for-off” type. 16 857-164055 / R System description DVD recorder The DVD recorder is placed at the front of the APC 1x, behind the cover, as illustrated in the figure below. A DVD containing backup of the delivered APOS system supplied at the system setup. USB memory stick USB ports for USB memory stick is placed at the front of the APC 1x, behind the cover, as illustrated in the figure below. An USB memory stick containing programs for backup and restore, is delivered at the system setup. These programs can only be used when the system boots on the USB memory stick. USB ports (Cd31089) DVD recorder Figure 4 APC 1x front 857-164055 / R 17 HiPAP GPS receiver signals Signals from the GPS receiver is normally connected to the APC 1x to give position and time information. This signal is a serial data line, and a separate pulse called 1PPS is a pulse coming every second to synch the clock information. The 1PPS pulse can have different pulse length and polarity from different suppliers of GPS receivers. To handle this problem a 1PPS converter can be used. GPS Input signal converter (1PPS converter) If a GPS is connected to the system, a 1PPS converter is used. The 1PPS converter is a separate box and is connected to the APC 1x with a standard cable. 18 857-164055 / R System description Keyboard Keyboard (Cd7079a) The keyboard is a PS/2 keyboard. It is a QWERTY keyboard with US layout and includes back-lighting. Figure 5 Keyboard Trackball Trackball (Cd7080a) The trackball is designed for easy use, and is delivered with cable. Figure 6 Trackball 857-164055 / R 19 HiPAP Display Display → 20 Refer to separat manual supplied with the display. 857-164055 / R System description 1PPS Converter (option) General The 1PPS converter is an option to a standard HiPAP system. A 1PPS converter passes the RS-232 GPS Position Data through but shapes the 1PPS pulse to a fixed pulse length and converts it from TTL level to RS-232 level. Mounting The 1PPS converter is mounted on the cable between the GPS receiver and the COM port used on the APC 1x. The box may be mounted wherever suitable. It is attached with a velcroue. Connections and diagrams → 1PPS connections, page 123. → 1PPS converter - block diagram, page 206. → 1PPS converter - assembly drawing, page 207. Figure 7 1PPS converter 857-164055 / R 21 HiPAP Transceiver units description Introduction A HiPAP transceiver unit is constructed of steel panels, containing a rack holding the system electronics modules. It is designed to be mounted on a suitable bulkhead, and is fitted with vibration / shock absorbers to reduce the effects of transceiver unit vibrations. The design of the HiPAP 500 (also used for the HiPAP 450 system) and HiPAP 350 transceiver units are identical. A HiPAP transceiver unit can be fitted with two types of front doors: • Standard door - delivered with all standard HiPAP systems. • Option - Door fitted with a cooling unit. Delivered upon request. Transducer cable SIMRAD HiPAP 500 (C d3082e) Figure 8 HiPAP transceiver unit External connections The transducer cable is connected into the transceiver unit via a connector located on the left side of the unit. All other cables to and from the transceiver unit enter the unit through the base of the unit. → 22 Refer to figure on page 42. 857-164055 / R System description Power initialization The transceiver unit is powered from a 230 Vac supply. A mains supply switch is located on the front of the main control panel to the right in the rack. → 857-164055 / R Refer to figure on page 42. 23 HiPAP Transceiver unit principles Introduction The transceiver unit is a central part of the HiPAP system. It contains the following: • Electronic circuitry for the transmission of acoustic pulses. • Amplifiers and filters for the reception of acoustic signals. • Interfaces to external sensors, roll, pitch, course and heave. • Serial line/ethernet link for communication with the Operator Station. The transceiver unit’s main navigation function is to interrogate transponders and measure the ranges and directions to them. It is interfaced to attitude sensors, and controls the triggering of up to 4 responders. The transceiver can operate with one HiPAP transducer. The unit outputs the transponder position to the 1x. Power 230 A/C Serial line Roll / Pitch / Heave Serial line Gyro 241 pair cable 8 TRBs HTC 10 Serial line Ethernet to operation station Data bus TMC PCI bus PC Control bus (CD3429) POWER RPC Responder Trigger Responder trig 241 Transducer elements TRANSDUCER Figure 9 HiPAP 500 transceiver unit - functional block diagram 24 857-164055 / R System description Transmission The operator sets up the transmission parameters. This is done using the APOS menu. These parameters are transferred to the transceiver unit via the serial/ethernet line. The transceiver unit generates the appropriate interrogation pulses, amplifies them to the required strength, and sends them via the transducer cable to the transducer. The transducer then transmits the pulses into the water. The transceiver unit also generates responder trigger pulses which are sent to the responder(s) via an umbilical. Reception The transceiver unit receives the analogue signals from the transducer. The signals are demodulated and analogue-to-digital converted, and the digital signals are then converted to position values. These are transferred on the serial/ethernet line to the Operator Station. Attitude sensors are interfaced to the transceiver unit to enable the vessel’s attitude to be taken into account when calculating the position data. Navigation The operator will select the active mode of operation. The system will then automatically switch between the selected mode and the other available modes as required. In the SSBL mode, both the direction and the range to the transponder are computed. When a transponder is switched on by the operator, the transceiver will commence interrogation using frequencies corresponding to the applicable transponder channel. This is done using the APOS menu. 857-164055 / R 25 HiPAP Transceiver unit options General → A redundant HiPAP system is shown in the APOS Instruction manual. In redundant HiPAP systems working with dual Ethernet, a serial line RS-422 to dual Ethernet converter has to be installed in the HiPAP transceiver unit. This is an option to a standard HiPAP transceiver. This option consists of: • Serial to Dual Net converter, SBC 400 If fibre-optic net is used, a fibre-optic Ethernet converter must be installed. This is an option to a standard HiPAP transceiver. This option consists of: • Ethernet converter for fibre-optic Serial to Dual Net converter SBC 400 The Serial to Dual Net converter is shown in the figure below. The converter is placed inside the transceiver unit. → Refer to figure on page 42. • Front panel - At normal operation the RUN lamp is light. This is the only function on the front panel in use. - (Cd4841) H Figure 10 Serial to Dual Net converter SBC 400 unit 26 857-164055 / R System description Ethernet converter for fibre-optic The Ethernet converter - EXC 0015, is shown in the figure below. The converter requires a power supply. The converter is placed at the base of the transceiver unit. → Refer to figure on page 42. (Cd6951) Figure 11 Ethernet converter, EXC 001 Status LEDs for 10BASE-FL connector Link (green) Rx (yellow) Steady LED indicates good 10Base-FL link and normal operation. Flashing LED indicates data reception on the 10BASE-FL link. Status LEDs for 10BASE-T connector Link (green) Rx (yellow) Power (yellow) 857-164055 / R Steady LED indicates good 10Base-T link and normal operation. LED extinguished, indicates lack of power or the 10BASE-T link is down. Flashing LED indicates data reception on the 10BASE-T link. Steady LED indicates connection to external power. 27 HiPAP MAINTENANCE Overview This section describes the basic maintenance routines for the standard HiPAP units. Before you start Before you start performing any maintenance, the power must be switched off, and it must be kept off while the maintenance is being carried out. Caution The maintenance engineer MUST wear a grounding bracelet, which is securely connected to the vessel’s ground, at all times when performing maintenance on the units. Preventive maintenance Topside units The preventive maintenance consists of keeping the units clean. Use: • Soft lint-free cloth • Bucket • Mild liquid detergent Wet the cloth, then wring as much of the water out as possible. Note 28 Use only a damp cloth - so there is no possibility of water dripping into the unit. 857-164055 / R Maintenance Maintenance philosophy General The maintenance philosophy recommended by Kongsberg Maritime is: • On-board maintenance should be carried out by a maintenance engineer, with the assistance of the operator. The maintenance should include the following: - Calibrations Simulations Functional tests Traditional troubleshooting based on a good knowledge of the system. • Replacement of faulty parts should be limited to the line replaceable units (LRUs) recommended in the spare parts list. Note To reduce the number of spare boards required, standard circuit boards without software may be provided. In the event of a replacement becoming necessary, the software on the faulty circuit board must then be transferred to the new board. Any links and switches on the new circuit board must also be set as on the old board. Whenever a faulty unit has been replaced, the unserviceable unit should be sent to Kongsberg Maritime, or an appointed dealer, for repair. Error detection If a fault is detected, the operator should call the maintenance engineer at the earliest opportunity. The operator should be issued with a standard procedure detailing how he/she is to respond to system errors or faults. This procedure should contain the following (as a minimum): Whenever a error message appears: • Write down the parameters currently set in the system. • Write down a brief description of the actions currently being carried out. • Write down the commands being executed (if any) when the error appeared. • Write down the controls carried out (if any) when the error message appeared. 857-164055 / R 29 HiPAP • Write down any other information that might be valuable to the maintenance engineer during troubleshooting. This also includes events not directly connected to the system (for example bad weather, excessive temperature in operations room etc.). Verification The first action to be performed by the maintenance engineer on receipt of a fault message must be fault verification. If the system has been closed down, it should be powered up again (unless the fault has caused serious damage to the system), and an attempt made to make the fault reappear. • Verify the fault during continued operation. 30 857-164055 / R Maintenance Maintenance schedule Maintenance routines must be performed regularly and effectively to ensure that the equipment is kept in top condition. The chart below states the maximum recommended intervals at which the various routines should be performed - the intervals should be decreased if the system is used excessively. Unit Weekly 1- 3 Month 6 Months Reference All units - exterior Clean - Check - All cable connections - - Check - APC 1x filter - - Check/Clean Page 36 APC 1x motherboard battery - - Check Page 72 Backup You are advised to take backup of all operator stations at regular intervals (1-3 months), and every time major changes has been performed in configuration and /or user settings. Software upgrade Caution A system backup must be performed when the software has been upgraded. → 857-164055 / R For backup procedures, refer to the backup files document, doc no 859-216300. 31 HiPAP Tools Standard tools A standard mechanical tool set will be required for: • Perform the majority of the maintenance described in this manual. • Perform the installation, removal and replacement of modules and parts described in this manual. This set should at the minimum contain the following tools: (in alphabetical order) • Adjustable spanners • Allen key in metric size • Flat nosed pliers • Grease gun with appropriate nipple connector (if required). • Grounding bracelet • Knife • Lap jointed pliers • Open ended and ring spanners in metric sizes • Phillips screwdrivers in various sizes • Pozidrive screwdrivers in various sizes • Socket set • Soldering iron • Standard screwdrivers in different widths and lengths • Wire cutters • Wire stripper A standard electrical tool set may be required to perform repairs to cables etc. In addition, the normal heavy tools designed for installation work is required. The following expendables are recommended: • Isolating plastic tape • Solders • Wire straps in different sizes Special tools If special tools are required for a particular procedure, they will be listed at the beginning of that procedure. 32 857-164055 / R Maintenance APC 1x internal The following units and circuit boards in the APC 1x are defined as Line Replaceable Units (LRUs): • Serial line adapter board • Two Ethernet boards • Video adapter board • Hard disk drive • Power supply • DVD Recorder unit The APC 1x is based on a commercially available motherboard, and the additional boards are standard plug-in circuit boards. The placement of boards and units are shown in the figure below. The boards (not the motherboard) and units can be replaced separately. Ethernet boards Processor Hard disk cooling fan Power supply Serial line adapter board Video adapter board Motherboard (CD31087) DVD recorder Figure 12 APC 1x - internal layout 857-164055 / R 33 HiPAP How to open the APC 1x unit To open the APC 1x unit, proceed as follows: 1 Switch off the APC 1x power. 2 Remove the power connector from the back of the unit. 3 Switch off power to all other units connected to the APC 1x (display, transceiver, motion sensor, etc). 4 Remove the 14 screws which secure the top cover onto the APC 1x (4 at the front, 4 on the top, and 3 on each side). 5 Lift the top cover clear of the APC 1x chassis. How to close the APC 1x unit To close the APC 1x unit, proceed as follows: Note 34 1 Ensure all the required units and circuit boards are located correctly, and any securing screws and clips are tight. 2 Ensuring no wires or cables are trapped, carefully replace the cover onto the APC 1x. 3 Once all the screw holes are aligned, replace the 14 securing screws. Do not over-tighten the screws as you may strip the threads off either the screws or the tapped holes in the APC 1x chassis. 4 Remount the APC 1x unit into its rack or desktop as required. 5 Check that the supply voltage change-over switch is set correctly, then plug the mains cable into the connector on the rear of the unit. 6 Apply power to the APC 1x unit and peripherals. 857-164055 / R Maintenance Replacement of APC 1x unit parts The following are described: 857-164055 / R → How to open the APC 1x unit, page 34 → How to close the APC 1x unit, page 34 → Replacing dust filter, page 36 → Replacing the hard disk, page 37 → Replacing the DVD recorder, page 37 → Replacing the power supply, page 38 → Replacing circuit boards, page 39 35 HiPAP Dust filter A filter is fitted at the left side of the APC 1x behind the top cover, as indicated in the figure below. When required, the filter must be cleaned, to avoid blocking of the air circulation within the unit. To clean the filters proceed as follows: Note 1 Switch off the APC 1x power. 2 Remove the top cover from the APC 1x. 3 Remove the filter. 4 Wash the filter in lukewarm water. 5 Leave it to dry before you re-install it. 6 When cleaning the filter is no longer sufficient, replace the dust filter. To ensure correct air flow, use the correct filter type! Dust filters types • Filter type SP 120, order number see page 143. (Cd31080a) Dust filter behind top cover Figure 13 APC 1x unit - filter placement 36 857-164055 / R Maintenance Replacing the hard disk To remove the hard disk unit, proceed as follows: 1 Switch off the APC 1x power. 2 Remove the top cover from the APC 1x. 3 Use a suitable box spanner and remove the four nuts that secure the hard disk drive onto the disk drive chassis. 4 Lift the hard disk unit off the chassis. 5 Disconnect the two plugs. 6 The hard disk unit can now be removed from the APC 1x. To replace the unit, follow the above procedure in reverse. Note For further details regarding formatting and configuration of the new hard disk, please contact Kongsberg Maritime. Replacing the DVD unit To remove the DVD unit disk drive unit, proceed as follows: 1 Switch off the APC 1x power. 2 Remove the top cover from the APC 1x. 3 Use a pozidrive screwdriver and remove the six screws that hold the disk drive chassis into the APC 1x unit. - Four screws are located in the front of the unit behind the drive unit cover plate. Two screws are located in the rear of the unit above the connector panel. → Refer to figure on page 38. 4 Carefully lift the disk drive chassis out. 5 Remove the eight screws (four on each side) holding the DVD unit into the chassis. 6 Lift the drive unit out. 7 Disconnect the two plugs. 8 The DVD unit can now be removed. To replace the unit, follow the above procedure in reverse. 857-164055 / R 37 HiPAP Replacing the power supply To remove the power supply unit, proceed as follows: 1 Switch off the APC 1x power. 2 Remove the top cover from the APC 1x. 3 Use a pozidrive screwdriver and remove the five screws that hold the power supply unit into the APC 1x chassis. - Four screws are located in the rear of the unit, one is located on the side. (CD3893) Figure 14 Locations of the five power supply retaining screws 4 Carefully lift the power supply out. 5 Disconnect the plug from the motherboard. 6 The power supply can now be removed. To replace the power supply unit, follow the above procedure in reverse. 38 857-164055 / R Maintenance Replacing circuit boards → Overview of “standard” boards, page 71 General procedure Caution If you are to use a board different from a “standard” board, contact Kongsberg Maritime service personnel for software updates. To remove one of the circuit boards, proceed as follows: 1 Switch off the APC 1x power. 2 Remove the top cover from the APC 1x. 3 Insert a small pozidrive screwdriver down through the appropriate hole in the APC 1x rear chassis plate, and remove the screw that secures the faulty circuit board into the chassis. 4 Slacken the three white plastic PCB clamping nuts located on the rear of the APC 1x chassis. (CD3893c) Figure 15 PCB clamp nuts 5 Carefully lift the circuit board out. To replace the board, follow the above procedure in reverse. 857-164055 / R 39 HiPAP Keyboard Under normal conditions, maintenance is not required, apart from keeping the unit clean. If the keyboard is not functioning properly, the unit must be replaced. Trackball Under normal conditions, maintenance is not required, apart from keeping the unit clean. If the trackball is not functioning properly, the unit must be replaced. 40 857-164055 / R Maintenance Transceiver units Overview Two types of HiPAP transceiver units are available: 1 HiPAP 500 Transceiver Unit also used for the HiPAP 450 system 2 HiPAP 350 Transceiver Unit. The to transceiver units are in principle the same. The only difference is: • The HiPAP 500 Transceiver Unit: - For a HiPAP 500 system, the transceiver unit includes eight Transmitter / Receiver boards. - For a HiPAP 450 system, the transceiver unit includes two Transmitter / Receiver boards, (the same as a HiPAP 350 system) • The HiPAP 350 Transceiver Unit includes two Transmitter / Receiver boards. → 857-164055 / R The figure on page 42 presents the internal layout of the HiPAP 500 Transceiver Unit. 41 HiPAP Transceiver unit internal layout A transceiver unit contains the following circuit boards and units: HiPAP 350/450 2 x TRBs HiPAP 500 8 x TRBs Powec power supply Main control panel Power socket Earth socket Rack unit Main switch 3 x fan drawers Serial to Dual Net converter (optional) Heater (behind panel) Power input/ terminal block (behind panel) Ethernet converter (optional) Relay (behind panel) Dual Ethernet connection box (optional) (behind terminal blocs) (Cd31064/102650) Terminal blocks Responder Terminal Block (RTB) Figure 16 HiPAP 500 Transceiver Unit - internal layout The boards and units are listed from the left top of the unit. • Transmitter/Receiver boards (TRBs). The TRBs are located in a standard 19” rack across the upper part of the transceiver unit. The TRB boards are double-Europe cards. 42 857-164055 / R Maintenance • POWEC power supply unit. This unit provides the voltages required by the TRBs, and carries a “power on” indicator. This is a plug-in unit. • Main control panel. This is a plug-in unit. The panel holds: - A standard 230 Vac power output socket intended for measuring instruments. - Main power On/Off breaker. - An earth socket to which maintenance personnel must be connected when servicing the unit. • Responder Terminal Block (RTB). This is a “snap-on” unit, located in the bottom of the transceiver unit. • Backplanes. The boards and units are connected into the backplane. • Fan rack, containing three 230 Vac cooling fans. • Transceiver Controller (HTC-10), including: - A PC with disk drive. - Transceiver Memory Control (TMC) board. - The serial lines are connected to a digi board. - The PC is loaded with the main operating program for the transceiver unit. • Terminal blocks for connecting externally supplied signals. • Power input / terminal blocks. • Heater and relay. When the main switch is switched off, the heater is switched on. When the mains is switched on again, the heater is automatically switched off. This prevents condensation. Options All mounted at the base transceiver unit: • Serial to Dual Net converter SBC 400 If dual Ethernet communication is implemented (cable or optical) a Serial to Dual Net converter must be used. • Dual Ethernet connecton box • Ethernet converter. If fibre-optic is implemented, an Ethernet converter (EXC 0015) must be used. 857-164055 / R 43 HiPAP LEDs indicating operating status The transceiver unit includes several LEDs that indicates the various status of operation. A LED is active when lit. The LEDs are as follows: • LEDs on the HTC -10 disk drive cover - 0-7 Debug indicators controlled from i960 (For Kongsberg Maritime service personnel only!) - D1 Debug indicator controlled from DSP (For Kongsberg Maritime service personnel only!) - D2 Debug indicator controlled from DSP (For Kongsberg Maritime service personnel only!) - Tx Transmitting - Rx Receiving - RUN System is running - Fail System failure (The TMC II board is not working) • LEDs on the lower cover plate - 1-4 Indicating active responder drive(s) 3 2 1 0 D1 D2 TX RX 7 6 5 4 RUN FAIL (Cd3080b) 2 1 3 4 6 5 8 7 10 12 9 11 13 14 1 6 18 20 15 1 7 1 9 2 1 4 3 6 5 8 7 10 12 9 11 13 14 16 18 2 0 15 1 7 1 9 4 3 2 1 Responder drives (mounted on the cover plate) Figure 17 Transceiver unit LEDs 44 857-164055 / R Maintenance Replacement of transceiver unit parts Line Replaceable Units (LRUs) The following parts contained within the HiPAP transceiver unit are defined as Line Replaceable Units (LRUs): • Transmitter / Receiver board (TRB) • Responder Terminal Block (RTB) • Main control panel • POWEC power supply • Backplane • Fan unit • Fuses • Dust filters The replacement procedures for each of these parts are described in the following paragraphs. Before you start removing any board / unit Caution 1 Switch off all power to the HiPAP system, and to other systems connected to the HiPAP (motion sensor etc.). 2 For the other systems, remove the fuses if possible, and label the fuse panels with tags stating that maintenance is being carried out on the system. 3 Open the transceiver unit front door. The maintenance engineer MUST wear a grounding bracelet which is securely connected to the vessel’s ground at all times while performing maintenance on the transceiver unit. Opening / closing door Before performing any replacements, you must open the transceiver unit front door. To do this: 1 Slacken the four captive screws in the corners of the door. 2 Lift the door off. To close the door, proceed in reverse order! 857-164055 / R 45 HiPAP Replacement of circuit boards The circuit boards in the transceiver unit rack are all plug-in modules which are easily replaceable. Use a small screw-driver to release the screws holding a board into the rack (two screws at the top and two at the bottom). All the boards are replaced using the same procedure. → For circuit board placement refer to figure on page 42. Removing a transmitter / receiver board A circuit board is removed according to the following procedure: 1 Read the section Before you start removing any board/unit on page 45. 2 Switch off the transceiver unit using the breaker on the main control panel. 3 Locate the faulty board. 4 Note the locations of, and remove, any connections to the front of the board. 5 Slacken the screws located at the upper and lower edges of the front of the board, and carefully pull the board straight out from the transceiver unit rack. 6 Put the board into an anti-static plastic bag and place it on a clean, stable work-bench where it cannot come to any harm. Replacing a transmitter / receiver board In principle, replacing a board is to perform the steps in Removing a transmitter/receiver board in reverse order. When replacing a board into the rack, ensure that the board is correctly located in the rails before any pressure is applied to the board! If the rear connector pins are damaged, the board will need to be replaced. Proceed as follows: 1 Note 46 Locate the board in the slots and carefully slide the board into the unit. - Ensure that the board does not interfere with any components as it is pushed in. The RPC board has only one permanent rail - the lower rail is mounted on the main control panel. 857-164055 / R Maintenance 2 When the connectors on the back of the board begin to mate with the connectors on the back plane, (approximately 5 mm before the board is fully home) check that the board is correctly located then apply even pressure over the front of the board and push it firmly home. 3 When the front of the board is fully home, fasten the securing screws to keep it in position. - Do not attempt to force the board into the rack by tightening the securing screws. This will damage the board and/or the rack, and result in replacement parts being necessary. Once all the boards are in position, re-apply power as required. 4 5 Close the transceiver unit front door. Replacement of units Removing the responder terminal block (RTB) The RTB module is located on the support rail at the bottom of the transceiver unit. Remove the module as follows: 1 Read the section Before you start removing any board/unit on page 45. 2 Switch off the transceiver unit - use the breaker on the main control panel. 3 Disconnect the RTB module. 4 The module is snapped on. To remove it, press it gently upwards, and pull it directly out from the support rail. 5 Put the module into an anti-static plastic bag and place it on a clean, stable work-bench where it cannot come to any harm. Replacing the responder terminal block To replace the RTB module, proceed as follows: 1 Align the RTB module on the support rail. 2 Press the RTB module until it snaps into place. Removing the main control panel The main control panel is removed according to the following procedure: 1 857-164055 / R Read the section Before you start removing any board/unit on page 45. 47 HiPAP 2 Switch off the transceiver unit using the breaker on the main control panel. 3 Unplug any instruments that are connected into the power socket, and move your ESD bracelet to another connection point. - Ensure the bracelet is properly earthed before continuing. Slacken the screws located at the upper and lower edges of the front of the main control panel, and carefully pull the unit straight out from the transceiver unit rack. 4 Replacing the main control panel In principle, replacing the main control is to perform the steps in paragraph: → Removing the main control panel on page 47 in revers order. In principle, replacing the main control is to perform the steps in paragraph in revers order. • Ensure that the lower edge of the RPC board fits smoothly into the rail on the control panel. Removing the POWEC power supply Removal of the POWEC power supply is performed according to the following procedure: 1 Read the section Before you start removing any board/unit on page 45. 2 Switch off the transceiver unit using the breaker on the main control panel. 3 Referring to the procedure on page 47, remove the main control panel from the transceiver unit rack. 4 Slacken the screws located at the upper and lower edges of the front of the power supply, and carefully pull it straight out from the transceiver unit rack till it is prevented from coming further by the power cable. 5 Put one hand into the space vacated by the main control panel, and carefully unplug the power cable. 6 Withdraw the power supply from the rack, and place it on a clean, stable work-bench where it cannot come to any harm. Replacing the POWEC power supply In principle, replacing the main control is to perform the steps in paragraph Removing the POWEC power supply in revers order. 48 857-164055 / R Maintenance Note When replacing the power supply into the rack, ensure it is correctly located in the rails before any pressure is applied to it! The mains power plug must be reconnected before the supply is pushed fully home. Proceed as follows: 1 2 Locate the supply into the appropriate rails and carefully slide it into the unit. - Ensure the supply does not interfere with any components as it is pushed in. When the supply is approximately half way in, reach in to the space vacated by the main control panel and reconnect the mains power plug. 3 Slide the supply fully into the rack. 4 When the connectors on the back of the supply begin to mate with the connectors on the Backplane, (approximately 5 mm before the supply is fully home) check that the supply is correctly located then apply even pressure over its front and push it firmly home. 5 When the supply is fully home, fasten the securing screws to keep it in position. - Do not attempt to force the supply into the rack by tightening the securing screws. This will damage the supply and/or the rack, and result in replacement parts being necessary. Removing the backplane The backplane is located behind the circuit board rack, and is accessible only by removing the entire rack from the transceiver unit. Note All the circuit boards and units in the rack must be removed before the rack can be removed. All connections to the backplane are made using plugs. To remove the backplane proceed as follows: 857-164055 / R 6 Disconnect the cables from the transducer and from the HPC-10. 7 Refer to the procedures: - Removing transmitter/receiver boards, on page 46. 49 HiPAP - Removing the main control panel, on page 47. - Removing the POWEC power supply, on page 48, and remove the circuit boards and units from the rack. 8 Support the rack, remove the ten screws that secure the rack into the cabinet, then carefully withdraw the rack from the cabinet till the connectors to the backplane are exposed. 9 Note the locations of the cable connectors connecting the rack to the transceiver unit cabinet, then disconnect all the cables. 10 Place the rack on a clean, stable work-bench. The backplane should now be readily accessible. 11 Note the locations of the cables connected to the backplane, then disconnect all the cables. 12 Slacken and remove the 22 screws securing the backplane into the transceiver unit. - The backplane should now be loose, and you can remove it carefully from the rack. If the backplane is going to be out of the transceiver unit for some time, you are recommended to replace the rack into the cabinet and replace the circuit boards into the rack, to protect the boards. Replacing the backplane Replacing the backplane is a reversal of the procedure given in paragraph → Note 50 Removing the backplane on page 49. Ensure that parts fit together correctly before securing screws are tightened. Do not attempt to apply force to any of the parts. Do not over tighten the securing screws. 857-164055 / R Maintenance Replacing a fan unit Three fan drawers are located immediately below the circuit board rack. The fan drawers each hold one fan unit, and are plug-in modules which are easily replaceable. Note The fans must be checked every 6 month, and replaced when required. You do not need to switch off power to the transceiver unit while replacing a fan unit. Follow the procedure below: 857-164055 / R 1 Open the transceiver unit front door. 2 Identify the defective fan unit, slacken the screws securing the fan drawer into the rack, then carefully pull out the fan draw. 3 Locate the new fan drawer into the tracks in the rack, then carefully slide it into the rack. 4 When the contacts at the rear of the drawer begin to mate (the last 5 mm of travel), apply even pressure across the front of the drawer to push it into the rack. 5 Tighten the screws to secure the fan drawer into the rack. 6 Close the transceiver unit front door. 51 HiPAP Replacing the HTC-10 LRUs General The following parts contained within the HTC-10 computer are defined as Line Replaceable Units (LRUs): • Power supply • Hard disk • 3.5” disk drive • PCBs - Digi board - TMC II board - Display board Replacement of HTC-10 computer parts are in principle the same as for the APC 1x computer. → Refer to page 34. Only replacement of the PCBs are described here. The placement of the different LRUs are indicated in the figure below. HTC-10 front Digi board (Cd5268) Display board Power supply Hard disk Figure 18 HTC-10 internal layout 52 857-164055 / R Maintenance PCBs For replacement of the PCBs you must pay special attention to the following: 1 Remove the PCBs cover plate. Front (Cd5274) Cover plate Figure 19 Indication PCBs cover plate Digi board replacement Before you plug in the board: → A complete Installation Guide is available on request. Before you plug in the Digi board, is important to: 1 Write down the serial number of the board in the space provided. 2 Set all four DIP switches on the ON position (towards the circuit board). You set the switches later without removing the board. → For DIP switch settings, refer to page 95. TMC II board replacement Note A complete Installation Guide is available on request. Standard procedure as for the APC 1x. Display board replacement Standard procedure as for the APC 1x. 857-164055 / R 53 HiPAP Replacing fuses Fuse locations A transceiver unit is powered via a main breaker mounted on the front of the main control panel. This breaker is also an automatic fuse. The POWEC power supply holds one fuse. The fuses are as follows: Unit Fuse POWEC The fuse is contained in a holder located on the rear of the unit. 1 fuse, 5 mm ∅ x 20 mm, 250 V, 3.15 A, slow- blow Main breaker Trips at 10 A RPC board 4 fuses, 0.1 A, slow- blow (one for each channel on the +24 V lines) → Caution Fuse location, see page 89. Allways the correct size and type of fuse. Irreparable damage may be caused to the transceiver unit if the wrong fuse (or anything else) is used. Fuse replacement 54 1 Switch off all external units and systems connected to the HiPAP system. 2 Open the transceiver unit front door. 3 Switch off power to the unit - use the main breaker. 4 If the suspect fuse is located on the POWEC power supply, → refer to Removing the POWEC power supply on page 48. 5 Remove the supply from the transceiver unit. 6 If the fuse is on the RPC board, → refer to Removing the responder controller on page 47. 7 Remove the RPC board from the transceiver unit. 8 Replace the blown fuse(s) with a fuse with correct size and type. 9 Replace the board/unit into the transceiver unit. 857-164055 / R Maintenance 10 Caution Release the switch immediately. It is made so it can trip again if necessary. 11 Caution First, return power to the HiPAP system, then to the other external units. If, when a fuse is replaced, it blows or trips again when power is switched on to the system, a more serious fault exists. Do not replace the fuse(s) a second time till the fault has been found and corrected. 12 857-164055 / R If the main breaker has tripped, remake the breaker. Close the transceiver unit front door. 55 HiPAP Cooling unit (optional) The cooling unit is located on the front door (if fitted). → Refer to drawing on page 200. No maintenance is required, apart from keeping the unit clean. The cooling unit is a sealed unit and must not be opened. If the unit is not working as expected, contact Kongsberg Maritime. To replace the cooling unit proceed as follows: 56 1 Open the transceiver unit front door. → Refer to page 45. 2 Disconnect the power cable. 3 Remove the eight screws securing the cooling unit to the door. 4 Replace the unit. 5 Connect the power cable. 6 Close the transceiver unit front door. → Refer to page 45. 857-164055 / R Maintenance Replacing the Serial to Dual Net converter (SBC 400 unit) This unit is located behind the row of terminal blocks, and is accessible only by removing the entire terminal block from the transceiver unit. To replace the unit proceed as follows: 857-164055 / R 1 Read the section Before you start removing any board / unit. → Refer to page 45. 2 Remove the row of terminal blocks. → Refer to page 47. 3 Disconnect the cables. 4 Remove the four screws that secure the rack to the cabinet. 5 To replace the SBC 400 unit, proceed in revers order. 57 HiPAP Dust filters Locations Dust filters are fitted at the air inlet and air outlet. When required, these dust filters must be cleaned, to avoid blocking of the air circulation within the unit. Dust filter Air outlet (Cd3082d) Figure 20 Side view of transceiver unit indicating air inlet / outlet and filters Changing the filter The filter at the air outlet on the rear side top, you can just press into place or pull out when required. To remove / replace the filter at the bottom air inlet, you must remove the coverplate. To clean the filters proceed as follows: 1 Remove the filter from the unit. 2 Clean the filter in lukewarm water. 3 Leave it to dry before you re-install it. 4 When cleaning is no longer sufficient, replace the dust filter. Types The filters types are as follows: • Top filter SP 115, size (500 x 20 x 60) mm • Bottom filter SP 180 Note 58 To ensure correct air flow it is important to use the correct filter type. 857-164055 / R Installation INSTALLATION Overview This section describes the installation of the standard HiPAP units. General installation information Note The display and computer should always be secured down to the surface on which they sit to avoid damage in the event of rough weather. Note The operator station units must be installed as close as possible to each other. The cables between the units must be as short as possible. 857-164055 / R 59 HiPAP APC 1x installation Introduction The APC 1x unit can be mounted either in a standard 19” rack, or on a desk. The type of installation must be stated when you order the unit, to ensure that rails or mounting brackets are supplied as appropriate. • APC 1x units supplied for desktop installation must be mounted as “best fit” for the user. • If the APC 1x unit is to be mounted in a 19” rack, an appropriate rack must be provided by the customer. Unit location The APC 1x unit must be easily accessible during operation of the system. Logistics Safety - Refer to the safety warning in the front of this manual. Personnel - Minimum 2 trained mechanical/electrical fitters. Ship location - No special requirements. The watertight integrity of the vessel will not be effected. Special tools - None. 19” rack installation The APC 1x is supplied with a rail kit for rack mounting. 60 → See also drawing on page 199. 1 Mount the rails and brackets onto the APC 1x unit. Use the bolts and washers provided. 2 Follow the procedure provided by the rack manufacturer and mount the APC 1x unit into the rack. 3 Place the keyboard and trackball on a suitable desk or shelf close to the APC 1x unit. 4 Connect the cables. 857-164055 / R Installation Desktop installation The APC 1x unit, keyboard and trackball must be placed on a suitable desk or shelf and secured in position using the mounting brackets provided. • Ensure that the desk / shelf is strong enough to support the weight of the units. • Check that you can operate the system comfortably before securing the units in position. Note Refer to technical specifications on page 66 for the weights of the units, and check the strength of the desk/shelf before placing the units. Remember that vertical accelerations due to vessel pitch, roll and slamming in heavy seas will increase the instantaneous weights of the units considerably. → See also drawing on page 194. Cabling Ensure that enough excess cable is provided to allow the units to be moved around during maintenance. Note 857-164055 / R 1 Connect the standard cables between the various units. 2 Perform the remaining cable interconnections. 3 Check the supply voltages and all cable connections before applying power to the system. Several of the cables are delivered with the units. Connectors and pin allocations for these cables are given in this document for reference only. 61 HiPAP Transceiver unit installation Introduction The HiPAP transceiver unit (cabinet) is to be mounted to a bulkhead. Note The guidelines for installation presented here must be regarded as a base for detailed plans to be prepared by the installation shipyard. These plans must include drawings, instructions and procedures specific to the ship in which the equipment is to be installed. These drawings must be approved by the local maritime classification society before use. (cd3168b) Figure 21 Cabinet mounting - side view Note For ventilation and maintenance purposes, there must be a minimum of 150 mm clear space between the transceiver unit and the next unit or bulkhead horizontally, and a minimum of 200 mm clear space below the unit. → 62 Refer to the figure on page 197 for further details. 857-164055 / R Installation Unit location The transceiver unit must be located close to the hull unit, either in the same compartment or in a compartment in the close vicinity. Note The maximum distance between the transceiver unit and the hull unit is restricted by the length of the transducer cable. → For information about the transducer cables, refer to the HiPAP hull units Instruction manual. Logistics Safety - Refer to the general safety procedures in the front of this manual. Personnel- Minimum 3. Qualifications - Trained mechanical/electrical fitters. Ship location - No special requirements. The vessel’s watertight integrity will not be effected. Special tools - None. Procedure Note You do not need to remove the circuit boards and modules from the cabinet during the installation process. Keep the cabinet door firmly shut. Ensure that the cabinet is not exposed to dust, moisture, vibration or physical damage during the installation process. Caution Check the other side of the bulkhead and decks before welding, to ensure there will be no “surprises” when you weld the brackets to the bulkhead. The anchor bolts for the shock absorbers are screwed on to the brackets. 857-164055 / R 1 Select a suitable bulkhead. → Refer to the figure on page 197 for distance and access restrictions. 2 Measure and mark the locations where the shock absorber brackets (with bolts) are to be mounted. 63 HiPAP Warning Caution 3 Remove the brackets from the shock absorbers by removing the 16 nuts (four for each shock absorber). - There is no need to remove the shock absorbers from the cabinet. 4 Weld the brackets to the bulkhead. 5 Clean the welds and brackets, and paint them with the appropriate preservation mediums. 6 Once the paint is dry, lift the cabinet into position and align the shock absorbers onto the the bracket bolts. 7 Start with the upper shock absorber, and bolt the shock absorbers to the brackets. - Use shake-proof washers, and tighten the nuts to a torque of approximately 50 Nm. - Ensure the correct nuts and washers are used. Ensure that all the power supplies are switched off and the fuses removed before attempting to connect the cables. 8 Connect the cables. → Refer to the Drawing file section on page 193 for the wiring and interconnection diagrams. 9 Once all the cables have been connected and the installation has been checked, remove all “foreign” matter from the cabinet and close the door. Do not attempt to run the system before the checks listed in the Test and alignment procedure have been completed. → Test and alignment procedure, refer to page 145. Cooling unit (option) As an option, the HiPAP transceiver door can be fitted with a cooling unit. Connect the cooling unit power plug to the power socket on the Main control panel. → 64 Refer to the drawing in the Drawing file section. 857-164055 / R Technical specification TECHNICAL SPECIFICATION Overview This section gives the technical specifications of the standard HiPAP 500 and HiPAP 350 units. 857-164055 / R 65 HiPAP APC 1x The APC 1x unit is supplied with several standard cables. These cables limit the maximum distance between the APC 1x and the display unit. Dimensions • Unit for desktop installation: → Outline dimensions, refer to the figure on page 194. - Weight: 17 kg • Unit for rack installation (including rails and side plates): → Outline dimensions, refer to the figure on page 199. - Weight: approximately 17 kg Note In all cases, allow 100 mm space behind the unit for plug connections and cables. Power • Voltage: 115 / 230 Vac - Selector-switch beside power connector. - The power supply must be kept within ±10% of the unit’s nominal voltage (90-132 Vac / 180-264 Vac). - The maximum transient voltage variations on the main switchboard’s bus-bars which could occur (except under fault conditions), are not to exceed -15% to +20% of the nominal voltage. • Frequency: 50-60 Hz • Maximum current drawn: 5 A • Normal current drawn: 0.5 A • Nominal: 80 W Environment • Storage temperature: -40 to +70_C • Storage / operating humidity: 95% / 85% relative Note 66 The unit must be operating in a non-corrosive and dust-free atmosphere, with temperature and humidity within the specified limits. 857-164055 / R Technical specification Vibration • Range: 5-100 Hz • Excitation level: 5-13.2 Hz ±1.5 mm, 13.2-100 Hz 1 g Protection • Degree of protection: IP 67 Keyboard • Weight: 0.5 kg • Cable length: 1.5 m • Degree of protection: IP 65 → See also drawing on page 195. Trackball • Weight: 1.5 kg • Cable length: 2.8 m • Degree of protection: IP 64 → See also drawing on page 195. → Outline dimensions, see drawing on page 196. For more information, refer to separate manual supplied with the display. Display 857-164055 / R 67 HiPAP Transceiver unit This section includes the technical data for the transceiver unit. These data are identical for both the HiPAP 500 and the HiPAP 350 transceiver units. Dimensions • Width (cabinet): 525 mm • Height (cabinet): 713 mm/(overall) 919 mm • Depth overall: 566 mm • Weight: approx 55 kg (depending on number of PCBs fitted. → See also drawing in the Drawing file section on page 193. Power • Voltage: 230 Vac - The power supply to a HiPAP transceiver unit must be kept within ±10% of the unit’s nominal voltage (180-264 Vac). - The maximum transient voltage variations on the main switch- board’s bus-bars which could occur (except under fault conditions), are not to exceed -15% to +20% of the nominal voltage. • Frequency: 50 - 60 Hz • Inrush max: 500 W • Nominal: 250 W Operating temperature • Standard (no cooling door): 0 to +35° C • Allowable maximum temperature for a 12 hour period (no cooling door): +55° C • With cooling door (309-216005): 0 to +55° C 68 857-164055 / R Technical specification Environment • Storage temperature: -20 to +65° C • Storage / operational humidity: 90% / 80% relative Note The unit must be operating in a non-corrosive and dust-free atmosphere, with temperature and humidity within the specified limits. Protection • Degree of protection: IP 44 Cooling unit (option) • Height x width x depth: (320 x 110 x 520) mm • Weight: 14.2 kg 857-164055 / R 69 HiPAP CIRCUIT BOARDS AND POWER UNITS DESCRIPTION Overview This section provides information on the circuit boards and power units used in the standard HiPAP 500 and HiPAP 350 units. Switch settings and links are described where necessary. 70 857-164055 / R Circuit board descriptions APC 1x computer This section provides a short description of the circuit boards and power unit contained within the APC 1x. The APC 1x is based on a commercially available motherboard, and the additional boards are standard plug-in circuit boards. Caution The APC 1x may be set up with various configurations of boards and units, depending on the actual delivery. The boards / units may also vary depending on availability. The “standard” boards and units are described here. The following circuit boards and units are described: • Motherboard (battery information), on page 72. • Serial line adapter board, on page 74. • Ethernet board, on page 76. • Video adapter board, on page 77. • Power supply with internal cooling fan, on page 78. → 857-164055 / R Board placement, se figure on page 33. 71 HiPAP Motherboard General The motherboard is the main computer board in the APC 1x unit. It holds the microprocessor and supporting electronics, and controls all the input/output interfacing for the APC 1x. Caution When installing any card on the motherboard, ensure that it is fully seated in the connector before you power on the system. If the card is not fully seated in the connector, an electrical short may result across the connector pins. Depending on the over-current protection of the power supply, certain board components and/or traces may be damaged. Note To remove a circuit board, press the lock handle on the connector sideways, while pulling out the circuit board. Battery General When your computer is turned off, a lithium battery maintains the current time-of-day clock and the values in CMOS RAM current. The battery should last about 3 years, but must be replaced when required. Caution Danger of explosion if the battery is replaced incorrectly. Contact your service representative to obtain a qualified replacement. Changing the battery To replace the battery proceed as follows: 1 72 2 Restart the APC 1x - Press the F2 key several times during boot to enter the BIOS configuration menus. - Note down the settings in all menus. Switch off the APC 1x power. 3 Turn off all peripheral devices connected to the computer. 4 Remove the APC 1x cover. 857-164055 / R Circuit board descriptions 5 Locate the battery on the motherboard. 6 Use a medium flat-bladed screwdriver, and gently pry the battery free from its socket. Note the orientation of the + and - on the battery. 7 Install the new battery correctly. 8 Replace the APC 1x cover. 9 Switch on the APC 1x - Press the F2 key several times during boot to enter the BIOS configuration menus. 10 Change the settings to the values you recorded before you replaced the battery. 11 Restart the APC 1x. Figure 22 Replacing the battery 857-164055 / R 73 HiPAP BlueStorm/PCI serial adapter board Manufacturer; http://www.connecttech.com Introduction This serial adapter board is a commercially available board. It is equipped with: • four RS-232 • four RS-422. Several cards can be used in the computer to increase the number of outputs available. BlueStorm/PCI installation for Windows XP The BlueStorm/PCI board uses a specific driver on Windows XP. This device driver provides an interface between the Windows XP operating environment and a BlueStorm/PCI adapter. Under Windows XP you can install a maximum of 256 serial ports. • Install the driver • Test the board → Refer to the BlueStorm/PCI User Manual. Switches The BlueStorm/PCI board holds no switches. Links The BlueStorm/PCI board holds no links. Connectors • One PCI connector • One VHDC1-68 female connector for the serial lines. The serial line cable is a split cable, with eight cables, one for each of the com port connectors. 74 857-164055 / R Circuit board descriptions (Cd31088) Figure 23 Serial lines cable • COM 2, COM 3, COM 4 and COM 5 are RS-232 • COM 6, COM 7, COM 8 and COM 9 are RS-422 857-164055 / R 75 HiPAP Ethernet board Manufacturer; http://www.intel.com The Desktop Adapter board is a commercially available Ethernet board. It is compatible with Fast Ethernet and Ethernet. This is a “Repair-by-replacement” item. If the board develops a fault, the entire board must be replaced. LEDs The PRO/1000 GT Desktop Adapter board holds no LEDs. Switches The PRO/1000 GT Desktop Adapter board holds no switches. Links The PRO/1000 GT Desktop Adapter board holds no links. Connectors • Three edge connectors to connect it into the motherboard. • One standard RJ-45 for external Ethernet connection. 76 857-164055 / R Circuit board descriptions ATI Radeon Video adapter board Manufacturer; http://www.ati.com The ATI Radeon is a commercially available video adapter board. This is a “Repair-by-replacement” item. If the board develops a fault, the entire board must be replaced. LEDs The ATI Radeon board holds no LEDs. Switches The ATI Radeon board holds no switches. Links The ATI Radeon board holds no links. Connectors • Three edge connectors to connect it into the motherboard. • One standard 15 pin D-connector for the monitor. • One standard DVI connector for the monitor. 857-164055 / R 77 HiPAP Power supply Manufacturer; http://www.enermax.com.tw The power supply is a commercially available power supply. The AC power supply enables the computer to be powered from a 115/230 Vac mains supply. The power supply is a sealed unit. In the event of malfunction, replace the unit. Input voltage The correct range of ac input voltage in the working environment is selected by the slide switch. • 230 Vac (minimum: 180 V / maximum: -265 V) or • 115 Vac (minimum: 90 V / maximum: -135 V) • The maximum Dc output current of +5V: 2.2A Configuration of power distribution: 78 +3.3 V 32 A +5 V 32 A 0.3 A 1. Max. continuous total Dc output power shall 0.3 A +12 V 26 A 1.5 A -5 V 1A -12 V 1A +5 VSB 2.2 A not exceed 350 W. W 2 Max. Max output combined 2. 0A on +5 V and +3.3 V 0A shall not exceed 185 W. 0.1 A 857-164055 / R Circuit board descriptions Transceiver unit - circuit boards and units Overview This section gives a short description of each of the circuit boards and units contained within the transceiver unit. The following circuit boards and units are described: • Transmitter/receiver board • Power supply • Main control panel • Responder Terminl Block • HTC-10 computer • Transceiver memory control board (within the HTC-10 computer) • Digi board (within the HTC-10 computer) • Serial to Dual Net converter, SBC 400 (optional) → 857-164055 / R Refer to the figure on page 42. 79 HiPAP Transmitter/receiver board (TRB) General A TRB holds a total of 32 transmitters and 32 receivers, and each transmitter/receiver pair is connected via a transmit/receive switch to a specific element in the transducer. 10 test points 10 LEDs P3 GND P4 Fron t Re ar P1 and P2 connectors Figure 24 Transceiver/receiver board (TRB) The TRB is fastened to a strengthening plate/heat sink which covers the entire component side of the board and also forms a “front panel” to the board. The board is located in tracks within the transceiver unit to ensure correct location, and is held in position by four screws. 80 857-164055 / R Circuit board descriptions Transmission - One TRB contains a control interface that controls the 32 transmitters on the board. The transmitters can be controlled individually to enable beamforming of the transmitted pulse. Reception - One TRB receives signals from 32 transducer elements. The signals are individually amplified, time-varied-gain regulated, demodulated, and analogue-to-digital converted. The converted signals are then sent to the computer (HTC-10) for further processing. Technical details • Analogue input/output: 32 channels, 60 Ω, + T/R switch • Analogue to Digital: - 12 bits resolution - I/Q simultaneously converted to 32-bit latched bus • Frequency range: - Transmitter - 23 to 26.5 kHz - Receiver - 25 to 29 kHz • TVG: 90 dB • Transmitter: - Maximum 20 W per channel. - Duty cycle controlled • Power requirements: + 5 Vdc, ± 8 Vdc, + 24 Vdc Figure 25 TRB functional block diagram 857-164055 / R 81 HiPAP LEDs There are ten red LEDs on the front edge, mounted in a vertical line between the connectors. → See the figure on page 80. When these LEDs are lit, they indicate the presence of the corresponding voltage levels listed in the table above. Switches The TRB holds no switches that can be adjusted by the maintenance engineer. Links The TRB holds no links that can be set by the maintenance engineer. Test points There are ten test points, as listed below (each testpoint is marked on the board). They are located on the front edge of the board, in front of the corresponding LED. → See the figure on page 80. AVEE analogue voltage -5V AVCC analogue voltage +5V VCC digital voltage +5V AVDD analogue voltage + 15 V VCC4 analogue voltage +5V HV1 high voltage transmitter + 24 V HV2 high voltage transmitter + 24 V HV3 high voltage transmitter + 24 V HV4 high voltage transmitter + 24 V Tx pulse 82 - 857-164055 / R Circuit board descriptions Connectors The TRB carries four connectors, two located at each end of the board. P1 - 96-pin, male right-angled euro-connector, located on the rear edge of the board, carrying power. P2 - 96-pin, male, right-angled euro-connector, also located on the rear edge of the board, carrying power and digital control signals. P3 and P4 - 34-pin, male, right-angled connectors with ejector/latch, located on the front edge of the board. Each connector carries 16 signals to and from the transducer. 857-164055 / R 83 HiPAP POWEC power supply General The POWEC low-voltage power supply is a commercially available power supply. It is a plug-in unit and is located in the rack. Technical details • Type: PMP 4.M08 SIC • Power requirements: - 161 - 276 Vac, 44 - 66 Hz, < 3.2 A at maximum load • Power output: + 5 Vdc, ± 8 Vdc, + 24 Vdc LEDs The power supply unit has three LEDs mounted in a vertical line on its front panel. These are used to indicate as follows: • LED 1 - Green, indicates power on when lit. • LED 2 - Red, not used. • LED 3 - Red, indicates an alarm condition. (If the output goes below 10% of the set value). - Does not apply to the 24 Vdc. Switches The power supply holds no switches. Links The power supply holds no links that are adjustable by the maintenance engineer. Test points The POWEC power supply unit holds no test points intended for use by the maintenance engineer. 84 857-164055 / R Circuit board descriptions Fuse The POWEC power supply unit holds one fuse. This is located at the rear of the unit, in the mains power connection block. The unit must therefore be removed from the rack if the fuse is to be replaced. • Fuse type: 5 mm Ø x 20 mm, 250 V, 3.15 A, slow-blow Warning Ensure all power to the transceiver unit is switched off before attempting the operation described below. Note The mains power plug must be disconnected before the POWEC unit can be removed from the transceiver unit. To achieve this: 1 Remove the service panel from the unit. 2 Withdraw the POWEC unit as far as possible, and then put your hand into the space left by the service panel and disconnect the plug. - The mains plug must be reconnected by reversing the procedure, when replacing the POWEC unit into the transceiver unit. Connectors Two 48-pin connectors and one standard 3-pin mains power input connector are located on the rear of the unit. 857-164055 / R 85 HiPAP Main control panel General The main control panel is located to the right side of the rack. The main control panel holds (from the top): • A standard, earthed, mains power socket • An earthing bracelet socket • A double-pole breakerCostel power supply power rof the Responder module (RTB) The panel is a plug-in unit, secured in position by two thumb-screws. Note The power socket is only to be used to power measuring instruments. Technical details • Power requirements: 230 Vac, 50 Hz mains supply • Power output: 230 Vac, 50 Hz supply to instruments LEDs The Main control panel holds no LEDs. Switches The main control panel holds one double-pole breaker mounted on its front panel. This breaker is the main power switch for the transceiver unit. Links The Main control panel holds no links. Test points The main control panel has no specific test points for use by the maintenance engineer. Fuse The double-pole breaker on the front panel serves as an automatic fuse for both power leads into the transceiver unit. The breaker will trip automatically if the current drawn by the transceiver unit exceeds 10 A. 86 857-164055 / R Circuit board descriptions Connectors The main control panel carries three connectors: 1 The mains power connector is located horizontally on the rear edge. - This connects 230 Vac power from the mains input cable into the main control panel while the panel is installed in the transceiver unit. 2 Power is supplied via the main breaker to the transceiver unit’s 230 Vac bus. 3 Socket for earthing bracelet. - The Electro-Static Discharge (ESD) earthing point connector is a standard 4 mm banana socket. An ESD bracelet plugged into this connector MUST be used by the maintenance engineer whenever he/she is working on the transceiver unit. The rear connector is laid out as show below (seen from rear of the main control panel). The power socket on the front panel is a standard mains supply socket (Norwegian), and is only to be used for powering measuring instruments. The maximum current output is 5 A. Power is available to the mains socket at all times. Mains power in to breaker and socket Earth Power out from breaker to TRU Figure 26 Layout of the rear connector 857-164055 / R 87 HiPAP Responder Terminal Block (RTB) Purpose The purpose of the RTB module is to provide responder trigger pulses as ordered by the Operator Station. Board description The RTB module is located in the bottom of the transceiver unit. The module holds four identical opto-isolated responder trigger circuits, and communicates with the TMC II board in the HTC-10 via a flat cable. P3 D1 D2 D3 D4 P2 Fuses (Cd5637) P1 Figure 27 RTB module 88 857-164055 / R Circuit board descriptions Circuit description The module needs external +5 VDC (P3 15) and GND (P3 16), normally supplied from the transceiver unit backplane. +24 Vdc is normally supplied from the internal responder power supply. If required, it can be supplied externally. The select signals (D0 -D3) for the responder to be activated, are latched in U6. A control WR signal is input to a one shot circuit U5 generating the responder trig pulse of a fixed length (5.5 ms). This pulse is connected to U6 producing the trigger pulse to the selected opto-coupler. The output of the opto-coupler (U1,U3,U4,U2) drives a responder driver circuit. → Refer to the block diagram on page 90. Each trigger pulse circuit is protected by a self repairing fuse which also secures the supply voltage to the responder. The trigger pulses are brought out via P3 as follows: 13 - 14 to: Responder 1 10 - 11 to: Responder 2 7-8 to: Responder 3 4-5 to: Responder 4 LEDs D1 Lights when Responder 4 is transmitting D2 Lights when Responder 3 is transmitting D3 Lights when Responder 2 is transmitting D4 Lights when Responder 1 is transmitting Switches The RTB board holds no switches. Links The RTB board holds no links. Test points The RPC has no specific test points for use by the maintenance engineer. Fuses The RTB board carries four 1.1 A PTC fuses (self repairing), on the +24 Vdc lines. → 857-164055 / R Placement of fuses are indicated on the figure on page 90. 89 HiPAP Connections → Placement of P1, P2 and P3 is shown in the figure on page 88. • P1 - connector for the select and control signals coming from the TMC II board in the HTC-10 computer. • P2 - socket for connection of the signals for driving LEDs on the cover plate of the module, in parallel with D1, D2, D3 and D4 on the module. → Refer to the figure on page 88. (cd5636) • P3 - terminal block for connection of the driver output signals and power to the responders. Figure 28 Responder Terminal Block - block diagram 90 857-164055 / R Circuit board descriptions HTC-10 computer General A HTC-10 computer is used in the transceiver unit to perform the transmission and reception signal processing calculations. Technical details • Outline dimensions (HxWxD): (110 x 437 x 411) mm • Weight: 9 kg • Power requirements: 230 Vac, 50 Hz Connections The connections to the HTC-10 computer are as follows: (CD3420A) F G H I J k B L A C D E Figure 29 HTC-10 computer - rear-mounted connectors The features are as follows: A- P6 TMC II Sync signals (option) P7 TMC II Responder control signals G- AC input voltage select switch B- VGA video connector H- Power supply fan C- TMC II Address control signals I- Keyboard connector D- TMC II Databus J- Mouse connector E- Digi board (serial lines) K- COM1 F- Socket for ac power cord L- COM2 857-164055 / R 91 HiPAP Transceiver memory control (TMC II) board General The TMC II board is located inside the HTC-10. The main function of the board: • Controls the transmitters and receivers on the TRB boards. • Collects all the sample data. • Transfers the data to the transceiver PC for digital signal processing. (cd5992) The TMC II board is a PCI plug-in board, containing a digital signal processor (DSP), and a 80960 CPU system with PCI interface. Figure 30 TMC II board Circuit description The DSP is loaded with its program from the Transceiver PC (HTC-10), through the PCI Interface connector, the 80960 PCI Interface block,and through buffers to the RAM memory. The TMC II controls all the transmitters and receivers on the TRBs via a 16-bit address bus and a 32-bit data bus (control TX/RX). The TMC II receives sample data from the TRBs and stores the data in the FIFO memory. The Transceiver PC (HTC-10) is supplied with data from the FIFO memory through the 80960 PCI Interface in DMA mode, and processes it as required. The system computer is interrupted by the DSP when real data arrives in the FIFO memory. 92 857-164055 / R Circuit board descriptions P10 P8 Buffer Address P6 DSP P1 PCI bus 80960 PCI Interface P4 Data Buffer Data (Cd3430b) RAM FIFO Frequency Control generator P11 P12 P13 Control TX/RX P14 Address P3 Data P2 32 P7 Figure 31 TMC II functional - block diagram LEDs The TMC II holds no LEDs. Switches The TMC II holds no switches. Links The TMC II holds the following links: • ST1 - Reset (Open) • ST2 - MCBL/MP (Closed) • ST3 - RX B Serial line 2 interface 80960 (Open) • ST4 - /CTSA Serial line 1 interface 80960 (Open) • ST5 - TX B Serial line 2 interface 80960 (Open) • ST6 - /RTSA Serial line 1 interface 80960 (Open) • ST7 - S_IDSEL To 80960 Not used (Open) • ST8 - /S_REQ 5 To 80960 Not used (Open) • ST9 - LRST Terminate to GND Not used (Open) • ST10 - /D/C Terminate to GND Not used (Open) • SK11 - XFO Not used (Open) / indicates active low 857-164055 / R 93 HiPAP Test points The following oscilloscope test points are available: • TP1-30 - Not mounted (for internal use only) • TP31 - S_CLK (PCI clock) • TP32 - + 5 V • TP33 - GND Connectors The TMC II has the following connectors: • P1 - PCI PC bus interface • P2 - 32-bit data bus to TRB boards • P3 - 16-bit address bus and control signals to TRB boards • P4 - DSP emulator plug • P6 - Synch plug • P7 - Responder control plug • P10 - 80960 Debug Interface (Not used) • P11 - Serial line 1 interface 80960 • P12 - Serial line 2 interface 80960 • P13 - LED indicators • P14 - Frequency generator programming connector 94 857-164055 / R Circuit board descriptions Serial I/O board (Digi board) Manufacturer; http://www.digiboard.com General The Digi board is a ISA bus plug-in board, and is located inside the HTC-10. The main function of this board is to handle the communication from the HTC-10 computer to the “outside world”. The communication is done with RS-422 serial lines. Technical details • • • • Power requirements: +5 Vdc 2.25A Interface: ISA PC bus interface Com ports: 8 CPU: 80186 microprocessor LEDs The board holds no LEDs Switches The board holds one dip-switch block. The settings are as follows: (ON position - switch position towards the circuit board) Settings for COM 3 to COM 10 (220H - 223H) Switch Setting 1 ON 2 OFF 3 ON 4 ON (This switch must always be in the on position) Links The board has no links that are adjustable by the maintenance engineer. Test points The board holds no test points intended for use by the maintenance engineer. Connectors • P1A - ISA PC buss interface • P2 A - ISA PC buss interface • P3 - Interface for the RS-422 serial line 857-164055 / R 95 HiPAP SBC 400 General The SBC 400 is a Serial to Dual Net converter. The function of this unit is to convert from serial line to dual Ethernet interface. This is required to interface the HiPAP transceiver to Ethernet. • The unit includes one circuit board. This board is not described here. • If the unit is not working, the entire unit must be replaced. Connectors The connections to and from the unit are as follows: P4 P5 Connected to Transceiver backplane P7-1 P7-3 P3 P7 P6 P2 P8 Figure 32 SBC 400 - rear side 96 • P4 - Power connector • P5/P3/P7 - Spare • P6 - Connection to Terminal Block 1 (Signals input/output) • P2 - Connection from dual Ethernet termination box • P8 - Connection from dual Ethernet termination box 857-164055 / R Circuit board descriptions Switch settings APC 1x computer There are no switches to be set by the operator at the APC 1x computer. Display unit Refer to the separate Display unit manual (delivered with the unit) for information. HTC-10, Digi board The Digi board contained within the transceiver unit’s HTC-10 computer holds one switch block. → 857-164055 / R For switch settings refer to page 95. 97 HiPAP CABLE LAYOUT AND INTERCONNECTIONS Overview This section describes the general installation requirements regarding cables, and then describes all the cables used in the HiPAP system. It explains how to perform the interconnections between the various units in the system. Note This section describes only the “cabinet” cables. All cables connected to the hull unit are described in the HiPAP hull units Instruction manual. Note All cable connections must be made in accordance with the guidelines laid down by the vessel’s classification society. If no such guidelines exist, Kongsberg Maritime recommends that the Det Norske Veritas (DNV) Report No. 80-P008, “Guidelines for Installation and Proposal for Test of Equipment” be used as a guide. 98 857-164055 / R Cable layout and interconnections Cable gland assembly procedure Purpose Cable glands are used whenever a cable passes through a water-tight bulkhead or into a cabinet, to seal the opening through which the cable passes and to protect the cable from abrasion on the edges of the hole. Follow the guidelines detailed here when installing cables through cable glands. Note There are many different types of cable gland on the market. This procedure describes the types used (now and previously) as standard in the units manufactured by Kongsberg Maritime. The cable glands are not supplied with the system. Even though the cabinets from Kongsberg Maritime may be prepared for specific types, the installation shipyard will be responsible for selecting cable gland types and installing them. General procedure 1 2 Note 857-164055 / R Ensure all the cables to be connected are completely isolated from any power sources. - I.e. Switch off and remove the supply fuses from any units or systems into which the cables are already connected. Select the cable to be connected into the cabinet, and select the cable gland through which the cable is to pass. A minimum of 5 cm (recommended 5 - 10 cm) of slack cable must be allowed, both inside and outside the cabinet, when installing cables. This is to allow for vibration damping, maintenance and measurement errors. Always double-check your measurements before taking any irreversible actions. 99 HiPAP 3 Depending on whether the cable has already been installed in conduits, either. a (installed) measure the maximum length of cable required to reach from the final cable clip outside the cabinet to the terminal blocks inside the cabinet, add 20 cm, then remove the excess cable, or: b (loose cable) measure the maximum length of wire required to reach from the cable gland to the terminal blocks inside the cabinet, add 20 cm. and mark the cable. Note The cable’s outer insulation will extend into the cable gland to a point approximately 5 mm outside the outer surface of the cabinet wall into which the cable gland is secured. 4 Taking care not to damage the screening, carefully remove the outer insulation from the required cable length. 5 Leaving an appropriate length of the screen exposed from the insulation, cut off the remainder. Securing and terminating the cables 1 Referring to the wiring diagram and ensuring that there is 5 to 10 cm. slack cable inside the cabinet, prepare and connect the cable cores to the appropriate terminals within the cabinet. 2 Secure the cable within the cabinet using cable clips. 3 Check the terminal connections against the wiring diagram to ensure they are correct. Follow the same procedure for all the cables and cable glands. Once all the cables have been fitted: 4 Check the cabinet to ensure all tools and rubbish are removed, then close the cabinet door. Once all the system cables are connected and checked: 100 5 Take the appropriate safety measures, then replace the fuses and apply power to the system. 6 Perform a system test to ensure the installation has been conducted successfully. 857-164055 / R Cable layout and interconnections Basic cabling requirements Cable trays All permanently installed cables associated with the system must be supported and protected along their entire lengths using conduits and/or cable trays. The only exception to this rule is over the final short distance (max. 0.5 metre) as the cables run into the cabinets/units to which they are connected. These short service loops are to allow the cabinets to move on their shock mounts, and to allow maintenance and repair. • Wherever possible, cable trays must be straight, accessible and placed so as to avoid possible contamination by condensation and dripping liquids (oil, etc.). They must be installed away from sources of heat, and must be protected against physical damage. Suitable shields must be provided where cables are installed in the vicinity of heat sources. • Unless it is absolutely unavoidable, cables should not be installed across the vessel’s expansion joints. If the situation is unavoidable, a loop of cable having a length proportional to the possible expansion of the joint must be provided. The minimum internal radius of the loop must be at least twelve times the external diameter of the cable. • Where a service requires duplicate supply lines, the cables must follow separate paths through the vessel whenever possible. • Signal cables must not be installed in the same cable tray or conduit as high-power cables. • Cables containing insulation materials with different maximum-rated conductor temperatures should not be bunched together (that is, in a common clip, gland, conduit or duct). When this is impractical, the cables must be carefully arranged such that the maximum temperature expected in any cable in the group is within the specifications of the lowest-rated cable. • Cables with protective coverings which may damage other cables should not be grouped with other cables. • Cables having a copper sheath or braiding must be installed in such a way that galvanic corrosion by contact with other metals is prevented. • To allow for future expansion of the system, all cables should be allocated spare conductor pairs. Also, space within the vessel should be set aside for the installation of extra cables. 857-164055 / R 101 HiPAP Radio Frequency interference All cables that are to be permanently installed within 9 m (30 ft) of any source of Radio Frequency (RF) interference such as a transmitter aerial system or radio transmitters, must, unless shielded by a metal deck or bulkhead, be adequately screened by sheathing, braiding or other suitable material. In such a situation flexible cables should be screened wherever possible. It is important that cables, other than those supplying services to the equipment installed in a radio room, are not installed through a radio room, high power switch gear or other potential sources of interference. Cables which must pass through a radio room must be screened by a continuous metal conduit or trunking which must be bonded to the screening of the radio room at its points of entry and exit. Physical protection Cables exposed to the risk of physical damage must be enclosed in a steel conduit or protected by a metal casing unless the cable’s covering (e.g. armour or sheath) is sufficient to protect it from the damage risk. Cables exposed to an exceptional risk of mechanical damage (for example in holds, storage-spaces and cargo-spaces) must be protected by a suitable casing or conduit, even when armoured, if the cable covering does not guarantee sufficient protection for the cables. Metallic materials used for the physical protection of cables must be suitably protected against corrosion. Grounding Grounding connections should be made using a conductor which has a cross-sectional area appropriate for the current rating of the cable, or with a metal clamp which grips the metallic covering of the cable and is bonded to the hull of the vessel. These cable coverings may also be grounded by means of glands specially intended for this purpose and designed to ensure a good ground connection. The glands used must be firmly attached to, and in good electrical contact with, a metal structure grounded in accordance with these recommendations. Electrical continuity must be ensured along the entire length of all cable coverings, particularly at joints and splices. In no case should the shielding of cables be used as the only means of grounding cables or units. Metallic casings, pipes and conduits must be grounded, and when fitted with joints these must be mechanically and electrically grounded locally. 102 857-164055 / R Cable layout and interconnections Cable connections All cable connections are shown on the applicable cable plan and interconnection diagrams. Where the cable plan shows cable connections outside an equipment box outline, the connections are to be made to a plug or socket which matches the plug or socket on that particular item of equipment. Where two cables are connected in series via a junction box or terminal block, the screens of both cables must be connected together but not grounded. Cable terminations Care must be taken to ensure that the correct terminations are used for all cable conductors, especially those that are to be connected to terminal blocks. In this case, crimped sleeve-terminations must be fitted to prevent the conductor core from fraying and making a bad connection with the terminal block. It is also of the utmost importance that where crimped terminations are used, the correct size of crimp and crimping tool are used. In addition, each cable conductor must have a minimum of 15 cm slack (service loop) left before its termination is fitted. Cable identification Cable identification codes corresponding to the cable number shown in the cable plan must be attached to each of the external cables. These identification codes should be positioned on the cable in such a way that they are readily visible after all panels have been fitted. In addition, each cable conductor should be marked with the terminal board number or socket to which it is connected. 857-164055 / R 103 HiPAP Cable plan General This section describe the cabling required for a standard Kongsberg Maritime HiPAP system installation with the APC 1x computer. Note Special system requirements, adaptions or components may introduce special drawings and cables. Note The hull unit cables are described in the HiPAP hull units Instruction manual. → Refer to page 101 in this section for details of cable laying, requirements for conduits etc. → Refer to the relevant cable plans and wiring diagrams for details of the terminations and connections. All power must be switched off to the system prior to the cable installation. All cables must be available at the units, properly installed in cable ducting. Note Do not to exceed the physical limitations of the cables. Note In order to meet the EMC requirements, dedicated grounding cables have been used to connect the various system units to the vessel’s ground. These cables are identified as “X” on the cable plan drawings. The braided grounding cable required is supplied with the system. These cables must not be longer than 1 metre. 104 857-164055 / R Cable layout and interconnections APC 1x cables The figure illustrates the cabling of the APC 1x. Display cable, supplied with the display 230 Vac power F C B1 APC 1x EMC Ground X B2 Single/dual network D B3 A RS-422 communication to the transceiver unit (Cd31024a) T G RS-422 Interface to external computer (DP, survey etc.) Printer cable DGPS (optional) Trackball cable, supplied with trackball Keyboard cable, supplied with keyboard Figure 33 APC 1x cabling Cable A RS-- 422 Serial line cable to the HiPAP transceiver unit • Yard supply. • 3 x 2 / 0.5 mm2, overall braided screen, 60 V. • RFI screen must be connected to the plug housing. • Maximum length: 1000 m. Cable B RS-- 422 Serial line cable to external computer or other peripheral devices • Yard supply. • 3 x 2 / 0.5 mm2, overall braided screen, 60 V. • RFI screen must be connected to the plug housing. • Maximum length: 1000 m. 857-164055 / R 105 HiPAP Cable C 230 Vac power supply to the APC 1x • Yard supply. • 3 x 1 / 1.5 mm2 with ground as separate conductor, 750 V. • APC 1x end terminated in standard 3-pin AC supply female connector. • Maximum length: No practical limits. Cable D Dual or single network → Cable F Refer to section Single/dual net on page 125. Display cable between APC 1x and display • Supplied with the display. Cable G Signal cable between APC 1x and keyboard • Standard 1.5 m, supplied with the keyboard. Cable T Signal cable between APC 1x and trackball • Standard 1.5 m, supplied with the trackball. Cable X Braided grounding cable to connect the cabinet to EMC ground • Included with the delivery • 2 x 7 mm. • Maximum length: 1 m. 106 857-164055 / R Cable layout and interconnections Connections All connections to and from the APC 1x are made on the rear of the unit. The rear panel is made up of three sections of connectors: Mains power input: • Power input Motherboard connectors: • Trackball (mouse) • Keyboard PS/2 style connector • 9-pin Delta-connector, serial port 1 (RS-232) COM 1 • 25-pin Delta-connector, parallel port for printer • 9-pin Delta-connector (not used) PCB connectors: • 15-pin Delta-connector, VGA video connector • VHDC1-68 connector, COM 2, COM 3, ...COM 9 for serial line cable → See cable on page 74 • Ethernet connectors for NET A and Net B • Ethernet connector • DVI connector VGA output COM 2, COM 3, ...COM 9 Mains power On/Off switch (Cd310086) Keyboard Trackball Ethernet Printer DVI Ethernet Net A Ethernet Net B Figure 34 APC 1x rear panel 857-164055 / R 107 HiPAP Serial lines (Com) RS-232 connector The serial line connector is a 9-pin Delta connector. The pins are allocated as follows: 5 9 1 (CD1919) 6 1 Carrier detect 2 Receive data 3 Transmit data 4 Data terminal ready 5 Ground 6 Data set ready 7 Ready to send 8 Clear to send 9 Ring indicator Serial lines (Com) RS-422 The pins are allocated as follows: 108 1 Reception data + 2 Transmission data + 3 Transmission data - 4 Reception data - 5 Ground 857-164055 / R Cable layout and interconnections Printer connector 13 1 (CD1918) 25 14 The printer connector is a 25-pin Delta connector. The pins are allocated as follows: 1 2 3 4 5 6 7 8 9 10 11 12 13 14 15 16 17 18 - 25 Strobe (active low) Data bit 0 Data bit 1 Data bit 2 Data bit 3 Data bit 4 Data bit 5 Data bit 6 Data bit 7 Acknowledge (active low) Busy Paper out Select Auto line feed (active low) Error (active low) Initialize printer (active low) Select in (active low) Ground VGA to display connector 5 1 10 15 The VGA signal connector is a standard VGA 15-pin Delta connector. The pins are allocated as follows: 6 (CD1945) 857-164055 / R 11 1 2 3 4 5 6/7/8 9 10 11/12 13 14 15 Red analogue Green analogue Blue analogue (Not connected) Ground Ground analogue (Not connected) Ground (Not connected) Horizontal synchronization Vertical synchronization (Not connected) 109 HiPAP Transceiver unit cabling General The transceiver unit has two main connection points: 1 The transducer cable terminates in a plug, which is connected into a socket on the left side (seen from the front) of the transceiver unit. 2 All other cables to and from the transceiver unit enter the unit through cable glands located in the bottom panel, and the cables are then connected into terminal blocks located in the base of the unit. Caution Ensure that 10 cm of slack cable is provided outside the cabinet to allow the cabinet to move on its shock absorbers without damaging the cable. Note At installation you are advised to have a “service loop” (approximately 15 cm) of slack cable inside the cabinet for maintenance purposes. Transducer cable connection procedure 110 → Refer to the Cable and interconnection section. 1 Remove the protective cover from the connector on the cable. 2 Align the connector with the socket on the transceiver unit, then carefully press the connector into the socket. - Ensure the pins are not damaged. 3 Tighten the securing screws to hold the connector firmly into the socket. 857-164055 / R Cable layout and interconnections Transducer cable connections • The HiPAP 500 connector contains a total of sixteen 37-pin “D” connectors. Transducer cable • The HiPAP 350 connector contains a total of three 37-pin “D” connectors. (Cd3082b Figure 35 HiPAP 500 Transceiver Unit indicating transducer cable connection Connection diagrams The diagrams are implemented in the Drawing file section. • Interconnection diagram (3 pages) → Refer to pages 201, 202, and 203. • Dual net connection diagram → 857-164055 / R Refer to page 205. 111 HiPAP Terminal blocks and options The terminal blocks and Dual Net connection box (option) are located as follows: Dual Ethernet connection box (Cd31061/102649) SBC 400 TBC TB1 TB2 RTB TB3 Figure 36 Layout of the terminal blocks within a transceiver unit • TBC - Terminal Block Converter • TB1 - 4 - Terminal Block (1-4) • RTB - Responder Terminal Block • SBC 400 - Serial to Dual Net converter (option) 112 857-164055 / R Cable layout and interconnections Transceiver unit cables The figure below illustrates the cabling of the transceiver units. RS-422 communication with external sensors RS 422 communication to the APC 1x computer L A HiPAP transceiver unit EMC Ground 230 Vac power J H Responder M Dual HiPAP sync. N External sync. (Cd31025a) Transducer cable for HiPAP 350, supplied with the system Y K Transducer cabe for HiPAP 500, supplied with the system Figure 37 Transceiver units, cables Cable A RS-- 422 Serial line cable to the APC 1x Cable H 230 Vac power supply to the transceiver • Kongsberg Maritime supply. • 3 x 1 / 1.5 mm2 with ground as separate conductor, 750 V. • Transceiver end terminated in standard 3-pin AC supply female connector. • Maximum length: No practical limits. Cable J Signal cable to responder(s) • Yard supply. • Maximum four responders may be connected, each will need a separate “J” cable. • 3 x 1.5 mm2, overall braided screen, 60 V. • Transceiver end terminated in the transceiver’s terminal block, refer to the interconnection drawing. • Maximum length: 1500 m. 857-164055 / R 113 HiPAP Cable K (HiPAP 500 system) Transducer cable from transceiver unit to transducer • Kongsberg Maritime supply. Note The transducer cable is described in the HiPAP hull units Instruction Manual. Cable L RS-- 422 Serial line cable to external peripheral devices • Yard supply. • 3 x 2 / 0.5 mm2, overall braided screen, 60 V. • Transceiver end terminated in the transceiver’s terminal block, refer to the interconnection drawing. • Maximum length: 1000 m. Cable M RS 422 Master Slave synchronization cable (Sync line for Dual HiPAP) • Yard supply. • 3 x 2 / 0.5 mm2, overall braided screen, 60 V. • Terminated in a 9 pin Delta connector in both ends. • Maximum length: 1000 m. Cable N External synchronization • Yard supply. • 2 x 2 / 0.5 mm2, overall braided screen, 60 V. • Maximum length: 20 m. Cable X Braided grounding cable • Kongsberg Maritime supply. Cable Y (HiPAP 350 system) Transducer cable from transceiver unit to transducer • Kongsberg Maritime supply. Note 114 The transducer cable is described in the HiPAP hull units Instruction Manual. 857-164055 / R Cable layout and interconnections Transceiver unit interconnections Overview The transceiver unit normally contains four RS-422 serial lines, available on terminal block 1. If a system needs more than four serial lines, an additional Digi board can be installed in the Transceiver computer (HTC-10) and connected with an optional cable to terminal block 2. This option can be RS-422 or RS-232 depending on the Digi board installed, and the cable connected to terminal block 2. Cables are included with the transceiver unit: H 230 Vac to the transceiver unit X Braided grounding cable 857-164055 / R 115 HiPAP Cables J One separate cable is required for each responder you connect to the system. The HiPAP end connects to the Responder Terminal Block (RTB) in the transceiver unit. The +24 Vdc connected to pins (1) and (2) on the RTB is supplied by a dedicated power supply mounted in the Main Control Panel in the transceiver cabinet. RXD1+ Responder no.4 Responder no.3 Responder no.2 GND (CD3104) Vr1 (+24) Responder no.1 TRIG 1 GND +5 Vdc NC NC = Not connected NC NC Dig GND Dig GND RTB HiPAP Transceiver Unit Responders Figure 38 Responder cable 116 857-164055 / R Cable layout and interconnections Cable A and L External sensors such as motion sensor or heading sensor may be connected via serial lines to terminal blocks 1 and 2 in the transceiver unit. RS-422 serial lines are supplied as standard. Cable “L” - External sensors RS-422 Serial line 1 Serial line 2 Serial line 3 Serial line 4 Normally used for cable A. Refer to appropriate paragraph in manual RXD1+ 3 RXD1TXD1+ 5 7 Site dependant external sensor Site dependant external sensor Site dependant external sensor (CD4212) 1 TXD1- 9 GND1 11 RXD2+ 13 RXD2- 15 TXD2+ 17 TXD2- 19 GND2 2 RXD3+ 4 RXD3- 6 TXD3+ 8 TXD3- 10 GND3 12 14 RXD4+ RXD4- 16 TXD4+ 18 TXD4- 20 GND4 Terminal block 1 HiPAP Transceiver Unit Figure 39 Cable for external sensors 857-164055 / R 117 HiPAP An additional four serial lines can be supplied as an option. RS-232 serial lines can be supplied as an option. (Option) RXD5+ RXD5TXD5+ 1 3 Serial line 5 Serial line 6 Serial line 7 Serial line 8 Site dependant external sensor Site dependant external sensor Site dependant external sensor Site dependant external sensor (CD4213) 5 7 TXD5- 9 GND5 11 RXD6+ 13 15 RXD6TXD6+ 17 TXD6- 19 2 GND6 RXD7+ 4 RXD7- 6 TXD7+ 8 TXD7- 10 12 GND7 RXD8+ 14 RXD8- 16 TXD8+ 18 20 TXD8GND8 Terminal block 2 HiPAP Transceiver Unit Figure 40 Four serial line - option Cable “L” - External sensors RS-232 (Option) Serial line 1 or 5 Site dependant external sensor 1 RXD1/5 3 TXD1/5 GND1/5 5 7 Serial line 2 or 6 Site dependant external sensor Serial line 3 or 7 Site dependant external sensor Serial line 4 or 8 Site dependant external sensor (CD4214) RXD2/6 9 TXD2/6 11 GND2/6 13 RXD3/7 15 17 TXD3/7 GND3/7 2 RXD4/8 4 TXD4/8 6 GND4/8 Terminal block 1 or 2 HiPAP Transceiver Unit Figure 41 RS-232 serial line - option 118 857-164055 / R Cable layout and interconnections Terminal Block Converter General An MRU interface to RS-422 Terminal Block Converter (TBC) can also be used. From P7-1 +5 V transceiver TB3 15 backplane TB3 19 P7-3 GND TX+ From TXMRU 6 5 8 7 TBC 4 3 2 1 TXD+ TXDNC (CD4215) RXD+ RXDGND Terminal block 1 HiPAP Transceiver Unit Figure 42 MRU interface RS-232 to RS-422 Terminal Block Converter The Terminal Block Converter link setting for MRU Interface is as follows: LK1 = OFF LK2 = OFF LK3 = ON LK4 = OFF LK5 = ON LK6 = OFF LK7 = OFF LK8 = OFF LK9 = ON LK10= OFF LK11= OFF LK12= ON LK13= OFF LK14= OFF LK15= ON LK16= OFF → 857-164055 / R The TBC diagram indicating the links, refer to page 204. 119 HiPAP Synchronization Synchronization line for Dual HiPAP, cable M (option) This cable is required for synchronization of the HiPAP transmitting in a Dual HiPAP system. Slave Master 6 1 7 2 3 9 pin male HTC 10 P6 S0 422+ S0 422S1 422S1 422+ GND (Cd4839) 2 7 1 6 3 9 pin male HTC 10 P6 Figure 43 Dual HiPAP Master Slave synchronization Master P6: TMC II sync signal Slave P6: TMC II sync signal External synchronization, cable N This line is for synchronizing the HiPAP system to external systems. Standard external synchronization The Terminal Block Converter (TBC) is used for standard external synchronization. If the TBC installed is already used for MRU interface, an additional TBC have to be installed in the transceiver unit next to the one that is already installed. The figure below shows the connections from the external synchronization signals to the TBC, and the internal connections in the transceiver from TBC to COM1/2 of the HTC-10, and the power supplied from P9 of the transceiver backplane. 120 857-164055 / R Cable layout and interconnections From transceiver backplane COM 1/2 External sync P7-1 +5 V OUT IN GND DTR 4 CTS 8 GND 5 9 pin female HTC 10 P7-3 From transceiver backplane 6 7 8 5 4 3 2 1 TBC (Cd4837) OUT+ OUTIN GND Nippel: transceiver Normally no light Normally closed External connection Figure 44 TBC used for external synchronization → The TBC diagram indicating the links, refer to page 204. Trigger puls: 5V 0V 1 mS The TBC link setting for synchronization input is as follows: LK1 = ON LK2 = OFF LK3 = OFF LK4 = ON LK5 = OFF LK6 = ON LK7 = OFF LK8 = ON LK9 = OFF LK10= OFF LK11= ON LK12= OFF LK13= OFF LK14= ON LK15= ON LK16= OFF Additional synchronization inputs (Option) If more synchronization signals are needed, an additional Terminal Block Converter (TBC) can be mounted in the transceiver unit next to the TBCs’ that is already installed. The link settings are the same as for the standard external synchronization. 857-164055 / R 121 HiPAP From transceiver backplane COM 1/2 P7-1 RTS 7 DSR 6 GND 5 9 pin female HTC 10 +5 V OUT IN GND P7-3 From transceiver backplane 66 67 7 TBC 7 8 TBC 8 TBC 85 5 5 (Cd4840) 44 43 3 32 2 21 1 1 External sync OUT+ OUTIN GND Nippel: transceiver Normally no light Normally closed External connection Figure 45 TBC - optional 122 857-164055 / R Cable layout and interconnections GPS Input signals connections General The signal from the GPS is normally a RS-232 serial line transmitting NMEA serial data, and a TTL pulse once pr. second to synchronise the APC 1x internal timing clock to the GPS clock. This connection is normally done as follows: RS-232 Data Pin 2 COM APC 1x I PPS Pulse* Pin 8 COM APC 1x Ground ref. Pin 5 COM APC 1x any COM port for RS-232 may be used. Note *The IPPS pulse can have different pulse length and polarity from different suppliers of GPS receivers, so the connection described above will not always work. A IPPS converter can be used to handle the problem. IPPS Converter (option) This converter passes the RS-232 Data through but shapes the IPPS pulse to a fixed pulse length and converts it from TTL level to RS-232 level. (Cd5464) Figure 46 IPPS converter connections A 9-pin D-connector extension cable is delivered with the converter so it can be mounted where the APC 1x is mounted. 857-164055 / R 123 HiPAP The converter need an external power of 9-15VDC 100 mA. If the distance between the GPS receiver and the APC 1x is more than 10 meters, it would be better if the IPPS converter was mounted close to the GPS receiver. → IPPS converter block diagram is shown on page 206. IPPS converter internal The IPPS converter contains 2 DIP switch blocks. → Refer to the 1PPS assembly drawing on page 207. → Function of the switches is indicated in the block diagram on page 206. ST14, ST15, ST16, ST17 controls the edge triggering of the 1PPS pulse. Pos Edge trig Neg Edge trig ST16 ST15 ST14 ST17 ST16 ST15 ST14 ST17 ST13 = ST12 = ST10 = ST11 = ON OFF ON OFF NEG POS NEG POS RS-232 RS-232 RS-232 RS-232 PULSE PULSE PULSE PULSE OFF ON OFF ON TERMINAL 9 TERMINAL 9 9 Pin D-SUB Pin 8 9 Pin D-SUB Pin 8 ST3 = Connect Data RX (Normally connected) to 9 Pin D-SUB Pin 2 ST4 = Connect ST7 = Connect Data TX (Normally connected) 422A+ (Normally open) to 9 Pin D-SUB Pin 3 to 9 Pin D-SUB Pin 9 ST2 = Connect ST6 = Connect ST1 = Connect 422A (Normally open) 422B (Normally open) 422B+ (Normally open) to 9 Pin D-SUB Pin 6 to 9 Pin D-SUB Pin 4 to 9 Pin D-SUB Pin 1 ST8 = Select ST9 = Select Length A pulse (Normally open) Length B pulse (Normally open) to RS-422 Converter ST5 = Connect IPPS (Normally connected) to 9 Pin D-SUB Pin 8 124 to RS-422 Converter 857-164055 / R Single/Dual Net SINGLE/DUAL NET INSTALLATION Overview This section describes the Net connections. This may be used as a Single or a Dual Net. When used as a Single Net, only Net A is used. The Net connections includes the following units: • APC 1x • HiPAP transceiver units • HPR transceiver units The APC 1x connected to a HiPAP transceiver unit on a Dual Ethernet is shown in the figure below Display cable, supplied with the display 230 Vac power EMC Ground F C B1 X B2 APC 1X computer B3 T G RS-422 Interface to external computer (DP, survey etc.) Printer cable DGPS (optional) Trackball cable, supplied with trackball Keyboard cable, supplied with keyboard Dual Ethernet Net A Net B (Option) RS-422 communication with external sensors Single or Dual Net communication to the APC 1x computer HiPAP transceiver unit L EMC Ground X 230 Vac power H J Responder Dual HiPAP sync. N External sync. (CD4024b) K Transducer cable, supplied with the system Figure 47 HiPAP Single/Dual Net communication → 857-164055 / R See also the figure on page 205. 125 HiPAP APC 1x Connections The APC 1x Net connection is implemented on the APC 1x with the Ethernet controller. Two Ethernet controller boards are installed in the APC 1x. The connector on the Ethernet board is a RJ45 Socket 10baseT. All the connections to and from the APC 1x are made on the rear of the unit. → Note 126 Refer to figure on page 107. The power supply selector switch must be set to the appropriate mains supply voltage (115 or 230 Vac). 857-164055 / R Single/Dual Net Connector pin allocations The setup and use of the APC 1x Ethernet lines are controlled via the system software. Ethernet The Single/Dual Net is connected to a RJ45 socket 10baseT connector. The pins are allocated as follows: Pin no. Description Colour 1 TX + White w/Orange 2 TX - Orange 3 RX + White w/Green 4 Blue 5 White w/Blue 6 RX - Green 7 White w/Brown 8 Brown 1 8 Top male Front male Front female 1 8 8 (Cd5035) 1 Figure 48 Ethernet RJ45 socket 10baseT 857-164055 / R 127 HiPAP APC 1x Dual Net connection The APC 1x connections for Dual Net is done via two connectors • NET A - The RJ45 connector from NET A is connected to the Main Net A. • NET B - If dual net is used, the RJ45 connector from NET B is connected to the Main Net B . Category 5 APC 1x NET A (Cd5037a) NET B Contact opening Front view RJ45 To Main NET A RJ45 To Main NET B (Option) Category 5, STP Patch cable Figure 49 APC 1x Dual Net connection Depending on the Main Net implementation, the RJ45 connector could be connected directly to a HUB or a Patch panel. If a fibre-optic net is used, a fibre-optic Ethernet converter is to be installed, and the RJ45 connector is then connected to this converter. When no other units are connected, a Category 5 STP cable can be used directly from APC 1x to the HiPAP / HPR transceiver unit. 128 857-164055 / R Single/Dual Net HiPAP transceiver unit Dual Net connection Dual fibre-optic net The connections for a dual fibre-optic net to a HiPAP transceiver is illustrated in the figure below. H HiPAP Transceiver Backplane TB 1 COM 3 HPR SBC 400 RS-422 NE T A TB From filter 3 4 Power TP M 15 RC + - Ethernet converter EXC 0015 NET B Fibre-optic TX from Main Net A RX Fibre-optic RX f rom Main Net A 10 BASE - T (Cd4549e) Ethernet RX converter 10 BASE - FL EXC 0015 Fibre-optic TX from Main Net B Fibre-optic RX from Main Net B Figure 50 HiPAP transceiver unit, dual fibre-optic net connection 857-164055 / R 129 HiPAP Dual copper net The connections for a dual copper net to a HiPAP transceiver is indicated on the figure below. The net connections are taken directly from the P2 (NET A) and P8 (NET B). To access the Dual Net, the transceiver unit controller (the HTC-10 computer) must be removed. HiPAP Transceiver backplane Cable from field SBC 400 (Cd31060) Dual net connection box Figure 51 HiPAP transceiver unit, dual copper net connection Spare parts list Power TMP 15 RC . . . . . . . . . . . . . . . . . . . . . . . . . . . . . . 290-087699 Ethernet converter EXC 0015 . . . . . . . . . . . . . . . . . . . . . 719-087687 SBC 400 converter . . . . . . . . . . . . . . . . . . . . . . . . . . . . . . 121-211266 130 857-164055 / R Integrated operation with SDP system INTEGRATED OPERATION WITH KM’S DYNAMIC POSITIONING (SDP) SYSTEM Introduction The operator console integrates a 21” monitor, a system controller and a keyboard. The console is to be mounted on the deck. The following configurations are available for a HiPAP system: • HiPAP system (APOS software) is implemented in the SDP system controller. • The HiPAP system controller APC 1x, is mounted separately and connected to the console via cable. Integrated operation with SDP Note The implementation of the APOS software in the SDP is an complex operation, and must be performed by Kongsberg Maritime service personnel. The integrated HiPAP/HPR 400 and SDP operation is available as two different solutions. HiPAP/HPR 400 and DP - one Operator Station The operator must select whether the HiPAP / HPR 400 or DP shall be viewed and operated. This is eligible from the menu. When the DP window is active, the HiPAP / HPR 400 can be accessed from the menu selecting the HiPAP / HPR 400 view or accessing a dialogue box for transponder operation. When the HiPAP / HPR 400 window is active, the DP can be accessed from the menu selecting DP view. HiPAP/HPR 400 and DP - multiple Operator Stations When several operator stations are available, the operator can view / operate the DP on one/several screen(s) and the HiPAP / HPR 400 on another screen. The operation is the same as for a single operator console. 857-164055 / R 131 HiPAP EQUIPMENT HANDLING Overview This section describes how to transport, pack and unpack, clean, preserve and store electronic, electro-mechanical and mechanical units supplied by Kongsberg Maritime AS. The units may be supplied as spare parts, or as parts of a delivery. Transportation General specifications Unless otherwise stated in the accompanying documentation, electronic, electro-mechanical and mechanical units supplied by Kongsberg Maritime can be transported using all methods approved for delicate equipment; (by road, rail, air or sea). The units are to be transported in accordance with general or specific instructions for the appropriate unit(s), using pallets, transport cases, or carton boxes as appropriate. Note Special local restrictions concerning air transportation may be applied to units containing certain types of batteries. The units should be checked and the regulations investigated by the packer/shipper before the unit is dispatched. Local transportation All local transportation must be carried out according to the same specifications as for the initial delivery. In general, all units must be handled with care. The carton or case containing the equipment must be kept dry at all times, and must be sheltered from the weather. It must not be subjected to shocks, excessive vibration or other rough handling. The carton or case will normally be marked with text or symbols indicating which way up it is to be placed. Follow any instructions given and ensure the case is always placed with its “top” uppermost. The carton or case must not be used for any purpose for which it was not intended (step, table, etc.), and in the absence of other information, no other cartons or cases must be stacked on top of it. 132 857-164055 / R Equipment handling Lifting A heavy crate will normally be marked with its weight, and the weights of other cartons or crates will normally be entered on the packing list. • Always check the weight of a crate before attempting to lift it. • Always use lifting apparatus that is certified for the load. Heavy units may be equipped with lifting lugs for transportation by crane within the workshop or installation area. Before a crane is used, check: • The applicable weight certificate for the crane. • The security of the lifting lugs. Ensure that all available lifting lugs are used. Ensure the unit remains under control during the operation to avoid damage to the unit, equipment or personnel. Heavy units may be transported using a fork-lift truck. Special attention must then be paid to the position of the unit’s centre of gravity. The units must be properly secured to the truck. Initial preservation Introduction When a system, a unit or a spare part has been delivered to the customer, it may be subject to long-time storage prior to installation and use. During this storage period, certain specifications must be met. The equipment must be preserved and stored in such a way that it does not constitute any danger to health, environment or personal injury. Specific specifications are presented below. → → → For further information about storage, refer to page 138. For further information about re-packing, refer to page 141. For further information about temperature protection, refer to page 142. Original packing crate 1 2 3 857-164055 / R The equipment must be stored in its original transportation crate. Ensure that the units are clearly separated in the shelves and that each unit is easily identifiable. The crate must not be used for any purpose for which it was not intended (eg. work platform etc.). 133 HiPAP 4 The crates must not be placed on top of each other, unless specific markings permit this. 5 The crates must not be placed directly on a dirt-floor. 6 Do not open the crate for inspection unless special circumstances permit so. - “Special circumstances” may be suspected damage to the crate and its content, or inspections by civil authorities. - If any units are damaged, prepare an inspection report stating the condition of the unit and actions taken. Describe the damage and collect photographic evidence if possible. Re-preserve the equipment. - If the units are not damaged, check the humidity absorbing material. If required, dry or replace the bags, then repack the unit(s) according to the packing instructions. If the crate has been opened, make sure that is it closed and sealed after the inspection. - Use the original packing material as far as possible. 7 → Refer to information on page 141. Ambient temperature and humidity Note 1 The storage room/area must be dry, with a non-condensing atmosphere. It must be free from corrosive agents. 2 The storage area’s mean temperature must not be lower than -30° C, and not warmer than +70° C. - If other limitations apply, the crates will be marked accordingly. Transducers must not be stored in temperatures below -20° C, or higher than +60° C. 3 The crate must not be exposed to moisture from fluid leakages. 4 The crate must not be exposed to direct sunlight or excessive warmth from heaters. Shock and vibration 1 The crate must not be subjected to excessive shock and vibration. ESD precautions → 134 Refer to the information on page 141. 857-164055 / R Equipment handling Batteries If the unit contains normal batteries, these may have been disconnected/isolated before the unit was packed. These must only be reconnected before the installation starts. Units containing batteries are marked. Caution Units containing lithium or alkaline batteries must be handled separately and with care. Such units are marked accordingly. Do not attempt to recharge such batteries, open them or dispose of them by incineration. Refer to the applicable product data sheets. Inspection and unpacking Inspection An inspection must be carried out immediately after the unit(s) have arrived at their destination. • Check all wooden or cardboard boxes, plastic bags and pallets for physical damage. Look for signs of dropping, immersion in water or other mishandling. • If damage is detected externally, you will have to open the packaging to check the contents. - Request a representative of the carrier to be present while the carton is opened, so any transportation damage can be identified. • If any units are damaged, prepare an inspection report stating the condition of the unit and actions taken. Describe the damage and collect photographic evidence if possible. Send the inspection report to Kongsberg Maritime as soon as possible. • If the units are not damaged, check the humidity absorbing material. If required, dry or replace the bags, then repack the unit(s) according to the packing instructions. 857-164055 / R 135 HiPAP General unpacking procedure Normal precautions for the handling, transportation and storage of fragile electronic equipment must be undertaken. Note If the unit is not to be prepared for immediate use, you may consider storing it unopened in its original packing material. However, it may be useful to open the case to check its contents for damage and retrieve any accompanying documentation. • Check the carton before opening it to ensure it shows no signs of dropping, immersion in water or other mishandling. - If the carton shows signs of such damage, refer to the paragraph covering Inspection on receipt. • Place the carton on a stable work bench or on the floor with the top of the carton uppermost. • In the absence of other instructions, always open the top of the carton first. The contents will normally have been lowered into the carton from above, so this will usually be the easiest route to follow. - Care must be used when opening the carton to ensure the contents are not damaged. Caution Do not use a knife to open cardboard cartons - the contents may lie close to the surface, and may be damaged by the blade. • If the carton has been closed using staples, remove the staples from the carton as you open it. This will reduce the possibilities of scratch injury to yourself and damage to the contents. • If a wooden crate has been closed using screws, always remove them using a screw-driver. Do not attempt to prise the lid off with a crow-bar or similar. • Once the carton is open, carefully remove all loose packing and insulation material. Check for manuals and other documents that may have been added to the carton during packing, and put these to one side. Check also for special tools, door keys etc. 136 857-164055 / R Equipment handling Electronic and electro-mechanical units Caution Beware of the dangers of Electro-Static Discharge (ESD) both to yourself and to the equipment, when handling electronic units and components. Refer to the precautions starting on page 141. Electronic and electro-mechanical units will normally be wrapped in a clear plastic bag. Lift the unit, in its bag, out of the carton and place it in a stable position on the floor/work bench. Inspect the unit for damage before opening the plastic bag. Note Cables must never be used as carrying handles or lifting points. Note Do not break the seal to open a circuit board package before the board is to be used. If the board package is returned to the manufacturers with the seal broken, the contents will be assumed to have been used and the customer will be billed accordingly. Assuming all is well, open the bag and remove the unit. Open the unit and check inside. Remove any packing and desiccant material that may be inside. Mechanical units Mechanical units may be heavy. Using a suitably certified lifting apparatus, lift the unit out of the crate and place it in a stable position on the floor/work bench. Inspect the unit for damage and remove any packing material that may be inside the unit. Transducers Transducers may be supplied mounted to a hull unit (if any), or packed separately. Crates are normally identified by the order number and the serial number. The transducer face must be protected by a rigid, padded cover (e.g. a wooden box lined with foam rubber) all the time it is exposed to the risk of physical damage. Note 857-164055 / R Once the units are unpacked, great care must be taken to ensure that transducers and cabling are not exposed to any mechanical stress. Never lift the transducers by the transducer cable. 137 HiPAP Re-packing If the unit is not to be installed immediately, re-pack it in its original packing material to prevent damage in the intervening period. → Refer to the information on page 141. Storage Pre-installation storage The equipment should be stored in its original transportation crate until ready for installation. The crate must not be used for any purpose for which it was not intended (eg. work platform etc.). Once unpacked, the equipment must be kept in a dry, non condensing atmosphere, free from corrosive agents and isolated from sources of vibration. Note Do not break the seal to open a circuit board package before the board is to be used. If the board package is returned to the manufacturers with the seal broken, the contents will be assumed to have been used and the customer will be billed accordingly. The unit must be installed in its intended operating position as soon as possible after unpacking. If the unit contains normal batteries, these may have been disconnected/isolated before the unit was packed. These must then be reconnected during the installation procedure. Units containing batteries are marked. Caution Units containing lithium or alkaline batteries must be handled separately and with care. Such units are marked accordingly. Do not attempt to recharge such batteries, open them or dispose of them by incineration. Refer to the applicable product data sheets. After use storage Introduction If a unit is removed from its operating location and placed into storage, it must be properly cleaned and prepared before packing. 138 857-164055 / R Equipment handling Cleaning cabinets If a cabinet has been exposed to salt atmosphere while it was in use, it must be thoroughly cleaned both internally and externally to prevent corrosion. • Wipe the cabinet externally using a damp cloth and a little detergent. Do not use excessive amounts of water as the unit may not be water tight. On completion, dry the unit thoroughly. • All surfaces must be inspected for signs of corrosion, eg. flaking/bubbling paint, stains etc. Damaged or suspect areas must be cleaned, prepared and preserved using the correct preservation mediums for the unit. The mediums to be used will usually be defined in the units’ maintenance manual. • All surfaces must be inspected for signs of corrosion, eg. flaking/bubbling paint, stains etc. Damaged or suspect areas must be cleaned, prepared and preserved using the correct preservation mediums for the unit. • Open the unit, and using a vacuum cleaner, remove all dust etc. from the unit. Great care must be taken to ensure the circuit boards and modules are not damaged in the process. Mechanical units If a mechanical unit may have been exposed to a salt atmosphere while it was in use, it must be thoroughly cleaned both internally and externally to prevent corrosion. • If the construction materials and type of unit permits, wash the unit using a high-pressure hose and copious amounts of fresh water. Examples: - The lower parts of hull units (outside the hull) - Subsea units • Ensure that all traces of mud and marine growth are removed. Use a wooden or plastic scraper to remove persistent growth, barnacles etc. On completion, dry the unit thoroughly. Caution Do not use a high pressure hose in the vicinity of cables or transducers. Do not use sharp or metal tools on a transducer face. • If the materials or type of unit prevents the use of a high-pressure hose, wipe the unit using a cloth dampened with water containing a little detergent. 857-164055 / R 139 HiPAP Examples: - The upper parts of hull units (inside the hull) - Hydraulic systems • Do not use excessive amounts of water as some components on the unit may not be water tight. Wipe off the detergent with a damp cloth, then dry the unit thoroughly. • All surfaces must be inspected for signs of corrosion, eg. flaking/bubbling paint, stains etc. Damaged or suspect areas must be cleaned, prepared and preserved using the correct preservation mediums. The mediums to be used will normally be defined in the unit’s maintenance manual. Cables Wipe clean all exposed cables, and check for damage. If a cable shows signs of wear or ageing, contact Kongsberg Maritime for advice. Internal batteries If the unit contains batteries, these may discharge slowly during storage. If the unit is to be stored for an extended period, disconnect or remove all internal batteries. A suitable piece of insulating material can be placed between the battery and the electrical contacts to prevent electrical discharge. The battery can then remain in the unit, reducing the risk of it being misplaced during the storage period. Caution Units containing lithium or alkaline batteries must be handled separately and with care. Such units are marked accordingly. Do not attempt to recharge such batteries, open them or dispose of them by incineration. Refer to the applicable product data sheets. Dehumidifier Place a suitably sized bag of desiccant material (silica gel or similar) into the unit to keep the electronic components as dry as possible. Coatings Spray the unit externally with a corrosion inhibitor (e.g. a light oil) before packing. 140 857-164055 / R Equipment handling Re-packing The unit should be stored and transported in its original packing material and/or crate. In the event that this material is not available, proceed as follows: • Small units must be protected from damp by being placed within a plastic bag at least 0.15 mm thick. An appropriate quantity of desiccant material should be placed inside this bag, and the bag sealed. The sealed unit must then be placed in an appropriate carton or crate, and supported in the container by appropriate shock-absorbing insulation (polystyrene foam chips etc.). • Large units must be placed in a suitable cardboard box or wooden crate. The unit must be protected against physical damage by means of shock-absorbing insulation mats. The box must be clearly marked with its contents, and must be stored in a dry and dust-free area. ESD precautions Electrostatic Discharge (ESD) Electro-Static Discharge (ESD) is the transfer of an electrostatic charge between two bodies at different electrostatic potentials, caused either by direct contact or induction by an electrostatic field. The passing of a charge through an electronic device can cause localised overheating, and it can also “puncture” insulating layers within the structure of the device. This may deposit a conductive residue of the vaporised metal on the device, and thus create a short circuit. This may result in a catastrophic failure, or degraded performance of the device. ESD Protection during transport and storage Sensitive electronic equipment must be transported and stored in protective packing bags, boxes and cabinets. The equipment must NOT be transported or stored close to strong electrostatic, electro-magnetic or radioactive fields. Unpacking and servicing ESD sensitive equipment If it is necessary to open and touch the electronics inside the boxes/cabinets, then the following precautions MUST be taken: • The working area must be covered by an approved conductive service mat that has a resistance of between 50kΩ and 2 MΩ, and is connected directly to a reliable earth point via its earthing cord. 857-164055 / R 141 HiPAP • The service personnel involved must wear a wrist-band in direct contact with the skin, connected to the service mat. • Printed circuit boards and other components should be placed on the conductive service mat during installation, maintenance etc. Caution If, for any reason, it is necessary to move the circuit board or components from the conductive service mat, they must be placed in an approved anti-static transportation container (e.g. static shielding bag) before transportation. • During installation and servicing, all electrical equipment (soldering irons, test equipment etc.) must be earthed. Temperature protection If the unit must be protected against extremes of temperature, the carton/crate must be lined on all walls, base and lid with 5 cm thick polyurethane or polystyrene foam. These units will be identified as delicate in the applicable documentation. The package must then be clearly marked: Note Must not be transported or stored in temperatures below -5 degrees Celsius. Other units can normally be stored in temperatures between -30° C and +70° C, refer to the system’s technical specifications for details. Transducers must not be stored in temperatures below -20° C and above +60° C. Warranty The warranty on the slope of supply in 365 days from the acceptance of the installation on board. Warranty does non cover damage or defects coming from improper storing of the equipment (i.e. cable damage by temperature oscillation, rusty components, physical damage etc.) 142 857-164055 / R Spare parts SPARE PARTS Introduction This section lists the parts and modules defined by Kongsberg Maritime as Line Replaceable Units (LRUs). The unit name and order number are given. Mounting components (such as nuts, bolts, washers etc.) have not been allocated order numbers as we regard these items as standard commercial parts available from retail outlets around the world. Operator station • Acoustic Positioning Computer : 307180 - Power supply unit: 305096 - Hard disk: 303326 - DVD-Recorder (ND-3520AA Ide black): 719-099083 - Ethernet PCB: 304737 - Serial adapter board: 306143 - Video adapter board: 304738 - EMC ground cable: 649-096720 - Filter: 599-217736 • Keyboard: 329-215303 - Keyboard cable: 380-215305 • Trackball: 309-219568 • Display: 298-099130 857-164055 / R 143 HiPAP Transceiver units • HiPAP 500 Transceiver Unit complete: 125- 102650 • HiPAP 350 Transceiver Unit complete: 125-214098 - Power supply unit: 719-087589 - TRU rack: 125-102655 - Transmitter/Receiver board: 382-211045 - POWEC power supply: 290-087025 - Main control panel: 290-089871 - Responder Terminal Block (RTB): 299-214157 - Fan unit: 299-049179 - HTC-10: 719-087082 - Transceiver Memory Board (TMC II): 211451 - Digi board 4 serial lines RS-422: 719-087122 - Fuses: Local supply recommended - Fiber converter kit: KIT-213098 144 857-164055 / R Test and alignment procedures HIPAP / HPR 400 TEST AND ALIGNMENT PROCEDURES Introduction The procedures are valid for: • High Precision Acoustic Positioning (HiPAP) systems • Hydroacoustic Position Reference (HPR 400) systems Purpose After the installation has been performed and before the system is brought into operation for the first time, a series of test and alignment procedures must be carried out to confirm a correct installation. This document contains the instructions and procedures required to ensure the system is installed correctly, is correctly set up and is safe to switch on and use. Test certificates Once the testing engineer has performed or witnessed the performance of a test or part of a test, he must sign on the test certificate to certify that the unit or system has passed that particular part of the procedure. The use of these fields is optional, but we recommend that they are properly filled in for future references. Note If the testing engineer is not satisfied with the standard of any part of the installation, he must contact the personnel who performed the installation, to have the work rectified and brought up to the required standards. Visual inspection After the physical installation has been carried out, all the system units must be visually checked to ensure the system has been installed correctly. You must ensure that the units have been mounted in the correct locations, correctly orientated (the right way up) and are correctly secured to the bulkhead / deck mounting brackets. 857-164055 / R 145 HiPAP The hull unit tests are described in the hull units Installation manual. Note This checks must be done before power is applied to the system. Visual checks require no power. Test and alignment Warning All required checks must be completed before any power is switched onto the system. The following related test procedures must also be performed: • Hull Unit Test and alignment, document no. 130600/section in the hull units Instruction manual • The HiPAP/HPR Customer Acceptance Test (CAT), document no. 160901/section in this manual. Test procedures introduction In all cases the step-by-step instructions must be followed if the tests are to be trustworthy. In order to verify that the HiPAP / HPR 400 system works properly, the following tests must be carried out: • Operator unit / station installation • HiPAP / HPR 400 transceiver unit • Roll, pitch and heave sensor • Heading sensor • Cabling • Applying power to the system Follow the procedures and fill in the tables. Once the system has been tested, sign the signature page (last page of this procedure). The test results will be: OK FAIL NA 146 when the test is done satisfactory. if the test fails. if the test is non-applicable. 857-164055 / R Test and alignment procedures Operation unit / station Note This test procedure applies only to those installations where the electronics units have been mounted on a desktop or in a 19” rack. An installation may also be an integrated part in a console - in this case a procedure provided by the console vendor may be used. General The installation of the operator unit / station is described in the Instruction manual. Logistics Safety - Not applicable. Personnel - Experienced engineer from the shipyard’s quality assurance department. Installation supervisor. Vessel location - Not applicable. References - Drawings from the HiPAP Instruction (this manual) / HPR Installation manual. Special tools - None. Procedure 857-164055 / R 1 Perform a close visual inspection of the installation. 2 Check that the units are installed in the correct locations, and are suitably orientated to enable easy operation. 3 Check that the units are not damaged, and that the paintwork is clean. 4 Check that the operator unit / station is properly secured to the desktop. 5 Check that the display unit is mounted properly as described in the Instruction / Installation manual. 147 HiPAP Test certificate Operator unit/station installation Item to be checked Visual inspection Location and paintwork Mounting Checked (sign) Operator unit / station units mounting Display unit mounting The installation of the desktop assembly has been checked according to the procedures defined in the Instruction / Installation/Installation manual. Comments concerning inaccuracies, faults and / or poor workmanship have been filed as a separate report. Shipyard’s quality assurance department Signature Installation team supervisor Date Signature Date 148 857-164055 / R Test and alignment procedures HiPAP / HPR 400 transceiver unit General The transceiver unit must be mounted according to the HiPAP Instruction manual / HPR Installation manual. It is important that environmental requirements are followed. Attention should also be on ease of service. Logistics Safety - Not applicable. Personnel - Experienced engineer from the shipyard’s quality assurance department. Installation supervisor. Vessel location - Not applicable. References - Standard HiPAP / HPR documentation. Special tools - None. Procedure 1 Perform a close visual inspection of the unit’s mounting arrangement. 2 Check that the unit is mounted according to Instruction / Installation manual. 3 Check that the unit is located within the environmental specifications. 4 Check that the unit is installed in a serviceable way. Test certificate Transceiver unit Item to be checked Checked (sign) Visual inspection Mounting Environments The installation of the transceiver unit has been checked according to the procedures defined in the Instruction / Installation manual. Comments concerning inaccuracies, faults and/or poor workmanship have been filed as a separate report. Shipyard’s quality assurance department Signature Installation team supervisor Date Signature Date 857-164055 / R 149 HiPAP Roll, pitch and heave sensor General The unit shall be installed close to the roll and pitch centre of the vessel, to reduce heave as much as possible. The unit may not have a heave output. The unit must be calibrated to be in line with the vessels roll and pitch axis before calibrating the integrated navigation system. It is of great importance that the unit’s reference in not changed after this. If so, a new calibration of the integrated navigation system may be required. Logistics Safety - Not applicable. Personnel - Experienced engineer from the shipyard’s quality assurance department. Installation supervisor. Vessel location - Not applicable. References - Manufacturer specifications. Special tools - None. Procedure 150 1 Perform a close visual inspection of the unit’s mounting arrangement. 2 Check that the unit is installed according to manufacturer specifications. 3 Check that the unit is installed in the correct location and that the vibration conditions are within the required limits. Check that the unit casing is not damaged. 4 Check that the unit is correctly orientated. It is very important that the unit is mounted with its roll, pitch and axis correctly. Please check with the sensors manual. 5 Check that the unit outputs values that is according to the vessel’s trim level. 857-164055 / R Test and alignment procedures Test certificate Roll, pitch and heave sensor Item to be checked Checked (sign) Visual inspection Manufacturer specifications Location, vibration Orientation Trim The installation of the roll, pitch and heave sensor has been checked according to the procedures defined in the sensor documentation. Comments concerning inaccuracies, faults and/or poor workmanship have been filed as a separate report. Shipyard’s quality assurance department Signature Installation team supervisor Date Signature Date 857-164055 / R 151 HiPAP Heading sensor General The Heading sensor must be mounted according to manufacturer specifications. The unit must be calibrated to be in line with the vessels centre line before calibrating the integrated navigation system. It is of great importance that the unit’s reference in not changed after this. If so, a new calibration of the integrated navigation system may be required. Logistics Safety - Not applicable. Personnel - Experienced engineer from the shipyard’s quality assurance department. Installation supervisor. Vessel location - Not applicable. References - Manufacturer specifications. Special tools - None. Procedure 1 2 3 Perform a close visual inspection of the unit’s mounting arrangement. Check that the unit is installed according to manufacturer specifications. Check that the unit is correctly orientated and calibrated to be in line with the vessel’s centre line. Test certificate Heading sensor Item to be checked Checked (sign) Visual inspection Manufacturer specifications Orientation and calibration The installation of the heading sensor unit has been checked according to the procedures defined in the sensors documentation. Comments concerning inaccuracies, faults and/or poor workmanship have been filed as a separate report. Shipyard’s quality assurance department Signature Installation team supervisor Date Signature Date 152 857-164055 / R Test and alignment procedures Cabling General This is the test procedures for the system’s power and signal interface cables. Warning These checks must be completed before any power is switched onto the system. The installation of the cables is described in the Cable layout and interconnections chapter in the HiPAP Instruction manual (this manual) / HPR Installation manual. Logistics Safety - Not applicable. Personnel - Experienced engineer from the shipyard’s quality assurance department. Electrician supervisor. Vessel location - Not applicable. References - Drawings from the Instruction / Installation manual. Special tools - None. Procedures Visual inspection of the cabling Refer to the cable plans and interconnection diagrams, and check all power and interconnection cables. Any locally fitted plugs and connectors should also be checked to ensure the correct types have been used for the specific locations. (Sealed/spark-proof connectors in areas where flammable gasses may accumulate, etc.) • Ensure all cable connections have been made according to the cable plan, and that all connections are tight and secure. • Ensure all cables are correctly laid in conduits, or are otherwise protected according to the regulations and recommendations laid down by the vessel’s registration authority. • Ensure all protective covers are fastened correctly. 857-164055 / R 153 HiPAP Cable connections and continuity After the cable connections have been completed and the visual inspection has been carried out, all the cable cores must be checked for correct connection and continuity. → Refer to the cable plans and interconnection diagrams, and check all inter-connection cables. Any locally fitted plugs and connectors should also be checked for shorts or open circuits. Ensure all cable connections have been made according to the cable plan, and that all connections are tight and secure. Warning These checks must be completed before any power is switched onto the system. This check procedure will require pairs of engineers, equipped with the appropriate cable plans and wiring diagrams, two-way communication devices and tool kits. The “tester” will require continuity test equipment, the assistant will require a suitable shorting strap. Note The exact resistance values will depend on the type and lengths of the cables, and the units to which the cables are connected. If in doubt, check with the manufacturers. Follow the check procedure below for each cable core: 1 The test engineers should position themselves one at each end of the cable to be checked. 2 Good communications must be established. 3 Ensure the cable to be tested is not connected to any power source. If a cable terminates in a plug at the unit, the test will be more easily conducted if the plug is disconnected from the unit. 4 Select one pair of cable cores, and check that the cores are connected to the correct terminals in the unit/plug. 5 The tester then connects his continuity tester to the two terminals in question and checks the continuity. - If a low resistance exists between the two cores, this may indicate the cores are connected to circuits or units with low internal resistance. If this is the case, disconnect the cores from the terminal block and test again. The resistance should be nearing 1 Ω - if so: 154 857-164055 / R Test and alignment procedures 6 The assistant then shorts the two cores together, and the tester repeats the test. The Resistance should be approximately 0Ω. 7 The assistant then removes the shorting strap, and the resistance should go up to approximately 1 Ω again. 8 The tester then checks each core’s resistance to ground, (this should be approximately 1 Ω depending on the cable and unit(s)), and each core’s resistance to all the other cores in the cable, (this should be approximately 1 Ω). 9 Assuming the test results are correct, the cores must be reconnected to the terminal block (if they had been removed), and the terminals checked to ensure they are correct and tight. 10 On completion, move on to the next pair of cores and repeat the tests till the entire cable has been checked. Test certificate Cabling Item to be checked Checked (sign) Visual inspection Connections Continuity The installation of the system cabling has been checked according to the procedures defined in the Installation manual. Comments concerning inaccuracies, faults and/or poor workmanship have been filed as a separate report. Shipyard’s quality assurance department Signature Electrician supervisor Date Signature Date 857-164055 / R 155 HiPAP Applying power to the system Once all the checks have been completed, power can be applied to the system. Follow the procedure below: 156 1 Check to ensure that all the test and alignment procedures have been carried out. 2 Check that all power switches to the system, and those on the system units, are set to OFF. 3 Insert the system fuses into the main fuse panel and switch power on to those fuses. 4 Check on the supply terminals in all the various units that the correct supply voltages are being fed to those units. 5 Switch on the units one at a time and ensure each unit operates. 6 Switch on the entire system and perform the Setting To Work procedures. - These procedures are described in the contract. 857-164055 / R Test and alignment procedures Remarks and signatures Remarks Remarks (if any) must be noted here or in a separate report. Signatures Checked by: Place Date Signature Date Signature Approved by: Place 857-164055 / R 157 HiPAP HIPAP / HPR CUSTOMER ACCEPTANCE TEST Introduction This test procedure explains how to perform the Customer Acceptance Test (CAT) on the High Precision Acoustic Positioning (HiPAP) and the Hydroacustic Position Reference (HPR) systems. Purpose The CAT is performed to verify the functions of the HiPAP / HPR system. After the installation has been performed, and before the system is brought into operation for the first time, a series of test and alignment procedures must be carried out to confirm a correct installation. The main subjects are: • Mounting of the system • Functional test • Interface test • Acoustic functional test • Offshore calibration of system for integrated navigation Test certificates Once the test engineer has performed or witnessed the performance of the test or part of a test, he must sign the appropriate field for each check, to certify that the unit or system has passed the particular part of the procedure. The use of these fields is optional, but we recommend that they are properly filled in for future references. Note 158 If the test engineer is not satisfied with the standard of any part of the installation, he must contact the personnel who performed the installation, to have the work rectified and brought to the required standards. 857-164055 / R HiPAP/HPR Customer Acceptance Test Visual inspections After the physical installation has been carried out, all the system units must be visually checked to ensure the system has been installed correctly. You must ensure that the units have been mounted in the correct locations, correctly orientated (the right way up) and are correctly secured to the bulkhead/deck mounting brackets. The hull unit tests are described in the hull unit Installation manual. Note These tests must be made before power is applied to the system. None of these tests will require power to be applied. Test and alignments Warning These checks must be completed before any power is switched onto the system. The following related test procedures must also be performed: • Hull unit Test and alignment, document no. 130600 / section in the hull units Instruction manual. • HiPAP / HPR 400 Test and alignment, document no. 130315 / section in this document. Test results Procedures Checked (sign) Hull unit, Test and alignment HiPAP / HPR 400, Test and alignment Shipyard’s quality assurance department Signature Kongsberg Maritime representative Date Signature Date 857-164055 / R 159 HiPAP Test procedures introduction In all cases the step-by-step instructions must be followed if the tests are to be trustworthy. In order to verify that the HiPAP / HPR system works properly, the following tests must be carried out: • Hull unit (Transducer 1) • Hull unit (Transducer 2) • Operator unit • Simulator/training mode • Transducer 1 using a transponder • Transducer 2 using a transponder • Printout on printers • Alignment for integrated navigation • Spare parts Follow the procedures and fill in the tables. Once the system has been tested, sign the signature page (last page of this procedure). The test results will be: OK FAIL NA 160 when the test is done satisfactory. if the test fails. if the test is non-applicable. 857-164055 / R HiPAP/HPR Customer Acceptance Test Hull unit (Transducer 1) General This test can be done when the vessel is alongside, and there is sufficient water under the keel to lower the hull unit. Check with the master before the test starts. Logistics Safety - Not applicable. Personnel - The test is performed by a representative for the customer and a representative for Kongsberg Maritime Vessel location - Not applicable. References - Instruction manual for the hull units. Special tools - None. Procedure • Ensure the gate valve is open. • Make sure that 220V / 440V is switched on for the Hoist Control Unit (HCU) / hoist motor. 1 Lower the hull unit approx. 50 cm. Use the control switch (rotary switch, S1) in the HCU. Set the switch in LOWER position. 2 To stop the hull unit, set the switch in STOP position. 3 Set the switch in HOIST position to hoist the hull unit again, to check the down/up function is working. 4 Set the switch in LOWER position to lower the hull unit, until it stops at the lower limit switch. Monitor the transducer cable when lowered. - If there is any chance of the transducer cable might catch onto anything, stop immediately. Guiderail must then be installed to prevent this. 5 Hoist the hull unit again while still monitoring the transducer cable. - If there is any chance of the transducer cable might catch onto anything, stop immediately. Guiderail must then be installed to prevent this. 6 Switch the HCU to REMOTE and do the next tests using the Remote Control Unit (RCU). 7 Lower the hull unit while pressing the LOWER / DOWN button, until it reaches the lower limit switch. 8 Hoist the hull unit again while pressing RAISE/UP. 9 After 10 seconds press STOP. 10 Press RAISE/UP again to hoist the hull unit until it reaches the upper limit switch. 857-164055 / R 161 HiPAP Test results Hull unit (Transducer 1) Item to be checked Checked (sign) LOWER / HOIST function - local Lower limit switch Upper limit switch LOWER / DOWN function - remote STOP function - remote RAISE / UP function - remote Installation has been checked according to the procedures defined in the instruction manual. Comments concerning inaccuracies, faults and/or poor workmanship have been filed as a separate report. Shipyard’s quality assurance department Signature Kongsberg Maritime representative Date Signature Date 162 857-164055 / R HiPAP/HPR Customer Acceptance Test Hull unit (Transducer 2) General This test can be done when the vessel is alongside, and there is sufficient water under the keel to lower the hull unit. Check with the master before the test starts. Logistics Safety - Not applicable. Personnel - The test is performed by a representative for the customer and a representative for Kongsberg Maritime. Vessel location - Not applicable. References - Instruction manual for the hull units. Special tools - None. Procedure • Ensure the gate valve is open. • Make sure that 220V/440V is switched on for the Hoist Control Unit (HCU)/hoist motor. 1 Lower the hull unit approx. 50 cm. Use the control switch (rotary switch, S1) in the HCU. Set the switch in LOWER position. 2 To stop the hull unit, set the switch in STOP position. 3 Set the switch in HOIST position to hoist the hull unit again, to check the down/up function is working. 4 Set the switch in LOWER position to lower the hull unit, until it stops at the lower limit switch. Monitor the transducer cable when lowered. - If there is any chance of the transducer cable might catch onto anything, stop immediately. Guiderail must then be installed to prevent this. 5 Hoist the hull unit again while still monitoring the transducer cable. - If there is any chance of the transducer cable might catch onto anything, stop immediately. Guiderail must then be installed to prevent this. 6 Switch the HCU to REMOTE and do the next tests using the Remote Control Unit (RCU). 7 Lower the hull unit while pressing the LOWER / DOWN button, until it reaches the lower limit switch. 8 Hoist the hull unit again while pressing RAISE / UP. 9 After 10 seconds press STOP. 10 Press RAISE / UP again to hoist the hull unit until it reaches the upper limit switch. 857-164055 / R 163 HiPAP Test results Hull unit (Transducer 2) Item to be checked Checked (sign) LOWER/HOIST function-local Lower limit switch Upper limit switch LOWER/DOWN function-remote STOP function-remote RAISE/UP function -remote Installation has been checked according to the procedures defined in the instruction manual. Comments concerning inaccuracies, faults and/or poor workmanship have been filed as a separate report. Shipyard’s quality assurance department Signature Kongsberg Maritime representative Date Signature Date 164 857-164055 / R HiPAP/HPR Customer Acceptance Test Operator unit General The following tests are performed in front of the HiPAP / HPR operator unit. In some instances, menu selections have to be made in order to display all information. Logistics Safety - Not applicable. Personnel - The test is performed by a representative for the customer and a representative for Kongsberg Maritime. Vessel location - Not applicable. References - Standard HiPAP / HPR documentation. Special tools - None. Procedure 1 Check that the transceiver is in Navigation mode. If there are more than one transceiver, check that all are in Navigation mode. 2 Check that Heading sensor input is available. If the system is configured with more than one Heading sensor, check all sensor inputs. 3 Check that Motion sensor input is available. If the system is configured with more than one Motion sensor, check all sensor inputs. 4 Check configuration to external equipment (information sent from/to the HiPAP/HPR from other units, for example DP, navigation system, GPS). If the system consists of more than one operator unit, do the above check on all dedicated HiPAP / HPR operator units. 857-164055 / R 165 HiPAP Test results Operator unit Item to be checked Checked (sign) Navigation mode -Transceiver 1 -Transceiver 2 Heading sensor data --Heading sensor 1 --Heading sensor 2 --Heading sensor 3 Motion sensor data --Motion sensor 1 --Motion sensor 2 --Motion sensor 3 External equipment Installation has been checked according to the procedures defined in the instruction manual. Comments concerning inaccuracies, faults and/or poor workmanship have been filed as a separate report. Shipyard’s quality assurance department Signature Kongsberg Maritime representative Date Signature Date 166 857-164055 / R HiPAP/HPR Customer Acceptance Test Simulator / training mode General The HiPAP / HPR can be run in simulator/training mode. All outputs to external equipment will then be activated, and the output signals can then be tested by the external systems. Note The telegrams sent from the HiPAP / HPR contains information that the system is in simulator/training mode, and some systems might not use the HiPAP / HPR information for this reason. Logistics Safety - Not applicable. Personnel - The test is performed by a representative for the customer and a representative for Kongsberg Maritime. Vessel location - Not applicable. References - Standard HiPAP / HPR documentation. Special tools - None. Procedure 1 Test serial lines to external equipment. 2 Test serial lines from external equipment. 3 Test Ethernet messages. Test results Simulator/training mode Item to be checked Checked (sign) Serial lines (output) Serial lines (input) Ethernet Installation has been checked according to the procedures defined in the installation manual. Comments concerning inaccuracies, faults and/or poor workmanship have been filed as a separate report. Shipyard’s quality assurance department Signature Kongsberg Maritime representative Date Signature Date 857-164055 / R 167 HiPAP Transducer 1 using a transponder General This test is to be done when the vessel is alongside, and there is sufficient water under the keel to lower the hull unit. Check with the master before the test starts. This test can also be done at anchorage or at open sea when the vessel has no speed. • Make sure the gate valve is open. • Lower the hull unit. • Prepare a transponder for deployment. - The deployment point of the transponder should be close to the hull unit. Take into consideration the installation angle of the transducer, if the transducer is fitted with a tilt adapter. - Connect the transponder to a rope long enough to reach 5-10 meters below the keel. Deploy the transponder. Logistics Safety - Not applicable. Personnel - The test is performed by a representative for the customer and a representative for Kongsberg Maritime. Vessel location - Not applicable. References - Standard HiPAP/HPR documentation. Special tools - None. Procedure 1 Note 168 Activate the transponder on the HiPAP / HPR operator station, and select Transducer 1. - The signal should be received and displayed on the HiPAP / HPR operator station. When this test is done alongside or in very shallow waters, the signal might be ”jumpy” because of reflections from the seabed and the hull. 857-164055 / R HiPAP/HPR Customer Acceptance Test Test results Transducer 1 using a transponder Item to be checked Checked (sign) Transponder on Transducer 1 Installation has been checked according to the procedures defined in the instruction manual. Comments concerning inaccuracies, faults and/or poor workmanship have been filed as a separate report. Shipyard’s quality assurance department Signature Kongsberg Maritime representative Date Signature Date 857-164055 / R 169 HiPAP Transducer 2 using a transponder General This test is to be done when the vessel is alongside, and there is sufficient water under the keel to lower the hull unit. Check with the master before the test starts. This test can also be done at anchorage or at open sea when the vessel has no speed. • Make sure the gate valve is open. • Lower the hull unit. • Prepare a transponder for deployment. - The deployment point of the transponder should be close to the hull unit. Take into consideration the installation angle of the transducer, if the transducer is fitted with a tilt adapter. - Connect the transponder to a rope long enough to reach 5-10 meters below the keel. Deploy the transponder. Logistics Safety - Not applicable. Personnel - The test is performed by a representative for the customer and a representative for Kongsberg Maritime. Vessel location - Not applicable. References - Standard HiPAP / HPR documentation. Special tools - None. Procedure 1 Note 170 Activate the transponder on the HiPAP / HPR operator station, and select Transducer 2. - The signal should be received and displayed on the HiPAP/HPR operator station. When this test is done alongside or in very shallow waters, the signal might be ”jumpy” because of reflections from the seabed and the hull. 857-164055 / R HiPAP/HPR Customer Acceptance Test Test results Transducer 2 using a transponder Item to be checked Checked (sign) Transponder on Transducer 2 Installation has been checked according to the procedures defined in the instruction manual. Comments concerning inaccuracies, faults and/or poor workmanship have been filed as a separate report. Shipyard’s quality assurance department Signature Kongsberg Maritime representative Date Signature Date 857-164055 / R 171 HiPAP Printout on printers General On systems supplied with printers, the printout function is checked. This is done by making a screen dump or a printout of simulated transponder positions. Logistics Safety - Not applicable. Personnel - The test is performed by a representative for the customer and a representative for Kongsberg Maritime. Vessel location - Not applicable. References - Standard HiPAP / HPR documentation. Special tools - None. Procedure 1 Printout from the HiPAP / HPR system. Test results Printout on printers Item to be checked Checked (sign) Printout on printer Installation has been checked according to the procedures defined in the instruction manual. Comments concerning inaccuracies, faults and/or poor workmanship have been filed as a separate report. Shipyard’s quality assurance department Signature Kongsberg Maritime representative Date Signature Date 172 857-164055 / R HiPAP/HPR Customer Acceptance Test Alignment for integrated navigation General The purpose of the alignment is to define: • The roll and pitch offsets between the roll and pitch sensor and the HiPAP / HPR roll and pitch axis. • The orientation offset between the heading reference (SEAPATH- compass) and the HiPAP / HPR orientation. • The horizontal and vertical offsets from the HiPAP / HPR transducer and the DGPS antenna to the vessels reference point. Defining the horizontal and vertical transducer offsets and the alignment of the heading reference is normally not a part of the Kongsberg Maritime responsibility. These steps must be repeated for each transducer. Logistics Safety - Not applicable. Personnel - Kongsberg Maritime representative or surveyor to operate the APOS computer and a Kongsberg Maritime service engineer. Vessel location - Along quay-side and at sea with water depth from 100 m to 500 m. References - Standard HiPAP / HPR documentation. Special tools - DGPS or RTK DGPS. Procedure Along quay Horizontal and vertical offset The distances from the transducer(s) and GPS to the vessel’s reference point, must be measured very accurately either from the vessel’s drawing or from real life measurements. This has a direct impact on the final position accuracy. The best way is probably to use a survey company to measure this by use of theodolite and fixed points. The accuracy of these measurements should be less than 0.05 meters. The offsets for the surface navigation systems antenna must be determined in the same way. 857-164055 / R 173 HiPAP HiPAP / HPR alignment at sea When the above subjects are done, the rest of the alignment is done at sea. The following is required: • The APOS computer that takes the HiPAP / HPR position and integrates this to the surface navigation system. • The surface navigation must be a good DGPS or better, a cinematic ”on the fly” DGPS. It is important that roll and pitch compensation of the DGPS is properly done in the APOS computer. • A sound velocity profile must be taken and entered to the system. Roll / pitch / heading alignment Water depth approximately 200 meters and a fixed transponder at the seabed. The following note only applies for the HPR system. Note If the system has a narrow beam transducer the horizontal distance vessel to transponder should be 1/3 of the water depth and if a medium beam transducer is used it should be 1 times the water depth. The alignment correction is found by doing a ”4 point box in”. Proceed as follows: Note 174 Alignment as described in the APOS on-line help. 857-164055 / R HiPAP/HPR Customer Acceptance Test Offset values The values used for the transducer offset are derived from: j j j Measurements on the GA drawings A survey report from xxxCOMPANY dated xx.yy.zzzz Measured using tape measure from an already surveyed in position as reference. The reference position is surveyed in by xxxCOMPANY in the report dated xx.yy.zzzz The values used for the antenna offset are derived from: j j j j Measurements on the GA drawings Taken from the DGPSx settings in the DP system A survey report from xxxCOMPANY dated xx.yy.zzzz Measured using tape measure from an already surveyed in position as reference. The reference position is surveyed in by xxxCOMPANY in the report dated xx.yy.zzzz Alignment values Offset Transducer 1 Transducer 1 X Offset (m) (m) Y Offset (m) (m) Z Offset (m) (m) Orientation (gear/rotation) (deg) (deg) X Inclination (roll) (deg) (deg) Y Inclination (pitch) (deg) (deg) Surface navigation antenna offsets used: OFFSET 857-164055 / R Nav. antenna X Offset (m) Y Offset (m) Z Offset (m) 175 HiPAP Test results Alignment for integrated navigation Item to be checked Checked (sign) Horizontal offsets Td 1 Inclination offsets Td 1 Orientation offset Td 1 Horizontal offsets Td 2 Inclination offsets Td 2 Orientation offset Td 2 Comments concerning inaccuracies, faults and/or poor workmanship have been filed as a separate report. Shipyard’s quality assurance department Signature Kongsberg Maritime representative Date Signature Date 176 857-164055 / R HiPAP/HPR Customer Acceptance Test Spare parts General Supplied spare parts are checked against the contract. Logistics Safety - Refer to HiPAP / HPR documentation/handling equipment. Personnel - The test is performed by a representative for the customer and a representative for Kongsberg Maritime. Vessel location - Not applicable. References - Standard HiPAP / HPR documentation. Special tools - None. Procedure Not applicable. Test results Spare parts Item to be checked Checked (sign) Supplied spare parts Installation has been checked according to the procedures defined in the installation manual. Comments concerning inaccuracies, faults and/or poor workmanship have been filed as a separate report. Shipyard’s quality assurance department Signature Kongsberg Maritime representative Date Signature Date 857-164055 / R 177 HiPAP Remarks and signatures Remarks Remarks (if any) must be noted here or in a separate report. Signatures Checked by: Place Date Signature Date Signature Approved by: Place 178 857-164055 / R APOS LBL/MULBL Customer Acceptance Test LBL / MULBL POSITIONING CUSTOMER ACCEPTANCE TEST Introduction This test procedure explains how to perform the Customer Acceptance Test (CAT) for Long Base Line (LBL) positioning and Multi-User LBL (MULBL) using the APOS OS program. The test is performed using the High Precision Acoustic Positioning (HiPAP 500 / HiPAP 350) or the Hydroacustic Position Reference (HPR 408 / 418) systems. Purpose The Customer Acceptance Test (CAT) is performed to verify the Long Base Line (LBL) or Multi-User LBL (MULBL) function of the system. The test should be done in water depth of more than 100 m. Note The Multi-User LBL mode can only be tested if the APOS operator station has the MULBL option installed, and the transponders are capable of running the MULBL mode. • A minimum of 3 transponders has to be deployed before this test (for MULBL 4 transponders minimum). The radius of the array should be adjusted with respect to water depth and transponder type. This is to make sure the system is operating within the defined beams of the transponders/transducers. Use a complete sound velocity profile if possible. - For MPT 331 transponders and /or narrow beam transducer, the baseline should be approximately 25% or less of the water depth, depending on the depth. - For MPT 319 or MPT 339 transponders, the radius can be from 25% of the water-depth and up to 1 x the water depending on type of ship’s transducer. • The radius should not exceed 300 m, even in deep waters. • For baseline measurements, the transponders must have line-of-sight between them. • During this test, the vessel has to stay within the coverage area of the transponders in the LBL array. Remember the transducer offset when setting up the vessel before the test. It is actually the transducer(s) that needs to be within the array. 857-164055 / R 179 HiPAP • The result depends on: - The array geometry - Number of transponders in the array - Calibration result - Sound velocity data. Important aspects Operation area The area the vessel need for manoeuvring defines the operation area. This might also influence on the choice of transponder type, number of transponders and array radius. (Cd5931) Figure 52 Example of operation area • You must have a good coverage (contact) from the transponders throughout your operation area. 180 857-164055 / R APOS LBL/MULBL Customer Acceptance Test Ships system / seabed footprint General The transducer footprint on the seabed is determined by the system / transducer onboard. The figure below shows a narrow / wide beam transducer coverage area for a HPR 400 system. The narrow beam area is indicated by “N”, and the wide beam area indicated by “N”+”W”. (Cd5930) Figure 53 Example of seabed footprints HPR HPR 418 systems with narrow/wide transducer (narrow beam transducer) covers + 22.5° in narrow beam, and + 80° in wide beam. Wide beam is more affected by noise than medium beam. HiPAP HiPAP 500 systems will cover + 100° from the vertical. The HiPAP 500 will always make + 5° narrow beams within the whole coverage area, since this is controlled electronically. HiPAP 350 systems will cover + 60° from the vertical. The HiPAP 350 will always make + 7° narrow beams within the whole coverage area, since this is controlled electronically. 857-164055 / R 181 HiPAP Transponder types / surface The transponder footprint on the surface is dependent on the type of transponder used. There are basically 2 types of LBL transponders. 30 - 30 -10 dB -20 -60 60 -30 -40 -90 -10 -20 -30 90 -40 120 -120 150 -150 180 MPT 339 series Source level = 195 dB 30 - 30 -10 dB -20 -6 0 60 -3 0 -40 -90 -10 -20 -30 90 -40 120 -120 -150 150 180 (Cd4628b) SPT 331 series MPT 331/DuB vertical Source level = 206 dB Figure 54 Example of transponder beam pattern MPT 319/MPT 339 The opening angle (cone) of these transponders is ± 90° (hemispherical). MPT 331/DuB This transponder type has got dual beams (DuB). One beam pointing upwards during positioning, while there is a horizontal beam during base line measurements. • The opening angle (cone) for the vertical beam is ± 15°. • The horizontal cone (doughnut) is ± 15°. 182 857-164055 / R APOS LBL/MULBL Customer Acceptance Test Choosing the transponder type In general, transponders with narrow beam transducers are more powerful than transponders with wider transducers, but the drawback is a reduced footprint on the surface. Normally the water depth determines the type of transponder to use. 1000 m – MPT 319 transponder is to be used if the ambient noise level on the vessel is low. If the noise level is high, a MPT 339 or MPT 331/DuB might be used. The MPT 331/Dub might restrict the operation. Test certificates Once the test engineer has performed or witnessed the performance of the test or part of a test, he must sign the appropriate field for each check, to certify that the unit or system has passed the particular part of the procedure. The use of these fields is optional, but we recommend that they are properly filled in for future references. Note If the test engineer is not satisfied with the results, he must contact the personnel who performed the installation, to have the work rectified and brought to the required standards. Visual inspections N/A Test and alignments The following related test procedure has to be completed. • HiPAP/HPR Customer Acceptance Test. Refer to the HiPAP Instruction manual / HPR Installation manual. 857-164055 / R 183 HiPAP Test procedure introduction In all cases the step-by-step instructions must be followed if the tests are to be trustworthy. In order to verify that the LBL function works properly, the following tests must be carried out: • Run the “New LBL array wizard” to set up the LBL array • Measure baselines in if positioning in multi-user LBL (MULBL) • Position the vessel using: - Transceiver 1/TD 1 - Transceiver 1/TD 2 - Transceiver 2/TD 1 - Transceiver 2/TD 2 Follow the procedures and fill in the tables. Once the system has been tested, sign the signature page (last page). The test results will be: OK FAIL NA When the test is done satisfactory. If the test fails. If the test is non-applicable. Procedure overview The following points give an overview of the main steps of the LBL calibration and positioning procedures. 1 Deploy the transponders. Activate the transponders in SSBL mode. Use the “New LBL array wizard” to calibrate the array. 2 MuLBL: Tick “Continue with measure baselines”. For all other applications remove the tick-mark. 3 Start LBL positioning. For HPR 400 systems, make sure the position calculation is based on ranges only. For HiPAP systems, use both ranges and angles. 4 Start “Runtime calibration”. Log 200 sets of data and calculate. Update the LBL array. 5 Observe the vessel position in relation to the array. If connected to a DP system, integrate the LBL position during DP station-keeping. Verify that the LBL is accepted by the DP system. 6 If the vessel is equipped with more than one transducer/transceiver, repeat step 5 for all relevant transducers/transceivers. 184 857-164055 / R APOS LBL/MULBL Customer Acceptance Test Test procedures Hull unit 1 Ensure the gate valve is open. 2 Make sure that 220 V / 440 V is switched on for the Hoist Control Unit (HCU) / hoist motor. 3 Lower the hull unit until it stops at the lower limit switch. APOS software How to start the APOS, is described in the APOS Instruction manual, section Operator manual doc no. 160841. Refer to the APOS on-line help menu for: • LBL general information • LBL position procedure Transceivers Select the transceivers to be tested during array calibration. 1 Transceiver to be tested Transceiver: (1, 2, 3 or 4) Selected Transponders * Checked before deployment. Transponder to be used Type 857-164055 / R Serial no Channel Checked* 185 HiPAP LBL calibration General The calibration is performed using the APOS software. Procedure Checked 1 Add all transponders to be used in the transponder configure dialogue. Remember to set the options correctly! 2 Set the system default parameters: - Select the transducer to be tested. - Select correct maximum range. 3 Select graphical view to show North up. 4 Use a correct sound velocity profile if possible. - Used sound profile: - Name: 5 Place 3 or more transponders in a circle evenly spaced. Arrange the array to best geometry, based on transmit and receive angle of the transducer and transponders. 6 Move the vessel in a position to get the best transponder positions. This is normally with the ship’s transducer in the centre of the array. 7 Activate all transponders in SSBL mode. 8 Wait for stable transponder position. 9 Select LBL Array-New LBL array wizard. The wizard will configure the array and do all necessary steps to prepare for LBL positioning. 10 If MuLBL is going to be tested, measure the baselines (tick “Continue with measure baselines”). For normal LBL do not tick the box. 11 Assign LBL positioning to the vessel (Positioning-LBL positioning) 12 Start positioning in LBL. 13 Run “Runtime calibration”. Log 200 samples and update the array. 14 Observe in the numeric view the range residuals are less than 1 meter. 186 857-164055 / R APOS LBL/MULBL Customer Acceptance Test Calibration checked LBL positioning has been checked according to the procedures defined. Comments concerning inaccuracies and faults have been filed as a separate report. Shipyard’s quality assurance department Signature Kongsberg Maritime representative Date Signature Date 857-164055 / R 187 HiPAP LBL Positioning General This test must be done when the vessel in a position to get the best transponder replies. This is normally the centre of the array. The result is greatly dependent on the array geometry, number of transponders in the array and sound velocity data. Procedure Checked 1 Select: - Positioning- LBL Positioning. - Enable Auto exclude. - Use “Transducer parameters” as Depth measurement. 2 Select the transducer to use. For HPR 400 systems, make sure the position calculation is based on ranges only. For HiPAP systems, use both ranges and angles. 3 Select Activate to start positioning. 4 Ranges are measured and the position calculated. The RMS residual figure is dependent upon the quality of the calibration. - The figure is 1 if the measurements are as expected, less than 1 if better than expected (a value up to 1.3 is acceptable). 5 If the system is interfaced to a DP system, integrate the LBL position in the DP. Verify a stable signal on the DP. Fill in test results in the table below. 6 Stop LBL positioning. 7 Repeat steps (2–6) for all transceiver/transducer combinations. 8 Stop LBL positioning when done. 188 857-164055 / R APOS LBL/MULBL Customer Acceptance Test Test results LBL positioning test using HiPAP/HPR Item to be checked Pos LBL array: - Transceiver 1 / TD1 (transceiver name________________) Checked (sign) …………… - DP reference - Transceiver 1 / TD2 …………… - DP reference - Transceiver 2 / TD 1(transceiver name________________) …………… - DP reference - Transceiver 2 / TD2 …………… …………… …………… …………… …………… - DP reference LBL positioning has been checked according to the procedures defined. Comments concerning inaccuracies and faults have been filed as a separate report. Shipyard’s quality assurance department Signature Kongsberg Maritime representative Date Signature Date 857-164055 / R 189 HiPAP MULBL positioning General This test must be done when the vessel in a position to get the best transponder replies. This is normally the centre of the array. The result is greatly dependent on the array geometry, number of transponders in the array, calibration result and sound velocity data. Procedure Checked 1 Set up MuLBL master and slave transponders. Select a master transponder and set position interval 3 seconds and master interrogation interval 12 seconds. Select “suggest turnaround delays” and set all transponders in LBL positioning mode. 2 Activate the master transponder. 3 Select: - Positioning- LBL Positioning. - Enable Auto exclude. - Use Transducer parameters as Depth measurement. 4 Select which transducer/transceiver to use. For HPR400 systems, make sure the position calculation is based on ranges only. For HiPAP systems, use both ranges and angles. 5 Select Activate to start positioning. 6 Ranges are measured and the position calculated. The RMS residual figure is dependent upon the quality of the calibration. - The figure is 1 if the measurements are as expected, less than 1 if better than expected (a value up to 1.3 is acceptable). 7 If the system is interfaced to a DP system, integrate the MULBL position in the DP. Verify a stable signal on the DP. 8 Stop MULBL positioning. 9 Select next combination of transceiver/transducer. 10 Repeat step (4–9) for all transceiver/transducer combinations. 11 When the test is done, send the “Deactivate master” command. 190 857-164055 / R APOS LBL/MULBL Customer Acceptance Test Test results MULBL positioning test using HiPAP/HPR Item to be checked Checked (sign) Pos MULBL array: - Transceiver 1 / TD1 (transceiver name________________) …………… - DP reference - Transceiver 1 / TD2 …………… …………… - DP reference …………… - Transceiver 2 / TD1 (transceiver name________________) …………… - DP reference - Transceiver 2 / TD2 …………… …………… - DP reference …………… - MuLBL master transponder stopped by telemetry. …………… MULBL positioning has been checked according to the procedures defined. Comments concerning inaccuracies and faults have been filed as a separate report. Shipyard’s quality assurance department Signature Kongsberg Maritime representative Date Signature Date 857-164055 / R 191 HiPAP Remarks and signatures Remarks Remarks (if any) must be noted here or in a separate report. Signatures Checked by: Place Date Signature Date Signature Approved by: Place 192 857-164055 / R Drawing file DRAWING FILE Overview This section holds illustrations referred to in various sections in this manual. The illustrations are based on the original system drawings and wiring diagrams. • The original drawings are available in electronic format on request. Drawings The following illustrations are implemented: • Outline dimensions - APC 1x, page 194. - Keyboard and trackball, page 195. - Display, page 196. - Transceiver unit, page 197. • Installation - APC 1x rack mounting, page 198. - APC 1x desktop mounting, page 199. - Transceiver door with cooling unit (option), page 200. • Interconnection and circuit diagrams - Transceiver unit interconnection diagram (three pages), pages 201, 202, and 203. - Terminal Block Converter (TBC) - diagram, page 204. - Dual net connection diagram, page 205. - IPPS Converter - block diagram, page 206. - IPPS Converter - assembly drawing, page 207. 857-164055 / R 193 Drawing file APC 1x - outline dimensions APC 1x Note: All measurements are in mm. The drawing is not in scale. 857-164055 / R 195 Drawing file Keyboard anf trackball 142 mm Cable length 1.5 m 50 mm 298 mm 136 mm 0m 12 m Note: All measurements are in mm. The drawing is not in scale. 857-164055 / R 195 HiPAP 65 35 52 232 509 19 inch display - outline dimensions 444 483 + + POWER Note: All measurements are in mm. The drawing is not in scale. 196 857-164055 / R Drawing file HiPAP transceiver unit - outline dimensions Note: All measurements are in mm. The drawing is not in scale. 857-164055 / R 197 HiPAP APC 1x - rack mounting Parts list for rack mounting 1 Mounting bracket for 19" rack - computer 2 Support bracket 19" rack, - APC 1x 6 T-HEAD BOLT, desktop computer 7 M6x10 Soc. h. cap scr. DIN912 A4 9 HEX Nuts M6 DIN934 AP 10 Split lockwasher F/M6 DIN127B A4 Note: All measurements are in mm. The drawing is not in scale. 198 857-164055 / R Drawing file APC 1x - desktop mounting Parts list for desktop mounting (1-3) Mounting bracket 4 T-head bolt, desktop computer 5 Hex nut M6 DIN934 A4 6 Shake-proof washer, F/M6 DIN6798A A4 serrated 7 M6x10 socket head cap DIN912 A4 8 9 10 16 17 M6x16 PANH W/ X ~DIN7985 A4 M6x60 socket head cap DIN912 A4 Handle, desktop computer Mounting bracket, display Plain washer F/M6 DIN125A A4 Note: All measurements are in mm. The drawing is not in scale. 857-164055 / R 199 HiPAP Transceiver unit door with cooling unit Transceiver unit door Cooling unit Power plug Note: All measurements are in mm. The drawing is not in scale. 200 857-164055 / R Drawing file HiPAP transceiver unit - wiring diagram, page 1 Note: All measurements are in mm. The drawing is not in scale. 857-164055 / R 201 HiPAP HiPAP transceiver unit - wiring diagram, page 2 Note: All measurements are in mm. The drawing is not in scale. 202 857-164055 / R Drawing file HiPAP transceiver unit - wiring diagram, page 3 Note: All measurements are in mm. The drawing is not in scale. 857-164055 / R 203 HiPAP Terminal Block Converter (TBC) - diagram Note: All measurements are in mm. The drawing is not in scale. 204 857-164055 / R Drawing file Par2 OR W W Par3 GR W Par4 BR 5 4 1 2 3 6 7 8 P4 4 3 +5V BL 1 BK R 2 1 GND W Par1 3 HiPAP Transceiver backplane TB1 COM3 HiPAP +5V P7 Category 5 GND Dual Net - connection diagram 1 2 3 4 5 6 7 8 Contact opening front view P6 1 2 3 NETA P2 4 5 BL 5 SOUT+ R 1 SIN1+ OR 3 SIN1- GN 7 SOUT- BK 9 GND RS-422 NETB P8 To be labelled with dymo lable. NETA NETB Note: All measurements are in mm. The drawing is not in scale. 857-164055 / R 205 HiPAP IPPS Converter - diagram Note: All measurements are in mm. The drawing is not in scale. 206 857-164055 / R Drawing file ST5 ST1 ST8 ST9 ST2 ST6 U2 S.NO. 1 ST3 ST4 ST7 P2 IPPS Converter - assembly ST10 ST11 C4 U4 P3 C2 C3 R4 1 U3 ST16 ST15 ST14 ST17 ST13 ST12 C1 R3 R2 R1 Note: All measurements are in mm. The drawing is not in scale. Filter converter kit: . . . . . . . . . . . . . . . . . . . . . . . . . . . . . . Kit-213098 857-164055 / R 207 HiPAP INDEX The next pages presents the index of this manual. Numbers 1PPS converter diagrams, 20 19 inch display --- outline dimensions, 195 Serial line adapter board, 32 Serial lines, 74, 107 USB memory stick, 17 VGA signal, 108 Video adapter board, 32, 70 1PPS converter, 18 APC 1x --- desktop mounting, 198 1PPS Converter , 20 APC 1x --- outline dimensions, 193 1PPS converter connections, 20 APC 1x --- rack mounting, 197 1PPS converter internal, 123 230 Vac power supply, 105, 112 A Abbreviations, 1 Acceptance test, 5 APC 1x computer, 10 APC 1x connections, 16 APC 1x Dual Net connection, 127 APC 1x installation, 59 19” rack installation, 59 Cabling, 60 Desktop installation, 60 APC 1x internal, 32 APC, 1 APC 1x specifications Dimensions, 65 Environment, 65 Power, 65 Protection, 66 Vibration, 66 APC 1x cables, 104 APC 1x unit, 60 APC 1x, 16, 32, 65, 70, 125 BlueStorm/PCI serial adapter board, 73 Connections, 106, 125 Connector pin allocations, 126 Cooling fan, 70 Dust filter, 35 DVD recorder, 17 DVD Recorder unit, 32 Ethernet board, 32, 70, 75 External connections, 16 Hard disk drive, 32 Mains power input, 106 Motherboard, 70, 71 Motherboard connectors, 106 PCB connectors, 106 Power initialization, 16 Power supply, 32, 65, 70, 77 Power supply selector switch, 125 Replacing circuit boards, 38 Replacing the DVD unit, 36 Replacing the hard disk, 36 Replacing the power supply, 37 Serial adapter, 70 APOS, 1 Alignment for integrated navigation, 172 Ambient humidity, 133 Ambient temperature, 133 208 APOS software, 184 ATI Radeon Video adapter board, 76 Connectors, 76 LEDs, 76 Links, 76 Switches, 76 B Backup, 3, 30 Batteries, 134 Battery duration, 71 Block diagrams: Responder terminal Block, 89 TMC II functional diagram, 92 Transceiver Unit, 23 TRB functional diagram, 80 BlueStorm/PCI serial adapter board, 73 BlueStorm/PCI installation for Windows XP, 73 857-164055 / R Index Connectors, 73 Links, 73 Switches, 73 BOP, 1 Braided grounding cable, 105 COS, 1 COS controller, 13 D Desktop system, 13 C Cable A, 104, 112 Cable B, 104 Cable C, 105 Cable D, 105 Cable F, 105 Cable G, 105, 113 Cable gland assembly procedure, 98 Cable glands, 98 Det Norske Veritas, 97 DGPS, 1 Digi board, 78, 94 Connectors, 94 LEDs, 94 Links, 94 Switches, 94 Technical details, 94 Test points, 94 Digi board replacement, 52 Display, 19, 66, 105 Display board replacement, 52 Cable H, 112 DNV, 97 Cable J, 112 Double --- pole breaker, 85 Cable K, 113 DP, 1, 13 Cable L, 113, 116 Dual HiPAP system, 15 Cable layout, 97 Dual Net --- connection diagram, 204 Cable M, 113 Dual net connection diagram, 110 Cable N, 113 Dual net Installation, 124 Cable plan, 103 Dust filter, 35 Cable T, 105 Dust filters, 44 Cable trays, 100 Dynamic Positioning system, 13 Cable X, 105 Cable Y, 113 Cables, 97 Connections, 102 Identification, 102 Terminations, 102 E Electrical installation, 5 Electro --- Static Discharge, 86 Electrostatic Discharge (ESD), 140 Cables J, 115 EMC, 105 Cabling, Requirements, 100 Equipment responsibility, 4 Calibrations, 28 Error detection, 28 Changing the filter, 57 ESD, 86 Classification society, 97 ESD precautions, 140 Closing the transceiver unit door, 44 Ethernet board, 75 Connectors, 75 LEDs, 75 Links, 75 Commissioning, 5 Cooling unit, 55, 68 857-164055 / R 209 HiPAP Switches, 75 Ethernet converter, 26, 42 Ethernet converter for fibre --- optic, 25 External peripheral devices, 113 External synchronization, 119 F Functional tests, 28 Fuses, 44 G General guidelines, 2 GPS, 1 GPS Input signal converter, 18 GPS Input signals connections, 122 GPS resceiver signals, 18 Grounding, 101 Guarantee period, 6 Guidelines for installation, 61 HiPAP/HPR 400 Test and alignment procedures, 144, 152 Applying power to the system, 155 Heading sensor, 151 HiPAP/HPR 400 transceiver unit, 148 Operation Unit/Station, 146 Purpose, 144 Remarks and signatures, 156 Roll, pitch and heave sensor, 149 Test and alignment, 145 Test certificates, 144 Visual inspection, 144 HiPAP/HPR Customer Acceptance Test, 157 Hull unit (Transducer 1), 160 Hull unit (Transducer 2), 162 Operator unit, 164 Printout on printers, 171 Purpose, 157 Remarks and signatures, 177 Simulator/training mode, 166 Spare parts, 176 Test and alignments, 158 Test certificates, 157 Transducer 1 using a transponder, 167 Transducer 2 using a transponder, 169 Visual inspections, 158 Hoist Control Unit, 10 How to close the APC 1x unit, 33 How to open the APC 1x unit, 33 HPR, 1, 180 H High Precision Acoustic Positioning, 144 High voltage safety warning, II HiPAP, 1, 144, 180 HiPAP 350, 8 HiPAP 450, 9 HiPAP 500, 7 HiPAP processing, 14 HiPAP system, 10, 13 HiPAP transceiver unit --- outline dimensions, 196 HiPAP transceiver unit --- wiring diagram, page 1, 200 HPR 400, 144 HTC--- 10, 1, 42 HTC--- 10 computer, 78 AC input voltage select switch, 90 Connections, 90 Digi board (serial lines), 90 Keyboard connector, 90 Mouse connector, 90 Power supply fan, 90 Socket for ac power cord, 90 Technical details, 90 TMC Address control signals, 90 TMC Databus, 90 TMC responder control signals, 90 TMC Sync signals, 90 VGA video connector, 90 Hull unit, 10 Hydroacustic Position Reference, 144 HiPAP transceiver unit --- wiring diagram, page 2, 201 HiPAP transceiver unit --- wiring diagram, page 3, 202 210 I I/O, 1 857-164055 / R Index Illustrations: APC 1x --- internal layout, 32 APC 1x cabling, 104 APC 1x Dual Net connections, 127 APC 1x front, 17 APC 1x PCB clamp nuts, 38 APC 1x rear panel, 106 APC 1x unit, 16 APC 1x unit filter, 35 Cabinet mounting --- side view, 61 Cable for external sensors, 116 Dual HiPAP Master Slave synchronization, 119 Ethernet converter, EXC 001, 26 Ethernet RJ45 socket 10baseT, 126 Example of operation area, 179 Example of seabed footprints, 180 Example of transponder beam pattern, 181 Four serial line --- option, 117 HiPAP 450 system, 11 HiPAP 500 system, 11 HiPAP 500 transceiver unit --- internal layout, 41 HiPAP Single/Dual Net communication, 124 HiPAP Transceiver Unit, 21 HiPAP transceiver unit dual copper net connection, 129 HiPAP transceiver unit dual fibre --- optic net connection, 128 HTC--- 10 computer --- rear --- mounted connectors, 90 HTC--- 10 internal layout, 51 Indication PCBs cover plate, 52 IPPS converter connections, 122 Keyboard, 19 Layout of the terminal blocks within the Transceiver Unit, 111 Locations of the five power supply retaining screws, 37 MRU interface RS --- 232 to RS --- 422 Terminal Block Converter, 118 Replacing the battery, 72 Responder cable, 115 RS --- 232 serial line --- option, 117 RTB module, 87 SBC 400 --- rear side, 95 Serial lines cable, 74 Serial to Dual Net converter SBC 400 unit, 25 Standard HiPAP 350 System, 12 Terminal Block Converter --- optional, 121 Terminal Block Converter link setting, 120 Terminal Block Converter used for external synchronization, 120 857-164055 / R TMC II board, 91 Tranceiver Unit with cables, 112 Transceiver unit indicating air inlet and filters, 57 Transceiver Unit indicating transducer cable connections, 110 Transceiver unit LEDs, 43 Transceiver/receiver board (TRB), 79 Important aspects, 179 Installation, 2, 4, 5, 58 Installation requirements, 97 Installation tests, 6 Integrated operation with KM’s Dynamic Positioning (SDP) system, 130 Integrated operation with SDP, 130 Interconnection diagram, 110 Interconnections, 97 IPPS Converter --- assembly, 206 IPPS Converter --- diagram, 205 K Keyboard, 13, 19, 39, 66, 105 Keyboard , 10 Keyboard anf trackball, 194 L LBL, 1 LBL mode, 14 LBL/MULBL positioning Customer Acceptance Test, 178 Choosing the transponder type, 182 LBL calibration, 185 Operation area, 179 Purpose, 178 Ships system/seabed footprint, 180 Test and alignments, 182 Test certificates, 182 Test procedures, 184 Transceivers, 184 Transponder types/surface, 181 Transponders, 184 Visual inspections, 182 LCD display, 10, 13 Line Replaceable Units, 1, 2, 44 Location, 62 211 HiPAP Logistics, 62 Long Base Line, 14 LRU, 1, 44 LRUs, 1, 2 M Main control panel Connectors, 86 Fuse, 85 LEDs, 85 Links, 85 Switches, 85 Technical details, 85 Test points, 85 Maintenance, 2, 27 POWEC power supply, 83 Connectors, 84 Fuse, 84 LEDs, 83 Links, 83 Switches, 83 Technical details, 83 Test points, 83 Power supply, 77 Pre --- commissioning, 5 Preventive maintenance, 27 Printer connector, 108 Project management, 4 Protection, 140 R Maintenance philosophy, 28 Radio Frequency interference, 101 Manual content, 1 Reception, 24 Maritime classification society, 61 Remote Control Unit, 10 Mechanical installation, 5 Replacement of APC 1x unit parts, 34 Motherboard, 71 Battery, 71 Replacement of transceiver unit parts, 44 MPT 319/, 181 Replacing circuit boards, 38 Replacing the HTC--- 10 LRUs, 51 MPT 331/DuB, 181 MPT 339, 181 MULBL, 1, 15 Multi--- User Long Base Line, 15 N Navigation, 24 O Opening the transceiver unit door, 44 Operator station configuration, 13 Original packing crate, 132 P PCB, 1 PCBs, 52 Physical protection, 101 212 Replacements, 28 Responder Terminal Block, 87 Board description, 87 Circuit description, 88 Connections, 89 Fuses, 88 LEDs, 88 Links, 88 Switches, 88 Test points, 88 Responder Terminl Block, 78 Responder trigger pulses, 87 ROV, 1 ROVs, 14 RPC board, 87 RS 422 Serial line cable, 104, 113 RS --- 232, 107 RS --- 422, 107 RTB, 1, 44, 46, 87 S SBC, 1 857-164055 / R Index SBC 400, 25, 95 Connectors, 95 SDP, 1 Securing and terminating the cables, 99 T Temperature protection, 141 Terminal Block Converter, 118 Serial I/O board, 94 Terminal Block Converter (TBC) --- diagram, 203 Serial lines, 107 TMC II, 91 Serial to Dual Net converter, 25, 56, 95 TMC II board replacement, 52 Serial to Dual Net converter SBC 400, 42 Shock and vibration, 133 Signal cable, 105 Signal cable to responder, 112 Simulations, 28 Software upgrade, 3, 30 Spare parts, 142 Acoustic Positioning Computer, 142 Display, 142 Keyboard, 142 Keyboard cable, 142 Stationary operator station, 142 Trackball, 142 Transceiver units, 143 Special tools, 31 SSBL, 1 SSLBL, 1 Stand alone APC 1x computer, 13 Standard 19” rack, 13 Standard tools, 31 Status LEDs for10BASE --- FL connector, 26 Status LEDs for10BASE --- T connector, 26 Supply conditions, 4 Switch settings, 96 APC 1x computer, 96 Display unit, 96 HTC--- 10, Digi board, 96 Synchronization line for Dual HiPAP, 119 System description, 7 System principles, 14 System units, 10 Systems overview, 7 857-164055 / R Tools, 31 Trackball, 10, 13, 19, 39, 66, 105 Traditional troubleshooting, 28 Transceiver memory control board, 91 Connectors, 93 LEDs, 92 Links, 92 Switches, 92 Test points, 93 Transceiver Unit, 10, 21, 53, 67 Backplanes, 42, 44 Connection diagrams, 110 Dust filters, 57 Dust filters types, 57 External connections, 21 Fan rack, 42, 44 Fuse locations, 53 Heater, 42 HTC--- 10 computer, 78, 90 LEDs indicating operating status, 43 Main control panel, 42, 44, 78 POWEC power supply, 42, 44 Power initialization, 22 Power supply, 78 Power terminal blocks, 42 Relay, 42 Removing a transmitter/receiver board, 45 Removing the backplane, 48 Removing the main control panel, 46 Removing the POWEC power supply, 47 Removing the responder terminal block, 46 Replacement of circuit boards, 45 Replacement of units, 46 Replacing a fan unit, 50 Replacing a transmitter/receiver board, 45 Replacing fuses, 53 Replacing the backplane, 49 Replacing the main control panel, 47 Replacing the POWEC power supply, 47 Replacing theresponder terminal block, 46 Responder Terminal Block, 42, 44 Serial to Dual Net converter SBC 400, 78 Signal output terminal block, 42 Terminal Block Converter link setting, 118 213 HiPAP Transceiver Controller, 42 Transceiver Memory Control, 42 Transceiver memory control board, 78 Transmitter/receiver board, 79 Transceiver unit --- circuit boards and units, 78 Transceiver Unit cables, 112 Transceiver Unit description, 21 Transceiver unit door with cooling unit, 199 Transceiver Unit installation, 61 Procedure, 62 Transceiver unit interconnections, 114 Transceiver unit internal layout, 41 Transceiver Unit options, 25 Transceiver unit principles, 23 Transceiver Unit specification Cooling unit, 68 Environment, 68 Operating temperature, 67 Power, 67 Unit dimensions, 67 Transceiver/receiver board Connectors, 82 LEDs, 81 Links, 81 Reception, 80 Switches, 81 Technical details, 80 Test points, 81 Transmission, 80 Transducer cable, 113 Transducer cable connections, 110 Transmission, 24 Transmitter/receiver board, 78 TRB, 79 TRBs, 41, 44 Telemetry, 15 TTL to RS422 converter, 20 Verification, 29 VGA to display connector, 108 U Upgrade to HiPAP 500, 9 V Ventilation, 61 214 857-164055 / R Index 857-164055 / R 215 HiPAP Instruction Manual HiPAP Instruction Manual HiPAP Instruction Manual HiPAP Instruction Manual HiPAP Instruction Manual HiPAP Instruction Manual