1
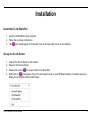
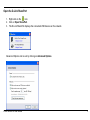
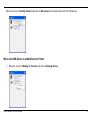
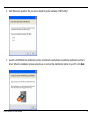
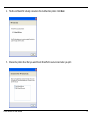
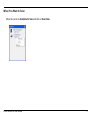
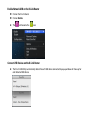
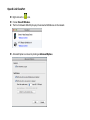
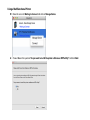
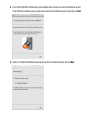
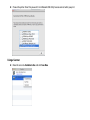
Table of Contents D-Link SharePort™..........................................................................................................................................................3 Introduction...................................................................................................................................................................3 System Requirements .................................................................................................................................................3 Installation........................................................................................................................................................................4 Install the D-Link SharePort .........................................................................................................................................4 Set up the D-Link Router .............................................................................................................................................4 Enable Network USB on the D-Link Router..................................................................................................................5 Connect USB Devices to the D-Link Router ................................................................................................................5 Open the D-Link SharePort .........................................................................................................................................6 Virtually Connect and Disconnect a USB Device ........................................................................................................7 When the USB Device is a Multifunction Printer..........................................................................................................8 When You Want to Scan ...........................................................................................................................................11 D-Link SharePort User Manual 2 D-Link SharePort™ Introduction The D-Link SharePort™ allows you to share USB devices such as external storage drives and multifunction printers with other users across your network by simply connecting the device to select D-Link routers. This allows you to use an external storage drive or printer located across your network as if it were connected to your local PC. System Requirements ® ® Windows 2000/2003/XP/Vista/7 32-bit/64-bit Pentium 3 800MHz or better 256MB RAM or higher CD-ROM drive A compatible D-Link router D-Link SharePort User Manual 3 Installation Install the D-Link SharePort 1. Insert the CD-ROM into your computer. 2. Follow the on-screen instructions. 3. The icon should appear in the System Tray at the lower-right corner on the desktop. Set up the D-Link Router 1. Connect the D-Link Router to the network. 2. Power on the D-Link Router. 3. Double-click on the icon to open the D-Link SharePort. 4. Right-click on in the System Tray at the lower-right corner on your Windows Desktop. A window pops up to display the IP address of the D-Link Router. D-Link SharePort User Manual 4 Enable Network USB on the D-Link Router 1. Click on the D-Link Router. 2. Click on Enable. 3. The icon in the Windows System Tray should change to a icon. Connect USB Devices to the D-Link Router The D-Link SharePort automatically detects for each connected USB device. A window will pop up for each detected USB device. D-Link SharePort User Manual 5 Open the D-Link SharePort 1. Right-click on the icon. 2. Click on Open SharePort. 3. The D-Link SharePort displays the connected USB devices on the network. Advanced Options can be set by clicking on Advanced Options. D-Link SharePort User Manual 6 Virtually Connect and Disconnect a USB Device Move the cursor to Waiting to Connect and click on Connect to virtually connect a USB device. The D-Link SharePort displays which user is virtually connecting this USB device. D-Link SharePort User Manual 7 Move the cursor to Use By (Owner) and click on Disconnect to virtually disconnect the USB device. When the USB Device is a Multifunction Printer 1. Move the cursor to Waiting to Connect and click on Manage Device. D-Link SharePort User Manual 8 2. Click Yes on the question “Do you want to install the printer software or MFP utility?” 3. Insert the CD-ROM of the multifunction printer and follow the instructions to install the multifunction printer’s driver. When the installation process prompts you to connect the multifunction printer to your PC, click Next. D-Link SharePort User Manual 9 4. The D-Link SharePort virtually connects to this multifunction printer. Click Next. 5. Choose the printer driver that you want D-Link SharePort to auto-connect when you print. D-Link SharePort User Manual 10 When You Want to Scan Move the cursor to Available for Use and click on Scan Now. D-Link SharePort User Manual 11 Version 1.0 | 11/06/2012 User Manual SharePort Manual for MAC D-Link SharePort.......................................................................................................................................................................................................... 3 System Requirement ..................................................................................................................................................................................... 3 Installation and Guide............................................................................................................................................................................................... 4 Install .................................................................................................................................................................................................................. 4 Setup .................................................................................................................................................................................................................. 4 Enable Network USB on the D-Link Router ............................................................................................................................................ 5 Connect USB Devices on the D-Link Router ........................................................................................................................................... 5 Open D-Link SharePort ................................................................................................................................................................................. 6 Virtual Connect and Disconnect ................................................................................................................................................................ 7 Using a Multifunctional Printer .................................................................................................................................................................. 8 Using a Scanner ............................................................................................................................................................................................ 10 D-Link SharePort System Requirement Mac 10.5, 10.6, 10.7, 10.8 256MB RAM or higher CD-ROM drive Installation and Guide Install Insert the CD-ROM into your computer Follow the on-screen instructions The icon should appear in the System Tray at dock on the desktop. Setup Connect the D-Link Router to the network. Power on the D-Link Router. Wait till your Mac got IP from the D-Link Router Click on the Right-click on icon to open the D-Link Network USB Utility at dock on the desktop. A window below would pop up to display the D-Link Router. Enable Network USB on the D-Link Router Click on the D-Link Router. Click on Enable. The will become the icon. Connect USB Devices on the D-Link Router The D-Link USB Utility automatically detects fro each USB device connected. A pop up window will show up for each detected USB device. Open D-Link SharePort Right click on the icon. Click on Show All Windows. The D-Link Network USB Utility displays the connected USB devices on the network. Advanced Options can be set by clicking on Advanced Options. Virtual Connect and Disconnect Move the cursor to Waiting to Connect and click on Connect to virtually connect a USB device. The D-Link Network USB Utility displays which user is virtually connecting this USB device. You can then move the cursor to In Use By (Owner) and click Disconnect to virtually disconnect the USB device. Using a Multifunctional Printer Move the cursor to Waiting to Connect and click on Manage Device. Choose Yes on the question “Do you want to install the printer software or MFP utility?” and click Next Insert the CD-ROM of the multifunction printer and follow the instructions to install the multifunction printer’s driver. When the installation process prompts you to connect the multifunction printer to your Mac, click Next. Use the D-Link Network USB Utility to virtually connect to this multifunction printer then click Next. Choose the printer driver that you want D-Link Network USB Utility to auto-connect when you print. Using a Scanner Move the cursor to Available to Use and click Scan Now