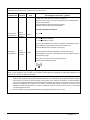
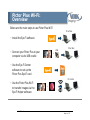
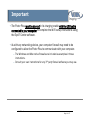
1
USER’S MANUAL Volk Pictor Plus Digital Imaging Device This sales package includes: Pictor Plus camera with optics lenses and accessories: Model: Retina Module (VP2RET) Anterior Module (VP2ANT) Imaging handset (VP2HAND) Cradle (VPCRADLE) Description: module for eye fundus imaging module for exterior ophthalmic imaging handset for general imaging for data transmission and battery charging Accessories Eye cup, quick user guide --------------------------------------------------------------USB cord Power unit In addition the sales case includes: - Cleaning cloth - User manual - Batteries The following accessory can be purchased separately: - Pictor Plus Slit Lamp Adapter (VP2SLM) that enables the camera to be used as stationary imaging tool. IM-071 Rev C Page 2 of 77 Quick start guide WHAT TO DO BEFORE THE FIRST USE: 1. Remove Volk Optical Pictor Plus from the sales package and check that all parts are undamaged. 2. Install Battery as instructed in Appendix B, page 42 of this manual. 3. Place Cradle on a desk next to the PC (Personal Computer). 4. Connect the other end of the USB-cable to the PC. 5. Connect power unit to the wall plug (mains) 6. Place Pictor Plus on the cradle. Battery starts to charge. Charge battery for four hours before the first use. When device is not used, it may be stored in the Cradle. IM-071 Rev C Page 3 of 77 Table of contents Quick start guide .................................................................................................................................... 3 Table of contents ................................................................................................................................... 4 1. Indications for use .......................................................................................................................... 5 2. Contraindications for use of the eye optics Retina module VP2RET and the eye optics Anterior module VP2ANT ............................................................................................................... 6 3. Warnings and cautions ................................................................................................................... 7 4. Important symbols ......................................................................................................................... 8 5. Parts of the device .......................................................................................................................... 9 6. Usage environment requirements ............................................................................................... 12 7. Operating instructions.................................................................................................................. 13 7.1. Preparations ......................................................................................................................... 13 7.2. Connection to a PC ............................................................................................................... 13 7.3. Basic use – starting up, shutting down and taking an image ............................................... 13 7.4. Attaching and detaching optics module .............................................................................. 14 7.5. Device Menu ........................................................................................................................ 15 7.6. Adjusting focus and automatic focus ................................................................................... 17 7.7. Patient Information Editor ................................................................................................... 18 7.8. Reset button ......................................................................................................................... 21 8. Retinal imaging using optics module VP2RET .............................................................................. 22 9. Eye imaging using anterior ophthalmic module VP2ANT ............................................................ 26 10. General imaging without optics module ...................................................................................... 29 11. Error messages ............................................................................................................................. 31 12. Cleaning instructions .................................................................................................................... 32 13. Device maintenance ..................................................................................................................... 33 14. Technical description.................................................................................................................... 34 15. Warranty....................................................................................................................................... 38 Appendixes: Appendix A: Electromagnetic compatibility information Appendix B: Battery replacement Appendix C: Wi-Fi Setup IM-071 Rev C Page 4 of 77 1. Indications for use Pictor Plus is a medical digital camera that is used with dedicated optics lenses intended to take images of the eye fundus, and surface of the eye. Supported optics lenses and their intended uses are: Component: VP2RET VP2ANT IM-071 Rev C Description: Module for fundus imaging. The Pictor Plus VP2HAND digital camera with VP2RET Optics module is intended to capture digital images and video of the fundus of the human eye. Module for exterior ophthalmic imaging. The Pictor Plus VP2HAND digital camera with VP2ANT Optics module is intended to capture images and video of the surface of the human eye and surrounding areas. Page 5 of 77 2. Contraindications for use of the eye optics Retina module VP2RET and the eye optics Anterior module VP2ANT Because prolonged intense light exposure can damage the retina, the use of the device for ocular examination should not be unnecessarily prolonged, and the brightness setting should not exceed what is needed to provide clear visualization of the target structures. The retinal exposure dose for a photochemical hazard is a product of the radiance and the exposure time. If the value of radiance were reduced in half, twice the time would be needed to reach the maximum exposure limit. While no acute optical radiation hazards have been identified for direct or indirect ophthalmoscopes, it is recommended that the intensity of light directed into the patient's eye be limited to the minimum level which is necessary for diagnosis. Infants, aphakes and persons with diseased eyes will be at greater risk. The risk may also be increased if the person being examined has had any exposure with the same instrument or any other ophthalmic instrument using a visible light source during the previous 24 hours. This will apply particularly if the eye has been exposed to retinal photography. Pictor Plus VP2RET and VP2ANT are classified as Class 2 based on standard ISO 15004-2:2007. The daily usage time and maximum allowed number of pulses is calculated based on optical classification results according to standard ISO15004-2:2007 CAUTION: “The light emitted from this instrument is potentially hazardous. The longer the duration of exposure and the greater the number of pulses, the greater the risk of ocular damage. Exposure to light from this instrument when operated at maximum output will exceed the safety guideline after: Maximum number of pulses (still images) allowed daily: - EY4: 6326 pulses (still images) / eye ES2: 575 pulses (still images) / eye The daily video usage time shall be limited to: - IM-071 Rev C EY4: 1 h 30 min video / eye ES2: 8 min video / eye Page 6 of 77 3. Warnings and cautions Use only accessories and battery provided by Volk Optical with this product. Place PC and cradle outside the patient environment (at least 4 feet distance from the patient). Connection between camera and workstation is USB and/or WIFI. Any authorization procedures should be carried out in workstation. Images and videos can be copied from camera to workstation via USB and/or WIFI and then viewed in workstation. USB write protection is on by default. When protection is on this feature will prevent writing to camera memory card from PC when connected to the cradle. In case device has WIFI functionality, USB write protection must be turned off. No modification of this equipment is allowed. IM-071 Rev C Page 7 of 77 4. Important symbols Symbol 0086 Description The CE mark on this product indicates it has been tested and conforms to the provisions noted within the 93/42/EEC Medical Device Directive. CE mark with notified body identification number indicates a class IIa product. Read accompanying user documentation indicates that important operating instructions are included in this User’s and Maintenance Manual. Failure to follow these instructions could place the patient or operator at risk. Indicates the need for the user to consult the instructions for use for important cautionary information such as warnings and precautions that cannot, for a variety of reasons, be presented on the device itself. Type BF applied parts. Applied part is a part of Pictor Plus that in normal use necessarily comes into physical contact with the patient. Charger polarity symbol, voltage and power 9V, 1.1 A The symbol indicating separate collection for Waste Electric and Electrical Equipment per Directive 2002/96/EC The symbol indicating that the device is capable of wireless data communication based on the 802.11 IEEE network standard. Sticker at the front of the device indicating Volk Optical’s address, integrated general imaging optics focal length and F-number. IM-071 Rev C Page 8 of 77 5. Parts of the device IM-071 Rev C Page 9 of 77 Cradle: IM-071 Rev C Page 10 of 77 Soft key indicators: Position Indicator Left soft key Purpose To power on the device To power off the device, with long press Right soft key Open menu with long press LED indicators: The recharging and connection to PC is indicated with green (charging) and blue (connection) LED-lights: Position Indicator Purpose Left LED-indicator Green Active when device is powered on, blinking when charging in cradle. Right LED-indicator Blue Active when device is placed to the cradle and connected to a PC. Graphical indicators: These indicators are displayed on the top row of the display during imaging: IM-071 Rev C Page 11 of 77 6. Usage environment requirements CAUTION: Pictor Plus is not suitable for use in the presence of flammable anaesthetics. Pictor Plus is intended to be used inside in a normal room temperature and normal humidity. Do not use Pictor Plus in an environment where there is possibility that water condenses to or inside the Pictor Plus. Type of power source is indicated in Chapter 16, Technical description. CAUTION: It is only allowed to attach USB cable and Power source provided in the sales package into the cradle. If you need replacement to the USB cable or Power source please contact Manufacturer or your own Retailer. USB Cable must be connected only to the USB port of a PC computer that complies with the IEC 60950 standard. Avoid using excessive power or twisting the connector when connecting the USB cord to a PC. Place PC and cradle outside the patient environment (at least 4 feet distance from the patient). To transfer patient image data the device must be used together with a PC (Personal Computer) running either Microsoft Windows XP®, Window Vista®, Windows 7®. The device does not need any drivers to be installed on a PC. Writing to the SD card from a PC is not enabled. Device can be used with all major patient database applications supporting both textual and image data recording. The device must be used according to this manual, quick reference guide and / or information found on Volk Optical’s website http://www.volk.com Electromagnetic compatibility information and recommended separation distances between portable and mobile RF communications equipment and the Volk Optical Pictor Plus are given in Appendix A. IM-071 Rev C Page 12 of 77 7. Operating instructions This chapter gives instructions for using the device. More specific instructions for using optics lenses are given in the optics lens specific chapters. 7.1. Preparations Pictor Plus is both charged and connected to a PC (Personal Computer) using the provided cradle. When Pictor Plus is not used, it may be stored in the cradle. Storing the device in the cradle is not harmful for the battery, because the battery is charged only when the charge has dropped below a certain limit. To connect Pictor Plus to the cradle gently place it into the connector hole. The device can be connected to the cradle with optics attached. 7.2. Connection to a PC Image data transfer method to a PC is similar as with a digital camera. When connected to a PC running Microsoft Windows XP, Vista or 7, the operating system displays query for AutoPlay. It is possible to select appropriate image viewing program or simply open the folder to view and then store files to the hard disk of the PC. Writing to the SD card from a PC is not enabled. 7.3. Basic use – starting up, shutting down and taking an image Device is powered on by pressing left soft key. Device offers possibility to edit the current patient information. It is possible to capture both still images and video. Image capture mode is changed from camera menu that opens by pressing right soft key for 1s. Still image is captured using the dual action shutter to the second position. Video is captured by keeping the dual action shutter pressed down in the second position. Taken image will stay on display until it is cleared by pressing right or left soft key. Image can be zoomed in instant preview by pressing middle key. There are four zoom levels. Pressing middle key activates the next level. Move around the image by using arrow keys. To transfer images to a PC, place device to the cradle. The image transfer and charging is indicated with green and blue LED-lights and text on LCD-screen. Pictor Plus verifies if image data is erased when: Device is powered on from power off mode or power save mode Device is removed from the cradle It is recommended that image data storage is always erased with a new patient. Device is powered off by keeping left soft key pressed down over 1 second. IM-071 Rev C Page 13 of 77 7.4. Attaching and detaching optics module CAUTION: Optic modules used with Volk Optical Pictor Plus must include text “PICTOR PLUS” or “PICTOR”. It is not allowed to attach other objects to the bayonet connector. Optics are attached by placing it in front of the bayonet area of the device. Three bayonet legs are placed on the holes and optics is pressed firmly to the device. Optics are released by sliding release button that is located in front of the device above the dual action shutter. IM-071 Rev C Page 14 of 77 7.5. Device Menu Menu is opened by pressing right soft key for 1s. Menu has six tabs. One is for device settings such as language selection. There is one tab for retinal imaging (RET), anterior eye imaging (ANT), and general imaging (DF). Arrow keys are used to move between tabs: use arrow key up until tab is active and use left and right arrow keys to change active tab. Light blue color indicates active tab. Arrow keys change values in the menu. Active value is indicated with light blue color. Changed values are saved by using left soft key (“Ok”) and cancelled by pressing right soft key (“Cancel”). Some values are confirmed by pressing the Middle key. Table below includes explanations of the Device settings tab: Setting Values (default bolded) Purpose Preview images New patient folder Ok Ok Erase image memory Ok Display brightness Icons Low-Med-High On/Off To preview the images on camera press middle button. To create a new patient folder press middle button. New patient folder can also be created in live view by long pressing the middle key. Select middle button to erase images and videos from camera SD card. Use left and right arrow keys to adjust display brightness Show graphical icons when imaging. Sounds Keyboard backlight Select language On/Off On/Off ENG-FIN-FRA-GER-ITAJPN-POR-SPA-ZHO On/Off USB write protection Video file format Image transfer method Restore factory Setting Date MPEG4/MPEG1 UMS/WIA Time HH:MM Camera SW version Start query Show camera SW version Era./Fol./None Set data cable type Remote trigger CRA/SLI On/Off IM-071 Rev C Ok DD-MM-YYYY When enabled, sound is played during image capture When enabled, keyboard illumination is on Use left and right arrow keys to select camera language When enabled, writing to SD card is not allowed when device is in cradle. This feature helps prevent any viruses getting from PC to the camera. Use left and right arrow keys to select video file format Use WIA for automatic and UMS for end-user activated image transfer. UMS can be used in most cases. To restore all settings menus to factory defaults. Activate using the middle key Use left and right arrow keys to set date. Use Middle key to select next field Use left and right arrow keys to set time. Use Middle key to select next field Browse version information with left and right arrow key Choose the startup query between memory erase, new patient folder or no query at all. This feature is currently not available This feature is currently not available Page 15 of 77 Preview images Image preview is opened by selecting “Preview files” with a middle key. Images are browsed by using arrow keys. Display gives information about usage of the image preview. Image can be zoomed while previewing by pressing middle key. Move around the image by pressing arrow keys. Change between the four zoom levels by pressing middle key. Patient ID information can be edited in image browser. New Patient Folder A new patient folder is created by pressing middle key when the New patient folder selection is active in Device menu. A new patient folder can also be created by pressing Middle key for 3 seconds when in live view. If the current patient folder is empty a new folder cannot be created. Patient ID information can be edited after creating new patient folder. Erase Image Memory Image memory can be erased by selecting “Erase Image Memory” in Device menu. This selection is activated by pressing middle key. The camera also prompts the question “Erase image memory?” when camera is powered on or removed from cradle. Display brightness The Display brightness selection has three options: low, medium and high. Choose the suitable level of display brightness according to for example how the examination room is lit up. Icons The icons shown on camera screen can be enabled or disabled to the user’s liking. The most essential icons such as Menu icon are always visible. Sounds By default the camera makes a sound during image capture. This sound can be turned off from Device menu. Keyboard backlight By default the camera keys have a backlight lit up when the camera is turned on. This light can be turned off from Device menu if it disturbs the user while taking images. Language The camera has nine different languages the user can choose from. Default language is English and the language selection is always shown in English in menu. USB write protection USB write protection is recommended to be turned on by user. When protection is on this feature will prevent any virus from entering the camera from a PC when connected to the cradle. Video file format The camera has two file formats that user can choose for videos: MPEG4 and MPEG1. MPEG4 is a higher quality file format but may not be viewed with all video players. MPEG1 format is more widely supported by different SW applications. Image transfer method There are two options for the image transfer method: UMS (USB Mass Storage) or WIA (Windows Image Acquisition). IM-071 Rev C Page 16 of 77 Restore factory settings By selecting “Activate” in Device menu “Restore factory defaults” selection the original factory settings will be returned. Date Date can be set using the left and right arrow keys. Move between day, month and year by pressing the middle key. Date format is DD MM YYYY for Finnish, German, French, Italian, Spanish, and Portuguese. Format is MM DD YYYY for Japanese. Time Time can be set using the left and right arrow keys. Move between hours and minutes by pressing the middle key. Camera SW version This item in Device menu tells the camera SW version. Start query User can choose start-up query between erasing images, creating new patient folder or no query at all. When erasing images is chosen as the query the camera will prompt user on start-up whether all images and videos shall be deleted. When new patient folder query is chosen the camera will ask if a new patient folder shall be created upon start-up to prevent from mixing images with previous patient. If no query is selected then camera will go directly to live view upon start-up. 7.6. Adjusting focus and automatic focus The camera has an autofocus function where camera finds correct focus place automatically. Automatic focusing start when shutter is pressed half way down (icon at the top right corner of the display shows icon “A”). The focus mode (Auto / Manual / AF Assist) can be changed by pressing right soft key. Image focus can be adjusted manually by pressing arrow keys up and down. When focus mode is set to manual and Retina optics is attached a dioptre scale is visible on the screen. IM-071 Rev C Page 17 of 77 7.7. Patient Information Editor What Is Patient Information Entry? The Pictor Plus has a feature that allows entry and editing of patient information (e.g., patient name, ID number or other identifier information). The patient information can contain a maximum of 32 characters, including letters (upper or lower case), numbers and some special characters: ( ) , . : - _ @ / and space. Which patient eye being imaged – left or right – can also be set. Additionally, they type of image saved (IR illuminated, normal color, red-free or color corrected) is also saved automatically. IR illuminated = IR Normal color = Co Red-free = RF Color corrected = CC Where Is The Patient Information Saved? The patient information is saved as part of the jpeg image file in two different locations: Location 1: the Exif data field (Exif = exchangeable image file format) o The Exif data field is embedded inside the jpeg image file. It can be accessed using typical EMR software that is set up to read the Exif field or by using Exif viewing software (e.g., Exif Pilot). o For example, if “John Doe 123” were entered for the patient information, then the Exif field would contain: Patient ID:John Doe 123 o If the Left setting were selected for John Doe, then the Exif field would also contain: Side:Left o If the particular image for John Doe were a color corrected image, then the Exif field would also contain: Image type:CC o IM-071 Rev C The entire Exif data field would be: Patient ID:John Doe 123,Side:Left,Image type:CC Location 2: the jpeg filename o The jpeg filename has 8 characters with a “.jpg” extension. o The first 3 characters of the jpeg filename are reserved for the first 3 characters of the patient information. If the Patient Information is shorter than 3 characters, the remaining characters are defaulted to underscore marks: _ o The last character of the jpeg filename is reserved for the type of image: IR illuminated = I Normal color = N Red-free = R Color corrected = C o The middle 4 characters are reserved as a counter for the number of images taken: 0000 to 9999, then rolling over to 0000 again. o For example, if “John Doe 123” were entered for the patient information as per the above example, then the jpeg filename would be: JOHxxxxC.JPG Page 18 of 77 How Is Patient Information Entered? Patient information is entered in the Patient Information screen. The Patient Information screen allows setting of which eye will be imaged (left or right). It also allows access to the Patient Information editing screen. The current Patient Information entered will be displayed to the right of the Patient ID icon. The default value is “ABC12345.” Selecting patient side: left or right o In the Patient Information entry screen, use the arrow keys to navigate to the Patient Side icon. o Select the Patient Side icon using the middle key. o Use the left or right arrow keys OR the middle key to toggle between the Left or Right side icons. o Use the up or down arrow keys to navigate out of the Patient Side setting, which saves your selection. Editing the Patient Information o Use the up and down arrows to navigate to the Patient ID icon, and select it using the middle key. This will open the Patient Information editor screen. o The Patient Information editor screen includes a simple, on-screen keyboard in ABC123 order, as well as the special characters mentioned above. It also includes a white editing field at the top of the screen. The 4 arrow keys are used to navigate to the desired character or up to the white editing field. The middle key is used to select that character, which will then appear at the top of the Patient Information editor screen in the editing field. o Toggle between upper or lower case characters by using the left soft key below the A / a icon. o Exit the editor screen by using the right soft key below the Exit icon. This saves the entered Patient Information. o To delete a character: Arrow up to the white editor field at the top of the screen. Use the left or right arrow keys to navigate the blinking cursor to the position AT THE IMMEDIATE RIGHT of the character you want to delete. Press the middle button to delete the character. In the Patient Information screen: Use the left soft key under the OK icon to save the Patient Information settings and exit the Patient Information screen, OR Use the right soft key under the Cancel icon to discard any changes and exit the Patient Information screen. How To Access The Patient Information Screen When powering on the Pictor Plus: When the Pictor Plus starts up after being powered on or being removed from its charging cradle, it automatically presents an option to “Edit current patient information?” in the startup screen. o Select Yes (left soft button) to proceed to the Patient Information entry screen. o Select No (right soft button) to proceed to the live view screen. IM-071 Rev C Page 19 of 77 This will set the Patient Information for the next images taken. When in the camera live view screen, using the Menu button (right soft key, long press): Use the right soft key (long press) to access the Menu screen Under the Device tab, the Patient Information entry screen can be accessed from either the Preview images icon or the New patient folder icon. From the Preview images icon, you can use the Patient Information entry screen to edit Patient Information on images you have already taken. You can edit Patient Information for ALL of the images in a selected folder, OR You can edit Patient Information for a single, selected image file. o o o Arrow to the Preview images icon and select with the middle key to access the Image Browser screen. In the Image Browser screen, use the arrow keys to navigate to a specific folder or a specific image file. When only a folder is selected, the folder name will be highlighted with white text (the filenames will be dark). When an image file is selected, that filename AND its folder name will be highlighted with white text. When your selected folder or image file is highlighted, press the right soft key under the Edit icon to access the Patient Information entry screen and edit the Patient Information per the above instructions. REMEMBER: IF YOU ARE EDITING PATIENT INFORMATION FOR A FOLDER, ALL OF THE IMAGE FILES IN THAT FOLDER WILL BE CHANGED TO THE NEW PATIENT INFORMATION. IF YOU ARE EDITING A SINGLE IMAGE FILE, ONLY THAT IMAGE FILE WILL BE CHANGED TO THE NEW PATIENT INFORMATION From the New patient folder icon, you can use the Patient Information entry screen to set Patient Information for images that you are going to take next. o o o IM-071 Rev C Arrow to the New patient folder icon and select with the middle key. The device will prompt “Create a new patient folder for new patient images?” Select Yes (left soft key) if you also wish to create a new patient folder in which to save your next images. Select No (right soft key) if you do not want a new patient folder. Next, the device will prompt “Edit current patient information?” Select Yes (left soft key) to enter the Patient Information entry screen. Proceed to edit Patient Information per the above instructions. Your next images will have the new Patient Information. Select No (right soft key) to return to the Device tab without editing Patient Information. Page 20 of 77 7.8. Reset button Reset button can be used if device behavior is abnormal. Reset button is located in a small opening under display. Button is marked with circle . Reset button can be pressed with a thin object such as a paper clip. Button needs to be pressed for over 7 seconds. IM-071 Rev C Page 21 of 77 8. Retinal imaging using optics module VP2RET Pictor Plus Retina digital ophthalmic camera is intended to capture digital images and video of the fundus of the human eye. The device set for retinal imaging consists of: Camera handset Attachable ophthalmic lens Retina Eye cup for Retina Cradle for charging and image transfer Pictor Plus Retina is intended for non-mydriatic imaging. This means that infrared is used for targeting image to the eye fundus and visible light is flashed when image is taken. Pupil does not respond to the infrared light so examination is convenient for the patient. Constant illumination can be selected from device menu if mydriatic drops are used. Pictures can also be taken using infrared light for both aiming and capturing. Pictor Plus Retina has 9 internal fixation targets for the patient to fixate at while imaging. Below section will guide how to control the fixation lights. STEPS FOR RETINAL IMAGING: 1. The examination room should be as dark as possible. 2. Recommended that both the patient and the examiner should be seated while taking the images. 3. Either autofocus or manual focus can be used. Autofocus range is -11 to +3 diopters, manual focus range is -20 to +20 diopters. If patient has a refractive error and autofocus is off, focus need to be adjusted: Hyperopia: camera is focused to distance by pressing arrow key up. One click of the key is approximately 1 Dioptre. Myopia: camera is focused closer by pressing arrow key down. One click of the key is approximately 1 Dioptre. 4. Aiming light is automatically turned on when camera enters live view. 5. The middle fixation target is lit when pressing left soft key and it provides a macula centred image. To change the fixation target press Left Soft Key and use arrow keys to navigate between the 9 targets as shown in the graphics in lower left corner of the display. If fixation target is turned off ask patient to look at a target in a wall 6-9 feet (2-3 meters) behind the operator. 6. Light is adjusted using left and right arrow key. There are altogether 10 brightness levels. Default value is 5. Suitable illumination is typically 2 to 8. When using IR/White capture mode changing illumination brightness affects only the white capturing flash. If using IR/IR or White/White both aiming and capturing light are changed. 7. Aim help circle on the screen guides user when to take image. When retina is not fully in view the circle is red. Once the aim is good and retina fully appears on screen the circle turns green indicating a IM-071 Rev C Page 22 of 77 good moment for capturing the image. 8. Approaching the eye is started from 4 inch (10 centimeters) distance. If internal fixation target is not used patient is asked to look at a target in a wall 6-9 feet (2-3 meters) behind the operator (patient’s eye targets to infinity and stays still). Pupil is approached until the reflection from the eye fundus can be seen. The right imaging distance is about 0.8 inch (2 cm). Eye cup must be compressed approximately half way down. Aim help circle on the display guides to take image once it turns from red to green. Camera is stabilised by keeping the outer side of the hand against the patient’s forehead. Example of the correct usage position is shown below: 9. Still image is captured by pressing the shutter key all the way down. Video is captured by keeping shutter down. Taken image is displayed on screen until user clears the image by pressing shutter, left or right soft key. Image can be zoomed in instant preview by pressing middle key. There are four zoom levels. Pressing middle key activates the next level. Move around the image by using arrow keys. 10. If multiple patients are examined during one session, a new file folder is created for each patient by pressing middle key for over 3 seconds. 11. Transfer images to a PC after capturing images. Images are transferred to the PC when camera is placed to the cradle. Pictor Plus works as any other digital camera. 12. To erase the image/video manually, choose Menu, then Preview Images. There will be an option to erase a specific image or a specific folder. 13. When the camera is removed from the cradle it verifies image data storage erase. It is recommended that image data storage is always erased before images are captured of a new patient. IM-071 Rev C Page 23 of 77 The camera keys function as shown in image below when Pictor Plus Retina optics module is attached: Below table provides explanations for the key functions: Key Press Short Function Control Fixation target level and selection Left soft key Long Power On / Off Manual / Auto Short is -11 to +3 diopters, manual focus range is -20 to +20 diopters. Right soft key Long Open Menu New patient folder Middle key Long Change brightness Left/Right arrow - Select fixation target Focus manually Up/Down arrow Select fixation target IM-071 Rev C Explanation Fixation target is off by default and can be turned on by pressing left soft key. Fixation target light has two levels: Low and High. If the patient cannot see the light on low level turn it up to high. Camera is powered on and off by pressing the Left soft key for longer than 2s. Switch between focus modes by pressing Right soft key. Manual focus is on by default. Autofocus range Enter camera menu by pressing Right soft key for longer than 1s. If multiple patients are examined during a same session, it is recommended to create a new file folder for each patient’s images. New folder is created by pressing middle key for 3 seconds. Icon P at the top of the screen indicates number of the current patient folder. If the current folder does not have any images in it, a new folder cannot be created. Use left and right arrow keys to adjust capture light brightness. Icon above left soft key must be selected (lighter color) to change brightness. Move between 9 internal fixation targets. Icon above left soft key turns to lighter color when fixation target selection mode is active. When manual focus is active use up and down arrow keys to focus. Press arrow key up when patient has myopia. Press arrow key down when patient has hyperopia. Move between 9 internal fixation targets. Icon above left soft key turns to lighter color when fixation target selection mode is active. Page 24 of 77 Table below includes explanations of the EY settings tab for retinal imaging: Setting Capture mode Values (default bolded) Still / Video Mark side IR brightness Red-free On/Off Low/High On/Off Save IR image On/Off Color correction On/Off Illumination mode IR/White, IR/IR, Wh/Wh Target blinking On / Off Purpose Use left and right arrow keys to choose between still capture and video capture. Mark side of the eye to the image data. Aiming light brightness Saves a copy of an eye image using green color channel only. Saves an image taken with IR light in addition to white light image when turned on. Saves a color corrected image in addition to normal fundus image. Use left and right arrow keys to select aiming and capture light source. Fixation target light can be set to constant if needed. Capture mode Both still images and video can be taken with the Pictor Plus camera. When taking video the shutter button must be held down while taking the video. The video recording will stop once the shutter button is released. Marking side It is possible to mark which eye was imaged. Marking side is enabled from the menu. When On side is marked to the file name and to the image. For video files, side is always marked only to the file name. When marking side is enabled, camera verifies side after each captured image. Identifiers used for eye images are OS for left and OD for right. IR brightness IR brightness can be set to high or low depending on the color of the retina. For dark eyes, use high IR brightness. Save Red-free If red-free image is enabled from menu, then camera will save a picture using only green channel at the same time when saving original picture. Save IR image If Save IR image is enabled from menu the camera will save an image taken with IR image in addition to saving a color image taken with white light. Color correction Turn color correction on when fundus is excessively red. The color correction provides a copy of the image with normalized white balance and brightness. It makes most interesting features better visible for bright red fundus. Illumination mode Illumination mode can be set to IR/Wh, IR/IR or Wh/Wh. In IR/Wh mode aiming is done using infrared light and image is captured using white light. The pupil does not react to infrared light and thus it is recommended to use IR/Wh mode whenever possible. In IR/IR mode both aiming and image capture are done with infrared light. In Wh/Wh mode aiming and image capture are done with white light Target blinking By default the fixation target light is on with blinking illumination. If patient cannot keep their eye targeted well the light can changed to constant to help focus on the target light. Camera stores selected menu settings when it is powered off. IM-071 Rev C Page 25 of 77 9. Eye imaging using anterior ophthalmic module VP2ANT Pictor Plus Anterior module VP2ANT is intended to capture images and video of the surface of the human eye and surrounding areas. The device set for anterior ophthalmic imaging consists of: Camera handset VP2HAND Attachable anterior ophthalmic lens Anterior VP2ANT Cradle for charging and image transfer Pictor Plus Anterior optics module has two light sources, white and cobalt blue light. User can choose between the light sources by pressing left soft key when Anterior module is attached. Cobalt blue light enables taking fluorescent pictures of the surface of the eye to reveal any cuts or defects. STEPS FOR EYE SURFACE IMAGING: 1. After Anterior optics module is attached the light source is chosen by pressing left soft key. 2. Still or video image is selected. Selection is made in ES menu. 3. It is recommended to use autofocus. 4. Aiming light is turned on by pressing the shutter key (in front of the device) half way down. 5. Light is adjusted using left and right arrow key. There are altogether 10 brightness levels. Default value is 5. Suitable illumination is typically 2 to 8. 6. Place the optics module cup on patient’s eye. Patient can be asked to look at different directions depending on what area of the eye needs to be captured. Camera is stabilised by keeping the outer side of the hand against the patient’s forehead. Example of the correct usage position is shown below: 7. Still image is captured by pressing the shutter key all the way down. Video is captured by keeping shutter down. Taken image is displayed on screen until user clears the image by pressing shutter, left or right soft key. Image can be zoomed in instant preview by pressing middle key. There are four zoom levels. Pressing middle key activates the next level. Move around the image by using arrow keys. 8. If multiple patients are examined during one session, a new file folder is created for each patient by pressing middle key for over 3 seconds. 9. Transfer images to a PC after capturing images. Images are transferred to the PC when camera is placed to the cradle. Pictor Plus works as any other digital camera. 10. Erase manually the image or video by choosing Menu – Preview images. The specific image or the specific folder can be chosen to be erased. 11. When the camera is removed from the cradle it verifies image data storage erase. It is recommended that image data storage is always erased before images are captured of a new patient. IM-071 Rev C Page 26 of 77 The camera keys function as shown in image below when Anterior optics module is attached: Below table provides explanations for the key functions: Key Press Short Function Edit focus window/ Activate Zoom Long Power On / Off Short Manual / Auto Long Open Menu Left soft key Right soft key White / Blue Short New patient folder Middle key Long - Change brightness Move AF window Left/Right arrow - Focus manually Zoom In / Out Up/Down arrow IM-071 Rev C Move AF window Explanation When focus window is visible it is possible to move it using arrow keys to better capture the wanted area. Digital zoom can be used for close up of features and image focus. Icon “Z” displayed in up right corner of display when active. Zoom value is saved to camera memory. Camera is powered on and off by pressing the Left soft key for longer than 2s. Switch between Auto and Manual focus by pressing Right soft key. Press Right soft key to activate zoom function. Enter camera menu by pressing Right soft key for longer than 1s. Choose between white and blue illumination by pressing left soft key. Blue light can be used with fluorescent applied on the eye to reveal any cuts or defects. If multiple patients are examined during a same session, it is recommended to create a new file folder for each patient’s images. New folder is created by pressing middle key for 3 seconds. Icon P at the top of the screen indicates number of the current patient folder. If the current folder does not have any images in it, a new folder cannot be created. Use left and right arrow keys to adjust capture light brightness. Move focus window left and right after pressing Middle key to activate. Window returns to original position when camera is put to cradle, turned off or optics module detached. Use up and down arrows to focus manually. Zoom in using arrow key up. Zoom out using arrow key down. There are four zoom levels: 1,2,4 and 6. Zoom value is saved to camera memory. Move focus window left and right after pressing Middle key to activate. Page 27 of 77 Table below includes explanations of the ES settings tab for anterior eye imaging: Setting Capture mode Values (default bolded) Still / Video Focus windows Visible/Hidden Shoot mode Normal / Auto Mark side Zoom cropping On/Off On/Off Purpose Use left and right arrow keys to choose between still capture and video capture. Use left and right arrow keys to choose between having focus window visible or hidden. In Auto mode camera takes picture automatically after focusing. In Normal mode user must press shutter button to second position to take picture after focusing. Mark side of the eye to the image data. When turned on camera will save the zoomed area only. When turned on camera will save the whole image area even when zoom is used. Capture mode Both still images and video can be taken with the Pictor Plus camera. When taking video the shutter button must be held down while taking the video. The video recording will stop once the shutter button is released. Focus Window Focus Window helps user position the image. The Focus Window can be moved on the screen by first pressing Middle key until icon “F” appears in up right corner of display and then using the arrow keys when aiming. Shoot mode Shoot mode function can be used when autofocus is enabled. There are two shoot modes to choose from: normal and auto. In normal mode the camera will focus when shutter button is pressed half way down and take a picture when shutter button is pressed all the way down. In auto mode when shutter button is pressed the camera will focus and take a picture automatically. Marking side It is possible to mark which eye was imaged. Marking side is enabled from the menu. When On side is marked to the file name and to the image. For video files, side is always marked only to the file name. When marking side is enabled, camera verifies side after each captured image. Identifiers used for eye images are OS for left and OD for right. Zoom cropping With zoom cropping on the camera will save the zoomed area instead of the whole image area. By default zoom cropping is turned off and camera will save the whole image area instead of the area that is visible on the camera screen when user has zoomed in. Camera stores selected menu settings when it is powered off. IM-071 Rev C Page 28 of 77 10. General imaging without optics module It is possible to take pictures using Pictor Plus without any optics module. When taking images without additional optics, integration time that corresponds to the brightness of the image is adjusted using left and right arrow key. Indicator for integration time is shown at the bottom of the display. Below picture shows the functions of camera keys when no optics is attached. Below table provides explanations for the key functions. Key Press Short Function Edit focus window/ Activate Zoom Long Power On / Off Short Auto / Manual focus Open Menu Still / Video Edit focus window/ Activate Zoom Left soft key Right soft key Middle key Left/Right arrow Up/Down arrow IM-071 Rev C Long Short Short Long New patient folder - Change brightness Move AF window - Focus manually Zoom In / Out - Move AF window Explanation When focus window is visible it is possible to move it using arrow keys to better capture the wanted area. Digital zoom can be used for close up of features and image focus. Icon “Z” displayed in up right corner of display when active. Camera is powered on and off by pressing the Left soft key for longer than 2s. Switch between Auto and Manual focus by pressing Right soft key. Enter camera menu by pressing Right soft key for longer than 1s. Choose between still image and video shooting by pressing left soft key. When focus window is visible it is possible to move it using arrow keys to better capture the wanted area. Digital zoom can be used for close up of features and image focus. Icon “Z” displayed in up right corner of display when active. If multiple patients are examined during a same session, it is recommended to create a new file folder for each patient’s images. New folder is created by pressing middle key for 3 seconds. Icon P at the top of the screen indicates number of the current patient folder. If the current folder does not have any images in it, a new folder cannot be created. Use left and right arrow keys to adjust capture light brightness. Move focus window left and right after pressing Middle key to activate. Window returns to original position when camera is put to cradle, turned off or optics module detached. Use up and down arrows to focus manually. Zoom in using arrow key up. Zoom out using arrow key down. There are four zoom levels: 1,2,4 and 6. Move focus window left and right after pressing Middle key to activate. Page 29 of 77 Table below includes explanations of the DF settings tab for general imaging: Setting Capture mode Values (default bolded) Still / Video Focus window Visible/Hidden Shoot mode Normal / Auto Zoom cropping On/Off Purpose Use left and right arrow keys to choose between still capture and video capture. Use left and right arrow keys to choose between having focus window visible or hidden. In Auto mode camera takes picture automatically after focusing. In Normal mode user must press shutter button to second position to take picture after focusing. When turned on camera will save the zoomed area only. When turned on camera will save the whole image area even when zoom is used. Capture mode Both still images and video can be taken with the Pictor Plus camera. Capture mode can be chosen in DF menu and left soft key when in live view. When taking video the shutter button must be held down while taking the video. The video recording will stop once the shutter button is released. Focus Window Focus Window helps user position the image. The Focus Window can be moved on the screen by first pressing Middle key until icon “F” appears in up right corner of display and then using the arrow keys when aiming. Shoot mode Shoot mode function can be used when autofocus is enabled. There are two shoot modes to choose from: normal and auto. In normal mode the camera will focus when shutter button is pressed half way down and take a picture when shutter button is pressed all the way down. In auto mode when shutter button is pressed the camera will focus and take a picture automatically. Zoom cropping With zoom cropping on the camera will save the zoomed area instead of the whole image area. By default zoom cropping is turned off and camera will save the whole image area instead of the area that is visible on the camera screen when user has zoomed in. Camera stores selected menu settings when it is powered off. IM-071 Rev C Page 30 of 77 11.Error messages The Pictor Plus will display error messages about the limitations of the usage. An Error message is always displayed with an explanatory message providing information about possible actions. List of the all possible error messages: Error message: What to do: Memory full Memory is full and you must empty memory card. Optics type not detected Optic failure # Please detach the optic and restart the camera. Reconnect optic lens. Contact maintenance if lens does not connect. Restart camera and reconnect optics lens. Contact maintenance if lens does not connect. The number after text “Optic failure” is an error code that can be needed by Optomed service team. Open battery cover and check the connection of SD / SDHC card. In case device has WIFI functionality contact Customer Service. Battery is either not well in place or has been damaged. Try to reattach battery or change it to a new one. Restart camera and reconnect optics lens. Image storage not found Battery error Light source temperature is too high IM-071 Rev C Page 31 of 77 12.Cleaning instructions Volk Optical Pictor Plus is a precision optics instrument that should be handled with care. Please note following cleaning instructions: Shut down device before cleaning it Remove cradle from mains before cleaning it Disinfect housing with soft cloth moistened with alcohol (e.g. 70% ethanol). Avoid touching System connectors in the handset and cradle. If acetone based product are used, wait for cleaning agent to dissolve before starting up the device or connecting cradle to the mains. Lenses may be cleaned with cleaning cloth. Also moist-cleaning tissue such as Hama Pro-Optic® cleaning tissue can be used. Volk Optical Pictor Plus is not intended to be sterilized. Clean Eye optics and Eye surface optics, eye cup, before each use on a new patient: disinfect eye cup with soft cloth moistened with alcohol (e.g. 70% ethyl alcohol), or soak eye cup in glutaraldehyde based solution, or hydrogen peroxide and peracetic acid solution such as Erisan OXY+ rinse the eye cup under running water dry the eye cup (e.g. with clean paper towel) before subsequent use If replacement for the eye cup is needed, please contact Volk Optical or your own retailer. Eye cup should be replaced if/when: the eye cup is discolored the eye cup form is deteriorated the eye cup is shattered, cracked or disintegrated CAUTION: Clean eye cup before each use on a new patient to avoid contamination. IM-071 Rev C Page 32 of 77 13. Device maintenance Pictor Plus contains a rechargeable Ni-MH battery pack. Service life of the battery is approximately 1-2 years. Battery needs to be replaced on planned intervals. When battery is at end of its service life, usage time of the device goes down. Appendix B gives instructions for battery replacement. There are no other maintenance procedures that can be carried out by the user. All servicing and repairs other than replacing the battery must be carried out by Volk Optical or Volk Optical certified service facilities and service personnel. Volk Optical will make available work instructions to repair those parts of medical electrical equipment that Volk Optical has designated as repairable by service personnel. CAUTION: If there are breaks in the device covers or other visual defects, contact Volk Optical or a Volk Optical certified service facility. IM-071 Rev C Page 33 of 77 14. Technical description CAMERA: Type: PICTOR Plus Handset (VP2HAND) Image sensor: Image memory type: CMOS, 5.0 Megapixels 2 GB, micro SD card. Display: 2.4'', TFT-LCD, 262 000 million colors, antireflective coating Image format: Video format: JPEG (file extension: jpg) MPEG-4 and MPEG-1 Connectivity: Operating systems: PC with USB port Windows XP®, Windows Vista®, Windows 7, Windows 8 No driver installation needed. Dimensions: Weight: 82,30(w) x166,50(h) x 66,50(d) mm 400 g Battery: Rechargeable Ni-MH Cylinder cell, HR4U 700 AAA, 4.8 V, 1.0 Ah User can change battery. Batteries provided by Volk Optical. Usage time: 1h 30min with full battery Operating systems: Windows XP, Windows Vista, Windows 7 CHARGING CRADLE: Type: PICTOR Plus Cradle (VPCRADLE) Dimensions: Weight: 170(w) x 35(h) x 150(d) mm 380 g Switching power supply connected to cradle: Type: CINCON TR10R090, Input: 100-240 V ~0.4A 47-63 Hz, Output: 9V, 1.1A, 10 W USB cable: Type A to mini B, high-speed, unshielded, length 1,8 m CAUTION: It is only allowed to attach Battery and Power source provided in the sales package into the Cradle. If you need replacement to the Battery or Power source, please contact Volk Optical or your own Retailer. IM-071 Rev C Page 34 of 77 NON-MYDRIATIC OPHTHALMIC MODULE VP2RET CONNECTED TO THE PICTOR PLUS HANDSET VP2HAND Type: Pictor Plus Retina (VP2RET) Intended use: Intended to capture digital images and video of the fundus of the human eye. Illumination: Infrared LED for targeting Visible white LED for photographing , 10 illumination brightness levels 9 red Internal fixation target LEDs Maximum Luminance output level towards eye: 95,8 cd/cm Field of view: Dioptre compensation: 40⁰ - 20 D to + 20 D Image resolution: 1536x1152 px (total 1,8 Mpix, informational area 1,41 Mpix) Dimensions: Weight: 160x73mm 310 g 2 EXTERNAL OPHTHALMIC MODULE VP2ANT CONNECTED TO THE PICTOR PLUS HANDSET VP2HAND Type: Pictor Plus Anterior (VP2ANT) Intended use: Digital eye anterior optics module. Intended to capture digital images and video of the surface of the human eye and surrounding areas. Illumination: Visible white and cobalt blue LED for photographing, 10 illumination brightness levels Maximum Luminance output level towards eye: 192 cd/cm Image resolution: 2560x1920 px Dimensions: Weight: 79x70 mm 90 g IM-071 Rev C 2 Page 35 of 77 ENVIRONMENTAL CONDITIONS FOR USE, STORAGE AND TRANSPORTATION: IP Code: IPX0 (Equipment not protected against the ingress of water) Intended to be use indoors: Temperature, use: + 10 C to 35 C Relative humidity, use: 10 % to 80 % Atmospheric pressure: 800 hPa to 1060 hPa Please note also EMC information given in Annex A. Temperature, storage Relative humidity, storage: Atmospheric pressure: - 10 C to 40 C 10 % to 95 % 500 hPa to 1060 hPa NOTE: If stored over 1 month, it is recommended to remove battery. Appendix B gives instructions for removing the battery. Transported in protective aluminium carrying case: Temperature: - 40 C to + 70 C Relative humidity: 10 % to 95 % Atmospheric pressure: 500 hPa to 1060 hPa Sinusoidal vibration: 10 Hz to 500 Hz: 0,5 g Shock: 30 g, duration 6 ms Bump: 10 g, duration 6 ms CAUTION: Do not leave the eye cup in direct sunlight as it may warm up and burn patients head when taking image. IM-071 Rev C Page 36 of 77 SERIAL NUMBERING: Sticker indicating serial number of the Handset is attached to the Warranty certificate and in the sticker next to system connector. Warranty certificate is part of this user’s manual Serial number of the cradle is in a sticker attached to the underside of the cradle. Serial numbers of the attachable optics modules are attached to the modules and also to the Warranty certificate. Year of manufacture is can be found from the serial number (digits 3 to 4). SW version is displayed in the device menu. EXPECTED USAGE LIFE OF THE PICTOR PLUS: There are no strict limitations on expected usage life of the Pictor Plus. Usage life is approximately five years. INTELLECTUAL PROPERTY RIGHT INFORMATION: Windows XP, Windows Vista, Windows 7 and Windows 8 are trademarks of Microsoft Corporation. Hama Pro-Optic is a trademark of Hama GmbH & Co KG. Erisan OXY+ is a trademark of Farmos Ltd DISPOSING THE VOLK OPTICAL PICTOR PLUS: Do not dispose Volk Optical Pictor Plus as unsorted municipal waste. Prepare Volk Optical Pictor Plus for reuse or separate collection as specified by Directive 2002/96/EC of the European Parliament and Council of the European Union on Waste Electronic and Electrical Equipment (WEEE). If this product is contaminated, this directive does not apply. For more specific information, please contact Volk Optical or your own retailer. CONTACT If you wish to contact your local support personnel please call to: 800-345-8655 or email to us at service@Volk Optical.com IM-071 Rev C Page 37 of 77 15. Warranty Volk Optical gives device a 1 year warranty for the parts and labor. Warranty for battery is 6 months. Submitting claim: Any claim under this warranty must be submitted in writing before the end of warranty period to Volk Optical. The claim must include a written description of the failure that the device have. Warranty does not cover: Products that have been subjected to abuse, accident, alternation, modification, tampering, misuse, faulty installation, lack of reasonable care, repair or service in any way that is not contemplated in the documentation of the product, or if the model or serial number has been altered, tampered with, defaced or removed. Warranty does not cover damage caused by dropping the device or damage caused by normal wearing. Any issue related to the stickers attached to the device coming off are not covered by warranty. Repair or service done by non Volk Optical certified service facility is not covered by warranty. For customer support, contact: [email protected] IM-071 Rev C Page 38 of 77 Appendix A - Electromagnetic compatibility information MEDICAL ELECTRICAL SYSTEM needs special precautions regarding EMC and needs to be installed and put into service according to the EMC information provided. Portable and mobile RF communications equipment can affect MEDICAL ELECTRICAL SYSTEM. Pictor Plus should not be used adjacent to or stacked with other equipment and that if adjacent or stacked use is necessary, the EQUIPMENT or SYSTEM should be observed to verify normal operation in the configuration in which it will be used. Manufacturer’s declaration – electromagnetic immunity: PICTOR PLUS is intended for use in the electromagnetic environment specified below. The customer or the user of the Pictor Plus should assure that it is used in such an environment. Immunity test IEC 60601 test level Electrostatic discharge (ESD) IEC 61000-4-2 ±6 kV contact ±8 kV air Electrical fast transient/burst IEC 61000-4-4 ±2 kV for power supply lines ±1 kV for input/output lines Surge IEC 61000-4-5 ±1 kV line(s) to line(s) ±2 kV line(s) to earth Voltage dips, short interruptions and voltage variations on power supply input lines IEC 61000-4-11 <5 % UT (>95 % dip in UT ) for 0.5 cycle 40 % UT (60 % dip in UT ) for 5 cycles 70 % UT (30 % dip in UT ) for 25 cycles <5 % UT (>95 % dip in UT ) for 5 sec Power frequency (50/60 Hz) magnetic field IEC 61000-4-8 3 A/m Compliance level Electromagnetic environment – guidance ± 2 kV, ± 4 kV, ± 6 kV Floors should be wood, indirect contact concrete or ceramic tile. If ± 2 kV, ± 4 kV, ± 6 kV floors are covered with contact synthetic material, the ± 2 kV, ± 4 kV, ± 8 kV air relative humidity should be at least 30 %. ±2 kV for AC power supply Mains power quality should ±1 kV for serial cable be that of a typical commercial or hospital environment. ± 1 kV for AC power Mains power quality should supply, 1 Phase without be that of a typical Protective Earth commercial or hospital environment. Manufacturer’s test shows Mains power quality should conformance to the be that of a typical requirements of the IEC commercial or hospital 61000-4-11/EN 61000-4-11 environment. If the user of the Pictor Plus requires continued operation during power mains interruptions, it is recommended that the Pictor Plus be powered from an uninterruptible power supply or a battery. 3 A/m Power frequency magnetic fields should be at levels characteristic of a typical location in a typical commercial or hospital environment. NOTE UT is the a.c. mains voltage prior to application of the test level. Guidance and manufacturer’s declaration – electromagnetic immunity: IM-071 Rev C Page 39 of 77 The Pictor Plus is intended for use in the electromagnetic environment specified below. The customer or the user of the Pictor Plus should assure that it is used in such an environment. Immunity test IEC 60601 test level Compliance level Electromagnetic environment – guidance Portable and mobile RF communications equipment should be used no closer to any part of the Pictor Plus, including cables, than the recommended separation distance calculated from the equation applicable to the frequency of the transmitter. Recommended separation distance Conducted RF IEC 61000-4-6 3 Vrms 150 kHz to 80 MHz 3 Vrms d = 1.2 √ d = 1.2√ 80 MHz to 800 MHz d = 2.3√ 800 MHz to 2.5 GHz where P is the maximum output power rating of the transmitter in watts (W) according to the transmitter manufacturer and d is the recommended separation distance in metres (m). Radiated RF IEC 61000-4-3 3 V/m 80 MHz to 2.5 GHz 3 V/M Field strengths from fixed RF transmitters, as determined by an electromagnetic site survey, a should be less than the compliance level in each frequency range. Interference may occur in the vicinity of equipment marked with the following symbol: NOTE 1 At 80 MHz and 800 MHz, the higher frequency range applies. NOTE 2 These guidelines may not apply in all situations. Electromagnetic propagation is affected by absorption and reflection from structures, objects and people. a) Field strengths from fixed transmitters, such as base stations for radio (cellular/cordless) telephones and land mobile radios, amateur radio, AM and FM radio broadcast and TV broadcast cannot be predicted theoretically with accuracy. To assess the electromagnetic environment due to fixed RF transmitters, an electromagnetic site survey should be considered. If the measured field strength in the location in which the Pictor Plus is used exceeds the applicable RF compliance level above, the Model 006 should be observed to verify normal operation. If abnormal performance is observed, additional measures may be necessary, such as re-orienting or relocating the Pictor Plus. b) Over the frequency range 150 kHz to 80 MHz, field strengths should be less than 3 V/m. IM-071 Rev C Page 40 of 77 Manufacturer’s declaration – electromagnetic emissions: PICTOR PLUS is intended for use in the electromagnetic environment specified below. The customer or the user of the Pictor Plus should assure that it is used in such an environment. Electromagnetic environment – guidance Emissions test Compliance level Uses RF energy only for its internal function. Therefore, its RF emissions Group 1 RF emissions are very low and are not likely to cause any CISPR 11 interference in nearby electronic equipment. RF emissions Class B CISPR 11 Harmonic Is suitable for use in all establishments, including domestic emissions IEC Not applicable establishments and those directly connected to the public 61000-3-2 low-voltage power supply network that supplies buildings Voltage used for domestic purposes. fluctuations/ flicker Complies emissions IEC 61000-3-3 Recommended separation distances between portable and mobile RF communications equipment and the Volk Optical Pictor Plus: The Pictor Plus is intended for use in an electromagnetic environment in which radiated RF disturbances are controlled. The customer or the user of the Volk Optical Pictor Plus can help prevent electromagnetic interference by maintaining a minimum distance between portable and mobile RF communications equipment (transmitters) and the Volk Optical Pictor Plus as recommended below, according to the maximum output power of the communications equipment. Rated maximum output power of transmitter W Separation distance according to frequency of transmitter m 150 kHz to 80 MHz 150 kHz to 80 MHz 800 MHz to 2.5 GHz d = 1.2 √ d = 1.2√ d = 2.3√ 0.01 0.12 0.12 0.23 0.1 0.38 0.38 0.73 1 1.2 1.2 2.3 10 3.8 3.8 7.3 100 12 12 23 For transmitters rated at a maximum output power not listed above, the recommended separation distanced in metres (m) can be estimated using the equation applicable to the frequency of the transmitter, where P is the maximum output power rating of the transmitter in watts (W) according to the transmitter manufacturer. NOTE 1 At 80 MHz and 800 MHz, the separation distance for the higher frequency range applies. NOTE 2 These guidelines may not apply in all situations. Electromagnetic propagation is affected by absorption and reflection from structures, objects and people. IM-071 Rev C Page 41 of 77 Appendix B - Replacing the battery A battery pack is specially designed and manufactured for this device. Volk Optical and Volk Optical’s retailers provide suitable battery packs. Labels in the battery and label inside the battery cover display following information: NiMH battery 4/HR-4U AAA 4.8V/1000 mAh Procedure for replacing the battery is: 1. Open the battery compartment cover by pushing and tilting the snap through the hole next to the connector in the bottom of the device. A pen, screw driver or similar pointy small device can be used to assist in opening the cover. 2. Remove the battery compartment cover by lifting it up. 3. Remove old battery. Squeeze battery wires with fingers and pull the connector out from its socket. 4. Put the new battery in the same position and attach the connector to its socket. 5. Replace the battery compartment cover and secure it in place by snapping it firmly to place. IM-071 Rev C Page 42 of 77 Appendix C – Wi-Fi Setup Pictor Plus Wi-Fi: Overview • The Wi-Fi feature of Pictor Plus is an optional feature that allows wireless transfer of images and videos from the Pictor Plus to your computer. – You do not need to use Wi-Fi in order to utilize the Pictor Plus. – Transfer of images and videos from the Pictor Plus is always possible via the Pictor Plus cradle and USB cable when connected to your computer. • The Wi-Fi feature of Pictor Plus is provided using the Eye-Fi SD card already installed in your Pictor Plus. – The Eye-Fi SD card is an SD memory card with Wi-Fi capabilities. • The Eye-Fi card requires two companion software called Eye-Fi Center & EyeFi Helper to be installed on your Windows or Mac computer. – All Eye-Fi card and account settings are managed using Eye-Fi Center. – Image and video transfers are managed automatically with Eye-Fi Helper. – A single downloaded file installs both software items. IM-071 Rev C Page 43 of 77 Pictor Plus Wi-Fi: Overview Below are the main steps to use Pictor Plus Wi-Fi PC or Mac • Install the Eye-Fi software USB • Connect your Pictor Plus to your computer via its USB cradle PC or Mac + • Use the Eye-Fi Center software to set up the Pictor Plus Eye-Fi card PC or Mac • Use the Pictor Plus Wi-Fi to transfer images via the Eye-Fi Helper software IM-071 Rev C + Page 44 of 77 Eye-Fi Center Software: Overview What software is installed on your computer? Eye-Fi Center: • Is a user application • Creates & manages Eye-Fi user account • Manages Eye-Fi card settings for your Pictor Plus Eye-Fi card Eye-Fi Helper: • Runs in the background on your computer • Transfers images and videos IM-071 Rev C A single Eye-Fi user account… A single Eye-Fi card… can have multiple cards can be on only one account An Eye-Fi Card must be removed from a given Eye-Fi account before it can be used with another Eye-Fi account. Page 45 of 77 Important • The Pictor Plus must be docked in its charging cradle with the USB cable connected to your computer to complete the Wi-Fi setup instructions using the Eye-Fi Center software. • As with any networking device, your computer firewall may need to be configured to allow the Pictor Plus to communicate with your computer. – The Windows and Mac native firewalls are included as examples in these instructions. – Consult your user instructions for any 3rd party firewall software you may use. IM-071 Rev C Page 46 of 77 Eye-Fi Center Installation: Windows Download Eye-Fi Center for Windows from http://support.eye.fi/downloads/ • Run Setup.exe • Select next IM-071 Rev C Page 47 of 77 Eye-Fi Center Installation: Windows 1. Check the License agreement box and click next. IM-071 Rev C 2. Select folder where the program will be installed It is recommended to use the default folder. Page 48 of 77 Eye-Fi Center Installation: Windows 3. Click Install for software installation. IM-071 Rev C 4. Click finish and installation is ready. Page 49 of 77 Eye-Fi Center Installation: Windows Allow Eye-Fi Helper to communicate through firewall. Check “Private networks” box and click Allow access button. IM-071 Rev C Test firewall settings with Firewall Tuning. Click Next button. Page 50 of 77 Eye-Fi Center Installation: Windows • After Firewall Tuning is done click Finish. • Note! If Firewall tuning fails please check your Internet connection. IM-071 Rev C Page 51 of 77 Eye-Fi Center Installation: Mac Download Eye-Fi Center for Mac from http://support.eye.fi/downloads/ • Open the downloaded Eye-Fi.dmg file • Double-click the Eye-Fi.mpkg icon IM-071 Rev C Page 52 of 77 Eye-Fi Center Installation: Mac • Select Continue IM-071 Rev C Page 53 of 77 Eye-Fi Center Installation: Mac • Select Continue IM-071 Rev C Page 54 of 77 Eye-Fi Center Installation: Mac • Select Agree IM-071 Rev C Page 55 of 77 Eye-Fi Center Installation: Mac • Select Install • Authorize installation on your Mac as needed. IM-071 Rev C Page 56 of 77 Eye-Fi Center Installation: Mac • Select Close IM-071 Rev C Page 57 of 77 Eye-Fi Center Installation: Mac Firewall setup 1 Go to System Preferences… > Security & Privacy / Firewall 2 Select Firewall Options… 3 Confirm the Eye-Fi Helper app is listed and set to “Allow incoming connections” with a green indicator IM-071 Rev C Page 58 of 77 Eye-Fi Set up: Windows & Mac After installing Eye-Fi Center: • Power on the Pictor Plus – Enter Menu using a long press on the right soft key – Under the Device tab, arrow down to the USB write-protection icon and confirm it is OFF • Connect cradle to AC power via power cable and computer via USB cord • Place Pictor Plus in the cradle • Wait until the Eye-Fi Helper software establishes connection with the Eye-Fi card and initializes it – You will see prompts indicating the Pictor Plus Eye-Fi card has been found Eye-Fi Helper software will recognize the Eye-Fi card in your Pictor Plus Mac Windows • Open the Eye-Fi Center application to begin Eye-Fi card setup IM-071 Rev C Page 59 of 77 Eye-Fi Set up: Windows & Mac • Open Eye-Fi center software. • Login window is opened automatically. • Select ”Create new account”. • If you already have an Eye-Fi account you can add the Pictor Plus Eye-Fi card to that account by selecting Login. IM-071 Rev C Page 60 of 77 Eye-Fi Set up: Windows & Mac 1. Create Eye-Fi account. Fill your email address and create a password. IM-071 Rev C 2. For destination select “My computer” and uncheck the box that enables sending images to Eye-Fi servers. Page 61 of 77 Eye-Fi Set up: Windows & Mac •Eject symbol is present if Eye-Fi card is connected to Eye-Fi Center software – Eye-Fi card settings can then be changed. Eye-Fi card is connected to Eye-Fi Center software. IM-071 Rev C Eye-Fi card is not connected to Eye-Fi Center software. Page 62 of 77 Eye-Fi Set up: Windows & Mac •Next steps are to setup the network connection. The mode can be direct mode or network mode. – Direct mode (recommended): The Pictor Plus Eye-Fi card functions as a Wi-Fi “hotspot” and creates its own Wi-Fi network to which the PC connects. • Direct mode is recommended if Wi-Fi network signal is low or Wi-Fi network does not work reliably. • Direct mode can be set to start if network connection fails or it can be on by default. – Network mode: The Pictor Plus Eye-Fi card is connected to a known Wi-Fi network (e.g., is a company or hospital network). IM-071 Rev C Page 63 of 77 Wi-Fi Overview: Direct Mode Images PC or Mac + Software IM-071 Rev C Page 64 of 77 Wi-Fi Overview: Direct Mode 1 • Connect the cradle power supply to AC power • Connect the cradle USB cable to your computer • Place the Pictor Plus in its cradle 2 3 Open the Eye-Fi Center software Select the settings “gear” icon to open the Eye-Fi card settings manager IM-071 Rev C Page 65 of 77 Direct mode: Windows & Mac 1 Select the amount of time you want the Eye-Fi card to wait to “go to sleep” after transferring images. (The card wakes up again when there are new images to transfer.) Use your computer’s Wi-Fi settings to find and connect to the Eye-Fi card using the SSID and password here. Confirm your computer is set to automatically connect to the Eye-Fi card. 4 Select Start Direct Mode Network to turn on the Eye-Fi card Wi-Fi network. IM-071 Rev C 2 Select the amount of time you want the Eye-Fi card to attempt to connect to your defined Private Networks. Page 66 of 77 3 5 Wi-Fi Overview: Network Mode Images Images PC or Mac + Software IM-071 Rev C Pictor Plus Page 67 of 77 Wi-Fi Overview: Network Mode 1 • Connect the cradle power supply to AC power • Connect the cradle USB cable to your computer • Place the Pictor Plus in its cradle 2 3 Open the Eye-Fi Center software Select the settings “gear” icon to open the Eye-Fi card settings manager IM-071 Rev C Page 68 of 77 Network mode: Windows & Mac 1 Your network 3 2 Your password 4 5 Note! Computer must be connected to Internet at this stage. • Wi-Fi network can be added at the initial setup or later from the settings. • Available Wi-Fi networks can be found from the drop down menu. • Select desired Wi-Fi network and enter password. IM-071 Rev C Page 69 of 77 Network mode: Windows & Mac Added networks are displayed at the bottom of the networks tab. • Networks can be removed from the list by selecting a network and then clicking the Remove button. IM-071 Rev C Page 70 of 77 Set “Save To” Locations: Windows & Mac Images Videos 1 1 2 2 3 Select the computer folder where you want to save your photos & videos. • Set remaining “Subfolder options” to your preferences. IM-071 Rev C Page 71 of 77 Transfer Images via Wi-Fi Eye-Fi setup is completed – now start transferring images! PC or Mac + • When you use your Pictor Plus to take images or videos, the Eye-Fi card will connect to the Eye-Fi Helper software and transfer them to your computer via Wi-Fi. • As the images are transferred, the Eye-Fi Helper software will display a pop-up window showing each image being transferred. • When the Eye-Fi card has completed transferring images, its Wi-Fi will “go to sleep” to conserve battery power. • When you take more new images or videos, the Eye-Fi card will recognize the new activity and “wake up” its Wi-Fi and start transferring the images or videos. IM-071 Rev C Page 72 of 77 How To Remove an Eye-Fi Card From Your Eye-Fi Account If needed, you can remove your Pictor Plus Eye-Fi card from your Eye-Fi account. 1. Confirm your computer is connected to the Internet 4 Right-click 2. Pictor Plus must be placed in docking cradle and connected to your computer via the USB cable 5 3. Open Eye-Fi Center 6 IM-071 Rev C Follow prompts to remove the Eye-Fi card from your account Page 73 of 77 Troubleshooting Problem Solution Notification saying that Eye-Fi card is write protected Verify from Pictor Plus Device menu that USB write protection is disabled (OFF) Eye-Fi card initialization fails Try to use different USB port and reboot PC Computer cannot connect to Pictor Plus in Direct Wi-Fi mode Verify that Wi-Fi network is enabled in the Windows firewall. Select either home or work network. Eye-Fi account creation does not succeed Verify that your computer is connected to Internet Cannot add Wi-Fi network Verify that your computer is connected to Internet Computer cannot connect to Internet In direct mode computer cannot connect to Internet by using Wi-Fi. Connect to Ethernet cable for Internet connection. IM-071 Rev C Page 74 of 77 Troubleshooting Problem Solution Eye-Fi center does not detect Pictor Plus when connected from cradle USB cable Reboot Pictor Plus and/or reboot computer. Cannot create account or change settings Eye-Fi lift and place Pictor Plus back to cradle and wait for Eye-Fi Helper to recognize the Eye-Fi card. Computer must be connected to Internet. Deactivating Eye-Fi card from the account does not succeed Computer must be connected to Internet. IM-071 Rev C Page 75 of 77 Ordering Information: Orders may be placed with the Authorized Volk Optical Distributor in your region. Authorized Distributor contact information is available directly from Volk Optical. Volk Optical Inc. 7893 Enterprise Drive Mentor, Ohio 44060 USA Toll free within the United States: 1-800-345-8655 Phone: 440 942 6161 Fax: 440 942 2257 Email: [email protected] Website: www.volk.com EU REPRESENTATIVE The Volk authorized representative based in the European Union (EU) is: Keeler Limited Clewer Hill Road Windsor Berkshire SL4 4AA U.K. Tel: +44(0) 1753 857177 0086 Note: This product complies with current required standards for electromagnetic interferences and should not present problems to other equipment or be affected by other devices. As a precaution, avoid using this device in close proximity to other equipment. Members of the European Union should contact their authorized Volk Distributor for disposal of this unit. Certificate FM 71461 IM-071 Rev C Page 76 of 77 Volk Optical Inc. 7893 Enterprise Drive Mentor, Ohio 44060 USA Phone: 440-942-6161 Toll free within the United States: 1-800-345-8655 Fax: 440-942-2257 Email: [email protected] Website: www.volk.com Copyright © 2014 Volk Optical Inc. IM-071 Effective: May 2, 2014 Revision: C IM-071 Rev C Page 77 of 77